#Zip File Extractor
Explore tagged Tumblr posts
Visit Tumblr Blog
Explore Tumblr blogs with no restrictions, modern design and the best experience.
Last Seen Tumblr Blogs


Fun Fact
Kazakhstan’s Minister of Communications and Informatics has blocked the Tumblr site because it contained 60 sites of terrorism, extremism, and pornography in 2015.
Text
7-Zip for Windows
7-Zip is an open-source compression tool licensed under the GNU LGPL. It helps reduce the size of email attachments and can decompress files downloaded online or created in RAR and Zip formats. The program offers a graphical user interface, command-line interface, and shell integration as its main methods of operation. It is known for being easy to use and secure, supporting encryption and…
View On WordPress
0 notes
Text
How to Download Our Life: Beginnings and Always Mods
(a step-by-step guide!)
If you've ever wanted to download extra content for OLBA but were unsure how or where to even start, this post will hopefully explain everything you need to know!
What you will need:
Our Life: Beginnings and Always
RPA extractor
Latest version of Python
RPA repack tool
1. Finding mods.
As far as I'm aware, there are very few people who make OLBA mods, but if you do happen to come across someone who makes mods/script edits and would like to download them, you'll likely end up with files with the end extension ".rpy" or ".rpyc" Because the software used to make OLBA is Ren'py, these are ren'py script files that basically contain the script that runs the mod and official script files. (Note: Some mods that don't just simply add onto/edit/add more scenes may also include other important resource files (images, sounds etc...) and might be formatted in a ".zip" file. I'll cover how to unzip and use those as well.)
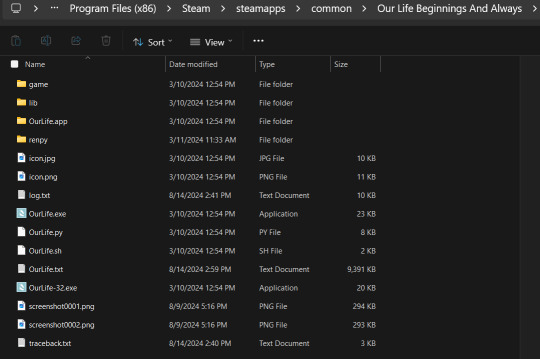
2. Find your game files.
First of all, before you do anything with your .zip or .rpy/.rpyc file(s) you're going to need to find your copy of your OLBA game's files. For Steam, you should be able to open the Steam app on your computer, navigate to your library, right-click your copy of OLBA, select "properties", navigate to the "Installed Files" tab, and click the "Browse" button.
For a direct download of the game such as from Itch.io, you should just be able to navigate to wherever you downloaded your game and find the same results. You should see your game files now like the picture below.
3. Finding/extracting the RPA file.
Now, you are going to want to navigate to the "game" folder inside the OLBA folder. Here you should find these files:
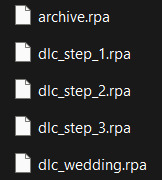
(Note: depending on whether you have the DLC or not, you may or may not have the DLC files. I do not have the Baxter or Derek DLC so I don't have those files here.) These files are basically all the .rpy/rpyc files, along with images, sounds and all other resources for the game, compressed into single files. So, in order to add our modded files, we will need to extract whichever RPA file pertains to the mod. For example, archive.rpa contains all the scripts, etc from the main game. The rest should just be DLC, so if you have a mod that only affects the main game, you will only need to extract that file. The same works if it is a mod that only affects a DLC; you will only need to extract that respective DLC file.
To do this, you can either download this RPA extractor or find your own and follow its steps. For this tutorial, we will be following the steps of the RPA extractor provided. Once you have downloaded the RPA extractor, drag the .RPA file you want to extract out of the OLBA folder, into a new folder, then drag and drop it onto the RPA extractor icon (shown below)
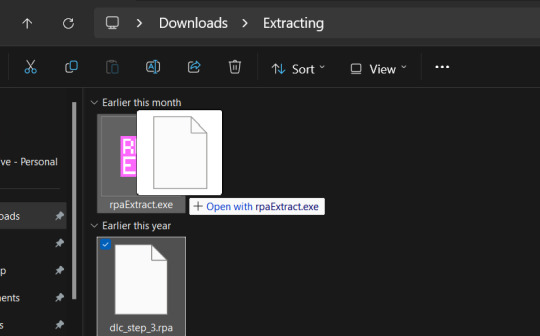
This should open a new Command window where the .rpa file will be extracted. You should end with something like this:
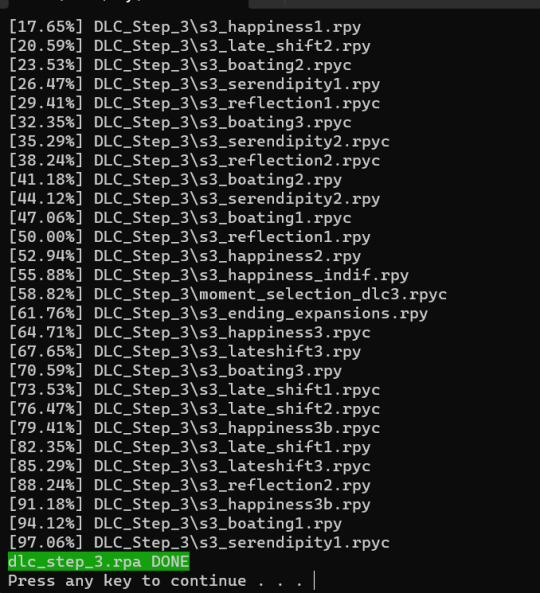
(for this example I extracted the step 3 DLC RPA file)
Now you should have a new folder containing all the .rpy and resource files you need.
4. What to do with modded .rpy/.rpyc and/or .zip files?
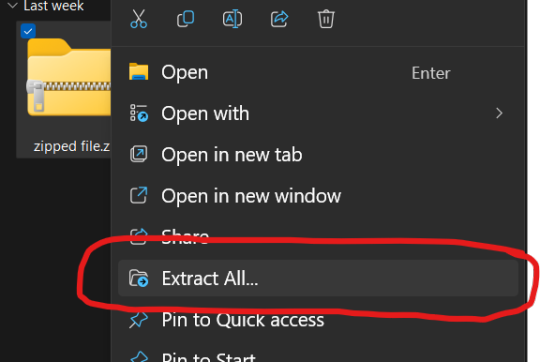
If the mod you downloaded just came with the files not zipped, you can skip this first part. Otherwise, you will need to unzip this zipped folder. To do this, you can either just right-click the zipped file and click "Extract All" and "Extract" when a new window pops up.
Alternatively, you can use a program such as 7-zip, which may help extract speeds for large files. Now, you should have, or already have your modded .rpa files on hand (finally!) Normally, if these files are editing preexisting material from the game or adding new scenes, at least one file, if not all of them will have the SAME EXACT file name as an already existing file. In this case, BEFORE YOU DO ANYTHING go into the folder(s) you got earlier by extracting the .rpa file(s) and look for the file(s) with the same name(s) as your modded .rpy/.rpyc file(s) and either make a copy or move them somewhere safe in case something is wrong with your modded files/you no longer want the modded files, you can put the original files back in. Once you have done this, you are going to drag the modded files directly into the folder(s) you got earlier by extracting the .rpa file(s). MAKE SURE YOU PUT THEM IN THE CORRECT FOLDERS AND EITHER OVERWRITE THE ORIGINAL FILES OR MAKE SURE THEY HAVE BEEN REMOVED.

If there are any other files, such as sounds or images or .rpy/rpyc files, feel free to just make another folder to put these in.
5. Repacking the RPA file.
Now these next steps can get really complicated, so I'll break them down into smaller steps. 1.) Download the RPA repack tool (make sure to unzip it) and the latest version of Python if you haven't already.
2.) Inside the unzipped "rpa-master" folder you'll find another folder of the same name. Inside this folder all you need is the "rpatool" file. Take this file and move it into a new folder completely outside of the "rpa-master" folder, name this folder whatever you want, it doesn't matter. (EXAMPLE BELOW)
3.) Now take the folder(s) you got from extracting the .rpa file earlier or created and put them in this new folder. (EXAMPLE BELOW)
4.) Type "cmd" into the path while in the folder with both of these.
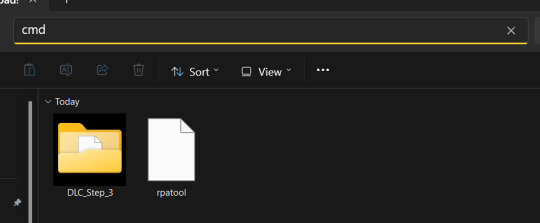
5.) Now, a command prompt window should pop up, type in this:
py rpatool -c
followed by the name of the .rpa file you want to make and the name of the folder(s) you are repacking separated by a space for each. (EXAMPLE BELOW)
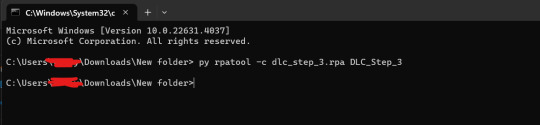
6.) Depending on the size of your file it might take some time, but once you see the .rpa file appear in the folder, you're all done! It should look something like this:
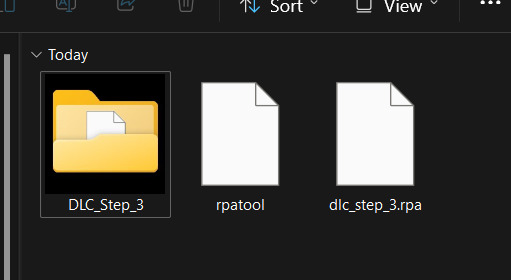
Now, all that's left to do is put that .rpa file into the game folder with the rest of the .rpa files !! After that you can test it out and your mods should now work!
As always if you have any questions or need help doing this yourself, feel free to contact me or submit an ask!
71 notes
·
View notes
Text
How to make a zip folder and your followers lives easier, not harder
You'll need:
Your cc
7zip
Knowledge on how to make a new folder
Sims 3 Thumbnail Extractor (only if you really want to make their lives easier)
An SFS account or any hosting site.
STEP 1: Create a new folder where you have your new cc. Name it whatever, or don't.
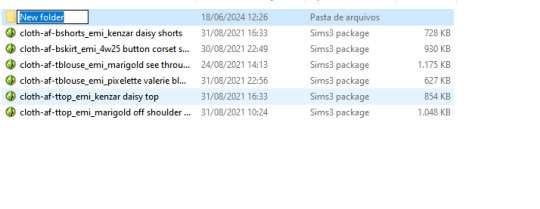
STEP 2: Throw said cc inside the folder
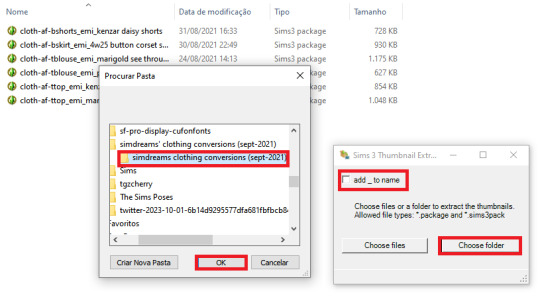
STEP 3 - optional: Extract and open S3TE. Untick 'add _ to name' and click 'choose folder'. Browse to the folder location, press 'ok'.

STEP 4 - optional: Voilà!!! You have effortless thumbnails! PRO TIP: You can get somewhat useful thumbnails straight out of TSRW if, just before exporting your file, you frame your mesh in a good, close angle. Delete the useless blank ones.

STEP 4.1 - optional: If you don't have good thumbnails, just throw your preview pics inside. Or don't, if you don't want to make anyone's life easier. PRO TIP: Rename thumbnail and cc the same. STEP 4.2 - optional (EDITED): If you're really devoted to making your followers' lives easier (I love you already), you can learn how to add good thumbnails here, here and here STEP 5: Leave your folder. Click on it with the right mouse button. Select 7-zip... < "add to yourfoldername.zip". If you have WinRAR installed, an option will show up below with the same command '"add to yourfoldername.zip"!

STEP 6: Throw zip folder on SFS and share only one link!
96 notes
·
View notes
Text
A Guide To Ripping Sonic x Shadow Generations Models
This guide is meant as a walkthrough to how to rip models from the PC version of SxSG. While this process and programs will work with the Nintendo Switch version, I cannot promise the decompilation and file directories will be the same, especially as there is a massive quality difference in the assets between the two versions.
I recommend already having fundamental computer literacy and pre-existing familiarity or experience with 3d models and programs such as Blender. I'll be using Blender here.
Now, lets begin!
What You Will Need
A PC version of Sonic x Shadow Generations, whether through Steam or Epic Games, installed on your computer. Please make sure you know where the file directory for your game is. for Steam, you can easily access this via the Properties menu for the game in your Steam library, Installed Files, and then Browse.
For Steam, your directory should look something like: Program Files (x86)\Steam\steamapps\common\SONIC_X_SHADOW_GENERATIONS
PLEASE make sure youre keeping track of which files are modified, if at all. While you can create new files and folders in your game directory without issue, you may break your game if you modify or delete existing files. If you encounter a problem, you may need to Verify the Integrity of Game Files (through Steam), or uninstall and reinstall your game entirely. You may want to Backup your game files just in case.
A 3d program for importing and previewing 3d models, such as Blender. Blender will be the program used in this tutorial.
Tools You Will Need
HedgeArcPack from HedgeLib - A program used for the decompilation of Hedgehog Engine .pac and .ar00 archive files. Currently works on all Hedgehog Engine games (Unleashed - SxSG). HedgeLib is a larger library of programs for ripping Hedgehog Engine assets. Modelfbx from LibGens - LibGens is a library of tools for modding and editing Hedgehog Engine asset files, originally a Level Editor for Sonic Generations. Modelfbx converts .model files to .fbx files for use in 3d programs. There are a bunch of other fun modding tools in here as well. NeedleTextureStreamingPackage from SkythTools - An extractor for the texture data of the dds files used in some Frontiers and Shadow Generations models. Not all models will need this. Part of SkythTools, a library of tools for modding and extracting assets from Hedgehog Engine games. I recommend reading through the page and seeing what all the other tools do and if theyre something you'd also want to use!
Both LibGens and SkythTools do not have a Releases page on their Github pages, so just download the master archive as a zip file as normal. All programs here work with drag-and-drop, meaning you drag and drop the files directly onto the .exe file. Do not open the .exe files. (nothing will happen if you do, it simply will not work.)
After downloading all three libraries in your preferred location, open your game directory.
Unpacking The Model Archive Files
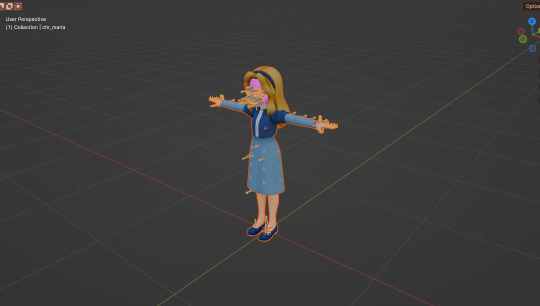
Now that you have your game directory open, you'll need to locate the model archive you wish to rip. All of the assets for Shadow Generations is located in image > x64 > raw in your game's base directory. Lets rip Maria's model.
Maria and other characters are located in the character folder. You'll need to find maria.pac.


Open a separate file explorer window to where you have HedgeArcPack.exe. For simplicity's sake, Ive put it on the desktop. Drag and drop the maria.pac file directly onto the exe file.

By default, it will unpack the archive in the original folder with the name of the archive you unpacked.
In this new maria folder, you'll find a lot of files. Dont be intimidated - these are simply the raw files for all of the model's dependencies and assets, including animations, dds files (texture files), and more.
A quick glossary: - .model - the base model file in native format. This is what youre looking for. - .dds - the texture files for the model. You will need these for importing and previewing the model in a program, as well as exporting it. - .material - the material data for the model for Hedgehog Engine 2. You wont need these so as long as you have the texture files on their own. - skl.pxd - the skeleton data for the model for Hedgehog Engine 2. - .anm.pxd - this is the file format for compressed Hedgehog Engine 2 animations the model uses. They can be opened using a plugin like FrontiersAnimDecompress, however this isnt a tutorial for how to use those. Feel free to ask for a tutorial on how to extract game animations or look it up on your own time, though!
Before we can convert and import the model to Blender, though, we'll need to extract the texture data.
Extracting the Textures
Note: not all models, such as bosses like Mephiles or Black Doom, will require this step. However, Maria's does.
Open a file explorer window to where you downloaded SkythTools. Make sure you have already unzipped the file. In SkythTools-master, go to Sonic Frontiers, and find NeedleTextureStreamingPackage.exe.

In the needle_texture_streaming_path.txt file, copy the file path for your Texture_Streaming folder in your game directory, then save the file. This is the path the program will use to extract the texture data for the .dds files.


Once that's done, you will need to drag and drop each .dds file onto the .exe one-at-a-time. Maria has multiple .dds files for different parts of her model, such as her eyes and hair, so make sure you do this for every one of them.

If youve worked with 3d models and textures before, you may recognizes some of the suffixes used for the texture files. Hedgehog Engine games use pbr texture maps. abd is the albedo map, nrm is the normal map, prm is the map for Metalness, Roughness and Specular, ems is the emission map, etc.
Now we can finally convert the model for use in 3d programs!
Converting and Importing the Model
We're in the homestretch! Finally we'll be able to preview and use our model. But first, we have to convert it to an .fbx.
Just like before, open a file explorer window to where you have LibGens downloaded (make sure you have already unzipped it). Go to the bin folder. This time, youre looking for a program called modelfbx.exe.
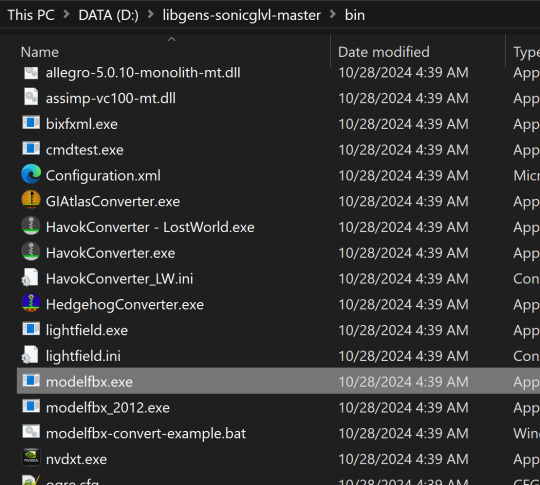
Find your .model file in your unpacked archive. Drag and drop it onto the exe.

It will create an .fbx file conversion of the .model file.
Now, we can finally open Blender!
I am using Blender 4.1.1 here, though the version doesnt matter as long as it is 2.8 or higher, as Blender has an fbx importer by default.
Like you would any other fbx file, go to File > Import > fbx (dont mind my Choco Mint blender theme here)

You'll need to navigate all to where you converted that fbx file. (Alternatively, you can copy that fbx file to somewhere else for ease of access, I just like keeping everything in one place).
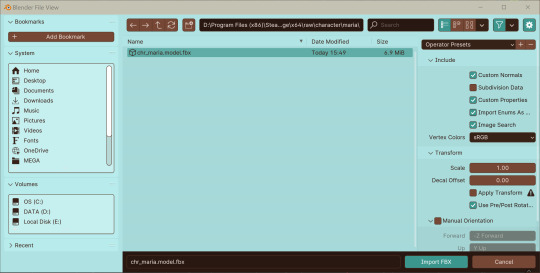
Import the fbx. You may notice that by nature of an fbx file, the albedo texture for the base model is already mapped to the model when you switch to Viewport Shading. However, sometimes, part of the model will be magenta, meaning we have a texture pathing error.
Hiding the bones, she looks a lil scary here--
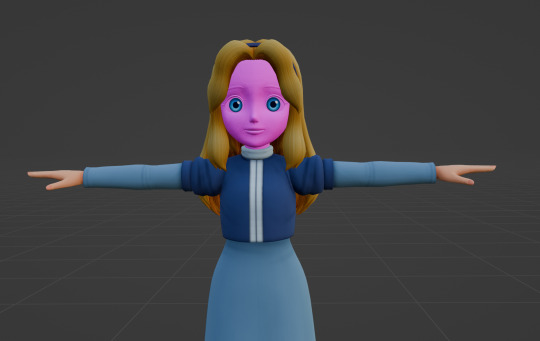
Opening the material data for the mesh, you can see where our problems lie. The texture map for her face has a file path that does not exist.


Its pretty easy to fix this - just open the albedo file for her face texture and map it to the material. You can simply drag and drop the dds file into the node editor in blender - blender can read the dds files just fine since weve extracted the texture data from them earlier.
Pathing errors can either happen as a result of the fbx file being wonky or if you havent properly extracted all the texture data for the dds files, so keep that in mind!

If you simply wish to view the models in their base colors, you can stop here. However, you can also set up the normal and prm maps for use in 3d renders or exporting the model!
The prm maps for Frontiers and Shadow Generations work a little differently than in other games. Instead of Red = Metalness, Green = Roughness, Blue = Ambient Occlusion, and Alpha = Specular, Frontiers and Shadow Generations uses Red = Specular, Green = Smoothness (inverted Roughness), and Blue = Metalness.
Setting this up in Blender is quite easy - simply drag and drop the respective prm, fal and nrm and other dds files into blender for their respective maps in the material editor.
If you already know 3d, you already know how to set up a normal map in Blender. Simply take the normal map, set the Color Space to Non-Color, then path it into the Normal Map node.

For the unique prm maps, you will need to create a Separate Color node, then plug Red into Specular > IOR Level (make sure Distribution is set to GGX, not Multi-Faceted GGX), Green through an Invert Color node > Roughness, and Blue > Metallic.
Overall, your node editor should be set up something like this for each material.

(I know it looks intimidating, but I promise its super quick and easy to set up - dont give up!)

And now we have our ripped model! You are now free to pose, deconstruct, play with, do whatever you please with it. Please note that if you want to export your model, you may want to convert the texture files to png using a program like Noesis. I hope this helps, and have fun!
#once again for other maps like the emissive map for Maria's eyes and etc you'd set them up like any other pbr texture#sonic x shadow generations#sxs gens#sxs generations#sxsg#sxsg dark beginnings#shadow generations#sonadow generations#shadow the hedgehog#maria robotnik#ripping guide
20 notes
·
View notes
Text
EDIT: solved! this was from my pc not being able to read japanese and setting all the game file names to nonsense. download a .zip extractor like bandizip and extract the game thru that after setting code to japanese (thank you @dovedrawsmo4 for help!!!)
downloaded the latest ver of mo4 and something weird happens?

this pops up every time I press enter on any selection on the start up screen
i downloaded "RPG tool VX Ace RTP" from the jp rpg maker site which is supposed to help with the game download (it was still 822 mb (T T )) and ran the wizard before downloading the game zip. the rtp files went straight to the os (c:)
pls help me i just want to play this stupid game ;-;
13 notes
·
View notes
Note
Where did you get the Undertale Version of Comic Sans from (and can the same be done for Papyrus and other fonts in Undertale)? I've seen it used in others' art, and I've tried searching for it myself, but I've only been able to find Determination Mono and variants of the original Comic Sans MS.
I've downloaded them from websites like fontstruct, and you can download the zip files from there. Using an online zip extractor, you can obtain the otf or ttf file, which are usually used in art programs with custom fonts. I just search up 'papyrus undertale font' or 'sans undertale font' , and then these downloads can show up.
For using these files, I use Kleki, which lets me import these fonts via otf or ttf. That's enough of my nerd rambling for now.
13 notes
·
View notes
Text

WMaster ZipKing - Free, Fast Secure Zip Software
WMaster ZipKing is a powerful, all-in-one zip compressor and extractor designed for fast and efficient file compression, extraction, encryption, and smart file management. Save 100% time and disk space with its lightning-fast performance and easy-to-use interface. Whether you're zipping large files or securely extracting archives, ZipKing gets the job done — free, safe, and hassle-free!
#WMaster ZipKing#File Compressor#File Extractor#Image Compressor#PDF Compressor#Video Compressor#Audio Compressor
3 notes
·
View notes
Note
You posted many of character sprites from Duel Links, and now I'm curious if you have any expanded sprites from DM, DSOD and the NPC characters so far. Can you provide the assets for us to download?
The hint is "Chara007_0" filename alongside the faces.
Don't have time to sort through them, so here's a google drive link everything relevant as a Zip file.
These were grabbed at the start of the Zwijo event. Some things are missing though, i.e. the Zwijo Sprites, the Mistuko sprites, and the alien form of Chupataro. There's probably more stuff from the recent Go Rush event that my extractor couldn't grab too, but i dont want to try again since the program puts an extremely heavy load on my PC.
Will try again next update though
6 notes
·
View notes
Text
I was not planning on reading DragonSteel prime, but then Sanderson released the Ebook and audiobook for free, and I can't pass up another Kramer and Reading Sanderson experience. I've only finished chapter 4 but that's about 3 hours of listening and it's pretty good. Really feels like wheel of time book 1 but without everything I hated. I am very surprised by how much I'm enjoying it and if you really need some more Cosmere, it's hard to pass up this free opportunity, even if it isn't really cannon. I also think it will be cool to see what cannon changes by the time the published version comes out like 15 years from now.
If you plan on using your phone to download it make sure you have a zip extractor (app store), it's nor gonna be as smooth as an audiobook experience, though I think you can open the file through some audiobook services. With a little effort though you have a totally free, excellently read audio or ebook. Would recommend.
11 notes
·
View notes
Text

World Icons List PSD
Update 17 Mar 2024 : Added Tomarang and a different version (details added to end of post).
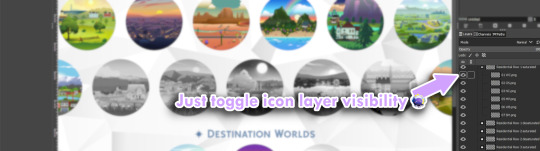
With huge credit to deevo's Image Viewer for Package Files which has a Packs Extractor tool. Similar to my Packs List PSD, this one is for the World icons. I've had this since April and never used it myself, but just in case someone would want this thing here it is updated to include Chestnut Ridge.
Download from source or link below:
SFS
1. [quiescence90] World Icons List in .pdf and .xcf formats - as pictured above
2. [quiescence90] Individual World Icons in .pdf and .xcf formats - this is the original sized images extracted from the game arranged and grouped together. You can move each layer as you please to create your own icons for the Worlds
3. [quiescence90] 512px World Icons - .zip folder containing all the uncropped original sized World icons in .png format. I only arranged them to match how they appear in the World Selection Menu so a few of them will show blank/unfilled spots because EA did not bother to draw anything on that part of the layer. See example below:
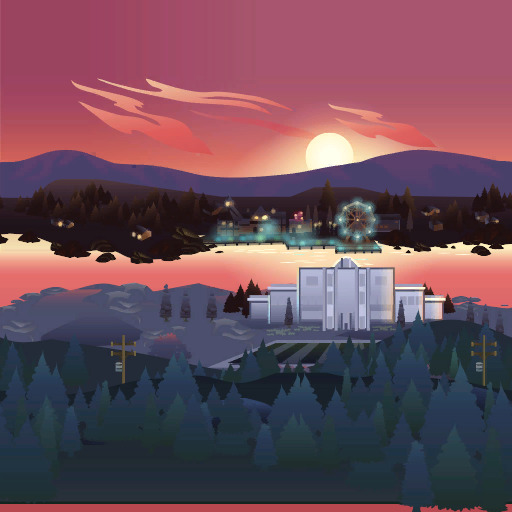
(observe the bottom)
4. ✨NEW!✨ [quiescence90] World List (by pack) in .pdf and .xcf formats - The worlds listed by pack icons as exemplified below:

I excluded basegame and Journey to Batuu for this one because this is meant for a "packs needed" kinda situation and I couldn't extract a bigger icon from JtB 🤷🏻♀️
9 notes
·
View notes
Text
Cloud's FNF GIF Making Tutorial
Hello there, have you ever wanted to make FNF GIFs like this for example?
Well, your in luck, because in my personal guide, I'll teach you how to do so. This is for desktop users by the way, I don't know how to do this on mobile.
1. Getting Started
You'll need the following program to make your GIFs. I personally use.
Spr2PNG (Highly Recommended | Automated, Simple Process)
Java (Needed for Spr2PNG to work.)
EZGif (Needed for GIF Making.)
But there are other options such as FnF-Spritesheet-and-XML-Maker but I personally use Spr2PNG as that is more simple.
To download Spr2PNG, first go to the releases tab and click on the Latest release you see, then click the zip file to download it automatically. You'll want a ZIP Extractor like 7-Zip, which I recommend, but WinRAR is another good option.

Now, once you have your programs, you'll want to download the FNF mod you want to rip the sprites from, like for instance; VS Sonic.EXE, or basically any other FNF Mod and download that either from GameBanana or GameJolt, depending on where it is.
2. Ripping the Sprites
Okay, now, to make the GIF, you have to rip the sprites. To do this, go to your FNF Mod that you downloaded and go to either mods\images\characters or assets\shared\images\characters. It depends where all the [charactername].xml and [charactername].png files of that character is located so you might have to do some digging around in the mod files. But once you find those, you want to copy & paste them into a separate folder, I recommend creating one to store all your ripped sprites at, aswell as your gifs.
3. Making the GIFs
Okay, now that you have your sprites ripped from the mod files. You'll want to open SprToPNG.bat or SprToPNG.jar. It doesn't really matter what you choose to open. It should show a small window that says “Select XML or PNG Files to Open” and you'll want to locate the files you ripped from the mod files. Please keep in mind that the .png and .xml files of that character must be in the same folder together otherwise it won't work. Just double-click on either file, again, it doesn't matter. Then, SprToPng will do the rest and separate the animation sprites into one folder that is named after that character, aswell as all the sprites.
Now, click on the folder of the sprites that you want to animate, it might say "Idle Dance" or any of the character poses, aswell as the special animations if the character has them. There should be some PNGs that are ranging from 0000 to random, depending on how many animation sprites that animation has.

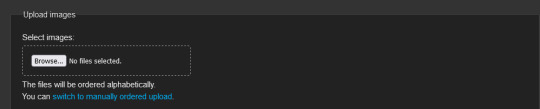
Now, open EZGIF.com and click on "GIF Maker" and then click on Browse and then locate the separate PNG files of the character. A good tip is that you can select the first PNG with 0000 and then the last by shift-clicking, just click the first png and then the last one with shift-click and it'll select all the following PNG files and then select "Open". It might take a couple of seconds, depending on the file but it should show all the PNG Sprites in order.

Set the delay time to either 4, 5, or 6. You want it to act like how the actual in-game sprites would. If it's too fast, increase the delay time, if its too slow, decrease the delay time. Optionally, you can set the last PNG to 30, then select "Don't Stack Frames" so the sprites don't overlap over each other and make it look ugly.
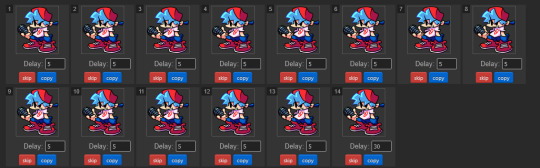
I'll show two examples, one with "Don't Stack Frames" on and off.

On the left is with it on while on the right is with it off. You see how on the right the sprites are behind the ones that are displayed? Yeah, you don't want that. So I highly encourage and recommend you to turn on "Don't Stack Frames" on.
Now, select "Crop" and then scroll down and select "Trim Transparent Pixels around the image" as this will remove any transparent pixels we don't want, while also reducing the file size, either a tad bit or a lot, depending on the sprite.


And once you're done, click save, your sprite should look like this!
Now that you made your Sprite, you can upload it to the Funkipedia wiki to help out with pages and such that need sprites.
Fin.
Feel free to leave any suggestions in reblogs or comments, they'll really help out. Also, make sure to reblog this so more people know how to make GIFs in the future (on desktop or laptop).
4 notes
·
View notes
Note
HIII okay so like. I REALLLYYY wanna start posting olnf stuff the way u do with the sprites and already made audios but like…I literally DONT know how. Would u mind telling me about it? No pressure though! 🫶🏽🫶🏽
I think you're referring to the stuff I post on tiktok and I'll try to explain the process as best as possible!! Let me know if it's confusing in any way.
First I get the sprites I need by either accessing spriters resource (which I did for OLB&A) or extracting the files directly from the game (which is what I had to do with OLN&F since they weren't on spriters resource)
Spriters resource: Simply search up "spriters resource our life sprites" in any search engine (I use google) and download the chosen character sprite packs! You'll then have to unzip the files in your files or download applications.
Extracting from the game files: This one may take a little longer. You need to have access to the games files obviously so using a pc would be best (that's what I did) and open the games files and then the file titled "game" there you should find a paper looking icon with "rpa" or "archive.rpa" next to it. Once you've found it, open your search engine and search rpa file extractor online. Don't download any apps, you don't need to. Then you should find the link that says "File extractor online — game resources viewer" then drag the rpa file from the games file and drop it! Then the extracted files should appear on the left side of the screen. There you'll select the files option at the top of the screen and select "save all (zip)" and unzip it in your files.
I know it's a lot!! If you can't be bothered going through with the whole process I can give you access to a discord I made and uploaded some of the sprites to. It's not all of them, just the kids, the backgrounds and overlays. I do plan to eventually get all the sprites uploaded but it'll most likely only happen if I need to use them for anything. I'll get around to uploading the OLB&A sprites sometime soon as well!
Now when you get the sprites, they'll all be separated by the base of the character and expressions so you'll have to put them together yourself. I use ibis paint to put the eyes and mouths in the right places, its the easiest way!
Then afterwards, just start editing in capcut or any editing app you prefer! I recommend making use of the graphs when making the sprites move if you use capcut or any editing app that makes use of graphs! :)
If there's anything else you wanna know just ask! I hope you found this helpful <3
3 notes
·
View notes
Text
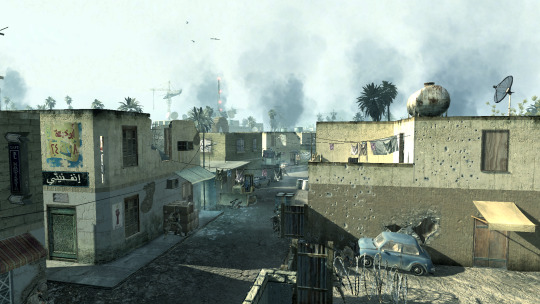
Capturing the ambience of Call of Duty 4 (2007)
This FPS set a high water mark for cinematic campaigns and addictive multiplayer progression. This guide will look at its Xbox 360 and PC versions (Steam and retail).
Enabling the developer console
First, add the following launch options to your executable shortcut:
+set thereisacow 1337 +set developer 1 +set sv_cheats 1 +set monkeytoy 0
Next, enable the console (AKA "monkey toy") inside CoD4's menus:

Running the game
As always, following the relevant PCGamingWiki entry for essential tips and troubleshooting.
We can explore the single-player offering more rapidly using a series of commands and tricks. Assuming we have the launch options in place above, we'll gain access to a "Dev. only" mission menu. This runs the selected level in developer mode, enabling the use of more console commands:
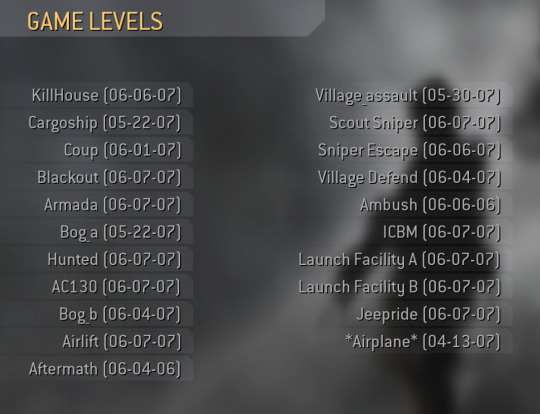
Alternatively, we can use the console to start a mission in dev mode:
spdevmap <Map Name (e.g. blackout)>
To speed through levels safely we should active the god and/or notarget commands. If we're feeling silly we can use g_ai 0 to disable AI, but it applies to both friendlies and enemies. To increase our sprint speed we can invoke the player_sprintSpeedScale 3 command; to increase our player-character's max velocity we can use g_speed <Integer>.
Optimizing visuals
We can edit our user CFG file or run console commands to ensure models and objects are drawn at the highest possible level of detail (LoD):
seta r_lodScaleRigid 1
seta r_lodScaleSkinned 1
seta r_lodBiasRigid -1000
seta r_lodBiasSkinned -1000
seta r_zfar 0
However, I noticed that certain foliage (e.g. palm trees) seems beholden to LoD no matter what these values are. There is a r_forceLod variable, but it doesn't seem to have any effect.
Capturing footage
Use cg_drawGun 0 to hide your gun while in developer mode. To remove your HUD, try cg_drawHUD 0 and/or cg_draw2D 0. The latter also eliminates onscreen developer messages.
To move the camera freely, use noclip, or ufo. Each controls a little differently but both use WASD and its neighboring keys, plus the mouse. If desired, use cg_fov to adjust field of vision from its default of 65.
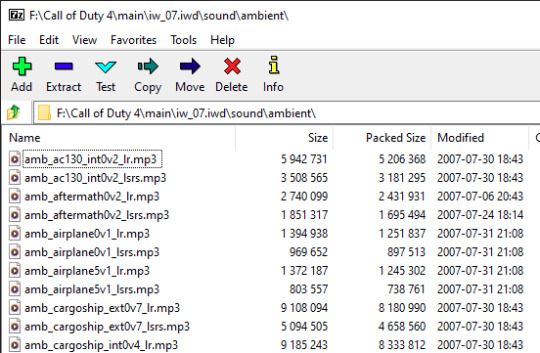
Extracting sounds from PC
CoD4's IWD archives are simply ZIPs in disguise, and can be opened with common programs like 7zip. For sound files, refer to iw_07 through iw_11.
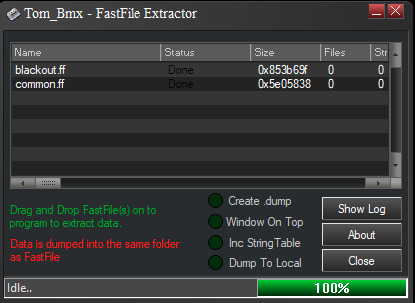
There are a handful of additional sound effects inside each mission's Fast File (FF). We can get at them via OpenAssetTools. I also had some luck with iw_ff_extractor or FastFile Extractor.
Extracting sounds from Xbox 360
I found these XMAs have a slightly higher bitrate than the corresponding MP3s on PC. Use PAKExtractor to decompress packfile1.pak. This will dump the contained XMAs, which we can then convert with vgmstream.
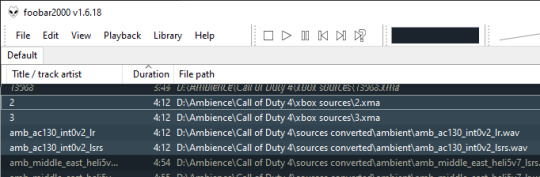
These lack names and metadata; we can use the track lengths to match them with their corresponding, named PC files.
Identifying sounds
To display an overlay detailed the sounds currently being played, and their parameters (volume, pitch, etc) we can use snd_drawInfo <0,1,2,3>. There is also snd_draw3D <Integer> which will render similar info but inside the 3D view.

From looking at this info it seems the engine typically plays a highly-detailed stereo track, and then randomly (i.e. start time and pitch) layers on detail sound effects, to create streamed ambience.
To determine the exact parameters of these detail sounds, you can look into each mission's FF files. You'll find GSC scripts (e.g. blackout\maps\blackout_amb.gsc) specifying the base sound environment and events.
As an example, let's examine the ambience defintion for the AC130 mission, defined in common\maps_ac130_amb.gsc. It declares that elm_ac130_rattles should be played four times as often as elm_ac130_hydraulics, and as often as no sound ("null") at all. An event is chosen every 3 to 6 seconds:
ambientDelay("ac130", 3.0, 6.0); // Trackname, min and max delay between ambient events ambientEvent("ac130", "elm_ac130_rattles", 4.0); ambientEvent("ac130", "elm_ac130_beeps", 0.3); ambientEvent("ac130", "elm_ac130_hydraulics", 1.0); ambientEvent("ac130", "elm_ac130_metal_stress", 0.3); ambientEvent("ac130", "null", 1.0);
Recording in-game
If extracting and mixing is too complex, we can simply record in-game.
To disable music, we can simply delete the relevant files from the IWD archives using 7Zip. We can then use noclip while in-game to fly out of "earshot" from any positional sounds and record only the ambience layer.
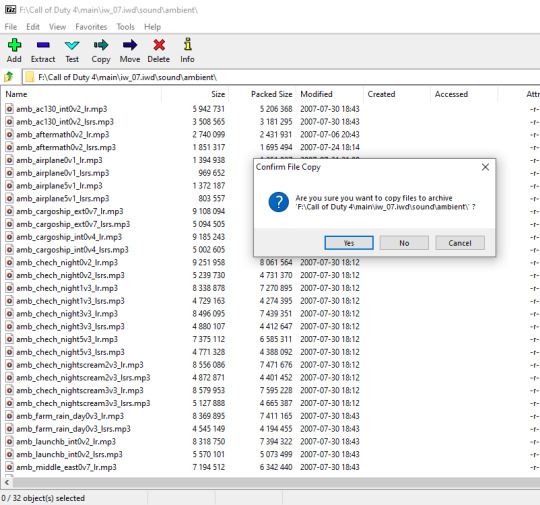
We can also use this approach to record complex ambient events in isolation (e.g. elm_ac130_rattles et al.) - just delete the ambient MP3s with 7Zip, instead.
Appendix 0: Getting WAVs out of FF archives
When the FF extractors above don't work for us, we can try a hex-editing approach. First, decompress the FFs using Offzip:
offzip.exe -a armada.ff
Then, open the DAT dump in HxD and copy everything between the .wav filenames you are looking for.
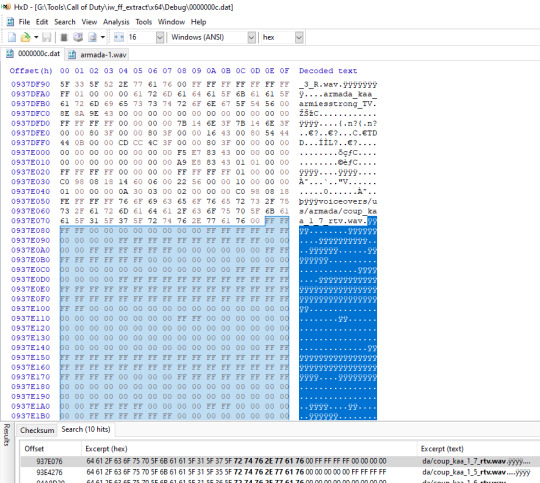
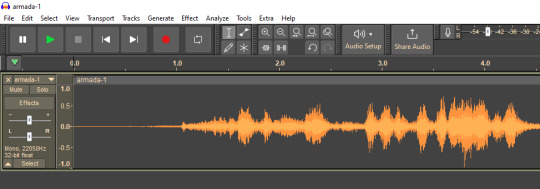
Paste this into a new file created within HxD, and save. You should then be able to open this as raw 16-bit PCM in Audacity.
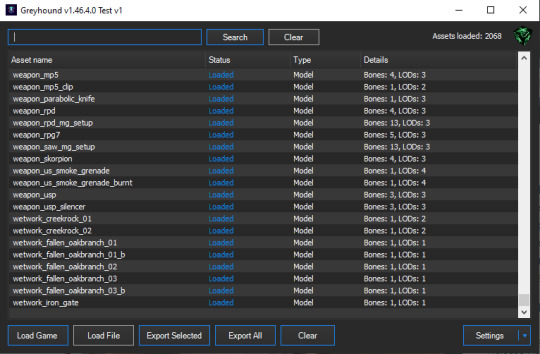
Appendix 1: Extracting other assets
Greyhound, a successor to Wraith, can extract models from CoD4 at runtime.
You can also try the IW3 toolchain for ZoneTool.
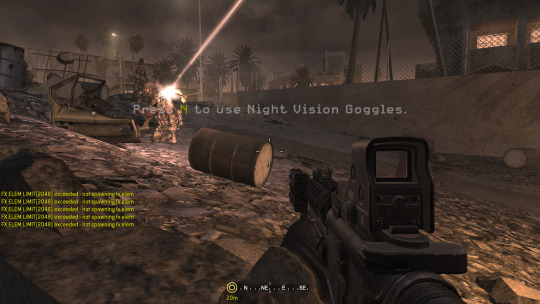
Appending 2: Popular mods that I couldn't try
Only supports Steam: https://gitea.com/JerryALT/iw3sp_mod/wiki/IW3SP-MOD%3A+Features.-. Presumably the resource limit increases would address issues like this:
For multiplayer only: https://github.com/Rex109/CoD4QOL
Official mod tools for building maps: https://www.moddb.com/games/call-of-duty-4-modern-warfare/downloads/mod-tools-sdk#membersform
Community enhancements and extensions for those tools: https://xoxor4d.github.io/projects/iw3xo-radiant/
Appendix 3: MW Remastered
I was able to extract the ambient streams from this release using Cordycep and Greyhound. I found MWR's assets are either qualitatively different or identical to MW's.
1 note
·
View note
Text
how to download sims 4 packs for free(mac)
Hi Besties, I recently posted on instagram about how I found a way to download the sims 4 expansion packs , game pack and stuff packs so here are the instructions on how to install them. If you have any issues please contact me on instagram and i'll happily help out.
here are a couple things to consider:
this tutorial is for mac only, there are options for windows on the website in step 1 and there should be instructions there aw well
do this at your own risk, i am not responsible for any issues or viruses you get on your computer. downloading anything off the internet risks the chance of viruses so be careful
If you have questions please dm me on INSTAGRAM @imanimckee , please make sure you are following me so that I get your message request.
now for the tutorial.
STEP 1: DOWNLOADING THE UNLOCKER
first thing we want to do type "sims 4 updater mac" into your web browser or go to this website. next, what we'll do is scroll down until you find "step 1" and follow the steps.
step 1 says to download the file: origin DLC unlocker for mac so let's do that. click this link then under "origin" and "EA" click the first link depending on which software you use to play the sims. if you use origin download with this link, if you use EA use this link.
the file should download in a .zip file, if this is the case it's downloading correctly. if not, you didn't do it right or there's some restriction on your computer.
once the file is downloaded, click it(or double click) to extract it. your computer should do it automatically but if not, go to the app store and download a zip extractor.
now, you should quit origin so it's not open at all. this means completely shut down the app(don't uninstall it, just close the app). to do this, click "quit" when holding down on the app
once you've done that, we're going to open the DLC unlocker folder we downloaded. inside the folder, there is a file called "fix originclient.command", hard press on the file then click "open" and it should open terminal.
NOTE: playing around with terminal can be detrimental to your computer. make sure to back up your device and do this at your own risk.
once terminal is open, follow the prompt and where it says "press any key to continue" press enter/return on your keyboard. once you've done that, it should say process completed. if it does, you did it correctly. if it doesn't, please contact me on instagram for further help.
now, we're going to repeat the process but with the "add fake entitlements.command". so, open the folder once again, open the file "add fake entitlements.command" and do what it says. if it says "press any key to continue", press enter/return on your keyboard. when it lists different sims games in order from 0-2, press 2 for sims4. if you're not playing sims4, this tutorial is not for you. after typing 2, press enter/return. now it'll ask you to open the sims4 online and quit it immediately after. to do this, open origin like normally, run the sims4(but don't play), then immediately quit the game once you get to the main screen. once you've done that, quit origin and go back to the terminal window and press enter/return on your keyboard. it should say "process completed" if you did it correctly.
STEP 2: DOWNLOADING THE PACK(S)
now, we're going to download our pack to add to our sims4 game. to do this click this link. if you scroll down, you should see an organized table of all the sims4 packs. important thing to note: download each pack one at a time. after each download of each pack you must redownload the DLC unlocker and repeat the steps in step 1.
to download your desired pack, click the red link beside the pack name. once you click the red link, it should immediately start to download. there may be an additional tab that opens , close it and go back to the original tab. I noticed it did this a few times before it finally downloaded th pack so just keep closing the additional tab until your desired pack is downloading
your file should be an .iso file. if this is the case, you're doing it correctly. if not, please dm me on instagram. wait for the file to download and once it's downloaded, DO NOT OPEN IT select the file , hard press , open with , → disk image mounter this step is important if you don't open the file correctly it won't apper in your game, please contact me for help.
now, we can open the .iso file from our downloads folder. a window should pop up named TS4-(your pack) with a folder inside , if this isn't the case something is wrong and/or you didn't do it correctly. We're going to go into finder and find the sims 4 packs folder. to do this, open finder → search → sims 4 packs. drag the folder into the sims 4 packs folder we just found.
lastly , make sure your game is offline. from now on anytime you want to play the game you have to open it while offline - you can disconnect from your wifi or go offline in origin. You can do this by opening origin → account → go offline.
If you open it online you will have to repeat all the above steps. But once your game is loaded you can go online from in the game. once origin is offline , open your sims4 game and it should be in there. if necessary i will post a tutorial soon but i hope this helps!
1 note
·
View note
Text
ppt viewer
Document Reader PDF, DOC, PPT
Document Reader is the solution! It is a free application that allows you to open and view over Word (DOC, DOCX), Sheet (XLS, XLSX), Slide (PPT, PPTX), PDF, TXT, ZIP, RAR and RTF file formats support. all document reader
Do you have documents files on your mobile that you can't open?
Document Reader is the solution! It is a free open office document files that allows you to open word document, read PDF file, open excel, open PowerPoint and extract zip and rar file formats support. document read
➡️ Why should you choose our all document reader app?
• Fast and easy viewing of your office documents
• Search particular document by name
• You can easily convert doc to pdf pdf opener
• Find any keyword in document files through quick search option
• Easily copy text from PDF file PDF opener
• All the functionality of this app you can access without internet access.
• You can easily view documents look like as a as Doc reader, PDF reader, PPT reader, XLS reader, TXT reader, csv file viewer, xml viewer & other open document format. ppt viewer
🌟 Document viewer - Document reader 📖
The most used tools for working with Word, Sheet, Slides, TXT, PDF, ZIP and RAR all from one application. You don’t need to install multiple applications to open apps on different platforms. It is a complete all document reader app. File Reader
🌟 PDF reader - PDF viewer - File Viewer
✔ Zoom in/zoom out pages while reading PDF document
✔ Jump to the page you want directly
✔ Switch from landscape and portrait reading mode freely
✔ Easily print and share PDFs using our PDF reader app
🌟 Word reader - Docx reader 📘
✔ A simple list of word file like as DOC, DOCS and DOCX files
✔ Easily find word document through quick search feature
🌟 Xlsx viewer - Xls reader 📊
✔ Quickly open all excel spreadsheets
✔ A simple and straightforward way to read xlsx file on your device
🌟 PPT reader - PPTX file opener 💻
✔ Support PPT files, PPTX reader, PowerPoint view with high resolution
✔ Easily you can convert ppt to pdf
🌟 Zip Extractor - RAR file opener 🗜️
✔ You can also extract files without internet connection
✔ The quickest way to create a zip file.
✔ All of the files that you want to archive into one folder.
🌟 PDF Tools
✅ JPG to PDF: You can easily convert images (jpg, jpeg, png, etc.) to PDF files. During file conversion time you can compress the pdf file acceding to your requirement.
✅ PDF to JPG: As Important favorite page saves into image format.
✅ Text to PDF: You can easily change your Text files to PDF with this tool.
✅ Remove Password: Remove PDF password security, giving you the freedom to use your PDFs as you want.
✅ Add Password: Encrypt your PDF with a password so it can't be read by unauthorized users.
✅ Merge PDF: Combine PDFs in the order you want with the easiest PDF merger available.
🌟 Document Scanner 📷
The Document Scanner is a PDF document scanner app. You can scan documents, receipts, photos, reports, or anything.
🌟 Notepad - TXT file 📝
Notepad is a small and fast note taking app for making and reading notes, memos, or just any plain text content.
🌟 Scan QR Code - Scan Barcode 📃
This scanner focuses on the core functionality to scan and read the most common types of QR codes and barcodes with super-fast speed.
🌟 File viewer - File opener 🔍
All files are no longer hidden in the mobile. The file manager will help you find files easily. It also provides for opening, deleting, renaming, and sharing files. See file information like file path, file size, last modified date, etc.
Experience the ultimate file reader for all formats now and boost your productivity while saving valuable time.
Our team is dedicated to enhancing the functionality of the office opener application, ensuring it meets your needs. As we continue to develop this comprehensive document management app, we eagerly welcome your feedback.
More Information - https://play.google.com/store/apps/details?id=com.united.office.reader
0 notes