#ZIP Extractor
Explore tagged Tumblr posts
Visit Tumblr Blog
Explore Tumblr blogs with no restrictions, modern design and the best experience.
Last Seen Tumblr Blogs


Fun Fact
After the announcement of the deal with Yahoo!, there were 170K signatures of unhappy Tumblr users petitioning to prevent the sale in 2013.
Text
7-Zip for Windows
7-Zip is an open-source compression tool licensed under the GNU LGPL. It helps reduce the size of email attachments and can decompress files downloaded online or created in RAR and Zip formats. The program offers a graphical user interface, command-line interface, and shell integration as its main methods of operation. It is known for being easy to use and secure, supporting encryption and…
View On WordPress
0 notes
Text
How to Download Our Life: Beginnings and Always Mods
(a step-by-step guide!)
If you've ever wanted to download extra content for OLBA but were unsure how or where to even start, this post will hopefully explain everything you need to know!
What you will need:
Our Life: Beginnings and Always
RPA extractor
Latest version of Python
RPA repack tool
1. Finding mods.
As far as I'm aware, there are very few people who make OLBA mods, but if you do happen to come across someone who makes mods/script edits and would like to download them, you'll likely end up with files with the end extension ".rpy" or ".rpyc" Because the software used to make OLBA is Ren'py, these are ren'py script files that basically contain the script that runs the mod and official script files. (Note: Some mods that don't just simply add onto/edit/add more scenes may also include other important resource files (images, sounds etc...) and might be formatted in a ".zip" file. I'll cover how to unzip and use those as well.)
2. Find your game files.
First of all, before you do anything with your .zip or .rpy/.rpyc file(s) you're going to need to find your copy of your OLBA game's files. For Steam, you should be able to open the Steam app on your computer, navigate to your library, right-click your copy of OLBA, select "properties", navigate to the "Installed Files" tab, and click the "Browse" button.
For a direct download of the game such as from Itch.io, you should just be able to navigate to wherever you downloaded your game and find the same results. You should see your game files now like the picture below.
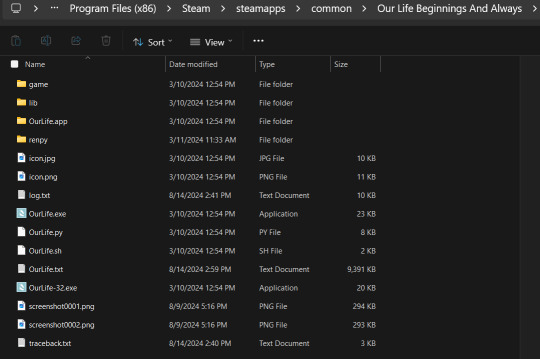
3. Finding/extracting the RPA file.
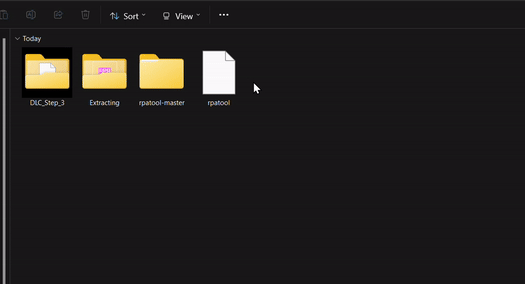
Now, you are going to want to navigate to the "game" folder inside the OLBA folder. Here you should find these files:
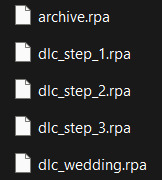
(Note: depending on whether you have the DLC or not, you may or may not have the DLC files. I do not have the Baxter or Derek DLC so I don't have those files here.) These files are basically all the .rpy/rpyc files, along with images, sounds and all other resources for the game, compressed into single files. So, in order to add our modded files, we will need to extract whichever RPA file pertains to the mod. For example, archive.rpa contains all the scripts, etc from the main game. The rest should just be DLC, so if you have a mod that only affects the main game, you will only need to extract that file. The same works if it is a mod that only affects a DLC; you will only need to extract that respective DLC file.
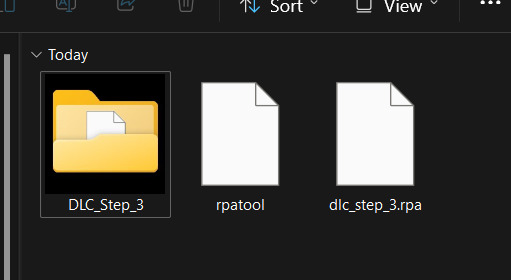
To do this, you can either download this RPA extractor or find your own and follow its steps. For this tutorial, we will be following the steps of the RPA extractor provided. Once you have downloaded the RPA extractor, drag the .RPA file you want to extract out of the OLBA folder, into a new folder, then drag and drop it onto the RPA extractor icon (shown below)
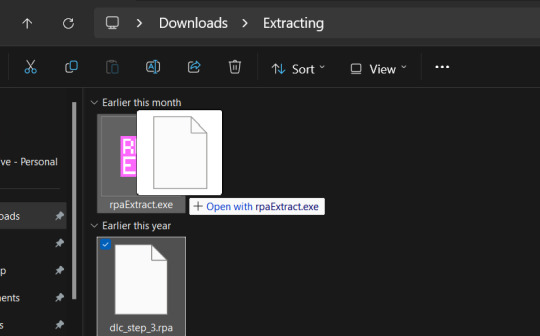
This should open a new Command window where the .rpa file will be extracted. You should end with something like this:
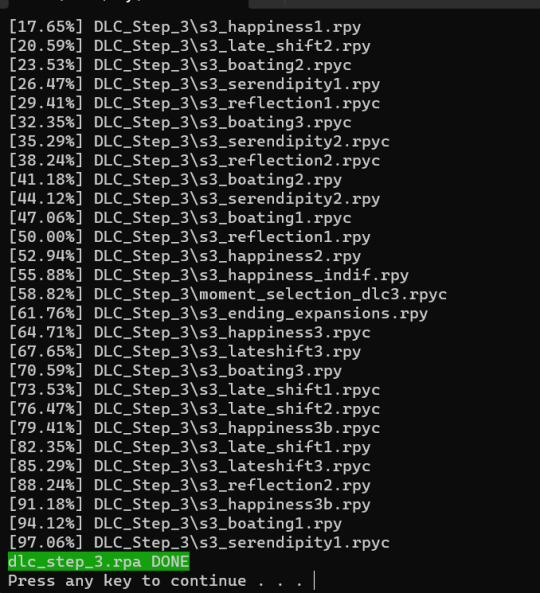
(for this example I extracted the step 3 DLC RPA file)
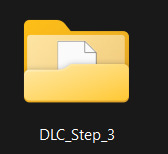
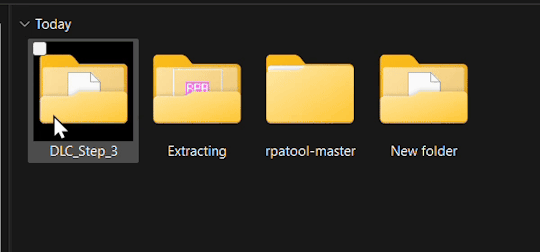
Now you should have a new folder containing all the .rpy and resource files you need.
4. What to do with modded .rpy/.rpyc and/or .zip files?
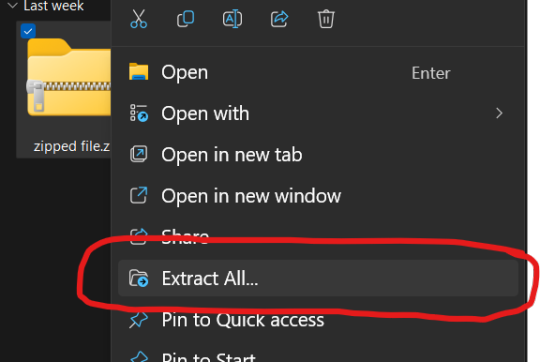
If the mod you downloaded just came with the files not zipped, you can skip this first part. Otherwise, you will need to unzip this zipped folder. To do this, you can either just right-click the zipped file and click "Extract All" and "Extract" when a new window pops up.
Alternatively, you can use a program such as 7-zip, which may help extract speeds for large files. Now, you should have, or already have your modded .rpa files on hand (finally!) Normally, if these files are editing preexisting material from the game or adding new scenes, at least one file, if not all of them will have the SAME EXACT file name as an already existing file. In this case, BEFORE YOU DO ANYTHING go into the folder(s) you got earlier by extracting the .rpa file(s) and look for the file(s) with the same name(s) as your modded .rpy/.rpyc file(s) and either make a copy or move them somewhere safe in case something is wrong with your modded files/you no longer want the modded files, you can put the original files back in. Once you have done this, you are going to drag the modded files directly into the folder(s) you got earlier by extracting the .rpa file(s). MAKE SURE YOU PUT THEM IN THE CORRECT FOLDERS AND EITHER OVERWRITE THE ORIGINAL FILES OR MAKE SURE THEY HAVE BEEN REMOVED.

If there are any other files, such as sounds or images or .rpy/rpyc files, feel free to just make another folder to put these in.
5. Repacking the RPA file.
Now these next steps can get really complicated, so I'll break them down into smaller steps. 1.) Download the RPA repack tool (make sure to unzip it) and the latest version of Python if you haven't already.
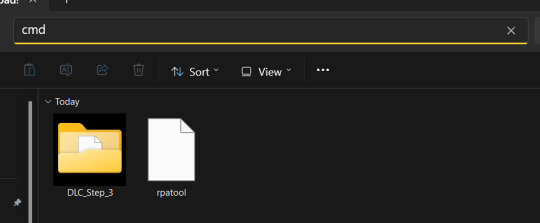
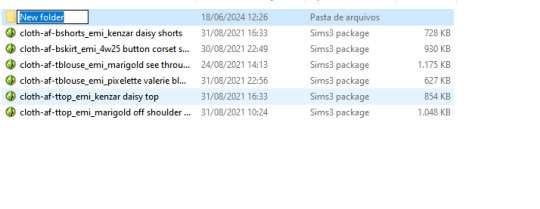
2.) Inside the unzipped "rpa-master" folder you'll find another folder of the same name. Inside this folder all you need is the "rpatool" file. Take this file and move it into a new folder completely outside of the "rpa-master" folder, name this folder whatever you want, it doesn't matter. (EXAMPLE BELOW)
3.) Now take the folder(s) you got from extracting the .rpa file earlier or created and put them in this new folder. (EXAMPLE BELOW)
4.) Type "cmd" into the path while in the folder with both of these.
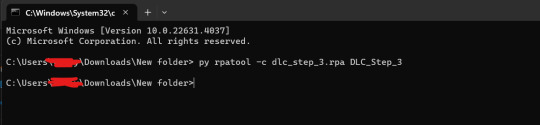
5.) Now, a command prompt window should pop up, type in this:
py rpatool -c
followed by the name of the .rpa file you want to make and the name of the folder(s) you are repacking separated by a space for each. (EXAMPLE BELOW)
6.) Depending on the size of your file it might take some time, but once you see the .rpa file appear in the folder, you're all done! It should look something like this:
Now, all that's left to do is put that .rpa file into the game folder with the rest of the .rpa files !! After that you can test it out and your mods should now work!
As always if you have any questions or need help doing this yourself, feel free to contact me or submit an ask!
71 notes
·
View notes
Text
How to make a zip folder and your followers lives easier, not harder
You'll need:
Your cc
7zip
Knowledge on how to make a new folder
Sims 3 Thumbnail Extractor (only if you really want to make their lives easier)
An SFS account or any hosting site.
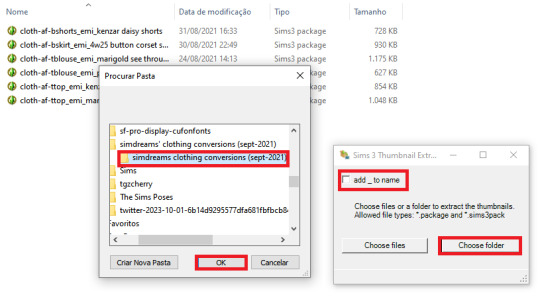
STEP 1: Create a new folder where you have your new cc. Name it whatever, or don't.
STEP 2: Throw said cc inside the folder
STEP 3 - optional: Extract and open S3TE. Untick 'add _ to name' and click 'choose folder'. Browse to the folder location, press 'ok'.

STEP 4 - optional: Voilà!!! You have effortless thumbnails! PRO TIP: You can get somewhat useful thumbnails straight out of TSRW if, just before exporting your file, you frame your mesh in a good, close angle. Delete the useless blank ones.

STEP 4.1 - optional: If you don't have good thumbnails, just throw your preview pics inside. Or don't, if you don't want to make anyone's life easier. PRO TIP: Rename thumbnail and cc the same. STEP 4.2 - optional (EDITED): If you're really devoted to making your followers' lives easier (I love you already), you can learn how to add good thumbnails here, here and here STEP 5: Leave your folder. Click on it with the right mouse button. Select 7-zip... < "add to yourfoldername.zip". If you have WinRAR installed, an option will show up below with the same command '"add to yourfoldername.zip"!

STEP 6: Throw zip folder on SFS and share only one link!
96 notes
·
View notes
Text
A Guide To Ripping Sonic x Shadow Generations Models
This guide is meant as a walkthrough to how to rip models from the PC version of SxSG. While this process and programs will work with the Nintendo Switch version, I cannot promise the decompilation and file directories will be the same, especially as there is a massive quality difference in the assets between the two versions.
I recommend already having fundamental computer literacy and pre-existing familiarity or experience with 3d models and programs such as Blender. I'll be using Blender here.
Now, lets begin!
What You Will Need
A PC version of Sonic x Shadow Generations, whether through Steam or Epic Games, installed on your computer. Please make sure you know where the file directory for your game is. for Steam, you can easily access this via the Properties menu for the game in your Steam library, Installed Files, and then Browse.
For Steam, your directory should look something like: Program Files (x86)\Steam\steamapps\common\SONIC_X_SHADOW_GENERATIONS
PLEASE make sure youre keeping track of which files are modified, if at all. While you can create new files and folders in your game directory without issue, you may break your game if you modify or delete existing files. If you encounter a problem, you may need to Verify the Integrity of Game Files (through Steam), or uninstall and reinstall your game entirely. You may want to Backup your game files just in case.
A 3d program for importing and previewing 3d models, such as Blender. Blender will be the program used in this tutorial.
Tools You Will Need
HedgeArcPack from HedgeLib - A program used for the decompilation of Hedgehog Engine .pac and .ar00 archive files. Currently works on all Hedgehog Engine games (Unleashed - SxSG). HedgeLib is a larger library of programs for ripping Hedgehog Engine assets. Modelfbx from LibGens - LibGens is a library of tools for modding and editing Hedgehog Engine asset files, originally a Level Editor for Sonic Generations. Modelfbx converts .model files to .fbx files for use in 3d programs. There are a bunch of other fun modding tools in here as well. NeedleTextureStreamingPackage from SkythTools - An extractor for the texture data of the dds files used in some Frontiers and Shadow Generations models. Not all models will need this. Part of SkythTools, a library of tools for modding and extracting assets from Hedgehog Engine games. I recommend reading through the page and seeing what all the other tools do and if theyre something you'd also want to use!
Both LibGens and SkythTools do not have a Releases page on their Github pages, so just download the master archive as a zip file as normal. All programs here work with drag-and-drop, meaning you drag and drop the files directly onto the .exe file. Do not open the .exe files. (nothing will happen if you do, it simply will not work.)
After downloading all three libraries in your preferred location, open your game directory.
Unpacking The Model Archive Files
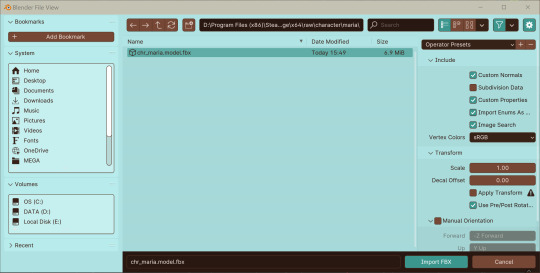
Now that you have your game directory open, you'll need to locate the model archive you wish to rip. All of the assets for Shadow Generations is located in image > x64 > raw in your game's base directory. Lets rip Maria's model.
Maria and other characters are located in the character folder. You'll need to find maria.pac.


Open a separate file explorer window to where you have HedgeArcPack.exe. For simplicity's sake, Ive put it on the desktop. Drag and drop the maria.pac file directly onto the exe file.

By default, it will unpack the archive in the original folder with the name of the archive you unpacked.
In this new maria folder, you'll find a lot of files. Dont be intimidated - these are simply the raw files for all of the model's dependencies and assets, including animations, dds files (texture files), and more.
A quick glossary: - .model - the base model file in native format. This is what youre looking for. - .dds - the texture files for the model. You will need these for importing and previewing the model in a program, as well as exporting it. - .material - the material data for the model for Hedgehog Engine 2. You wont need these so as long as you have the texture files on their own. - skl.pxd - the skeleton data for the model for Hedgehog Engine 2. - .anm.pxd - this is the file format for compressed Hedgehog Engine 2 animations the model uses. They can be opened using a plugin like FrontiersAnimDecompress, however this isnt a tutorial for how to use those. Feel free to ask for a tutorial on how to extract game animations or look it up on your own time, though!
Before we can convert and import the model to Blender, though, we'll need to extract the texture data.
Extracting the Textures
Note: not all models, such as bosses like Mephiles or Black Doom, will require this step. However, Maria's does.
Open a file explorer window to where you downloaded SkythTools. Make sure you have already unzipped the file. In SkythTools-master, go to Sonic Frontiers, and find NeedleTextureStreamingPackage.exe.

In the needle_texture_streaming_path.txt file, copy the file path for your Texture_Streaming folder in your game directory, then save the file. This is the path the program will use to extract the texture data for the .dds files.


Once that's done, you will need to drag and drop each .dds file onto the .exe one-at-a-time. Maria has multiple .dds files for different parts of her model, such as her eyes and hair, so make sure you do this for every one of them.

If youve worked with 3d models and textures before, you may recognizes some of the suffixes used for the texture files. Hedgehog Engine games use pbr texture maps. abd is the albedo map, nrm is the normal map, prm is the map for Metalness, Roughness and Specular, ems is the emission map, etc.
Now we can finally convert the model for use in 3d programs!
Converting and Importing the Model
We're in the homestretch! Finally we'll be able to preview and use our model. But first, we have to convert it to an .fbx.
Just like before, open a file explorer window to where you have LibGens downloaded (make sure you have already unzipped it). Go to the bin folder. This time, youre looking for a program called modelfbx.exe.
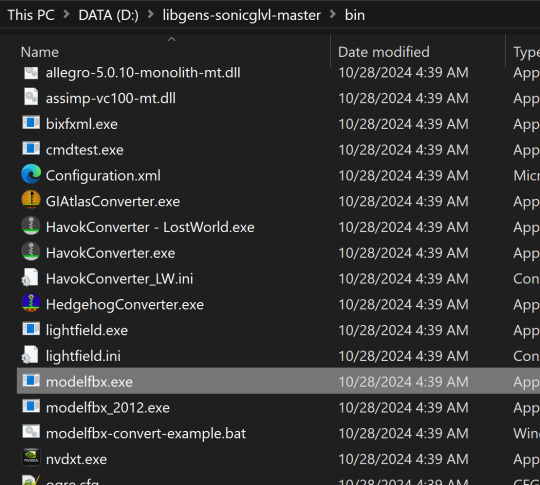
Find your .model file in your unpacked archive. Drag and drop it onto the exe.

It will create an .fbx file conversion of the .model file.
Now, we can finally open Blender!
I am using Blender 4.1.1 here, though the version doesnt matter as long as it is 2.8 or higher, as Blender has an fbx importer by default.
Like you would any other fbx file, go to File > Import > fbx (dont mind my Choco Mint blender theme here)

You'll need to navigate all to where you converted that fbx file. (Alternatively, you can copy that fbx file to somewhere else for ease of access, I just like keeping everything in one place).
Import the fbx. You may notice that by nature of an fbx file, the albedo texture for the base model is already mapped to the model when you switch to Viewport Shading. However, sometimes, part of the model will be magenta, meaning we have a texture pathing error.
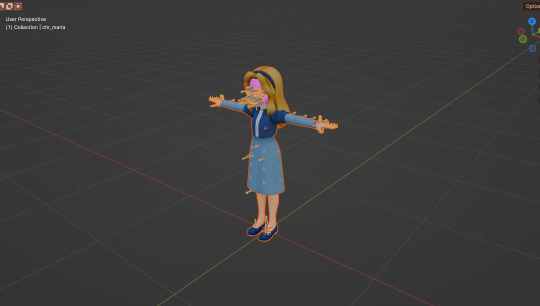
Hiding the bones, she looks a lil scary here--
Opening the material data for the mesh, you can see where our problems lie. The texture map for her face has a file path that does not exist.


Its pretty easy to fix this - just open the albedo file for her face texture and map it to the material. You can simply drag and drop the dds file into the node editor in blender - blender can read the dds files just fine since weve extracted the texture data from them earlier.
Pathing errors can either happen as a result of the fbx file being wonky or if you havent properly extracted all the texture data for the dds files, so keep that in mind!

If you simply wish to view the models in their base colors, you can stop here. However, you can also set up the normal and prm maps for use in 3d renders or exporting the model!
The prm maps for Frontiers and Shadow Generations work a little differently than in other games. Instead of Red = Metalness, Green = Roughness, Blue = Ambient Occlusion, and Alpha = Specular, Frontiers and Shadow Generations uses Red = Specular, Green = Smoothness (inverted Roughness), and Blue = Metalness.
Setting this up in Blender is quite easy - simply drag and drop the respective prm, fal and nrm and other dds files into blender for their respective maps in the material editor.
If you already know 3d, you already know how to set up a normal map in Blender. Simply take the normal map, set the Color Space to Non-Color, then path it into the Normal Map node.

For the unique prm maps, you will need to create a Separate Color node, then plug Red into Specular > IOR Level (make sure Distribution is set to GGX, not Multi-Faceted GGX), Green through an Invert Color node > Roughness, and Blue > Metallic.
Overall, your node editor should be set up something like this for each material.

(I know it looks intimidating, but I promise its super quick and easy to set up - dont give up!)

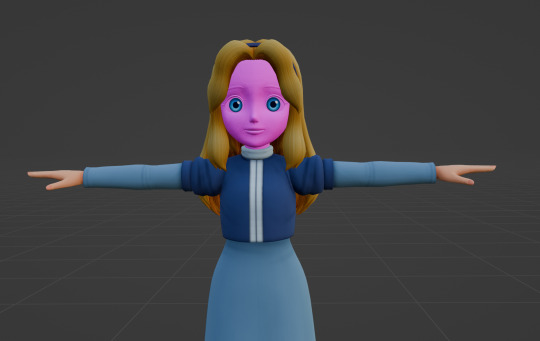
And now we have our ripped model! You are now free to pose, deconstruct, play with, do whatever you please with it. Please note that if you want to export your model, you may want to convert the texture files to png using a program like Noesis. I hope this helps, and have fun!
#once again for other maps like the emissive map for Maria's eyes and etc you'd set them up like any other pbr texture#sonic x shadow generations#sxs gens#sxs generations#sxsg#sxsg dark beginnings#shadow generations#sonadow generations#shadow the hedgehog#maria robotnik#ripping guide
20 notes
·
View notes
Text
EDIT: solved! this was from my pc not being able to read japanese and setting all the game file names to nonsense. download a .zip extractor like bandizip and extract the game thru that after setting code to japanese (thank you @dovedrawsmo4 for help!!!)
downloaded the latest ver of mo4 and something weird happens?

this pops up every time I press enter on any selection on the start up screen
i downloaded "RPG tool VX Ace RTP" from the jp rpg maker site which is supposed to help with the game download (it was still 822 mb (T T )) and ran the wizard before downloading the game zip. the rtp files went straight to the os (c:)
pls help me i just want to play this stupid game ;-;
13 notes
·
View notes
Note
Where did you get the Undertale Version of Comic Sans from (and can the same be done for Papyrus and other fonts in Undertale)? I've seen it used in others' art, and I've tried searching for it myself, but I've only been able to find Determination Mono and variants of the original Comic Sans MS.
I've downloaded them from websites like fontstruct, and you can download the zip files from there. Using an online zip extractor, you can obtain the otf or ttf file, which are usually used in art programs with custom fonts. I just search up 'papyrus undertale font' or 'sans undertale font' , and then these downloads can show up.
For using these files, I use Kleki, which lets me import these fonts via otf or ttf. That's enough of my nerd rambling for now.
13 notes
·
View notes
Text
Dandy's world rant about my opinions on random things.
Dog plush is not a good speed trinket unless you are distracting. I swear I see so many vees and Rodgers with the trinket combo of dog plush and fancy purse. Did they read the description wrong? It only boosts walk speed, you're not gonna out walk the twisteds.
What is with the glistens dying floor two? It's always the ones with diary on too. They make it look like he's hard to play as. I know it sucks that both five star extractors have two star stealth but it is not that hard to deal with. And at least he has three star movement speed. I've seen the vees with dog plush last longer than the glistens I've joined runs with.
Now this is a controversial one but I don't care about extracting distractors. My excuse isn't that "distracting wasn't meant to exist" or "you shouldn't need a distractor to survive". My excuse is that I just don't give a shit. The only time I play as pebble is in solo runs cause I can't distract. Distracting is such a stressful role and I can understand why you'd rather extract. I don't blame them cause people can also be so entitled and ungrateful. I've seen so many videos of people being rude to pebble and goob cause of a small mistake. Me personally, I would extract after that too.
Looey is not a distractor. He is an all rounder. The amount of entitlement people have is insane. I saw a video of a team being incredibly rude to a looey for extracting. Then in a run I was in, a pebble told a looey to distract. (Looey had brick and pebble was a "I only distract mains" type.) then when I was looey, after our distractor died, some bitch in the chat said "looey distract". No please, no can you, just straight up demanding. Luckily someone else said "only if they want to" but the nerve of some people. Same thing happened when I was tisha as well but I just left after cause the run was buns.
Why is rnd the end of public runs. Anytime I'm in a run and see a machine in rnd's circle, I sigh. It's not funny and genuinely sucks cause there's always some brightney running and not letting anyone do the machine. I was in a promising run as sprout. We had a good distractor and everything. We got Connie and rnd floor four. Usually that's a free floor and we'd be able to zip right through. I saw a machine in his circle and thought I should vee mote it but it looked like others were gonna go for it so I didn't, big mistake. Everyone gave up and died cause this whore of a brightney kept activating rnd. I gave up after they killed our distractor cause unfortunately I knew I wouldn't be able to save tapes after that. It hurts cause it was such a good team and we might have actually been able to make it far. I fucking hate people who activate rnd period.
What is with the cursed trinket combo of fancy purse and fishing rod? Especially on a toon that desperately need trinkets. I was with a ginger who had this combo and they died floor eight cause they're dumbass couldn't out run the twisteds. Same with a Connie. Like you need speed trinkets, stop wasting your slots.
What's with people using fancy purse trying to turn runs into dandy runs? That literally makes your trinket more useless than before. They always suggest on like floor two when dandy doesn't sell anything good. I hate it when this happens cause you might as well not have any trinkets at all.
Can you please wear thinking cap when you play as Cosmo. I'm sick and tired of hearing failed skill checks every five seconds. I hate doing a machine near them as well cause the twisteds always see me instead of you. I'm tired of being blamed for your mistakes. I swear some of y'all do it on purpose. I also hate having to wait 20 minutes for the last machine to be done. I used to feel sympathy for y'all but there is a trinket made specifically to help you, use it. I sigh every time I see a Cosmo without thinking cap cause I know what's gonna happen.
That's all.
#dandys world#pebble dandys world#dandys world looey#vee dandys world#dandy's world brightney#dandy's world rnd#dandys world connie#trinkets#rant
8 notes
·
View notes
Text

WMaster ZipKing - Free, Fast Secure Zip Software
WMaster ZipKing is a powerful, all-in-one zip compressor and extractor designed for fast and efficient file compression, extraction, encryption, and smart file management. Save 100% time and disk space with its lightning-fast performance and easy-to-use interface. Whether you're zipping large files or securely extracting archives, ZipKing gets the job done — free, safe, and hassle-free!
#WMaster ZipKing#File Compressor#File Extractor#Image Compressor#PDF Compressor#Video Compressor#Audio Compressor
3 notes
·
View notes
Note
You posted many of character sprites from Duel Links, and now I'm curious if you have any expanded sprites from DM, DSOD and the NPC characters so far. Can you provide the assets for us to download?
The hint is "Chara007_0" filename alongside the faces.
Don't have time to sort through them, so here's a google drive link everything relevant as a Zip file.
These were grabbed at the start of the Zwijo event. Some things are missing though, i.e. the Zwijo Sprites, the Mistuko sprites, and the alien form of Chupataro. There's probably more stuff from the recent Go Rush event that my extractor couldn't grab too, but i dont want to try again since the program puts an extremely heavy load on my PC.
Will try again next update though
6 notes
·
View notes
Text

answering this one without doodles since im going to be away fron my desk for a hot second but I still wanna answer some;
archie- sprout/cosmo/ginger (basically any variety of healers, usually playing with someone who takes damage and needs healing)
zip- extractor pebbles because he wants to finish machines fast but doesn't want to be slow and stupid (yes he knows glisten is right there but he likes pebbles)
dell- probably vee
chip- gigi
florence- would probably get attached to one of the starter toons and stick with them
mark- razzle n dazzle
(strawpage)
5 notes
·
View notes
Text
I was not planning on reading DragonSteel prime, but then Sanderson released the Ebook and audiobook for free, and I can't pass up another Kramer and Reading Sanderson experience. I've only finished chapter 4 but that's about 3 hours of listening and it's pretty good. Really feels like wheel of time book 1 but without everything I hated. I am very surprised by how much I'm enjoying it and if you really need some more Cosmere, it's hard to pass up this free opportunity, even if it isn't really cannon. I also think it will be cool to see what cannon changes by the time the published version comes out like 15 years from now.
If you plan on using your phone to download it make sure you have a zip extractor (app store), it's nor gonna be as smooth as an audiobook experience, though I think you can open the file through some audiobook services. With a little effort though you have a totally free, excellently read audio or ebook. Would recommend.
11 notes
·
View notes
Text

World Icons List PSD
Update 17 Mar 2024 : Added Tomarang and a different version (details added to end of post).
With huge credit to deevo's Image Viewer for Package Files which has a Packs Extractor tool. Similar to my Packs List PSD, this one is for the World icons. I've had this since April and never used it myself, but just in case someone would want this thing here it is updated to include Chestnut Ridge.
Download from source or link below:
SFS
1. [quiescence90] World Icons List in .pdf and .xcf formats - as pictured above
2. [quiescence90] Individual World Icons in .pdf and .xcf formats - this is the original sized images extracted from the game arranged and grouped together. You can move each layer as you please to create your own icons for the Worlds
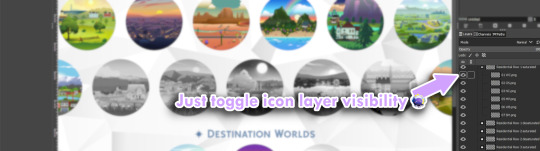
3. [quiescence90] 512px World Icons - .zip folder containing all the uncropped original sized World icons in .png format. I only arranged them to match how they appear in the World Selection Menu so a few of them will show blank/unfilled spots because EA did not bother to draw anything on that part of the layer. See example below:
(observe the bottom)
4. ✨NEW!✨ [quiescence90] World List (by pack) in .pdf and .xcf formats - The worlds listed by pack icons as exemplified below:

I excluded basegame and Journey to Batuu for this one because this is meant for a "packs needed" kinda situation and I couldn't extract a bigger icon from JtB 🤷🏻♀️
9 notes
·
View notes
Text
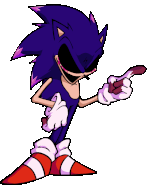
Cloud's FNF GIF Making Tutorial
Hello there, have you ever wanted to make FNF GIFs like this for example?
Well, your in luck, because in my personal guide, I'll teach you how to do so. This is for desktop users by the way, I don't know how to do this on mobile.
1. Getting Started
You'll need the following program to make your GIFs. I personally use.
Spr2PNG (Highly Recommended | Automated, Simple Process)
Java (Needed for Spr2PNG to work.)
EZGif (Needed for GIF Making.)
But there are other options such as FnF-Spritesheet-and-XML-Maker but I personally use Spr2PNG as that is more simple.
To download Spr2PNG, first go to the releases tab and click on the Latest release you see, then click the zip file to download it automatically. You'll want a ZIP Extractor like 7-Zip, which I recommend, but WinRAR is another good option.

Now, once you have your programs, you'll want to download the FNF mod you want to rip the sprites from, like for instance; VS Sonic.EXE, or basically any other FNF Mod and download that either from GameBanana or GameJolt, depending on where it is.
2. Ripping the Sprites
Okay, now, to make the GIF, you have to rip the sprites. To do this, go to your FNF Mod that you downloaded and go to either mods\images\characters or assets\shared\images\characters. It depends where all the [charactername].xml and [charactername].png files of that character is located so you might have to do some digging around in the mod files. But once you find those, you want to copy & paste them into a separate folder, I recommend creating one to store all your ripped sprites at, aswell as your gifs.
3. Making the GIFs
Okay, now that you have your sprites ripped from the mod files. You'll want to open SprToPNG.bat or SprToPNG.jar. It doesn't really matter what you choose to open. It should show a small window that says “Select XML or PNG Files to Open” and you'll want to locate the files you ripped from the mod files. Please keep in mind that the .png and .xml files of that character must be in the same folder together otherwise it won't work. Just double-click on either file, again, it doesn't matter. Then, SprToPng will do the rest and separate the animation sprites into one folder that is named after that character, aswell as all the sprites.
Now, click on the folder of the sprites that you want to animate, it might say "Idle Dance" or any of the character poses, aswell as the special animations if the character has them. There should be some PNGs that are ranging from 0000 to random, depending on how many animation sprites that animation has.

Now, open EZGIF.com and click on "GIF Maker" and then click on Browse and then locate the separate PNG files of the character. A good tip is that you can select the first PNG with 0000 and then the last by shift-clicking, just click the first png and then the last one with shift-click and it'll select all the following PNG files and then select "Open". It might take a couple of seconds, depending on the file but it should show all the PNG Sprites in order.

Set the delay time to either 4, 5, or 6. You want it to act like how the actual in-game sprites would. If it's too fast, increase the delay time, if its too slow, decrease the delay time. Optionally, you can set the last PNG to 30, then select "Don't Stack Frames" so the sprites don't overlap over each other and make it look ugly.
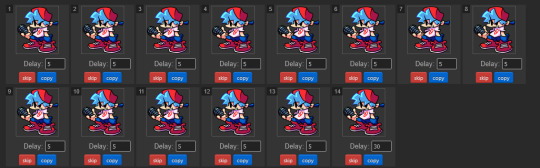
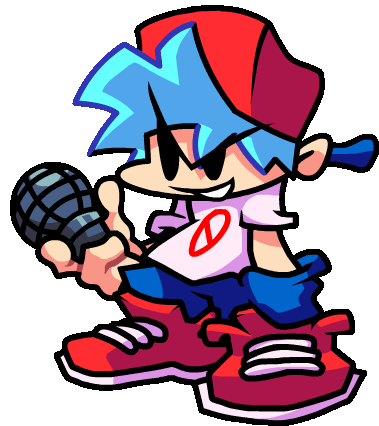
I'll show two examples, one with "Don't Stack Frames" on and off.

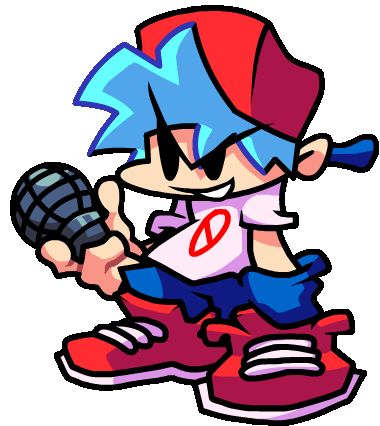
On the left is with it on while on the right is with it off. You see how on the right the sprites are behind the ones that are displayed? Yeah, you don't want that. So I highly encourage and recommend you to turn on "Don't Stack Frames" on.
Now, select "Crop" and then scroll down and select "Trim Transparent Pixels around the image" as this will remove any transparent pixels we don't want, while also reducing the file size, either a tad bit or a lot, depending on the sprite.


And once you're done, click save, your sprite should look like this!
Now that you made your Sprite, you can upload it to the Funkipedia wiki to help out with pages and such that need sprites.
Fin.
Feel free to leave any suggestions in reblogs or comments, they'll really help out. Also, make sure to reblog this so more people know how to make GIFs in the future (on desktop or laptop).
4 notes
·
View notes
Text

SHADOWS OF SORCERY INTRODUCTION POST:

SYNOPSIS:
Elora Spade joins the Regents Academy of Magic to investigate whoever has been trying so hard to kill her. She has a rare (and illegal) mind control ability—and despite her best efforts to hide it, someone knows all about it.
Someone who wants to steal her magic core for themselves.
Elora has a strong feeling that it's someone with a magic extraction ability. That's the only way somebody could have scrounged up that poison core she took. Which makes her very weary of the regional extractor... So her next step is to befriend the regional extractor's daughter to scope him out.
STATUS: Complete at ~32,200 words
GENRE: Fantasy, mystery-esque
ELEMENTS: Dark academia with lighthearted moments and humor, hard magic system, magic types inspired by MBTI Meyers Briggs personality types (meaning that all sorcerers have at least 4 abilities)
THEMES: Friendship, trust, belonging, self-actualization, second chances
TROPES: Hiding powerful magic powers, seeking revenge for hurting someone near and dear to the main character, befriending someone close to the enemy, the struggle between good and evil
CONTENT WARNINGS: Violence, blood, swearing, kidnapping, anxiety, depression, murder attempts (DM me if you want to confirm whether there are major character deaths or not!)
CHARACTERS:
Elora Spade: She relies on a bunch of eccentric firelights for their healing magic! She, uh, never had that magic poison core removed. Look, the regional magic extractor is her PRIME SUSPECT
Imogene Heron: Elora's sunshine coded best friend with an exceptional mind reading ability.
Charlotte Gallison: Daughter of the regional extractor… with an exceptional healing ability? That might be suspicious.
Jaelin Seal: He thinks Elora murdered his grandfather when they first meet! Oops. But there's a chance their cases are connected.
Kaden Brush: Tried to kill Elora! He was sent by the person who's trying to steal her magic. Definitely not a ray of sunshine.
Masterlist Post | First Part | Which SoS Magic Type Are You? Quiz
MISCELLANEOUS NOTES:
Special mention about the firelights: They're like fireflies and zip around like bees! They have wings like dragonflies! And they hover like hummingbirds! And sometimes they're skiddish like cats! And they crave attention like golden retrievers!
#wip: SoS#writing#writeblr#fantasy#the purple divider is by newlips on tumblr#SoS#or AKA the side project that stole a piece of main status wip vibes from my heart
6 notes
·
View notes
Note
HIII okay so like. I REALLLYYY wanna start posting olnf stuff the way u do with the sprites and already made audios but like…I literally DONT know how. Would u mind telling me about it? No pressure though! 🫶🏽🫶🏽
I think you're referring to the stuff I post on tiktok and I'll try to explain the process as best as possible!! Let me know if it's confusing in any way.
First I get the sprites I need by either accessing spriters resource (which I did for OLB&A) or extracting the files directly from the game (which is what I had to do with OLN&F since they weren't on spriters resource)
Spriters resource: Simply search up "spriters resource our life sprites" in any search engine (I use google) and download the chosen character sprite packs! You'll then have to unzip the files in your files or download applications.
Extracting from the game files: This one may take a little longer. You need to have access to the games files obviously so using a pc would be best (that's what I did) and open the games files and then the file titled "game" there you should find a paper looking icon with "rpa" or "archive.rpa" next to it. Once you've found it, open your search engine and search rpa file extractor online. Don't download any apps, you don't need to. Then you should find the link that says "File extractor online — game resources viewer" then drag the rpa file from the games file and drop it! Then the extracted files should appear on the left side of the screen. There you'll select the files option at the top of the screen and select "save all (zip)" and unzip it in your files.
I know it's a lot!! If you can't be bothered going through with the whole process I can give you access to a discord I made and uploaded some of the sprites to. It's not all of them, just the kids, the backgrounds and overlays. I do plan to eventually get all the sprites uploaded but it'll most likely only happen if I need to use them for anything. I'll get around to uploading the OLB&A sprites sometime soon as well!
Now when you get the sprites, they'll all be separated by the base of the character and expressions so you'll have to put them together yourself. I use ibis paint to put the eyes and mouths in the right places, its the easiest way!
Then afterwards, just start editing in capcut or any editing app you prefer! I recommend making use of the graphs when making the sprites move if you use capcut or any editing app that makes use of graphs! :)
If there's anything else you wanna know just ask! I hope you found this helpful <3
3 notes
·
View notes
Text
Starting out
What you’ll need:
A windows computer or laptop
Blender 3.3
TS4Ripper
Winzip or another .zip extractor if needed
Sims 4 studio
(Optional) Any photo editing app
My personal favourite rendering tutorial (may not be beginner friendly)
Posing tutorials (Specific to 2.7, but can be transferred to 3.3)
Exploring Blender (I will not be discussing it in this tutorial, and there are many tutorials online)
7 notes
·
View notes