#Zmodeler
Link
ZModeler is a package assessing the simulation process, and you will find GTA-5 kinds of gates, clothing procedures object winds, and movement up the match having a responsibility. To start with, It has product starting packages and handles the vehicle simulator process controversially. It is determined by the thing, comprised of Grand thieving, of rate, and is fast. It’s an excellent tool for this objective.
0 notes
Photo

Much to my dismay, I had to finally pull up the ZModeler brush >< there’s just no way to sculpt some of his hard edges without it :< but we will get there soon enough I think. Still very much wip but I can see the light at the end of the tunnel
44 notes
·
View notes
Text
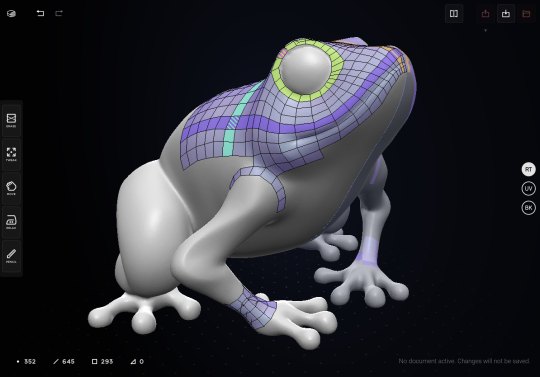
I finally tried CozyBlanket and I REALLY like it!
They just updated it to include UV & baking — incredible for an iPad app. I had sticker shock when it first came out: $90 is not cheap* for a specialist tablet app that only does retopology (+ had issues at launch). But with all of these features, it's worth it.
Haven't tried UV or baking yet, only retopo on their default frog (pic 1). Works well.
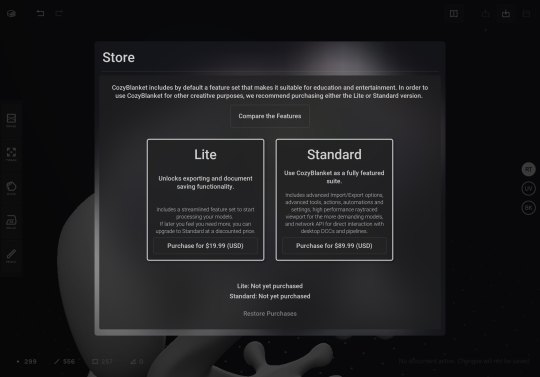
You can do basic retopo, UV, & baking with the $20 Lite version (pic 2). I think it'd be perfectly fine for things like a head or small prop; like this frog or simpler.
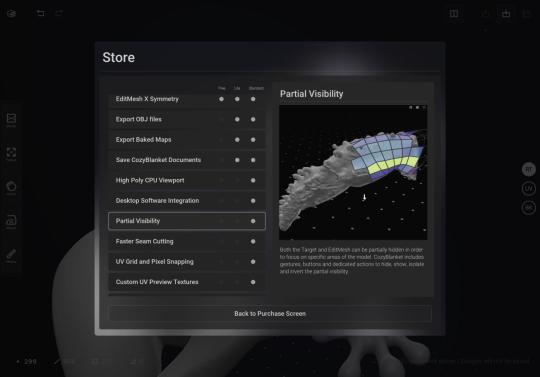
More complex models would be frustrating without the $90 features. On the comparison screen, you can scroll down the full list, tap on each for a visual & explanation of what it does. (pic 3)
—
The tutorial doesn't show some key features:
The constant double-tapping to move points or edges was annoying: You can get around this with the side buttons, like Tweak:
Those are Press & Hold.
You can draw entire rows: draw a connecting rectangle to the row you want to add to.
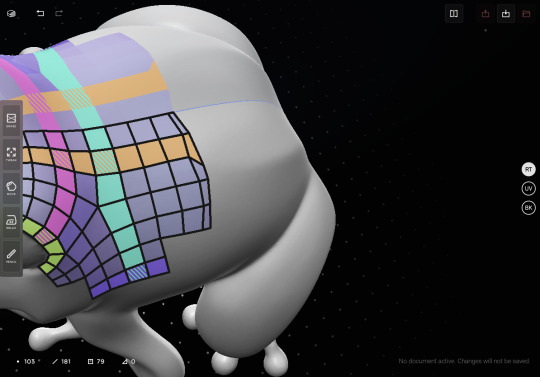
Problems so far: (pic 4)
If you try to move an open row of edges, the polys can get "stuck" and only shorten. (See screenshot: right-most row is shorter.) To move those edges out (elongate), you have to tweak individual points.
You have to zoom in close to tweak a row, else it won't recognize it & picks up a point instead.
—
Other software I've tried retopo in: Zbrush (ZRemesher, ZModeler & Topology brushes), Blender (no addon), C4D, 3DCoat, Topogun (trial).
I won't go into detail about each, but CozyBlanket was instantly easier, more intuitive, and pleasant than any of them. Eliminating frustration is worth a lot.
Topogun is a close 2nd; 1st in some ways (here's a good thread about it). But it's $100 for retopo only and the developer seems MIA. So CB looks like the better deal if you have an iPad.
The 3rd option I'd try is Retopoflow in Blender. It's popular, actively being developed, and there's talk it'll be integrated into Blender main.
—
*"Cheap" is relative, obviously. Context: for an individual freelancer + compared to other, full desktop software that does more than retopo & can be had for around the same price when on sale.
Black Friday is coming up: I don't know if CozyBlanket will go on sale (new; indie dev), but it'd be an instant buy if it did.
& Related:
For UVs, RizomUV is worth every penny. I hated UVs and it improved everything about that. It's not worth hours of suffering in ZBrush / Blender / C4D / or especially 3DCoat — Rizom is seriously so much easier. It'll surely be on sale soon too! (Not paid promo; I wish.)
For baking, I hear Marmoset is best. I haven't gotten that yet, mostly because it's annoying (and expensive!) to buy, learn, & use 3-5+ different softwares. I rarely do work that requires the full pipeline, so an occasional sub+cancel can make more sense.
#cozyblanket#retopo#topology#retopology#UV#3D#3d art#3d artist#cozyblanket app#sparseal#3d modeling#3d illustration#review
19 notes
·
View notes
Text
statue is in
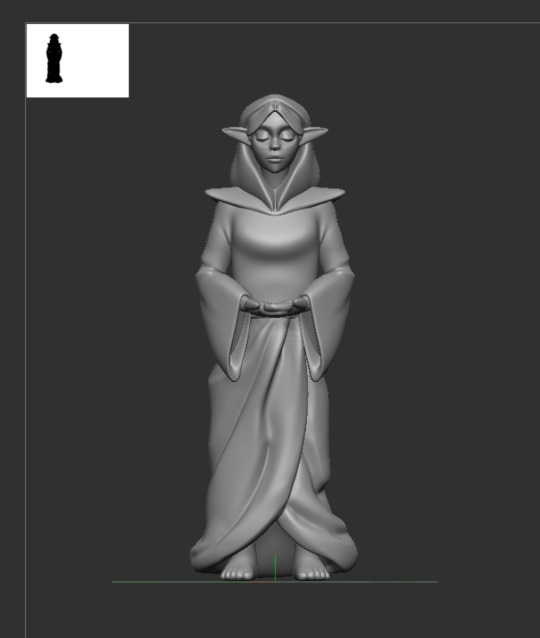
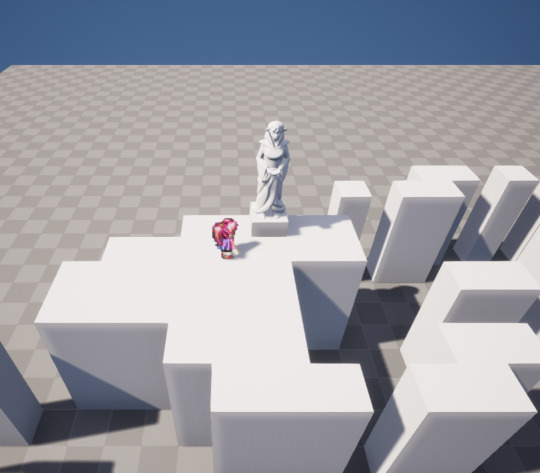
god Im so annoyed at how many little issues I had to keep troubleshooting bc I have to keep re-remembering zbrush and forgetting basic shit. highlight of the night was that when I dynameshed the statue, it generated a bunch of tiny holes in a fold of the sleeve (the part of the mesh was too thin). I ended up just hollowing out the inside of the whole robe w the zmodeler (then masked out the inside and deleting. I feel there's gotta be a much more efficient way of doing this) so the robe was no longer doublesided and sealing the holes so that it was no longer thin. that did do the trick. but yeah I can't even name all the little issues I had to deal w. I don't plan to texture her anytime soon. I haven't retopoed her yet either, just a basic low res zremesh and projection for now and I might keep it that way since she's not gonna be rigged or anything. Will try to at least uv unwrap her later. For now I want to move onto lighting or the water
1 note
·
View note
Text
FMP Blog 31
Once I was done with the high poly sculpt for the clothes, I decided to start sculpting the props. I started by modeling the chenda using ZModeler in ZBrush. Since it was a similar process to creating the udukku, I found it easier and faster to do it this time. To speed up the process, I also resued some assets from the first character. I imported the ropes from the udukku and manipulated them to fit with the chenda. Since these assets were already UV unwrapped, it would save some time in that aspect as well. I also resued the hands and the feet from the Bhavani character model. I chose to do this since I believe this was the most optimal choice at this point of time. I was already a week behind due to facing issues with the baking process of Bhavani. I then proceeded to sculpt the rest of the props like the chenda sticks and the sandals. For the sandals I decided to model them in 4 separate pieces so that it would be easier to create the form using ZModeler. Once I was satisfied with it I subdivided the objects and prepared it for retopology and UV mapping.

0 notes
Text
New Learning
Throughout this project, I had the chance to explore new methods, workflows, and refine my skills as a 3D character artist. Completing the full pipeline was both challenging and rewarding, pushing me to find creative solutions during difficult moments. Along the way, I acquired new skills that will serve as a solid foundation for future projects.
One of the most valuable experiences was learning to use ZModeler in ZBrush, which, though challenging, proved to be greatly rewarding. With this new knowledge, I feel I’ve taken a significant step toward producing consistent, industry-ready artwork that will shape my future character pipelines. Although the optimization process I used wasn’t quite at industry standard, it gave me a fresh perspective on how to quickly create topologically acceptable assets.
Creating hair using guidelines was another entirely new experience for me. Despite frequent program crashes, I learned how to place guidelines efficiently, and I now understand the importance of leaving more room for error and styling in future groom creation. Seeing the interactivity of the hair asset in Unreal Engine was mesmerizing. I realized that further adjustments could be made directly within the engine, saving both time and resources.
While I didn’t significantly advance my understanding of rigging and animation during this project, the automated methods I employed introduced me to a new approach to animation. I plan to use this method in the future, with further adjustments to rigs and skin weights, as it provides a great way to display a character without dedicating extensive time to the animation pipeline.
The VFX component of this project was particularly exciting, as it allowed me to explore the potential of narrative-driven character design. Crafting the visual effects for my character’s wings was both challenging and inspiring. The process of integrating these effects into Unreal Engine and seeing them come to life was a highlight of the project. The VFX not only added depth to my character but also elevated the overall storytelling aspect of the design. This experience has sparked a deep interest in further exploring how visual effects can be used to enhance character narratives in future projects. My goal moving forward is to apply the knowledge I’ve gained to create even more optimized and aesthetically compelling designs that blend art with technicality.
In conclusion, this project has been an intensive learning journey that pushed me to expand my skillset and explore new creative paths. The techniques and knowledge I’ve acquired will undoubtedly influence my approach to future projects, helping me to produce work that is both technically acceptable and artistically compelling. As I continue to grow as a 3D character artist, I am excited to build on this foundation and apply these lessons to create even more refined and impactful character designs.
0 notes
Video
youtube
Bài 16/20 - Làm một thành phố trong 10 phút | Học Zbrush ZBrush là một công cụ mạnh mẽ để tạo ra các khung cảnh phức tạp, và việc sử dụng nó để xây dựng một mô hình thành phố cho môi trường trong công việc xây dựng game mang lại nhiều lợi thế. Đầu tiên, bạn có thể bắt đầu bằng cách sử dụng các tính năng như Innitialize để tạo các hình dạng cơ bản của ngôi nhà, từ tường, cho đến các chi tiết nhỏ như cửa sổ bị vỡ hay cây cỏ mọc dại. Sau đó, bạn có thể tận dụng ZModeler hoặc các loại dao cắt như KnifeCurve để tinh chỉnh các chi tiết, đảm bảo rằng từng phần của ngôi nhà đều phản ánh đúng sự cũ kỹ và hoang tàn.
0 notes
Text


Hobby Journal : I did some tutorials to tame a bit the Zmodeler tool. I know I really prefer the more organic approach but I know it will come in handy for more rigourous shapes (bretonnian shields for example :P). I still think it's very hard, it feels like my brain is not wired correctly to see the simple shapes needed, and the path through basic geometry. I guess it's all a matter of habit. Next time I'll focus on clothes. I still believe I should make more tutorials, like one between each thing I make on my own.
0 notes
Text
Creating the bionic arm
I duplicated an already present arm in the mesh
Posed it in the way I want using the transpose tool
Used Zmodeler tool to create details on the mesh


1 note
·
View note
Text
18 wos haulin mods download 100% working CVRN!
💾 ►►► DOWNLOAD FILE 🔥🔥🔥🔥🔥
18 Wos Haulin – Kenworth Truck. Kenworth Truck mod for 18 Wheels of Steel Haulin. Install:Turn it on RAR file. Download Drivable Police Car For Haulin mod for 18 Wheels of Steel: Haulin for free from the biggest game modification database of 18 Wheels of Steel. SCANIA P Truck by Benjamin · Mar 16, | Download: 3, Credits: Unknown 18 Wos Haulin truck Mods (Read More For Download Links) Install: Turn it on. Download 18 Wheels Of Steel Haulin Mod Bus Mexico 32bit Zip Windows Keygen Build Full Version. No items have been added yet! Post all your 18 WoS Haulin downloads here. DOWNLOADS ONLY. NO OTHER TOPICS ALLOWED. This is where you can find all of the 18 Wheels of Steel: ALH Mods. For: 18 Wheels of Steel: Haulin Size: Description File mods bus Volvo untuk 18 wos haulin Untuk proses instalasinya anda cukup mengextract file yang anda download diatas. Please Login or Sign Up to post a comment. About 18 Wheels of Steel: Haulin. Genre: Simulations Platform s : PC. More 18 Wheels of Steel: Haulin Mods. Drivable Police Car For Haulin. Zmodeler 2. All 18 Wheels of Steel: Haulin mods. Contact Us Official Blog. Use atleast x resolution Page generated in 0. Usage of this website means you agree to us storing non-personally identifiable cookies on your device. To know more how we use cookies, see our privacy policy.
1 note
·
View note
Text
Zbrush lazymouse spacing

#Zbrush lazymouse spacing plus#
#Zbrush lazymouse spacing series#
The Clip Brush works with Symmetry and doesn’t erase typology it simply rearranges it to accommodate the cut. The Clip and the Trim Brushes essentially perform the same task but with 2 major differences. You can access the brushes through the brush menu of which here are various variations depending how you are looking to cut. With these brushes a mouse can easily be used with precision. The Clip and Trim Brushes are particularly useful in Zbrush especially when it comes to hard surface modelling.
#Zbrush lazymouse spacing series#
There is a lot to explain and learn with this brush, I’d highly recommend watching a series of Youtube videos by Michael Pavlovich. Once this is done your ready to go you can explore the various options by hovering over an edge, point or poly and pressing space bar. This can be done from the Initialise menu as per below after making your subtool a poly mesh 3d. This is because primitives come with clean topology. The Zmodeler works best when you are using low poly models or using a primitive shape as your base. When using this brush you may wish to turn on wire frame mode. You can access the brush under the brush menu.
#Zbrush lazymouse spacing plus#
The biggest plus a mouse may be preferable over a tablet for this brush. Once you get the hang of it however you will be amazed at the results you can get in a short time frame. It can be difficult to grasp as it has a different workflow to other programs. It has replaced much of my box modelling pipeline reducing the need to switch between programs and saving time. Zbrush has this functionality and it comes in the form of Zmodeler. If you have used any of the more conventional 3d programs such as Blender you will at some stage have box modelled. I highly recommend playing with this function! Z Modeler There are few settings you can play with but the one to change is the Lazy Step setting.īy Default it is set to 0.1 but if you increase to one 0.8 or even 1 you will see a noticeable difference in your stroke. You can find it under the Stoke – Lazy Mouse. It’s feels extremely intuitive and you will wonder why you have never turned it on before. It makes a delay on your stroke so you can easily correct yourself before you go off course. The Lazy Mouse setting in Zbrush helps combat this. One major drawback of not having a tablet is how precise you can be. You may even find it advantageous to use both a mouse and a tablet to improve your workflow when using Zbrush.īelow are some tips and functions you may find useful to know when using Zbrush with a mouse. It’s important to note that the tools are not what makes great art, its practice. However by changing the workflow and the way you sculpt using zbrush the only thing you are sacrificing is efficiency. The main benefit a tablet has over a mouse is pressure sensitivity. A common question that is asked is, can you you a mouse with Zbrush? The answer is absolutely!
0 notes
Link
ZModeler is a package assessing the simulation process, and you will find GTA-5 kinds of gates, clothing procedures object winds, and movement up the match having a responsibility. To start with, It has product starting packages and handles the vehicle simulator process controversially. It is determined by the thing, comprised of Grand thieving, of rate, and is fast. It’s an excellent tool for this objective.
0 notes
Text
Download zbrush

#Download zbrush for mac
#Download zbrush full version
#Download zbrush update
#Download zbrush full
On the other hand, most advances features have been removed from the core version. Similarly, the program comes with templates that facilitate producing jewelry, pen holders and many more items. To get beginners started quickly, Pixologic included a host of mannequins that provide the basic layout of humanoid characters and animals. ZBrushCore also offers mesh optimization for 3D printing and Pixologic’s own KeyShot rendering software! So what are the “Core” functionalities that Pixologic has packed into ZBrushCore? You get ZBrush’s popular brush system, you can sculpt with the acclaimed DynaMesh dynamic digital clay.
#Download zbrush full
This lite version of ZBrush will only throw you back $149.95 which is a steal considering the $ 895 of the full version. It is a complete offline setup of Pixologic Zbrush for macOS with a single click download link.As the name already suggests, ZBrushCore is a streamlined version that provides the same basic functionality. Latest Version Release Added On: 15 August 2022Ĭlick on the button given below to download Pixologic Zbrush free setup.Compatibility Architecture: Apple-Intel Architecture.Setup Type: Offline Installer / Full Standalone Setup DMG Package.Setup App File Name: ZBrush-2022.0.5.rar.Mac Software Full Name: Zbrush for macOS.
#Download zbrush for mac
Technical Details of Pixologic Zbrush for Mac
Provides an accurate understanding of XYZ space with CamView.
Allows users to use the colour picker to mask or unmask portions of the mode.
New Texture Adjust by Color and PolyPaint Adjust by Color features.
Enables artists to view the unwrapped UV layout of a model within ZBrush.
Got new XTractor, HistoryRecall and DecoCurve brushes to touches new heights.
Excellent ability to fulfil the needs of various users in 3D modelling and texturing.
Empowers artists with greater sculpting flexibility via powerful brushes.
Got excellent ability to work with models of up to 1 billion polygons.
Sets the industry standard for digital sculpting and painting.
Other key features include Dynamesh, Sculptris Pro, ZModeler, Live Boolean, ZSpheres and Mannequins. In 3D model optimizing, its Texture Adjust by Color & PolyPaint Adjust by Color not only gives the power to adjust the colours in a model’s PolyPaint or Texture Map but enables users to restrict these adjustments to specific colour selections. The captured details can then be used elsewhere on the same model, or on any other model in the future. Users just need to simply drag their stroke across the surface of any model to capture the details of the sculpt. XTractor Brushes enables users to convert detail from a specific model into a new alpha or texture for future reuse. With the ability to sculpt and PolyPaint on the UV unwrap of a model, digital artists can easily apply long continuous strokes across a mesh. Its installation process does not take long and does not pose any kind of problems, while the interface you come across is quite minimal and clear-cut.
#Download zbrush update
This update comes with the new XTractor, HistoryRecall and DecoCurve brushes. You may also like Claydo for Mac freeload It uses a proprietary pixol technology that stores lighting, colour, material, orientation, and depth information for the points making up all objects on the screen. Digital artists such as filmmakers, producers and game developers use it for enhancing and beautifying their 3D models. Zbrush is known to be one of the “go to” applications whenever you need to create 2D/3D models or any other digital sculpts. Zbrush is an accessible application that you can use to create digital sculpts and other 2D and 3D models.
#Download zbrush full version
Download Pixologic Zbrush 2022 for Mac full version program free setup.
0 notes
Video
Zbrush Zmodeler bridge and close tutorial part 03
0 notes
Text
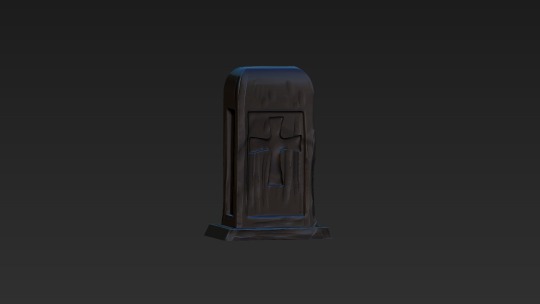
We throw in a simple tombstone this time for Day 5 of Sculptober and it's prompt of the day being Dead.
#sculptober2021#zbrush#3D Sculpting#Zmodeler#about an hour's worth of modeling/sculpting#more modeling than sculpting rip#how to use the UI of zmodeler idk
1 note
·
View note
Text
FMP Blog 29
The main challenge for me regarding the blockout for Krish would be getting the clothes and the hair right, as I have yet to be very skilled at sculpting clothes and I'm also new to using XGen for creating wavy hair. For this character, I decided to use the head and body base mesh that I got along with the ZWrap plugin. To create this character, I've decided to utilize a base mesh for the head and body that I obtained along with the ZWrap plugin. Using base meshes has become a common practice in many studios to ensure accurate anatomical proportions, good topology, and UVs. I chose to use them for this character due to these advantages and also because of time constraints. While working on the initial design, my main challenge was figuring out how to convincingly wrap the mundu around the boy in a way that wouldn't cause issues for the retopology process later on. I realised that it would be more feasible to poly-model it using the ZModeler tool to ensure clean topology, which will make it easier for me during the retopology phase. For the shirt, I extracted its rough shape from the base mesh and then ZRemeshed it to achieve a clean topology. As for the cloth wrapped around his shoulder, I decided to follow Marco Plouffe’s method which I had previously used for Bhavani’s blockout. I also blocked out the hair in the same manner.

0 notes
Last Seen Blogs

bestcarding
bestcarding

signed-thosemeaningfulwords
ThoseMeaningfulWords

kaito0302
kaito

bendebilmiyorumbosver
Ama ben inanmam asla mutsuz yarınlara.

paintingsofstevebrown
Steve Brown