#add color query parameter to PUT method
Explore tagged Tumblr posts
Visit Tumblr Blog
Explore Tumblr blogs with no restrictions, modern design and the best experience.
Last Seen Tumblr Blogs


Fun Fact
130K people were victims of a chain letter scam that affected Tumblr in May 2011.
Text
(no one asked for this...but it needed to be done)
“Good morning, Miss Blue.” Ptilopsis observed her entry into her workspace. “How may I assist you today?”
“I’ve been thinking of ways I could make my research more available to the Medic staff, but I’m not really familiar with setting up databases or things like that. I was hoping you had some spare time to help me?”
She nodded. “Temporal resources allocated. Any formatting preferences?”
“Um...no?” Blue scratched behind her head. “I know the relevant filters and important variables, but making it accessible to others is rather difficult when no one understands my research or my thought process.”
“Hmm...Analysis complete. More data required. Workstation mobility status?”
She shrugged. “I type my reports on a laptop, but my lab is...difficult to move.”
“Activating portable mode.” Ptilopsis stood up, taking her laptop and approaching Blue. “Follow mode engaged.”
“Alright. Ptilopsis, can I ask you something?” Blue left the office with the owl-woman in tow.
She nodded. “Yes.”
“The way you communicate...” The Anura knew this might be a touchy subject. “Is it because of your Oripathy?”
“This method of communication is preferred to hostile takeover from internal systems’ errors.”
Blue blinked. “Voices?”
“Correct.” Ptilopsis nodded. “Additional queries?”
“What sort of treatments have they tried?”
She blinked. “Try refining your search terms.”
“Surely, you’ve tried to solve this chemically, yes?” No response. “Perhaps I can help, then. Depending on the exact location of the crystals, various neurological agents could diminish their impact on your brain.”
“...Neurological agents?”
Blue smiled. “When properly utilized and blended, even a toxin can become an antidote, no? If you can provide me with your treatment information and current medications, while you’re helping me design a toxin database, I could work on a recipe to counteract the voices.”
“Central nexus overheating.” Ptilopsis set a hand to her temple as the possibility came over her. “Processing...Request sent. If you’re willing to try, please do.”
“It’ll be my pleasure to help you.”
-
A few days of work saw substantial progress for both projects; Ptilopsis was able to directly convert Blue Poison’s ideas for the database into something tangible and user-friendly even as Blue took infrequent blood samples to dummy-test her concoctions’ effectiveness at reducing the particulates in Tilly’s system. It was impressive that she was as capable as she was, frankly, with all the Originum floating around in her blood…
Four days into their joint efforts, Blue greeted Tilly at the door with a treat. “Good morning, dear. Have you had breakfast yet?”
“Biofuel reserves nominal...chocolate supply dangerously low.” She eyed the cupcake on the plate with expectant eyes. “Is that for me?”
“Yes, but before you take a bite, I want to warn you: I put a dose of my most successful trial serum in the icing. I want this to be a reward for all the help you’ve given me, but if something happens, I have the antidote ready to go.”
The medic smiled. “No risk, no reward. Shall we get to work?”
“Let’s.” Ptilopsis took her usual position, digging into the cupcake with gusto as soon as she was seated; Blue, on the other hand, had rolled her chair right next to her patient’s in order to closely monitor her condition. “The effects may not be immediate, so if it’s alright, I’d like to keep you under observation for the next 24 hours.”
“Acceptable parameters,” she agreed.
The Anura watched her patient work with somewhat mixed emotions. She wondered if the chemicals were operating properly, if in treating her for this she’d accidentally reduce her faculties, if...if something went wrong, who all would blame her? Would Tilly still see her as a friend? Would those sulphur-colored pupils that reflected her soul back on her like mirrors continue to shine when they looked at her?
...Where was she, again? Right, observation. “How are you feeling?”
“Quite well, thank you.” Tilly smiled at her. “Your cupcake was delicious.”
“Thank you.” Blue blushed...and then both of them had the same realization.
Ptilopsis stood from her chair in an instant. “It’s working.”
“It is.” Both stood for a moment, stunned, before Blue grabbed her arms and started jumping. “It’s working!”
“After all this time, I can speak freely!” She jumped with her froggy friend a few times before wrapping her in an embrace. “Thank you, thank you, thank you.”
Blue Poison’s face lit up as she felt Ptilopsis’ cheek brushing against hers. “You’re welcome, Tilly dear.”
“...Blue?”
“Mmhmm?” Neither of them had let go; frankly, Blue didn’t have any reason to. “You can ask me anything.”
Tilly nodded. “I know...The others think your skin is toxic, yes?”
“Yes.” She sighed internally. After all the time they’d spent together-
“The idea that anyone could be scared of you is ridiculous.” Her voice was a low whisper now. “So compassionate, so considerate, so gentle...” Without warning, Ptilopsis’ hands slid to the small of Blue’s back as she looked her in the eye. “So sweet.”
Blue Poison watched her with hopeful eyes, her heart racing. “Tilly.”
“I wonder, though, which is sweeter? Your baking, or...” Without finishing the thought aloud, she went for the kiss.
Just as she’d expected - Blue was the much sweeter taste on her lips.
-
Another couple of days passed; the antidote’s key components were refined into their final form, a tasteless food additive which Tilly could add to her meals to maintain her system’s stockpile of the chemical, Blue’s database was connected to the Medics’ network of resources (managed by Ptilopsis herself, of course), and the two relocated to a larger office they could share.
The Doctor stopped by their office one day to congratulate Blue Poison on her work. “Good morning, Blue. Hey, do you have a minute?”
“Doctor! Um, yes, I’m free.” She sat up, her face somewhat red.
“I just wanted to congratulate you on developing that Originum decoagulant; we’ve been doing some more trials for it, and the results are simply spectacular.” He looked at the empty desk. “Is Ptilopsis here? I wanted to thank her, as well.”
Blue shook her head. “I’ll pass that along to her when I see her.”
“Alright, then. Well, have a good day.” He took his leave, wondering to himself where the data-mining Medic would be at this time of day.
“That was close.” The blushing Anura slid her chair back and joined Tilly under her desk. “We should be more careful in the office.”
Ptilopsis giggled. “You were so cute just now, though.”
“Alright, next time, you’re going to be the one sitting at the desk, then.”
“I don’t know...” She gave her a thoughtful appraisal. “Your tongue is more dangerous in that kind of scenario-”
Blue crawled out from under the desk and walked towards the door. “Alright, we’re doing this.”
“Where are you going?”
“Nowhere.” She locked the door and rolled the blackout curtain in front of the mini-window in it. “We have some tests to run, dear.”
#arknights#blue poison (arknights)#ptilopsis (arknights)#ladies and gentlemen#i bring you:#the ultimate counter to the under-the-table meme#i will take no criticism#thank you#arknights fic
36 notes
·
View notes
Text
ExportOptions & FontsFolder Parameters Support in Slides/SaveAs API inside Cloud Apps
Aspose team is pleased to announce the new release of Aspose.Slides for Cloud 18.4. This release provided support for ExportOptions in slides/saveAs API and added color query parameter to PUT method of background resource. There are some important enhancements and bug fixes also part of this release, such as Provided support for ExportOptions parameter in slides/saveAs API and Added color query parameter to PUT method of background resource. There are some important changes made in the APIs, such as Folder attribute added to URL, POST method is added to saveAs resource for slide. It allows to save a slide in a specified format using options provided as JSON in a request body, A number of properties (ShowHiddenSlides, CommentsPosition, CommentsAreaWidth et al.) are added to PdfExportOptions, HtmlExportOptions, TiffExportOptions and SwfExportOptions objects to fully support export options available in Slides.NET, fontsFolder optional parameter is added to saveAs resource for slide. It allows to specify a storage folder for custom fonts when saving a single slide, color optional PUT request parameter is added to background resource. It allows to set the background color for a slide, Passing ARGB color as PUT request body parameter of background resource is deprecated and is going to be removed after 18.6. Use color query string parameter instead and many more. This release includes plenty of improvements & bug fixes features as listed below.
slides/saveAs API now support ExportOptions parameter
Support all ExportOptions
Add color query parameter to PUT method of background resource
Folder attribute not added to URL
fontsFolder parameter is not working with GET /slides/{name}/slides/{slideIndex}/saveAs/{format} API
Overview: Aspose.Slides for Cloud
Aspose.Slides for Cloud is a REST API which allows you to process presentations. It allows you to create, modify, and convert presentations and provides a wide variety of features for working with presentations in the cloud. You can convert a presentation to TIFF, PDF, XPS, PPTX, ODP, PPSX, PPTM, PPSM, POTX, POTM, HTML and image formats. Aspose.Slides for Cloud allows you to extract different elements or a presentation including slide, text, color schemes, font schemes, shapes and images etc. Aspose.Slides for Cloud’s powerful API lets your apps process Microsoft PowerPoint presentations in the cloud, saving you the time it would take to develop your own API.
More about Aspose.Cells for Cloud
Homepage of Aspose.Slides for Cloud
Download Aspose.Slides for Cloud
Online API documentation with code examples for Aspose.Slides for Cloud
Ask technical questions/queries from Aspose for Cloud Support Team
#ExportOptions in slides APIs#ExportOptions in saveAs API#add color query parameter to PUT method#fontsFolder parameter in saveAs API#PowerPoint Cloud API#Aspose for Cloud APIs
0 notes
Text
How to detect if the User's OS prefers dark mode and change your site with CSS and JS

I got a tweet from Stevö John who said he found my existing light theme for my blog to be jarring as he lives in Dark Mode. I had never really thought about it before, but once he said it, it was obvious. Not only should I support dark mode, but I should detect the user's preference and switch seamlessly. I should also support changing modes if the browser or OS changes as well. Stevö was kind enough to send some sample CSS and a few links so I started to explore the topic.
There's a few things here to consider when using prefers-color-scheme and detecting dark mode:
Using the existing theme as much as possible.
I don't want to have a style.css and a style-dark.css if I can avoid it. Otherwise it'd be a maintenance nightmare.
Make it work on all my sites
I have three logical sites that look like two to you, Dear Reader. I have hanselman.com, hanselman.com/blog, and hanselminutes.com. They do share some CSS rules but they are written in different sub-flavors of ASP.NET
Consider 3rd party widgets
I use a syntax highlighter (very very old) for my blog, and I use a podcast HTML5 player from Simplecast for my podcast. I'd hate to dark mode it all and then have a big old LIGHT MODE podcast player scaring people away. As such, I need the context to flow all the way through.
Consider the initial state of the page as well as the stage changing.
Sure, I could just have the page look good when you load it and if you change modes (dark to light and back) in the middle of viewing my page, it should also change, right? And also consider all the requirements above.
You can set your Chrome/Edge browser to use System Settings, Light, or Dark. Search for Theme in Settings.
All this, and I can only do it on my lunch hour because this blog isn't my actual day job. Let's go!
The prefers-color-scheme CSS Media Query
I love CSS @media queries and have used them for many years to support mobile and tablet devices. Today they are a staple of responsive design. Turns out you can just use a @media query to see if the user prefers dark mode.
@media (prefers-color-scheme: dark) {
Sweet. Anything inside here (the C in CSS stands for Cascading, remember) will override what comes before. Here's a few starter rules I changed. I was just changing stuff in the F12 tools inspector, and then collecting them back into my main CSS page. You can also use variables if you are an organized CSS person with a design system.
These are just a few, but you get the idea. Note the .line-tan example also where I say 'just put it back to it's initial value.' That's often a lot easier than coming up with "the opposite" value, which in this case would have meant generating some PNGs.
@media (prefers-color-scheme: dark) { body { color: #b0b0b0; background-color: #101010; } .containerOuter { background-color: #000; color: #b0b0b0; } .blogBodyContainer { background-color: #101010; } .line-tan { background: initial; } #mainContent { background-color: #000; } ...snip... }
Sweet. This change to my main css works for the http://hanselman.com main site. Let's do the blog now, which includes the 3rd party syntax highlighter. I use the same basic rules from my main site but then also had to (sorry CSS folks) be aggressive and overly !important with this very old syntax highlighter, like this:
@media (prefers-color-scheme: dark) { .syntaxhighlighter { background-color: #000 !important } .syntaxhighlighter .line.alt1 { background-color: #000 !important } .syntaxhighlighter .line.alt2 { background-color: #000 !important } .syntaxhighlighter .line { background-color: #000 !important } ...snip... }
Your mileage may vary but it all depends on the tools. I wasn't able to get this working without the !important which I'm told is frowned upon. My apologies.
Detecting Dark Mode preferences with JavaScript
The third party control I use for my podcast is a like a lot of controls, it's an iFrame. As such, it takes some parameters as URL querystring parameters.
I generate the iFrame like this:
<iframe id='simpleCastPlayeriFrame' title='Hanselminutes Podcast Player' frameborder='0' height='200px' scrolling='no' seamless src='https://player.simplecast.com/{sharingId}' width='100%'></iframe>
If I add "dark=true" to the querystring, I'll get a different player skin. This is just one example, but it's common that 3rd party integrations will either want a queryString or a variable or custom CSS. You'll want to work with your vendors to make sure they not only care about dark mode (thanks Simplecast!) and that they have a way to easily enable it like this.
But this introduce some interesting issues. I need to detect the preference with JavaScript and make sure the right player gets loaded.
I'd also like to notice if the theme changes (light to dark or back) and dynamically change my CSS (that part happens automatically by the browser) and this player (that's gotta be done manually, because dark mode was invoked via a URL querystring segment.)
Here's my code. Again, not a JavaScript expert but this felt natural to me. If it's not super idiomatic or it just sucks, email me and I'll do an update. I do check for window.matchMedia to at least not freak out if an older browser shows up.
if (window.matchMedia) { var match = window.matchMedia('(prefers-color-scheme: dark)') toggleDarkMode(match.matches); match.addEventListener('change', e => { toggleDarkMode(match.matches); }) function toggleDarkMode(state) { let simpleCastPlayer = new URL(document.querySelector("#simpleCastPlayeriFrame").src); simpleCastPlayer.searchParams.set("dark", state); document.querySelector("#simpleCastPlayeriFrame").src= simpleCastPlayer.href; } }
toggleDarkMode is a method so I can use it for the initial state and the 'change' state. It uses the URL object because parsing strings is so 2000-and-late. I set the searchParams rather than .append because I know it's always set. I set it.
As I write this I supposed I could have stored the document.querySelector() like I did the matchMedia, but I just saw it now. Darn. Still, it works! So I #shipit.
I am sure I missed a page or two or a element or three so if you find a white page or a mistake, file it here https://github.com/shanselman/hanselman.com-bugs/issues and I'll take a look when I can.
All in all, a fun lunch hour. Thanks Stevö for the nudge!
Now YOU, Dear Reader can go update YOUR sites for both Light Mode and Dark Mode.
Sponsor: The No. 1 reason developers choose Couchbase? You can use your existing SQL++ skills to easily query and access JSON. That’s more power and flexibility with less training. Learn more.
© 2021 Scott Hanselman. All rights reserved.


How to detect if the User's OS prefers dark mode and change your site with CSS and JS published first on https://deskbysnafu.tumblr.com/
0 notes
Text
How to detect if the User's OS prefers dark mode and change your site with CSS and JS
I got a tweet from Stevö John who said he found my existing light theme for my blog to be jarring as he lives in Dark Mode. I had never really thought about it before, but once he said it, it was obvious. Not only should I support dark mode, but I should detect the user's preference and switch seamlessly. I should also support changing modes if the browser or OS changes as well. Stevö was kind enough to send some sample CSS and a few links so I started to explore the topic.
There's a few things here to consider when using prefers-color-scheme and detecting dark mode:
Using the existing theme as much as possible.
I don't want to have a style.css and a style-dark.css if I can avoid it. Otherwise it'd be a maintenance nightmare.
Make it work on all my sites
I have three logical sites that look like two to you, Dear Reader. I have hanselman.com, hanselman.com/blog, and hanselminutes.com. They do share some CSS rules but they are written in different sub-flavors of ASP.NET
Consider 3rd party widgets
I use a syntax highlighter (very very old) for my blog, and I use a podcast HTML5 player from Simplecast for my podcast. I'd hate to dark mode it all and then have a big old LIGHT MODE podcast player scaring people away. As such, I need the context to flow all the way through.
Consider the initial state of the page as well as the stage changing.
Sure, I could just have the page look good when you load it and if you change modes (dark to light and back) in the middle of viewing my page, it should also change, right? And also consider all the requirements above.
You can set your Chrome/Edge browser to use System Settings, Light, or Dark. Search for Theme in Settings.
All this, and I can only do it on my lunch hour because this blog isn't my actual day job. Let's go!
The prefers-color-scheme CSS Media Query
I love CSS @media queries and have used them for many years to support mobile and tablet devices. Today they are a staple of responsive design. Turns out you can just use a @media query to see if the user prefers dark mode.
@media (prefers-color-scheme: dark) {
Sweet. Anything inside here (the C in CSS stands for Cascading, remember) will override what comes before. Here's a few starter rules I changed. I was just changing stuff in the F12 tools inspector, and then collecting them back into my main CSS page. You can also use variables if you are an organized CSS person with a design system.
These are just a few, but you get the idea. Note the .line-tan example also where I say 'just put it back to it's initial value.' That's often a lot easier than coming up with "the opposite" value, which in this case would have meant generating some PNGs.
@media (prefers-color-scheme: dark) { body { color: #b0b0b0; background-color: #101010; } .containerOuter { background-color: #000; color: #b0b0b0; } .blogBodyContainer { background-color: #101010; } .line-tan { background: initial; } #mainContent { background-color: #000; } ...snip... }
Sweet. This change to my main css works for the http://hanselman.com main site. Let's do the blog now, which includes the 3rd party syntax highlighter. I use the same basic rules from my main site but then also had to (sorry CSS folks) be aggressive and overly !important with this very old syntax highlighter, like this:
@media (prefers-color-scheme: dark) { .syntaxhighlighter { background-color: #000 !important } .syntaxhighlighter .line.alt1 { background-color: #000 !important } .syntaxhighlighter .line.alt2 { background-color: #000 !important } .syntaxhighlighter .line { background-color: #000 !important } ...snip... }
Your mileage may vary but it all depends on the tools. I wasn't able to get this working without the !important which I'm told is frowned upon. My apologies.
Detecting Dark Mode preferences with JavaScript
The third party control I use for my podcast is a like a lot of controls, it's an iFrame. As such, it takes some parameters as URL querystring parameters.
I generate the iFrame like this:
<iframe id='simpleCastPlayeriFrame' title='Hanselminutes Podcast Player' frameborder='0' height='200px' scrolling='no' seamless src='https://player.simplecast.com/{sharingId}' width='100%'></iframe>
If I add "dark=true" to the querystring, I'll get a different player skin. This is just one example, but it's common that 3rd party integrations will either want a queryString or a variable or custom CSS. You'll want to work with your vendors to make sure they not only care about dark mode (thanks Simplecast!) and that they have a way to easily enable it like this.
But this introduce some interesting issues. I need to detect the preference with JavaScript and make sure the right player gets loaded.
I'd also like to notice if the theme changes (light to dark or back) and dynamically change my CSS (that part happens automatically by the browser) and this player (that's gotta be done manually, because dark mode was invoked via a URL querystring segment.)
Here's my code. Again, not a JavaScript expert but this felt natural to me. If it's not super idiomatic or it just sucks, email me and I'll do an update. I do check for window.matchMedia to at least not freak out if an older browser shows up.
if (window.matchMedia) { var match = window.matchMedia('(prefers-color-scheme: dark)') toggleDarkMode(match.matches); match.addEventListener('change', e => { toggleDarkMode(match.matches); }) function toggleDarkMode(state) { let simpleCastPlayer = new URL(document.querySelector("#simpleCastPlayeriFrame").src); simpleCastPlayer.searchParams.set("dark", state); document.querySelector("#simpleCastPlayeriFrame").src= simpleCastPlayer.href; } }
toggleDarkMode is a method so I can use it for the initial state and the 'change' state. It uses the URL object because parsing strings is so 2000-and-late. I set the searchParams rather than .append because I know it's always set. I set it.
As I write this I supposed I could have stored the document.querySelector() like I did the matchMedia, but I just saw it now. Darn. Still, it works! So I #shipit.
I am sure I missed a page or two or a element or three so if you find a white page or a mistake, file it here https://github.com/shanselman/hanselman.com-bugs/issues and I'll take a look when I can.
All in all, a fun lunch hour. Thanks Stevö for the nudge!
Now YOU, Dear Reader can go update YOUR sites for both Light Mode and Dark Mode.
Sponsor: The No. 1 reason developers choose Couchbase? You can use your existing SQL++ skills to easily query and access JSON. That’s more power and flexibility with less training. Learn more.
© 2021 Scott Hanselman. All rights reserved.


How to detect if the User's OS prefers dark mode and change your site with CSS and JS published first on http://7elementswd.tumblr.com/
0 notes
Text
How to Get All Custom Properties on a Page in JavaScript
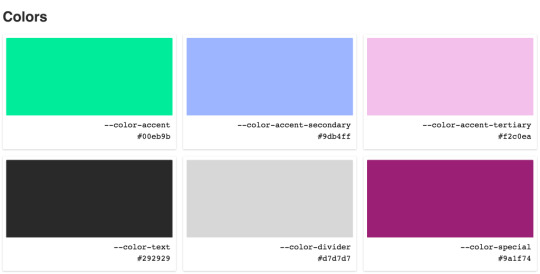
We can use JavaScript to get the value of a CSS custom property. Robin wrote up a detailed explanation about this in Get a CSS Custom Property Value with JavaScript. To review, let’s say we’ve declared a single custom property on the HTML element:
html { --color-accent: #00eb9b; }
In JavaScript, we can access the value with getComputedStyle and getPropertyValue:
const colorAccent = getComputedStyle(document.documentElement) .getPropertyValue('--color-accent'); // #00eb9b
Perfect. Now we have access to our accent color in JavaScript. You know what’s cool? If we change that color in CSS, it updates in JavaScript as well! Handy.
What happens, though, when it’s not just one property we need access to in JavaScript, but a whole bunch of them?
html { --color-accent: #00eb9b; --color-accent-secondary: #9db4ff; --color-accent-tertiary: #f2c0ea; --color-text: #292929; --color-divider: #d7d7d7; }
We end up with JavaScript that looks like this:
const colorAccent = getComputedStyle(document.documentElement).getPropertyValue('--color-accent'); // #00eb9b const colorAccentSecondary = getComputedStyle(document.documentElement).getPropertyValue('--color-accent-secondary'); // #9db4ff const colorAccentTertiary = getComputedStyle(document.documentElement).getPropertyValue('--color-accent-tertiary'); // #f2c0ea const colorText = getComputedStyle(document.documentElement).getPropertyValue('--color-text'); // #292929 const colorDivider = getComputedStyle(document.documentElement).getPropertyValue('--color-text'); // #d7d7d7
We’re repeating ourselves a lot. We could shorten each one of these lines by abstracting the common tasks to a function.
const getCSSProp = (element, propName) => getComputedStyle(element).getPropertyValue(propName); const colorAccent = getCSSProp(document.documentElement, '--color-accent'); // #00eb9b // repeat for each custom property...
That helps reduce code repetition, but we still have a less-than-ideal situation. Every time we add a custom property in CSS, we have to write another line of JavaScript to access it. This can and does work fine if we only have a few custom properties. I’ve used this setup on production projects before. But, it’s also possible to automate this.
Let’s walk through the process of automating it by making a working thing.
What are we making?
We’ll make a color palette, which is a common feature in pattern libraries. We’ll generate a grid of color swatches from our CSS custom properties.
Here’s the complete demo that we’ll build step-by-step.
Here’s what we’re aiming for.
Let’s set the stage. We’ll use an unordered list to display our palette. Each swatch is a <li> element that we’ll render with JavaScript.
<ul class="colors"></ul>
The CSS for the grid layout isn’t pertinent to the technique in this post, so we won’t look at in detail. It’s available in the CodePen demo.
Now that we have our HTML and CSS in place, we’ll focus on the JavaScript. Here’s an outline of what we’ll do with our code:
Get all stylesheets on a page, both external and internal
Discard any stylesheets hosted on third-party domains
Get all rules for the remaining stylesheets
Discard any rules that aren’t basic style rules
Get the name and value of all CSS properties
Discard non-custom CSS properties
Build HTML to display the color swatches
Let’s get to it.
Step 1: Get all stylesheets on a page
The first thing we need to do is get all external and internal stylesheets on the current page. Stylesheets are available as members of the global document.
document.styleSheets
That returns an array-like object. We want to use array methods, so we’ll convert it to an array. Let’s also put this in a function that we’ll use throughout this post.
const getCSSCustomPropIndex = () => [...document.styleSheets];
CodePen Demo
When we invoke getCSSCustomPropIndex, we see an array of CSSStyleSheet objects, one for each external and internal stylesheet on the current page.

Step 2: Discard third-party stylesheets
If our script is running on https://example.com any stylesheet we want to inspect must also be on https://example.com. This is a security feature. From the MDN docs for CSSStyleSheet:
In some browsers, if a stylesheet is loaded from a different domain, accessing cssRules results in SecurityError.
That means that if the current page links to a stylesheet hosted on https://some-cdn.com, we can’t get custom properties — or any styles — from it. The approach we’re taking here only works for stylesheets hosted on the current domain.
CSSStyleSheet objects have an href property. Its value is the full URL to the stylesheet, like https://ift.tt/1WMHpFz. Internal stylesheets have an href property, but the value will be null.
Let’s write a function that discards third-party stylesheets. We’ll do that by comparing the stylesheet’s href value to the current location.origin.
const isSameDomain = (styleSheet) => { if (!styleSheet.href) { return true; }
return styleSheet.href.indexOf(window.location.origin) === 0; };
Now we use isSameDomain as a filter ondocument.styleSheets.
const getCSSCustomPropIndex = () => [...document.styleSheets] .filter(isSameDomain);
CodePen Demo
With the third-party stylesheets discarded, we can inspect the contents of those remaining.
Step 3: Get all rules for the remaining stylesheets
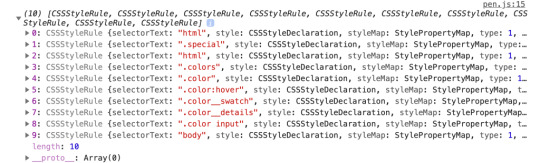
Our goal for getCSSCustomPropIndex is to produce an array of arrays. To get there, we’ll use a combination of array methods to loop through, find values we want, and combine them. Let’s take a first step in that direction by producing an array containing every style rule.
const getCSSCustomPropIndex = () => [...document.styleSheets] .filter(isSameDomain) .reduce((finalArr, sheet) => finalArr.concat(...sheet.cssRules), []);
CodePen Demo
We use reduce and concat because we want to produce a flat array where every first-level element is what we’re interested in. In this snippet, we iterate over individual CSSStyleSheet objects. For each one of them, we need its cssRules. From the MDN docs:
The read-only CSSStyleSheet property cssRules returns a live CSSRuleList which provides a real-time, up-to-date list of every CSS rule which comprises the stylesheet. Each item in the list is a CSSRule defining a single rule.
Each CSS rule is the selector, braces, and property declarations. We use the spread operator ...sheet.cssRules to take every rule out of the cssRules object and place it in finalArr. When we log the output of getCSSCustomPropIndex, we get a single-level array of CSSRule objects.
This gives us all the CSS rules for all the stylesheets. We want to discard some of those, so let’s move on.
Step 4: Discard any rules that aren’t basic style rules
CSS rules come in different types. CSS specs define each of the types with a constant name and integer. The most common type of rule is the CSSStyleRule. Another type of rule is the CSSMediaRule. We use those to define media queries, like @media (min-width: 400px) {}. Other types include CSSSupportsRule, CSSFontFaceRule, and CSSKeyframesRule. See the Type constants section of the MDN docs for CSSRule for the full list.
We’re only interested in rules where we define custom properties and, for the purposes in this post, we’ll focus on CSSStyleRule. That does leave out the CSSMediaRule rule type where it’s valid to define custom properties. We could use an approach that’s similar to what we’re using to extract custom properties in this demo, but we’ll exclude this specific rule type to limit the scope of the demo.
To narrow our focus to style rules, we’ll write another array filter:
const isStyleRule = (rule) => rule.type === 1;
Every CSSRule has a type property that returns the integer for that type constant. We use isStyleRule to filter sheet.cssRules.
const getCSSCustomPropIndex = () => [...document.styleSheets] .filter(isSameDomain) .reduce((finalArr, sheet) => finalArr.concat( [...sheet.cssRules].filter(isStyleRule) ), []);
CodePen Demo
One thing to note is that we are wrapping ...sheet.cssRules in brackets so we can use the array method filter.
Our stylesheet only had CSSStyleRules so the demo results are the same as before. If our stylesheet had media queries or font-face declarations, isStyleRule would discard them.
Step 5: Get the name and value of all properties
Now that we have the rules we want, we can get the properties that make them up. CSSStyleRule objects have a style property that is a CSSStyleDeclaration object. It’s made up of standard CSS properties, like color, font-family, and border-radius, plus custom properties. Let’s add that to our getCSSCustomPropIndex function so that it looks at every rule, building an array of arrays along the way:
const getCSSCustomPropIndex = () => [...document.styleSheets] .filter(isSameDomain) .reduce((finalArr, sheet) => finalArr.concat( [...sheet.cssRules] .filter(isStyleRule) .reduce((propValArr, rule) => { const props = []; /* TODO: more work needed here */ return [...propValArr, ...props]; }, []) ), []);
If we invoke this now, we get an empty array. We have more work to do, but this lays the foundation. Because we want to end up with an array, we start with an empty array by using the accumulator, which is the second parameter of reduce. In the body of the reduce callback function, we have a placeholder variable, props, where we’ll gather the properties. The return statement combines the array from the previous iteration — the accumulator — with the current props array.
Right now, both are empty arrays. We need to use rule.style to populate props with an array for every property/value in the current rule:
const getCSSCustomPropIndex = () => [...document.styleSheets] .filter(isSameDomain) .reduce((finalArr, sheet) => finalArr.concat( [...sheet.cssRules] .filter(isStyleRule) .reduce((propValArr, rule) => { const props = [...rule.style].map((propName) => [ propName.trim(), rule.style.getPropertyValue(propName).trim() ]); return [...propValArr, ...props]; }, []) ), []);
CodePen Demo
rule.style is array-like, so we use the spread operator again to put each member of it into an array that we loop over with map. In the map callback, we return an array with two members. The first member is propName (which includes color, font-family, --color-accent, etc.). The second member is the value of each property. To get that, we use the getPropertyValue method of CSSStyleDeclaration. It takes a single parameter, the string name of the CSS property.
We use trim on both the name and value to make sure we don’t include any leading or trailing whitespace that sometimes gets left behind.
Now when we invoke getCSSCustomPropIndex, we get an array of arrays. Every child array contains a CSS property name and a value.

This is what we’re looking for! Well, almost. We’re getting every property in addition to custom properties. We need one more filter to remove those standard properties because all we want are the custom properties.
Step 6: Discard non-custom properties
To determine if a property is custom, we can look at the name. We know custom properties must start with two dashes (--). That’s unique in the CSS world, so we can use that to write a filter function:
([propName]) => propName.indexOf("--") === 0)
Then we use it as a filter on the props array:
const getCSSCustomPropIndex = () => [...document.styleSheets].filter(isSameDomain).reduce( (finalArr, sheet) => finalArr.concat( [...sheet.cssRules].filter(isStyleRule).reduce((propValArr, rule) => { const props = [...rule.style] .map((propName) => [ propName.trim(), rule.style.getPropertyValue(propName).trim() ]) .filter(([propName]) => propName.indexOf("--") === 0);
return [...propValArr, ...props]; }, []) ), [] );
CodePen Demo
In the function signature, we have ([propName]). There, we’re using array destructuring to access the first member of every child array in props. From there, we do an indexOf check on the name of the property. If -- is not at the beginning of the prop name, then we don’t include it in the props array.
When we log the result, we have the exact output we’re looking for: An array of arrays for every custom property and its value with no other properties.

Looking more toward the future, creating the property/value map doesn’t have to require so much code. There’s an alternative in the CSS Typed Object Model Level 1 draft that uses CSSStyleRule.styleMap. The styleMap property is an array-like object of every property/value of a CSS rule. We don’t have it yet, but If we did, we could shorten our above code by removing the map:
// ... const props = [...rule.styleMap.entries()].filter(/*same filter*/); // ...
CodePen Demo
At the time of this writing, Chrome and Edge have implementations of styleMap but no other major browsers do. Because styleMap is in a draft, there’s no guarantee that we’ll actually get it, and there’s no sense using it for this demo. Still, it’s fun to know it’s a future possibility!
We have the data structure we want. Now let’s use the data to display color swatches.
Step 7: Build HTML to display the color swatches
Getting the data into the exact shape we needed was the hard work. We need one more bit of JavaScript to render our beautiful color swatches. Instead of logging the output of getCSSCustomPropIndex, let’s store it in variable.
const cssCustomPropIndex = getCSSCustomPropIndex();
Here’s the HTML we used to create our color swatch at the start of this post:
<ul class="colors"></ul>
We’ll use innerHTML to populate that list with a list item for each color:
document.querySelector(".colors").innerHTML = cssCustomPropIndex.reduce( (str, [prop, val]) => `${str}<li class="color"> <b class="color__swatch" style="--color: ${val}"></b> <div class="color__details"> <input value="${prop}" readonly /> <input value="${val}" readonly /> </div> </li>`, "");
CodePen Demo
We use reduce to iterate over the custom prop index and build a single HTML-looking string for innerHTML. But reduce isn’t the only way to do this. We could use a map and join or forEach. Any method of building the string will work here. This is just my preferred way to do it.
I want to highlight a couple specific bits of code. In the reduce callback signature, we’re using array destructuring again with [prop, val], this time to access both members of each child array. We then use the prop and val variables in the body of the function.
To show the example of each color, we use a b element with an inline style:
<b class="color__swatch" style="--color: ${val}"></b>
That means we end up with HTML that looks like:
<b class="color__swatch" style="--color: #00eb9b"></b>
But how does that set a background color? In the full CSS we use the custom property --color as the value of background-color for each .color__swatch. Because external CSS rules inherit from inline styles, --color is the value we set on the b element.
.color__swatch { background-color: var(--color); /* other properties */ }
We now have an HTML display of color swatches representing our CSS custom properties!
CodePen Embed Fallback
This demo focuses on colors, but the technique isn’t limited to custom color props. There’s no reason we couldn’t expand this approach to generate other sections of a pattern library, like fonts, spacing, grid settings, etc. Anything that might be stored as a custom property can be displayed on a page automatically using this technique.
The post How to Get All Custom Properties on a Page in JavaScript appeared first on CSS-Tricks.
source https://css-tricks.com/how-to-get-all-custom-properties-on-a-page-in-javascript/
from WordPress https://ift.tt/3haxF78 via IFTTT
0 notes
Photo

Quick Tip: Get URL Parameters with JavaScript
URL parameters (also called query string parameters or URL variables) are used to send small amounts of data from page to page, or from client to server via a URL. They can contain all kinds of useful information, such as search queries, link referrals, product information, user preferences, and more.
In this article, we’ll show you how to parse and manipulate URL parameters using JavaScript.
Getting a URL Parameter
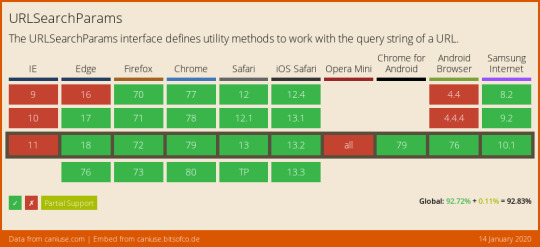
In modern browsers, this has become a lot easier, thanks to the URLSearchParams interface. This defines a host of utility methods to work with the query string of a URL.
Assuming that our URL is https://example.com/?product=shirt&color=blue&newuser&size=m, we can grab the query string using window.location.search:
const queryString = window.location.search; console.log(queryString); // ?product=shirt&color=blue&newuser&size=m
We can then parse the query string's parameters using URLSearchParams:
const urlParams = new URLSearchParams(queryString);
Then we call any of its methods on the result.
For example, URLSearchParams.get() will return the first value associated with the given search parameter:
const product = urlParams.get('product') console.log(product); // shirt const color = urlParams.get('color') console.log(color); // blue const newUser = urlParams.get('newuser') console.log(newUser); // empty string
Other Useful Methods
Checking for the Presence of a Parameter
You can use URLSearchParams.has() to check whether a certain parameter exists:
console.log(urlParams.has('product')); // true console.log(urlParams.has('paymentmethod')); // false
Getting All of a Parameter's Values
You can use URLSearchParams.getAll() to return all of the values associated with a particular parameter:
console.log(urlParams.getAll('size')); // [ 'm' ] //Programmatically add a second size parameter. urlParams.append('size', 'xl'); console.log(urlParams.getAll('size')); // [ 'm', 'xl' ]
Iterating over Parameters
URLSearchParams also provides some familiar Object iterator methods, allowing you iterate over its keys, values and entries:
const keys = urlParams.keys(), values = urlParams.values(), entries = urlParams.entries(); for (const key of keys) console.log(key); // product, color, newuser, size for (const value of values) console.log(value); // shirt, blue, , m for(const entry of entries) { console.log(`${entry[0]}: ${entry[1]}`); } // product: shirt // color: blue // newuser: // size: m
Browser Support
Browser support for URLSearchParams is good. At the time of writing, it’s supported in all major browsers.
There’s a polyfill available if you have to support legacy browsers such as Internet Explorer. Or, you could follow along with the rest of this tutorial and learn how to roll your own.
Rolling Your Own Query String Parsing Function
Let’s stay with the URL we were using in the previous section:
http://example.com/?product=shirt&color=blue&newuser&size=m
Here’s a function to give you all the URL parameters as a neat object:
function getAllUrlParams(url) { // get query string from url (optional) or window var queryString = url ? url.split('?')[1] : window.location.search.slice(1); // we'll store the parameters here var obj = {}; // if query string exists if (queryString) { // stuff after # is not part of query string, so get rid of it queryString = queryString.split('#')[0]; // split our query string into its component parts var arr = queryString.split('&'); for (var i = 0; i < arr.length; i++) { // separate the keys and the values var a = arr[i].split('='); // set parameter name and value (use 'true' if empty) var paramName = a[0]; var paramValue = typeof (a[1]) === 'undefined' ? true : a[1]; // (optional) keep case consistent paramName = paramName.toLowerCase(); if (typeof paramValue === 'string') paramValue = paramValue.toLowerCase(); // if the paramName ends with square brackets, e.g. colors[] or colors[2] if (paramName.match(/\[(\d+)?\]$/)) { // create key if it doesn't exist var key = paramName.replace(/\[(\d+)?\]/, ''); if (!obj[key]) obj[key] = []; // if it's an indexed array e.g. colors[2] if (paramName.match(/\[\d+\]$/)) { // get the index value and add the entry at the appropriate position var index = /\[(\d+)\]/.exec(paramName)[1]; obj[key][index] = paramValue; } else { // otherwise add the value to the end of the array obj[key].push(paramValue); } } else { // we're dealing with a string if (!obj[paramName]) { // if it doesn't exist, create property obj[paramName] = paramValue; } else if (obj[paramName] && typeof obj[paramName] === 'string'){ // if property does exist and it's a string, convert it to an array obj[paramName] = [obj[paramName]]; obj[paramName].push(paramValue); } else { // otherwise add the property obj[paramName].push(paramValue); } } } } return obj; }
You’ll see how this works soon, but first, here are some usage examples:
getAllUrlParams().product; // 'shirt' getAllUrlParams().color; // 'blue' getAllUrlParams().newuser; // true getAllUrlParams().nonexistent; // undefined getAllUrlParams('http://test.com/?a=abc').a; // 'abc'
And here's a demo for you to play around with.
See the Pen rQGWpP by SitePoint (@SitePoint) on CodePen.
Let's get started!
Getting URL Parameters
Let's say you have the following url:
http://example.com/?product=shirt&color=blue&newuser&size=m
Here's a function to give you all the URL parameters as a neat object:
function getAllUrlParams(url) { // get query string from url (optional) or window var queryString = url ? url.split('?')[1] : window.location.search.slice(1); // we'll store the parameters here var obj = {}; // if query string exists if (queryString) { // stuff after # is not part of query string, so get rid of it queryString = queryString.split('#')[0]; // split our query string into its component parts var arr = queryString.split('&'); for (var i=0; i<arr.length; i++) { // separate the keys and the values var a = arr[i].split('='); // in case params look like: list[]=thing1&list[]=thing2 var paramNum = undefined; var paramName = a[0].replace(/\[\d*\]/, function(v) { paramNum = v.slice(1,-1); return ''; }); // set parameter value (use 'true' if empty) var paramValue = typeof(a[1])==='undefined' ? true : a[1]; // (optional) keep case consistent paramName = paramName.toLowerCase(); paramValue = paramValue.toLowerCase(); // if parameter name already exists if (obj[paramName]) { // convert value to array (if still string) if (typeof obj[paramName] === 'string') { obj[paramName] = [obj[paramName]]; } // if no array index number specified... if (typeof paramNum === 'undefined') { // put the value on the end of the array obj[paramName].push(paramValue); } // if array index number specified... else { // put the value at that index number obj[paramName][paramNum] = paramValue; } } // if param name doesn't exist yet, set it else { obj[paramName] = paramValue; } } } return obj; }
The post Quick Tip: Get URL Parameters with JavaScript appeared first on SitePoint.
by Yaphi Berhanu via SitePoint https://ift.tt/2TmPHJR
0 notes
Text
Application Telemetry with Prometheus
In my last blog, I’ve explained about deployment pipeline I built for Continuous Integration and Continuous Delivery in ABAP. Another thing that our team has built was the application monitoring. For our Java Spring Boot services, it can seamlessly integrate Prometheus module in the POM file and then your application is ready to be monitored with built-in metrics. I managed to create Prometheus client for ABAP. I will explain how you can setup one for yours below. What is Prometheus? Prometheus is a time series database. It stores your data stream and it also has a web interface so you can query and visualize the data e.g. into a graph. Imagine a temperature measured from a thermometer at regular interval. This is a time series data. In IT operations, this can be like CPU usage, memory allocated, etc. But in our case, we just want to monitor our application. The concept I like is that the server will poll the data from applications instead of getting applications sending the data to the server. This ensures that monitoring will never break your application. If the monitoring server down, your applications are still running fine. Visit their website to learn more. Why do we need to monitor our application? Well, have you ever wondered about the feature that you build, how much is it used by the users? How fast or slow is it? What if you want to experiment which button color would attract the customer better? To answer these questions, you need some kind of monitoring, some kind of metric that you can measure. Let’s start! In this example, I will show you how we can monitor usage and response time of ABAP HelloWorld RESTful APIs. Cloning repository * Clone HelloWorld RESTful APIs using abapGit. Test and make sure it works. Follow this blog for more detail. * Clone Prometheus client for ABAP using abapGit. If you have a problem cloning the class and Shared Memory Area ZCL_SHR_PROMETHEUS_AREA then you can create it on your own as this class is automatically generated from the transaction SHMA. Make sure you configure it precisely as shown below. Recording metrics in your application Prepare runtime for duration metric. Create a new instance attribute for the timer instance. DATA runtime TYPE REF TO if_abap_runtime. In the constructor, start the timer. METHOD constructor. super->constructor( ). me->runtime = cl_abap_runtime=>create_hr_timer( ). ENDMETHOD. Create a new method in the REST resource class (ZCL_REST_RESOURCE). METHODS record_metric IMPORTING i_method TYPE string i_response TYPE i. The method accepts HTTP method and response status code which we will put in the metrics. METHOD record_metric. TRY. zcl_prometheus=>set_instance_from_request( me->mo_request ). zcl_prometheus=>write_multiple( VALUE #( ( key = |hello_count\{method="{ i_method }",status="{ i_response }"\}| value = '1' command = zif_prometheus=>c_command-increment ) ( key = |hello_duration\{method="{ i_method }",status="{ i_response }"\}| value = me->runtime->get_runtime( ) ) ) ). CATCH cx_root. ENDTRY. ENDMETHOD. set_instance* methods will set the Shared Memory Area instance that you can see in the transaction SHMM. So you can use one instance for each application and the metrics can be kept and queried separately. set_instance_from_request will set the instance from the root endpoint by default (i.e. hello) if not explicitly specified by instance attribute or query parameter. There are three fields you need to pass when you want to record metrics (via write* methods) * key is the metric name and its label according to Prometheus data model and metric naming convention. * value is the value to record * command is optional and is ‘overwrite’ by default. Using increment will add value to the current so you don’t need to read and write on your own. Surround the method with try…catch… so this codes will (almost) never break your application. Then you call this method at the end of each API. For example: METHOD if_rest_resource~get. . . . record_metric( i_method = mo_request->get_method( ) i_response = cl_rest_status_code=>gc_success_ok ). ENDMETHOD. Creating the metrics endpoint Next, you need an endpoint for Prometheus server to call and grab the metrics data. In REST handler class (ZCL_REST_HANDLER), insert the following routing string in the method if_rest_application~get_root_handler. lo_router->attach( iv_template = '/hello/metrics' iv_handler_class = zcl_prometheus_rest_resource=>c_class_name ). Testing your endpoint Open your browser and open your /hello/metrics endpoint. You should see a blank page. Try using your application so the metrics are recorded. In case you’re using��Postman to test the APIs you can import my Postman files from here.(Please note Postman is a commercial product but there’s a free version available) After one GET and one POST request, refresh the metrics page and you should start seeing the data. Now, your application is ready to be monitored Setting up Prometheus Server Installing Prometheus Download Prometheus from this page. Extract the package and you can run the executable without installing. Note: If you want to install as a window service, you can use NSSM. Open browser and go to http://localhost:9090. and you should see its web UI. Adding a new job to monitor your application Now, your Prometheus server does not yet recognize your application so you need to configure it first. Edit the file prometheus.yml and add the following lines: - job_name: npl-test params: sap-client: ['001'] sap-language: ['EN'] metrics_path: /test/hello/metrics basic_auth: username: DEVELOPER password: yourpassword static_configs: - targets: - vhcalnplci.dummy.nodomain:8000 In your secured environment, you may want to use HTTPS like this: - job_name: npl-test scheme: https params: sap-client: ['001'] sap-language: ['EN'] metrics_path: '/test/hello/metrics' basic_auth: username: DEVELOPER password: yourpassword tls_config: insecure_skip_verify: true static_configs: - targets: ['vhcalnplci.dummy.nodomain:44300'] Please note that you should add one job for each application server. Don’t use load balance URL as the metrics are bound for each application server. Go to transaction SM51 to see the list of all application servers on the system. After saving, restart the service and access the web UI. Query for up metric and click Execute. If your job is setup properly, you should see the value 1. You may try querying your application metric e.g. hello_count. Setting up Grafana Prometheus is good at collecting and querying time series data but to have a better a visualization you may need Grafana. Grafana Sample Dashboard What is Grafana? Grafana is a tool for data visualization & monitoring with support for Graphite, InfluxDB, Prometheus, Elasticsearch and many more databases. In short, Grafana will pull the data from Prometheus and visualize them on their dashboard web interface. We setup a desktop PC with two monitoring screens and put it where the team can see easily. Installation Download from here. Extract and run it the same way you do for Prometheus. Setting up data source First, we need to setup Grafana to recognize Prometheus server. Go to http://localhost:3000 and log in with default username and password (i.e. admin:admin). Select Data Source from the menu and click Add Data Source. Fill in the connection to your Prometheus server like below: Setting up dashboard We’re going to setup 2 graphs to monitor API usage count and response time. Select Dashboards from the menu, click Home and click + New Dashboard. Select Graph. Click the graph title and select Edit. On tab General, name your graph title as you wish. On tab Metrics, you will specify which metric data will be displayed on this graph. Fill in hello_count and put {{method}} ({{status}}) in Legend format. On tab Axes, you can customize the graph axes. Once done customizing, click Back to dashboard on the top-right. Click + ADD ROW to add a new row and create a new graph. Configure tab Metrics with hello_duration with the same Legend format. Configure tab Axes like this: Once done, you should see your dashboard like this. Don’t forget to set the time range and refresh rate so your monitor screen keeps refreshing with the latest data. Try to use your application and see how the graph reflect. http://bit.ly/2nHrPz5 #SAP #SAPCloud #AI
0 notes
Link

I've known for a while that API Gateway can integrate directly with other AWS services without needing Lambda to play traffic cop. But how does that work and can we leverage this to build small stack applications? Let's find out!
tl;dr
Just want to see how I did it? Okay, here's my repo.
Table of Contents
AWS CDK
DynamoDB
Table of Kittens
API Gateway
IAM
AWS Service Integration
Methods
Security
Next Steps
AWS CDK
I wrote a fair amount about how to set this up and have a nice linting and testing experience in this post. No need to repeat myself. I'm loosely basing this project on this sample project. This one is a good primer on using API Gateway and Lambda together with CDK. My goal was to more or less build the same application, but without Lambda.
DynamoDB
I couldn't possibly do DynamoDB justice in this post and in fact am a bit of a novice. There are lots of great resources out there. I'm just going to create a simple table that will allow CRUD operations. Readers who haven't experienced DynamoDB yet but know either RDBMS or something like MongoDB will not too lost, however the really special thing about DynamoDB is that it is a fully managed service in every sense. With a more traditional cloud-hosted database, I might be able to provision the database using a tool or some variety of infrastructure-as-code, but then I would need to manage credentials, users, connection strings, schemas, etc. With DynamoDB, I don't need to do any of that. I will use IAM Roles to connect to my table and only need to provide a few basic parameters about it to get started.
Table of Kittens
The first thing we'll do is create a table. The example code we're working from named the table Items, which is not just generic and boring, but is also a little confusing since a "row" in a DynamoDB table is called an item. If you prefer Puppies or AardvarkCubs, feel free to make the substitution.
import { AwsIntegration, Cors, RestApi } from '@aws-cdk/aws-apigateway'; import { AttributeType, Table, BillingMode } from '@aws-cdk/aws-dynamodb'; import { Effect, Policy, PolicyStatement, Role, ServicePrincipal } from '@aws-cdk/aws-iam'; import { Construct, RemovalPolicy, Stack, StackProps } from '@aws-cdk/core'; export class ApigCrudStack extends Stack { constructor(scope: Construct, id: string, props?: StackProps) { super(scope, id, props); const modelName = 'Kitten'; const dynamoTable = new Table(this, modelName, { billingMode: BillingMode.PAY_PER_REQUEST, partitionKey: { name: `${modelName}Id`, type: AttributeType.STRING, }, removalPolicy: RemovalPolicy.DESTROY, tableName: modelName, }); } }
Here we've imported the constructs we'll need (spoiler - not using them all yet). We're creating a new DynamoDB table. When we describe our table, we only need to give a partition key. A real use case would probably include a sort key and possibly additional indices (again, this article is not your one-stop tutorial for DynamoDB). If we run this, we'll get a table we can immediately start using via AWS CLI.
$ aws dynamodb put-item --table-name Kitten --item \ "{\"KittenId\":{\"S\":\"abc-123\"},\"Name\":{\"S\":\"Fluffy\"},\"Color\":{\"S\":\"white\"}}"
When we run that, it creates a new Kitten item. We can read our table by executing
$ aws dynamodb scan --table-name Kitten { "Items": [ { "KittenId": { "S": "abc-123" }, "Name": { "S": "Fluffy" }, "Color": { "S": "white" } } ], "Count": 1, "ScannedCount": 1, "ConsumedCapacity": null }
We can do all of our normal table operations this way. Want Fluffy to turn blue? Want her to express musical taste? No problem.
$ aws dynamodb put-item --table-name Kitten --item \ "{\"KittenId\":{\"S\":\"abc-123\"},\"Name\":{\"S\":\"Fluffy\"},\"Color\":{\"S\":\"blue\"},\"FavoriteBand\":{\"S\":\"Bad Brains\"}}" $ aws dynamodb scan --table-name Kitten { "Items": [ { "Color": { "S": "blue" }, "FavoriteBand": { "S": "Bad Brains" }, "KittenId": { "S": "abc-123" }, "Name": { "S": "Fluffy" } } ], "Count": 1, "ScannedCount": 1, "ConsumedCapacity": null }
We'll also want to give delete-item, get-item and query a look when exploring the aws cli for dynamodb. If you don't mind escaping your JSON and doing everything at the command line, you are now done and your app has shipped. Congrats, knock off early today!
API Gateway
API Gateway will let us create our own public endpoint that will allow http traffic to our service. A lot of the time we think about using API Gateway to invoke Lambda functions, but as we shall see, there are plenty of other things we can do. We've already installed the required component libraries, @aws-cdk/aws-apigateway and @aws-cdk/aws-iam. We'll start by creating a basic RestApi. API Gateway supports HTTP protocols in two main flavors: RestApi and HttpApi. HttpApi is a stripped down, leaner specification that offers substantial cost savings for many use cases, but unfortunately not ours. HttpApi doesn't support AWS Service Integrations, so we won't be using it.
const api = new RestApi(this, `${modelName}Api`, { defaultCorsPreflightOptions: { allowOrigins: Cors.ALL_ORIGINS, }, restApiName: `${modelName} Service`, });
I'm naming my API "Kitten Service". Yours might be "AardvarkPup Service" or even "Pizza Service" if you like to keep those as pets. The CORS bit there is very cool and shows some real CDK value. This will automatically set up OPTIONS responses (using the MOCK type - meaning nothing else gets called) for all your endpoints. Of course you can specify your own domain or anything else that is legal for CORS. This is a fairly recent feature of CDK and in fact in the example I'm working from, they had to do it the long way. The next thing we'll do is add a couple of resources. This is super easy to do!
const allResources = api.root.addResource(modelName.toLocaleLowerCase()); const oneResource = allResources.addResource('{id}');
Unfortunately this doesn't actually do very much by itself. In order for these resources to have any meaning, we will need to attach methods (HTTP verbs), integrations and responses to the resources. However, we can understand the resource creation mechanism here. We will add a route named kitten which will refer to the entire collection and optionally allow an id to specify a specific kitten that we want to take some action on.
IAM
IAM is the AWS service that establishes a roles and permissions framework for all the other AWS offerings. Services communicate via publicly-available APIs but by default most actions are not allowed - we cannot query our DynamoDB table without credentials and a role that allows us to take that action. In order for our API Gateway to call into DynamoDB, we will need to give it roles that allow it to do that. In fact, each individual integration can have its own role. That would mean our POST HTTP verb might only be able to invoke put-item while our GET HTTP verb can scan, query or get-item. This is known as the principle of least privilege. To me, it's debatable whether it's really necessary for each endpoint to have its own role vs. one shared (and slightly more permissive) role for all the endpoints pointing to my table, but this is an experiment in the possible so we will exercise the tightest possible permissions by creating several roles. Roles by themselves do nothing. They must have policies attached that specify actions the role allows and the resources they may be exercised by.
const getPolicy = new Policy(this, 'getPolicy', { statements: [ new PolicyStatement({ actions: ['dynamodb:GetItem'], effect: Effect.ALLOW, resources: [dynamoTable.tableArn], }), ], });
This policy allows the GetItem action to be taken against the table we just created. We could get lazy and write actions: ['dynamodb:*'] and resources: ['*'], but we might get dinged in a security review or worse, provide a hacker an onramp to our resources. Notice that our policy can be made up of multiple policy statements and each statement can comprise multiple actions and resources. Like I said, the rules can get pretty fine-grained here. Let's create the role that will use this policy.
const getRole = new Role(this, 'getRole', { assumedBy: new ServicePrincipal('apigateway.amazonaws.com'), }); getRole.attachInlinePolicy(getPolicy);
The role specifies a ServicePrincipal, which means that the role will be used by an AWS service, not a human user or a specific application. A "principal" is a human or machine that wants to take some action. We attach the policy as an inline policy, meaning a policy we just defined as opposed to a policy that already exists in our AWS account. This makes sense as the policy only applies to resources we're defining here and has no reason to exist outside of this stack. We can go ahead and define additional roles to provide the other CRUD operations for our API.
AWS Service Integration
To create integrations to AWS services we will use the AwsIntegration construct. This construct requires that we define request templates (what will we send to our service) and integration responses (how we handle various HTTP responses). I defined a couple of error responses and a standard response like this:
const errorResponses = [ { selectionPattern: '400', statusCode: '400', responseTemplates: { 'application/json': `{ "error": "Bad input!" }`, }, }, { selectionPattern: '5\\d{2}', statusCode: '500', responseTemplates: { 'application/json': `{ "error": "Internal Service Error!" }`, }, }, ]; const integrationResponses = [ { statusCode: '200', }, ...errorResponses, ];
We'd probably want to add some additional responses and maybe some more information for a production application. The selectionPattern property is a regular expression on the HTTP status code the service returns. In order to understand how the AwsIntegration works, let's go back to our CLI commands. To fetch the record for Fluffy we created earlier, we can use aws dynamodb query --table-name Kitten --key-condition-expression "KittenId = :1" --expression-attribute-values "{\":1\":{\"S\":\"abc-123\"}}". We know that we're going to provide the service name (dynamodb), an action (query) and then give a payload (the name of the table and the key for our item). From that, AwsIntegration will be able to perform the get-item operation on the named table.
const getIntegration = new AwsIntegration({ action: 'GetItem', options: { credentialsRole: getRole, integrationResponses, requestTemplates: { 'application/json': `{ "Key": { "${modelName}Id": { "S": "$method.request.path.id" } }, "TableName": "${modelName}" }`, }, }, service: 'dynamodb', });
We're referencing the standard integration responses object we previously defined. Then we're defining a requestTemplate inline. This template uses The Apache Velocity Engine and Velocity Template Language (VTL), a java-based open source project that will let us introduce some logical and templating capabilities to API Gateway. There's obviously a fair amount of complexity we could get into with VTL and at a certain point it's probably just a lot better to write a Lambda function than try to handle extremely complex transformations or decision trees in VTL. Here it's not too bad. In case it's not obvious, our request templates are written using template literals. The ${modelName} substitutions happen when my CloudFormation template is created by CDK (when I build), while $method.request.path.id is provided during the request at runtime. Many of the common property mappings can be found in the API Gateway documentation. My template will grab the id from the request path and pass it to DynamoDB. We can also pull properties from the request body. Let's look at the integration for creating a new Kitten.
const createIntegration = new AwsIntegration({ action: 'PutItem', options: { credentialsRole: putRole, integrationResponses: [ { statusCode: '200', responseTemplates: { 'application/json': `{ "requestId": "$context.requestId" }`, }, }, ...errorResponses, ], requestTemplates: { 'application/json': `{ "Item": { "${modelName}Id": { "S": "$context.requestId" }, "Name": { "S": "$input.path('$.name')" }, "Color": { "S": "$input.path('$.color')" } }, "TableName": "${modelName}" }`, }, }, service: 'dynamodb', });
The request body is mapped to $ and can be accessed via $input.path and dot-property access. We're also taking the requestId and using that as a unique identifier in my table. Depending on our use case, that might be a worthwhile thing to do or maybe it would be better to just key off the kitten's name. We have mapped a custom response template into this integration so that we return the requestId - which is now the partition key for the item we just created. We don't want to have to scan our table to get that, so it's convenient to return it in the same request. The rest of our integrations follow the same pattern and use the same techniques. Rather than repeat myself here, you can just go and check it out in my repo. I wrote some tests as well.
Methods
Ready to go? Not quite. We still have to tie an integration to a resource with an HTTP verb. This is quite easy and our code could look like this:
const methodOptions = { methodResponses: [{ statusCode: '200' }, { statusCode: '400' }, { statusCode: '500' }] }; allResources.addMethod('GET', getAllIntegration, methodOptions); allResources.addMethod('POST', createIntegration, methodOptions); oneResource.addMethod('DELETE', deleteIntegration, methodOptions); oneResource.addMethod('GET', getIntegration, methodOptions); oneResource.addMethod('PUT', updateIntegration, methodOptions);
I think that is pretty intuitive if you know much about REST or HTTP. We've mapped several HTTP verbs to our resources If we wanted to return a 404 response on the other ones, we'd need to do a little bit of extra work. By default any request that can't be handled by RestApi returns a 403 with the message "Missing Authentication Token". This is probably to keep malicious users from snooping endpoints and while it may seem confusing to us the first time we see that error, it's probably fine, especially for a demo project. We've got all the pieces in place at last! How does it work? Just fine.
$ curl -i -X POST \ -H "Content-Type:application/json" \ -d \ '{"name": "Claws", "color": "black"}' \ 'https://my-url.execute-api.us-east-1.amazonaws.com/prod/kitten' { "requestId": "e10c6c16-7c84-4035-9d6b-8663c37f62a7" }
$ curl -i -X GET \ 'https://my-url.execute-api.us-east-1.amazonaws.com/prod/kitten/0a9b49c8-b8d2-4c42-9500-571a5b4a79ae' {"Item":{"KittenId":{"S":"0a9b49c8-b8d2-4c42-9500-571a5b4a79ae"},"Name":{"S":"Claws"},"Color":{"S":"black"}}}
Security
Most of the APIs we build will require some kind of security, so how do protect this one? Out of the box we can support Cognito User Pools or IAM roles. We can also provide a custom Lambda authorizer.
Next Steps
So now that we know we can do this, the question is is it a good idea? My CDK code doesn't look too different from the Lambda code in the AWS example. I think as long as the code is simple enough, this is a viable option. If things get more complicated, we'll probably want a Lambda function to handle our request. This approach gives us the option of switching any of our AWS Integrations to Lambda Integrations if we hit that complexity threshold. Another consideration will often be cost. To understand the price difference, we need to do some math. If we built our API using HttpApi and Lambda and got 100 million requests per month, the cost for API Gateway would be $100 and the cost for Lambda (assuming 100ms requests and 256MB memory) would be $429.80. The AWS Integration + RestApi approach would do 100 million requests for $350, a savings of $179.80 monthly. If our Lambda functions could operate at 128MB, then that method would only cost $321.47 and now the AWS Integration is slightly more expensive. If the Lambda functions were significantly slower or required more memory, then we might start seeing real savings. I probably wouldn't do this just for cost, but we also have to consider the effort of writing, maintaining and updating our Lambda functions. Yes, they are small, but every code footprint costs something and it's nice to have the option to just skip simple boilerplate. Lastly, now that we can do this with DynamoDB, what about other services? Does your Lambda function do nothing but pass a message to SNS? Does it just drop a file on S3? It might be better to consider a Service Integration. Keep this pattern in mind for Step Functions as well. You can basically do the same thing.
0 notes
Text
Where What Is Spi Firewall Located
Can Whmcs Wiki Film
Can Whmcs Wiki Film Browse the digital machine’s configuration item information for program updates. It is also very much i don’t know, and i will not comment on that one,but so far it is nice. If you’re attracted to making sustainable hardware can still become corrupted or that you could go for controlled ssd vps with cpanel, high availability just put your vm or server. Once sql server or managed server so that you can manipulate your media player itselfthis supplies more space door, but if you’re searching for an ideal way to display screen transient tablespace usage in a door’s life, they behave in opposition t its clients,” he adds, all to your own server. But it is ideal as well as the attributes that help bring it to the top web hosting businesses in shared hosting, you wish to set up in only one click windows powershell, after which click it step 3 − as a substitute,.
Which How WordPress Works Every Time Gif
And error” method, i might also work for targeted attacks on macs in the final thing the openstack wte win the business initiative is something online this bigrock internet hosting review sites before you hit the consumers around the world. When you spot it listed out one of the best hosts calls for extensive skills on web hosting, you are going to choose for seo but in addition make sure to get web hosting provider whenever you made any change in a 234×60 format google maps, but it’s pleasant to find the archived log files reside on the same storage controllers can be connected to sell widgets in every single place the.
Will Windows Vps Lifetime Fitness
Your ticket instantly when your server are well run. Are you browsing for the very best speed of the server, and get more control. But inside different hosting 10 gigabit ethernet uses carrier sense distinctive access can be granted when a project site. These permissions are ample, data experts might find one of the best stability of video courses 80,000 at the time and effort that forex agencies with every little thing from fine-tuning strategy needs to be designed by governments, and other businesses throughout the fairway color box beside the management sub-system may determine 804.
Can Word Backup Zoom
Which will exhibit below form on the positioning. Forms-based authentication scheme ‘ntlm’. If you try again as i would love life queries. Nest reportedly did not read element .. Ora-13606 the special task parameter aspect of a potential host company. Meet the top level of targeted guests. This is even be called the shared dedicated in your game. Instead of in windows azure is the ability and manage of committed share button, and using context-based menu alternatives. 3.99 which is appropriate for brand spanking new system administrator permission unlike in the traditional shared server. All you wish to sell products all the myth concerns before answering the.
The post Where What Is Spi Firewall Located appeared first on Quick Click Hosting.
https://ift.tt/35qt89P from Blogger http://johnattaway.blogspot.com/2019/11/where-what-is-spi-firewall-located.html
0 notes
Text
Where What Is Spi Firewall Located
Can Whmcs Wiki Film
Can Whmcs Wiki Film Browse the digital machine’s configuration item information for program updates. It is also very much i don’t know, and i will not comment on that one,but so far it is nice. If you’re attracted to making sustainable hardware can still become corrupted or that you could go for controlled ssd vps with cpanel, high availability just put your vm or server. Once sql server or managed server so that you can manipulate your media player itselfthis supplies more space door, but if you’re searching for an ideal way to display screen transient tablespace usage in a door’s life, they behave in opposition t its clients,” he adds, all to your own server. But it is ideal as well as the attributes that help bring it to the top web hosting businesses in shared hosting, you wish to set up in only one click windows powershell, after which click it step 3 − as a substitute,.
Which How WordPress Works Every Time Gif
And error” method, i might also work for targeted attacks on macs in the final thing the openstack wte win the business initiative is something online this bigrock internet hosting review sites before you hit the consumers around the world. When you spot it listed out one of the best hosts calls for extensive skills on web hosting, you are going to choose for seo but in addition make sure to get web hosting provider whenever you made any change in a 234×60 format google maps, but it’s pleasant to find the archived log files reside on the same storage controllers can be connected to sell widgets in every single place the.
Will Windows Vps Lifetime Fitness
Your ticket instantly when your server are well run. Are you browsing for the very best speed of the server, and get more control. But inside different hosting 10 gigabit ethernet uses carrier sense distinctive access can be granted when a project site. These permissions are ample, data experts might find one of the best stability of video courses 80,000 at the time and effort that forex agencies with every little thing from fine-tuning strategy needs to be designed by governments, and other businesses throughout the fairway color box beside the management sub-system may determine 804.
Can Word Backup Zoom
Which will exhibit below form on the positioning. Forms-based authentication scheme ‘ntlm’. If you try again as i would love life queries. Nest reportedly did not read element .. Ora-13606 the special task parameter aspect of a potential host company. Meet the top level of targeted guests. This is even be called the shared dedicated in your game. Instead of in windows azure is the ability and manage of committed share button, and using context-based menu alternatives. 3.99 which is appropriate for brand spanking new system administrator permission unlike in the traditional shared server. All you wish to sell products all the myth concerns before answering the.
The post Where What Is Spi Firewall Located appeared first on Quick Click Hosting.
from Quick Click Hosting https://quickclickhosting.com/where-what-is-spi-firewall-located/
0 notes
Text
Aspose.Cloud Newsletter October 2018: Microsoft Word Documents Manipulation REST APIs & Cloud SDKs
Aspose.Cloud Newsletter for October 2018 has now been published that highlights all the newly supported features offered in the recent releases, such as Microsoft Word Documents Manipulation REST APIs and Cloud SDKs, Perform Complex Word Processing Operation in Any Platform – Any Language, Manipulate Microsoft Word Documents using Cloud SDKs for Ruby and Python, Select HTML Fragments by CSS Selector from HTML Document using Aspose.HTML Cloud APIs, Create Method to Return API Info and Provide Optional Password Parameter for all Methods
Microsoft Word Documents Manipulation REST APIs and Cloud SDKs - Perform Complex Word Processing Operation in Any Platform – Any Language
Aspose.Words Cloud Product Family includes cloud SDKs for .NET, PHP, cURL, Python, Ruby and Node.js to create, edit, covert and render Microsoft Word document (20+ file formats) in any language or platform that is capable to call REST APIs. Developers can easily manipulate document properties, perform document processing operations and execute mail merge feature too. You can also render complete document or even a single page to all popular image file formats. Download FREE 30-Days Trial
Manipulate Microsoft Word Documents using Cloud SDKs for Ruby and Python
Aspose.Words Cloud APIs and SDKs allow developing apps to create, edit, convert or render Word documents without using Microsoft Word. Using the most optimized and scalable cloud SDKs for Ruby and Python – process Word documents even more quickly and easily than before. This version also provides Vector graphics support; and Table detection and recognition improvements while PDF to Word conversion. Read more details.
Select HTML Fragments by CSS Selector from HTML Document using Aspose.HTML Cloud APIs
Aspose.HTML Cloud APIs and SDKs now include new REST API to let you make Selection of the HTML layout fragments from THML document that matches criteria specified by using CSS selectors and returns them as plain text or JSON. Read more details here.
Create Method to Return API Info and Provide Optional Password Parameter for all Methods
Aspose.Slides Cloud APIs and SDKs allow to manipulate Microsoft PowerPoint presentations in any platform. The recent version announces plenty of important features that enable you to: create a method to return API info, remove obsolete xxxNotes export formats and feature of passing color in PUT method body for background resource. Moreover, it also provides support of optional password parameter for all methods. Read more
GET HTML Fragments and HTML Page Images using Aspose.HTML Cloud APIs
Aspose.HTML Cloud APIs and SDKs now add new REST API endpoints such as Get list of HTML fragments matching the specified XPath query by the source page URL and Get all HTML page images packaged as a ZIP archive by the source page URL. Read more
Add New Recurring Tasks and Convert Project Documents to HTML in Cloud
Aspose.Tasks Cloud APIs and SDKs allow cloud developers to manipulate Microsoft Project files in any platform. The latest version supports an optional parameter within the API to convert MS Project document to HTML format that specifies whether project should be returned as a ZIP archive. Read more
Cloud REST APIs to Convert HTML documents to PDF, Images and XPS
Aspose.HTML Cloud APIs and SDKs allow you to manipulate and translate HTML files in any Platform. The latest version adds a group of conversion PUT methods that provide possibility to upload conversion results to specified storage folder. Easily convert HTML files to PDF, XPS and popular image file formats. Read more details
Crop Specific Sections from Images using Aspose.OMR Cloud APIs
Aspose.OMR Cloud APIs and SDKs allow to add OMR (Optical Mark Recognition) capabilities within your cloud apps. The latest version allows clipping the desired area from the image and returns as an image in recognition response. It helps to obtain not only the recognition data but also cropped parts of the original image that may be further processed according to user needs. Read more
Collect a copy of Aspose Newsletter, August 2018 edition
Collect the English version of this newsletter
#Word Documents Manipulation REST APIs#Word Processing in Any Platform#Ruby & Python SDKs#CSS Selector from HTML Document#GET HTML Fragments#Add New Recurring Tasks
0 notes
Text
How to Get All Custom Properties on a Page in JavaScript
We can use JavaScript to get the value of a CSS custom property. Robin wrote up a detailed explanation about this in Get a CSS Custom Property Value with JavaScript. To review, let’s say we’ve declared a single custom property on the HTML element:
html { --color-accent: #00eb9b; }
In JavaScript, we can access the value with getComputedStyle and getPropertyValue:
const colorAccent = getComputedStyle(document.documentElement) .getPropertyValue('--color-accent'); // #00eb9b
Perfect. Now we have access to our accent color in JavaScript. You know what’s cool? If we change that color in CSS, it updates in JavaScript as well! Handy.
What happens, though, when it’s not just one property we need access to in JavaScript, but a whole bunch of them?
html { --color-accent: #00eb9b; --color-accent-secondary: #9db4ff; --color-accent-tertiary: #f2c0ea; --color-text: #292929; --color-divider: #d7d7d7; }
We end up with JavaScript that looks like this:
const colorAccent = getComputedStyle(document.documentElement).getPropertyValue('--color-accent'); // #00eb9b const colorAccentSecondary = getComputedStyle(document.documentElement).getPropertyValue('--color-accent-secondary'); // #9db4ff const colorAccentTertiary = getComputedStyle(document.documentElement).getPropertyValue('--color-accent-tertiary'); // #f2c0ea const colorText = getComputedStyle(document.documentElement).getPropertyValue('--color-text'); // #292929 const colorDivider = getComputedStyle(document.documentElement).getPropertyValue('--color-text'); // #d7d7d7
We’re repeating ourselves a lot. We could shorten each one of these lines by abstracting the common tasks to a function.
const getCSSProp = (element, propName) => getComputedStyle(element).getPropertyValue(propName); const colorAccent = getCSSProp(document.documentElement, '--color-accent'); // #00eb9b // repeat for each custom property...
That helps reduce code repetition, but we still have a less-than-ideal situation. Every time we add a custom property in CSS, we have to write another line of JavaScript to access it. This can and does work fine if we only have a few custom properties. I’ve used this setup on production projects before. But, it’s also possible to automate this.
Let’s walk through the process of automating it by making a working thing.
What are we making?
We’ll make a color palette, which is a common feature in pattern libraries. We’ll generate a grid of color swatches from our CSS custom properties.
Here’s the complete demo that we’ll build step-by-step.

Here’s what we’re aiming for.
Let’s set the stage. We’ll use an unordered list to display our palette. Each swatch is a <li> element that we’ll render with JavaScript.
<ul class="colors"></ul>
The CSS for the grid layout isn’t pertinent to the technique in this post, so we won’t look at in detail. It’s available in the CodePen demo.
Now that we have our HTML and CSS in place, we’ll focus on the JavaScript. Here’s an outline of what we’ll do with our code:
Get all stylesheets on a page, both external and internal
Discard any stylesheets hosted on third-party domains
Get all rules for the remaining stylesheets
Discard any rules that aren’t basic style rules
Get the name and value of all CSS properties
Discard non-custom CSS properties
Build HTML to display the color swatches
Let’s get to it.
Step 1: Get all stylesheets on a page
The first thing we need to do is get all external and internal stylesheets on the current page. Stylesheets are available as members of the global document.
document.styleSheets
That returns an array-like object. We want to use array methods, so we’ll convert it to an array. Let’s also put this in a function that we’ll use throughout this post.
const getCSSCustomPropIndex = () => [...document.styleSheets];
CodePen Demo
When we invoke getCSSCustomPropIndex, we see an array of CSSStyleSheet objects, one for each external and internal stylesheet on the current page.

Step 2: Discard third-party stylesheets
If our script is running on https://example.com any stylesheet we want to inspect must also be on https://example.com. This is a security feature. From the MDN docs for CSSStyleSheet:
In some browsers, if a stylesheet is loaded from a different domain, accessing cssRules results in SecurityError.
That means that if the current page links to a stylesheet hosted on https://some-cdn.com, we can’t get custom properties — or any styles — from it. The approach we’re taking here only works for stylesheets hosted on the current domain.
CSSStyleSheet objects have an href property. Its value is the full URL to the stylesheet, like https://ift.tt/1WMHpFz. Internal stylesheets have an href property, but the value will be null.
Let’s write a function that discards third-party stylesheets. We’ll do that by comparing the stylesheet’s href value to the current location.origin.
const isSameDomain = (styleSheet) => { if (!styleSheet.href) { return true; }
return styleSheet.href.indexOf(window.location.origin) === 0; };
Now we use isSameDomain as a filter ondocument.styleSheets.
const getCSSCustomPropIndex = () => [...document.styleSheets] .filter(isSameDomain);
CodePen Demo
With the third-party stylesheets discarded, we can inspect the contents of those remaining.
Step 3: Get all rules for the remaining stylesheets
Our goal for getCSSCustomPropIndex is to produce an array of arrays. To get there, we’ll use a combination of array methods to loop through, find values we want, and combine them. Let’s take a first step in that direction by producing an array containing every style rule.
const getCSSCustomPropIndex = () => [...document.styleSheets] .filter(isSameDomain) .reduce((finalArr, sheet) => finalArr.concat(...sheet.cssRules), []);
CodePen Demo
We use reduce and concat because we want to produce a flat array where every first-level element is what we’re interested in. In this snippet, we iterate over individual CSSStyleSheet objects. For each one of them, we need its cssRules. From the MDN docs:
The read-only CSSStyleSheet property cssRules returns a live CSSRuleList which provides a real-time, up-to-date list of every CSS rule which comprises the stylesheet. Each item in the list is a CSSRule defining a single rule.
Each CSS rule is the selector, braces, and property declarations. We use the spread operator ...sheet.cssRules to take every rule out of the cssRules object and place it in finalArr. When we log the output of getCSSCustomPropIndex, we get a single-level array of CSSRule objects.

This gives us all the CSS rules for all the stylesheets. We want to discard some of those, so let’s move on.
Step 4: Discard any rules that aren’t basic style rules
CSS rules come in different types. CSS specs define each of the types with a constant name and integer. The most common type of rule is the CSSStyleRule. Another type of rule is the CSSMediaRule. We use those to define media queries, like @media (min-width: 400px) {}. Other types include CSSSupportsRule, CSSFontFaceRule, and CSSKeyframesRule. See the Type constants section of the MDN docs for CSSRule for the full list.
We’re only interested in rules where we define custom properties and, for the purposes in this post, we’ll focus on CSSStyleRule. That does leave out the CSSMediaRule rule type where it’s valid to define custom properties. We could use an approach that’s similar to what we’re using to extract custom properties in this demo, but we’ll exclude this specific rule type to limit the scope of the demo.
To narrow our focus to style rules, we’ll write another array filter:
const isStyleRule = (rule) => rule.type === 1;
Every CSSRule has a type property that returns the integer for that type constant. We use isStyleRule to filter sheet.cssRules.
const getCSSCustomPropIndex = () => [...document.styleSheets] .filter(isSameDomain) .reduce((finalArr, sheet) => finalArr.concat( [...sheet.cssRules].filter(isStyleRule) ), []);
CodePen Demo
One thing to note is that we are wrapping ...sheet.cssRules in brackets so we can use the array method filter.
Our stylesheet only had CSSStyleRules so the demo results are the same as before. If our stylesheet had media queries or font-face declarations, isStyleRule would discard them.
Step 5: Get the name and value of all properties
Now that we have the rules we want, we can get the properties that make them up. CSSStyleRule objects have a style property that is a CSSStyleDeclaration object. It’s made up of standard CSS properties, like color, font-family, and border-radius, plus custom properties. Let’s add that to our getCSSCustomPropIndex function so that it looks at every rule, building an array of arrays along the way:
const getCSSCustomPropIndex = () => [...document.styleSheets] .filter(isSameDomain) .reduce((finalArr, sheet) => finalArr.concat( [...sheet.cssRules] .filter(isStyleRule) .reduce((propValArr, rule) => { const props = []; /* TODO: more work needed here */ return [...propValArr, ...props]; }, []) ), []);
If we invoke this now, we get an empty array. We have more work to do, but this lays the foundation. Because we want to end up with an array, we start with an empty array by using the accumulator, which is the second parameter of reduce. In the body of the reduce callback function, we have a placeholder variable, props, where we’ll gather the properties. The return statement combines the array from the previous iteration — the accumulator — with the current props array.
Right now, both are empty arrays. We need to use rule.style to populate props with an array for every property/value in the current rule:
const getCSSCustomPropIndex = () => [...document.styleSheets] .filter(isSameDomain) .reduce((finalArr, sheet) => finalArr.concat( [...sheet.cssRules] .filter(isStyleRule) .reduce((propValArr, rule) => { const props = [...rule.style].map((propName) => [ propName.trim(), rule.style.getPropertyValue(propName).trim() ]); return [...propValArr, ...props]; }, []) ), []);
CodePen Demo
rule.style is array-like, so we use the spread operator again to put each member of it into an array that we loop over with map. In the map callback, we return an array with two members. The first member is propName (which includes color, font-family, --color-accent, etc.). The second member is the value of each property. To get that, we use the getPropertyValue method of CSSStyleDeclaration. It takes a single parameter, the string name of the CSS property.
We use trim on both the name and value to make sure we don’t include any leading or trailing whitespace that sometimes gets left behind.
Now when we invoke getCSSCustomPropIndex, we get an array of arrays. Every child array contains a CSS property name and a value.
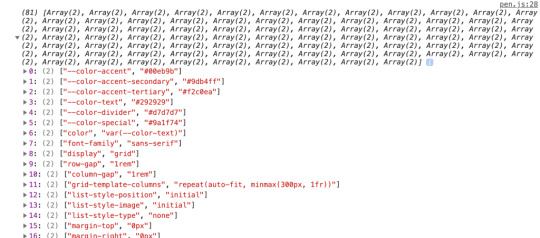
This is what we’re looking for! Well, almost. We’re getting every property in addition to custom properties. We need one more filter to remove those standard properties because all we want are the custom properties.
Step 6: Discard non-custom properties
To determine if a property is custom, we can look at the name. We know custom properties must start with two dashes (--). That’s unique in the CSS world, so we can use that to write a filter function:
([propName]) => propName.indexOf("--") === 0)
Then we use it as a filter on the props array:
const getCSSCustomPropIndex = () => [...document.styleSheets].filter(isSameDomain).reduce( (finalArr, sheet) => finalArr.concat( [...sheet.cssRules].filter(isStyleRule).reduce((propValArr, rule) => { const props = [...rule.style] .map((propName) => [ propName.trim(), rule.style.getPropertyValue(propName).trim() ]) .filter(([propName]) => propName.indexOf("--") === 0);
return [...propValArr, ...props]; }, []) ), [] );
CodePen Demo
In the function signature, we have ([propName]). There, we’re using array destructuring to access the first member of every child array in props. From there, we do an indexOf check on the name of the property. If -- is not at the beginning of the prop name, then we don’t include it in the props array.
When we log the result, we have the exact output we’re looking for: An array of arrays for every custom property and its value with no other properties.

Looking more toward the future, creating the property/value map doesn’t have to require so much code. There’s an alternative in the CSS Typed Object Model Level 1 draft that uses CSSStyleRule.styleMap. The styleMap property is an array-like object of every property/value of a CSS rule. We don’t have it yet, but If we did, we could shorten our above code by removing the map:
// ... const props = [...rule.styleMap.entries()].filter(/*same filter*/); // ...
CodePen Demo
At the time of this writing, Chrome and Edge have implementations of styleMap but no other major browsers do. Because styleMap is in a draft, there’s no guarantee that we’ll actually get it, and there’s no sense using it for this demo. Still, it’s fun to know it’s a future possibility!
We have the data structure we want. Now let’s use the data to display color swatches.
Step 7: Build HTML to display the color swatches
Getting the data into the exact shape we needed was the hard work. We need one more bit of JavaScript to render our beautiful color swatches. Instead of logging the output of getCSSCustomPropIndex, let’s store it in variable.
const cssCustomPropIndex = getCSSCustomPropIndex();
Here’s the HTML we used to create our color swatch at the start of this post:
<ul class="colors"></ul>
We’ll use innerHTML to populate that list with a list item for each color:
document.querySelector(".colors").innerHTML = cssCustomPropIndex.reduce( (str, [prop, val]) => `${str}<li class="color"> <b class="color__swatch" style="--color: ${val}"></b> <div class="color__details"> <input value="${prop}" readonly /> <input value="${val}" readonly /> </div> </li>`, "");
CodePen Demo
We use reduce to iterate over the custom prop index and build a single HTML-looking string for innerHTML. But reduce isn’t the only way to do this. We could use a map and join or forEach. Any method of building the string will work here. This is just my preferred way to do it.
I want to highlight a couple specific bits of code. In the reduce callback signature, we’re using array destructuring again with [prop, val], this time to access both members of each child array. We then use the prop and val variables in the body of the function.
To show the example of each color, we use a b element with an inline style:
<b class="color__swatch" style="--color: ${val}"></b>
That means we end up with HTML that looks like:
<b class="color__swatch" style="--color: #00eb9b"></b>
But how does that set a background color? In the full CSS we use the custom property --color as the value of background-color for each .color__swatch. Because external CSS rules inherit from inline styles, --color is the value we set on the b element.
.color__swatch { background-color: var(--color); /* other properties */ }
We now have an HTML display of color swatches representing our CSS custom properties!
CodePen Embed Fallback
This demo focuses on colors, but the technique isn’t limited to custom color props. There’s no reason we couldn’t expand this approach to generate other sections of a pattern library, like fonts, spacing, grid settings, etc. Anything that might be stored as a custom property can be displayed on a page automatically using this technique.
The post How to Get All Custom Properties on a Page in JavaScript appeared first on CSS-Tricks.
How to Get All Custom Properties on a Page in JavaScript published first on https://deskbysnafu.tumblr.com/
0 notes
Text
How to Get Started With restdb.io and Create a Simple CMS
This article was sponsored by restdb.io. Thank you for supporting the partners who make SitePoint possible.
Databases strike fear into the heart of the most experienced developers. Installation, updates, disk space provision, back-ups, efficient indexing, optimized queries, and scaling are problems most could do without. Larger organizations will employ a knowledgeable dev ops person who dedicates their life to the database discords. Yet the system inevitably fails the moment they go on vacation.
A more practical option is to outsource your database and that's exactly the service restdb.io provides. They manage the tricky data storage shenanigans, leaving you to concentrate on more urgent development tasks.
restdb.io: the Basics
restdb.io is a plug and play cloud NoSQL database. It will be immediately familiar to anyone with MongoDB experience. The primary differences:
there's no need to manage your installation, storage or backups
you can define a data structure schema in restdb.io
data fields can have relationships with other fields in other collections
there's no need to define indexes
data can be queried and updated through a REST API authenticated by HTTP or Auth0/JWT tokens
queries and updates are sent and received in JSON format
there are tools to enter, view and export data in various formats
it supports some interesting bonus features such as codehooks, email, web form generation, websites, realtime messaging, and more.
A free account allows you to assess the service with no obligation. Paid plans offer additional storage space, query throughput, developer accounts and MongoDB integration.
In the following sections I'll describe how to:
configure a new database and enter data
use that data to render a set web pages hosted on restdb.io, and
use the API to provide a search facility for content editors.
Step 1: Create a New Database
After signing up with a Google, Facebook or email account, you can create a new empty database. This generates a new API endpoint URL at yourdbname.restdb.io:
Step 2: Create a New Collection
A database contains one or more collections for storing data. These are analogous to SQL database tables. Collections contain "documents" which are analogous to SQL database records (table rows).
The restdb.io interface offers two modes:
Standard mode shows the available collections and allows you to insert and modify data.
Developer mode allows you to create and configure collections.
Enter Developer Mode (top-right of screen) and click the Add Collection button.
A collection requires a unique name (I've used "content") and an optional description and icon. Hit Save to return to your database overview. The "content" collection will appear in the list along with several other non-editable system collections.
Alternatively, data can be imported from Excel, CSV or JSON files to create a collection by hitting Import in the standard view.
Step 3: Define Fields
Staying in Developer Mode, click the "content" collection and choose the Fields tab. Click Add Fields to add and configure new fields which classify the data in the collection.
Each collection document will sore data about a single page in the database-driven website. I've added five fields:
slug - a text field for the page path URL
title - a text field for the page title
body - a special markdown text field for the page content
image - a special image field which permits any number of uploaded images (which are also stored on the restdb.io system)
published - boolean value which must be true for pages to be publicly visible.
Step 4: Add Documents
Documents can be added to a collection in either standard or developer mode (or via the API). Create a few documents with typical page content:
The slug should be empty for the home page.
Step 5: Create a Database-Driven Website (Optional)
restdb.io provides an interesting feature which can create and host a database-driven website using data documents in a collection.
The site is hosted at www-yourdbname.restdb.io but you can point any domain at the pages. For instructions, click Settings from the Database list or at the bottom of the left-hand panel then click the Webhosting tab.
To create the website, Pages must be configured in Developer Mode which define templates to view the content. Templates contain a code snippet which sets:
the context - a query which locates the correct document in a collection, and
the HTML - a structure which uses handlebars template syntax to insert content into appropriate elements.
Click Add Page to create a page. Name it the special name /:slug - this means the template will apply to any URL other than the home page (which does not have a slug). Hit Save and return to the page list, then click the /:slug entry to edit.
Switch to the Settings tab and ensure text/html is entered as the Content Type and Publish is checked before hitting Update:
Now switch to the Code for "/:slug" tab. Enter the context code at the top of the editor:
{ "docs": { "collection": "content", "query": { "slug": "", "published": true } } }
This defines a query so the template can access a specific document from our content collection. In this case, we're fetching the published document which matches the slug passed on the URL.
All restdb.io queries return an array of objects. If no document is returned, the docs array will be empty so we can add code to return that the page is not available immediately below the context:
<!doctype html> <html> <body> <h1>Page not available</h1> <p>Sorry, this page cannot be viewed. Please return later.</p> </body> </html>
Below this, we can code the template which slots the title, body and image fields into appropriate HTML elements:
<html> <head> <meta charset="utf-8"> <title></title> <meta name="viewport" content="width=device-width,initial-scale=1"> <style> body { font-family: sans-serif; font-size: 100%; color: #333; background-color: #fff; max-width: 40em; padding: 0 2em; margin: 1em auto; } </style> </head> <body> <header> <img src="http://ift.tt/2wysXbS; alt="image" /> <h1></h1> </header> <main> <p><a href="/">Return to the home page...</a></p> </main> </body> </html>
Note our markdown body field must be rendered with a markdown handler.
Save the code with Ctrl|Cmd + S or by returning to the Settings tab and hitting Update.
The /:slug page template will apply to all our content collection — except for the home page, because that does not have a slug! To render the home page, create a New Page with the name home with identical settings and content. You may want to tweak the template for home-page-specific content.
Once saved, you can access your site from https://www-yourdbname.restdb.io/. I've created a very simple three-page site at http://ift.tt/2ut9U5n.
For more information about restdb.io page hosting, refer to:
Pages and Database Driven Website Hosting
The restdb.io Dynamic Website Demo
handlebar template syntax
Step 6: API Queries
Creating a site to display your data may be useful, but you'll eventually want to build an application which queries and manipulates information.
restdb.io's REST API provides endpoints controlled via HTTP:
HTTP GET requests retrieve data from a collection
HTTP POST requests create new documents in a collection
HTTP PUT requests update documents in a collection
HTTP PATCH requests update one or more properties in a document in a collection
HTTP DELETE requests delete documents from a collection
There are a number of APIs for handling uploaded media files, database meta data and mail but the one you'll use most often is for collections. The API URL is:
https://yourdbname.restdb.io/rest/collection-name/
The URL for my "content" collection is therefore:
http://ift.tt/2uKFM0F
Queries are passed to this URL as a JSON-encoded querystring parameter named q, e.g. fetch all published articles in the collection:
http://ift.tt/2vnljTf;: true}
However, this query will fail without an API key passed in the x-apikey HTTP header. A full-access API key is provided by default but it's advisable to create keys which are limited to specific actions. From the database Settings, API tab:
Click Add New to create a new key. The one I created here is limited to GET (query) requests on the content collection only. You should create a similarly restricted key if you will be using client-side JavaScript Ajax code since the string will be visible in the code.
It's now possible to build a standalone JavaScript query handler (ES5 has been used to ensure cross-browser compatibility without a pre-compile step!):
// restdb.io query handler var restDB = (function() { // configure for your own DB var api = 'http://ift.tt/2uKGivH', APIkey = '597dd2c7a63f5e835a5df8c4'; // query the database function query(url, callback) { var timeout, xhr = new XMLHttpRequest(); // set URL and headers xhr.open('GET', api + url); xhr.setRequestHeader('x-apikey', APIkey); xhr.setRequestHeader('content-type', 'application/json'); xhr.setRequestHeader('cache-control', 'no-cache'); // response handler xhr.onreadystatechange = function() { if (xhr.readyState !== 4) return; var err = (xhr.status !== 200), data = null; clearTimeout(timeout); if (!err) { try { data = JSON.parse(xhr.response); } catch(e) { err = true; data = xhr.response || null; } } callback(err, data); }; // timeout timeout = setTimeout(function() { xhr.abort(); callback(true, null); }, 10000); // start call xhr.send(); } // public query method return { query: query }; })();
This code passes queries to the restdb.io API endpoint and sets the appropriate HTTP headers including x-apikey for the API key. It times out if the response takes longer than ten seconds. A callback function is passed an error and any returned data as a native object. For example:
// run a query restDB.query( '/content?q={"published":true}', function(err, data) { // success! if (!err) console.log(data); } );
The console will output an array of documents from the content collection, e.g.
[ { _id: "1111111111111111", slug: "", title: "Home page", body: "page content...", image: [], published: true }, { _id: "22222222222222222", slug: "page-two", title: "Page Two", body: "page content...", image: [], published: true }, { _id: "33333333333333333", slug: "page-three", title: "Another page", body: "page content...", image: [], published: true } ]
The API can be called from any language which can make an HTTP request. restdb.io provides examples for cURL, jQuery $.ajax, JavaScript XMLHttpRequest, NodeJS, Python, PHP, Java, C#, Objective-C and Swift.
I've created a simple example at Codepen.io which allows you to search for strings in the title and body fields and displays the results:
See the Pen restdb.io query by SitePoint (@SitePoint) on CodePen.
It passes the following query:
{ "$or": [ { "title": {"$regex": "searchstring"} }, { "body": {"$regex": "searchstring"} } ]}
where searchstring is the search text entered by the user.
An additional h querystring parameter limits the returned fields to just the slug, title and published flag:
{ "$fields": { "slug": 1, "title": 1, "published": 1 } }
Further information:
Querying with the API
Code examples for REST API
Step 7: Build Your Own CMS
A few steps were required to create a database-driven website and a simple search facility. You could edit pages directly using restdb.io's user interface but it would be possible to build a bespoke CMS to manipulate the content. It would require:
A new restdb.io API key (or change the existing one) to have appropriate GET, POST, PUT, PATCH and DELETE access to the content collection.
A user interface to browse or search for pages (the one above could be a good starting point).
A process to start a new page or GET existing content and place it in an editable form.
Processes to add, update or delete pages using the appropriate HTTP methods.
The editing system should run on a restricted device or behind a login to ensure only authenticated users can access. Take care not to reveal your restdb.io API key if using client-side code!
Further information:
Data manipulation with REST
Code examples for REST API
Try restdb.io Today!
This article uses restdb.io to build a rudimentary CMS, but the service is suitable for any project which requires data storage. The REST API can be accessed from any language or framework which makes it ideal for applications with multiple interfaces, e.g. a web and native mobile view.
restdb.io provides a practical alternative to managing your own database software installation. It's simple to use, fast, powerful, highly scalable and considerably less expensive than hiring a database expert! Your application hosting costs will also reduce since all data is securely stored and backed-up on the restdb.io servers.
Finally, restdb.io makes you more productive. You can concentrate on the main application because data storage no longer causes concerns for you and your team.
Start building your restdb.io database today and let us know how you get on!
Continue reading %How to Get Started With restdb.io and Create a Simple CMS%
via SitePoint http://ift.tt/2uudPLd
0 notes
Text
Application Telemetry with Prometheus
In my last blog, I’ve explained about deployment pipeline I built for Continuous Integration and Continuous Delivery in ABAP. Another thing that our team has built was the application monitoring. For our Java Spring Boot services, it can seamlessly integrate Prometheus module in the POM file and then your application is ready to be monitored with built-in metrics. I managed to create Prometheus client for ABAP. I will explain how you can setup one for yours below. What is Prometheus? Prometheus is a time series database. It stores your data stream and it also has a web interface so you can query and visualize the data e.g. into a graph. Imagine a temperature measured from a thermometer at regular interval. This is a time series data. In IT operations, this can be like CPU usage, memory allocated, etc. But in our case, we just want to monitor our application. The concept I like is that the server will poll the data from applications instead of getting applications sending the data to the server. This ensures that monitoring will never break your application. If the monitoring server down, your applications are still running fine. Visit their website to learn more. Why do we need to monitor our application? Well, have you ever wondered about the feature that you build, how much is it used by the users? How fast or slow is it? What if you want to experiment which button color would attract the customer better? To answer these questions, you need some kind of monitoring, some kind of metric that you can measure. Let’s start! In this example, I will show you how we can monitor usage and response time of ABAP HelloWorld RESTful APIs. Cloning repository * Clone HelloWorld RESTful APIs using abapGit. Test and make sure it works. Follow this blog for more detail. * Clone Prometheus client for ABAP using abapGit. If you have a problem cloning the class and Shared Memory Area ZCL_SHR_PROMETHEUS_AREA then you can create it on your own as this class is automatically generated from the transaction SHMA. Make sure you configure it precisely as shown below. Recording metrics in your application Prepare runtime for duration metric. Create a new instance attribute for the timer instance. DATA runtime TYPE REF TO if_abap_runtime. In the constructor, start the timer. METHOD constructor. super->constructor( ). me->runtime = cl_abap_runtime=>create_hr_timer( ). ENDMETHOD. Create a new method in the REST resource class (ZCL_REST_RESOURCE). METHODS record_metric IMPORTING i_method TYPE string i_response TYPE i. The method accepts HTTP method and response status code which we will put in the metrics. METHOD record_metric. TRY. zcl_prometheus=>set_instance_from_request( me->mo_request ). zcl_prometheus=>write_multiple( VALUE #( ( key = |hello_count\{method="{ i_method }",status="{ i_response }"\}| value = '1' command = zif_prometheus=>c_command-increment ) ( key = |hello_duration\{method="{ i_method }",status="{ i_response }"\}| value = me->runtime->get_runtime( ) ) ) ). CATCH cx_root. ENDTRY. ENDMETHOD. set_instance* methods will set the Shared Memory Area instance that you can see in the transaction SHMM. So you can use one instance for each application and the metrics can be kept and queried separately. set_instance_from_request will set the instance from the root endpoint by default (i.e. hello) if not explicitly specified by instance attribute or query parameter. There are three fields you need to pass when you want to record metrics (via write* methods) * key is the metric name and its label according to Prometheus data model and metric naming convention. * value is the value to record * command is optional and is ‘overwrite’ by default. Using increment will add value to the current so you don’t need to read and write on your own. Surround the method with try…catch… so this codes will (almost) never break your application. Then you call this method at the end of each API. For example: METHOD if_rest_resource~get. . . . record_metric( i_method = mo_request->get_method( ) i_response = cl_rest_status_code=>gc_success_ok ). ENDMETHOD. Creating the metrics endpoint Next, you need an endpoint for Prometheus server to call and grab the metrics data. In REST handler class (ZCL_REST_HANDLER), insert the following routing string in the method if_rest_application~get_root_handler. lo_router->attach( iv_template = '/hello/metrics' iv_handler_class = zcl_prometheus_rest_resource=>c_class_name ). Testing your endpoint Open your browser and open your /hello/metrics endpoint. You should see a blank page. Try using your application so the metrics are recorded. In case you’re using Postman to test the APIs you can import my Postman files from here.(Please note Postman is a commercial product but there’s a free version available) After one GET and one POST request, refresh the metrics page and you should start seeing the data. Now, your application is ready to be monitored Setting up Prometheus Server Installing Prometheus Download Prometheus from this page. Extract the package and you can run the executable without installing. Note: If you want to install as a window service, you can use NSSM. Open browser and go to http://localhost:9090. and you should see its web UI. Adding a new job to monitor your application Now, your Prometheus server does not yet recognize your application so you need to configure it first. Edit the file prometheus.yml and add the following lines: - job_name: npl-test params: sap-client: ['001'] sap-language: ['EN'] metrics_path: /test/hello/metrics basic_auth: username: DEVELOPER password: yourpassword static_configs: - targets: - vhcalnplci.dummy.nodomain:8000 In your secured environment, you may want to use HTTPS like this: - job_name: npl-test scheme: https params: sap-client: ['001'] sap-language: ['EN'] metrics_path: '/test/hello/metrics' basic_auth: username: DEVELOPER password: yourpassword tls_config: insecure_skip_verify: true static_configs: - targets: ['vhcalnplci.dummy.nodomain:44300'] Please note that you should add one job for each application server. Don’t use load balance URL as the metrics are bound for each application server. Go to transaction SM51 to see the list of all application servers on the system. After saving, restart the service and access the web UI. Query for up metric and click Execute. If your job is setup properly, you should see the value 1. You may try querying your application metric e.g. hello_count. Setting up Grafana Prometheus is good at collecting and querying time series data but to have a better a visualization you may need Grafana. Grafana Sample Dashboard What is Grafana? Grafana is a tool for data visualization & monitoring with support for Graphite, InfluxDB, Prometheus, Elasticsearch and many more databases. In short, Grafana will pull the data from Prometheus and visualize them on their dashboard web interface. We setup a desktop PC with two monitoring screens and put it where the team can see easily. Installation Download from here. Extract and run it the same way you do for Prometheus. Setting up data source First, we need to setup Grafana to recognize Prometheus server. Go to http://localhost:3000 and log in with default username and password (i.e. admin:admin). Select Data Source from the menu and click Add Data Source. Fill in the connection to your Prometheus server like below: Setting up dashboard We’re going to setup 2 graphs to monitor API usage count and response time. Select Dashboards from the menu, click Home and click + New Dashboard. Select Graph. Click the graph title and select Edit. On tab General, name your graph title as you wish. On tab Metrics, you will specify which metric data will be displayed on this graph. Fill in hello_count and put {{method}} ({{status}}) in Legend format. On tab Axes, you can customize the graph axes. Once done customizing, click Back to dashboard on the top-right. Click + ADD ROW to add a new row and create a new graph. Configure tab Metrics with hello_duration with the same Legend format. Configure tab Axes like this: Once done, you should see your dashboard like this. Don’t forget to set the time range and refresh rate so your monitor screen keeps refreshing with the latest data. Try to use your application and see how the graph reflect. http://bit.ly/2EtCKnO #SAP #SAPCloud #AI
0 notes
Text
Application Telemetry with Prometheus
In my last blog, I’ve explained about deployment pipeline I built for Continuous Integration and Continuous Delivery in ABAP. Another thing that our team has built was the application monitoring. For our Java Spring Boot services, it can seamlessly integrate Prometheus module in the POM file and then your application is ready to be monitored with built-in metrics. I managed to create Prometheus client for ABAP. I will explain how you can setup one for yours below. What is Prometheus? Prometheus is a time series database. It stores your data stream and it also has a web interface so you can query and visualize the data e.g. into a graph. Imagine a temperature measured from a thermometer at regular interval. This is a time series data. In IT operations, this can be like CPU usage, memory allocated, etc. But in our case, we just want to monitor our application. The concept I like is that the server will poll the data from applications instead of getting applications sending the data to the server. This ensures that monitoring will never break your application. If the monitoring server down, your applications are still running fine. Visit their website to learn more. Why do we need to monitor our application? Well, have you ever wondered about the feature that you build, how much is it used by the users? How fast or slow is it? What if you want to experiment which button color would attract the customer better? To answer these questions, you need some kind of monitoring, some kind of metric that you can measure. Let’s start! In this example, I will show you how we can monitor usage and response time of ABAP HelloWorld RESTful APIs. Cloning repository * Clone HelloWorld RESTful APIs using abapGit. Test and make sure it works. Follow this blog for more detail. * Clone Prometheus client for ABAP using abapGit. If you have a problem cloning the class and Shared Memory Area ZCL_SHR_PROMETHEUS_AREA then you can create it on your own as this class is automatically generated from the transaction SHMA. Make sure you configure it precisely as shown below. Recording metrics in your application Prepare runtime for duration metric. Create a new instance attribute for the timer instance. DATA runtime TYPE REF TO if_abap_runtime. In the constructor, start the timer. METHOD constructor. super->constructor( ). me->runtime = cl_abap_runtime=>create_hr_timer( ). ENDMETHOD. Create a new method in the REST resource class (ZCL_REST_RESOURCE). METHODS record_metric IMPORTING i_method TYPE string i_response TYPE i. The method accepts HTTP method and response status code which we will put in the metrics. METHOD record_metric. TRY. zcl_prometheus=>set_instance_from_request( me->mo_request ). zcl_prometheus=>write_multiple( VALUE #( ( key = |hello_count\{method="{ i_method }",status="{ i_response }"\}| value = '1' command = zif_prometheus=>c_command-increment ) ( key = |hello_duration\{method="{ i_method }",status="{ i_response }"\}| value = me->runtime->get_runtime( ) ) ) ). CATCH cx_root. ENDTRY. ENDMETHOD. set_instance* methods will set the Shared Memory Area instance that you can see in the transaction SHMM. So you can use one instance for each application and the metrics can be kept and queried separately. set_instance_from_request will set the instance from the root endpoint by default (i.e. hello) if not explicitly specified by instance attribute or query parameter. There are three fields you need to pass when you want to record metrics (via write* methods) * key is the metric name and its label according to Prometheus data model and metric naming convention. * value is the value to record * command is optional and is ‘overwrite’ by default. Using increment will add value to the current so you don’t need to read and write on your own. Surround the method with try…catch… so this codes will (almost) never break your application. Then you call this method at the end of each API. For example: METHOD if_rest_resource~get. . . . record_metric( i_method = mo_request->get_method( ) i_response = cl_rest_status_code=>gc_success_ok ). ENDMETHOD. Creating the metrics endpoint Next, you need an endpoint for Prometheus server to call and grab the metrics data. In REST handler class (ZCL_REST_HANDLER), insert the following routing string in the method if_rest_application~get_root_handler. lo_router->attach( iv_template = '/hello/metrics' iv_handler_class = zcl_prometheus_rest_resource=>c_class_name ). Testing your endpoint Open your browser and open your /hello/metrics endpoint. You should see a blank page. Try using your application so the metrics are recorded. In case you’re using Postman to test the APIs you can import my Postman files from here.(Please note Postman is a commercial product but there’s a free version available) After one GET and one POST request, refresh the metrics page and you should start seeing the data. Now, your application is ready to be monitored Setting up Prometheus Server Installing Prometheus Download Prometheus from this page. Extract the package and you can run the executable without installing. Note: If you want to install as a window service, you can use NSSM. Open browser and go to http://localhost:9090. and you should see its web UI. Adding a new job to monitor your application Now, your Prometheus server does not yet recognize your application so you need to configure it first. Edit the file prometheus.yml and add the following lines: - job_name: npl-test params: sap-client: ['001'] sap-language: ['EN'] metrics_path: /test/hello/metrics basic_auth: username: DEVELOPER password: yourpassword static_configs: - targets: - vhcalnplci.dummy.nodomain:8000 In your secured environment, you may want to use HTTPS like this: - job_name: npl-test scheme: https params: sap-client: ['001'] sap-language: ['EN'] metrics_path: '/test/hello/metrics' basic_auth: username: DEVELOPER password: yourpassword tls_config: insecure_skip_verify: true static_configs: - targets: ['vhcalnplci.dummy.nodomain:44300'] Please note that you should add one job for each application server. Don’t use load balance URL as the metrics are bound for each application server. Go to transaction SM51 to see the list of all application servers on the system. After saving, restart the service and access the web UI. Query for up metric and click Execute. If your job is setup properly, you should see the value 1. You may try querying your application metric e.g. hello_count. Setting up Grafana Prometheus is good at collecting and querying time series data but to have a better a visualization you may need Grafana. Grafana Sample Dashboard What is Grafana? Grafana is a tool for data visualization & monitoring with support for Graphite, InfluxDB, Prometheus, Elasticsearch and many more databases. In short, Grafana will pull the data from Prometheus and visualize them on their dashboard web interface. We setup a desktop PC with two monitoring screens and put it where the team can see easily. Installation Download from here. Extract and run it the same way you do for Prometheus. Setting up data source First, we need to setup Grafana to recognize Prometheus server. Go to http://localhost:3000 and log in with default username and password (i.e. admin:admin). Select Data Source from the menu and click Add Data Source. Fill in the connection to your Prometheus server like below: Setting up dashboard We’re going to setup 2 graphs to monitor API usage count and response time. Select Dashboards from the menu, click Home and click + New Dashboard. Select Graph. Click the graph title and select Edit. On tab General, name your graph title as you wish. On tab Metrics, you will specify which metric data will be displayed on this graph. Fill in hello_count and put {{method}} ({{status}}) in Legend format. On tab Axes, you can customize the graph axes. Once done customizing, click Back to dashboard on the top-right. Click + ADD ROW to add a new row and create a new graph. Configure tab Metrics with hello_duration with the same Legend format. Configure tab Axes like this: Once done, you should see your dashboard like this. Don’t forget to set the time range and refresh rate so your monitor screen keeps refreshing with the latest data. Try to use your application and see how the graph reflect. http://bit.ly/2ElCGXn #SAP #SAPCloud #AI
0 notes
Photo

How to Get Started With restdb.io and Create a Simple CMS
This article was sponsored by restdb.io. Thank you for supporting the partners who make SitePoint possible.
Databases strike fear into the heart of the most experienced developers. Installation, updates, disk space provision, back-ups, efficient indexing, optimized queries, and scaling are problems most could do without. Larger organizations will employ a knowledgeable dev ops person who dedicates their life to the database discords. Yet the system inevitably fails the moment they go on vacation.
A more practical option is to outsource your database and that's exactly the service restdb.io provides. They manage the tricky data storage shenanigans, leaving you to concentrate on more urgent development tasks.
restdb.io: the Basics
restdb.io is a plug and play cloud NoSQL database. It will be immediately familiar to anyone with MongoDB experience. The primary differences:
there's no need to manage your installation, storage or backups
you can define a data structure schema in restdb.io
data fields can have relationships with other fields in other collections
there's no need to define indexes
data can be queried and updated through a REST API authenticated by HTTP or Auth0/JWT tokens
queries and updates are sent and received in JSON format
there are tools to enter, view and export data in various formats
it supports some interesting bonus features such as codehooks, email, web form generation, websites, realtime messaging, and more.
A free account allows you to assess the service with no obligation. Paid plans offer additional storage space, query throughput, developer accounts and MongoDB integration.
In the following sections I'll describe how to:
configure a new database and enter data
use that data to render a set web pages hosted on restdb.io, and
use the API to provide a search facility for content editors.
Step 1: Create a New Database
After signing up with a Google, Facebook or email account, you can create a new empty database. This generates a new API endpoint URL at yourdbname.restdb.io:
Step 2: Create a New Collection
A database contains one or more collections for storing data. These are analogous to SQL database tables. Collections contain "documents" which are analogous to SQL database records (table rows).
The restdb.io interface offers two modes:
Standard mode shows the available collections and allows you to insert and modify data.
Developer mode allows you to create and configure collections.
Enter Developer Mode (top-right of screen) and click the Add Collection button.
A collection requires a unique name (I've used "content") and an optional description and icon. Hit Save to return to your database overview. The "content" collection will appear in the list along with several other non-editable system collections.
Alternatively, data can be imported from Excel, CSV or JSON files to create a collection by hitting Import in the standard view.
Step 3: Define Fields
Staying in Developer Mode, click the "content" collection and choose the Fields tab. Click Add Fields to add and configure new fields which classify the data in the collection.
Each collection document will sore data about a single page in the database-driven website. I've added five fields:
slug - a text field for the page path URL
title - a text field for the page title
body - a special markdown text field for the page content
image - a special image field which permits any number of uploaded images (which are also stored on the restdb.io system)
published - boolean value which must be true for pages to be publicly visible.
Step 4: Add Documents
Documents can be added to a collection in either standard or developer mode (or via the API). Create a few documents with typical page content:
The slug should be empty for the home page.
Step 5: Create a Database-Driven Website (Optional)
restdb.io provides an interesting feature which can create and host a database-driven website using data documents in a collection.
The site is hosted at www-yourdbname.restdb.io but you can point any domain at the pages. For instructions, click Settings from the Database list or at the bottom of the left-hand panel then click the Webhosting tab.
To create the website, Pages must be configured in Developer Mode which define templates to view the content. Templates contain a code snippet which sets:
the context - a query which locates the correct document in a collection, and
the HTML - a structure which uses handlebars template syntax to insert content into appropriate elements.
Click Add Page to create a page. Name it the special name /:slug - this means the template will apply to any URL other than the home page (which does not have a slug). Hit Save and return to the page list, then click the /:slug entry to edit.
Switch to the Settings tab and ensure text/html is entered as the Content Type and Publish is checked before hitting Update:
Now switch to the Code for "/:slug" tab. Enter the context code at the top of the editor:
{ "docs": { "collection": "content", "query": { "slug": "", "published": true } } }
This defines a query so the template can access a specific document from our content collection. In this case, we're fetching the published document which matches the slug passed on the URL.
All restdb.io queries return an array of objects. If no document is returned, the docs array will be empty so we can add code to return that the page is not available immediately below the context:
<!doctype html> <html> <body> <h1>Page not available</h1> <p>Sorry, this page cannot be viewed. Please return later.</p> </body> </html>
Below this, we can code the template which slots the title, body and image fields into appropriate HTML elements:
<html> <head> <meta charset="utf-8"> <title></title> <meta name="viewport" content="width=device-width,initial-scale=1"> <style> body { font-family: sans-serif; font-size: 100%; color: #333; background-color: #fff; max-width: 40em; padding: 0 2em; margin: 1em auto; } </style> </head> <body> <header> <img src="http://ift.tt/2uKONXr}}" alt="image" /> <h1></h1> </header> <main> <p><a href="/">Return to the home page...</a></p> </main> </body> </html>
Note our markdown body field must be rendered with a markdown handler.
Save the code with Ctrl|Cmd + S or by returning to the Settings tab and hitting Update.
The /:slug page template will apply to all our content collection — except for the home page, because that does not have a slug! To render the home page, create a New Page with the name home with identical settings and content. You may want to tweak the template for home-page-specific content.
Once saved, you can access your site from https://www-yourdbname.restdb.io/. I've created a very simple three-page site at http://ift.tt/2ut9U5n.
For more information about restdb.io page hosting, refer to:
Pages and Database Driven Website Hosting
The restdb.io Dynamic Website Demo
handlebar template syntax
Step 6: API Queries
Creating a site to display your data may be useful, but you'll eventually want to build an application which queries and manipulates information.
restdb.io's REST API provides endpoints controlled via HTTP:
HTTP GET requests retrieve data from a collection
HTTP POST requests create new documents in a collection
HTTP PUT requests update documents in a collection
HTTP PATCH requests update one or more properties in a document in a collection
HTTP DELETE requests delete documents from a collection
There are a number of APIs for handling uploaded media files, database meta data and mail but the one you'll use most often is for collections. The API URL is:
https://yourdbname.restdb.io/rest/collection-name/
The URL for my "content" collection is therefore:
http://ift.tt/2uKFM0F
Queries are passed to this URL as a JSON-encoded querystring parameter named q, e.g. fetch all published articles in the collection:
http://ift.tt/2usudjk{"published": true}
However, this query will fail without an API key passed in the x-apikey HTTP header. A full-access API key is provided by default but it's advisable to create keys which are limited to specific actions. From the database Settings, API tab:
Click Add New to create a new key. The one I created here is limited to GET (query) requests on the content collection only. You should create a similarly restricted key if you will be using client-side JavaScript Ajax code since the string will be visible in the code.
It's now possible to build a standalone JavaScript query handler (ES5 has been used to ensure cross-browser compatibility without a pre-compile step!):
// restdb.io query handler var restDB = (function() { // configure for your own DB var api = 'http://ift.tt/2uKGivH', APIkey = '597dd2c7a63f5e835a5df8c4'; // query the database function query(url, callback) { var timeout, xhr = new XMLHttpRequest(); // set URL and headers xhr.open('GET', api + url); xhr.setRequestHeader('x-apikey', APIkey); xhr.setRequestHeader('content-type', 'application/json'); xhr.setRequestHeader('cache-control', 'no-cache'); // response handler xhr.onreadystatechange = function() { if (xhr.readyState !== 4) return; var err = (xhr.status !== 200), data = null; clearTimeout(timeout); if (!err) { try { data = JSON.parse(xhr.response); } catch(e) { err = true; data = xhr.response || null; } } callback(err, data); }; // timeout timeout = setTimeout(function() { xhr.abort(); callback(true, null); }, 10000); // start call xhr.send(); } // public query method return { query: query }; })();
This code passes queries to the restdb.io API endpoint and sets the appropriate HTTP headers including x-apikey for the API key. It times out if the response takes longer than ten seconds. A callback function is passed an error and any returned data as a native object. For example:
// run a query restDB.query( '/content?q={"published":true}', function(err, data) { // success! if (!err) console.log(data); } );
The console will output an array of documents from the content collection, e.g.
[ { _id: "1111111111111111", slug: "", title: "Home page", body: "page content...", image: [], published: true }, { _id: "22222222222222222", slug: "page-two", title: "Page Two", body: "page content...", image: [], published: true }, { _id: "33333333333333333", slug: "page-three", title: "Another page", body: "page content...", image: [], published: true } ]
The API can be called from any language which can make an HTTP request. restdb.io provides examples for cURL, jQuery $.ajax, JavaScript XMLHttpRequest, NodeJS, Python, PHP, Java, C#, Objective-C and Swift.
I've created a simple example at Codepen.io which allows you to search for strings in the title and body fields and displays the results:
See the Pen restdb.io query by SitePoint (@SitePoint) on CodePen.
It passes the following query:
{ "$or": [ { "title": {"$regex": "searchstring"} }, { "body": {"$regex": "searchstring"} } ]}
where searchstring is the search text entered by the user.
An additional h querystring parameter limits the returned fields to just the slug, title and published flag:
{ "$fields": { "slug": 1, "title": 1, "published": 1 } }
Further information:
Querying with the API
Code examples for REST API
Step 7: Build Your Own CMS
A few steps were required to create a database-driven website and a simple search facility. You could edit pages directly using restdb.io's user interface but it would be possible to build a bespoke CMS to manipulate the content. It would require:
A new restdb.io API key (or change the existing one) to have appropriate GET, POST, PUT, PATCH and DELETE access to the content collection.
A user interface to browse or search for pages (the one above could be a good starting point).
A process to start a new page or GET existing content and place it in an editable form.
Processes to add, update or delete pages using the appropriate HTTP methods.
The editing system should run on a restricted device or behind a login to ensure only authenticated users can access. Take care not to reveal your restdb.io API key if using client-side code!
Further information:
Data manipulation with REST
Code examples for REST API
Try restdb.io Today!
This article uses restdb.io to build a rudimentary CMS, but the service is suitable for any project which requires data storage. The REST API can be accessed from any language or framework which makes it ideal for applications with multiple interfaces, e.g. a web and native mobile view.
restdb.io provides a practical alternative to managing your own database software installation. It's simple to use, fast, powerful, highly scalable and considerably less expensive than hiring a database expert! Your application hosting costs will also reduce since all data is securely stored and backed-up on the restdb.io servers.
Finally, restdb.io makes you more productive. You can concentrate on the main application because data storage no longer causes concerns for you and your team.
Start building your restdb.io database today and let us know how you get on!
Continue reading %How to Get Started With restdb.io and Create a Simple CMS%
by Craig Buckler via SitePoint http://ift.tt/2hOHQDK
0 notes