#also shader nodes(?) are confusing
Explore tagged Tumblr posts
Visit Tumblr Blog
Explore Tumblr blogs with no restrictions, modern design and the best experience.
Last Seen Tumblr Blogs


Fun Fact
In 2020, Tumblr had 29.4 million users in the US.
Text
rotate 360°
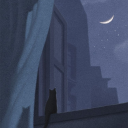
#weiss schnee#derg AU#rwby#..#my art#(?)#there was an attempt#gonna kms!!!!#blender kept randomly crashing!!!!!!!!!#anyways this took two days to do idk why#still not very good at the software so yeag;;;#it's so confusinggg#round derg ily#she has little fangs but it's kinda hard to see#there definitely are ways to improve on this#might remake it sometime when i get better lol#also shader nodes(?) are confusing#like how are you supposed to know what to connect what with#jumps off a cliff
203 notes
·
View notes
Text
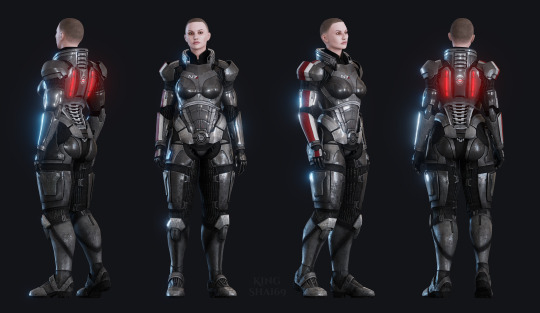
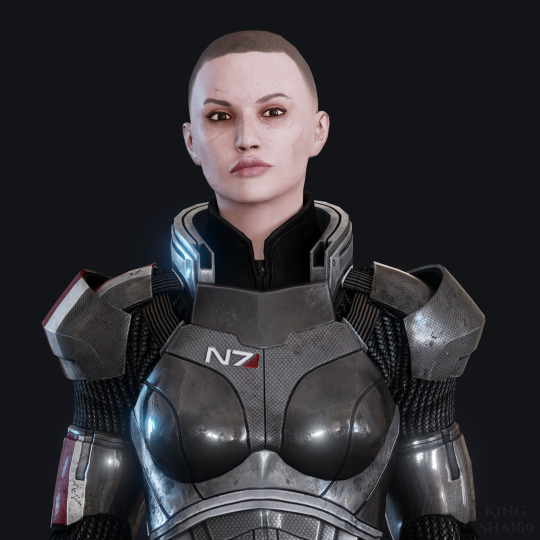
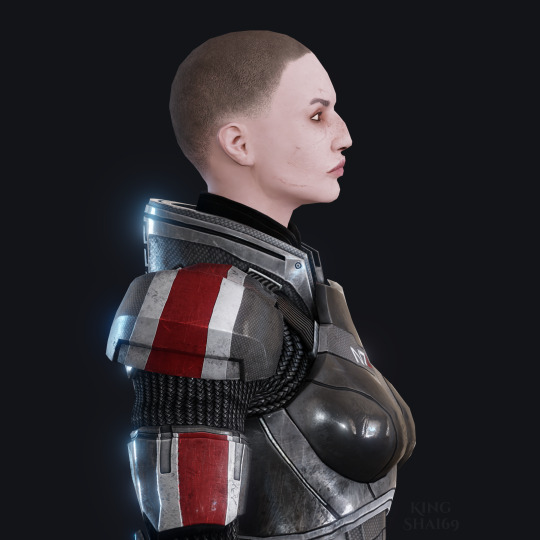
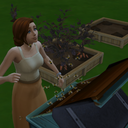
was editing her armor to fit the bulkier body edit i made for her casual outfits n remembered i have free will n can just make fake promo renders of her
#yes i could try n match the style of the official renders but have u considered SHINY SPARKLY GLARE which brings me joy#elanore shepard#commander shepard#femshep#mass effect#jackies 3d stuff#oc blogging#im so happy w her head edit ok almost fixed bone placements n she looks so good in game too aaaaah#this is just the raw extracted textures in blender w shader nodes idk if i keep being sidetracked by renders i might do a lil retex n rerig#just for render stuff bcs i hate the elbows on the standard rig its been the biggest cause of my modding troubles the past 2 weeks#n also im still trying to get used to the spec gloss workflow its confusing i still havent identified every type of tex packed in channels#adding new armor n outfits to the game was easy enough but now that i have to replace meshes im very confused so i keep getting sidetracked#as soon as my modding adventures leave blender n substance painter im very much out of my element
2 notes
·
View notes
Text
I think really the worst part of geo nodes isn't even trying to be halfway between grasshopper and houdini, its that it also wants to do with the same UI that was designed for compositing and shaders, both of which involve operations on the entirety of an object (a piece of geometry or a set of images). Meshes, curves and surfaces simply do not fit into that same mold. They are objects that contain numerous components and collections of components which are the main things you'll want to be interacting with. Shit that would take 3 or 4 nodes in Grasshopper or maybe 1 or 2 in Houdini take like 15 in Blender because you need a separate node to handle every. single. tiny. thing. It's messy and confusing and annoying and tedious as fuck.
0 notes
Note
How did you actually start making these models or how do you basically have the motivation to do so, i really wanna try modeling like yours but im so confused on where to start😵💫
My motivation originally came from wanting to animate, but to animate in 3d you also have to know how to model, texture, and shade... As of some resources to start, I've included what helped me the most under the cut!
Getting Started:
Im sure anybody new to learning blender has probably heard of blender guru, if not, ill be happy to introduce him!
youtube
He's honestly what helped me the most with getting familiar with all the in's and out's of creating a good render, as well as figuring out how to go about approaching certain things. He also has a few older videos (blender 2.79 my beloved and behated....) that walks you through the process of creating different renders. My only problem with them is that they're a bit long...
youtube
ok hear me out, this actually really helped me with learning how to model in general. This tutorial may be old but it honestly taught me things like using the mirror modifier (an actual lifesaver), and how to approach modeling more complex shapes. Yea i get that the entire tutorial is kinda hyper specific but sometimes you just gotta roll up your sleeves and say "today im going to learn how to model a lowpoly elephant"
Intermediate:
have you gotten bored of making lowpoly elephants? Time to expand onto more advanced things, like people! One of the absolute best tutorial makers i've ever seen with my own two peepers is daniel krueter
youtube
Again, a bit of an old tutorial, its what opened the door to creating characters for me. He expands upon more complex box modeling, as well as introduces you to edge modeling for more specific shapes like the face. I'm pretty sure he also goes a lil bit into topology, and edge flow, but in case he doesn't the general idea is: quads are amazing and beautiful, tris can stay but are on thin ice, and n-gons are the devils spawn. (you know its true because it rhymes)
youtube
youtube
Two other tutorials from him that utilize 2.8+ and a lil bit of sculpting/retopologizing. To be honest I haven't really gotten around to watching these, but I would recommend the second one if you want a more in-depth look on how he did certain things, whereas if you want a general view of his process you should take a look at the first one.
If you're looking for some ✨quick tips✨ a few recommendations I have are Gleb Alexandrov, Cgmatter/Default Cube, and Ian Hubert.
Gleb Alexandrov has a lot of tips on just how to make things look a lil bit better, rendering/material-wise
Cgmatter/Default Cube do more technical tutorials, like how you would go about making certain things, abstract or otherwise
Ian Hubert is kinda like Cgmatter but they do more tutorials on things you would find out in the wild such as buildings, fish, posters, and scary nightmare men! (They also do a lot of vfx/hard surface stuff which i think is super cool)
And finally, leaning on the more advanced side is Dikko
youtube
youtube
he does quite a few tutorial videos for things like Adobe Illustrator/Maya both of which i don't have because im broke but i mainly really like their rigging/hand modeling tutorials. I'm pretty sure he introduces drivers for the different controllers of rigs and ik constraints, but im not sure because i haven't really gotten around to watching the whole thing.
Advanced; Learning to Stylize:
From here it gets a lil bit more abstract because theres no "right" way to stylize, whereas with photorealistic rendering most of the time there is a very clear line between real-lookin and not real-lookin. A lot of it is just kinda what looks good.
My go-to person for stylized environments is Kristof Dedene, he makes some of the prettiest shaders ive ever seen. (im a huge fan of his water shader)
youtube
he has tutorials for clouds, waterfalls, buildings, rocks, and grass which all look so good i could cry
My absolute beloved, my blorbo, my favorite activity. Sam Bowman is like the godfather of all things procedural, words cannot describe how much this man has helped me make funny lil designs for my funny lil projects. Everyone should watch his videos (and subscribe while youre at it, my boy is criminally underrated)
A geometry nodes connoisseur (if theyre doing geo nodes you know they got the class that wont quit). Their renders are really cool to look at, but geo nodes scare me so i haven't really gotten around to doing their tutorials yet, still would definitely recommend them if youre interested!
ok so if im being completely honest i don't know what hes doing, but in my defense i don't think anyone else does either. His newest normal editing series is witchcraft to me but i think its funny how he casually dabbles in the dark arts so im including him in here. He's covered a lot from uvs, to masks, to drivers, to shaders, but again they are all kinda advanced so proceed with caution.
And because this post wasn't long enough heres some extra people to check out who do kinda tutorial stuff (but mostly i just like looking at their work)
Bobacupcakes - Who i reference the most whenever i wanna make something sparmkly (i know the link leads to twitter but theyre also on tumblr)
Rukikuri - prebbty models!! (some normal editing too!)
Niall Stenson - kinda a grab bag of stuff (i just think theyre neat)
Late as Usual - another wild geo node wizard!
Dillon Goo - suuuuper cool animator (i like their fight scenes)
Rui - neato burrito 3d character creator (their textures are godly)
Dyzi&liz - im pretty sure theyre actually making an entire show in blender and i am both scared and amazed
Yoolie - another 3d character creator <3
高部 - テクスチャが大好き~~~ ;0; いちばんすきなテクスチャアーティスト!!
Nugget - Yet another wizard that dabbles in the darkest of arts (im pretty sure ive mentioned them before but in case i haven't theyre the person who's node setup ive been using for raymarching textures)
かめ山 - モデルはとてもかわいい~~
Im sorry that most of these people are from the bird app, but trust me they are definitely worth checking out
Super Secret Bonus Channel For Those Like Me Who Are Constantly Frothing At The Mouth For More Bnpr Content. We Want It, Crave It. We Lurk In The Shadows Waiting With Slacked Jaws And Glazed Eyes, Waiting For The Next Model To Descend Down Upon In Droves:
86 notes
·
View notes
Text
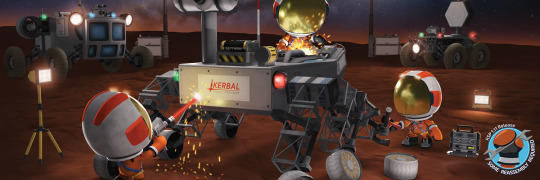
Kerbal Space Program 1.11: "Some Reassembly Required" is now available!
Hello everyone!
Gear up Kerbonauts, engineers are required for some in situ reassembling! Stack up your inventory with parts and tools in order to prepare for any contingencies. With a reimagining of the game’s inventory system and the introduction of a new EVA construction mode, KSP is here with new content for everyone!
Kerbal Space Program 1.11: Some Reassembly Required is the game’s latest major free update and with it, we’re adding some significant and game changing elements that give players added flexibility and a more immersive KSP experience. Pack an inventory for your missions and modify your crafts or even assemble a new vehicle on the spot with the help of your engineers, or bring an EVA Science Experiment Kit and have your Kerbals undertake fun animated experiments. In addition to some new parts, visual enhancements, and some bug-fixing, Some Reassembly Required continues to enrich the KSP experience.
Let’s go through some of the update’s highlights below:
EVA Construction Mode
This mode gives your engineers tools similar to what you find in the VAB/SPH to manipulate parts in their inventory or within their range while on EVA in any location. Need to make some adjustments to your Vallerian SSTO, or build an improvised Munar rover in situ? Now you can!

youtube
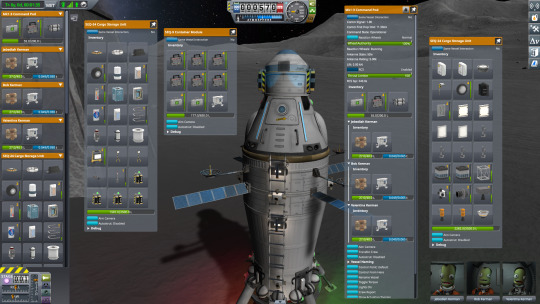
Inventory System Changes
This update expands upon the inventory system and gives it deeper meaning and functionality! These changes include the option to carry and stack various parts in your craft’s inventory and adds to the ability of Kerbals to carry an inventory of their own. All while making it easier to get access to and manage all of the inventories on a craft. Just remember to think wisely on what you want to bring with you on a mission…
New Lights and RCSs
Some Reassembly Required adds new lights parts to the game, including some smaller, physics-less lights as well as a couple of deployable lights that work without the need for an attached craft or EC power source. And not only that, two new smaller Reaction Control Systems are being added to the part repertoire! These smaller RCS are perfect to make your probes, drones or smaller crafts more mobile and versatile.

Joolian Moons’ Visual Improvements
With this update, we will continue with the overhauling of the rest of the Joolian satellite system with Bop, Vall and Tylo. These moons have been popular destinations for intrepid space explorers and now they will look better than ever before, with high-quality texture and graphic shaders.
youtube
youtube
youtube
And more!
To learn more you can read the full Changelog here:
============================= v1.11.========================
+++ Improvements
* Improve version checking for save files to prevent incorrect compatability messages. * Added game setting to enable Ghosted Navigation Markers. These let you see targets behind you by presenting a faded marker on the navball as if you are looking through the navball. * Text in action group labels now moves if truncated so the text can be fully read. * A notification is displayed on the Fairings PAW when it has a flag attached and the sides and edit Fairing options are blocked. * Robotic Controllers like KAL can now be accessed by EVA Kerbals to Play and Stop the Sequence. * Revamped Vall! It now has a low, medium and high quality shaders as well as a new scaled space textures. * Revamped Tylo! It now has a low, medium and high quality shaders as well as a new scaled space textures. * Revamped Bop! It now has a low, medium and high quality shaders as well as a new scaled space textures. * Launchclamps will now default to the earliest stage on a craft. * Added a speed slider to the Axis Groups Binding so players can control how fast a binding will move. The value shown is in % of full axis range per second. * Expanded on the Warp to Sunrise button functionality. It's now available in flight and Tracking Station whenever it makes sense. * Added onscreen tab to Map Filters panel to make it more obvious and changed the behaviour to be click to toggle like the navball tab. * Implemented Menu Navigation on the Action Groups in Flight. * Added new Color Picker for the Kerbal Light Color during Flight. * Parts of the same type and variant can now be stacked in a single inventory slot. Each part has a maximum allowed stack amount. * Change PPD-10 Hitchhiker and Mk3 Passenger Module mass to align with passenger/mass ratio of Mk1 Crew cabin. * Change PPD-12 Cupola Cost and Mass to align with cost/mass ratio of Mk1 Capsule. * Change Mk2 Crew Cabin mass to incorporate wing mass. * Don't put parachutes in the first (launchpad) stage by default. * Crewable part masses revised to account for crew mass and their cargo. * Crew now have mass when on IVA (inside parts) along with their cargo. * The Flag browser now categorizes flags into groups. * Added RocketLabs and Electron flags. * Added EVA Construction Mode. * Amended dV and orbit calcs to use Double precision. * Some large parts cannot be put into cargo containers but can be manipulated in EVA construction mode. * Players can no longer assign the Undock node Action. This has been removed as it was causing confusion with the Decouple node Action in some parts. Crafts with the action assigned can still fire it. * Construction Mode provides CoM CoT CoL overlays. * Kerbals stop climbing on reaching the end of a ladder. A new toggleable game setting Check ladders end enables/disables the behavior. * SEQ-3 and SEQ-9 Cargo Containers are now Stock parts. * All Cargo Parts can now be searched by the tag cargo in editor and mission builder. * Flight Info debug window now shows the angle of the surface the vessel is currently on. * Asteroids have new textures and shader. * New rover construction contract for career games. * New vessel repair contract for career games. * New satellite upgrade contract for career games. * Improvements over the Kerbal jittery movement. * Comet visual FX performance improvements. * Added a repair kit part. Now repairing broken parts uses up repair kits, be sure to have some in your Engineer's inventory. * Added new EVA science experiments and animations. * Kerbal Jetpack and Parachute are now cargo items that kerbals must carry in their inventory to use them. * Kerbals in EVA use EVA propellant from EVA cylinder parts and Jetpacks that they are carrying. * EVA cylinder parts and Jetpacks are refilled when they are transferred back into a vessel from a kerbal. * Amended dV and orbit calcs to use Double precision. * Make render probes fade in better when a new render probe is added. +++ Localization * Removed line breaks in the Orbit's Ejection field tooltip. * Fix missing localized text in the Robotic controller name input field. * Multiple bug fixes for all languages. * Navigation console had missing space for the field IZQUIERDA which affected only Spanish. * Fix fairing variants having wrong language on textures in English and French. * Multiple string additions and corrections for some languages. * Fix spelling of BepiColombo and Rosetta. * Multiple KSPedia fixes all languages. +++ Parts * The LFB KR-1x2 Twin-Boar Liquid Fuel Engine now has the correct diameter. * Added colliders to all flag part variants. * Removed the gaps of the FL-R25 RCS Fuel Tank when attached to other tanks. * New SEQ-24 Cargo Storage Unit and new SEQ-1C Conformal Storage Unit. * New Place Anywhere 1 Linear RCS Port. * New RV-1X Variable Thruster Block. * New Repair kit part. * Added new EVA science experiment kit. * EVA Fuel Cylinder cargo part. * Fix gap in the Mk2 Cockpit IVA. * HG-5 High Gain Antenna is now placed correctly in mirror symmetry. * Fix LFB KR 1x2 'Twin Boar' off placed surface attach underneath. +++ Bugfixes * Revised the instructions on several tutorials regarding the recent changes to the flight UI mode toggling. * Fix issues with fairing shaders when width/height ratio is extreme. * Craft file name is now independent of command pod vessel naming, preventing accidental overwrites when re-naming command pods. * Fix flickering orbit lines in mapview. * Fix an overlap in some languages between the Header and vessel stats field in the craft browser dialog. * Fix part joint failure including autostruts when target RigidBody is same as host RigidBody which can occur in some edge cases. * Fix tourists from being EVA'd from a command seat. * Fix steep textures shaking on lower quality shaders after reentry. * Fix payload inside fairing not being released when decoupled and fairings are still intact. * Fix resource transfer failing when opening and closing a parts action windows several times. * Fix inventory part tooltips lingering on the screen when changing Camera Mode. * Fix EVA Kerbal walking animation sync, timing and bounding issues. * Fix EVA Kerbal sliding issues. * Fix menu navigation issues when navigating between columns in the Action Groups menu. * Fix craft thumbnails not showing fairings. * Fix Female Kerbals not walking correctly on some low g bodies. * Fix Incremental speed sliders now update on symmetric parts on the Action Groups Menu. * Fix Comet Sample contracts not completing if comet is renamed by the player after the science sample is taken. * Fix AOOREs and flow on effects that occur on vessel markers for vessels that use ( as the first character in their name. * Fix issue with flags on parts that are set flipped that also have variants set not flipping the flag textures. * Fix AOORE on temperature gauges when parts explode. * Fix NRE on adding any action to action groups. * The crew inventory initialization doesn't break the kerbal roster initialization on the astronaut complex. * Fix alignment in action group text in the action group editor window. * Fix localization of tech tree node names in UI. Including Part Upgrades. * Fix Camera controls are now enabled when the Action Groups panel is open during Flight. * Fix Staging is now Locked when Action Groups panel is open during Flight. This could cause firing unintentional staging while having the panel opened. * Fix issue with SEQ-3 search tags. * Fix inconsistency in the detection of hatch obstruction. * Fix click-through issue occuring with the main menu expansion dialogs. * Fix Action groups UI becoming non-functional on pressing the KAL's Action Groups button more than once. * Fix Kerbals rotating when walking on hills. * Fix System set to Time Zone that KSP can't handle from crashing the game. eg: Hong Kong. * Fix the Comet and Asteroid showing up in the Size3 Bulkhead filter. * Fix issue that prevented fairing panels from exploding when colliding. * Fix mistake in the 1.10 section of the changelog. * Fix the white rectangle showing in both Advanced Grabbing Units when rotating in the part picker. * Fix multiple comet comas blotting out the sky when a comet breaks up on reentry. * Fix lighting issues in Terrain System. * Fix issue with forward axis not updating properly. * Fix Fuel tanks could get stuck with no references to transfer resources when opening and closing PAWs while a transfer was being done. * Fix Kerbals neck showing when swimming. * Fix Grand Tour contracts need a new vessel to be built requirement. * Fix default helmet and neck ring settings not applying on first EVA. * Fix KSPedia continues to work as expected even after closing it abruptly while a slide was loading. * Fix Color values update correctly now in the color picker for HSV values and sliders. * Fix undo in editor with fairings changing materials on cargo bays. * Fix comet science contracts failing when sample has been collected but not yet transmitted or returned. * Fix the kerbal ladder sliding. * Fix Color values update correctly now in the color picker for HSV values and sliders. * Fix camera being too far from vessel when exiting map view in some situations. * Fix the Kerbals hands on fire idle arms shrinking at the end. * Fix Paws are automatically opened when hovering a cargo part over an inventory in the Editor. +++ Modding * Inventory system is now persisted as a list of protoparts instead of a comma-separated string of names. The old system is still there for compatibility, but the new one is preferred. * LightOn/Off events have been replaced with a toggle event on the PAW to reduce PAW redraw. The events still exist and can be triggered, but are hidden from the PAW. * Tech Tree now correctly reads all TechTree nodes from gamedata folder. * QuaternionD now supports LookRotation. * Implemented FlightVesselOverlays class to implement the Center overlays to be displayed in flight. * New pre-generated craft and locations capability for contracts in career games. * ModuleInventoryPart.allowedKerbalEvaDistance obselete in preference to GameSetting.EVA_INVENTORY_RANGE. * Parts now have a minimum Rigidbody mass minimumRBMass which affects how small the rigidbodies mass can be. Does not affect part.mass - which is whats used to calculate force, etc - but does affect rigidbody collisions. ==================== Making History 1.11.0 ===================== +++ Improvements * Added the option "All SAS Modes on all probes" to the Mission Builder Start node Difficulty options. The same option found in Sandbox games. +++ Localization * Fix mission validation report dialog not displaying validation options text in Chinese and Japanese. +++ Parts * Added colliders to all flag part variants. * Fix the LV-TX87 Bobcat Liquid Fuel Engine's attach rules, no more surface attach. +++ Bugfixes * Engine plates now shroud parts attached to nodes inside shroud from airstream. * Fix user is was unable to switch the GAP Vessel Token from Aircraft to Rocket after saving a mission with the Aircraft selection. * Change the error message when you try to launch a vessel in the SPH with the same name in the VAB or vice-versa. * Fix issue with Mission Builder when animating parts are toggled when the flight scene loads. * Fix the seam on the Making History suit helmet. * Fix active vessel not switching when explode part node fires in missions. * Fix undo in editor with fairings changing materials on cargo bays. ================== Breaking Ground 1.6.0 ===================== +++ Improvements * Added toggle to enable or disable a KAL controller. +++ Bugfixes * Fix InventoryModules adding mass to a part even if there was no cargo in it. * Fix floating Mun ROCs by adjusting the meshes. * Fix NRE in deployed science when retrieving experiment parts.
Kerbal Space Program 1.11: Some Reassembly Required is now available on Steam and will soon be available on GOG and other third-party resellers. You will also be able to download it from the KSP Store if you already own the game.
Happy launchings!
39 notes
·
View notes
Text
Recoloring assets at runtime in elf game
(crossposted from https://paranoodle.itch.io/elf-game/devlog/75412/recoloring-assets-at-runtime-in-elf-game )
intro
first disclaimer: this is just how i decided to do things and i've been using godot for barely a month so there's likely things that could be done better, but it does work. that said if you have suggestions on how to improve feel free to let me know!
when i was trying to decide on ways to handle color choices in the character creator, two implementation options were covered in example/guides and the such:
have every asset image available in every color
have every asset image available once in white, and use modulate/multiply to add color programmatically
the issues with (1) should be pretty obvious: not only do you have to recolor everything manually, but you have to have as many files for each asset as you have colors, so it scales incredibly badly both time-wise (your time) and storage-wise (you need to have all the files included with the game).
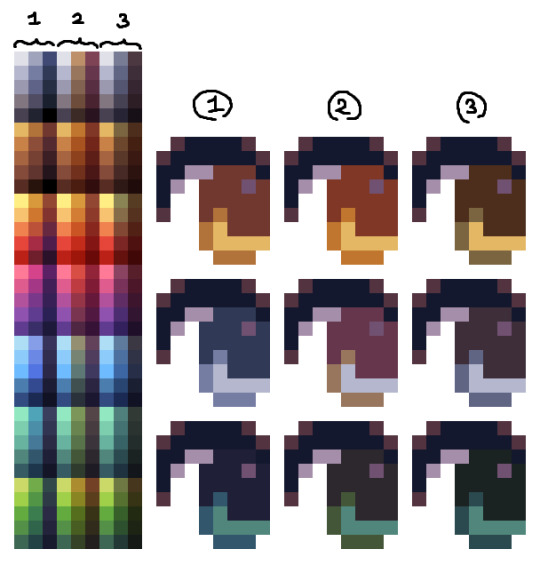
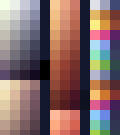
(2) already sounds more reasonable, since it scales well both time-wise and storage-wise, but the way modulate works means that you only use one color to modulate with, instead of having control over every swatch in the image. that's not inherently a bad thing, but i personally like having control over all the colors in an image (doubly so for pixel art). see below for the difference between column 1 (manual palettes) and 2-3 (modulate with different color bases).
so, in comes option 3, which i ended up coding from scratch and is what i decided to implement in this game: have every asset image available once in a pre-determined palette, and use shaders to palette-swap at runtime. it scales as well as (2) because i only need one image per asset, and while setting up the palettes takes a little longer, it's work that only has to be done once and then never needs touching again.
in theory it'd be possible to set up the list of palettes as just using Color objects or hex codes, but i find it a lot more intuitive to make/edit the palette file in an image editor, so i went and coded a script that can read the palette file i give it and translate to Color objects as needed.
so, in practice, on top of the standard asset files, i end up with two other files:
a "reference" file that lists all the colors from the asset files i want to edit (from left to right: hair color, skin color, marking color, eye colors)

a "palette" file that lists all the palettes i want to make available (truncated preview, from left to right: hair colors, skin colors, eye colors)
(note: you can also make one file for each type of palette you want, i just wanted to keep everything in one place because otherwise i get easily confused. it's very slightly simpler code if you have one file for hair colors, one for skin colors, etc)
and using those, i need to code two things: some manner of ui so people can select palettes, and the shaders to actually apply said selection.
palette selection node
the palette selection is reasonably simple to set up, we just need to:
decide what columns in the palette file we're reading from, and which one specifically to display as the selectable swatch
read through all the lines in the palette file, and for each of them, build an array of Color objects corresponding to the palette
fill our grid node with a bunch of buttons that link a swatch to a whole palette
in practice, here's a runthrough of the code for the palette selection node (implemented as a GridContainer, using markings as an example):

3: used to keep track of which part of the character i'm recoloring, edited via the node options 5: signal sent when we click on a swatch, containing the palette info linked to that swatch 7: list of all the swatch buttons in the palette grid 9-11: textures for the buttons (light/dark versions on press to prevent from blending in with the swatch/background) 13: ButtonGroup is necessary to handle toggle functionality on the swatch buttons (we only want one of them selected at any given time) 14: used to prevent sending the recolor signal again if we click on the same button twice in a row
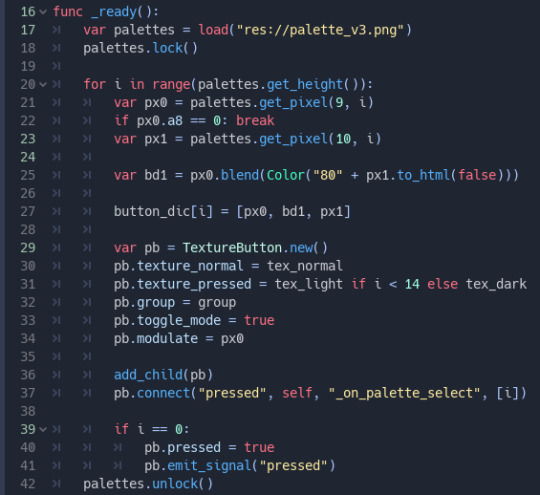
17-18: loads the palette file and locks it so we can read pixel data 21-27: reads the pixels from the palette file and stores them into an array. line 22 stops the loop if we reach a line of transparent pixels (no more colors to read!) and line 25 blends a 50/50 mix of two of the pixels programmatically because it's easier than blending it myself in aseprite 29-34: creates the actual swatch buttons, sets the appropriate light/dark texture, and sets its modulate to the first color in the palette 36-37: adds the button to the grid and links its "pressed" signal to a function later in the file 39-41: "clicks" on the first swatch so we don't get any weird behavior with not having any of the swatches toggled when the menu opens 42: locking the palette file again since we're done using it

as mentioned in line 37 above, this sends a signal with the key defined in line 3 and the palette linked to the swatch that was clicked, but ignores any clicking on the currently selected button
coding the shader
in theory the shader is reasonably simple, since essentially all we need is "here's a file with the target colors, here's another with the new colors" and let it do the replacing, but in practice it's not quite trivial to write, especially for someone like me who's new to shader coding.

in the editor for the parameters, old_palette and new_palette are both the reference file listed earlier (imported as a texture), and palette_size is the width of the reference file. there isn't a ton to comment past that. for every color in the palette, we replace the old one in the image with the new one, keeping opacity intact.
tying everything together
with the shader and buttons coded, all that's left is something to tie the signal to the shader, and it's this little snippet of code here:
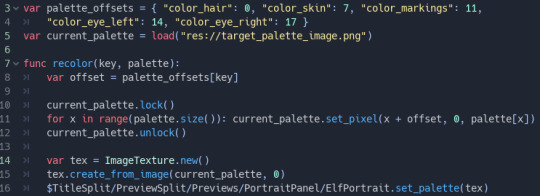
3-4: offsets (with names matching the key variable all the way back up in palette selection) so we know what part of the reference to replace with what colors 5: reference file from earlier, but with a different name because we're importing it as an image. this has to do with how godot reads image/texture data differently 10-12: replace all the pixels in the reference image that correspond to the channel we want to modify 14-16: create a new texture from this reference image (shaders can only take textures as input, not images) and apply it to our material
on line 16, the set_palette method is just a wrapper for get_material().set_shader_param("new_palette", palette)
make sure you make a ShaderMaterial object and assign it to the part you want recolored, and then assign your shader script to it, as well as linking the recolor signal from the palette selection to wherever you want the above code to run.
result, with a couple more bells and whistles:

and that covers most of how the recoloring works! actually changing the image for each option is as simple as having it load a different texture, since the material stays unchanged. the way recoloring works for markings is a tiny bit more complicated as it uses what amounts to improvised masking mixed with the recoloring. i won't be sharing the code for it here since it's a bit more finicky and needs refactoring at the moment. the cool thing with this shader is it means i can also use it with all the npcs in the game, reusing any relevant assets without needing a full-on unique colored copy of their portraits/sprites
i hope this makes sense and explains things to anyone interested! feel free to throw questions at me over any of the implementation :>
7 notes
·
View notes
Text
Download Maya 2022 crack (license key) latest version ZPF№

💾 ►►► DOWNLOAD FILE 🔥🔥🔥 Maya is a program that is easy to use. Design, edit, enhance and create 3D content. Autodesk Maya is one of the most powerful and well-known software for computer animation, which overcomes all of these responsibilities. The computer animation tool at Autodesk Maya allows you to create characters and distortions that look natural and move that is close to the geometry of the original solid and are therefore smarter. When using textures, you can use the map and painting options manually. Autodesk Maya Serial Key is a highly customizable and expanded request. This provides several pipeline integration strategies. It offers a complete set of scripting and API tools user interface programming. It also provides workflows that are optimized with several 2D and 3D applications and tools for managing large data models. Based on the foregoing, this software is certainly one of the most visible options for those who need strong computer animation and simulation requests. Impressive functional loads can meet the needs of most users, and energy management is also of high quality. An excellent matching engine combines 2D direct action with 3D elements. Maya Live provides the best flexibility with an easy-to-use 2D tracker and interactive core structure breaker. Autodesk Maya has worked with a number of standards in the making but focuses on five Mental Ray nodes. Autodesk Maya Full Patch: Autodesk Maya Crack can be used to animate any object, add aesthetic results to your masterpiece in the video, and do digital work. In addition, it offers to do something in the cloud that is synchronized with ZYNC, which allows you to keep all data files made safe. This solution for 3D modelling and computer animation includes all the functions you might need to start an assignment from scratch or load an existing one to change it. This program combines advanced tools for computer 3D animation, such as modelling, simulation, creation and composition creation. Autodesk Maya can be used as an editor to create textures, shaders, or other professional visual elements. The editor offers many tools for all of this. This is used to make some of the most trusted 3D entertainment characters. Some options for bit and bit Windows. Because of its part, this model has some interesting information, as well as the truth of the temporary editor and its own motion graphics toolkit. In addition, it has a review tool for teamwork and is well integrated with a shotgun panel. Precisely because this is one of the most complete applications for creating models, cases and 3D animations, Autodesk Maya is also one of the most complex complexes. A large number of tools and features in many editing modes, of course, can confuse anyone unfamiliar with market conditions. Autodesk Maya Keygen Features: A more user-friendly and intuitive user interface and multiple iterations with high resolution. Atmospheric effects with controlled modelling and 3D modelling, texturing, rendering. Create detailed and realistic scenes and create high-resolution simulations. In addition, these are simpler and more reliable tools and features. This gives the user the opportunity to work on various projects, and this software is easy to use. Faster and easier to use workflow, as well as higher detail and higher physical effects. Creative lighting and rendering workflows, as well as customizable graphics accelerators. Adaptive fluid simulation and character reproduction and manipulation. You may also want to download Windows Movie Maker Crack. ScreenShots: New PC rates of speed. It has a lot of functions and features. A large quantity of VFX, Modelers. It is straightforward software. It creates branding, logos, headings, and other wordings.
1 note
·
View note
Text
Download Maya 2022 crack (keygen) latest version 30L#

💾 ►►► DOWNLOAD FILE 🔥🔥🔥 Maya is a program that is easy to use. Design, edit, enhance and create 3D content. Autodesk Maya is one of the most powerful and well-known software for computer animation, which overcomes all of these responsibilities. The computer animation tool at Autodesk Maya allows you to create characters and distortions that look natural and move that is close to the geometry of the original solid and are therefore smarter. When using textures, you can use the map and painting options manually. Autodesk Maya Serial Key is a highly customizable and expanded request. This provides several pipeline integration strategies. It offers a complete set of scripting and API tools user interface programming. It also provides workflows that are optimized with several 2D and 3D applications and tools for managing large data models. Based on the foregoing, this software is certainly one of the most visible options for those who need strong computer animation and simulation requests. Impressive functional loads can meet the needs of most users, and energy management is also of high quality. An excellent matching engine combines 2D direct action with 3D elements. Maya Live provides the best flexibility with an easy-to-use 2D tracker and interactive core structure breaker. Autodesk Maya has worked with a number of standards in the making but focuses on five Mental Ray nodes. Autodesk Maya Full Patch: Autodesk Maya Crack can be used to animate any object, add aesthetic results to your masterpiece in the video, and do digital work. In addition, it offers to do something in the cloud that is synchronized with ZYNC, which allows you to keep all data files made safe. This solution for 3D modelling and computer animation includes all the functions you might need to start an assignment from scratch or load an existing one to change it. This program combines advanced tools for computer 3D animation, such as modelling, simulation, creation and composition creation. Autodesk Maya can be used as an editor to create textures, shaders, or other professional visual elements. The editor offers many tools for all of this. This is used to make some of the most trusted 3D entertainment characters. Some options for bit and bit Windows. Because of its part, this model has some interesting information, as well as the truth of the temporary editor and its own motion graphics toolkit. In addition, it has a review tool for teamwork and is well integrated with a shotgun panel. Precisely because this is one of the most complete applications for creating models, cases and 3D animations, Autodesk Maya is also one of the most complex complexes. A large number of tools and features in many editing modes, of course, can confuse anyone unfamiliar with market conditions. Autodesk Maya Keygen Features: A more user-friendly and intuitive user interface and multiple iterations with high resolution. Atmospheric effects with controlled modelling and 3D modelling, texturing, rendering. Create detailed and realistic scenes and create high-resolution simulations. In addition, these are simpler and more reliable tools and features. This gives the user the opportunity to work on various projects, and this software is easy to use. Faster and easier to use workflow, as well as higher detail and higher physical effects. Creative lighting and rendering workflows, as well as customizable graphics accelerators. Adaptive fluid simulation and character reproduction and manipulation. You may also want to download Windows Movie Maker Crack. ScreenShots: New PC rates of speed. It has a lot of functions and features. A large quantity of VFX, Modelers. It is straightforward software. It creates branding, logos, headings, and other wordings.
1 note
·
View note
Text
Journal - How to Create Photorealistic Architectural Renderings Using Unreal Engine 4
Ronen Bekerman is an industry leader in Architectural Visualization who hosts in-depth tutorials on his specialist blog. Architizer is pleased to present a selection of these guides written by some of the world’s best rendering artists.
Keeping on the trail we took in the previous installment of this series, “A Photographic Approach to Architectural Visualization“, we will check how these effects can be transported into the world of real-time, more specifically with Unreal Engine as the champion of game engines making their way into the realm of ArchViz. To present this case, let’s take a trip down memory lane starting at the point that sparked it all for me and for the ArchViz community at large as well.
Here, Lasse Rode of Berlin-based studio xoio takes Unreal Engine for a good spin as he strives for photorealism using a real-time tool. He does this with his great-looking, and mostly white, Berlin Flat scene as seen on the forums. Follow along as Lasse explains getting started with Unreal Engine 4. Enjoy it!
Introduction
My name is Lasse Rode, and I am part of studio xoio. We are a small agency specializing in visualization and illustration works for architecture and product marketing. Usually we work in a kind of “traditional” 3D environment utilizing applications such as 3ds Max and the like. We are constantly checking out new rendering engines and currently making big use of Corona Renderer, V-Ray and Octane. Each engine has its strengths, and we always try to use it like that: each for the best purpose.

Lasse Rode’s modeling techniques enable realistic renderings to be created in a relatively short amount of time; images via Corona Renderer.
Back in August 2014, I stumbled upon some drop dead gorgeous Unreal Engine 4 architectural visualization tests by Frenchman Koola, which immediately reminded me “The Third & The Seventh” by Alex Roman, only this time it was done in REAL-time.
In my eyes there have been several main trends within our industry: The strive for (photo)realism and becoming faster — if not real time. Not having to wait for your rendering to come out of your render farm was always a dream for us — especially when rendering animations!
For a long time, the main downside of the “real-time-thing” was the lack of quality you could achieve compared with pre-rendered still images or animations. So even though it looked very interesting, the application of it in a visualization context seemed hard to imagine. And honestly, the “gamey” look of it made it hard to sell for high-demanding clients from the architecture and brand fields.
This has changed rapidly. The results possible with real-time engines today are very beautiful and convincing!
Why Unreal Engine?
The release of UE4 gained a lot of attention within our industry, and the possibilities seemed to be endless. The PBR (Physically Based Rendering) material system and the easy-to-use importing pipeline for getting your models into the Unreal Engine were the most compelling reasons for us to give it a try — in addition to the quality of output possible! If you have seen the work of Koola (also available as a download in the Unreal Engine Marketplace), which went viral some weeks ago, you are probably as convinced as we are that Unreal Engine 4 is capable of impressive quality.
In the following article, I want to give you an outline of the workflow I used to make the Berlin Flat scene you can download from the Marketplace and share some techniques and tricks I came across during the process. Some of them I found myself, while others are derived from information I found on the web. The Unreal Engine Forums and Documentation are a vast and great resource, as are the starter content that comes with the engine and the assets and scenes you can get from the Marketplace.
The Berlin Flat
I made a series of images of this flat in a historic building in Berlin at the beginning of 2013 using 3ds Max with the Corona Renderer. It’s a flexible way of handling the color-mapping, which really helped to pull off the very whitish mood of the whole set. This actually was also the reason for choosing it when giving UE4 a try.
I noticed UE4 being very successfully used on scenes with gloomy lighting and busy textures. I suspected it to be not that easy to get precise shadows and GI within an ultra-white interior. And honestly: It is a tricky task!
Above is one of the original renders done with 3ds Max and Corona Renderer. To have a look at the entire set, click here. Below is the UE4 video made with this scene …
youtube
Viewing on mobile? Click here.
The Original Scene
The entire model was done in 3ds Max in a rush, so I actually detailed only the parts that are visible in the final images. Of course, this is an approach that is not possible in a real-time environment. Repurposing the scene for use with Unreal Engine, I had to reduce the scope a bit because furnishing and detailing the complete space would have taken too much time for testing purposes. I decided to export only two rooms: the ones you see on the lower part of the screenshot below.
Exporting the Geometry for Unreal Engine
This is a very easy task IF you keep some things in mind!
It makes sense to split things up a bit. Because the lightmass is calculated with a separate map for every object, it is good to be a bit careful with high values especially on big plain objects like walls and ceiling. Because of this, I only exported the inner faces of the walls that we actually see.
I also added a bit to the top and bottom of the walls to intersect them later with the ceilings. I found this to be a good way to prevent “light leaks” — lighting artifacts that happen when geometry is not closed or not intersecting. This is no problem when having a gloomy scene with lots of busy textures, but because we are going to have an ultra-white space, it is important to get as precise GI as possible, especially in the corners.
The second crucial thing is to create unwrapped UV coordinated for the channel the GI is going to be stored in by Unreal Engine’s lightmass calculation. In 3ds Max, this would be UV-channel 2.
Channel 1 is for use by all the other textures like diffuse, roughness, normal, etc. Unreal Engine counts the channels starting from 0, which can cause some confusion in the beginning — but once you get it, it is fairly simple.
Note: Unwrapping is only important for the light-map channel! For the texture channel, any kind of mapping can work, such as cubic or cylindrical mapping. In most cases, a simple “flatten mapping” in 3ds Max unwrap does the job to create sufficient UV-coordinates!
If you want to put your scene together in UE4 like it has been in your Max-scene, it is good to leave the entire “space” in place when exporting because the object’s coordinates are easier to align. For single objects like chairs and other assets, it is very comfortable to export it only once and install them in your Unreal Engine scene. For this purpose, it is good to move them near the center of your 3ds Max scene because the new object’s pivot in Unreal Engine will be there.
I used high-poly geometry without any LOD (Level of Detail) simplification. This is only recommended in small scenes like this one, but because I’m after a smooth experience and don’t want to have any jagged edges on my furniture, this was logical for me. I have no doubt there’s room for optimization, though!
Make sure your assets are merged into one object and have different material-IDs applied to handle the different materials later in UE4. Then, save your geometry as an FBX file and off you go over to the Unreal Engine editor!
Importing Into Unreal Engine 4
Importing FBX files into Unreal Engine 4 works pretty smooth! I did it in several steps.
I prepared different files that made sense:
The geometry of the room in a separate FBX file
Different file for the assets, each with some objects in them
Just make sure to uncheck the “Combine Meshes” to receive your objects separately and not baked into a single mesh!
Materials
I’m a very straightforward guy and a big fan of simple setups! It’s a philosophical thing, but achieving things with the least effort possible is far superior to using a setup only you understand or you can’t remember when opening a scene half a year later.
So this example of a shader is very simple, consisting of a diffuse map, desaturated and blended with black color. The same map is then color corrected and inverted to put into the roughness channel of the material. Done.
A normal map would have been too much here, but feel free to explore the materials for yourself in the scene!
Here you see the wood material applied to the chairs and the table — a dark dyed wood with a crisp matte reflection revealing the wood structure and texture.
In this image you see two more materials that might be of interest: firstly the curtain, which is backlit by sunlight and is a two-sided material:
You have to set the Shading Model to “Subsurface” and add a constant node with a value smaller than 1 and wire it to the Opacity property of your material to get this effect.
Secondly, the jar in the foreground has a very simple glass material:
It has a fairly dark diffuse color, zero roughness and a high specular value. I also involved a Fresnel-node with a value of 1.5 to control the opacity and refraction. There are a lot more complex ways to generate more realistic glass — but I honestly had some trouble to really get control over that, so this easy glass seems to be good enough.
Note that I checked “Two Sided” and set Translucency Lighting Mode to “TLM Surface” in the Details tab on the left.
One other material I want to show here as well is the floor because this one is the only one to have a normal map applied:
Here you see a material defined by a diffuse color, a roughness texture and a normal map. The diffuse color is a simple very light gray, defined by a 4-value constant.
Roughness looks a bit more complex: On the left, you see the same map three times scaled differently with a TexCoord node. The red channel of each is then multiplied with the others and then wired as an alpha into a Linear interpolation node (Lerp) to blend to values; 0.3 and 0.2 in this example to get a subtle noisy reflection on the floor planks. This is then fine tuned with a “Power” node to get just the right amount of roughness that looks OK.
The normal map again is influenced by a TexCoord and is then flattened a fair amount via a “FlattenNormal” node to get a subtle relief on the material.
Preparing the Assets
Before dropping the assets into your scene, it is always best to apply the materials onto them within the geometry editor. You only have to do it once and can still apply different materials in the main scene if needed. This is a fast process: Here you see it is important to apply different Material-IDs to your objects to put the different materials where they belong!
Building the Scene
This is kind of brief, but: Put the thing together. First you have to drag in the room geometry. The best way is to select all the parts needed and drag and drop them into the empty scene. Afterwards all the furniture and assets have to be placed in the environment.
Here you don’t see the back faces of the outer walls. As I’ve explained above: They are only single-sided for better lightmass calculation.
For this exact purpose it is also good to set the lightmap resolution for your larger objects to a high value, for the walls I set it at 2048, for example.
As mentioned above, light leaks can be an issue. To prevent these, I put black boxes around the whole scene. It looks kind of messy from the outside — though more clean on the inside!
Lighting and Lightmass
The lighting is also a fairly simple setup: I used the “Koola method” — a combination of a sun and planes with spotlights in front of the window to simulate a skylight. It is rather effective and easy to control!
To calculate the global illumination, only a few tweaks are important:
I drastically increased the lighting bounces and the indirect lighting quality. I also decreased the smoothness to 0.6. Details are pronounced better and the shadows don’t wash away so much.
Further to this, I set the direct lighting to a dynamic shadow, which is important to have the light moving later in the animation!
The last step before hitting “Build” is to set the Lighting Quality to “Production”!
This should result in smooth lighting everywhere.
Actually when getting to this point the first time, I was kind of thrilled! This is actually the strongest part of this engine: to thrill you. Being able to move inside my “rendering” in real time was really a delightful moment!
Post Processing
One of the greatest features is the possibility to apply color correction and camera effects just within the editor. This can be done with a Post Process Volume for global settings. I did some tweaks on the saturation, fringing and vignette, the bloom, disabled the auto exposure by setting the min. and max. values to 1 and increased the overall brightness by setting the Exposure Bias to 1.42. I also added a lens flare, which I find really awesome happening in real time!
Setting up the Animation
The ability to move freely inside the scene makes doing animation a very easy and pleasing task because of the instant-feedback nature of the real-time environment. As a frequent user of compositing software, it took not much time for me to adapt to the integrated Matinee tool and set up an animation.
First thing to do is setting up a Matinee Actor.
When opening Matinee, you will see a window with a track section and a curve editor.
Setting up the cameras and animation work is very self-explanatory. Motion is controlled by key frames and curves just like any other animation software. Also the “cutting” work is done just within the Matinee editor.
I created a couple cameras moving slowly through the space: Seeing exactly what you are doing really helps to tweak the timing of cuts and speed of camera movement!
You can see the camera trajectories just in the editor and control the editing on the fly! After getting the rough “cut” done in Matinee, I then exported the complete animation as an AVI and fine-tuned it in Premiere and aligned it to the music.
Conclusion
The entire process starting at exporting from 3ds Max and importing into Unreal Engine 4, working out the shading and lighting to produce the animation and then posting on YouTube took me about one day. This speed is unheard of in ArchViz and reflects very much the key potential that lies in the use of Unreal Engine 4 for visualization works.
Some screenshot details from the animation
The absence of render times in terms of “producing” images really makes the process of creation very flexible and free. The fast feedback of your action is the real revolution!
We are constantly thinking and testing the possibilities of applying this kind of production and workflow into our daily work and our environment as a whole.
There are a lot of possible applications, and we are very eager to explore them!
I hope I gave some insight into my motivation and process and wish a lot of fun with the Berlin flat scene.
Kind regards,
Lasse.
This article was first published on Ronen Bekerman Architectural Visualization Blog in December 2014 and refers to software available at that time. Enjoy this article? Check out the other features in our series on “The Art of Rendering”:
Methanoia Reveals the Story Behind Architecture’s Most Striking Visualizations
When Architectural Visualization Gets It Right: Victor Enrich’s Surreal Art
7 Magical Demonstrations of Hyper-Real Environments
Alex Hogrefe Creates Stunning Architectural Visualizations Using SketchUp and Photoshop
How Technology Will Revolutionize Architectural Representations
The post How to Create Photorealistic Architectural Renderings Using Unreal Engine 4 appeared first on Journal.
from Journal https://architizer.com/blog/practice/details/the-art-of-rendering-real-time-photorealism/ Originally published on ARCHITIZER RSS Feed: https://architizer.com/blog
#Journal#architect#architecture#architects#architectural#design#designer#designers#building#buildings
0 notes
Text
UV Mapping, Trim Sheets and HyperShade
What is a UV Map:

A UV map is a flat representation of a 3D model which is used to wrap textures around that model, hence why the process of creating a UV Map is called UV Unwrapping.
The term "UV" comes from U and V being used to represent the horizontal and vertical axes in 2D space since X, Y and Z are already used in 3D space.
A good way to look at UV maps is like the paper nets that can be used to make simple shapes like cubes or pyramids.
UVs aren't just used for textures however, they're also used for light baking inside of real time engines like Unreal, which means your model will need a functional UV map if you want them to interact with light and shadow properly.
Creating a UV Map:
First you need to have a finished polygonal mesh and during the process of building the model you need to keep in mind how complex it is, natural the simpler a mesh, the easier it is to unwrap.
Unwrapping an object is usually a similar process in whatever 3D modelling software you use, though some might have extra features that make the process simpler. I'll use Maya as the example since we're using it as part of the course.

From my own experience it's best to start with the program's automatic unwrap then work from there, since it seems to be able to make a decent UV Map on it's own, however its ability to make something useful diminished as the objects complexity increases.

While Unwrapping the object, it's a good idea to place a chequered texture onto the model so you can see any distortion that might have occurred so it can quickly be fixed.

Once the UV map is finished, you can export it out of Maya as a PNG at the resolution you would like and take it into photoshop or any other editing software. This is where you can paint the objects texture onto the UV and after the textures are painted, you can import the UV back into the modelling software to check how it looks.
During UV Unwrapping and Wrapping process, two rather irritating issues can occur besides the already existing distortion process, these are overlapping UVs and seams. Seams are an unfortunate inevitability when flattening a 3D object because the mesh has to be cut somewhere in order to turn it 2D and this generally results in textures not lining up properly at this seam. The best thing to do is hide the seem somewhere the player wont see it, like under the hair of a character for example or on part of a wall that the player wouldn't ever be able to see.
Overlapping UVs are a slightly less obvious problem, but just as annoying. You generally want to avoid Overlapping UVs to keep you textures varied as well as make sure they can be wrapped onto the object properly. The most problematic thing about overlapping UVs occurs when you import the model into a real time engine like Unreal. I mentioned earlier that the UV maps were also used for light baking and when they're overlapping the engine has difficulty figuring out where lights and shadow should go, for example overlapping cam cause shadows to appear on an object even though there is nothing to cast them.
However overlapping UVs can be a useful technique allowing you to repeat a basic texture across a single object, this can help by keeping texture sizes down which is incredibly useful when creating things for weaker machinery. I imagine this technique would mean you'd have to manually make a light map yourself though, instead of allowing the engine to generate one for you, which is where UV channels come in.
UV channels allow an object to have more than one UV map, for instance you would have a UV channel for your texture and another for lighting, which would allow you to have as many overlapping textures as you'd like while making sure the lighting functioned normally.
UV Toolkit:

The Toolkit is essential to creating an efficient UV map, it gives you access to the move, scale and rotation tool, the automatic unwrap presets, as well as the rest of the tools that allow you to manipulate the UV. Many of these tools have very specific uses and I've only really used the cut and sew tools along side the basic transform tools.
Due to only being able to utilise the space of the first square in the UV editor, space is at a premium and the cut tool allows you slice up the UV map into individual UV shells that gives you the ability to use the space more efficiently, since the automatic unwrap feature isn't the best at using the area it is given.
The Difference Between UV Maps and Trim Sheets:

Where UV maps are created by painting an object onto an unwrapped UV, trim maps are created by placing a UV onto an already existing texture, essentially make them the opposite of a UV map.
From my own experience, trim sheets are much easier to work with the UV maps, but they don't always produce results that are as good as UV maps. It all depends, Trim sheets, by their vary nature, are best for objects that do not need a dedicated UV map texture, for example if you have 5 different vases you could probably get away with using the same tile map on each of them due to their similar shape.
Maya's Hypershade:

Hypershade is the main area of Maya for rendering, creating materials an shaders. Like many other 3D softwares like Blender or Unreal, materials use a node based system, however Maya's materials seem to deviate from the norm and for whatever reason decided to not use the traditional names for different material types.
A good example of Maya's uniqueness is the Lambert material. This material is best for flat, smooth surfaces like chalk, pottery, matte paint and so forth, this is because it doesn't produce highlights and calculates without taking surface reflectivity into account; in any other software this would be called the diffuse. There are different materials, like Phong and Blinn which have different speculations values to the default Lambert.
With names like Phong, Blinn, and Lambert, it can be a bit confusing to move from one piece of software to Maya.
Creating a Material and Adding Textures:


Under the create menu, you can select material which will give you an few options for which material you'd like to create. For the basic example of Unwrapping the Cube, it's best to go with Lambert since it's the simplest material. Its best to create new materials instead of using the present ones that are creating along with the scene, because that way you have the default back up.

To get an image texture into to the material is just a simple matter of dragging the image out of the file explorer into the workspace, then you just have to connect the texture Out Colour into the Lambert's Colour input.
0 notes
Text
New Post has been published on Fazeup
New Post has been published on https://www.fazeup.tk/2019/05/arm-mali-g77-gpu-the-whole-ins-and-outs/
Arm Mali-G77 GPU – the whole ins and outs
Alongside its new Cortex-A77 CPU core, Arm has unveiled a next-generation GPU destined for next-generation smartphone SoCs. The Mali-G77, to not be confused with the brand new Mali-D77 show processor, marks the departure of Arm’s Bifrost structure and the transfer over to Valhall.
We’ll get into the advantageous particulars of the brand new structure in a second. First, we’ll leap proper into what customers ought to anticipate when it comes to efficiency beneficial properties.
Mali-G77 efficiency overview
Arm boasts as much as a 40 % graphics efficiency enhance with next-gen Mali-G77 units in contrast with immediately’s Mali-G76 fashions. This quantity is making an allowance for course of in addition to architectural enhancements. The Mali-G77 is configurable from 7 to 16 shader cores, and every core is sort of precisely the identical measurement because the G76 core. Which means high-end smartphones will doubtless ship with comparable GPU core counts as they do immediately – someplace within the low teenagers. Handily, this lets us make some speculative efficiency assessments towards current chipsets.
Wanting on the common Manhattan GFXBench benchmark, a 40 % efficiency enhance opens up a sizeable lead towards present era hardware. Qualcomm’s next-generation Adreno chip will want its personal important efficiency improve to maintain the taking part in area stage. The tables look like handing over Arm’s favor.
Structure sensible, gaming efficiency will increase 20 to 40%, whereas machine studying earns a 60% enhance
Primarily based on this reasonably crude ballparking, a 10 core Mali-G77 (a configuration we regularly see from Huawei) seems to simply about edge out this era’s prime of the road cell graphics hardware. A 12 core configuration, usually seen in Samsung’s Exynos, gives an enormous lead for Arm’s newest GPU. In fact, actual benchmarks will depend upon different elements, together with course of node, GPU cache reminiscence, LPDDR reminiscence configuration, and the kind of software you’re testing. So take the above graph with a healthy dose of salt.
When it comes to the brand new structure alone, Arm states that the Mali-G77 affords an averaged 30 % enchancment to vitality effectivity and efficiency density. There’s additionally an enormous 60 % enhance for machine studying purposes, because of INT8 dot product assist. Gaming efficiency expectations are set someplace between a 20 and 40 % enhance, relying on the title and the kind of graphics workloads on supply.
To grasp precisely how Arm has achieved this efficiency uplift, let’s take a deeper dive into the structure.
Meet Valhall, Bifrost’s successor
Vahall is Arm’s second era scalar GPU structure. It’s a 16-wide-warp execution engine, which basically means the GPU executes 16 directions in parallel per cycle, per processing unit, per core. That’s up from Four and eight vast in Bifrost.
Different new architectural options embody dynamic instruction scheduling managed totally in hardware and an all-new instruction set that retains operational equivalence to Bifrost. Others embody assist for Arm’s AFBC1.three compression format, FP16 render targets, layered rendering, and vertex shader outputs.
The Mali-G77 does 33% extra math in parallel than the G76.
The keys to understanding the most important architectural adjustments are discovered by examing the execution unit contained in the core. This a part of the GPU is accountable for quantity crunching.
Contained in the execution engine
In Bifrost, every GPU core contained three execution engines or two within the case of some lower-end Mali-G52 designs. Every engine comprises an i-cache, register file, and warp management unit. Within the Mali-G72, every engine handles Four directions per cycle, which elevated to eight in final 12 months’s Mali-G76. Unfold throughout these three cores permits for 12 and 24 32-bit floating level (FP32) fused multiply-accumulate (FMA) directions per cycle.
With Valhall and the Mali-G77, there’s only a single execution engine inside every GPU core. As earlier than, this engine homes the warp management unit, register, and icache, which is now shared throughout two processing items. Every processing unit handles 16 warp directions per cycle, for a complete throughput of 32 FP32 FMA directions per core. That’s a 33 % enhance to instruction throughput over the Mali-G76.
Arm has transitioned from three to only one execution unit per GPU core, however there are actually two processing items inside a G77 core.
As well as, every of those processing items comprises two new mathematical operate blocks. The brand new convert unit (CVT) handles primary integer, logic, department, and conversion directions. The particular operate unit (SFU) accelerates integer multiplication, divisions, sq. root, logarithms, and different complicated integer features.
The usual FMA unit has seen a number of tweaks, supporting 16 FP32 directions per cycle, 32 FP16, or 64 INT8 dot product directions. These optimizations produce the 60 % efficiency uplift in machine studying purposes.
The Quad Texture Mapper
The opposite key change within the Mali-G77 is the introduction of a quad texture mapper, up from a twin texture mapper within the earlier era. The feel mapper is accountable for mapping the 3D polygons in a scene into the 2D illustration that you simply see on a display screen. It’s accountable for sampling, interpolation, and filtering to easy out angled and transferring content material to keep away from harsh, low-quality edges.
Low-cost anti-aliasing stays in place to help with picture high quality, however the doubling of texture efficiency is the most important profit right here. The feel unit now processes Four bilinear texels per clock up from 2 beforehand, 2 trilinear texels per clock, and deal with quicker FP16 and FP32 filtering.
The quad texture mapper is cut up into two paths, offering a shorter pipeline for threads that hit content material within the cache. The miss path, which handles format conversion and texture decompression, contains a wider interface to L2 cache. That is additionally useful for machine studying workloads which may continuously want to tug in new knowledge from reminiscence.
Bringing every thing collectively within the Mali-G77
Arm has made numerous different tweaks to the Mali-G77 to coincide with the most important adjustments within the Valhall structure. The management block is simplified because of the only execution unit design, whereas the inner dynamic scheduler truly permits for a extra versatile instruction issuing inside every core. With a better throughput in every core, the datapath can also be shorter and decrease in latency, down to simply 4-cycles from eight beforehand.
The brand new design can also be higher aligned with the Vulkan API, simplifying driver descriptors to decrease driver overhead for improved “to the metal” efficiency.
In abstract, the Mali-G72 and Valhall make necessary adjustments from Bifrost that promise important efficiency boosts for gaming and machine studying purposes. Importantly, the design suits inside the similar energy and space budgets as Bifrost, making certain that cell units will be capable to supply extra peak efficiency with out worrying about warmth, energy, and silicon prices. Primarily based on the efficiency projections, the Mali-G77 ought to be capable to give Qualcomm’s next-gen Adreno a superb run for its cash.
Supply
#above#affords#amd#and#apple#ARM#Arm Mali G77#assist#based#basic#benefit#boasts#bringing#change#comes#complete#comprises#computers#configuration#customers#design#designs#different#doubtless#earlier#energy#engine#enhancements#extra#Features
0 notes