#and it's the same psd too lol
Text


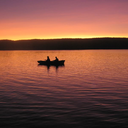
the prettiest smile on earth. | 🍊 | for → @sopekooks
↳ suchwita episodes #1 and #2
#btshoneyhive#dailybts#purplearmynet#boongietrack#annietrack#userjeonjcngkook#trackofthesoul#heyryen#shirleytothesea#usersky#tusermanny#yoonkookclub#dailydaegu#cyphernet#tusercait#tusercelia#flytomyroom#myg#suchwita#my+gifs#i am not a fan of the colorings i used here tbh T_T esp the ones of the 2nd episode#and it's the same psd too lol#(and i just now realized this but the watermarks of each episode are in different positions oh my god#well it's nearly midnight here and i need to sleep lmao)#anyway crystal hi! i tried to find all of the moments of yoongi smiling and laughing in the 2 episodes of suchwita#and compile them for you <3#i hope it makes you happy! ^^#and also late happy new years! i'm praying that 2023 treats you well!
2K notes
·
View notes
Note
alie! I absolutely adore this mirrorball x buck set that you made last year! (/post/701462848238403584/) (also I can't believe it's been a year, like seriously what is time?) I was wondering how you did the shattered glass effect in the first gif? in particular how you made the black and white gifs appear distorted within the glass if that makes sense? thank you!!!
ahhh thank you so much renee! literally what is time lol, this gifset is still one of my faves that i made. the shattered glass effect is mostly just a lot of layer masks to be honest hahaha. i'm so glad i still have the psd, so here's how i did it under the cut~

(this tutorial assumes you know how to put multiple gifs in the same canvas and are familiar with layer groups and masks)
I. PREPARATION
first things first, create an empty canvas of your desired size. mine was 540x540 px.
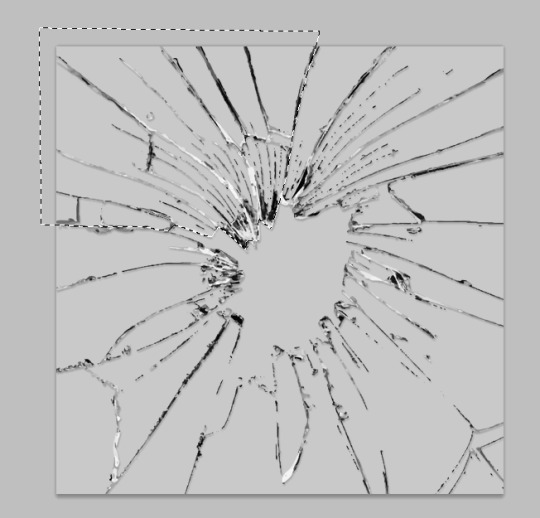
then, you need to find a cracked glass texture. if i remember correctly i simply googled something like "broken glass png", "cracked glass png", because i wanted something already transparent.
(a texture that's something like black lines over a white background definitely works too, you'll just have to put that layer's blending mode to darken or multiply.)
here's the png i used (and a download link for best quality):
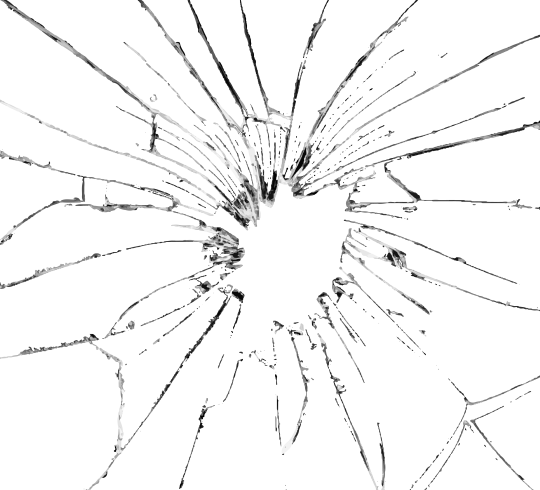
and after positioning it into my canvas.

II. CREATING MAIN SECTIONS FOR GIFS
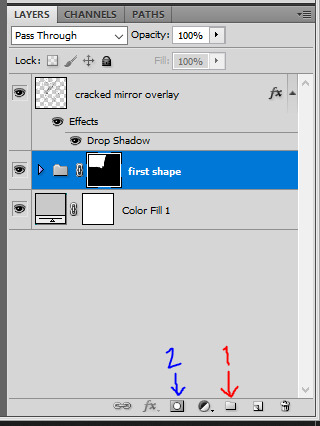
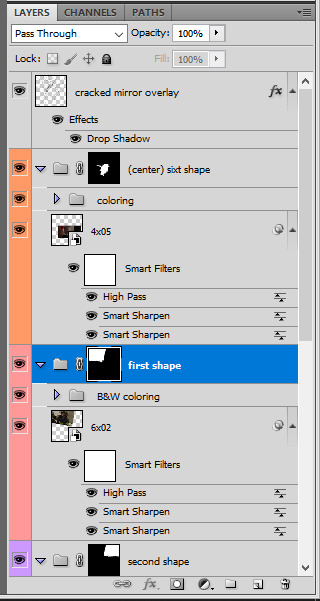
so basically when i did is i sectioned parts of the texture for each gif that i wanted to put. following the texture's lines, i zoomed in and carefuly drew a first shape along the lines with the polygon tool. you can also put a color fill layer behind the cracked glass layer so it's easier to see, like i did.
once you have your shape selected, click on the folder icon (1), then on the layer mask icon (2). it should give you a nice masked group to put gifs in hehe
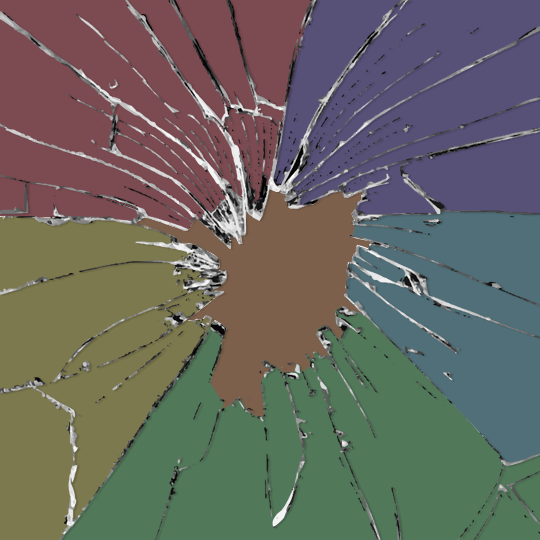
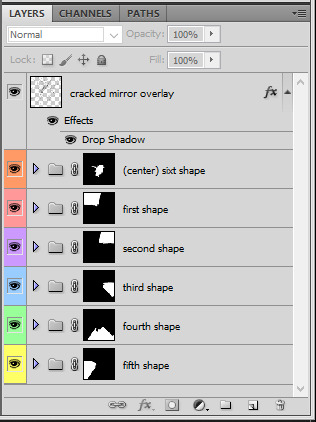
then i repeated the process until i had all of my desired shapes. i've put some color layers so it's easier to see, but here are my 6 main shapes and how my layer groups look like so far:
III. GIFFING TIME
after screencaping and making all 6 gifs required for each section, you need to put all of them in the same canvas. i simply put one smart object gif layer in each group created earlier. then, i resized and rotated each gif to fit its group (by hitting ctrl + T while selecting the gif layer), as you can see with the gif labeled 6x02 in the layers preview. for the coloring, i went simple with black and white for most of them.
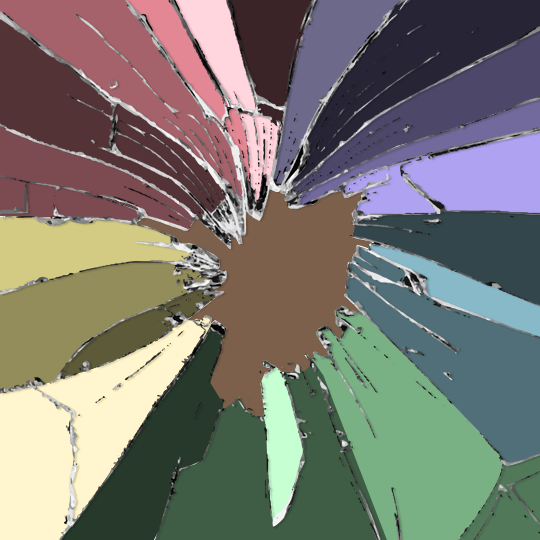
once i have all six gifs sharpened, colored, and placed in each shape group, the gif looks like this. the broken glass texture does most of the work to be honest:


obviously the center gif doesn't have any kind of effect, it's just colored as usual, so i'm not gonna go over it. it's just one gif layer in a masked group.
IV. SUBSECTIONS FOR DISRTORTED EFFECT
okay so for the distorted effect it's even more layer masks! basically i created more smaller sections within each main shapes already, still following the cracked glass texture's lines with the polygon tool and put them in individual masked groups like i did in the second step. here's how i ended up dividing each main sections:
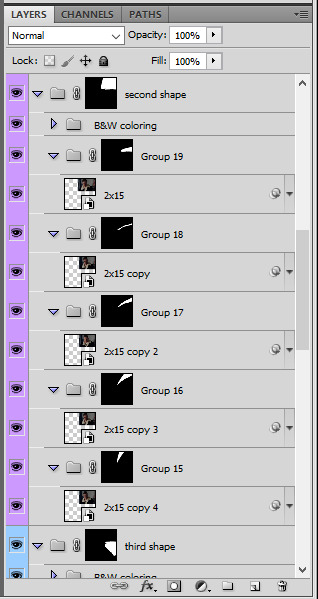
yep, each color here is a different masked group, for example the 2nd and 3rd shape sections:

for each main shape section, you want to duplicate your gif layer the same amount of times as you have subsections within that shape. so if the main shape has 5 smaller subsections, i want 5 layers of that same gif. just make sure to not change its duration or position yet, and make sure the coloring layers/group stays on top of the groups in its shape section. then, simply put one gif layer duplicate in each group. example of my layers for the second shape so far:
then just repeat this until all subsections have its own gif layer.
V. DISTORTED EFFECT
this is the best part! and it's really easy. basically you want to slightly move each subsection by a few pixels, so they're in a slightly different position than the ones next to it.
to do so, select one of the gif layers and with the arrows on your keyboard, move it left or right, and even up or down if it looks good. i do this for all duplicated gif layers, making sure it looks like they're all slightly offset. focus on the cracked glass overlay's lines while nudging the gif layers, it's easy to see how the shapes break when you move them. for example here:
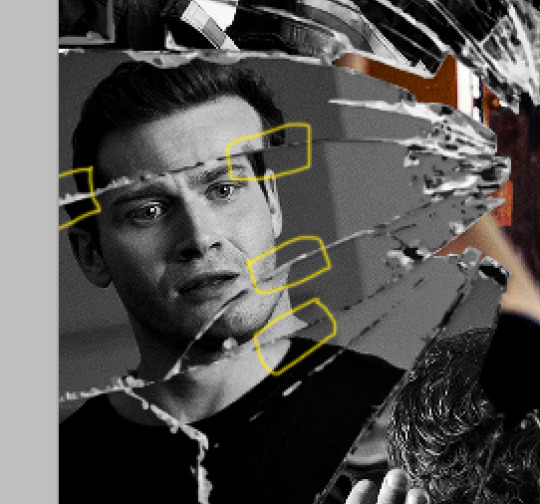
this is really just all trial and error, you just need to move each subsection gif layer by a few pixels with the keyboard arrows until it looks good to you.
here's my result once i've done this for all (23!!) subsections:
VI. FINAL TOUCHES
i don't think i did much else to this before typography besides adding a bit of contrast overall and a thin drop shadow to the cracked layer texture on top of everything. if you have a transparent png this definitely helps to give a bit more dimension to the effect. so here's the final result:
i hope that was clear enough hehe :D
#alie replies#tutorial#photoshop#resource#*ps help#completeresrouces#allresources#userhella#userabs#userkarolina#userdena#tuserheidi#usercats#userrainbow#userbunneis#usersmia#tuserabbie#usertreena#usernik#swearphil
373 notes
·
View notes
Text
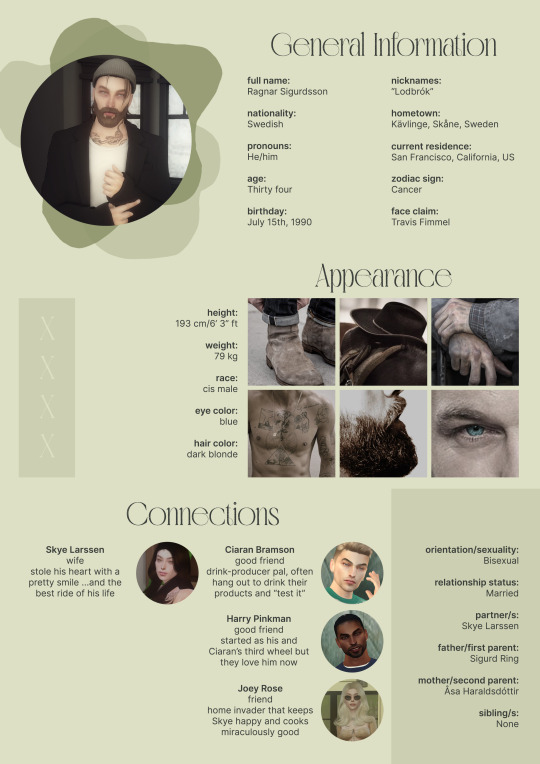
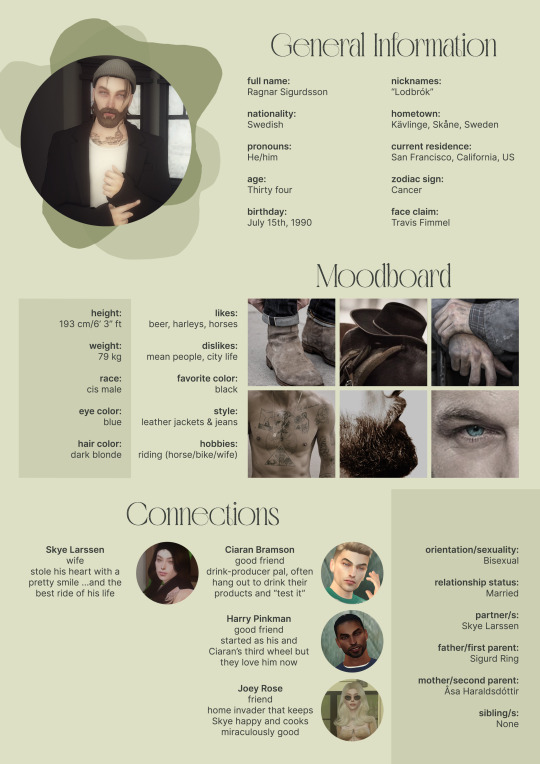
So uhm... I did a thing...
✨Character Info Template✨
Been meaning to do this a long time ago (and actually started it but never finished it, lol) as a way to share some more information about my ocs without needing to use a custom page theme, but mostly because I haven't found any page theme that looks exactly as I want and allows this much customization.
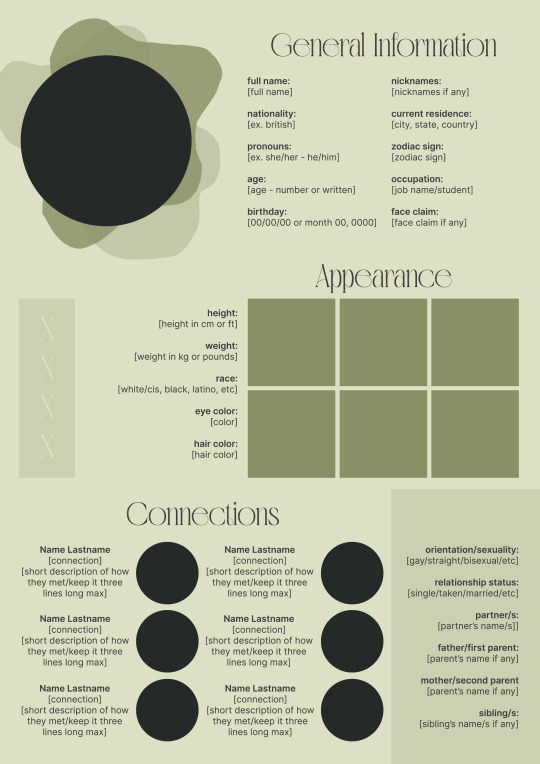
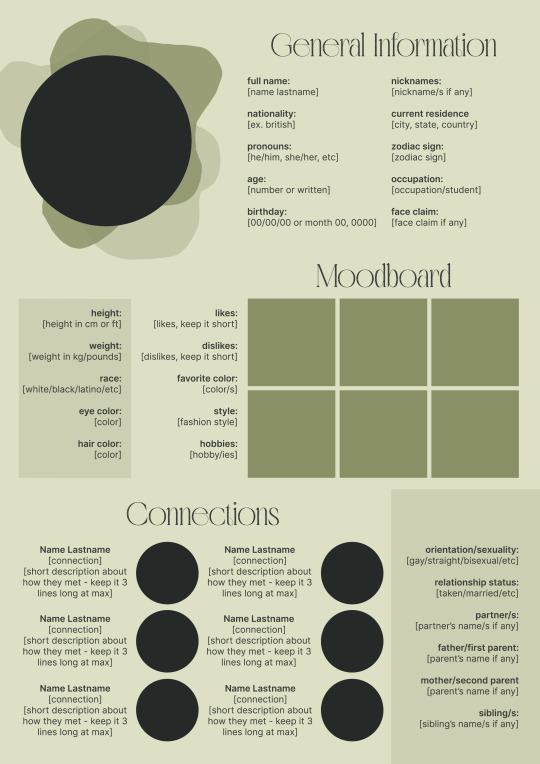
There are two versions and both are almost exactly the same; but the example shown in the left has an 'appearance' section which is small and has few quick facts regarding the oc's appearance; while the example on the right has a 'moodboard' section instead which allows you to add more info about your oc.
You can change every section/title to fit your needs like I did in the examples below; I personally removed some categories as well and got rid of some connections as this oc doesn't have that many close friends/partners to fill the original template. However, I also included an extra separated 'connections' section in the download in case you want to add more people and more information.
I recommend you stick to square-shaped pictures so it's easier to fit them to each section. Also if and when you edit the information or section titles, please select only one line at a time to replace it so you don't lose the text format. (Titles shouldn't change because that's a single format/font within the same text box, but should it change you can always hit ctrl+z hehe) When you're done, I strongly recommend you save this as a .png instead of .jpg so it's the best possible quality!
Last but not least, this is a .psd file. So you'll need either Photoshop (I did this with Photoshop Portable, but it supports newer versions of PS and it *should* support older versions too) or Photopea to open and edit this file.
Credits: Adobe Photoshop, Inter font, Golften Vintage font
>DOWNLOAD< (patreon but free :p)
(note: I'm posting this with my gaming blog because I think my fellow gamers might be interested in this, but please consider giving credits to me if you use this template by tagging @synindoodles instead of this blog)
More info on how to use and edit this template below the cut!
Layers:
>Each layer is properly named and categorized. The general layers such as the background, the icon shape and background shapes are under the groups.
>If you don't want to see/don't need one of the connections' pictures and information, I recommend you find which one it is (1, 2, 3, 4, 5 or 6) and click on the eye symbol next to the layer to hide it so that way if you ever need it, it won't be truly gone.
>To edit a text section, simply find the layer (such as General Information>Left Column) and double click on the 'T' symbol next to the layer. That way it will open edit mode and allow you to edit the text, just don't hit delete or enter while everything is selected or you'll erase it :p
>Main text sections aren't separated, they're blocks of text. I recommend you don't remove the amount (for example, if you downloaded the version with the 'appearance' section, which has 5 sections of information, don't remove the fifth line.) Either leave it empty or replace it with another data, otherwise it will look weird. The 'general information' section might look good even if you remove a few lines, just don't get rid of the whole block of text.
Pictures:
>To add a new picture, simply paste it over this document and move it using the Move Tool.
>To frame it (so it becomes a circle or fits over the shape you want), make sure the picture layer is over the layer you want, then while holding alt click between the two layers. [For example, if you want to add a new main oc picture: 1) paste the pic you want, 2) move it with the Move Tool so it's covering the big circle, 3) once you've fully covered the shape (if it isn't you can resize it by right clicking on it then on 'free transform', sometimes you might need to hold shift to proportionally resize it) make sure the newly pasted pic layer is over the layer named "picture goes here", 4) hold the alt key and hover your mouse cursor over the line between your pic layer and the circle layer until you see an arrow going down symbol, once you see it click it and tah dah! your picture should now have the same shape as the circle! - you can further move it if it doesn't fit the way you want with the Move Tool (;
Others:
>You can change every color, font and section to your liking, just don't change the general layout of the template.
>To hide/show the guides (those bright blue lines all over the document), click ctrl+,
>'Inter' is a free font and you can get it in the link above (linked with the credits), Golften Vintage is not, but you can get the demo version >here< (just scroll down and click the blue download button under license). I will not tell you how to install fonts as it might be different for everyone (for me it's C:/Windows/Fonts and I just drop the zipped files (except the .txt one) there), but google is your friend.
>I can't think of anything else that needs to be said here, but if you have any other question feel free to send me an ask or dm and I'll help you out!
>Last but not least, a like is appreciated if you plan to use this plus consider tagging @synindoodles if you use it <3
#psd template#template#characters page#muses page#muse page#muse template#character template#character page template#oc page#oc page template#synindoodles#rp resources#rp template#roleplay resources#roleplay template#writers resources#writing resources#writing template#writers template
51 notes
·
View notes
Note
do you think you could please do a tutorial for your greys anatomy edit (kinda similar to your brittana edits) i'm shocked if no one has ever asked you before for tutorials (and if you do i'd love to see them) your edits are so gorg and you're incredibly talented !
Totally! Bare with me, this is my first tutorial in like 8 years. Haha. I'll show you how I made this one:
For reference, I use Photoshop CS5. (My computer hates the newer versions. It'll run three different video editing softwares but hates photoshop. Idk lol.)
Okay, first you want to make 2 gifs with the same amount of frames. That's important. And then you want to convert them to a smart object.
So we have these two gifs.

Now, depending on what you're doing, you can do this next step now or you can color your gifs how you like, save them separately and then reopen them with all the coloring on them. Sometimes I do this if I'm working with a lot of effects but since these two gifs have the same coloring, we're going right click on one of them (it doesn't matter which one tbh) and you're going to select "duplicate layer"
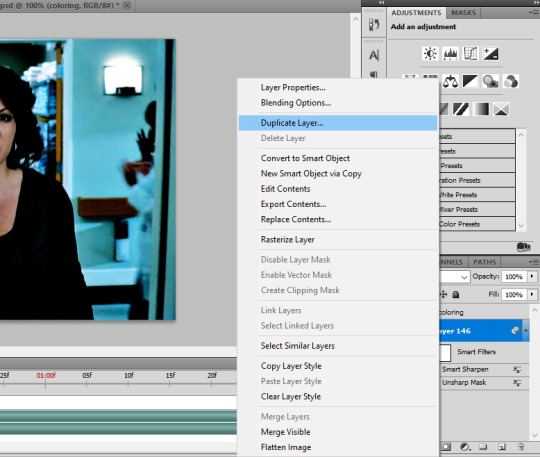
A little box will pop up and this is where you're going to select the project name that you want to essentially paste this gif on top of.
Set the top gif to Screen.
The first thing I usually do is sharpen them.
So I use Smart Sharpen and Unsharp Mask with these settings:
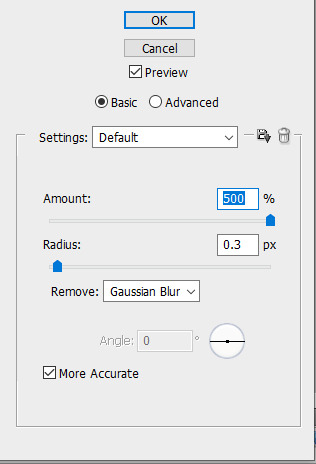

With Unsharp Mask, you have to tweak them depending on the gif, quality, what effect you're going for, etc.
Then we add some basic coloring:
Now, I have a base for specific shows because all shows are colored different. Grey's is more blue toned whereas Glee is more yellow toned. However, since coloring is a bitch sometimes, I'll add a PSD that I use ALOT. You can download it here.
So now that we've sharpened and added some coloring, this is what we have (separately):
This is what it looks like after I set it to Screen (and I moved the top gif a little to the right.)
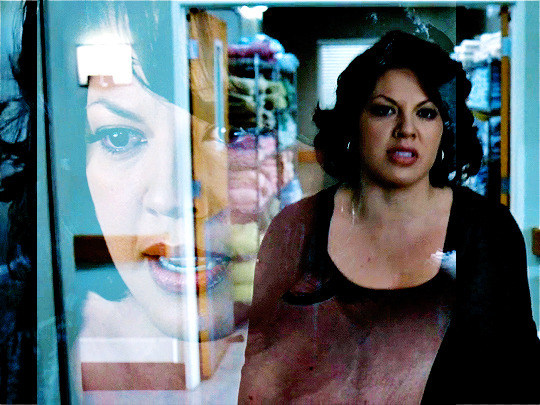
Obviously, we need to get rid of those lines and make it so that each gif is more visible.
So now we blend.
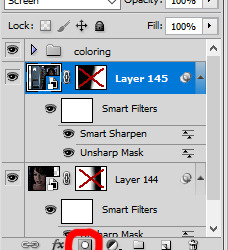
On the top gif, you're going to add a layer mask to that gif. So with that top gif selected, you're going to select the mask button that looks like this:
Select your brush tool and use a soft brush to erase what you want from the background of each gif. (Make sure to repeat the previous steps to get a layer mask on the bottom gif.)
I have this now, after using the brush tool.

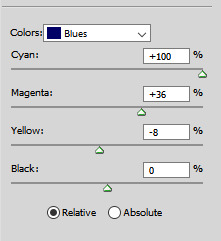
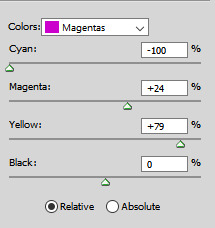
As you can see, it's very blue and I wasn't feeling blue for this gif so we want to change blue color. That's where the Selective Color comes in.
We're going to get rid of that cyan tone. So you're going to add adjustment layer and select Selective Color.
All I did for this one was adjust the cyan tones in the drop down box.
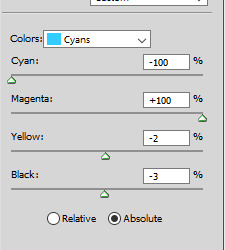
Now we have a pretty purple tone!
Now, we're going to add a light grey squareish box this to outline.
Set the blending mode to exclusion. To get the bar (and we'll do this again with the text) you're going to select the FX icon.
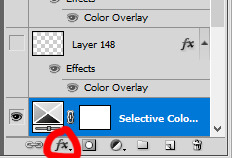
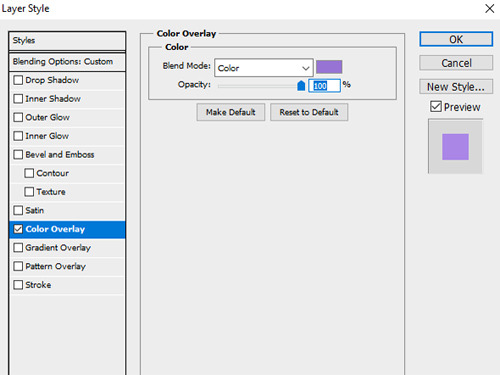
Select Color Overlay. A box will popup. You're going to set the blending mode to Color and then select whatever color you want the bar to be. (If it comes out with too much white, adjust the color of the bar itself to a darker shade.)
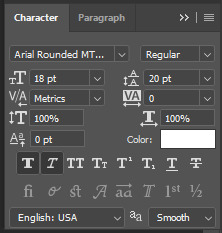
Lastly, we're going to add our text. For this gif I used Magnolia Script and Montserrat.
To get the purple effect on the "The Story" text, you're going to do the same thing you just did for the bar.
Voila! I hope this helped. If you need any further assistance, I'm always happy to help!
#tutorial#gif tutorial#blending tutorial#usergif#completeresources#mine#also anon you’re so fucking sweet
101 notes
·
View notes
Photo


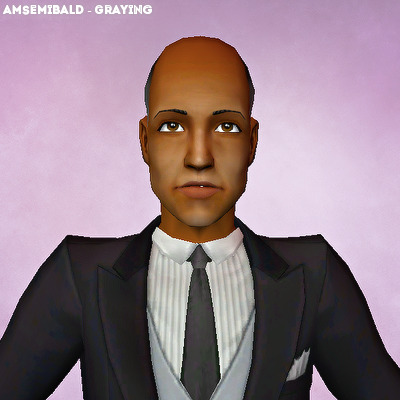

Graying Maxis Hairs in The New Hair System.
binned but not familied, so that means elders can keep these colors too.
no meshes needed (note: these probably won’t work if you have mesh default replacements for the og maxis hairs?)
once again, credit to @deedee-sims for the graying psds! 😄
these hairs have textures/colors from the nhs texture defaults, i just copy pasted stuff around. i couldn’t remember if vikuu’s messy ftm conversion has been done in the nhs or not, but since i couldn’t find it from my own folder, i made naturals as well as the graying version of it. @yandereplumsim has previously done the graying version for the short combed hair (here), but i made my own version as well (for practice, lol 😂) but it’s pretty much the same thing, so feel free to skip that one if you already have yander’s one (they do have slightly different texture, though, since yander made her own blend!)
download links are under the cut 💜↓
AF Low Bun - graying : sfs // mf (another preview here)
AF Messy - graying : sfs // mf
Vikuu “Messy Bob FtM” - graying + naturals : sfs // mf
AM Peak - graying : sfs // mf (another preview here)
AM Semibald - graying : sfs // mf (another preview here)
AM Short Combed - graying : sfs // mf (another preview here)
#the sims 2#ts2#ts2cc#s2cc#sims 2#sims 2 download#fhair#mhair#maxis#maxis match#maxis: f#maxis match: m#maxis match: f#maxis: m#hair#done by me#vikuu#vikuu: m#graying hairs
142 notes
·
View notes
Note
Oops I didn't mean to post that anonymously. Yes, if you have the time to post more about giffing, that would be awesome!
Okay so I'll make a quick tutorial and I hope it's easy to understand ksjsk. It's very image heavy and I apologize for any typos. We'll be making this:
So I start by taking the screencaps with Potplayer. Just open your video (preferably 1080p x264). The shortcut to take your screencaps is Ctrl + G, it'll open this window:

(those are my configurations, it's in portuguese but it's easy to understand)
I usually create a folder in Documents for each gif. Also remember to start capturing a little earlier because it takes a few seconds to start, same thing when you finish.
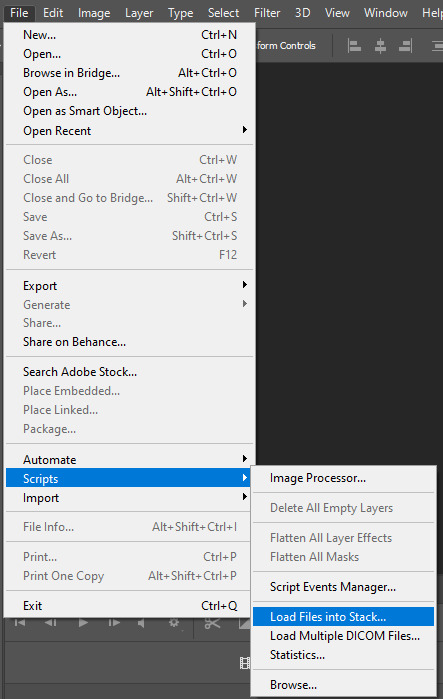
Now it's time to open it on photoshop! Make sure you have your timeline set up, if it's not showing up go to Window > Timeline. Now go to File > Scripts > Load File into Stacks
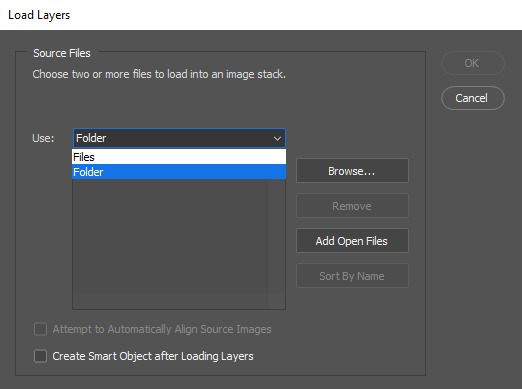
When this window opens, just choose your folder and click okay after it loads (might take a while if there's too many files)
So when it opens, you'll click on the 'Create Frame Animation' option in the timeline

It'll create a single layer, so go to the little button at the side and click on make frames from layers

they'll show up backwards, so go back and choose reverse frames

Now you're all set. It's time to delete what you don't want. Since tumblr accepts up to 10mb, I usually keep it between 60 frames. Really it depends on the scene and the dimensions you're gonna make your gif. (for example, if after your coloring, the background of your gif is completely black, you can go up to 175 frames, even if you make a 540x gif, i did that once lol)
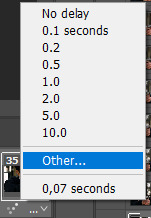
So when you have your scene ready, select all frames and set your frame delay to 0,05.

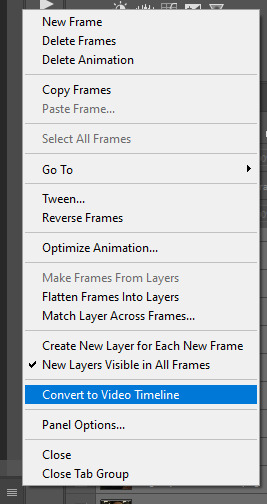
Then, with all your frames still selected, convert them to video timeline
Go to your frames, select all of them and convert them to smart object

So after that, you can crop your image! Check the tumblr dimensions here. When making big gifs I like to use 540x400, 500 or 600. Just what I think it'll fit best. For 2 per row, I usually use 268x180 or 268x200. For this gif I used 540x400 and cropped it, I always try to crop the borders so there's no risk of the gif having that weird white border around it.

Then go to Image > Image Size on top of the screen

Set to the dimensions you used when cropping, so for me it was 540 x 400:

I use bicubic smoother to resample but honestly i don't really know the difference kdjsk
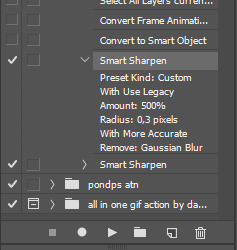
Now let's sharpen it! I usually use this one for big gifs (comes with a better tutorial than this kdjsk) but it's got a lot of steps to it that i like to do it myself, so i just use to sharpen it. And if you're following this tutorial, we already did all the steps on the action, so just click on the Smart Sharpen.
I also recommend this action for when you're making 268px gifs (two per row). I love this action too. Btw if you're just downloading your actions, you have to load them on those 3 little lines:

So for coloring! I use a base for most of my gifs and I edit them from there. Here's a great blog for coloring psds. If you want, I can make a separate tutorial on how I color my gifs, because it won't fit it all in 1 post.
Then I added my subtitles. Make sure the subtitle layer is on top of the coloring one so it doesn't look weird. Here's the settings I'm using for this one:
Now we're gonna add blending options. Go to the bottom of the screen with your subtitle layer selected and click on that little Fx:

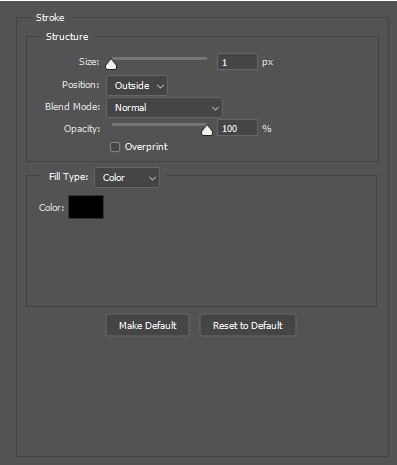
I added drop shadow, outer glow and stroke:


When you're done, you're gonna want to Save for Web. The shortcut is Ctrl + Shift + Alt + S. All at once. This window will open up:

This is how I like to save them. Don't forget to make sure your gif is set to forever and less than 10mb (you can check at the bottom of the screen, below your gif, mine is 5,5mb). And you're done!
Or not. I don't know why I have this problem, but after save it, my photoshop sets the frame delay back to 0,07, and that's too slow. So I open my gif again in File > Open. Or Ctrl + O.
Select all frames and set your frame delay to 0,05 again

Do not convert to video timeline. Just Save for Web again. And now you're really done.
#gif tutorial#i hope this is not too confusing#im a terrible teacher#but please lemme know if you have any questions or if i didnt touch on something you were wondering
38 notes
·
View notes
Note
21, 32, 41 :D
thank you!! 🫶
21. PSDs or original coloring for each gif
original coloring! i tried PSDs once and didnt really like it. i do tend to use the same edits and similar settings between different gifs tho!
32. Do you like to/can you make edits and graphics too or only gifs
yeah, i’ve made some other edits! (some more serious than others lol) i also edit photos for my icon/theme but i think making gifs is fun so thats my main focus rn :)
41. What is your least favorite part about your gif making process
choosing and formatting the clip tbh. idk if i just do it in a roundabout way but clipping the original video, saving the clips to my pc then importing them to photoshop, deleting frames, etc. ugh. so much work. i vastly prefer the coloring and editing process
3 notes
·
View notes
Note
HIIII psd anon i think i’ve got it figured out?? i deleted all my gradient maps and that mostly fixed it but i’ll try doing the thing u suggested,, if i can figure out how LOL thank you for your help!!
HIII im glad u got some brightness back so this is for the future if u keep wanting to use gradient maps (theyre cool and let you do cool stuff imo, if you use them right? the gradient map from Panera looks insane but it makes mafuyu Green so thats cool)


(panera bread filter and the settings for my gradient map)
levels also helps even if ur not relying on gradient maps, thats how i got erich from having these rlly dire shadows to looking abit less like i was flash banging him with a stage light


(left is before levels, right is after. everything else is the same)
i put the actual tut under cut bc its long um lol anyways mr /luvrevue himself taught me this trick so i'll pass it on to you since dark PSDs can be a real pain sometimes :clap:
i'm using one of /cutesiplushi's PSDs for this bc this psd has like 5 gradient maps and makes the example img crazy dark. peek.

first im going to open everything and remove any thresh hold layers i'm not a fan of. still too rich imo. the original is pastel so now i can bring levels into things to bring some of that pastel/lightness back

see the boxes labled "sample from image" ? You select a box then select a colour you want to have a certain property relavtive to the other colours...
black -> darkest in the img
grey -> mid tone for the img
white -> lightest colour in the img
i selected the grey box and selected part of fyo's hair, and the image brightened up abit!
from here i would increase the contrast and lower the saturation but thats be i have an insane style that loves HAZE and GREY TONES !!! once the brightness is corrected u can go crazy, i hope this helps abit :thumbsup:
the same exact thing can be done in curves but the PSD makes my chromebook lag like CRAZY so i dont like messing w curves when im lagging um lol experiment and throw random shit at the wall tbh
2 notes
·
View notes
Note
Hi, I really love your andor gifset from September 28 2022 (idk if I can post a link so... but it's from the first episode) and I was wondering if you could maybe give me some tips on how to make it so clear and vibrant even when the picture is big? I have just started gif-making a few days ago and I definitely want to aspire to make such great gifs.
Hi there!!!! Firstly tysmmm 🥺 i really had a fun time making those big gif andor episode sets i think they all turned out great!
I did make a tutorial a while back mostly focusing on how I sharpen my gifs. My steps mostly the same as they were here except I now export gifs using "adaptive & diffusion"
The Andor gifsets you called out I did use 4K SDR videos. But I don't always think 4K is necessary (especially where r we gunna get them now rip rarbg), 1080p is always preferred and if you're d*wnl*ding / t*rr*nting i would recommend trying to pick the larger file size, for example choosing a movie thats 5GB over 1.5GB.
In my last tutorial I didn't really go into how I colour my gifs but that's where the biggest changes come into place. I don't use a set preset/psd, I colour each gifset uniquely but I do have the same order of steps generally. My order of adjustment layers tends to be: Levels, Curves, Selective Colour, Vibrancy. I also frequently use Channel Mixer and Hue/Saturation when needed. Below the cut I'll share my "starting" settings for some of the adjustments layers but these often change as the gif needs.
I hope this is somewhat helpful!! I think with practice and more gifing you'll find your own style and process. I look back at gifs I made a year ago and think oooof haha what was I doing back then. constant improvements & always finding new tricks♥️ I would also recommend following some gif resources blogs like @usergif or @pscentral they often post really helpful tutorials & tricks to help make your gifmaking the best it can be!
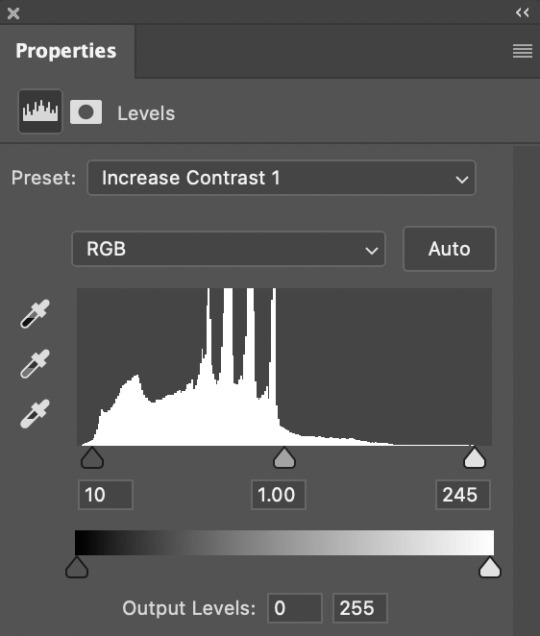
Levels - I tend to start with the default "Increase Contrast 1" or "Increase Contrast 2" depending on how dark the intial scene is. When making aditional adjustments I focus on the end sliders - the dark & light, and barely ever touch the midtones adjustment, if i do use it I go very subtly so 1.05 or 0.95. Our goal in the end is to make the darkest parts of the gif black & the lightest parts almost white.
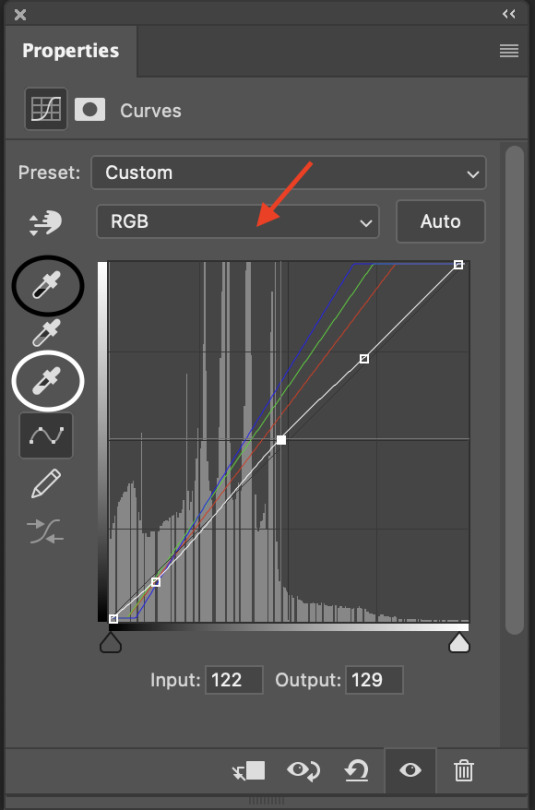
Curves - imo curves makes the biggest adjustment for the gif colouring. shes my best friend! So again I focus on the dark/light eye droppers. I start with the white eyedropper and select something white or the lightest part of the gif, then go to the black eye dropper selecting a very dark portion of the gif. Then in the middle section I adjust the curves line (white line) to meet the needs of the gif for proper contrast / brightness. If needed Ill open the RGB drop down (red arrow) and adjust specific colours. I use the Blue the most as i often see alot of yellow tint in movies (which i hate lol) so ill bring the top end of the blue line closer to the centre of the grid to reduce the yellowness. Sometimes ill make a second curves layer, set the preset to "linear contrast" then adjust the sliders as needed, this often gives additional contrast & brightness.
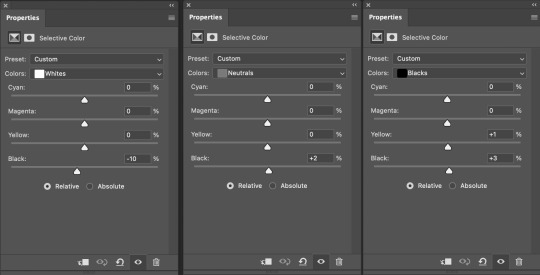
Selective Colour - my second best friend! this is where you can make little adjustments to the hues of the gif, then fine tweak the darkness/brightness in the gif. So below i have my "starting points" in the white, natural & black colours. Often the white ends up being a much lower number (-40 or less) and in the neutrals area i can fine tune the overall hue of the gif - reduce the yellows or increase the reds etc. This tool is alot of playing around with and just seeing what looks good!
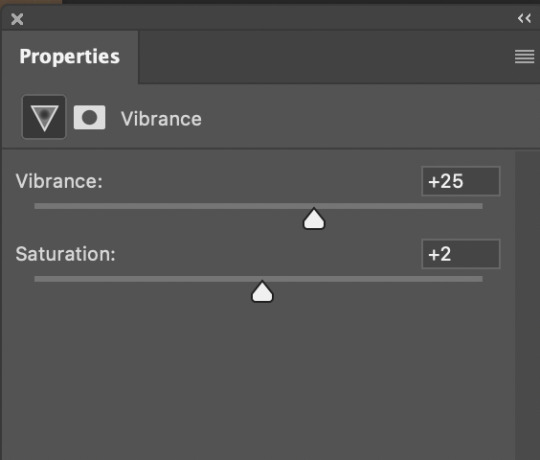
Vibrance - this is normally the last layer ill add. I barely change the settings I tend to go with 20-30 Vibrance and then 2-5 on Saturation. Just gives add extra vibrancy and colour pop. Saturation stays a bit on the lower side as often bringing it makes peoples skin tone too orange/red/yellow etc. But if I want over saturation increase on particular colours I'll make those adjustments with a Hue/Saturation layer.
10 notes
·
View notes
Note
never used photoshop so im curious to see your opinions about photopea vs photoshop
ok things to be known: 1) adobe can suck my cock and balls theyre evil and i wish that the corporate entity that is adobe would go up in flames, a corporation shoud NOT have that much insight in your privacy, files, sensitive info, etc 2) photopea is great and built off a small dev team as a basically a passion project, which is awesomesauce! i'm not knocking them at all, and i think ppl should support them in anyway they can
i've been a graphic designer and photographer for years now, and in hs i became adobe certified. i literally spent four years of my life learning on an industry standard. it becomes muscle memory after a while. beside that i was a roleplayer so i became VERY familiar with edits and gifs and all that. again everything became muscle memory. adobe suites are the industry standard for a reason, and for GOOD reason. i think they have an amazing interface and work hard to update the experience and make shit easier for artists; like i will give them that even if i sound like a bootlicker. i never paid for it tho lol as a student i got it for free and i would use cracks/torrents.
when i got my new computer it wouldn't let me run bootcamp so i couldn't crack the adobe suites like i used to :/ new mac processors or whatever don't rely on intel anymore, so not intel = no bootcamp. most cracks are pc based so i just couldn't find one that worked for me. apple went ham on protecting IP and combating torrents so it's like impossible to crack without an extensive VPN or else adobe will literally send a cease and desist to your internet provider. its sincerely fucked up.
i switched to photopea bc of this. i really liked it, but im autistic so having to relearn my own workflow that ive had for years made me want to hashtag die. the interface is VERY close to photoshop, so it wasn't hard, but it doesn't have the same capabilities i was used to w ps. i do NOT like edited photos in photopea; i think its way too laggy and glitchy to work with giant raw files, which really sucks!!! for making small edits and doing my graphic design tho??? i do really like it. it doesn't have the same capabilities as ps sure, but once i just fucked with the filter galleries and different plug ins and worked my process around what photopea could accomplish, i was good as gold. i've been producing quality work on commission through photopea. it's a learning curve for sure, especially if you have zero experience with an editing interface like that, but the more i use it the more i learn.
all of that being said, i think photopea is fucking awesome for being completely free and open source. it has its issues —— sometimes its way too glitchy for me and pisses me the fuck off, i have to frequently save my psd files and hope that they don't fuck up, and then reopen so it's less laggy and rinse and repeat bc some of my stuff takes hours lmfao —— but i think its pretty darn close to the photoshop i was using like less than a year ago. its glitchy, its laggy, the ads are annoying and clog up the screen, but i simply cannot complain to much when its a smallish dev team working on a shoestring budget (last time i checked) and for FREE. like its open and usable on any browser and computer and i think thats rad.
if i could go back to ps without giving them money i would in a heartbeat. ps is awesome for the work i do, and i like that there's constant improvements and updates. it just boils down to look, feel, and workflow to me; ps is rarely laggy and glitchy, its meant to handle giant projects, there's so many plug ins you can find online, etc. i just wish it wasn't a subscription based software; honestly if i new adobe was less like the elf on the shelf and i could make a one time purchase, i would. but alas.
anyways i'm pro photopea all the way. idk if any of this was helpful its mostly rambly lmfao. but yeah. i don't do much photography anymore, so i don't have to work around the glitches and lags and all of that with photopea; i focus on graphic design for event fliers and social media content + rp resources. it has room for improvement for sure for sure, but it's lovely and helpful in its own way.
3 notes
·
View notes
Text
lil tutorial on how i make bigass gifsets with multiple smaller gifs
what i'm talking about, ex this gifset of dean in each episode
For the lovely @klinejack I hope you find this helpful 💞💋
Back then I made that gifset using groups and masks but other sets afterwards I've been using shapes and clippings masks. Also in my gifmaking process I use the timeline and smart objects.
I'll put the rest under a read more since i'm gonna put in a few pics so this doesn't get too long.
I'm not gonna get in details about sharpening/coloring etc as everyone has their own process!!
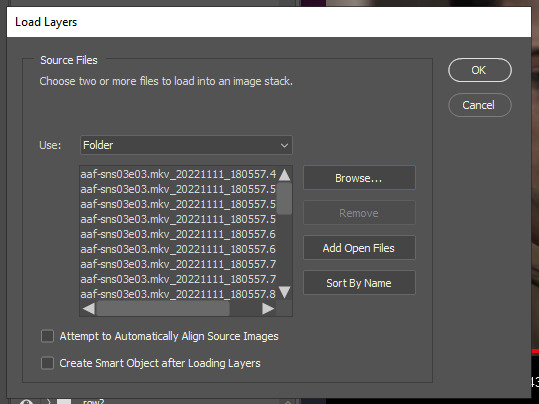
I start with loading the frames I previously extracted from File > Scripts > Load Files into Stack... > select the folder where the frames are located > click OK:
2. Next up I use my own Action to load the frames into a Smart Object:


3. Then I copy the Smart Object layer into my layout, bellow is the 5x5 template & then position the Smart Object layer above of the shape where you want it located:
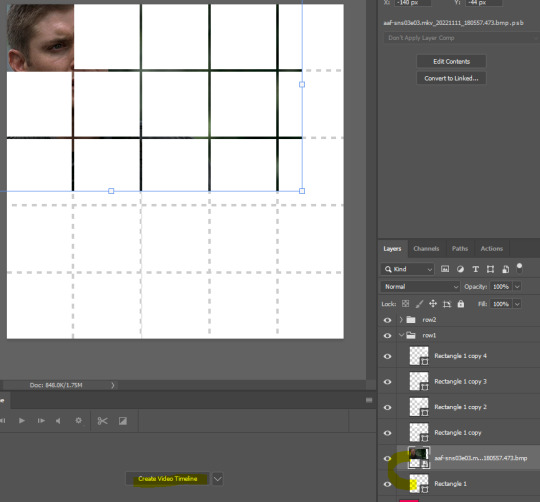
4. Resize the Smart Object to fit as wanted over the respective shape and then go to create a Clip Mask
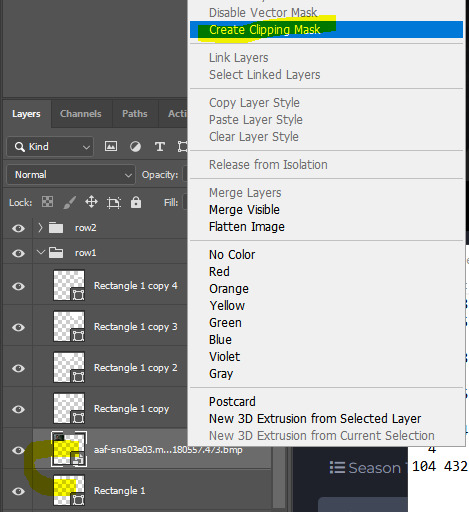
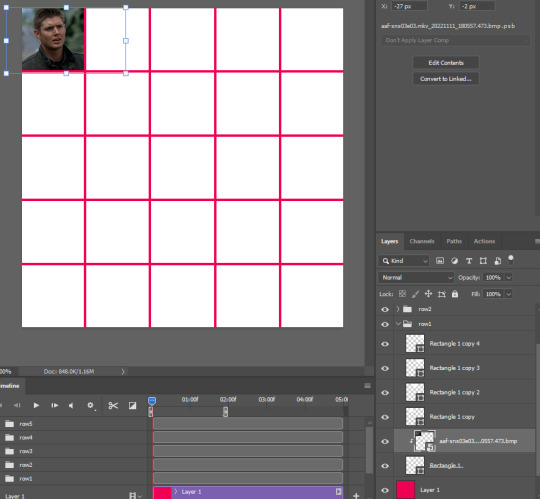
5. I enabled the pink layer bellow so that you can see that it fits exactly over the shape
6. Load all the gifs into the layout one after the other - do NOT apply any sharpening or other filtering until the end
7. Make sure beforehand that you got the same number of frames for each gif - this will simplify the process as you don't need to scroll along the timeline to see where you want it to start end. Also the less resources (RAM) Photoshop uses the better
8. If psd file size goes over2GB while saving, you cannot save it as PSD but will need to select PSB from the drop down:

9. When I was making the Dean set linked above each PSB file (size was around 4GB for each 5x5) would use up around 90GB of RAM by the time the last gif is in place - so make sure you have enough space on the harddrive that Photoshop uses. If you run out of space you won't even be able to save the file. You can try then to clear some of the PS cache (Edit > Purge > select each). Try to save it and close Photoshop, then reopen it and you will have more space again.
10. Best to prepare your coloring in a separate file beforehand and at the end just paste it on top.
11. Just before saving it, add your sharpening (easier to have an action for this with a keyboard shortcut) to each Smart Object.
Okay i hope this made sense lol if there are questions let me know!!
I'm going to add a link to a gdrive folder with some templates I have made (the 4x4 & 4x5 are form this spn women set and the 5x5 I made just now): click here.
EDIT (25.11.2022): added some more templates!!
Yeah except coloring this is pretty much my gif making process for large sets sdfegrvfs is this the best? Idk but i've gotten used to it lol
#gif making#photoshop#i hope there are no typos i read once through it lol#gif tutorial#cowboycoven2
34 notes
·
View notes
Note
Hey!! I just wanted to say that your recent speak now gif set is sooo stunning. I was wondering how you managed to create that cassette tape effect if it isn’t any trouble? It’s really so pretty.
Have a great day! ✨
ahhh thank you so so much! first of all, i cannot take any credit for this effect, as it was greatly inspired by this amazing yellowjacket gifset by @thewintersoldier!!
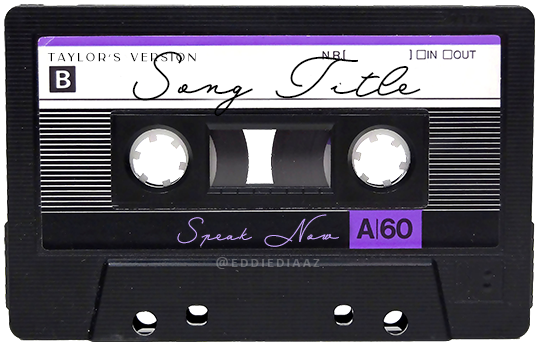
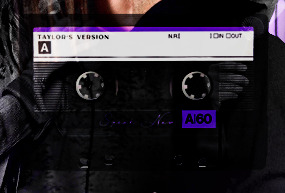
but here's how i recreated the effect, from a cassette png (found on pngwing here), to this animated cassette effect (as seen in my speak now set):
psst: i usually always create in photoshop cs5, but for this effect you need a recent version of photoshop because it's using transform keyframes (i think cs5 doesn't let you do that, or i just don't know how to lol). i used cc 2019 for this.
sorry if this is lengthy or has too much or too little details haha, but i hope it's comprehensible! english is not my first language so i also apologize in advance for any mistakes!
I. PREPARING THE CASSETTE
so, starting with the png here:

i removing everything i didn't want on the cassette png with the brush tool by just drawing the right color over the unwanted text. for the color, i then went to image > adjustments > hue/saturation and in the red tab, i played with the hue slider to get that purple color. finally, i added some text to my liking, and this is what i ended up with:
(not necessary but: i also selected the white lines on each side with the magic wand tool because i wanted these lines to be transparent. once your selection is done, go right click > layer via cut. it will create a new layer of the cutout you just made. you just need to disable or delete the layer to make the selection (lines) transparent.)
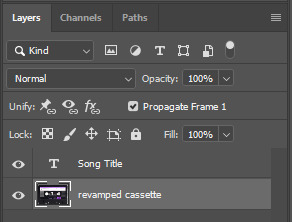
at this point you want to have only 2 layers: the revamped cassette and the text layer. you can remove the text layer actually, and just add the title back at the end, as it is not necessary for this effect. i just like to have the visual.
if you have multiple layers, you need to select all of them (except the song title layer), right click on the png layer and click on merge layers. this will create one layer with all the editing you made on the cassette. if you think you will need to edit this later though, i would save the file as a psd before merging the layers.
II. THE EFFECT
okay, so now that you have your cassette, make sure your video timeline is activated, not frame animation, and you are ready to go.
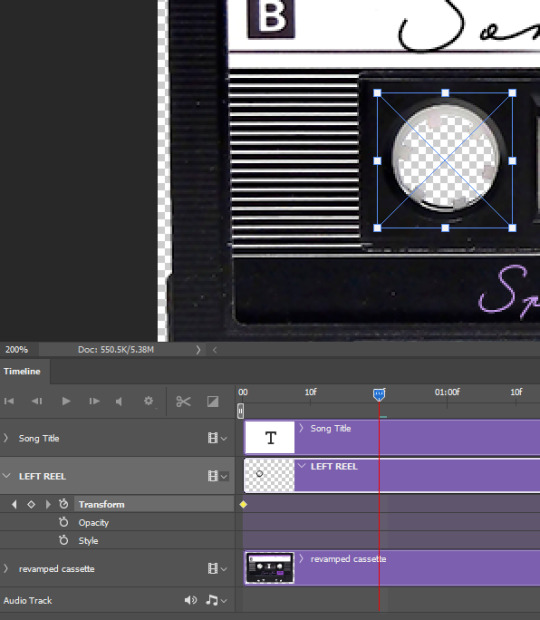
first, you want to create a perfect circle shape around one of the reel with the elliptical marquee tool (hold shift while dragging the circle). make sure it covers the entire area that will later be rotated. make sure this circle is perfectly centered around the reel or otherwise the animation will be a bit lopsided.
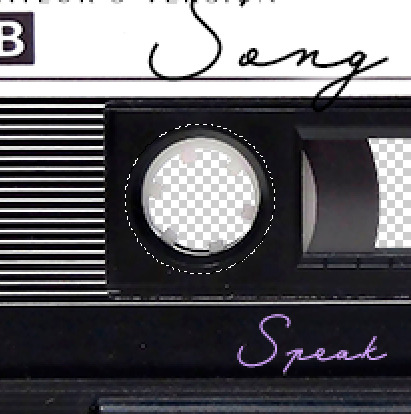
then right click on this selection and go "layer via copy". this will create a layer of only that circle selection. important step: right click on that new layer and go "convert to smart object". the layer should look like that, i've renamed mine:
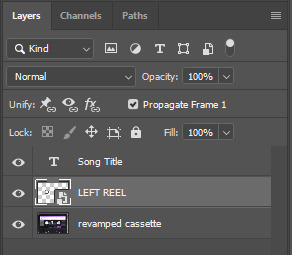
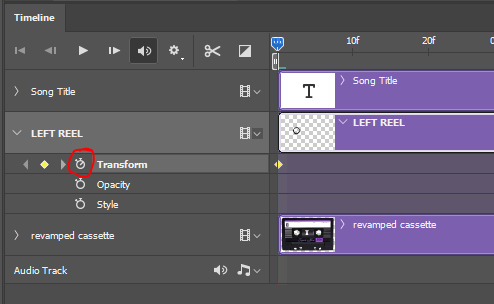
now if you go to your timeline and open that new smart object layer, you will see that you have 3 keyframe options. we only need the transform one.
go to the start of the timeline and activate the transform animation by clicking on the stopwatch button. a keyframe will be created automatically.
to create the actual animation, move the position of the cursor on the timeline further, i put mine at the 01:00f mark so it's easier to create the right timing.
then what you want to do is select the reel smart object layer and hit ctrl + T. a box will appear and this is how you will make the reel rotate.
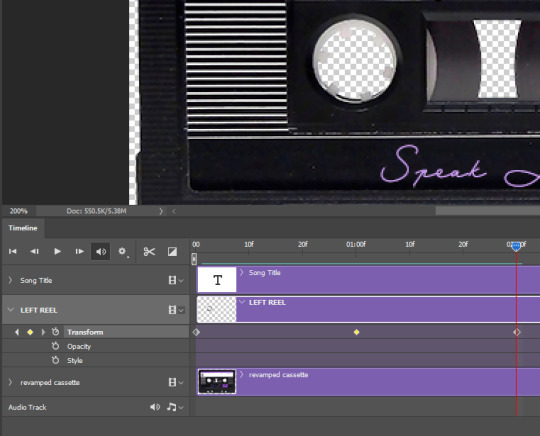
to rotate the reel shape, move your cursor near the blue box on your canvas and drag it until you have rotated the shape halfway through and hit enter. another keyframe will be created and if you play your animation, the reel should rotate on itself for half a turn

move your position on the timeline to 02:00f and do the same thing: select the left reel smart object, hit ctrl + T, rotate for another half turn, and hit enter. this third keyframe should be the last one needed for the animation and you should have a full animated rotation of the reel.
play your animation, and adjust the speed to your liking by dragging the keyframes on the timeline (but make sure they stay within the same distance from each other). the closer the keyframes are, the faster the animation are, and the further they are, the slower it'll be.
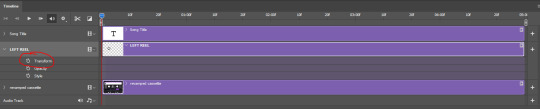
then you can just trim the smart object to your animation's length, and duplicate (right click the smart object > duplicate layer) this layer the amount of times needed (i find this less finicky than duplicating keyframes), and placing them one after the other. three full turns should be enough. this is what my timeline looks like right now:
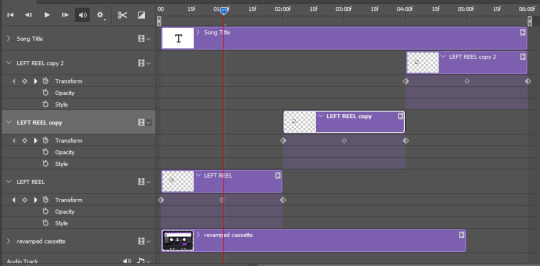
and my animation for the left side looks like this:
as you can see, we can see the little "dents" peeking through behind the animation. we don't want that! to remove it, select the revamped cassette layer (that should be under the reel smart object), and create another perfect circle around it with the marquee tool. this time make sure it's smaller than the previous one, it just needs to cover these dents.
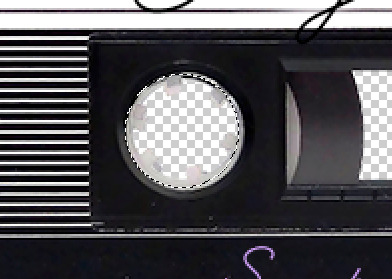
then right click on this selection on your canvas and go "layer via cut". this will create a new layer with that selection, and all you need to do is to disable it. this is removing the information in that circle.
once you are happy and the animation works, you can just delete that cut layer. now the animation is done and looks like this:

III. SECOND ANIMATION
one you have done it on the left side, you just gotta do the same thing on the right side. you can also try duplicating it, but i found it finicky for some reason (or maybe i'm just not used to the controls of this 2019 photoshop version?).
this is what i have once i've done the same thing on the right reel:
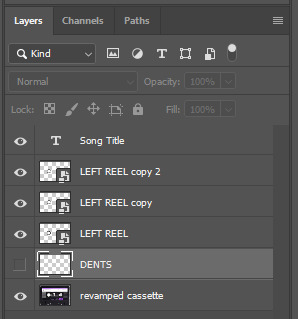
once i am happy with the speed and everything, i want to have only one layer so it's easier to use on gifs. first, i will save this animation as a psd file, in case i want to reuse it. then i am removing the song title layer and will be flattening everything and creating frames from this animation. to do so i am using the "save" action from here.
i'm not sure why it does that, but it's creating a couple of frames where the reels are a bit offset from their position everytime there's a full circle done, so i just delete these 5-6 frames. you can also change the speed here, but by default it should be 0.05.
once you are happy with it, just turn these frames into a smart object with the video timeline again (convert frame animation to video timeline and select all the frame layers > right click > convert to smart object)
now you have a smart object that is ready to be used anywhere!
IV. FINAL TOUCHES
for my particular speak now gifset, i have multiple layers of the animated cassette on each gif:
1, bottom one - cassette layer set to the blending mode "hard light" and set to opacity 86%:
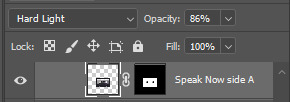

2, middle - this same cassette layer set to hard light, but with the opacity at 100%, AND with a layer mask so it's only applied to the animated reels (i wanted them to show up more):

3, top one - and finally a third layer with another layer mask because i wanted the white label and speak now area to be less see through. it's set to the normal blending mode and the opacity is at 75%


and then i just added the song title on top at 100% opacity and normal blending mode, and added some drop shadows, and tada!
there we have it, i hope this was helpful <3
#alie replies#Anonymous#photoshop#tutorial#*ps help#completeresources#allresources#resourcemarket#userrobin#userraffa#userpjo#usertreena#tuservaleria#tuserheidi#userdean#userrainbow#usersalty#userzaynab#usernik#swearphil
360 notes
·
View notes
Photo


before and after coloring challenge — tagged by @delhyun @yutaslaugh @baekwin (thank you!! this was fun!)
my coloring on the left & the original on the right! (ignore how grainy these are it's the unfortunate consequence of putting two colorings on one gif lol)
i feel like i have two or three distinct colorings that i always end up with, but all of them tend to have a theme of lots of yellow/red + often cyan. i always try to make my gifs really vibrant and bright while also unwhitewashing, and the rest just kind of happens lol. i sometimes use psds but usually i just use an action that puts my favorite layers on and then i basically go from scratch. i literally always use my girls curves+vibrance+selective color+exposure every single time without fail, and 90% of the time i use color lookup too. i also sometimes use color balance and hue/saturation if i'm struggling, and sometimes i use multiple of the same layers (especially curves & selective color). i really love the process of coloring (remind me next time i'm struggling with it lol) and i tend to get really finicky about it. never underestimate how many microadjustments i am capable of lol
tagging: @fadedinmysong @bangzchan @kdyism @sunwoozs
of course only if you want to! and if you've already done it tag me/send it to me so i can see!!
15 notes
·
View notes
Note
spare coloring tutorial for your colorful sandman gifs? they're stunning! 💜💫
hi! tank you so much!!!!!
so to be honest i dont remember exactly how i edited each of them because i usually color every gif from scratch. sometimes i save as psd but sadly i didnt this time.
but i tried to replicate the one i liked the most and is almost the same way i edited the rest of that gifset, maybe with just some things more or less. i hope it helps!
first, this is the first frame with the brightness and contrast adjusted w a levels layer

then layer > new fill layer > rainbow gradient
next i adjusted the layer to saturation and adjusted the fill to 17%

and now it looks like this:

i like this method because makes every color pop, even if it was ALMOST gray, you will see a color and its so much easier to use selective color after.
next usually i would need to adjust the screencaps a little with color balance UNDER the gradient layer. adjust to fit the kind of coloring you have in mind like for example this gif

i needed to adjust the color balance to be more reddish so i could be able to adjust the color of the floor because otherwise i woud not be able to, since this scene was too blue and if i adjusted the blue i changed everything.
but here i didnt think it was necessary.
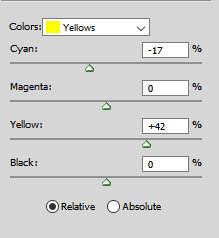
next is just playing around with selective color, the best part imo. and chose the colors you want to make more vibrant ou change the tone etc.
in this gif the main colors are red, a bit of magenta, yellow and blue so i played with those


just play around and add as many layers as you want. i used one more to adjust the yellow and add a little more contrast adjusting the black


now see how it affected his hands? i used clipping mask to erase the layer that adjusted the reds on his hands


eh, its still doesnt look perfect but i didnt mind much
i added one more selective color layer to adjust the magenta a little bit to kind of make up for the red parts i erased and also adjusted cyan


add a little bit of vibrance just to make a little more vibrant, why not

anddd its done!
thats usually the way i go. levels > gradient layer (or vibrance layer) > color balance UNDER the gradient/vibrance layer > play with color balance > a little more of vibrance
let me know if i helped! if you have any more questions feel free to ask. if you’re interested i can also share the psd (since now i remembered to save lol)
26 notes
·
View notes
Note
Hi! Just wanted to send an ask to say thank you for all you do, I really respect what you do for the fandom and the hours you give to us. From one gifmaker to another, your output is completely incredible, especially at the high quality you achieve. Do you have a lot of Actions to speed up the process? For me a gifset takes about 30min to an 2hr from start to finish depending on complexity of post-processing, so I can't imagine doing what you do! I assume the show lighting being fairly consistent for runway vs werkroom helps with presets, or is it still very manual?
Hey!! Aw thank you so much! it's always nice to speak to a fellow gifmaker! ❣️(especially if you gif drag race because i feel like the people who do have dwindled over the years!)
I actually don't really use actions.. or at all really lol (if you think itd help/speed up the process do let me know!) i use smart sharpen with pretty much the same settings every time so that definitely helps!
But yes for me it's about the same, 30 min to 2hr depending on the post (unless its a more complex compilation.. those have taken me 5+ hrs in the past 😅) . but thankfully with US drag race the runway lighting is pretty consistent so most of the time its pretty easy to colour, sometimes i can copy my psd from the 1st set almost exactly and get sets done in 20-25 mins 👌🏻the werkroom colouring is definitely more manual; i make a couple of base PSDs each season but it literally changes depending on the angle of the werkroom lol especially in untucked (when i giffed bosco in untucked every week sometimes i'd have like 4-5 different sets of colouring for one set lol 😭but worth it in the end!)
but yeah for US seasons its not too difficult to gif so i can get sets done a lot quicker! the international seasons often have pretty bad/crazy lighting so that usually requires a lot more colouring and time to correct everything lol
#ask#anon#edit: i also don't know where to find/how to make actions which is mainly why i dont use them 😆
16 notes
·
View notes
Note
Hi!!!! No worries if you don’t want to tell me or respond lol. But I really like the colour grading you did on that most recent Joel Miller gif set. I do photography and I’ve been struggling for ages to find a way to bring out the warm sort of brown tones without making things feel too muddy or red. Just curious about what HSL adjustments you made / what colour grading helped you get that look?
ohhhh my god thank you so much??? this might be a convoluted answer/unnecessary rant so i apologize in advance lol but i tend to keep the colorings/psds i use for gifs saved in a folder so every gif i make in a set is consistent with color/lighting/shading/whatever. i get anxious if there's even a little bit of difference per gif lol
a lot of what turned out in those gifs has to do with the lighting/coloring that's already in the show/that specific episode/scene. i've got the rest of the episodes' gifsets made and finished but i can try and kind of show what i'm talking about. they all look different color-wise, at least in my opinion, because of the differences in each episode's lighting. if that makes sense.
the goal with any gif i make, regardless of show/movie, is to make them either
1) better than what was there before (for example, if the movie is INCREDIBLY blue/yellow then i try and color correct that blue or yellow to be more neutral)(i'm looking at you triple frontier and your dark, blue ass scenes dfjkdflh)
and
2) not whitewash pedro. this is incredibly important (at least in my opinion) because i've noticed a lot of gifmakers (or least they used to) went for a really pastel/pale look and it whitewashed poc so dramatically and it was ~problematic~ to say the least. (i used to make gifs for a band that consisted of all mexican band members and i got hate a few times/people policing how i should color my gifs so the band wouldn't get whitewashed, so it's something i've been hyper aware of ever since)
so, even if i'm going for a more moody/darker aesthetic like i am with these gifsets of tlou, i never try and diminish the color pedro has in his skin tone. he's got a lot of color in his skin and i want to be able to see it, y'know what i mean?
basically, that boils down to keeping a lot of the warmer tones while also going for an ~aesthetic~ and it can be really hard sometimes. sometimes a show or movie, in this case the last of us, every episode is lit a little differently since it takes place over the course of a year.
i'll put some examples under the cut:
ok so i'll use episodes 2 and 8 as my examples.
to begin with, the last of us has, what i call, a "post-apocalyptic filter" over the top of it so i kinda have to work with that from the start. lots of greens/earthy brown tones and stuff.
this is with only sharpening applied and no color or anything:

and this is with my previously mentioned ~dark and moody~ psd applied on top of that sharpening:
now, this is the same color grading i used on that gifset you were mentioning.
this is also the same color grading i used on episode 8, which takes place in the winter/snowy areas so the coloring to begin with is going to reflect that:
and now with the coloring:
the big thing between these two scenes is that in the winter one, he's also recovering from actively dying and being deathly pale so any color he had in his face is really minimal lmao
so this is already way too fucking long and i don't think i even actually answered your question i am so sorry lol
to start, i ALWAYS start with an automatic curves layer and then adjust accordingly.
the actual color grading part mostly consists of vibrance, hue/saturation, selective color, channel mixer, gradient map, and level layers. i'm willing to give you the psd privately if you'd like to have a closer look at them!
thank you so much for asking and for putting up with my ranting lmao
#toointojoelmiller#asks#i really hope i answered this jfc#if i didn't i'm really sorry#it felt like i was trying to explain like 7 things at once lmao
3 notes
·
View notes
Last Seen Blogs
hearsayhorizons
Hearsay Horizons
azsluttyslut
Azriel Slut
rosesareredandtheskyisthelimit
Roses are red and the sky is the limit.

sasosupanoli
Untitled

gotdba
Untitled