#and with a new psd comes a new icon style
Text
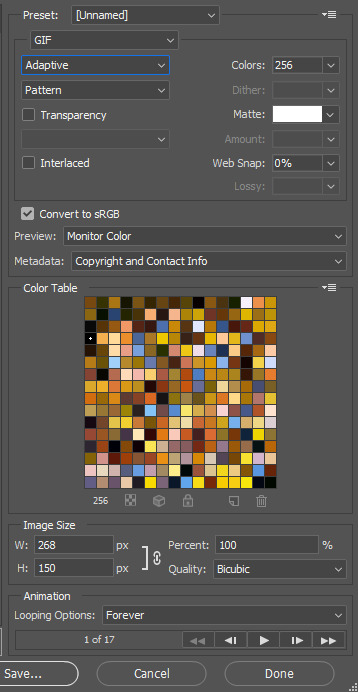
COCO: PERSONAL THEME BY ETHEREAL THEMES
View on payhip ($6.50), check out the preview or support me on patreon for more themes + pages, header templates, coloring psds and more every month!
Personal with 300-540px posts
Navigation: Home, Contact, +4 additional links (customizable icons selections + filled or line)
Four images styled as polaroids, these include two large portraits and two icons
Body font family options
Font size options
Polaroid text + font options (not shown on preview)
Dark or light custom tumblr tools control
Misc PNG, torn paper and "blob" shape decos, all customizable and uploaded using main editor
Un-nested captions + NPF support ; All post previews are made using the new post editor, but this theme also supports old posts. New + old post styles look the same.
Color options for: background, text, links, borders, content, three accents, polaroid colors (if image is removed), polaroid tape colors, content, liked posts heart, question posts, all decos + more
Other Options (with on/off toggles):
Blog Title
Sharpened images (large polaroids are slightly rotating which can cause blurriness)
Polaroid Text (two separate toggles)
Do edit any feature to make it your own.
Don’t use as base code, remove credit or claim as your own.
Everything you see can be edited including colors, texts and much more. This theme was made with personal (and muse / rp) blogs in mind.
Basic HTML to edit, all info is on the main editor, so no html needed! Please reblog or like if using. And let me know if you come across any issues.
#personal theme#muse theme#contained theme#rpt#codingcabin#dearindies#personal#rp#themes#all#coco#muse*#personal*#contained*#premium theme#ethemes#all*
34 notes
·
View notes
Text

#𝐒𝐔𝐑𝐕𝟏𝐕𝐑 ... independent and mutuals only multimuse writing blog. featuring canon and original muses from tvdu, scooby doo, buffyverse, 911, and more ... created by sydney + she \ they + 21+ ... this blog uses beta editor and xkit rewritten. written in first person pov.
other blogs : @supubus
affiliates : @brknghrts , @casua1ties
sideblog : @surv1vrs
highest muses : kayce dutton, dean winchester, andie nash, zeus, sefa bolat, alaric k saltzman, and elena gilbert.
film & literature. television. mixed media. original.
triggers will be tagged as both trigger tw & trigger // & nsfw threads if/when present will be tagged as nsfw // and usfw //.
PLEASE NOTE i am mutuals only. meaning i will only interact with people that i follow and that follow me back. i do not always follow back . it's not because of aesthetic or anything, sometimes i just don't see that i got a new follow, or i cannot see my muses interacting with your muse. please do not keep following me until i follow back. i will block people that do this.. i will also not follow certain fandoms due to not being familiar with them so unless you have a verse in a fandom i'm familiar with i will not necessarily follow back.
the psd used here is OLIVE MARTINI by PINKINNARDS and the icon style is by me (if/when i use icons) but anything used on this blog is made by me, with the exception of most screencaps.
memes are always a great to break the ice between muses, and they are always welcomed at any time, even if it's been a bit since i reblogged the meme.
this blog is low activity. between working a full time job and having adhd, dyslexia, depression, and anxiety this sometimes stops me from being here.
I am a lover of ships, but I prefer shipping based off chemistry, between both the muses and the muns, meaning our writing has to flow together, and isn’t forced. Do not be afraid to approach me if we have interacted and you feel our muses have chemistry, and want to plot. Chances are I agree and I am down to plot. I will always listen to the ideas and help come up with interesting things for our muses.
Also do not interact with me if you take a POC in a show and use a white fc for them — for example; Alina Starkov, Mal Oretsev, Bonnie Bennett (McCullough) — because they are white in the novels. They are no longer white as soon as they are portrayed by a POC actor or actress. I will also not interact with genderbent/rule!63 muses, this is transphobic. I will also not rp with anyone who makes canon LGBTQIA characters and rps them as straight.
1 note
·
View note
Note
🌟 ― i love how you portray your muse(s)
🎀 ― i love your aesthetic / graphics
✨ ― i love the way you write
💖 ― you seem like a genuinely nice person
☀️ ― your posts always bring me joy
❤️ ― you're one of my favorite blogs
🌺 ― simply admiring you from afar
I'm so late to this meme, so please forgive me for coming into your inbox like a jumpscare with this! Haha. Even still, I gotta send you in these symbols! I've never gotten the courage to reach out with the cooking ghouls, BUT OH MY GOD, I LOVE YOUR BLOG SO MUCH.
Everything from the personalized graphics for each thread containing your characters featuring imagery consistent with their character and overall roles and theme, such as the ghouls with what looks like black flicked paint and a screenshot of them with their instruments like with Rain, to their era's uniform like with Flora! Or with Special, the imagery of his clasped hands
LIKE, it's the little details that resound to aesthetic beauty and get a feel for their overall characters too!! And the fact that while you have such beautiful graphics, you also make sure to match with your partners and stagger their use, switching out with other icons to bring out the poignancy of larger headers and fill what would otherwise make bigs wall of text without breaks into something that's really broken up and digestible and so personalized, like, now that I write it out it seems really small and nit-picky. Still, it is HEAVEN for how I personally process reading threads and getting a feeling for all the gears moving!!
AND ON THAT NOTE: The way you perfectly transition between actions and speech and even inner thoughts of characters makes all your posts drip with the individuality of the characters and the style and overall voice of your characters and just!!!! It's so awesome, and you inspire me so much in my own writing and really make me want to focus on my own formatting and graphics because seeing your stuff just sparks so much love for the medium and for all the attention to detail that I can only point insistently at my screen and go 'that!! I someday hope to be able to make something that will spark in other people the creativity and drive to write, and format make like you make me!' y'know?? I hope my gushing makes sense; I just want you to know I think all your stuff is cool as hell and that you seem baller!
@dcwnthercbbithcle
while i did selfishly want to hoard this for a while, i also just wanted to make sure i was giving this the proper attention, because it honestly made my jaw drop. & i screen-grabbed it immediately to show it to my fiancé. i was so unbelievably floored, it honestly was a really true boost to my confidence & a reminder that we're all our own worst critics sometimes. so first of all, no apologies needed because this was the most welcomed ask! i always welcome late memes, & i'm honestly so happy.
(putting the rest under the cut bc sappy & long!)
first of all, i'm going to reach out! i'm sorry i haven't already, i'm also somewhat shy believe it or not. at least with new people, so while i'm always trying to be approachable we all have our bad experiences that make it harder to want to start new ooc interactions. but, i cannot wait to speak/plot/write with you !!! immediately. 👀
first i just wanna say thank you for sending this? thank you for liking my blog, thank you for the compliments? i'm so bad at taking them, and all i usually do is compliment people back, but!!! thank you all the same. it meant so much to me to read this, and it's hard to understand how words like this affect me.
my banners for my ghouls are made by my lovely fiancé @chrchgrl btw!! so i want to thank her very much for that, and i'm so glad you like them! same with most of my graphics, except my single icons which i do make myself (sometimes ofc with help from creators making base icons & psds). i don't find it nit-picky at all? especially since i sometimes wonder if it even matters. but for me, i like to have visuals & it also helps ME a lot to have them, even if they're consistent banners. like an expressionless mask i don't need to icon 20,000 times just for icon variety. and they're giving off what i want, at the same time. so i definitely understand & have the same opinion when it comes to post breaks and that it's less for aesthetic than for other reasons, so this is just really cool to hear. i like that it's resonating with others, & not just exists purely for my benefit. i like that i can make your experience better, if you are reading my threads and stuff. which if you are, THANK YOU 1000X !!
now like, this next part is the part that got me fucked up. like the idea that someone could think something like that about me, or get inspiration from ME? from MY WRITING? like hello? excuse me? it's so humbling and incredible and unbelievable to hear something like this, because of how much i pick at my own writing and ESPECIALLY my characterization. it makes me insane when i think i'm not producing my very best, & i constantly pick my work apart. i always say i don't think we should compare each other to someone else. i literally have a writing degree, and i'm not under any impressions that i'm better than ANYBODY else. you miss out on some amazing interactions that way, & it's really not fair. writing is expressive and beautiful and as long as you're having fun (or anyone is having fun, i'm talking generally obviously), than it's worth it. and creativity is a beautiful thing. i'm just so happy that someone actually enjoys what i do here, because i do put an unbelievable amount of effort into it. & that is my choice as well! it's just tumblr rp, and we do what we can/what's fun! that's what this is about, at the end of the day. it just??? it makes me scream and cry to even think that people are reading my shit, let alone enjoying it. so the idea that i inspire you is incredibly unbelievable and i thank you so much for being so kind as to tell me this. it means so much to me! just thank you thank you!!
#misc * / answered#misc * / out of character#this was the most amazing ask to get#i'm so !!! like thank you so much
4 notes
·
View notes
Text
Basics.
(one.) I am writing from the point of an original character I have played for over 7 years so she is advanced in what she can do. Her information will have what she can do.
(two.) Her information has a lot on her but not everything as she is in a constant state of development. You can find her Head Canon’s Here.
(three.) I am as active as I can manage with IRL and the world itself in general. I am currently healing after a long sickness. So activity will be sparser on some days as opposed to others. This cannot be helped, but I always come back.
(four.) I am open to connections, plotting something out or in just winging it. I am open to cousins and family and friends who are as good or better than family. Please hit me up I am always happy to figure something out.
(five.) This is a disclaimer that if a power would take agency away from my writing partner, I will never force it. If you don't want this to happen to your character, I am Okay with this.
Things to Know.

(one.) I am semi selective I will write with anyone who wants to write with me. I know it is difficult to get role play with female OC’s so I am hoping people will give me half a chance.
(two.) If I follow you, I want to write with you. I love having threads and I love plotting. I might be fuzzy headed from Med’s, but I will always try to contribute and write worthwhile rp’s with my partners.
(three.) I use small font and icons, I do not require this of my partners, you never have to match my length in post. I write in Para to novella style of writing.
(four.)I am happy to write with OC’s/Side Blogs/etc I am even happy to make a new verse for our characters. I will write in any system/show/movie/anime etc I can always learn, if I have no interest, I will let you know straight away.
(five.)All my images are my own and if I use a template, it will be noted in 𝓒𝓻𝓮𝓭𝓲𝓽𝓼. This includes psd’s as well. All my icon images are created by me from various things I have watched and high def. images.
About Rping.
(one.)I only ship chemistry , my muse is demisexual and demiromantic
(two.)I will not write cheating threads with you.
(three.)I am perfectly fine with fade to black.
(four.) I may or may not write smut, but it MUST be with chemistry and a level of comfort between the muns as much as the characters.
(five.) Anything spicy will be under (tw.)nsfw
(six.)Do not god-mod my character period. Let me write what they are doing and feeling. I expect the same from you. You do not have to like what my character does, nor are you required to be kind--however I do write with consequences intact. Meaning if something causes a fight--it will be a fight.
My sideblogs
You will be able to find my side-blogs under other characters. They are also open for rp. Please understand any ask for them will come from mccnblade.
0 notes
Text
Adobe photoshop free app

#ADOBE PHOTOSHOP FREE APP INSTALL#
#ADOBE PHOTOSHOP FREE APP SOFTWARE#
#ADOBE PHOTOSHOP FREE APP PC#
#ADOBE PHOTOSHOP FREE APP PROFESSIONAL#
#ADOBE PHOTOSHOP FREE APP FREE#
Photoshop 2018 price starts from $119 and this photo editing tool, which is available online, is entirely free.
#ADOBE PHOTOSHOP FREE APP SOFTWARE#
It is a 100% online available photo editing software that has all photo editing features including many basic features of freemium Photoshop.
#ADOBE PHOTOSHOP FREE APP FREE#
This is where Free Photo Tool comes into play! However, all of them have one thing for sure: The internet. Most of those internet cafes do not have Photoshop installed on their computers. What to do? Tell you what, as awesome a photo editing tool Photoshop online is, The best photo editing software Photoshop, it won’t work if you’re not on a computer where it is installed. You are out shopping and your friend asks for a new photograph, you have the need to use Photoshop or some photo editing software, but you didn’t bring your laptop with you. Share this amazing tool with your friends and family, They’ll Thank you for this. Some people call it Photoshop Online Powered by Photopea. You can open and edit PSD, XCP, Sketch (Photoshop, GIMP, and Sketch), or any other image file and experience the best photo editing tool for free, Always!!! With its ease-of-use and basic video editing features, it continues to win hearts around the is the best Free Online Photoshop Alternative. Over the years, Adobe Photoshop has become a benchmark in image editing. Last but not least, the program provides you with multiple resolution options for different devices. Though the app has minimal audio tools, you can still play around with the track’s volume, fade in, fade out, and mute.
#ADOBE PHOTOSHOP FREE APP PC#
Photoshop for PC comes with basic video editing features, which let you join, split, and trim clips. You can use cropping tools, exposure features, and multiple filters. While Photoshop for PC isn’t as powerful as GoPro Studio in terms of video editing, it’s still an excellent choice for basic tasks. Moreover, the app comes with basic video editing features, sufficient for editing a wide range of video clips. While programs like Fresh Paint come with basic features, Adobe Photoshop offers comprehensive image editing tools. Does Adobe Photoshop support video editing? With a huge selection of filters, effects, layers, and other prominent features, you can use the app to enhance images with ease.
#ADOBE PHOTOSHOP FREE APP PROFESSIONAL#
Amateur photographers and professional designers from around the world have been using the program. While Adobe Photoshop takes a simplistic approach, it won’t be wrong to say that it’s a powerful image editing tool.įor several years, Adobe Photoshop has been the benchmark for image editing. With some extra plugins, you can add a wide range of filters, and optimize the image appears in different ways. With support for several plugins, Adobe Photoshop allows you to add more functionalities for enhancing the overall experience.
#ADOBE PHOTOSHOP FREE APP INSTALL#
Can you install plugins in Adobe Photoshop? A two-finger swipe can be used to undo selections. With Adobe Photoshop, you can use the touchscreen options to pan and zoom image, and use the three-finger swipe for scrolling through galleries. Considering the increasing number of touch desktops and laptops in the market, Adobe has focused on touch input. In Adobe Photoshop, all the icons feature a 2D style, which is often preferred by beginners and techies alike. With the program, you can even rearrange the toolbar buttons as per your preferences. Unlike other apps, Adobe Photoshop lets you create customized layouts of panels and windows. While using the app, you can choose from a wide range of workspace layouts, including Web, 3D, Graphics, Motion, Painting, and Photography. With the program’s built-in installer, you can be assured of hassle-free installation. Even then, the app has an easy-to-navigate and customizable interface. While programs like Phototastic Collage focus on just one aspect of image editing, Adobe Photoshop offers a full-fledged suite of editing tools. Additionally, with the program’s abundant filters, effects, and brushes, you can fill colors, adjust saturation, use masks, customize alpha channels, and play around with different textures. As such, it integrates well with a wide range of Adobe products, including Adobe Bridge, which is a powerful multimedia manager.Īdobe Photoshop features several traditional editing tools to effortlessly assemble collages, drag clips, activate timelines, and perform other tasks. In fact, the product has also been a part of the Creative Cloud suite and is available in the form of Adobe Photoshop CC. Unlike competing programs, Adobe Photoshop comes with a wide range of editing tools. Multiple editing features and excellent results!
0 notes
Text
Stream deck animated wallpapers

Stream deck animated wallpapers skin#
Stream deck animated wallpapers download#
While it’s not the largest collection of designs they do come in at relatively cheap prices. Nerd or die have 6 options on their site for Icon packs. If you are just looking for a few specific keys this might be your best option as it is free. You can now use that key on your Elgato stream deck.
Stream deck animated wallpapers download#
Once you have created your key, just click on the save key button and a png file will download to your computer ready for use. You can then edit the background colors, fonts, sizes etc to customise each key to your brand. The tool has 100s of icons which you can choose from when using the creator. While it is a little more tedious than downloading an icon pack, it is free and gives you a lot more customisation. If you want to create your own custom stream keys Elgato has an amazing free tool that allows you to create custom keys. Personally I really like how they provide you with the PSD files as you can make small customisations to the icons if you need to. Optimise your Stream Deck and make it the visual highlight on your desk!.
Stream deck animated wallpapers skin#
Included: JPEG & Gif file & PSD file – Optional: Stream Deck Skin.matching skin for your Elgato Stream Deck ( Normal: 3 x 5 buttons ) 188 high-quality animated Stream Deck icons for every use case.They have lots of different styles available with over 25+ different icon packs available. They have a whole new section on their website dedicated to icons for your stream deck. Own3d is one of our favourite graphics creators on the market for overlays, sub badges and now icon packs. Below we have selected a few of the best for you to check out. More and more services are popping up all the time for icon packs. Where To Find Icon Packs For Stream Deck? Let’s jump in and take a look at some of the best icon packs on the market for your stream deck. These are custom icons which you can upload to your stream deck so you know which button is mapped to a certain command. So, how do we solve this problem? Icon packs! There are lots of places selling icon packs for your stream deck. This can ruin jokes, have your viewers watching the wrong scene etc. However there is nothing worse than hitting the incorrect button at the wrong time. It allows you to easily switch scenes, play sounds, make transitions, mute mic and whatever else you can come up with to program into it. Have you just picked up a stream deck from Elgato? It’s probably one of the best devices for increasing the production value on your stream.
0 notes
Text
Flyer templates for indesign
#Flyer templates for indesign software#
#Flyer templates for indesign professional#
#Flyer templates for indesign download#
After everything is done, print these flyers and they will turn out to be great success of your purpose because it contains captivating design along with the useful message that can be conveyed quickly. It is easy to customize them using the PSD or EPS and AI format. 1 page. 1 page.Flyer 3Contains a landscape design for a full-color flyer.
#Flyer templates for indesign professional#
Choosing the wide collection of flyer templates, you will surely find captivating one that people will love to read.Ĭustomize the flyer template with the information you want to spread to the public and you will find it is so easy with these templates, which have attractive layouts and professional fonts. Flyer 2Contains a portrait design for a full-color flyer. Using tools and design templates, create and adjust your own flyer quickly InDesign helps you take your ideas from the desktop to the print shop. Templates are available in Corel Draw, Publisher, InDesign and Word formats. Make a flyer that stands out with Adobe InDesign.
#Flyer templates for indesign download#
Whatever your purpose is, whether it is for an event like concert and party or a promotion of goods-selling business, search for the theme or industry of the flyers, such as a promotion flyer for a new-opening resaurant, an upcoming concert or new products release. Follow the correct format of a letter with these letter templates that. Find & freeload Graphic Resources for Indesign Template. InDesign Brochure Templates Free Free Bifold template InDesign Trifold Template Free Brand.
#Flyer templates for indesign software#
Adobe InDesign is a must-have software tool if you are in the business of. Without further ado here are all the chosen brochure templates. Visit Pngtree for + professionally-designed flyer templates. Quick-Start Templates Flyer templates and examples make you instantly. Silk and Recycled Flyers and Leaflets can be ordered by clicking here. Hiring a graphic designer for flyers is expensive. Our InDesign template contains locked layers and is provided as an. As the lifespan of flyers is very short, it is of great importance to design an eye-catching flyer to draw the audience's attention. The download includes 10 pages, all of which present a vivid design in an A4 size paper (210mm x 297mm).Distributing flyers are a simple and widely-used way to promote an event or business products. The combination of red and blue is not strange: barber poles, Pepsi’s logo, even Captain America’s outfit, and as these combinations shine through the years, they prove how mesmerizing this color duo is. Simply drag and drop them, then call it a day and enjoy the weekend! And rest assured, your readers will do so as well with their newest read. Once you sync the font family, you can easily make the template yours as you change the texts and insert your images and photographs. The template is available in A4 size and can be customized with InDesign CS4 and higher. This template is highly customizable and allows you to use it to create an attractive flyer to promote your seasonal sales and offers in style. Planning a birthday party, and require a flyer template for the same. Fashion Flyer InDesign Template Every fashion store prints a fresh batch of flyers for each seasonal sale. Birthday Invitation InDesign Flyer Template. If you need to promote an upcoming event, this InDesign flyer template can come. Evoke feelings of luxury, power, and elegance with this template and personalize it as you please. 30+ Best InDesign Flyer Templates for Events, Parties + More Biggest Event InDesign Flyer Template. But when that deadline draws near with still plenty of stuff to do, you can design a magazine with iconic pages thanks to this InDesign magazine template from Unsell Design. And that month is filled with work under pressure as articles need to be written and deadlines need to be met for a new issue that readers excitingly await for.
0 notes
Text

ooc: The new multi-muse is still a work in progress. I got the overall theme edits finished just have to work on icons and such. I hope people don’t mind if some of my muses don’t have icons at first. There are a lot of muses I’ve on here now and don’t want to get too overwhelmed when it comes to making edits for the blog. I also decided to keep the username I had since it fits really well with Kingdom Hearts in generally and means the world to me. I’ll try and get things moving as fast as I can.
The main muses for this blog are mainly Kingdom Hearts ones with expectation of a few others from other fandoms that I care about. I hope once I get things started that I can work on starters I owe and such.

I’m kind of experiment for now with the style of icons I want to use but I like how this looks so fair. I even got use a newer psd coloring I made myself which makes me happy. Also for future reference I hope you guys can refer to me as Stella. It’s just a name I like better. There are other reasons but that’s the main one. I also plan use the Destiny Trio to represent this account so those three are my main muses and some of the ones I put alot of thought into.
#Stardust letters(Ooc)#I'm surprised I had the energy make all these edits in one night..#Work tends to leave me pretty tired so hard to get things done
0 notes
Text


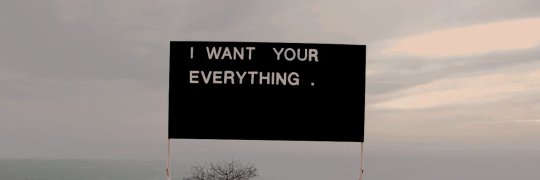
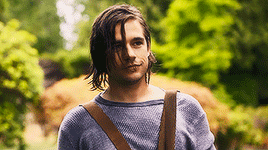
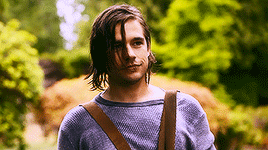
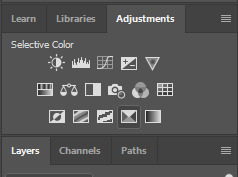
today on “summer is changing her psd again” ...
#♕ ooc ▹ rambling#and with a new psd comes a new icon style#the blue isn't as 'in your face' as i'd like it to be#BUT it shows up more in edits so i think i'll be fine w it
8 notes
·
View notes
Text

𝐡𝐚𝐫𝐫𝐲 𝐬𝐭𝐲𝐥𝐞𝐬 𝐥𝐚𝐲𝐨𝐮𝐭𝐬
#harry styles icons#harry styles rolling stones#harry styles layouts#psd headers#psd icons#hs2#hs2 speculation#hs2 era#hs2019#harry styles packs#harry styles psd icons#harry edward styles#harry styles#rolling stones#hes#hs2 is coming#new era#harry#styles
87 notes
·
View notes
Text
NO LONGER UPDATED: PLEASE LOOK TO MY RESOURCE ACCOUNT FOR HELP AND TUTORIALS ( @oflegaciesresources ) large masterlist of all the tutorials that I have done in the past for easy to grab and look at usage. This covers almost every single tutorial from all platforms. This post will be edited as more comes to me which is why it isn’t under the cut and I will just long post tag it and such. If you need help with anything just ask! THIS MASTERLIST IS NO LONGER BEING UPDATED ON A TUMBLR POST. THE UPDATED VERSION IS ON GOOGLE DOCS. CHECK PINNED POST FOR THE LINK.
𝐇𝐓𝐌𝐋 / 𝐅𝐎𝐑𝐌𝐀𝐓𝐓𝐈𝐍𝐆
How to do small text / colored text with byluna’s generator
Make a new post for an answered ask. How to link it and everything
How to add a link to your description on your blog.
How to cut your threads and some formatting tips.
Another basic formatting tutorial using bestonlinehtmleditor
Gradient text using gradientext
How to cut posts on MOBILE DEVICES as of March 7th, 2021
How to cut posts in the BETA FEATURED text post as of March 7th, 2021
𝐏𝐇𝐎𝐓𝐎𝐏𝐄𝐀 (𝐏𝐡𝐨𝐭𝐨𝐬𝐡𝐨𝐩 𝐚𝐥𝐭𝐞𝐫𝐧𝐚𝐭𝐢𝐯𝐞)
How to make an icon border ( dotted border )
How to make blockquote icons
Mirror effect
creating a vignette in photopea?
Rainbow flare texture and how to make your own.
how to make a rainbow gradient psd ? or just gradient psds in general in photopea ?
how do you work the gradient in photopea like to change the gradient color without it being black and white
Cropping and how to do it.
How to use an action / make an action in photopea
Mix and match find your iconing style base icon edition.
Add gifs to blockquotes
Ezgif / photopea how to add borders, colorings, crop a gif.
How to add a psd using photopea
Make a jagged / ripped border effect for headers
What is the hue / saturation tool and how to use it.
Light leak tutorial
how to make gifs using photopea and ezgif
How to sharpen images and different methods to sharpen images.
Clipping mask and raster mask.
How to fix that blue filter in Legacies 2x01 Hope ( Danielle’s ) scenes.
Splatter image tutorial
How to center text in photopea
GIF PROMO with motion blur text
Animated text on a static image.
Black and white half image with a drop shadow. An instagram style.
Motion blur gif made in photopea
How to make an isolated color that pops but everything else turns to greyscale.
How to blend two images together using the gradient tool
Aura gradient and how to get it + two other gradient options.
Transitional gif that has a paint stroke and goes from one static image to another. ( Requires ezgif and filmora9 as well ).
How to do AESTHIC ICONS to make the most of a single screencap.
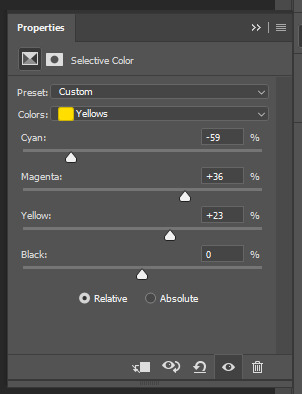
Selective color and how it works.
how to merge two gifs together so they run at the same time + how to make one of the gifs to be a shaped gif.
How to do a simple manip of two people. Two screencaps.
How to make a GIF in photopea WITH screencaps only.
Werewolf glowing eyes.
How to use a HEAVY psd and make it work for a LOT of scenes.
How to make a COLORING PSD.
How to help get rid of the green filters using a photo filter layer to cancel out the color that you don’t want.
How to do spaces between letters in text
How to use textures.
What is a clipping mask? How do you use it?
How to edit someone’s template that they made for others to use.
𝐏𝐇𝐎𝐓𝐎𝐒𝐇𝐎𝐏
How to add a psd to images
How to make an action for iconing making
An updated tutorial on how to make actions for icons
How to make gifs with timeline
How to use my action to help you make gifs
𝐕𝐈𝐃𝐄𝐎 𝐄𝐃𝐈𝐓𝐎𝐑 (𝐅𝐈𝐋𝐌𝐎𝐑𝐀𝟗)
How to make gifs
Some basics to making a video. Go through how to cut videos and things.
𝐎𝐓𝐇𝐄𝐑 𝐎𝐍𝐋𝐈𝐍𝐄 𝐄𝐃𝐈𝐓𝐎𝐑 𝐓𝐔𝐓𝐎𝐑𝐈𝐀𝐋𝐒
How to use picmonkey’s collage feature.
Pixlr dash icon tutorial
Pixlr photo editing tutorial
How to gif with ezgif and finish up in photope
How to make a discord icon in ipiccy
𝐎𝐓𝐇𝐄𝐑 𝐓𝐔𝐓𝐎𝐑𝐈𝐀𝐋𝐒
How to block / blacklist tags on tumblr using the tumblr filter feature.
How to credit someone for using their resources.
Formatting examples with tupperbox for discord
How to use tupperbox for discord.
How to use google forms.
Multilogin with chrome.
how to use one note / one drive for rp blogs
rpthreadtracker and how to use it.
Making gifs using GIFCAM which is a portable gif’er that you download
How to use sessionbox
How to make a timeline with a generator to help you. Get accurate times and dates between two different dates.
How to stop stretching of the tumblr header. Explains the dash settings for your dash icon and mobile header.
The mobile / sideblog method to help with blog set up. What I use on my rp indie blog instead of google docs.
An overview / tutorial on discord with signing up and understanding the layout and making a server
920 notes
·
View notes
Text
MY GIF-MAKING TUTORIAL
for @sunshinesquash
i use photopea.com for making gifs so if you have photoshop i’m not sure how much different these tools will be, but i hope this can help!! i also have a windows computer so if you have a mac my recording technique might not work :’( all the tools i use are pretty simple and basic so if you can’t afford to download a lot of software dont worry!
recording:
when you’re finding videos to use for gifs, you want to use the highest quality footage u can find! you normally always want to use 1080p, but if you can only find 720p then make sure its not too grainy!
for the actual recording, i use the (windows + g) shortcut. once you click that this should pop up!

if this is your first time opening the game bar, it might just show only the top bar - if that happens, click on the second icon! when the capture sidebar shows up click on the third icon and the recording will begin :] make sure that your recording is 4-5 seconds max, otherwise it will be too big for photopea to handle and there will be too many frames!
opening the recording:
all your recordings from the windows game bar will automatically show up in videos > captures.
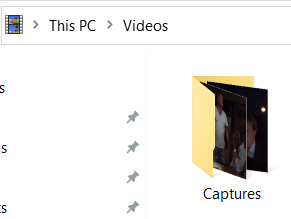
open photopea, and then click file > open and locate your recording!
when it’s opened photopea should look like this:

this image size is 1920 x 1080 which is way too big for photopea to load your final gif and for tumblr to accept! because of this you’ll click file > new and get to a pop-up that looks like this:

the size that i normally make my gifs is 540 x 540 which is what i’m going to use for this tutorial! you can always go for other dimensions - whatever you’re comfortable with :]. click create!
ok now comes the complicated part :
select all of the frames that you’re going to work with until they become highlighted grey. make sure the folder is not selected!

right click on the highlighted area so an options bar pops up!
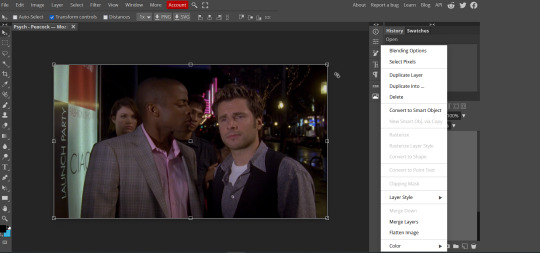
click on ‘duplicate into...’ and select the drop down menu and click on ‘new project.psd’. there will be a ‘new project’ and a ‘new project.psd’ option - ‘new project.psd is the one you want to click on! ‘new project.psd’ is the 540x540 project that you created.
next, click on the tab that says ‘New Project.psd’ and it should show you something like this:
the frames are really zoomed in because of the different dimensions, so we’re going to fix that! make sure all of your frames are still highlighted and then click on the little folder button that i circled:
now all of your frames are going to be under a single folder. make sure ‘transform controls’ on the top menu is selected! now single click on the edge of the selected frames:

now a new menu is going to show up where it used to say ‘transform controls’ was! make sure the little hamburger button in between the dimensions is selected.

replace the 100% with 50% and now your dimensions will look like this!
now just drag that box of frames onto the white area! (make sure only the folder is selected on the side bar):

sharpening + color:
now you’re going to open that folder and then select all your frames again (make sure the folder is not highlighted):

now click filter > noise > and type in 1%.

im adding noise here because it helps smooth out the gif and makes sure there arent any wavy/grainy lines!
after you click ‘ok’ then click filter > sharpen > smart sharpen. you don’t have to change any settings here! just click ‘ok’ with the default settings.
now your base gif is ready for coloring!
all your coloring tools will be under layer > new adjustment layer.
always remember that whatever settings/coloring that i use may be different from the way you want to do it! gif-making always starts with exploring and experimenting with your style :]
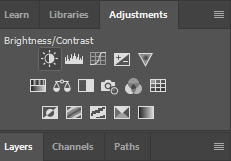
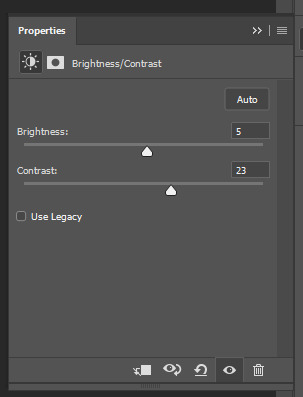
the first type of adjustment layers that i always start with are the ones that deal with adjusting brightness! depending on how dark your gif is you will either want to start with ‘brightness/contrast’ or ‘levels’. (you can also use curves but levels are easier to control for me.)
if you have a super dark gif, you’re going to want to start with ‘brightness/contrast’. no actual adjustments will be made to this layer but you’re going to make its type ‘screen.’

BE CAREFUL WITH THIS LAYER! doing ‘screen’ with brightness/contrast will often whitewash characters of color so for this gif we’re going to just use ‘levels’! (there are ways to get the original skin tone back when using this layer, so if it’s completely necessary depending on the scene, you’re going to have to work a lot with coloring adjustment layers to make sure not to oversaturate or whiten when doing this. you’ll get there with practice, but for this tutorial we’re going to work with safe adjustments!)
if the gif becomes too bright because of ‘screen’ in brightness/contrast you can adjust the opacity!
whenever you use brightness/contrast you’re also going to use a levels layer because just this layer can remove a lot of the depth
now let’s open the levels layer!
you’ll see the three squares that you can adjust - the black is shadows, the grey is mid-tones, and the white is highlights. when working with characters of color don’t brighten the mid-tones, this will also whitewash them! dragging the squares to the left will brighten, and to the right will darken. each scene will require different adjustments so explore and figure out what’s right! make sure when brightening, that you remember to give it enough depth.

now the gif has proper lighting!
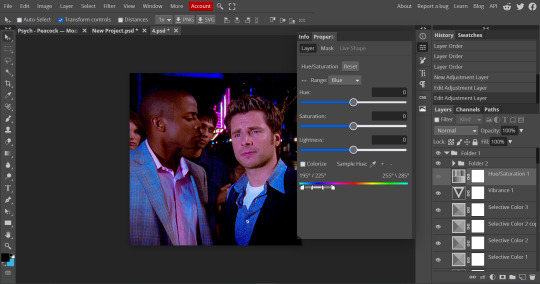
after your brightening layers, you’re going to look at the scene and check whether you need a photo filter layer! if your scene has a strange filter - for example, cw shows often use a weird dark yellow filter: this is where a photo filter comes in.
for this tutorial im going to show how to use the photo filter! shawn’s face has a yellow tint so we’re going to try this out. (there are ways to get rid of the yellow in selective color, but for this tutorial we’re going to start with photo filter.)
photopea automatically provides a yellow color photo filter which is not what we want for this scene! (if you have an especially blue scene this might help though!)

click on the orange square and drag the color picker to the opposite color of the one you’re trying to get rid. we’re getting rid of yellow, so we’ll select blue.
now, we’re going to adjust the density so it doesn’t look so blue. now it looks perfect!

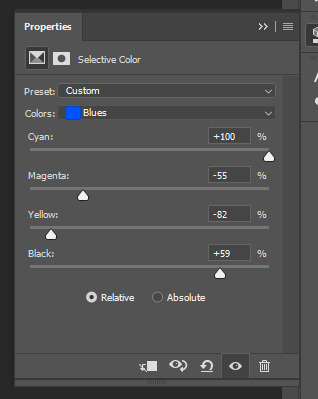
now we’re going to go to my favorite tool: selective color :]
you can see hints of blue, and pink in the scene already - so we’re going to really bring those out!!

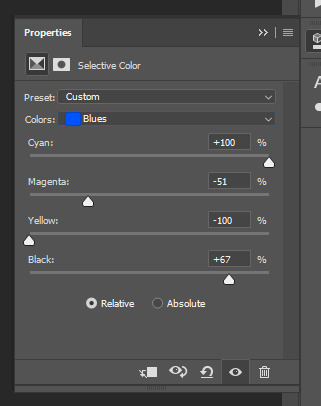
click on the drop down that will bring up a list of colors! we’re going to especially go for cyan and blue. when i really need to bring out blue, i drag the cyan fully over to 100% and the yellow to -100%

if you look at the gif now, you can see that the blue is starting to come out! duplicate that selective colors layer until the blue becomes saturated enough, but not grainy. i duplicated mine’s three times for this gif!

now that you see how to manipulate the colors with selective colors, experiment and see what you can do! i felt like the skin tones were too pale so i messed with the reds :] you may think differently, that’s why coloring is subjective not objective!
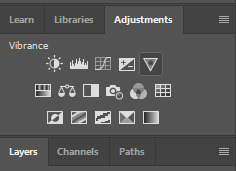
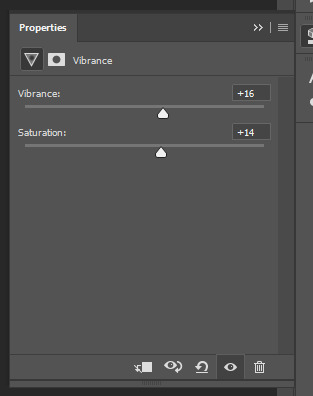
one of my other favorite tools to use is the vibrance tool! make sure not too saturate your colors too much so be careful with this layer!
another really fun tool to use is the hue/saturation tool! if you have a very prominent stable color that isnt too grainy, you can manipulate it to another totally different color! this gif may not do too well, since the blue isn’t completely solid, but we can still test it out!
click on the drop down to the color you want to manipulate and have fun with it! i could make the blue a little cyan here without making it too grainy so this is what we ended up with :]

this is going to be the end of the tutorial for now but always feel free to ask me if you need some more advice. if some of it was confusing dm me or i can always make a video of my process!
[VERY IMPORTANT: REMEMBER that photopea.com is a website so it’s always prone to crashing. always ALWAYS save your psd’s after you’re done editing. a psd will save all your coloring and frames! go to file > save as psd. to export your frames as a gif go to file > export as > gif > save! if photopea starts lagging, it might be the time to open it in another tab and start making your other gifs there.]
this is our before and after coloring!:

#husband.message#*mystuff#gif tutorial.#i hope this could help a little bit!!!!#ok for anyone to rb!!!
21 notes
·
View notes
Text
detailed giffing + basic coloring tutorial for beginners
so a lot of gif/coloring tutorials are pretty outdated or not that detailed & i wanted to put my own out there! in this:
how to get the screencaps for your gifs
how to make a general gif
basic coloring (no psds here, it just gives you a basic idea for making colors pop and look nice. you can look up how to use psds, but i prefer making my own for every gif as it’s much more personal, gratifying, and creative. there’s nothing wrong with using psds as long as you don’t claim them as your own, it’s just not my personal thing)
how to save a gif
we’ll be going from this:
to this
what you need:
photoshop (cc 2019 is what i’m using, but this works with any version of photoshop really as long as you download a version with the timeline feature) i won’t add download links here since i don’t want this deleted, but you can look some up on tumblr or use the pirate bay (current url is pirateproxy.blue as of 4/29/2020) & follow the instructions there.
for windows: potplayer/kmplayer (both use literally the exact same instructions) this tutorial uses potplayer but kmplayer uses like literally the same instructions, it just doesnt work right on my computer
for mac: mplayer. this tutorial does NOT cover this so find a tutorial on tumblr on how to take screencaps with mplayer & then skip to the “how to make a general gif” section. though, again, i’m on a pc so i have no idea if this is entirely accurate for mac.
if you’re downloading from youtube: clipconverter
if you’re Definitely Legaly torrenting: utorrent + the pirate bay (again, current url is pirateproxy.blue as of 4/29/2020) or another torrent site + you should really consider getting a VPN when torrenting (i use privateinternetaccess but you can find one that suits you)
note: download an adblock of some kind, disable automatic downloads on your computer, & download an antivirus program if you want because some sites are sketchier than others! this is ESPECIALLY crucial on sites like piratebay. keep your computer safe babes.
1. screencapping
there’s several ways to get screencaps on photoshop, but this is the easiest imo and i’ve never done the whole convert video frames to layers thing. like i said, you’ll need potplayer or kmplayer. i’m using potplayer. important note: don’t accidentally download viruses here! read each screen carefully & make sure you’re not hitting accept to download any secondary programs.
1. download your .mp4/.mkv. you can go to youtube & find a clip/scene/whatever and use clipconverter to download it. just make sure you download it at 720 (or higher) as anything lower than that will give you a poor quality gif. you can also download using somewhere like the pirate bay, but for this you need utorrent & i would HIGHLY recommend using a vpn if you live in a country where torrenting copyrighted content is illegal, as your internet provider may flag your ip address if you don’t & you torrent too often.
2. download potplayer/kmplayer & get it set up
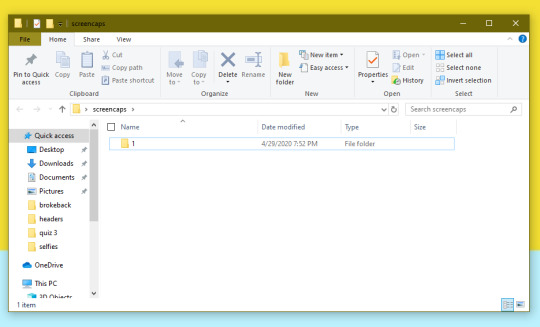
3. create a screencaps folder. i always put mine on my desktop. in your screencaps folder, make a folder for however many gifs you want in your set. i just have one for mine so:
4. open up your .mp4/.mkv

5. hit ctrl + g to bring up the screen capture pop-up & set your settings to these. click the button w/the three dots next to the storage option & select the folder you created for your first gif
6. navigate to the scene you want to gif. when you’re there, pause it and hit the start button on the consecutive image capture screen, then play the video. how many screencaps you need depends on the size of your gif. for larger gifs (so like 540px wide gifs), you’re probably going to want to keep it below 30 frames. for smaller gifs (268px wide or less) you can maybe stretch it to 60, depending on how much coloring you add. you can always delete screencaps later though in photoshop, so don’t worry about it too much. for this gif, i only had 17 frames because the scene was really short lmao
7. go to your screencap folder you made & delete any unnecessary frames. it’ll look like this:
8. repeat the process for any other gifs, making new folders in your “screencaps” folder, numbered for however many gifs you’re making. make sure to change the folder you’re loading the images into on the image capture pop up though so they don’t all go into folder 1.
2. making a simple gif (+sharpening)
1. first, you need to load your screencaps. when you open up photoshop, go to file > scripts > load files into stack
2. when the window pops up, switch the “file” option to “folder”

3. click browse and find your screencap folder for your first gif (in my case, desktop > screencaps > 1) once it’s all loaded, click “OK”
4. it’ll take a minute to load all your screencaps into photoshop. when they do, go to the upper bar on photoshop > windows > timeline
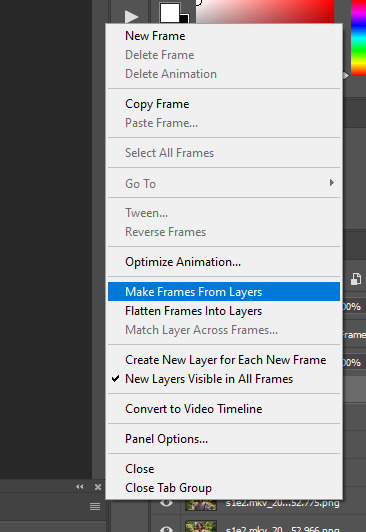
5. when the timeline bar shows up, click “create frame animation”

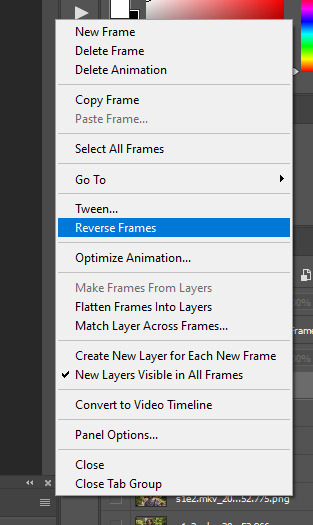
6. hit this button and click “make frames from layers”

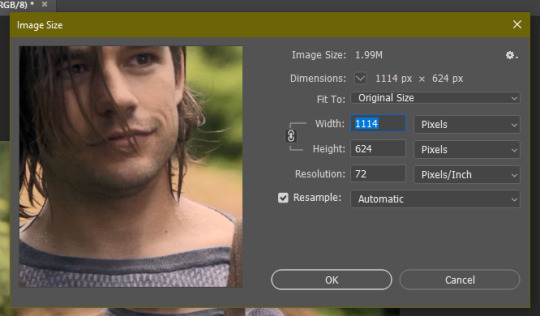
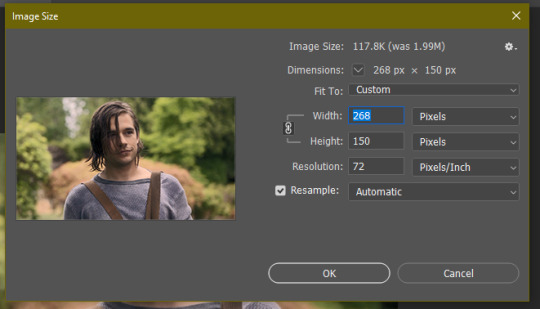
7. hit the button again and click “reverse frames”
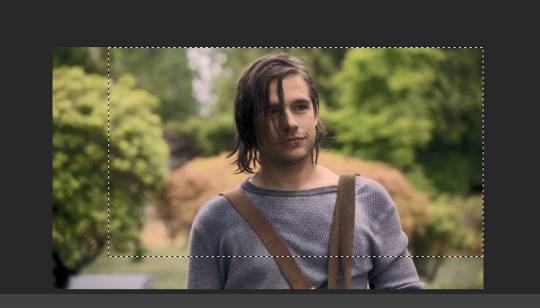
8. click back onto your first gif. then select the rectangular marquee tool and set it to whatever gif size you want. the width for 2 small gifs next to each other is 268px, the width for full size gifs is 540px. most people use 268x150 px for gifsets of 4+


9. use the marquee tool to select what area you want for your gif, like this. it’s up to you how to crop it! get creative!
10. go to image > crop
11. now that your image is cropped, go to image > image size. change the size to your desired gif size (in this case 268x150). hit “OK”. then make sure it’s zoomed in to 100%

12. now, you COULD just save this gif, but they look way better sharpened. so you need to convert this to a smart object. to do so, first select all your layers in the righthand layer window. to select all the layers, click on your top layer, hold shift, and scroll down to your bottom layer & click on it as well while still holding shift
13. next, you need to select all your frames. go back to the options button from part 6 > select all frames
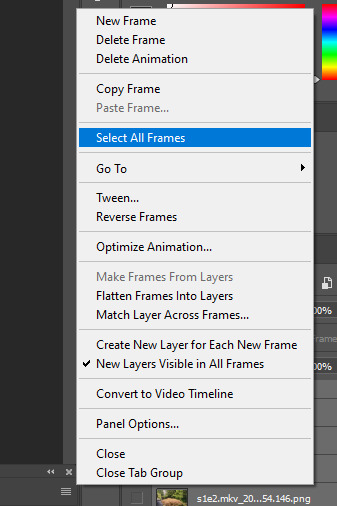
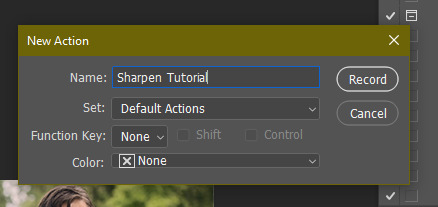
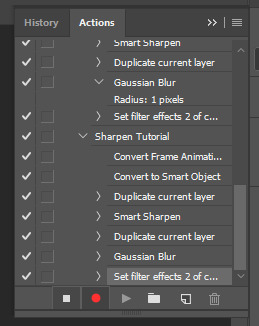
14. next, we’re going to create an action to make your life 100x easier when it comes to sharpening gifs in the future. to do so, go to the actions icon (may look different on different versions of photoshop, but basically just find the actions window)
15. create a new action with this button. name it something. i named this one “sharpen tutorial” and hit “record”
16. click this button to convert to video timeline
17. go to filter > convert for smart objects
18. go to your single created layer and right click and click duplicate layer. this helps get rid of the transparent border around the gif.
19. go to filter > sharpen > smart sharpen & use these settings
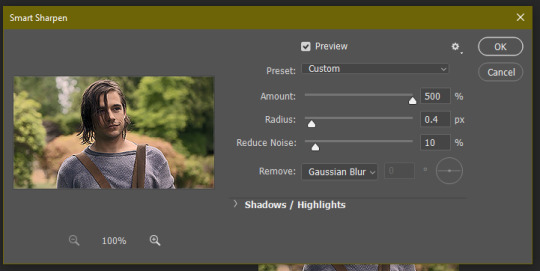
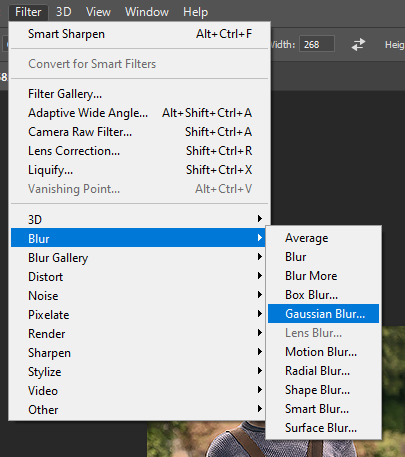
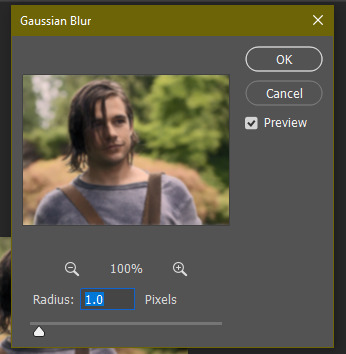
20. go to filter > blur > gaussian blur. set it to these settings.
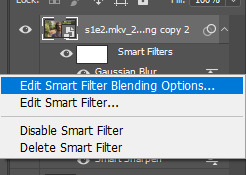
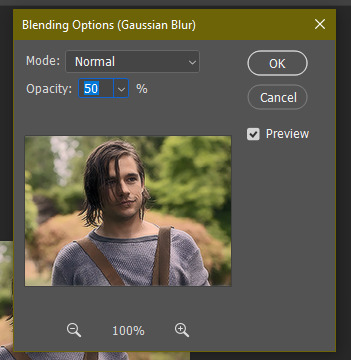
21. go to your second layer with the filters on it & right click on the gaussian blur filter to select “edit smart filter blending options” and set the opacity to 50%. you can mess around with this for different levels of sharpness. the closer to 0%, the sharper your gif will be.
22. hit the stop recording button on your sharpen action. now you’ll have an action to use next time you make a gif! after you’ve followed all the steps 1-13 you simply go to actions, click on your saved sharpening action, and hit play instead & it’ll do steps 14-21 in a few seconds. here’s a pic of the stop button on the actions window
23. our gif is now sharpened! you can end with this & skip to the saving a gif section, or you can continue to coloring. here’s what we have so far.
3. coloring
now on to coloring. this is pretty basic coloring and it probably won’t work if you follow my numbers exactly, as every single scene is different color + lighting wise. but this is just an example of the kind of thing you could do. basically, if you’re making vibrant gifs, you want to up the brightness + contrast + vibrance and make the colors already present pop. if you want anything more complicated (pale gifs, changing the colors to make, say, quentin’s shirt in these gifs red instead of blue), you’ll have to find other tutorials or experiment on your own. learning how to color & finding your style takes time! you can download psds if you want, but imo those kinda take the fun out of making gifs? that’s just me though.
after each step, i’ll show you what the gif looks like.
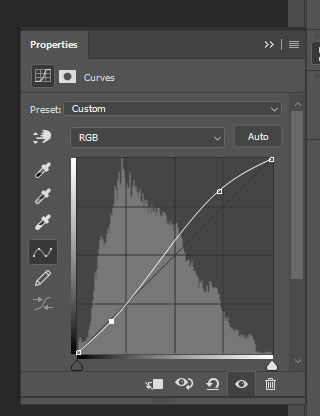
1. i usually start with a curves layer. i usually don’t mess with the color curve options, just this one:

2. next, i do a brightness/contrast layer

3. next, i do a vibrance layer. make sure not to make it TOO saturated or it’ll look bad.
4. next i do a color balance layer. this is where it really starts differing depending on what color you want your gif to be.

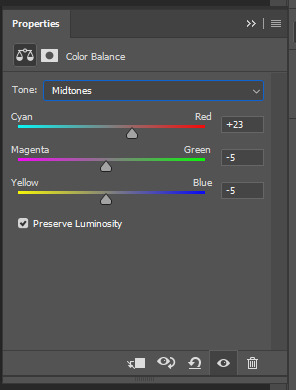
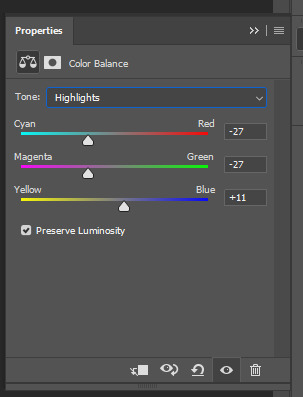
5. next we move to the selective color layers, which are arguably the most powerful. here you can make colors pop, change colors, etc. it’ll take lots of practice & messing around with, but here’s what i did with this gif. this one is making yellow + blue pop
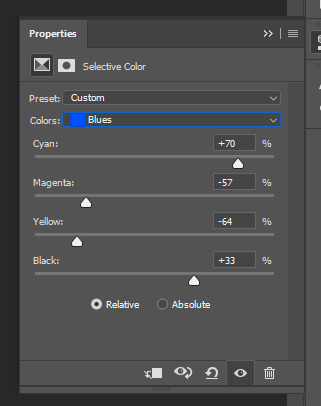
6. next, i did two more selective color layers editing the blue tab to make the blue pop even more


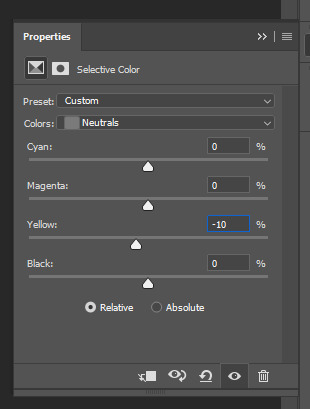
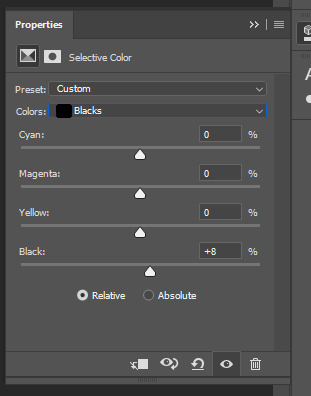
7. i still wasn’t quite happy with it, so i added another selective color layer to edit the blacks + neutrals + greens
8. for good measure, i added one more brightness/contrast layer

9. and the gif is done! however, you can play around with various adjustment layers until you’re happy. again, this is just an example of how to do basic coloring. it’s a skill like any other & takes practice. to keep consistent coloring in a gifset,
9b. you may want to make a psd of this coloring. to do so, you need to put all your adjustment layers in a folder, delete your frame layers, and click file > save as. save it as a .psd. then you can open it and drag it onto any other gifs you make, adjusting the coloring accordingly but still with the same vibes. you don’t have to do this, but it makes life easier. here’s how to use your saved psd, though obviously you’re using your own in this case and not a downloaded one.
4. saving your gif
1. on photoshop cc 2019, you go to file > export > save for web (legacy). for other versions, you can just go to file > save for web. use these settings. the gif size limit is 3mb per gif, so make sure your file size is under that. if it’s not, you’ll need to delete some frames or some adjustment layers.
2. now, photoshop is a bit of a pain & this gif timing will not be right. so you need to open your newly saved gif. then you hit this button + select all frames
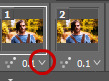
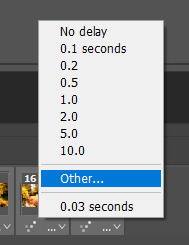
3. click this button & select “other”. tumblr gifs are typically .05-.08. my photoshop is glitchy and i have to set mine to .1-.15 or they’re WAY too fast. but usually, go with .05-.08 unless yours ends up glitching too.
4. save it like you did the first time and ta-da! you’ve made a gif!
#gif tutorial#photoshop tutorial#edit tutorial#coloring tutorial#yes im using the magicians its my hyperfixation and i get to choose the gifs
164 notes
·
View notes
Text
hi! welcome to my oc based in the str.anger th.ings universe. we’re crossover/au friendly, strictly 18+, and mutuals only! i realize being selective can come off a certain kind of way, but i assure you it's purely for comfort. i like getting to know my partners and being selective helps me manage. charlie they/them over twenty - one. below the cut, you’ll find my rules and bio. please read those before deciding to follow. see ya around!
a study in eighties magical realism, found family dynamics, the lost girl, wallflower traits, && the strange concept of TIME.
RULES
reblog from the source and don’t reblog an ask. i usually make a new posts to answer memes which you’re perfectly welcome to reblog and continue if you want.
be kind. don’t harass me for replies or answers to your messages. checking in once in a while is nice but sending multiple messages without getting a reply from me yet can make me feel rushed and guilty. don’t godmod or force ship.
don’t interact with threads you aren’t participating in. personals and non-rp blogs should not interact with any posts as it messes with the notifications. mutuals only are invited to send in memes and respond to open starters.
i choose not to interact with muns that are under 18. i will have different verses for my muse, but i won’t write her under 18. mun and muse are 18+
i will interact with villainous/dark muses but i do not apologize or agree for their actions. i will practice the same selectivity i do with every muse when it comes to interacting with these muses. chemistry between muns and muses is important.
i don’t have triggers to mention. there are topics i refuse to interact with like dub/non-con, gore, and p*dophilia. there may be action typical violence, language, and adult situations. be mindful before following. triggers will be tagged as: trigger tw //
i don’t practice mains or exclusives. i will likely write with different versions of the same character. every muse is unique and their muns work hard on every individual portrayal. unless there’s a special connection between me and another mun, i’m not open to limitations at this time.
my format style is small text triple spaced, all lowercase, and 90x90 sized icons. psd and template credit to somresources.
i reserve the right to change or add to these rules at any point. thanks for reading!
CHARACTER PROFILE
trigger warning: parent death, death, family dysfunction.
you are no one in a small town of familiar faces. your purpose is to make it to school on time, keep your head down, and blend in.
working weekend shifts leaves you stuck in a stagnate routine. something deep inside of you claws to break through, to break free.
it hadn't always been this way. you used to live on the east coast with your parents until your father died. you were so close to him that you didn't think anyone could compare. not even your own mother. she tried her best, but the two of you could do nothing except butt heads. after the funeral, all your mother could think to do is move back home to indiana. she needed to be close to family and the familiar. to you, it was a death sentence. you were about to graduate and now you would have a new life, no friends, and be bombarded by the friendliness of a supposed uncle you haven't been around since you were a kid. bob newby wasn't so bad. he tried. like really hard. you were helpless to his open heart, and soon barriers fell as you began to do the worst thing you could possibly do: settle in.
alternate "stranger" bio continued: you thought hawkins would be a quiet town, but it was a weird place the more you got to know it and the strange lab that was stationed on the far side of town. on your days off or after school, sometimes you'd find yourself looking through the surrounding fence trying to get at any clues as to what exactly went on in there. you'd mapped out the entire outer layout in no time, and eventually, you began to imagine what it might look like on the inside. late one night, you'd stayed out longer than you should have and a great shock wave emitted from the building. the pulse shook through the trees and into your anatomy. suddenly, nothing felt quite right. your pulse slowed, a light sweat broke out on your forehead and then you black out.
when you next come to, there's a distant clicking. it's the ticking of a clock. all the times you imagined what the lab looked like couldn't prepare you for its reality. a man in a white coat stood above you... he explained something wonderful has happened and that you must remain calm.
as a cover, dr. brenner established an internship that you must attend after school everyday so that he may monitor the effects of the blast. you learned the electro-magnetic pulse wave deconstructed and reanimated your cells, giving you extraordinary "gifts" as the doctor referred to them. your uncle bob was beyond proud of the fact you were attending the lab for a special assignment as he had a keen interest in all science. he'd boast how you'd run the place some day if you continued to work hard. if only he knew the truth. if only you could control your slips into different, parallel universes. if only you went straight home after school before the accident. if only every tick of the second hand on the clock didn't now match each beat of your heartrate.
STATS
name: ruth newby
age: eighteen
origin: hawkins, indiana
orientation: pansexual
powers (verse dependent): shift between realities, modify current time ie. slow it down or speed it (drains energy), see into a person’s memories.
faceclaim: jessica barden
special notes: if any canon characters would like to plot pre-established relationships, let’s do it! if bob blogs don’t wish to have a pre-established connection based on ruth’s background, we can plot around it.
2 notes
·
View notes
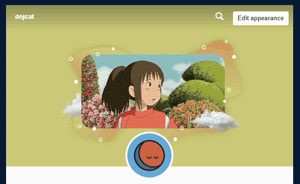
Photo

hello i had a request to make a tutorial on how i made my mobile header and i always wanna do more on this blog so i was like why not <3 i’ve been using photoshop for awhile so these things just kinda come naturally to me so i hope i do okay at explaining these steps!! i’d say you need a basic understanding of photoshop for this but i tried breaking it down as much as possible <3
okay so first i make a gif i wanna use in the header, so for this lil tutorial im gonna be using a scene from spirited away!! there’s no specific dimensions for this part yet, just make sure it’s not a small gif u kno.
next you’re gonna wanna create a new file with the dimensions 3000 x 1055 (the tumblr header size) and fill in the background with any color u want!! so now you should have the 3000 x 1055 file and your gif in a different tab or somethin like:

so now, focusing on the 3000 x 1055 picture, take the rounded rectangle tool:

make any type of rectangle shape, any that’ll fit your gif at least!! it should look something like this after applying the settings, which i have on the side.


(if you can’t find this tab, go to the top of photoshop > window > properties!!)
then i go back to my gif i had made, convert it to timeline and taken select all the layers, right click, convert to smart object. so it should look something like this…

now drag that gif onto the 3000 x 1055 image and it should look something like this:

so now that you have the gif onto the header, right click on the gif layer in the column on the right and click “create clipping mask”. this will make it latch onto whatever layer is beneath it, so make sure you have your rounded rectangle layer beneath it!! then resize your gif to fit how you want in the rectangle. it should look something like this afterwards
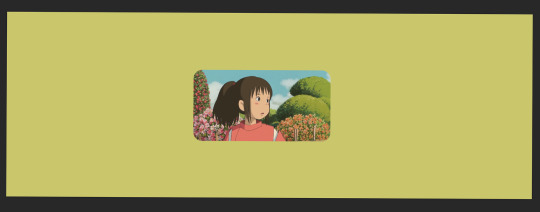
now this part i always forget but its really important. there’s these little things that dictate where the gif begins/ends…

the symbols are circled, and the line is where the actual gif i made ends. so you want to drag the little symbol on the far right to line up with where your actual gif ends. this will help when you’re saving it at the end so there’s not just a long blank screen!!
so now with your gif in the rectangle, it’s time to style it however you want!! normally i go with some type of trend i see on tumblr or maybe a type of aesthetic that goes with it. for the sake of the tutorial, i’m going to style it similar to what my actual header looks like. i downloaded these formas that i honestly use all the time with graphics. it comes with quite a few different shapes and i normally just pick and choose the ones i think would look good behind the image. all of the formas have a gradient overlay, which i change to fit my image better. i make the gradient be 1. the background color i already have put down and 2. a complementary color from the gif. i resize them and place them to my liking and i end up with something like this:

now to add some little fun details i take the ellipse tool (under the same tab as where the rounded rectangle was!) and scatter small circles around the gif like this:

and for the final touch i like to add some clouds! for this i simply search “cloud png” on google and you should come up with a buncha results!! i usually pick one of the first few. this is the point when you can add a psd, make your own psd, etc… or keep it this way if you like it like that?! aaaand this is what i come up with:

so next: tumblr won’t play gifs that are over 3 MB so to be safe i like to resize the image so the length is now 2000 instead of 3000. select all the layers in the layer menu so you can move them down and also resize it to be smaller. it should end up looking something like this:

at this point, you’re done!! go to file > export > save for web or just use the shortcut shift + ctrl + alt + s and make sure it’s below 3 mb. when you upload it it’ll look real small like this:
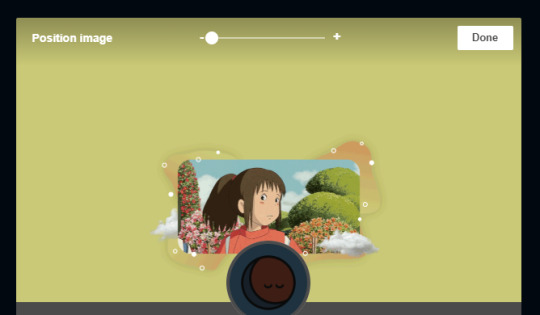
but just zoom in and center it to your liking and your result should look something like this! (also i recommend hiding your icon if you wanna show off the gif but itll still look cute with the icon <3 )
#rph#photoshop tutorial#ps tutorial#mobile header#idk what to tag it#sorry if i missed anything this my first tutorial LMFAO
88 notes
·
View notes
Last Seen Blogs
ceydabyrz-blog
💜GİZEM CEYDA 💜
the-red-and-the-black
All the love for Severus

verifiedtrashpanda
#academiaaesthetic
arvangurav
Every day is Taemin's day

witherdiritos
withering hellhole