#android sync sqlite database with server
Explore tagged Tumblr posts
Visit Tumblr Blog
Explore Tumblr blogs with no restrictions, modern design and the best experience.
Last Seen Tumblr Blogs


Fun Fact
When “GIF” was named word of the year in 2012, Oxford Dictionaries U.S.A. credited Tumblr for pushing the word.
Text
Offline-First Apps: How Cross-Platform Development Companies Do It
In today’s mobile-driven world, users expect apps to work anytime, anywhere—even without an internet connection. That’s where offline-first app development comes in. For businesses aiming to deliver seamless user experiences regardless of connectivity, partnering with a cross platform mobile app development company is the smartest move.
Let’s explore what offline-first apps are, why they matter, and how cross-platform development teams make them work.
What Are Offline-First Apps?
Offline-first apps are designed with the assumption that users may not always have internet access. These apps:
Store data locally on the device
Sync with servers once the connection is restored
Provide a smooth, uninterrupted experience for the user
This approach is ideal for industries like logistics, field services, healthcare, and e-commerce, where connectivity can be spotty or unavailable.
Why Go Offline-First?
Here’s why businesses are investing in offline-first solutions:
Improved user experience: Users stay productive even without Wi-Fi or cellular data.
Wider accessibility: Expands app usability to remote or low-bandwidth areas.
Data reliability: Prevents loss of important user inputs during connection drops.
Competitive edge: Offers a feature set many apps still lack.
How a Cross Platform Mobile App Development Company Builds Offline-First Apps
Building an offline-first app isn’t just about caching data. It requires thoughtful architecture and the right tools. Here’s how expert teams do it:
1. Choosing the Right Framework
Top cross-platform frameworks like Flutter, React Native, and Xamarin support offline capabilities. A skilled cross platform mobile app development company selects the most appropriate tech stack based on your app’s needs.
2. Local Data Storage Implementation
Developers use options like:
SQLite databases
Room (for Android)
Core Data (for iOS)
Realm or Hive (cross-platform)
This ensures that users can continue using the app and storing data locally when offline.
3. Data Synchronization Strategy
A smart sync strategy prevents conflicts and data loss:
Background sync when the connection is restored
Conflict resolution rules (e.g., last-write-wins or user-defined)
Sync queues to manage pending operations
4. Optimized Caching Mechanisms
Caching allows users to view previously loaded data even when offline. Developers implement smart caching strategies to:
Store API responses
Load static assets like images and documents
Reduce load times and data consumption
5. User Feedback and Error Handling
Offline-first apps must inform users of connection status and sync progress. Thoughtful UX design includes:
Offline banners or indicators
Retry buttons for failed submissions
Transparent messaging to prevent confusion
6. Testing in Offline Scenarios
Reliable offline-first apps are tested rigorously in both connected and disconnected environments. QA teams simulate poor networks, airplane mode, and slow syncing to ensure the app handles all conditions gracefully.
Benefits of Working with a Cross Platform Mobile App Development Company
A specialized cross platform mobile app development company offers:
Unified codebase across iOS and Android
Cost-effective offline functionality
Faster development cycles
Consistent user experience on all devices
Deep expertise in data syncing, storage, and offline UX patterns
Conclusion
Offline-first is no longer a “nice-to-have”—it’s a must for delivering robust, reliable mobile experiences. Whether you're targeting remote field teams or rural customers, the right strategy begins with a trusted cross platform mobile app development company that understands how to build for both connectivity and independence.
Looking to build an offline-ready app that works anywhere, anytime? Talk to our expert cross-platform team today and get a solution built for performance, scalability, and offline reliability.
0 notes
Text
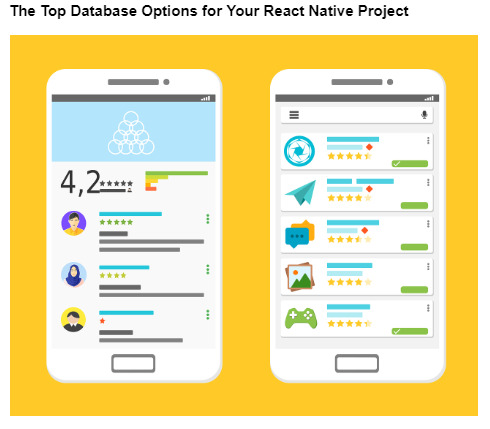
The Top Database Options for Your React Native Project
As a React Native Developer, one of the crucial decisions you need to make is choosing the right database for your project. The database you select can significantly impact the performance, scalability, and offline capabilities of your app. In this article, we will explore the top database options for React Native app development and discuss their features, benefits, and pricing.
Factors to Consider when Choosing a Database for React Native
Before diving into the specific database options, let's discuss some important factors to consider when selecting a database for your React Native application.
Data Complexity
The complexity of your data structure plays a vital role in choosing the right database. For most applications, storing data in the form of key-value pairs or a JSON structure is sufficient. However, if your app deals with complex data structures like full documents or objects, you need a database that can handle such complexity efficiently.
Memory Management
Proper memory management is crucial for the smooth functioning of your app. Improper handling of data can lead to frequent crashes. Look for databases that clear their cache at regular intervals to ensure sufficient memory availability for your app.
Offline Synchronization of Data
In today's world, users expect their apps to work seamlessly even in offline mode or with a slow internet connection. Therefore, it is essential to choose a database that allows data synchronization when users reconnect to the internet. This feature ensures that the app remains functional and up-to-date, regardless of the network availability.
Data Conflicts and Concurrency Handling
If your app includes collaboration-related features, the chances of data conflicts increase. It is essential to choose a database that has robust conflict-handling policies. Look for databases that provide documentation on how they handle syncing and conflicts, as well as any trade-offs involved.
Lines of Code
The number of lines of code required to perform basic CRUD (Create, Read, Update, Delete) operations can impact the efficiency and performance of your app. Avoid using databases that require excessive lines of code for simple operations, as it can slow down the application and make coding more complex.
Now that we have discussed the factors to consider let's explore the top database options for React Native app development.
1. Realm
Realm is a popular local database option for React Native app development. It is designed for real-time and offline applications for wearable and mobile devices. Realm supports both iOS and Android platforms and offers easy integration with React Native.
Unlike other databases that rely on ORM or SQLite, Realm has its own database engine. This makes it a preferred choice for handling large amounts of data and developing high-performance applications. Realm also provides features like Realm Sync for background sync services, offline friendliness via Redux Offline, and robust security measures.
Realm is an open-source database, but it also offers a pro version with additional features. The pro version comes with a cost of $1750 per month.
2. Firebase
Firebase is another popular choice for React Native app development. It offers real-time NoSQL databases and provides excellent support for offline data changes and synchronization. Firebase is known for its low setup effort and cross-platform API, which allows easy access to data directly from mobile devices without the need for an application server.
With Firebase, data is synchronized in real-time for all clients, making it ideal for apps that require real-time updates. It also provides offline persistence, allowing users to continue using the app even without an internet connection. Firebase offers a free plan with up to 1GB of data storage, along with paid plans for additional storage requirements.
3. SQLite
SQLite is a lightweight and widely used database option for React Native app development. It provides local storage databases, and its integration with React Native is seamless. SQLite follows ACID-compliant principles and implements SQL standards with some omissions. It is file-based and supports various data types.
Developers prefer SQLite for its offline persistence capabilities. By using the react-native-sqlite-storage plugin, you can enable offline persistence and efficiently manage data within your app. SQLite is free to use and open-source, making it a cost-effective choice for many projects.
4. PouchDB
PouchDB is an open-source JavaScript database that stores data in JSON format. It offers a single JavaScript API for developing, reading, updating, querying, and deleting queries. PouchDB supports various backend databases like MySQL, CouchDB, PostgreSQL, and MongoDB.
One of the significant advantages of PouchDB is its ability to run within a browser, eliminating the need for network queries. This results in faster query execution and improved performance. PouchDB also provides data synchronization capabilities with supported servers, enabling offline and online app functionality. Its flexibility and compatibility make it a valuable choice for React Native app development.
5. Async Storage
Async Storage is a local storage database system specifically designed for React Native. It allows developers to store data locally and persist it across app restarts. Async Storage is built with React Native, making it convenient to use without additional setup requirements.
Async Storage is particularly useful when you need to save data that the app requires even after the user has closed the app or device. It provides a simple and efficient solution for storing small amounts of data locally. Async Storage is widely used in React Native app development due to its ease of use and seamless integration.
6. WatermelonDB
WatermelonDB is a high-performance reactive database built on SQLite specifically for React Native apps. It is designed to handle large datasets without compromising speed. WatermelonDB focuses on real-world performance and optimization, making it an excellent choice for complex applications.
In addition to its scalability, WatermelonDB offers features like a first-generation offline system, support for Flow static typing, and seamless integration with the SQLite platform. With WatermelonDB, you can build efficient and performant React Native apps that can handle hundreds to thousands of records.
7. Vasern
Vasern is a lightweight and open-source database for React Native app development. It provides an API for local and cloud storage, as well as client syncing. Vasern draws inspiration from various open-source databases, focusing on consistency and performance.
Vasern offers features like end-to-end database syncing, rapid operation, and a concentration on consistency and performance. Its lightweight nature and open-source nature make it an attractive choice for developers seeking simplicity and efficiency in their React Native apps.
Conclusion
Selecting the right database for React Native app development is crucial for performance, scalability, and offline capabilities. Top options include Realm, Firebase, SQLite, PouchDB, Async Storage, WatermelonDB, and Vasern. Evaluate factors and explore features to make an informed decision that aligns with project goals. Choose a suitable database for real-time sync, offline capabilities, or performance optimization.
0 notes
Text
Android Sync SQLite Database with Server using PHP and MySQL - Android Coding by DMTechnolab
Android Sync SQLite Database with Server using PHP and MySQL – Android Coding by DMTechnolab
The package The trap.Simplified coding.androidmysqlsync; Import Android.Clearly; Import Android.App.Progressressialog; Import Android.Content.broadcast receiver; Import Android.Content.Context; Import Android.Content.Intent; Import Android.Content.Intent filter; Import Android.Content.in the evening.package manager; Import Android.The database.Cursor; Import Android.The trap.Valency; Import…

View On WordPress
0 notes
Text
New Post has been published on Simplified Coding
New Post has been published on https://www.simplifiedcoding.net/android-sync-sqlite-database-with-server/
Android Sync SQLite Database with Server using PHP and MySQL
Lets learn Android Sync SQLite Database with Server. Assume we have to send some information from the application to our webserver and internet is not available on the device at a particular time. So instead of giving error to the user that internet is not available we can store the data to SQLite and send it later automatically when the internet is available. And this is what we are going to learn in this Android Sync SQLite Database with Server Tutorial.
Contents
1 Android Sync Sqlite Database with Server Demo
2 Creating Web Service and MySQL Database
2.1 Creating Database
2.2 Creating Web Service
2.2.1 Creating Script
2.2.2 Testing Script
3 Android Sync SQLite Database with Server
3.1 Creating Android Project
3.2 Adding Permissions
3.3 Adding Dependencies
3.4 Handling SQLite Operations
3.5 Handling Volley RequestQueue
3.6 Building Interface
3.6.1 MainActivity
3.6.2 ListView
3.7 Building ListView
3.7.1 Model Class
3.7.2 Adapter
3.8 Coding MainActivity
3.9 Detecting Network State
3.9.1 Creating Broadcast Receiver
3.9.2 Adding Receiver in Manifest
3.9.3 Registering Receiver
4 Testing the Application
5 Download Source Code
Android Sync Sqlite Database with Server Demo
You can first see what we are going to learn in this video where I am showing the application.
youtube
Now lets move ahead and start Android Sync Sqlite Database with Server.
Creating Web Service and MySQL Database
Creating Database
I have the following database. I am using XAMPP you can use anything you want.

So we have the database table. Now we will create a php script that will handle the insertion to the database.
Creating Web Service
Creating Script
Create folder in your root directory (in my case it is htdocs).
Now create a php file inside the folder, I have created saveName.php. And write the following code.
<?php /* * Database Constants * Make sure you are putting the values according to your database here */ define('DB_HOST','localhost'); define('DB_USERNAME','root'); define('DB_PASSWORD',''); define('DB_NAME', 'android'); //Connecting to the database $conn = new mysqli(DB_HOST, DB_USERNAME, DB_PASSWORD, DB_NAME); //checking the successful connection if($conn->connect_error) die("Connection failed: " . $conn->connect_error); //making an array to store the response $response = array(); //if there is a post request move ahead if($_SERVER['REQUEST_METHOD']=='POST') //getting the name from request $name = $_POST['name']; //creating a statement to insert to database $stmt = $conn->prepare("INSERT INTO names (name) VALUES (?)"); //binding the parameter to statement $stmt->bind_param("s", $name); //if data inserts successfully if($stmt->execute()) //making success response $response['error'] = false; $response['message'] = 'Name saved successfully'; else //if not making failure response $response['error'] = true; $response['message'] = 'Please try later'; else $response['error'] = true; $response['message'] = "Invalid request"; //displaying the data in json format echo json_encode($response);
Testing Script
Now its time to test the script we created. So in my case the URL is http://localhost/SqliteSync/saveName.php
I am using POSTMAN to test the script and you can see it in below screenshot.
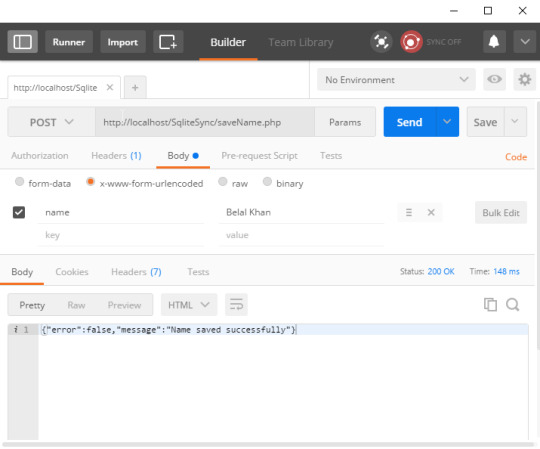
As you can see the script is working fine. Now lets move ahead in android project.
Android Sync SQLite Database with Server
Creating Android Project
Create a new project.
I have created AndroidMySQLSync with an Empty Activity.
Adding Permissions
We need the following permissions so first add these to AndroidManifest.xml.
<uses-permission android:name="android.permission.INTERNET" /> <uses-permission android:name="android.permission.ACCESS_NETWORK_STATE" />
Adding Dependencies
For network requests I am going to use Volley. So add the following line inside dependencies block of your app level build.gradle file.
dependencies compile fileTree(dir: 'libs', include: ['*.jar']) androidTestCompile('com.android.support.test.espresso:espresso-core:2.2.2', exclude group: 'com.android.support', module: 'support-annotations' ) compile 'com.android.support:appcompat-v7:25.0.1' //add this line compile 'com.android.volley:volley:1.0.0' testCompile 'junit:junit:4.12'
Handling SQLite Operations
In this case we have to use both SQLite and MySQL. So a class named DatabaseHelper.java and write the following code.
package net.simplifiedcoding.androidmysqlsync; import android.content.ContentValues; import android.content.Context; import android.database.Cursor; import android.database.sqlite.SQLiteDatabase; import android.database.sqlite.SQLiteOpenHelper; /** * Created by Belal on 1/27/2017. */ public class DatabaseHelper extends SQLiteOpenHelper //Constants for Database name, table name, and column names public static final String DB_NAME = "NamesDB"; public static final String TABLE_NAME = "names"; public static final String COLUMN_ID = "id"; public static final String COLUMN_NAME = "name"; public static final String COLUMN_STATUS = "status"; //database version private static final int DB_VERSION = 1; //Constructor public DatabaseHelper(Context context) super(context, DB_NAME, null, DB_VERSION); //creating the database @Override public void onCreate(SQLiteDatabase db) String sql = "CREATE TABLE " + TABLE_NAME + "(" + COLUMN_ID + " INTEGER PRIMARY KEY AUTOINCREMENT, " + COLUMN_NAME + " VARCHAR, " + COLUMN_STATUS + " TINYINT);"; db.execSQL(sql); //upgrading the database @Override public void onUpgrade(SQLiteDatabase db, int oldVersion, int newVersion) String sql = "DROP TABLE IF EXISTS Persons"; db.execSQL(sql); onCreate(db); /* * This method is taking two arguments * first one is the name that is to be saved * second one is the status * 0 means the name is synced with the server * 1 means the name is not synced with the server * */ public boolean addName(String name, int status) SQLiteDatabase db = this.getWritableDatabase(); ContentValues contentValues = new ContentValues(); contentValues.put(COLUMN_NAME, name); contentValues.put(COLUMN_STATUS, status); db.insert(TABLE_NAME, null, contentValues); db.close(); return true; /* * This method taking two arguments * first one is the id of the name for which * we have to update the sync status * and the second one is the status that will be changed * */ public boolean updateNameStatus(int id, int status) SQLiteDatabase db = this.getWritableDatabase(); ContentValues contentValues = new ContentValues(); contentValues.put(COLUMN_STATUS, status); db.update(TABLE_NAME, contentValues, COLUMN_ID + "=" + id, null); db.close(); return true; /* * this method will give us all the name stored in sqlite * */ public Cursor getNames() SQLiteDatabase db = this.getReadableDatabase(); String sql = "SELECT * FROM " + TABLE_NAME + " ORDER BY " + COLUMN_ID + " ASC;"; Cursor c = db.rawQuery(sql, null); return c; /* * this method is for getting all the unsynced name * so that we can sync it with database * */ public Cursor getUnsyncedNames() SQLiteDatabase db = this.getReadableDatabase(); String sql = "SELECT * FROM " + TABLE_NAME + " WHERE " + COLUMN_STATUS + " = 0;"; Cursor c = db.rawQuery(sql, null); return c;
Handling Volley RequestQueue
We are going to use Volley for http request. So for this we will create a singleton class.
Create a class named VolleySingleton and write the following code.
package net.simplifiedcoding.androidmysqlsync; import android.content.Context; import android.graphics.Bitmap; import android.support.v4.util.LruCache; import com.android.volley.Request; import com.android.volley.RequestQueue; import com.android.volley.toolbox.ImageLoader; import com.android.volley.toolbox.Volley; /** * Created by Belal on 21/09/16. */ public class VolleySingleton private static VolleySingleton mInstance; private RequestQueue mRequestQueue; private static Context mCtx; private VolleySingleton(Context context) mCtx = context; mRequestQueue = getRequestQueue(); public static synchronized VolleySingleton getInstance(Context context) if (mInstance == null) mInstance = new VolleySingleton(context); return mInstance; public RequestQueue getRequestQueue() if (mRequestQueue == null) // getApplicationContext() is key, it keeps you from leaking the // Activity or BroadcastReceiver if someone passes one in. mRequestQueue = Volley.newRequestQueue(mCtx.getApplicationContext()); return mRequestQueue; public <T> void addToRequestQueue(Request<T> req) getRequestQueue().add(req);
Building Interface
MainActivity
Now inside activity_main.xml write the following code.
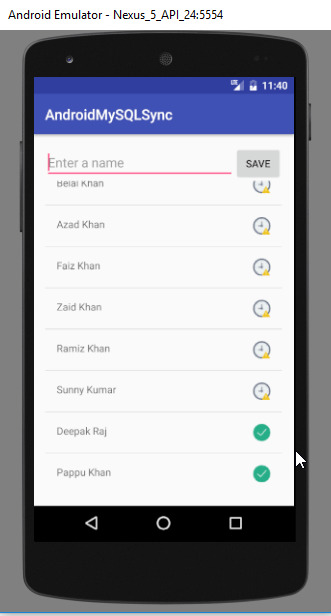
<?xml version="1.0" encoding="utf-8"?> <LinearLayout xmlns:android="http://schemas.android.com/apk/res/android" xmlns:tools="http://schemas.android.com/tools" android:id="@+id/activity_main" android:layout_width="match_parent" android:layout_height="match_parent" android:orientation="vertical" android:paddingBottom="@dimen/activity_vertical_margin" android:paddingLeft="@dimen/activity_horizontal_margin" android:paddingRight="@dimen/activity_horizontal_margin" android:paddingTop="@dimen/activity_vertical_margin" tools:context="net.simplifiedcoding.androidmysqlsync.MainActivity"> <LinearLayout android:layout_width="match_parent" android:layout_height="wrap_content" android:orientation="horizontal"> <EditText android:id="@+id/editTextName" android:layout_width="match_parent" android:layout_height="wrap_content" android:layout_weight="3" android:hint="Enter a name" /> <Button android:id="@+id/buttonSave" android:layout_width="wrap_content" android:layout_height="wrap_content" android:layout_weight="1" android:text="Save" /> </LinearLayout> <ListView android:id="@+id/listViewNames" android:layout_width="match_parent" android:layout_height="wrap_content"></ListView> </LinearLayout>
The above code will generate the following output.
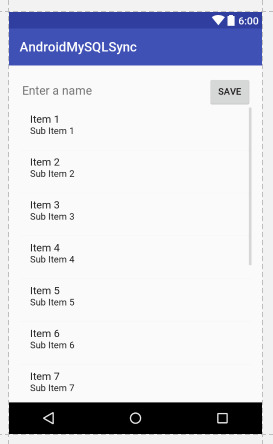
Android Sync SQLite Database with Server
As you can see we have an EditText, a Button and a ListView.
Now let me tell you what we are going to do. We will save the Name from EditText and we will also display the saved name in ListView with the Sync Status. So the next part is designing a layout for our Custom ListView.
ListView
Create an xml file inside layout directory. I have created names.xml.
<?xml version="1.0" encoding="utf-8"?> <RelativeLayout xmlns:android="http://schemas.android.com/apk/res/android" android:padding="@dimen/activity_horizontal_margin" android:layout_width="match_parent" android:layout_height="match_parent"> <TextView android:text="Name" android:layout_alignParentLeft="true" android:id="@+id/textViewName" android:layout_width="wrap_content" android:layout_height="wrap_content" /> <ImageView android:background="@drawable/success" android:layout_alignParentRight="true" android:id="@+id/imageViewStatus" android:layout_width="wrap_content" android:layout_height="wrap_content" /> </RelativeLayout>
As you can see we have a TextView to display the name and an ImageView to display the status.
Download the icons from the below link, we have two images to display queued or synced.
Icons Download (Android Sync SQLite Database with Server) (0 downloads)
(adsbygoogle = window.adsbygoogle || []).push();
You have to copy the downloaded icons inside drawable folder.
Building ListView
Model Class
Now create a class Name.java and write the following code.
package net.simplifiedcoding.androidmysqlsync; /** * Created by Belal on 1/27/2017. */ public class Name private String name; private int status; public Name(String name, int status) this.name = name; this.status = status; public String getName() return name; public int getStatus() return status;
Now we will create an Adapter for our ListView.
Adapter
Create a class NameAdapter.java and write the following code.
package net.simplifiedcoding.androidmysqlsync; import android.content.Context; import android.view.LayoutInflater; import android.view.View; import android.view.ViewGroup; import android.widget.ArrayAdapter; import android.widget.ImageView; import android.widget.TextView; import java.util.List; /** * Created by Belal on 1/27/2017. */ public class NameAdapter extends ArrayAdapter<Name> //storing all the names in the list private List<Name> names; //context object private Context context; //constructor public NameAdapter(Context context, int resource, List<Name> names) super(context, resource, names); this.context = context; this.names = names; @Override public View getView(int position, View convertView, ViewGroup parent) //getting the layoutinflater LayoutInflater inflater = (LayoutInflater) context.getSystemService(Context.LAYOUT_INFLATER_SERVICE); //getting listview itmes View listViewItem = inflater.inflate(R.layout.names, null, true); TextView textViewName = (TextView) listViewItem.findViewById(R.id.textViewName); ImageView imageViewStatus = (ImageView) listViewItem.findViewById(R.id.imageViewStatus); //getting the current name Name name = names.get(position); //setting the name to textview textViewName.setText(name.getName()); //if the synced status is 0 displaying //queued icon //else displaying synced icon if (name.getStatus() == 0) imageViewStatus.setBackgroundResource(R.drawable.stopwatch); else imageViewStatus.setBackgroundResource(R.drawable.success); return listViewItem;
Coding MainActivity
Now lets come inside MainActivity.java and write the following code.
package net.simplifiedcoding.androidmysqlsync; import android.Manifest; import android.app.ProgressDialog; import android.content.BroadcastReceiver; import android.content.Context; import android.content.Intent; import android.content.IntentFilter; import android.content.pm.PackageManager; import android.database.Cursor; import android.net.ConnectivityManager; import android.support.v4.content.ContextCompat; import android.support.v7.app.AppCompatActivity; import android.os.Bundle; import android.view.View; import android.widget.Button; import android.widget.EditText; import android.widget.ListView; import android.widget.Toast; import com.android.volley.AuthFailureError; import com.android.volley.Request; import com.android.volley.RequestQueue; import com.android.volley.Response; import com.android.volley.VolleyError; import com.android.volley.toolbox.StringRequest; import com.android.volley.toolbox.Volley; import org.json.JSONException; import org.json.JSONObject; import java.util.ArrayList; import java.util.HashMap; import java.util.List; import java.util.Map; public class MainActivity extends AppCompatActivity implements View.OnClickListener /* * this is the url to our webservice * make sure you are using the ip instead of localhost * it will not work if you are using localhost * */ public static final String URL_SAVE_NAME = "http://192.168.1.107/SqliteSync/saveName.php"; //database helper object private DatabaseHelper db; //View objects private Button buttonSave; private EditText editTextName; private ListView listViewNames; //List to store all the names private List<Name> names; //1 means data is synced and 0 means data is not synced public static final int NAME_SYNCED_WITH_SERVER = 1; public static final int NAME_NOT_SYNCED_WITH_SERVER = 0; //a broadcast to know weather the data is synced or not public static final String DATA_SAVED_BROADCAST = "net.simplifiedcoding.datasaved"; //Broadcast receiver to know the sync status private BroadcastReceiver broadcastReceiver; //adapterobject for list view private NameAdapter nameAdapter; @Override protected void onCreate(Bundle savedInstanceState) super.onCreate(savedInstanceState); setContentView(R.layout.activity_main); //initializing views and objects db = new DatabaseHelper(this); names = new ArrayList<>(); buttonSave = (Button) findViewById(R.id.buttonSave); editTextName = (EditText) findViewById(R.id.editTextName); listViewNames = (ListView) findViewById(R.id.listViewNames); //adding click listener to button buttonSave.setOnClickListener(this); //calling the method to load all the stored names loadNames(); //the broadcast receiver to update sync status broadcastReceiver = new BroadcastReceiver() @Override public void onReceive(Context context, Intent intent) //loading the names again loadNames(); ; //registering the broadcast receiver to update sync status registerReceiver(broadcastReceiver, new IntentFilter(DATA_SAVED_BROADCAST)); /* * this method will * load the names from the database * with updated sync status * */ private void loadNames() names.clear(); Cursor cursor = db.getNames(); if (cursor.moveToFirst()) do Name name = new Name( cursor.getString(cursor.getColumnIndex(DatabaseHelper.COLUMN_NAME)), cursor.getInt(cursor.getColumnIndex(DatabaseHelper.COLUMN_STATUS)) ); names.add(name); while (cursor.moveToNext()); nameAdapter = new NameAdapter(this, R.layout.names, names); listViewNames.setAdapter(nameAdapter); /* * this method will simply refresh the list * */ private void refreshList() nameAdapter.notifyDataSetChanged(); /* * this method is saving the name to ther server * */ private void saveNameToServer() final ProgressDialog progressDialog = new ProgressDialog(this); progressDialog.setMessage("Saving Name..."); progressDialog.show(); final String name = editTextName.getText().toString().trim(); StringRequest stringRequest = new StringRequest(Request.Method.POST, URL_SAVE_NAME, new Response.Listener<String>() @Override public void onResponse(String response) progressDialog.dismiss(); try JSONObject obj = new JSONObject(response); if (!obj.getBoolean("error")) //if there is a success //storing the name to sqlite with status synced saveNameToLocalStorage(name, NAME_SYNCED_WITH_SERVER); else //if there is some error //saving the name to sqlite with status unsynced saveNameToLocalStorage(name, NAME_NOT_SYNCED_WITH_SERVER); catch (JSONException e) e.printStackTrace(); , new Response.ErrorListener() @Override public void onErrorResponse(VolleyError error) progressDialog.dismiss(); //on error storing the name to sqlite with status unsynced saveNameToLocalStorage(name, NAME_NOT_SYNCED_WITH_SERVER); ) @Override protected Map<String, String> getParams() throws AuthFailureError Map<String, String> params = new HashMap<>(); params.put("name", name); return params; ; VolleySingleton.getInstance(this).addToRequestQueue(stringRequest); //saving the name to local storage private void saveNameToLocalStorage(String name, int status) editTextName.setText(""); db.addName(name, status); Name n = new Name(name, status); names.add(n); refreshList(); @Override public void onClick(View view) saveNameToServer();
Now if you will run the application it will save the name to MySQL and SQLite with the sync or unsynced status.
But to send the unsynced names to the server automatically we have to detect the Network Status of the phone. For this we need one more broadcast receiver.
Detecting Network State
Creating Broadcast Receiver
Create a class named NetworkStateChecker.java and write the following code.
package net.simplifiedcoding.androidmysqlsync; import android.content.BroadcastReceiver; import android.content.Context; import android.content.Intent; import android.database.Cursor; import android.net.ConnectivityManager; import android.net.NetworkInfo; import com.android.volley.AuthFailureError; import com.android.volley.Request; import com.android.volley.Response; import com.android.volley.VolleyError; import com.android.volley.toolbox.StringRequest; import org.json.JSONException; import org.json.JSONObject; import java.util.HashMap; import java.util.Map; /** * Created by Belal on 1/27/2017. */ public class NetworkStateChecker extends BroadcastReceiver //context and database helper object private Context context; private DatabaseHelper db; @Override public void onReceive(Context context, Intent intent) this.context = context; db = new DatabaseHelper(context); ConnectivityManager cm = (ConnectivityManager) context.getSystemService(Context.CONNECTIVITY_SERVICE); NetworkInfo activeNetwork = cm.getActiveNetworkInfo(); //if there is a network if (activeNetwork != null) activeNetwork.getType() == ConnectivityManager.TYPE_MOBILE) //getting all the unsynced names Cursor cursor = db.getUnsyncedNames(); if (cursor.moveToFirst()) do //calling the method to save the unsynced name to MySQL saveName( cursor.getInt(cursor.getColumnIndex(DatabaseHelper.COLUMN_ID)), cursor.getString(cursor.getColumnIndex(DatabaseHelper.COLUMN_NAME)) ); while (cursor.moveToNext()); /* * method taking two arguments * name that is to be saved and id of the name from SQLite * if the name is successfully sent * we will update the status as synced in SQLite * */ private void saveName(final int id, final String name) StringRequest stringRequest = new StringRequest(Request.Method.POST, MainActivity.URL_SAVE_NAME, new Response.Listener<String>() @Override public void onResponse(String response) try JSONObject obj = new JSONObject(response); if (!obj.getBoolean("error")) //updating the status in sqlite db.updateNameStatus(id, MainActivity.NAME_SYNCED_WITH_SERVER); //sending the broadcast to refresh the list context.sendBroadcast(new Intent(MainActivity.DATA_SAVED_BROADCAST)); catch (JSONException e) e.printStackTrace(); , new Response.ErrorListener() @Override public void onErrorResponse(VolleyError error) ) @Override protected Map<String, String> getParams() throws AuthFailureError Map<String, String> params = new HashMap<>(); params.put("name", name); return params; ; VolleySingleton.getInstance(context).addToRequestQueue(stringRequest);
Adding Receiver in Manifest
Add the following code in your AndroidManifest.xml file inside application tag.
<receiver android:name=".NetworkStateChecker"> <intent-filter> <action android:name="android.net.conn.CONNECTIVITY_CHANGE" /> </intent-filter> </receiver>
Registering Receiver
You also need to register the receiver. So add the following line inside onCreate() method of your MainActivity.java file.
registerReceiver(new NetworkStateChecker(), new IntentFilter(ConnectivityManager.CONNECTIVITY_ACTION));
Now you can run your application.
Testing the Application
Run your application. And try saving the name when internet is available also turn off the internet and again try saving your name.
Android Sync SQLite Database with Server
When the internet will be available again the data will be automatically sent to MySQL.
Download Source Code
You can get the source code from the following GitHub repository.
Android Sync SQlite Database with Server Source Code
So thats it for this android sync sqlite database with server tutorial friends. Feel free to leave your comments if you are having any troubles making the project. Also follow the steps carefully as the post is very long. And if you found this helpful please favor us by sharing this post in your social network. Thank You 🙂
0 notes
Text
List of Top Local Databases used for React Native App Development in 2021!

React Native has become the most talked-about technology in the last couple of years and its popularity as a cross-platform framework owing to cost efficiency has made React Native Development the most preferred development technology in mobile app development companies. Due to the ever-growing demand, it is expected from the developers to build highly performant apps. One of the challenging decisions while architecting React Native apps is to select the right database for the project. The good news is, that the React Native framework comes with some really good choices available for data storage. So, in this blog, we will shed light on top React Native databases for 2021. Let’s explore them in detail. But before that, let’s quickly run through the significant factors that a React Native app development company should consider while choosing the apt database for React Native App Development.
Variables to be considered while choosing the Apt Database for Your Project
Data and App Complexity: complex data sets in the applications can cause severe app performance issues. So, databases that can store complex data should be chosen. Apps that have lower complexity can use simple databases so that such apps can be easily synced with the server. But complicated apps with multiple-user collaboration requirements require a complex database for ensuring seamless syncing.
Memory Handling: inadequate database memory management can lead to the crashing of apps. Hence, it should be ensured that memory management is done efficiently through processes like compaction, garbage collection, etc.
Line of Codes: if a higher number of code lines are used in a project for CRUD like operations, then an advanced database should not be the choice as the coding gets more cumbersome. This code complication deteriorates the performance of the app significantly.
Data Conflicts: the possibility of data conflicts increases when more collaboration related features are added to the app and data is being used concurrently. So, it is always good to select a database that handles data conflicts and concurrency and shares the conflict handling policies on the website or at least on repository pages.
Top React Native Databases for 2021!

Realm
Realm is an object-oriented database that enables the creation of real-time and offline applications that run on both- wearable devices as well as smartphones. It is one of the top React Native databases amongst all the available ones. This database is highly preferred when the end goal of the project is building high-performance apps that can deal with a huge data flow. The database benefits both platforms- iOS and Android. It doesn’t depend on key-value stores as it has its own database engine.Realm allows the React Native app developers to frequently undergo tables, mapping classes, fields, foreign keys, etc.
Key Advantages of Realm:
Makes use of multiple encryption standards to ensure good security for diverse mobile platforms
Realm Synchronization service works locally in the background for recording user interactions and service requests and sends the data to the server after the device goes online.
Redux offline can be used to fulfill offline-first architecture requirements.
Firebase
For React Native development, Firebase supports real-time NoSQL DB. This database is known for its offline data modifications and data synchronization capabilities. Besides, it can handle M (model) and C (controller) of the MVC that is needed while building React Native applications.
Key Advantages of Firebase:
This database allows real-time data syncing for all the clients simultaneously.
Firebase offers a cross-platform API that can be easily set-up with minimum effort.
Firebase database can be directly accessed with a mobile device and so, the application servers are not needed.
Firebase supports the creation of real-time apps with offline persistence capabilities.
SQlite
SQLite is a relational database management system developed for offering local storage to React Native applications. ‘Lite’ in SQLite depicts the light-weight nature of this database. Also, this database is very easy to setup. It can be directly integrated with the mobile applications for accessing the database. For data encryption,SQLite can be used with an extension called SQLite Encryption Extension (SEE).
Key Advantages of SQLite:
This database can support offline persistence, simply by using a react-native-SQLite-storage plugin for data management within the mobile app.
SQLite is ACID-compliant and employs most of the SQL standards with just a few omissions. It comes with a file-based library architecture and some tools for easily and efficiently handling all data types.
PouchDB
This is a Javascript database developed using a storage mechanism and CouchDB protocols. It stores the data in JSON format. This open-source database enables the React Native developers to read, create, delete, update, and query the objects using a singleJS API. Furthermore,PouchDB is compatible with MongoDB, CouchDB, PostgreSQL, and MySQL.
Key Advantages of PouchDB:
It allows data syncing using a supported server for running the apps online as well as offline.
Ensures speedier execution of queries.
Also, as PouchDB remains inside a browser, it is not necessary to run queries over the network resulting in faster execution of queries.
Vasern
This is an open-source, lightweight, and fast database used for React Native based application development for both- Android and iOS. It is developed with a robust server-side language-Golang, created by Google. Vasern’s API can also be utilized for syncing across app clients, local storage, and for cloud storage.
Key Advantages of Vasern:
Vasern ensures good performance of apps and speedier operations
Provides end-to-end database syncing
Support basic data-types like string, double, int, double, reference, date time, etc.
Provides support to languages that use UTF – 8 coding.
Watermelon DB
This database is built on top of SQLite. It can scale a myriad number of records without impacting the application speed. This is perfectly optimized for the creation of complicated React Native apps with real-world performance.
Key Advantages of Watermelon DB:
It is a fast, multi-threaded, relational, and highly cached database.
It supports an offline first system for syncing with your own backend.
It allows static typing with flow
BerkeleyDB
This is a high-performing backend and allows the React Native developers to handle data in several ways. It comes with an API that is compatible with numerous languages and several platforms like Android and iOS.
Key Advantages of BerkeleyDB:
Simple to use
Provides support for industrial-strength transactions
Ensures concurrent access for multiple users
AsyncStorage
This is a local storage database and comes in-built with React Native. It enables React Native developers to persist data between reboots of the apps. It acts as an outstanding solution for saving the data that the app required, even when the app is being closed by the users.
Concluding Views:
Apart from the local databases mentioned here, there are several other databases available for the React Native app developers to utilize in their projects. But, the choice of a database used for React Native mobile app development ultimately depends on the project requirement, its scope, and end goals. For instance, Firebase suits perfectly when one has to develop real-time apps. Realm is great for almost every possible requirement, but comparatively, SQLite doesn’t provide the same level of performance, scalability, and security. Rather SQLite is good to go with when one requires to leverage the abilities of a relational database. So, the one that suits your requirements is the best choice for you.
To know more about our other core technologies, refer to links below
Angular app Development Company
Ionic App Development Company
Blockchain App Development
#React Native app Development Company#React Native app developers#React Native databases#React Native Development
1 note
·
View note
Text
Announcing Emby Server 4.0
At long last we're pleased to announce Emby Server 4.0. This new release will begin rolling out over the next 24 hours, so please be patient. This has been our longest release period ever, and going forward we intend to get back to a more frequent release schedule. This release is packed with improved performance, updates to existing features, as well as several brand new features. Important Upgrade Information After installing the update, the server will begin a database upgrade operation. If you attempt to open the web app during this time, you'll be given a friendly message informing you about this. This operation could take a little time, so please be patient with it. After this is complete, any plugins you may have installed will require updates, so please check the status of this on your server dashboard. If any plugins are updated, remember that Emby Server will need to be restarted. After all updates have been applied, we recommend that you run a library scan. The first scan following the update could take longer than usual, so please be patient. With that out of the way, let's go over the highlights of this release. No Telemetry or Anonymous Usage Reporting If you're wondering why the anonymous usage reporting setting has been removed, it's because not only have we removed the setting, but we've removed the function altogether. We know our audience pretty well thanks to this community, and because of that we've decided we no longed need any data reporting. New Emby Live TV Guide Data As previously announced, Live TV Guide Data is Now Included with Emby Premiere, if you're in the USA, Canada, or the UK. What does this mean? This means if you're in the USA, Canada or UK, you'll no longer need to setup an account with another website nor pay someone else for this data. You'll simply enter your zip code into Emby, select your channel lineup, and we'll handle retrieving your guide data. We believe this will provide a better experience for Emby users with fewer setup steps. The new data is also quite a bit richer, and we will be looking at how we can take advantage of that to bring new Live TV features to Emby. Going forward, Live TV will require Emby Premiere in the web app, where previously this was not the case. How to Migrate From Schedules Direct If you are setting up the server fresh, then you should use our new Emby guide provider, which will be the default. If you are already using Schedules Direct, then you can continue to use it through the remainder of your Schedules Direct subscription. Schedules Direct has pledged to continue to honor your subscriptions, and we thank them for that. New Levels of Performance A database re-structuring brings your Emby Server and apps to new levels of performance that were previously not possible. Screens will load faster, videos will start quicker, and more. This will also manifest itself in other areas, such as improved library scan performance, and faster live tv guide refreshes. Please Note: The first scan after the update may take quite a while depending on your library contents and exactly what features you have enabled. Please be patient as subsequent scans will be much faster. New and Improved Hardware Acceleration This has been rebuilt from the ground up and is better than ever. We now have sophisticated hardware detection that runs on server startup to determine what your system can support. This allows us to provide you with an "easy mode" setting: And if you enable advanced control, you'll be able to see what was detected: Our hardware transcoding has been rewritten to take better advantage of each of the major GPU platforms, whether it be QuickSync, Nvidia, DXVA, VAAPI, MediaCodec, or others. This will allow hardware transcoding performance to perform better than ever. Best of all, you can now monitor this on the server dashboard. The green bar indicates the current playback position while the orange bar designates the range that has been transcoded so far. Important: Hardware acceleration has been truly a major effort for us, and because of this, it will now require Emby Premiere on all platforms except for Nvidia Shield and Western Digital. Transcoding Throttling is Back This feature has returned after a two year hiatus and is better than ever. What is transcoding throttling? Sometimes your server can transcode content much quicker than you're actually watching it. When the transcoding process gets a big enough lead on your watching position, we can slow it down on the fly in order to reduce the load on your server. Then as you're watching, if we need to speed it back up, we can do that too. And best of all, your server dashboard will show you when transcoding is being throttled: Emby Server Now Available for Android and Nvidia Shield Stay tuned for separate announcements. Improved Search Search is now faster and now supports fuzzy search! This means you don't need to type your searches perfectly in order to see the matches you're looking for. For example, if you accidentally enter "Bad Breaking", instead of "Breaking Bad", you'll still be able to see Breaking Bad in the results. Multi-Resolution TV Shows Without requiring any changes to your file names, we now support having multiple versions of episodes. This doesn't require any special setup and you'll now see the friendly version selection on the episode screen: Revamped Grouping Into Collections This has now been moved from a server setting to directly onto the Movies list screen where it can be easily toggled. Expanded Filtering You can now filter on more fields such as container, video codec, audio codec, subtitle codec, and more. This filters are also remembered ! Expanded User Library Access User library access can now be controlled for sub-folders, providing you with even greater flexibility than before. Other Improvements * Update to .NET Core 2.2 * Update to Sqlite 3.26.0 * Improve library scan performance * Improve performance of live tv guide refresh * Improve subtitle delivery performance * Support Brotli http compression * Display video size on detail screens in Media Info * Significantly reduce dlna related network traffic * Add More Like This On Live TV section * Add tabbed layouts for music videos and home videos * Add network browsing to directory picker for Linux, Android and MacOS. * Change new indicators for programs to match guide data * Rework mobile context menus * Rework tv tabs to be consistent with Emby Theater * Downloaded subtitles are now saved using the two-character language code * Improve transcoding of low bit rate hevc * Add Moviedb season image provider * Show favorite people * Support tvg-chno with m3u tuners * Support tvg-shift with m3u tuners * Allow a library to be named "backdrops", a previously reserved name * Improve server dashboard display with blue radiance theme * Improve mobile server dashboard with bottom navigation * Added live tv channels to search feature * Improve layout of live tv channels tab under live tv * Add audio books content type * Use es-MX with MovieDb when Spanish language is selected along with Mexico as the country * Improve metadata with absolute episode ordering * Cloud sync upload improvements * Support launching android server on device startup * Add container, video codec, audio codec, and subtitle codec filters * Improve multi-resolution naming recognition * Improve automatic refreshing in the web app * Improve resiliency with iptv streams * Improve Windows sleep prevention while server is being used * Improve Chromecast volume control * Improve xmltv parsing of European characters * Support multiple images with xmltv * Use transcode=none profile for HD Homerun when appropriate * Support splitting musicbrainz id's on both slashes and semi-colons * Make alpha pickers dynamic based on content * Improve identify feature * Improve manual refreshing when replacing existing images * Improve database cleanup procedures of removed content * Improve automatic refreshing of recordings * Restore user permission to change password and profile image * Prevent syncing of in-progress recordings * Improve authentication failure logging for Fail2ban support * Add API to find item by provider id * Update new user defaults to not allow deleting media * Make news notifications configurable * Reduce size of Windows and MacOS installers by 30 MB * Support user subtitle download permissions * Defer collage image generation until images are needed * Move AudioDb and Omdb to pre-installed plugins * Move fanart.tv to pre-installed plugin * Move MusicBrainz to pre-installed plugin * Move MovieDb metadata provider to pre-installed plugin * Move nfo saver to pre-installed plugin * Move tvdb to pre-installed plugin * Support per-library resume settings Bug Fixes * Fix issue of changing password in Firefox when Firefox password manager is used * Fix repeated Visual Studio C++ install prompts when VS2017 is already present * Fix favorite artists page showing empty list * Fix search by accent characters * Fix web access by ipv6 ip address * Fix More Like This for artists always showing same content * Fix xmltv programs not being marked as new when they are also a Premiere * Fix recording image file names for shows containing a period in the name * Workaround .net core crashes on network availability changes * Fix collection and playlist separation per library * Fix hardware transcoding options being reverted to defaults * Fix cloud sync upload throttle not being applied * Fix xmltv failures with SMB paths * Fix audio books getting immediately marked as watched * Fix intermittent crash associated with log file rotation * Fix windows task scheduler entries not getting cleaned up * Fix typo in Exynos spelling * Fix remote URL showing with remote access disabled * Various DLNA bug fixes http://dlvr.it/QwgNpv
2 notes
·
View notes
Text
Redhat webdav client

#REDHAT WEBDAV CLIENT PDF#
#REDHAT WEBDAV CLIENT INSTALL#
#REDHAT WEBDAV CLIENT FOR ANDROID#
#REDHAT WEBDAV CLIENT SOFTWARE#
#REDHAT WEBDAV CLIENT LICENSE#
#REDHAT WEBDAV CLIENT INSTALL#
Read More: Install Seafile Secure Cloud Storage in Linux 4. Other features of Seafile which have made it common in many universities like University Mainz, University HU Berlin, and University Strasbourg and also among other thousands of people worldwide are online file editing, differential sync to minimize the bandwidth required, client-side encryption to secure client data. Its main features are syncing and sharing with the main focus on data safety. Since it got open sourced in July 2012, it started gaining international attention.
#REDHAT WEBDAV CLIENT LICENSE#
Along with a community edition released under General Public License, it also has a professional edition released under a commercial license that provides extra features not supported in community edition i.e. Seafile provides desktop clients for Windows, Linux, and OS X and mobile clients for Android, iOS and Windows Phone. It is written in C, Python with the latest stable release being 7.0.2.
#REDHAT WEBDAV CLIENT SOFTWARE#
Seafile is another file hosting software system that exploits open source property to avail its users with all advantages they expect from a good cloud storage software system. Nextcloud File Share and Collaboration Platform 3. The functionality is similar to the Dropbox, but it offers on-premises file storage hosting with strong security, compliance, and flexibility in synchronization and sharing solution to the server that you control. With Nextcloud you can share multiple files and folders on your system and sync them with your nextcloud server. The software is available for everyone from the individual to large enterprises to install and operate the application by their private server device. Nextcloud is an open-source suite of client-server applications for creating and using file hosting services. Read More: Install OwnCloud to Create Personal Cloud Storage in Linux 2. 10 adds on other new features including improved design, allows admin to notify users and set retention limits on files in the trash.
#REDHAT WEBDAV CLIENT PDF#
Provides a large number of features countable of which include: File storage and encryption, Music Streaming, content sharing across URLs, Mozilla sync hosting and RSS/Atom feed reader, one-click app installation, Video, and PDF viewer and many more. OwnCloud employs WebDav server for remote access and can integrate with a large number of Databases including SQLite, MariaDB, MySQL, Oracle Database, PostgreSQL.
#REDHAT WEBDAV CLIENT FOR ANDROID#
It is written in PHP, JavaScript and available for Windows, Linux, OS X desktops and even successfully provides mobile clients for Android and iOS. The project started in January 2010 with the aim to provide open source replacement for proprietary cloud storage service providers. Its open-source functionality provides users with access to an unlimited amount of storage space. OwnCloudĪ Dropbox replacement for Linux users, giving many functionalities which are similar to that of DropBox, ownCloud is a self-hosted file sync and share server. In this article, we will present some of the selected contributions for this concern which are open source and successfully being accepted by huge masses and big organizations. Whereas this field is under active development and will be because of potential threats including loss of data or information, data hacking or masquerading and other attacks, many organizations have come forward with their own solutions to Cloud Storage and Data Privacy which is strengthening and stabilizing its future. At its earliest, CompuServe in 1983 offered its customers 128k of disk space which could be used to store files. Cloud StorageĬloud Storage means storage of data away from users’ local systems and across the span of dedicated servers which are meant for this. Mainly, three types of Services come associated with Cloud which are: SaaS ( Software as a Service) for allowing users to access other publically available clouds of large organizations for storing their data like Gmail, PaaS ( Platform as a Service) for hosting of apps or software on Others public cloud ex: Google App Engine which hosts apps of users, IaaS ( Infrastructure as a Service) for virtualizing any physical machine and availing it to customers to make them get feel of a real machine. Nowadays, Cloud computing is used by small as well as large organizations for data storage or providing customers with its advantages which are listed above. Going by the name, in a technical field, Cloud is something that is virtual and provides services to end-users in the form of storage, hosting of apps or virtualizing any physical space. The cloud by the name indicates something which is very huge and present over a large area.
0 notes
Photo

Create an Offline-first React Native App Using WatermelonDB
React Native has different database storage mechanisms for different mobile app purposes. Simple structures — such as user settings, app settings, and other key-value pair data — can be handled easily using async storage or secure storage.
Other applications — such as Twitter clones — fetch data from the server and directly show it to the user. They maintain a cache of data, and if a user needs to interact with any document, they call the APIs directly.
So not all the applications require a database.
When We Need a Database
Applications such as the Nozbe (a to-do app), Expense (a tracker), and SplitWise (for in-app purchases), need to work offline. And to do so, they need a way to store data locally and sync it up with the server. This type of application is called an offline first app. Over time, these apps collect a lot of data, and it becomes harder to manage that data directly — so a database is needed to manage it efficiently.
Options in React Native
When developing an app, choose the database that best fits your requirements. If two options are available, then go with the one that has better documentation and quicker response to issues. Below are some of the best known options available for React Native:
WatermelonDB: an open-source reactive database that can be used with any underlying database. By default, it uses SQLite as the underlying database in React Native.
SQLite (React Native, Expo): the oldest, most used, battle-tested and well-known solution. It’s available for most of the platforms, so if you’ve developed an application in another mobile app development framework, you might already be familiar with it.
Realm (React Native): an open-source solution, but it also has an enterprise edition with lots of other features. They have done a great job and many well-known companies use it.
FireBase (React Native, Expo): a Google service specifically for the mobile development platform. It offers lots of functionality, storage being just one of them. But it does require you to stay within their ecosystem to utilize it.
RxDB: a real-time database for the Web. It has good documentation, a good rating on GitHub (> 9K stars), and is also reactive.
Prerequisites
I assume you have knowledge about basic React Native and its build process. We’re going to use react-native-cli to create our application.
I’d also suggest setting up an Android or iOS development environment while setting up the project, as you may face many issues, and the first step in debugging is keeping the IDE (Android Studio or Xcode) opened to see the logs.
Note: you can check out the official guide for installing dependencies here for more information. As the official guidelines are very concise and clear, we won’t be covering that topic here.
To set up a virtual device or physical device, follow these guides:
using a physical device
using a virtual device
Note: there’s a more JavaScript-friendly toolchain named Expo. The React Native community has also started promoting it, but I haven’t come across a large-scale, production-ready application that uses Expo yet, and Expo port isn’t currently available for those using a database such as Realm — or in our case, WatermelonDB.
App Requirements
We’ll create a movie search application with a title, poster image, genre, and release date. Each movie will have many reviews.
The application will have three screens.
Home will show two buttons — one to generate dummy records, and a second to add new movie. Below it, there will be one search input that can be used to query movie titles from the database. It will show the list of movies below the search bar. If any name is searched, the list will only show the searched movies.
Clicking on any movie will open a Movie Dashboard, from where all its reviews can be checked. A movie can be edited or deleted, or a new review can be added from this screen.
The third screen will be Movie Form, which is used to create/update a movie.
The source code is available on GitHub.
Why We Chose WatermelonDB (features)
We need to create an offline-first application, so a database is a must.
Features of WatermelonDB
Let’s look at some of the features of WatermelonDB.
Fully observable A great feature of WatermelonDB is its reactive nature. Any object can be observed using observables, and it will automatically rerender our components whenever the data changes. We don’t have to make any extra efforts to use WatermelonDB. We wrap the simple React components and enhance them to make them reactive. In my experience, it just works seamlessly, and we don’t have to care about anything else. We make the changes in the object and our job’s done! It’s persisted and updated at all the places in the application.
SQLite under the hood for React Native In a modern browser, just-in-time compilation is used to improve speed, but it’s not available in mobile devices. Also, the hardware in mobile devices is slower than in computers. Due to all these factors, JavaScript apps run slower in a mobile application. To overcome this, WatermelonDB doesn’t fetch anything until it’s needed. It uses lazy loading and SQLite as an underlying database on a separate thread to provide a fast response.
Sync primitives and sync adapter Although WatermelonDB is just a local database, it also provides sync primitives and sync adapters. It makes it pretty easy to use with any of our own back-end databases. We just need to conform to the WatermelonDB sync protocol on the back end and provide the endpoints.
Further features include:
Statically typed using Flow
Available for all platforms
Dev Env and WatermelonDB Setup (v0.0)
We’re going to use react-native-cli to create our application.
Note: you may be able to use it with ExpoKit or Ejecting from Expo.
If you want to skip this part then clone the source repo and checkout the v0.0 branch.
Start a new project:
react-native init MovieDirectory cd MovieDirectory
Install dependencies:
npm i @nozbe/watermelondb @nozbe/with-observables react-navigation react-native-gesture-handler react-native-fullwidth-image native-base rambdax
Below is the list of installed dependencies and their uses:
native-base: a UI library that will be used for look and feel of our app.
react-native-fullwidth-image: for showing full-screen responsive images. (Sometimes it can be a pain to calculate the width, height and also maintain aspect ratio. So it’s better to use an existing community solution.)
@nozbe/watermelondb: the database we’ll be using.
@nozbe/with-observables: contains the decorators (@) that will be used in our models.
react-navigation: used for Managing routes/screens
react-native-gesture-handler: the dependency for react-navigation.
rambdax: used to generate a random number while creating dummy data.
Open your package.json and replace the scripts with the following code:
"scripts": { "start": "node node_modules/react-native/local-cli/cli.js start", "start:ios": "react-native run-ios", "start:android": "react-native run-android", "test": "jest" }
This will be used to run our application in the respective device.
Set Up WatermelonDB
We need to add a Babel plugin to convert our decorators, so install it as a dev dependency:
npm install -D @babel/plugin-proposal-decorators
Create a new file .babelrc in the root of the project:
// .babelrc { "presets": ["module:metro-react-native-babel-preset"], "plugins": [["@babel/plugin-proposal-decorators", { "legacy": true }]] }
Now use the following guides for your target environment:
iOS
Android
Open the android folder in Android Studio and sync the project. Otherwise, it will give you an error when running the application for the first time. Do the same if you’re targeting iOS.
Before we run the application, we need to link the react-native-gesture handler package, a dependency of react-navigation, and react-native-vector-icons, a dependency of native-base. By default, to keep the binary size of the application small, React Native doesn’t contain all the code to support native features. So whenever we need to use a particular feature, we can use the link command to add the native dependencies. So let’s link our dependencies:
react-native link react-native-gesture-handler react-native link react-native-vector-icons
Run the application:
npm run start:android # or npm run start:ios
If you get an error for missing dependencies, run npm i.
The code up to here is available under the v0.0 branch.
Tutorial
As we’ll be creating a database application, a lot of the code will be back-end only, and we won’t be able to see much on the front end. It might seem a long, but have patience and follow the tutorial till the end. You won’t regret it!
The WatermelonDB workflow can be categorized into three main parts:
Schema: used to define the database table schema.
Models: the ORM mapped object. We’ll interact with these throughout our application.
Actions: used to perform various CRUD operations on our object/row. We can directly perform an action using a database object or we can define functions in our model to perform these actions. Defining them in models is the better practice, and we’re going to use that only.
Let’s get started with our application.
Initialize DB Schema and WatermelonDB (v0.1)
We’ll define our schema, models and database object in our application. We won’t able to see much in the application, but this is the most important step. Here we’ll check that our application works correctly after defining everything. If anything goes wrong, it will be easy to debug it at this stage.
Project Structure
Create a new src folder in the root. This will be the root folder for all of our React Native code. The models folder is used for all of our database-related files. It will behave as our DAO (Data Access Object) folder. This is a term used for an interface to some type of database or other persistence mechanism. The components folder will have all of our React components. The screens folder will have all the screens of our application.
mkdir src && cd src mkdir models mkdir components mkdir screens
Schema
Go to the models folder, create a new file schema.js, and use the following code:
// schema.js import { appSchema, tableSchema } from "@nozbe/watermelondb"; export const mySchema = appSchema({ version: 2, tables: [ tableSchema({ name: "movies", columns: [ { name: "title", type: "string" }, { name: "poster_image", type: "string" }, { name: "genre", type: "string" }, { name: "description", type: "string" }, { name: "release_date_at", type: "number" } ] }), tableSchema({ name: "reviews", columns: [ { name: "body", type: "string" }, { name: "movie_id", type: "string", isIndexed: true } ] }) ] });
We’ve defined two tables — one for movies, and another for its reviews. The code itself self-explanatory. Both tables have related columns.
Note that, as per WatermelonDB’s naming convention, all the IDs end with an _id suffix, and the date field ends with the _at suffix.
isIndexed is used to add an index to a column. Indexing makes querying by a column faster, at the slight expense of create/update speed and database size. We’ll be querying all the reviews by movie_id, so we should mark it as indexed. If you want to make frequent queries on any boolean column, you should index it as well. However, you should never index date (_at) columns.
Models
Create a new file models/Movie.js and paste in this code:
// models/Movie.js import { Model } from "@nozbe/watermelondb"; import { field, date, children } from "@nozbe/watermelondb/decorators"; export default class Movie extends Model { static table = "movies"; static associations = { reviews: { type: "has_many", foreignKey: "movie_id" } }; @field("title") title; @field("poster_image") posterImage; @field("genre") genre; @field("description") description; @date("release_date_at") releaseDateAt; @children("reviews") reviews; }
Here we’ve mapped each column of the movies table with each variable. Note how we’ve mapped reviews with a movie. We’ve defined it in associations and also used @children instead of @field. Each review will have a movie_id foreign key. These review foreign key values are matched with id in the movie table to link the reviews model to the movie model.
For date also, we need to use the @date decorator so that WatermelonDB will give us the Date object instead of a simple number.
Now create a new file models/Review.js. This will be used to map each review of a movie.
// models/Review.js import { Model } from "@nozbe/watermelondb"; import { field, relation } from "@nozbe/watermelondb/decorators"; export default class Review extends Model { static table = "reviews"; static associations = { movie: { type: "belongs_to", key: "movie_id" } }; @field("body") body; @relation("movies", "movie_id") movie; }
We have created all of our required models. We can directly use them to initialize our database, but if we want to add a new model, we again have to make a change where we initialize the database. So to overcome this, create a new file models/index.js and add the following code:
// models/index.js import Movie from "./Movie"; import Review from "./Review"; export const dbModels = [Movie, Review];
Thus we only have to make changes in our models folder. This makes our DAO folder more organized.
Initialize the Database
Now to use our schema and models to initialize our database, open index.js, which should be in the root of our application. Add the code below:
// index.js import { AppRegistry } from "react-native"; import App from "./App"; import { name as appName } from "./app.json"; import { Database } from "@nozbe/watermelondb"; import SQLiteAdapter from "@nozbe/watermelondb/adapters/sqlite"; import { mySchema } from "./src/models/schema"; import { dbModels } from "./src/models/index.js"; // First, create the adapter to the underlying database: const adapter = new SQLiteAdapter({ dbName: "WatermelonDemo", schema: mySchema }); // Then, make a Watermelon database from it! const database = new Database({ adapter, modelClasses: dbModels }); AppRegistry.registerComponent(appName, () => App);
We create an adapter using our schema for the underlying database. Then we pass this adapter and our dbModels to create a new database instance.
It’s better at this point in time to check whether our application is working fine or not. So run your application and check:
npm run start:android # or npm run start:ios
We haven’t made any changes in the UI, so the screen will look similar to before if everything worked out.
All the code up to this part is under the v0.1 branch.
The post Create an Offline-first React Native App Using WatermelonDB appeared first on SitePoint.
by Dhanraj Acharya via SitePoint https://ift.tt/2A9F95X
0 notes
Text
10 Interesting JavaScript and CSS libraries for October 2018
Our mission at Tutorialzine is to keep you up to date with the latest and coolest trends in web development. That’s why every month we release a handpicked collection of some of the best resources that we’ve stumbled upon and deemed worthy of your attention.

This is a next-gen database for building powerful React and React Native apps. It is extremely fast, highly scalable - from hundreds to tens of thousands of records. In Watermelon everything is lazy loaded, only load the data you need. It is built on rock-solid SQLite foundation and supports both iOS and Android.

This is a lightweight framework for building static and server-rendered applications with JavaScript and React. It comes with automatic code splitting for quickly page loading, simple client-side routing and built-in CSS support. Next.js is mobile friendly and can be customized with plugins.

GrapesJS is an open-source web builder framework for creating beautiful templates without writing any code. It offers a large number of features that help you to build you templates faster and easier like drag and drop blocks, limitless styling, asset manager and a lot more.

A modern JavaScript library for manipulating dates in browser and Node.js. It is highly modular and works well with webpack, Browserify and Rollup, and supports Flow and TypeScript. The library is really tiny, efficient and easy to use, with detailed documentation and examples.

This is an amazingly quick and lightweight GraphQL server that gives you instant, realtime GraphQL APIs over Postgres. It offers powerful queries for single and multiple objects, event-triggers on database changes and dynamic access control.

Tiptap is a renderless rich-text editor for Vue.js. It is highly extensible and there are multiple packages and extensions for importing new functionalities like adding links, images, ToDo lists, placeholders, code highlighting and many more. You can also export your data as HTML or json.

This is a modern open-source Content Management Framework for building secure and performant API with no effort. It comes with an elegant and fully customizable and extensible admin panel. Strapi is built on top of Node.js which makes it really efficient, and can be used with any front-end framework.

A modern static site generator built with Node.js and based on Webpack. It is open-source, offers high-speed performance and works with Vue.js, React and every modern frontend framework. It allows you to generate pages from Markdown, Pug, EJS or any other node-compiled markup language and upload them to the server via FTP or SFTP.

Sqorn is a JavaScript library for building SQL queries. It allows you to build complex queries and chain, extend and embed them to create more complex ones. It provides concise syntax for common CRUD operations and is extremely fast. It generates parameterized queries for preventing SQL injection.

This is a modern, open-source wiki app built on Node.js, Git and Markdown. It comes with a built-in editor which allows you to write your content in Markdown format that is automatically synced with your Git repository. The app has an integrated access control and assets manager and is really lightweight and designed to work with low CPU resources.
Bootstrap Studio
The revolutionary web design tool for creating responsive websites and apps.
Learn more
0 notes
Text
Local Database in React Native Application
In this post we are going to learn how to work with Local Database in React Native Application. More and more mobile applications need data to work, and databases have for quite a while been the most common way of storing and managing data. So, in some scenario, a mobile application uses a database that is hosted in the cloud, and connects remotely to it in order to access its data. This of course implies that, in order to be responsive, a mobile application needs an active and quite fast network connection. As a Mobile Application developer, we always search for a Local Database. A database which offers offline synchronization, reliable performance, security, and better integration with other stacks.
Why use a mobile app database? There are some advantages associated with using a mobile database:
full offline modes for apps that depend on stored data.
frugal on bandwidth for apps that depend on stored data.
stable and predictable performance independent from network availability.
personal data can be stored with the user, where some say they belong.
Lightweight as storage is limited on mobile devices.
No server requirement.
In a form of library with no or very limited dependency (embeddable) so that it can be used when needed.
Fast and secure.
Easy to handle through code, and option to make it private or shared with other applications.
Low memory and power consumption.
Most Popular Databases for Mobile Apps
There are lots of mobile databases coming into the market but not all of them satisfy all requirements mentioned in this article. Let us discuss few of the most popular databases for mobile apps and try to highlight their characteristics and feature.
1. Realm
Nowadays we have a lot of options when deciding to choose a database solution. We have different attractive options each of which has it's strengths and weaknesses. One I have found to be outstanding is Realm database. Realm database can be used by Android, IOS, React and even Xamarin developers.
When Realm was launched in 2014, the goal was to help mobile developers build better apps faster by giving them a robust alternative to SQLite and Core Data. The Realm Mobile Database is a cross-platform database solution that can be used as an alternative to SQLite and Core Data. Compared to these two options, Realm is easier to set up and use. To perform the same operation in Realm, you usually end up writing fewer lines of code than you would with SQLite or Core Data. On performance, Realm is said to be faster and it also offers other modern features such as encryption, JSON support and data change notifications. Advantages of Realm over SQLite:
easy to use
faster than SQLite (up to 10x speed up over raw SQLite for normal operations)
object conversion handled for you
very responsive team
Cross-platform support.
convenient for creating and storing data on the fly.
Click here to read more about react native mobile database
2. Firebase
Firebase Realtime database is a cloud hosted database that supports multiple platforms Android, iOS and Web. All the data is stored in JSON format and any changes in data, reflects immediately by performing a sync across all the platforms & devices. This allows us to build more flexible realtime apps easily with minimal effort.Store and sync data with our NoSQL cloud database. Data is synced across all clients in realtime and remains available when your app goes offline.
The Firebase Real-time Database is a cloud-hosted database. Data is stored as JSON and synchronized in real-time to every connected client. When you build cross-platform apps with our iOS, Android, and JavaScript SDKs, all of your clients share one Real-time Database instance and automatically receive updates with the newest data.
3. ORMLite
ORMLite is lighter version of Object Relational Mapping which provide some simple functionality for persisting java objects to SQL databases. It is ORM wrapper over any mobile SQL related DB. ORMLite is used to simplify complicated SQL operations by providing flexible query builder. It also provides powerful abstract Database Access Object (DAO) classes. ORMLite is helpful in big size applications with complex queries because it handles "compiled" SQL statements for repetitive query tasks. It also has support for configuring of tables and fields without annotations and supports native calls to Android SQLite database APIs. But ORMLite does not fulfil all the requirements, like it is bulky as compared to SQLite or Realm, slower than SQLite and Realm but faster than most of the other ORMs present in market. All in all ORMLite is a good SQLite replacement if application is big and complex in terms of DB usage.
4. Berkeley DB
Berkeley DB is an open source high performance embedded DB that allow us to handle data in different ways. It was developed by Sleepycat Software but acquired by Oracle in 2006. It provides API for so many languages including Android and iOS. Berkeley DB can handle data in many ways. It can be in relational way like SQLite (by replacing SQLite with its own library), or it can be in Key/Value pair data as byte arrays and supports multiple data items for a single key. It also supports java objects as data or it can also be XML documents. Different libraries provides different types of API to handle multiple formats but all packaged Berkeley DB.
Berkeley can work as relational DB as well as NoSQL DB (Depends on which library you are using). Good thing about Berkeley DB is that the API provided by it are compatible with SQLite. So one can use Berkeley DB without rewriting whole code again. Combination of Berkeley and SQLite is considered faster and perform better in concurrent and single writing multiple reading operations. Berkeley is relatively faster than SQLite but because of so many different features it is bulkier than any other discussed DBs. So if Size of the application is a criteria try to use some other DB, unless you want a feature exclusively provided by Berkeley DB.
5. SQLite
SQLite is relational DB, a lighter version of SQL designed for mobile. It is an in-process library that implements a self-contained, serverless, zero-configuration, transactional SQL database engine. It is an embedded SQL Database engine without any separate server process, unlike any other SQL database.
SQLite supports all the relational databases features and is open source compact library which is by default present in two main Mobile OS i.e. Android and iOS, and supported by blackberry and Windows phone.
SQLite can be stored both on disk as well as in memory and each database file is a single disk file and can be used cross-platform. It is very fast and need very less memory to operate.
6. PouchDB
PouchDB is an open-source JavaScript database inspired by Apache CouchDB which is designed to run well within the browser.If you want to use the Local Database in you React Native app then you should know the different factors about them so that you can decide which database is best suitable for your application. Factors while selecting a database for your app:
Offline-first.
Database security.
Read/Write Speed.
Industry regulations.
Supported data types.
Pricing.
Real-time sync.
This is all about Local Database in React Native Application. Thank you for reading this article, and if you have any problem, have a another better useful solution about this article, please write message in the comment section.
via Blogger http://bit.ly/2P58Uv8
0 notes
Text
Android application linked with server dissertation sample How to connect Android to a database server - Stack Overflow
Android application linked with server dissertation sample. You should either use web services or implement an HTTP handler and transfer in a RESTful manner. In order to connect to a MySQL server, you need a MySQL client. Android does not come with any MySQL libraries. You may be able to take a generic Java MySQL library and fudge it to work with Android, but that would be a big undertaking and wasted time. The link you pointed to already told you that what you're trying to do is wrong in the first place. Don't connect to a database across the internet! You will need something on your server that responds to HTTP requests, looks up data in the database, and sends them back via HTTP. The link already mentioned a few options. You could even write something yourself, although it's most likely easier to use an existing solution than trying to make your own approach safe and hack-proof. I tried to connect DatabaseServer from an Android Application,initially i faced some issue while i was using jtds, jar package for database Driver Support, instead of using jtds jar file use mysql-Connector jar file for Database Driver Support. I hope it could work. Cheers Rajesh P Yadav. I'm a fan of Offline First, meaning your app should be usable without a connection. To facilitate this, I would recommend using a SQLite local database, and syncing to a remote database when online. You can use a tool like SymmetricDS or Daffodil Replicator to sync your local and remote databases over HTTP(S). You won't be able to connect directly to a MySQL database with the HttpClient, as the MySQL database doesn't operate on that protocol. The second part of the answer to the question you linked recommends going with web services and consuming those to communicate with the database server.... View more ...
0 notes
Text
Announcing the Advanced Swift Spring Fling!
It’s Spring once again, which means it’s time to take a fresh look at your bookshelf and grow your tutorial library!
To help you do this, we’re releasing three new books:
Realm: Building Modern Swift Apps with Realm Database: The perfect introduction to Realm Database and Realm Platform. Learn how to set up your first Realm database, see how to persist and read data, find out how to perform migrations and more.
Data Structures and Algorithms in Swift: Learn how to implement the most popular and useful data structures, and when and why you should use one particular data structure or algorithm over another.
Design Patterns by Tutorials: Explore the usefulness of design patterns, moving from the basic building blocks of patterns into more advanced patterns and completes the lesson with less common but incredibly useful patterns.
To celebrate these three books, we’re running a special event over the next two weeks: the Advanced Swift Spring Fling, where you can get all three books at a massive discount.
Over the next two weeks, we’ll be releasing some free chapters from our three new books so you can get a taste of what’s in store. We’re also running a giveaway where a few lucky readers can win themselves a copy of one of our new books!
And in keeping with the spirit of Spring, we’re running a time-limited sale to help you save some green:
Save a massive 40% over the regular price when you buy the three new books in our Advanced Swift Spring Bundle — that’s all three books for just $99.99!
Want to buy select books from the bundle? No problem. Save 10% on each of the new books when you buy them separately — that’s $49.49 each.
Here’s a quick overview of what’s in each book:
Data Structures and Algorithms in Swift
Learn how to implement the most common and useful data structures and algorithms in Swift!
Understanding how data structures and algorithms work in code is crucial for creating efficient and scalable apps. Swift’s Standard Library has a small set of general purpose collection types, yet they definitely don’t cover every case!
In Data Structures and Algorithms in Swift, you’ll learn how to implement the most popular and useful data structures and when and why you should use one particular datastructure or algorithm over another. This set of basic data structures and algorithms will serve as an excellent foundation for building more complex and special-purpose constructs. As well, the high-level expressiveness of Swift makes it an ideal choice for learning these core concepts without sacrificing performance.
You’ll start with the fundamental structures of linked lists, queues and stacks, and see how to implement them in a highly Swift-like way.
Move on to working with various types of trees, including general purpose trees, binary trees, AVL trees, binary search trees and tries.
Go beyond bubble and insertion sort with better-performing algorithms, including mergesort, radix sort, heap sort and quicksort.
Learn how to construct directed, non-directed and weighted graphs to represent many real-world models, and traverse graphs and trees efficiently with breadth-first, depth-first, Dijkstra’s and Prim’s algorithms to solve problems such as finding the shortest path or lowest cost in a network.
And much, much more!
By the end of this book, you’ll have hands-on experience solving common issues with data structures and algorithms — and you’ll be well on your way to developing your own efficient and useful implementations.
This book is in early access; the complete digital edition will be released in Late Spring 2018.
We’ll be releasing two free chapters from this book this week on Wednesday and Friday to help give you a taste of what’s inside.
“Whether you want to ace your next coding interview, or use Swift successfully in competitions on HackerRank, or want to make sure your Swift code is well designed and scalable, this is the right book for you. The authors explain data structures and algorithms with diagrams and examples and explain the Swift code implementation step by step.” – Christina Bharara
About the Authors
Kelvin Lau is a physicist turned Swift-iOS Developer. While he’s currently entrenched with iOS development, he often reminisces of his aspirations to be part of the efforts in space exploration. Outside of programming work, he’s an aspiring entrepreneur and musician. You can find him on Twitter: @kelvinlauKL.
Vincent Ngo is a software developer by day, and an iOS-Swift enthusiast by night. He believes that sharing knowledge is the best way to learn and grow as a developer. Vincent starts every morning with a homemade green smoothie in hand to fuel his day. When he is not in front of a computer, Vincent is training to play in small golf tournaments, doing headstands at various locations while on a hiking adventure, or looking up how to make tamago egg. You can find him on Twitter: @vincentngo2.
Realm: Building Modern Swift Apps with Realm Database
Create powerful, reactive iOS apps with Realm Database and Realm Cloud!
Realm finds the sweet spot between the simplicity of storing data as JSON on disk and using heavy, slow ORMs like Core Data or similar that are built on top of SQLite. The Realm Database aims to be fast, performant and provide the commodities that mobile developers need such as working with objects, type-safety, and native notifications.
Realm Database has been under active development for several years. It powers apps by some of the biggest names in the App Store, including Adidas, Amazon, Nike, Starbucks, BBC, GoPro, Virgin, Cisco, Groupon and many more who have chosen to develop their mobile apps with Realm.
Realm Platform is a relatively new commercial product which allows developers to automatically synchronize data not only across Apple devices but also between any combination of Android, iPhone, Windows, or macOS apps. Realm Platform allows you to run the server software on your own infrastructure and keep your data in-house which more often suits large enterprises. Alternatively you can use Realm Cloud which runs a Platform for you and you start syncing data very quickly and only pay for what you use.
In this book, you’ll do the following:
Learn how easy it is to set up your first Realm database.
See how to persist and read data under the CRUD model.
Discover how to work with Realm configurations.
Design smart and responsive migrations for your Realms.
Create a Realm Cloud instance and sync your data in real time, across all devices, anywhere.
We’ll be releasing a free chapter from this book on Monday, April 23, to help you get started with Realm Database and see what the book’s all about!
“I enjoyed the book [Realm: Building Modern Swift Apps with Realm Database] and learned much from it. The book shed light on a long time mystery. Despite the fact we previously worked with Realm never before it was so accessible and easy to understand. Book is full with down-to-earth, to-the-core, beautiful explanation, diagrams and code samples. Great to dive in to and great to keep at your desk for easy reference.” – Michal Shatz
About the Author
Marin Todorov is the author of this book. Marin is one of the founding members of the raywenderlich.com team and has worked on seven of the team’s books. Besides crafting code, Marin also enjoys blogging, teaching, and speaking at conferences. He happily open-sources code. You can find out more about Marin at www.underplot.com.
Design Patterns by Tutorials
Learn design patterns with Swift!
Design patterns are incredibly useful, no matter what language or platform you develop for. Using the right pattern for the right job can save you time, create less maintenance work for your team and ultimately let you create more great things with less effort.
Every developer should absolutely know about design patterns and how and when to apply them. That’s what you’re going to learn in this book!
Start with the basic building blocks of patterns such as MVC, Delegate and Strategy.
Move into more advanced patterns such as the Factory, Prototype and Multicast Delegate pattern.
Finish off with some less-common but still incredibly useful patterns including Flyweight, Command and Chain of Responsibility.
And not only does Design Patterns by Tutorials cover each pattern in theory, but you’ll also work to incorporate each pattern in a real-world app that’s included with each chapter. Learn by doing, in the step-by-step fashion you’ve come to expect in the other books in our by Tutorials series.
This book is in early access; the complete digital edition will be released in Late Spring 2018.
We’ll be releasing a free chapter from this book on Wednesday, April 25, to help you discover what the book has in store for you!
“The book all iOS and macOS developers have all been waiting for: Design Patterns by Tutorials is the best of the wisdom of that gang of four written in Swift. Need a singleton that’s ready to try in a playground, along with clear guidance about how to use it and not misuse it? This is your essential guide.” – Mark W. Powell
About the Authors
Joshua Greene is an experienced iOS developer who loves creating elegant apps. When he’s not slinging code, he enjoys martial arts, Netflix and spending time with his wonderful wife and two daughters. You can reach him on Twitter at @jrg_developer.
Jay Strawn is a former librarian and is passionate about languages both human and code based. When she’s not working as a developer, Jay enjoys being an ESL conversation partner and reading zines.
Advanced Swift Spring Bundle
To celebrate the launch of our new advanced Swift books, we’re offering a special bundle where you can get all three books at a massive discount!
Our new Advanced Swift Spring Bundle includes all three books in PDF/ePub format, with all source code included:
Realm: Building Modern Swift Apps with Realm Database
Data Structures and Algorithms in Swift
Design Patterns by Tutorials
That’s a $164.97 value — but you can get all three books for just $99.99 in the Advanced Swift Spring Bundle! But don’t wait: this bundle deal is only good until Friday, April 27.
Advanced Swift Spring Fling Giveaway
To celebrate the Spring Fling, we’re giving away three Advanced Swift Spring Bundles to some lucky readers!
To enter the giveaway, simply leave a comment below and answer the following question:
What are you most excited about in our new book lineup?
We’ll select three winners at random who leave a comment below before Friday, April 27. Get your entries in early!
Where to Go From Here?
To recap, here’s the schedule of events for the Advanced Swift Spring Fling:
April 16: Design Patterns, Data Structures, and Realm books launched
April 18: Free chapter from Data Structures and Algorithms in Swift
April 20: Swift Algorithm Club post
April 23: Free chapter from Realm: Building Modern Swift Apps with Realm Database
April 25: Free chapter from Design Patterns by Tutorials
April 27: Giveaway and Last Day for Discount!
If you are comfortable with Swift and iOS development and want to take your development skills to the next level, there’s no better way to do that than through the Advanced Swift Spring Bundle.
Don’t miss out on your chance to grab this bundle of three books for just $99.99 — that’s a massive savings of 40% off of the regular price! This bundle pricing is only available until Friday, April 27, 2018, so grab this great discount while you can.
We truly appreciate the support of all our readers; you help make everything we do here at raywenderlich.com possible. Thanks for your support — and don’t forget to leave a comment below to enter the giveaway!
The post Announcing the Advanced Swift Spring Fling! appeared first on Ray Wenderlich.
Announcing the Advanced Swift Spring Fling! published first on https://medium.com/@koresol
0 notes
Photo

A SQLite primer for Android app developers Sometimes, you need to store more complex data in your app than just simple key/value pairs saved with a text file or Shared Preferences. Databases are ideal for storing complex data structures and are particularly suited to storing records, where each block of data stored uses the same fields, formatted in the same manner. This works like a table or an Excel spreadsheet, and, like Excel, it allows for much more dynamic manipulation and logical organization of data. It’s thanks to databases that many machine-learning and big data applications are possible. Databases also make everyday tools like Facebook possible. As a result it’s a skill in high demand. Programmers will eventually need to learn to use databases This is why programmers will eventually need to learn to use databases. That way, your data will be organized and you’ll have no difficulty retrieving passwords, user data or whatever other information you need. And this also happens to be a great way to store data on an Android device as well. To do all this, we’ll be using SQLite. Introducing SQLite SQL databases are relational databases where data is stored in tables. The Structured Query Language (SQL) is the declarative language used to query those databases so that you can add, remove and edit data. For more on SQL itself, check out this article. SQLite is an implementation of a relational database, specifically aimed for embedded scenarios. It’s ideal for the likes of an Android app. The easiest way to imagine a relational database is to think of it as a series of tables. What’s cool is SQLite doesn’t require a dedicated relational database management system (RDBMS)— it is used directly from your code, rather than via a server or external resource. Your data is saved into a file locally on your device, making it a powerful and surprisingly easy way to store persistent data on Android. SQLite is open-source, easy to use, portable, and highly cross-compatible. There’s no need to install anything additional if you want to start using SQLite in Android Studio. Android provides the classes which you can use to handle your database. Android developers can use the SQLiteOpenHelper to use SQL commands. That’s what we’ll be looking at in this post. In the next few sections, you’ll learn create a table this way and in the process, you’ll hopefully start to feel comfortable with SQLite, SQL, and databases in general. Creating your first database Start a new empty Android Studio project. Now create a new class by right-clicking the package on the left and choosing New > Java Class. I’ve called mine ‘Database’. We want to extend SQLiteOpenHelper class and so enter that as the superclass. To recap: this means we’re inheriting methods from that class, so our new class can act just like it. Right now, your code will be underlined red because you need to implement the inherited methods and add the constructor. The finished article should look like so: package com.androidauthority.sqliteexample; import android.content.Context; import android.database.sqlite.SQLiteDatabase; import android.database.sqlite.SQLiteOpenHelper; public class Database extends SQLiteOpenHelper { public Database(Context context, String name, SQLiteDatabase.CursorFactory factory, int version) { super(context,name,factory, version); } @Override public void onCreate(SQLiteDatabase db) { } @Override public void onUpgrade (SQLiteDatabase db, int oldVersion, int newVersion) { } } The first thing to do is to simplify our constructor. Add these variables: public static final int DATABASE_VERSION = 1; public static final String DATABASE_NAME = "MyDatabase.db"; With that done, update your constructor like so: public Database(Context context) { super(context,DATABASE_NAME,null, DATABASE_VERSION); } Break it down and you can see that we’re calling our database ‘MyDatabase.db’. Now, whenever we make a new Database object from this class, the constructor will build that database for us. Creating tables Now we’re ready to start populating it with some data! This data takes the form of a table and hopefully you’ll see why this is useful. What kind of thing might we use a database for in the real world? Well, how about CRM – customer relationship management? This is what big companies use to keep track of their customers’ details. It’s how they know to call us with special offers in which we may be interested. It’s how your magazine subscription always knows when it’s time for a renewal – that might be a good example to use. In other words, we’re using our powers for evil. To that end, we’re going to need some more variables so that we can build our table and start populating it with data. Logically, that might look something like this: public static final String TABLE_NAME = "SUBSCRIBERS"; public static final String COLUMN_NAME = "NAME"; public static final String COLUMN_MAGAZINE_TITLE = "MAGAZINE_TITLE"; public static final String COLUMN_RENEWAL_DATE= "RENEWAL_DATE"; public static final String COLUMN_PHONE = "PHONE_NUMBER"; Now the publishers who we’re building our app for will be able to query when a certain use is due for a renewal and easily grab their phone number to give them a buzz. Imagine trying to do this without SQL; you’d be forced to create multiple text files with different names for each user, or one text file with an index so you know which line to retrieve information from different text files. Then you’d have to delete and replace each entry manually with no way to check when things got out of sync. Searching for information by name would be a nightmare. You might end up using your own made-up shorthand. It would get very messy, very fast. While it might be possible to avoid using tables with a little creativity— all this can be a little daunting at first— it is an invaluable skill to learn in the long run and will actually make your life a lot easier. It’s also pretty much required if you ever have dreams of becoming a ‘full stack’ developer or creating web apps. SQL is pretty much required if you ever have dreams of becoming a ‘full stack developer' or creating web apps. To build this table, we need to use execSQL. This lets us talk to our database and execute any SQL command that doesn’t return data. So it’s perfect for building our table to begin with. We’re going to use this in the onCreate() method, which will be called right away when our object is created. @Override public void onCreate(SQLiteDatabase db) { db.execSQL("create table " + TABLE_NAME + " ( " + COLUMN_NAME + " VARCHAR, " + COLUMN_MAGAZINE_TITLE + " VARCHAR, " + COLUMN_RENEWAL_DATE + " VARCHAR, " + COLUMN_PHONE + " VARCHAR);"); } What’s happening here is we’re talking to our database and telling it to create a new table with a specific table name, which we’ve defined in our string. If we break the rest of that long ugly string down, it actually contains a number of easy-to-understand SQL commands: create table + TABLE_NAME( COLUMN_NAME + VARCHAR, COLUMN_MAGAZINE_TITLE + VARCHAR, COLUMN_RENEWAL_DATE + VARCHAR, COLUMN_PHONE + VARCHAR) SQLite will also add another column implicitly called rowid, which acts as a kind of index for retrieving records and increases incrementally in value with each new entry. The first record will have the rowid ‘0’, the second will be ‘1’, and so on. We don’t need to add this ourselves but we can refer to it whenever we want. If we wanted to change the name of a column, we would manually create one with the variable INTEGER PRIMARY KEY . That way, we could turn our ‘rowid’ into ‘subscriber_id’ or something similar. The rest of the columns are more straightforward. These are going to contain characters (VARCHAR) and they will each be named by the variables we created earlier. Here is a good resource where you can see the SQL syntax on its own for this command and many others. If we break the string down, it actually contains a number of easy-to-understand SQL commands The other method, onUpgrade, is required for when the database version is changed. This will drop or add tables to upgrade to the new schema version. Just populate it and don’t worry about it: @Override public void onUpgrade (SQLiteDatabase db, int oldVersion, int newVersion) { db.execSQL("DROP TABLE IF EXISTS " + TABLE_NAME); onCreate(db); } DROP TABLE is used to delete the existing data. Here we’re deleting the table if it already exists before rebuilding it. See the previous post for more. If all that’s in place, you’ve built your first database. Well done! In future, if we to refer to a database that was already created, then we would use getReadableDatabase() or getWriteableDatabase() to open the database ready for reading-from or writing-to. Inserting data To insert new data as a row, simply use db.insert(String table, String nullColumnHack, ContentValues). But what are ContentValues? This is a class used by Android that can store values to be resolved by the ContentResolver. If we create a ContentValues object and fill it with our data, we can pass that to our database for assimilation. It looks like this: contentValues.put(COLUMN_NAME, "Adam"); contentValues.put(COLUMN_MAGAZINE_TITLE, "Women's World"); contentValues.put(COLUMN_RENEWAL_DATE, "11/11/2018"); contentValues.put(COLUMN_PHONE, "00011102"); db.insert(TABLE_NAME, null, contentValues); db.close(); Another option would be to use database.execSQL() and input the data manually: db.execSQL("INSERT INTO " + TABLE_NAME + "(" + COLUMN_NAME + "," + COLUMN_MAGAZINE_TITLE + "," + COLUMN_RENEWAL_DATE + "," + COLUMN_PHONE + ") VALUES('Adam','Women's World','11/11/2018','00011102')"); db.close(); This does the exact same thing. Remember to always close the database when you’re finished with it. You weren’t brought up in a barn, were you? Optional Of course, to really use this database properly, we would probably want to populate our columns using objects. We could use the following class to add new subscribers to our list: public class SubscriberModel { private String ID, name, magazine, renewal, phone; public String getID() { return ID; } public String getName() { return name; } public String getRenewal() { return renewal; } public String getMagazine() { return magazine; } public String getPhone() { return phone; } public void setName(String name) { this.name = name; } public void setMagazine(String magazine) { this.magazine = magazine; } public void setRenewal(String renewal) { this.renewal = renewal; } public void setPhone(String phone) { this.phone = phone; } } Then we could easily build as many new subscribers as we liked and take the variables from there. Better yet, we can also retrieve data from our database this way to build new objects. For instance, we might use something like the following to read through a list of clients and then populate an array list using those objects. This uses a ‘cursor’, which you’ll learn about in the next section. public ArrayList getAllRecords() { SQLiteDatabase db = this.getReadableDatabase(); Cursor cursor = db.query(TABLE_NAME, null, null, null, null, null, null); ArrayList subs = new ArrayList(); Subscribers subscribers; if (cursor.getCount() > 0) { for (int i = 0; i
0 notes
Link
0 notes
Text
List of Top Local Databases used for React Native App Development in 2022!

React Native has become the most talked-about technology in the last couple of years. Its popularity as a cross-platform framework due to cost efficiency has made React Native Development the most preferred development technology in the tech world. Due to the ever-growing demand, developers are expected to build highly performant apps. One of the challenging decisions while architecting React Native apps is to select the right database for the project. The good news is, that the React Native framework comes with some really good choices available for data storage. So, in this blog, we will shed light on top React Native databasesfor 2022. Let’s explore them in detail. But before that, let’s quickly run through the significant factors that should be considered while choosing the apt database for React Native projects.
Variables to be considered while choosing the Apt Database for Your Project
Data and App Complexity: complex data sets in the applications can cause severe app performance issues. So, databases that can store complex data should be chosen. Apps that have lower complexity can use simple databases so that such apps can be easily synced with the server. But complicated apps with multiple-user collaboration requirements require a complex database for ensuring seamless syncing.
Memory Handling: Inadequate database memory management can lead to the crashing of apps. Hence, it should be ensured that memory management is done efficiently through processes like compaction, garbage collection, etc.
Line of Codes: If a higher number of code lines are used in a project for CRUD-like operations, then an advanced database should not be the choice as the coding gets more cumbersome. This code complication deteriorates the performance of the app significantly.
Data Conflicts: the possibility of data conflicts increases when more collaboration-related features are added to the app and data is being used concurrently. So, it is always good to select a database that handles data conflicts and concurrency and shares the conflict handling policies on the website or at least on repository pages.
Top Databases for React Native in 2022!

Realm
Realm is an object-oriented database that enables the creation of real-time and offline applications that run on both- wearable devices as well as smartphones. It is one of the top React Native databases amongst all the available ones. This database is highly preferred when the end goal of the project is building high-performance apps that can deal with a huge data flow. The database benefits both platforms- iOS and Android. It doesn’t depend on key-value stores as it has its own database engine. Realm allows the React Native app developers to frequently undergo tables, mapping classes, fields, foreign keys, etc.
Key Advantages of Realm:
Makes use of multiple encryption standards to ensure good security for diverse mobile platforms
Realm Synchronization service works locally in the background for recording user interactions and service requests and sends the data to the server after the device goes online.
Redux offline can be used to fulfill offline-first architecture requirements.
Firebase
For React Native development, Firebase supports real-time NoSQL DB. This database is known for its offline data modifications and data synchronization capabilities. Besides, it can handle M (model) and C (controller) of the MVC that is needed while building React Native applications.
Key Advantages of Firebase:
This database allows real-time data syncing for all the clients simultaneously.
Firebase offers a cross-platform API that can be easily set up with minimum effort.
Firebase database can be directly accessed with a mobile device and so, the application servers are not needed.
Firebase supports the creation of real-time apps with offline persistence capabilities.
SQlite
SQLite is a relational database management system developed for offering local storage to React Native applications. ‘Lite’ in SQLite depicts the lightweight nature of this database. Also, this database is very easy to set up. It can be directly integrated with mobile applications for accessing the database. For data encryption, SQLite can be used with an extension called SQLite Encryption Extension (SEE).
Key Advantages of SQLite:
This database can support offline persistence, simply by using a react-native-SQLite-storage plugin for data management within the mobile app.
SQLite is ACID-compliant and employs most of the SQL standards with just a few omissions. It comes with a file-based library architecture and some tools for easily and efficiently handling all data types.
PouchDB
This is a JavaScript database developed using a storage mechanism and CouchDB protocols. It stores the data in JSON format. This open-source database enables the React Native developers to read, create, delete, update, and query the objects using a singleJS API. Furthermore, PouchDB is compatible with MongoDB, CouchDB, PostgreSQL, and MySQL.
Key Advantages of PouchDB:
It allows data syncing using a supported server for running the apps online as well as offline.
Ensures speedier execution of queries.
Also, as PouchDB remains inside a browser, it is not necessary to run queries over the network resulting in faster execution of queries.
Vasern
This is an open-source, lightweight, and fast database used for React Native-based application development for both- Android and iOS. It is developed with a robust server-side language-Golang, created by Google. Vasern’s API can also be utilized for syncing across app clients, local storage, and for cloud storage.
Key Advantages of Vasern:
Vasern ensures good performance of apps and speedier operations
Provides end-to-end database syncing
Support basic data types like string, double, int, double, reference, DateTime, etc.
Provides support to languages that use UTF – 8 coding.
Watermelon DB
This database is built on top of SQLite. It can scale a myriad number of records without impacting the application speed. This database is perfectly optimized for complex apps built with React Native that ensures real-world performance.
Key Advantages of Watermelon DB:
It is a fast, multi-threaded, relational, and highly cached database.
It supports an offline first system for syncing with your own backend.
It allows static typing with flow.
BerkeleyDB
This is a high-performing backend and allows the developers to handle data in several ways. It comes with an API that is compatible with numerous languages and several platforms like Android and iOS.
Key Advantages of BerkeleyDB:
Simple to use
Provides support for industrial-strength transactions
Ensures concurrent access for multiple users
AsyncStorage
This is a local storage database and comes in-built with React Native. It enables developers to persist data between reboots of the apps. It acts as an outstanding solution for saving the data that the app required, even when the app is being closed by the users.
Concluding Views:
Apart from the local databases mentioned here, there are several other databases available for the React Native app developers to utilize in their projects. But, the choice of a database ultimately depends on the project requirement, its scope, and end goals. For instance, Firebase suits perfectly when one has to develop real-time apps. Realm is great for almost every possible requirement, but comparatively, SQLite doesn’t provide the same level of performance, scalability, and security. Rather SQLite is good to go with when one needs to leverage the abilities of a relational database. So, the one that suits your requirements is the best choice for you.
Here we come to an end! We hope this write-up was insightful.
To know more about our other core technologies, refer to links below:
Angular App development
Ionic App Development
.Net App Development
0 notes