#applique machine embroidery
Text


Derailing project of the moment, Project "Nephew's Birthday Gift" is... Technically done. Added side seams, because he's turning four, and pockets, because cool rocks exist.

I also kept the promise of it not taking up much space. It's about the size of a T-shirt, and I'm so very very tempted to just... Buy a T-shirt and play an innocent prank on the birthday boy.

And then the fiber craft demons struck, in the shape of a very charming man in the open air museum doing a demonstration with five dozen cards and sewing thread on a +5m inkle loom, and I decided nephew needs a knighty belt. Because that's what kindergartners care about: handmade decorative techniques that were available to people in the era. It's definitely not just that he wants a dress-up outfit to boink his brother on the butt with a toy sword in.
#nephew's birthday#knightcore#pazyryk kurhan phoenix#phoenix#embroidery#tablet weaving#sewing#all of this is technically machine washable at 30°C#my mom took measurements and they were... odd#so I chickened out on self drafting#this is a free children's winter coverall pattern#minus the sleeves#minus the zipper#with the center seam drawn straight down#and seam allowance added to the fold line#and then you just hem the bottom bits arm holes and neckline#leaving slits at the bottom and the neck#and smack a shield shaped applique on there#i reinforced every slit opening too#the mantra is very much that this is for a small active child#it will get played in#have I ever done tablet weaving before?#nope#that's why the start looks like crap#I'm also too pms-y to focus on the pattern so I am going by vibes#heraldry
20 notes
·
View notes
Text
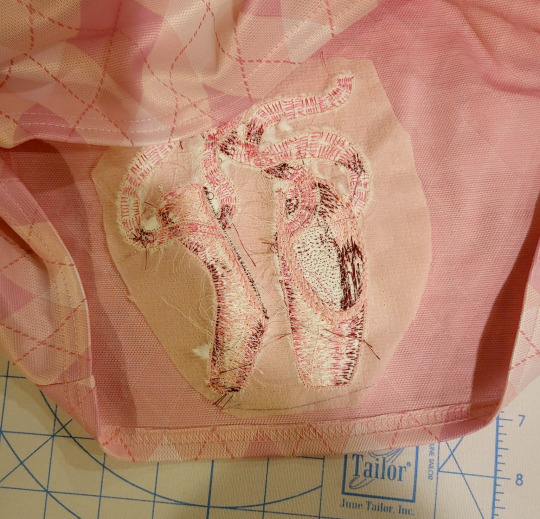
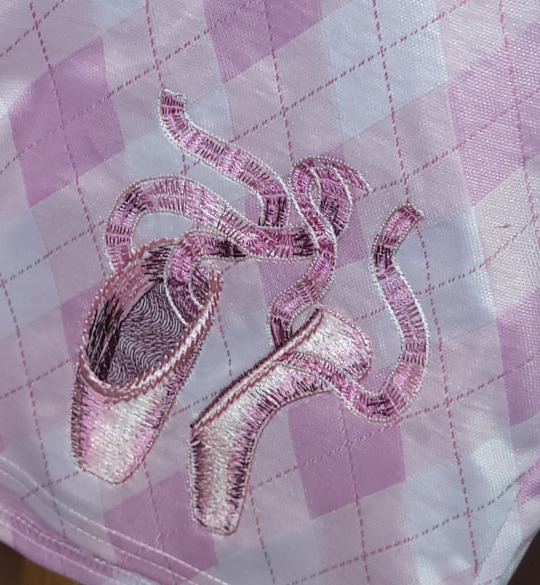
Machine embroidery tutorial: Shaded pointe shoes.
I know from working in a sewing machine store that a lot of people are intimidated by machine embroidery. So, I made this pattern the other day, and let's go into how I stitched it out.
Embroidery does not need to be this hard. If you've never used the embroidery part of your sewing machine before, stick some cheap stabilizer in the hoop with some fabric, grab a random pattern from inside your machine, and run all or part of it. Once you do this, you will be much less afraid of it. Some brands of machines will include some stabilizer and fabric for you to run an initial test on.
So, let's get into something more complicated. There's a few things that we're going to do to make this more complicated. The first is the surface that we're embroidering on. I'm using a dress from Five Below, which is made of a knit fabric without a whole lot of stretch. The surface that you embroider on does impact how you want to set up the design. I also want to do the embroidery very close to the bottom edge of the dress, so it's won't fit in the whole hoop. The third difficult thing about this design is that there's a machine applique in the very start. This applique will let you embroider this on a fabric that isn't pink, and the shoes will stay pink.
Regarding the applique, I've been told that it's small enough that you could cut up an actual pointe shoe and use the satin from that, if you want to. I don't have a shoe on me, since I don't dance (I just do the costumes). But, if you're making a gift for someone who dances on a level where they're throwing away dead pointe shoes instead of keeping them in a memory box, it could be a fun addition. Here is a template to show you how big the pieces need to be. Important: do not cut out the appliques using this template. The machine will cut them out for you later. You can use this template to know if the pieces of fabric you are using for your applique will be big enough. You want your pieces to be larger than this template, but they don't need to be significantly larger.

The first problem that we're going to deal with is the fact that the dress has a small amount of stretch in it. We don't want the section of the dress that has our embroidery to stretch at all. At best, it'll look bad, and at worst, it'll destroy the whole embroidery. To stop the area with the embroidery from stretching, we're fusing a fusible non-showing mesh stabilizer onto the area to be embroidered. I'm doing this design in 6x6 hoop, so I got a piece that was about 8x8 and fused it on the area.
When you're using fusible stabilizer, you want to iron it on from the fabric side. Some nylon meshes will melt if you iron them, but most importantly you want the face of the fabric to be perfectly smooth.
When the design is done, this stabilizer will remain in the design forever. This stops the design from stretching, even when the garment is worn or washed. The mesh is light and flexible enough that it doesn't drastically change the way the fabric moves.

The next thing we need to do is add stabilizer to the hoop. Embroidery machines put a lot of stress on the fabric, and so it's not usually possible to embroider without stabilizer. In this case, we're also using the stabilizer to hold the fabric, since we can't get it in our hoop.
This is two layers of soluble tear-away stabilizer. If I'm using tear-away, I always use lightweight tear-away. Using multiple layers of tear-away will put less stress on the stitching when you rip it away, because you rip one layer at a time. This requires less force than ripping a thicker layer away all at once. We're using tear-away because we don't want to keep all this stabilizer in the design. The specific one I'm using is a tear-and-wash stabilizer, where the extra bits of tear-away can be washed out of the finished design.
The other thing that I did while the iron was still hot was to press the pink satin that I'm going to use for my applique. Applique is much easier if the fabric you're using isn't wrinkled.

We're going to pop the hoop into the machine. Now is a good time to go into your machine's manual and find out where the basting line setting is. Bernina, Viking, and Pfaff all make this super easy, and Baby Lock and Brother do not. For Brother and Baby Lock, it's often in the "embroidery edit" mode. If it really gives you trouble, tell me what hoop you need it for, and I'll make you a version of this file with a predone basting line.
Some people like to spray-baste into the hoop. I do not like this, because it makes your hoop and your machine all ugly and coated in spray shit. If you are one of those people who likes spray, 100% take the hoop outside to spray! It's not good for your body and you'll get overspray glue all over your shit. If you're not a person who spray-bastes, do not become one.
Some people like to use tacky or sticky tear-away for this. That's a completely fine and valid option, but that shit is expensive. Basting line is cheap. A general stabilizer rule is that you can cheap out on tear-away and cut-away, go mid-price on fusible, and buy a good brand of tacky or wash-away. This is because it's pretty hard to fuck up cut-away stabilizer, but also pretty hard to make a good stabilizer that's also tacky and n'gones when you need it to. Since I have 200 things I'd rather do with $86 than buy a roll of stabilizer, I just use the basting program for 99% of my embroideries.
Before you run the design, flip through your color blocks. Make sure that your design starts with five blocks of the same color. If your machine decides to "help" you and merge the color blocks together, this won't work properly.
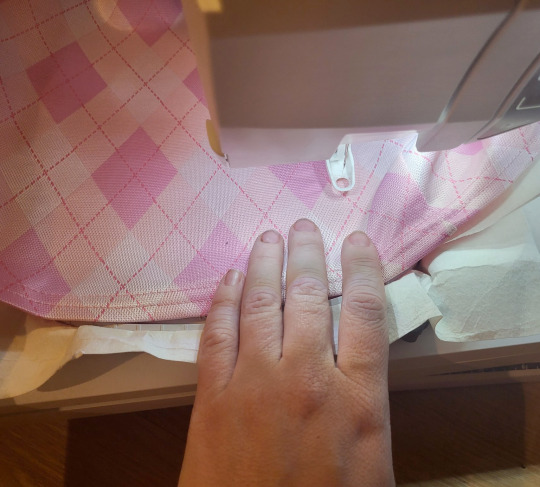
Now, put your fabric in the hoop, wherever you want the final design to go. I lined the hem up with the bottom of my hoop. Run your basting line, holding your fabric flat on the hooped stabilizer. You might need to pause and unpause the machine several times to move your hand and keep the fabric flat. Remember that as long as your hand is flat on the fabric, and you have a presser foot on your machine, you can't hit your fingers with the needle. Despite what this image shows, I often hold the fabric down with my whole hand in the center of the hoop.
Floating the fabric like this, instead of hooping, also allows you to line the fabric up very precisely. It's hard to hoop something 100% straight, but it's pretty easy to float it 100% straight.
Another advantage of floating with a basting line is that the line will show you exactly where the design is going to go. If you don't like where it's going to go, you only have about 50 stitches to rip out so that you can change the location. You'll know that your embroidery unit will have enough space to move. All hail the basting line.

The machine is going to sew an outline, and then stop. This is showing you where to place your applique fabric.
A good general rule is that any time a pattern sews an outline and then stops, you're supposed to put fabric down there. If your pattern does this, and you're not sure why, see if there's any instructions that tell you what applique fabric to use where.
If your machine sewed this outline and then kept going, make sure you have color block merge turned off, and that you're not in monochrome mode.
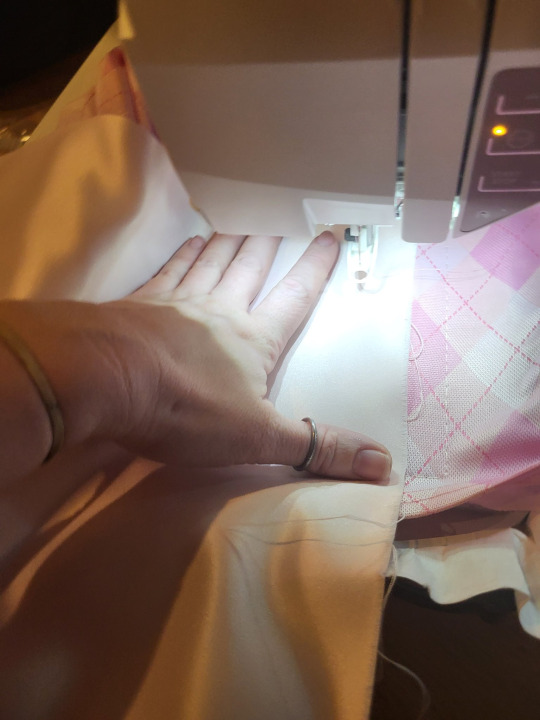
Just like when you were basting your garment onto the hoop, you're going to hold the applique fabric over the outlined area, and keep it there while your machine runs the next color.

Once the machine has sewn the applique fabric down, you'll want to trim away the excess. I use some very small curved scissors for this, since the curve lets me get very close to the stitching line. Generally, you want to be as close as possible to that line.
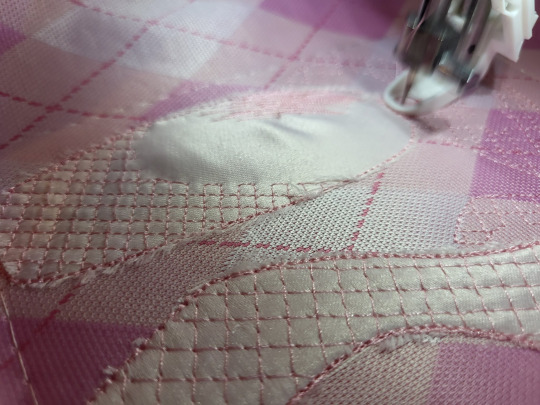
Once you have your applique fabric sewn in, you can more or less just watch the machine and change the colors when it asks you to. You'll see that I have a bulge in my applique fabric on the lefthand shoe. This isn't ideal, but since this design has so much stitching, it all got flattened down in the end.
You'll see that there's a lot of crosshatching on the surface before the colors go on. This is to stabilize the fabric and keep it in place when the big feathered stitches start. These stitches also sew the stabilizer to the back of the fabric, which means that if your fusible mesh starts to lose fusion, it'll still be completely sewn down.
If your machine has manual tension, you'll want to lower it after the crosshatching layers are done. You can change it after color block 5.

The reason that you're lowering your tension is that these stitches are particularly lorge and lomg, and that means the machine can pull just a bit harder than normal when it moved form place to place.
If your machine doesn't cut jump stitches (the long stitch the machine leaves when it jumps from one section of embroidery to another), you will want to trim them between color blocks, instead of waiting until the end.
If you're watching this stitch out and going, "Wait, I was told my machine embroidered at 1200 stitches per minute! This isn't going at 1200 stitches per minute! What gives?" well, I'll tell you. Your machine's stitch speed was rated by the absolute fastest that the machine head can go. It doesn't actually take into account how fast the embroidery unit can move. Since these are longer stitches, the embroidery unit can't move fast enough to keep up with the machine going 1200 stitches a minute, so the machine has to slow down to deal with the e-unit's speed.
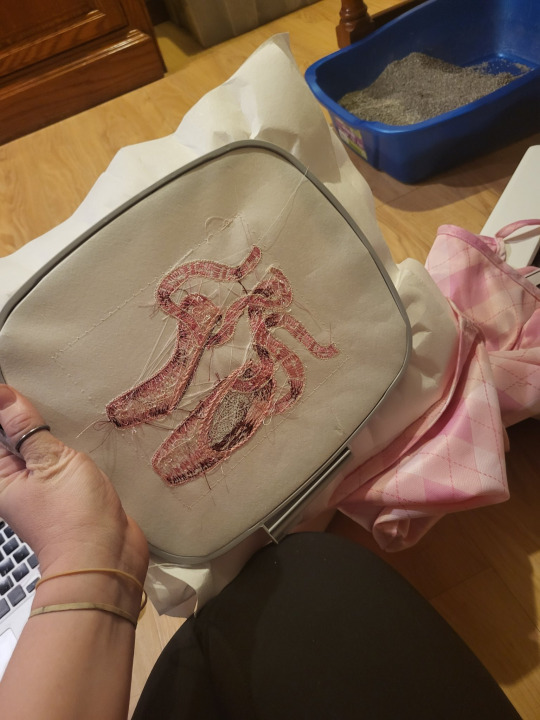
If you did this correctly, the back of your embroidery will not be sewn to the front of your embroidery, and you'll have something that looks like this.

You'll need to cut your bobbin thread about every 10 stitches in your basting line. This is pretty easy, because the stitches are so big. I do this from the back side because the stabilizer protects the fabric from my scissors.
Then, flip it over and rip out your tear-away, one layer at a time. You'll notice that my back side is really ugly. This is because Viking and Pfaff don't cut the bobbin thread between jump stitches. In the old days, this meant that they jammed and locked up significantly less than other brands, but now there's things like wiper feet and tail-clearing programs that work a lot better. No, there's no way to activate bobbin jump cuts. If there was, I'd have done it by now.
Now, using your iron if you need to, peel back the extra fusible mesh and trim around your design. You can get closer to it than I did here. I'm just lazy.
If you're using polyester embroidery thread, you get some pretty good results by sticking a press cloth over the design and ironing it. This will make sure the threads line up and stay extra shiny.

And that's important because polyester thread already doesn't have the same luster as rayon thread. It's more sparkly than lustrous. However, some brands of thread are just easier to work with. When we're testing machine problems in my store, we test with isacord, since it's the least likely to have problems, so we can rule out thread problems. But man, I just think it's so ugly. I used polyester for this design, because it's long stitches on a garment, and I need that strength, but I'm not happy about it.
Anyway, there you go, that's the basics of a somewhat complex machine embroidery pattern.
I'm considering making a separate blog for embroidery stuff. I'm really tired of the embroidery industry charging for tutorials like this or instructions on the embroidery software (looking at you, Floriani Total Control University DVD for $218), but this blog isn't really for my vendetta against the embroidery industry.
#machine embroidery#tutorial#not lolita#applique#pointe shoes#ballet shoes#you know that moment in welcome to the black parade where they modulate and it's just such a good moment
40 notes
·
View notes
Photo


I’mma learnin’ appliques! That way, I need less fluff for spiders. Newer revisions compared to earlier ones.
I’m still not sure what’s going on with the fingers on the first one. Alignment’s a fussy thing.
#machine embroidery#hazbin angel dust#hazbin hotel#wanna buy a fluffy spider?#fleece applique booooi
24 notes
·
View notes
Text
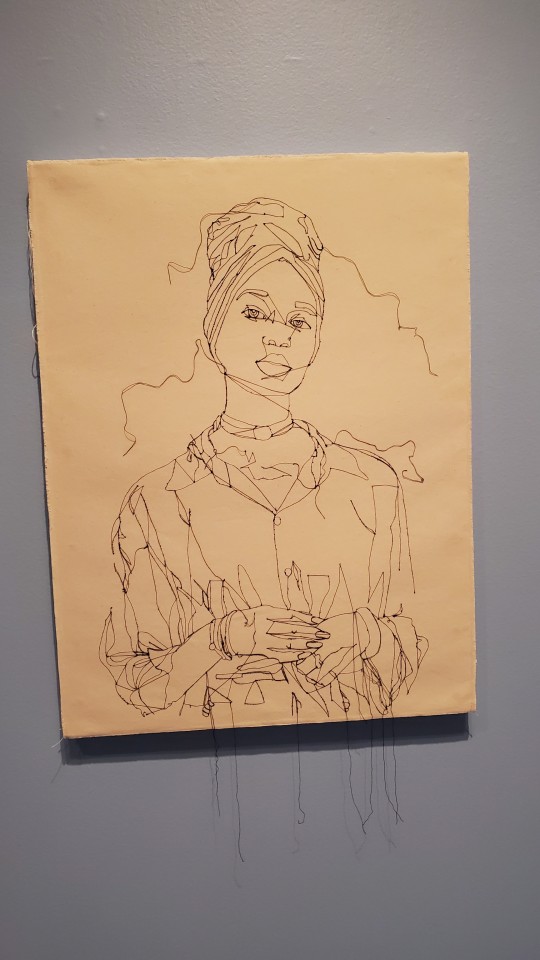


the Gio Swaby exhibit made me sooo happy. like I love fiber art OMG
7 notes
·
View notes
Text
I think I have bought most of the supplies I will need to make Carrie plush become real 😈
#💭#got blue and yellow minky fabric 4 her body and the like inside of her ears#i'm making her paw pads yellow too (the paw pads and ear insides will be applique)#got blue and black and yellow spools of thread...#got white fabric for her hospital gown and mask...#which for like sturdiness/actually staying on their body as a plush it will just be a tshirt/dress thing kinda instead of a hospital gown#i got various ribbon to make their bracelets...#i have plenty of embroidery thread to make her doodles#and fabric markers for the blood on her gown and the smiley on her mask#i have red and green fabric for like applique of her eyes but i'm not sure how to go about that...#ideally like machine embroidery or like maybe satin stitch embroidery would be good but#i don't have a machine embroidery thing and idk how to do more than the most basic ever embroidery so!#might applique might learn fancier embroidery we'll see
8 notes
·
View notes
Photo


another poll... which one should i sew... frog or shark...
#this is cholyknight again the same person who made the manta ray pattern i didi ...#*did#also i dont have an embroidery machine so i will be doing applique for the eyes
14 notes
·
View notes
Text
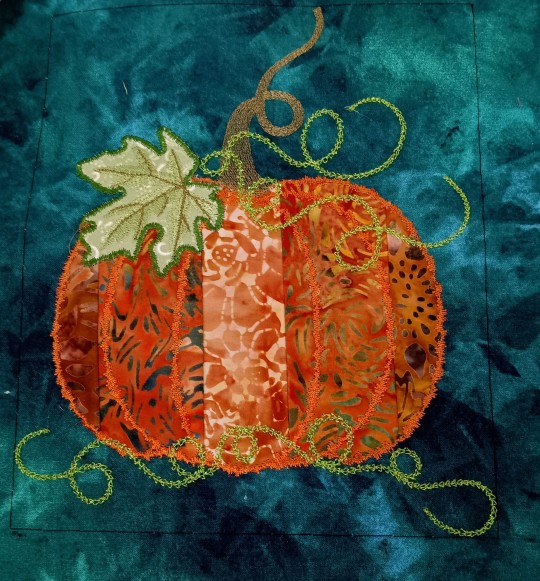
I'm incredibly pleased with these. This is a "Scrappy" project, using up bits and bobs. It's about 9-10 inches tall.
A coworker gifted me with her leftover batik strips from a fall project. I hate to see Batiks go to waste so I set them aside.
Then I found this design from Floriani, with it's strange satin stitches and put it up on the 6 Needle Embroidery machine at work.
I pieced the orange pieces together first, then used the pieced fabric as the applique fabric. I dug up green scraps for the leaves.

I made this one first, and the coworker who gave me the scraps fell in love with it, so I made her another. Then I made the one at the top, with metallic thread for the vines, and she begged me for a second one.
So she's got two, and I have two. I think I want to make a table runner with these blocks pieced in at the ends.
I want to do one in silvers and slate blues with iridescent metallic thread for the vine, as a Cinderella/Fairytale version.
13 notes
·
View notes
Text
The second a cosplay guest says "can i offer a suggestion?" To your cosplay is the minute you should walk away.
#i like my little lamb crown :(#its stylistic and simple#it looks exactly how I wanted it to#AND it took FOREVER because I satin stitched the applique#i dont own a fucking embroidery maching so that was MACHINE SATIN STITCHED.#do you have any idea the effort and time that went into that?#its like 5 min for an inch of stitching!#idc how you made your crown because its not the same fuckin cstegory!#mines made of a single layer of half in foam and a tiny bit of cheap fleece!#its accessible#its soft#its easy#it canbe flattened if needed and still hold its shape!#i dont want to incorporate EVA foam!#and i think your suggested idea isdumb actually!#and unnecessary
0 notes
Text
Chicken Embroidery Applique
Have you heard? The bird is the word… I mean Chicken embroidery applique designs!
New! Chicken embroidery applique designs. Stitch out 8 blocks featuring different chicken portraits and a chicken coop. You will fall in love with these new chicken designs. There is a chicken for everyone in this design set.
“I made a funny, son and you’re not laughin’” Foghorn Leghorn
PS: If you don’t know who…
#chicken embroidery applique#chicken machine embroidery#Embroidered chickens#Embroidery designs#funny chicken embroidery#Sue Brown
0 notes
Text
Embroidery machine Tips for wonderful applique
Applique Magic with Your Embroidery Machine: Tips for Stunning Results
Embroidery machines unlock a world of creative possibilities, and applique adds a delightful dimension to your projects. By fusing fabric pieces onto a background fabric, you can create vibrant designs, personalized gifts, and charming home decor. But achieving flawless applique with your machine requires specific techniques and knowledge. Fear not, embroidery enthusiasts! This guide delves into essential tips to help you master applique and transform your machine into a tool for stunning fabric art.
Preparing the Perfect Canvas: Fabrics for Applique Success
The foundation for beautiful applique lies in the fabric choices. Here's what to consider:
Background Fabric: Opt for a stable woven fabric that can withstand the heat and pressure of embroidery stitching. Cotton woven fabrics like quilting cottons or poplin are excellent choices. Avoid stretchy materials that may distort during embroidery.
Applique Fabrics: The possibilities are endless! Choose fabrics that complement your design and add visual interest. Popular options include felt, wool, cotton, and even lightweight synthetic fabrics. Test different fabrics on a scrap piece before incorporating them into your project to ensure they adhere well and handle embroidery stitching without fraying.
Pro Tip: Starch the background fabric lightly to provide extra stability and prevent puckering during applique stitching.
Interfacing Your Applique Shapes: Adding Strength and Stability
For a professional finish and to prevent fraying, interfacing your applique shapes is crucial. Here are some interfacing options:
Fusible Webbing: This is a popular choice for small to medium-sized applique shapes. Apply the fusible webbing to the backside of your applique fabric following the manufacturer's instructions, then iron it onto your pre-cut applique pieces.
Heat n' Bond Lightweight: This interfacing provides slightly more structure than fusible webbing and is ideal for intricate applique details or slightly heavier fabrics.
Non-Fusible Interfacing: Use this for larger applique shapes that require additional stability. Adhere the interfacing to the back of your applique fabric with a temporary fabric adhesive spray or glue stick, then stitch around the shape's edges to secure it in place.
Remember: Choose the interfacing weight and type based on the applique fabric's weight and overall design complexity.
Tools of the Trade: Essential Supplies for Machine Applique
Embroidery Machine: With various applique stitch options (satin stitch, blanket stitch, zigzag stitch, etc.), your machine is your creative partner.
Stabilizer: Use a water-soluble stabilizer for raw-edge applique or a tear-away stabilizer for applique with a satin stitch finish. Stabilizers prevent the background fabric from puckering and ensure smooth stitching.
Fabric Scissors: Sharp fabric scissors are essential for precise cutting of applique shapes. Consider investing in dedicated applique scissors with a small, pointed tip for intricate details.
Fabric Marking Pen: Use a heat-soluble or water-soluble pen to mark placement lines for your applique pieces on the background fabric.
Embroidery Hoop: Choose a hoop size that comfortably accommodates your entire applique design.
Adhesives: Temporary spray adhesive or glue sticks can be helpful for positioning applique pieces before stitching them in place.
Mastering the Art of Cutting: Techniques for Flawless Applique Shapes
Templates: Create paper or cardboard templates for your applique shapes. Trace the templates onto your chosen applique fabric and cut them out.
Die Cutters: For precise and consistent shapes, especially with intricate designs, invest in embroidery applique dies and a compatible die-cutting machine.
Heat Cut Tools: Some machines offer built-in heat cutting capabilities. Utilize these if your machine has this feature to directly cut your applique shapes from the chosen fabric.
Important Note: Always reverse your applique shapes if the design features text or lettering to ensure it reads correctly after being stitched onto the background fabric.
Choosing the Right Stitch: Embracing the Power of Applique Stitches
Embroidery machines offer a variety of stitches ideal for applique. Here are some popular options:
Satin Stitch: This is a go-to stitch for creating a smooth, decorative edge around your applique shapes. Experiment with different stitch widths to achieve the desired effect.
Blanket Stitch: This stitch offers a more casual finish while still securing the applique piece in place. It's a good choice for adding a touch of texture to your projects.
Zigzag Stitch: This stitch provides a secure hold for applique pieces and can be used for both straight and curved edges.
Decorative Stitches: Many machines offer specialized decorative stitches that can enhance the visual appeal of your applique. Explore the options available on your machine and experiment with creative stitch combinations.
Tip: When selecting an applique stitch, consider the size and intricacy of your design, as well as the desired finished look.
The Magic Touch: Stitching Strategies for Flawless Applique
Now that you've chosen your perfect applique fabrics, mastered cutting techniques, and selected the ideal stitch, it's time to bring your design to life! Here are some essential stitching strategies for flawless applique with your embroidery machine:
Securing Your Applique:
Temporary Adhesive: For added control and to prevent applique shapes from shifting during stitching, use a small amount of temporary spray adhesive or a glue stick to secure the applique pieces onto the marked positions on your background fabric.
Placement Hooping: When using a hoop, ensure the applique pieces lay flat and wrinkle-free within the hooping area. Avoid excessive tension that might distort the shapes.
Stitch Order and Overlap:
Start from the Center: Begin stitching from the center of your applique design and work your way outwards. This approach minimizes any puckering or distortion around the edges.
Stitch Overlap: When using a satin stitch or other decorative stitch for the applique edge, ensure the stitches slightly overlap the raw edge of the applique fabric. This encloses the fabric edge and prevents fraying.
Compensate for Stitch Density: Dense applique stitches can cause the applique piece to shrink slightly. To counteract this, consider using a slightly larger applique shape compared to the final desired size in your design.
Advanced Applique Techniques:
Reverse Applique: This technique involves stitching the applique shape onto the background fabric, then carefully cutting away the excess background fabric from within the stitched outline. This creates a unique, layered effect.
In-the-hoop Applique: Some embroidery machines offer specialized in-the-hoop applique features. These may involve cutting and fusing applique shapes directly within the hooping frame using the machine's capabilities. Explore your machine's manual to see if it offers such functionalities.
Finishing Touches:
Trimming Excess Threads: Carefully trim any loose threads or jump stitches with sharp embroidery scissors.
Pressing (Optional): For a crisp, professional finish, lightly press your completed applique project from the backside using a cool iron setting appropriate for the fabric types used.
By following these tips and practicing your applique techniques, you'll be well on your way to creating stunning, personalized projects with your embroidery machine. Remember, experimentation is key! Don't be afraid to try different applique fabrics, stitches, and design elements to discover your own unique style.
Bonus Tip: Invest in a magnifying lamp for close-up work while stitching intricate applique details.
With a little practice and these helpful insights, you can transform your embroidery machine into a powerful tool for creating beautiful and captivating applique masterpieces. Happy stitching!
Discover Our Collection of Applique designs Here
Read the full article
0 notes
Note
You’ve officially convinced me to buy some cheap felt and make a few plushies how dare you /lh
That's excellent! But I would recommend working with cheap fabric over felt. Felt can be frustrating and it tears easily if you try to work it inside out. Also it's better sewn with strands of embroidery floss or thick crochet string. [I use a blanket stitch. Look at the jester shoes on my plushies to see how that looks.]
And as an aside; for anyone who attempts my DCA pattern- it's actually a decent first project because you'll learn how to
-Work on things on the wrong side and turn them right side out. And add features by putting extra pieces into a seam. Which is basic plushie stuff.
-Do a small amount of applique and see how you feel about it. [Some people find it frustrating.]
-Sew buttons on.
-The bare bones of how pants are constructed.
-Use stuffing and make doll joints by leaving parts pinched/sewn and without any.
-Make a crude ruffle.
It's a nice quiet hobby that's fairly portable. And at the end of it you have a little guy.
None of this pattern requires a machine and if the fabric you get is thin, then it'll just put up less resistance when sewn by hand.
HOT TIPS
- Do not sew hand-dyed-type batik fabric with a needle and thread. It looks like regular cotton but it's very dense.
- Best place to get a sewing machine is Goodwill. Look for the heaviest metal machine you can find. Singer and Kenmore are the best. And places still exist to get them tuned up and fixed if needed.
- When stuffing tear small bits of fluff and poke them into little crevices with a chopstick or similar. Don't over-stuff. Keep it light.
- Ignore tutorials that sew stretch fabric on a regular sewing machine. You won't get good or durable results. You need a Baby-Lock sewing machine for stretch fabric. Turn your current t-shirt inside out and look at the seams. It makes a four thread seam just like that.
- Slick fabric paint needs a minimum of four hours to cure. Don't try to cheat this, you cannot touch it until it's dry. If you're painting on something that's not flat; pin it to some Styrofoam like you're dissecting a frog to prevent accidents.
- Always wash fabric before use. It's okay to stomp cotton/poly around in the shower with whatever soap comes off you hair and just hang dry. Don't use the finished edge of the fabric for anything. Just cut it off and pitch it.
- Paper clothing patterns can be ironed flat on the lowest setting. Go quick and don't push hard.
ALSO - You guys can always ask me anything if you get stuck! My grandma and my mother taught me the basics and I figured out quite a bit on my own. :)
33 notes
·
View notes
Text


This is Zero the Cccat! Made for X3NO42 on Twitter back around the end of 2023. :)
This plush is made entirely with custom dyed minky. Details on this plush were machine embroidered and appliqued. Unfortunately I do not recall the total length of the plush, but the base body was at least 24 inches long, including the tail was probably about 40+ inches. gradient on the body was hand dyed and touched up with dry brushing.
I will say it how it was-- this absolutely beautiful character and design broke me (and literally broke my sewing machine! Like, very literally knocked it off my work table and needed to buy a new one the next morning.🤣😭 ) I have so many mixed feelings about this little one, aggressively revolving around how proud I am of completing them and trying new techniques all the way to seeing that I don't feel like I did justice to them with some intense disappointment. I will let those be the only negative words on this gorgeous project and lay them to rest. ❤
The WHOLE body was custom dyed, save for the main pink color of the head and belly to chest ( creamy yellow). I split the body into a few pieces since different gradients were applied-- Tail, Back Legs, Torso/Trunk, Chest, and Arms and head(that didn't require dyeing). The underside of the tail was dyed as a long strip like the top side.
Just about every piece of this plush was embroidered or had embroidery details! I used some lovely pearlescent thread for the sparkles!
Nothing much else to add without rambling, but the two little orbs were refreshing to make after this sweetheart was completed! <3
Ko-fi: https://ko-fi.com/appledew
Trello queue: https://trello.com/b/FZKSnMo7/plushie-commission-to-do-list
Twitter: https://twitter.com/AppleDew_
Instagram: https://www.instagram.com/apple.dew
Tumblr: http://appledew.tumblr.com/
Furaffinity: http://www.furaffinity.net/user/appledew
deviantArt: https://www.deviantart.com/appledew
11 notes
·
View notes
Text
Let's Make Cute Sweaters!!!
Listen up Tumblr, your local goth is going to teach you how to make an applique and sew it onto a sweater or sweatshirt.


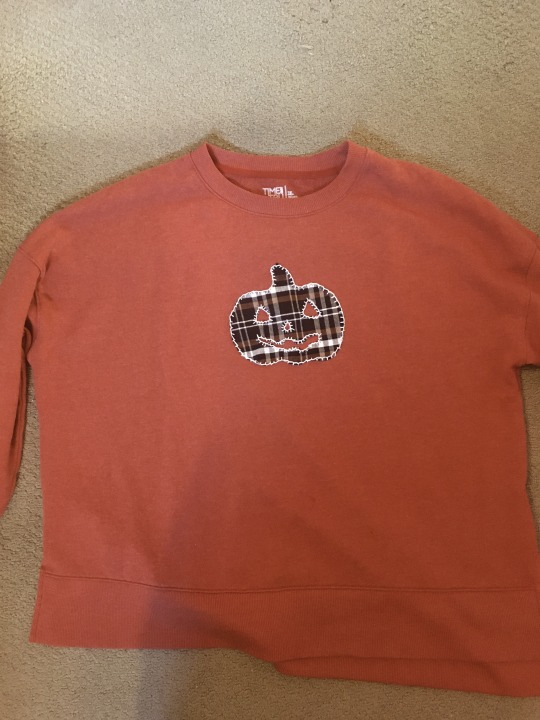
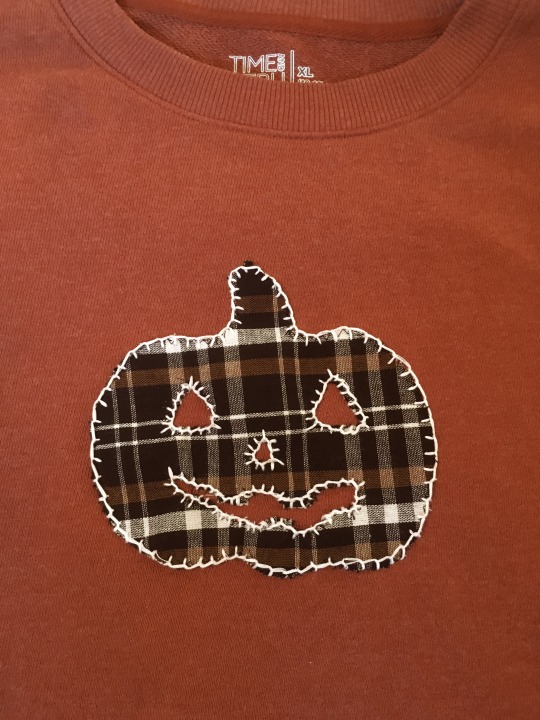
Yeah, my pumpkin's wonky, but he's my Special Little Guy, and I love him.
I used plain, Time And Tru sweatshirts from Walmart that only cost about $10, but you can easily thrift a sweater or use one you already have that needs a little spice. The tombstone is made with felt, and the pumpkin is made from a plaid fat quarter--I will explain both methods, as they differ slightly.
Felt (the easiest): Find or draw a template (I searched tombstone templates for mine), cut it out, then use it to cut out the same shape from your felt of choice. If you want to embroider any details on your applique, like I did with the RIP and cracks, do that before sewing it onto the sweater. Put the sweater on and pin the applique where you want it to sit (doesn't have to be on the center--you could easily do elbow patches or a little patch off to the side), then do a blanket stitch by hand around the border for a decorative, clean way to attach it. I used 4 strands of embroidery floss in a contrasting color on the tombstone and six strands on the pumpkin--I think four works perfectly fine and is a little less bulky. Embroidery floss comes in every color imaginable and is pretty cheap, so you can experiment with color combos or even use multiple colored threads. You're welcome to play around with stitches and find something that works for you if you don't like the look of the blanket stitch, you can use a sewing machine instead, or you can safety-pin or fabric-glue the applique on if sewing isn't for you.
Optional: I sewed lace trim around the neckline and added a tiny bow for extra cuteness. If you're going to add lace trim, keep in mind that unless you're using stretchy lace, it'll hinder the stretch of the sweater. To mitigate this, I stretched the neckline a bit as I sewed and used a zig-zag stitch with my machine (you can sew it on by hand, too, just using wider stitches). I also must mention that the neckline on this sweater was decently wide without stretching, so even though it can't stretch as far anymore, it's no trouble getting it over my head. If you're using something with a tighter neckline, or tight cuffs on the sleeves, that really needs to stretch, then use stretchy lace or none at all. Bows are still something you can add that won't affect the stretch, so go wild with bows, buttons, safety pins, and all manner of little trinkets!
Cotton: The attachment process is still the same as the felt method, but making the applique is a little different. Since cotton isn't as sturdy as felt, and it frays, you need to prepare it differently. Before you cut out your shape, iron on lightweight fusible interfacing (sold at Walmart--make sure it's compatible with woven fabric if your fabric isn't stretchy and knit fabric if it is). I've made appliques without interfacing before, but they'll hold their shape much better and be sturdier if you do use it, so I recommend taking the couple extra minutes to iron it on. On the wrong side of your fabric, iron on a patch of interfacing large enough to fit your shape, let it cool, and then cut out your shape. I used an X-acto knife to cut out the face of the jack-o-lantern, which did pretty well, but did cause a bit of fraying that I cleaned up with my fabric scissors. To seal the edges, you can sew a zig-zag stitch around them, use an overlocker/serger, or use Fray-Check or fabric glue. I chose to do a zig-zag stitch so it'd be less noticeable under my blanket stitch, but I've used my serger in the past, and it looks nice, too--especially if you use a contrasting color. Now the process is exactly the same as the felt one.
Remember, it's perfectly okay if it has that "homemade look," and it doesn't need to look perfect or symmetrical, by any means! This is about having a fun little project to do while watching a show or some YouTube videos and sipping on some hot cocoa, knowing that you'll get a cute new sweater out of it that'll be unique and your own. And it's also okay to use it as stay-at-home lounge wear if it looks as wonky as Mr. Crooked Smile the pumpkin over there. Have fun, learn new techniques, and make happy little accidents!
Happy crafting!
#diy advice from your local goth#goth#goth subculture#gothgoth#goth diy#goth fashion#diy#diy fashion#crafting#sewing#sewing tutorial#diy tutorial#mine
38 notes
·
View notes
Text
I thought you guys might like to see my new leggings (and my freshly-painted toes)! 🥂
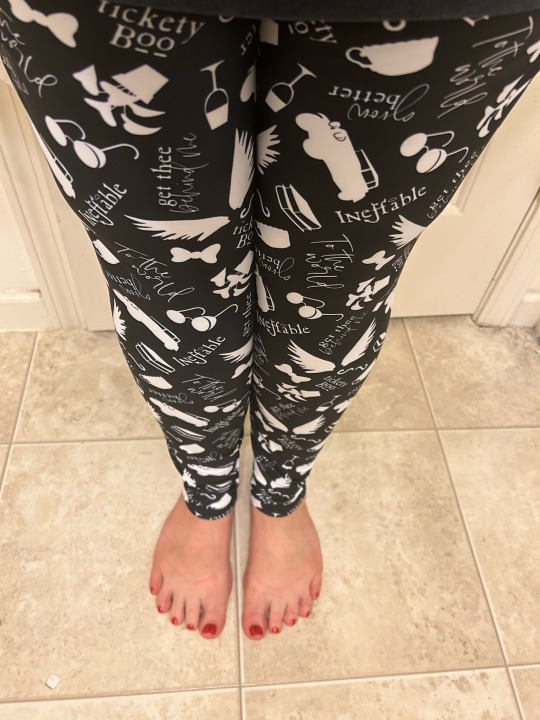
They are INSANELY comfy. I have not washed them yet. They are available in size S-5x and can buy them for yourself at:
To the world! 🥂

#good omens#good omens 2#gomens#ineffable lovers#ineffable husbands#ineffable spouses#ineffable wives#ineffable partners#aziraphale x crowley#aziracrow#No I don’t own this shop and stand to gain nothing from this#I’m just that in love with them#and supporting small business!!
35 notes
·
View notes
Note
Hi ! Your stuffed dragons look really cool:) im currently sewing some Pokémon … do you have any patterns or any like deconstructed dragons ? I’m not super familiar with the process and it would be really swag if you had and tips, pointers or process-related images. Thanks !

Hey no worries lol, happens to the best of us
As for general tips, for the dragons specifically Hebi Haberdashery is also making a YouTube series, the first few videos especially explain the process very well. I would also recommend Choly Knight's tutorials and free patterns (they even have a few Pokémon and dragons in there), the instructions are very clear and the patterns all have a difficulty rating, plus every step has a photo to illustrate it!
Personal tips under the cut ^^
Now personally I like to draw the seam lines on the fabric instead of the seam allowances for the accuracy, but I gather that's not the norm for machine sewing; idk, I don't really get it, I like to see where I'm supposed to sew. Those erasable pens that vanish with heat are the best imo, they don't stain or smudge, don't disappear on their own and they're easy to remove when you're done
I like to use basting thread instead of pins (a kind of specialty thread that breaks easier than normal thread) and blunt embroidery needles, simply because I prefer not to stab myself lol. I find embroidery needles working just fine on minky, sometimes even better than sharp needles, since they're less prone to snagging on the loops
If you do applique, I recommend some sort of iron-on adhesive or fabric glue, it holds the stuff in place better than pins; you'll want the iron on as low setting as possible, faux fur and minky is easy to melt; also some sort of press cloth (or baking paper if you're on a budget like me) to diffuse the heat better and/or to protect your iron in case it does end up melting
Sew around applique even if you glue it down, the fur makes it hard for the glue to get enough heat to activate all the way so it tends to unstick. Whip stitch is the easiest and the most subtle, but blanket stitch can make interesting edges. Also it's good to match your embroidery thread/floss to the applique, it usually looks better than when it's matched to the background
#not art#asks#sewing#sewing tips#tips#if you have more questions lmk! I'm no professional but I do know a thing or two imo
5 notes
·
View notes
Text

Spy crab pattern!


To be done in velour or minky, 1 cm seam allowance, ignore all lines with an x through them. Eyes are plastic safety eyes. Applique to be done with a close zigzag stitch. If you have an embroidery machine, I have the files for the applique and for the legs (because I'm lazy lmao). Please just ask.
Have fun sewing!
10 notes
·
View notes
Last Seen Blogs

rajadrama
Si Raja Drama

honeysmacked
Honeysmack

una-victoria-mas
Ella
starcrossedmade
JUST KEEP FOLLOWING THE HEARTLINES ON YOUR HAND.

rainylovelady
hl mis amores soy nueva