#arduino camera wifi
Explore tagged Tumblr posts
Visit Tumblr Blog
Explore Tumblr blogs with no restrictions, modern design and the best experience.
Last Seen Tumblr Blogs


Fun Fact
25% of US internet users with an annual income of $80-100K use Tumblr.
Text
We're looking at making/buying a non-cloud doorbell camera for the house. I'm not afraid of working with an Arduino/Rasp Pi, etc if necessary, but obviously if I could just buy something affordably, I'd rather do that. Basically something where someone could ring it and it would ping people on the local wifi (or maybe through an API like Adafruit IO, but not Amazon, etc). Anyone have any recs?
(@robustcornhusk this seems especially up your alley)
6 notes
·
View notes
Text
AH I REMEMBERED WHAT I WAS GONNA SAY EARLIER but it's kind of stupid, lmao.
So my partner is getting into brewing beer and I got them a Tilt, which is a Bluetooth hydrometer. It measures specific gravity and temperature, which are things you want to know so that you don't kill your yeast or whatever. Except the sensor's Bluetooth range is super short, and it basically runs via a phone app, and the temperature we're logging currently is the crawlspace, accessible via the staircase closet. So they were like, wait, what do we do about this, because I can't leave my phone in the closet, that's my alarm clock.
In a kind of ridiculous turn of life imitating art, I was like, hold up, I got just the thing right at my desk. Bam. Old phone. We just needed to scrounge up a charger because the battery is so dead that after charging just enough to power on it claimed it was at 53% (to be fair to it, there is a very real chance that it's correct, and it just holds no charge at this point so the capacity is just THAT low) and now it lives in the closet logging sensor data.
And I was like, you know...didn't I just solve a major story detail with a much larger version of this...yeah, no, this is all vaguely familiar somehow, power supply issues and all. Kind of cool that the concept works though. Kind of weird that it came up at all?
We are not gonna talk about the fact that I still have at least two more ancient-ass phones in a drawer where that came from because look, man, sometimes you just need a camera/mic/mini computer with Bluetooth and wifi that fits in a pocket, and people just get rid of these things, but not me. I actually could build a shitty security system out of them if I was reaaaally inclined. I mean. I'm not. But it's technically possible.
For real though, If I pick up any stupid maker projects I still high-key am thinking about slapping Bluetooth into a necomimi headset and running that through an Arduino and learning to code just enough to let me skip songs/change the volume on Spotify with my brain, because it's entirely doable, and I mean yeah I could do that on my phone remotely too, but that's not funny, now, is it. I'm just not sure it's $350+ of parts funny. Kind of a big investment just to prove the point that haha look I am the extremely ADHD type of lazy where I would rather solve a problem via the most convoluted and complicated Rube-Goldberg type ass machine way possible rather than just perform a single simple action.
YEAH I'VE BEEN THIS SCATTERED ALL DAY AND I REALLY SHOULD GO TO BED SHOULDN'T I. I started playing Satisfactory. Mistakes were made. I'm going to dream about conveyor belts again and I did it to myself...
#you know I used to mostly blog about witchcraft and paganism#and now I'm like. you know what I want to do? chain an EEG sensor to the Spotify API and skip songs with my brain.#it's kind of like magic when you put it like that. maybe things haven't actually changed that much after all#the headset idea actually came about bc I'd gotten so far into the writing zone that I literally just. tried to skip a song with my brain.#because I had so much reploid characters on my mind that it just sounded like a normal course of action I should be able to take#obviously it didn't work and cue me sitting there for a full 3 seconds going 'why didn't it. wait. why did I think it would?'#followed immediately after by 'YEAH BUT I PROBABLY COULD DO THAT ACTUALLY'#because you just Cannot write a character like Glitch without it rubbing off on you a little bit and WWGD kicked in real hard lmao#well obviously he'd [ridiculous chain of ideas ending in 'anyway I installed some shit and now I can control Spotify with my mind']#and I gotta say I do not like the idea of sticking a sensor on the *inside* of my skull. sounds very bad.#but it doesn't have to be on the inside to work soooo there's that!#I have a friend who for quite a long time had a rare earth magnet in one finger so he could find live wires by touch#he ended up removing it for work eventually but when I say I was jelly. man. but also kinda squeamish about it.#I do not like sharp things and I am Very funny about my fingers as an artist/writer/used to be musician.#but man that sounds cool. I want the magnet senses. I don't think I want them enough to have a magnet under my skin though#I think I wouldn't use them enough for that to be helpful actually lmao#anyway do I even need more senses? probably not. mine are already unfiltered and loud as shit.#'boy I wish I could sense magnetic fields' says idiot guy who can hear the mains hum even with no electronics currently turned on#like when the power goes out I can FEEL the fucking difference in the air and it's unnaturally quiet and kinda spooky#I do not think I need help on this front actually. I think I got it handled pretty okay lol
3 notes
·
View notes
Video
youtube
Smart QR-Code Based Door Lock System Using ESP32-CAM \Wi -Fi Door Lock System Using ESP32 CAM Based on IoT | IoT Operated Door Lock using ESP32 CAM Module | ESP32-CAM Face Recognition Door Lock System | IoT based Door Access Control System using ESP32cam | esp32-cam face recognition door lock system | face recognition door lock system using esp32-cam ppt | WiFi door locking System using ESP32 project report | esp32-cam face detection door lock system ieee paper***********************************************************If You Want To Purchase the Full Working Project KITMail Us: [email protected] Name Along With You-Tube Video LinkWe are Located at Telangana, Hyderabad, Boduppal. Project Changes also Made according to Student Requirementshttp://svsembedded.com/ https://www.svskits.in/ http://svsembedded.in/ http://www.svskit.com/M1: 91 9491535690 M2: 91 7842358459 We Will Send Working Model Project KIT through DTDC / DHL / Blue Dart We Will Provide Project Soft Data through Google Drive1. Project Abstract / Synopsis 2. Project Related Datasheets of Each Component3. Project Sample Report / Documentation4. Project Kit Circuit / Schematic Diagram 5. Project Kit Working Software Code6. Project Related Software Compilers7. Project Related Sample PPT’s8. Project Kit Photos9. Project Kit Working Video linksLatest Projects with Year Wise YouTube video Links152 Projects https://svsembedded.com/ieee_2024.php133 Projects https://svsembedded.com/ieee_2023.php157 Projects https://svsembedded.com/ieee_2022.php135 Projects https://svsembedded.com/ieee_2021.php 151 Projects https://svsembedded.com/ieee_2020.php103 Projects https://svsembedded.com/ieee_2019.php61 Projects https://svsembedded.com/ieee_2018.php171 Projects https://svsembedded.com/ieee_2017.php170 Projects https://svsembedded.com/ieee_2016.php67 Projects https://svsembedded.com/ieee_2015.php55 Projects https://svsembedded.com/ieee_2014.php43 Projects https://svsembedded.com/ieee_2013.php1500 Projects https://www.svskit.com/2025/01/1500-f...***********************************************************1. ESP32CAM QR Code Reader | ESP32-CAM-QR Code Scanner,2. DIY Smart Wi-Fi Video Doorbell using ESP32 and Camera,3. ESP32 CAM Face Detection Door Lock System,4. ESP32 CAM Face Recognition Door Lock System,5. ESP32 Cam Motion Alert | Send Image to Telegram,6. ESP32-CAM Face Recognition for Access Control,7. How I Build Face Recognition Door Lock,8. ESP32CAM QR Code Scanner,9. ESP32-CAM Face Recognition and Video Streaming with Arduino IDE,10. ESP32CAM QR Code Reader | ESP32-CAM-QR Code Scanner,11. ESP32-CAM Video Streaming and Face Recognition with Arduino IDE,12. WiFi Door Lock using ESP32 CAM
0 notes
Text
UBTECH UGOT kit-AI Space Exploration version - ROBOSTEAM
https://robosteam.ro/product/ubtech-ugot-kit-ai-space-exploration-version/
Arduino GIGO R1 WIFI is the moat powerfull Arduino board ever, the GIGA R1 is based on the same microcontroller as thr Portenta H7, the STM32H747. The Arduino I/O pin can handle 40ma as an absolute maximum without damage to the Arduino. The STM32H7x7 lines combine the performance of the Cortex-M7 (with double-precision floating point unit) running up to 480 MHz and the Cortex-M4 core (with single-precision floating point unit)
- PERFORMANCE
480 MHz fCPU on the Cortex-M7, 240 MHz on the Cortex-M4, 3224 CoreMark / 1327 DMIPS executing from Flash memory with 0-wait states thanks to its L1 cache
L1 cache (16 Kbytes of I-cache +16 Kbytes of D-cache) boosting execution performance from external memories
- Security
Crypto/hash hardware acceleration, secure Firmware Install (SFI) embedded, security services to authenticate protect your software IPs while performing initial programming
Secure Boot Secure Firmware Update (SBSFU)
Power efficiency multi-power domain architecture enables different power domains to be set low-power mode to optimize the power efficiency. Embedded SMPS to scale down the supply voltage, supply external circuitry , combined with the LDO for specific use cases. USB regulator to supply the embedded physical layer (PHY).
145 µ/MHz typical @VDD = 3.3 V and 25 °C in Run mode (peripherals off) and SMPS
2.43 µA typical in Standby mode (low-power mode)
460 nA typical in VBAT mode with RTC (low-power mode)
- Graphics
LCD-TFT controller interface with dual-layer support MIPI-DSI interface for driving the DSI display Chrom‑ART Accelerator™. boosts graphical content creation while saving core processing power, thus freeing up the MCU for other application needs JPEG hardware accelerator for fast JPEG encoding and decoding, off-loading the CPU
- Embedded peripherals
Up to 35 communication interfaces including FD-CAN, USB 2.0 high-speed/full-speed. Ethernet MAC, Camera interface
Easily extendable memory range using the flexible memory controller with a 32-bit parallel interface, or the Dual-mode Quad-SPI serial Flash memory interface.
Analog: 12-bit DACs, fast 16-bit ADCs
Multiple 16- and 32-bit timers running at up to 480 MHz on the 16-bit high-resolution timer
0 notes
Text
Price: [price_with_discount] (as of [price_update_date] - Details) [ad_1] Plug and Play, No Driver Required. Ideal USB Printer Cable: type A to Type B printer cable is a versatile solution for connecting both USB-A enabled devices to your printer. This USB hp printer cord is the perfect choice for desktops and laptops, providing an efficient way to reduce clutter and save money. Additionally, the added benefit of compatibility offers even greater flexibility in how you connect and use your printer, embracing the convenience of Printer Cable. 480Mbps High-speed Transfer: High speed Lexmark printer cord transfers data fast speed up to 480 Mbps for USB 2.0 devices, this USB A to B canon printer cable is backward compliant with low-speed USB 1.0 (1.5 Mbps) and full-speed USB 1.1 (12 Mbps). Compared to a WIFI connection, a printer USB type b cable provides a more stable connection and offers a more efficient work way for you. Easy to Plug & Durable Dell Printer Cord: Simply connect to your printer, no driver is required. Tangle-free printer cable USB B with TPE jacket eliminates bunching, tangles, and knots, photo scanner cable makes the USB 2.0 printer cord more flexible and offers a long lifespan. ▶WIDE COMPATIBILITY - ideal for connecting your Printer, Scanner, Fax, Hard Drive Disk, Server, Keyboard, Midi, DAC, Snowball mic, Development board, UPS, Digital Camera and more to a Laptop, Computer (Mac and PC) and other legacy devices with a USB-B port. Also is a good USB Type B replacement cord for devices like Arduino, Blue, Brother, Canon, CyberPower, Dell, Epson, Fujitsu, HP, IOGEAR, Lexmark, M-Audio, and Panasonic, Plug and play, no need to install any plug-in, No drive required. HP Deskjet, HP Officejet, HP Envy, HP Photosmart, Epson Stylus, Canon Pixma, Brother MFC, Brother DCP, Lexmark, Samsung, Oki, Yamaha digital piano, sound bar, DAC etc.HP Deskjet, HP Officejet, HP Envy, HP Photosmart, Epson Stylus, Canon Pixma, Brother MFC, Brother DCP, Lexmark, Samsung, Oki, Yamaha digital piano, sound bar, DAC etc. ✅ [Universal Printer Cable]: Sweguard USB 2.0 Printer Cable is ideal for connecting your scanner, printer, server, camera such as HP, Canon, Lexmark, Epson, Dell, Xerox , Samsung and other usb b devices to a laptop, computer (Mac/PC) or other USB-enabled device. 【Ideal Printer Cable】Printer Cable can easily can connect usb type b scanners, printers, all-in-one machines, fax machines and other usb-b devices to your laptop. It can help you solve the problem of file transfer errors and improve office efficiency. Note: This USB Printer Cable is suitable for most printer devices, printing is related to software, please make sure that your device has downloaded the driver, select the corresponding model when printing. ▶UPGRADED VERSION-SHIELDING RING - The normal printer cable will receive all kinds of messy high-frequency signals in the surrounding environment, and these signals are superimposed on the originally transmitted signal, and even change the original transmission of useful signals. Shielding Ring Connector make the normal useful signal Stable Transmission better, and a good suppression of high-frequency interference signal, this is why FEDUS improve the cable with Layer Shielding Structure. ▶REINFORCED & MORE DURABLE - 10X DURABLE CABLE: In order to enhance the durability of the printer cable and ensure that customers can achieve the purpose of "NEVER CHANGE THE CABLE", we strive to perfection in both material selection and wire structure. High quality PVC and machine moulded connector provides strong protection for the printer cord. At the same time, the special SR design makes the internal core not to be damaged no matter how many times the customer bends. ▶2 YEAR REPLACEMENT WARRANTY - 1 Year manufacturer warranty and product support provide peace of mind when purchasing, Each Printer Cord goes through rigorous testing to ensure a secure wired connection If for any reason you are not satisfied with the item, you will get a replacement
0 notes

Video
youtube
KALIAN WAJIB PUNYA! Stop Kontak Timer dan kontrol jarak jauh Rabit Smart...
Link Pembelian TERMURAH : https://s.shopee.co.id/8AAYWpwBfK
Link Grup Komunitas Meja Unbox : Grup WhatsApp : https://chat.whatsapp.com/BiEQ2v8IDsg... Grup Telegram : https://t.me/+Yg5a0rFFgmc2ZDFl
Hal pertama yang membuat baterai kita cepat rusak adalah ketika kita lupa melepaskan charger ketika baterai kita sudah 100% yang dimana hal tersebut bisa membuat baterai soak, rusak, bahkan juga bisa menyebabkan overheat pada smartphone kita, oleh karena itu, colokan dari rabit yang memiliki smart system ini bisa membuat seluruh perangkat elektronik kami memiliki timer, dan juga bisa dikontrol dari jarak jauh, bahkan support google asisten loh ! untuk selengkapnya silahkan tonton video sampai selesai
YouTube : youtube.com/MejaUnbox TikTok : tiktok.com/mejaunbox Instagram : instagram.com/meja.unbox Facebook Page : facebook.com/mejaunbox Twitter : x.com/MejaUnbox
smart home smart home gadgets smart home china smart home cleaning asmr smart home system smart home parody smart home indonesia smart home arduino smart home bardi smart home murah stop kontak stop kontak listrik stop kontak timer stop kontak broco stop kontak tanpa kabel stop kontak ac stop kontak panasonic stop kontak anti jeglek stop kontak saklar stop kontak paralel stop kontak terbaik stop kontak ada arus listrik semua stop kontak anti konslet smart door smart door lock smart door lock murah smart door lock 2 pintu smart door lock terbaik smart door lock kadonio smart door lock paloma smart door lock bardi smart cctv smart cctv terbaik smart cctv murah terbaik smart cctv v380 smart cctv xiaomi smart cctv outdoor terbaik smart cctv camera smart cctv tanpa wifi smart cctv terbaik 2023 smart cctv ezviz smart cctv outdoor smart cctv alarm smart cctv avaro smart cctv acome smart led smart led bulb smart led strip lights smart led philips smart led strip smart led ws2812b smart led avaro smart led light smart led bardi smart led hannochs colokan listrik colokan listrik di arab saudi colokan listrik tidak berfungsi colokan listrik 3 kabel colokan listrik nyala keduanya colokan listrik longgar colokan listrik yang bagus colokan listrik di jepang colokan listrik di thailand colokan listrik terbaik
#youtube#KALIAN WAJIB PUNYA! Stop Kontak Timer dan kontrol jarak jauh Rabit Smart Extension Wifi Power Strip Link Pembelian TERMURAH : https://s.sho
1 note
·
View note
Text
ESP8266 Wifi Module | Nodemcu ESP8266 for IoT Solution
The Internet of Things (IoT) is revolutionizing the way we interact with technology, making our lives smarter and more efficient. At the heart of this revolution is the ESP8266 WiFi module, a low-cost, powerful solution perfect for your IoT projects. Whether you're a hobbyist, a professional developer, or a business looking to integrate smart technology into your products, the ESP8266 WiFi module offers unmatched versatility and performance. Here's why you should consider buying the ESP8266 WiFi module and how the NodeMCU ESP8266 can be your gateway to a myriad of IoT solutions.
What is the ESP8266 WiFi Module?
The ESP8266 is a highly integrated chip designed for the needs of a new connected world. It offers a complete and self-contained WiFi networking solution, allowing it to either host the application or offload all WiFi networking functions from another application processor. With its low cost and high performance, the ESP8266 WiFi module has become a popular choice among IoT developers.
ESP8266 NodeMcu WiFi Development Board Features:-
It is based on ESP8266, integates GPIO, PWM, IIC, 1-Wire and ADC all in one board.
Power your developement in the fastest way combinating with NodeMCU Firmware!
USB-TTL included, plug&play
10 GPIO, every GPIO can be PWM, I2C, 1-wire
Open source IoT Platform
Easily Programmable
Low cost & Simple to Implement
WI-FI enabled
ESP8266 NodeMcu WiFi Development Board Applications:-
Home Appliances
Home Automation
Smart Plug and lights
Mesh Network
Industrial Wireless Control
Baby Monitors
IP Cameras
Sensor Networks
Wearable Electronics
Why Choose NodeMCU ESP8266 for Your IoT Projects?
Ease of Use: NodeMCU's integrated USB-to-serial interface and pre-flashed firmware allow for immediate programming and development.
Versatile Programming: You can program the NodeMCU using the Arduino IDE or NodeMCU’s native Lua scripting language, giving you flexibility in development.
Wide Community Support: As one of the most popular IoT development platforms, NodeMCU has extensive documentation and a large community, making it easier to find support and resources.
Cost-Effective: NodeMCU provides a highly cost-effective solution for IoT development, offering excellent value for money.
Rapid Prototyping: Its comprehensive feature set and ease of use make NodeMCU ideal for rapid prototyping and deployment of IoT solutions.
Conclusion
Purchase Your ESP8266 and NodeMCU ESP8266 Today!
Don't miss out on the opportunity to enhance your IoT projects with the best technology available. Purchase your ESP8266 WiFi module and NodeMCU ESP8266 development board today and join the growing community of IoT developers who are shaping the future of technology.
Innovation awaits at Campus Component, where you can buy genuine ESP8266 NodeMCU boards at competitive prices. Take the first step towards realizing your IoT dreams and explore the endless possibilities of connected devices. Order now and join the IoT revolution with Campus Component as your trusted partner.
0 notes
Text
Raspberry Pi Pico: Programmierung und Entwicklung mit der Arduino IDE auf Linux

In diesem Artikel zeige ich dir, wie du den Raspberry Pi Pico in der Arduino IDE unter Linux programmieren kannst. Gemeinsam werden wir die Schritte zur Einrichtung und Konfiguration der Entwicklungsumgebung durchgehen, um sicherzustellen, dass du problemlos mit der Programmierung starten kannst.

Den Raspberry Pi Pico gibt es derzeit in zwei Versionen, zum einen mit und ohne WiFi und neuerdings sogar mit Bluetooth Support. Der kleine Zwerg auf dem nachfolgenden Bild ist der XIAO RP2040 welcher auch mit dem RP2040 Chip des Pi Pico daher kommt nur Bauartbedingt weniger Pins als der große hat.

Mikrocontroller - XIAO RP2040 & Raspberry PI Pico Die Inspiration für diesen Artikel stammt von einem treuen Leser meines Blogs, der aktuell Schwierigkeiten bei der Einrichtung und Konfiguration seines Raspberry Pi Pico hat. Mein Ziel mit diesem Beitrag ist es, ihm und anderen, die auf ähnliche Herausforderungen stoßen, zu helfen und eine Lösung für dieses Problem anzubieten.
Anschluss & Einrichten des Raspberry Pi Pico unter Linux
Zunächst schließen wir den Raspberry Pi Pico an einen freien USB-Anschluss an, dieser sollte dann auch erkannt werden. oem@anna:~$ lsusb Bus 001 Device 002: ID 8087:8000 Intel Corp. Bus 001 Device 001: ID 1d6b:0002 Linux Foundation 2.0 root hub Bus 003 Device 001: ID 1d6b:0003 Linux Foundation 3.0 root hub Bus 002 Device 002: ID 0bda:57bc Realtek Semiconductor Corp. USB Camera Bus 002 Device 003: ID 2e8a:0005 MicroPython Board in FS mode Bus 002 Device 001: ID 1d6b:0002 Linux Foundation 2.0 root hub oem@anna:~$ Nun müssen wir dieses Board in den Bootloader Modus starten, dazu trennen wir zuerst das USB-Kabel wieder vom PC und drücken den kleinen, weißen RESET-Taster auf dem Board und verbinden dann wieder den Raspberry Pi Pico (mit gedrückter RESET-Taste) mit dem PC. Im Dateimanager sollte dann ein neues Laufwerk "RPI-RP2" sichtbar sein. In meinem Fall hatte ich sogar auf dem Desktop noch ein zusätzliches Symbol für dieses Laufwerk erhalten.

Laufwerk des Raspberry Pi Pico unter Linux
Installieren der Treiber für die Arduino IDE unter Linux
Jetzt wechseln wir zur Arduino IDE, in meinem Fall hatte ich bereits die Version 1.8.18 auf meinem Linux Mint 20.2 installiert, welches ich weiter nutze. oem@anna:~$ lsb_release -a No LSB modules are available. Distributor ID: Linuxmint Description: Linux Mint 20.2 Release: 20.2 Codename: uma oem@anna:~$ Schritt 1 - Erweitern der zusätzlichen Boardverwalter-URLs Als ersten Schritt müssen wir der Arduino IDE eine neue Quelle für Boardtreiber angeben, dieses wird im Dialog "Zusätzliche Boardverwalter URLs" gemacht. Du erreichst diesen über "Datei" > "Voreinstellungen" > "Zusätzliche Boardverwalter URLs"

Dialog "Zusätzliche Boardverwalter-URLs" in der Arduino IDE Hier fügen wir die nachfolgende URL hinzu und betätigen die Schaltfläche "OK" https://github.com/earlephilhower/arduino-pico/releases/download/3.4.1/package_rp2040_index.json Schritt 2 - Installieren des Boardtreibers über den Boardverwalter Nachdem wir die neue Quelle für unseren Boardtreiber angegeben haben, können wir in den Boardverwalter wechseln. Diesen findest du unter "Werkzeuge" > "Board: xyz" > "Boardverwalter...". In diesem Dialog suchst du nun nach "rp2040" und wählst die Schaltfläche "Installieren" am Paket "Raspberry Pi Pico/RP2040" aus.

Boardtreiber "RP2040" im Boardverwalter Es werden jetzt diverse Dateien heruntergeladen, die Verbindung war in meinem Fall nicht sehr stabil und somit musste ich diesen Vorgang insgesamt dreimal starten. Das gute war jedoch, dass der Installer am letzten Schritt weitergemacht hat, somit dauerte dieser Vorgang nur wenige Minuten. Schritt 3 - Auswahl des Boardtreibers Wenn der Boardtreiber für den Raspberry Pi Pico erfolgreich installiert wurde, dann wählen wir diesen aus "Werkzeuge" > "Board: xyz" > "Raspberry Pi RP2040 Boards (3.4.1)" aus. In meinem Fall habe ich einen normalen RP2040 also ohne WiFi Support gewählt.
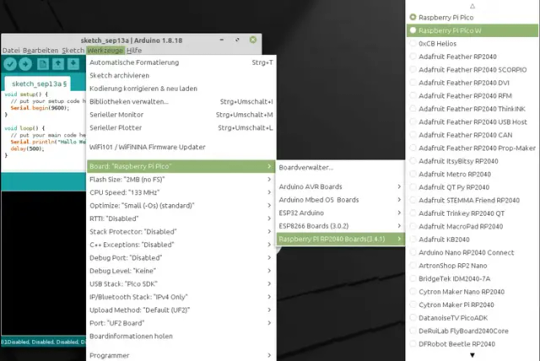
Unterstützte Boards des Treibers Im nächsten Schritt müssen wir noch sicherstellen das, der korrekte Anschluss gewählt ist, hier muss "UF2 Board angewählt sein.

Auswahl des Ports für den RP2040 Die Konfiguration des Boards habe ich nicht verändert und mit dieser hat der Upload eines ersten Sketches auch funktioniert.
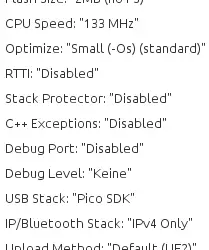
Konfiguration des Raspberry Pi Pico in der Arduino IDE
Testen der Installation & Konfiguration mit einem kleinen Sketch
Nachdem jetzt alles eingerichtet ist, testen wir unsere Installation & Konfiguration einmal. Dazu schreiben wir ein kleines Sketch welches uns lediglich die Textzeile "Hallo Welt!" auf der seriellen Schnittstelle ausgibt. void setup() { // put your setup code here, to run once: Serial.begin(9600); } void loop() { // put your main code here, to run repeatedly: Serial.println("Hallo Welt!"); delay(500); } Der Upload-Button führt dann nachfolgende Schritte aus: - prüfen & kompilieren des Codes, - Umwandeln in eine UF2-Datei, - suchen nach Laufwerken / RP2040 Geräten, - kopieren der erzeugten UF2-Datei auf das gefundene Laufwerk
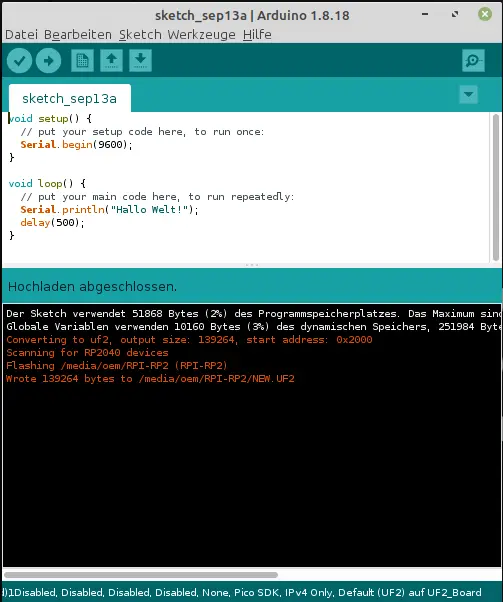
kleines Beispiel Sketch zum Testen der Installation & Konfiguration Wenn wir uns nun die Ausgabe im seriellen Monitor anschauen möchten, erhalten wir eine Fehlermeldung, denn im letzten Schritt wurde der RP2040 neu geflasht und dann mit einem neuen Anschluss eingebunden. Diesen Anschluss müssen wir dann zunächst unter "Werkzeuge" > "Port" auswählen.

Auswahl des neuen Anschlusses nach dem Upload einer ersten UF2-Datei Nun können wir wie gewohnt den seriellen Monitor öffnen und sehen unsere Ausgabe "Hallo Welt!" (hier zusätzlich mit einem Zeitstempel).
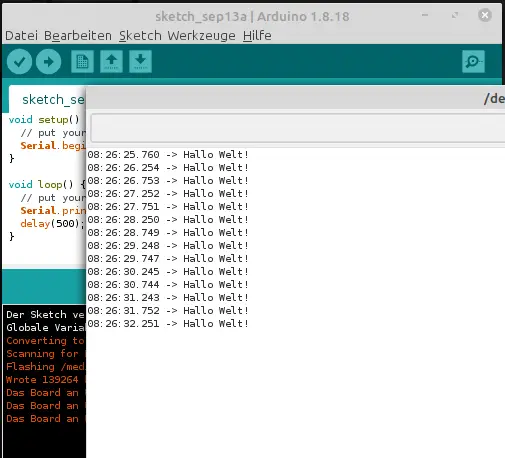
Ausgabe der Textzeile "Hallo Welt!" im seriellen Monitor der Arduino IDE
Abschluss & Ausblick
Ich habe dir jetzt gezeigt, wie du deinen Raspberry Pi Pico unter Linux einrichten und ein erstes Sketch auf diesen speichern kannst. Die Information dazu musste ich jedoch zunächst auch erstmal suchen, dass dieses nicht so einfach ist. Hier habe ich mir als Quelle den Beitrag Raspberry Pico mit der Arduino IDE programmieren vom Heise-Verlag genommen. Im nächsten Beitrag würde ich mir mal den Raspberry Pi Pico mit WiFi und neuerdings auch Bluetooth Support nehmen und testen, wie man dort einen kleinen Webserver programmiert. Read the full article
0 notes
Photo

The Most Advanced Camera Module from Arducam:
Programmable Motorized Focus Camera for Raspberry Pi Now Supports Auto-Focus!
Key Features:
High-Definition video camera for Raspberry Pi Model A/B/B+ and Raspberry Pi 2 Pi 3B, Pi 3B+ and Pi Zero
5MP OV5647 or 8MP IMX219 sensor with motorized focus lens
Integral IR filter
Angle of View: 54 x 41 degrees
Field of View: 2.0 x 1.33 m at 2 m
Full-frame SLR lens equivalent: 35 mm
Focus distance: 4 cm to infinity
Size: 25 x 24 mm
15 cm flat ribbon cable to 15-pin MIPI Camera Serial Interface (CSI) connector
The auto-focus demo source code is available on our GitHub.
Check out the blog here: http://bit.ly/2wWZ1Yn
Find the 5MP OV5647 here and the 8MP IMX219 here.
Or buy them directly from one of our distributors here.
#Arducam#arducam for pi#arduino projects#arduino cameras#arduino cam#Raspberry Pi#pi cameras#pi projects#camera module for pi#auto-focus control#camera module usb#best raspberry pi camera#arduino camera control#arduino camera projects#sony camera module#camera module for raspberry pi zero#camera module board#OV5647#IMX219#arduino camera wifi#arduino camera image recognition
0 notes
Note
That Optor thing sent me down a rabbit hole (the rest of the site)
The author invented an LED data transmission system that allows a minimum of 10Mbps over 1.4km, and because it doesn't use lasers, there's minimal regulations on it. He has very detailed guides that include vocabulary and pictures on how to make the physical devices (just plug ethernet into the box and you can ping your neighbors).
But anyways, it got me to thinking about your idea to make a book broadcasting station. Phone cameras can record infrared light, so what about infrared LEDs that broadcast data anyone with a smartphone app can access? You'd be limited to the 24FPS of the camera, which would be 3 ASCII characters per second. A book would take 1/3 of a year to download, but a smaller essay or article would take tens of minutes.
Transmitters could be set up in busy areas surrounded by office windows or food places and people in the know could just use their camera app to look around for blinking infrared lights, then face their cameras toward it while they eat or work and read the articles later.
You could even add a wifi module and have it set up as an open access point with a webpage that allows text uploads (with a filesize limit). People could anonymously upload files, and they'd be broadcast in order.
(Could also skip the LED part and just make little arduinos for $40 that access points with write-only file servers so anyone could leave pdfs or recordings. And then autodelete files after # days. Could run off a lithium battery and would be difficult to find the transmitter)
Hm, I don't know about using infrared. I'd much prefer radio waves, which (I believe) would allow a more usable speed of ~27 bytes/ASCII per second over regular radio. This would mean an average book would take just under 4 hours.
I do like the last paragraph, that's an interesting idea. Analogue pastebin...
2 notes
·
View notes

Text
Pixelstick logo

Pixelstick logo code#
Pixelstick logo professional#
If that is your case, try installing older versions of the app. Even in some rare cases, the re-install step also don't work.iOS usually provides an option to restore settings and content from iCloud backup, if you've enabled it previously. Finally, if you can't fix it with anything, you may need to uninstall the app and re-install it.After that put it to charge, and press the power button. If none of the above working, you can wait till your phone battery drains and it turns off automatically.Press the power off button for few seconds and then choose restart from the menu to restart your device.Now you can try opening the app, it may work fine. Then you close the app that has this issue. You just need to press the recent applications menu (usually the first left button) in your phone. Most of the times, it might be a temporary loading issue.Usually when you open an app, you will see a black screen for few seconds and then app will crash with or without an error message. It is one of the most common problem in mobile phones and tablets. jules.dukers liked DIY Beam-on-Target Fusion Particle Accelerator.Common PixelStick App Problems and Troubleshooting Steps ✅ I'm getting black screen / white screen (blank screen) when I open PixelStick?.jules.dukers liked Web security everywhere.Florian Festi wrote a reply on Boxes.py.kelvinA wrote a comment on project log Project Log 4: Not So Much Fun With FEA.micl has updated the project titled PicoPad.Charlie Lindahl liked Solar Powered WiFi Weather Station V4.0.Steven J Greenfield wrote a comment on Metrix Create:Space.Elliot Williams on As Europe Goes To LEDs, Scientists Worry.Darren on Better Mousetraps (or Screw Drives) Don’t Always Win.thoriumbr on Raspberry Pi Grants Remote Access Via PCIe (Sort Of).one on Mechanical Color Picker Types Hex Codes For You.70sJukebox on Raspberry Pi Grants Remote Access Via PCIe (Sort Of).Elliot Williams on 3D Printed String Vase Shows What’s Possible.Eric Chapin on Mechanical Color Picker Types Hex Codes For You.daveboltman on It’s Pi All The Way Down With This Pi-Powered Pi-Picking Robot.Alexandre on Mechanical Color Picker Types Hex Codes For You.Hackaday Podcast 185: A 2022 Rotary Phone, How AI Imagines Zepplin, Are We Alone In The Universe 1 Comment Posted in Arduino Hacks, LED Hacks Tagged addressable led, ESP8266, light painting Post navigation This isn’t the first LED light stick we’ve seen, if you’re interested in such things. There aren’t currently too many galleries of DIY LED-enabled light paintings, but we’d love to see some custom modded light painting approaches in the future. Some future improvements planned for the project include TFT/OLED support, rainbow or color gradient patterns in the LEDs, and accelerometer or gyroscope support for supporting animation. Images are drawn from the bottom row to the top, so images have to be transformed before updating to the LED painter.
Pixelstick logo code#
The project uses the Adafruit NeoPixel, ArduinoJson, and Bodmer’s TFT_HX8357 libraries for implementing the BMP drawing code, which also allows for an image preview prior to uploading the code to the microcontroller. The settings for the number of LEDs, time for the image row, and STA/AP-mode for wireless connections are also set by the web interface. Images are stored internally in Flash memory and are uploaded through a web interface. It directly supports 24-bit BMP, with no conversion needed. The LED Lightpainter takes the Pixelstick a few notches lower for amateur photographers and hobbyists. Nevertheless, it’s a huge step up from waving around a flashlight with your friends.
Pixelstick logo professional#
The equipment needed for setting up the light painting sticks runs in the order of hundreds, not to mention the professional camera and lenses needed. It’s actually based on the Pixelstick, a tool used by professional photographers for setting up animations and photorealism shots. This weekend project from uses an ESP8266-based microcontroller and an addressable WS2812-based LED strip to paint words or custom images in thin air. Light painting has long graced the portfolios of long-exposure photographers, but high resolution isn’t usually possible when you’re light painting with human subjects.
0 notes