#camera module for raspberry pi zero
Explore tagged Tumblr posts
Visit Tumblr Blog
Explore Tumblr blogs with no restrictions, modern design and the best experience.
Last Seen Tumblr Blogs


Fun Fact
Tumblr is used by 21% of adults online aged 18-29 years.
Text
Why India’s Drone Industry Needs Periplex: The Hardware Tool Drones Didn’t Know They Needed
As drones fly deeper into critical roles — from agricultural intelligence to autonomous mapping, from disaster response to military ops — the hardware stack that powers them is undergoing a silent revolution.
At the center of that transformation is Periplex — a breakthrough tool from Vicharak’s Vaaman platform that redefines how drone builders can interface with the real world.

What is Periplex?
Periplex is a hardware-generation engine. It converts JSON descriptions like this:{ "uart": [ { "id": 0, "TX": "GPIOT_RXP28", "RX": "GPIOT_RXN28" } ], "i2c": [ { "id": 3, "SCL": "GPIOT_RXP27", "SDA": "GPIOT_RXP24" }, { "id": 4, "SCL": "GPIOL_63", "SDA": "GPIOT_RXN24" } ], "gpio": [], "pwm": [], "ws": [], "spi": [], "onewire": [], "can": [], "i2s": [] }
…into live hardware interfaces, directly embedded into Vaaman’s FPGA fabric. It auto-generates the FPGA logic, maps it to kernel-level drivers, and exposes them to Linux.
Think of it as the “React.js of peripherals” — make a change, and the hardware updates.
Real Drone Applications That Truly Need Periplex
Let’s break this down with actual field-grade drone use cases where traditional microcontrollers choke, and Periplex thrives.
1. Multi-Peripheral High-Speed Data Collection for Precision Agriculture
Scenario: A drone is scanning fields for crop health with:
2 multispectral cameras (I2C/SPI)
GPS + RTK module (2x UART)
Wind sensor (I2C)
Sprayer flow monitor (PWM feedback loop)
ESCs for 8 motors (PWM)
1 CAN-based fertilizer module
The Periplex Edge: Microcontrollers would require multiple chips or muxing tricks, causing delays and bottlenecks. With Periplex:
You just declare all interfaces in a JSON file.
It builds the required logic and exposes /dev/pwm0, /dev/can0, etc.
Zero code, zero hassle, zero hardware redesign.
2. Swarm Communication and Custom Protocol Stacks
Scenario: Swarm drones communicate over:
RF LoRa (custom SPI/UART)
UWB mesh (proprietary protocol)
Redundant backup over CAN
Periplex lets you:
Create hybrid protocol stacks
Embed real-time hardware timers, parity logic, and custom UART framing — none of which are feasible in most MCUs
Replacing Microcontrollers, Not Just Augmenting Them
| Feature | Microcontroller | Periplex on Vaaman | |---------------------------|----------------------------|------------------------------------| | Number of peripherals | Limited (4–6) | Virtually unlimited (30+ possible) | | Reconfiguration time | Flash + reboot | Real-time, dynamic reload | | Timing precision | Software-timer limited | FPGA-grade nanosecond-level timing | | AI compatibility | Not feasible | Integrated (Gati Engine) | | Sensor fusion performance | Bottlenecked | Parallel FPGA pipelines |
Developers Love JSON, Not Register Maps
No more:
Scouring 400-page datasheets
Bitmasking registers for I2C configs
Writing interrupt handlers from scratch
Just declare what you need. Let Periplex do the work. Peripherals become software-defined, but hardware-implemented.
Built in India, for India’s Drone Revolution
Vaaman + Periplex isn’t just about tech. It’s about self-reliance.
India’s defence, agriculture, and logistics sectors need secure, reconfigurable, audit-friendly hardware — not black-box SoCs from questionable supply chains.
Periplex is the hardware engine for Atmanirbhar Bharat in drones.
TL;DR
Periplex lets drones adapt hardware to the mission — instantly.
It replaces tangled microcontroller logic with clean, structured JSON.
It unlocks use cases microcontrollers can’t touch: AI at the edge, dynamic reconfiguration, secure protocol stacks, and more.
And it’s built into Vaaman, India’s first reconfigurable edge computer.
Ready to Get Started?
Explore Vaaman on Crowd Supply Reach out for Periplex SDK access: [email protected]
Raspberry Pi
Drones
Drones Technology
Jetson Orin Nano
Technology
0 notes
Photo

The Most Advanced Camera Module from Arducam:
Programmable Motorized Focus Camera for Raspberry Pi Now Supports Auto-Focus!
Key Features:
High-Definition video camera for Raspberry Pi Model A/B/B+ and Raspberry Pi 2 Pi 3B, Pi 3B+ and Pi Zero
5MP OV5647 or 8MP IMX219 sensor with motorized focus lens
Integral IR filter
Angle of View: 54 x 41 degrees
Field of View: 2.0 x 1.33 m at 2 m
Full-frame SLR lens equivalent: 35 mm
Focus distance: 4 cm to infinity
Size: 25 x 24 mm
15 cm flat ribbon cable to 15-pin MIPI Camera Serial Interface (CSI) connector
The auto-focus demo source code is available on our GitHub.
Check out the blog here: http://bit.ly/2wWZ1Yn
Find the 5MP OV5647 here and the 8MP IMX219 here.
Or buy them directly from one of our distributors here.
#Arducam#arducam for pi#arduino projects#arduino cameras#arduino cam#Raspberry Pi#pi cameras#pi projects#camera module for pi#auto-focus control#camera module usb#best raspberry pi camera#arduino camera control#arduino camera projects#sony camera module#camera module for raspberry pi zero#camera module board#OV5647#IMX219#arduino camera wifi#arduino camera image recognition
0 notes
Text
Recording lost seconds with the Augenblick blink camera
Recording lost seconds with the Augenblick blink camera
Warning: GIFs used in today’s blog contain flashing images.
Students at the University of Bremen, Germany, have built a wearable camera that records the seconds of vision lost when you blink. Augenblick uses a Raspberry Pi Zero and Camera Module alongside muscle sensors to record footage whenever you close your eyes, producing a rather disjointed film of the sights you miss out on.
Blink and…
View On WordPress
#Augenblick#blinking#Raspberry Pi Camera Module#Raspberry Pi Zero/Zero W#student project#University of Bremen#Your Projects
1 note
·
View note
Text
Awesome Arduino UNO Projects to Try in 2022!
1.Farmaid: Plant Disease Detection Robot
In this Arduino Project, the author is inspired by the work of Plantvillage.psu.edu and iita.org, and we want to use the DonkeyCar platform to build an autonomous robot that can move around a farm environment without damaging existing plants or soil, and we want to use objects Detection to find and mark diseased crops with eco-friendly colors.
What do you need:
Arduino UNO
Raspberry Pi 3 Model B
ibt-2 H Bridge
Raspberry Pi Camera Module
2.Intelligent Door Lock
In today's world, security and accessibility are major concerns. We are constantly striving to keep our home secure while making our home devices easily accessible even remotely. This Arduino project will show you how to convert an Arduino UNO into a door lock using a Raspberry Pi camera.
What do you need:
Arduino UNO

Raspberry Pi 3 / 4 / Zero / 2 / 1
Raspberry Pi Camera Module
Servos (Tower Pro MG996R)
Speaker: 0.25W, 8 ohms
Mono Audio Amp Breakout – TPA2005D1
Pushbutton switch 12mm
3.Arduino Nano BLE 33 Sense Game Controller
PRABEEN built this game controller with an Arduino Nano BLE 33 Sense, which includes a proximity sensor. As you can see, this is a simple and enjoyable Arduino project!
What do you need
Arduino Nano BLE 33 Sense / XIAO BLE Sense
USB Cable Assembly, USB Type A Plug to Micro USB Type B Plug
4.Arduino Radar
It detects stationary and moving objects with the help of an ultrasonic sensor and an Arduino. And this is a simple Arduino project for beginners!
What do you need?
Arduino UNO
Ultrasonic Sensor
Breadboard
SG90 Micro-servo motor
5. Arduino Weather Station
A powerful Arduino weather station can assist you in more efficiently watering plants and lawns. Use the daily report to determine whether you can skip an irrigation day. Smart Weather will even communicate with connected irrigation systems automatically. You can learn how to use an arduino uno to connect other sensors to monitor the temperature and humidity of your garden in this cool arduino project.
What do you need?
UNO

16X2 LCD RGB Backlight – Full Color Display
Temperature & Humidity Sensor (DHT11)
Female/Female Jumper Wires
Male/Female Jumper Wires
6. Arduino 3D Axonometric Projection
Any method of mapping three-dimensional points to a two-dimensional plane is referred to as 3D projection. Because the majority of current methods for displaying graphical data are based on planar two-dimensional media, this type of projection is widely used, particularly in computer graphics and engineering. In addition, this project Although Arduino is difficult, it is still a fun arduino project.
What do you need?
Arduino Pico
TFT Touch Shield V1.0
ESP-32
7. Making Famous Magic Wand 33x Faster
Do you want to be a wizard for a day? This project will show you how to use a small PCB board to transform a stick in your hand into a magic wand. And this is a really enjoyable Arduino project!
What do you need?
Arduino Nano 33 BLE Sense or XIAO BLE Sense
Wooden Magic Wand ( wooden stick )
8. Arduino Distance sensor and OLED
You can find this blog here. In this blog, you will learn how to use an Arduino UNO and an Ultrasonic Sensor to detect the distance between two objects and how to use a Graphic OLED to display the distance. This project is ideal for Arduino beginners.
What do you need?
Arduino UNO
Grove – Ultrasonic Distance Sensor
Graphic OLED / Graphic LCD
Jumper Wires
9. IoT Weather Data Logger Using Blues Wireless
This project will walk you through the process of building an IoT-based weather data logger using Blues Wireless hardware modules; no SD card, Wi-Fi, or BLE is required. To track your weather data, simply connect your Blues Notecard and Note carrier to the controller.
What do you need?
Arduino Nano 33 BLE Sense
DHT11 Temperature Sensor
Air Quality Sensor
Light Sensor
Source- Seed Studio
2 notes
·
View notes
Text
Lepton camera module

#LEPTON CAMERA MODULE HOW TO#
#LEPTON CAMERA MODULE DRIVERS#
#LEPTON CAMERA MODULE PORTABLE#
#LEPTON CAMERA MODULE SOFTWARE#
#LEPTON CAMERA MODULE PROFESSIONAL#
There’s also a 1/4-20 threaded insert on the bottom of ’s version, making it far more useful in any experimental setup. These thermal images were combined with a VGA resolution camera to produce the very cool enhanced imagery the commercial unit will get you. This thermal camera is built around the FLIR Lepton sensor, providing thermal images with a resolution of 60 by 80 pixels. We first saw it about a year ago, and the results were impressive. has been working on his DIY thermal imager for a while now. That doesn’t mean we’re stuck with crippled thermal imaging cameras, though: we can build our own, with better specs than what the big boys are selling.
#LEPTON CAMERA MODULE HOW TO#
Once FLIR figured out the people who would be most likely to own a thermal imaging camera can figure out how to upload firmware, the party was over. In a manufacturing triumph, the cheapest of these thermal imaging cameras contained the same circuitry as the one that cost six times as much. Who doesn’t like a challenge? Posted in contests, hardware Tagged contest, flir, Flir lepton, thermal imaging cameraĪ few years ago, FLIR unleashed a new line of handheld thermal imagers upon the world. And the challenge of solving a tricky problem and making designs easier for others is a powerful motivator. Peter has a $125 Sparkfun gift card on offer for each of the two winners.
#LEPTON CAMERA MODULE DRIVERS#
The goal here is to create useful Open Source drivers for some very interesting hardware, and there’s some prizes to sweeten the pot. This really is a great example of what the Hackaday.io community is capable of. You can understand how he became interested in portable, and we’re sure whatever project he has in mind for this battery-powered Flir will be awesome. Peter Jansen is the creator of the Open Source Science Tricorder (yes, it’s a tricorder) which took Fourth Prize in the 2014 Hackaday Prize. The Lepton gives any project thermal imaging, and the PureThermal board turns the Lepton into a USB device. For a pair of Benjamins, the specs are very impressive: the Lepton has a resolution of 60×80 pixels and everything is can be read over an SPI port. The Flir Lepton is a tiny little thermal camera that’s been available to the Maker community for some time now, first through GroupGets and now through Sparkfun. There are two challenges here, one for the Raspi and one for the ESP32 and winner will be named for each.
#LEPTON CAMERA MODULE SOFTWARE#
Any software in this challenge must spit out absolute temperature values in a text format, and there must be a demonstration of putting the Flir Lepton into low-power mode. The rules for this challenge are to use the Flir Lepton 2.5 in radiometric mode using either the Raspberry Pi Zero W or ESP32. Yes, this is a documented feature in the Flir Lepton module, but so far very few people are using it, and no one has done it with a small, battery-powered device. There’s a catch, though: this is a project to use the Lepton in radiometric mode, where the camera spits out an actual temperature value for each pixel. Use a Flir Lepton thermal imaging camera module in a battery-powered configuration. Peter Jansen has opened up the Hot Camera Contest on Hackaday.io to use a thermal imaging camera in a battery-powered project. Here’s a challenge for all you hardware hackers out there. Posted in hardware Tagged diy flir camera, Flir lepton, tcam-mini Along with tweaking the ESP32 firmware, there is still a lot that can be done with the TCam-Mini, but it sure looks like a fun project to tinker with if one is into Leptons. For this he repurposed an old in-ear thermometer calibration device. Recently has also begun to further characterize these Lepton sensors, in order to see whether their accuracy can be improved from the rated +/- 5-10 ☌.
#LEPTON CAMERA MODULE PROFESSIONAL#
Being able to load the radiometric data directly into a desktop application for processing makes it a closer match to the professional thermal cameras which states that he’d like to get as close to in terms of features as possible.
#LEPTON CAMERA MODULE PORTABLE#
Compared to the aforementioned FLIR One Pro, there’s a definite benefit in having a more portable unit that is not reliant on a smartphone and accompanying FLIR app. Not cheap, but quite a steal relative to e.g. The project is available on GitHub, as well as as a GroupGets crowd-funding campaign, where $50 gets one a TCam-Mini board, minus the $199 Lepton 3.5 sensor. Using the 160×120 pixel FLIR Lepton 3.5 thermal sensor, and combining it with a custom PCB and ESP32 module for wireless, he created a wireless thermal camera called the TCam-Mini along with accompanying software that can display the radiometric data. While the ultimate goal is to create a stand-alone solution, with its own screen, storage and processing, the TCam-Mini is an interesting platform. With how expensive thermal cameras are, why not build your own? This is the goal with which set out a while ago, covering the project in great detail.
0 notes
Text
The Skull of the Terminator, Raspberry Pi style
The Skull of the Terminator, Raspberry Pi style
It has a Raspberry Pi 4 Model B brain and a Raspberry Pi camera in one of its eye sockets (a Pimoroni Camera Module for Raspberry Pi Zero, to be precise). Nice. There’s also an Adafruit Braincraft HAT, for machine learning-powered banter, and a Seeed Studio Grove speaker, for optimum vocalisations. Oh, and a red LED for artistic effect, in the eye socket. Because this isn’t just an objet d’art.…

View On WordPress
0 notes
Text
Top 10 Best os for pi zero w [2022]
Top 10 Best os for pi zero w [2022]
1. Aokin for Raspberry Pi Camera Module, 5MP 1080p with OV5647 Sensor Video Camera Module for Raspberry Pi Model A/B/B+, Pi 2, Raspberry Pi 3 3B+, Pi 4 and Pi Zero/Zero W with Flex Cable Buy On Amazon Compatible: camera module fit for Raspberry Pi Model A/B/B+, Pi 2B and Raspberry Pi 3B 3B+, Pi 4B, Pi Zero, Pi Zero W. Ribbon flex cable: 11.81in/30cm golden camera cable specially designed for…

View On WordPress
0 notes
Text
World's First Pi-Powered Satellite Shows the Resilience of Raspberry Pi
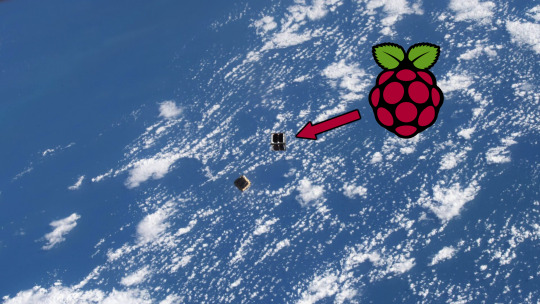
Undergraduate students at the Utah State University (USU) have successfully launched the first Pi-powered satellite into orbit. The GASPACS CubeSat, which was sponsored by NASA, features a Raspberry Pi Zero computer, a second-gen Pi Camera Module, and a DFRobot Beetle microcontroller to facilitate basic tasks at a low price.
Read This Article on Review Geek ›
via:the How-To Geek, March 13, 2022 at 02:07PM
0 notes
Link
The 5MP Raspberry Pi Zero W Camera Module W/ HBV FFC Cable equips flexible cable for attaching with Raspberry Pi Zero W. The 5MP camera module is perfect for small Raspberry Pi projects which have very little space allowance just boot up the latest version of Raspbian and you are good to go!!!
0 notes
Text
Raspberry Pi Zero Camera Cable 5MP Mini Size Vision Camera for Raspberry Pi Zero W/Zero/ Raspberry Pi 3 Model B+Camera module
Raspberry Pi Zero Camera Cable 5MP Mini Size Vision Camera for Raspberry Pi Zero W/Zero/ Raspberry Pi 3 Model B+Camera module

Raspberry Pi Zero Camera Cable 5MP Mini Size Vision Camera for Raspberry Pi Zero W/Zero/ Raspberry Pi 3 Model B+Camera module
Price
5 Catch me HERE
0 notes
Text
WATNEY: A FULLY 3D PRINTED ROVER PLATFORM

The development of 3D printer technology has made itself indispensable in many industries, from the defense industry to the industry. But now these are included in our homes. Low-cost desktop 3D printers represent the aspect of this printing technology that is more accessible and affordable. Now you do not have to go to any adventure to find these types of printers, because all you have to do is order and wait. Nik Ivanov, who made an initiative in this regard and made his own camcorder, was able to attract a lot of attention in the Internet world.

Nik Ivanov took the issue in general and realized that he could create a whole system of systems that could print small pieces of this technology. Nik then helped build a four-wheel traction platform with help from some electronic devices and M3 screws. Moreover, it should be noted that this tool is rather cute rather than useful.

The size of this new Rover platform, named "Watney-4" by Nik is 120mmx190mm. So any desktop 3D printer that can produce a body as large as it is, it's enough to create your own walking camera platform. Nik prints all parts with PETG (raw materials available in 3D printers) for the production of some specific parts, such as transmission gears. Because this material provides the most detailed and durable shape of the upper and lower parts of the body. Nik recommends TPU material for tires, but if you do not have TPU, you can wrap around the wheels with any soft plastic or material to get a soft rubber tread.

As for the materials used in the vehicle. This is the main center of the Rover platform, creating the Raspberry Pi Zero W chips. Designed to serve many purposes, these open-source chips offer benefits to users in every way. Of course, this chip is not enough to build the car. In addition, to create the interfaces of the dual-gear motor, a servo motor with a tilt is required along with the L298N H dual motor driver card and the SainSmart camera module.

The result is that when we look at it, it is quite interesting but we see that it is a fun, handy device that demands labor but provides its counterpart. Perhaps the reason why 3D printer technology is so popular and widespread is that it is not the limit of its immense capabilities. Because the only limit here is your imagination. Read the full article
1 note
·
View note
Link
Description: This is a raspberry pie camera that supports night vision and focus adjustment.It is connected to the Raspberry Pi through the CSI interface.It is usually used as a night ...
0 notes
Text
RUHAcam Is A Raspberry Pi-Powered Digital Camera You Can 3D Print
RUHAcam Is A Raspberry Pi-Powered Digital Camera You Can 3D Print
Inspired by do-it-yourself camera parts and projects, Ping-Hsun Chen and Ruha Cheng took things a step further and released a retro-style RUHAcam kit built around a Raspberry Pi Zero W connected to the High-Quality Camera Module. DIY photography kits have been the source of lots of incredibly unique and creative projects. One of the most recently loved and praised is the Raspberry Pi-powered…

View On WordPress
0 notes
Text
RUHAcam Is A Raspberry Pi-Powered Digital Camera You Can 3D Print
RUHAcam Is A Raspberry Pi-Powered Digital Camera You Can 3D Print
Inspired by do-it-yourself camera parts and projects, Ping-Hsun Chen and Ruha Cheng took things a step further and released a retro-style RUHAcam kit built around a Raspberry Pi Zero W connected to the High-Quality Camera Module. DIY photography kits have been the source of lots of incredibly unique and creative projects. One of the most recently loved and praised is the Raspberry Pi-powered…

View On WordPress
0 notes
Text
The RUHAcam is a ‘retro-style’ digital camera made with the Raspberry Pi HQ Camera module
The RUHAcam is a ‘retro-style’ digital camera made with the Raspberry Pi HQ Camera module
When Raspberry Pi announced its 12.3MP High Quality Camera module in April 2020, it opened up a whole new world of photo-centric DIY projects. One such project that’s come as a result of its release is the RUHAcam, a ‘retro-style’ digital camera made from scratch by Ping-Hsun ‘penk’ Chen and Ruha Cheng. The RUHAcam is built around a Raspberry Pi Zero W connected to a Raspberry Pi High Quality…

View On WordPress
0 notes
Photo

Hat Day 5. The dreaded Cap Cam!!! A while back I saw a Maker article about a gent down in Australia who had built a camera onto his cap and was documenting his travels using it. He had even integrated a GPS module to track his movements. I liked the idea, and built a Matt Version of it. No GPS. Simple, time-lapse speeds. I played with a remote trigger, but the Bluetooth triggers available all tended to shut down to save battery at inopportune times. So I took this out to the Civil War Reenactment here in Huntington Beach a few years back and walked around with it. I learned a few things. I am a squirrel, a non stabilized fixed focus camera on my head tends to capture a great number of pictures that could be kindly called modern art. People look at you funny with this thing on your head. Oddly enough I am used to that. When I forced myself to stand still, yes I had anticipated the head motion problem, I had to freeze for a couple of minutes to make sure I got a few good shots. Which is frustrating. So I shelved this idea for a while. I still have all the parts, and the unit has been handy for developing a python script to take the pictures rather than using shell scripts and Cron like on my other Raspberry PI cameras. I have included pictures of several views of this cap, and you can see from the brim that I experimented with several different cases and mounting methods. Presently there is a trio of rare earth magnets on the brim, and a matching trio on the case so that I can attach it and remove it as needed. I anticipated that I might have to remove it quickly if someone took offense to a camera. It's fun to make sure that the magnets are aligned properly, north south pole wise to make sure they stick together and not throw your project away! I am considering adding a motion sensing capability so that it only takes a picture when I am not moving. Or a trigger on the brim. Specs: Raspberry PI Zero W Raspberry PI Camera v2 - 8 Megapixel. C4Labs Case with handy heat sink Camera Mount Short camera cable from other case kit Short USB cable Small USB power pack fastened to the back of the Cap. Sacrificial cap, full head that actually fit. I bought several! (at Planet Earth) https://www.instagram.com/p/B-NFB5OjWhE/?igshid=p9rnjcu870qv
0 notes