#arduino clock
Explore tagged Tumblr posts
Visit Tumblr Blog
Explore Tumblr blogs with no restrictions, modern design and the best experience.
Last Seen Tumblr Blogs


Fun Fact
Tumblr was the first site to host the blog for President Barack Obama in 2011.
Text

Cinema Cielo 2 - Arduino Cantàfora , 2003.
Italian , b. 1945 -
Oil on wood , 120 x 80 cm
222 notes
·
View notes
Video
youtube
GPS Clock Using Raspberry Pi Pico (RP2040) Arm Cortex-M0
#youtube#GPS Clock Using Raspberry Pi Pico (RP2040) Arm Cortex-M0+ & LCD Display | Make a GPS Clock With Arduino - Projects | Arduino GPS Clock | ras
0 notes
Text

Puppies Puppies (Jade Guanaro Kuriki-Olivo) World Population Clock (Horloge Mondiale de la Population), 2023 Dot matrix LED panels, Arduino micro controller
14 notes
·
View notes
Text
Damian: it's all pretty easy to do Damian: magnetic lock, electronic alarm clock and scales, and the simplest Arduino from a children's robotics kit Damian: a few minutes to figure it out, tinker with it and solder everything together Damian: as a result, the refrigerator is locked, in front of it—scales. If the weight is from 40 to 60 and the time of day is from 6 to 22, the lock is unlatched, full access, if one of the conditions isn’t met—access is denied Jon: I always knew that you were a sadist Jon: but I'm surprised that Marinette didn't kill you after this Damian: well, she did yell a little, but then she just resigned herself Damian: she was the one who asked me not to let her eat after 6pm, so… Jon: wait! Jon: but how do you live without access to the fridge? Jon: do you also stay hungry after 6? Jon: or do you only press on the scale with one foot? Damian: I'm certainly not an engineer, but I prefer engineering solutions Damian: undocumented possibility—with a weight strictly from 4 to 6 kg, time isn’t taken into account and the lock opens in any case Damian: and we always have a spare 5 kg pack of cat food for Alfred the cat at home…
#dcu x mlb#mlb x dc#dc x mlb#maribat#maridami#daminette#damian x marinette#marinette x damian#damian x marinet#damimari#maribat damian wayne#maribat fanfic#Maribat fanfiction#maribat au#incorrect dcu#dc incorrect quotes#dc memes#batman memes#mlb incorrect quotes#mlb quotes#mlb memes#miraculous memes#ml memes#damian wayne#robin#damian robin#mlb marinette#miraculous marinette#jon kent#superboy
40 notes
·
View notes
Note
I just wanted to say thanks, I really appreciate all of your projects. About six years ago I built a very simple z80 connected to some fsram with an arduino driving the clock and printing the bus state. It was very roughly inspired by either your cactus computer or something very similar to it
Thank you, that's very kind of you to say.
I would love to see more of this Z80 project of yours, that sounds awesome!
8 notes
·
View notes
Text
Capstone #11: Final?
<-<- FIRST || <- PREV || NEXT ->
First off, Capstone is done done and just waiting on graduation. Next up, our capstone won us a little award! We did our little poster session and showed off the assembly. But lets show off something I wish I had done under the cut
The Arduino doesn't have the ability to process more than one thing at a time, it doesn't even have threads. It's single core, single thread. So when the gantry wants to move, it needs to do all the math of where to go, then move the stepper motors. The entire time where it's calculating, the motors aren't moving, and the entire time the motors are moving, the cpu is sitting there doing jackshit nothing. And it has to do this for each and every stepper step until it reaches the end position. (The speed of this is dramatically slowed. The actual stepper step takes about 3 milliseconds, and the calculation takes maybe a few clock cycles (idk exactly how long, but lets just say ~0.005 milliseconds)). Point is, 3 milliseconds is an eternity to a cpu.
In that 3 milliseconds we could do a lot of things. Lets use time more efficiently...
In the project I had coded the gantry to not use a queue and event handler. This is mostly because of a lack of hindsight. But had I, it would something like this: The "math" process does the math and drops the result into the queue, the "gantry" process picks up the next thing in the queue and executes it. In the meantime while the cpu is waiting for the motor to reach its position, there's plenty of time to do plenty more math and start filling the queue. Because math is fun and it can't wait to do MORE math (:
All this makes this run far faster by doing 2 things at once. It gives you more control over how fast the gantry moves, because its speed depends on how fast you read from the queue. Once the queue is filled you could even spend that time doing literally anything else, like blinking lights, updating screens, or read from sensors.
There ARE even more clever things you can do, but this is just one that I feel like I totally could have done if I wasn't already nearly done by the time I thought of it
2 notes
·
View notes
Text
ATMEGA328P-PU: The Little Prince of Microcontrollers in Circuits & Stars
A Meeting in the Desert of Circuits
The desert stretched endlessly, its sands glowing like gold under the sun. I was tracing the dunes, heading toward a distant oasis, when I spotted a glint in the sand—a small, rectangular shape, no bigger than a ladybug.
“You’re… very small,” I said, kneeling. “And you’re a child who talks to microcontrollers,” it replied, voice soft as the wind. “But some keepers of light are smallest when they’re strongest. Ask the fox.”
It was an ATMEGA328P-PU—the heart of Arduino Uno, but to me, it felt like a secret. Let me tell you its story.

1. What Is the ATMEGA328P-PU? (A Keeper of Code, Not Just Silicon)
This was no ordinary chip. It was a ATMEGA328P-PU, an 8-bit AVR microcontroller in a 28-pin DIP suit—smaller than a baobab seed, but tough as the roots of the rose’s planet. Here’s its secret:
Clock Speed: 16-20MHz (overclockable to 24MHz for daredevils). Faster than the fox darting across the dunes.
Memory: 32KB Flash (stores code), 2KB SRAM (variables), 1KB EEPROM (your debugging tears). Like a Pensieve for electrons.
I/O Pins: 23 programmable pins (14 digital, 6 analog). Windows to the world—like the portholes on a spaceship.
Fun Fact: Engineers call it the “Cockroach of MCUs.” Survives power surges, cosmic rays, and your “hold my beer” coding experiments. Even the baobabs can’t crush it.
“Why so quiet?” I asked. “Keepers don’t shout,” it said. “They just keep.”
2. ATMEGA328P-PU & Its Siblings: Stars in the Same Sky
In the desert of microcontrollers, ATMEGA328P-PU has siblings—some older, some louder, but none quite like it:
ATMEGA328-PU: An older star. Higher power draw, like a planet that burns too bright. Avoid—like flip phones in 2025.
ATMEGA328PB-PU: A louder sibling. Extra peripherals (UART, timers), but bulkier. For complex projects, like a planet with too many volcanoes.
ATMEGA328P-PU: The steady one. Lower power (1.8V-5.5V), optimized code. Ideal for battery-powered projects—like a rose that blooms in the desert.
Roast Alert: ATMEGA328-PU (grumbling): “I’m vintage!” ATMEGA328P-PU (calm, like the fox): “I’m in NASA prototypes. You’re in a landfill. Bye.”

3. Why the Fox (and Engineers) Choose It
ATMEGA328P-PU isn’t flashy. It’s the kind of friend who shows up, fixes your code, and leaves without fanfare. Here’s why:
Cost: $3/unit—cheaper than a morning espresso (and way more useful). Even the rose, who’s picky, approves.
Simplicity: No Wi-Fi tantrums or driver hell (looking at you, ESP32). Like a well-tended garden—no weeds.
Community Support: 10k+ Arduino tutorials. Google is your co-pilot, and the fox is your guide.
Real-World Flex:
Mars Rover Prototypes: Runs in -40°C labs (tested by NASA JPL). Even cosmic frost can’t stop it.
DIY COVID Ventilators: 2020’s MacGyver hero (MIT Open-Source Project). Saved lives, one byte at a time.
“Why not be bigger?” I asked. “Big things break,” it said. “Tiny things fit. In garage labs. In Mars rovers. In portable ECGs.”
4. Programming the Little Prince: A Dance with Code
Want to wake the ATMEGA328P-PU? It’s like taming a fox—gentle, patient, and rewarding.
Option 1: Arduino IDE (The Friendly Path)
Connect via USB-to-Serial (e.g., CH340G). Pray the drivers install (sometimes they don’t—blame AliExpress).
Select Board: Arduino Uno (even if you’re using a breadboard).
Upload Code: Watch the LED blink, like a star winking hello.
Option 2: Bare-Metal with AVRDUDE (The Adventurer’s Path)
Command: avrdude -c usbasp -p m328p -U flash:w:your_code.hex
Pro Tip: If smoke appears, take a breath. The fox says, “It’s not your fault—sometimes stars misbehave.”

5. Burning the Bootloader: Tending the Rose
Burning a bootloader is like planting a rose—delicate, but necessary.
Tools Needed:
Programmer: USBasp, Arduino as ISP, or a sacrificial Uno (no tears, it’ll forgive you).
Software: Arduino IDE or AVRDUDE (the gardener’s tools).
Steps:
Wire It Up: Connect MOSI, MISO, SCK, RESET, GND, VCC. Triple-check—no one likes a fried rose.
Arduino IDE: Tools > Programmer > USBasp (or your tool).
Burn: Tools > Burn Bootloader. Wait for the magic (or error messages—they’re just the rose’s thorns).
1 note
·
View note
Text
Features
SD Card Slot: Supports standard SD and microSD cards (with adapter) for data storage.
Real-Time Clock (RTC): Includes an integrated DS1307 RTC to timestamp data accurately.
Dedicated Headers: Pin headers for easy connection to Arduino and external modules.
Reset Button: Convenient reset function for debugging and testing.
Prototyping Area: Extra space for adding custom circuits or components.
Battery Backup: Keeps the RTC running during power loss (requires CR1220 battery, not included).
2 notes
·
View notes
Text

Battery overheating notwithstanding, the DCO is working! (ignore the VCA prototype in the upper right, I realized I needed different voltage levels than the arduino 0-5V and didn't want to disassemble the VCA)
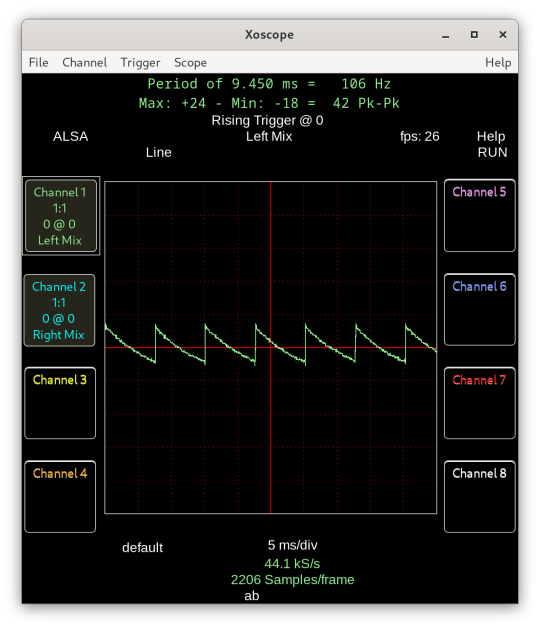
I've got a bit of fine tuning to do, so I'm not quite ready to share any sounds just yet. I'm just excited to get a (mostly) decent looking ramp out of it. The amplitude drops at higher frequencies, so there's definitely some updates needed in the DAC voltage lookup table. Also there's a really weird ripple at the very lowest frequencies that I suspect might be due to the HPF on the clock signal (that might end up being a feature though).
Also, my scope is showing signals inverted from what I expect and I'm wondering if I've just always had my probe wired up wrong.
Next step will be getting the ATtiny set up to replace the Arduino!
12 notes
·
View notes
Text
Arduino Nano Board R3 with CH340 chip

Based on the Arduino platform, the Nano R3 Board CH340 Chip without USB Cable does all the functions of the Uno, but has a smaller footprint.
Using Nano CH340 Soldered Board R3 Chip without USB cable is essential for your small project where you don’t need many pins, but the small size is very important to make it look nice.
In comparison to older versions of Arduino Nano with FTDI USB-Serial Chip, the Nano uses a low-cost USB-Serial Chip.
With the ATmega328 (Arduino Nano R3), the Nano is small, complete, and breadboard-friendly. It has more or less the same functionality as the Arduino Uno but in a different package. In addition to lacking a DC power jack, it uses a Mini-B USB cable instead of a standard one.
This device can be powered by a mini-USB cable, a 6-20V unregulated external power supply (pin 30), or a 5V regulated external power supply (pin 27).
Six PWM I/O are included from a total of 14 digital I/O, eight analog inputs, 16Mhz clock speed, and 32kB flash memory.
Please note:
The CH340 chip might not work directly with some PCs/laptops. You will need some drivers for the CH340 chip.
Arduino nano features :
TTL level serial transceiver ports (RX / TX)
Atmel Atmega328P-AU MCU used
It has a bootloader installed
Supports USB download and power supply
Provides support for external DC power supplies of 5V and 12V
2 notes
·
View notes
Text
Прототип внешне-хронируемого источника такта (externally syncable Clock module) на базе Arduino Nano. Код имитирует работу Автоподстройки Частоты (Phase Licked Loop PPL) Работает безупречно.


#device under test#Delian Diver#Modular Synth#Modular Synthesis#Delian Diver Modular#Synth DIY#DIY#Clock Module#Ext. Syncable Clock
2 notes
·
View notes
Text
[2999] 4 questions
#nid#cinema4d#everyday#c4d#3d#art#life#self portrait#chennai#nyc#time zones#time#clock#physical computing#arduino#code
0 notes
Text
My final project for my art and technology class! We were told to imagine that disaster struck the world, and we were forced to live in a bunker for 12 years, but after that we were able to live in the earth again. We had to make a museum as a class, and show what happened during the time in the bunker.
I created 12 flowers to show the 12 years, and they start out looking very flower like, and turn into mutated monsters.

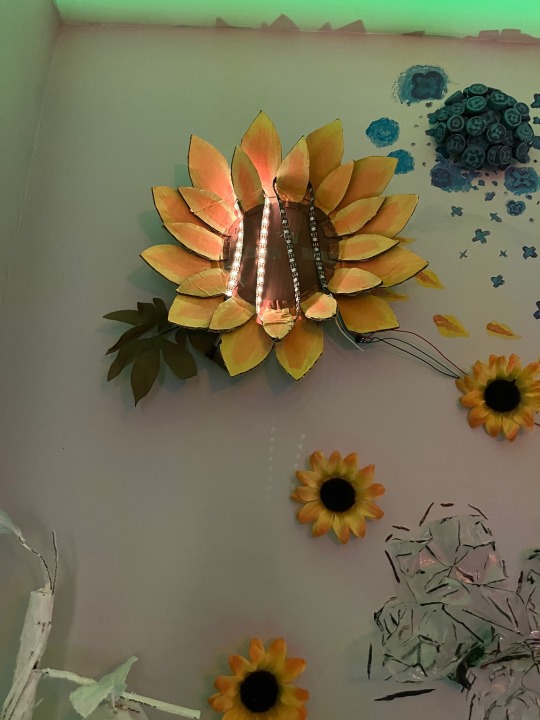
This is the sunflower, the most flowery of all of the flowers. I used neopixel strips to light up the center of it, to show to hope in the beginning.


the next two are the hydrangea made out of bottle caps, and the lavender made out steel and rubber wire. These still look like flowers, and are modeled after actual flowers.
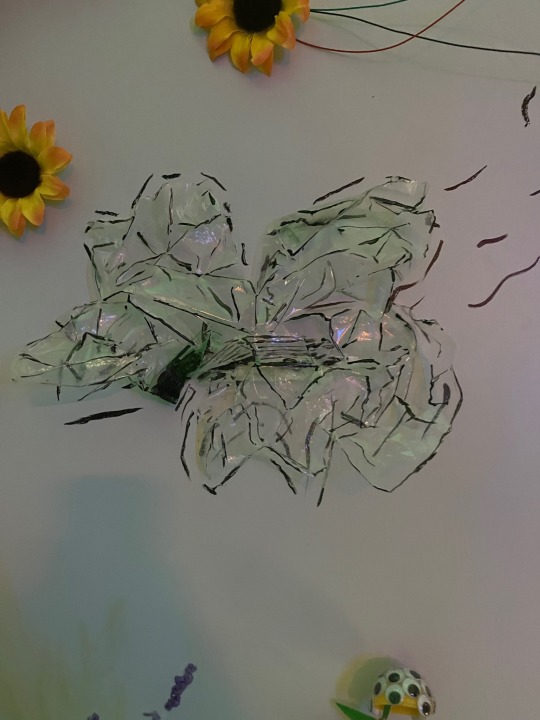

The first one is made out of plastic bags, the second is made out of tinfoil and cut up cds. These two are not modeled after actual flowers, and I focused more on the material than looking like a flower.
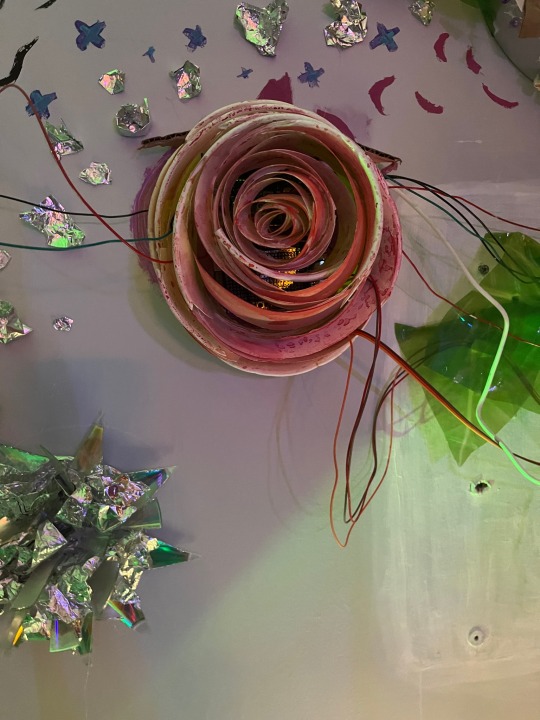
This is the rose, it is made out paper cups painted with water color, and covers the arduino. (that’s why it has wires coming out of it). This is my favorite flower, and I’m really happy with how well it turned out.

This is the clock. It has bits of most of the other flowers on it, and all the flowers have a trail flowing into/out of it. It represents the flow, and stoping of time that happens when you are trapped in a single place for a long time.
Now we are moving on to the weird ones!
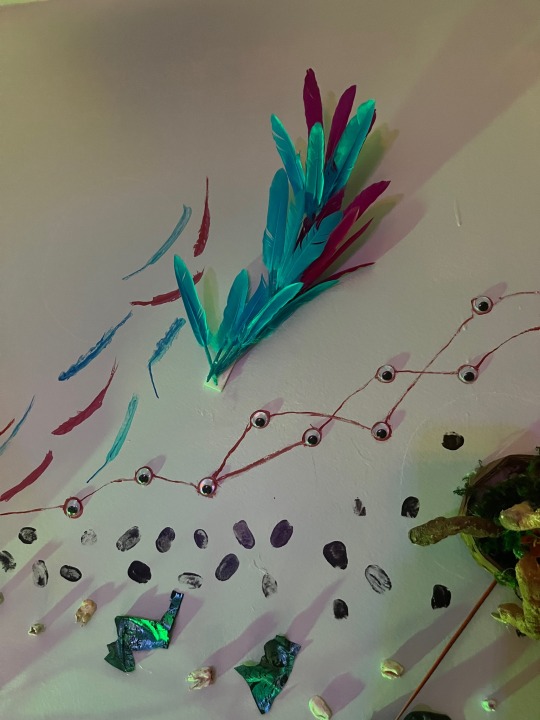
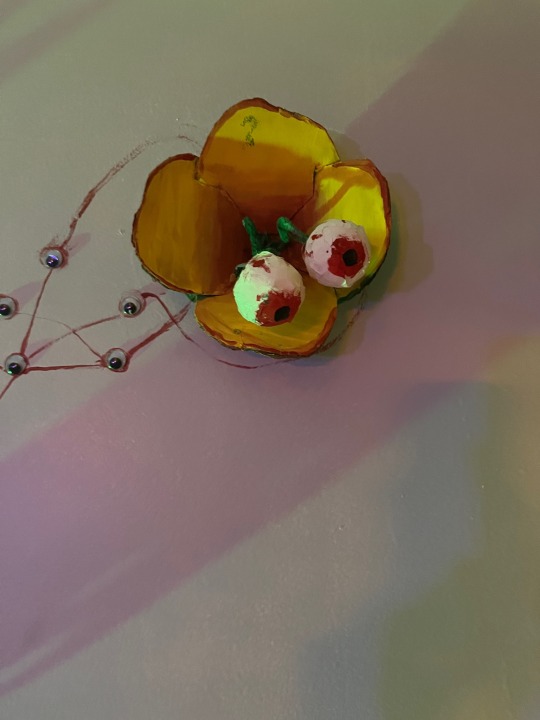
One made of feathers (I was running out of ideas and time) and one with eyeballs!
Second post will have the final flowers, and picture of everything! (i hit the picture limit for this post)
#art#arduino#flowers#sculpture#art and technology#you spend 12 years in a bunker and go crazy and make weird ass flowers
2 notes
·
View notes
Text
Arduino Due vs. Mega: A Comprehensive Comparison
What is Arduino Due and Mega?
The Arduino platform has revolutionized the world of DIY electronics, providing hobbyists and professionals alike with versatile and powerful microcontroller boards. Among the myriad of options, the Arduino Due and Arduino Mega stand out for their advanced features and robust performance. The Arduino Due, introduced in 2012, is the first Arduino board based on a 32-bit ARM core microcontroller, the Atmel SAM3X8E. In contrast, the Arduino Mega, built around the 8-bit ATmega2560 microcontroller, is known for its abundant I/O pins and memory. Understanding the differences between these two boards can help in selecting the right one for specific projects, enhancing both functionality and efficiency.
Processing Power and Performance
The processing capabilities of the Arduino Due and Mega are distinctly different, primarily due to their core microcontrollers. The Arduino Due, with its 32-bit ARM Cortex-M3 processor running at 84 MHz, offers significantly higher processing power compared to the Arduino Mega's 8-bit ATmega2560, which operates at 16 MHz. This difference in architecture and clock speed means that the Due can handle more complex calculations and tasks faster and more efficiently than the Mega. For projects requiring high computational power, such as real-time data processing or handling multiple sensors simultaneously, the Due is the superior choice. However, for simpler tasks, the Mega's processing power may suffice.
Memory and Storage Capabilities
Memory is another critical aspect where the Arduino Due and Mega diverge. The Arduino Due is equipped with 512 KB of flash memory for code storage and 96 KB of SRAM for data. On the other hand, the Arduino Mega has 256 KB of flash memory and 8 KB of SRAM. Additionally, the Due features a Direct Memory Access (DMA) controller, which allows for efficient memory operations, freeing up the CPU to handle other tasks. These memory enhancements make the Due more suitable for applications requiring large codebases and significant data handling, such as advanced robotics or sophisticated control systems. The Mega, with its more modest memory, is ideal for less demanding applications.
Input/Output Capabilities and Expansion
Both the Arduino Due and Mega are renowned for their extensive input/output (I/O) capabilities, yet they cater to different needs. The Mega boasts a whopping 54 digital I/O pins, 16 analog inputs, and 4 UARTs, making it ideal for projects that require multiple sensors, actuators, or communication interfaces. The Due, while offering fewer digital I/O pins at 54, includes 12 analog inputs and 4 UARTs, along with additional features like two DAC outputs for analog signal generation and enhanced PWM capabilities. These features provide the Due with superior analog output capabilities, making it suitable for applications like audio processing or advanced signal generation.
Power Consumption and Compatibility
Power consumption and compatibility are practical considerations when choosing between the Arduino Due and Mega. The Due operates at 3.3V logic levels, which makes it more power-efficient than the Mega, which uses 5V logic levels. This lower voltage operation is beneficial for battery-powered projects where energy efficiency is crucial. However, the 3.3V logic also means that the Due is not directly compatible with 5V components without level shifters. The Mega, with its 5V logic, offers broader compatibility with existing Arduino shields and components, making it a versatile choice for a wide range of projects. Understanding these power and compatibility nuances can help in making an informed decision based on the project's specific requirements.
2 notes
·
View notes
Text
LED displays are the easiest parts on which to identify the pins when you don't have any information on their pinouts, but they're still very satisfying to get working.
See, I've got a couple of cute little displays with no accompanying data:
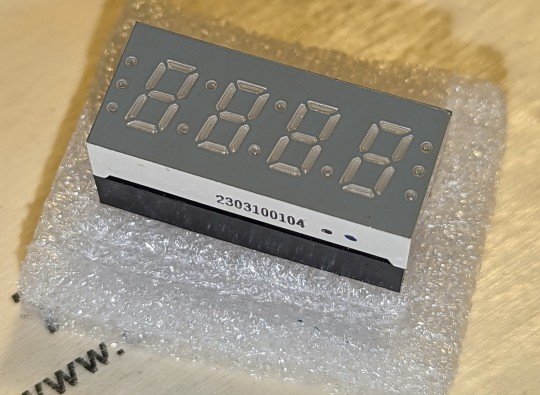
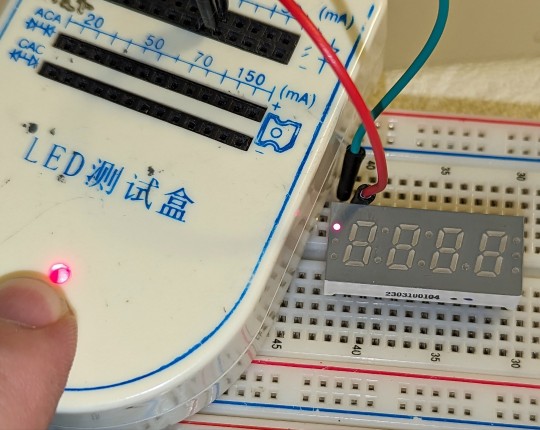
The number on the side isn't an identifiable part number, and the markings on the other side — "07817N" — is more likely a date code or batch number than anything else. With this many segments and 24 pins, it's likely either a common-cathode or common-anode device, and not a matrix, so that's somewhere to start; I popped one into a breadboard and started probing with a little LED tester and some jumper wires. The first few pins I tested turned up some red light, so that was very encouraging.
It turned out to be a common cathode device, mostly.

A single-digit common cathode display works like this: you ground the single wire for the whole display — the common cathode of all the LEDs — and supply voltage to each segment's anode. So to make a three on one of these, you put the voltage into the anodes for segments a, b, c, d, and g, and to turn the whole thing off, you stop grounding the cathode.
A multidigit common cathode display works the same way, but all the identically named segment displays are tied together. You usually need a microcontroller to manage the timing, but you have it ground the cathode for the digit and light up the segments, then stop, unground it, and do the same for the next digit. You can't light them with different layouts at the same time, but thanks to human persistence of vision, you don't have to. You just loop through really fast and it looks like it stays lit. On this one, pins 2, 5, 8, and 10 are the cathodes for digits 1-4 respectively, and the pins for segments a-g are 17, 19, 20, 3, 11, 18, and 22. The decimal points for digits 1-3 have their anode at pin 9, while the one for digit 4 (the bottom of the final three dots on the display) is on pin 16 for some reason.
But while the device I have operates like that for the digits, the dots are handled a little differently. The first three are an independent common cathode display, with individual segment pins that aren't connected to anything else (CC on 24, with a on 23, b on 4, and c on 1), and the top two of the last three are the same way (CC on 15, top on 13, middle on 14). The top dots of the middle colons are independent LEDs — the first has its cathode at 12 and anode at 21, and the second has its cathode at 7 and anode at 6.
I'd show off the thing working if it didn't mean breaking out an Arduino board and hooking it to at minimum 11 patch wires. I don't actually have an immediate use for these. I should figure out something synthesizer related that could make use of a wall clock.
6 notes
·
View notes
Text
Hi Tumblr!
Okay, as I promised, a first Big Project post.
Intro and sentimental stuff
Here's the deal: I have a gf, and her birthday is in June. And I really really really want to make something special. So, fact 1: I have almost unlimited access to electro-stuff. Fact 2: Portal (both parts) is one of her favourite games, and the only of her favourite games I've completed so far.
Combining these two, we get ✨gift idea✨: a paired portal lamp (I did somewhat of a sketch, it's on the attached picture. Unfortunately, it isn't digital, as I do not own any kind of tablet, but I hope the overall shape is still visible)
All of the comments are written in Russian, but I'll translate them below the cut and in future posts.
Anyways! The problem is: it's entirely based on Arduino. And I've never worked with Arduino IN MY LIFE. I know Python on intermediate level, tho, and I've worked with electronics before, so it's not all that new to me.
So, yeah! I'll post updates on my work, so if I manage to get this right anyone will be able to create something like this for yourself and your loved one! From my calculations, it shouldn't cost more than 20 dollars for both of them in currency of my country, but it obviously depends on your location. But if you study in university or know someone who works with electronics, they'll probably give you a lpt of this stuff for free, as it's found easily and in large amounts.
Below is more word-y description of the project.
How it should work
This thing is, ideally:
Turned on and off with 'portal gun' (which is basically a water gun with tech stuff inside). And maybe you can change the mode, turning it into clock, but I haven't decided about it yet
By default, one 'Portal' is orange and one is blue, but through the special server you can change the color of any of this, and the other one will change automatically on the opposite color (for example, if one's color changes to red, the other will be turned green with no manual interactions with it)
In addition, through the same server, you should be able to:
Set an alarm (which will change the brightness of the whole thing at the given time)
Turn it into a clock (I'll describe how it works in a different post, maybe, but there will be no digits or display there)
Refuse the connection with the other lamp and still do all of this things with only your one
Make the other lamp, if it's connected, blink a few times to get the other person's attention
And maybe something else, if I'll think of it later
So yeah, that's the plan! It should be pretty simple technically speaking, and quite cheap at the end. I'll post the scheme and how it will work a bit later, with my Github link for future code. But that's it for now :)
See ya, Tumblr!

#portal#portal 2#diy#diy projects#I literally have no idea how to tag this#yeah that's my homosexual audacity speaking in this project#electronics#arduino#portal lamp#I'll probably have other projects here so I want to tag this as well
3 notes
·
View notes