#arduino uno buy online
Explore tagged Tumblr posts
Visit Tumblr Blog
Explore Tumblr blogs with no restrictions, modern design and the best experience.
Last Seen Tumblr Blogs


Fun Fact
Forty percent of Tumblr users are between the ages of 18 to 25.
Text
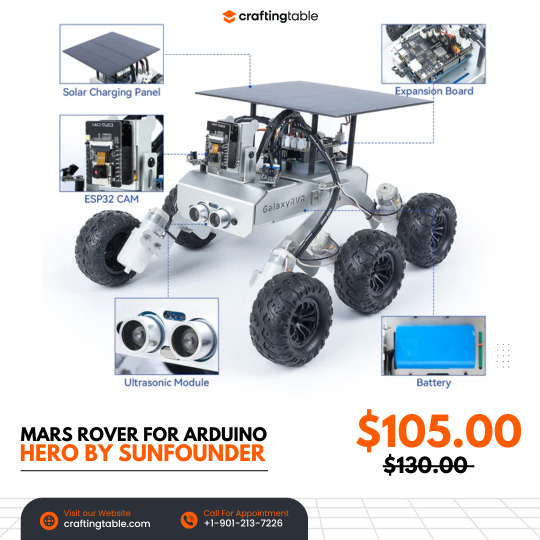
GalaxyRVR is an easy-to-use robot that works with Arduino Uno R3 and lets you experience what it’s like to explore Mars. It’s built strong with metal parts and has a smart wheel system to move smoothly over sand, rocks, grass, and even mud. It uses solar power to charge and has a camera (ESP32-CAM) that shows you what it sees in real time through an app. You can drive it from anywhere! It also has sensors to avoid obstacles and bright lights so it can explore in the dark too. The kit comes with helpful videos and guides, and there's an online community ready to help, making it perfect for beginners who want to build and explore. Buy Now
0 notes
Text
Components for a DIY BCI
EEG (Electroencephalography) Hardware:
The most basic BCIs rely on EEG sensors to capture brainwaves.
OpenBCI is a popular, relatively affordable option for DIY BCI projects. While it costs a few hundred dollars, it is one of the most versatile kits available.
NeuroSky MindWave or Muse Headband are other cheaper alternatives, ranging from $100-$200. These are commercially available EEG devices for consumer-grade BCIs.
OpenEEG is another open-source project that allows you to build your own EEG hardware from scratch, though it requires more technical skill.
Electrodes:
You’ll need wet or dry electrodes to attach to your scalp. Wet electrodes give more accurate readings but are messier, while dry electrodes are more convenient.
You can order pre-gelled electrodes online or even repurpose ECG/EMG electrodes.
Amplifier:
The signal from the brain is very weak and needs to be amplified. Most consumer-grade EEG headsets already include built-in amplifiers.
If you're building your own, you’ll need to add an instrumentation amplifier like the INA114 to your circuit.
Microcontroller (optional but recommended):
You can use a microcontroller (e.g., Arduino or Raspberry Pi) to process and transmit the EEG signals.
This allows you to handle signal conditioning (filtering noise, extracting frequency bands like alpha or beta waves) before passing the data to a computer.
Signal Processing Software:
To interpret the brainwave data, you’ll need software to process the EEG signals.
OpenBCI GUI or BrainBay (open-source software for EEG processing) are good choices.
If using a commercial device like the Muse headband, you can use their respective apps or SDKs.
Python libraries like MNE-Python or OpenBCI_Python can be used for more advanced data processing and visualizations.
Steps to Build a Basic DIY BCI
Choose Your EEG Hardware:
If you're starting from scratch, something like OpenBCI Cyton board is a good start. It’s open-source, has good community support, and includes everything from the signal acquisition to the interface.
Set Up Your Electrodes:
Attach electrodes to specific parts of the scalp. The 10-20 system is commonly used in EEG to position electrodes. For basic experiments, placing electrodes on the frontal or occipital lobes is common for reading alpha and beta waves.
Amplify the Signal:
If you're using raw hardware, you need to amplify the EEG signal to make it usable. Most DIY kits or premade EEG headsets have built-in amplifiers. If you're building one from scratch, the INA114 or a similar instrumentation amplifier can be used.
Capture the Data:
Use a microcontroller or a computer interface to collect and transmit the amplified EEG data. For example, with an Arduino or Raspberry Pi, you can read analog signals from the amplifier and stream them to your PC via serial communication.
Process the Data:
Use software like OpenBCI GUI, BrainBay, or MNE-Python to filter and visualize the brainwave data. You’ll want to filter out noise and focus on frequency bands like alpha waves (8–12 Hz) for meditation or relaxation signals.
Analyze and Create Control Mechanisms:
Once you have the processed data, you can start building applications around it. For instance:
Detecting Alpha waves: You can trigger certain actions (e.g., turning on a light or moving a cursor) when you detect increased alpha activity (indicating relaxation).
Training with Neurofeedback: Users can learn to modulate their brain activity by receiving real-time feedback based on their brainwave patterns.
DIY EEG Project Example: Arduino-based EEG
Here’s a simplified example of how you could set up a basic EEG using an Arduino:
Materials:
Arduino Uno
EEG electrodes (you can buy inexpensive ECG electrodes online)
Instrumentation amplifier (e.g., INA114 or an open-source EEG shield for Arduino)
Resistors, capacitors for noise filtering
Cables to connect electrodes to the amplifier
Steps:
Assemble the amplifier circuit:
Build a simple differential amplifier circuit to pick up the small EEG signals from the electrodes.
Use the INA114 instrumentation amplifier to boost the signal.
Connect to Arduino:
The amplified signal can be connected to one of the Arduino’s analog inputs.
Write an Arduino script to read the analog value and send it to the PC via serial communication.
Filter and Process the Signal:
On your PC, use Python (or Processing) to capture the signal data.
Apply digital filters to isolate the EEG frequency bands you’re interested in (e.g., alpha, beta, theta waves).
Visualize or Control:
Create a simple application that shows brainwave activity or controls something based on EEG input (like blinking an LED when alpha waves are detected).
Further Ideas:
Neurofeedback: Train your brain by playing a game where the user must relax (increase alpha waves) to score points.
Control Mechanisms: Use the brainwave data to control devices, such as turning on lights or moving a robotic arm.
Estimated Cost:
EEG Kit: If using pre-made kits like Muse or NeuroSky: $100–$200.
DIY EEG Build: OpenBCI costs around $300–$400 for more advanced setups, while OpenEEG might be built for less, but requires more technical expertise.
Challenges:
Noise Filtering: EEG signals are weak and can easily be corrupted by muscle movements, electrical interference, etc. Filtering noise effectively is key to a successful BCI.
Precision: DIY BCIs are generally not as accurate as commercial-grade devices, so expect some limitations.
Building a homebrew BCI can be fun and educational, with a wide variety of applications for controlling electronics, games, or even providing neurofeedback for meditation
0 notes
Link
Buy Arduino Board online in India - Arduino Uno R3 Compatible Board-AR-134-D @ Best Price with Campus Component. Arduino UNO r3 specifications offer onboard 5V and 3V3 voltage having USB connection for PC, & atmega328 with Arduino boot loader. For more details like Arduino Board Online Purchase India, price, specification & delivery details visit - https://www.campuscomponent.com/products/b35366a0e0/2208614000001835606
0 notes
Text
In the past few weeks I’ve built a model railroad signal for garden railways with a custom DCC decdoder. Here’s what it looks like:
youtube
I’ve heard from a number of people that they thought this was interesting, but they didn’t really understand what I was doing. So today I’ll try to explain the core of it all, this circuit board:
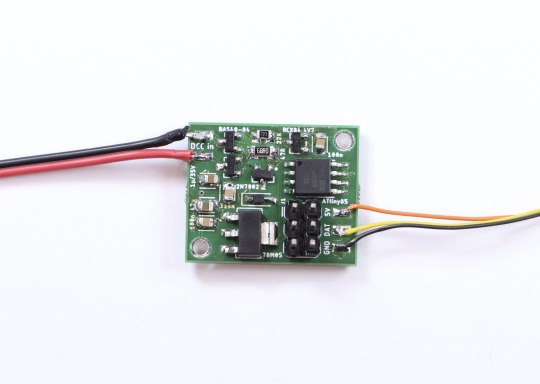
And here’s the associated circuit diagram:
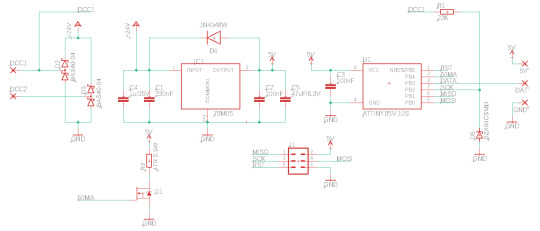
I’ll try to explain why this is the way it is and what it does.
(This whole explanation is aimed at people who have never done anything with electronics before. If that’s not you, then this may be a bit boring. Also, I didn’t come up with any of the parts of this. Most of this is based on things I learned by reading OpenDCC and Mikrocontroller.net. I’m sure I still made a lot of mistakes, though, and they’re definitely all mine and not the fault of anyone on these sites.)
The goal
First let’s talk about requirements. My goal was to build an american signal type “Searchlight”. Such a signal has between one and three lamps. Thanks to a clever electromechanic design that moves different color filters around, each lamp can show different colors - up to three from a total selection of four.
Replicating this system for a model railroad is not practical. I need something else. Having multiple colored LEDs next to each other wouldn’t work; they’re too big and I want it to all look like one light source. There are LEDs that contain red, blue and green in one housing, but that would require a lot of wires quickly that all have to be put in the mast. The solution is this:

This is an “adressable” LED, better known under the name “Neopixel” used by a large american online store. There are many variations from different manufacturers. The key thing is that each LED has a tiny control circuit built right in. It takes four wires: Plus five volts, minus, data in and data out. If you have more than one, you can connect the data out of the first directly to the data in of the second and so on. Connect the plus and minus as well, and you can control almost unlimited amounts of LEDs with just three wires.
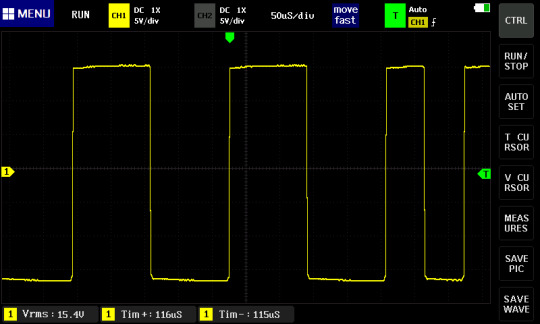
The data line has a special protocol that you need to generate. Basically you need to switch it from 0 to 5 to 0 volts again and again at a certain rate; the time it stays at 5 volts (“high”) determines whether you’re sending a 0 or a 1. From these bits you form bytes, which tell each LED what specific color value to send.
Due to this dataformat, you definitely need some electronic circuit controlling the signal, and the first requirements for this are:
Provide five volts DC power
Generate the data for the LEDs in the correct format
The Input
There are a lot of options for designing the input side of things. In my case, I’m assuming the signal is electrically connected to the rails of a model railroad that is controlled digitally. With digital command control (DCC), the voltage at the rails has a constant value of about 15 to 25 volts, larger for larger scales. This voltage constantly flips polarity; first plus is on the left rail, then it goes to the right rail (and minus vice versa), and then back. It’s like AC in normal wall outlets, but with very abrupt changes instead of a smooth sine wave.
This voltage has two tasks. First it supplies the locomotives with power, but it also transmits information. If one of these change-and-back sequences is long, it transmits a “0”; if it’s short, it transmits a “1”. These bits together then form the bytes that form the messages that say things like, “Locomotive three run at speed step 64” or “switch 10 switch to direction left”.
This decoder uses both features. The digital voltage provides both the data and the power. For a locomotive, that is required since the only conductors you have are the rails. This is a stationary decoder, so I could have designed it so that it only uses digital commands, and gets the power from an external power supply. However, I wanted to use the least amount of cables, so I’m using the simple version.
With that, the requirements are fixed. The circuit has to:
Turn the digital power (15-25 Volts, AC-ish) into 5 Volts DC
Read and understand the digital data signal (decode it, hence the name “decoder”) and calculate the colors for the LEDs.
Computation
This calculation is the real key here. The digital signal has a completely different fromat than what the LEDs expect. It’s slower, but also has completely different meaning. At best it transmits “set switch or signal 10 to state 0”. Which color values are associated with that, let alone any blending to make it look nice, are things the signal has to decide for itself. There is no way to build a simple stupid adapter here; I need a complete computer.
Luckily, you can get those for cheap and in really tiny.
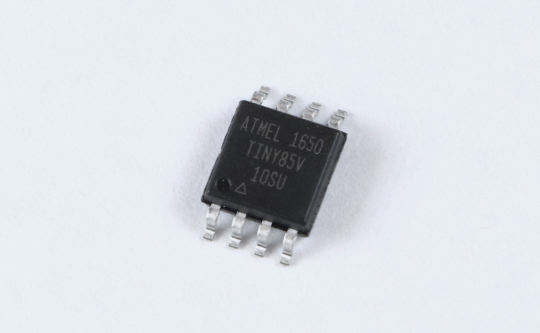
The ATtiny85 costs about 1€ depending on how many you order, and it’s smaller than one cent coin (I think in basically any currency), but from a technical point of view, it is essentially a full computer. It has all the important parts anyway. There is a CPU that can run at (depending on the version) up to 20 MHz; half a kilobyte of RAM and eight kilobyte of internal storage for the program. Multiple programs is a bit of a challenge. If you know Arduinos, the ATtiny85 is related to the ATmega328p in the Arduino Uno and Nano. Far less powerful, but cheaper and significantly smaller.
What it lacks are all the surroundings like keyboard and screen for input and output. The chip is designed for applications where this isn’t needed, or at least only minimal things. The software that you write can assign each pin (okay, five out of eight) freely for different tasks: The pin can work as an input, telling the software whether there’s a low or high level of voltage at it (meaning 0 or 5 Volts), or it can work as an output and write high or low values, meaning setting the pin explicitly to 0 or 5 Volts.
There are other options for the Pins as well; among other things it can also read analog voltages and generate them to some extent. But for this task I only need the simple digital high-low inputs and outputs.
These types of chips, known as microcontrollers, exist in thousands of variations by different manufacturers with very different performance characteristics. They are the key part of basically everything that’s digitally controlled these days. Washing machines, everything that plugs into a computer including every single Apple lightning cable, TVs, TV remotes, amazing amounts of parts in cars and so on are all the realm of microcontrollers. The ATtiny85 is, as the name implies, very much at the low end of the scale (though there are smaller ones), and even here, it is a bit out of date. But it is very easy to program and very forgiving of mistakes, which makes it great in hobby situations.
To run, this chip needs around 3-5 Volts DC (some versions like the one here can also run on a bit less) and exactly one capacitor. I’m already generating 5 Volts DC for the LEDs anyway, so this chip will get them as well. That means for all the calculation, only two pieces of hardware are required.


There is some more associated hardware, though, for getting the program (which I’ve written myself) on the chip. For that you need a programmer, a device that you can buy for some money, or make yourself astonishingly easily from an Arduino. It needs to be connected with six wires to the chip. The standard for this is with a six-pin plug, which I’ve thus included here as well. There are standard six-wire cables for this.

You could connect the cables differently, for example with some sort of spring-loaded contacts on some programming circuit board you’d have to build for that, or in the worst case, just temporarily solder the cables in there. But the plug version is both simple and convenient, with the only downside that it makes the circuit a bit more pointy.
(Due to the Tumblr image limit, the next part will have to be in a reblog)
46 notes
·
View notes
Link
#Arduino UNO RFID Starter Kit#buy arduino rfid starter kit online#Buy arduino kit online in pakistan
0 notes
Text
What is Arduino?
Today, the world is developing so fast. But the question is, are we?
Today’s stunning technologies are used by us all the day, all the time. Sometimes, we are ourselves fascinated by what we are able to do by just the click of a button. But, what if, we could make all of that, ourselves?
INTRODUCTION
So, the question arises, how can I make fascinating technologies?
The answer is simple: Learning electronics.
And, how to start with it?
The answer is: ARDUINO
All those people who are interested in robotics or hardware engineering might be familiar with Arduino, unless you haven’t made anything from it yet. Arduino is a open-source (open to public) electronic platform based on easy-to-use hardware and software. In other words (for a simpler definition), Arduino refers to an open-source electronics board and the software used to program it. Arduino is a fantastic way for anyone to learn about robotics, hardware engineering and programming. Over the years Arduino has been the brain of thousands of projects, from everyday objects to complex scientific instruments. Arduino boards are able to read inputs — light on a sensor, a finger on a button, or a Twitter message — and turn it into an output — activating a motor, turning on an LED or publishing something online.

Excited to learn it? Here we go!
HISTORY
The Arduino project was started at the Interaction Design Institute Ivrea (IDII) in Ivrea, Italy. The project goal was to create simple, low cost tools for creating digital projects. At that time, the students used a BASIC Stamp microcontroller at a cost of $50, a considerable expense for many students. In 2003 Hernando Barragán created the development platform Wiring as a Master’s thesis project at IDII, under the supervision of Massimo Banzi and Casey Reas. Wiring was important for Arduino since it is based on wiring in both software and programming language. In 2005, Massimo Banzi, with David Mellis, another IDII student, and David Cuartielles, extended Wiring by adding support for the cheaper ATmega8 microcontroller. The new project, forked from Wiring, was called Arduino.

Massimo Banzi
“Hardware becomes a piece of culture that anyone can build upon, like a poem or a song.”
-Massimo Banzi
WHY ARDUINO?
We know what is Arduino, but why should we choose it. There are dozens of other options out there, so why Arduino:
Arduino is an open-source electronic platform. This means that, not only can the public openly use the software and hardware, it can also constantly update and modify the hardware and software, proving Arduino to be diverse collection of boards. As a matter of fact, huge amounts of software libraries have been made by people at various communities to make the Arduino capable of working and behaving much better with more and more electronic components which are coming up.
Apart from that, Arduino is also one of the most cloned microcontroller boards out their. This means that Arduino is unexpectedly cheap. Moreover, Arduino gives a lot of options to choose from while building your project. It has several boards, some small, some large, each having their own features.
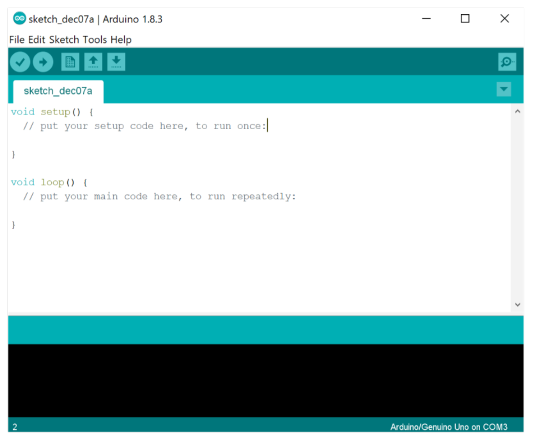
Not only that, the Arduino IDE (Integrated Development Environment) is an all-in-one software IDE, which allows us to program in the same language, for almost every Arduino board out there! This helps a lot as we do not have to download a different IDE each time we buy a different Arduino board!
Since Arduino is an open-source electronic platform, A worldwide community of makers — students, hobbyists, artists, programmers, and professionals — has gathered around this open-source platform, their contributions have added up to an incredible amount of accessible knowledge that can be of great help to novices and experts alike. :)

“A child educated only in school is an uneducated child”
— Unknown
HARDWARE
Arduino is open-source hardware. This means layout and production files for some versions of the hardware are also available. Although hardware and software designs for the arduino boards are freely available under the copyleft license, the developers have requested the name “Arduino” to be exclusive to the official product and not be used for derived works without permission. Most Arduino boards consist of an Atmel 8-bit AVR microcontroller (ATmega8, ATmega168, ATmega328, ATmega1280, or ATmega2560) with varying amounts of flash memory, pins, and features. The most famous and common boards include Arduino UNO, Arduino Mega and Arduino Nano. The boards use single or double-row pins or female headers that facilitate connections for programming and incorporation into other circuits. This allows for the connection of wires with male heads and also the connections for shields. Shields here refer to special arduino boards that can be attached over other boards, so as to increase their functionality. Some arduino boards also include ethernet connections, while some are as small as your thumb! Special arduino boards like the Arduino Lily can also be stitched upon clothes, to make wearable devices.

SOFTWARE
Any hardware is useless without a software. We need someone to explain the boards what we need them to do. For this, we have to speak the board’s language. This language is known as machine code and it exists as a series of 1’s and 0’s inside the memory of the board or the computer. Although machine code might be great for computers, it is extremely difficult for humans to understand. Early computers in the 1940’s and 1950’s had what was known as an Assembler. The job of this assembler was to translate assembly language into machine code. Users could write instructions for the computer known as a program with numbers and things that almost looked like words. While it was still difficult to understand, the language was also unique to each type of computer. It was better than writing a machine code but having to write assembly and learn a new set of instruction for each new computer was quite burdensome. So, people began to create high-level programming languages in the 1950’s, such as COBOL, Lisp and Fortran. These languages did not talk in the native language of the computers, but relied on a compiler to translate the high-level language into something the computer can understand. A compiler is simply a program that does the above mentioned work. When you write a program in Arduino, you write in the combination of C and C++ which is a high-level programming language used to construct instructions for Arduino. Arduino has a special software known as the Arduino IDE (short for, Integrated Development Environment) which provides us an environment to write our code into and upload it to the Arduino board.
That was all about Arduino, and believe me, this was just an introduction. Further, we will be diving deeper into this marvelous world of electronics, made up of wires and pcb’s!
Do not forget to follow and share with your friends and colleagues. Stay tuned for further updates!
Till then, Keep innovating!!
3 notes
·
View notes
Text
youtube
Project-arduino projects led code
/* Blink Turns on an LED on for one second, tarduino projects for kidshen off for one second, repeatedly. */
// the setup function runs once when you press reset or power the board
void setup() {
// initialize digital pin 13 as an output. pinMode(13, OUTPUT); }
// the loop function runs over and over again forever
void loop() { digitalWrite(13, HIGH);
// turn the LED on (HIGH is the voltage level)
delay(1000); // wait for a second digitalWrite(13, LOW);
// turn the LED off by making the voltage LOW
delay(1000); // wait for a second }
Arduino-droid application link 👇👇
https://play.google.com/store/apps/details?id=name.antonsmirnov.android.arduinodroid2
Arduino uno board online buy link👇👇
https://amzn.to/3fknhcp
coding for kids in python 👇👇
https://youtu.be/dvXsXgosg18
https://www.facebook.com/codingscience/
1 note
·
View note
Text
Important Things You Need To Know Before Buying Electronics Products Online
Purchasing items online is more normal than at any other time now, as it is hard to contend contrary to the accommodation it offers. Costumers save piles of time looking for from the encouragement of their homes or anyplace they're. They not should pass right down to the shop, battling by site guests and consuming fuel along the way, to make a buy.
It has been really a huge amount something very similar with electronics, as people have acquired self-confidence in purchasing for such items on the web, despite the fact that they were unsure of it previously. A valid justification behind this has been the blaze deals or the limits on certain celebrations, with online internet business sites empowering such deals by extraordinary missions. In any case, there are regardless matters that might turn out badly when you are purchasing such products on the web, even from the best electronic stores. There are a few matters a client should know about, to stay away from disasters in purchasing electronics. Some of these are recorded as follows:
Make a point to look at costs
A ton of the times individuals are looking for items on the web, they see a deal transfer ownership of and they right hurry to search for that thing. It's conceivable, particularly on account of electronics that the particular item may be at a deal at a cheap expense on a particular site. Subsequently, it very well may be valuable to you to check cost on every one of the main, real internet based sites you can find. Besides, there are a couple of sites that really do offer that indistinguishable capacity, so visiting them might be a choice.
Monitoring cost records
Discussing those cost evaluation sites, some of them likewise let you investigate the charge history of a specific item and to decide while it become at its greatest, or while it declined the most. Utilizing that measurements, you might figure out the best opportunity to look for the item you want on the most potential reasonable expense.
Contemplating revamped or utilized items
It used to be the situation that people typically advised towards looking for utilized or revamped electronics, as they did now not close exceptionally extended and more prominent frequently than now not, there were issues with the item. Such issues exist even these days, yet there are ensures set up that offer the individual with additional confidence and confidence in the item. There are likewise guaranteed renovated contraptions from the assembling venture itself and can be a best cash saver for a many individuals.
Investigate audits
In the event that you feel a little skeptical or fears about a good item, they might be set to rest through counseling surveys that not set in stone in overflow on the site. A basic guideline of thumb shows that on the off chance that a survey of a specific item is difficult to track down; it would be an insightful decision to cease from purchasing for that item. Gadgets are no unmistakable, as there gives off an impression of being a boundless measure of brands delivering all types of items every week. The best computerized stores and sites as well, offer a rating framework for items that can be helpful in sorting out the consumer loyalty that may in flip help various clients make an educated determination.
For more information:-
Buy Arduino Uno accessories buy Microcontrollers Devices In Egypt buy Microcontrollers Products Online in Egypt
0 notes
Text
Tech101 - the Challenge
11th blog
We continue to search and looked for the remaining materials needed for the miniature. Unluckily, a certain material is only available online, the shipment will be overseas. So we didn't bother to order the material. We dont want to waste anymore time. We challenged ourselves to make our own system without that certain material. So, we bought the components to make our very own DC power meter. Later last week, we started to make our miniature. We also discussed the update for our project to our class. We reported to our instructor that we haven't started building our miniature yet due to the materials. Our instructor offered/let us borrow his solar panel for our miniature.
The problems that we encountered was: How can we measure the power by using Arduino uno. This microcontroller is only capable and can be supplied by a maximum of 5VDC. We talked to some people who are knowledgeable in this type of problems. Hopefully they can help us.
As a group, our decisions were; not to buy the material we beed online and decide on making it. We decided to start with the miniature.
1 note
·
View note
Text

Buy Quality Arduino Boards Online
The best collection high quality Arduino board including Arduino UNO, Mega, Micro, Pro mini, Leonardo, Due, and LilyPad. These boards are available at Tomson Electronics at the best price. Pan India delivery within 7 working days. Hyper delivery is available in Kochi, Ernakulam. Fast shipping to all places in Kerala and South India.
#wholesale electronics distributor tamilnadu#Top Electronics Components Distributors#Buy IT & Electronic Items Online at Best Price in India#Buy IT & Electronic Items Online at Best Price#LED lights bulk purchase India#Consumer electronics distributor India#Wholesale electronics marketplace
0 notes
Text
A Peek at the Pico, Raspberry Pi's Newest Petite Powerhouse
Raspberry Pi Pico
8.80 / 10
Read Reviews
Read More Reviews
Read More Reviews
Read More Reviews
Read More Reviews
Read More Reviews


Shop Now
Meet the new Raspberry Pi Pico; a tiny microcontroller filled with big possibilities.
Specifications
Brand: Raspberry Pi
CPU: Dual-core 133Mhz ARM
Memory: 264Kb
Ports: microUSB
Pros
Powerful ARM Processor
Micro-USB Connectivity
Breadboard Mountable
Easy-To-Use Interface
Absolutely Adorable
Inexpensive
Cons
No Wi-Fi or Bluetooth connectivity
No Header Pins
I/O Port Labelling on One Side Only
No USB-C Connectivity
Buy This Product
Raspberry Pi Pico other
Shop
// Bottom var galleryThumbs1 = new Swiper('.gallery-thumbs-1', { spaceBetween: 10, slidesPerView: 10, freeMode: true, watchSlidesVisibility: true, watchSlidesProgress: true, centerInsufficientSlides: true, allowTouchMove: false, preventClicks: false, breakpoints: { 1024: { slidesPerView: 6, } }, }); // Top var galleryTop1 = new Swiper('.gallery-top-1', { spaceBetween: 10, allowTouchMove: false, loop: true, preventClicks: false, breakpoints: { 1024: { allowTouchMove: true, } }, navigation: { nextEl: '.swiper-button-next', prevEl: '.swiper-button-prev', }, thumbs: { swiper: galleryThumbs1 } });
We’ve managed to get our hands on the coveted Raspberry Pi Pico. Today, we’re going to be looking at some of the most important features and putting it toe-to-toe with some of the biggest names in small electronics.
We’ll be showing you what the Pico can do, and we’ll get you started with MicroPython, one of Pico’s supported programming languages. We’ll even offer up some code to try in case you decide to buy a Pico of your own.
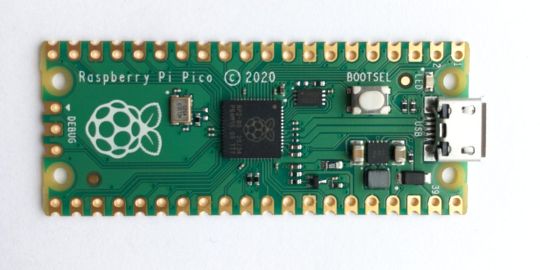
What Is a Raspberry Pi Pico?
Raspberry Pi Pico is a new budget microcontroller designed by Raspberry Pi. It’s a tiny computer built around a single chip, with onboard memory, and programmable in/out ports. Historically, microcontrollers are used in a variety of devices from medical implants to power tools. If you have an electronic device sitting in your vicinity, there’s a good chance that there’s a microcontroller inside of it.
Key Features of the Pico
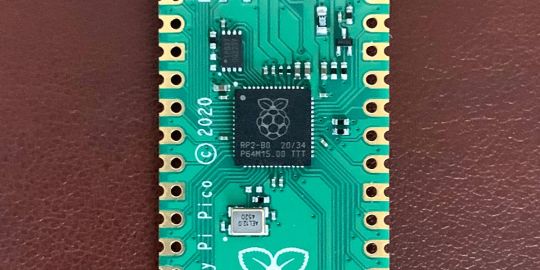
The Pico is built around the RP2040 microcontroller chip, which was designed by Raspberry Pi UK. It’s a Dual-Core ARM processor with a flexible clock that can run up to 133 MHz. The Pico also supports 1.8-5.5 DC input voltage, has a micro-USB input port, and an onboard temperature sensor.
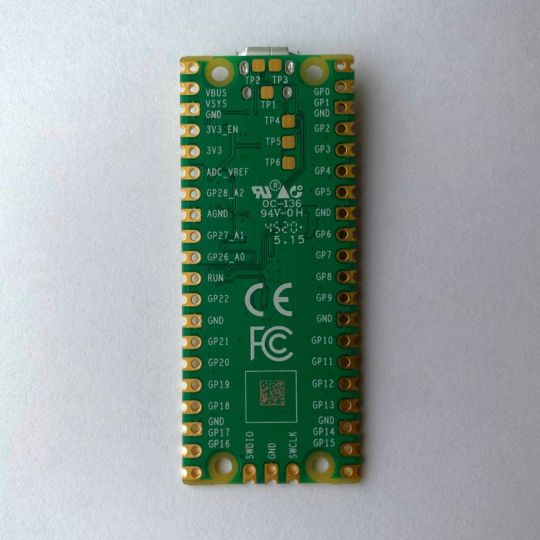
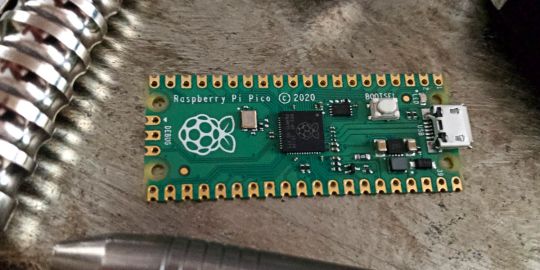
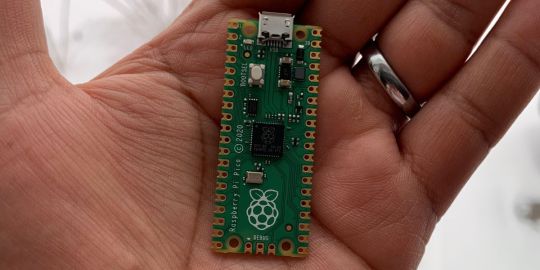
Flanking the chip on all sides are a series of castellations that allow easy soldering to a Veroboard or breadboard. This dual in-line package (DIP) style form factor is stackable, and can also be used in carrier board applications.
Technical Specifications
21 mm x 51 mm
264kb on-chip RAM
2 MB on-board QSPI flash
2 UART
26 GPIO
2 SPI controllers
2 ISC controllers
16 PWM channels
Accelerated integer and floating-point libraries
3-pin ARM Serial Wire Debug (SWD) port
What’s So Special About the Pi Pico?
The Pi Pico is a different kind of microcontroller. It’s Raspberry Pi’s first, and it features ARM technology in its RP2040 silicon chip. Many technology companies are embracing silicon ARM chips, with major manufacturers like Apple leading the charge.
The punchy little Pico packs a staggering 26 multifunction general purpose input/output (GPIO) ports, including 3 that are analog. Alongside these ports are 8 programmable input/output (PIO) ports. Compare this to other microcontrollers like the Arduino Nano, and the Pico packs roughly 18% more GPIO capability.
The most considerable difference between the Pico and its competitors, however, is the $4 price tag. Low cost is the main selling point of this unique offering.
At launch, many online retailers sold out of the device due to the interest and Raspberry Pi’s favorable reputation. By setting the price so low, the Pico opens the door for a new class of high-powered, budget microcontrollers.
There are many potential applications for the new Pico. With its onboard temperature sensor, the device is an obvious choice for IoT projects.
One talented retro gaming enthusiast even used a Pico to build a gaming console with full VGA video support.
youtube
This means that makers who have been curious about Raspberry Pi, or microcontrollers in general, now have the ability to experiment for less than the price of a fancy cup of coffee.
Related: The Raspberry Pi Comes of Age With the Pi 400 Desktop
The Raspberry Pi Pico Processor
The RP2040 ARM chip is an interesting choice for the Pico. At 133MHz, the chip is capable of leaving more expensive boards, like the Arduino Uno, in the dust.
Using ARM processors seems to be an emerging trend in the world of microcontrollers. In addition to Raspberry Pi, both Sparkfun and Adafruit also offer boards with similar ARM technology.
The industry-wide switch was made for a single reason—speed. ARM processors give a considerable boost over standard Atmel chips. In a board this size, using an ARM processor is like dropping a fully kitted Porsche engine into a Volkswagen. On the other hand, many microcontrollers don’t require that much processing speed. Yet.
Ramping up performance means that makers who want to push the limits of the Pico will have an abundance of power to do so.
The I/O Ports
The GPIO ports on the Pi Pico feature several interesting functions for common uses such as operating a screen, running lighting, or incorporating servos/relays. Some functions of the GPIO are available on all ports, and some only work for specific uses. GPIO 25, for example, controls the Pico’s onboard LED, and GPIO 23 controls the onboard SMPS Power Save feature.
The Pico also has both VSYS (1.8V — 5.5V) and VBUS (5V when connected to USB) ports, which are designed to deliver current to the RP2040 and its GPIO. This means that powering the Pico can be done with or without the use of the onboard micro-USB.
A full list of the I/O ports is available on Raspberry Pi’s website in its complete Pico documentation.
Pico vs. Arduino vs. Others
One question on the minds of many makers is whether or not the Raspberry Pi Pico is better than Arduino?
That depends. Pound-for-pound, higher-end Arduino boards like the Portenta H7 make the Pico look like a toy. However, the steep cost for a board of that caliber might be a tough pill for the microcontroller hobbyist to swallow. That's why the smaller price tag on the Pico makes it a win for makers who enjoy low-risk experimentation.
Along with minimal cost, the Raspberry Pi jams an extensive feature set into the Pico, comparable to boards like the Teensy LC, and the ESP32. But neither of these competitors manage to challenge the budget-friendly Pico on price.
That's what makes the Pico such a fantastic value, and a great choice for hobbyists and power users alike.
The Pi Pico: What’s Not To Love?
Unfortunately, to drive the price of the Pico down, Raspberry Pi had to make a few compromises. The most notable of which is the lack of an onboard radio module. Neither Bluetooth nor Wi-Fi is supported without add-ons.
The Wi-Fi limitation can be eliminated by adding a module like the ESP-01. Bluetooth support may prove a bit more challenging. If you need an all-in-one solution for your products, you’re better off skipping the Pico, and spending a little extra for something like the Pi Zero W, or ESP32.
Additionally, many early adopters are complaining about the lack of GPIO labeling on the top of the board. Raspberry Pi provides an extensive amount of documentation on its website to address this, but pointing-and-clicking, or thumbing through paperwork when you have a hot soldering iron in your hands isn’t often desirable.
Lastly, the lack of I/O pin headers is something of an issue for some, as it means less convenience when swapping I/O components. This minor annoyance can be solved via the use of leads, soldering the component wiring directly to the Pico, or using a breadboard.
If you’ve been using microcontrollers or small electronics for any period of time, then an unpopulated board is most likely a non-issue. Of course, you could also add your own pin headers if you plan on regular experimentation with different external components.
The final rub with the Pico is the micro-USB port. With many other microcontrollers like the Portenta H7 moving toward USB-C, Raspberry Pi's micro-USB port seems dated.
Logically however, the decision to use micro-USB makes sense. It was done by Raspberry Pi to keep costs as low as possible, and to keep interface capability almost universal. Everyone we know has at least a few micro-USB cables tucked away somewhere in their homes.
However, with future versions, a USB-C interface would be a nice addition to an already spectacular package.
Related: A Beginners Guide To Breadboarding With Raspberry Pi
Programming the Raspberry Pi Pico
Interfacing with the Pi Pico can be done via C/C++, or via MicroPython in the Read-Eval-Print-Loop or REPL (pronounced “Reh-pul”). The REPL is essentially a command line interface that runs line-by-line code in a loop.
In order to access the REPL, you’ll need to install MicroPython onto the Pico. This process is simple and only involves four steps.
Installing MicroPython
Download MicroPython for Raspberry Pi Pico from the Raspberry Pi Website
Connect the Pico to your computer via micro-USB while holding the BOOTSEL button
Wait for the Pico to appear as an external drive
Copy the MicroPython file to the Pi Pico, and it will automatically reboot
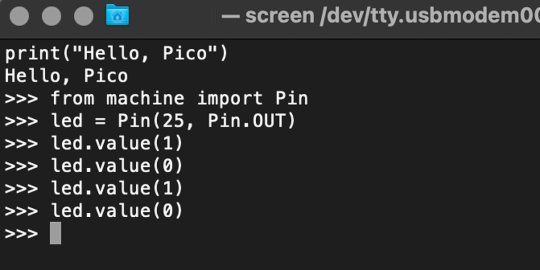
You can access the REPL in a number of ways. We used the screen command in a macOS terminal window to access the serial bus connected to the Pico. To accomplish this with Terminal, you’ll first open a new terminal window, then type ls /dev/tty*
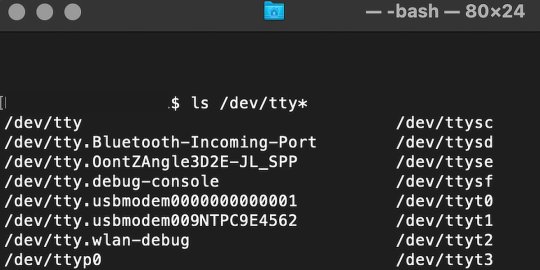
From there, find the port where the Pico is connected. It should be labeled something like /dev/tty.usbmodem0000000000001. Then run the command:
screen /dev/tty.usbmodem0000000000001
Your cursor should change. Hit Return and the cursor will change again to >>>.
In the image below we've included the classic Hello World (Hello, Pico) command-line program in the REPL, along with a few lines of code that will turn the Pico's LED on and off. Feel free to try them yourself.
For more information, we recommend you invest in the official starter guide to MicroPython that Raspberry Pi has published on their website.
Download: MicroPython for Raspberry Pi Pico (free)
Using the Raspberry Pi Pico With Thonny
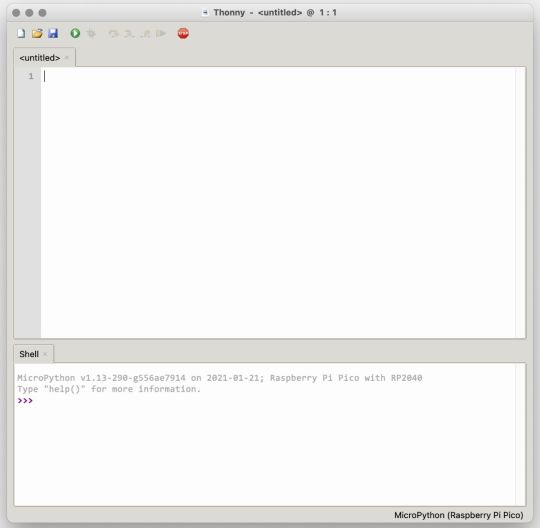
If you’re looking for a more proper coding environment, the Raspberry Pi Pico will also allow access to the REPL with Thonny. To enable this feature, first download and install Thonny. Once installed, connect your Pi Pico. Open Thonny and you'll see information indicating your Pico is connected in the Shell.
At the bottom right of the screen, you should see a version of Python. Click this version and select MicroPython (Raspberry Pi Pico) from the drop-down menu.
Now you can type commands into the Shell, or you can use Thonny’s editor to write or import multiple lines of code.
The abundance of interface possibilities make the Raspberry Pi Pico easy to program. For those who are familiar with MicroPython, this should be nothing new. For beginners, however, Thonny provides a powerful interface and debugger to get started with programming.
Download: Thonny (Free) Windows | Mac
Should I Buy the Raspberry Pi Pico?
The Raspberry Pi Pico is a powerful budget board that is perfect for hobbyists, or makers just starting out with microcontrollers. The documentation, low cost, and wide range of possibilities for the Pico also make it a great choice for seasoned small electronics wizards. If you’re a DIYer who loves to tinker, or you just want to challenge yourself to a weekend project, then you’ll love playing with the Pico.
On the other hand, if you don't have one or more projects in mind that need a microcontroller, then this board is probably not for you. Also, if your project needs Wi-Fi connectivity or Bluetooth, then the Pico won’t scratch that itch. And finally, for users who aren’t comfortable learning MicroPython, or exploring C/C++, the Pico isn't ideal. And remember: this Raspberry Pi is not like the others. It will not run a full Linux operating system.
But, if you dream in Python, or if you love the smell of solder, then you won't regret grabbing this tiny powerhouse. Most of all, if the sight of the sports-car-sleek RP2040 gets your creative gears turning, then we think you’ll really benefit from picking up the Pico.
Serving up Several Sweet Possibilities
While it isn’t perfect, the Raspberry Pi Pico is a strong entry into the world of microcontrollers. The reputation that Raspberry Pi has built for quality electronic components at a relatively low price extends to the Pico.
It’s everything a Raspberry Pi should be: small, sweet, and superb. It’s beautifully designed, and extremely inexpensive. But the best part isn’t the looks or the low cost.
The best part about this small wonder is picking it up, and holding it in your hands. It's feeling the tug of electronic inspiration. It's realizing just how powerful the Pico is, and what it means for microcontrollers going forward.
And truthfully, we think it's amazing that something as small as the Pico can offer so many unique possibilities.
A Peek at the Pico, Raspberry Pi's Newest Petite Powerhouse published first on http://droneseco.tumblr.com/
0 notes
Link
The Arduino boards are provided as open source that helps the user to build their projects and instruments according to their need. This electronic platform contains microcontrollers, connections, LEDs and many more. There are various types of Arduino boards present in the market that includes Arduino UNO, Red Board, LilyPad Arduino, Arduino Mega, Arduino Leonardo. All these Arduino boards are different in specifications, features and uses and are used in different type of electronics project. You can buy arduino board online in india with campus component. Visit https://www.campuscomponent.com/categories/arduino/2208614000002321119
0 notes
Text
Using a microcontroller + learning basic electronics
Initially for my experiments, I’ve been using an existing drum brain to receive signals from the piezos or pads and send MIDI notes to the computer.
However when I was planning out the design of the MIDI Marimba, I realised that if I wanted to have a large number of keys, I’d be plugging in a huge amount of cables every time I wanted to use it - it was looking like it was going to be 16 cables for the piezos, two power cables, two USB / MIDI cables... Way too much trouble, effort, and cables that could get damaged or unplug. So I decided to look into other options. I had initially wondered about using something called a microcontroller, which you can read more about here: https://electronics.howstuffworks.com/microcontroller.htm

I had asked around on the forum of a local electronics store and described my project and what I wanted to do - and had received the answer that it would be way too complicated and costly - so I initially abandoned the idea.
Luckily I decided to look into it again and ask different people, and it turned out that it couldn’t be further from the truth!
Microcontrollers are pretty inexpensive and there is an absolute wealth of information out there on how to use them and an insane amount of cool projects that people make with them.
Here’s an overview of using Arduino based microcontrollers, mainly for creating MIDI controllers
youtube
If i used a microcontroller to build my marimba, I would connect all the piezos and everything else to the controller, and then the ONLY cable I would need to plug in to use it would be the USB cable for power and receiving the MIDI signal, OR a separate physical MIDI cable if I wanted.
This sounded like a way better option and also opened a world of possibilities - I would be able to add my own knobs, buttons, faders, pedals, sensors - anything really to the marimba.
While it was going to be a steep learning curve without any background in electronics, I was very excited for all the possibilities and amazing things I could add to the instrument - so I went ahead and bought a cheap Arduino Uno copy board, some basic parts and started doing online tutorials.
ARDUINO TUTORIALS
I started with these tutorials by amandaghassaei and they were the perfect introduction! There are heaps of other ones on the instructables site as well as all over youtube!
https://www.instructables.com/Beginner-Arduino/ https://www.instructables.com/Arduino-Sensors-and-MIDI/ https://www.instructables.com/Intermediate-Arduino-Inputs-and-Outputs/

Following the tutorials was great, but as soon as I started trying to modify or build my own circuits I found I really needed to learn more electronics knowledge.
LEARNING BASIC ELECTRONICS
Sparkfun was my saviour, their tutorials are really straightforward and they use great demonstrations - it seems like it’s all focused more at kids and schools but it’s really well done. I found I really needed this knowledge to make any changes to builds and figure out what parts I needed to buy!
https://learn.sparkfun.com/tutorials/what-is-a-circuit/short-and-open-circuits
https://learn.sparkfun.com/tutorials/voltage-current-resistance-and-ohms-law
youtube
youtube
youtube
I bought some extra parts to play around with, and experimented with potentiometers ( often you will you see this as knobs ), buttons, LEDs, MIDI ports and piezos. In the beginning all the parts could fit right into a breadboard, which is a board that you use for making prototype circuits. The great thing about these is that they are electronically connected in a way that you can mostly plug parts and cables right into them, without any need for soldering anything. Here’s a compilation of some of the tests I did with MIDI
youtube
STARTING TO SOLDER
The next test I wanted to do was to connect a 1/4″ jack to connect a sustain pedal or external pads. This meant that I needed to solder, so that I could connect the jack to wires that could plug into my breadboard.
This was a great place to start as soldering is a skill that is key to building anything with microcontrollers that is more permanent and stronger than a prototype.
Again I started with sparkfun tutorials
youtube
https://learn.sparkfun.com/tutorials/how-to-solder-through-hole-soldering/all
My first solders weren't very neat, but they worked!
Building on other projects that I found online, I then created the code to use a sustain pedal - which could be used to add one to a keyboard that doesn’t have one, or as part of a project like my marimba :D After that I moved on to using the same pedal as a hi-hat controller pedal, to change the note being played by a piezo if the pedal is pressed. I was surprised at how hard it was to find similar code online, but with some trial and error I was able to combine different bits and pieces I found and come up with some bits of my own.
Here it is in action
youtube
It was definetly a steep learning curve for all of this, but I got a lot out of it and the potential for customisation is so much greater now, my design for the marimba has really changed and I now know that I can include heaps of amazing features that I thought would be great but I dismissed as not being acheiveable. Very excited to keep learning more and experimenting!
0 notes
Note
What do i do if I want to get into coding and robotics but Im dumb as a stump? Are there any good beginner resources you know of?
Sparkfun and Arduino themselves sell starter kits consisting of an Arduino Uno microcontroller and a bunch of accessories like motors and LEDs you can use to make really simple projects, usually working from online tutorials. it's extremely beginner friendly: they handle most of the hard parts of C for you (no need to malloc OR free!) and there's a drop-down menu in the coding environment with almost 100 snippets of example code you can work with. once you understand the basic operating procedure behind Arduino projects you can start looking for cooler ideas on Instructables or if you're REALLY deadass about your robotics you can buy a Turtlebot and teach yourself ROS and a little bit of Linux
16 notes
·
View notes
Text
Uno the Game? Nope, Uno the Microcontroller
This week marks the beginning of my something awesome project.
Getting My Equipment:
The first thing I needed to do was get my equipment. I decided to see if anyone else has done a similar project to mine to checkout what they used and it turns out a lot of people have created Morse code translators. All were implemented in different ways. Some people just translated just made encoders, other also made decoders. Some people used light to express the Morse code and others used sound. I haven’t really decided my method of displaying my messages but I think I’ll try all of them if I can.
After looking at everyone’s implementation, I decided getting the Arduino Uno microcontroller was a good place to start.
I decided to buy my supplies from CREATE UNSW’s online store (https://www.createunsw.com.au/store/), where they also sell a bunch of other electrical components for an affordable price. I was tossing up between buying the Starter Kit and the Uno Kit. In the end, I bought the Uno Kit because it had other components I thought might be useful (the buzzer) and if I continue to use Arduino after this project (I hope I do), I’ll have extra components ready to use and explore. It’s a win-win situation.
When I went to pick up my order, the people at the store were really nice. They said that if I had any questions, I could ask them.
Here’s a photo of the kit below:

What’s What?
Now that I had all my equipment, I still didn’t know what anything was. So I decided just to take everything out of the box and label them as you can see below.

I've got a lot more to cover and a lot of videos to show what I've done so far but it'll probably get cluttered in this one blog post. So there will a part 2 covering me learning about the language, hardware and trying to get some basic output coming soon...
0 notes
Text
Robot chassis and its DIY
Robot chassis:-

Robot chassis are terribly straightforward accessories that are notably designed for college kids and learners UN agencies take a keen interest in forming the mechanism. we tend to cater to mechanism chassis of varied shapes and sizes like useful plastic chassis plate, Robo human chassis board metal board, motor board, and tiny and super giant board. A chassis is that the framework of a man-made object, that supports the article in its construction and use. associate degree example of a chassis could be a vehicle frame, the body part of a motorcar, on that the body is mounted; if the running gear like wheels and transmission, and typically even the driver's seat, are enclosed, then the assembly is represented as a rolling chassis. You have detected the word “Chassis” in an automobile however until currently, you've got confusion regarding it. however, nowadays I'm reaching to tell you regarding it. Chassis is that the base of a vehicle. It consists of an engine, the transmission system, brakes, suspension, steering mechanism, cooling system, wheels, etc
Types of chassis:-
1. Conventional chassis or frame-full chassis
2. Non-conventional chassis and frame-less chassis
The prayog India provides you the robot chassis as well as you can buy electronic project kits online, Buy engineering project kits online, buy science project kits in India.
DIY Spider Robot Chassis

Here is that the cute DIY Spider robot chassis creating your robotic dreams come back true. With the DIY Spider robot, you'll style and manufacture a robotic creature as you would like and underneath your control! Battery(1.2V) is enclosed. activate the switch, you will find the tiny robotic creature is jam-packed with energy! The vivid DIY robotic spider with eight multi-jointed legs accurately duplicates the movement of a true spider. There are 2 assembly decisions for you to vary the stride length and gait of the spider. Want the Spider robot to become smarter and additional powerful? currently, it is your address to be its master and DIY! Add a brain (microcontroller and programming) therefore your robotic spider will mechanically avoid barriers.
You may need:
l Arduino Uno microcontroller (or equivalent, ATmega328-based)
l Sharp IR Distance Sensor (GP2Y0A21YK0F)
DIY Spider robot offers you a good probability to be told regarding robotic science, in spite of your age. you will never run out of how to own fun as a baby with the Spider. youngsters can also expertise the enjoyment and action with the assembly, which may facilitate to cultivate their innovation and intelligence.
WARNING: CHOKING HAZARD-Small parts. Not for children under 3 years.
Specification
· Attractive color
· Package size:18*24*6cm
· Two assembly choices for you to change the stride length and gait of the spider
· The robotic creature designed by you!
Shipping List
· Gearbox (x1)
· Switch (x1)
· Terminal A (x1)
· Terminal B (x1)
· Rubber tube (x1)
· Plastic Part A (x1)
· Plastic Part B (x1)
· Plastic Part C (x2)
For the best science, engineering, electronic projects you can visit prayog India. This site provides you a wide range of engineering and electronic materials for the DIY projects. We have developed more than 500 + Science & Engineering projects & kits for students who belong to the different trades. Such as engineering students and school students.
#buy electronic project kits online#Buy engineering project kits online#buy science project kits in India
0 notes