#arduino uno projects
Explore tagged Tumblr posts
Visit Tumblr Blog
Explore Tumblr blogs with no restrictions, modern design and the best experience.
Last Seen Tumblr Blogs


Fun Fact
Post activity is at the highest at 4:00 pm EDT; notes peak at 10:00 pm EDT.
Text
DIY Laser Tripwire Security System Using Arduino

The project consists of a laser module that continuously emits a beam aimed at a laser receiver sensor. When an object (such as a person) obstructs the laser, the receiver detects the interruption and triggers an alarm via a buzzer. This system is ideal for securing doorways, hallways, or any restricted area.
COMPONENTS REQUIRED
Arduino Uno
Laser LED Module
Laser Receiver Sensor Module
Buzzer
Jumper wires
Breadboard
Circuit Diagram

CODE
#define LASER_PIN 7
#define RECEIVER_PIN 8
#define BUZZER_PIN 9
void setup() {
pinMode(LASER_PIN, OUTPUT);
pinMode(RECEIVER_PIN, INPUT);
pinMode(BUZZER_PIN, OUTPUT);
digitalWrite(LASER_PIN, HIGH); // Laser ON
Serial.begin(9600);
}
void loop() {
int status = digitalRead(RECEIVER_PIN);
if (status == 1) { // If laser beam is blocked
Serial.println("⚠️ Intruder Detected!");
digitalWrite(BUZZER_PIN, HIGH);
} else {
Serial.println("✅ Area Secure");
digitalWrite(BUZZER_PIN, LOW);
}
delay(500);
}
youtube
9 notes
·
View notes
Text
SERVO DISTANCE INDICATOR USING ARDUINO UNO
INTRODUCTION
Distance measurement is a fundamental concept in various fields, including robotics, automation, and security systems. One common and efficient way to by emitting sound waves and calculating the time it takes for the waves to reflect back from an object, allowing accurate measurement of distance without physical contact.
In this project, we will use an HC-SR04 Ultrasonic Sensor in conjunction with an Arduino microcontroller to measure the distance between the sensor and an object. The sensor emits ultrasonic waves and measures the time it takes for the waves to return after reflecting off the object. By using the speed of sound and the time measured, the distance is calculated. This simple yet powerful setup can be applied in a variety of real-world applications such as obstacle detection in robots, parking assistance systems, and automatic door operations.

WORKING PRINCIPLE
1. Servo Movement: The servo motor rotates to different angles (0° to 180°). The ultrasonic sensor is mounted on top of the servo and moves with it.
2. Distance Measurement: At each position, the ultrasonic sensor sends out an ultrasonic pulse and waits for the echo to return after hitting an object. The Arduino records the time taken for the echo to return.
3. Distance Calculation: The Arduino calculates the distance to the object based on the time recorded and the speed of sound (0.0343 cm/µs).
4. Servo as Indicator: The servo motor's position provides a physical indication of the direction of the detected object. As the servo moves across a range of Image map out objects in different directions based on distance.
5. Visual Output: The Arduino can also send the distance and angle data to the serial monitor, creating a real-time visual representation of the detected object positions.
APPLICATIONS
1. Autonomous Robots and Vehicles
2. Radar Systems
3. Parking Assistance
4. Security Systems
5. Environmental Scanning in Drones
6. Warehouse Management and Automation
7. Industrial Automation
8. Robotic Arm Guidance
9. Collision Avoidance in UAVs/Robots
10.Interactive Displays or Art Installations
11.Smart Doors and Gates
CONCLUSION
The Servo Distance Indicator Project successfully demonstrates the integration of an ultrasonic sensor and a servo motor to create an effective distance measurement an object, the project provides real-time feedback through the movement of a servo motor, which indicates the measured distance via a visual representation.
7 notes
·
View notes
Text
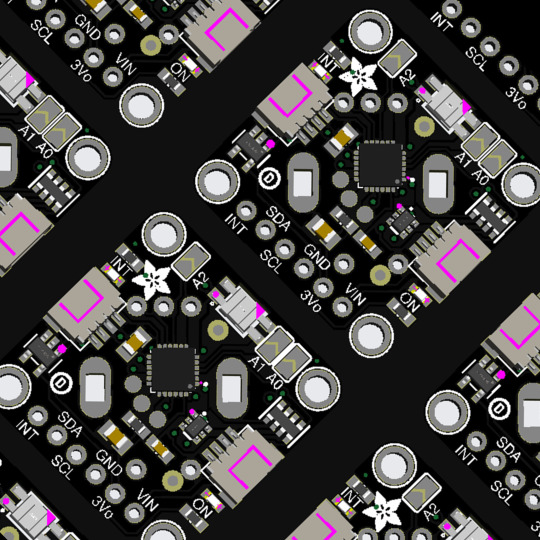
PCB of the day! Adafruit I2C Stemma QT Rotary Encoder Breakout with NeoPixel - STEMMA QT / Qwiic 🔧🔄🎛️
Rotary encoders are soooo much fun! Twist them this way, then twist them that way. Unlike potentiometers, they go all the way around and often have little detents for tactile feedback. But, if you've ever tried to add encoders to your project, you know they're a real challenge to use: timers, interrupts, debouncing…
This Stemma QT breakout makes all that frustration disappear - solder in any 'standard' PEC11-pinout rotary encoder with or without a push switch. The onboard microcontroller is programmed with our seesaw firmware and will track all pulses and pins for you and then save the incremental value for querying over I2C. Plug it in with a Stemma QT cable for instant rotary goodness with any microcontroller from an Arduino UNO up to a Raspberry Pi.
You can use our Arduino library to control and read data with any compatible microcontroller. We also have CircuitPython/Python code for use with computers or single-board Linux boards.
#adafruit#electronics#pcb#opensource#opensourcehardware#pcboftheday#arduino#raspberrypi#circuitpython#python#linux#rotaryencoder#stemmaqt#neopixel#i2c#breakoutboard#engineering#hardware#microcontroller#diy#technology
35 notes
·
View notes
Text
Creating a GPS Treasure Box
Andrew did a write up of one of his projects that we would love to share. We wish you all a happy ❤️Valentines Day!❤️
---
Many years ago I came across the idea for a GPS treasure box, from a post originally by Kenton Harris (I think - apologies if it was somebody else). Some called it a reverse geocache too, but in simple terms, it's a locked box that only opens at a certain location.
The idea behind the box was a very simple interaction - one button, and a screen. The process would go like this:
Press button
Screen lights up, and GPS begins scanning
Screen tells you how many attempts you have left
Once GPS has location, the distance from the target location in kilometers is shown
One attempt is removed from total # of attempts
Screen turns off
Eventually, the target location would be found (and the box unlocks), or the attempts will run out and the box will be sealed shut forever!
Inspired to create a fun adventure for myself and a friend on a weekend in Spain, I ordered all the relevant components including GPS module, Arduino Uno, batteries and a servo motor to lock the box. This was back in January of 2020.
Ah, how times change...
---
Fast forward to January of 2023. I'd moved back to Sydney years prior and still had all of these components sitting around. I knew I'd get to this project one day.
I came across a local makerspace with access to a laser cutter. This was the missing ingredient I needed - not only were there the facilities I needed to create the treasure box, there was also vibrant community of people who had done similar things before.
I started out by gathering some code to power the project, and thankfully found a number of helpful repositories on Github.
I was able to clone one, and adapt it to the paricular hardware and display I was using pretty easily. Annoyingly I had to learn all about Baud rates and GPS modules - but I'm glad I did as I'm sure it will contribute to projects in the future.
---
At long last, the finished project was here.

Not too shabby I thought, but it was time to put it to the test.
I enlisted the help of my girlfriend. We began at home and she pressed the button.
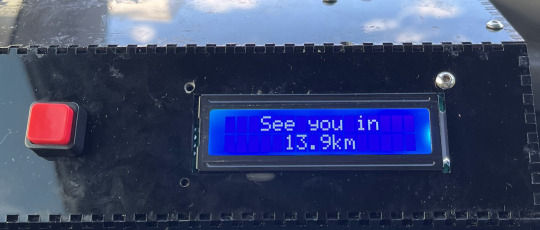
As a guess, she told me to head to Pyrmont, an inner-city suburb. So off we drove.
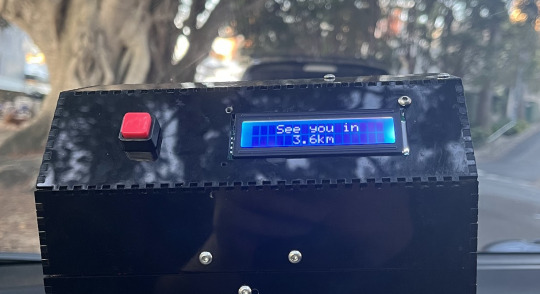
Getting warmer! And still with heaps of attempts left.

With the sun setting, we headed to a nice spot in Rose Bay, by the water.
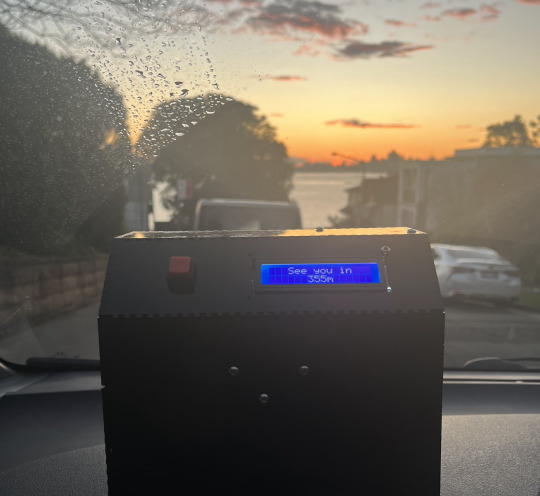
It was close enough to continue on foot, so we decided to put the dog in a backpack (I didn't realise prior that he was not allowed in Sydney Harbour National Park, so I hope this was an OK compromise! Apologies to the national parks service).
---
Here, my true colours were revealed. I'd actually added some extra code into the mix - getting the box to ask a very important question on my behalf.

And sure enough, the box opened on cue, revealing an exciting treasure hidden within!
7 notes
·
View notes
Text
First ATTINY85 project!
(warning: video has actual flashing LED lights)
[ Video ID: A breadboard with a Blue LED on top of an 8-pin DIP Integrated Circuit on it. The Blue LED is flashing rapidly. There are other components on the breadboard in the background. End ID ]

Last week I bought some ATTINY85 Microprocessors to experiment and work with :) With my W65C02 project on hold until I can afford an oscilliscope, and my Radio project delayed because I can’t quite figure out how to reverse engineer the 8 pins on the volume knob, I wanted something else to work with. I’ve been wanting to mess with Atmel microprocessors (Arduino Uno runs on an Atmel ATMEGA328), and now’s a good chance!
I’m jumping straight to assembly with the ATTINY85; I don’t know any C/C++ code, and also I’m familiar with other processor Assembly languages, so I might as well. And other than different names for functions, it’s been pretty easy so far! Something I’m not used to is that this processor, despite being pathetically tiny, has 32 registers; I’m used to working with 8 Max.
Anyways, for the code explanation: When the processor first starts, it turns on PINB0, which is physical pin 5 on the processor. Then, after counting to 256 256 times, it turns off PINB0 for another 256^256 counts. I’m away from home while writing this, so my notes arn’t here, but if I remember correctly it came up to 200k microseconds? That adds up to about 400 nano seconds per on/off cycle, or 2.5 flashes per second. I can add in another loop to make it last longer, but before I do that I’d like to look about to see if there’s a smarter way to tackle this.
My next step after this, is to figure out how to get this processor to read digital inputs: My next project is to finally do something with my box of telephone rotary dials. I already have one spec’ed out for breadboard testing. I would LOVE to show it, but Tumblr has a One Video Per Post limit :(
13 notes
·
View notes
Text
Arduino Nano Board R3 with CH340 chip

Based on the Arduino platform, the Nano R3 Board CH340 Chip without USB Cable does all the functions of the Uno, but has a smaller footprint.
Using Nano CH340 Soldered Board R3 Chip without USB cable is essential for your small project where you don’t need many pins, but the small size is very important to make it look nice.
In comparison to older versions of Arduino Nano with FTDI USB-Serial Chip, the Nano uses a low-cost USB-Serial Chip.
With the ATmega328 (Arduino Nano R3), the Nano is small, complete, and breadboard-friendly. It has more or less the same functionality as the Arduino Uno but in a different package. In addition to lacking a DC power jack, it uses a Mini-B USB cable instead of a standard one.
This device can be powered by a mini-USB cable, a 6-20V unregulated external power supply (pin 30), or a 5V regulated external power supply (pin 27).
Six PWM I/O are included from a total of 14 digital I/O, eight analog inputs, 16Mhz clock speed, and 32kB flash memory.
Please note:
The CH340 chip might not work directly with some PCs/laptops. You will need some drivers for the CH340 chip.
Arduino nano features :
TTL level serial transceiver ports (RX / TX)
Atmel Atmega328P-AU MCU used
It has a bootloader installed
Supports USB download and power supply
Provides support for external DC power supplies of 5V and 12V
2 notes
·
View notes
Text
Essential Electronic Items for IoT and Electronics Enthusiasts
Are you diving into the world of Internet of Things (IoT) and electronics? Whether you are a seasoned engineer or simply beginning out, having a stable list of essential components is key to bringing your initiatives to existence. Here’s a curated list of electronic objects that each maker and tech enthusiast ought to have of their toolkit:
1. Microcontrollers
Arduino Uno: Great for novices and versatile for diverse projects.
Raspberry Pi: Ideal for more complex duties and going for walks complete operating structures.
ESP8266/ESP32: Perfect for wireless communication and IoT projects.
2. Sensors
DHT22: For temperature and humidity readings.
PIR Sensor: Useful for movement detection.
Ultrasonic Distance Sensor: Measures distances with high accuracy.
3. Actuators
Servo Motors: For unique manage in robotics and mechanical structures.
Stepper Motors: Ideal for applications requiring particular movement.
Solenoids: Good for growing mechanical actions and locks.
4. Displays
LCD Display: Useful for showing records and debugging.
OLED Display: Compact and clean for exact photographs and texts.
5. Connectivity Modules
Bluetooth Module (HC-05/HC-06): For short-range wi-fi communication.
Wi-Fi Module (ESP8266): Connects gadgets to the internet.
GSM Module: Enables verbal exchange over mobile networks.
6. Power Supplies
Battery Packs: Various types for transportable electricity.
Voltage Regulators: Ensure solid voltage ranges in your circuits.
Power Banks: Handy for charging and powering devices on the move.
7. Prototyping Tools
Breadboards: Essential for prototyping with out soldering.
Jumper Wires: For making connections on breadboards.
Soldering Kit: For everlasting connections and circuit meeting.
eight. Additional Components
Resistors, Capacitors, and Diodes: Fundamental for circuit design and stability.
Transistors: Key for switching and amplification tasks.
Connectors and Switches: For interfacing and controlling circuits.
By preserving these objects handy, you'll be nicely-prepared to address a huge range of IoT and electronics projects. Whether you're constructing smart domestic devices, wearable tech, or computerized structures, having the right additives can make all the difference.
#IoT#Electronics#Arduino#RaspberryPi#ESP32#Sensors#Actuators#Displays#ConnectivityModules#PowerSupplies#Prototyping#Tech#DIY#Makers#Engineering#ElectronicComponents#TechProjects
2 notes
·
View notes
Text
The Ugly Project
Over the course of my 30+ year career as a Technical & Training Representative for Hunter Engineering Company I saved pretty much everything. When I retired, I decided to check out sim-racing, which is hardware and software that attempts to accurately simulate auto racing, complete with real-world variables such as fuel usage, damage, tire wear and grip, and suspension settings. I started with iRacing, then moved to Assetto Corsa Competizione. I'm not very good, but I'm having fun.
In 2023 I found out about motion simulators, which as you may imaging, attempt to simulate the physical movement of the car being driven in the game. I can't afford to purchase one, so using YouTube for guidance, I thought I would try to make one using all of the scrap hardware I had filling up my barn.
I decided to start simple, with a rig with just one motor that simulated traction-loss. I did have to purchase some special items such as a 12VDC motor originally meant for dump truck tarp systems, an Arduino Uno, a 12 Volt power supply, things like that.
The prototype is all together now, and it does work - mostly. There is still a lot of tweaking to do regarding the control settings and programing.
I realize the captions are not going to mean much for most people, sorry.
2 notes
·
View notes
Text
EXPLORING THE 5 COOL PARTNER SELLER ELECTRONICS PRODUCTS-Part1
Exploring the 5 Cool Partner Seller Electronics Products
Prologue
Are you an electronics enthusiast looking to expand your electronics project repertoire? Want to take your skills to the next level by exploring new and exciting products? Look no further than our list of five cool electronics products from partner sellers!
Whether you’re interested in building your own smart home devices, experimenting with sensors, or creating your own robot, these products are sure to inspire you. They cover a lot of application areas, from loop detectors used to monitor vehicle count in parking garages to Arduino CNC shields used in CNC machines, from simple pulse sensors used to detect cardiovascular pulse signals from fingertip to RGB LED panel light used in smart home, these products are unique, compact, and functional. Not only are these products fun to build and use but they’re also designed to help you learn new skills and techniques along the way.
What’s more, these products all come from trusted partner sellers who are committed to developing high-quality products. They’re happy to provide technical support for customers who have questions, so you can be sure you’re getting the best in electronics.
So get ready to dive into the world of electronics and explore these five cool partner seller products. You’re sure to find something that piques your interest and takes your own electronics projects to the next level.
Inductive Loop Vehicle Detector by Elektronika-ba
Whether you need to monitor occupancy and count vehicles in parking garages, control vehicle access at door and barrier controls, or facilitate traffic light installations and traffic controllers, the inductive loop detector is the perfect solution. It can even detect the direction and speed of vehicle traffic, making it an invaluable tool for a variety of traffic-related applications. In addition, this device can function as a stand-alone speed trap and can be easily interfaced with Arduino.
We can also provide a pre-programmed PIC chip to meet your project requirements.
Specifications
Number of operating modes: 4
Tuning: Automatic
Detection type: Presence/Pulse
Presence time: Adjustable in 3 steps
Pulse duration: 250 ms / 500 ms
Signal filtering: Adjustable in 2 steps (NORMAL, HIGH)
Loop inductance: 20 uH — 1000 uH
Frequency range: 20 kHz — 145 kHz
Frequency selection: 2 combinations (LOW, HIGH)
Sensitivity: Maximum 0.0025% Δf/f, adjustable in 8 steps
Detection speed: 10 ms by default, adjustable
Start-up time: ~ 1 second per channel (or longer if the frequency is not stable)
Temperature range: -35°C — 120°C
Sensor protection: Galvanic isolation + gas discharge tube for lightning protection
Don’t settle for less — click here to learn more about the Inductive Loop Vehicle Detector and experience the compact, yet cool detector!
Arduino CNC Shield V3.51 by Protoneer
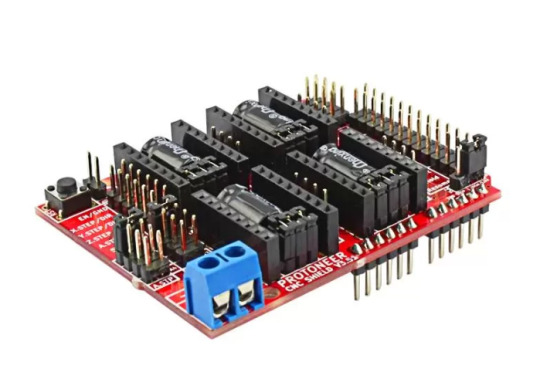
Designed by Protoneer, this kit is packed with features to ensure high precision control of your stepper motors, you can use it to easily build small CNC routers, DIY laser cutters, 3D printers, or any project that requires precise stepper motor control.
Our latest version 3.51 includes several enhancements to make assembly and installation even easier. We’ve added end-stop and probe signal filtering circuitry to eliminate false triggers and allow the use of unshielded cables for end-stops and probes. We’ve also increased the size of the solder pads for easier assembly and updated the probe pin labels to make installation a breeze.
With the Arduino CNC Shield Kit, you’ll have everything you need to build your own CNC router or mill with ease.
Features
Includes Noise Filers on all end stops and the probing pin. (New in V3.51)
GRBL 0.9 compatible. (Open source firmware that runs on an Arduino UNO that turns G-code commands into stepper signals https://github.com/grbl/grbl)
4-Axis support (X, Y, Z, A-Can duplicate X, Y, Z or do a full 4th axis with custom firmware using pins A4 and A3)
2 x End stops for each axis (6 in total)
Coolant enable
Uses removable Pololu A4988 compatible stepper drivers. (A4988, DRV8825 and others)(Not Included)
Jumpers to set the Micro-Stepping for the stepper drivers. (Some drivers like the DRV8825 can do up to 1/32 micro-stepping )
Compact design.
Stepper Motors can be connected with 4-pin molex connectors or soldered in place.
Runs on 12–36V DC. (At the moment only the Pololu DRV8825 drivers can handle up to 36V so please consider the operation voltage when powering the board.)
Don’t wait — click here to see more about the Arduino CNC Shield V3.51 and start your next project today!
Easy Pulse Mikro by Embedded Lab

What’s more, the Easy Pulse Mikro is designed in the convenient Mikro bus form factor, making it easy to integrate with a wide range of mikroElektronika’s development boards. With all necessary instrumentation and amplification built right in, this powerful sensor provides a clean and precise analog PPG waveform output that’s routed to the AN pin of the mikroBus connector.
Whether you’re a hobbyist, student, or professional developer, the Easy Pulse mikro is the perfect tool for monitoring heart rate and other vital signs.
Click here to see more about the Easy Pulse mikro.
Features
Compatible with mikroBus socket.
Filtered and amplified analog PPG signal output
On-board potentiometer for adjusting amplifier gain, if needed (rotate clock-wise for increasing gain)
Onboard LED for indicating heartbeat. It flashes synchronously with the heartbeat on detecting the pulse from the fingertip.
2 notes
·
View notes
Text
Robotics | Admissions Open 2025–26 | best engineering colleges in bangalore for placements
Master the Future of Automation with Robotics at RRCE! Join the advanced Robotics course with Microcontroller & Arduino Uno at Rajarajeswari College of Engineering (RRCE) and kickstart your journey into the world of intelligent automation. Gain hands-on experience, build real-world projects, and become the innovator the tech industry needs. Explore Robotics Programs at RRCE | Admissions Open for 2025–26 – Apply Now!

#“Placement Engineering Colleges in bangalore”#“best private engineering colleges in bangalore”#“top engineering colleges in bangalore vtu affiliated”#“best engineering colleges in bangalore for placements”#“NAAC A grade engineering colleges in bangalore”
0 notes
Text
youtube
DIY Sun Tracking Solar Panel Project using Arduino
Are you looking to boost the efficiency of your solar panels? A dual-axis solar tracking system is the perfect solution! Instead of a static panel, this system automatically follows the sun, ensuring maximum energy absorption throughout the day. In this blog, we'll guide you through building your own Arduino-powered solar tracker and show you how it works in action. 🎥✨
🛠️ How Does this Sun Tracking Solar Panel Project Work?
A solar tracking system adjusts the position of the solar panel in two axes (vertical & horizontal) to follow the sun’s movement. This ensures optimal solar exposure, which significantly increases power output compared to fixed panels.
Using Arduino, LDR sensors, and servo motors, we can create a system that continuously detects sunlight intensity and adjusts the panel accordingly. 🌞⚙️
🔹 Components Needed:
🔧 Arduino Uno– The brain of the system 🔧 LDR Sensors – Light intensity detectors 🔧 Servo Motors – For precise panel movement 🔧 Solar Panel – The power generator 🔧 Resistors & Jumper Wires – For connections
📝 Step-by-Step Instructions
1️⃣ Set up the Circuit: Connect LDR sensors, servo motors, and the solar panel to the Arduino. 2️⃣ Upload the Code: Use the provided Arduino sketch to program the tracker. 3️⃣ Test the System: Place it under sunlight and watch the panel follow the sun in real-time! 4️⃣ Optimize & Improve: Adjust sensor placement for better accuracy.
📌 Full Code & Circuit Diagram: https://quartzcomponents.com/blogs/electronics-projects/dual-axis-solar-tracking-system-using-arduino
🔋 Why Use a Solar Tracker?
✅ Increases energy output compared to a fixed panel ✅ Automatically adjusts for optimal sunlight exposure ✅ Enhances efficiency of solar power systems ✅ Perfect for DIY solar enthusiasts & engineers
Whether you're building a home solar system or a DIY electronics project, this Arduino solar tracker is an exciting way to improve energy efficiency!
📢 Share Your Builds!
Tried making this project? Share your solar tracker setup with us in the comments or tag us! We'd love to see your innovation. 🌍⚡
📌 Full Tutorial & Code: 👉 https://quartzcomponents.com/blogs/electronics-projects/dual-axis-solar-tracking-system-using-arduino
1 note
·
View note
Text
Learning of Arduino Coding for Kids
In today’s fast-changing world, it’s more important than ever to introduce kids to technology at an early age. One of the best ways to do that is through Arduino Coding for Kids. It’s fun, creative, and opens the door to exciting fields like Sensors automation and robotics. This blog will explore what Arduino is, why it’s perfect for kids, and how learning it can shape their future.
What is Arduino?
Arduino is a small, open-source IDE (Integrated Development Environment) used to Develop Embedded Systems. It includes a physical board (called a microcontroller) and software that allows users to write and upload code. The best part? It’s easy to understand, even for beginners.
Arduino is widely used by students, hobbyists, and professionals to build devices that can sense the environment and respond in smart ways. For example, you can use it to make a robot, a weather station, or even an automatic plant watering system.
Why Arduino Coding for Kids is Important
1. Encourages Problem Solving
Kids learn how to think logically and solve problems step-by-step. Whether it’s turning on a light or making a toy car move, Arduino Coding for Kids teaches them how to break down problems and fix them on their own.
2. Builds Confidence
When kids see a light turn on or a robot start moving because of their code, it boosts their confidence. They realize that they can create real things with just a few lines of code.
3. Enhances Creativity
Arduino Coding for Kids is not just about electronics. It’s about imagination. Children can design their own smart toys, games, or useful devices. Their only limit is their creativity.
Tools Needed to Get Started
Getting started with Arduino doesn’t require much. Here are the basics:
Arduino board (like Arduino Uno)
USB cable to connect the board to a computer
LEDs, sensors, motors (depending on the project)
Arduino IDE – a free software to write and upload code
Basic components like wires, resistors, and breadboards
Most of these are available in beginner kits that are designed especially for kids.
Simple Projects for Beginners
Here are some fun and easy projects that make Arduino Coding for Kids exciting:
1. Blinking LED
This classic starter project helps kids understand how code controls physical devices. With a few lines of code, they can make an LED blink on and off.
2. Light Sensor
Using a light sensor, kids can build a system that turns on a light when it gets dark. This introduces them to the concept of automation.
3. Obstacle-Avoiding Robot
With a few motors and an ultrasonic sensor, kids can build a simple robot that avoids obstacles. This project is a perfect example of how Arduino Coding for Kids leads into robotics.
The Role of Arduino in Automation and Robotics
One of the most exciting parts of learning Arduino is its connection to automation and robotics. These are not just buzzwords; they are the future of many industries. Here's how Arduino Coding for Kids fits in:
1. Learning Automation
Automation is when machines do tasks without human help. For example, automatic doors or smart lights are based on automation. Arduino helps kids understand how to use sensors and write code that makes machines work on their own.
2. Introduction to Robotics
Robotics combines electronics, coding, and mechanics. By learning Arduino, kids get hands-on experience in all these areas. They can build robots that move, talk, or even follow lines on the ground. This knowledge gives them a strong foundation for future careers.
3. Real-Life Applications
What makes Arduino Coding for Kids so special is how real it feels. Kids are not just learning theory; they are building things that work. From making a smart home system to designing a robotic arm, the projects have real-world value.
How to Teach Arduino Coding to Kids
You don’t need to be an expert to teach Arduino Coding for Kids. Here are some tips to make learning fun and effective:
Start small: Begin with simple projects and increase difficulty step-by-step.
Use visual resources: Many online platforms offer videos and tutorials just for kids.
Encourage teamwork: Let kids work in pairs or groups to build projects together.
Celebrate success: Showcase their projects to friends and family to boost motivation.
Be patient: Every child learns at a different pace. Support and encouragement go a long way.
Where to Find Learning Resources
There are many websites, YouTube channels, and books focused on Arduino Coding for Kids. Look for platforms that offer beginner-friendly guides, videos, and project ideas. Some popular choices include:
Tinkercad Circuits
Wokwi
Future Opportunities
Learning Arduino Coding for Kids is more than just a hobby. It builds skills that are in high demand. As technology grows, so does the need for people who can understand and create smart machines. Kids who start early will have an advantage in fields like:
Engineering
Robotics
Computer Science
Artificial Intelligence
Internet of Things (IoT)
Conclusion
Introducing kids to Arduino is like giving them a superpower. They learn how things work, how to fix them, and how to make their own creations. More importantly, Arduino Coding for Kids builds confidence, creativity, and problem-solving skills.
0 notes
Text

STEM Education Robot Starter Kit for Arduino Car Kit The development board is based on Arduino Uno R3 smd board control.Use this 2 wd robotics kit can accomplish ultrasonic obstacle avoidance, tracking, and other functional expansion project. The Features of arduino car kits: - Ultrasonic automatic obstacle avoidance,the ultrasonic sensor module uses the HC-SR04 module, which measures the distance and realizes the ultrasonic obstacle avoidance function. - Motherboard is based on Arduino,control board is based on Uno R3 with SMD CH340 USB Driver. Features of the robot kits: 1. The starter kits main control board is with UNO R3 with CH340 usb driver. 2. The motor drive module uses the typical L298N module to drive the DC motor. 3. The infrared signal detection module uses four pairs of infrared light to detect the black line to achieve the tracking function. 4. The ultrasonic sensor module uses the HC-SR04 module, which measures the distance and realizes the ultrasonic obstacle avoidance function. Shipping components list is unassembly condition,each components are in bulk as below seen: They are exact as below loose condition shipment: If you are in the stem education fields and had a customized hardware list they are okay to send to quote.Contact us to talk details.. Interested with more other development board kits,view here Know more about our company,view here Read the full article
0 notes
Text
Price: [price_with_discount] (as of [price_update_date] - Details) [ad_1] The Arduino is a cheap, flexible, open source microcontroller platform designed to make it easy for hobbyists to use electronics in homemade projects. With an almost unlimited range of input and output add-ons, sensors, indicators, displays, motors, and more, the Arduino offers you countless ways to create devices that interact with the world around you.In Arduino Workshop, you'll learn how these add-ons work and how to integrate them into your own projects. You'll start off with an overview of the Arduino system but quickly move on to coverage of various electronic components and concepts. Hands-on projects throughout the book reinforce what you've learned and show you how to apply that knowledge. As your understanding grows, the projects increase in complexity and sophistication.Among the book's 65 projects are useful devices like:– A digital thermometer that charts temperature changes on an LCD–A GPS logger that records data from your travels, which can be displayed on Google Maps– A handy tester that lets you check the voltage of any single-cell battery– A keypad-controlled lock that requires a secret code to openYou'll also learn to build Arduino toys and games like:– An electronic version of the classic six-sided die– A binary quiz game that challenges your number conversion skills– A motorized remote control tank with collision detection to keep it from crashingArduino Workshop will teach you the tricks and design principles of a master craftsman. Whatever your skill level, you'll have fun as you learn to harness the power of the Arduino for your own DIY projects.Uses the Arduino Uno board Publisher : No Starch Press; 1st edition (13 May 2013) Language : English Paperback : 392 pages ISBN-10 : 1593274483 ISBN-13 : 978-1593274481 Item Weight : 726 g Dimensions : 17.98 x 2.31 x 23.5 cm Country of Origin : USA [ad_2]
0 notes
Text
HW 2: Deep Diver - The Enclosure 🐠
For my midterm physical computing project, I used photoresistors as a game controller to control a fish character inside a P5.js-based video game. By covering or uncovering the sensors, the fish swims up, down, left, or right depending on which direction is triggered. Since the game was aquatic-themed, I wanted to design an enclosure that matched the environment and enhanced the interaction. That’s how I came up with Deep Dover, a controller enclosure styled after a fish tank that would serve as both a protective shell and a visual element to support the game’s narrative.

I started the process by designing a custom acrylic case using MakerCase and laser-cutting it in the Spelman Innovation Lab. I chose a translucent blue acrylic to reflect the water aesthetic and designed the dimensions to be roughly 5 x 7 x 5 inches—just big enough to hold the Arduino Uno, breadboard, and sensors comfortably. The top half of the enclosure was built from this laser-cut acrylic, while the bottom half was a found plastic container that I cleaned thoroughly. I filled the container with water and tinted it using blue ink, then added handmade Play-Doh rocks to simulate the feel of a real aquarium. Once I had both parts ready, I hot-glued the acrylic case together and mounted it on top of the container to complete the enclosure.
To integrate the electronics, I drilled holes in the acrylic for both photoresistors and the USB cable that powers the Arduino. I then disassembled my controller setup temporarily and mounted the Arduino on the bottom shelf inside the box and the breadboard above it. Once the core components were fixed in place, I fed the two light sensors through the pre-drilled holes, aligning them so users could interact with the sensors directly from the outside. The sensors worked well within the design and were easy to access without interfering with gameplay. Placement was especially important to ensure that the photoresistors were responsive to ambient light changes and player interaction.


There were definitely some challenges throughout this process. Making sure the enclosure was the right size to hold everything without being overly bulky required a few adjustments during assembly. Fitting the Arduino and breadboard into the limited space inside the case was also a bit difficult, and I had to be cautious not to tangle or overstress the wiring. The biggest risk I took was incorporating water into the design—something I probably won’t do again unless I have more advanced waterproofing methods available. That said, I was extremely careful with sealing, and nothing got wet. I think the result was not only practical but genuinely cute, and I was proud of how I merged functionality with a strong visual theme.
Seeing the final project come together made me realize how valuable enclosure design is—not just for aesthetic purposes but also to protect the hardware, organize components, and create an immersive experience for the user. I enjoyed being able to incorporate my artistic interests in design and storytelling into a technical assignment, which made this one of the more rewarding projects I've worked on this semester. If I were to do this again, I might explore other materials, add LED lighting for more atmosphere, or integrate sound elements to give the enclosure even more personality.
Overall, building Deep Dover helped me grow as both a designer and a developer. I got to test my creative problem-solving skills, explore sensor integration in a hands-on way, and create something that felt like a real fusion of code, electronics, and art. Even with the risks, the build turned out well, and it taught me that when you take the time to design an enclosure thoughtfully, it can truly bring your whole project to life.
0 notes
Video
youtube
Hand Talk Using Flex Sensor With Voice Output | Sign Language to Speech Conversion using Arduino With Flex Sensor | Sign Language to Speech Conversion using Arduino with 4 flux Sensors | SMART GLOVE - Translate Gestures to Text and Text to speech through Bluetooth | Sign Language To Text Conversion With Flex Sensor | Arduino Projects | Gesture vocalizer | sign language to speech converter using Arduino | best Arduino project | Arduino | Arduino and Flex Sensor Based Hand Gesture to Speech Conversion | Sign Language To Speech Conversion | Hand Gesture Convert in Voice Speech | Home Automation Arduino.***********************************************************If You Want To Purchase the Full Working Project KITMail Us: [email protected] Name Along With You-Tube Video LinkWe are Located at Telangana, Hyderabad, Boduppal. Project Changes also Made according to Student Requirementshttp://svsembedded.com/ https://www.svskits.in/ http://svsembedded.in/ http://www.svskit.com/M1: 91 9491535690 M2: 91 7842358459 We Will Send Working Model Project KIT through DTDC / India Post / Blue Dart We Will Provide Project Soft Data through Google Drive1. Project Abstract / Synopsis 2. Project Related Datasheets of Each Component3. Project Sample Report / Documentation4. Project Kit Circuit / Schematic Diagram 5. Project Kit Working Software Code6. Project Related Software Compilers7. Project Related Sample PPT’s8. Project Kit Photos9. Project Kit Working Video linksLatest Projects with Year Wise YouTube video Links152 Projects https://svsembedded.com/ieee_2024.php133 Projects https://svsembedded.com/ieee_2023.php157 Projects https://svsembedded.com/ieee_2022.php135 Projects https://svsembedded.com/ieee_2021.php 151 Projects https://svsembedded.com/ieee_2020.php103 Projects https://svsembedded.com/ieee_2019.php61 Projects https://svsembedded.com/ieee_2018.php171 Projects https://svsembedded.com/ieee_2017.php170 Projects https://svsembedded.com/ieee_2016.php67 Projects https://svsembedded.com/ieee_2015.php55 Projects https://svsembedded.com/ieee_2014.php43 Projects https://svsembedded.com/ieee_2013.php1600 Projects https://www.svskit.com/2025/01/1500-f...***********************************************************1. Gesture vocalizer | Sign language to speech conversation for deaf and dumb | using arduino Uno,2. SMART GLOVE - Translate Gestures to Text and Text to speech through Bluetooth,3. SMART GLOVE : Hand Gesture Detection and Conversion to Speech and Text for Dumb and Deaf,4. Smart Gloves To Convert Sign To Speech For The Mute Community,5. Sign Language To Speech Conversion | Hand Gesture Convert in Voice Speech,6. Sign Language To Speech Conversion | Hand Gesture Convert in Voice Speech | Home Automation Arduino,7. B.E/B.TECH Final Year Project Presentation| Smart Glove for Deaf and Dumb peoples || SVSEMBEDDED,8. SIGN TO SPEECH CONVERSION USING ANDROID PHONE FOR DUMP PEOPLE,9. Hand Talk Assistive Technology for Deaf
0 notes