#DIY electronic projects
Explore tagged Tumblr posts
Visit Tumblr Blog
Explore Tumblr blogs with no restrictions, modern design and the best experience.
Last Seen Tumblr Blogs


Fun Fact
Tumblr has 16.74 million mobile monthly users in the US.
Text


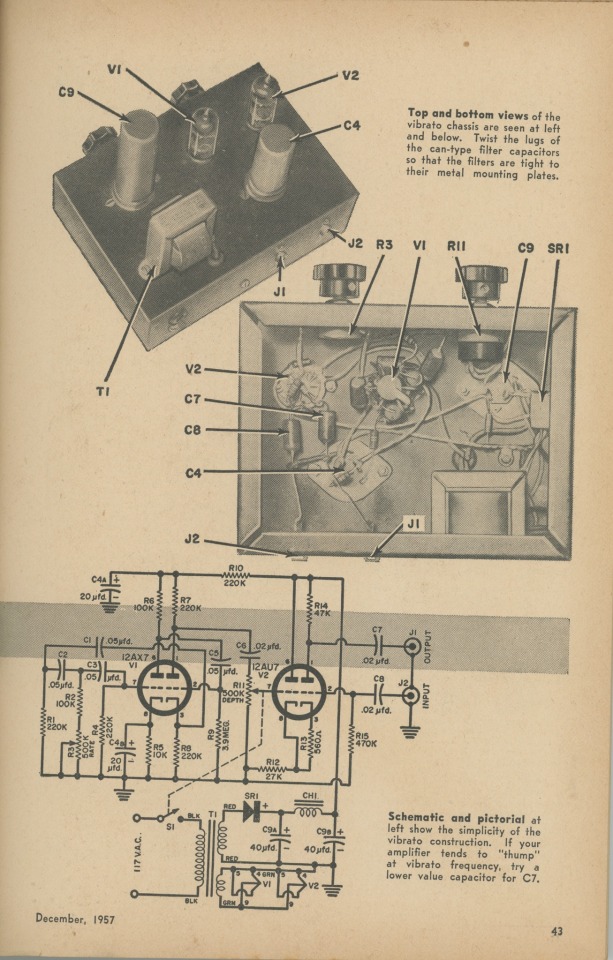
Popular Electronics - Build "Throbbing" Vibrato, December 1957
cred: facebook.com/Danelectro Fan Club
273 notes
·
View notes
Text
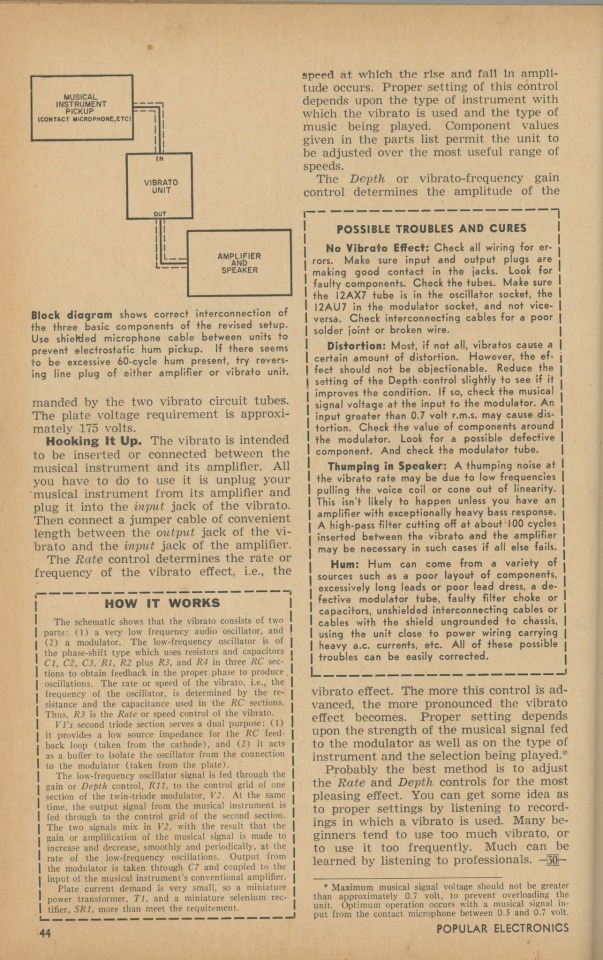
Cyber goth dress + my favourite way to make patches
I thrifted this dress a couple of weeks ago for £1. I believe it started life as some sort of costume, possibly a sexy firefighter, but the fabric is really good quality cotton, and I thought it had some cybergoth potential with the yellow and reflective bits. I also really like the metal fastenings.

I already had a high-viz coat in my wardrobe from when I used to go bicycling more often, so I was able to steal more reflective bits from that. Not yet sure what I'll do with them, probably cut interesting shapes and glue or sew them on. Photos with and without flash.

And then yesterday I got a half meter of cotton fabric for £1 which is an almost exact colour match, so I can make some stencilled patches.
I already had fabric paint at home, so this entire outfit has only cost me £2! Cybergoth clothing is usually super expensive.
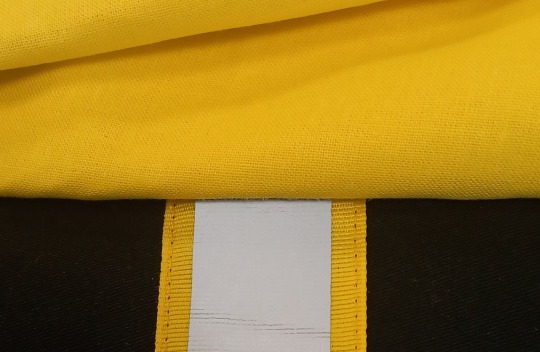
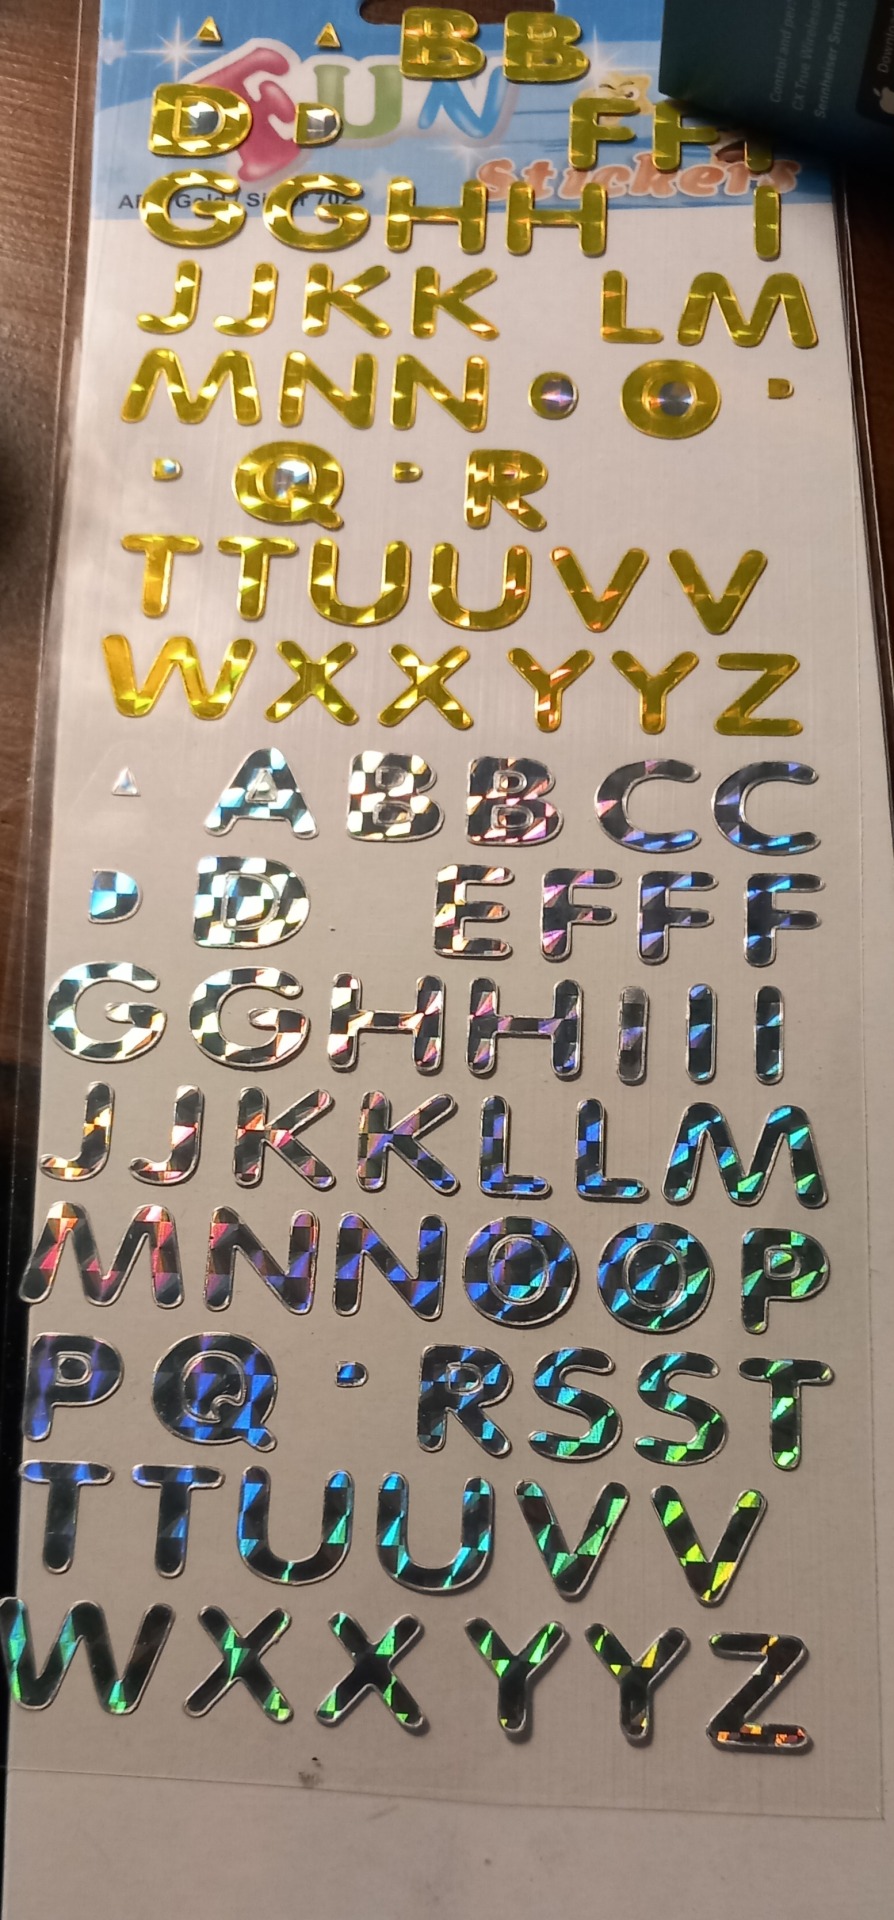
There are lots of tutorials for making stencilled patches on YouTube, (@rattusrattus3 has some excellent ones) but I lack patience and don't like cutting out intricate pieces, especially for lettering, so I had the idea to use alphabet stickers. You can pick these up really cheap from your local pound shop or dollar store depending on where you're from. I think mine were 40p a packet.
Stick them to your fabric, use fabric paint and a sponge, then when you peel the stickers off you'll have the words in relief. You can go thicker than I have here to make the surrounding area totally opaque, but I like the edges being messy and faded out. These are both song titles from cyber/industrial bands that I like.


Here are some other examples that I've done in the past. These were all done with pound shop spray paint which isn't ideal for fabric, but it's cheap! You'll also get more of the original fabric colour showing through with this kind of paint, which is nice.
If you're using black fabric, gold or silver paint will generally work better than white. These are all Devin Townsend song lyrics.


The only negative to this method for some people may be that the letters will be very uniform, but I like that. And if you want to you can space them irregularly to break things up a bit. Or you might be able to find more interestingly shaped alphabet stickers than I did!
#goth diy#cybergoth#goth sewing#goth upcycling#upcycle#upcycling#punk patches#stencil#goth#industrial#electronic music#alternative fashion#alternative#diy craft#diy sewing#diy projects#cyber goth#goth subculture#thrifting#thrifted#goth thrifting#goth charity shopping#charity shop finds
259 notes
·
View notes
Text
Wire Harness Assembly Process: A Step-by-Step Guide
A wire harness assembly is an organized set of wires, connectors, terminals, and other components that transmit electrical power or signals in a system. The wire harness assembly process is crucial for industries like automotive, aerospace, medical devices, and industrial equipment, ensuring reliable electrical connections. This guide outlines the key steps involved in assembling a wire harness,…
32 notes
·
View notes
Text
IN-17 nixie wrist clock based on Artyom's bracer Metro 2033. started working on this project years ago, and still can't get to finally finish it. will hopefully be able to complete assembly on at least one full kit, as i still owe it to my good friend (really sorry for the delay, Scarlett)
43 notes
·
View notes
Text

The computer & testing corner of my workbench in my basement, featuring:
An old toughbook I got for cheap, zip-tied to a VESA stand, mounted to...
An old Ergotron monitor arm I intercepted on its way to the dumpster from work (needs new bushings, its lopsided and flops everywhere)
My first ever "good" mic i got back in college; a yeti mic and shitty boom arm, migrated down here when I upgraded my main pc
Headphones my roomate gifted me
a crappy 2-channel oscilloscope I bought off a friend.
The idea of having the laptop on an arm is so I can push it out of the way when I'm not using it. It was on the table before, taking up useful space I could use for abandoning projects! There's at least two entire project's-worth of space I got back by doing this, so I'm very proud! I expect piles of random junk to accumulate their quickly.
I only use the laptop to look up random datasheets, flashing microcontrollers with premade code (I 'ain't in the business of writing software, I let someone else do that), and voice training, so most of the time I can "stow" it off to the side.
Though... It's only running windows because I was being lazy. Maybe another project could be installing Linux...
52 notes
·
View notes
Text

Honey, I Shrunk the Kids (1989)
#honey i shrunk the kids#science fiction#retro tech#old tech#1980s#80s#80s tech#scifi aesthetic#80s aesthetic#80s movies#80s films#old technology#classic sci fi#80s scifi#dog#doggo#automatic dog feeder#electronics#diy#diy projects
27 notes
·
View notes
Text
Skaven warpstone lantern prototype!
Warning: flashing lights


Here's a little Arduino project I've been working on for my Skaven themed LARP group! It's a multifunctional lantern with three different modes, an unstable warp stone powered light, a standard flame lantern and a full bright white light for those late-night toilet runs.
I'm pretty proud of the warpstone effect, I made it so when the light dims the warpstone becomes unstable and starts crackling unpredictability as it tries to restabilize, then eventually once it destabilizes it glows more solidly and more brightly for a time before it fades and destabilizes again.
#3d printing#larp#larp costume#skaven#warhammer fantasy#arduino#diy craft#diy projects#rgb lights#led lights#led lamp#electronic
9 notes
·
View notes
Text

Sunken USB Type C breakout 🔌🛠️🧩
Folks love our standard USB Type C breakout (https://www.adafruit.com/search?q=usb+type+c+breakout) - and we recently got a request to carry a 'sunken' Type C breakout - what's that mean? It looks like this! instead of sitting above the PCB the connector sits in the midline for a svelte look. this connector got our pick because it has four burly THM tabs to keep the connector from cracking at the contact pads.
#adafruit#usb#usbc#pcb#electronics#hardware#maker#diy#breakoutboard#connectors#tech#engineering#innovation#projects
22 notes
·
View notes
Text
DIY Laser Tripwire Security System Using Arduino

The project consists of a laser module that continuously emits a beam aimed at a laser receiver sensor. When an object (such as a person) obstructs the laser, the receiver detects the interruption and triggers an alarm via a buzzer. This system is ideal for securing doorways, hallways, or any restricted area.
COMPONENTS REQUIRED
Arduino Uno
Laser LED Module
Laser Receiver Sensor Module
Buzzer
Jumper wires
Breadboard
Circuit Diagram

CODE
#define LASER_PIN 7
#define RECEIVER_PIN 8
#define BUZZER_PIN 9
void setup() {
pinMode(LASER_PIN, OUTPUT);
pinMode(RECEIVER_PIN, INPUT);
pinMode(BUZZER_PIN, OUTPUT);
digitalWrite(LASER_PIN, HIGH); // Laser ON
Serial.begin(9600);
}
void loop() {
int status = digitalRead(RECEIVER_PIN);
if (status == 1) { // If laser beam is blocked
Serial.println("⚠️ Intruder Detected!");
digitalWrite(BUZZER_PIN, HIGH);
} else {
Serial.println("✅ Area Secure");
digitalWrite(BUZZER_PIN, LOW);
}
delay(500);
}
youtube
9 notes
·
View notes
Text
need a bit of advice on something rather new to me... i have been DYING to get into some semblance of diy electronics/robotics, specifically regarding the idea of building a flipper zero knockoff with a raspberry pi/esp32/arduino. or a hack rf one ripoff, etc. u get it? i wanna make a lil handheld pwnagotchi pet style device for rolljam rf shit, something that can copy and paste and send and receive rf signals, but homemade by my self....
please if anyone has experience, resources, ideas, anything at all= hit me up right now immediately asap today please.... i am so passionate and ready to do this please help me make device go beepboop
#flipper zero#hack rf one#raspberry pi#esp32#arduino#diy electronics#diy#diy hacking#car hacking#hacking hardware#hacking#help#hacking help#hacking question#need advice#diy projects#diy craft#diy punk#upcycle#homebrew
14 notes
·
View notes
Text
Numpad Jr
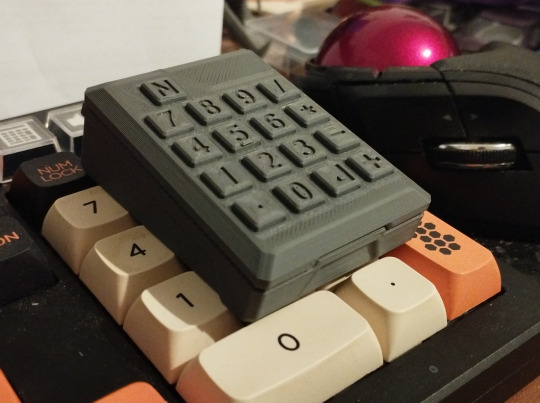
My thinkpad doesn't have a numpad and could use something more portable than the average USB ones, so… just made one! Used Kailh square mouse buttons and an Arduino Pro Micro.
Sure, tactility's compromised due to size… but look at the cute lil' thingy lol.
13 notes
·
View notes
Text
I should post this.
Awhile back I started a drawing just for fun. Something to emulate the look and feel if retro sci-fi. Stuff from the 70's and 80's. While drawing the main guy and his flight suit, I thought, "man, I'd love to dress up like that". So thats what I'm doing :)

I want that flight suit. So I'm building it. Starting with the chest life support display.

#furry#furry oc#my artwork#original creation#phone and thumb#huntertag#art#wip#space#retro scifi#Starfighter#costume#cosplay#electronics#diy projects
7 notes
·
View notes
Text
How to Connect a BNC Connector to a Coaxial Cable (Step-by-Step Guide)
Connecting a BNC connector to a coaxial cable assembly involves stripping the cable, attaching the connector, and crimping or soldering the parts for a secure connection. Here’s a detailed guide for crimp-type BNC connectors, which are commonly used. Tools and Materials Needed: BNC connector (crimp-type or solder-type) Coaxial cable (e.g., RG58, RG59, or RG6) Cable stripper (for coaxial…
8 notes
·
View notes
Text
#Built-in Wi-Fi for Raspberry Pi Pico#IoT development board#Raspberry Pi for IoT projects#Wi-Fi-enabled microcontroller#DIY electronics with Raspberry Pi#Robotics with Raspberry Pi Pico#Home automation with Raspberry Pi
3 notes
·
View notes
Text
Hell is terms like ASIC, FPGA, and PPU
I haven't been doing any public updates on this for a bit, but I am still working on this bizarre rabbit hole quest of designing my own (probably) 16-bit game console. The controller is maybe done now, on a design level. Like I have parts for everything sourced and a layout for the internal PCB. I don't have a fully tested working prototype yet because I am in the middle of a huge financial crisis and don't have the cash laying around to send out to have boards printed and start rapidly iterating design on the 3D printed bits (housing the scroll wheel is going to be a little tricky). I should really spend my creative energy focusing on software development for a nice little demo ROM (or like, short term projects to earn money I desperately need) but my brain's kinda stuck in circuitry gear so I'm thinking more about what's going into the actual console itself. This may get techie.
So... in the broadest sense, and I think I've mentioned this before, I want to make this a 16-bit system (which is a term with a pretty murky definition), maybe 32-bit? And since I'm going to all this trouble I want to give my project here a little something extra the consoles from that era didn't have. And at the same time, I'd like to be able to act as a bridge for the sort of weirdos who are currently actively making new games for those systems to start working on this, on a level of "if you would do this on this console with this code, here's how you would do it on mine." This makes for a hell of a lot of research on my end, but trust me, it gets worse!
So let's talk about the main strengths of the 2D game consoles everyone knows and loves. Oh and just now while looking for some visual aids maybe I stumbled across this site, which is actually great as a sort of mid-level overview of all this stuff. Short version though-
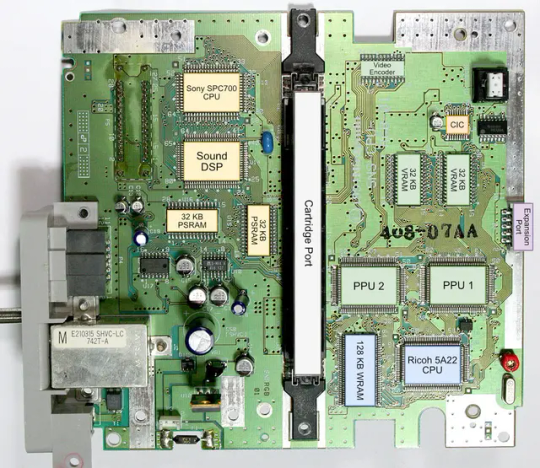
The SNES (or Super Famicom) does what it does by way of a combination of really going all in on direct memory access, and particularly having a dedicated setup for doing so between scanlines, coupled with a bunch of dedicated graphical modes specialized for different use cases, and you know, that you can switch between partway through drawing a screen. And of course the feature everyone knows and loves where you can have one polygon and do all sorts of fun things with it.
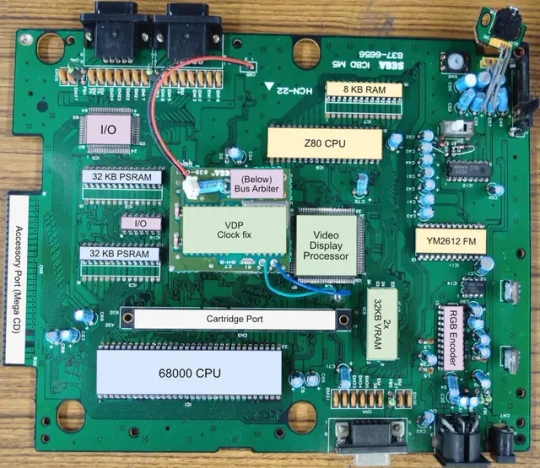
The Genesis (or Megadrive) has an actual proper 16-bit processor instead of this weird upgraded 6502 like the SNES had for a scrapped backwards compatibility plan. It also had this frankly wacky design where they just kinda took the guts out of a Sega Master System and had them off to the side as a segregated system whose only real job is managing the sound chip, one of those good good Yamaha synths with that real distinct sound... oh and they also actually did have a backwards compatibility deal that just kinda used the audio side to emulate an SMS, basically.
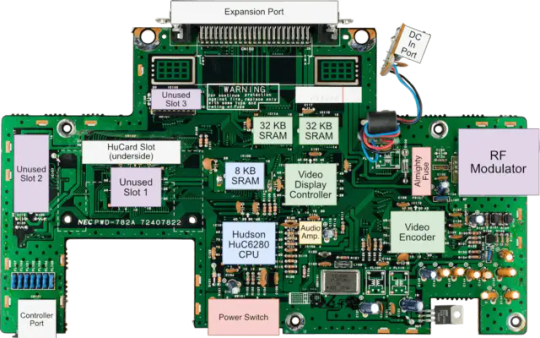
The TurboGrafix-16 (or PC Engine) really just kinda went all-in on making its own custom CPU from scratch which...we'll get to that, and otherwise uh... it had some interesting stuff going on sound wise? I feel like the main thing it had going was getting in on CDs early but I'm not messing with optical drives and they're no longer a really great storage option anyway.
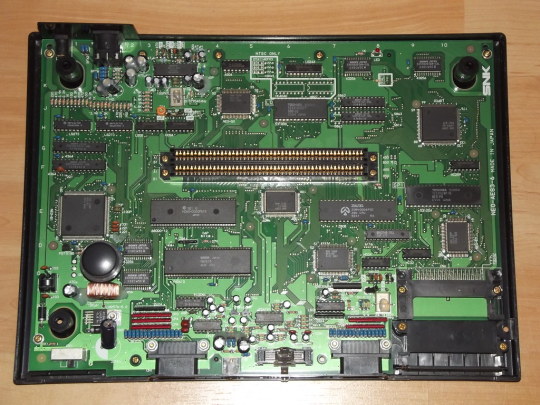
Then there's the Neo Geo... where what's going on under the good is just kind of A LOT. I don't have the same handy analysis ready to go on this one, but my understanding is it didn't really go in for a lot of nice streamlining tricks and just kinda powered through. Like it has no separation of background layers and sprites. It's just all sprites. Shove those raw numbers.
So what's the best of all worlds option here? I'd like to go with one of them nice speedy Motorolla processors. The 68000 the Genesis used is no longer manufactured though. The closest still-in-production equivalent would be the 68SEC000 family. Seems like they go for about $15 a pop, have a full 32-bit bus, low voltage, some support clock speeds like... three times what the Genesis did. It's overkill, but should remove any concerns I have about having a way higher resolution than the systems I'm jumping off from. I can also easily throw in some beefy RAM chips where I need.
I was also planning to just directly replicate the Genesis sound setup, weird as it is, but hit the slight hiccup that the Z80 was JUST discontinued, like a month or two ago. Pretty sure someone already has a clone of it, might use that.
Here's where everything comes to a screeching halt though. While the makers of all these systems were making contracts for custom processors to add a couple extra features in that I should be able to work around by just using newer descendant chips that have that built in, there really just is no off the shelf PPU that I'm aware of. EVERYONE back in the day had some custom ASIC (application-specific integrated circuit) chip made to assemble every frame of video before throwing it at the TV. Especially the SNES, with all its modes changing the logic there and the HDMA getting all up in those mode 7 effects. Which are again, something I definitely want to replicate here.
So one option here is... I design and order my own ASIC chips. I can probably just fit the entire system in one even? This however comes with two big problems. It's pricy. Real pricy. Don't think it's really practical if I'm not ordering in bulk and this is a project I assume has a really niche audience. Also, I mean, if I'm custom ordering a chip, I can't really rationalize having stuff I could cram in there for free sitting outside as separate costly chips, and hell, if it's all gonna be in one package I'm no longer making this an educational electronics kit/console, so I may as well just emulate the whole thing on like a raspberry pi for a tenth of the cost or something.
The other option is... I commit to even more work, and find a way to reverse engineer all the functionality I want out with some big array of custom ROMs and placeholder RAM and just kinda have my own multi-chip homebrew co-processors? Still PROBABLY cheaper than the ASIC solution and I guess not really making more research work for myself. It's just going to make for a bigger/more crowded motherboard or something.
Oh and I'm now looking at a 5V processor and making controllers compatible with a 10V system so I need to double check that all the components in those don't really care that much and maybe adjust things.
And then there's also FPGAs (field programmable gate arrays). Even more expensive than an ASIC, but the advantage is it's sort of a chip emulator and you can reflash it with something else. So if you're specifically in the MiSTer scene, I just host a file somewhere and you make the one you already have pretend to be this system. So... good news for those people but I still need to actually build something here.
So... yeah that's where all this stands right now. I admit I'm in way way over my head, but I should get somewhere eventually?
11 notes
·
View notes
Text
My PC Has Seen Some Shit
I build my computer during the lockdowns, and like many others, was doing some wacky shit just because.
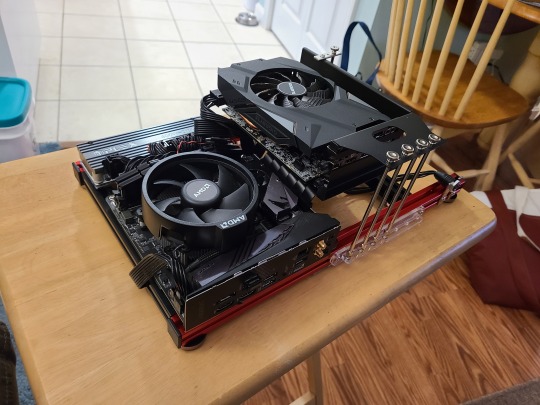
I decided I was going to build a small form factor (SSF) PC, but I wasnt satisfied with simply jaming all the parts AND cooling into a relatively small case, I wanted to cram all the bits into the smallest volume I could manage, and utilize an external radiator to cool it all. Thus, the abomination:
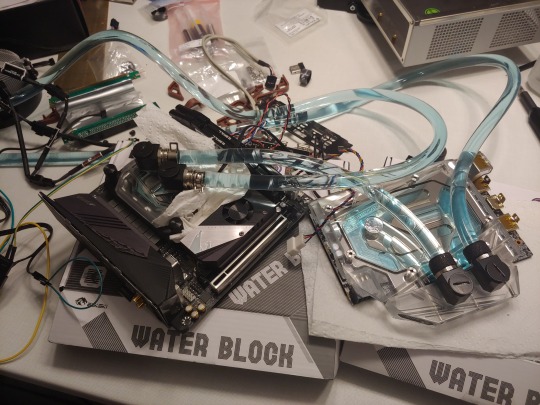
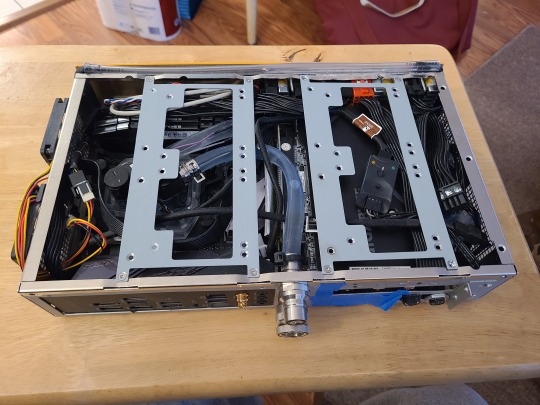
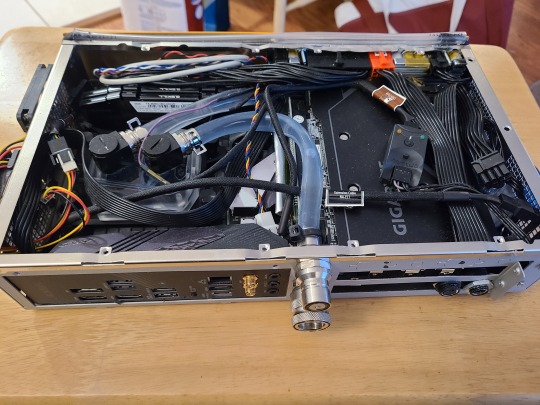
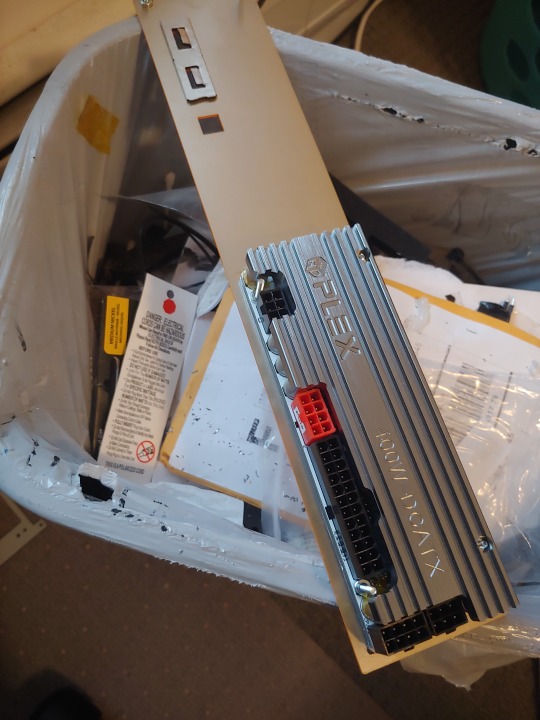
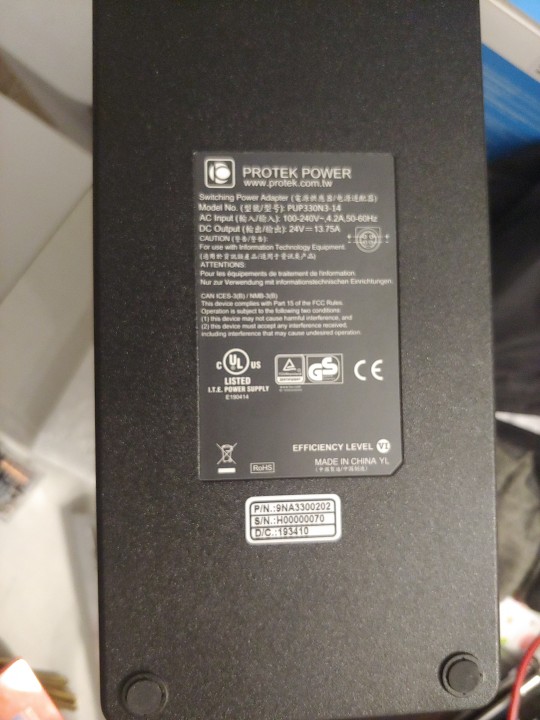
(I may or may not have "borrowed" the kitchen countertop for a full week, my roomate took it in stride.) At the time, it was decent hardware, if intentionally limited. Ryzen 5 5600 CPU, RTX 2070 GPU, and a special power supply combination - HDPLEX 400W DC-DC power converter/ATX power supply internal to the case, and a 380-watt external power brick. I had to hunt for a very specific GPU, that was both small enough to fit in the chassis I picked out, and also efficient enough to fit in the 380W power budget:
and also some dope-ass no-drip quick-disconnect fittings for the water loop:
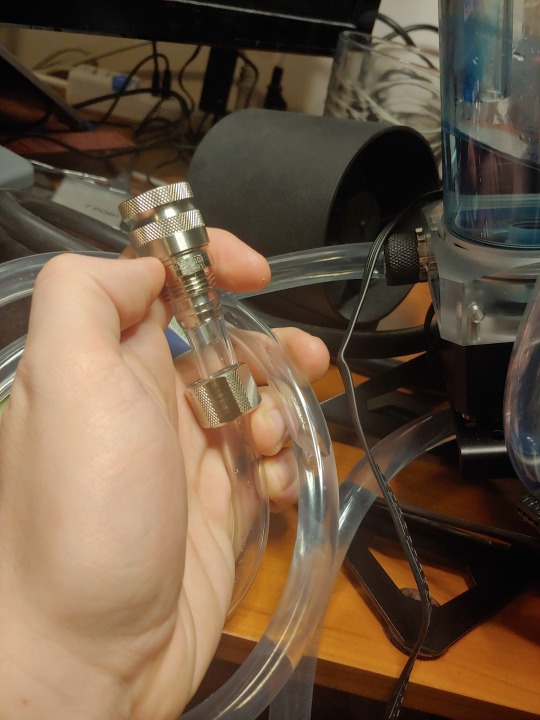
Those, plus a panel mount connector on the chassis for the pump and fan cables on the cooling tower, means I could easily dissasemble the pc into 3 parts - power brick, pc, and tower, to easily move it if needed.
I am still really proud of what I accomplished in terms of fitting everything into such a small chassis, if I had a 3D printer I could have made a couple brackets and covers to fill the holes that are covered in painter's tape, and had something looking real nice, but in the end I decided it was too much work to upkeep, the quick-connect ports on the back restricted water flow too much, and caused a lot of noise in the flow, like an air pocket that never went away with time. That and the blue coloring I added (actual cooling liquid coloring, NOT FOOD DYE) almost immediately cooked out of the water and deposited in the water block fins, and on the inside walls of the tubes, making it look a bit ugly tbh.
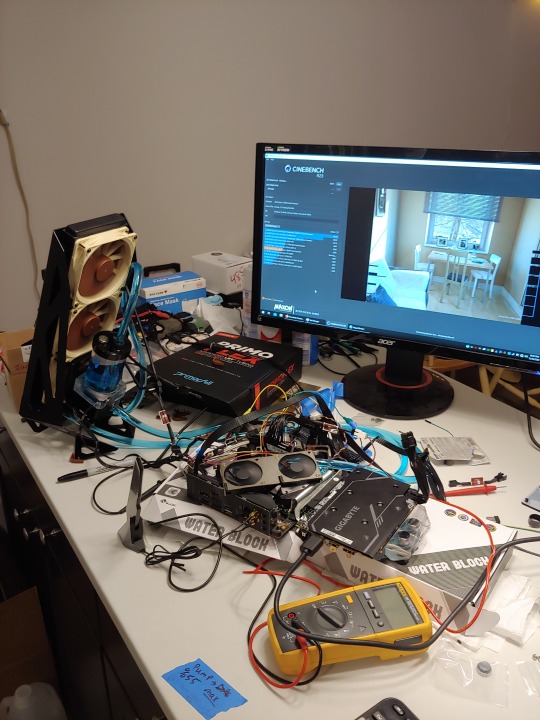
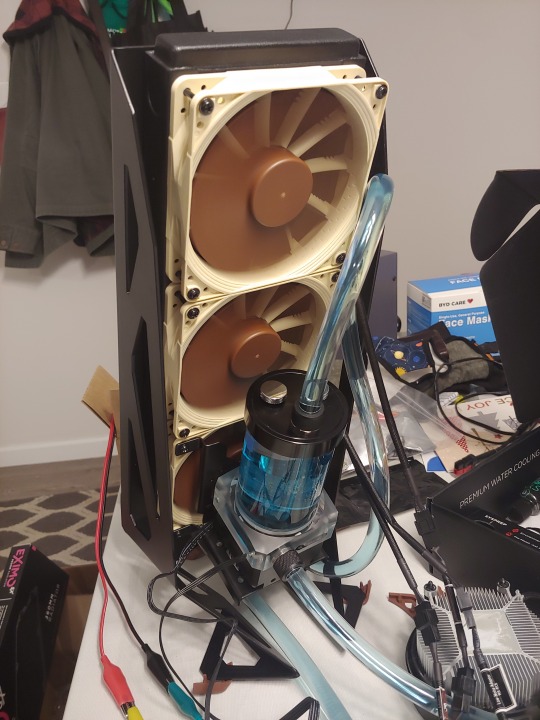
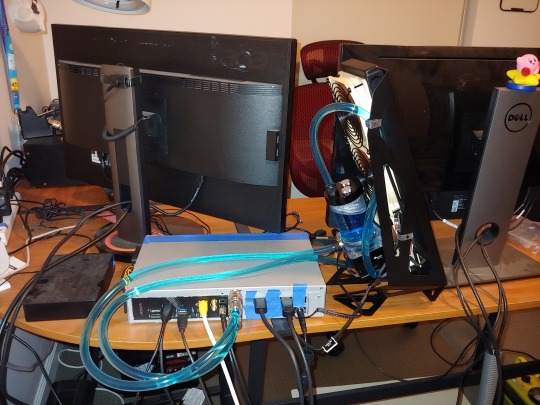
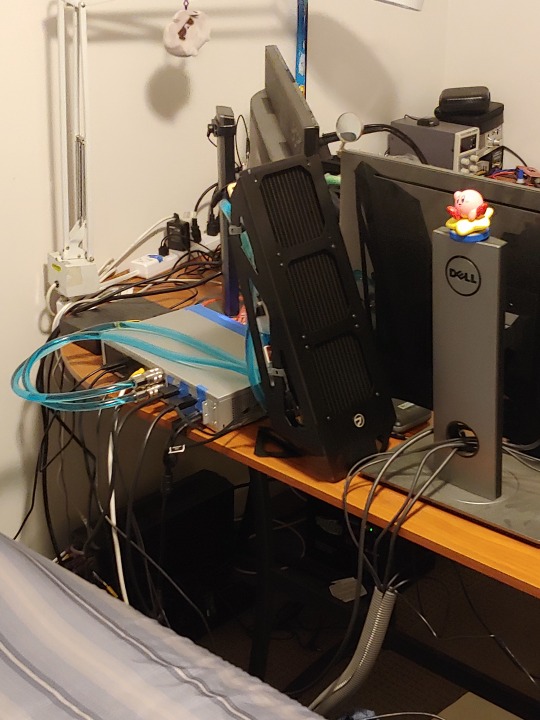
In 2023, I took the complete OPPOSITE approach and rebuilt the computer on an open-frame chassis, and hung it on the wall behind my monitor at my new place:
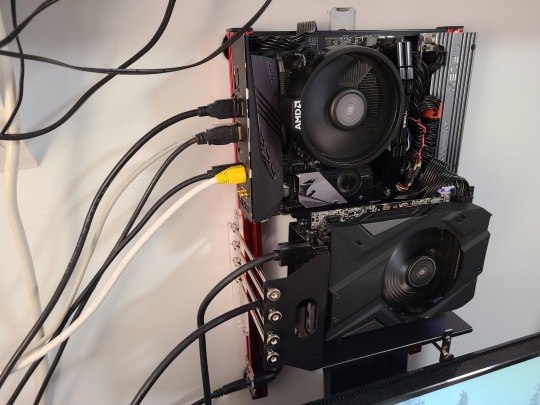
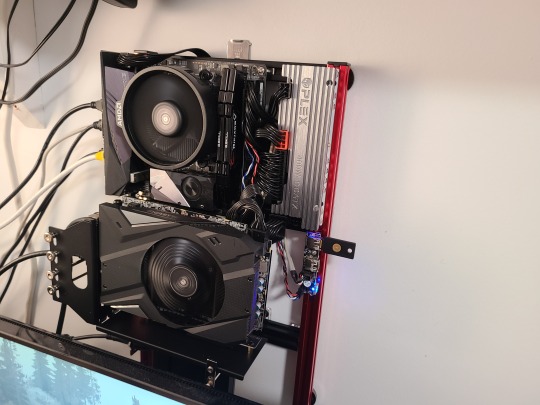
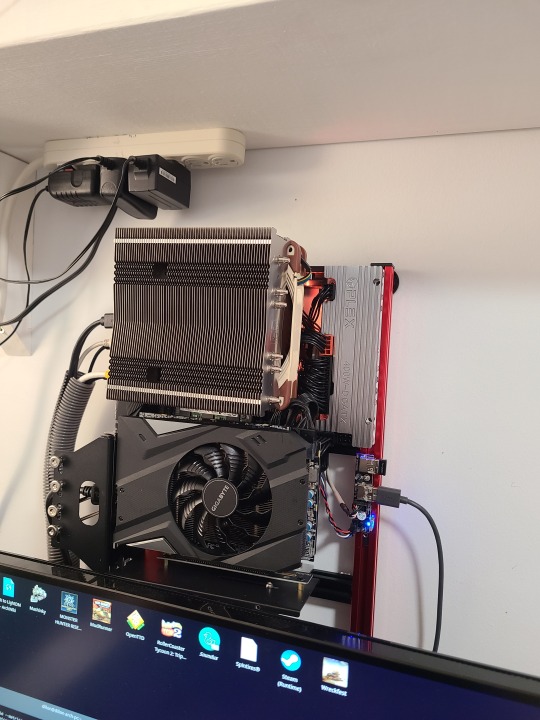
My desire had shifted from "unassuming box with neat internals" to "pussy out". Since all the components are now exposed to naked air, i was able to adjust fan curves so that they only turned on under extreme load. The GPU fan doesnt even spin until I boot up a game! I initially used the stock CPU cooler, but it didn't work well enough to keep the fan at low RPM, so I upgraded to a Noctua low profile cooler with a way better configuration that cools the cpu and board components really well.
The end result is a super quiet PC that is damn near silent until I boot up a game, and even then, the loudest thing is a battle between the GPU fan and the coil whine from that same GPU!
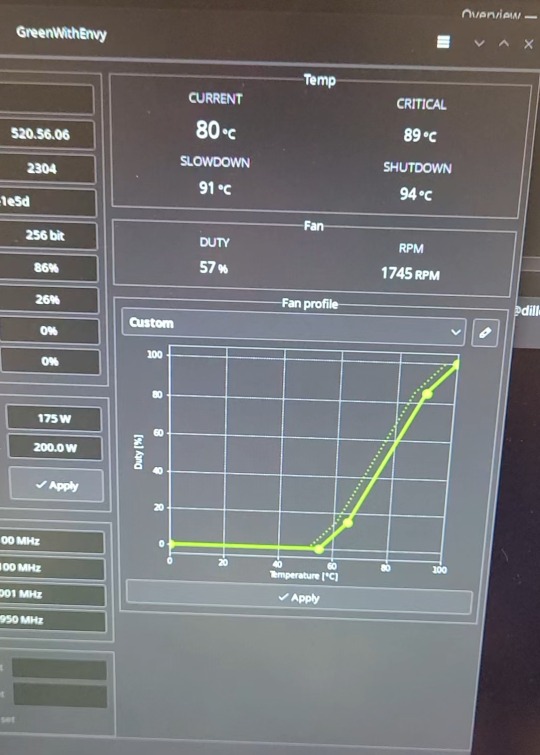
60% duty cycle on the GPU fan was about the minimum I can spin it to keep the temperature below throttling point at 100% utilisation, and I'm totally happy with that! The CPU fan spins all the time, but it's a noctua so I can't even hear it at idle, and at 100% CPU use, it's only up to maybe 50% speed, which is still damn quiet.
This is how my computer has been configured ever since, and I am proud for sure! It's a fun PC to look at visually, and it's got an interesting history to talk about (to me at least!)
2 notes
·
View notes