#avisynth tutorial
Explore tagged Tumblr posts
Visit Tumblr Blog
Explore Tumblr blogs with no restrictions, modern design and the best experience.
Last Seen Tumblr Blogs


Fun Fact
Tumblr has 16.74 million mobile monthly users in the US.
Text

Avisynth Basics - Resizing and Sharpening for Gifs
Prerequisites
Avisynth (Wikipedia)
How to Use Avisynth For Gif Making by MichieTuts
Installing Avisynth by brandinator
Tumblr Dashboard Image Display Sizes by Unwrapping Tumblr
This post details my process for using Avisynth to resize a video file. The video file can then be edited and converted to a gif.
I learned how to use Avisynth through the posts linked above. I highly recommend reading through them; they're very detailed and easy to follow. By comparison, this is a basic guide as it only offers one method for using Avisynth.
In this post, I cover the following:
Why use Avisynth?
Using Avisynth to resize a video clip
This post assumes that you've already installed Avisynth.

💡 Why use Avisynth?
Avisynth is a frameserver that takes a video file as input and resizes it for editing. The width of a Tumblr post is 540 pixels (px); with Avisynth, we can resize video files so that they fit that criteria. (For context, a 1080p (HD) YouTube video is 1920 x 1080 px.)
While Photoshop is able to resize images (Image > Image Size), it's not as accurate as Avisynth is.
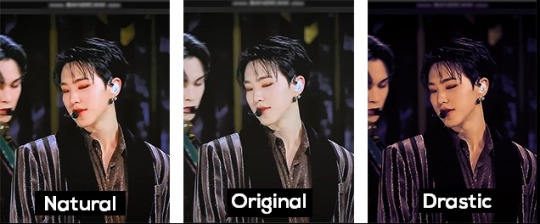
Here are two gifs that have been resized through different software:


The difference is subtle, but the left gif (Avisynth) appears more detailed to me!
However, please note that I didn't run any Photoshop sharpening on the right gif. When learning how to resize and sharpen gifs in Photoshop, I followed rubyredwisp's Gif Sharpening Tutorial.
🎥 Using Avisynth to resize a video clip
The following steps detail how I use Avisynth to resize videos. The final product, an .avi file, can be imported into your editor (eg. Photoshop) and edited there.
① Choose a video file that you'd like to gif.
For the purpose of this tutorial, I work with a screenrecording that I took of Dragon Age 2.

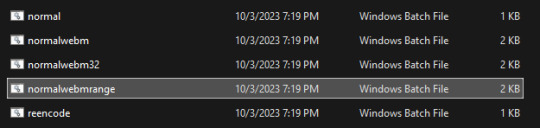
② Navigate to your Avisynth folder and locate the normalwebmrange script.
This may differ depending on how you installed Avisynth, but my Avisynth folder is located at \This PC\Windows (:C)\video.
normalwebmrange is a Windows batch file (.bat). I use this particular script because it allows you to clip out a few seconds of the video by specifying the start and end timestamps. These timestamps specify the video clip that will become your gif(s).
I recommend working with video clips that are 4-8 seconds long.
ⓘ This means that you may need to load your video file back into normalwebmrange to make a gif in a new timestamp range. While inconvenient, I recommend working with smaller video clips so that you're asking Avisynth to process multiple small videos rather than one large video. A larger video is more likely to crash the software.
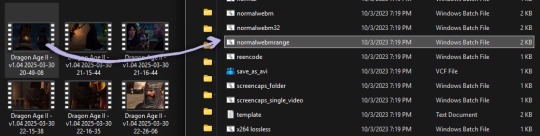
③ Load the video file into normalwebmrange.
To do so, select and drag your video file into normalwebmrange.
④ Enter the timestamps of the portion of the video you want to clip out.
A pop-up window will appear that asks you for the "starting time in hh:mm:ss format."
For this example, I want my gif to start at about 3 minutes and 13 seconds into my video file. My start timestamp is therefore 00:03:13.
Enter this information, then hit the Enter key.
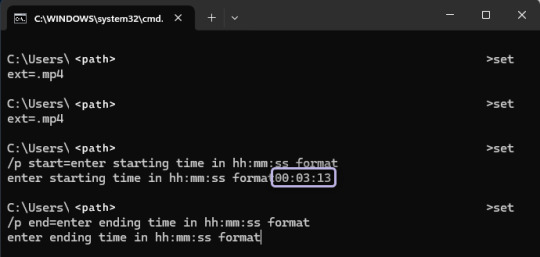
Next, enter the "ending time in hh:mm:ss format." (For this example, my end timestamp is 00:03:21.) Hit the Enter key.
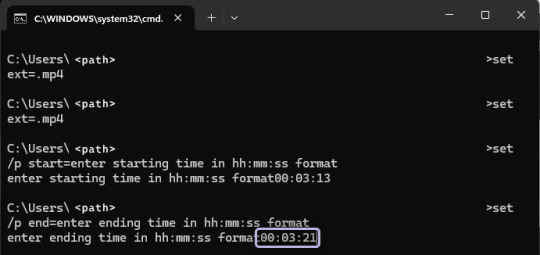
normalwebmrange will then generate a bunch of log lines. After, it will automatically open two things:
A tab in your computer's default web browser.
An Avisynth window.
⑤ Specify the resizing details for your gif.
Navigate to the browser tab that normalwebmrange opened. There are several fields for you to fill out here.

GIF Size - This is the width and height of your gif. For more details on Tumblr post sizes, see Tumblr Dashboard Image Display Sizes. After filling this out, you may have to adjust your video clip in the preview box (below the white textbox).
Opacity - Leave this value at 100.
Preprocessor - I always use qtgmc 30 slow for the framerate and debilinear sharpening. "30" refers to how many frames per second (fps) you want your gif to display; I find that the alternative, 60 fps, is overkill for Tumblr gifs. "Slow" means that Avisynth will take longer to process your video, but this results in better quality.
Extra Sharpening - I don't use this field, but feel free to experiment!
After filling out all of the fields, copy all of the text in the white textbox.
⑥ Enter the resizing information in Avisynth.
Navigate to the Avisynth window that normalwebmrange opened.
Paste the text you just copied on line 17:
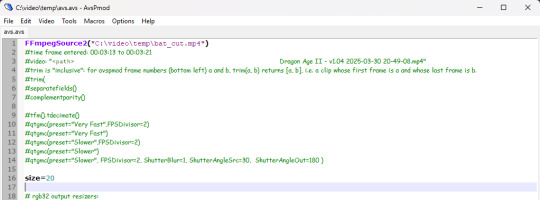
Your Avisynth window should now look something like this:

Select File > Save Script.
Close the Avisynth window.
This automatically launches another Avisynth window called VirtualDub. Here, you can watch Avisynth resize and sharpen your video clip in real time!
Once the VirtualDub window automatically closes, you'll know that your video clip has been fully processed and is now ready for editing.
? Where did my video clip save to? If you go back to your Avisynth folder (\This PC\Windows (:C)\video), open the \temp folder. The .avi file named "video" is your resized and sharpened video clip!
17 notes
·
View notes
Text
pov: u finally figure out how to gif a show 6 hours and 5 different ps methods later 💀🤡
#mika rambles#this is abt dangerous romance btw#like honestly. GOD#this is why i love animegiffing the quality is so much better#for dr i literally downloaded the ep from 3 different sites all w the same shit quality....#then spent 3 hrs on avisynth trying to upscale it.....#then another 3 hrs on ps trying to figure the right settings to make it look good.....#finally figured it out thank god#honestly god bless all the gifmakers that upload tutorials on here cuz i cant edit to save my life when it comes to lq content😭💀
3 notes
·
View notes
Note
hi! i noticed you said you were fairly new to making gifs, and i'm also kind of new and still struggling on how to make the quality crisp/how to get good coloring. is it possible for you to provide some advice / tips for me?
ah hello !! yes, i started last year spring but i'm feeling a lot more confident these days so hopefully i'll have some insights that are of use to you 💜
i yapped a lot, so i'm putting most of this under a readmore
first: tutorials are your friend. gifmakers sharing things are your friend! we gotta look out for each other lmao. how else will we keep our timeconsuming hobby on dying website alive. try to find resource blogs like usergif tutorials section or these sorts of things. im sure lots of us muddled our way through like that. if you have a favorite gifmaker see if they have like a photoshop help or a ref tag, too, that's nice (i dont on this blog, but lots of folks do)
second: quality generally is going to be a lot bit down to your source video. u can sharpen and do everything you like to 480p and it will still be 480p you know? so for kpop, most mvs and that kinda stuff will be in 4k which you can download from youtube and that's nice enough. if you want to have better you can look for masters (which i do, i have a huge list of hoarded mvs). for performances ideally you want either like nice 1080p .ts files or uhd - there are places you can look for that like on twitter or on different sites. basically you want to use the nicest you can get (that wont brick your computer - 4k can be troublesome for this reason sometimes)
third: once you have nice quality video source, a lot of crispiness and prettiness is down to individual sharpen settings and coloring, especially contrast and white balance. curves tool is your friend for fixing tints/white balance/contrast. here's a good sharpen actions set from my mutual @/sugurugetos (and thats her resource blog so it may be worthwhile to poke around in there). i use a combination of my own sharpen settings + photoshop camera raw filter most of the time.
(aside: there are some other more complicated things you can do to nice-ify your footage, like vaporsynth/avisynth or handbrake or topaz upscale or whatever, and im here to tell you i dont use any of those things and i still make it out okay hehe. but there are many tutorials for them too if you like)
fourth: it is a learning curve like any other creative hobby so give it time & keep trying hehe. most gifmakers have their own style of coloring/sharpening and yours will become more apparent once you figure out how you like to do it. i believe in u
#rowan asks#gifmaking#long post#side note: one of the most important coloring skills for kpop gifmaker compared to regular is that you Need to know how to make things#less white and overexposed esp when stage lighting is super duper bright and/or filters are involved#curves + gradient maps on soft light low opacity + selective color white are your friends#hopefully any of this is of some use to you hehe#if you have a more specific question let me know and i can try to answer that too !
5 notes
·
View notes
Note
https://kookyjin.tumblr.com/post/172370431539/avisynth-alternatives-potplayerkmplayer-tutorial here it is, the tutorial I mentioned for potplayer, in case you don't use it and download it. Some of the default settings have to be adjusted before use but it's very simple. Then when you press ctrl + G a menu will pop up and you can see some options and even if you leave subtitles on there's an option to leave it out when capturing screenshots. :D
Aah thank you so much!! Unfortunately, I read it works only for windows but I see there’s an alternative for Mac users so again, thank you!! 😘💕
2 notes
·
View notes
Note
How do you make your Gifs so hd? I swear, you have the best quality gifs!
Hi! Thank you! It's a combination of many things;
game graphics settings on ultra quality
otis_inf's camera tool to zoom in the face
avisynth to crop/sharpen gifs before loading the frames in ps
the sharpen action in photoshop
If you would like a better 'tutorial' of sorts, let me know!
6 notes
·
View notes
Note
hi umm so I really love your gifs and i was wondering how you make them so good?? no pressure tho
ahh i'm so flattered you like my gifs but i'm ngl! i've only been making gifs for like, a month and a half now? so i will try my best to answer your question with my limited experience 🙇♀️
there are 3 main programs i use which are 4k video downloader, vapoursynth, and photoshop -- 4k to download yt videos in the best quality, vs to preprocess the video (crop, resize, denoise, and sharpen) and photoshop for recoloring and other edits! ik other people may use different programs like avisynth instead of vapoursynth for their preprocessing, and topaz for sharpening/cleaning but these are the ones i use! in addition you may be able to find ultra hd videos on other sites without going through 4k downloader but yeah this is the one i use specifically for yt. i've found that these programs have really helped improve the quality of my gifs in terms of smoothness and clarity
these are the tutorials i used when i first started learning and they explain how to use those programs in greater depth:
vapoursynth link one, link two
photoshop link one, link two, link three
other tips link one, link two, link three
(also i would exercise caution in regards to any download links you come across in these tutorials!!)
but yeah there are loads of other resources online that go in depth about where to find hd videos, how to use photoshop, etc and the gifmaking community is p friendly so don't hesitate to reach out!! when i first started making gifs (which wasn't even on photoshop LOL) i went through a lot of trial and error and tbh i still haven't really found my style yet! but i kept trying to experiment with different programs and techniques and the process itself became fun and i felt a big sense of accomplishment just learning to do the little things :^)
i hope this was helpful and if you come off anon i can't wait to see the gifs you make!! fighting by bss 😎
#woo boy this got long#tbh feeling v embarrassed but ty annonie for liking my gifs 🫶#nina answers#anonnie
7 notes
·
View notes
Note
PAUSE how did you get vapoursynth working drop the tut 😭
I watched like plenty of tutorial videos on youtube tbh 😭 here’s one that watched that’s pretty simple and helped me a lot had vapoursynth installed on my pc for like about 1-2ish years but i didn’t get around to using it because it just wouldn’t work and have been using avisynth instead lol if you have any problems still, feel free to ask!
#once ive got the hang of vapoursynth ive never looked back LMAO#it’s more convinient than avisynth when it comes to encoding your clips AND FASTER TOO!
2 notes
·
View notes
Note
Hi so I have no idea if you're even still active on here but I figured it'd be worth a shot, I randomly got this error on my avisynth after saving [Avisynth open failure: SeperateFields: YV12 height must be multiple of 4] would you happen to know the fix by any chance? Thank u so so so much for all the help/tutorials you've posted on this blog btw they're an actual lifesaver
oh HELLO, barely managed to see the email notification for this lmao...not active on here but I do still see messages, even if it's a couple days late!
For starters, which files are you using? Honestly been so long that I don't even remember all the differences, but the latest updates I made are here, so if you're not using those files and are able to make the update, I would recommend going for that--since I'm sure past me was smarter than present me and made updates for some specific reasons...
Second, I feel like I MUST have coded in a failsafe for this kind of error but maybe not? Basically, as it says there, it's crying cuz the height value of the input video you are trying to use the filter on is not a multiple of 4. I'm pretty sure I have it coded so that whenever you resize, the output window will round to the nearest multiple of 4 for the height value, so technically it should always be a multiple of 4 UNLESS you're not resizing at all.
Check out this post here for a slightly more thorough explanation to a similar problem and lmk if any of that gives some insight towards a solution. If not you can send over a screenshot of the code in avspmod and the error that displays and we can go from there~
2 notes
·
View notes
Note
how did u get so good at giffing?
hi anon great question! so back in 2012 i used to be a gifmaker during tumblr's "popular" days. the gifs were very low quality but it fit right if u wanted to be a content creator for a specific fandom
not a lot of people know this but i use to make gifs of glee. yes, you heard that right. i was a gleek on tumblr during 2011 to 2013.
my gifmaking skills were very naive during that time. i was using my mom's old windows 7 laptop to make 400 - 800kb gifs. where i had to lock my folder filled with gifs and psd's just in case my mom wanted to use her laptop.
i was also torrenting every 1080p episode of glee with a really bad wifi. i cant imagine how i would make them like that today.
but luckily times have changed. and gifmakers also have changed their methods on making gifs where it went from just photoshop to programs such as avisynth and vapoursynth.
i recently got back to gifing after 7 years in 2020 because of BL and i think bl has made me see how much i had changed from my old gifs to my current one.
i think i got so good at giffing because i was persistent in looking for resources and making sure i had the right amount of style that says alot about what im gifing whereas back them i would just load the clip in photoshop and it would look bad but still gain notes.
so basically i went from this

(this is the only set i can find of my old gifs lol)
to this

because of the psd's, tutorials and other gifmakers that have given me advice on what to do and i based that in to making my own kind of style. also thankful that tumblr made the gif size from less than 1000kb to 10MB so i guess thats what makes this even better.
1 note
·
View note
Text
If you want your analog series to have a more authentic feel, start watching actual analog videos for reference. These can be pretty much anything, from home videos to VHS recordings of commercials. You can't have your only reference be other analog series. They're not a bad start, but your work will benefit from expanding your library and trying to understand the aesthetic you're going for.
As for trying to make it have the look without the need of an actual VHS system since I know not everyone can get their hands on one (myself included), I've found tutorials out there for various editing software like CapCut, After Effects, Premiere Pro, etc.
Unfortunately, there aren't many good VHS tutorials, especially for certain video editing software. Most of them tend to be lazily throwing one or two effects together and calling it a day.
But what you can do is download software designed specifically to give your video that analog tape feel.
NTSCqt and NTSC-RS are two that I've used before and would highly recommend. They're both free, and you could either edit the effects to your liking or use pre-made/custom ones from their respective communities. NTSC-qt does have one major downside, and it's the ungodly amount of time it takes to render even short videos. I'm willing to wait, but this isn't for you if you don't want to wait too long for video rendering.
There's also AVIsynth, which I haven't used, but it looks very promising too.
Certain editing software like Blender and Vegas Pro have VHS plugins that you can use. But I don't use either, and I'm not sure if they're something you can just get for free.
As for audio, I personally use Audacity to get that old sound going on. There are really good tutorials on YouTube that are easy to find and follow. I also know that more advanced editing software also allows for in-depth audio editing.
But of course, you gotta find what works for you. Also, if you don't care for authenticity, you can just disregard this entire post and do whatever the hell you want. I made this for people who want to at least try having a more authentic look to their fake analog videos.
1 note
·
View note
Note
hello have you ever or would you ever make a gif tutorial?
hi! i never made one but i use avisynth so plenty tutorials should come up if you look it up, other than that for anime gifs i only apply a premade sharpening action & color them
0 notes
Note
could you give a tutorial on how you gif? like do you use vapor/avisynth, where you get files from, etc? you're always so crazy fast and they're always so good!!! thank you so much!!
hi! i am not sure on how to do a tutorial but i'll try to help!!
for files : for performance gifsi try to use ts files as much as possible since they are the best quality, i usually download them from kpop24hrs or 4sashi, if you can still sign up for kpop24hrs i would go for that because they do all kpop groups while 4sashi focuses on girl groups only (occasionally they upload popular boy group performances) 4sashi is good to get older gg performances but that is on their drive and i think you have to pay for that now so that would be a personal choice. Youtube is great though, just make sure you download at 1080p if possible. For older performances it is harder to find good quality videos so if you want to gif older groups i usually check this account (x) its only girlgroups so if you are looking for older boy group performances you might have to really search for it. i use vaporsynth but i have used avisynth before , i prefer vaporsynth because it feels a bit quicker for me and its denoise and sharpen options are great. I don't have a saved setting, i kinda just mess around with it. I am not sure if you would want an indepth tutorial for vapoursynth but there are some great ones here (x) (x)
0 notes
Note
hey! i had a question if it’s not rude? or invasive?
i was wondering where you get such high quality videos of skz in order to gif them? 👉🏼👈🏼
hello! i honestly usually just use the youtube videos and download the 1080p version (or higher quality if available), and use vapoursynth/avisynth to cut the clips for ps (there are tutorials on tumblr for downloading those programs and how to use them!). video quality makes a big difference with gif quality in my experience. i hope that helps ^^
0 notes
Photo
Welcome to soonhoonsol’s gif tutorial!
As a nice anon asked me how I make my gifs, I thought it’d be cool to create an in-depth tutorial :) Perhaps this can help some others enter the gif-ing world too!
What we’ll be using for this tutorial:
Software: Bandicam, Avisynth, Photoshop CC 2018, Topaz Labs
File Format: .mp4
Operating System: Windows
Disclaimer: This is just my method. Every gif maker works differently and has different preferences. What works for me may not work for you, and that’s completely okay!
Let’s get into it!
1. Find the best quality video you can find
This really depends on the content you want to gif. For variety shows, music videos or photoshoots, any video of [1080p] should be sufficient. Try not to use anything below 720p.
For stage performances, fancams tend to have higher resolutions [1440p, 4k]. Use these if your computer can handle it. If not, usually 1080p works fine. The best option would be to download .ts files, which provide clearer and less grainy videos.
For Seventeen, you can get .ts files from The Rosebay on Twitter :)
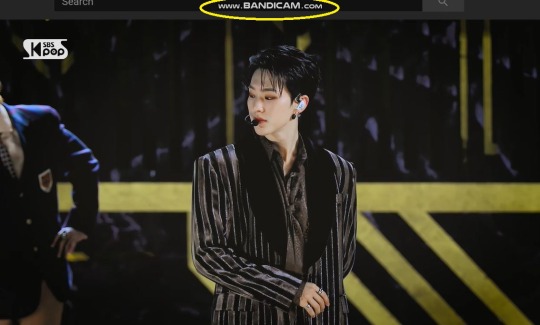
2. Screen recording
As a Windows user, I don’t have a built-in screen recorder on my laptop. So, I use Bandicam, which is a free screen recording software. The only con to it is that it has a watermark.
To combat the watermark, I always have the boundary box a little bigger than the video itself so that I can crop it out of the gif.
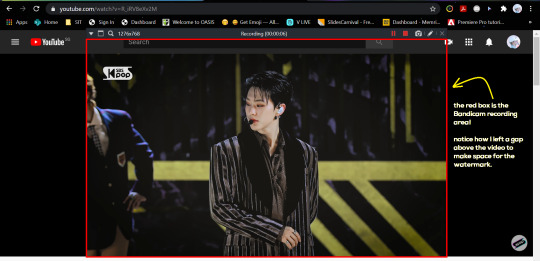
This is what the recording would look like:
Just record the scene(s) that you want to gif so your video file doesn’t end up too large! Your recording should be in .mp4 format.
(You may use pure .ts files in Avisynth but it never worked well for me so I usually screen record the .ts video and move on)
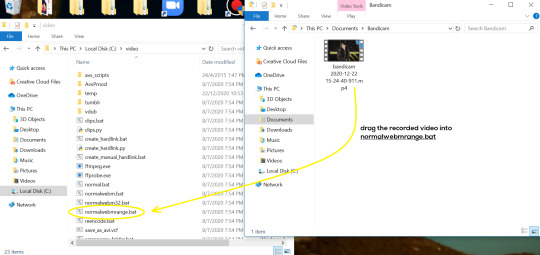
You can find your recorded videos in Documents > Bandicam.
3. Avisynth
I followed THIS tutorial to download Avisynth. This software is really helpful if you want sharp and clear gifs! I recommend to follow the steps in the tutorial as the below method stems from it.
- Once you have downloaded it, open up your recorded video from Step 2 and watch it. Take note of the duration you want to gif. (e.g. from 00:01 to 00:05)
- Drag your video file into normalwebrange.bat. On Windows, you can find this in File Explorer > Local Disk (C:) > video. For other .bat files, you may check out THIS tutorial.
- In the pop-up box, key in the start time for your gif (e.g. 00:00:01). It has to be in hh:mm:ss format. Press “enter”.
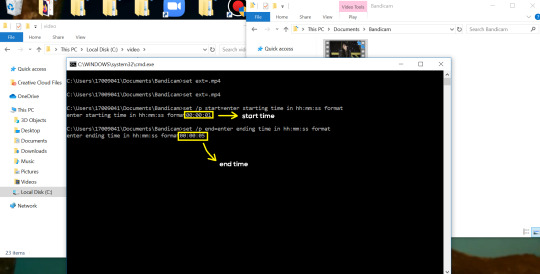
- Key in the end timing and press “enter” again. A resizer should pop up in an Internet Browser. I found that Firefox works best for me.
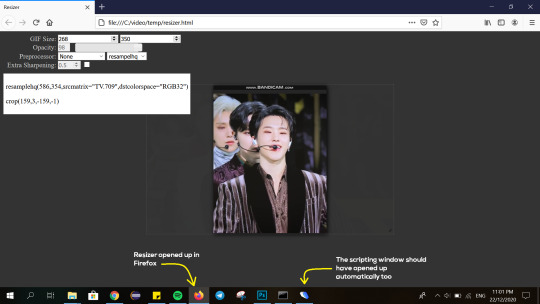
- In the resizer, you may indicate the size of the gif you’d like to make. You can also click and drag the video to resize and frame it to your liking. You may refer to THIS post for Tumblr dashboard sizing.
(These are some common gif sizes for stage performances):
1 gif - 540px by 540px (square)
2 gifs - 268px by 350px
3 gifs - 177/178px by 250px
- Under “Preprocessor”, select “debilinear” for the second box. For the first box, you may pick between qtgmc 30 (same frame rate as video) or qtgmc 60 (doubles the frame rate; smoother).
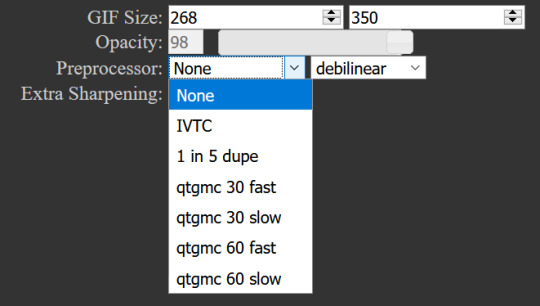
- You will also see “fast” or “slow” options. These are just how long the video will take to render. “Fast” will give you slightly lower quality as compared to “slow”, but usually is good enough.
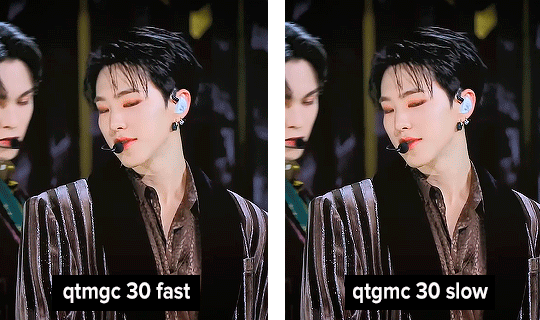
(You can see that his features are sharper and more defined in the “slow” gif as compared to the “fast” one.)
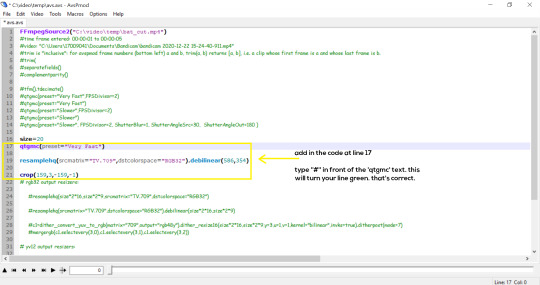
- Copy the code in the white box. Navigate to the scripting window (it should have popped up with the resizer) and paste the code at line 17. Type a “#” before qtgmc on the same line. This will prevent the software from lagging.
- Click on the inverted triangle at the bottom of the screen. Your video will now appear in the scripting window. Drag the slider to the intended starting point of your gif and press the “home” key on your keyboard.
- Drag the slider again to the intended ending point of your gif and press the “end” key on your keyboard. This blue area you see is the duration of your gif.
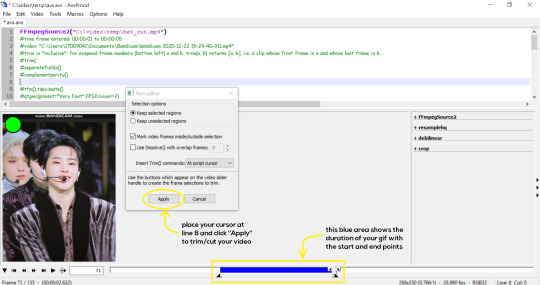
- On an empty line (I usually go to line 8), place your cursor there and click “Apply” in the mini pop-up window. Afterwards, remove the “#” from line 17.
- Go to File > Save or press Ctrl + S to save the code. Close the scripting window. The video renderer will pop up. When it’s done, it will automatically close by itself.
4. Using Photoshop and Topaz
I’m using my school license for Photoshop 2018, but if you don’t have that, there are plenty of cracked versions for free. I don’t have any to recommend though so I’m sorry about that :(
I followed THIS video tutorial to download Topaz plug-ins for free. I use Topaz DeNoise (the most helpful) and Clean, but you may use others if you’d like :)
Alright, let’s dive in to the steps!
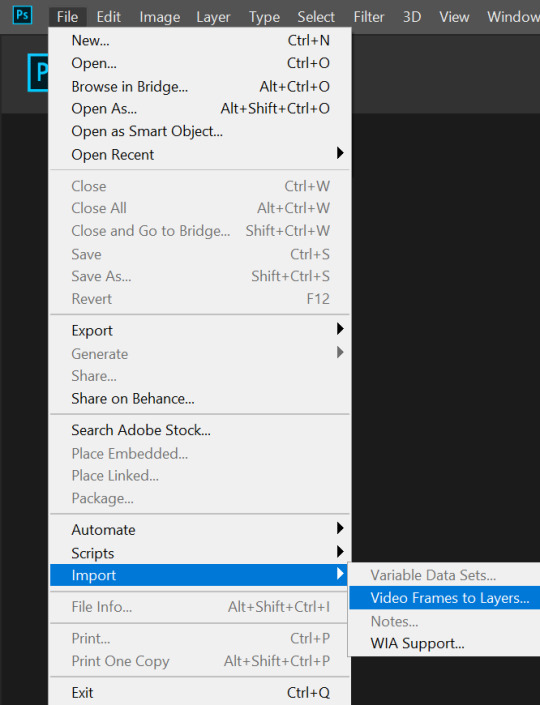
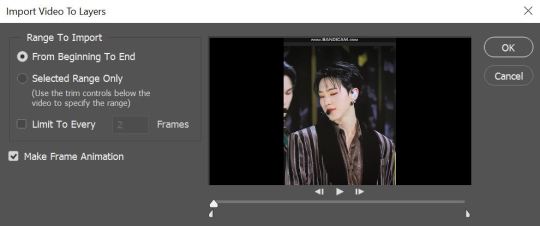
- Open up Photoshop and go to File > Import > Video Frames to Layers.
- A pop-up will appear. You can find your deinterlaced Avisynth video in File Explorer > Local Disk (C:) > video > temp > video.avi. Follow the settings in the picture and click “OK”.
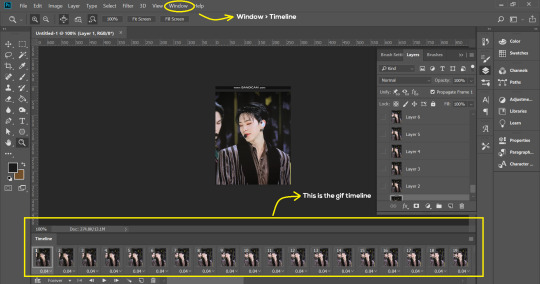
- Go to Window > Timeline to open up the timeline. You should be able to see your gif spread out in frames. If you press the play button, it should play like a video.
- (Quick optional step I learned from THIS tutorial) Go to Image > Canvas and set the Resample option to “Bicubic (smooth gradients)”.)
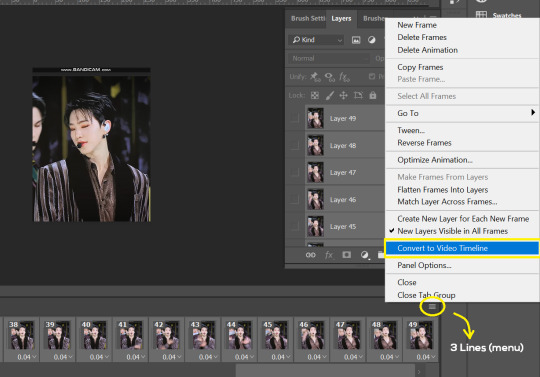
- Select the first frame of your gif in the timeline. Shift select the last frame. Go to Window > Layers. Shift select these layers as well.
- With everything selected, click the 3 lines at the top right corner of the timeline. Select “Convert to Video Timeline”.
- At the top of the screen, select Filter > Convert for Smart Filters. Your layers will condense into one layer. Don’t worry, your gif is fine.
- Now it’s time to sharpen the gifs. Go to Filter > Sharpen > Smart Sharpen. Play around with the settings to your liking!
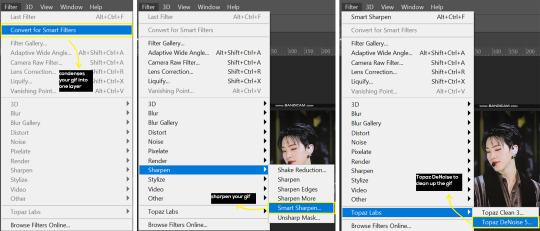
- If you’ve downloaded Topaz correctly, it should appear under Filter > Topaz Labs. If a pop-up asks you for an activation key, you may use THESE to activate it for free.
- Go to Filter > Topaz Labs > DeNoise and/or Clean and play with the settings until you’re satisfied.
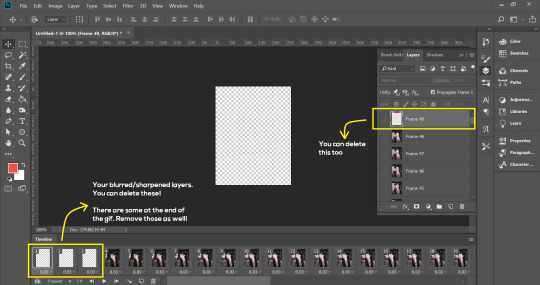
5. Blurring
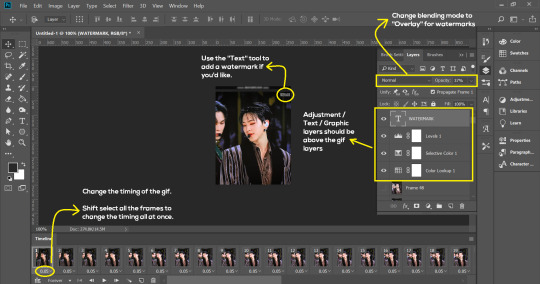
If your gifs have captions/logos that are distracting, you’d want to blur them out. Don’t be like 2018 me that blurred out the logo frame by frame; it’s very tiring. Instead, using this method from @scoupsy‘s tutorial, you’ll save lots of time.
- In the Layers tab (Windows > Layers), select the “New Layer” icon. It should be blank.
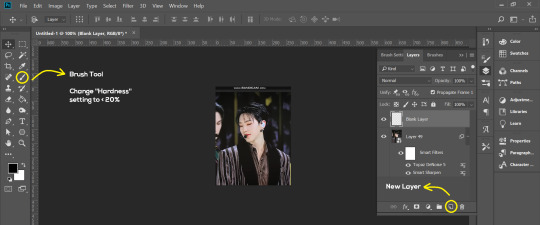
- Select the Brush tool. Make sure the “Hardness” setting is below 20%. This will blend the blurring nicely into the gif.
(For the sake of this tutorial, I will be blurring out the Bandicam logo to show you.)
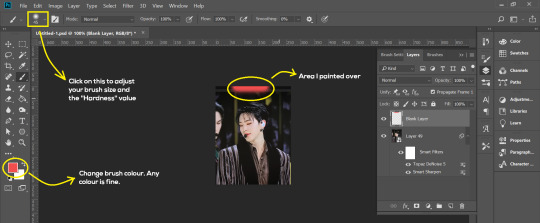
- Paint over the captions/logos. Make sure this is on the blank layer!
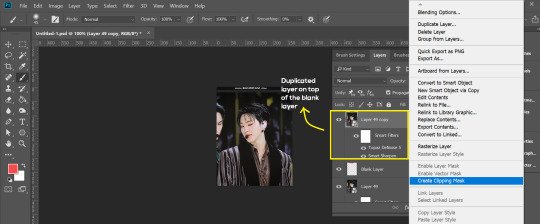
- Duplicate (Right Click > Duplicate) the gif layer and drag it so that it’s on top of the blank layer.
- Right click on the duplicate layer and select “Create Clipping Mask”.
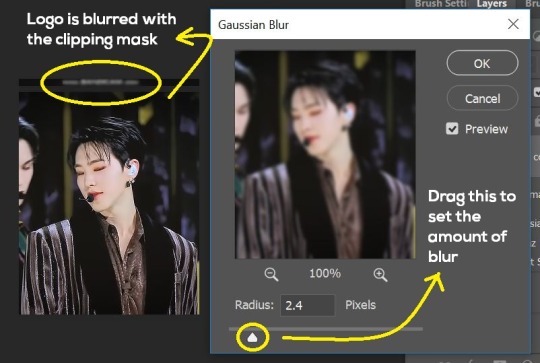
- Go to Filter > Blur > Gaussian Blur and play around with the settings until you’re satisfied with the level of blurring. Click “OK”.
6. Flattening & Colouring
- Once you’re done with sharpening and/or blurring, click on the 3 lines on at the right corner of the video timeline and go to Convert Frames > Flatten Frames Into Clips.
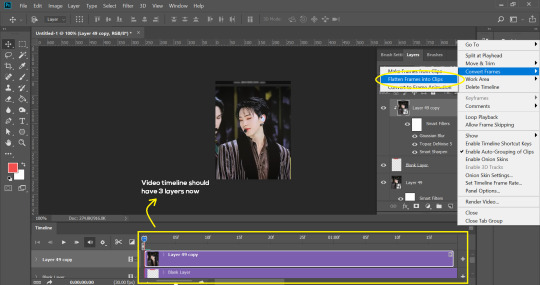
- Topaz layers and blurring will take some time to render so you can just chill for now~
- When it’s done rendering, click again on the 3 lines and go to Convert Frames > Make Frames From Clips.
- Convert it back to the gif timeline by clicking on the 3-box icon at the bottom left of the timeline.
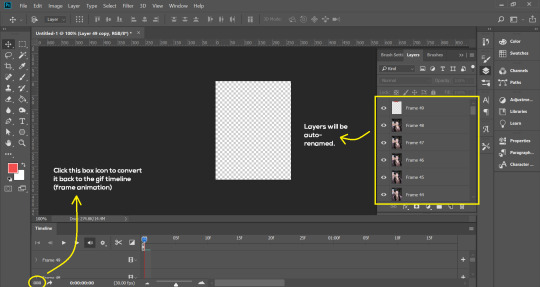
- Select the first frame of your gif. It must be the FIRST.
- Scroll to the top of the layers and select the layer at the top. Any other layers you add should be on top of this layer. VERY IMPORTANT!!
- In the Adjustments Tab (Window > Adjustments), there are many different things to play with. There’s a high chance you won’t use everything, but here’s a few of my favourites.
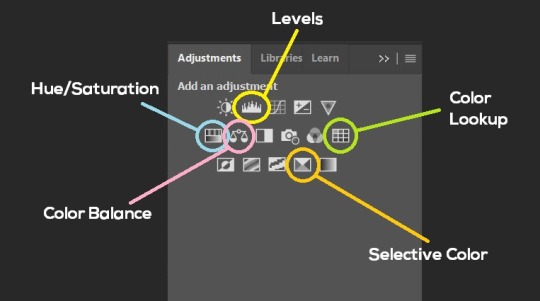
Levels - Adjust the brightness and contrast of your gif in depth.
Hue/Saturation - Useful for changing colours, or switching it to black and white.
Color Balance - Tweak the colours to your liking.
Colour Lookup - Comes with built-in LUTs that you can use as a preset. Great starting point for colouring. Saves time too. You can even download plug-ins for this. 11/10 tool.
Selective Colour - Adjust the vibrancy of specific colours.
- Colouring is completely up to the gifmaker. Go crazy go stupid :D
7. Exporting
We’re almost to the end!
- Set the timing for your gif.
If you used qtgmc30, the best timing would be 0.04s / 0.05s / 0.06s.
If you used qtgmc60, the best timing would be 0.02s / 0.03s / 0.04s.
- Once you’re satisfied with everything, go to File > Export > Save for Web (Legacy).
- Follow the settings in the picture below:
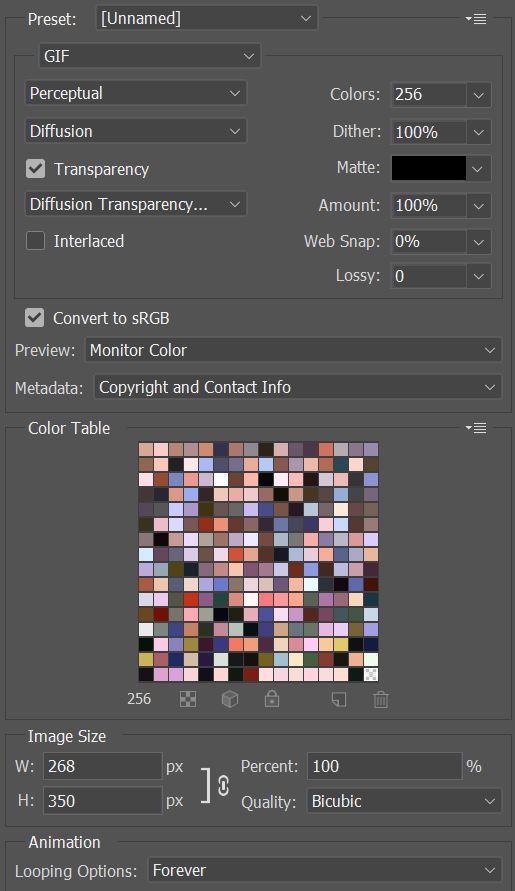
- Tumblr’s gif limit is 10mb per gif. Check the gif size at the bottom left of the pop-up window. Make sure it’s below 10mb; the smaller the better.
- Click “Save”. Choose where you’d like to save the gif.
- Done!
~~~~~~~~~~~~~~~~
And that’s it! You’ve successfully made a gif! Good job you :D
I hope this tutorial was helpful! Please leave some feedback if it helped, or if you have other methods you’d like to share :)
Lastly, if you have any questions, feel free to send in an ask or DM me!! :)
Good luck and happy gif-ing :’D
#gif tutorial#kpop gifs#avisynth tutorial#topaz tutorial#gifs#chey.resource#kpop#idk what else to tag so...#i finally posted the tutorial yay!!#please spare a reblog if you find this even remotely helpful thank you <3#also to spread it hehe i spent a lot of time on this#if anyone has any questions please feel free to DM me!!#i apologize if there are any spelling errors
230 notes
·
View notes
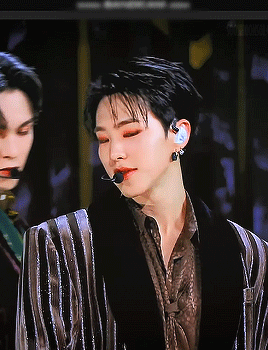
Photo
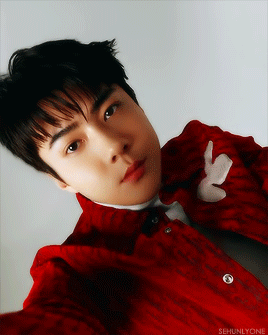
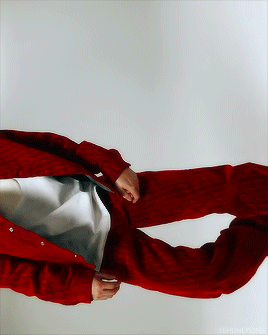
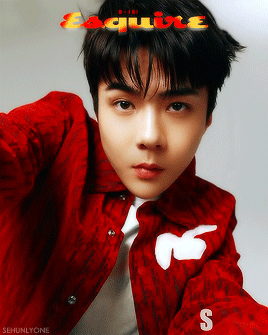
Sehun for Esquire E Issue
"How does he make even the simplest moves charming? Is his attractive face the answer to all?"
#exo#sehun#oh sehun#exosnet#sehun gif#sehunlygif#esquire#uhm... hello it's been a while#i legit forgot how to gif#avisynth doesn't work anymore (probably i need a new update or smth)#and i'm lucky i had actions saved because if not i had to look up a tutorial for real#i had a sudden urge to gif when i saw the two videos of him#so yes there will be another set#but i'm not back to giffing regularly#*200
414 notes
·
View notes
Note
hello! this is the anon who asked for gifmaking advice the other day! i just wanted to say thank you SO much for your tips and the tutorial you linked, it's been incredibly helpful!!
Hi!! I'm so happy to hear that! :) If you end up posting gifs on tumblr, let me know so I can reblog! <3
By now the tutorial is a bit outdated on the avisynth part (if you used that) but if it still works that's awesome!
1 note
·
View note