#bitlocker file recovery software
Explore tagged Tumblr posts
Visit Tumblr Blog
Explore Tumblr blogs with no restrictions, modern design and the best experience.
Last Seen Tumblr Blogs


Fun Fact
Tumblr.com is the 103rd most visited website in the world.
Text
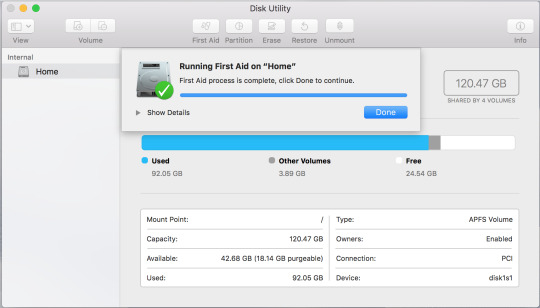
How to Recover Data from Corrupted/Failed BitLocker Drive

Introduction: Encountering a corrupted or failed BitLocker drive can be a daunting experience, potentially leading to the loss of valuable data. However, with the right approach and tools, it's possible to recover your files and regain access to your encrypted data. In this guide, we'll explore the steps to recover data from a corrupted or failed BitLocker drive and delve into how BitLocker data recovery tools can help restore your data effectively.
Understanding BitLocker Drive Encryption:
BitLocker is a built-in feature in Windows operating systems that provides encryption for your files and drives. It secures data by requiring a password or encryption key to access it, protecting against unauthorized access and data breaches. However, in the event of drive corruption or failure, recovering data from a BitLocker-encrypted drive becomes necessary.
Steps to Recover Data from Corrupted/Failed BitLocker Drive:
Assess the Extent of Corruption: The first step to recover bitlocker data from a corrupted or failed BitLocker drive is to assess the extent of the damage. Connect the corrupted drive to a computer running a Windows operating system and check if it's recognized by the system. Use Disk Management or DiskPart to identify the status of the drive, whether it's healthy, damaged, or showing as RAW.
Utilize BitLocker Recovery Options: If the BitLocker drive is partially accessible or recognized by the system but inaccessible due to corruption, attempt to decrypt it using the BitLocker recovery key or password. You can find the BitLocker recovery key in your Microsoft account, on a USB drive, or in a printed copy if you've saved it during the encryption process. Use the BitLocker Recovery Console or Recovery Wizard to access recovery options.
Use BitLocker Data Recovery Software: If traditional recovery methods fail to restore your data, consider using BitLocker data recovery software. These specialized tools are designed to recover data from corrupted or failed BitLocker drives effectively. Choose a reputable BitLocker data recovery tool that supports BitLocker drive recovery and follow the software's instructions to initiate the recovery process.
Scan and Recover Data: Once you've selected a BitLocker recovery tool, scan the corrupted drive thoroughly to identify and recover any accessible data. The software will analyze the drive's file system and attempt to recover lost or inaccessible files. Follow the software's prompts to select the files you want to recover and specify a destination for the recovered data.
Seek Professional Assistance: If all else fails and your data is critically important, consider seeking assistance from professional data recovery software services. These experts have advanced tools and techniques to recover data from severely corrupted or damaged drives. Contact reputable data recovery specialists to assess the situation and explore recovery options.
Conclusion:
Recovering data from a corrupted or failed BitLocker drive requires a systematic approach and the right tools. By assessing the extent of corruption, utilizing BitLocker recovery options, and using specialized BitLocker data recovery software, you can increase your chances of successfully recovering your valuable files. Remember to keep backups of your important data to avoid data loss in the future. With patience and persistence, you can overcome BitLocker drive failures and restore your encrypted data effectively.
#bitlocker data recovery software#bitlocker data recovery tool#bitlocker file recovery software#recover bitlocker data#retrive bitlocker data#restore bitlocker key
0 notes
Text
For those who are not aware: Bitlocker is encryption software, it encrypts your computer and makes it impossible to access the information on the computer unless you have the key.
It should be standard practice for IT companies to document the bitlocker keys as they are configuring bitlocker on a computer; generally you would do this by creating a record in your client management software for that specific device and putting the key in the record. Sometimes software can be used to extract that information in the event that it's necessary, but even if there's theoretically a way to extract the key, it should be documented somewhere *other* than on the encrypted computer.
This is something that a lot of IT people fuck up on kind of a lot (we've definitely had problems with missing bitlocker keys and I'm quite happy that the people who didn't document those keys aren't my coworkers anymore).
So what do you do if you want to use encryption software and you're NOT an IT company using a remote management tool that might be able to snag the keys?
When you are setting up encryption, put the encryption key in your password manager. Put it in your password manager. Document the important information that you cannot lose in your password manager. Your password manager is a good place to keep important things like your device encryption key, which you do not want lost or stolen. (If you run your password manager locally on an encrypted computer, export the data every once in a while, save it as an encrypted file, and put the file on your backup drive; you are going to have a bad time if your computer that hosts the only copies of your passwords shits the bed so *make a backup*)
This is my tip for home users for any kind of important recovery codes or software product keys: Print out the key and put it in your underwear drawer. Keep it there with your backup drive. That way you've got your important (small) computer shit in one place that is NOT your computer and is not likely to get shifted around and lost (the way that papers in desks often get shifted around and lost).
2K notes
·
View notes
Text
Installing Linux (Mint) as a Non-Techy Person
I've wanted Linux for various reasons since college. I tried it once when I no longer had to worry about having specific programs for school, but it did not go well. It was a dedicated PC that was, I believe, poorly made. Anyway.
In the process of deGoogling and deWindows365'ing, I started to think about Linux again. Here is my experience.
Pre-Work: Take Stock
List out the programs you use regularly and those you need. Look up whether or not they work on Linux. For those that don't, look up alternatives.
If the alternative works on Windows/Mac, try it out first.
Make sure you have your files backed up somewhere.
Also, pick up a 5GB minimum USB drive.
Oh and make a system restore point (look it up in your Start menu) and back-up your files.
Step One: Choose a Distro
Dear god do Linux people like to talk about distros. Basically, from what all I've read, if you don't want to fuss a lot with your OS, you've got two options: Ubuntu and Linux Mint. Ubuntu is better known and run by a company called Canonical. Linux Mint is run by a small team and paid for via donations.
I chose Linux Mint. Some of the stuff I read about Ubuntu reminded me too much of my reasons for wanting to leave Windows, basically. Did I second-guess this a half-dozen times? Yes, yes I did.
The rest of this is true for Linux Mint Cinnamon only.
Step Two: Make your Flash Drive
Linux Mint has great instructions. For the most part they work.
Start here:
The trickiest part of creating the flash drive is verifying and authenticating it.
On the same page that you download the Linux .iso file there are two links. Right click+save as both of those files to your computer. I saved them and the .iso file all to my Downloads folder.
Then, once you get to the 'Verify your ISO image' page in their guide and you're on Windows like me, skip down to this link about verifying on Windows.
Once it is verified, you can go back to the Linux Mint guide. They'll direct you to download Etchr and use that to create your flash drive.
If this step is too tricky, then please reconsider Linux. Subsequent steps are both easier and trickier.
Step Three: Restart from your Flash Drive
This is the step where I nearly gave up. The guide is still great, except it doesn't mention certain security features that make installing Linux Mint impossible without extra steps.
(1) Look up your Bitlocker recovery key and have it handy.
I don't know if you'll need it like I did (I did not turn off Bitlocker at first), but better to be safe.
(2) Turn off Bitlocker.
(3) Restart. When on the title screen, press your Bios key. There might be more than one. On a Lenovo, pressing F1 several times gets you to the relevant menu. This is not the menu you'll need to install, though. Turn off "Secure Boot."
(4) Restart. This time press F12 (on a Lenovo). The HDD option, iirc, is your USB. Look it up on your phone to be sure.
Now you can return to the Linux Mint instructions.
Figuring this out via trial-and-error was not fun.
Step Four: Install Mint
Just follow the prompts. I chose to do the dual boot.
You will have to click through some scary messages about irrevocable changes. This is your last chance to change your mind.
I chose the dual boot because I may not have anticipated everything I'll need from Windows. My goal is to work primarily in Linux. Then, in a few months, if it is working, I'll look up the steps for making my machine Linux only.
Some Notes on Linux Mint
Some of the minor things I looked up ahead of time and other miscellany:
(1) HP Printers supposedly play nice with Linux. I have not tested this yet.
(2) Linux Mint can easily access your Windows files. I've read that this does not go both ways. I've not tested it yet.
(3) You can move the taskbar (panel in LM) to the left side of your screen.
(4) You are going to have to download your key programs again.
(5) The LM software manager has most programs, but not all. Some you'll have to download from websites. Follow instructions. If a file leads to a scary wall of strange text, close it and just do the Terminal instructions instead.
(6) The software manager also has fonts. I was able to get Fanwood (my favorite serif) and JetBrains (my favorite mono) easily.
In the end, be prepared for something to go wrong. Just trust that you are not the first person to ever experience the issue and look it up. If that doesn't help, you can always ask. The forums and reddit community both look active.
178 notes
·
View notes
Text
How To Make Sure Information On Your Old Computer Is Really, Truly Deleted
It Isn’t As Simple As Pressing ‘Delete’ And Emptying The Trash. Here’s A Step-By-Step Guide.
— By Sean Captain | June 17, 2025 | The Wall Street Journal (WSJ)

Illustration: Jon Krause
Spring-cleaning season is almost done, and it is time to finally get rid of that old computer. But be very careful before you sell, give away or recycle it.
You could be handing over sensitive information.
Even if you think you deleted everything on it, your old computer may hold lots of personal items you don’t want anyone seeing. In a 2019 study by the University of Hertfordshire (funded by security tech-reviews site Comparitech), researchers purchased 200 used hard drives from the U.S. and U.K. An analysis found data remaining on 59% of the drives, including passport and driver’s license scans, bank statements, utility bills and “intimate photos.”
Just pressing “delete” and emptying the Trash in macOS or the Recycle Bin in Windows won’t do the trick. That’s because your computer maintains an index of where every file resides. Deleting a file erases only its entry in the index, telling your system that it can put new files in that space. But until the system actually does put new files there, the old ones remain accessible. Simple consumer-level file-recovery apps can get at it—never mind professional-grade forensic software.
Here’s how to make sure your data is really gone—even on a computer that won’t start up.
Back-up And Log Out
Start by backing up anything you want to keep. You could drag files onto an external hard drive or use backup software such as the Time Machine app in macsOS. You can also back up to the cloud using Microsoft OneDrive, Apple iCloud, Google Drive, Dropbox or other services. (Don’t empty the Trash or Recycling bin. The wipe process will take care of this.)
Next, log out of applications or games with an online component, so the license is no longer associated with your old computer. Also do this for services like Gmail or Facebook, and web browsers like Chrome that sync your data online—on the admittedly remote chance that an incomplete wipe allows the next owner to access those accounts.
Another step for any type of computer is making sure your files are encrypted—scrambled in a mathematical operation based on very long strings of random numbers and letters called encryption keys. The wiping process will delete the keys to make sure any files that may remain on the machine are unreadable.
What you do next depends on your operating system.
Clearing Out A PC
Windows 10 and the current Windows 11 have a feature called “Reset this PC,” which, with the right settings, thoroughly wipes your data. First, make sure your operating system is up-to-date, as Microsoft recently fixed a bug that sometimes caused the reset process to fail. Press the Windows key, search for “updates” and select “Check for updates.” Install any that are available.
Now check on encryption. In Windows 10 or 11 Home editions, press the Windows key and search for “device encryption settings.” Click “Device encryption settings” on the next screen, then make sure the switch next to “Device encryption” is toggled on. Windows Pro, Enterprise and Education editions have an encryption utility called BitLocker. To enable it, click the Start button, type “bitlocker” and select “Manage BitLocker” from the list of results. (All versions of Windows 10 and 11 also encrypt deleted files.)
Now you’re ready to wipe. Tap the Windows key again, search for “Reset this PC,” then click on it. On the next screen, tap “Reset PC” (Windows 11) or “Get started” (Windows 10), and on the following screen, click “Remove everything.” On the next screen, select “Local reinstall.” (If this doesn’t work, try the “Cloud download” option.) Then click “Change settings,” and on the following screen (under “Clean data?”), toggle the switch to “Yes” and press “Confirm.” On the following screen, press “Next” (Windows 11) or “Reset” (Windows 10). On Windows 11, you will press “Reset” on one more screen. Then let the process run for a few hours.
“Reset this PC” deletes your files, apps and settings, logs you out of your Microsoft account and disables the “Find My Device” feature so the computer is no longer associated with you. Then the serious wiping starts. The encryption keys are deleted, making any encrypted data irretrievably scrambled, and the Clean data option overwrites the ones and zeros that had encoded data on your drive. A clean copy of Windows is also installed.
The MacOS Method
Apple’s “Erase Assistant” feature made its debut in 2021’s macOS 12 Monterey. If your current OS is older, you may be able to update it. To update an older OS to Monterey or a later one, click the Apple menu, then “System Preferences” and “Software Update.” If the update process doesn’t work, jump to “If all else fails” below for another option.
As with Windows, the “Erase All Content & Settings” process should start with encryption. On newer Macs (starting between 2018 and 2020, depending on the model), data is encrypted automatically. Just to be safe, though, turn on a feature called FileVault that adds encryption to older systems and an extra layer to newer ones. Click the Apple icon, then “System Settings” (or “System Preferences” in Monterey). In the next window, click “Privacy & Security” (or “Security & Privacy”), then click FileVault.
Now it is time to wipe. Click again on the Apple icon and “System Settings” (or “System Preferences”), click “General” on the left, then “Transfer or Reset” on the bottom right. Finally, on the next screen, click “Erase All Content & Settings.” (In Monterey, you’ll go there directly from “System Preferences.”)
This process signs you out of Apple services, turns off the “Find My” and “Activation Lock” security measures so that the system is no longer associated with you, and erases all your files, settings, apps and anything else. It deletes the encryption keys, permanently scrambling any data that remains.
If All Else Fails
If your PC or Mac is so old that it can’t run a modern wipe process, you have one more option before seeking pro help. For Windows, several experts recommended the KillDisk app. The $49.95 Professional version runs from a USB drive and overwrites the ones and zeros that encode data on your hard drive with all zeros. Afterward, your computer will no longer boot into Windows unless you reinstall the OS.
For a Mac, your best option is a complex process that Apple describes online.
If these processes sound too complicated, or if your system won’t even turn on, use Apple’s recycling program for Macs or a disposal company that offers hard-drive destruction (or shredding) and recycling for consumers with either type of system. Look for ones that issue a certificate of destruction to verify the process. For instance, Ship ‘N’ Shred accepts drives or whole devices, with prices that include shipping ranging from around $30 to $200.
Modern technology leaves a lot of digital footprints, but at least you can sweep them off your old computer.
— Sean Captain is a Writer ✍️ in New York.
#Technology#Personal Technology#Personal Information#Old Computer 💻 🖥️#Deleting Personal Data#‘Delete’ | Emptying The Trash#Step-By-Step Guide#Sean Captain#The Wall Street Journal (WSJ)
0 notes
Text
Supporting and Troubleshooting Windows 11 Course in Australia: A Complete Guide
Windows 11 has become the operating system of choice for businesses and individuals, offering advanced security, enhanced performance, and a modern interface. However, managing and troubleshooting Windows 11 in a professional environment requires specialized skills. The Supporting and Troubleshooting Windows 11 Course in Australia is designed to equip IT professionals with the knowledge and hands-on experience needed to support and resolve issues in Windows 11 systems efficiently.
Why Enroll in a Supporting and Troubleshooting Windows 11 Course?
With the transition from older Windows versions to Windows 11, IT support teams must adapt to new technologies, security features, and system configurations. Here’s why taking this course is beneficial:
1. Stay Updated with Windows 11 Technology
Learn about the latest Windows 11 features and enhancements.
Understand changes in system architecture and security protocols.
Gain insights into compatibility issues and best practices for troubleshooting.
2. Enhance Your IT Support Skills
Develop expertise in diagnosing and resolving Windows 11 issues.
Master tools like Windows Recovery, Event Viewer, and Command Prompt.
Improve efficiency in handling system crashes, performance issues, and network problems.
3. Increase Job Opportunities and Career Growth
IT professionals with Windows 11 troubleshooting skills are in high demand.
Employers prefer certified experts for desktop support, system administration, and IT helpdesk roles.
The course prepares you for industry-recognized certifications that boost your resume.
Key Topics Covered in the Course
The Supporting and Troubleshooting Windows 11 Course is comprehensive and designed for IT professionals, covering the following crucial areas:
1. Windows 11 Installation and Configuration
Setting up and customizing Windows 11.
Managing user accounts and permissions.
Understanding Windows Update and Feature Management.
2. Troubleshooting Boot and Startup Issues
Identifying and resolving boot failures and startup delays.
Using Advanced Startup Options and Safe Mode.
Repairing the Windows bootloader and system files.
3. Performance Optimization and System Monitoring
Using Task Manager, Resource Monitor, and Performance Monitor.
Troubleshooting slow performance and high CPU/RAM usage.
Managing background applications and startup processes.
4. Network Connectivity and Troubleshooting
Configuring and troubleshooting Wi-Fi, VPN, and Ethernet connections.
Understanding TCP/IP, DNS, and Firewall settings.
Resolving common connectivity issues and IP conflicts.
5. Security and Access Management
Implementing BitLocker encryption and Windows Defender policies.
Managing user authentication and account recovery.
Preventing and troubleshooting malware and ransomware attacks.
6. Hardware and Peripheral Troubleshooting
Diagnosing driver and compatibility issues.
Troubleshooting printer, scanner, and peripheral device failures.
Using Device Manager and Windows Troubleshooters.
7. Data Recovery and Backup Solutions
Configuring OneDrive and local backup solutions.
Recovering lost data using Windows File History and Recovery Tools.
Preventing data loss through effective backup strategies.
Who Should Take This Course?
The Supporting and Troubleshooting Windows 11 Course is ideal for:
IT Support Specialists – Handling user support and troubleshooting requests.
System Administrators – Managing enterprise Windows 11 environments.
Helpdesk Technicians – Assisting with hardware, software, and network issues.
Technical Consultants – Offering Windows 11 support for business clients.
Benefits of Certification in Windows 11 Troubleshooting
Earning a certification after completing this course offers several advantages:
Better Job Prospects: Companies prefer certified IT professionals.
Higher Salary Potential: Skilled troubleshooting experts earn more.
Enhanced Problem-Solving Skills: Learn real-world troubleshooting techniques.
Industry Recognition: Gain credibility as a Windows 11 support specialist.
Choosing the Right Training Provider in Australia
When selecting a training provider for the Supporting and Troubleshooting Windows 11 Course in Australia, consider these factors:
Accreditation: Ensure the provider is recognized by Microsoft.
Hands-on Labs: Look for courses offering real-world troubleshooting scenarios.
Flexible Learning Options: Online, classroom, or hybrid training formats.
Certification Preparation: Providers offering exam support and practice tests.
Student Reviews: Check ratings and testimonials for course quality.
Final Thoughts
The Supporting and Troubleshooting Windows 11 Course in Australia is an essential step for IT professionals looking to expand their expertise in Windows 11 support. With a structured curriculum covering installation, performance tuning, security, and network troubleshooting, this course provides the necessary skills to manage and resolve issues efficiently.
0 notes
Text
How to Securely Erase Data from Your SSD?
In today’s digital world, ensuring the security of your data is more important than ever. Whether upgrading to a new SSD, repurposing an old one, or just wanting to ensure sensitive information is unrecoverable, securely erasing data from an SSD is critical. Unlike traditional hard drives, SSDs (Solid State Drives) require special methods for secure data deletion due to their unique storage techniques.
SSDs use NAND flash memory to store data organized into blocks and pages, unlike the spinning platters in traditional hard drives. This architecture introduces complexities like wear leveling and garbage collection. Wear leveling ensures even data distribution across memory cells to prevent premature wear, while garbage collection consolidates unused blocks, making old data scattered across the drive and difficult to erase.
When a file is deleted from an SSD, it is not physically erased but marked as available for new data. Until overwritten, the data can be recovered using data recovery software. This is why secure data erasure methods are essential for preventing unauthorized recovery of sensitive information.
Several methods exist for securely erasing data from an SSD:
Built-in SSD Secure Erase Utility: Many SSD manufacturers offer built-in secure erase utilities like Samsung Magician, Intel SSD Toolbox, or Crucial Storage Executive. These tools use the SSD's firmware to perform a thorough data wipe. To use these tools, users need to check the manufacturer's documentation, backup important data, create a bootable USB drive (if necessary), and follow prompts to run the secure erase utility.
Third-Party Software: If the manufacturer doesn’t provide a secure erase tool, third-party software like Parted Magic, HDDErase, or DBAN (Darik’s Boot and Nuke) can be used. Similar to the built-in utilities, these tools offer additional features and allow users to select their SSD and securely erase it.
ATA Secure Erase Command: This low-level command, built into most SSDs' firmware, resets the NAND cells to their factory state. It requires technical knowledge and involves using a bootable Linux distribution like Ubuntu or Parted Magic to execute the ATA Secure Erase command.
Encryption Method: Encrypting the SSD before erasing it adds an extra layer of security. Even if remnants of data remain after erasure, they will be indecipherable without the encryption key. This can be done using encryption software like BitLocker (Windows), FileVault (Mac), or VeraCrypt (cross-platform).
For maximum data security, it’s recommended to regularly update SSD firmware, use multiple erasure methods, and physically destroy the drive if it’s no longer needed. Additionally, proper disposal of the SSD through e-waste recycling ensures that the drive is handled responsibly.
In conclusion, securely erasing data from an SSD is crucial for protecting sensitive information. By understanding the storage mechanics of SSDs and using the appropriate erasure methods, users can ensure their data is irretrievable. Always back up data before proceeding with any erasure and verify the process to ensure complete data destruction.
Want to Buy SSDs in Bulk from VSTL?
If you're looking to purchase SSDs in bulk, VSTL offers a reliable option for businesses and individuals seeking quality storage solutions. With competitive pricing and a range of SSD models to suit various needs, VSTL ensures high-performance drives for both personal and professional use. Bulk buyers can benefit from wholesale rates, making it an efficient choice for large-scale projects or tech upgrades. Whether upgrading office systems or managing data storage for a business, VSTL provides dependable SSDs to meet diverse requirements.
0 notes
Text
Recover Data from Encrypted Windows Hard Drive - BLR BitLocker Unlocker

Recovering data from encrypted Windows hard drive can be complex, especially when the hard disk drive is protected by BitLocker encryption. In such cases, it's essential to have the correct decryption key "BitLocker recovery key" or password to access the hard drive. Without BitLocker key or password, the BitLocker encrypted data remains locked and unreadable. However, if you have the necessary credentials, the process involves unlocking the drive and scanning it for recoverable files, even if the data was accidentally deleted or the drive was damaged. With professional data recovery software like BLR data recovery tool, users can recover encrypted files without compromising the integrity of the data.
Read more:https://www.linkedin.com/pulse/bitlocker-data-recovery-recover-from-encrypted-7ogkc/
0 notes
Text
How To Safeguard Your Laptop: Best Practices

How secure is your Laptop? We know today, that laptops are essential tools for work, study, and personal use. However, they are also vulnerable to cyber threats, data breaches, and physical theft. Whether you’re using your device at home or on the go, following security measures to protect your information is important.
Below are some crucial security tips to keep your laptop safe, especially if you require services like Real Expert Qatar, a trusted laptop service center Doha.
1. Use Strong Passwords
A strong password is the first line of defense against unauthorized access. Ensure your passwords are at least 12 characters long and include a mix of letters, numbers, and special characters. Regularly change your passwords, and avoid using easily guessed information like your name or birthdate.
2. Keep Your Software Updated
Outdated software can have vulnerabilities that hackers exploit. Regularly updating your operating system, antivirus software, and applications is essential to ensure your laptop is protected from the latest security threats. If you face any issues with updates, consider visiting Real Expert Qatar, a trusted Laptop Service center in Qatar for professional assistance.
3. Enable Two-Factor Authentication
Two-factor authentication (2FA) adds an extra layer of security by requiring a second form of verification, such as a text message code or an authentication app, in addition to your password. This reduces the risk of someone accessing your laptop even if they have your password.
4. Use Encryption
Encryption protects your sensitive data by converting it into a secure format that can only be read by authorized parties. You can enable encryption through built-in tools like BitLocker on Windows or FileVault on macOS. In case of any technical issues, Real Expert Qatar, a reputable laptop service center Doha can assist with configuration and troubleshooting.
5. Install Antivirus and Anti-Malware Software
Having robust antivirus and anti-malware software installed is essential for protecting your laptop from viruses, spyware, and other malicious threats. These programs regularly scan your laptop and quarantine any suspicious files. If you notice your laptop behaving unusually, it may be time to consult Real Expert Qatar-laptop repair center Doha for an in-depth inspection.
6. Avoid Public Wi-Fi Without a VPN
Public Wi-Fi networks are often unsecured, making it easy for hackers to intercept your data. If you must use public Wi-Fi, ensure you connect through a virtual private network (VPN) to encrypt your internet connection and protect your privacy.
7. Regular Backups
Backing up your data ensures that you don’t lose important information in case your laptop is lost, stolen, or compromised by malware. Use an external hard drive or a cloud storage solution for regular backups. In case you experience hardware failure, Real Expert Qatar, laptop repair center in Qatar can help with data recovery and getting your laptop back to optimal performance.
8. Physically Secure Your Laptop
When not in use, store your laptop in a safe location. Use a laptop lock to physically secure it if you leave it in public places like a café or library. This helps reduce the risk of theft, especially when traveling or working remotely.
Securing your laptop involves a combination of good digital habits and physical safeguards. By following these tips, you can minimize the risks of data breaches, malware attacks, and theft. For any technical support, whether it’s software updates or hardware repairs, Real Expert Services, a dependable Laptop service center in Doha can help ensure your laptop remains secure and functional.
Protect your laptop, protect your data!
1 note
·
View note
Text
Understanding the BitLocker Recovery Key: What It Is and How to Use It

Hey Tumblr friends! 🌟
If you've recently enabled BitLocker on your Windows device and suddenly find yourself staring at a prompt asking for a BitLocker recovery key, you might be wondering what this mysterious key is all about. Let’s dive into the essentials of the BitLocker recovery key, why you might need it, and how to find it when necessary.
What is a BitLocker Recovery Key?
A BitLocker recovery key is a 48-digit numerical password that acts as a backup method to unlock your encrypted drive. This key is generated when you first enable BitLocker on a drive and is crucial for situations where you can’t access your drive through the usual means.
Why Might You Need a BitLocker Recovery Key?
There are several reasons why you might be prompted to enter your BitLocker recovery key:
Forgotten Password: If you forget your BitLocker password, the recovery key is your only way to regain access.
Hardware Changes: Making significant changes to your computer’s hardware, like replacing the motherboard, can trigger the recovery key prompt.
Software Updates: Major updates to your operating system or BIOS might require you to enter the recovery key.
Security Concerns: If BitLocker detects potential security threats or unauthorized access attempts, it will ask for the recovery key.
Where to Find Your BitLocker Recovery Key
If you’re in a pinch and need to find your BitLocker recovery key, here are some common places to check:
Microsoft Account: If you linked BitLocker to your Microsoft account, you can find your key on the Microsoft BitLocker recovery key portal.
USB Drive: If you saved the recovery key to a USB drive, make sure to keep it somewhere safe and accessible.
Printout: Some folks print their recovery key and store it securely.
Azure Active Directory (AAD): If your device is connected to an organization’s AAD, your IT department might have a copy.
File: If you saved the recovery key as a file, it’s usually named something like BitLocker Recovery Key.txt.
What to Do if You Can’t Find Your Recovery Key
If you can’t locate your BitLocker recovery key, your options are unfortunately limited. Without the recovery key, accessing your encrypted data is not possible. This is a vital reminder to store your recovery key securely in multiple locations.
Best Practices for Managing Your BitLocker Recovery Key
Store Multiple Copies: Keep your recovery key in several places, such as your Microsoft account, a USB drive, a printout, and a secure digital file.
Secure Storage: Ensure your recovery key is stored in a safe location, like a safe or encrypted digital storage.
Keep Updated: Regularly update your recovery key and ensure it’s accessible, especially after significant system changes.
By following these best practices, you can avoid the potential frustration and data loss associated with being locked out of your BitLocker-encrypted drive.
For a more detailed guide on BitLocker and managing recovery keys, including step-by-step instructions and troubleshooting tips, check out this Comprehensive BitLocker Recovery Key Guide.
Hope this helps you stay secure and stress-free! If you have any more questions about BitLocker or need further assistance, feel free to drop a comment. 💬✨
Also read our related articals:
How Ad Blockers Might Trigger BSOD Blue Screen
Audio Troubleshooter: Resolve No Sound Issues On Dell Laptop
Laptop Not Connecting To WiFi? Fix Laptop WiFi Issues Today!
How To Fix ‘No Sound’ Issues On Your Laptop Or PC: A Comprehensive Guide
1 note
·
View note
Text
Bitlocker Data Recovery - Recover your lost data (Bitlocker Recovery Software)

In the digital age, data security is paramount, and encryption plays a crucial role in safeguarding sensitive information. BitLocker, a built-in encryption feature in Windows, provides users with a powerful tool to protect their data. However, despite its robust security measures, data loss can still occur due to various reasons such as accidental deletion, formatting, or drive corruption. In such situations, BitLocker data recovery software becomes indispensable, offering users a lifeline to retrieve their valuable data. In this comprehensive guide, we'll delve into the intricacies of BitLocker data recovery tool and explore how BitLocker recovery software can help users recover their lost data effectively.
Understanding BitLocker Encryption: BitLocker encryption is a security feature introduced by Microsoft in Windows operating systems to protect data stored on drives. It encrypts the entire drive, making it inaccessible without the encryption key or password. While BitLocker enhances data security, it also poses a challenge when data loss occurs, as accessing encrypted data without the key becomes nearly impossible.

Common Causes of BitLocker Data Loss:
Accidental deletion of BitLocker-encrypted files or folders.
Formatting of the BitLocker-protected drive.
Corruption of the BitLocker encryption key or password.
Drive failure or hardware malfunction.
System crashes or software errors.
Introducing BitLocker Data Recovery Software:
BitLocker data recovery software is specifically designed to address the challenges of recovering lost or inaccessible data from BitLocker-encrypted drives. These software solutions leverage advanced algorithms and techniques to scan, detect, and recover data from encrypted drives, providing users with a reliable means to retrieve their valuable information.
Key Features of BitLocker Recovery Software:
Deep Scan: BitLocker recovery software conducts a thorough scan of the encrypted drive, identifying lost or deleted files and folders.
File Preview: Users can preview recoverable files before proceeding with the recovery process, ensuring accurate retrieval of data.
Selective Recovery: Users have the option to selectively recover specific files or folders, minimizing the time and effort required for data recovery.
User-Friendly Interface: BitLocker recovery tool features an intuitive interface that guides users through the recovery process, making it accessible to users of all skill levels.
Compatibility: BitLocker recovery software is compatible with various versions of Windows operating systems, ensuring broad compatibility and usability.
Step-by-Step Guide to BitLocker Data Recovery:
Install and Launch the Software: Download and install the BitLocker recovery software on your Windows computer. Launch the software to begin the recovery process.
Select the Encrypted Drive: Choose the BitLocker-encrypted drive from which you want to recover bitlocker data and initiate the scanning process.
Scan the Drive: The software will conduct a deep scan of the encrypted drive, identifying lost or deleted files and folders.
Preview and Select Files: Once the scan is complete, preview the recoverable files and select the ones you wish to recover.
Recover Data: Click on the "Recover" button to initiate the data recovery process. The software will retrieve the selected files and save them to the desired location.
Benefits of Using BitLocker Recovery Software:
Efficient Data Recovery: BitLocker data recovery software offers a streamlined and efficient process for recovering lost data, minimizing downtime and productivity loss.
Comprehensive Solution: BitLocker recovery software can handle various data loss scenarios, including accidental deletion, formatting, or drive corruption.
User-Friendly Interface: With an intuitive interface, BitLocker recovery software makes data recovery accessible to users of all skill levels.
Time-Saving: The selective recovery feature allows users to retrieve specific files or folders, saving time and effort.
Data Integrity: BitLocker recovery software ensures the integrity and security of recovered data, providing users with peace of mind.
Conclusion: BitLocker data recovery software is a valuable tool for users who have encountered data loss on BitLocker-encrypted drives. Whether due to accidental deletion, formatting, or drive corruption, BitLocker recovery software offers a reliable solution to retrieve lost or inaccessible data with ease. By following the step-by-step guide outlined in this blog, users can effectively recover their valuable data and ensure business continuity and data security. With its advanced features and user-friendly interface, BitLocker recovery software is an indispensable tool for recovering lost data and protecting sensitive information.
#bitlocker recovery tool#bitlocker data recovery tool#bitlocker recovery software#bitlocker recovery key generator#bitlocker data recovery software
0 notes
Text
AZ-801: Configuring Windows Server Hybrid Advanced Services
This course teaches IT professionals to configure advanced Windows Server services using on-premises, hybrid, and cloud technologies. The course teaches IT professionals how to take advantage of the hybrid capabilities of Azure, how to migrate physical and virtual server workloads to Azure IaaS, and how to secure Azure virtual machines running Windows Server. IT professionals are also taught to perform tasks related to high availability, troubleshooting, and disaster recovery. Administrative tools and technologies are highlighted, including Windows Admin Center, PowerShell, Azure Arc, Azure Automation Update Management, Microsoft Defender for Identity, Azure Security Center, Azure Migrate, and Azure Monitor. Course AZ-801: Configuring Windows Server Hybrid Advanced Services
Module 1: Windows Server security
This module discusses how to protect an Active Directory environment by securing user accounts to least privilege and placing them in the Protected Users group. The module covers how to limit authentication scope and remediate potentially insecure accounts. The module also describes how to harden the security configuration of a Windows Server operating system environment. In addition, the module discusses the use of Windows Server Update Services to deploy operating system updates to computers on the network. Finally, the module covers how to secure Windows Server DNS to help protect the network name resolution infrastructure. Hardening con Docker
Lesson
Secure Windows Sever user accounts
Hardening Windows Server
Windows Server Update Management
Secure Windows Server DNS
Lab : Configuring security in Windows Server
Configuring Windows Defender Credential Guard
Locating problematic accounts
Implementing LAPS
After completing this module, students will be able to:
Diagnose and remediate potential security vulnerabilities in Windows Server resources.
Harden the security configuration of the Windows Server operating system environment.
Deploy operating system updates to computers on a network by using Windows Server Update Services.
Secure Windows Server DNS to help protect the network name resolution infrastructure.
Implement DNS policies.
Module 2: Implementing security solutions in hybrid scenarios
This module describes how to secure on-premises Windows Server resources and Azure IaaS workloads. The module covers how to improve the network security for Windows Server infrastructure as a service (IaaS) VMs and how to diagnose network security issues with those VMs. In addition, the module introduces Azure Security Center and explains how to onboard Windows Server computers to Security Center. The module also describes how to enable Azure Update Management, deploy updates, review an update assessment, and manage updates for Azure VMs. The module explains how Adaptive application controls and BitLocker disk encryption are used to protect Windows Server IaaS VMs. Finally, the module explains how to monitor Windows Server Azure IaaS VMs for changes in files and the registry, as well as monitoring modifications made to application software.
Lesson
Implement Windows Server IaaS VM network security.
Audit the security of Windows Server IaaS Virtual Machines
Manage Azure updates
Create and implement application allowlists with adaptive application control
Configure BitLocker disk encryption for Windows IaaS Virtual Machines
Implement change tracking and file integrity monitoring for Windows Server IaaS VMs
Lab : Using Azure Security Center in hybrid scenarios
Provisioning Azure VMs running Windows Server
Configuring Azure Security Center
Onboarding on-premises Windows Server into Azure Security Center
Verifying the hybrid capabilities of Azure Security Center
Configuring Windows Server security in Azure VMs
After completing this module, students will be able to:
Diagnose network security issues in Windows Server IaaS virtual machines.
Onboard Windows Server computers to Azure Security Center.
Deploy and manage updates for Azure VMs by enabling Azure Automation Update Management.
Implement Adaptive application controls to protect Windows Server IaaS VMs.
Configure Azure Disk Encryption for Windows IaaS VMs.
Back up and recover encrypted data.
Monitor Windows Server Azure IaaS VMs for changes in files and the registry.
Module 3: Implementing high availability
This module describes technologies and options to create a highly available Windows Server environment. The module introduces Clustered Shared Volumes for shared storage access across multiple cluster nodes. The module also highlights failover clustering, stretch clusters, and cluster sets for implementing high availability of Windows Server workloads. The module then discusses high availability provisions for Hyper-V and Windows Server VMs, such as network load balancing, live migration, and storage migration. The module also covers high availability options for shares hosted on Windows Server file servers. Finally, the module describes how to implement scaling for virtual machine scale sets and load balanced VMs, and how to implement Azure Site Recovery.
Lesson
Introduction to Cluster Shared Volumes.
Implement Windows Server failover clustering.
Implement high availability of Windows Server VMs.
Implement Windows Server File Server high availability.
Implement scale and high availability with Windows Server VMs.
Lab : Implementing failover clustering
Configuring iSCSI storage
Configuring a failover cluster
Deploying and configuring a highly available file server
Validating the deployment of the highly available file server
After completing this module, students will be able to:
Implement highly available storage volumes by using Clustered Share Volumes.
Implement highly available Windows Server workloads using failover clustering.
Describe Hyper-V VMs load balancing.
Implement Hyper-V VMs live migration and Hyper-V VMs storage migration.
Describe Windows Server File Server high availablity options.
Implement scaling for virtual machine scale sets and load-balanced VMs.
Implement Azure Site Recovery.
Module 4: Disaster recovery in Windows Server
This module introduces Hyper-V Replica as a business continuity and disaster recovery solution for a virtual environment. The module discusses Hyper-V Replica scenarios and use cases, and prerequisites to use it. The module also discusses how to implement Azure Site Recovery in on-premises scenarios to recover from disasters.
Lesson
Implement Hyper-V Replica
Protect your on-premises infrastructure from disasters with Azure Site Recovery
Lab : Implementing Hyper-V Replica and Windows Server Backup
Implementing Hyper-V Replica
Implementing backup and restore with Windows Server Backup
After completing this module, students will be able to:
Describe Hyper-V Replica, pre-requisites for its use, and its high-level architecture and components
Describe Hyper-V Replica use cases and security considerations.
Configure Hyper-V Replica settings, health monitoring, and failover options.
Describe extended replication.
Replicate, failover, and failback virtual machines and physical servers with Azure Site Recovery.
0 notes
Text
Recover Files From External Hard Drive Mac Free

Supports file recovery from Seagate HDD or external hard drive. Including data loss due to unintentional deletion, Seagate drive damaged, inaccessible, formatted, Diskpart, virus attack, and more. Fully compatible with macOS to recover deleted/lost files on Mac and Windows PC.
Disadvantages. Encrypt External Hard Drive on Windows 10. Using EFS to Password Protect Hard Drives (For Windows Home Edition) Encrypt Hard Drives on macOS (By Using FileVault) Put Password on External Hard Drive on Linux (By Enabling LVM) Encrypt Your Hard Drive Using a Third-Party Tool (KakaSoft) Conclusion.
There are many data recovery applications that can restore files from external hard drive for general users. Wondershare Data Recovery for Mac is one of the.
This can be used to recover data from your Mac hard drive. It can restore videos and pictures and works on both external and storage devices. It has the unique feature of being both effective and efficient.
When you install BestCrypt, you can select 'Simple Interface' as the default mode. If the program ever opens in 'Advanced Mode', click the 'Application' tab and select 'Switch to simple mode'. Plug in the removable drive you want to encrypt. Select your removable drive shown in BestCrypt. Click 'Encrypt'.
What is the best SSD for Mac?
Intel SSD 320 Series is the best SSD for Mac Book Pro or Mac Air SSD upgrade. This 320 Series Disc delivers sequential read speeds of up to 270 MB/s and sequential write speeds of up to 220 MB/s fair enough for moderate use with MacBook Pro SSD upgrade.
What is the best backup drive for Mac?
Best Portable Backup Drive: Seagate Backup Plus Portable Drive for Mac. The portable version of Seagate’s Backup Plus drive is also a bargain. It’s the most affordable portable drive we cover in either the 2 TB or 4 TB capacities. The drive is mounted in a sturdy metal case, and the 4 TB case is a little thicker than the 2 TB version.
How secure are flash drives?
You may secure your flash drive by doing one of two actions: (1) purchasing security software for your existing non-secure flash drive or (2) purchasing a secure flash drive. Unlike a non-secure flash drive, a secure flash drive offers built-in security capabilities, which range from password to fingerprint access.
What is hard disk encryption?
Hard Drive Encryption. Definition - What does Hard Drive Encryption mean? Hard drive encryption is a technology that employes sophisticated mathematical functions to convert data stored on a hard drive into a form that is not recognizable to unauthorized persons.
How to Encrypt External Hard Drive? Full Guide Here!
Click , then enter an administrator name and password. Click Turn On FileVault. If other users have accounts on your Mac, you might see a message that each user must type in their password before they will be able to unlock the disk. For each user, click the Enable User button and enter the user's password.
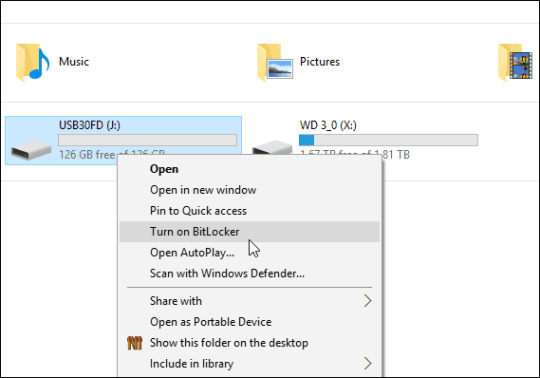
Encryption on Windows PC: Encrypting a file or drive on a Windows PC is simple. Follow the steps below to enable the option: Click on This PC. Right-Click on the drive that you want to encrypt. Click on Turn on BitLocker. Check the option ' Use a Password to Unlock the Drive.' Enter and verify your password. Click on Next.
Windows 10 has a disk encryption tool called Bitlocker, with which you can password protect external hard drives connected to your PC. Bitlocker is for Windows 10 Pro and Enterprise editions only. Connect external hard drive to PC. Next, from ‘This PC,’ right-click on that external hard drive and click on ‘turn on BitLocker.’
Most modern operating systems such as Windows, macOS, and Linux come with built-in tools for encrypting your external hard drives or USB peripherals. For instance, you can use BitLocker for Windows, FileVault for Mac, and LUKS (Linux Unified Key Setup-on-disk-format) for Linux to encrypt your USB drives.
Method 1: Using Finder. 1. Open the Finder window and locate your external drive on it. 2. Then, r ight click (control + click) on the drive icon and select “ Encrypt (drive name) ” from the drop-down menu. 3. A dialogue box will open asking for you to create a strong password and a hint.
How to Encrypt Data on External Drives
Right-Click or CTRL+Click the drive in the Finder sidebar to choose the encrypt option. Enter a password of your choice to encrypt the drive. The encryption process of the drive can take time, depending upon the data in the drive and the speed of the drive. Encrypting External Hard drive in windows.

In the sidebar, select the storage device you want to encrypt. Click the Erase button in the toolbar. Enter a name for the volume. Click the Scheme pop-up menu, then choose GUID Partition Map. Click the Format pop-up menu, then choose an encrypted file system format. Enter and verify a password, then click Choose.
Step 1) Use the internal Mac volume or connect the external storage drive you wish to encrypt. Step 2) Launch Finder, and from the left pane, secondary-click a drive or volume and select the Encrypt ‘Drive_Name’ option. Step 3) Set a password and hint as requested by macOS. Wait till the hard drive encrypts.
The concept of hard drive encryption is simple enough. The encryption process uses sophisticated mathematical functions to protect the data from anyone without the appropriate password or key. This provides an additional layer of security , preventing hackers from entering.
One way is to use encryption software that comes with Windows or Mac OS or is developed by third parties. Another way is to buy a USB flash drive with pre-installed encrypting hardware. The pros of encrypting your flash drive . There is no doubt that if you need to use a flash drive, encryption is one of the best ways to safeguard your data.
How to encrypt a flash drive for Windows and macOS
Once encrypted, it will be converted to Mac OS Extended (Journaled, Encrypted) file system. Here are the steps to encrypt external USB with FileVault: Step #1. Open Finder and select external USB from the list of drives on the left. Step #2. Right-click and select Encrypt & flashdrivename>. Step #3.
Plug your thumb drive or generic mass storage medium into your Mac. Open Finder. Right-click the thumb drive in the left sidebar. It’ll be under Locations. Click on Encrypt “ (Name of mass storage drive)”. If you don’t see this option, skip to the note below. Finder will now prompt you to enter a password and a hint.
I opened the file and an infinity symbol loading image opened and after a second or two, disappeared. The details in the exe's windows properties say it is original filename is LeafCollectorSetup.exe. I did a MalwareBytes scan and a Windows Defender quick scan after the fact, both came up negative.
Step 1: Use a Windows system and connect your USB. Step 2: Enter your USB password to unlock the BitLocker encryption. Step 3: Now copy all the files to the Windows system and name the file accordingly. Step 4: Now go to 'My Computer', right click on the drive and format it.
I'm trying to encrypt an external drive of mine using Apple's built in drive encryption tool into OS X through Finder. The drive is formatted as Mac OS Extended(Journaled) and I'm plugging the drive through USB 2.0. Also I'm running Mavericks with all the latest updates.
How to Encrypt an External Hard Drive? (Windows + MAC)
Then head to system preferences in the option. Step 2: In this option, select Security and Privacy as an option. Lastly, click on the File Vault tab. Step 3: Here you have to click the option of 'Turn on the File Vault'. Step 4: Enter a strong password to complete the process of encryption to encrypt mac hard drive.
You can encrypt your entire hard drive, encrypt an external drive, or just create an encrypted container for your most important files. It’s a better situation than Windows 10, where full disk encryption is only offered on some PCs , and partial encryption depends on third party tools.
<bump> I would suggest looking into true hardware encryption (e.g. Apricorn Aegis Secure Key). I would reformat the device or hard drive (if not formatted already) to exFAT, which will handle large files natively on the Mac and PC for read/write.
1 Answer1. There’s no option for stopping and reversing the encryption process. It doesn’t matter that it is an external drive, as it is still the same processs as is used when enabling FileVault on internal drives. Note that if you unmount/unplug the drive, encryption will be paused - but it resumes the next time it is plugged in.
3. Click ( Protect USB Drive) in ( Protect USB) to create a portable virtual disk in USB disk. 4. Select ( Create a new portable Silo in my USB Drive) and click ( Next ). 5. Set a password for the virtual disk and click ( Next ). 6. Choose a range of the disk size and click ( Next) to wait for the encryption finished.
How to Encrypt an External Hard Drive or USB Flash Drive
OS X users needing to run Windows need to use VMware Fusion or Parallels. If you are ready to encrypt your hard drive. Dual Booting Encrypted Windows AND Encrypted OS X Lately I’ve needed Windows to work on some projects, but my usual method of running a Windows VM inside OS X wasn’t cutting it performance-wise.
The external hard drive format is HFS+ and i have macdrive as well, but it won't mount ever since i encrypted in lion with disk utility and the other partition that isn't encrypted just mount fine.
Step 4: Choose the method to unlock the drive. Here the iSunshare BitLocker Genius offers you two methods to unlock the drive: the password and the recovery key file. Normally, the password option will be the first consideration. You just need to type the passwor for BitLocker hard drive and the drive is unlocked in minutes.
Choose System and Security. BitLocker Drive Encryption. Or just right click on the device and select Turn on BitLocker. Setup your password to encrypt the hard drive. Windows 10. Go to “Setting” app. Select “System” option. Go to “ About” pane. Select ‘ ’Bitlocker settings’ ’ to enable this feature.
2. Choose the drive you’d like to encrypt and then click Manage tab. 3. Click BitLocker. 4. Click “Turn on BitLocker”. Note: You can also click This PC, right-click the USB drive you want to encrypt, and select “Turn on BitLocker”. 5. Wait a few seconds for BitLocker to setup.
6 Ways To Read Mac-Formatted Drive On Windows: Free & Paid
The BIOS is a pre-Windows environment that allows you to control the hardware of your computer with specific settings. Setting a hard drive password would essentially lock the drive and it would not be able to boot into Windows unless you provide the key. The key would then be required every single time the computer is turned on or rebooted.
3. Open Up Disk Utility. Disk Utility is the software on your Mac that will format your external hard drive for Mac and PC. You can find Disk Utility by clicking on the Application folder. Application Folder in Dock. Then click on the Utilities folder inside the Application folder. Utilities In Application’s Folder.
When you format your external hard drive, it should be formatted for Mac OS Extended. If you are transferring data from an OS 10 system to an OS 9 computer, or trying to access the data through OS 9 (with a drive formatted through OS 10), you will need to have installed OS 9 driverswhen you erase the drive.
Windows 8.X and Windows 10, at least with BitLocker, break with tradition, and only require that the used space on the drive be encrypted. So with full data loaded hard drive, it takes much longer than empty one, and 4tb might take even longer than encryption time of four 1TB drives. Regards, D. Wu
The best way to look for an incorrectly formatted drive is to go to. Apple (in the top toolbar menu) > About This Mac > Storage. See if the external drive shows up here. For more information, go to the same menu option, then select System Report. Mac not formatted to display external drives on the desktop.
Data Recovery Mac Hard Drive
How To Encrypt an External Hard Drive
The simplest and securest way to encrypt a PDF file is by applying a professional file lock and encrypt tool. EaseUS LockMyFile is a lightweight and reliable file protection software that can hide, lock, protect, and encrypt files on local and external hard drives in Windows 11/10/8/7.
My Book Essential hard drive. Continuing with this compilation of the best external hard drives with encryption, we want to recommend the My Book Essential from WD. A model that has AES 256-bit hardware encryption built into the WD Security software, so you just have to turn it on, set the password and start storing information safely.
Connect the drive you want password protected. Select the drive in Disk Utility, and click on the “Erase” tab. Pull down the “Format” menu and choose “Mac OS Extended (Journaled, Encrypted)”. Click on “Erase”. At the next screen, set a password – do not lose this password or you will lose access to the drives data.
This is a great external hard drive for your Mac if you are concerned about keeping your data safe and secure. Western Digital My Passport Ultra features cloud storage and 256-AES encryption. 6.
The external hard drive is widely used around the world, and many people like use BitLocker Drive Encryption to encrypt their external hard drive on Windows in order to protect personal data from being stolen by others. The only way to access an encrypted external hard drive is to type correct password so as to decrypt the external hard drive.
Access encrypted external drive
3 years limited. Seagate Portable External Hard Drive for Mac (USB 3.0) Check Price. on Amazon. PROS. This HDD is very simple to use. It connects to a computer (both Mac and Windows) within a second via USB 3.0 at the maximal speed of 120 Mb/s. CONS. It is a bit noisy when running.
This high-speed SSD for Windows and Mac is capable of reading/writing at lightning speed. In addition to the improved design and robust features, SanDisk Extreme 500 comes with 128-bit AES encryption software that helps you protect all your files wherever you go. This external SSD hard drive comes with a durable case and compact design.
But base from what I have read on the problem, you might have to wipe the external hard drive clean again and then re do your Vera-crypt encryption. While your redoing the encryption, I would pick the ext format, ether ext or ext4 would work. This format tends to work more with Mac OS do to its nature.
4. Never print a backup key on paper and store it somewhere. If someone, even the police, can get access to that paper, they can decrypt your entire hard drive. Now let’s talk about actually enabling BitLocker. Open the Control Panel in Windows and click on BitLocker Drive Encryption.
Look for what you called the drive when you originally partitioned it. This will delete all data from this partition, which is the only way to unpartition a drive. For Windows 7 and Vista users: Right click the same partition and select 'Delete Partition' from the menu. You should now see the partition as unallocated space.
How to Encrypt a Hard Drive on Windows 10 (2021)
Microsoft introduced BitLocker encryption feature since the release of Windows Vista and it becomes a native tool for encrypting internal partition and external drives (USB, hard drive or SSD). And it is much more accessible on modern Windows PCs and laptops as an integrated part of Windows OS.
UkeySoft File Lock is a data security software that uses AES 256-bit military-grade encryption algorithm technology, it can help you password protect files/folders your USB flash drive, but also enables you hide files and folders on internal hard drive, flash drive, external USB drive, thumb drive, memory card, pen drive, and network drive.
Connect your external hard drive to PC and right-click on 'Start', select 'Search'. Step 2. Type: Command Prompt in the Search box and click Command Prompt to bring it up. Sign in with your administrator account and password if the system asks. Step 3. Type: E: and hit Enter. (Replace E: with the drive letter of your USB, pen drive.) Step 4.
G-Technology G-Drive Mobile 1TB. Best for Photographers. Price: $99.00. Get it now on Shopee. Compatible with both Mac and Window users, the G-Drive is one of the most in-demand hard drives in the market today Despite its price tag, most customers really like investing in this hard drive given its special features.
Using VeraCrypt, you have three different ways to encrypt your files. Using one of the options, you can encrypt an entire drive, which means, all the files within the drive will be encrypted. The second option will encrypt the system partition or drive. The third or the best option is to create a virtual drive and encrypt the same.
How to Encrypt, Decrypt Mac Hard Drive and Recover Files
Recover Files From External Hard Drive Mac Free Without
Seagate Backup Plus Hub 4 TB External HDD - USB 3.0 for Windows and Mac, 3 yr Data Recovery Services, Desktop Hard Drive with 2 USB Ports and 4 Month Adobe CC Photography (STEL4000300) 4.4 out of 5 stars 5,104
WD - My Passport for Mac 4TB External USB 3.0 Portable Hard Drive - Blue. User rating, 4.7 out of 5 stars with 255 reviews. (255) $109.99. Your price for this item is $ 109.99. $129.99. The previous price for this item was $ 129.99. WD - My Passport Ultra 1TB External USB 3.0 Portable Hard Drive - Silver.
WD My Book 12TB Desktop External Hard Drive for Windows/Mac/Laptop, USB 3.0 Black (WDBBGB0120HBK-NESN) ( 226) ( 1) Write a Review. See more ' wd my book '. In stock. Limit 100 per customer. Ships from United States. Capacity: 12TB. 3TB.
It can scan hard drives, SSDs, and removable media to recover deleted encrypted image files and folders on Mac and Windows systems. Regardless of the reason behind the photo loss, its advanced algorithms ensure you get back the encrypted pictures in their original form.
It measures 6.7x5.5x1.9 inches. For a USB 3.0 enclosure using a 3.5' HDD it reads and writes at about 165MB/s. The WD software is quite easy to use and allows for password protection to unlock the drive as well as scanning utilities to detect bad sectors. Overall, it's a solid product and works as advertised.
Recover Files From External Hard Drive Mac Free
How To Encrypt Your Hard Drive? (Ultimate 2021 Guide)
Recover Files From External Hard Drive Mac Free Trial

Ensure important data is safe with this black external desktop Seagate Backup Plus Hub 4TB hard drive. Desktop drive in black features 4TB storage capacity and PC and Mac compatibility. Uses USB 3.0 for ultra-fast data transfer and works with USB 2.0 ports on older machines. View all product Details & Specifications. $99.99.
1 note
·
View note
Text
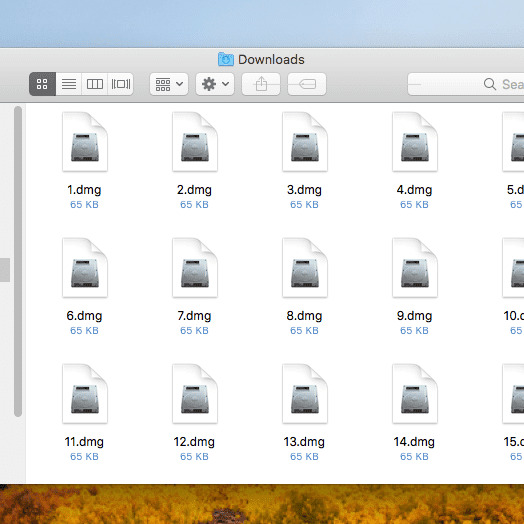
How To Open Dmg Files On Ipad
When you download software from the Internet on your Mac, you may find that the software installation file is a DMG file. So, what is a DMG file? And how to open DMG files on your Mac? Let's find the answer from the following content now.
What's a DMG file?

The DMG file is a disk image file of macOS, which is just like the Windows ISO file in some way. It is treated by macOS as it were a physical disk and can contain the program installation file.
Way 1: Open DMG Files Directly
Double-click the DMG file in the place where stores it, such as Download folder, desktop, etc. Then a box written with 'opening-name.dmg' will be shown. When the DMG file is verified successfully, it will be opened automatically and you can access it now.
Tap Select the file name Organize. Open macOS DMG files on Windows. Extract any file from a DMG archive with just a few clicks! Passcodes Explore + extract data from iOS backups & devices Download iCloud photos & data Manage & backup your iPhone and iPad Work with DMG files on Windows Get data from BlackBerry backups. Open DMG Files with DMG Extractor. DMG extractor provides another choice for extracting DMG files. The free version works well, but it does have some limitations: You cannot extract files bigger than 4 GB; You cannot extract encrypted files; You can only extract 5 files at a time, which can be a pain if you need to extract an entire DMG file. Open Dmg File On Ipad This is the best method to download the MacOS High Sierra dmg file and I have shown you the two handy methods that you can easily download dmg file. So, I hope you understand everything and if our article was helpful for you then please give your feedback in the comment box.
Way 2: Open DMG Files with Disk Image Mounter
Step 1:Right-click the DMG file and then choose Disk Image Mounter option in the menu of Open With button.
Note: After clicking Mounter button, a small window will be popped out to tell you that the DMG file is opening.
App To Open Dmg Files On Ipad
Step 2: After the DMG file is mounted, its content will be displayed directly for you to use.
Way 3: Use a Tool to Open DMG Files
Step 1: Install iSunshare BitLocker Genius on your Mac.
Step 2: Launch BitLocker Genius. Then click Attach option in the interface.
Step 3: Select the DMG file and then tap Open button in the lower-right corner of the window.
Step 4: Now, you have opened the DMG file and can install your wanted software on Mac.
Tips: iSunshare BitLocker Genius also has BitLocker decryption feature, which can unlock a BitLocker USB drive with 3 simple steps: Obtain BitLocker Genius >Mount BitLocker drive by entering password or attaching recovery key >Open BitLocker drive successfully.
Related Articles:
It’s been a week since Apple introduced iOS 15 and iPadOS 15 at WWDC 2021, but we’re still discovering some new features that weren’t mentioned on stage or on Apple’s website. In addition to having widgets on the home screen and new multitasking shortcuts, iPadOS 15 enhances the Files app with a progress bar, NTFS support, and more.
Now when you’re copying a file in Apple’s Files app, there’s finally a progress bar to indicate the remaining time and how much data has already been copied. A progress indicator icon appears right next to the create new folder button, and users can cancel ongoing tasks from there.
This alone would be a great improvement for iPad users as previously there was no way to see the progress of such tasks in the Files app, but there’s even more.
If you plug an NTFS-formatted USB stick into the iPad, it can now be read by the Files app. It’s worth noting that this is only partial support, just like on the Mac, so you’ll only get the read-only mode without being able to add files to the USB storage. Still, much better than not even being able to see the files on an NTFS flash drive as in iPadOS 14.
For those who have a mouse or trackpad paired to the iPad, iPadOS 15 enables the selection of multiple files at once with the cursor, so you no longer have to select one file at a time in order to copy, move, or share them. Unfortunately, at least in beta 1, the Files app still lacks the ability to check folder sizes or open DMG files, which are features requested by many iPad users.
iPadOS 15 beta is currently available for developers, while a public beta release will be available in July. The update is expected to be officially released to the public this fall.
How Do I Open Dmg Files On Ipad Pro
H/T Steven Fjordstrom
Read also:

FTC: We use income earning auto affiliate links.More.
1 note
·
View note
Text
How to Encrypt a USB Drive on Windows 10?
USB flash drives are a great way to carry data, but they also require protection. Encrypting a portable USB flash drive is an excellent approach to keep critical data out of the wrong hands.
Encrypting your USB device is rather simple if you’re using Windows 10. Here’s a step-by-step instruction to assist you in the process of securing your USB drive.
Encrypting a USB Drive on Windows 10
If you’re running Windows 10 Pro, Enterprise, or Education, you may encrypt your flash drive with BitLocker To Go, Microsoft’s native disc encryption software. You can utilize a third-party disk encryption application if your device is running Windows 10 Home.
1. Encrypting a USB Drive on Windows 10 Using BitLocker To Go
BitLocker is a disk encryption software from Microsoft that comes pre-installed on several Windows editions, including Windows 10. To protect your data, it employs AES encryption technology with customizable key lengths of 128 or 256 bits. BitLocker To Go is an edition of BitLocker drive encryption for USB flash drives, SD cards, and external drives (HDD and SSD) that are formatted in the NTFS, FAT16, FAT32, or exFAT file systems.
To encrypt your USB device with BitLocker To Go, follow the steps below:
Connect the USB device that you want to encrypt to the computer.
Click Start and type Control Panel into the search box.
Select BitLocker Drive Encryption from the System and Security menu in the Control Panel.
Select your detachable drive under Removable data drives -BitLocker To Go on the BitLocker Drive Encryption window.
Next to the selected drive, click Turn on BitLocker.
Check the box next to To unlock the drive and create an encryption password, use a password and click next. [Make sure your password is strong]
Choose any one of the following options for saving the recovery key: Save on your Microsoft user account, save to a file, or print the recovery key on the next screen and click next.
Choose how much of your drive you wish to encrypt: you can encrypt just the used disc space or the full drive.
Choose between New encryption mode and Compatible encryption mode. Choose Compatible mode if you plan to use the drive with older versions of Windows. Otherwise, select New encryption mode and go to the next step.
Finally, choose to Start encrypting to begin the process of encrypting your drive.
The encryption procedure can take a long time, depending on how much data you have on your device and the encryption mode you choose.
Remove the drive from your computer once it has been encrypted.
2. Encrypting a USB Drive on Windows 10 with the help of VeraCrypt
If your computer runs Windows 10 Home, you’ll have to use third-party disc encryption software to encrypt your USB drive. There are several options available that provide strong, on-the-fly encryption in this area (OTFE). VeraCrypt, on the other hand, is the one we’ll be using in this guide.
Veracrypt is a freeware drive encryption program that runs on all major operating systems, including Windows. It’s simply a fork of TrueCrypt, an encryption program that stopped being developed in 2014. The software primarily employs the AES encryption technique, as well as a few cascaded algorithms such as AES-Twofish, AES-Twofish-Serpent, and others.
Below are the steps to encrypt your USB drive using VeraCrypt:Visit the VeraCrypt website to get the program for your Windows 10 computer.To install VeraCrypt, double-click on the.exe file to launch the installer and follow the on-screen instructions.Connect the USB disc you want to encrypt to the computer.Now, open VeraCrypt and select the Create Volume button.Select the radio button that says Encrypt a non-system partition/drive on the VeraCrypt Volume Creation Wizard and then click Next.Select your USB device on the next screen and click OK.Select a creation mode on the Volume Creation Mode screen. Choose to create an encrypted volume and format it if your drive is empty. Select Encrypt partition in place if none of the other options are available, and then hit next.Create a strong password for your drive on the next screen, then click Next.Move your cursor around randomly in the Collecting Random Data screen to make the encryption keys stronger.
Again, depending on how much data is saved on your USB device, the encryption process may take some time to finish. Remove the drive from your computer once it’s finished.
Protecting USB Drives With Encryption
Encrypting your USB drive makes it unreadable and protects it from illegal access. When you insert your encrypted drive into a PC, you’ll need its decryption password, which you set when it was encrypted, to decrypt it and gain access to its contents.
Since this password is so crucial, create a backup of the recovery keys for your encrypted USB device. You will be unable to decrypt the drive and retrieve its data if you do not supply the right password at the moment of decryption.
I am a tech writer based in the USA. I like to write about games, gadgets, and everything that interests me. I take digital security very seriously and encourage readers for the same by reviewing different antiviruses and elaborating on their installation process, such as
Norton.com/setup
.Source: How to Encrypt a USB Drive on Windows 10?
1 note
·
View note