#budget CPU coolers
Text
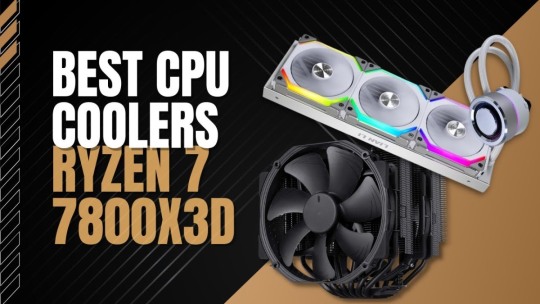
Ultimate Cooling Showdown: 5 Top CPU Coolers for Ryzen 7 7800X3D
This blog is an Amazon affiliate, which means that if you click on a paid link from this website that takes you to Amazon and you purchase a product, I will receive a small commission. You can find links to Amazon in the highlighted words.
AMD’s latest Ryzen 7000 series with 3D-V Cache promises a significant leap in performance, but keeping that power tamed requires a top-notch CPU cooler. This…
View On WordPress
#3D V-Cache#AIO liquid coolers#air coolers#AMD Ryzen 7000 series#budget CPU coolers#computer hardware#cooling solutions#CPU coolers#gaming PC#High-performance cooling#overclocking#PC components#pc cooling#performance cooling#RGB lighting#Ryzen 7 7800X3D#silent coolers#tech reviews
1 note
·
View note
Text
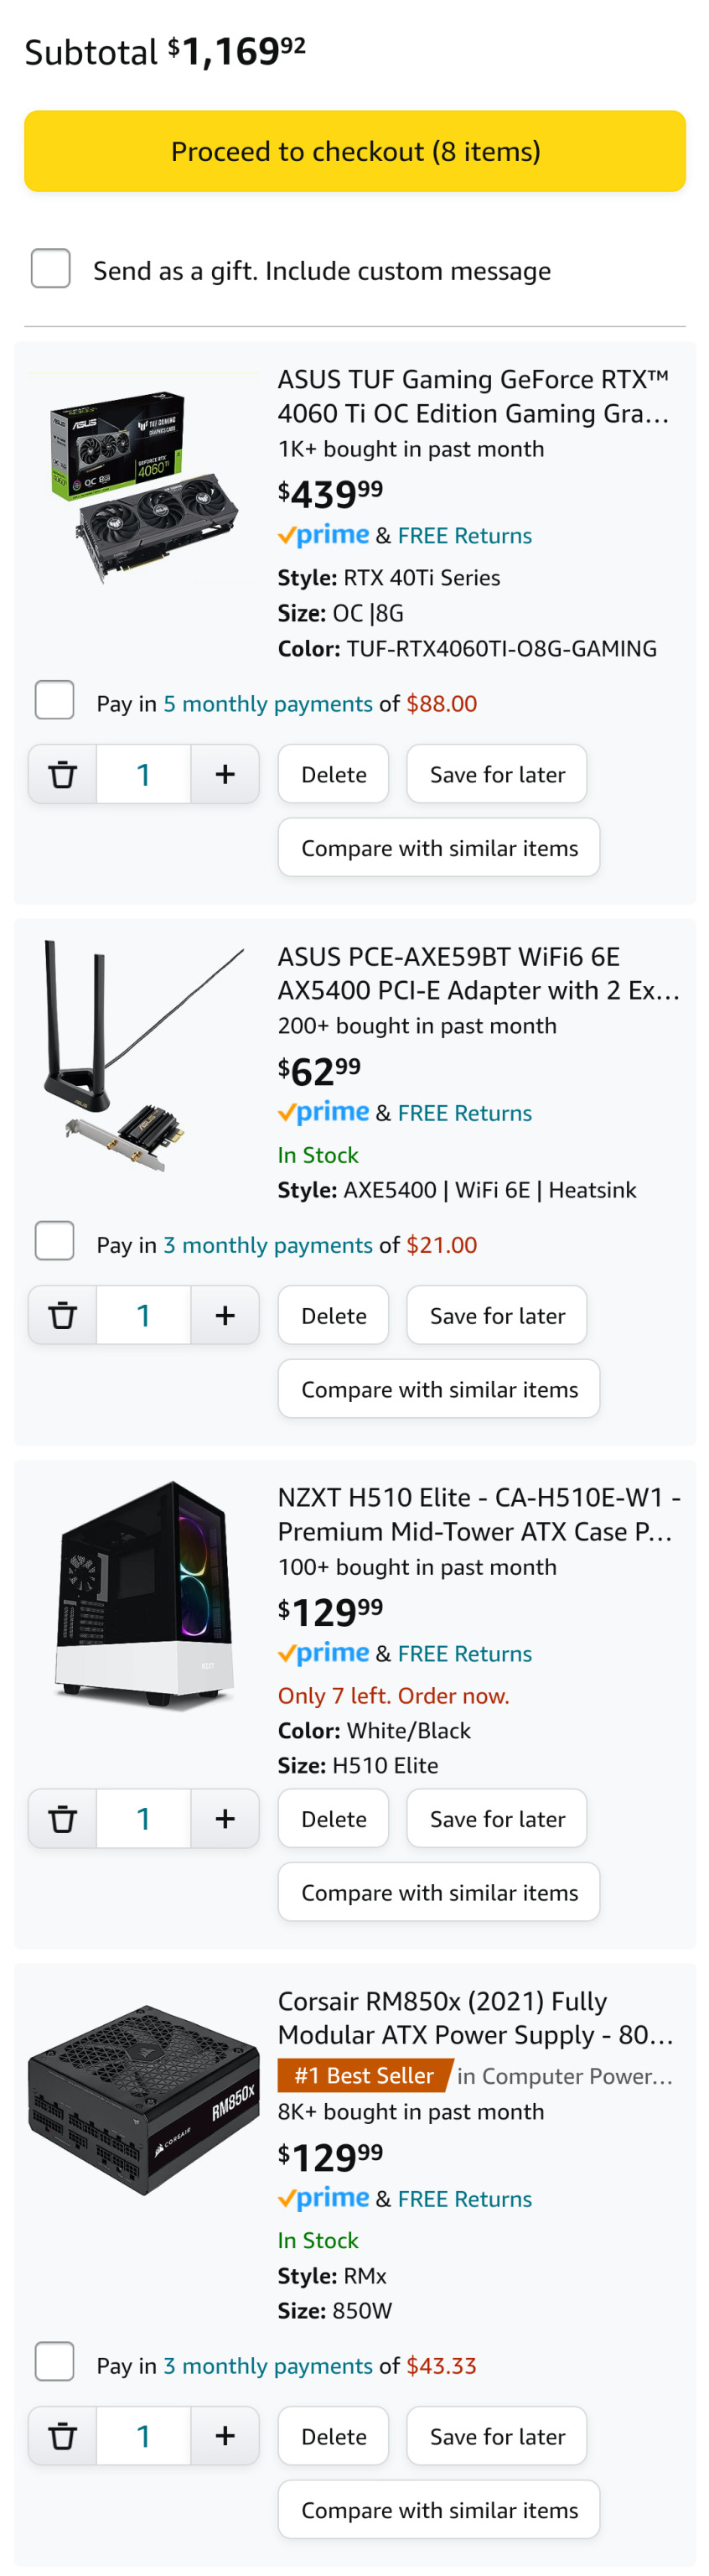
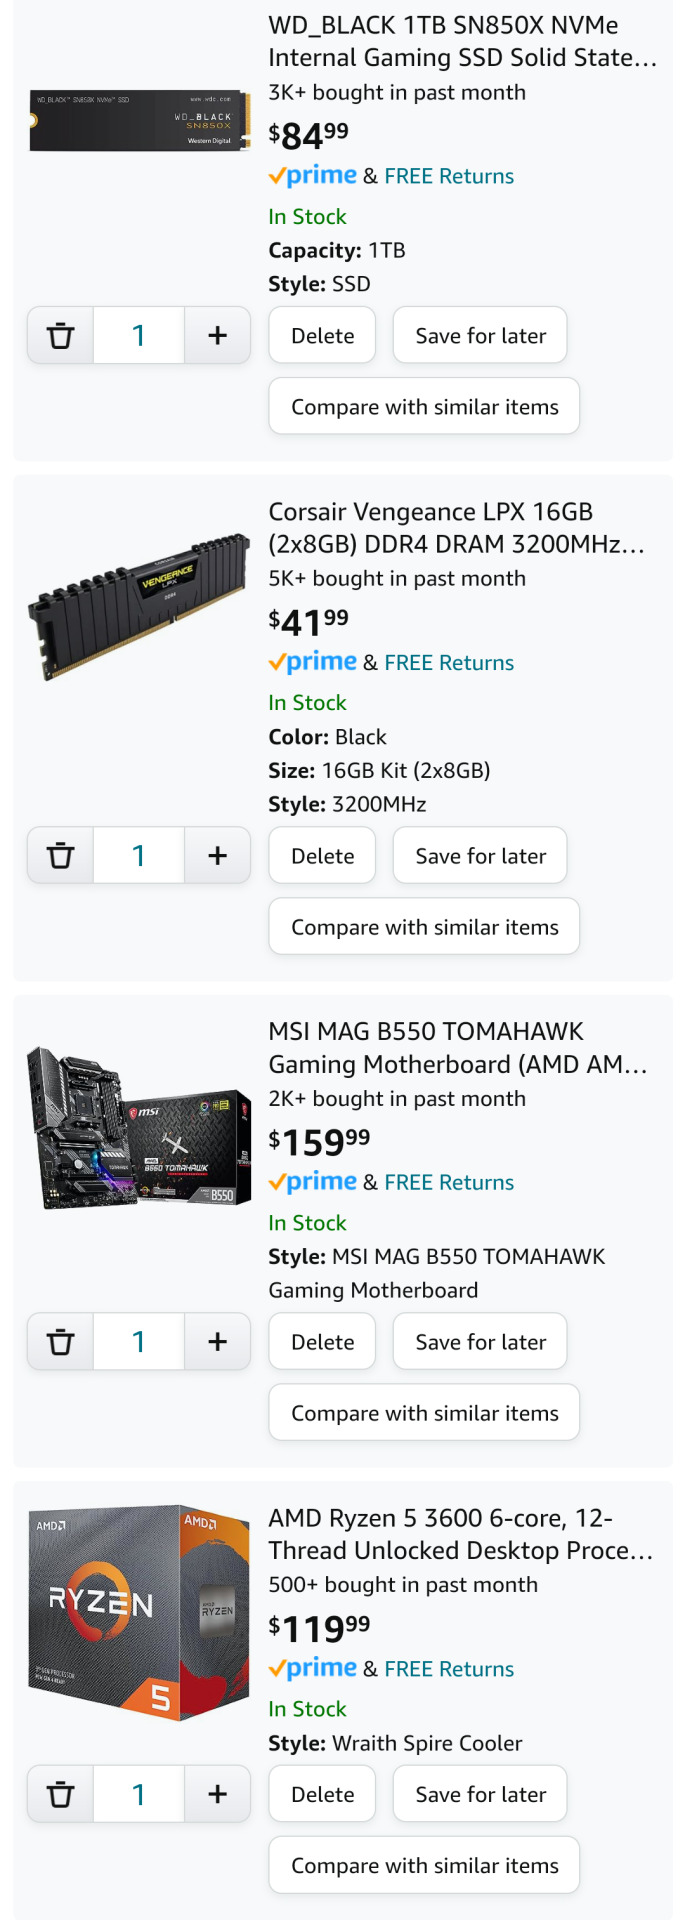
Building on a Budget: Unveiling the Top Best Affordable PC Parts for Your Next Build, Coming in under $1200!
Hey Tumblr fam! 💻✨
Are you ready to embark on the journey of building your dream PC without breaking the bank? We've got your back! 🚀 In today's post, we're unveiling the top best affordable PC parts that are turning heads in the tech world on a budget. Whether you're a gaming enthusiast, content creator, or just looking to upgrade your rig, these components offer incredible performance without burning a hole in your pocket. Let's dive in!
Processor (CPU): AMD Ryzen 5 3600
An absolute powerhouse with 6 cores and 12 threads.
Unmatched performance for its price range.
Perfect for gaming and multitasking.
Graphics Card (GPU): ASUS TUF GAMING NVIDIA GeForce RTX 4060TI
Budget-friendly with impressive gaming performance.
8GB GDDR6 VRAM for smooth amazing ray tracing graphics.
Ideal for 1440p gaming without compromise.
Motherboard: MSI MAG B550 TOMAHAWK GAMING
Supports AMD Ryzen processors out of the box.
High-quality components for stability.
Excellent overclocking capabilities.
Memory (RAM): Corsair Vengeance LPX 16GB (2 x 8GB) DDR4-3200
Fast and reliable DDR4 memory.
Ideal for gaming and multitasking.
Low-profile design for compatibility with most coolers.
Storage: WD_BLACK 1TB SN850X NVME
Blazing-fast read and write speeds.
Compact M.2 form factor for a clean build.
Affordable NVMe option for quick system responsiveness.
Power Supply (PSU): CORSAIR RM850X FULLY MODULAR
Reliable power delivery with 80+ Gold efficiency.
Fully Modular design for clean cable management.
Great value for its wattage.
Case: NZXT H510
Sleek and minimalist design.
Excellent cable management options.
Comes with two Aer F120mm fans for optimal cooling.
Wireless Network Adapter: ASUS PCE-AXE59BT WIFI6 6E AX5400
Dual-band support for faster wireless speeds.
Easy installation with PCIe interface.
Ideal for gaming and streaming without lag.
Ready to take the plunge into the world of affordable PC building? These components have got you covered! Share your thoughts, ask questions, and let us know what other budget-friendly gems you've discovered for your setups. Happy building! 🛠️🎮✨ #PCBuild #BudgetGaming #TechTalks
Full Amazon Parts Links Below:
Graphics: https://amzn.to/46MqOcD
Wi-fi Card: https://amzn.to/41aY0sV
Case: https://amzn.to/41bkJVD
Power Supply: https://amzn.to/3GsMBv9
Hard Drive: https://amzn.to/3t7eqWL
RAM: https://amzn.to/3GtgnzF
Mother Board: https://amzn.to/3sWMYem
Processor w/ Cooler: https://amzn.to/3NcZPzQ
4 notes
·
View notes
Text
WHAT YOU NEED TO BUILD PC?
Title: Building a High-Performance PC: A Comprehensive Guide
Are you a tech enthusiast looking to embark on the journey of building your own high-performance PC? Whether you're a gamer, content creator, or simply seeking a custom computing experience, building your PC can be both rewarding and empowering. In this guide, we'll take you through the step-by-step process of assembling a powerful PC from scratch. Let's dive in!
1. Planning Your Build:
Before you dive into the build process, take some time to plan out your PC build. Define your use case – gaming, video editing, programming, etc. Set a budget, consider compatibility between components, and make a list of parts you'll need.
2. Selecting Components:
a. CPU (Central Processing Unit): Choose a CPU that matches your needs. Consider factors like core count, clock speed, and compatibility with your chosen motherboard.
b. Motherboard: Your motherboard choice affects compatibility and expansion options. Ensure it supports your CPU, has enough RAM slots, and the necessary connectors.
c. GPU (Graphics Processing Unit): For gaming or graphics-intensive tasks, invest in a powerful GPU. Research benchmarks and choose a card that meets your performance expectations.
d. RAM (Random Access Memory): Opt for sufficient RAM for multitasking and running applications smoothly. 16GB is a good starting point for most users.
e. Storage: Decide between SSDs (faster) and HDDs (more storage). Consider an SSD for your OS and frequently used software.
f. Power Supply: Choose a reliable PSU that provides enough power for your components. Ensure it's from a reputable brand and offers some headroom for future upgrades.
g. Cooling: Depending on your CPU choice, you may need an aftermarket cooler for efficient heat dissipation.
h. Case: Select a case that accommodates your components, offers good airflow, and has space for cable management.
3. Building Process:
a. Prepare Your Workspace: Clear a clean, well-lit area to assemble your PC. Have tools like screwdrivers ready.
b. Install CPU and Cooler: Follow your CPU manufacturer's instructions to install the CPU onto the motherboard. Apply thermal paste and attach the cooler.
c. Install RAM: Insert your RAM sticks into the designated slots on the motherboard.
d. Mount Motherboard: Secure the motherboard in the case, ensuring standoffs are correctly aligned.
e. Install Storage and GPU: Install your storage drives and GPU into their respective slots.
f. Connect Cables: Connect power cables, SATA cables, and data cables as needed. Route cables neatly to ensure good airflow.
g. Connect Case Fans: If your case includes case fans, connect them to appropriate headers on the motherboard.
h. Power Supply Connections: Connect the PSU cables to the motherboard, CPU, GPU, and storage drives.
4. First Boot and Testing:
a. Double-Check Connections: Before powering on, double-check all connections to ensure everything is properly connected.
b. Power On: Press the power button and check if all components light up and fans spin. If not, troubleshoot connections.
c. BIOS Setup: Enter the BIOS to configure boot order, RAM settings, and other necessary adjustments.
5. Software Installation:
a. Operating System: Install your chosen operating system using a USB drive or optical disc.
b. Drivers: Install motherboard, GPU, and other hardware drivers to ensure proper functionality.
c. Software and Updates: Install essential software and update your OS to the latest version.
6. Final Touches:
a. Cable Management: Neatly organize cables for better airflow and aesthetics.
b. System Monitoring: Install monitoring software to keep an eye on temperatures, performance, and other metrics.
c. Benchmarking: Run benchmark tests to ensure your PC is performing as expected.
Congratulations! You've successfully built your own high-performance PC. Remember that building a PC is a continuous learning experience. Stay updated on hardware trends, software updates, and potential upgrades to keep your system running smoothly and efficiently. Enjoy your custom-built powerhouse for years to come!
2 notes
·
View notes
Text
this is. so random. but.
it's been really fun to see all of the high-performance pc fans coalesce around the same general fan blade shape. and by fun I mean sort of silly, because... I mean, you would think that for the however many years before this one that people had been making PC fans they would have actually bothered figuring out the correct shape to make the blades, but whatever
but yeah. after having swapped every fan in every product he buys for a cheaper, quieter, and higher-performing Arctic P14/P12, my dad has enough of them to build a small house.

back in 2018, noctua spent what I assume is an exorbitant amount of R&D money creating the industry's highest-end and most expensive 120mm fan, the NF-A12x25. thermaltake was roundly criticized for immediately copying them.


in 2022, corsair finally got with the program and redesigned its fans to create the AF140/AF120 elite. it has recently come to the attention of some big reviewers that thermalright's peerless assassin cooler is probably the best deal in cpu coolers, driven by its very competent TL-C12 fans.


this post probably looks completely absurd. yes, you are saying, those definitely are fans with smooth, scooped, very forward-swept blades. like a fan. what is your point.
I need you to understand something. for years, the standard budget cooler to recommend was the cooler master hyper 212 evo. we had people buy, over many years, what I assume is many, many millions of these. I had one. it was fine, albeit somewhat whiny at higher rpms. but... okay it is hard to illustrate this, but the outer centimeter or so of these blades sweeps out in the wrong direction! that is not how air works! whoever designed this was presumably just like "this looks fancy let's do it." I mean, there is nothing fundamentally wrong with that, but like... it doesn't cost you anything more to manufacture it the right way, right? if you shaped the fan correctly you could reduce the size of the fin stack slightly for the same noise level and save what would have turned out to be like multiple tons of aluminum! idk.


4 notes
·
View notes
Text
How to Customize Your Gaming PC in Dubai for Ultimate Performance
In the rapidly evolving world of gaming, a high-performance PC is crucial for a truly immersive experience. For gamers in Dubai, customizing a gaming PC tailored to specific needs can make all the difference in achieving smooth gameplay, stunning visuals, and fast response times. Whether you’re an avid gamer or just starting, this guide will walk you through how to customize your gaming PC in Dubai for ultimate performance.
1. Choosing the Right Processor (CPU)
The CPU acts as the brain of your gaming PC, playing a vital role in its overall performance. When customizing your gaming rig in Dubai, consider the following:
Intel vs. AMD: Intel CPUs are known for strong single-core performance, making them ideal for gaming, while AMD’s Ryzen processors offer excellent multi-core performance and value, especially for gaming and streaming.
Performance Levels: Opt for a high-performance CPU like Intel’s Core i7/i9 or AMD’s Ryzen 7/9 series for top-tier gaming. For mid-range builds, Intel’s Core i5 or AMD’s Ryzen 5 are solid choices.
2. Selecting a Powerful Graphics Card (GPU)
The GPU is the heart of any gaming PC, responsible for rendering visuals and ensuring smooth gameplay. In Dubai’s competitive gaming market, choosing the right GPU is critical:
NVIDIA vs. AMD: NVIDIA’s GeForce RTX series and AMD’s Radeon RX series are the top contenders. For the best performance, consider GPUs like the NVIDIA RTX 3080/3090 or AMD Radeon RX 6800/6900 XT.
Resolution and Refresh Rate: Your choice should match your gaming monitor’s resolution and refresh rate. For 1080p gaming at high refresh rates (144Hz+), a mid-range GPU like the RTX 3060 or RX 6700 XT is sufficient. For 1440p or 4K gaming, opt for higher-end models.
3. Investing in High-Speed RAM
RAM (Random Access Memory) affects your system’s ability to handle multiple tasks and run games smoothly. When customizing your gaming PC:
Capacity: 16GB of RAM is the sweet spot for most gaming setups, providing ample memory for modern games and multitasking. For future-proofing or heavy multitasking, consider 32GB.
Speed: Higher RAM speeds (measured in MHz) can provide a slight performance boost in certain games. Aim for at least 3200MHz or higher, especially if you’re using an AMD Ryzen CPU.
4. Choosing the Right Storage Solutions
Storage impacts both load times and the overall responsiveness of your gaming PC. In Dubai, where SSDs are readily available, consider the following options:
SSD vs. HDD: A fast NVMe SSD should be your primary storage for the operating system and games, offering significantly faster load times compared to traditional HDDs. A 500GB to 1TB SSD is ideal, with an additional HDD for bulk storage if needed.
Storage Size: With modern games requiring more space, it’s wise to opt for at least 1TB of SSD storage to ensure you don’t run out of space too quickly.
5. Optimizing Cooling Solutions
Keeping your gaming PC cool is essential for maintaining performance and prolonging component lifespan. Dubai’s warm climate makes effective cooling even more critical:
Air Cooling vs. Liquid Cooling: Air coolers are sufficient for most builds, but if you plan to overclock your CPU or want a quieter system, consider a liquid cooling solution. Dubai’s gaming shops offer a range of both, so choose based on your needs and budget.
Case Airflow: Ensure your PC case has good airflow to keep temperatures in check. Consider cases with multiple fan mounts and ensure that intake and exhaust fans are properly positioned.
6. Choosing the Right Motherboard
The motherboard serves as the backbone of your gaming PC, linking all components together. When customizing:
Compatibility: Ensure the motherboard supports your chosen CPU socket and has enough PCIe slots for your GPU and any additional cards.
Features: Look for motherboards with features like Wi-Fi, Bluetooth, multiple M.2 slots for SSDs, and USB Type-C ports. Gaming-centric boards also offer better power delivery, which is crucial for overclocking.
7. Selecting a Reliable Power Supply (PSU)
A reliable power supply ensures your components get the necessary power without risking damage:
Wattage: Calculate your system’s power requirements and choose a PSU that offers at least 20–30% more wattage than needed. For most gaming PCs, a 650W to 750W PSU is sufficient.
Efficiency Rating: Opt for a PSU with an 80 Plus certification, which ensures better efficiency and reliability. Gold-rated PSUs are popular for gaming builds.
Conclusion
Customizing your gaming PC in Dubai for ultimate performance requires careful consideration of each component, from the CPU and GPU to cooling solutions and aesthetics. By focusing on your specific gaming needs and leveraging the wide range of components available in Dubai’s tech market, you can build a powerful and visually stunning gaming PC that delivers the performance you crave.
Whether you’re aiming for high frame rates in the latest AAA titles or a flawless VR experience, the right customization choices will ensure your gaming PC meets and exceeds your expectations.
0 notes
Text
Breathe Easy, Game Hard: Gigabyte MX660 RGB Mesh Gaming Case (Black)
The Gigabyte MX660 RGB Mid Tower Mesh Gaming Case isn't your average gaming enclosure. It prioritizes airflow, aesthetics, and functionality to create the perfect battleground for your PC components. Here's a breakdown of its potential strengths:

Superior Airflow for Optimal Performance:
Mesh Front Panel: The massive mesh front panel allows for exceptional air intake, ensuring your components stay cool under pressure during intense gaming sessions.
Multiple Fan Mounting Points: The MX660 provides mounting points for additional fans, allowing you to customize your cooling setup for even more efficient airflow.
Striking RGB Lighting:
Pre-Installed ARGB Fans: Three pre-installed ARGB (Addressable RGB) fans illuminate the interior of your case with stunning and customizable lighting effects.
Integrated Lighting Button: Easily control the RGB lighting with the dedicated button on the case, allowing you to create the perfect atmosphere for your gaming setup.
Tempered Glass Side Panel:
Showcase Your Build: The crystal-clear tempered glass side panel offers a stunning view of your meticulously chosen internal components.
Designed for Builders and Gamers:
Mid-Tower Design: The ATX mid-tower form factor offers ample space for most motherboards, graphics cards, and CPU coolers, while maintaining a manageable size.
Hassle-Free Cable Management: Strategically placed cutouts and included cable ties allow for clean and organized cable management, improving airflow and aesthetics.
Dust Filters: Easy-to-clean dust filters help prevent dust buildup and maintain optimal system performance.
Additional Considerations:
Water Cooling Support: While airflow is prioritized, the MX660 may offer limited radiator support for those considering closed-loop liquid cooling solutions. Double-check radiator compatibility before purchase.
Storage Options: The MX660 likely offers mounting points for multiple 2.5” SSDs and 3.5” HDDs for ample storage space for your games and applications. Confirm specific storage options on the chosen model.
Overall, the Gigabyte MX660 RGB Mid Tower Mesh Gaming Case is an excellent choice for budget-conscious gamers and builders who prioritize airflow and aesthetics. The combination of a mesh front panel, pre-installed ARGB fans, tempered glass panel, and user-friendly features makes it a compelling option for creating a stylish and well-cooled gaming PC.
0 notes
Text
How to build a Desktop PC for Home?

Building a desktop PC for home use can be a fun and rewarding experience. Here's a basic guide to help you get started:
Define Your Needs: Determine what you'll primarily use the PC for. Is it for web browsing, office work, gaming, or content creation? Your needs will dictate the components you choose.
Select Components: Here are the key components you'll need:
Processor (CPU): Choose a CPU from Intel or AMD based on your budget and performance requirements.
Motherboard: Ensure compatibility with your chosen CPU and other components. Consider factors like expansion slots, RAM support, and connectivity options.
Memory (RAM): Aim for at least 8GB for general use. For more demanding tasks like gaming or video editing, consider 16GB or more.
Storage: Decide between a traditional Hard Disk Drive (HDD) or a Solid State Drive (SSD). SSDs offer faster performance but are typically more expensive per GB.
Graphics Card (GPU): Necessary for gaming or graphics-intensive tasks. For basic home use, integrated graphics on the CPU might suffice.
Power Supply Unit (PSU): Choose a reliable PSU with sufficient wattage to power your components.
Case: Select a case that fits your motherboard and has good airflow for cooling.
Additional Components: Consider peripherals like a monitor, keyboard, mouse, and speakers if you don't already have them.
Assembly:
Start by installing the CPU and CPU cooler onto the motherboard according to the manufacturer's instructions.
Install RAM into the appropriate slots on the motherboard.
Install storage drives (HDDs/SSDs) and connect them to the motherboard.
Install the motherboard into the case and connect all necessary cables (power, data, front panel connectors, etc.).
Install the GPU, if you have one, into the appropriate PCIe slot on the motherboard.
Install the PSU into the case and connect all power cables to the motherboard, GPU, and other components.
Double-check all connections and ensure everything is securely fastened.
Operating System Installation: Once your hardware is assembled, you'll need to install an operating system (e.g., Windows, Linux). Follow the installation instructions provided with your chosen OS.
Drivers and Updates: After installing the OS, download and install the latest drivers for your hardware components from the manufacturers' websites. Also, ensure your OS is up to date with the latest patches and updates.
Testing: Boot up your PC and ensure everything is functioning correctly. Run some stress tests to check for stability and monitor temperatures to ensure your cooling solution is adequate.
Personalization: Customize your desktop with your preferred settings, software, and applications.
Remember to take your time during the build process and consult guides or tutorials if you encounter any difficulties. Building a PC can be a learning experience, so don't hesitate to ask for help if needed!
0 notes
Text
AMD beats Intel Core i5-14400 in budget gaming processor
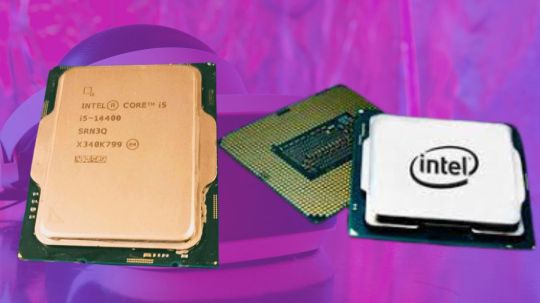
Intel Core i5-14400
At $225, the 14th-generation Intel Core i5-14400 offers the same productivity software and gaming performance as its predecessor. Despite lacking graphics, the i5-14400F variant costs $15 less than the $225 model and performs similarly. Additionally, cheaper DDR5 memory and motherboards have helped Ryzen surge back into the race for budget-conscious setups.
For those on a budget, AMD also offers the intriguing new Ryzen 7 5700X3D. These chips aren’t as effective in productivity applications because they are built on the Zen 3 architecture from the prior generation. Nevertheless, they provide a compelling alternative for individuals who are solely concerned in gaming, fitting into more reasonably priced AM4 motherboards and offering greater gaming performance than the Core i5-14400 or the Ryzen 5 7600X.
Using the same architectural foundations as its predecessor, Intel Core i5-14400 has six P-cores and four E-cores. The only improvements on the chip over the previous generation Core i5-13400, as you can see above, are a 100 MHz boost clock increase to 4.7 GHz and a 200 MHz boost to the E-core boost.
These small enhancements don’t seem to indicate that real-world performance will rise significantly over the previous generation of chips. Let’s see how our gaming and application testing with DDR4 and DDR5 RAM turns out in terms of performance.
Prices and Specifications for the Core i5-14400/F
The Raptor Lake Refresh design is fibbed on the “Intel 7” manufacturing node, just like the higher-end K-Series devices that Intel unveiled last year. This also applies to the lower-power models. Updated 13th-generation Raptor Lake CPUs from 2022 are used in Intel’s latest chips. Intel Core i9-14900K, i7-14700K, and i5-14600K evaluations detail the architecture.
Intel’s F-series Core i5-14400F, which lacks the 24-EU integrated UHD Graphics 730 engine and requires a detached GPU, costs $15 less and performs similarly. Although many of the 13th generation boxed CPUs from Intel were recently decommissioned, the present price of $185 for the previous generation Core i5-13400F may not last long.
The latest Core i5 variants fit onto Intel’s 600 and 700-series motherboards, much like their K-Series predecessors did. However, the former is getting harder to get at fair pricing. Because the Intel Core i5-14400 is a 65W / 125W model, you should use motherboards from the B- and H-series, which are more reasonably priced.
With its Core i5 CPUs, Intel permits memory overclocking; nevertheless, multiplier overclocking is not possible (power restrictions can be raised, though). As with all overclocking, your mileage may vary, but Intel has also finally unlocked the System Agent (SA) voltage, meaning that if you’re willing to put in a little more effort to tune, you could achieve greater peak DDR4 speeds in Gear 1.
Although we usually advise purchasing a better cooler, the Laminar RM1 cooler that comes packed is at least functional. You will have to put up with a little more noise because the default cooler isn’t silent. When the power constraints are removed, the included cooler is sufficient for multi-threaded workloads and can manage the chip at the lower 65W/148W power limits.
Higher ambient temperatures and longer workloads may have an impact on performance. Therefore, choosing a less expensive air or water cooler may help you operate more efficiently throughout extended periods of time.
With the exception of compatibility for up to 192GB of RAM, the Core i5 models have a lower DDR5 transfer rate, measuring DDR5-4800 as opposed to DDR5-5200 found in the more powerful variants. This means that the Intel Core i5-14400 has most of the capabilities of the more powerful models. Support for DDR4 is still available at DDR4-3200, giving manufacturers a less expensive choice that, when using stock settings, offers performance that is almost identical to that of DDR5.
Any cost reductions are much less noticeable, though, as DDR5 pricing has significantly decreased since we examined the Core i5-13400 from the previous generation. Furthermore, the Ryzen 7 5700X3D, which also supports DDR4 and joins the reasonably priced AM4 ecosystem, presents a formidable rivalry for the Core i5-14400.
For most of the previous generation Core i5 processors, Intel used two different types of dies, both of which provided the same performance. The 14th-generation Intel Core i5-14400 and Core i3 models carry on with this approach. A 13th-generation Raptor Lake die or a C0 stepping 12th-generation Alder Lake die were the two types of dies available for the 13th generation. We bought our test sample at retail, and it’s a C0 die, which means it has the same design as the Alder Lake chips from the previous two generations but contains four more activated E-cores.
In addition, the Intel Core i5-14400 supports additional connectivity options like as USB 3.2 with up to 20 Gbps transfer rates and the same PCIe 5.0/4.0 lane allocations as the previous generation CPUs. Let us move on to the benchmarks.
Read more on Govindhtech.com
0 notes
Text
Just built my first PC!

specs for my fellow nerds
16 gb DDR4 $23
512 gb Samsung SSD $29.99
ASROCK B450 pro4 $67.57
Ryzen 5 2600 $60
SE-214-XT TITAN CPU cooler $15.99
650w PSU $64
Navida Quadro m4000 (will upgrade but it's what my dad had sitting in his garage and I'm a 12 year old on a budget) Free
Monotech six fan case $70
1 note
·
View note
Text
DEEPCOOL AK500 CPU COOLER | HOW GOOD IS IT?
The DeepCool AK500 is a high-performance CPU cooler designed to keep your system running cool and quiet. This single-tower cooler boasts a variety of features that make it a compelling option for both budget-minded builders and those seeking a balance of performance and noise levels. Let’s explore it thoroughly:
Design and Construction:
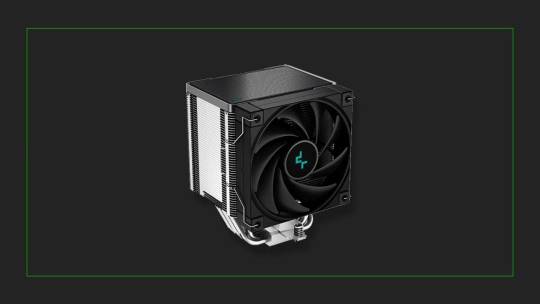
Heatsink:
Unlike bulkier dual-tower coolers, the AK500 employs a single-tower heatsink, making it ideal for mid-tower and smaller cases where space is a concern. Despite its single-tower design, the AK500 boasts a large heatsink measuring 127 x 90 x 158mm, providing ample surface area for efficient heat dissipation.
The AK500 utilizes DeepCool’s signature black matrix fin design. These fins are strategically staggered to create micro-channels, increasing airflow and heat exchange with the surrounding air. The heat pipes directly touch the CPU’s integrated heat spreader (IHS), eliminating thermal resistance and ensuring rapid heat transfer from the CPU core.
Heat Pipes:
Five 6mm nickel-plated copper heat pipes efficiently transfer heat away from the CPU core and distribute it evenly across the large heatsink. Balanced Bidirectional Heat Pipe Technology optimizes the heat pipes’ layout to counteract the effects of gravity, ensuring efficient heat transfer even in vertical PC cases.
Fan:
The fluid dynamic bearing (FDB) fan uses a lubricating fluid to reduce friction, resulting in smoother operation, lower noise levels, and increased lifespan compared to sleeve bearing fans. The fan speed is intelligently controlled by the motherboard based on CPU temperature, ensuring optimal cooling while minimizing noise when the system is under low load.
Additional Details:
The heatpipes are angled slightly to ensure 100% compatibility with most standard and high-profile RAM modules, eliminating clearance issues. The AK500 is built with high-quality materials, including a nickel-plated base and aluminum fins, ensuring long-lasting performance and reliability.
Performance and Cooling:
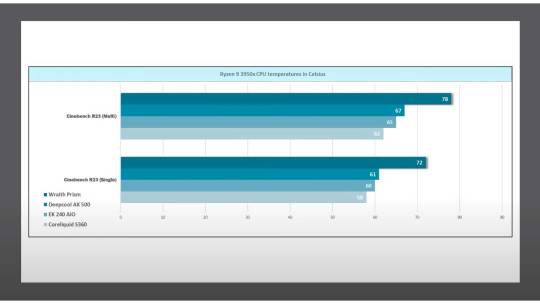
Credit: Dannys Tech Channel
Cooling Capacity:
240W TDP rating signifies the maximum amount of heat the AK500 can effectively dissipate, making it suitable for cooling most modern CPUs, including mid-range and high-performance processors with a TDP of up to 240W. The combination of a large heatsink, five heat pipes, and Direct Touch technology facilitates efficient heat transfer away from the CPU core.
The black matrix fin design and PWM-controlled 120mm FDB fan work together to generate optimal airflow throughout the heatsink, effectively transferring heat to the surrounding environment.
Performance in Practice:
While real-world performance can vary depending on specific system configurations and usage scenarios, independent tests and user reviews consistently show that the AK500 is capable of maintaining safe CPU temperatures even under demanding workloads. Depending on your specific CPU and other system components, the AK500 may offer limited headroom for overclocking. However, it should be sufficient for moderate overclocking on most mid-range CPUs.
Noise Levels:
One of the AK500’s key strengths is its quiet operation. The FDB fan and PWM control work together to minimize noise generation. The fan operates at speeds between 300 and 1,500 RPM, depending on the CPU temperature. At its lowest speed, the AK500 is nearly inaudible, making it suitable for noise-sensitive environments.
While the AK500 prioritizes quiet operation, it’s important to remember that noise levels will increase as the fan ramps up under heavier loads to maintain optimal cooling. Users seeking absolute silence at the expense of some cooling performance might need to consider alternative cooling solutions.
Installation and Compatibility:
The DeepCool AK500 boasts a user-friendly and straightforward installation process. This makes it a great choice for both experienced builders and beginners.
Installation Process:
Prepare your system: Before installation, ensure your system is powered off and unplugged. Locate the motherboard socket and remove any existing coolers or thermal paste.
Mount the backplate: The AK500 utilizes a universal backplate design compatible with various Intel and AMD sockets. Position the backplate on the backside of your motherboard and secure it using the provided screws.
Attach the mounting brackets: Depending on your specific CPU socket, attach the designated mounting brackets to the backplate using the included thumbscrews.
Apply thermal paste: Apply a thin, even layer of thermal paste (not included) onto the center of your CPU’s integrated heat spreader (IHS).
Position the heatsink: Carefully place the heatsink onto the CPU, ensuring the heat pipes make proper contact with the CPU’s IHS.
Secure the heatsink: Secure the heatsink to the mounting brackets using the provided thumbscrews. Tighten them evenly in an alternating pattern to avoid uneven pressure.
Compatibility:
The AK500 is compatible with a wide range of Intel and AMD CPU sockets, including:
Intel: LGA 115x, 1200, 1700, 2066
AMD: AM4, AM5
Installation Process:
Prepare your system: Before installation, ensure your system is powered off and unplugged. Locate the motherboard socket and remove any existing coolers or thermal paste.
Mount the backplate: The AK500 utilizes a universal backplate design compatible with various Intel and AMD sockets. Position the backplate on the backside of your motherboard and secure it using the provided screws.
Attach the mounting brackets: Depending on your specific CPU socket, attach the designated mounting brackets to the backplate using the included thumbscrews.
Apply thermal paste: Apply a thin, even layer of thermal paste (not included) onto the center of your CPU’s integrated heat spreader (IHS).
Position the heatsink: Carefully place the heatsink onto the CPU, ensuring the heat pipes make proper contact with the CPU’s IHS.
Secure the heatsink: Secure the heatsink to the mounting brackets using the provided thumbscrews. Tighten them evenly in an alternating pattern to avoid uneven pressure.
Compatibility:
Read Here
Originally Published @ Gamers' Guide
1 note
·
View note
Text

Want to build a high performance computer by yourself? You should not miss trying transparent cases. Just imagine, the lighting will change with the move of you actions on the computer, ain’t that gaming atmosphere cool? But all transparent cases are not cheap until Segotep releases its Lumi II, an affordable case for all budget-conscious players.

Lumi II is a compact case, measuring 424mm*284mm*368mm, that can be put on the desk without blocking your sight. And the clearance between its bottom and the desk surface is enough for air to be taken into the case. Speaking of its fracture, the case is really strong, it did not deform even I pressed it hard. Apparently it is built with quality materials.

This is a black case to go with all my black hardware. It is also available in white for a wholly white build. From the photo we can see that all lighting inside the case can be easily seen from the two transparent tempered glass panels. Thanks to these glass panels, you can put some of your preferred or interesting stuff inside the case.


Now we will talk about the top and the rear panels. On the top is a dust filter designed for protecting the hardware from dust.There are lots of vents in the rear and bottom panels too. Users can build a stereoscopic air channel to dissipate heat. It is available to installation of up to 9pcs of 12cm case fans.
Though Lumi II is a case supporting M-ATX and ITX motherboards, its inside space is designed and used in a good way.

As we all know, most compact transparent cases suffers a poor compatibility with high-end graphics cards, especially vertically. But, Lumi II does really good in this. It provides 5 PCI-E slots with a maximum GPU length of 410mm. You don’t need to worry the heat dissipation or space for other hardware even you are using a non-Founder Edition 4090 GPU taking up 3.5 PCI-E slots.


A good GPU must go with a good CPU. So it is true with the cooler and CPU. Lumi II is compatible with coolers of different specifications. So it is ok for a cost-effective build or a high-end build with Intel Core i9-13900KS.

Now let’s take a look at the back of the case. As a wide chassis, its internal board can installed with 2pcs of 2.5’’ SSD and a 3.5’’ HDD for huge data storage. Even the most undesirable cable routing has been solved by Lumi II, which provides up to 95mm rear clearance for back cable routing.

Lumi II is also known for its excellent expandability. In top there is a USD3.0, two USB2.0 and a audio jack, which are enough for daily use.

To sum up, as a cost-effective case, Lumi II is a good choice for most budget-conscious users or students. With years of experience in developing computer cases, Segotep has deliver a good case with excellent designs inside and outside Lumi II.
0 notes
Text
Buying Computer Accessories to Your PC

When buying computer accessories for your PC, it's important to consider your specific needs, preferences, and the type of tasks you'll be performing. Here's a guide to help you choose the right accessories:
1. Monitor:
Consider the size and resolution based on your work or gaming preferences.
Look for features like refresh rate, response time, and panel type (e.g., IPS for better color accuracy, TN for faster response times).
2. Keyboard and Mouse:
Choose a keyboard and mouse that are comfortable for long periods of use.
Mechanical keyboards are popular for their tactile feedback, while some prefer the quieter membrane keyboards.
For mice, consider features like sensitivity (DPI), programmable buttons, and ergonomic design.
3. Speakers or Headphones:
Depending on your preference, choose speakers or headphones with good audio quality.
Gaming headphones often come with built-in microphones.
4. Webcam and Microphone:
For video conferencing or streaming, consider a high-quality webcam.
A dedicated microphone can improve audio quality for voice calls or content creation.
5. External Storage:
Consider additional storage space if your PC's storage is running low.
External hard drives or SSDs are portable options for backup and extra storage.
6. USB Hub or Docking Station:
If your PC has limited USB ports, a USB hub or docking station can expand connectivity.
Look for USB-C hubs if your PC supports it.
7. Gaming Accessories:
If you're a gamer, you might want accessories like a gaming headset, controller, or a gaming mouse with extra features.
Gaming keyboards with customizable RGB lighting are also popular.
8. Cooling Solutions:
If you're into gaming or heavy computing tasks, consider additional cooling solutions such as cooling pads or aftermarket CPU coolers.
9. UPS (Uninterruptible Power Supply):
Protect your PC from power outages with a UPS, which provides a battery backup to allow you to save your work and shut down your PC safely.
10. Cables and Cable Management:
Ensure you have the necessary cables for your accessories and consider cable management solutions to keep your setup neat.
11. Monitor Stand or Mount:
If you want to save desk space, consider a monitor stand or wall mount.
Extended Warranty or Protection Plans:
Depending on the value of your accessories, you might want to consider extended warranties or protection plans.
Before making any purchase, read reviews, compare prices, and check compatibility with your existing hardware. Additionally, consider your budget and prioritize the accessories that will make the most significant impact on your computing experience.
It is quite vital to shop for computer accessories as they make your use of the electronic device
comfortable and interesting. Online shipping gives you best offers and various choice on PC accessories. In fact, manufacturers are now on the net to showcase their products.
Shweta Computers is best online shop for computer parts store in Hyderabad. We Providing all kinds of computers, laptops, processors, motherboards, cabinets, monitors, pen-drives, speakers and computer peripherals with best price.
0 notes
Text
Zebronics Zeb-Titan: A Feature-Packed Full-Tower Case for Gamers on a Budget
The Zebronics Zeb-Titan is a full-tower ATX gaming case that caters to budget-conscious gamers seeking a blend of functionality, style, and airflow. Here's a breakdown of its key features:
Spacious Interior and Excellent Cooling:
Full-Tower Design: The Zeb-Titan provides ample space for accommodating high-performance components like ATX motherboards, long graphics cards (up to 400mm), and bulky CPU coolers (up to 175mm).
Mesh Front Panel: The mesh front panel prioritizes airflow, ensuring your system stays cool during extended gaming sessions.
Four Pre-installed ARGB Fans: The case comes with three 120mm ARGB fans in the front and one 120mm ARGB fan in the rear, providing ample airflow and a touch of customizable lighting. Additional fan slots on the top (3x 120mm) allow for further cooling expansion.
Top and Bottom Dust Filters: Removable dust filters on the top and bottom help prevent dust buildup, maintaining optimal airflow and component health.

Sleek Design and User-Friendly Features:
Tempered Glass Side Panels: Dual tempered glass side panels showcase your internal components and RGB lighting for a stylish look.
ARGB Lighting Control: A dedicated LED control switch allows you to customize the lighting effects of the pre-installed ARGB fans, adding a personalized touch to your setup.
Multiple Connectivity Options: The front panel features a USB Type-C port, a USB 3.0 port, and a USB 2.0 port, offering easy access for connecting peripherals. Additionally, HD audio jacks are included for microphone and headphone connections.
Easy Cable Management: Strategically placed cutouts facilitate clean cable management, improving airflow and aesthetics within the case.
Who is the Zeb-Titan For?
The Zebronics Zeb-Titan is a great choice for:
Budget-minded gamers seeking a feature-rich case with excellent airflow and cooling capabilities.
Users who want a spacious case for building a powerful gaming PC with room for future upgrades.
Builders who appreciate a stylish design with tempered glass panels and customizable ARGB lighting.
Things to Consider:
While the case comes with pre-installed ARGB fans, you might need additional fans for an even more optimized cooling setup, depending on your chosen components.
The case's size might not be ideal for compact spaces. Ensure you have sufficient room for this full-tower case on your desk.
Overall, the Zebronics Zeb-Titan offers a compelling package for budget-conscious gamers. It provides a spacious interior, excellent airflow potential, and a stylish design with ARGB lighting, making it a well-rounded option for building a powerful and visually appealing gaming PC.
0 notes
Text
Silence and Performance: Choosing the Right Cooler for Ryzen 5 5600X
Introduction
When it comes to maximizing the operation of your computer, silence and performance are two essential factors, especially when working with powerful processors like the Ryzen 5 5600X. This post will go into the world of coolers and show you how a good cooling solution may improve the overall performance of your Ryzen 5 5600X as well as the peace and quiet of your computer.
Understanding Ryzen 5 5600X
Before we jump into the intricacies of coolers, let's take a moment to understand the Ryzen 5 5600X processor. Known for its impressive performance, this CPU requires effective temperature control to operate optimally.
The Impact of Silence on Performance
Silence is golden, they say, and when it comes to your computing experience, this saying holds true. Noise can significantly impact your concentration during tasks and, over time, lead to stress that affects productivity. Let's explore how the right cooler can mitigate these issues.
Factors to Consider in Cooler Selection
Choosing the right cooler involves considering various factors, such as whether to opt for air or liquid cooling, and ensuring compatibility with Ryzen 5 5600X specifications. Let's break down these crucial aspects.

Importance of Optimal Cooling
Maintaining an optimal temperature is not just about immediate performance gains; it also contributes to the longevity of your CPU. We'll discuss the correlation between temperature and CPU lifespan and how a well-cooled system can enhance gaming and multitasking experiences.
Evaluating Noise Levels
Decibel ratings play a pivotal role in selecting a suitable cooler. We'll guide you through understanding these ratings and how to choose a cooler that provides efficient cooling without sacrificing a peaceful computing environment.
Air Cooling Solutions
Air cooling remains a popular choice for many users. We'll provide an overview of some of the best air coolers in the market, highlighting their pros and cons, and assess their compatibility with Ryzen 5 5600X.
Liquid Cooling Solutions
Liquid cooling offers advantages in maintaining lower temperatures, especially under heavy workloads. We'll explore the benefits of liquid cooling and present examples of liquid coolers that complement the Ryzen 5 5600X.
Budget Considerations
For many users, the budget is a crucial factor. We'll discuss how to find a balance between cost and performance, presenting affordable cooling solutions that don't compromise on quality.
Installation Guide
Ensuring proper installation is key to the effectiveness of any cooling solution. We'll provide step-by-step instructions for installing your chosen cooler, along with common mistakes to avoid during the process.
User Experiences and Reviews
Real-world experiences matter. We'll gather feedback from users who have paired the Ryzen 5 5600X with specific coolers, offering insights into the actual performance and noise levels of these setups.
Troubleshooting Common Cooling Issues
Even with the best cooling solutions, issues may arise. We'll address common cooling problems, providing tips on how to avoid overheating concerns and maintain optimal cooling performance.
Future-Proofing Your Cooling Solution
Technology evolves, and so should your cooling solution. We'll discuss considerations for future upgrades and advancements in cooling technology, ensuring your investment stands the test of time.
Conclusion
In conclusion, choosing the right cooler for your Ryzen 5 5600X is not just about reducing noise or keeping temperatures low. It's about creating an environment where silence and performance coexist harmoniously. By considering the factors mentioned in this article, you can elevate your computing experience to new heights.
#best motherboard for ryzen 7 5800x#best gpu for ryzen 5 5600x#best motherboard for ryzen 5 3600#best gpu for ryzen 5 2600#best motherboard for 5800x#5800x best motherboard#good motherboards for ryzen 7 5800x#5800x compatible motherboard#best motherboard 5800x#best gpu for ryzen 7 3700x
0 notes
Text
The Battle of Titans: Ryzen 5 5600 GT and 5500 GT

Processors from AMD such as the Ryzen 5 5600 GT and 5500 GT
In the ever-evolving world of computer technology, Gesci and Geizhals have just disclosed the specs of the highly anticipated AMD Ryzen 5 5600GT and 5500GT processors. These processors are expected to be released early next year. These latest additions to the AM4 series use cutting-edge Zen 3 cores in conjunction with Radeon “Vega” graphics, which promises a performance jump that lovers of technology just cannot resist.
Examining AMD Ryzen 5 5500GT in Great Detail
From a performance standpoint, the Ryzen 5 5600 GT and 5500 GT is on par with its predecessor, the Ryzen 5 5500 central processing unit. Additionally, both CPUs use the cutting-edge 7nm Zen 3 core architecture and share the Cezanne A1 chip, which is capable of housing six cores. A computing experience that is both efficient and responsive is ensured by the presence of 12 threads, a massive 16 MB L3 cache, and a 3 MB L2 cache.
The Impressive Speeds of the Clock
When they get into the facts, they find that the Ryzen 5 5500GT excels with a base frequency of 3.60 GHz and a boost frequency that reaches an amazing 4.4 GHz, which is higher than the 4.2 GHz that its predecessor had. When users demand more from their systems, these clock speed advancements result into meaningful performance advantages that can be experienced by everyone.
The Powerhouse, the Ryzen 5 5600GT Processor
Bringing competitors with storm, the Ryzen 5 5600GT is the main attraction of the show sporting a fundamental frequency that soars to 4.6 gigahertz. The introduction of the increase in speed of the clock is an indicator of the AMD committment to establishing processing companies with specifications capable of matching the high-performance requirements of today’s demanding software and gaming situations.
Advancements in Achievement Made Accessible by Ryzen 5 3400G and Ryzen 3 3200G
Their Ryzen 5 3400G as well as Ryzen 3 3200G CPUs, which additionally promise an additional boost to the clock, have been released by Radeon since the company has become discontented with basically its GT series. The addition of this feature is not only a marketing gimmick; rather, it constitutes a discernible improvement in how they perform, particularly among consumers who have migrated from earlier AM4 central processor units. The Nvidia “Vega” graphics processing unit (GPU) and the power source Wraith Spire CPU cooler are both incorporated in your purchase of any of these CPUs, which guarantees the best possible thermal performance.
Improvements to the Firmware Hardware and Compatibility Evaluation
It must be remembered to take notification of the fact that the the AMD Ryzen 5 5600 GT and 5500 GT main processing units are only incompatible with motherboards that correspond to the 500-series. These motherboards encompass the X570, B550, and A520. Users, for the other hand, have accountability for ensuring that their motherboards are updated with the most recent BIOS firmware in order to achieve smooth integration.
Price and Value Proposition of the Product
These computer processors can be found at prices that span from 133.98 euros to 159.90 euros, granting consumers an abundance of options to choose amongst depending on their financial constraints and the level of performance they desire. The preliminary pricing are anticipated to be much more alluring upon introduction, which will make these processors an appealing choice for customers who are concerned about their budgets as well as those who are motivated by their performance.
A Glance Behind Behind the Scenes at Approaching Announcements
the AMD is expected to debut the most contemporary Ryzen 5000 desktop main processing units (CPUs) and processing chips (APUs) on their AM4 platform in the coming weeks. On top of that, the Revelation 8000G “Hawk Point” APUs for the AM5 platform are on the horizon, and it is believed that further information will be brought to light throughout the Consumer Electronics Show in 2024. AMD is committed to pushing the frontiers of performance and innovation, and these upcoming products demonstrate that dedication.
Providers of Retail Goods
Powerful AMD the latest Ryzen 5 5600 GT and 5500 GT is available at 185.63 euros, the Ryzen 5 5500GT is priced at 164.19 euros, and the Ryzen 7 5700X3D is priced at 328.58 euros. Each regarding these CPUs is available from a variety of stores for those who are ready to get their hands on them. Users who are looking for top-tier performance without breaking the bank may find these pricing to be an appealing option.
Final Thoughts
Since an assessment, the new AMD Ryzen 5 5600 GT and 5500 GT computers provide a substantial move backward in terms of both functionality and pricing when compared to the AM4 a portfolio. These modern processors are designed to meet the expectations of an extensive spectrum of users, from game enthusiasts to digital media makers, due to their advanced features, boosted clock rates as well as low costs.
Just follow this link if you have a curiosity in learning more about my website Govindhtech.com
Read more on Govindhtech.com
1 note
·
View note
Text
All About the Gamer - Hot Deals For You

All About the Gamer
If you have a gamer on your gift list (or if you happen to be one), then you do not want to miss these deals!
Meta Quest 2 - 128GB Holiday Bundle - Advanced All-In-One Virtual Reality Headset
My kids have this and I can't keep them (or my husband) off of it! I've even had a blast playing with it and I am not otherwise a gamer! This is so much fun for the whole family!
Gaming Laptops
The following are a few options across a range of price points. These laptops are specifically geared to the gamer, but, can be used for work, school, or whatever else as well.
Acer Nitro 5 AN515-58-525P Gaming Laptop |Core i5-12500H | NVIDIA GeForce RTX 3050 Laptop GPU | 15.6" FHD 144Hz IPS Display | 8GB DDR4 | 512GB PCIe Gen 4 SSD | Killer Wi-Fi 6 | Backlit Keyboard
ASUS TUF Gaming A17 (2023) Gaming Laptop, 17.3” FHD 144Hz Display, GeForce RTX 4060, AMD Ryzen 7 7735HS, 16GB DDR5, 1TB PCIe 4.0 SSD, Wi-Fi 6, Windows 11
Razer Blade 17 Gaming Laptop: NVIDIA GeForce RTX 3070 Ti - 12th Gen Intel 14-Core i9 CPU - 17.3" QHD 240Hz - 16GB DDR5 RAM - 1TB PCIe SSD - Windows 11 - Chroma RGB - Thunderbolt 4 - SD Card Reader
MSI Stealth 17 Studio 17.3" QHD 240Hz Gaming Laptop: 13th Gen Intel Core i9, RTX 4080, 32GB DDR5, 1TB NVMe SSD, Thunderbolt 4, USB-Type C, Cooler Boost Trinity+, Win11 Home: Core
Accessories for the Gamer
CHECK OFTEN FOR UPDATED SALES – WE WILL KEEP THEM COMING!
MORE WAYS TO CONNECT
We also, as a homesteading family, have a variety of blogs that might interest you. A Life on the Farm focuses on the more personal side of the homesteading life. We discuss subjects like family, parenting, relationships, homeschooling, cooking, canning and so much more.
Two Oaks Farm Talk concerns the more technical side of homesteading. We discuss subjects like gardening, food prep, and farm building and construction with lots of tutorials!
Farm Raised Family is basically a hub for everything under the Two Oaks Farmstead umbrella. You can learn a great deal about all parts of the farmstead there. The Farm Raised Family blog focuses on financial matters such as budgeting, saving, and more and on current events affecting families.
You can also have a more in depth look at all that we do by visiting our Two Oaks Farmstead YouTube Channel and be sure to subscribe so that you don’t miss a thing!
Farm Life and Freedom is the new podcast we are in the process of launching! It is going to be so much fun! You could also check in with our Farm Life and Freedom Youtube Channel.
Two Oaks Farmstead is the farm store… the one that holds the umbrella! Check us all out and join us, not only on our blogs and Farm Life and Freedom podcast but come join the fun on Facebook, Instagram, Twitter… wherever you get social!
Read the full article
0 notes
Last Seen Blogs

whore-ibly-hot
Wicked, but so romantic.


totodatasgp-blog
Totodatasgp.com

misseviejones
can u not

skullkyrie
🌒🍥🌿