#carburetor cleaners
Text
Injector Pro Clean Diesel Fuel Injector Cleaner
Injector pro clean is a concentrated, one-tank clean-up product that will reduce smoke, improve performance, and reduce emissions. cleans intake manifolds, injectors, combustion chambers, turbochargers, and coolers, restoring lost performance. use injector pro clean annually or whenever deposit-related performance issues are suspected. available in sizes to treat small and commercial vehicles or bulk tanks.

#engine cleaners degreasers#professional fuel injector cleaner#brake repair cleaner#automotive paint cleaner#fallout cleaners#automotive enamel spray paint#carburetor cleaners#professional car odor eliminator#automotive brake parts cleaner#silicone spray grease#rubber care spray#professional car care kits#wheel cleaners#cooling system flush#parts cleaner#heavy duty white lithium grease#battery cleaners#aircraft glass cleaners#fuel additives for cars#fuel injector cleaner for car
0 notes
Text
1962 Plymouth Savoy Max Wedge: Unleashing the Power of Muscle

1962 Plymouth Savoy Max Wedge
In 1962, a new era of muscle cars emerged, radiating brilliance and power. Chrysler led the way with their groundbreaking Max Wedge lineup, introducing the world to the fusion of unitized-body construction and the high-performance ram-tuned dual-carbureted 413 CI engine. Among these legends was the Plymouth Savoy Max Wedge, a remarkable vehicle that holds a significant place in automotive history.

1962 Plymouth Savoy Max Wedge

1962 Plymouth Savoy Max Wedge
The First Super Stock Max Wedge with Manual Transmission
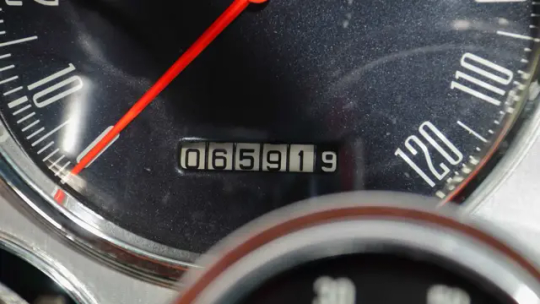
According to the esteemed Chrysler Registry and the meticulous documentation by Darrell Davis, this specific Plymouth Savoy Max Wedge holds a groundbreaking distinction—it was the first Super Stock model equipped with a manual transmission. The car’s odometer displays a mere 6,593 miles and has undergone a meticulous restoration process to return it to its original specifications. Notably, the engine has been upgraded, boasting a dyno-proven power output exceeding 500 HP.
1962 Plymouth Savoy Max Wedge
Unleashing the Power of the 413 CI V-8 Engine
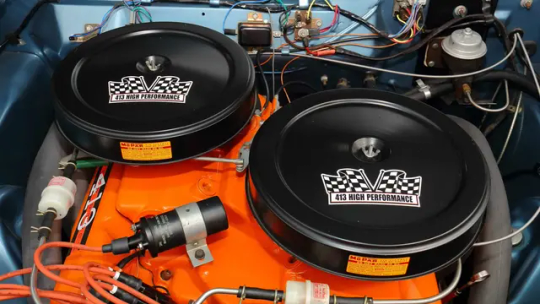
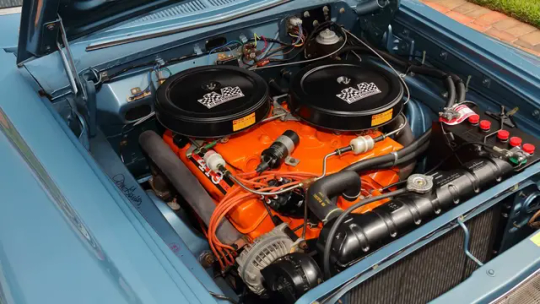
The 1962 Plymouth Savoy Max Wedge was powered by the formidable 413 CI V-8 engine. This was the first iteration of Chrysler’s renowned ram induction system, featuring a cross-ram intake manifold meticulously designed to optimize engine efficiency. The engine’s performance was further enhanced by the utilization of cast-iron header-style manifolds, which were rarely preserved but featured in this exceptional vehicle. Dale Reed of California refreshed the engine around 300 miles ago, ensuring its optimal performance. The correct Carter AFB carburetors reside beneath dual black air cleaners, accentuated by carefully placed decals.
1962 Plymouth Savoy Max Wedge
1962 Plymouth Savoy Max Wedge
A Unique Manual Transmission Experience
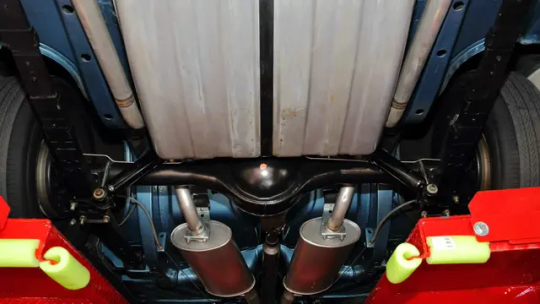
One of the distinctive aspects of this Plymouth Savoy Max Wedge is its manual transmission. Unlike its automatic counterparts, this car delivers a unique driving experience through its floor-mounted shifter, allowing the driver to truly feel the power at their fingertips. Paired with a full aftermarket exhaust equipped with cutouts and the robust 8 ¾ Chrysler differential, this Max Wedge offers an exhilarating ride for those who crave the thrill of the open road.
1962 Plymouth Savoy Max Wedge
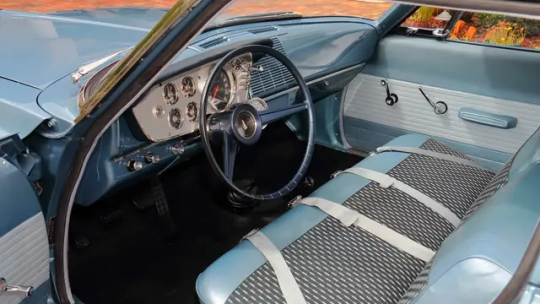
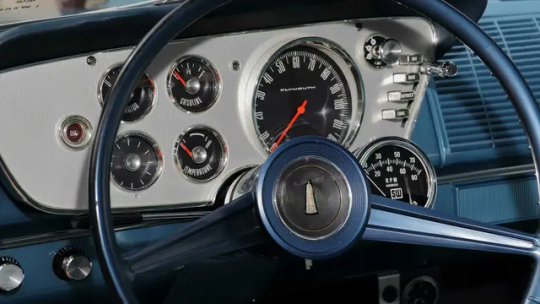
Captivating Style and Authenticity
The exterior of this Plymouth Savoy Max Wedge embodies the spirit of the era. Finished in captivating light blue paint, it exudes a timeless charm. The interior features a complementary blue cloth-and-vinyl combination, while the white-and-blue two-tone trim adds an elegant touch. The front and rear bench seats provide comfort, and the radio delete plate pays homage to the car’s performance-focused nature. Notably, it features a knee-knocker S-W column-mounted tachometer and a beautifully presented trio of rubber pedals. The car’s attention to detail is evident throughout, with the inclusion of circa-1962 chrome fonts, single-lens tail lamps, and OEM steel wheels adorned with poverty-type hubcaps.
1962 Plymouth Savoy Max Wedge
1962 Plymouth Savoy Max Wedge
Provenance and Documentation
Accompanying this Plymouth Savoy Max Wedge is a wealth of provenance and documentation that adds to its allure. It includes the original OEM IBM punch card and build sheet, which serve as a testament to its authenticity. Additionally, the window sticker provides insight into its original specifications, while the dyno sheet confirms its impressive horsepower rating. Vintage photos capture the car’s early years when it was part of a famous drag car collection, showcasing its illustrious past.

1962 Plymouth Savoy Max Wedge

1962 Plymouth Savoy Max Wedge
Conclusion
The 1962 Plymouth Savoy Max Wedge stands as a testament to the golden age of muscle cars. With its groundbreaking manual transmission configuration, powerful 413 CI V-8 engine, and captivating style, it represents the pinnacle of Mopar’s storied performance heritage. Meticulously restored to its original glory, this Max Wedge allows enthusiasts to experience a bygone era’s raw power and timeless charm.
FAQs:
How many miles does the 1962 Plymouth Savoy Max Wedge have?
The odometer of the 1962 Plymouth Savoy Max Wedge reads 6,593 miles.
Who documented the Chrysler Registry for this particular car?
The meticulous documentation of the Chrysler Registry for this car was done by Darrell Davis.
Has the engine of the 1962 Plymouth Savoy Max Wedge been upgraded?
Yes, the engine of this Plymouth Savoy Max Wedge has been upgraded to a dyno-proven 500-plus HP.
What is the significance of the 413 CI V-8 engine in this car?
The 413 CI V-8 engine in this car was the first to receive Chrysler’s shortened version of ram induction, known as the cross-ram intake. It maximizes engine efficiency and pairs it with rarely preserved cast-iron header-style manifolds.
What documentation and provenance come with this Plymouth Savoy Max Wedge?
This Plymouth Savoy Max Wedge comes with various documentation, including the OEM IBM punch card, build sheet, window sticker, dyno sheet confirming horsepower rating, and vintage photos of its early years as part of a famous drag car collection.
#Plymouth Savoy Max Wedge#Plymouth Savoy#plymouth#Max Wedge#car#cars#muscle car#american muscle#mopar#moparperformance#moparnation#moparworld
94 notes
·
View notes
Text
“They” say that unattended cooking is the number one cause of kitchen fires, but I was standing right next to the oven when that pot full of carburetor cleaner went up in flames. Okay, not carb cleaner. I can’t afford the good stuff. It was a pot full of Pine-Sol. Okay, Columbo, it was dollar-store brand imitation Pine-Sol, which is indeed flammable.
The most important thing to do in the event of a fire is not to panic. Luckily for me, my life experience consists of dealing with many fires. Panic is actually completely impossible for me at this point, as the part of my brain that handles the adrenaline response for such a disaster is no longer responsive to stimuli. Last doctor I had was pretty sure it had just burned itself straight out from over-use, did two papers on it. She got a job at some AI-run drug company, one of the ones whose name is all consonants. Let’s get back to the fire.
I had a fire extinguisher. In my kitchen, no less. It was just attached to a big chunk of Chrysler Imperial, because it used to be part of an NHRA-standard drag racer. Those guys are sticklers about fire protection, probably because you can only watch so many up-and-coming teenagers with immense racing talent reduce themselves to barbecue before you decide it might be time to ask them to carry a fire suppression system onboard. I hit it with my adjustable wrench, which is the only thing an adjustable wrench is good for, and it goes off, blanketing the room in some horrendously caustic fire-uncausing chemical. I also sometimes use it (the wrench) to grab hot pots off the stove when I can’t find my oven mitts. Now is such a time, and I quickly throw the entire assembly out of the missing kitchen window into the snow, where it sizzles and is rendered inert.
After a few minutes to regain my composure and discover the furthest extents of man’s discoveries of new and exciting profanity, I step outside to retrieve the carburetor. Clean as a whistle. I smile, and walk back inside, ready to begin the arduous task of forming my own carburetor gaskets out of old roof shingles.
717 notes
·
View notes
Photo


Lamborghini Islero
Built as a replacement for the 400GT, the Islero was introduced at the 1968 Geneva Auto Show. Its name, like the earlier Miura and Espada models, was inspired by Spanish bullfighting. Styling is by Carrozzeria Marazzi, and aluminum bodywork is wrapped over a tubular steel chassis. The car had impressive performance for the era, including a 0-60 time of about six and a half seconds and a top speed in excess of 150 mph.
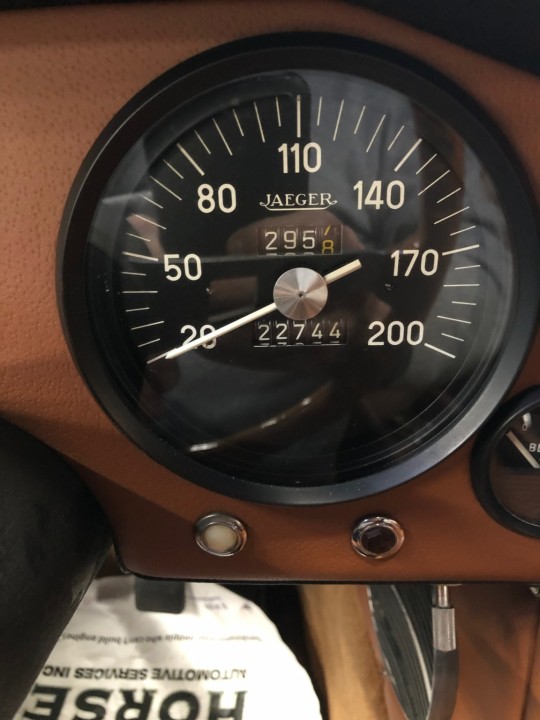
A three-spoke steering wheel frames a suite of Jaeger instrumentation, including a 200-mph speedometer, 8k-rpm tachometer, ammeter, fuel-level indicator, oil and water temperature gauges, and an oil pressure gauge. The clock was also rebuilt and the wiring for the wipers, turn signals, and headlights was repaired. A three-spoke steering wheel frames a suite of Jaeger instrumentation, including a 200-mph speedometer, 8k-rpm tachometer, ammeter, fuel-level indicator, oil and water temperature gauges, and an oil pressure gauge. The clock was also rebuilt by the current owner and the wiring for the wipers, turn signals, and headlights was repaired.
The 3.9L quad-cam V12 was rated for 325 horsepower when new and is paired with a five-speed manual transmission. Induction is handled by six Weber carburetors. The engine was removed for cosmetic detailing by the owner, including repainting the air cleaner housings and coolant expansion tank. The clutch slave cylinder was also repaired and a new ignition coil, spark plugs, and heater hoses were installed.
93 notes
·
View notes
Text
Fixed our water heater!

Fixed our dead water heater! This post is a little PSA if you're ever in the same position and want to save a few hundred bucks (or if you're a renter and don't want to wait for the landlord to get around to fixing it).
The pilot light was out, and the indicator panel showed nothing, so I was at a loss. First (after turning off gas and power) I cleaned and vacuumed the air intake, but that changed nothing. I tested the ignitor, and it produced spark when pressed, but the pilot light remained out. That meant something else was preventing gas from flowing. Could be many things!
Apparently the most common issue is the thermocouple, which creates a tiny flow of electricity to the control panel when heated with a pilot light, and allows that to open the gas valve to heat your water. Testing could reveal the issue to be one of many other things, so I went to the interwebs looking for answers.
This video provided them! Turns out our problem was a clogged pilot tube, which I cleared with compressed air, then scrubbed clean with a toothbrush soaked in carburetor cleaner, and blasted with air again to dislodge gunk.
After reassembling everything and doing the pilot-lighting procedure, voila - a little fire lit up! After replacing the cover, I reset the control panel and switched to regular operation. Full-on water-heating levels of fire!
Soon we'll have hot water again, thanks to this kind person: X
8 notes
·
View notes
Note
" take your pick . " (i will put doc anywhere/when you just tell me where you want him)
THE SOUNDS OF NIGHTMARES SENTENCE STARTERS .

Jim had the tendency to lash out first, ask questions later. In fact, his knuckles were still bruised from a fight he'd been in the night before. Though his hands were now buried deep in the pockets of a severely faded pair of jeans, inevitably the old man would see them. Not that he wouldn't also see the black eye that ringed his left one - always the left, where he tended to drop his guard more.
Which brought him to his next point: why was he following this eccentric figure that others seemed to shy away from? Easier to ignore than face head on. It sounded familiar, as their eyes tended to dip away from him as well.
Maybe there was the tiniest spark of hope that he could find something here that he needed, whether unconscious or not. More than definitely he was curious.
So when he was beckoned, he followed.
But he hadn't expected the junk filled garage. Full of half completed projects that he had to duck his head just to avoid brushing the hanging ones. This is, of course, after he'd already knocked one with his forehead after initially coming through the door and missing the way Doc moved.
"I don't know about all this." He voices his reservations as he comes to where the other has stopped in front of a table. It's much cleaner than their surroundings, with a few objects laid out. Somehow, it feels like a test. Like depending on what he chooses, he'll be seen.
So he purposefully avoids what appears to be the handle of a phaser, and a circuit board, until his hand hovers over what appears to be a standard carburetor. He recognizes it from the engine of his father's old Corvette - may it rest in pieces at the bottom of the ravine. Kirk presses the tips of his bruised fingers to the metal.
"What is all this junk?"
#doctorbrown#v. who caught and sang the sun in flight | main#my brain still wants to put this pre starfleet where doc finds this dumb ass kid that is in need of some guidance#q. you have the conn
5 notes
·
View notes
Text
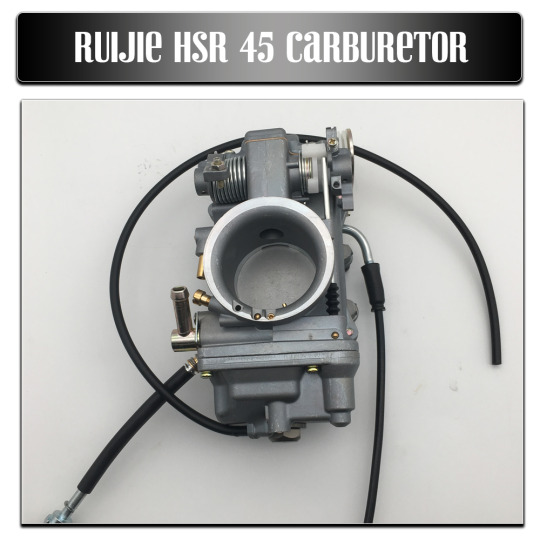
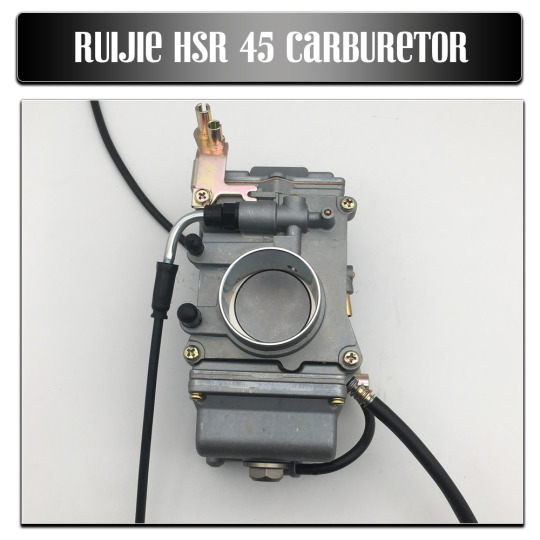
HSR45 Smoothbore Replace Carburetor fit for
1990-2006 Harley-Davidson
Bad Boy Dyna Fatboy Low Rider Night Train Road King Heritage Softail Heritage
Springer Softail Softail Springer Electra/Street/Super/Tour/Road Glide Series
link here 👉 bit.ly/3IBXE7u
The re-designed the popular HSR42 Performance carburetor and upgraded it with a 45mm venturi to accommodate for large cubic and High Performance Big-Twin engines.
The HSR45 carburetor has the same proven quality features as the HSR42 with only a larger venturi for a bigger airflow, which is needed for highly modified engines.
It is absolutely the best carburetor available today if you don't want to have any restrictions in your incoming airflow for a maximum air-fuel mixture.
Kit comes with carburetor, jet kit, K&N air filter, and chromed air cleaner cover. Works with stock style throttle cables as used on 1996 to present models.
Available for 1984 thru 1999 Evolution Big-Twins with or without manifold and 1999 thru 2017 Twin-Cam models complete with manifold. For custom applications the carburetor is also available separately.
Throttle and idle cables for use with the HSR42, and the HSR45 carburetors Early style HSR42 and HSR45 carburetors have the cable wheel on the left side of the carburetor and use cables as in the table below.
Late style HSR42 and HSR45 carburetors have the cable wheel on the right side of the carburetor and use 1990 or later OEM style cables as used on Big-Twin models. Most cables are available in black vinyl or braided steel.
Compared to comparable carburetors with larger venturi bores, the HSR 45 carb produces higher peak power at full throttle. While the HSR 45 carb's smaller, yet higher velocity flowing venturi and advance fuel metering system deliver a stronger overall powerband with greater ridability at reduced throttle openings, respectively.
The HSR 45 Carburetor Easy Kit should produce an appreciable 10% boost in power and torque on a stock engine with no further modifications, and up to a 25% increase in power and torque when paired with a higher flowing intake and exhaust system.
Note: 1993 to present models need ZPN232234 crankcase breather kit. 1984 thru 1989 models also need 1990 thru 1995 stock Big-Twin style throttle and idle cables.


#carburetor#mikuni#bikeride#bikelove#harleydavidson#fatboy#bad boy#softail#slide and glide#classic#motorcycles#motorcycleslifestyle
4 notes
·
View notes
Video
youtube
1957 (All Original) Chrysler 300C Convertible
The Chrysler 300 "letter series" are high-performance personal luxury cars that were built by Chrysler in the U.S. from 1955 to 1965 and were a sub-model from the Chrysler New Yorker. At its introduction, it was advertised as "America's Most Powerful Car".
The 1957 model year 300C was corporately shared with an all new appearance for Chrysler products called the "Forward Look" and featuring a "yawning" wide trapezoid-shaped front grille which was unique to the 300C, "Vista-Dome" windshield, dual headlights, and gradually rising tailfins starting from the doors similar to Chrysler-branded products. The wheel diameter changed from 15 in (381 mm) to 14 in (356 mm) while continuing to use drum brakes for all wheels, and to keep the front brakes cool a cooling duct was installed with the air intake located just below the headlights that fed air directly to the front brakes. The exterior color list was expanded to offer Jet Black, Parade Green metallic, Copper Brown metallic, Gauguin Red and Cloud White while the interior was tan leather standard and optional interior choices were available from the New Yorker list of which the 300 was based.
The Hemi engine was upgraded to 392 cu in (6.4 L) with 375 hp (280 kW), or as a limited edition 390 hp (290 kW) version (18 built). The 392 CID engine was exclusive to the 300, New Yorker and Imperials, while the dual four barrel carburetors was standard on the 300C and continued with an improved air induction system that gave each carburetor its own air cleaner to improve efficiency. A convertible model was available for the first time and was listed at US$5,359 ($51,704 in 2021 dollars) while the two-door hardtop was listed at US$4,929 ($47,556 in 2021 dollars). In comparison, a 1957 Imperial Crown Convertible was listed at US$5,598 ($51,276 in 2021 dollars). GM's Pontiac Division introduced the Pontiac Bonneville as a convertible only, offering fuel injection and a similar price tag but offered lower luxury content and a reduced price for 1958, and Mercury offered the Mercury Turnpike Cruiser for 1957 with the optional 430 cu in (7.0 L) Super Marauder V8.
The car introduced red, white, and blue '300C' circular medallions on the sides, hood, trunk, and interior and was the first model to use the color scheme. A total of 1,918 coupes and 484 convertibles were built.
#twoguysandaride #carsoftheday #CarReview #CarReviews #ClassicCar #ClassicCars #ClassicBoat #HowTo #TechHowTo #CarTech #Racing #PontoonBoat #Ford #Chevy #Honda #Toyota #Porsche #Honda #Toyota #Chevrolet #Buick #KIA #Hyundai #GMC #Volvo #Mercedes #Polestar #Ferrari #CarReview #CarReviewChannel #NewCars #Pontoon #FishingBoat #4Wheeler #OffRoad #Dirt #Snow #Sand #Water #Technology #Tech #Bentley #Jaguar #LandRover #Audi #BMW
2 notes
·
View notes
Text
Understanding Carburetors & Fuel Injection
🚗💨 Transforming Performance: From Carburetor to Fuel Injection!
In the world of automotive engineering, the evolution from carburetors to fuel injection systems marks a significant leap in performance, efficiency, and reliability. ✨
#Carburetor_to_Fuel_Injection_for_Enhanced_Performance
#CarburetorToFuelInjectionForEnhancedPerformance
#CarburetorToFuelInjection
#FuelInjectionPerformance
#EnhancedPerformanceAutomotive
Carburetors have long been a staple in older vehicles, providing a simple method of mixing fuel and air. However, as technology advanced, fuel injection systems emerged, offering precise fuel delivery tailored to the engine’s needs. This transition not only enhances power output and fuel efficiency, but also ensures cleaner emissions—an important factor in today’s eco-conscious world. 🌍
Here are some key benefits of making the switch:
1️⃣ Improved fuel atomization for better combustion.
2️⃣ Increased power and torque across the RPM range.
3️⃣ Enhanced fuel economy and reduced emissions.
4️⃣ Better cold starts and smoother operation.
It’s amazing to see how innovation continues to drive the automotive industry forward! 🚀
Have you made the switch from carburetor to fuel injection? Share your experiences in the comments!
#AutomotiveEngineering #FuelInjection #Carburetor #Performance #AutoInnovation #EngineTech #Efficiency #SustainableDriving #CarEnthusiasts #Mechanics #Motorsport #CleanEnergy
0 notes
Text
Understanding and Fixing EGR Issues in the Ford Somerset
Common Symptoms of EGR Problems
Before diving into the solutions, it’s essential to identify the symptoms of a faulty EGR system. Here are some common signs that the EGR valve or system in your Ford Somerset may be malfunctioning:
Rough Idling and Stalling: A malfunctioning EGR valve can cause the engine to idle roughly or even stall. egr fix somerset This happens because an EGR valve that is stuck open allows too much exhaust gas to enter the intake manifold, disrupting the air-fuel mixture.
Poor Engine Performance: If the EGR valve is stuck closed or clogged, the engine may suffer from poor acceleration, reduced power, and decreased fuel efficiency. This is due to the higher combustion temperatures, which can cause knocking and inefficient fuel combustion.
Increased Emissions: A faulty EGR system can lead to increased NOx emissions, which can result in the vehicle failing an emissions test. This happens because the EGR system is not properly recirculating exhaust gases to lower the combustion temperature.
Check Engine Light (CEL): The vehicle's onboard computer monitors the EGR system. If it detects a problem, it will illuminate the check engine light. Common diagnostic trouble codes (DTCs) related to EGR issues include P0401 (insufficient EGR flow) and P0402 (excessive EGR flow).
Steps to Fix EGR Issues
If you've identified EGR-related symptoms in your Ford Somerset, follow these steps to diagnose and fix the problem:
Inspect the EGR Valve: Start by locating the EGR valve, usually found on or near the intake manifold. Visually inspect the valve and its connections for signs of damage, corrosion, or carbon buildup. If the valve appears to be clogged with carbon deposits, it may need cleaning or replacement.
Clean the EGR Valve: If the EGR valve is clogged but otherwise in good condition, cleaning it can often restore proper function. Remove the valve and use a carburetor cleaner or a specialized EGR valve cleaner to remove carbon deposits. Ensure that the valve moves freely after cleaning.
Check EGR Passages: Sometimes, the problem isn't with the valve itself but with the passages that direct exhaust gases to the intake manifold. These passages can become clogged with carbon deposits over time. Use a wire brush and cleaner to clear any obstructions.
Test the EGR Valve: If cleaning doesn't resolve the issue, test the EGR valve using a vacuum pump (for vacuum-operated valves) or a multimeter (for electrically operated valves). The valve should open and close in response to the correct signals. If it doesn't, the valve may need replacement.
Inspect EGR Solenoid and Sensor: The EGR system includes a solenoid and a position sensor, which control and monitor the EGR valve's operation. If these components are faulty, they can cause the EGR valve to malfunction. Use a diagnostic tool to test the solenoid and sensor for proper operation.
Replace Faulty Components: If testing reveals a faulty EGR valve, solenoid, or sensor, replace the defective component. Be sure to use OEM (Original Equipment Manufacturer) parts to ensure compatibility and reliability.
Reset the ECU: After repairing or replacing EGR components, reset the vehicle’s ECU (Engine Control Unit) to clear any stored trouble codes. This can usually be done by disconnecting the battery for a few minutes or using an OBD-II scanner.
Preventing Future EGR Problems
Regular maintenance can help prevent EGR issues in your Ford Somerset. adblue removal somerset Here are some tips to keep your EGR system in good working order:
Regularly Clean the EGR Valve: Periodically cleaning the EGR valve and passages can prevent carbon buildup and ensure smooth operation.
Use High-Quality Fuel: Using high-quality fuel can reduce carbon deposits and prolong the life of the EGR system.
Perform Regular Engine Maintenance: Regular oil changes, air filter replacements, and overall engine maintenance can reduce the risk of EGR problems by keeping the engine running clean and efficiently.

0 notes
Text
What is Vacuum Leak Tester and how it works?
Source of Info: https://www.perfectgroupindia.co.in/what-is-a-vacuum-leak-tester-and-how-does-it-work.php

Have you ever experienced engine problems such as rough idling, poor acceleration, or decreased fuel efficiency? If yes, then it could be due to a vacuum leak in your engine. A vacuum leak tester is a tool used to detect any leaks in the vacuum system of an engine. In this article, we will discuss what it is, how it works, and its importance in maintaining the health of your engine.
What Is A Vacuum Leak Tester?
A vacuum leak tester is a diagnostic tool that helps detect any leaks in the vacuum system of an engine. The vacuum system is an essential component of any engine, as it controls various functions such as fuel injection, emission control, and air intake. A vacuum leak can cause several problems in the engine, affecting its performance and fuel efficiency. The vacuum leak tester is designed to detect any leaks in the vacuum system to prevent such problems from occurring.
How Does A Vacuum Leak Tester Work?
It works by creating a vacuum in the engine's intake manifold and measuring the pressure in the system. The vacuum leak tester consists of a vacuum pump, a gauge, and various adapters to fit different types of engines. The tester is connected to the intake manifold of the engine and pumps out the air, creating a vacuum. If there is a leak in the vacuum system, the pressure in the system drops, and the gauge readings change. The tester then helps identify the location of the leak, allowing for quick repairs.
Types Of Vacuum Leak Testers
There are two types: pressure-based and smoke-based testers. Pressure-based testers work by creating pressure in the system, while smoke-based testers use smoke to detect any leaks. Smoke-based testers are more accurate and effective, as they can detect even the smallest of leaks.
Importance Of Vacuum Leak Testers
They are essential tools for maintaining the health of your engine. A vacuum leak can cause several problems, affecting the performance and fuel efficiency of the engine. Vacuum leaks can also cause damage to other engine components, leading to costly repairs. Using a vacuum leak tester can help detect any leaks early on, preventing such problems from occurring.
How To Use A Vacuum Leak Tester?
Using a vacuum leak tester is a simple process. Here are the steps to follow:
1. Identify the intake manifold of the engine and remove the air filter.
2. Select the appropriate adapter for your engine and attach it to the intake manifold.
3. Connect the vacuum pump to the adapter and pump out the air to create a vacuum.
4. Check the gauge readings for any drops in pressure, indicating a leak.
5. Use the tester to identify the location of the leak and make necessary repairs.
Steps For Vacuum Leak Detection
Here are the steps to follow when detecting vacuum leaks:
1. Start the engine and let it idle.
2. Spray the carburetor cleaner or brake cleaner around the intake manifold, vacuum hoses, and other components of the vacuum system.
3. Listen for any changes in the engine's sound, indicating a leak.
4. Observe any changes in the engine's performance, such as a drop in RPM, indicating a leak.
5. create a vacuum in the system and check for any drops in pressure, indicating a leak.
6. Identify the location of the leak and make necessary repairs
Symptoms Of A Vacuum Leak
Vacuum leaks can cause several symptoms in the engine. Here are some of the most common symptoms of a vacuum leak:
Rough idling
Poor acceleration
Decreased fuel efficiency
Check engine light
Hesitation or stumbling during acceleration
Engine stalls at idle
Causes Of Vacuum Leaks
Vacuum leaks can be caused by several factors, including:
Loose or damaged vacuum hoses
Cracked or damaged intake manifold gasket
Faulty vacuum pump
Leaking EGR valve
Faulty brake booster
Damaged or cracked throttle body gasket
How To Prevent Vacuum Leaks?
Preventing vacuum leaks involves regular maintenance and inspection of the vacuum system. Here are some tips to prevent vacuum leaks:
Regularly inspect vacuum hoses for cracks or damage
Replace any damaged vacuum hoses immediately
Check and replace the intake manifold gasket if necessary
Regularly clean the throttle body and EGR valve
Keep the engine well-tuned and maintained
When To Use A Vacuum Leak Tester?
A should be used whenever you experience symptoms of a vacuum leak in your engine. It is also recommended to use a vacuum leak tester during regular maintenance and inspection of the vacuum system to prevent any potential problems from occurring.
Common Mistakes To Avoid When Using A Vacuum Leak Tester
Here are some common mistakes to avoid when using a vacuum leak tester:
Not properly attaching the adapter to the intake manifold
Not pumping out enough air to create a vacuum
Not properly identifying the location of the leak
Not making necessary repairs after identifying the leak
Benefits Of Using A Vacuum Leak Tester
Using a vacuum leak tester can provide several benefits, including:
Early detection of vacuum leaks, preventing potential problems from occurring
Accurate and effective detection of even the smallest of leaks
Saves time and money on costly repairs
Helps maintain the health and performance of the engine
Conclusion
A vacuum leak tester is an essential tool for maintaining the health and performance of your engine. It helps detect any leaks in the vacuum system, preventing potential problems from occurring. By regularly inspecting and maintaining the vacuum system of your engine, you can prevent vacuum leaks and ensure its smooth performance.
FAQs
1. How much does a vacuum leak tester cost?
The cost of a vacuum leak tester can vary depending on the type and brand. However, they typically range from $30 to $200.
2. Can a vacuum leak cause engine damage?
Yes, a vacuum leak can cause engine damage if left untreated. It can cause several problems, including decreased fuel efficiency, rough idling, and poor acceleration.
3. How long does it take to detect a vacuum leak using a vacuum leak tester?
It typically takes a few minutes to detect a vacuum leak using a vacuum leak tester.
4. Can I use a vacuum leak tester on any engine?
No, you need to select the appropriate adapter for your engine to use a vacuum leak tester.
5. How often should I inspect the vacuum system of my engine?
It is recommended to inspect the vacuum system of your engine during regular maintenance and inspection, which is typically every 30,000 miles or as recommended by the manufacturer.
0 notes
Text
How do you Find the Best Product for Cleaning Engine Parts?
When was the last time you cleaned the engine of your car? However, if you cannot tell when was the last you didn't know that engine cleaning is an important part of vehicle maintenance, this blog post is definitely for you.
While maintaining a vehicle is a necessary expense, most automobile owners trust professionals for engine work, brakes, and more. However, the auto industry and many others are adapting to climate change policy, affecting everything from machine work to new car buying decisions.
Broad-based top-down decisions will impact future consumer choices. Traditional fossil fuels are still used to power various vehicles, including lawnmowers, trains, cars, boats, and motorcycles.
Using highly toxic chemical solvents during the part-cleaning process can be necessary for auto mechanics and rebuilders to maintain engine parts clean.
The improvement of user safety brought about by climate change policies sparked the development of safer cleansers and degreasers to replace hazardous chemicals.
Read the Following Complete Guide!
1: Engine Cleaning

The most important components of an automobile are located in the engine room, yet it is one of the most poorly cleaned spaces. Cleaning car parts intimidates a lot of individuals because they need to gain experience with them. You can get the Best product for cleaning engine parts, which keeps running your vehicle well.
They choose to leave it alone rather than take the chance of destroying delicate parts, such as electrical connections. Most people need to know how crucial engine maintenance is compared to maintaining a clean appearance. Also, it must be repeated frequently. Here are a few explanations.
The Benefits
1: It Will Keep Your Car Running in its Best Condition
By clearing clogged delicate parts of dirt and grease, you avoid causing damage to the components and interfering with their normal operation. The labels and measuring instruments are easier to view when not covered with dirt. The fluids in your car can also be checked and refilled as necessary.
2: It Saves You Money
Finding the source of a leak is simpler if your engine is clean. This saves you the time and money of having your car mended for far more extensive damage by allowing you to identify the issue while it is still modest and controllable.
When sensitive auto parts are kept out of contact with oil through routine cleaning, they won't require replacement as frequently. Having less rust and corrosion will result in lower overall maintenance expenses.
3: Your Car Will Have a Higher Resale Value
Even if they are still determining what they are looking at, prospective purchasers always open the hood to inspect the inside, even if the outside of your automobile appears brand new.
Purchasers will dramatically lower their price bid or examine other vehicles once they notice rust or corrosion damage on the engine. An uncluttered engine bay is a sign of regular auto maintenance.
There are several different ways to clean an engine.
Using an Engine Degreaser and Pressure Washer
This is the most popular technique for those who wish to clean their car's engine. The entire engine bay is cleaned with an engine grease remover. Before properly rinsing off, extra-dirty portions must be brushed and scrubbed.
You must understand how to clean delicate parts, such as battery terminals, and which engine components should be kept dry. To prevent rusting, you must quickly dry the water off.
Look for dirt and grease residue that might harm your car's paint if not cleaned correctly. While using a washer, only use low pressure. It is essential to avoid pushing water into crevices where it will be challenging to dry out.
Glass Bead and Soda Blasting

This technique removes carbon buildup on aluminum engine parts using glass beads or baking soda. The Top engine degreaser cleaners are typically cleaned one piece at a time, as well as the minor details.
If carried out incorrectly, the procedure can rub the surface of your engine and leave behind a residue that could lead to an early engine failure.
#fastest brake cleaners#automotive brake parts cleaner#brake cleaner price#brake cleaner on sale#carburetor cleaners#spray carburetor cleaner#carburetor cleaner spray price#combustion chamber cleaner#fast carburetor cleaner#engine cleaners degreasers#top engine degreaser cleaners#heavy duty engine degreaser#auto engine cleaning products#fuel injector cleaner for car#top fuel injector cleaners#professional fuel injector cleaner
0 notes
Text
Fuel Injection or Carburetion - Opting for the Right Dual Fuel Kit

In today’s business landscape, reducing operational costs and minimizing environmental impact are top priorities. Dual fuel technology provides a practical solution for diesel generator owners in Delhi NCR, allowing them to switch between diesel and cleaner, more cost-effective fuels such as PNG, CNG, and LPG. However, with multiple dual fuel kits available, selecting the right technology can be challenging. This blog, from CNG Power, a leading supplier of Dual Fuel Kits in Delhi NCR, will highlight two major fuel delivery systems: carburetion and fuel injection.
Decoding the Technology: Carburetion vs. Fuel Injection
Carburetion
A carburetor is a relatively simple mechanical device that mixes air and fuel to create a combustible mixture for the engine. It relies on the vacuum created by the engine’s intake to draw fuel through a nozzle. The amount of fuel delivered depends on the air flow, making it less precise.
Fuel Injection
Fuel injection is a more advanced electronic system that precisely measures and delivers fuel directly into the engine’s cylinders. Sensors monitor engine parameters like air pressure and temperature, allowing the electronic control unit (ECU) to calculate the optimal fuel amount for each combustion cycle.
The Dual Fuel Kit Landscape in India
Both carburetion and fuel injection technology is being used in dual fuel kits for diesel engines in India. However, the trend is shifting towards fuel injection due to its numerous advantages.
Choosing the Right Dual Fuel Kit for Your Needs
While carburetion-based dual fuel kits might seem attractive due to their lower initial cost, the long-term benefits of fuel injection outweigh the price difference. Here’s why:
Fuel Efficiency and Savings: Precise fuel metering in fuel injection systems translates to significant fuel cost savings over time. Compared to carburetion, which struggles to maintain an optimal air-fuel ratio, fuel injection delivers the exact amount of fuel needed for efficient combustion. This translates to using less fuel to achieve the same power output, leading to substantial cost reductions on your operational expenditure.
Reduced Emissions: Cleaner combustion in fuel injection kits minimizes your environmental impact and helps comply with emission regulations. Carburetion systems often struggle to adapt to varying engine loads, resulting in incomplete combustion and the release of harmful pollutants. Fuel injection, on the other hand, precisely controls the fuel mixture based on real-time engine data. This ensures cleaner burning, minimizing harmful emissions like nitrogen oxides (NOx), particulate matter (PM), and hydrocarbons (HC). By opting for a fuel injection dual fuel kit, you not only contribute to a cleaner environment but also potentially avoid future penalties for non-compliance with emission regulations.
Full Blog Click Here — https://cngpower.in/fuel-injection-or-carburetion-choosing-the-right-dual-fuel-kit/
0 notes
Text
Ultrasonic Cleaners in Australia: A Comprehensive Guide to Efficient Cleaning
In the world of cleaning, ultrasonic cleaners have revolutionized how we approach stubborn dirt and grime. Whether you're dealing with delicate jewelry, intricate mechanical parts, or even medical instruments, these devices offer a powerful, yet gentle, cleaning solution. In Australia, ultrasonic cleaners are increasingly popular across various industries and for personal use. Here’s everything you need to know about ultrasonic cleaners in Australia, and why they might be the perfect addition to your cleaning arsenal.
1. What Are Ultrasonic Cleaners?
Ultrasonic cleaners are devices that use high-frequency sound waves to create microscopic bubbles in a cleaning solution. When these bubbles collapse, they generate intense pressure that effectively removes dirt, grime, and contaminants from even the tiniest and most intricate surfaces. This process, known as cavitation, is highly effective and safe for cleaning a wide range of items.
How It Works: The ultrasonic cleaner is filled with a cleaning solution, usually water with a mild detergent or a specific solvent. The items to be cleaned are submerged in this solution, and the machine generates ultrasonic waves that cause cavitation. The bubbles created during cavitation penetrate deep into crevices, removing dirt without damaging the items.
2. Applications of Ultrasonic Cleaners in Australia
Ultrasonic cleaners are versatile and can be used across various industries as well as for personal cleaning needs. Some common applications include:
Jewelry Cleaning: Ultrasonic cleaners are perfect for cleaning jewelry, especially intricate pieces with hard-to-reach areas. They can safely remove dirt and oils without damaging delicate stones or metals.
Medical and Dental Instruments: In medical and dental practices, ultrasonic cleaners are used to clean instruments thoroughly before sterilization, ensuring that all contaminants are removed.
Automotive Parts: Mechanics use ultrasonic cleaners to clean carburetors, fuel injectors, and other small engine parts. The precision cleaning ability of ultrasonic cleaners makes them ideal for removing oil, grease, and carbon buildup.
Electronics: Ultrasonic cleaners can be used to clean electronic components, such as circuit boards, without causing damage. They remove dust, dirt, and flux residues efficiently.
Eyewear: Opticians use ultrasonic cleaners to clean glasses and sunglasses, removing dirt and oils from lenses and frames without causing scratches.
Industrial Use: In manufacturing, ultrasonic cleaners are used to clean small parts, tools, and components during production processes, ensuring high levels of cleanliness and quality.
0 notes
Photo


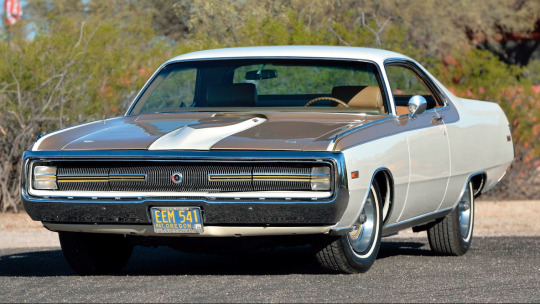

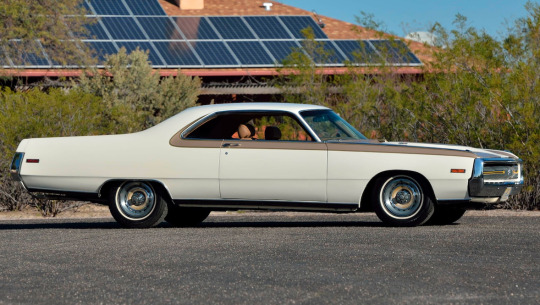


Chrysler 300H
The 1970 Chrysler 300 Hurst is a limited-edition unicorn that offers performance, luxury, size, and exclusivity. With a length of over 18 feet, it earns a place in history as one of the longest luxury performance coupes of all time.
Chrysler 300 Hurst’s origin is shrouded in mystery. The car was assembled at Chrysler’s Jefferson Avenue plant in Detroit, Mich. It was shipped 600 miles east to Warminster, Penn. for completion.Hurst bolted on a distinctive satin tan fiberglass-skinned hood with 300H emblems and a fiberglass trunk lid with an integrated spoiler. There’s no mistaking a 300H on the street because the car was only available in Spinnaker White, with orange and brown tape stripes embellishing the flanks. Oddly, the cars were not equipped with Hurst shifters.Safe to say, there’s nothing like the 300 Hurst’s magnificent interior in the muscle car world. The designers swiped the gorgeous overstuffed tan leather seating from the Imperial. It’s as if someone stuffed a living room sofa into a Charger.
Every 300 Hurst edition left the factory with Mopar’s well-proven 440 cubic-inch V-8 and a heavy-duty TorqueFlite 727 three-speed automatic transmission. The air-cleaner housing proudly carried a TNT designation.
With a four-barrel carburetor, the TNT 440 engine had a 375-horsepower rating with 480 pound-feet of torque. The 300H’s V-8 wedge is identical to Plymouth’s Super Commando 440 and Dodge’s 440 Magnum. Slap on a decal and boom: It’s a TNT.
With the standard 3.23 gears out back, the 300 Hurst delivered 0-60 MPH times in 7.1 seconds and a quarter-mile time of 15.3 seconds. Its speed with more aggressive gearing and stickier tires is anyone’s guess.
42 notes
·
View notes
Text
Essential Guide to Jaguar Carburetor Services: Troubleshooting, Repairs, and Maintenance

Owning a Jaguar is not just about driving a car; it's about experiencing a legacy of British automotive craftsmanship. These luxury vehicles, known for their elegance and performance, have a rich history that dates back to the early 20th century. One of the key components that contribute to the performance of classic Jaguars is the carburetor. While modern vehicles have largely transitioned to fuel injection systems, many classic Jaguars still rely on carburetors. However, these components can be finicky and require proper care to ensure optimal performance. In this guide, we will delve into the essentials of Jaguar carburetor services, covering troubleshooting, repairs, and maintenance.
Understanding the Jaguar Carburetor
The carburetor is a crucial part of the engine in many classic Jaguar models, such as the E-Type and XJ6. It is responsible for mixing air and fuel in the correct ratio before delivering it to the engine cylinders. This mixture is vital for combustion, which powers the engine. A well-functioning carburetor ensures that the engine runs smoothly, providing the power and performance that Jaguar owners expect.
Common Carburetor Problems in Jaguars
Carburetors, especially in older vehicles, can develop a range of issues that affect engine performance. Some of the most common problems include:
Fuel Mixture Imbalance: The most frequent issue with carburetors is an improper air-fuel mixture. If the mixture is too rich (too much fuel), the engine may run rough, emit black smoke, or experience poor fuel efficiency. Conversely, a lean mixture (too little fuel) can cause engine hesitation, misfiring, or even overheating.
Clogged Jets: Jets are small passages in the carburetor that control the flow of fuel. Over time, these can become clogged with dirt or debris, leading to poor engine performance. Symptoms of clogged jets include sputtering, hesitation during acceleration, and difficulty starting the engine.
Float Problems: The float controls the fuel level within the carburetor bowl. If the float is damaged or misaligned, it can cause flooding (excess fuel) or fuel starvation. This can result in inconsistent engine performance or even stalling.
Vacuum Leaks: Carburetors rely on a vacuum to draw fuel into the engine. A vacuum leak, often caused by worn gaskets or cracked hoses, can disrupt this process, leading to rough idling, poor acceleration, and reduced power.
Worn Throttle Linkages: The throttle linkage controls the opening and closing of the carburetor’s throttle valve. If these linkages are worn or out of adjustment, it can cause uneven acceleration, hesitation, or difficulty maintaining a steady speed.
Troubleshooting Jaguar Carburetor Issues
Properly diagnosing carburetor problems in a Jaguar requires a systematic approach. Here are the steps you can take to troubleshoot common issues:
Check the Air-Fuel Mixture: Using a vacuum gauge or exhaust gas analyzer, check the air-fuel mixture. If it's too rich or too lean, adjust the carburetor’s mixture screws accordingly. Ensure that the adjustments are made incrementally to avoid overcompensation.
Inspect and Clean the Jets: Remove the carburetor and inspect the jets for any signs of blockage. Use compressed air or a carburetor cleaner to clear any debris. Reassemble the carburetor carefully, ensuring that all components are clean and properly aligned.
Examine the Float Level: Check the float level using the manufacturer's specifications. Adjust the float height if necessary, ensuring it moves freely without sticking. A misaligned float can cause erratic fuel delivery.
Test for Vacuum Leaks: Use a smoke machine or carburetor cleaner to test for vacuum leaks around the carburetor base, intake manifold, and vacuum hoses. If a leak is found, replace the faulty gasket or hose.
Inspect Throttle Linkages: Check the throttle linkages for wear or misalignment. Lubricate any moving parts and adjust the linkage to ensure smooth operation.
Repairing and Maintaining a Jaguar Carburetor
Repairing a Jaguar carburetor often involves disassembling it, cleaning the internal components, and replacing any worn or damaged parts. Here's how you can go about it:
Disassemble the Carburetor: Carefully remove the carburetor from the engine and disassemble it on a clean work surface. Take note of the order in which parts are removed to ensure correct reassembly.
Clean All Components: Use a carburetor cleaner to soak and clean all metal parts, paying special attention to the jets, float, and throttle body. Avoid using abrasive materials that could damage the surfaces.
Replace Worn Parts: Inspect all gaskets, O-rings, and seals for wear and tear. Replace any components that appear damaged or brittle. A carburetor rebuild kit can be handy as it contains all necessary replacement parts.
Reassemble and Test: Reassemble the carburetor, ensuring all parts are correctly aligned and tightened to the manufacturer's specifications. Reinstall the carburetor on the engine and test it for proper operation. Adjust the air-fuel mixture and idle speed as necessary.
Preventative Maintenance Tips
To keep your Jaguar's carburetor in top condition, regular maintenance is essential. Here are some tips:
Regular Cleaning: Periodically clean the carburetor to prevent dirt and debris buildup. This can help avoid issues like clogged jets and poor fuel mixture.
Fuel Additives: Use fuel additives that help clean the fuel system and prevent varnish buildup in the carburetor.
Check for Leaks: Regularly inspect the carburetor and surrounding components for signs of fuel or vacuum leaks. Addressing leaks promptly can prevent more severe problems down the road.
Proper Storage: If your Jaguar is not driven frequently, consider draining the carburetor or using a fuel stabilizer to prevent the fuel from becoming stale and gumming up the carburetor.
Conclusion
The carburetor is a vital component of classic Jaguars, and keeping it in good working order is essential for maintaining the performance and reliability of these iconic vehicles. By understanding common carburetor issues, following a systematic approach to troubleshooting, and performing regular maintenance, you can ensure that your Jaguar runs smoothly for years to come. Whether you’re a seasoned Jaguar enthusiast or a new owner, taking care of the carburetor is key to preserving the legacy and driving experience of these remarkable cars.
#jaguar car#jaguar car carburetor#jaguar service center#jaguar car maintenance#jaguar car mechanic#jaguar car services
0 notes
Last Seen Blogs

hkwoodstradingllc
Untitled

kin-homes
• Come Home •

kienokoru
消え残る

cynister-little-sister
Cynthia Elliott
