#cctutorials
Explore tagged Tumblr posts
Visit Tumblr Blog
Explore Tumblr blogs with no restrictions, modern design and the best experience.
Last Seen Tumblr Blogs


Fun Fact
The KCSC sent more than 20K requests to delete posts related to prostitution and porn to Tumblr from January to June 2017.
Text
extremely helpful Sims tip, also check out the default replacements and overrides by this creator. I have the most adorable cutting board override thanks to them <3

IF YOU CAN'T ENABLE CC 🌸
Sul sul ^^
After today updates, I wasn't able to enable CC again. It doesn't matter how many times I closed and launched the game.
So I remembered that this had already happened to me before.
If you're going through the same problem, this is how you can fix it:
🌸🌸🌸🌸🌸🌸🌸🌸
HOW TO ENABLE CC AGAIN:
1- On the game home page, in the bottom right corner of the screen, you can see what the current game version is. After today's update, mine was: 1.108.318.1020. Launch the game and check the number that appears for you.
2- In your game folder (Documents>Electronic Arts> The Sims 4) you'll find a file called "GameVersion". There will be a number.
The number in that file has to match the current game version number.
When I opened mine, it was "1.107.151.1020". So I just updated it to "1.108.318.1020" and saved. Then when I launched the game I could enable CC again.
Note 1: There's a "space" before the number in "GameVersion" (as if it were a paragraph). Keep that space. Change the numbers exactly where they are.
Note 2: If you prefer, before changing the number, make a backup copy of "GameVersion" just in case. It won't harm your game, but it's better, just to prevent and make it safer.
💎 If you want a tutorial video, I made one about it some time ago. You can watch it here :)
🌸🌸🌸🌸🌸🌸🌸🌸
ALSO IMPORTANT AFTER UPDATES:
Remember to delete "localthumbcache". You can find the tutorial here.
🌸🌸🌸🌸🌸🌸🌸🌸
I'm currently checking my CC to see if they're still working.
If anything, I'll let you know :)
I hope it helps you if you're having any problems :)
Happy Simming ^^
3K notes
·
View notes
Text
How to render in blender for cc previews..etc..

Hello everyone! So @sikoi asked me to do a tutorial on how I got one of my recent “WIP” pictures, so here it is !! So this might be a little long ! First this is something you can use to display your cc, or if you just want to build fun sets (that's more advanced but you get what I mean). P.S: You need some understanding of blender to be able to do this successfully.
What I am using:
Blender 2.82 or any of the 2.8’s (2.80, 2.81..)
Now, I am using the more recent version of blender because it renders images more smoothly and it helps me get a mannequin “skin” look. I tried using the later versions of blender and I came out with this:
Not what I want but doesn’t mean the picture isn’t nice.
Ok enough rambling here’s what to do.
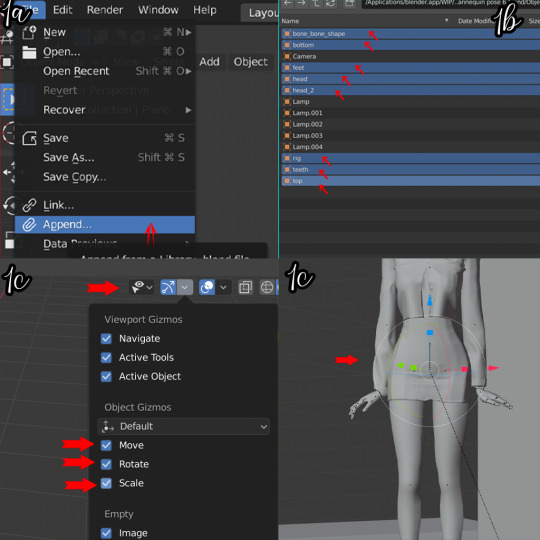
STEP 1: Adding your mannequins
First you make your poses, I have attached 3 different poses so you can experiment in blender : ℌ𝔢𝔯𝔢
* Go to the left side of the window and click on append and locate the mannequin pose you want.(If you make poses already this shouldn’t be too hard)
* Append the following from the file: bone_bone_shape, bottom, feet, head, head_2, rig,teeth, top.
You can append more than two files, so just follow the same process. I appended 3 files.- If you make cc all you need to do is append your clothing mesh and rig it to each mannequin.
* To scale and move your object, and rotate you need to go to the scroll bar ..the place where it shows pose mode, view, select pose..etc. Click the button next to the object that looks like a bow and arrow and select the move, rotate and scale botton
* Make sure the eyes of the rigs are turned on as you need to be able to move them, then click on the root bind button. It should be below the waist area. Use that to move your mannequins to whatever area you want to.
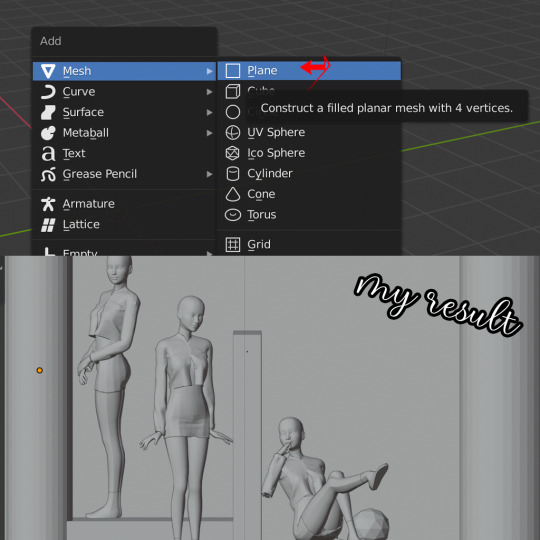
STEP 2: Set up your scene.
This is more or less the fun part of the rendering and you don’t have to follow what I did..be creative and make different sets!
*To get the shapes all you need to do is click shift+A and it should bring up an option menu that says add, click on mesh and you should see different shapes. I selected a plane first as my floor.
*Select your plane mesh again (or whatever object you choose) and move or scale depending on what you want. The move button looks like an arrow, the scale button looks like a box, and the rotate button looks like a sphere.
* Now do the same thing for any shape you would like to add. You can flatten the cubes and layer them on top of each other to make stairs, you can use the cylinders as chairs etc.
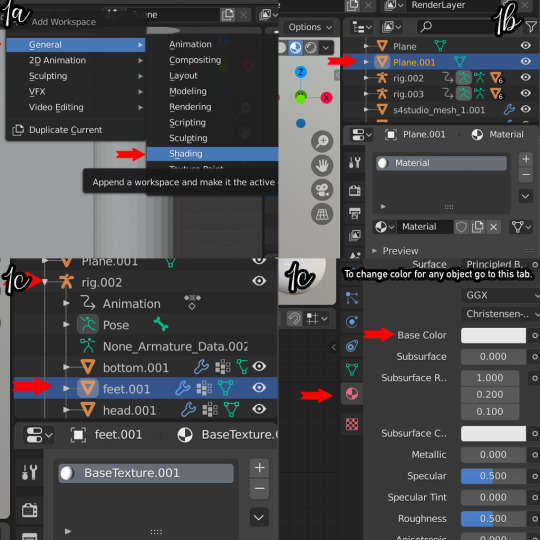
STEP 3- A splash of color
* Here comes the really fun part..adding color to everything!!. For this you need to go to the shading tab up on the menu..if you don’t see it scroll further right and click on the add button, click general and you should find shading.
* Now you can see your workspace more clearly and you can see the colors...this is the hardest part for me cause it is so hard choosing colors ..my suggestion? Have a theme, look up references.
* For this make sure you are in object mode. For the shapes all you need to do is select them, click on the little ball that looks like a soccer ball(that is the materials tab). Add new.
* You should have a list of things like “base color”, “metallic color”..etc. click on the base color and change it to what you like. Other settings I suggest playing with is specular..and metallic...they give it more shine in my opinion.
* For the mannequin click the little arrow next to the rig, then select any of the body parts(It could be the feet, the bottom..etc). Then do the exact same thing you did for the shapes.
STEP 4- Lighting, colors and so on
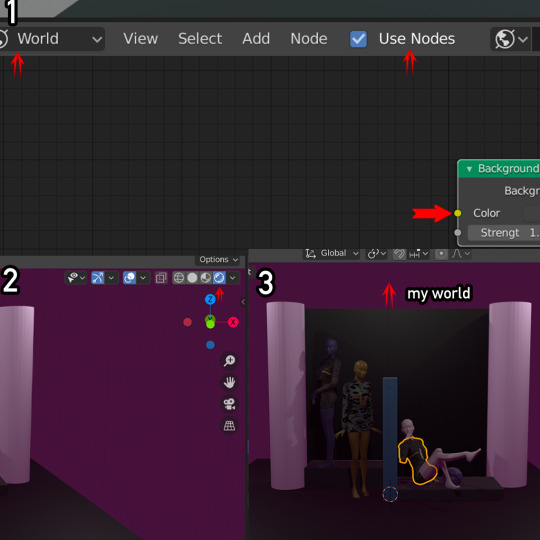
* Now to change the color of the “world”...you need to go to the bottom bar and then where it says object mode? Change it to world, on the same tab you will also see an option that says use nodes..click on that as well.
* It shows two things that have background and world output(pictures below).
* Click the area where it says color and change it to what you like.
* At this point you are probably wondering..why isn’t it showing up in my scene? ..well there’s an easy fix. At the top right you’ll see different “balls” ..click the last one. And there you have your cool looking scene.
Now for lights. Click shift+A again and scroll down to where it says light and click point (you can change it to area, sun..etc if you like the effect it gives)
Use the g key to move it around and position it where you want it to be…
To change the color of the light simply click on the light bulb to the right and where it says color change it. Then add light to wherever you want.

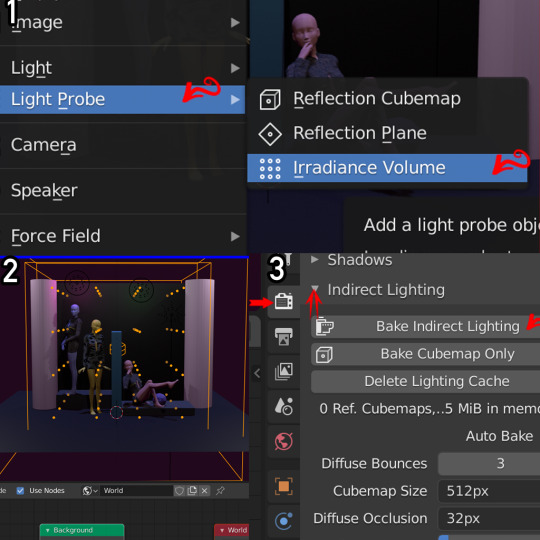
*This part is optional but if you want your picture to look more bright. Click shift+a again and click on light probe and click irradiance volume.
*Scale the box so that your objects are in the middle, and your box surrounds the scene. Then go to the left side click on the camera icon, click iridescent lighting and then select bake iridescent lighting.
STEP 5: The end..YAY!!
Now that you have gone through all that work...it is time to take pictures!!
* All you need to do is locate the camera icon and bring it to your scene
* Scale, move, rotate to set up your different angles. You can go back to the default tab to get a better view of the camera angles.
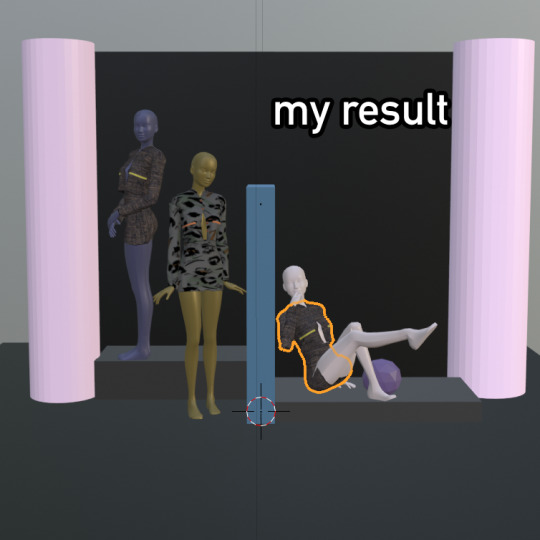
* Then once you have positioned your camera, go to the menu up top and click on render image. And there you have it! Your result.
* Just save your png. File your done!!

-This was super super long, but I didn’t know how to explain it without going into a lot of details. And also I included the blender files for this use only. Feel free to use it in your cc previews.
But DO NOT copy or use them to make a pose pack and claim it as your own.
Feel free to ask me any questions!!
#cctutorials#ts4 tutorial#thesims 4#thesims4#the sims#sims#ts4 custom content#sims cc#blender render#blender tutorial#sims4#ts4 wips#mannequin
107 notes
·
View notes
Video
youtube
Sims 4 CC Fundamentals Tutorial: Mesh, UVMap, and Texture
This the first of a series that goes over the fundamentals of Sims 4 custom content. This video was made for absolute beginners, recolor artists, or simmies interested in learning what CC is.
Before even getting started in a 3D modeling program like Blender, it is essential to understand these basic principals. I promise you it will save you so much time if you have an understanding of what's covered here before jumping right into making CC.
I put so much effort into making all of the graphics and demonstrations in this video from scratch instead of using ones commonly found on the internet. I did this because this video series is focused solely on making Sims 4 CC and there can be a lot of extra information that you don't necessarily need to know as a beginner. I also used a base game object from the Sims 4 so everything will look familiar when you move onto the next step.
The programs used to make CC can be very intimidating on their own, so I hope this overview gives you a good foundation for when you are ready to move onto the next step.
The next videos in this series will cover the programs needed to make CC and we will start building up a package file to test in the game.
Enjoy and reach out if you have any questions!
Watch the video here!
508 notes
·
View notes
Video
Clean Lower Thirds Motion Design from Antony Parker on Vimeo.
✔️ Download here: templatesbravo.com/vh/item/clean-lower-thirds/18814464
The project will be updated Version [information on project page] 20 Clean Lower Thirds Free Updates (1920×1080)resolutions Easily to customize with the Controller : Zoom, Color, Position Universal ExpressionsCompatible with After Effects [information on project page], CS6 and CCTutorial includedEasy to customize projectWell organizedVery Fast RenderNo plug-ins required
0 notes
Video
Marvelous Designer Sims 4 dress creation (+MD download)
0 notes
Video
youtube
The Sims 4 Studio: Standalone Recolor #2 Swatches
0 notes
Video
youtube
The Sims 4 Studio: Standalone Recolor #1 Creation
0 notes
Video
youtube
Introductory Tutorial to Blender for Sims 4 Creators
0 notes
Video
youtube
The Sims 4 | How To Frankenmesh Hair
0 notes
Video
youtube
The sims 4 || Lipstick Tutorial
1 note
·
View note
Video
vimeo
Clean Lower Thirds Motion Graphics from ✔️ Motion Graphics Designer on Vimeo.
✔️ Download here: videohive.net/item/clean-lower-thirds/18814464?ref=templatesbravo
✔️✔️ Unlimited Downloads 400,000+ Design Items: templatesbravo.com/elements ✔️✔️✔️ 2000+ verified professionals ready for your work: templatesbravo.com/studio
The project will be updated Version [information on project page] 20 Clean Lower Thirds Free Updates (1920×1080)resolutions Easily to customize with the Controller : Zoom, Color, Position Universal ExpressionsCompatible with After Effects [information on project page], CS6 and CCTutorial includedEasy to customize projectWell organizedVery Fast RenderNo plug-ins required
Youtube Subscribe Button Reminder: videohive.net/item/youtube-subscribe-and-likes-reminder/20392107?ref=templatesbravo
Other After Effects Templates: templatesbravo.com/
0 notes