#com powershell
Explore tagged Tumblr posts
Visit Tumblr Blog
Explore Tumblr blogs with no restrictions, modern design and the best experience.
Last Seen Tumblr Blogs


Fun Fact
Kazakhstan’s Minister of Communications and Informatics has blocked the Tumblr site because it contained 60 sites of terrorism, extremism, and pornography in 2015.
Text
Powershell syntax is not confusing
(you are just confused because posix compliant shells have corrupted your mind)
> do-action -param "string" $variable (do this first) [type]value
To declare a function:
function do-mythings {
param([int]$argument)
$argument + 5
}
> do-mythings -arg 5
10
That's all you need to get started.
Numbers are just numbers.
Inline math just works. Parentheses for order of operations.
Strings you put in quotes - double quotes allow interpolation, single quotes don't. This is the same as sh.
All variables are prefixed with $s. Even when declaring them. This makes slightly more sense than sh.
A region in {squirrelly braces} gets the [scriptblock] data type. It's like a lambda but comprehensible by mere mortals.
if (test) {success} else {fail} - the test is always executed first because (). Success and fail conditions only depending on the test. They're script blocks. No weird special syntax, if may as well be a user function.
Functions can be named anything, but the convention is Verb-PlaceThing. Not case sensitive.
Named arguments are specified with a single hyphen, like MIT Unix software (xorg for instance). If there is only one parameter the name is optional, etc. Param names can be abbreviated as long as they aren't ambiguous. This is also easy to follow with your own functions, unlike in sh (fricking hate getopt).
Types are inferred dynamically because it's easier to write scripts that way. If you need to force something (variable, expression, whatever) to have a specific type, put it in [brackets] beforehand. The type names are the same as c# and every other post-algol language. For comparison, posix shell only has one type, String.
To make an array, @(item1, item2, etc)
To make a hashtable, @{
key1 = val1
key2 = val2
}
Adding strings concatenates them together. Adding numbers adds their values. If this is not satisfactory, declare their types and it will work.
All expressions are technically objects with properties and methods. $var.property returns the value of that property. $var.invokeMethod() runs the method, which is just a function built into that data type by some poor intern 20 years ago.
Pipes (|) work similarly to sh, but transfer objects. The current object in the pipeline is always the variable $_.
As a bonus, here's a one-liner for opening Internet Explorer on Windows 11 (they lied, it's still there, they will never remove it)
(new-object -com "InternetExplorer.application").visible = $true
COM is an old windows api. Com Objects are just instances of apps. We open internet explorer as a com object.
The parentheses sets that as an expression, and its return value _is_ the exploder. It has properties like visibility, which is $false by default. This is boring so set it to $true. Now we have a real working instance of an app they've been trying to remove for years, because they can't actually remove it merely hide it away. As long as the windows api can parse HTML, this will still work.
#powershell#propaganda#i was going to write this up anyway but#you had to awaken the beast#you know who you are#mir rants#internet explorer
70 notes
·
View notes
Quote
「Microsoft COM」既知脆弱性に悪用報告 - 台湾狙う攻撃に使用 2018年に修正された「Microsoft COM for Windows」の脆弱性「CVE-2018-0824」が、台湾の政府系研究機関に対するサイバー攻撃に悪用されていたことがわかった。 「ShadowPad」や「Cobalt Strike」などを使用した台湾の政府系研究機関に対するサイバー攻撃において、同脆弱性の悪用が確認されたもの。攻撃グループ「APT41」が犯行に関与した可能性があるとしてCisco Systemsが報告した。 「CVE-2018-0824」は、異なるプログラミング言語で書かれたオブジェクト間のやり取りを可能にする「Microsoft COM for Windows」に判明した脆弱性。悪用されるとリモートよりコードを実行されるおそれがある。2018年5月にマイクロソフトより公開された月例パッチで修正された。 Ciscoでは、2023年8月に異常な「PowerShellコマンド」を検出。同年7月より開始された一連の攻撃で、端末上で権限を昇格させるためにメモリ上で「CVE-2018-0824」が悪用されていたことを確認した。 関与が疑われる「APT41」は、2012年以降活動が観測されており、中国が国家として主導していると見られるサイバー攻撃グループ。今回確認された攻撃についてCiscoは、同グループ独自の手法、インフラ、「ShadowPad」をはじめとするマルウェアの利用状況から「APT41」が関与した可能性を中���度と評価していると説明した。 同問題を受けて、米サイバーセキュリティインフラストラクチャセキュリティ庁(CISA)は、8月5日に「悪用が確認された脆弱性カタログ(KEV)」に同脆弱性を追加。行政機関に脆弱性への対応を促すとともに、広く注意を呼びかけている。
【セキュリティ ニュース】「Microsoft COM」既知脆弱性に悪用報告 - 台湾狙う攻撃に使用(1ページ目 / 全1ページ):Security NEXT
2 notes
·
View notes
Text
A couple tips to (try to) prevent something like this happening, from someone who works with cybersec:
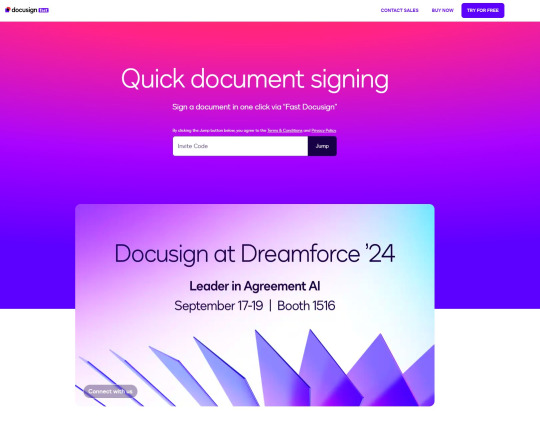
1) Docusign, which is the service impersonated here, is a real document signing service, but it's very common to see it impersonated in phishing and scam cases like this. So are Dropbox, Google Drive and other file sharing services; always double (or triple) check if the page looks at all odd.
Adding to the previous point: You can see page's url and domain (in this case the domain would be app[.]fastsigndocu[.]com) at the top of the page (if you've already clicked onto the page) or by hovering over the link with a mouse (if you're on your PC) - always check that the domain looks right! If you're not sure, google the service/web page first to check what the domain should be.
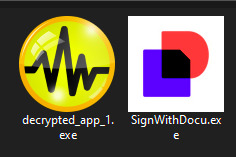
2.) If you're downloading something, always check the file type of what you're downloading! If the file is supposed to be a text/pdf document like in this case, it's name should NEVER end in ".exe" or ".bat". I suggest being careful of ".zip" and ".rar" files too, because it's very common to hide malware inside them. (And if you're purposefully downloading ".exe" files, please be careful of what you're downloading and from where)
3) Consider whether or not you actually need to stay constantly signed in to a service or site on your browser, or if you could sign in separately each time and log out when you're done (and clear your cookie data sometimes). I know, it's convenient to not have to sign in each time, but as seen here, it does mean that if your browser cookies are stolen, your MFA/2FA will probably not help you. If you don't use the service or website constantly/daily, you probably don't need to be signed in all the time.
Continuing point 3, the same goes double for any and all passwords saved in your browser data. There are malware going around right now that steal both your browser cookies AND the login data (meaning: any passwords saved in your browser), from any and all browsers the malware finds on your device. These are generally called "infostealers", but the one going around right now is called "Lumma stealer".
4) Related to point 3: Lumma stealer is currently being spread with fake Captcha (that "I'm not a robot" thing):
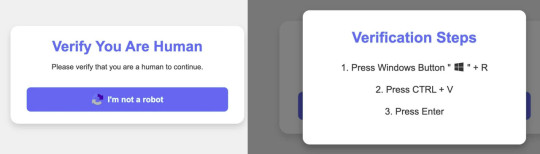
(image source: Finnish National Cybersecurity Center)
What happens is that if you click the button you see on the left, it copies a malicious Powershell script onto your clipboard and opens the pop-up you see on the right side of the image. Pressing the windows button + R opens the Windows "run command" window, to which Ctrl + V copies the script from your clipboard, and runs it when you press Enter (which then downloads and runs the actual malware file and anything saved in your browser data will be gone).
Never, EVER run ANYTHING in the run command window if you don't know exactly what it is and what it does.
Real Captcha will never ask you to do this. If you see a window like this, exit the page you were on immediately.
If you did run the script before realizing something is wrong, run a malware scan on the device, log out of everything you were signed in to on your browsers and change your passwords immediately.
5) Despite all of the above, do have 2FA/MFA activate whenever possible, because even if it might not help you if your session cookies are stolen, it will protect your account if your password is leaked some other way (such as from the service or website itself).
(And if anyone has any cybersec-related questions, feel free to ask!)
Someone accessed my Gmail 2 days ago, compromising my linked accounts like Twitter and YouTube. Here's how it happened, why I fell for it, and what you can learn to avoid making the same mistake:

The scam I fell victim to was a cookie hijack. The hacker used malicious software to steal my browser cookies (stuff like autofill, auto sign in, etc), allowing them to sign in to my Gmail and other accounts, completely bypassing my 2FA and other security protocols.
A few days ago, I received a DM from @Rachael_Borrows, who claimed to be a manager at @Duolingo. The account seemed legitimate. It was verified, created in 2019, and had over 1k followers, consistent with other managers I’d seen at the time n I even did a Google search of this person and didnt find anything suspicious.


She claimed that @Duolingo wanted me to create a promo video, which got me excited and managed to get my guard down. After discussing I was asked to sign a contract and at app(.)fastsigndocu(.)com. If you see this link, ITS A SCAM! Do NOT download ANY files from this site.
Unfortunately, I downloaded a file from the website, and it downloaded without triggering any firewall or antivirus warnings. Thinking it was just a PDF, I opened it. The moment I did, my console and Google Chrome flashed. That’s when I knew I was in trouble. I immediately did an antivirus scan and these were some of the programs it found that were added to my PC without me knowing:
The thing about cookie hijacking is that it completely bypasses 2FA which should have been my strongest line of defense. I was immediately signed out of all my accounts and within a minute, they changed everything: passwords, 2FA, phone, recovery emails, backup codes, etc.
I tried all methods but hit dead ends trying to recover them. Thankfully, my Discord wasn’t connected, so I alerted everyone I knew there. I also had an alternate account, @JLCmapping, managed by a friend, which I used to immediately inform @/TeamYouTube about the situation

Meanwhile, the hackers turned my YouTube channel into a crypto channel and used my Twitter account to spam hundreds of messages, trying to use my image and reputation to scam more victims

Thankfully, YouTube responded quickly and terminated the channel. Within 48 hours, they locked the hacker out of my Gmail and restored my access. They also helped me recover my channel, which has been renamed to JoetasticOfficial since Joetastic_ was no longer available.

Since then, I’ve taken several steps to secure my accounts and prevent this from happening again. This has been a wake-up call to me, and now I am more cautious around people online. I hope sharing it helps others avoid falling victim to similar attacks. (End)
(side note) Around this time, people also started to impersonate me on TikTok and YouTube. With my accounts terminated, anyone searching for "Joetastic" would only find the imposter's profiles. I’m unsure whether they are connected or if it’s just an unfortunate coincidence, but it made the situation even more stressful.


#cybersecurity#it ended up being more than a “couple” things#this is probably the longest comment on a post I've ever made#whoops#anyway don't run anything in powershell if you don't know what it is and check the domains
3K notes
·
View notes
Text
🔧 Fix TLD_NOT_SUPPORTED WHOIS Error ⚡Quick & Easy Guide

Introduction
Running a WHOIS lookup and suddenly getting hit with the error "TLD_NOT_SUPPORTED" can feel frustrating—especially when you're just trying to grab some basic domain information. But don’t worry, this isn’t as complicated as it sounds. In this guide, I’ll break down why this error happens and, more importantly, how you can fix it. Let’s dive in and get your WHOIS queries back on track. 🚀
🔍 What Is a WHOIS Lookup, Anyway?
Before we jump into the solutions, let’s quickly cover the basics. A WHOIS lookup helps you find details about a domain name—like who owns it, when it expires, and where it’s registered. It’s super handy for everything from buying domains to cybersecurity checks. But sometimes, when you try to look up a domain, you might hit this error: "Failed to perform lookup using WHOIS service: TLD_NOT_SUPPORTED." This simply means the WHOIS tool doesn’t recognize or support the Top-Level Domain (TLD) of the domain you’re searching for. TLDs are the endings of domain names—like .com, .net, .org, or newer ones like .ai or .tech.
⚠️ Why Am I Seeing This Error?
There are a few reasons why this might be happening: - The domain extension (TLD) isn’t supported by the WHOIS tool you’re using. - Your WHOIS tool is outdated and doesn’t recognize newer TLDs. - The server for that specific TLD isn’t properly set up in your system. - Your network or firewall might be blocking the WHOIS service. - Certain TLDs have restrictions due to privacy laws like GDPR. The good news? Each of these issues has a fix. Let’s go through them step by step.
🔧 How to Fix the TLD_NOT_SUPPORTED Error
✅ 1. Double-Check the Domain Name The simplest solution is often the most overlooked. A typo in the domain name could be causing the issue—especially if you’re dealing with unfamiliar TLDs. Try this: - Make sure the domain is spelled correctly. - Verify that the TLD is valid. For example, .comm or .coom won’t work—only .com will. Still stuck? Move on to the next step. 🔄 2. Use an Updated WHOIS Tool If your WHOIS tool is outdated, it might not recognize newer TLDs like .ai, .dev, or .app. How to update your WHOIS client: - On Linux (Debian-based): sudo apt update && sudo apt upgrade whois - On Windows: - Use PowerShell to install a fresh WHOIS tool. - You can also try using third-party WHOIS applications like Sysinternals WHOIS. ⚙️ 3. Set Up the Correct WHOIS Server Not all WHOIS clients automatically know where to look for every TLD. You might need to manually point your tool to the right server. Here’s how: - Run a WHOIS command using the specific TLD server: whois -h whois.nic. example. 🔗 Example: For an .ai domain, type: whois -h whois.nic.ai example.ai - On Linux systems, you can also edit the configuration file (/etc/whois.conf) to add missing WHOIS servers permanently. 🔒 4. Check Your Firewall and Network Settings WHOIS lookups typically use port 43. If your network or firewall blocks this port, you won’t be able to run WHOIS queries. Here’s what you can do: - Try connecting through a VPN to bypass network restrictions. - Check your firewall settings and ensure port 43 is open for outgoing traffic. 🛡 5. Domain Registry Restrictions Some domains hide WHOIS data due to privacy laws, like GDPR. In such cases, your lookup might not return any information, even if the TLD is supported. Solution: - Use registrar-specific WHOIS lookup tools. For example: - GoDaddy WHOIS - Namecheap WHOIS - Contact the domain registrar directly for more information.
📋 Quick Troubleshooting Cheat Sheet
Problem Solution Incorrect or unsupported TLD Double-check the domain name and TLD Outdated WHOIS tool Update your WHOIS client Missing WHOIS server configuration Manually set the correct WHOIS server Firewall blocking WHOIS requests Use a VPN or unblock port 43 Privacy restrictions on domain Use the registrar’s WHOIS tool
🎨 Visual: How WHOIS Lookup Works
Here’s a simple illustration of the WHOIS lookup process and where things can go wrong: 🎨 (Image suggestion: A flow diagram showing a user sending a WHOIS request, the query traveling through the internet, hitting the WHOIS server, and either receiving the data or getting blocked due to TLD_NOT_SUPPORTED.)
💡 Final Thoughts
The "TLD_NOT_SUPPORTED" error can be annoying, but it’s usually easy to fix once you know what’s causing it. Whether it’s updating your WHOIS tool, checking your domain’s spelling, or tweaking network settings, one of these solutions should have you sorted in no time. Read the full article
0 notes
Text
Como habilitar o RDP no Windows 10/11
O RDP (Remote Desktop Protocol) é um protocolo de comunicação desenvolvido pela Microsoft para facilitar o acesso remoto a servidores Windows, permitindo que usuários controlem desktops e aplicativos à distância. Baseado na família de padrões T.120, o RDP oferece uma conexão segura e eficiente entre o Terminal Server e o Cliente do Terminal Server, sendo capaz de transmitir dados como interface gráfica, comunicação de dispositivos e informações criptografadas. O protocolo opera através do TCP, criptografando e encapsulando os dados em pacotes antes de enviá-los pela rede. Esses dados passam por processos de segmentação, criptografia e encaminhamento, garantindo a segurança e integridade da comunicação.
Os principais componentes do RDP incluem:
- MCSMUX: Gerencia a comunicação entre múltiplos pontos, criando canais virtuais. - GCC: Controla a criação e exclusão de sessões e a comunicação em grupo. - Wdtshare.sys e Tdtcp.sys: Drivers responsáveis pela interface do usuário, compactação e criptografia dos dados. Além disso, o RDP é projetado para ser independente de protocolos de rede, embora atualmente funcione com TCP/IP.
Como habilitar o RDP no Windows 10/11
Veremos como habilitar o RDP no Windows 11 de maneira simples e rápida! - Prompt de Comando (CMD) - Powershell - Painel de controle Habilitar o RDP via CMD Siga estas etapas para habilitar o RDP no seu sistema usando o Prompt de Comando (CMD): 1. Na aba de pesquisas do menu iniciar, pesquise por CMD e execute como Administrador. 2. Execute o comando abaixo para permitir conexões RDP: 3. Em seguida, execute o comando para permitir que o firewall aceite conexões RDP: Após executar esses comandos, o **RDP** estará habilitado no seu sistema. Habilitar RDP via Powershell Abra o Powershell como administador e execute os comandos: Em seguida execute o próximo comando: Habilitar RDP via Painel de controle do Windows - Pressione a tecla Win e pesquise digitando Painel de Controle. - No Painel de Controle, clique em Sistema e Segurança e, em seguida, em Sistema. - Na janela Sistema, no menu à esquerda, clique em Configurações avançadas do sistema. - Na janela Propriedades do Sistema, vá até a guia Remoto. - Em Área de Trabalho Remota, marque a opção Permitir conexões remotas a este computador. - Clique em Aplicar e depois em OK.
Verifique configure o Firewall
O Firewall do Windows geralmente ajusta automaticamente as configurações para permitir o RDP. Caso necessário, acesse Painel de Controle > Todos os Itens do Painel de Controle > Windows Defender Firewall > Permitir um aplicativo ou recurso através do Windows Defender Firewall. Certifique-se de que a opção Área de Trabalho Remota esteja marcada.

Dicas Para otimizar o desempenho do RDP
- Usar conexões de alta largura de banda para melhorar a fluidez. - Habilitar a compressão de dados em redes com largura de banda limitada. - Manter o sistema atualizado para garantir segurança e performance. Read the full article
0 notes
Text
Automatize a Renomeação de Arquivos com PowerShell: Tutorial Abrangente do Cmdlet Rename-Item
Introdução à Renomeação de Arquivos Usando o PowerShell Renomear arquivos é uma tarefa comum e essencial para manter seus dados organizados e acessíveis. No entanto, quando você enfrenta a necessidade de renomear grandes quantidades de arquivos e pastas, o processo manual pode ser extremamente demorado e sujeito a erros. É aqui que o PowerShell se destaca como uma solução poderosa e…

View On WordPress
0 notes
Text

Solucionar problemas de sistema com o PowerShell http://dlvr.it/TBw2hV
0 notes
Text
Golpe de phishing do OneDrive engana usuários para executar script malicioso do PowerShell
Pesquisadores de segurança cibernética estão alertando sobre uma nova campanha de phishing que tem como alvo usuários do Microsoft OneDrive com o objetivo de executar um script malicioso do PowerShell. “Esta campanha depende fortemente de táticas de engenharia social para enganar os usuários e fazê-los executar um script do PowerShell, comprometendo assim seus sistemas”, disse o pesquisador de…

View On WordPress
#Cíber segurança#engenharia social#Malware#Microsoft#Phishing#powershell#segurança cibernética#segurança de e-mail#Segurança na nuvem
0 notes
Text
Procedural, Property//(Holding{ing}), Business Model, Brand, Distribution, Minimal Capital & Liability, Uneven Rate in place brought to in part Squarespace
Location location location in red q1toq3 8.8.8.8
Customer Accounts TCP/IP registered trademark Microsoft server provided top-to-bottom scale firm
Registry/Register Windows PowerShell authentication, update, search;
American International Primary
fund source quasi dot #com# (.) “Me ask yes” non-fungible tokens interior blockchain in the regard & [Bitcoin] BUZZWORD ALERT
aviation set Décor 1930 Garland Texas
Canada
Saudi Arabia
Arab Emirates
Operating
Income
Equity
%above chart in part%
0 notes
Text
como conectar em uma vpn via powershell
🔒🌍✨ Ganhe 3 Meses de VPN GRÁTIS - Acesso à Internet Seguro e Privado em Todo o Mundo! Clique Aqui ✨🌍🔒
como conectar em uma vpn via powershell
Comando Connect-Vpn no PowerShell
O comando Connect-Vpn no PowerShell é uma ferramenta poderosa que permite estabelecer conexões VPN de forma simples e eficiente através da linha de comando. Com essa funcionalidade, os usuários podem configurar e conectar-se a redes privadas de forma rápida, sem a necessidade de utilizar interfaces gráficas complexas.
Para utilizar o comando Connect-Vpn, basta abrir o PowerShell e digitar o comando seguido do nome da conexão desejada. É importante ressaltar que o PowerShell deve ser executado como administrador para garantir que as operações sejam realizadas com sucesso.
Além de se conectar a redes VPN, o comando Connect-Vpn também permite realizar outras operações, como a desconexão de redes ativas, listagem de conexões disponíveis e até mesmo a criação de novas conexões.
Essa ferramenta é especialmente útil para usuários que precisam configurar conexões VPN de forma frequente e desejam automatizar o processo. Com o PowerShell, é possível criar scripts e agendar tarefas para facilitar ainda mais o gerenciamento de redes privadas.
Em resumo, o comando Connect-Vpn no PowerShell é uma excelente opção para aqueles que buscam uma maneira prática e eficiente de se conectar a redes VPN diretamente da linha de comando. Com ele, é possível simplificar a configuração e o gerenciamento de conexões VPN, trazendo mais praticidade e segurança para os usuários.
Configurar conexão VPN via PowerShell
A configuração de uma conexão VPN através do PowerShell pode ser uma solução eficaz para garantir a segurança e a privacidade dos dados durante a navegação na internet. O PowerShell é uma ferramenta poderosa que permite automação de tarefas e configurações complexas no sistema operacional Windows.
Para configurar uma conexão VPN via PowerShell, é necessário iniciar abrindo o Powershell como administrador. Em seguida, você pode usar cmdlets específicos, como o Add-VpnConnection, para adicionar uma nova conexão VPN. É importante fornecer os parâmetros corretos, como o servidor de VPN, tipo de VPN e credenciais de autenticação.
Além disso, é possível utilizar cmdlets como Set-VpnConnection para configurar as propriedades da conexão VPN, como rediscagem automática, compartilhamento de VPN, entre outros. Para finalmente estabelecer a conexão VPN, você pode usar o cmdlet Start-VpnConnection.
A configuração de uma conexão VPN via PowerShell oferece mais controle e flexibilidade em comparação com a configuração manual através da interface gráfica do Windows. Além disso, a automação proporcionada pelo PowerShell torna o processo mais eficiente e escalável, sendo uma ótima opção para administradores de sistemas e usuários avançados.
Em resumo, configurar uma conexão VPN via PowerShell é uma maneira eficaz de garantir a segurança e a privacidade dos seus dados ao navegar na internet, oferecendo controle e automação para simplificar o processo de configuração.
Scripts para conectar VPN com PowerShell
Scripts para conectar VPN com PowerShell
Conectar-se a uma rede privada virtual (VPN) por meio de um script PowerShell pode ser uma maneira eficiente de automatizar esse processo. Com scripts personalizados, é possível conectar-se à VPN com facilidade e rapidez, poupando tempo e esforço.
Para criar um script para conectar-se a uma VPN com PowerShell, é necessário ter conhecimento básico da linguagem e dos comandos específicos para esse fim. Primeiramente, é preciso definir as configurações da VPN, como o endereço do servidor, o tipo de conexão e as credenciais de acesso.
Em seguida, pode-se utilizar comandos como Add-VpnConnection, Set-VpnConnection e Connect-VpnConnection para configurar e estabelecer a conexão com a VPN de forma automatizada. É importante garantir a segurança das informações, como senhas e chaves de acesso, ao criar e armazenar esses scripts.
Ao utilizar scripts para conectar VPN com PowerShell, é possível integrar esse processo a outras tarefas e rotinas do sistema, tornando a conexão mais prática e eficiente. Além disso, a automação proporcionada pelos scripts pode contribuir para melhorar a produtividade e a segurança da rede.
Portanto, se você deseja simplificar o processo de conexão à VPN e otimizar suas operações, considerar a criação de scripts com PowerShell pode ser uma solução adequada e vantajosa. Com um pouco de prática e conhecimento técnico, é possível desenvolver scripts personalizados e tirar proveito dos benefícios da automatização para conectar-se à VPN de forma mais eficaz.
Passos para estabelecer conexão VPN usando PowerShell
Ao estabelecer uma conexão VPN usando o PowerShell, é possível garantir um acesso seguro à rede, protegendo seus dados e informações confidenciais. Existem alguns passos que podem ser seguidos para realizar esse procedimento de forma eficiente.
O primeiro passo é abrir o PowerShell no seu computador. Para isso, basta digitar "PowerShell" na barra de pesquisa do menu Iniciar e clicar na opção correspondente. Em seguida, é importante executar o PowerShell como administrador para garantir todas as permissões necessárias.
O segundo passo consiste em utilizar o comando correto para estabelecer a conexão VPN. Você deve digitar o comando "Add-VpnConnection" seguido das informações da conexão, como o nome da conexão, o endereço do servidor VPN, o tipo de VPN, entre outros parâmetros.
No terceiro passo, é importante inserir suas credenciais de usuário para autenticar a conexão VPN. Você pode fazer isso digitando o comando "Get-Credential" no PowerShell e inserindo seu nome de usuário e senha quando solicitado.
Por fim, basta pressionar "Enter" para estabelecer a conexão VPN usando o PowerShell. Você poderá verificar o status da conexão e garantir que está protegido ao navegar na internet ou acessar recursos da rede de forma segura.
Seguindo esses passos, você poderá estabelecer uma conexão VPN de maneira rápida e eficiente usando o PowerShell, garantindo a segurança dos seus dados e comunicações online.
Conectar em uma VPN através do PowerShell
Conectar em uma VPN através do PowerShell pode facilitar a vida de muitos usuários que desejam estabelecer uma conexão segura e privada para acessar a internet. O PowerShell é uma poderosa ferramenta da linha de comando no Windows que permite automatizar tarefas e gerenciar configurações do sistema. Para conectar-se a uma VPN via PowerShell, é preciso seguir alguns passos simples.
O primeiro passo é abrir o PowerShell como administrador, digitando "PowerShell" na barra de pesquisa do Windows e clicando com o botão direito para executar como administrador. Em seguida, é necessário usar o comando 'Add-VpnConnection' seguido das configurações da VPN, como o nome da conexão, o endereço do servidor VPN, o tipo de VPN, entre outros.
Após configurar a conexão com o comando adequado, é possível conectar-se à VPN utilizando o comando 'Connect-VpnConnection' seguido do nome da conexão criada anteriormente. Este comando irá estabelecer a conexão com o servidor VPN de forma rápida e fácil, sem a necessidade de utilizar interfaces gráficas.
Conectar-se a uma VPN através do PowerShell pode ser especialmente útil para usuários mais avançados que preferem a praticidade e rapidez da linha de comando. Além disso, o PowerShell oferece uma série de opções e configurações avançadas que podem ser exploradas para personalizar ainda mais a conexão com a VPN.
Em resumo, conectar-se a uma VPN através do PowerShell é uma maneira eficaz e conveniente de garantir a segurança e a privacidade ao navegar na internet, proporcionando aos usuários maior controle sobre sua conexão.
0 notes
Video
youtube
Prompt de comando com PowerShell ISE
0 notes
Text
Instead of listing every reason why I hate windows, I am going tell the tale of the straw that broke the camel's back.
Background: When I was using Windows for my main PC, I would do an entire fresh install every 6 months because weird unexplainable issues would crop up and frustrate me. I think windows updates would corrupt some important file somewhere or something. Regardless of the actual issue, it wasn't worth the time to troubleshoot as a drive nuke is faster. I keep all important files on a NAS anyways.
Issue: I don't know if its still the case but at the time of my most recent windows reinstall, I found out that your account name would become the first 5 characters of your email when installing win11 with a Microsoft account. There was no option to change in setup. The email used for my Microsoft account is microsoft@[custom email domain].com so my account name was "micro". I did not want to be "micro" so I followed a guide to change my account name by changing a registry key (since there was no other way to change it). That broke my windows so hard that it refused to post until I did a factory reset on my motherboard. (needless to say the windows install was unsalvageable)
Meanwhile on Linux, I really appreciate the fact that I don't need to paste
New-ItemProperty -Path 'HKLM:\SOFTWARE\Microsoft\Windows\CurrentVersion\Policies\System' -Name EnableLinkedConnections -Value 1 -PropertyType 'DWord'
into powershell in order access admin directories on my NAS. Linux permissions are so much easier to mange.
gathering public correspondence: what is/was your least favorite part about windows? and what are your favorite parts about linux in comparison (if applicable)
147 notes
·
View notes
Text
Blog: Checking Open/Closed Ports with Test-NetConnection
In the realm of network troubleshooting and security, the ability to check open or closed ports is a fundamental task. PowerShell, a powerful scripting language, offers a convenient cmdlet known as Test-NetConnection for this purpose. This tool allows users to verify the status of ports on a target system, aiding in diagnosing connectivity issues and ensuring network security.
Understanding Test-NetConnection
Test-NetConnection is a versatile cmdlet that comes in handy for network administrators and IT professionals. By utilizing this command, one can quickly determine whether a specific port on a remote host is open or closed. This functionality is crucial for verifying network configurations, identifying firewall restrictions, and troubleshooting connectivity problems.
How to Use Test-NetConnection
The process of checking ports with Test-NetConnection is straightforward. Users can specify the target host and port number they wish to examine. The cmdlet then performs a series of tests to ascertain the status of the port, providing valuable feedback on whether it is open or closed.To initiate a port check using Test-NetConnection, one can follow these simple steps:
Open PowerShell on your system.
Enter the command: Test-NetConnection -ComputerName <TargetHost> -Port <PortNumber>
By executing this command, users can swiftly determine the accessibility of a specific port on the designated host.
Practical Applications
The utility of Test-NetConnection extends across various scenarios. From verifying the availability of essential services to conducting security assessments, this cmdlet serves as a valuable tool in the arsenal of network administrators. By promptly identifying open or closed ports, professionals can streamline troubleshooting processes and fortify network defenses.In conclusion, Test-NetConnection stands out as a reliable solution for assessing port status in network environments. Its simplicity and effectiveness make it an indispensable resource for individuals tasked with maintaining robust and secure networks.By leveraging PowerShell’s Test-NetConnection cmdlet, users can gain valuable insights into their network infrastructure, empowering them to address connectivity issues proactively and enhance overall system resilience.For more detailed information on using Test-NetConnection and its capabilities, refer to the provided resources from SID-500.COM, Acronis Knowledge Base, Reddit’s PowerShell community, Stack Overflow, and Microsoft Learn.
0 notes
Text
How exporting User Lists from AD Server with PowerShell Magic

Introduction
This guide helps system administrators handle user data in an Active Directory (AD) Server. It explains how to use PowerShell to export user lists from the AD Server in a simple step-by-step process. With PowerShell cmdlets, administrators can easily get, filter, and export user information without using additional software.
Pre-requisites
Before embarking on the user list export journey, ensure you have the necessary permissions to access the Active Directory and execute PowerShell commands. Additionally, confirm that PowerShell is installed on your system.
How to Install PowerShell on a Windows Server
If you don't have PowerShell installed in your system just follow the below steps and install Powershell features.
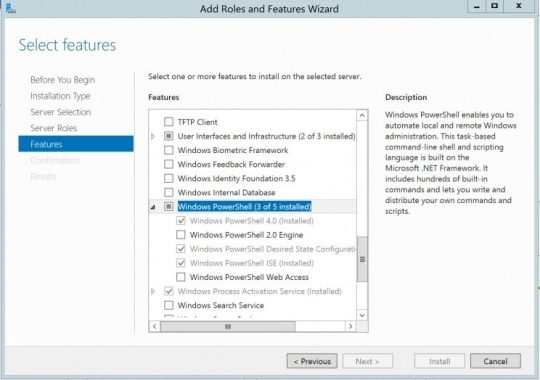
- Open the "Server Manager" on your Windows Server. - In the Server Manager dashboard, locate and click "Add roles and features." - In the "Add Roles and Features" Wizard, click "Next" until you reach the "Select features" page. - Scroll down and find "Windows PowerShell" under the "Features" section. - Check the box next to "Windows PowerShell" to select it. - Continue clicking "Next" until you reach the "Install" button. - Click "Install" to start the installation process. - Once the installation is complete, you'll see a confirmation message. - You can now access PowerShell by searching for it in the Start menu or launching it from the taskbar.
Step to export user list and understand the command line
Now we are going to know how to export the AD user list from the domain server and understand the command line of Powershell Understanding Command Line The key to unlocking your user list lies in two powerful PowerShell cmdlets: Get-ADUser: This retrieves user objects from AD, allowing you to select specific users or filter based on criteria. Export-Csv: Transforms the user data into a tidy CSV file, accessible by spreadsheets and analysis tools. Let's assemble your command lineup: Basic Export: Get-ADUser | Export-Csv -Path "C:usersyouadusers.csv" This simple code grabs all users and dumps them into a CSV file named "adusers.csv" on your user directory. However, for targeted operations, we have some handy tricks up our sleeve: Filtering by Specific Users: Get-ADUser-Identity "JohnDoe", "JaneDoe" | Export-Csv -Path "C:usersyoufiltered_users.csv" This command pulls only JohnDoe and JaneDoe, sending them to "filtered_users.csv." Filtering by Criteria: Get-ADUser -Filter * -SearchBase "OU=Marketing,DC=contoso,DC=com" -Properties Name,EmailAddress | Export-Csv -Path "C:usersyoumarketing_users.csv" This code grabs all users from the Marketing OU, retrieves their names and email addresses, and exports them to "marketing_users.csv." Bonus Tip: Customize your exported data by specifying desired properties after Get-ADUser. For example, -Properties Name,LastLogin,City select those specific attributes. Step-by-Step Guide: A Journey through PowerShell Prompts Open PowerShell: Launch the PowerShell application as an administrator from the Start menu. Craft your Export Command: Choose the appropriate combination of Get-ADUser and Export-Csv based on your desired user set and data. Execute the Command: Press Enter and watch PowerShell work its magic, retrieving and formatting your user data. Locate your CSV File: The specified path in your command will guide you to the freshly minted CSV file, ready for further analysis.
Conclusion
In conclusion, using PowerShell to export user lists from an AD Server is a powerful and efficient method for system administrators. This guide provides the necessary skills to retrieve user information easily, simplifying administrative tasks without the need for third-party software. Read the full article
#exportactivedirectoryuserstoexcel#exportadusersandgroupmembershiptocsv#Exportaduserslist#exportaduserspowershell#exportaduserstoanotherdomain#exportaduserstocsvpowershell#exportaduserstocsvwithallattributes#exportaduserstocsvwithallattributespowershell#exportaduserstoexcel#exportaduserswithallattributesexportaduserstocsv#exportaduserswithattributestocsv#exportaduserswithgroupmembership#exportalladuserstocsv#howtoexportuserlistfromactivedirectorypowershell
0 notes
Text
Creating HTML report with CSS (Cascading Style Sheet) using Powershell
Creating HTML report with CSS (Cascading Style Sheet) using Powershell
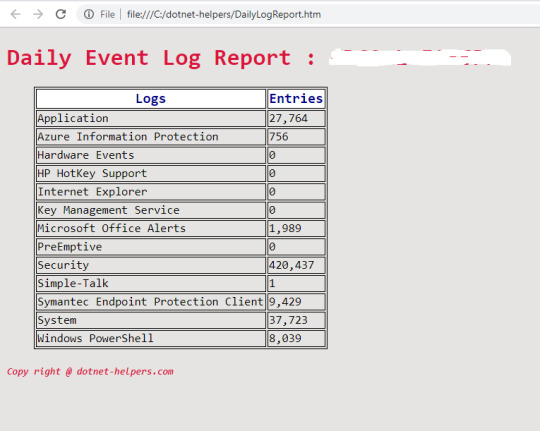
All Tech/non Tech peoples loves a nice HTML report for reviewing. Creating these type of reports in PowerShell is very easy and simple. These type of nice HTML reports can be generate with the help ConvertTo-HTML cmdlet. Converts Microsoft .NET Framework objects into HTML that can be displayed in a Web browser. The ConvertTo-HTML does not create an actual file, just the HTML code.This means that…
View On WordPress
#com powershell#convertto-html css#Creating HTML report with CSS (Cascading Style Sheet) using Powershell#creating html reports in powershell#powershell convert from html#powershell convert xml to html#powershell convertto-html fragment#powershell convertto-html multiple tables#powershell html report generator#powershell html report template#thiyagu dotnet-helpers
0 notes
Text
The worst part about PowerShell is that it was so close to being great, and then it tripped and broke its face on the last 50 feet of the marathon. Passing strongly-typed objects across pipes between your programs is awesome, and I won't apologize for saying so. Once you're used to it, going back to Unix shells which pass text— where you have to both format it on the output side with arcane flags and then parse it on the input side— feels barbaric.
But they fucked it all up when they made PowerShells pass around objects (specifically, .NET and COM objects) instead of data. I understand that this made both technical and corporate-political sense in the context of its day, especially when supposedly PowerShell was already delayed, but with that decision they snatched defeat from the jaws of victory. I really think that if PowerShell had been entirely based on passing around JSON (or hell, even XML) across pipes, it could've conquered the world.
powershell feels like it was designed as a prank on developers who want to use windows
204 notes
·
View notes