#config cache php
Explore tagged Tumblr posts
Visit Tumblr Blog
Explore Tumblr blogs with no restrictions, modern design and the best experience.
Last Seen Tumblr Blogs


Fun Fact
Tumblr was attacked by a cross-site scripting worm deployed by the Internet troll group GNAA on Dec 3, 2012.
Text
Solution to Laravel "table.cache Doesn't Exist"
Hey! as of recently, was implementing an e-commerce online office furniture store while using my favorite PHP Laravel framework. I landed on this "table.cache doesn't exist" error which took me time to realize that I was accessing a table which wan not yet created. So i had to correct this configuration setting and also create a table for storing the cached data. You no longer need to reinvent the wheel. A full guide to how to resolve Laravel "Table.Cache Doesn't Exist" is here.
#laravel#office furniture#online store#programming error#configuration solution#Resolve error#debugging#Debug Laravel#Laravel Config file#Laravel Framework#database#env file#config cache php#programming#deployment#ecommerce
0 notes
Text
Laravel customized portal development services
Laravel Customized Portal Development Services – Config Infotech
Introduction
With the advancement of the digital era, businesses need scalable and secure web solutions to remain competitive in the market. A custom portal offers specified functionalities that support particular business requirements, ensuring efficient operations and increased user interaction. Laravel, being one of the strongest PHP frameworks, is highly favored for its security, scalability, and performance. At Config Infotech, we offer Laravel Customized Portal Development Services, providing high-performance and feature-rich web portals customized to suit your business needs.
Why Use Laravel for Customized Portal Development?
Laravel has become a leading framework for web application development because of its vast features and flexibility. Here's why Laravel is the best framework for customized portal development:
MVC Architecture
Laravel adheres to the Model-View-Controller (MVC) architecture, maintaining a clean separation between presentation and logic. This makes development organized, efficient, and maintainable.
Strong Security Features
Security is a top priority in web development. Laravel provides in-built security features like CSRF protection, preventing SQL injection, and encryption to secure your portal from any threat.
Scalability and Performance Optimization
Laravel provides support for caching, database query optimization, and queue management, so that your portal is able to scale smoothly with high traffic and grow with your business.
Rapid Development with Built-in Features
Laravel is shipped with pre-configured libraries, authentication modules, and Blade templating engine, which accelerate development and cut down on time-to-market.
Seamless Third-Party Integrations
With Laravel, you can integrate third-party APIs, payment gateways, CRMs, and other business applications seamlessly, thereby increasing the functionality of your portal.
Our Laravel Customized Portal Development Services at Config Infotech
Config Infotech offers full-fledged Laravel portal development services for different industries, such as e-commerce, healthcare, finance, education, and others. Our skilled Laravel developers design customized solutions that meet your business objectives.
Custom Web Portal Development
We create completely tailored web portals with Laravel that offer a smooth user experience, effective data management, and top-notch security. Be it a B2B, B2C, or enterprise portal, we have the capability to create it.
E-commerce Portal Development
We design Laravel-based e-commerce portals with sophisticated features such as product management, shopping cart integration, secure payment options, inventory management, and order management.
CRM and ERP Solutions
Customer relationship and process management is essential for every business. Our CRM and ERP solutions based on Laravel facilitate automating tasks, monitoring customer interactions, and improving operational effectiveness.
Learning Management Systems (LMS)
Our Laravel-based LMS portals for educational institutions and corporate training centers feature online courses, user management, tracking of progress, and issuance of certificates.
Marketplace Portal Development
Our team creates multi-vendor marketplace portals with functionalities such as vendor dashboards, product catalogs, payment gateways, and customer reviews, allowing companies to operate an online marketplace effectively.
Booking and Appointment Portals
For healthcare, hospitality, or service-based businesses, we create bespoke booking and appointment portals that provide real-time scheduling, automated reminders, and smooth user experiences.
Custom API Development and Integration
Our Laravel developers design specialized APIs to connect your Laravel portal with third-party APIs like payment gateways, social media sites, shipping companies, and analytics services.
Laravel Maintenance and Support
Our support team offers regular maintenance, security patches, and performance upgrades to keep your portal in top condition and always secure.
The Config Infotech Advantage
Experienced Laravel Developers
Our team is comprised of highly experienced Laravel developers who have a rich background in developing customized portals across different industries.
Customized Solutions
We scrutinize your business needs deeply to provide customized solutions that meet your goals and workflow.
Agile Development Methodology
We adopt an agile development approach, which allows transparency, flexibility, and on-time delivery of projects.
Search Engine Optimization -Friendly Development
We develop Laravel portals in a way that they are search engine friendly, making them more visible and better ranked in search results.
Mobile-Responsive Design
Each of our Laravel portals is created to be highly responsive, supporting smooth user experience on desktops, tablets, and smartphones.
Cost-Effective Solutions
Our Laravel portal development solutions are offered at reasonable costs without sacrificing quality, enabling businesses to achieve their highest ROI.
How We Work – Our Development Process
At Config Infotech, we adhere to a methodical process in developing Laravel portals for smooth execution and successful project delivery.
Requirement Analysis
We begin by learning about your business requirements, objectives, and target users to establish the project scope.
Planning and Design
Our UI/UX developers design user-friendly and aesthetically pleasing wireframes and prototypes to maximize user interaction.
Development and Coding
Our Laravel professionals implement the portal with the latest technology to provide high-performance and secure solutions.
Testing and Quality Assurance
We test the portal rigorously to make it bug-free, fast, and secure prior to deployment.
Deployment and Launch
We deploy the portal on your server after approval and ensure a seamless launch.
Post-Launch Support
We offer ongoing support, updates, and improvements to ensure your portal continues to run efficiently.
Industries We Serve
We provide Laravel customized portal development services to numerous industries, including:
E-commerce and Retail
Healthcare and Telemedicine
Finance and Banking
Education and E-Learning
Real Estate and Property Management
Hospitality and Travel
Manufacturing and Logistics
Get Started with Config Infotech
Whether you need a tailored Laravel portal that boosts your business processes and fuels growth, Config Infotech is your go-to technology partner. Our knowledge of Laravel development, smooth integration, and out-of-the-box solutions guarantees your business remains at the forefront in the digital age.
Call us now to talk through your project and take the initial step towards an influential, flexible, and safe web portal personalized for you.
0 notes
Text

How To Get Started With Laravel? — A Beginner’s Guide By Sohojware
Laravel, a free, open-source PHP web framework, has become popular worldwide for web developers. Laravel streamlines development by providing a robust foundation for building modern web applications. This comprehensive guide from Sohojware, a leading US-based software development company, will equip you with the essential knowledge to embark on your Laravel development journey.
Why Choose Laravel?
There are many reasons why Laravel stands out in the world of web frameworks. Here are a few key benefits:
Elegant MVC Architecture: Laravel enforces the Model-View-Controller (MVC) design pattern, promoting clean code separation and maintainability. This structure makes your code easier to understand, test, and scale as your application grows.
Object-Oriented Approach: Built on top of PHP’s object-oriented capabilities, Laravel fosters code reusability and promotes a well-organized development workflow.
Built-in Features: Laravel comes packed with a plethora of pre-built functionalities, including authentication, authorization, routing, caching, database management, and more. This saves you time and effort by eliminating the need to develop these features from scratch.
Artisan CLI Tool: Laravel’s powerful command-line interface (CLI) tool, Artisan, simplifies common development tasks like generating models, migrations, controllers, and other boilerplate code. This speeds up development significantly.
Active Community and Ecosystem: Laravel boasts a large and active community of developers who contribute to its continuous improvement. This ensures access to extensive documentation, tutorials, and readily available packages for various functionalities.
Getting Started with Laravel
Now that you’re convinced about the advantages of Laravel, let’s delve into the steps to get you started:
1. Prerequisites:
Before diving into Laravel development, ensure you have the following tools installed on your system:
PHP (version 7.4 or later): Download and install the latest version of PHP from the official website (https://www.php.net/downloads/).
Composer: Composer is a dependency manager for PHP. Follow the installation instructions on the Composer website (https://getcomposer.org/).
2. Install Laravel:
There are two primary methods for installing Laravel:
Method 1: Using Composer:
Open your terminal and navigate to your desired project directory. Then, run the following command:
Bash

Replace “your-project-name” with your preferred application name. This command will create a new Laravel project directory with all its dependencies installed.
Method 2: Using Laravel Installer:
If you don’t have Composer installed, you can download the Laravel installer from the official website ([invalid URL removed]). Once downloaded, execute the following command in your terminal:
Bash

3. Set Up Database:
Laravel utilizes a database to store application data. You can choose from various database management systems like MySQL, PostgreSQL, or SQLite. Configure your database credentials in the .env file located at the root of your project directory.
4. Start the Development Server:
Laravel provides a built-in development server to run your application locally. Navigate to your project directory in the terminal and execute the following command to start the server:
Bash

This will typically launch your application at http://localhost:8000 in your web browser.
5. Explore the Project Structure:
Laravel adheres to a well-defined directory structure, making locating and managing different application components easy. Take some time to familiarize yourself with the key directories like app, config, public, resources, and routes, each serving specific functionalities.
Building Your First Laravel Application
Now that you have a basic Laravel setup, let’s create a simple application to demonstrate its functionalities. We’ll build a basic blog system where users can view a list of posts.
1. Create a Model:
A model represents the data structure of your application. To create a model for posts, run the following Artisan command in your terminal:
Bash
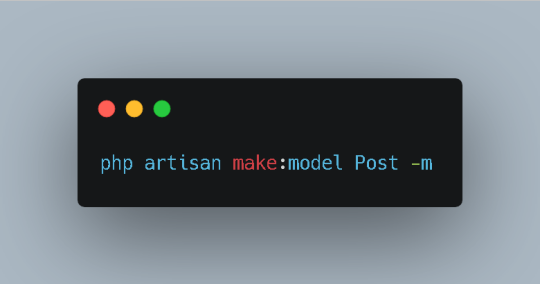
This command generates a Post.php file within the app directory. Modify this file to define the attributes associated with a post, such as title, content, and author.
2. Create a Migration:
A migration is a version control system for your database. It allows you to define changes to your database schema and easily roll them back if necessary. To create a migration for the Post model, run the following Artisan command:
Bash
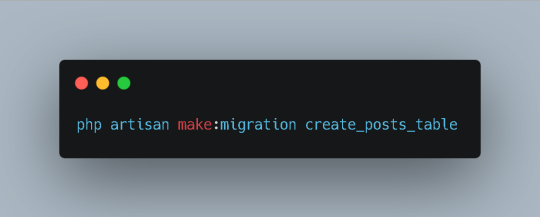
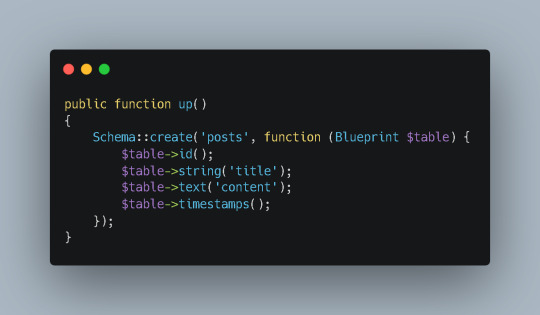
This will generate a new migration file within the database/migrations directory. Open the file and add the necessary columns to the up method. For example:
PhP
3. Run the Migration:
To apply the changes defined in the migration to your database, run the following command:
Bash
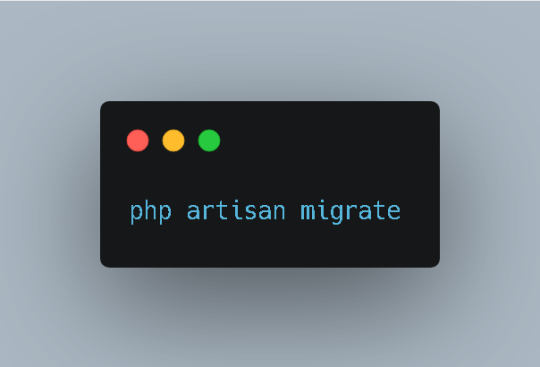
This will create the posts table in your database.
4. Create a Controller:
A controller handles user requests and interacts with your models. To create a controller for managing posts, run the following Artisan command:
Bash

This will generate a PostController.php file within the app/Http/Controllers directory. Inside the controller, define methods to handle different actions, such as displaying a list of posts, creating a new post, and editing or deleting existing posts.
5. Define Routes:
Routes map URLs to specific controller actions. To define routes for your blog application, open the routes/web.php file and add the following code:
Php

This route will map the root URL (http://localhost:8000) to the index method of the PostController class.
6. Create a View:
Views are responsible for rendering HTML content. To create a view for displaying the list of posts, run the following Artisan command:
Bash
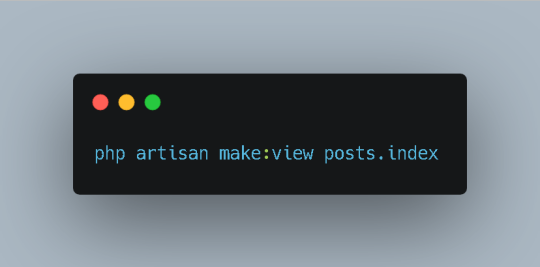
This will generate a posts/index.blade.php file within the resources/views directory. Inside the view, write the HTML code to display the list of posts.
7. Complete the Controller:
In the index method of the PostController, retrieve the list of posts from the database using the Post model and pass it to the view:
PhP

8. Test Your Application:
Access http://localhost:8000 in your web browser to see the list of posts displayed on the page.
Conclusion
This guide has provided you with a solid foundation for getting started with Laravel. By following these steps and exploring the framework’s rich features, you can efficiently build robust and scalable web applications. Remember, practice is key to mastering Laravel. Start experimenting with different features and building your own projects to enhance your skills.
FAQs
What is the difference between Laravel and CodeIgniter?
Laravel and CodeIgniter are both popular PHP frameworks, but they have distinct approaches and features. Laravel emphasizes convention over configuration and provides a more expressive syntax, while CodeIgniter offers a more lightweight and flexible structure. The choice between the two often depends on project requirements and developer preferences.
Can I use Laravel for large-scale applications?
Absolutely! Laravel is designed to handle complex and high-traffic applications. Its robust architecture, scalability features, and active community support make it a suitable choice for enterprise-level projects.
How does Laravel compare to other popular frameworks like Symfony and Yii?
Laravel, Symfony, and Yii are all powerful PHP frameworks with their own strengths and weaknesses. Laravel is known for its ease of use and expressive syntax, Symfony offers a more modular and customizable approach, and Yii emphasizes performance and efficiency. The best framework for your project depends on your specific needs and preferences.
Does Sohojware offer Laravel development services?
Yes, Sohojware provides professional Laravel development services. Our team of experienced developers can help you build custom Laravel applications tailored to your business requirements.
How can I learn Laravel more effectively?
The best way to learn Laravel is through hands-on practice and experimentation. Start by following tutorials and building small projects. As you gain confidence, gradually tackle more complex applications. Additionally, consider joining online communities and forums where you can connect with other Laravel developers and seek help when needed.
1 note
·
View note
Photo
Deploy laravel project with docker swarm We check three major step in this guide Setup laravel project with docker compose Deploy the stack to the swarm Create gitlab-ci Setup laravel project with docker compose we will explore the process of deploying a laravel project using docker swarm and setting up a CI/CD pipline to automate the deployment process. Now let’s start with containerize a laravel project with docker compose we need three separate service containers: An app service running PHP7.4-FPM; A db service running MySQL 5.7; An nginx service that uses the app service to parse PHP code Step 1. Set a env variable in project In root directory of project we have .env file now we need to update some variable DB_CONNECTION=mysql DB_HOST=db DB_PORT=3306 DB_DATABASE=experience DB_USERNAME=experience_user DB_PASSWORD=your-password Step 2. Setting up the application’s Docekrfile we need to build a custom image for the application container. We’ll create a new Dockerfile for that. Docker file FROM php:7.4-fpm # Install system dependencies RUN apt-get update && apt-get install -y \ git \ curl \ libpng-dev \ libonig-dev \ libxml2-dev \ zip \ unzip # Clear cache RUN apt-get clean && rm -rf /var/lib/apt/lists/* # Install PHP extensions RUN docker-php-ext-install pdo_mysql mbstring exif pcntl bcmath gd # Get latest Composer COPY --from=composer:latest /usr/bin/composer /usr/bin/composer # Set working directory WORKDIR /var/www Step 3. Setting up Nginx config and Database dump file In root directory create a new directory called docker-compose Now we need two other directories, a nginx directory and mysql directory So we have this two route in our project laravel-project/docker-compose/nginx/ laravel-project/docker-compose/mysql/ In nginx directory create a file called experience.conf we write nginx config in this file like: server { listen 80; index index.php index.html; error_log /var/log/nginx/error.log; access_log /var/log/nginx/access.log; root /var/www/public; location ~ \.php$ { try_files $uri =404; fastcgi_split_path_info ^(.+\.php)(/.+)$; fastcgi_pass app:9000; fastcgi_index index.php; include fastcgi_params; fastcgi_param SCRIPT_FILENAME $document_root$fastcgi_script_name; fastcgi_param PATH_INFO $fastcgi_path_info; } location / { try_files $uri $uri/ /index.php?$query_string; gzip_static on; } } In mysql directory create a file called init_db.init we write mysql initialization in this file like: DROP TABLE IF EXISTS `places`; CREATE TABLE `places` ( `id` bigint(20) unsigned NOT NULL AUTO_INCREMENT, `name` varchar(255) COLLATE utf8mb4_unicode_ci NOT NULL, `visited` tinyint(1) NOT NULL DEFAULT '0', PRIMARY KEY (`id`) ) ENGINE=InnoDB AUTO_INCREMENT=12 DEFAULT CHARSET=utf8mb4 COLLATE=utf8mb4_unicode_ci; INSERT INTO `places` (name, visited) VALUES ('Berlin',0),('Budapest',0),('Cincinnati',1),('Denver',0),('Helsinki',0),('Lisbon',0),('Moscow',1); Step 4. Creating a multi container with docker-compose We need a building three container that should share networks and data volumes. Ok so create a docker-compose file in root directory of project For craete a network for connecting services we define network in docker-compose file like this: networks: experience: driver: bridge App service: app: build: context: ./ dockerfile: Dockerfile image: travellist container_name: experience-app restart: unless-stopped working_dir: /var/www/ volumes: - ./:/var/www networks: - experience DB service: db: image: mysql:8.0 container_name: experience-db restart: unless-stopped environment: MYSQL_DATABASE: ${DB_DATABASE} MYSQL_ROOT_PASSWORD: ${DB_PASSWORD} MYSQL_PASSWORD: ${DB_PASSWORD} MYSQL_USER: ${DB_USERNAME} SERVICE_TAGS: dev SERVICE_NAME: mysql volumes: - ./docker-compose/mysql:/docker-entrypoint-initdb.d networks: - experience Nginx service: nginx: image: nginx:1.17-alpine container_name: experience-nginx restart: unless-stopped ports: - 8000:80 volumes: - ./:/var/www - ./docker-compose/nginx:/etc/nginx/conf.d networks: - experience So our docker-compose file be like this: version: "3.7" services: app: build: context: ./ dockerfile: Dockerfile image: travellist container_name: experience-app restart: unless-stopped working_dir: /var/www/ volumes: - ./:/var/www networks: - experience db: image: mysql:8.0 container_name: experience-db restart: unless-stopped environment: MYSQL_DATABASE: ${DB_DATABASE} MYSQL_ROOT_PASSWORD: ${DB_PASSWORD} MYSQL_PASSWORD: ${DB_PASSWORD} MYSQL_USER: ${DB_USERNAME} SERVICE_TAGS: dev SERVICE_NAME: mysql volumes: - ./docker-compose/mysql:/docker-entrypoint-initdb.d networks: - experience nginx: image: nginx:alpine container_name: experience-nginx restart: unless-stopped ports: - 8100:80 volumes: - ./:/var/www - ./docker-compose/nginx:/etc/nginx/conf.d/ networks: - experience networks: experience: driver: bridge Step 5. Running application with docker compose Now we can build the app image with this command: $ docker-compose build app When the build is finished, we can run the environment in background mode with: $ docker-compose up -d Output: Creating exprience-db ... done Creating exprience-app ... done Creating exprience-nginx ... done to show information about the state of your active services, run: $ docker-compose ps Well in these 5 simple steps, we have successfully ran our application. Now we have a docker-compose file for our application that needs for using in docker swarm. Let’s start Initialize docker swarm. After installing docker in your server *attention: To install Docker, be sure to use the official documentation install docker check docker information with this command: $ docker info You should see “swarm : inactive” in output For activate swarm in docker use this command: $ docker swarm init The docker engine targeted by this command becomes a manager in the newly created single-node swarm. What we want to use is the services of this docker swarm. We want to update our service like app with docker swarm, The advantage of updating our service in Docker Swarm is that there is no need to down the app service first, update the service, and then bring the service up. In this method, with one command, we can give the image related to the service to Docker and give the update command. Docker raises the new service without down the old service and slowly transfers the load from the old service to the new service. When running Docker Engine in swarm mode, we can use docker stack deploy to deploy a complete application stack to the swarm. The deploy command accepts a stack description in the form of a Compose file. So we down our docker compose with this command: $ docker-compose down And create our stack. ok if everything is ok until now take a rest Deploy the stack to the swarm $ docker stack deploy --compose-file docker-compose.yml For example : $ docker stack deploy --compose-file docker-compose.yml staging Probably you see this in output: Creating network staging_exprience Creating service staging_nginx failed to create service staging_nginx: Error response from daemon: The network staging_exprience cannot be used with services. Only networks scoped to the swarm can be used, such as those created with the overlay driver. This is because of “driver: bridge” for deploying your service in swarm mode you must use overlay driver for network if you remove this line in your docker compose file When the stack is being deployed this network will be create on overlay driver automatically. So our docker-compose file in network section be like this: networks: experience: And run upper command: $ docker stack deploy --compose-file docker-compose.yml staging For now you probably you see this error : failed to create service staging_nginx: Error response from daemon: The network staging_experience cannot be used with services. Only networks scoped to the swarm can be used, such as those created with the overlay driver. Get network list in your docker: $ docker network ls Output: NETWORK ID NAME DRIVER SCOPE 30f94ae1c94d staging_experience bridge local So your network has local scope yet because in first time deploy stack this network save in local scope and we must remove that by: $ docker network rm staging_experience After all this run command: $ docker stack deploy --compose-file docker-compose.yml staging Output: Creating network staging_experience Creating service staging_app Creating service staging_db Creating service staging_nginx Now get check stack by: $ docker stack ls Output: NAME SERVICES staging 3 And get service list by: $ docker service ls Output: If your REPLICAS is 0/1 something wrong is your service For checking service status run this command: $ docker service ps staging_app for example And for check detail of service run this command: $ docker service logs staging_app for example Output of this command show you what is problem of your service. And for updating your a service with an image the command you need is this: $ docker service update --image "<your-image>" "<name-of-your-service>" --force That's it your docker swarm is ready for zero down time deployment :))) Last step for have a complete process zero down time deployment is create pipeline in gitlab. Create gitlab-ci In this step we want create a pipeline in gitlab for build, test and deploy a project So we have three stage: stages: - Build - Test - Deploy Ok let’s clear what we need and what is going on in this step . We want update laravel project and push our change in gitlab create a new image of this changes and test that and after that log in to host server pull that updated image in server, and update service of project. For login to server we need define some variable in gitlab in your repository goto setting->CI/CD->VARIABLES Add variable Add this variables: CI_REGISTRY : https://registry.gitlab.com DOCKER_AUTH_CONFIG: { "auths": { "registry.gitlab.com": { "auth": "<auth-key>" } } } auth-key is base64 hash of “gitlab-username:gitlab-password” SSH_KNOWN_HOSTS: Like 192.168.1.1 ssh-rsa AAAAB3NzaC1yc2EAAAADAQABAAABgQCGUCqCK3hNl+4TIbh3+Af3np+v91AyW4+BxXRtHBC2Y/uPJXF2jdR6IHlSS/0RFR3hOY+8+5a/r8O1O9qTPgxG8BSIm9omb8YxF2c4Sz/USPDK3ld2oQxbBg5qdhRN28EvRbtN66W3vgYIRlYlpNyJA+b3HQ/uJ+t3UxP1VjAsKbrBRFBth845RskSr1V7IirMiOh7oKGdEfXwlOENxOI7cDytxVR7h3/bVdJdxmjFqagrJqBuYm30 You can see how generate ssh key in this post: generate sshkey SSH_PRIVATE_KEY: SSH_REMOTE_HOST: root@ This is your variables in gitlab. So let’s back to gitlab-ci In root directory of project create a new file .gitlab-ci.yml and set build stage set test stage And in the last set deploy stage like: stages: - Build - Test - Deploy variables: IMAGE_TAG: $CI_REGISTRY_IMAGE:$CI_COMMIT_REF_SLUG-$CI_COMMIT_SHORT_SHA build: stage: Build image: docker:20.10.16 services: - docker:dind script: - docker login -u $CI_REGISTRY_USER -p $CI_REGISTRY_PASSWORD $CI_REGISTRY - docker build --pull -f Dockerfile -t $IMAGE_TAG . - docker push $IMAGE_TAG preparation: stage: Test image: $IMAGE_TAG needs: - build script: - composer install artifacts: expire_in: 1 day paths: - ./vendor cache: key: ${CI_COMMIT_REF_SLUG}-composer paths: - ./vendor unit-test: stage: Test image: $IMAGE_TAG services: - name: mysql:8 alias: mysql-test needs: - preparation variables: APP_KEY: ${APP_KEY} MYSQL_ROOT_PASSWORD: ${MYSQL_ROOT_PASSWORD} MYSQL_DATABASE: ${MYSQL_DATABASE} DB_HOST: ${DB_HOST} DB_USERNAME: ${DB_USERNAME} DB_PASSWORD: ${DB_PASSWORD} script: - php vendor/bin/phpunit staging-deploy: stage: Deploy extends: - .deploy-script variables: APP: "stackdemo_app" STACK: "travellist-staging" only: - develop needs: - unit-test environment: name: stage .remote-docker: variables: DOCKER_HOST: ssh://${SSH_REMOTE_HOST} image: docker:20.10.16 before_script: - eval $(ssh-agent -s) - echo $IMAGE_TAG - echo "$SSH_PRIVATE_KEY" | tr -d '\r' | ssh-add - - mkdir -p ~/.ssh - chmod 700 ~/.ssh - echo "HOST *" > ~/.ssh/config - echo "StrictHostKeyChecking no" >> ~/.ssh/config - echo -n $CI_REGISTRY_PASSWORD | docker login -u $CI_REGISTRY_USER --password-stdin $CI_REGISTRY .deploy-script: extends: - .remote-docker script: - cp $develop_config /root/project/core - docker pull $IMAGE_TAG - docker service update --image "$IMAGE_TAG" "$APP" --force dependencies: [] Change something in your project and push to gitlab and wait for it To see all pipeline pass like this : And this is beautiful. https://dev.to/holyfalcon/deploy-laravel-project-with-docker-swarm-5oi
0 notes
Text
Self vs Managed WordPress Hosting : An In-Depth Comparison [2023]

The main difference between Self Hosting and Managed WordPress hosting is that Self hosting gives you full control and responsibility for your WordPress website’s server and infrastructure, whereas managed WordPress hosting provides a hands-off approach, letting the host handle security, updates, and performance optimization.
If you're starting a new WordPress website, one of the biggest decisions you'll make is whether to go with self-hosted WordPress or use a managed WordPress hosting provider.
This choice affects everything from your monthly hosting bill to the amount of control you have over your site. It's important to weigh the pros and cons carefully based on your specific needs.
In this guide, we'll dive deep into the self-hosting vs managed WordPress hosting debate and equip you with everything you need to decide. Buckle up for a bumpy ride down the WordPress hosting rabbit hole!
Self-Hosted WordPress Explained
Self-hosting means you rent a virtual private server (VPS) or dedicated server, install WordPress yourself, and manage everything at the system and application level.
With self-hosted WordPress, you take complete ownership over your hosting environment. Here's a closer look at what's involved :
Hardware Provisioning
The first step is sourcing the actual physical server your site will run on. You can rent a VPS or dedicated server from providers like :
DigitalOcean
Vultr
Linode
AWS
Google Cloud
VPS plans start around $10/month for basic setups. Dedicated servers are more expensive but give you sole access to the underlying hardware.
Make sure to choose a provider with servers near your audience for fastest performance.
Software Setup & Configuration
Once you have your VPS or dedicated box, it's time to set up the software powering your WordPress site :
Install a Linux distro like Ubuntu or CentOS
Configure the LAMP or LEMP stack (Linux, Apache/Nginx, MySQL, PHP)
Tweak the Apache/Nginx config for optimal WordPress performance
Secure MySQL, PHP, and other services
Install caching like Varnish and php-fpm
Set up a control panel like CPanel for easier management
This process requires deep Linux server and WordPress expertise. But the payoff is getting everything finely tuned for your particular site's needs.
Ongoing Management
Server setup is just the beginning. With self-hosted infrastructure, you must handle all ongoing management and maintenance yourself including :
OS and software updates
Security patching
WordPress core, plugin and theme updates
Backups and disaster recovery
Monitoring uptime and performance
Optimizing the stack as needed
Troubleshooting any issues that arise
The work never stops when you self-host! You must stay vigilant to keep your site running smoothly.
The Pros of Self-Hosted WordPress
Let's recap the biggest benefits of rolling your own WordPress hosting environment :
Total control: You make all hosting decisions to perfectly fit your specific needs.
Flexibility and customization: You can configure server software like PHP, MySQL, Nginx however you want.
Cost savings: Once optimized, self-hosted sites can cost less per month than managed WordPress hosting.
Performance and scalability: You can fully optimize and tune the server for your particular site.
No vendor lock-in: You can easily migrate between different server providers.
When to Consider Self-Hosted WordPress
Self-hosted infrastructure makes the most sense for :
Developers and engineers with server administration expertise
Sites that require total control over the stack
Companies with large budgets for hosting costs
Complex sites anticipating high traffic and load
Businesses wanting to scale sites across multiple servers
Anyone running advanced stack configurations like HHVM or custom LEMP
Potential Downsides of Self-Hosted
Self-hosting isn't all sunshine and rainbows. Here are the biggest challenges to weigh :
Time investment: Server setup and management is extremely time consuming and complex.
Technical skill required: You must have significant sysadmin, DevOps, and WordPress expertise.
Maintenance overhead: OS, software, and WordPress updates are a never-ending chore.
Security liability: You're fully responsible for protecting against threats and vulnerabilities.
No support: If (and when) problems occur, you're on your own to fix them.
Higher learning curve: Be prepared to invest many hours mastering server configuration.
As you can see, self-managed WordPress hosting is definitely not for the faint of heart!
Managed WordPress Hosting Overview
In contrast to the DIY approach of self-hosting, managed WordPress hosting providers take care of everything related to your infrastructure and server environment.
Companies like WordPress Engine, Kinsta, and Pagely handle all aspects like :
Server provisioning
WordPress installation
Software setup and configuration
Ongoing maintenance and management
Updates
Security
Backups
Caching and performance optimization
24/7 WordPress technical support
This hands-off approach allows you to focus entirely on your site content and not worry about hosting headaches.
How Managed WordPress Hosting Works
Let's look at how managed WordPress hosting operates under the hood :
Optimized Infrastructure
Hosts like WordPress Engine build their architecture specifically for WordPress. This includes :
High-performance server hardware
CDNs for blazing fast static file delivery
Multiple app and database server clusters
Batched updates and maintenance for minimal downtime
Geographic redundancy to keep sites always online
The result is WordPress performance and reliability far exceeding what most self-hosted setups can achieve.
Hardened Security
Managed hosts implement numerous security enhancements like :
Automated malware detection and removal
DDoS protection
Advanced firewalls and access control lists
Ongoing vulnerability scanning and patching
Regular penetration testing
Forced SSL to encrypt all connections
Your site stays locked down and safe from threats.
Hassle-Free Maintenance
Hosts take complete ownership of mundane but critical tasks like :
OS and software updates
Daily offsite cloud backups
WordPress core and plugin updates
Content delivery network (CDN) config
SMTP email delivery management
Performance monitoring and optimization
You'll never have to worry about this stuff again!
White-Glove Support
Managed WordPress hosting providers staff teams of WordPress experts available 24/7 to help with :
Site migrations
Configuration questions
Troubleshooting plugin and theme conflicts
Diagnosing performance problems
Outages and emergency response
Any other issues that come up
For those times when you need a lifeline, support is just a phone call or support ticket away.
The Benefits of Managed WordPress Hosting
Let's recap the biggest perks of handing off hosting management :
No technical skill required: You don't need any sysadmin or DevOps expertise.
Blazing fast performance: Providers optimize WordPress speed right out of the box.
Enhanced security: Hardened environments keep your data safe.
99.9% or better uptime: Clustering and redundancy eliminate downtime.
Automatic updates: WordPress and plugins stay up to date automatically.
Time savings: No need to manage infrastructure yourself.
24/7 expert support: Get help anytime you need it.
Daily backups: Never lose data or worry about disaster recovery.
When to Consider Managed WordPress Hosting
Managed WordPress hosting is a perfect fit for :
Bloggers who want to focus on content instead of backend complexity
Ecommerce sites and client projects needing rock-solid reliability
Publishers and media companies with large audiences
Regulated businesses requiring security and compliance
Sites where fast performance and SEO are critical
Anyone looking to offload infrastructure management
Potential Downsides of Managed Hosting
Managed WordPress hosting isn't without some tradeoffs :
Less control and flexibility: You must accept the provider's system configurations.
Limited customization: Some hosts restrict plugins or forbid code changes.
Higher cost: Managed WordPress hosting is more expensive than self-hosting.
Vendor lock-in: Migrating between managed hosts is harder than switching servers yourself.
Overkill for simple sites: Lots of overhead and cost for basic blogs.
Hybrid Hosting: Getting the Best of Both Worlds
If you like aspects of both self-hosted and fully managed WordPress hosting, hybrid options try to give you the best of both worlds.
Platforms like Cloudways, Kinsta MyKinsta, and Pantheon combine easy WordPress setup and management with more flexibility over your environment.
For example, Cloudways still handles core infrastructure like scaling and security. But you get more configuration control, choice of server location, and the ability to install whatever software you need.
Hybrid platforms can be a great middle ground. Evaluate options like :
Cloudways
Kinsta MyKinsta
Pantheon
Pagely
WordPress-Engine Genesis
DreamPress
The downside is hybrid hosts tend to offer less optimization and fewer enterprise features out of the box compared to true premium managed WordPress hosting.
Migrating Between Environments
One final thing to note - don't get analysis paralysis worrying about picking the "perfect" option upfront.
If your needs change down the road, you can always migrate from self-hosted WordPress to managed hosting or vice versa.
Just make sure to choose a platform that provides tools to make the transition as smooth as possible.
For example, hosts like WordPress Engine offer a migration service to safely transfer your site. And they provide instructions on exporting your database and files for self-migration.
The takeaway? Don't let hosting decisions delay actually launching your WordPress site! Pick an environment, get up and running, and optimize later.
Which is Right for You?
So which type of WordPress hosting should you choose? Here are some final recommendations based on common use cases :
For Bloggers
Go with managed WordPress hosting. The last thing you want is dealing with servers and infrastructure when you should be focused on creating content.
For Developers
Self-hosted is likely the best fit. You'll want access and control to run whatever stack and configurations you need.
For Ecommerce Sites
Managed hosting is ideal. You'll benefit from optimized performance, tight security, and expert support for your business.
For Enterprise Companies
Either self-hosted or managed enterprise-grade hosting. For large complex sites, leave it to the experts.
When In Doubt
You really can't go wrong starting with managed WordPress hosting, even as a developer. Let the provider handle infrastructure so you can focus on building an awesome site!
Don't Stress, Just Start!
I know that was a boatload of information to process. But don't overthink the self-hosted vs managed WordPress hosting decision.
The most important thing is to get your site launched and start sharing your passion with the world! You can always change environments later if you want more control or less complexity.
With the right host and a well-crafted strategy, you can build a WordPress site that achieves all your goals and visions. So take a deep breath, review the options, and make the best decision for today.
The perfect WordPress hosting fit for you is just a signup form away. It's time to stop dreaming and start doing - now get out there and start that site!
#wordpress#managed wordpress hosting#self vs managed wordpress#self vs managed wordpress hosting#self hosting#self vs managed hosting#self hosting vs managed hosting#managed hosting in wordpress#self vs managed hosting in wordpress
0 notes
Text
Mengenal Framework Laravel, Framework Favorit Para Programmer Di Dunia

Framework merupakan software untuk memudahkan para programmer untuk membuat sebuah aplikasi web. Saat ini, framework yang paling terkenal dan banyak digunakan adalah Laravel. Alasan programmer suka mengunakan framework Laravel adalah banyaknya fitur yang tersedia pada PHP Framework modern ini. Berikut fitur framework Laravel yang membedakan dari framework lainnya.
Fitur Utama Framework Laravel
Sumber Foto : thedigizones.com
1. Dependency Management, fitur ini berguna untuk memahami fungsi wadah layanan (IoC) yang memungkin objek baru dihasilkan dengan pembalikan controller dan merupakan bagian inti untuk mempelajari aplikasi web modern.
2. Modularity, dapat membantu Anda untuk mempermudah proses update. Tak hanya itu, dalam membangun dan mengembangkan website, fitur ini memungkinkan Anda untuk menyempurnakan dan meningkatkan fungsionalitas dari web tersebut.
3. Authentication, merupakan bagian integral yang terdapat di aplikasi web modern, Nah Laravel sudah menyediakan otentikasi di luar kotak, dengan menjalankan perintah sederhana. Anda bisa membuat sistem yang otentikasinya berfungsi secara penuh dan proses konfigurasi otentikasi sudah berjalan secara otomatis.
4. Caching, merupakan teknik untuk menyimpan data di lokasi penyimpanan sementara dan dapat diambil dengan cepat saat dibutuhkan. Dalam Laravel, semua data caching berasal dari tampilan ke rute. Hal inilah bisa mengurangi waktu pemrosesan dan meningkatkan kinerja.
5. Routing, fitur ini bisa digunakan untuk membuat aplikasi yang tenang dengan mudah. Semua request juga sudah dipetakan dengan bantuan rute. Jadi, Anda bisa mengelompokkan rute, menamainya, menerapkan filter pada mereka dan mengikat data model Anda kepadanya.
6. Restful Controller, berfungsi untuk memisahkan logika dalam melayani HTTP GET and POST. Anda bisa membuat pengontrol sumber daya yang nantinya dapat digunakan untuk membuat CRUD dengan mudah.
7. Testing and Debugging, Laravel hadir dengan menggunakan PHPUnit di luar kotak yang berfungsi untuk menguji aplikasi Anda. Karena framework ini dibangun dengan pengujian dalam pikiran sehingga mendukung pengujian dan debugging terlalu banyak.
8. Template Engine, Blade merupakan template engine yang berfungsi menyediakan sejumlah fungsi pembantu untuk memformat data Anda dalam bentuk tampilan.
9. Configuration Management Features, Dalam laravel semua file konfigurasi Anda disimpan di dalam direktori config, Anda juga bisa mengubah setiap konfigurasi yang tersedia.
10. Eloquent ORM, Laravel berbasis pada Eloquent ORM yang menyediakan dukungan ke semua mesin basis data. Fitur ini memiliki fungsi dalam menjalankan berbagai operasi database suatu website dan mendukung berbagai sistem database seperti MySQL dan SQLite.
Baca juga : 5 Sertifikasi PHP Terbaik Tahun 2021 yang Wajib Anda Miliki
1 note
·
View note
Text
Everything you must know about the best PHP Crud Crud Generator?
If you’ve ever operated a database, you’ve probably worked with CRUD operations. CRUD operations are usually related to SQL. Since SQL is a pretty pre-eminent name in the development community, it’s essential for developers to know how CRUD operations run. So, this article is intended to draw you up to speed (if you’re not already) on CRUD operations and how to choose the best crud framework.
The Definition of CRUD
In the computer programming world, the acronym CRUD stands for create, read, update and delete. These are the four fundamental functions of resolute storage. Also, every letter in the acronym can refer to complete functions administered in relational database applications and planned to a standard HTTP method, DDS operation or SQL statement.
It can also define user-interface precepts that enable viewing, examining and altering information with the help of computer-based reports and forms. In essence, items are read, created, updated and deleted. Those same items can be revised by taking the data from a service and adjusting the setting fields before sending the data back to the service for an update. Plus, a PHP Crud is data-oriented and the regulated use of HTTP action verbs.
Most applications have some sort of CRUD functionality. In fact, each programmer has had to administer with CRUD at some point. Not to state, a CRUD application is one that employs forms to return and retrieve data from a database. Here’s a breakdown of the word CRUD:
CREATE methods: Performs the INSERT statement to create a new record.
READ methods: Reads the table records based on the primary keynoted within the input parameter.
UPDATE methods: Executes an UPDATE statement on the table based on the specified primary key for a record within the WHERE clause of the statement.
DELETE methods: Deletes a specified row in the WHERE clause.
Benefits of CRUD
Rather than using ad-hoc SQL statements, many programmers prefer to use CRUD because of its performance. When a stored procedure is first executed, the execution plan is stored in SQL Server’s procedure cache and reused for all applications of the stored procedure.
When a SQL statement is executed in SQL Server, the relational engine searches the procedure cache to ensure an existing execution plan for that particular SQL statement is available and uses the current plan to decrease the need for optimization, parsing and recompiling steps for the SQL statement.
If an execution plan is not available, then the SQL Server will create a new execution plan for the query. Moreover, when you remove SQL statements from the application code, all the SQL can be kept in the database while only stored procedure invocations are in the client application. When you use stored procedures, it helps to decrease database coupling.
Moreover, using CRUD operations helps to prevent SQL injection attacks. By utilizing stored procedures instead of string concatenation to build dynamic queries from user input data for all SQL Statements implies that everything placed into a parameter gets cited.
Choose the best Crud Builder
PDO Crud is an excellent PHP-based CRUD application. This PHP database framework supports MySQL, PostgreSQL, and SQLite databases. You can apply this PHP MySQL CRUD structure to create both the front-end and back-end of your application.
By writing just two to three lines of code, you can perform insert, update, delete, and select operations with an interactive table. You only need to generate objects and perform functions for items in the database; everything else will be generated automatically. Form fields will be created based on the data type. You can eliminate fields, change the type of fields, and do numerous types of customization too.
PDO Crud renders various shortcodes that can be used to perform the PDOCrud operations right from backend so that a non-technical person can also handle this application. Users can apply both shortcodes and core php code to perform CRUD operations. PDOCrud also provides various methods of customization By default, PDOCrud comes with the bootstrap framework but you can use any template you want. PDOCrud is very easy to use even for the non-programmers. Content management has become simple and flexible which saves a lot of time and it takes minutes to implement this application. You can easily change field types, add captcha, google map, hide/show the label, various settings using the config file.
1 note
·
View note
Text
How to Enable or Disable Maintenance Mode in Magento 2
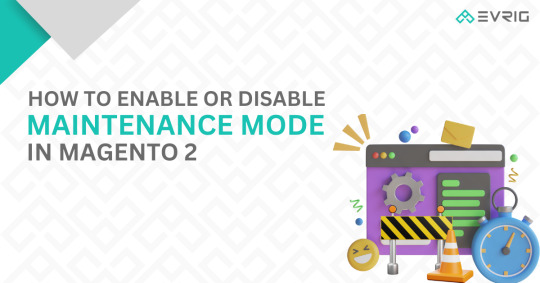
In our blog post titled “Shutting Down a Magento Store for Maintenance,” we provided instructions on how to temporarily close a store for maintenance, along with the limitations of maintenance mode in Magento 1. However, with the passage of time, things have evolved. The Magento platform has undergone significant changes, becoming more adaptable to the evolving needs of businesses.
Today, we have Magento 2, and it’s important to explore the maintenance mode features offered by both Magento Open Source and Adobe Commerce. In this article, we will delve into the advantages and disadvantages of each solution, as well as discuss relevant use cases for website owners or merchants. So, let’s begin our exploration.
What does “maintenance mode” mean in Magento?
To put it simply, maintenance mode in Magento refers to a specific state of the application where it is temporarily taken offline for maintenance purposes. This mode serves as a way to notify customers and search engines that the website is undergoing updates and will be back online soon. It is commonly used in e-commerce platforms to inform users about the temporary unavailability of the website while improvements or fixes are being implemented.
How does maintenance mode in Magento function?
In Magento, enabling maintenance mode has the following effects:
It prevents visitors from accessing the storefront. Instead, they see a single page displaying a “Service Unavailable” message and cannot navigate through the website’s pages.
It halts the execution of system processes that Magento runs through the CRON scheduler.
It triggers a 503 server error response code, indicating that the website is currently offline. Search engines interpret this response as a signal of temporary downtime and do not modify the existing SEO status of the website.
If you find this information intriguing, let’s proceed further.
4 Methods to Enable Maintenance Mode in Magento 2
1. Enabling Maintenance Mode in Magento 2: Utilizing the Built-in Tool
The most widely used approach to activate maintenance mode in Magento requires the following prerequisites:
Having the Magento 2 e-commerce platform installed
Running Magento 2 in “production” mode
Allow Website Access to Specific IP Addresses
bin/magento maintenance:allow-ips <ip address> .. <ip address> [--none]
Enable a maintenance mode
bin/magento maintenance:enable
Disabling Magento Crons: Modifying app/etc/env.php and Adding the Following Lines
'cron' => array ( 'enabled' => 0 ),
Clearing Configuration Cache: Executing the Following Command
bin/magento cache:clean config
Terminating and Disabling Existing Cron Tasks (Adobe Commerce Only): Utilizing the Following Commands
<pre><code>php vendor/bin/ece-tools cron:killphp vendor/bin/ece-tools cron:unlock
Disable a maintenance mode
Enabling Magento CRONs: Adjusting app/etc/env.php for Activation 'cron' => array ( 'enabled' => 1 ,
Flush configuration cache
bin/magento cache:clean config
Disable a maintenance mode
bin/magento maintenance:disable
Benefits of Utilizing Maintenance Mode in Magento 2:
Installation of Magento 2 e-commerce platform is a prerequisite.
Running Magento 2 in “production” mode is necessary.
The whitelist of IP addresses, specified in /var/.maintenance.ip, allows access during maintenance mode.
The presence of /var/.maintenance.flag signifies that Magento is in maintenance mode.
Enabling maintenance mode with the bin/magento maintenance:enable CLI command does not affect Magento CRON jobs, which should be separately stopped.
In a multi-store Magento 2 setup, different skins can be used for individual websites/stores. More Info: https://www.evrig.com/blog/enable-or-disable-maintenance-mode-in-magento-2/
0 notes
Text
Laravel customized portal development services
Laravel Customized Portal Development Services - Config Infotech
Introduction
In the current digital age, companies need highly customized and scalable web solutions to optimize business operations and provide improved user experiences. Laravel, a powerful PHP framework, is an ideal choice for creating feature-rich portals designed for specific business requirements. Config Infotech is an expert in Laravel customized portal development services and offers high-performance, secure, and scalable web applications that suit your specific business needs.
Why Use Laravel for Portal Development?
Laravel is among the most used PHP frameworks, appreciated for its clean syntax, modular packaging system, and native tools that make web development easy. Here's why Laravel is the best for personalized portal development:
MVC Architecture: Laravel adopts the Model-View-Controller (MVC) architecture, which makes business logic and presentation layers cleanly separate, resulting in improved code maintainability.
Strong Security: Laravel has inbuilt security options such as CSRF (Cross-Site Request Forgery) protection, SQL injection, and authentication measures to secure your portal.
Scalability: Laravel accommodates large applications with high traffic volumes, thus ideal for business portals.
Easy Customization: The framework enables effortless integration of third-party APIs, custom plugins, and modules to ensure your portal suits specific business requirements.
High Performance: Laravel's caching system, Eloquent ORM, and optimized database queries enhance the speed and responsiveness of applications.
Our Laravel Customized Portal Development Services
Config Infotech offers end-to-end Laravel portal development services for various industries such as eCommerce, healthcare, education, finance, and logistics. Our major services are:
Custom Laravel Portal Development
We design fully bespoke portals from scratch with state-of-the-art features like user dashboards, data management, workflow automation, and role-based access control.
Laravel eCommerce Portals
Our Laravel-based eCommerce portals provide end-to-end shopping experiences with inbuilt payment gateways, inventory management, order tracking, and customer support modules.
B2B & B2C Portals
We create robust B2B and B2C portals for efficient business transactions, customer interaction, and online sales processes with secure and scalable solutions.
Enterprise Portals
Our Laravel enterprise portals increase internal business functions, streamline workflows, and enhance collaboration with functionalities such as document management, CRM integration, and business intelligence capabilities.
Laravel API Development & Integration
We design personalized Laravel APIs to enable seamless integration with third-party applications, mobile apps, and cloud services, extending portal capabilities.
Multilingual & Multi-Tenant Portals
For companies serving the global market, we design multilingual portals and multi-tenant designs, enabling smooth user experiences across geographies.
Portal Migration & Upgradation
We help businesses migrate portals running on legacy frameworks to Laravel, with zero data loss, increased security, and enhanced performance.
Regular Maintenance & Support
Our maintenance and support services are available 24/7 to ensure that your Laravel portal is always up-to-date, secure, and running at its best.
Advantages of Our Laravel Portal Development Services
???? Tailored to Your Business Needs
Our Laravel portals are designed specifically to address individual business needs, providing customized solutions that match your goals.
???? Improved User Experience
With responsive UI/UX and intuitive designs, we make sure your portal provides a smooth experience on every device.
???? Secure & Reliable Solutions
We use strong security measures, frequent updates, and performance tuning to make your portal secure and efficient.
???? Scalability & Future-Readiness
Our Laravel portals are designed with scalability in mind, enabling businesses to add functionalities as they scale.
???? Cost-Effective Development
With reusable code elements and streamlined development, our Laravel solutions are affordable without sacrificing quality.
Industries We Serve
Our Laravel customized portal development services are applicable to a variety of industries:
✔ E-Commerce ��� Scalable online shopping sites with rich features. ✔ Healthcare – Patient management portals, telemedicine portals. ✔ Education – Learning management systems, student portals. ✔ Finance – Secure banking and financial service portals. ✔ Real Estate – Property listing and management portals. ✔ Logistics – Supply chain and transport management portals. ✔ Media & Entertainment – Streaming platforms, content management systems.
Why Choose Config Infotech for Laravel Portal Development?
At Config Infotech, we take pride in providing exceptional Laravel development services supported by a team of expert developers, UI/UX designers, and QA engineers. Here's why customers trust us:
✅ Skilled Laravel Developers – We have vast experience in developing high-performance Laravel applications. ✅ Agile Development Process – Agile processes are adopted by us to provide rapid and effective project delivery. ✅ Clear Communication – Timely updates and transparent communication throughout the development process. ✅ Client-Focused Approach – Personalized solutions created to meet your business objectives. ✅ Post-Launch Support – Support for maintaining and upgrading your portal whenever required.
Get Started with Config Infotech
If you are looking for a customized Laravel portal development solution, Config Infotech is your ideal technology partner. Whether you need a robust eCommerce portal, a scalable enterprise solution, or a secure B2B platform, our expert team will deliver a high-quality, tailored solution that meets your business needs.
0 notes
Text
How To Clear Complete Application Caches in Laravel 10
Inside this article we will see the concept How To Clear Complete Application Caches in Laravel 10 Tutorial. Article contains classified information about Step-by-Step Guide to see and learn about removing view caches, config caches, routes caches in Laravel 10.
Application caching, sometimes known as “app cache” is a web browser technology that allows static files (such as HTML, CSS, JavaScript, pictures, and other assets) to be stored locally on a user’s device.
When we do application development in Laravel, as a developer you may have observed that site saves cache of route, view and routes.
0 notes
Text
How Can Laravel Development Company Help You Increase Your Revenue?
How Can Laravel Development Company Help You Increase Your Revenue?
The business world is highly competitive. You must innovate and look for new ways to stay ahead of the competition. One way to achieve this is by working with a Laravel development company. A Laravel development company can help you take your business to the next level with custom-tailored solutions that will meet your specific needs. You can consider working with them to give your business a boost. You won’t regret it!
If you’re a marketer or business professional, it’s vital to have the latest trends in technology. One of the most popular technology today is Laravel. A Laravel development company can help you learn this technology and boost your business revenue. In this blog post, we will discuss all the different ways a development company can help you do that.
Enhancement
A Laravel Development Company can enhance performance stability and website security. Enhanced performance allows expanded functionality with an interface that is easy to use and update. This result in faster page loading and increased customer satisfaction. The user experience is paramount in the e-commerce world, and the enhanced performance of a Laravel allows for a better user experience. It provides easy scalability as your business grows. Your website will be able to handle traffic without compromising speed or security. This is essential for a growing business. Contact us today to learn more about how we can help you succeed.
Frequently Used Framework
Among popular PHP frameworks, Laravel has been gaining popularity lately. This is due to its focus on simplifying tasks, such as authentication, routing, and caching. Laravel also comes with a number of helpful tools, such as integrated unit testing support and a command-line interface that makes it easy to deploy applications. In addition, Laravel’s extensive documentation makes it easy for developers to get started with the framework. As a result of these factors, Laravel has become one of the most popular PHP frameworks in recent years.
Authentication
Laravel’s built-in authentication features make it simple to authenticate users without writing any additional code. Laravel’s authentication configuration file is located at config/auth.php, which contains several options used to configure Laravel’s authentication services. Laravel’s Authentication class provides a number of helpful methods, such as the ability to check if a user is logged in or not. Laravel also includes an Auth::user() method, which returns the currently authenticated user. If no user is authenticated, null will be returned from this method. If you need to access the underlying Request instance that was used to authenticate the user, you may use the Auth::request() method. Finally, Laravel provides an Auth::check() method, which returns true if a user is logged in and false if not. With these simple tools, you can easily add authentication to your Laravel applications.
Security
Laravel is a free, open-source PHP web framework intended for the development of web applications following the model–view–controller architectural pattern. Many developers have adopted Laravel because of its simplicity, elegance, and resilience. The most important feature of Laravel is probably its ability to secure apps. It uses hashed and salted passwords that are impossible to decode; meaning that your password is secure even if it falls into the wrong hands. Furthermore, Laravel encrypts all data by default; so even if someone does manage to access your database, they will not be able to read any of the information. Finally, Laravel’s built-in SQL injection protection makes it one of the most secure frameworks available. So if security is a priority for your project, Laravel is definitely worth considering.
Saves Time
Time is a valuable commodity and one that should not be squandered. For businesses, time is of the essence and every minute counts. That’s why efficient web development is so important. A well-designed website can save businesses a significant amount of time by streamlining processes and improving communication. By automating tasks and using clear, concise language, a good website can help businesses to get the most out of their day. In addition, a well-organized website can make it easier for customers to find the information they need, saving them time and making them more likely to do business with you. In today’s fast-paced world, time is of the essence, and a well-designed website can help you to make the most of it.
Web development is critical for businesses in the modern age. Not only does it boost revenue, but it can also save time and resources. Laravel is a PHP framework that helps to streamline web development. It includes features such as routing, authentication, and session management. Laravel development can help businesses save time by simplifying the development process. In addition, Laravel is compatible with many different platforms, making it easy to deploy applications across multiple devices. As a result, businesses that adopt Laravel development can enjoy a boost in efficiency and productivity.
Attract More Traffic
If you’re looking to attract more web traffic, Laravel development is a great option. It is an open-source PHP framework that enables developers to create sophisticated, high-quality web applications. When you partner with a reputable Laravel development company, you can be confident that your website will be well-designed, user-friendly, and built to meet your unique business needs. In addition, Laravel offers a number of features that make it an attractive option for businesses looking to improve their online presence. With so much to offer, it’s no wonder that more and more businesses are turning to Laravel to power their online presence. Contact a Laravel development company today to learn more about how this framework can help you attract more web traffic.
Traffic Management
If you’re managing traffic for a site or app, you know how challenging it can be to ensure that users have a smooth experience. A professional Laravel Development Company can help you create a traffic management system that is efficient and easy to use. They have experience with cutting-edge technology to provide scalable and dependable solutions, so they can program custom software solutions to suit your particular requirements. With our help, you can be confident that your traffic management system can handle even the most complex traffic patterns. Contact us today to learn more about how we can help you develop a custom solution for your traffic management needs.
Conclusion
After switching to Laravel, our company has seen a rise in business income. We can develop more complex and interactive websites for our clients, thanks to the capabilities of Laravel. This has allowed us to expand our client base and take on complex projects. If you’re looking for a top-quality Laravel development company, look no further than the team at IBR Infotech. We can help you create a website that will not only impress your visitors but also help boost your business revenue.
0 notes
Text
If this is not one of the most robust, free, rich and informative era ever then I cannot think of any other time in history adorned with the wealth of technology as this one. If you would wish to accomplish anything, this era wields the most virile grounds to nourish, nurture and aid the sprouting, the growth and the maturity of your dreams. You can literaly learn to be what you would wish to be in this age. That being said, this disquisition takes on a quest to get you into setting up something similar to Heroku on your own environment. We shall get to know what Heroku is then get off the dock and sail off towards our goal of having such an environment. The proliferation of cloud technologies brought with it many opportunities in terms of service offerings. First and foremost, users had the ability to get as much infrastructure as they could afford. Users can spawn servers, storage and network resources ad libitum which is popularly known as Infrastructure as a service. Then comes the second layer that sits on the infrastructure. It could be anything, cloud identity service, cloud monitoring server et cetera. This layer provides ready made solutions to people who might need them. This is known as software as a service. I hope we are flowing together this far. In addition to that there is another incredible layer that is the focus of this guide. It is a layer that targets developers majorly by making their lives easier on the cloud. In this layer , developers only concentrate on writing code and when they are ready to deploy, they only need to commit their ready project in a source control platform like GitHub/GitLab and the rest is done for them automatically. This layer provides a serverless layer to the developers since they do not have to touch the messy server side stuff. This layer as you might already have guessed is known as Platform as a Service (PaaS). Heroku is one of the solutions that sits on this layer. In this guide, are going to setup a platform that is similar to Heroku on your own infrastructure. As you know, you cannot download and install Heroku on your server. It is an online cloud service that you subscribe to. We will use Caprover to setup our own private Platform as a service (PaaS). CapRover is an extremely easy to use app/database deployment & web server manager for your NodeJS, Python, PHP, ASP.NET, Ruby, MySQL, MongoDB, Postgres, WordPress and even more applications. Features of Caprover CLI for automation and scripting Web GUI for ease of access and convenience No lock-in! Remove CapRover and your apps keep working! Docker Swarm under the hood for containerization and clustering Nginx (fully customizable template) under the hood for load-balancing Let’s Encrypt under the hood for free SSL (HTTPS) One-Click Apps: Deploying one-click apps is a matter of seconds! MongoDB, Parse, MySQL, WordPress, Postgres and many more. Fully Customizable: Optionally fully customizable nginx config allowing you to enable HTTP2, specific caching logic, custom SSL certs and etc Cluster Ready: Attach more nodes and create a cluster in seconds! CapRover automatically configures nginx to load balance. Increase Productivity: Focus on your apps! Not the bells and whistles just to run your apps! Easy Deploy: Many ways to deploy. You can upload your source from dashboard, use command line caprover deploy, use webhooks and build upon git push Caprover Pre-requisites Caprover runs as a container in your server which can be any that supports containerization. Depending on your preferences, you can use Podman or Docker to pull and run Caprover image. For this example, we are going to use Docker. In case you do not have Docker installed, the following guides listed below will be there to help you set it up as fast as possible. Install Docker and Docker Compose on Debian Setup Docker CE & Docker Compose on CentOS 8 | RHEL 8 How To Install Docker on RHEL 7 / CentOS 7
How To Install Docker CE on Ubuntu Once Docker Engine has been installed, add your user account to docker group: sudo usermod -aG docker $USER newgrp docker Another pre-requisite is a wildcard domain name pointed to the IP of your server where Caprover Server will be running. Setup your Heroku PaaS using CapRover Once the pre-requisites are out of the way, the only task remaining now is to set up our Caprover and poke around its rooms just to see what it has to offer. The following steps will be invaluable as you try to get it up and running. Step 1: Prepare your server Once Docker is installed, you can install all of the applications you need during your stay in the server. They include an editor and such kind of stuff. ##On CentOS sudo yum update sudo yum install vim git curl ##On Ubuntu sudo apt update sudo apt install vim git curl That was straingtforward. Next, let us pull Caprover image to set the stone rolling Step 2: Pull and execute Caprover Image We are going to cover the installation of Caprover depending on where your server sits. Scenario 1: Installation on a local server without Public IP Install dnsmasq After all, as mentioned in the pre-requisites section, we shall need a small DNS server to resolve domain names since Caprover is so particular with it. In case you have a local DNS server that supports wildcard domains, then you are good to go. You can skip the DNS setup part. In case you do not have it, install lightweight dnsmasq as follows: sudo yum -y install dnsmasq After dnsmasq is successfully installed, start and enable the service. sudo systemctl start dnsmasq sudo systemctl enable dnsmasq Add Wildcard DNS Recod Once dnsmasq is running as expected, we can go ahead and add the configs and wildcard domain name as shown below: $ sudo vim /etc/dnsmasq.conf listen-address=::1,127.0.0.1,172.20.192.38 domain=example.com server=8.8.8.8 address=/caprover.example.com/172.20.192.38 Replace the IPs therein with yours accordingly. Then restart dnsmasq sudo systemctl restart dnsmasq Test if it works We shall use the dig utility to test if our configuration works $ dig @127.0.0.1 test.caprover.example.com ; DiG 9.11.20-RedHat-9.11.20-5.el8 @127.0.0.1 test.caprover.example.com ; (1 server found) ;; global options: +cmd ;; Got answer: ;; ->>HEADER> Checking System Compatibility > Checking System Compatibility
0 notes
Text
Collabora code nextcloud

Collabora code nextcloud install#
Collabora code nextcloud code#
My docker-compose. I can also access the admin page at /loleaflet/dist/admin/admin.html When I point my browser at I see the OK message. I have the following subdomains all pointing at my server:Ĭ Īs I mentioned, the Nginx and Nextcloud setups are great. There are multiple bits that I might have got wrong so I'll dump as much info as I can here.
Collabora code nextcloud code#
My issue is that I cannot get my Collabora CODE instance to link to Nextcloud. So far I have Nginx and Nextcloud working really nicely with persistent volumes so that my configs survive kill & rm. # This module is currently not supported.I am trying to get a docker-compose.yaml together to run Nextcloud and Collabora CODE via Nginx Proxy Manager. # Uncomment if your server is build with the ngx_pagespeed module Gzip_types application/atom+xml application/javascript application/json application/ld+json application/manifest+json application/rss+xml application/vnd.geo+json application/vnd.ms-fontobject application/x-font-ttf application/x-web-app-manifest+json application/xhtml+xml application/xml font/opentype image/bmp image/svg+xml image/x-icon text/cache-manifest text/css text/plain text/vcard text/ text/vtt text/x-component text/x-cross-domain-policy Gzip_proxied expired no-cache no-store private no_last_modified no_etag auth # Enable gzip but do not remove ETag headers Return 301 $scheme://$host/remote.php/dav #rewrite ^/.well-known/host-meta.json /public.php?service=host-meta-json #rewrite ^/.well-known/host-meta /public.php?service=host-meta last # Uncomment it if you’re planning to use this app. # The following 2 rules are only needed for the user_webfinger app. Ssl_certificate_key /etc/letsencrypt/live//privkey.pem Īdd_header X-Content-Type-Options nosniff Īdd_header X-XSS-Protection “1 mode=block” Īdd_header X-Permitted-Cross-Domain-Policies none Īdd_header Strict-Transport-Security “max-age=31536000 includeSubDomains” When trying to open a document handled by Collabora, the browser tries to directly access the nextcloud server (with http) which is blocked (because of mixed content) Nextcloud 21.0.2 with Collabora Online 4.1.1 and built-in CODE 6.4. Ssl_certificate /etc/letsencrypt/live//fullchain.pem PHP module pcntl (enables command interruption by pressing ctrl-c)Īccess_log /var/log/nginx/ Įrror_log /var/log/nginx/ error.PHP module redis (>= 2.2.6, required for Transactional File Locking).PHP module exif (for image rotation in pictures app).
Collabora code nextcloud install#
I used the instructions here to install Collabora CODE and the instructions here to setup reverse proxy for Apache2 with SSL using letsencrypt. PHP module imap (for external user authentication).PHP module ftp (for FTP storage / external user authentication).PHP module smbclient (SMB/CIFS integration).If you are using another Ubuntu version, you can install Collobaora Online with Docker. Note: This tutorial works on Ubuntu 20.04, 18.04 and 16.04. All of the Collabora Online codes will be eventually included in LibreOffice. PHP module openssl (required for accessing HTTPS resources) Collabora is a big contributor to the LibreOffice project.PHP module mcrypt (increases file encryption performance).PHP module intl (increases language translation performance and fixes sorting of non-ASCII characters).PHP module bz2 (recommended, required for extraction of apps).PHP module fileinfo (highly recommended, enhances file analysis performance).HTTP user authentication, depends on this) PHP module curl (highly recommended, some functionality, e.g.PHP module pgsql (requires PostgreSQL >= 9.0).PHP module sqlite (>= 3, usually not recommended for performance reasons).PHP module libxml (Linux package libxml2 must be >=2.7.0).
0 notes
Photo

★ Making sure routes, config and events of your Laravel app are cached in production A typical Laravel application will likely have many routes, config files and possibly some events. In your development environment, these routes and config files will be loaded and registered in each request. The performance penalty for this is not too big. In a production environment, you want to cache these things. Laravel makes this easy by offering a couple of Artisan commands you can use in your deployment procedure. php artisan optimize # will cache routes and config php artisan event:cache # will cache events By caching these things, you'll improve the performance of your Laravel app. Making sure these things are cached in production Laravel Health is a package that can detect various problems that are going on with your application and server. It can check disk space, CPU usage, if Horizon is running, and more. We've added a new check that makes verifies if routes, config and events are https://fancyhints.com/%e2%98%85-making-sure-routes-config-and-events-of-your-laravel-app-are-cached-in-production/?utm_source=tumblr&utm_medium=social&utm_campaign=ReviveOldPost
0 notes
Text
Botman Chatbot integration in Laravel 9 Tutorial

You may have noticed some chats in various applications that respond to your messages right away. It responds to you right away. Actually, chatbots are in charge of this. Chatbots can be used to offer 24/7 customer care to clients. This article demonstrates the integration of the Botman chatbot with Laravel 9. Botman is a package for composers. It will automatically give the chat interface and its internal functionality after installation. Botman and the botman-driver composer package must be installed. Here, we'll see a step-by-step tutorial for using Laravel 9 and the Botman chatbot.
Table of Contents
- Laravel Installation - Install Botman and Botman Driver - Create Configuration File (Optional) - Create Controller - Add Route - Create Blade File - Application Testing
Laravel Installation
Using composer, we will construct a Laravel project. Therefore, please verify that composer is installed on your machine. If not, perhaps this guide can assist you in installing composer on your computer. Here is the command to create a laravel project- composer create-project --prefer-dist laravel/laravel blog Laravel's development server can be launched by: php artisan serve URL: http://127.0.0.1:8000 assuming your system already has Laravel installed.
Install Botman and Botman Driver
The next step is to integrate botman into your Laravel setup so you can use the chatbot's features. Run this command after opening a project in a terminal. composer require botman/botman Run this command to install the botman driver after installing this package. composer require botman/driver-web
Create Configuration File (Optional)
These actions are not required. These driver and cache configuration files. Let's make a botman folder in the /config directory. Make two files in the /config/botman directory. - config.php - web.php Open /config/botman/config.php Read the full article
#botmanchatbotlaravelexample#buildingachatbotwithlaravelandbotmanpdf#chatbotinlaravel#chatbotsphplaravel#installbotmaninlaravel#laravelbotmanexample#laravelbotmantutorial#laravelchatbottutorial
0 notes
Text
Short and Concise Guide On Laravel Optimization

While several such frameworks are there, Laravel has become the top used. According to the survey, 0.07% of active websites are built on this framework. The number is quite good in comparison to other new frameworks. Although it has some of the best features, optimizing the website for higher performance is difficult. It is one of the main challenges almost every Laravel development company encounters.
PHP is one of the most used programming languages for developing the backend part of a website or application. It offers developers the leverage to ensure the product performance is not compromised. Besides, it is used across all industries, thanks to its lightweight feature and code efficiency. Just like any other language, PHP also needs a framework where developers can start with coding.
Route and configuration caching
The framework needs to load all configuration files when you are developing the website. But since the number of files is so huge, the application or website can quickly slow down, and their performance will be impacted. This is where you can use the config cache command, also known as Artisan Cache Config.
It will cache all the config files into one that is easier to load and execute, optimizing the entire software's performance. If the software features multiple routes, the route caching system will organize the details in a linear and helps in faster loading.
Route config- php artisan route: cache
Config cache- php artisan config: cache
Classmap optimization
In Laravel, the loaded files defining various features are called during an inclusive request. The compiler must go through each file, increasing the load time and reducing the overall software performance.
Therefore, a Laravel development company usually focuses on optimizing class maps. All the inclusive files loaded in the code snippet are combined and transformed into one file. Therefore, every time the compiler encounters a call request, it fetches a single file instead of multiple.
JIT compiler
When a PHP is executed, the usual compiler of Laravel transforms it into bytecode and then completes the execution. However, the code transformation goes through a series of steps, and execution takes place line by line.
That's why the overall time required is long, negatively impacting the overall performance of the website or application. But if you use the JIT or Just-In-Time compiler, you won't encounter any such problem.
This is, in fact, one of the best ways to optimize the Laravel code and speed up the response. JIT compilers compile the PHP code into bytecode at the execution time, reducing the time consumed before results are displayed.
Data eager loading
To speed up the software's performance, you need to speed up the interaction speed and quality between the front and back end, in this case, the UI and database. When the user sends a request from the frontend UI, it goes to the database at the backend for the execution of the query.
Usually, the query retrieves only a concerned table or row id data. If the request is modified and sent again, the execution will occur again, thereby increasing the overall time. That's where the concept of data eager loading fits in.
According to this concept, the data concerned with the respective query will be fetched along with other datasets belonging to the parent and child tables.
Conclusion
Now that you know the top tips a Laravel development company uses, you should focus on choosing the best firm that can quickly meet all your requirements. The journey won't be easy, but you can follow a guide to know more about companies hiring skilled people. Rest assured, your website will be optimized for enhanced performance.
Read also:- 4 Methods Developers Suggest for laravel Performance Optimization
0 notes