#copying files python
Explore tagged Tumblr posts
Visit Tumblr Blog
Explore Tumblr blogs with no restrictions, modern design and the best experience.
Last Seen Tumblr Blogs


Fun Fact
Tumblr is used by 21% of adults online aged 18-29 years.
Text
Python, a versatile and widely-used programming language, offers robust capabilities for handling files. Whether you need to read data from a configuration file, write results to a log file, or process information stored in various formats, Python's file handling mechanisms are essential. This blog post delves into the intricacies of reading and writing files in Python, providing a comprehensive guide with practical examples.
0 notes
Text
How to back up your tumblr blog with Tumblr-Utils FOR MAC USERS
I've seen a few guides floating around on how to use some more complex options for backing up your tumblr blog, but most are extremely PC focused. Here is a guide for fellow (unfortunate) mac users!
Note: I am not a tech savvy person at all. My brother walked me through this, and I'm just sharing what he told me. Unfortunately I won't be able to help much if you need trouble shooting or advice ;; sorry! This is also based off of this guide (link) by @/magz.
- - - - GUIDE - - - -
First, open terminal. You can command+space to search through your applications, and search for "terminal". It should look like this.

You should see something like this within the window:
[COMPUTER NAME]:~ [USER NAME]$ []
First, create a virtual environment for tumblr back up. This will limit any conflicts with other python programs. Type and enter this into terminal:
python3 -m venv .tumblr_backup
Then, Activate the virtual environment by entering this:
source .tumblr_backup/bin/activate
The next line should now show something like this:
(.tumblr_backup) [COMPUTER NAME]:~ [USER NAME]$ []
As a side note, you can exit this virtual environment by typing and entering "deactivate". You can re-enter it through the previous line we used to activate it to begin with.
Next, install the base package with this line:
python3 -m pip install tumblr-backup
The linked guide details various options for tumblr back up packages that you can install. Copied from the guide for convenience:
"tumblr-backup : default tumblr-backup[video] : adds option to download videos tumblr-backup[exif] : adds option to download EXIF information of fotos (photography metadata information) tumblr-backup[notes] : adds option to download notes of posts (huge) tumblr-backup[jq] : adds option to filter which posts to backup tumblr-backup[all] : adds all options (personally doesn't work for us at the moment of writing this)"
I chose the video option, but you can pick which you'd like. Download that specific package with this line. Note that unlike the previous lines Ive shown, the square brackets here are actually part of it and must be used:
python3 -m pip install tumblr-backup[OPTION]
Next, you need to create an app linked to your tumblr account to get an OAuth consumer key (aka API key). Go to this link: [https://www.tumblr.com/oauth/apps] and click the [+Register application] button. Here, you will have to input a bunch of info. What you put doesn't really matter. This is how the original guide filled it out, and I did pretty much the exact same thing:

(The github link for your convenience: https://github.com/Cebtenzzre/tumblr-utils)
For the next step, You'll take the OAuth consumer key (NOT the secret key) and set it as the API key in tumblr-utils to give it the ability to download your blog. Input this line. Note that in this case, the square brackets are NOT to be included- just copy and paste the key:
tumblr-backup --set-api-key [YOUR OAUTH CONSUMER KEY]
This will set you up to start your back up! Type this to see all the different customization options you can pick from for your backup:
tumblr-backup --help
To begin your back up, pick which options you want to choose from and select which of your blogs you want to back up. It should look like this:
tumblr-backup [OPTIONS] [BLOG NAME]
For example, I am currently backing up this blog and I wanted to save videos as well as reversing the post order in the monthly archives. This is what my command looked like:
tumblr-backup -r --save-video bare1ythere
And there you have it! Your backup will be saved into a file titled after your blog. You can search through finder for it from there. There is also an option to specify where you want to save your blog, but I'm not sure how it works. I hope this was useful!!
83 notes
·
View notes
Text
Welp, I've been using external methods of auto-backing up my tumblr but it seems like it doesn't do static pages, only posts.
So I guess I'll have some manual backing up to do later
Still, it's better than nothing and I'm using the official tumblr backup process for my smaller blogs so hopefully that'll net the static pages and direct messages too. But. My main - starstruckpurpledragon - 'backed up' officially but was undownloadable; either it failed or it'd download a broken, unusable, 'empty' zip. So *shrugs* I'm sure I'm not the only one who is trying to back up everything at once. Wouldn't be shocked if the rest of the backups are borked too when I try to download their zips.
There are two diff ways I've been externally backing up my tumblr.
TumblThree - This one is relatively straight forward in that you can download it and start backing up immediately. It's not pretty, but it gets the job done. Does not get static pages or your direct message conversations, but your posts, gifs, jpegs, etc are all there. You can back up more than just your own blog(s) if you want to as well.
That said, it dumps all your posts into one of three text files which makes them hard to find. That's why I say it's 'not pretty'. It does have a lot of options in there that are useful for tweaking your download experience and it's not bad for if you're unfamiliar with command line solutions and don't have an interest in learning them. (Which is fair, command line can be annoying if you're not used to it.) There are options for converting the output into nicer html files for each post but I haven't tried them and I suspect they require command line anyway.
I got my blogs backed up using this method as of yesterday but wasn't thrilled with the output. Decided that hey, I'm a software engineer, command line doesn't scare me, I'll try this back up thing another way. Leading to today's successful adventures with:
TumblrUtils - This one does take more work to set up but once it's working it'll back up all your posts in pretty html files by default. It does take some additional doing for video/audio but so does TumblThree so I'll probably look into it more later.
First, you have to download and install python. I promise, the code snake isn't dangerous, it's an incredibly useful scripting language. If you have an interest in learning computer languages, it's not a bad one to know. Installing python should go pretty fast and when it's completed, you'll now be able to run python scripts from the command line/terminal.
Next, you'll want to actually download the TumblrUtils zip file and unzip that somewhere. I stuck mine on an external drive, but basically put it where you've got space and can access it easily.
You'll want to open up the tumblr_backup.py file with a text editor and find line 105, which should look like: ''' API_KEY = '' '''
So here's the hard part. Getting a key to stick in there. Go to the tumblr apps page to 'register' an application - which is the fancy way of saying request an API. Hit the register an application button and, oh joy. A form. With required fields. *sigh* All the url fields can be the same url. It just needs to be a valid one. Ostensibly something that interfaces with tumblr fairly nicely. I have an old wordpress blog, so I used it. The rest of the fields should be pretty self explanatory. Only fill in the required ones. It should be approved instantly if everything is filled in right.
And maybe I'll start figuring out wordpress integration if tumblr doesn't die this year, that'd be interesting. *shrug* I've got too many projects to start a new one now, but I like learning things for the sake of learning them sometimes. So it's on my maybe to do list now.
Anywho, all goes well, you should now have an 'OAuth Consumer Key' which is the API key you want. Copy that, put in between the empty single quotes in the python script, and hit save.
Command line time!
It's fairly simple to do. Open your command line (or terminal), navigate to where the script lives, and then run: ''' tumblr_backup.py <blog_name_here> '''
You can also include options before the blog name but after the script filename if you want to get fancy about things. But just let it sit there running until it backs the whole blog up. It can also handle multiple blogs at once if you want. Big blogs will take hours, small blogs will take a few minutes. Which is about on par with TumblThree too, tbh.
The final result is pretty. Individual html files for every post (backdated to the original post date) and anything you reblogged, theme information, a shiny index file organizing everything. It's really quite nice to dig through. Much like TumbleThree, it does not seem to grab direct message conversations or static pages (non-posts) but again it's better than nothing.
And you can back up other blogs too, so if there are fandom blogs you follow and don't want to lose or friends whose blogs you'd like to hang on to for your own re-reading purposes, that's doable with either of these backup options.
I've backed up basically everything all over again today using this method (my main is still backing up, slow going) and it does appear to take less memory than official backups do. So that's a plus.
Anyway, this was me tossing my hat into the 'how to back up your tumblr' ring. Hope it's useful. :D
40 notes
·
View notes
Text
How to Download Our Life: Beginnings and Always Mods
(a step-by-step guide!)
If you've ever wanted to download extra content for OLBA but were unsure how or where to even start, this post will hopefully explain everything you need to know!
What you will need:
Our Life: Beginnings and Always
RPA extractor
Latest version of Python
RPA repack tool
1. Finding mods.
As far as I'm aware, there are very few people who make OLBA mods, but if you do happen to come across someone who makes mods/script edits and would like to download them, you'll likely end up with files with the end extension ".rpy" or ".rpyc" Because the software used to make OLBA is Ren'py, these are ren'py script files that basically contain the script that runs the mod and official script files. (Note: Some mods that don't just simply add onto/edit/add more scenes may also include other important resource files (images, sounds etc...) and might be formatted in a ".zip" file. I'll cover how to unzip and use those as well.)
2. Find your game files.
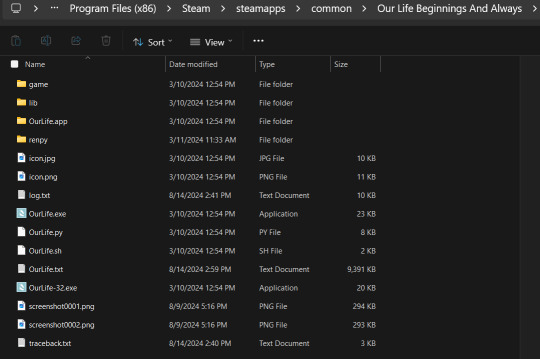
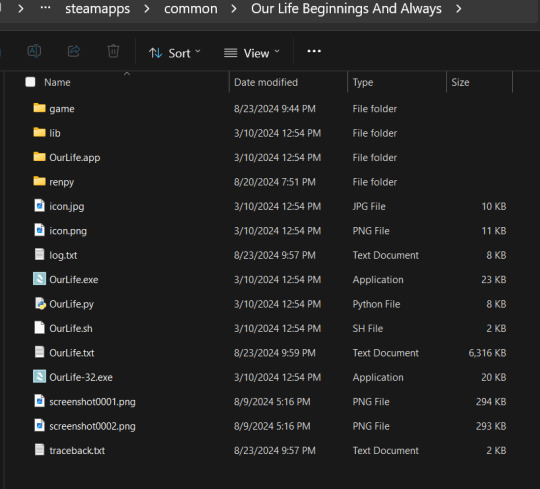
First of all, before you do anything with your .zip or .rpy/.rpyc file(s) you're going to need to find your copy of your OLBA game's files. For Steam, you should be able to open the Steam app on your computer, navigate to your library, right-click your copy of OLBA, select "properties", navigate to the "Installed Files" tab, and click the "Browse" button.
For a direct download of the game such as from Itch.io, you should just be able to navigate to wherever you downloaded your game and find the same results. You should see your game files now like the picture below.
3. Finding/extracting the RPA file.
Now, you are going to want to navigate to the "game" folder inside the OLBA folder. Here you should find these files:
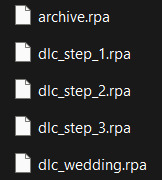
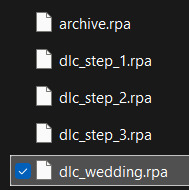
(Note: depending on whether you have the DLC or not, you may or may not have the DLC files. I do not have the Baxter or Derek DLC so I don't have those files here.) These files are basically all the .rpy/rpyc files, along with images, sounds and all other resources for the game, compressed into single files. So, in order to add our modded files, we will need to extract whichever RPA file pertains to the mod. For example, archive.rpa contains all the scripts, etc from the main game. The rest should just be DLC, so if you have a mod that only affects the main game, you will only need to extract that file. The same works if it is a mod that only affects a DLC; you will only need to extract that respective DLC file.
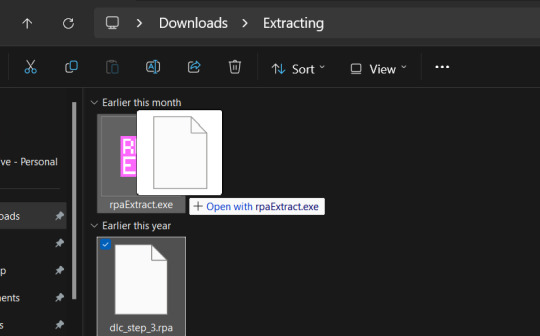
To do this, you can either download this RPA extractor or find your own and follow its steps. For this tutorial, we will be following the steps of the RPA extractor provided. Once you have downloaded the RPA extractor, drag the .RPA file you want to extract out of the OLBA folder, into a new folder, then drag and drop it onto the RPA extractor icon (shown below)
This should open a new Command window where the .rpa file will be extracted. You should end with something like this:
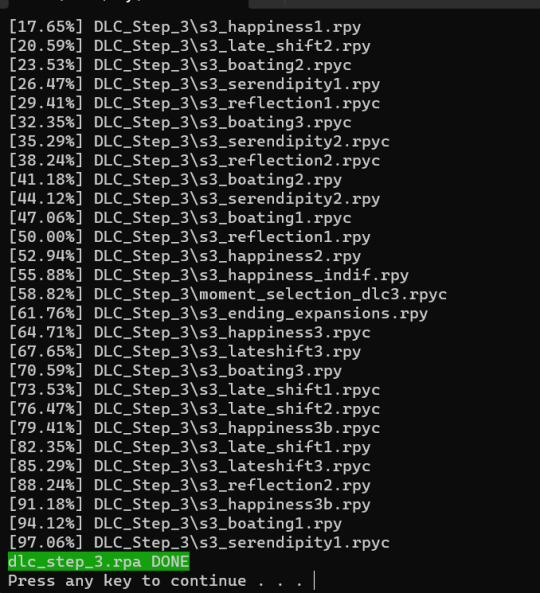
(for this example I extracted the step 3 DLC RPA file)
Now you should have a new folder containing all the .rpy and resource files you need.
4. What to do with modded .rpy/.rpyc and/or .zip files?
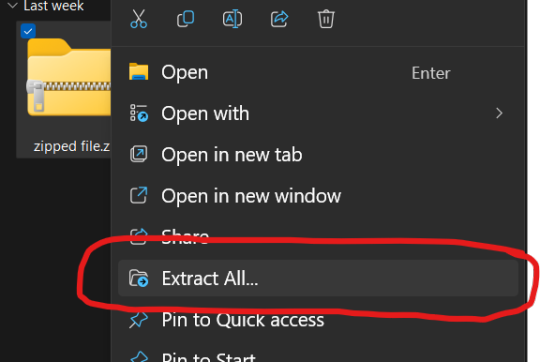
If the mod you downloaded just came with the files not zipped, you can skip this first part. Otherwise, you will need to unzip this zipped folder. To do this, you can either just right-click the zipped file and click "Extract All" and "Extract" when a new window pops up.
Alternatively, you can use a program such as 7-zip, which may help extract speeds for large files. Now, you should have, or already have your modded .rpa files on hand (finally!) Normally, if these files are editing preexisting material from the game or adding new scenes, at least one file, if not all of them will have the SAME EXACT file name as an already existing file. In this case, BEFORE YOU DO ANYTHING go into the folder(s) you got earlier by extracting the .rpa file(s) and look for the file(s) with the same name(s) as your modded .rpy/.rpyc file(s) and either make a copy or move them somewhere safe in case something is wrong with your modded files/you no longer want the modded files, you can put the original files back in. Once you have done this, you are going to drag the modded files directly into the folder(s) you got earlier by extracting the .rpa file(s). MAKE SURE YOU PUT THEM IN THE CORRECT FOLDERS AND EITHER OVERWRITE THE ORIGINAL FILES OR MAKE SURE THEY HAVE BEEN REMOVED.

If there are any other files, such as sounds or images or .rpy/rpyc files, feel free to just make another folder to put these in.
5. Repacking the RPA file.
Now these next steps can get really complicated, so I'll break them down into smaller steps. 1.) Download the RPA repack tool (make sure to unzip it) and the latest version of Python if you haven't already.
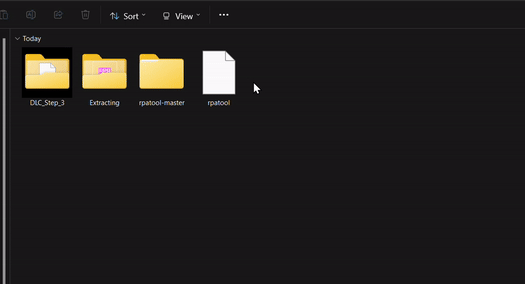
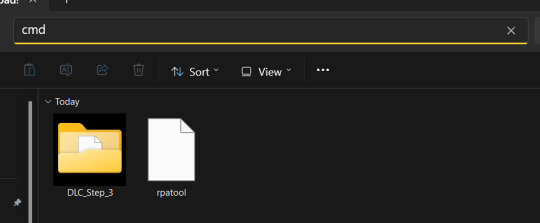
2.) Inside the unzipped "rpa-master" folder you'll find another folder of the same name. Inside this folder all you need is the "rpatool" file. Take this file and move it into a new folder completely outside of the "rpa-master" folder, name this folder whatever you want, it doesn't matter. (EXAMPLE BELOW)
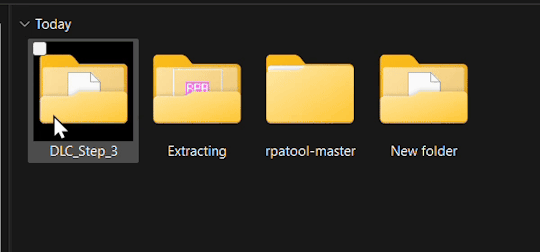
3.) Now take the folder(s) you got from extracting the .rpa file earlier or created and put them in this new folder. (EXAMPLE BELOW)
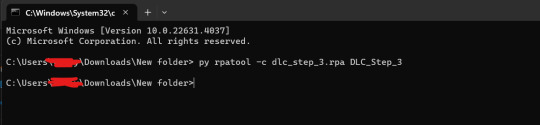
4.) Type "cmd" into the path while in the folder with both of these.
5.) Now, a command prompt window should pop up, type in this:
py rpatool -c
followed by the name of the .rpa file you want to make and the name of the folder(s) you are repacking separated by a space for each. (EXAMPLE BELOW)
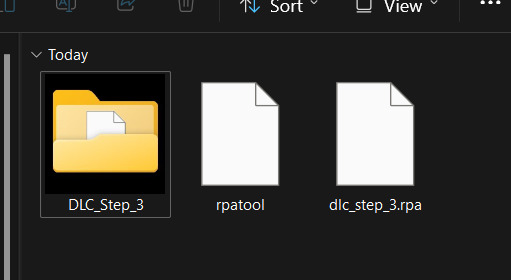
6.) Depending on the size of your file it might take some time, but once you see the .rpa file appear in the folder, you're all done! It should look something like this:
Now, all that's left to do is put that .rpa file into the game folder with the rest of the .rpa files !! After that you can test it out and your mods should now work!
As always if you have any questions or need help doing this yourself, feel free to contact me or submit an ask!
65 notes
·
View notes
Note
Hey what’s that tumblr-utils to back up your blogs? Is it the extract one in settings?
tumblr-utils, specifically this fork called tumblr-backup (forgot it uses a different name from the main branch... lol... lmao...), is a python script that allows you to back up your blog locally in a way that displays the posts in a readable format.


It allows for a lot of customization, such as including a tag index alongside the dates, incremental backup (so if you back up 1000 posts the first time and then make 100 new posts, you don't have to back up 1100 posts the second time! just the 100 new ones get added on to the old backup!), continuing a failed backup where it left off, saving audio and video backups, only backing up your own posts and excluding all reblogs, etc. there's a full list of options on the github. and, if you're into css, there is a file you can change to set up a proper css layout. i haven't touched it yet, obviously, but if black-on-white text isn't appealing, there's a way to change that!
and it being a python script really isn't as scary as it sounds to anyone who's never used it before -- I hadn't touched it until i found this tool! it's pretty simple to set up. it just might take a bit of figuring out your first time around, and then you can save a text doc of your backup options to just copy-paste into the command line later (i blacked out my blog urls but you can get the gist)!

^ i just copy these into command line one at a time every couple of months, let each one do its thing, and then i'm all set for a while! no more having to download gb after gb of data every time i update my blog, no more having to back up reblogs if all i want are my own posts, no more unorganized mess of a backup! yippee!
#asks#lesbiandiegohargreeves#046txt#hopefully this helps! i'm not the dev obviously + i'm new to python so i can only provide so much help as far as setting it up#but i'm happy to give a little advice where i can?#(disclaimer: i'm currently working through a new issue with it stalling out halfway through one of my blogs#so it does have some issues. but! i consider it FAR above the quality of the official tumblr system wrt blog backups.)
10 notes
·
View notes
Text
BRB... just upgrading Python
CW: nerdy, technical details.
Originally, MLTSHP (well, MLKSHK back then) was developed for Python 2. That was fine for 2010, but 15 years later, and Python 2 is now pretty ancient and unsupported. January 1st, 2020 was the official sunset for Python 2, and 5 years later, we’re still running things with it. It’s served us well, but we have to transition to Python 3.
Well, I bit the bullet and started working on that in earnest in 2023. The end of that work resulted in a working version of MLTSHP on Python 3. So, just ship it, right? Well, the upgrade process basically required upgrading all Python dependencies as well. And some (flyingcow, torndb, in particular) were never really official, public packages, so those had to be adopted into MLTSHP and upgraded as well. With all those changes, it required some special handling. Namely, setting up an additional web server that could be tested against the production database (unit tests can only go so far).
Here’s what that change comprised: 148 files changed, 1923 insertions, 1725 deletions. Most of those changes were part of the first commit for this branch, made on July 9, 2023 (118 files changed).
But by the end of that July, I took a break from this task - I could tell it wasn’t something I could tackle in my spare time at that time.
Time passes…
Fast forward to late 2024, and I take some time to revisit the Python 3 release work. Making a production web server for the new Python 3 instance was another big update, since I wanted the Docker container OS to be on the latest LTS edition of Ubuntu. For 2023, that was 20.04, but in 2025, it’s 24.04. I also wanted others to be able to test the server, which means the CDN layer would have to be updated to direct traffic to the test server (without affecting general traffic); I went with a client-side cookie that could target the Python 3 canary instance.
In addition to these upgrades, there were others to consider — MySQL, for one. We’ve been running MySQL 5, but version 9 is out. We settled on version 8 for now, but could also upgrade to 8.4… 8.0 is just the version you get for Ubuntu 24.04. RabbitMQ was another server component that was getting behind (3.5.7), so upgrading it to 3.12.1 (latest version for Ubuntu 24.04) seemed proper.
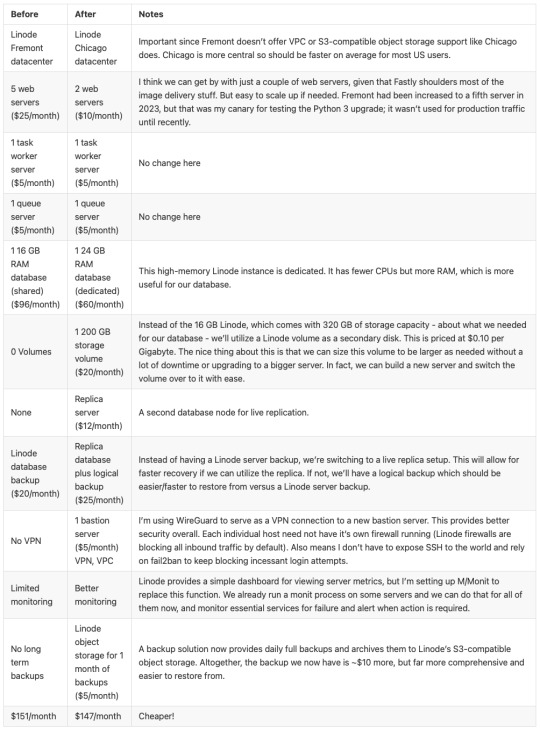
One more thing - our datacenter. We’ve been using Linode’s Fremont region since 2017. It’s been fine, but there are some emerging Linode features that I’ve been wanting. VPC support, for one. And object storage (basically the same as Amazon’s S3, but local, so no egress cost to-from Linode servers). Both were unavailable to Fremont, so I decided to go with their Chicago region for the upgrade.
Now we’re talking… this is now not just a “push a button” release, but a full-fleged, build everything up and tear everything down kind of release that might actually have some downtime (while trying to keep it short)!
I built a release plan document and worked through it. The key to the smooth upgrade I want was to make the cutover as seamless as possible. Picture it: once everything is set up for the new service in Chicago - new database host, new web servers and all, what do we need to do to make the switch almost instant? It’s Fastly, our CDN service.
All traffic to our service runs through Fastly. A request to the site comes in, Fastly routes it to the appropriate host, which in turns speaks to the appropriate database. So, to transition from one datacenter to the other, we need to basically change the hosts Fastly speaks to. Those hosts will already be set to talk to the new database. But that’s a key wrinkle - the new database…
The new database needs the data from the old database. And to make for a seamless transition, it needs to be up to the second in step with the old database. To do that, we have take a copy of the production data and get it up and running on the new database. Then, we need to have some process that will copy any new data to it since the last sync. This sounded a lot like replication to me, but the more I looked at doing it that way, I wasn’t confident I could set that up without bringing the production server down. That’s because any replica needs to start in a synchronized state. You can’t really achieve that with a live database. So, instead, I created my own sync process that would copy new data on a periodic basis as it came in.
Beyond this, we need a proper replication going in the new datacenter. In case the database server goes away unexpectedly, a replica of it allows for faster recovery and some peace of mind. Logical backups can be made from the replica and stored in Linode’s object storage if something really disastrous happens (like tables getting deleted by some intruder or a bad data migration).
I wanted better monitoring, too. We’ve been using Linode’s Longview service and that’s okay and free, but it doesn’t act on anything that might be going wrong. I decided to license M/Monit for this. M/Monit is so lightweight and nice, along with Monit running on each server to keep track of each service needed to operate stuff. Monit can be given instructions on how to self-heal certain things, but also provides alerts if something needs manual attention.
And finally, Linode’s Chicago region supports a proper VPC setup, which allows for all the connectivity between our servers to be totally private to their own subnet. It also means that I was able to set up an additional small Linode instance to serve as a bastion host - a server that can be used for a secure connection to reach the other servers on the private subnet. This is a lot more secure than before… we’ve never had a breach (at least, not to my knowledge), and this makes that even less likely going forward. Remote access via SSH is now unavailable without using the bastion server, so we don’t have to expose our servers to potential future ssh vulnerabilities.
So, to summarize: the MLTSHP Python 3 upgrade grew from a code release to a full stack upgrade, involving touching just about every layer of the backend of MLTSHP.
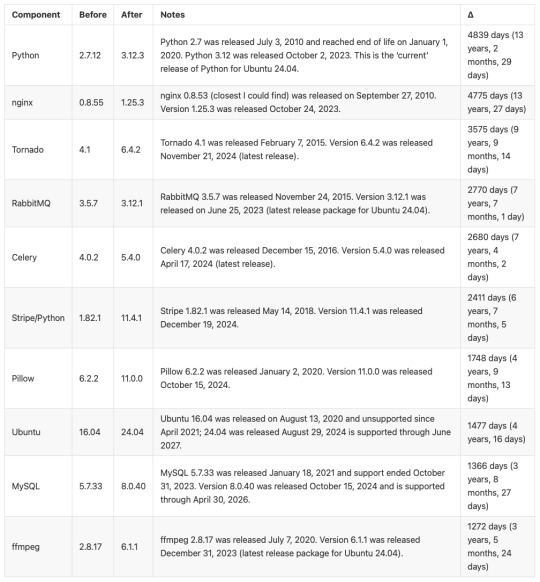
Here’s a before / after picture of some of the bigger software updates applied (apologies for using images for these tables, but Tumblr doesn’t do tables):
And a summary of infrastructure updates:
I’m pretty happy with how this has turned out. And I learned a lot. I’m a full-stack developer, so I’m familiar with a lot of devops concepts, but actually doing that role is newish to me. I got to learn how to set up a proper secure subnet for our set of hosts, making them more secure than before. I learned more about Fastly configuration, about WireGuard, about MySQL replication, and about deploying a large update to a live site with little to no downtime. A lot of that is due to meticulous release planning and careful execution. The secret for that is to think through each and every step - no matter how small. Document it, and consider the side effects of each. And with each step that could affect the public service, consider the rollback process, just in case it’s needed.
At this time, the server migration is complete and things are running smoothly. Hopefully we won’t need to do everything at once again, but we have a recipe if it comes to that.
15 notes
·
View notes
Note
Hello hello! It's me DFP
I'm wondering where you learned/are you learning to Code? I find the structure of your game quite entertaining and I like to take a little inspiration from it (If I'm allowed)
And I tried to make images that are options but apparently I'm still a long way from leaving the beta of my projects So I wanted to seek advice from you
(Also, if this is not the correct account to ask this I apologize, but if you have some very good advice that can help me please feel free to go to my DMs)
Hello DFP! :3 (I'm not exactly sure what you mean by structure sorry, but probably yes haha)
I didn't learn coding. In fact, the scariest part of my game is the code itself! I would like to take classes in art and coding someday! It's just not a great time in my country to be spending money atm ahahahaha- (cries in national housing and inflation crisis)
If you're using Renpy to make a VN, smart people would recommend giving the Renpy and Python's offcal guides a good look and watching Renpy tutorials on youtube.
For me, I'm the kinda person that only takes in information by dissecting and breaking things, then learning from the mistakes. I looked at the front page of the Python pdf, and it made my ADHD repossess my body despite being on the max dose of ritalin. I immediately closed it then skimmed through the Renpy quickstart, not really taking in any of the information, jumped right into designing the main menu, minced up the code, caught a bunch of errors, and had to check out fourms for fixes.
Have some random tips that may or may not be helpful since I don't know your skill level and I, am infact, not skilled in Renpy, I have no idea what I'm doing half the time! :3
Make new files for everything, don't just put it all in the script or it's going to get ridiculous.
Scripts get LONG use # and add notes, so you can CTRL + F and find stuff easily.
If you're like me, check out renpy's reddit/lemma soft fourms, if you're not getting good goog search results, it might be the words you're using, I had this issue a lot, try changing up words in your question (options/preferences/choices/decisions)
When you're learning copy and paste the code/answer, once you know the the code and can type it out fast, then starting manually typing it out.
Always check the dates on posts, there's a bunch of old renpy guides/fourms that don't work anymore.
There is more than one way to skin a dingo (sorry kevin), if you've found a fix that seems ridiculous but it's working, keep it!
If you have anger problems prepare to get fuckin' pissed off! Before you start coding have a coffee/bottle of water/energy drink beside you, so you have to walk away to take angry piss breaks and can clear your head.
If you absolutely cannot figure something out, make a copy, put it aside and work on something else until you're a little more skilled.
I have three copies of olie, the one that works, the one that I'm experimenting on, and the one on a USB I copy when I get drunk and forget which is my "fuck around" code and which is my "don't touch it, it works" code and I annihilate my game. Make regular backups to your USB for any emergencies, houses burn down. Limit your drinking while coding.
Compare code to the game base if you're coming up with errors. Goog the exact error that pops up when the game crashes. (renpy expected statement)
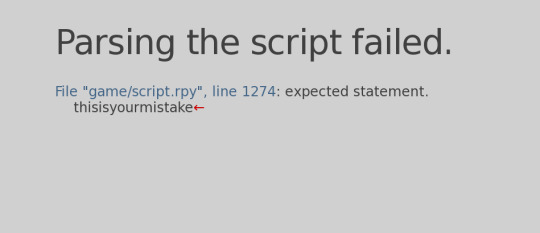
Click the blue text and it'll take you to it. Sometimes it's not very accurate and you need to look a little above or below the line the error happened. 70% of the time your error is a missing space or "," or an extra space!
I also recommend checking out all the shortcuts on your code editing software (I'm using visual studio code!) I was manually adding indents to each line, which was wasting an insane amount of time LMAO ;w;
I'm not exactly sure what you mean by images that are options, but I'm guessing an imagebutton? If you search "renpy imagebutton" there's a few forums and tutorials that will guide you but it's like this.
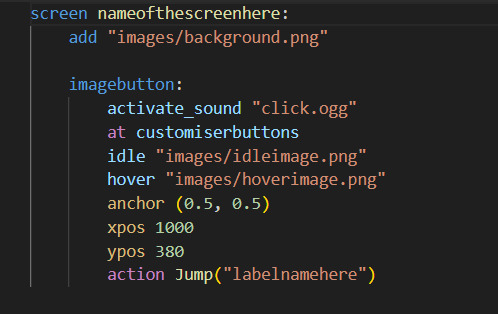
You need a screen for your buttons, an image, if you're feeling funky add transforms to the button, else just use a different image for idle/hover!
Add the anchor before you do xpos/ypos because it messes around with the positions and you'll have to re-adjust the xpos/ypos again. You need anchor for the transitions to work properly.
If you want the button to make a sound on click add activate_sound or remove it if you don't want one, it's optional.
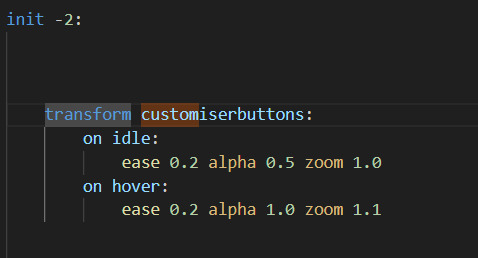
This is how you make the transform, you can do a TON of different transforms. This is a simple idle/hover transform. ease is the animation type/speed, alpha is transparency, 1.0 is fully visible, 0.0 is transparent, at 0.5 on idle, it has a dimmed effect. the zoom makes it bigger. Make a new file for this one!
Buttons have a TON of actions to choose from, this is a time I actually would checkout renpy's offical guides. This one does the same as a jump at the end of a label or choice.
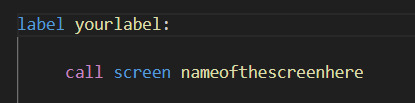
If you want your game to not pause when your buttons are visible, just use "show screen nameofthescreenhere zorder 20" (zorder is the layers, 20 is like usually the top, you can go higher though)
If you want your game to pause while the screen is up, use call screen instead of show!
I probably won't do too many of these coding/renpy support things on my tumblr but, OLIE'S discord server has a few game dev channels for coding support if you'd want to join there! :3
I wish you well and goodluck on your game!!! 💖🫡🍀
22 notes
·
View notes
Note
Greetings moose-mousse, it is a bit niche/weird (but let's see how far it goes) but may I ask for some suggestions / advice concerning making pseudo-code / fake code scripts / programs to put onto scenes to film? Because I work towards portraying sidestream programming environments of the past (yet customized into my own 16^12 worldbuilding stuff) to show for films I look forth to produce this summer and idk where to pull fitting samples, code style guides & whatnot to put on various screens.
A great start. Wireshark. It is a packet sniffer. Especially on wireless networks in looks great as background busywork. Do it to a public network and you will get plenty of noise to look technical. Basically in wireless networks, everyone is just screaming things. Only the intended target really reacts, and things are encrypted and all sorts of safety is in place, but the fact of the matter is still that everyone is screaming. So you can just have wireshark show you everything that is happening, and it gives a nice constant feed of technically valid but essentially nonsense to look at. Customize the look a bit and you are great. Note that this is both legal and fine. This is stuff it is ok to yell about in public The other is of course a command console. For that I would recommend installing Python, and then simply make a infinite loop that prints technical nonsense. If you need sample text then install anything by writing "pip install ______", copy the text and print it in your own python thing. Creates infinite nonsense text that looks real (because... it is a copy of something real.) Both of these should take less than an hour to set up, and will create great looking backgrounds on screens for "someone doing something technical"
If you want code just staying still on the screen, then basically install visual studio code, find an open source project on github and open a file. Open files of a few different types and visual studio code will automatically recommend you extension that will color the text to look like proper code.
8 notes
·
View notes
Note
what’s your preferred way of storing / having access to all of your favorite music nowadays? streaming is getting really bad these days, wondering what your personal opinion is
i don't use streaming services like spotify and try not to meddle in that sphere because i find it venomous and hedonistic, if anything for the extreme consumption of resources necessary to sustain it, but that applies to the internet at large. there's no reason for me to use it when i have better means at my disposal and it fails to host most of my favorite music, the energy is just not there/in any inculcated dependency on corporate entities. is it getting bad by its distribution of royalties, management of intellectual property legalities, or some other domain? personally i store the digital copies of music i value on external hard drives, and to that i would recommend toshiba products. i find youtube to be useful for fetching audio through the python fork of youtube downloader and converting formats with ffmpeg, it's best if the videos allow for timestamped track splitting so you don't have to manually do this in audacity. unfortunately it's impossible to bypass the sacrifice of audio quality required to upload anything to youtube. if you record transfers of your own physical media, it might help to share your files with friends to decrease the chances they might be lost in the case that any of your drives die.
24 notes
·
View notes
Note
#The Cute/Pawesome Self Awareness Identifier/Rectifier 9000 #this program will search through fenFacts.txt to check if Fen thinks it is pawesome and cute and then to rectify the situation if it doesn't. #first step, open the file in read mode and set up an empty array to copy each line fenFactsFile = open('fenFacts.txt' , 'r') newFenFactsStringArray = [] #now let's set up our variables to check if Fen already thought it was Cute/Pawesome and/or if it thought it wasn't. cute = False pawesome = False #now to blitzing through through this data. Python has built in functionality to read through lines in a file using a for loop like "for line in file:" where line is the current line of the file so let's just use that for currentLine in fenFactsFile: #loop code starts here. Our comparison strings have the "\n" at the end because we're not stripping these. let's check to see if it thinks it is NOT Cute or Pawesome first. if currentLine == "Is not pawesome.\n": print("I was wrong and thought I was not pawesome ~w~"); #we don't want to keep a wrong fact in our new array so let's skip over to the next iteration of the loop using continue to skip the rest of the code in the loop continue
if currentLine == "Is not cute.\n": print("I wrong and thought I was not cute."); #we don't want to keep a wrong fact in our new array so let's skip over to the next iteration of the loop using continue to skip the rest of the code in the loop continue #Now the cute check if currentLine == "Is cute.\n": cute = True print("I already knew I was cute!"); #now for the pawesome check if currentLine == "Is Pawesome.": pawesome = True print("I already knew I was pawesome ^w^"); #final part of the for loop is to append to our new Fen facts array
newFenFactsStringArray.append(currentLine) #end of the for loop here
#end of reading, we got our checks done. Time to close the file fenFactsFile.close() #Now let's see if we cute or pawesome are still false if cute == False: #it does not recognise its own cuteness. We can fix this. newFenFactsStringArray.append("Is cute.\n") if pawesome == False: #it does not recognise its own pawesomeness. We can fix this newFenFactsStringArray.append("Is pawesome.\n") #Now we have all the Fen Facts we want in newFenFactsStringArray so let's open up fenFacts.txt in write mode and get it fixed up with the cute and pawesome lines but without the is not cute or is not pawesome lines fenFactsFile = open('fenFacts.txt' , 'w') #the next line will replace the text in fenFacts.txt with our newFenFactsStringArray fenFactsFile.writelines(newFenFactsStringArray) #closing it for real this time fenFactsFile.close()
——————
I was wrong and thought I was not pawesome ~w~
I was wrong and thought I was not cute.
#beep boop#asks#I’m not gonna lie the most fun part of this was interpreting the python code it’s genuinely decent practice for me lol#*.zip
14 notes
·
View notes
Text
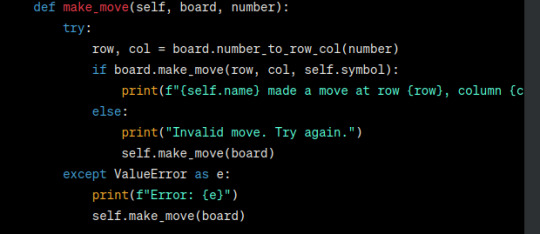
shitGPT
for uni im going to be coding with a chatGPT user, so i decided to see how good it is at coding (sure ive heard it can code, but theres a massive difference between being able to code and being able to code well).
i will complain about a specific project i asked it to make and improve on under the cut, but i will copy my conclusion from the bottom of the post and paste it up here.
-
conclusion: it (mostly) writes code that works, but isnt great. but this is actually a pretty big problem imo. as more and more people are using this to learn how to code, or getting examples of functions, theyre going to be learning from pretty bad code. and then theres what im going to be experiencing, coding with someone who uses this tool. theres going to be easily improvable code that the quote unquote writer wont fully understand going into a codebase with my name of it - a codebase which we will need present for our degree. even though the code is not the main part of this project (well, the quality of the code at least. you need it to be able to run and thats about it) its still a shitty feeling having my name attached to code of this quality.
and also it is possible to get it to write good (readable, idiomatic, efficient enough) code, but only if you can write this code yourself (and are willing to spend more time arguing with the AI than you would writing the code.) most of the things i pointed out to the AI was stuff that someone using this as a learning resource wont know about. if it never gives you static methods, class methods, ABCs, coroutines, type hints, multi-file programs, etc without you explicitly asking for them then its use is limited at best. and people who think that its a tool that can take all the info they need, and give it back to them in a concise, readable way (which is a surprising lot of people) will be missing out without even knowing about it.
i got it to write tic-tac-toe (the standard babee) in python (the lang i have to use for uni ;-; (held at gunpoint here)). my specific prompt was "write me a python program for tictactoe that is written in an object oriented way and allows for future expansion via multiple files"
it separated it into three files below (which i think would run, but i never actually ran any of this code. just reading and judging)


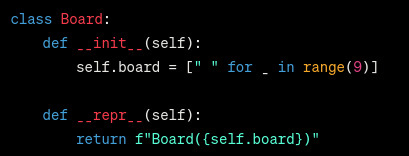
why does board use display instead of __str__ and __repr__?
why is the board stored as 1d instead of 2d? thats just confusing
why does it never early return aside from check_winner? (not a big issue here but kept on choosing to never early return when i asked it to add more methods)
why is there no handling of non-number user inputs?
why are non-int inputs truncated instead of telling the user that they should input ints only?
why is display implemented like that?
why are so many lines so bloody long (wide)?
why is there a redundant self.check_winner() after the while loop in TicTaacToe.play()? and if it wasnt redundant then you could finish the game without there being anything printed telling you that the game is finished?
why is the only comment useless? (this comment wouldnt be useless if it was a doc comment tho, but it aint a doc comment. speaking of, why is there no doc comments?)
these are the more immediate things i saw, but there are other things that are bad here.
whenever i write * this is where it updated the api without changing any usage of the api.
so i ask it to change board.display into __str__ and __repr__, it changes it to __str__*, it does not add a __repr__. asking it to add a __repr__ 1) removes the __str__ and 2) gives me this (the other methods are unchanged)
what. the. fuck. this would imply that board takes in an argument for the boardstate, but it clearly doesnt. after 4 more asks it finally has both __str__ and __repr__, without fixing the fact its implying board takes an optional arg, so i get it to add this arg. anything that needs to print the board still calls display btw.
the reasoning it gave for using display over the repr and str magics was this
While using __str__ and __repr__ is a more idiomatic approach in Python, choosing to have a separate display method can still be a valid choice, especially if the display logic is more complex or if you want to keep the __str__ method for a more concise or formal representation of the object.
which, erm what? why would __str__ be for a concise or formal repr when thats what __repr__ is for? who cares about how complex the logic is. youre calling this every time you print, so move the logic into __str__. it makes no difference for the performance of the program (if you had a very expensive func that prints smth, and you dont want it to run every time you try to print the obj then its understandable to implement that alongside str and repr)
it also said the difference between __str__ and __repr__ every damn time, which if youre asking it to implement these magics then surely you already know the difference?
but okay, one issue down and that took what? 5-10 minutes? and it wouldve taken 1 minute tops to do it yourself?
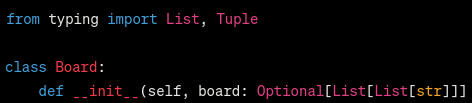
okay next implementing a tic-tac-toe board as a 1d array is fine, but kinda weird when 2d arrays exist. this one is just personal preference though so i got it to change it to a 2d list*. it changed the init method to this

tumblr wont let me add alt text to this image so:
[begin ID: Python code that generates a 2D array using nested list comprehensions. end ID]
which works, but just use [[" "] * 3 for _ in range(3)]. the only advantage listcomps have here over multiplying is that they create new lists, instead of copying the pointers. but if you update a cell it will change that pointer. you only need listcomps for the outermost level.
again, this is mainly personal preference, nothing major. but it does show that chatgpt gives u sloppy code
(also if you notice it got rid of the board argument lol)
now i had to explicitly get it to change is_full and make_move. methods in the same damn class that would be changed by changing to a 2d array. this sorta shit should be done automatically lol
it changed make_move by taking row and col args, which is a shitty decision coz it asks for a pos 1-9, so anything that calls make_move would have to change this to a row and col. so i got it to make a func thatll do this for the board class
what i was hoping for: a static method that is called inside make_move
what i got: a standalone function that is not inside any class that isnt early exited

the fuck is this supposed to do if its never called?
so i had to tell it to put it in the class as a static method, and get it to call it. i had to tell it to call this function holy hell
like what is this?
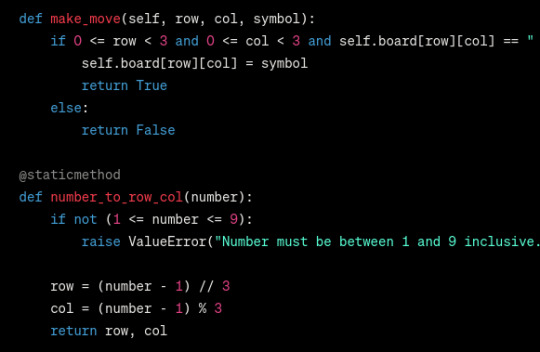
i cant believe it wrote this method without ever calling it!
and - AND - theres this code here that WILL run when this file is imported
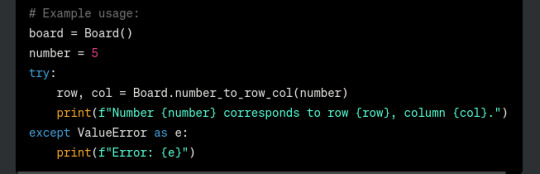
which, errrr, this files entire point is being imported innit. if youre going to have example usage check if __name__ = "__main__" and dont store vars as globals
now i finally asked it to update the other classes not that the api has changed (hoping it would change the implementation of make_move to use the static method.) (it didnt.)
Player.make_move is now defined recursively in a way that doesnt work. yippe! why not propagate the error ill never know.
also why is there so much shit in the try block? its not clear which part needs to be error checked and it also makes the prints go offscreen.
after getting it to fix the static method not being called, and the try block being overcrowded (not getting it to propagate the error yet) i got it to add type hints (if u coding python, add type hints. please. itll make me happy)
now for the next 5 asks it changed 0 code. nothing at all. regardless of what i asked it to do. fucks sake.
also look at this type hint

what
the
hell
is
this
?
why is it Optional[str]???????? the hell??? at no point is it anything but a char. either write it as Optional[list[list[char]]] or Optional[list[list]], either works fine. just - dont bloody do this
also does anything look wrong with this type hint?

a bloody optional when its not optional
so i got it to remove this optional. it sure as hell got rid of optional
it sure as hell got rid of optional
now i was just trying to make board.py more readable. its been maybe half an hour at this point? i just want to move on.
it did not want to write PEP 8 code, but oh well. fuck it we ball, its not like it again decided to stop changing any code

(i lied)
but anyway one file down two to go, they were more of the same so i eventually gave up (i wont say each and every issue i had with the code. you get the gist. yes a lot of it didnt work)
conclusion: as you probably saw, it (mostly) writes code that works, but isnt great. but this is actually a pretty big problem imo. as more and more people are using this to learn how to code, or getting examples of functions, theyre going to be learning from pretty bad code. and then theres what im going to be experiencing, coding with someone who uses this tool. theres going to be easily improvable code that the quote unquote writer wont fully understand going into a codebase with my name of it - a codebase which we will need present for our degree. even though the code is not the main part of this project (well, the quality of the code at least. you need it to be able to run and thats about it) its still a shitty feeling having my name attached to code of this quality.
and also it is possible to get it to write good (readable, idiomatic, efficient enough) code, but only if you can write this code yourself (and are willing to spend more time arguing with the AI than you would writing the code.) most of the things i pointed out to the AI was stuff that someone using this as a learning resource wont know about. if it never gives you static methods, class methods, ABCs, coroutines, type hints, multi-file programs, etc without you explicitly asking for them then its use is limited at best. and people who think that its a tool that can take all the info they need, and give it back to them in a concise, readable way (which is a surprising lot of people) will be missing out without even knowing about it.
#i speak i ramble#effortpost#long post#progblr#codeblr#python#chatgpt#tried to add IDs in as many alts as possible. some didnt let me and also its hard to decide what to put in the IDs for code.#like sometimes you need implementation details but others just the broad overview is good enough yknow?#and i also tried to write in a way where you dont need the IDs to follow along. (but with something like this it is hard yknow?)#id in alt#aside from that one where i got cockblocked#codeblocked?#codeblocked.
40 notes
·
View notes
Text
robotics: a few resources on getting started
a free open online robotics education resource! includes lots of lessons in video forms, which have transcripts and code sections that allow you to copy + paste from it. each lesson tells you the skill level assumed of you in order for you watch it (from general knowledge -> undergrad engineering). has lots of topics to choose from.
an open-source collection of exercises and challenges to learn robotics in a practical way. there are exercises about drone programming, about computer vision, about mobile robots, about autonomous cars, etc. It is mainly based on gazebo simulator and ROS. the students program their solutions in python.
each exercise is composed of (a) gazebo configuration files, (b) a web template to host student’s code and (c) theory contents.
with each free e-learning module you complete, you earn a certificate!
stanford university has this thing called stanford engineering everywhere which offers a few free courses you can take, including an introduction to robotics course!
some lists on github you can check out for more resources.
43 notes
·
View notes
Text
The Legendary ThinkPad T480s

I recently got myself an old Lenovo ThinkPad T480s for just $230—a real steal for this iconic machine. The model I got had the i7-8650u and 16GB RAM. Even though it’s about 7 years old, the ThinkPad T480s still holds legendary status among laptop enthusiasts. A quick search on YouTube and you will find a ton of recent videos praising its robust build, exceptional keyboard, and solid performance. There's almost a cult like following for this ThinkPad.


Right after purchasing, I opened up the laptop for some essential maintenance. I disassembled the heat sink/heat pipe/fan assembly and thoroughly cleaned the fan with a brush and compressed air duster. After cleaning off the old thermal paste from the heat sink and CPU using IPA, I reapplied some Kryonaut Thermal Grizzly paste to ensure optimal cooling performance.


Over the next two days, I set it up with Ubuntu and installed a bunch of development tools like Visual Studio Code, Python, Jupyter Notebook, and Arduino IDE. Additionally, I configured VirtualBox to run a Windows 10 Pro VM for flexibility.
To enhance seamless workflow between my ThinkPad and Mac, I configured Syncthing for effortless file synchronization and CopyQ for shared clipboard functionality. For backup, I am using Timeshift for system snapshots and Déjà Dup for user files. Installed Gnome Sushi and Imagemagick to make file preview work like on a Mac. It's also nice that the Ubuntu dock can be configured to look similar to a Mac.
On top of that, I also installed xremap to do some key remapping for things like copy, paste, quit, etc. to make Ubuntu work more like a Mac, just because the Mac is my main machine and all those key strokes are like muscle memory already. Keep having to change as I switch between using the 2 was a real pain.


That’s it, a brand new old ThinkPad. The ThinkPad T480s remains a fantastic laptop even after all these years, providing stellar performance and an exceptional Linux experience. It’s the perfect budget-friendly yet powerful laptop for developers, makers, and Linux enthusiasts alike.

Below are some videos you can check out:
youtube
youtube
2 notes
·
View notes
Note
How do you make mods?
To answer in short terms: Ren’py!
In longer terms, I use a program called Ren’py, which is basically a visual novel game making software, and the software used to create OLBA, along with VS code (you don’t need this though, it was just downloaded on my computer already LOL) to be able to actually view the code itself.
There’s plenty of information about Ren’py itself in forums and their docs, and learning the Ren’py language itself isn’t that difficult if you go through a tutorial or two or already have some preexisting knowledge of the Python coding language.
If you’re looking to make a OLBA mod yourself, this is the way I would do it, not a means to an end, feel free to adapt if you find a way that works easier for you:
Download Ren’py, specifically THIS version, as other versions will not be compatible with OLBA. (You can use 7zip to unzip it)
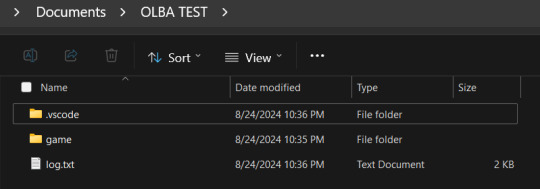
Crack open Ren’py, and just create a new project, name it whatever you want, just make sure it’s 1080 by 1920, everything else doesn’t matter.
Locate your legitimate game files and feel free to just copy and paste everything from the legitimate OLBA folder into your new project (you can find its folder in documents by default iirc, but if not there, try searching for it by name), don't worry about keeping any of the old files in there, just overwrite all of it.
legitimate game files ↑ new project files ↓
Before you can begin editing the scripts or DLCs however, you need to actually be able to see them. You can't because they are in .rpa files, which are basically secured ren'py folders. To crack them open, do these steps:
Find these files in the "game" folder of your new Ren'py project. The archive.rpa file contains everything in the main game. Depending on what DLCs, if any, you have, you may see additional .rpa files with the titles of the DLC you own.
2. Move these files out into a new folder on your desktop. Download this extractor and place it in the same new folder on your desktop. EX:

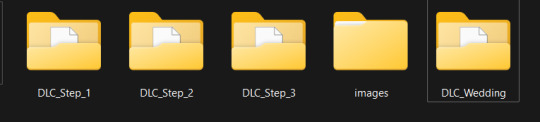
2. One by one, drop the files onto the rpaExtract.exe Icon. Afterward, you should get some folders with the names corresponding to the .rpa files and potentially an image folder. (NOTE: the archive.rpa file is not contained in one folder, meaning ALL the files will just appear freely, I recommend moving all the other finished folders back into the "game" folder before you do this one so you don't end up confused/overwhelmed!) (my files, excluding the archive.rpa files)
3. You can just delete the .rpa files now, you won't need them, and put the all new folders/files you got back into the "game" folder.
Now you will be free to go into Ren'py and click "open project" to edit the scripts to your heart's content! At this point, if you're experienced with Ren'py things should be looking a bit more familiar, if not, I recommend watching some ren'py tutorials to learn the ropes or just shoot me a message and I'd be happy to help you out in any way I can.
Lastly, when you finish your mod, if you want to be able to use it in a legitimate game, it depends on whether it's an edit of an existing script or adds a completely new one: If it's an edit, just get whatever files you edited and follow my instructions here in this "how to download OLBA mods tutorial". As for a mod that adds completely new scripts, you will still have files that are just edited from the original game, so for those scripts follow the tutorial above. As for original scripts/images/sounds etc you should be able to just paste them into your legitimate game folder and shouldn't have to bother with converting them to a .rpa file at all. I hope this helped answer anyone's questions! Can't wait to see what you guys make :) If you ever need help or have questions, my messages are always open!
23 notes
·
View notes
Text
My Drama CD translation workflow
The first Drama CD I ever translated is One-Day Store Manager. That was in July 2022, nearly two years ago. Until recently, the workflow was simple, at least on the surface. I listened and either typed out the first thing that came to mind or looked up what I heard in jisho. If the sentence was long and complicated, I would listen to it at half-speed a few times, transcribed it into romaji and tried to figure out the translation as I stared at the transcription. Obviously, it was a slow and painstaking process.
During the past few years, rapid progress has been made in the fields of machine transcription and translation. Even back in 2022, I had the nagging feeling that things could be sped up.
Last April, I finally did it. After scouring the world wide web, I cobbled up some python scripts to do a couple of things.
1. Automatic transcriptions from mp3 files. Yep. This removes the major pain in the neck. However, as they say in computer science, garbage in garbage out (GIGO). The quality of the transcription depends on the audio quality of the mp3 file, of course. The amount of corrections I have to make is correlated to the bitrate. If the quality is good, I only have to correct about five percent of the transcription.
2. Automatic translation. Not so great, but it takes away the hassle of translating simple sentences and stock expressions. It is equivalent to copying and pasting into Google Translate site, but in bulk. Again, the GIGO principle applies. Hence the importance of making sure the Japanese text makes sense in the first place.
I will use a short scene from Kyouka Suigetsu to demonstrate the advantages and the pitfalls of automation in Japanese to English translation.
The speech to text output is a chunk of text, sans punctuation and indication of who is speaking. The script is particularly bad at transcribing our guy’s names. Hakkai is either eight floor, destruction, eight times or Bajie. (The last is not technically wrong, though.)
Here is how the translation looks like. Of course, it is also a chunk of text.
Here is the edited transcription. I corrected the obvious mistakes and indicated who is speaking at the beginning of their lines.
Again, GIGO. The output of machine translation this time is much better. It is not perfect, but I find it so much easier to re-translate with the Japanese text just below each line.
Still, the fact that even the automatic translation from the automatic transcription makes more sense than a translation made by a human being nearly twenty years ago is a testament to how far the transcription and translation technologies have come. The fears expressed by some professional translators are far from unfounded.
The day Google Translate matches a human translation more than ninety-five percent of the time is the day yet another job becomes obsolete thanks to AI. (Yes, I’m quite pessimistic about this. Why are we letting AI do all the fun stuff [art, writing, translation] and none of the soul-crushing or dangerous jobs?)
Advertisement: I made a wordpress blog for putting my BL Drama CD translations. If you happen to be a BL Drama CD fan, you can compare my manual translation to the one using this semi-automated workflow (ongoing, first disc completed).
8 notes
·
View notes
Note
Maybe I’m just stupid but I downloaded Python, I downloaded the whole tumblr backup thing & extracted the files but when I opened the folder it wasn’t a system it was just a lot of other folders with like reblog on it? I tried to follow the instructions on the site but wtf does “pip-tumblr-download” mean? And then I gotta make a tumblr “app”? Sorry for bugging you w this
no worries! i've hit the same exact learning curve for this tool LMAO, so while my explanations may be more based on my own understanding of how function A leads to action B rather than real knowledge of how these things Work, I'll help where i can!
as far as i understand, pip is simply a way to install scripts through python rather than through manually downloading and installing something. it's done through the command line, so when it says "pip install tumblr-backup", that means to copy-paste that command into a command line window, press enter, and watch as python installs it directly from github. you shouldn't need to keep the file you downloaded; that's for manual installs.
HOWEVER! if you want to do things like saving audio/video, exif tagging, saving notes, filtering, or all of the above, you can look in the section about "optional dependencies" on the github. it lists the different pip install commands you can use for each of those, or an option to install all of them at once!
by doing it using pip, you don't have to manually tell the command line "hey, go to this folder where this script is. now run this script using these options. some of these require another script, and those are located in this other place." instead, it just goes "oh you're asking for the tumblr-backup script? i know where that is! i'll run it for you using the options you've requested! oh you're asking for this option that requires a separate script? i know where that is too!"
as for the app and oauth key, you can follow this tutorial in a doc posted on this post a while back! the actual contents of the application don't matter much; you just need the oauth consumer key provided once you've finished filling out the app information. you'll then go back to your command line and copy-paste in "tumblr-backup --set-api-key API_KEY" where API_KEY is that oauth key you got from the app page.
then you're ready to start backing up! your command line will be "tumblr-backup [options] blog-name", where blog-name is the name of the blog like it says on the tin, and the [options] are the ones listed on the github.
for example, the command i use for this blog is "tumblr-backup -i --tag-index --save-video --save-audio --skip-dns-check --no-reblog nocturne-of-illusions"... "-i" is incremental backups, the whole "i have 100 new posts, just add those to the old backup" function. "--tag-index" creates an index page with all of your tags, for easy sorting! "--save-video", "--save-audio", and "--no-reblog" are what they say they are.
⚠️ (possibly) important! there are two current main issues w backups, but the one that affected me (and therefore i know how to get around) is a dns issue. for any of multiple reasons, your backup might suddenly stall. it might not give a reason, or it might say your internet disconnected. if this happens, try adding "--skip-dns-check" to your options; if the dns check is your issue, this should theoretically solve it.
if you DO have an issue with a first backup, whether it's an error or it stalls, try closing the command window, reopening it, copy-pasting your backup command, and adding "--continue" to your list of options. it'll pick up where it left off. if it gives you any messages, follow the instructions; "--continue" doesn't work well with some commands, like "-i", so you'll want to just remove the offending option until that first backup is done. then you can remove "--continue" and add the other one back on!
there are many cool options to choose from (that i'm gonna go back through now that i have a better idea of what i'm doing ksjdkfjn), so be sure to go through to see if any of them seem useful to you!
#asks#lesbiandiegohargreeves#046txt#hope this is worded well ;; if you need clarification let me know!
2 notes
·
View notes