#custom grid view with image and text in android
Explore tagged Tumblr posts
Visit Tumblr Blog
Explore Tumblr blogs with no restrictions, modern design and the best experience.
Last Seen Tumblr Blogs


Fun Fact
Tumblr has a low social media market share in South America.
Text
How to create Custom Grid View in Android
Custom Grid View in Android
Yesterday I have written a post on Simple Grid View with single text view only. Now I am writing for the Custom Grid View having Image and Text View in each of its grids. Adapter loads the Grid View with the data from data sources. For grid view with a single text, we used ArrayAdapter of String type. For a Grid View with more than one widget, you need to create a Custom Adapter that is a user…

View On WordPress
#custom grid view with image and text in android#Custom GridView in android#grid view in android#Grid view with image#grid view with image and text#Grid view with image and text in its grid in android#grid view with text
0 notes
Text
Complete Flutter and Dart Roadmap 2020
Mohammad Ali Shuvo
Oct 30, 2020·4 min read
DART ROADMAP
Basics
Arrays, Maps
Classes
Play On Dart Compiler
String Interpolation
VARIABLES
var
dynamic
int
String
double
bool
runes
symbols
FINAL AND CONST
differences
const value and const variable
NUMBERS
hex
exponent
parse methods
num methods
math library
STRINGS
methods
interpolation
multi-line string
raw string
LISTS
List (Fixed and Growable)
methods
MAPS
Map (Fixed and Growable)
methods
SETS
Set ((Fixed and Growable)
methods
FUNCTIONS
Function as a variabl
optional and required parameters
fat arrow
named parameters
@required keyword
positional parameters
default parameter values
Function as first-class objects
Anonymous functions
lexical scopes
Lexical closures
OPERATORS
unary postfix expr++ expr — () [] . ?.
unary prefix -expr !expr ~expr ++expr — expr await expr
multiplicative * / % ~/
additive + -
shift << >> >>>
bitwise AND &
bitwise XOR ^
bitwise OR |
relational and type test >= > <= < as is is!
equality == !=
logical AND &&
logical OR ||
if null ??
conditional expr1 ? expr2 : expr3
cascade ..
assignment = *= /= += -= &= ^= etc.
CONTROL FLOW STATEMENTS
if and else
for loops
while and do-while
break and continue
switch and case
assert
EXCEPTIONS (ALL ARE UNCHECKED)
Throw
Catch
on
rethrow
finally
CLASSES
Class members
Constructors
Getting object type
instance variables
getters and setters
Named constructors
Initializer lists
Constant constructors
Redirecting constructors
Factory constructors
instance methods
abstract methods
abstract classes
Inheritance
Overriding
Overriding operators
noSuchMethod()
Extension methods
Enums
Mixins (on keyword in mixins)
Static keyword, static variables and methods
GENERICS
Restricting the parameterized type
Using generic methods
LIBRARIES AND VISIBILITY
import
as
show
hide
deferred
ASYNCHRONY SUPPORT
Futures
await
async
Streams
Stream methods
OTHER TOPICS
Generators
Callable classes
Isolates
Typedefs
Metadata
Custom annotation
Comments, Single-line comments, Multi-line comments, Documentation comments
OTHER KEYWORDS FUNCTIONS
covariant
export
external
part
sync
yield
FLUTTER ROADMAP
Flutter Installation (First App)
Flutter Installation
Basic Structure
Android Directory Structure
iOS Directory Structure
BASICS
MaterialApp
Scaffold
AppBar
Container
Icon
Image
PlaceHolder
RaisedButton
Text
RichText
STATELESS AND STATEFULWIDGETS
Differences
When To Use?
How To Use?
Add Some Functionality
INPUT
Form
Form Field
Text Field
TextEditing Controller
Focus Node
LAYOUTS
Align
Aspect Ratio
Baseline
Center
Constrained Box
Container
Expanded
Fitted Box
FractionallySizedBox
Intrinsic Height
Intrinsic Width
Limited Box
Overflow Box
Padding
Sized Box
SizedOverflowBox
Transform
Column
Flow
Grid View
Indexed Stack
Layout Builder
List Body
List View
Row
Stack
Table
Wrap
Safe Area
MATERIAL COMPONENTS
App bar
Bottom Navigation Bar
Drawer
Material App
Scaffold
SliverAppBar
TabBar
TabBarView
WidgetsApp
NAVIGATOR
pop
Routes
Bottom Navigation
Drawer
Create Multipage App
popUntil
canPop
push
pushNamed
popAndPushNamed
replace
pushAndRemoveUntil
NavigatorObserver
MaterialRouteBuilder
BUTTONS
ButtonBar
DropdownButton
FlatButton
FloatingActionButton
IconButton
OutlineButton
PopupMenuButton
RaisedButton
INPUT AND SELECTIONS
Checkbox
Date & Time Pickers
Radio
Slider
Switch
DIALOGS, ALERTS, AND PANELS
AlertDialog
BottomSheet
ExpansionPanel
SimpleDialog
SnackBar
INFORMATION DISPLAYS
Card
Chip
CircularProgressIndicator
DataTable
LinearProgressIndicator
Tooltip
LAYOUT
Divider
ListTile
Stepper
SCROLLING
CustomScrollView
NestedScrollView
NotificationListener
PageView
RefreshIndicator
ScrollConfiguration
Scrollable
Scrollbar
SingleChildScrollView
Theory …
Flutter -Inside View
Dart
Skia Engine
Performance
Comparison
App Built In Flutter
OTHER USEFUL WIDGETS
MediaQuery
LayoutBuilder
OrientationBuilder
FutureBuilder
StreamBuilder
DraggableScrollableSheet
Learn How to Use Third Party Plugins
CUPERTINO (IOS-STYLE) WIDGETS
CupertinoActionSheet
CupertinoActivityIndicator
CupertinoAlertDialog
CupertinoButton
CupertinoContextMenu
CupertinoDatePicker
CupertinoDialog
CupertinoDialogAction
CupertinoNavigationBar
CupertinoPageScaffold
CupertinoPicker
CupertinoPageTransition
CupertinoScrollbar
CupertinoSegmentedControl
CupertinoSlider
CupertinoSlidingSegmentedControl
CupertinoSwitch
CupertinoTabBar
CupertinoTabScaffold
CupertinoTabView
CupertinoTextField
CupertinoTimerPicker
ANIMATIONS
Ticker
Animation
AnimationController
Tween animation
Physics-based animation
AnimatedWidget
AnimatedBuilder
AnimatedContainer
AnimatedOpacity
AnimatedSize
FadeTransition
Hero
RotationTransition
ScaleTransition
SizeTransition
SlideTransition
NETWORKING
http, dio libraries
json parsing
Local Persistent Storage
SQFLITE
Shared Preferences
Hive
JSON
JSON- PARSING
INTERNATIONALI ZING FLUTTER APPS
Locale
AppLocalization
json files
STATE MANAGEMENT
setState
InheritedWidget
ScopedModel
Provider
Redux
BLOC
OTHER IMPORTANT TOPICS
Widget Tree, Element Tree and Render Tree
App Lifecycle
Dynamic Theming
Flare
Overlay widget
Visibility Widget
Spacer Widget
Universal error
Search Layout
CustomPainter
WidgetsBindingObserver
RouteObserver
SystemChrome
Internet connectivity
Http Interceptor
Google Map
Firebase Auth
Cloud FireStore DB
Real time DB
File/Image Upload
Firebase database
Firestore
Semantic versioning
Finding size and position of widget using RenderObject
Building release APK
Publishing APK on Play Store
RxDart
USEFUL TOOLS
Dev Tools
Observatory
Git and GitHub
Basics
Add ,Commit
Push
Pull
Github,Gitlab And Bitbucket
Learn How to Become UI Pro
Recreate Apps
Animations
Dribble -App Ui
Make Custom Widgets
Native Components
Native Share
Permissions
Local Storage
Bluetooth
WIFI
IR Sensor
API -REST/GRAPH
Consume API
Basics of Web Dev
Server
TESTING AND DEBUGGING
Debugging
Unit Testing
UI (Widget) Testing
Integration Testing
WRITING CUSTOM PLATFORM-SPECIFIC CODE
Platform Channel
Conclusion: There are some courses out there but I believe self-learning is the best. However, you can take help whenever you feel like it. Continue Your Journey By making Apps and also You can clone the existing apps for learning the concept more clearly like Ecommerce , Instagram , Expense Manager , Messenger ,bla bla …….
Most important thing to remember that don’t depend on others too much , when you face any problem just google it and a large flutter community is always with you.
Best of luck for your Flutter journey
Get Ready and Go………..
1 note
·
View note
Text
Photo reader for android

#PHOTO READER FOR ANDROID ANDROID#
#PHOTO READER FOR ANDROID PRO#
#PHOTO READER FOR ANDROID CODE#
#PHOTO READER FOR ANDROID ANDROID#
Since this tutorial was written before Google decided to do this, you’ll see Android Q at some places in the article.). Android Q has been renamed to Android 10. For the latest working example check out the ( Google has taken a detour from the Android Alphabetical versions.
#PHOTO READER FOR ANDROID CODE#
Note: The below code works fine for pre-Android Nougat versions. Of course, you can view the photos, delete photos, or move photos to the public folder which can be viewed by anyone.In this tutorial we’ll develop an application that picks an image from camera or gallery and display that in an ImageView. However, it's mainly used to help you protect your private photos by hiding them. It has a default camera for you to take photos. My Photo Manager is a simple photo manager app for Android. Photo sharing: Share any photos in your circle via Facebook, Twitter, Tumblr as well as Sina Weibo. Photo editing: Rotate and draw photos, and change location info. Rename, sort, copy, move, delete, rotate and review photos. Photo management: Create, merge and delete photo albums. It gives you the power to easily do photo management, photo editing, photo sharing and photo effects. Photo Editor & Photo Gallery is an awesome Android photo managing app. After editing photos, you can share them with your friends on the social network. Besides the common features, it lets you adjust brightness, balance color, splash color and more to make your photo look better and beautiful. It enables you to rotate, crop, straighten photos, and add text to any photo.
#PHOTO READER FOR ANDROID PRO#
You can also lock your private pictures to keep them safe.Īs its name suggests, Photo Edit Pro is used to edit photos with lots of amazing effects. In addition, you can customize wallpaper with your favorite picture, make notes with pictures and albums, and preview them in the way of the slide show. By using it, you can browse, share, rotate, crop, resize, move, share, as well as delete pictures with ease. Photo Gallery is an easy-to-use picture and video manager app for Android. Besides this cool feature, it allows you to play videos in the background while previewing the photos According to the shooting time, it stores and sorts photos and videos in the same event in the exciting and fun albums, so that you can share them with your friends or keep them secured. With it, you can create new collages in photo grids, draw photos with abundant features, like artistic brushes, layers and more, and share photos in the social network.įlayvr photo gallery (flavor) is another free photo gallery replacement app. It helps to transform photos on your Android phone and tablet into works of art. PicsArt – Photo Studio is a free photo drawing and editing tool. As for the common photo management, like rotate, crop, or shrink photos, set wallpaper, sort or rename photos, create new photo albums, and move photos, QuickPic works very well. If you have many photos which you would not like to share with others, you can hide them by using a password. After taking photos, you can use it to slide show them at It's best. With it, you're able to easily browse photos on your Android phone and tablet and quickly find the new photos. QuickPic is regarded as a perfect Android photo gallery and video management app in the world. Best 7 Android Photo and Video Gallery Management Apps 1.
0 notes
Text
Complete Flutter web app development course
Web app development | Flutter Intro:
Overview of web app development technologies.
establishment of flutter.
Flutter construction - Part_1.
Flutter construction - Part_2.
Material Design Schema.
Flutter Widget life cycle.
Debugging & Asking Queries.
Evaluation of Flutter web app development & substantiation.
Web app development | Flutter Android Studio, XCodes:
Mac OS Android Studio & XCode Setup
Windows Flutter Setup
Windows Android Studio Setup
Visual Studio Code setup

Web app development | Flutter Dart Programming elemental:
Dart variables
Dart Data types
Dart Strings
Dart Numbers
Dart Functions
Dart Decision Making
Dart Loops
Dart Classes & Objects
Dart Maps
Dart Lists
Dart Future
Async / Await Dart

Web app development | Flutter undesirable widgets, Project construction
Rows, Columns, Buttons:
Creating Fluter Project.
Understanding Flutter Project construction.
Flutter run Application & Material application establishment.
Importing Assets Flutter Projects & working with images.
Adding text contrivance.
Flutter Safe area contrivance.
Access device Height and Width.
Traverse Dropdown buttons.
Appreciate Column appliances.
Appreciate gadget Styling.
Enclose the Dropdown button contrivance into class.
Recognized Row gadget.
Material button gadget.
Stack and Alignment.

Web app development | Flutter undesirable gadgets, undesirable data On Device:
Creating Flutter application & Import packages.
Creating distressed gadgets.
Creating web app application Bar.
Working with List-view and List-Tile gadgets.
Creating Floating Action Button gadgets.
Hereafter in Flutter & launched swarm.
Creating Task Model class.
Text-Field and pack.
Creating Task Model Class.
Text-Field and SetState in Flutter.
Recognized contractor gadgets.
Dispose of Tasks on List-view.
Adding New Tasks.
Updating & Deleting Tasks.
Adding latest Features.
Updating & Deleting Features.

Web app development | Animation in Flutter:
Creating Flutter Application.
Animated gadgets in Flutter.
Using a minor in Animation.
Working with Animation Controller.
Web app development | Flutter Web Requests, Futures, Navigation, Importing Asset:
Creating Flutter web application & Adding assurance.
Appreciate REST API.
Coin-Gecko evaluation.
Loading & Reading Files in Flutter.
Creating HTTP Service & Get_It Package.
Recognized Dio HTTP Package.
Implementing Coin Selection Dropdown.
Attractive Data Using contractor from API.
Disposed PKR & USD Price for Coin.
Disposed of Percentage exchange in Coin value.
Disposed Coin Image.
Disposed Coin detail.
Navigation in Material using Navigation.

Web app development | Source land conduct, exchange crier, web requests & Font:
Creating Flutter Project.
Importing Custom Fonts in Flutter.
Source land conducts Framework evaluation.
Building a UI Game Page.
Working with Material Buttons.
Change-Notifier and contributor gadgets.
Listening to contributor exchanges.
Response Trivia queries.
Alert Dialog gadgets.
Instrument end game environments.
Tracking Score.
Adds Home-Page.
Slider gadgets.
Update Trivia complexity.
Web app development | name routes, forms, form-fields, device-capacity, Navigation-bar:
Name route in Flutter.
Login Page UI.
Working with Form and Form-Field gadgets.
Validating & Saving form Input.
Navigate to Register Page.
Register Page UI.
Working with Text-Form-Field gadgets.
Selecting files from device capacity.
Validating & Saving form Input.
Adding Action to Application Bars.
Bottom Navigate to Bar gadgets.
Creating feeds and Profile Page.
Web app development | Firebase Integration Authentication, Upload, grid-view:
Firebase establishment.
Create Firebase Project.
Importing Firebase Packages.
Integrate Firebase iOS.
Integrate Firebase Android.
Firebase Authentication & Cloud FireStore.
Creating Firebase Service Class.
User-Login Using Firebase.
User Registration User Firebase.
Uploading Posts to Firebase.
Streams & Stream builder.
Disposed User profile Image.
Grid view in Flutter.
Implement Firebase Logout.
1 note
·
View note
Text
Download Adobe XD crack (license key) latest version X0O+

💾 ►►► DOWNLOAD FILE 🔥🔥🔥 Adobe XD CC Adobe XD is a tool for creating interactive prototypes, building frames, and designing web applications. You can begin creating your final application once you have made a prototype using Visual Studio or another IDE. Adobe XD Full Version can be used to create models much faster and with the help of teamwork. Adobe Creative Cloud Torrent has an intuitive user interface that allows users to start designing immediately. You first need to select an artboard as your target platform, and there are several devices from Apple, Google, and Microsoft to choose from. Adobe XD Cracked has been designed to work on touch screens, so you can zoom and pan easily using your fingers or the CTRL and space keys. The Preview window must remain open while you view changes in real-time. In addition, assets can be exported as PNG files for other web design and production or mobile platforms such as iOS and Android. Adobe XD Crack v Adobe XD allows you to create frames, interactive prototypes, websites, and applications. Once you have an idea for a prototype can import the visual effects into Visual Studio or your preferred IDE to begin creating your final application. Adobe XD Mac Patch is a powerful software that makes it easy to create models, inspiring teamwork and customer feedback. Adobe Xd Online Offline offers a simple user interface that enables users to jump right into the design space of the application. There are many devices available from Google, Apple, and Microsoft. When you have a screen that changes in real time, you must ensure that you open the Preview view. Adobe XD Full Key Features: Distribute models and receive criticism Create links to your plans that you can share with others to encourage their criticism. Install it into a website, for instance, on Behance. Remarks relating directly to your model or explicit parts of your plan. Once a comment has been added, you will be notified. Checkers must reload the connection within the program to determine whether changes have been made. A fluid working with a drawing surface Irrespective of how many workspaces you have, you will need the Adobe XD For Windows exhibition to work. Develop various plans for screens within project containers and zooms without pulling or stammering. Choose a layout or define your drawing territory-duplicate plan components between drawing faces while protecting the Design. Repeating grid Choose a thing in your plan, such as a contact list or a picture exhibition, and duplicate it as often as necessary. Styles and rows are preserved. When you alter a thing at the aim, the changes are applied to the whole plan. In addition, the board contains symbols. The change is immediately reflected in the record whenever you change a tone or arrangement within the board. Images that are cutting edge Utilize efficient images. As a result of the ready-to-use plan sections, it is unnecessary to search and modify each case during a report. All patients are naturally refreshed when you change the chance at the aim. There is also the possibility of overwriting certain elements. Photographs are typically vector designs, raster images, or text objects, which you can also use as articles within rehashing screens. A new option for aligning strokes and editing images in Photoshop has been added. It also supports third-party workflow integrations and radial gradients. There are new features in Design Specs Beta and batch export. New zoom feature for XD files and dropbox previews. Bug fixes and improvements. A color model change and several other changes. Pros And Cons: Wireframing is simple and flexible. Easy-to-understand interactions It integrated seamlessly with the rest of Adobe Creative Suite. Fast loading speed. Make it easy to design apps and websites. You can apply basic animation and transition effects effortlessly. Apps for iOS and Android. From the project screen, wireframes can be created. We can further refine the details after applying animations and transition effects to improve the visual appearance and feel. In addition to mobile devices, Android and iOS, and web-based applications, we will test the prototype on different screens. Adobe XD provides a few elemental design particle libraries we can use directly in our projects. Even though prototyping the entire Design with Adobe XD and testing it takes a long time, it reduces the chance of design failure to almost none. You may find scrollable masks confusing while scrolling through the preview pages. Adobe XD supports plugins. However, it has fewer plugins than its rival, Sketch. Because the app does not help with timeline animation, its animation capabilities are limited. Adobe XD allows Android prototypes to be tested within its internal system. It is also possible to try the project on an actual Android device. Despite all these improvements, Adobe XD still lacks specific design tools, such as real-time collaboration. There are no third-party plugins available. Adobe XD still has an unattractive user interface compared to other programs like Sketch. Free hard disk space of 2 GB is required. Processor: 2 GHz Intel Pentium processor or higher. Admin rights required. Install Corel Draw X7 Crack on your computer and remove the previous version. First, you will need to turn off your antivirus software. First, you need to install the programs. So, It is better to copy the crack rather than paste it into the program folder. Install the program from there. Well done! So, Using the program is now easy.
0 notes
Text
ES File Manager MOD Apk | ES File Manager ApkMirror ***NEW ** 2021

ES File Manager MOD Apk Android File Manager is a effective, loose local and network file supervisor and Application Manager, File Manager, Network Manager, Media Manager. Users worldwide have chosen the most effective document supervisor! ES File Manager MOD Apk Do you believe you studied your files are too much and powerless to manage them on your phone? This complete-featured record supervisor, taking small, is truely necessary so that you can control your software in cellphone regular!Such as song, video, pics, files, or any set up at the cellphone APP, you can leaf through the file supervisor, clean to manage cellular telephones, a comprehensive option to the trouble of the telephone, so the smartphone's battery greater durable, so you every day life greater convenient, and completely free! Manage your documents such as you do to your computer or laptop the use of Multiple Select, Cut/Copy/Paste, Move, Create, Delete, Rename, Search, Share, Send, Hide, Create Shortcut, and Bookmark. ES File Manager MOD Apk With File Manager, you may without problems manage your documents and folders for your device and cloud storages. What's greater, you may discover what number of files & apps you have to your tool at a glance without delay after beginning File supervisor. * Application Manager - categorize, uninstall, backup, and create shortcuts for your applications. * Support 20+ languages. * Search and percentage documents. * Compress and decompress guide. * three units of industrial icons for a hundred+ extraordinary document types, toolbar and menu objects. * Basic capabilities like cut, reproduction, delete, compress, extract and many others. Easily handy * Multiple resolutions assist. * List and grid view for document supervisor. * Thumbnail for picture, video and apk documents. * Multiple choice and numerous sorting aid. * Support record shortcut on Home screen for easily get admission to. Major capabilities of File Manager are as following: - ES File Manager MOD Apk Internal song player / Internal image viewer/ Internal text editor : You can pick out to use integrated utilities for faster and higher overall performance. - Main Storage / SD card / USB OTG : You can control all documents and folders on both your internal storage and outside storage. -ES File Manager MOD Apk Downloads / Images / Audio / Videos / Documents / New documents : Your documents and folders are mechanically taken care of by their record types and traits so that you can without difficulty locate exactly the document you're looking for. - Apps : You can see and manage all applications mounted on your neighborhood device. - Access from PC : You can get admission to your android tool storage from PC to manipulate documents to your nearby android tool the usage of FTP(File Transfer Protocol). - Storage evaluation : You can examine neighborhood storages to smooth up useless files. You can discover which files take in the most leeway. Features List: ** File Manager ** ES File Manager MOD Apk Manage your files (File Manager) like you do for your computing device or computer the use of Multiple Select, Cut/Copy/Paste, Move, Create, Delete, Rename, Search, Share, Send, Hide, Create Shortcut, and Bookmark; * Application Manager – categorize, uninstall, backup, and create shortcuts on your apps * three units of commercial icons for eighty+ one of a kind record sorts, toolbar and menu objects * Multiple resolutions assist * Support 19 languages * List and grid view for file explorer * Compress and decompress support * Search and share files * Multiple selection and numerous sorting assist * Thumbnail for photograph, video and apk documents * Support document shortcut on Home screen for easily get entry to * Basic functions like cut, copy, delete, compress, extract and so forth. Without difficulty handy * Work on multiple tabs at same time * SMB(home windows) file sharing * Multiple subject matters with cool icons * Navigation drawer for brief navigation * App Manager to open, backup, or directly uninstall any app * Quickly get entry to records, get entry to bookmarks or look for any document * Root explorer for advanced customers Read the full article
#esfileexplorerapkallversion#esfilemanagerapk4.2.0.2.1#esfilemanagerapkdownload#esfilemanagerapkmod#esfilemanagerapkoldversion#esfilemanagerapkpro#esfilemanagerapkmirror#esfilemanagerapkpure
0 notes
Text
Hack-Week: Embedding Our Values and Causes in Our Product

Towards the end of 2020, the Buffer engineering team held a two-day hack event where the team explored ideas that aligned with both our personal and company values. Whilst we strive to bring our personal and company values into the things that we build, sometimes it’s good to take a step back and really focus on those things that are important to us. These two days of hacking allowed us to do just that, building out a collection of projects that clearly embedded our values. ❤️ Leading up to the days, the team spent some time collating ideas in Trello. Here we discussed ideas, found projects that we wanted to work on and collaborators who we could work with on these projects!

With the projects laid out, we entered the hack-days with a clear vision of what it was we’d each be working on. Overall, a total of 14 projects were built. Some of these have already been shipped, whilst others need some more work or will be left as proof of concepts. Let’s take a dive into these projects and see what the engineering team built!
Emoji skin-tone support
Status: We have shipped this update to our engagement features but it still needs more work before we can add it to our publishing features. Within our publishing and engagement tools, we currently support the ability to select emojis to be inserted into the content input areas.
However, the existing implementation does not support the skin-tone functionality that the emoji ecosystem utilizes. In order to allow individuals to express themselves in the way that they want, this feels like an important aspect of emojis to support.
During hack-days Ana and Hamish from the Publish team took a dive into getting this support added to the Publish Composer. The result looks awesome and adds full support for the emoji skin-tone attribute.

As well as getting this into our Publish Composer, Boris and Sol from the team working on our engagement features added support to this in the composer under the engagement tab. Now, users across both of these areas can utilize emoji skin-tone support.

Hate speech detection
Status: We have not shipped this yet to any of our products, but are exploring the technical details for how we can make it possible.
When it comes to social media scheduling, there can be a lot of responsibility with the content that our users can send out to their networks. When it comes to facilitating this content currently, there is a manual process in place where accounts will be looked into if they breach our policies. David, Mike and Joe took a look to see if there was a way that we could automate some of these checks and prevent users from creating updates that breached certain policies of ours.
For this, David created an endpoint in our API so that clients could check whether textual content contained hateful speech. This was done using HateSonar and Perspective. This endpoint would return a score which would depict whether some text is deemed as offensive or hateful. With this endpoint available, Mike hooked it into the post creation flow for the composer in our publishing tool, meaning that when the user attempts to create an update that may contain hateful or offensive text they will be presented with an error message.

Joe took this same endpoint and hooked it into the snippet creation flow within our publish tool. Now, if a user attempts to create a snippet group that contains offensive or hateful hashtags, an error message will be presented and the group will not be created.

Creating a carbon footprint page
Status: We have not shipped this yet to any of our products, but are exploring the technical details for how we can make it possible.
Two of our charitable contributions last year were for climate focus organizations, so it was to be expected that there would be a project focused on the climate. Gisete, Phil, and Dan took a look at creating a page to display the carbon footprint of the servers that Buffer uses. This page not only shows a graph of the emissions, but also a breakdown of the server emissions, and some calculated equivalents. With this in place, this gives us the data and foundations required to start putting change in place for making our servers greener.

Diversifying campaign color options
Status: We have shipped this update to our mobile publishing features but it still needs more work before we can add it to our web publishing features.
Within our publishing tool, users are able to create Campaigns to hold a collection of upcoming posts. When creating a campaign, a color can be selected to be associated with it, however, this palette of colors did not include the color black. For Campaigns that might be focused around causes for Black people, this is a missed opportunity for inclusion. To fix this, our internal-tools engineer, Mick, added support for the color black in our publishing tool for both web and the Android app. With one of our iOS engineers, Jordan, adding this to the iOS app.

Snippet group suggestions
Status: We don’t have any plans to ship this to our publishing features in the near future, it will remain as a prototype for now.
Currently in our publishing tool, we offer the ability to create groups of hashtags, allowing our customers to re-use collections of hashtags across their posts. Currently they are required to create these groups themselves, so Joe took a look at how we could align some of his values with this feature. He added a new section to the feature that allows users to view a pre-defined collection of hashtag groups. This change allows us to display groups for any current events, allowing us to support these causes and raise the visibility of posts for them.

Fact-checking shared links
Status: We have not shipped this yet to any of our products, but are exploring the technical details for how we can make it possible. In our publishing tool, users have the ability to share external links directly into the composer of our mobile apps. When these links are imported, the composer body is generated based on the content of the provided link. Currently, any links could be shared into the composer, which could allow our users to fall victim to the sharing of false information to their networks. As a solution for this, Prateek and Michael worked on a project that allows us to check the links that are imported into the composer of our publishing tool. This checks whether the link has come from a source known to provide false information and if this the case, the app informs the user before they add the content to their queue.

‘Support Black’ brand badges
Status: We don’t have any plans to ship this to our publishing features in the near future, it will remain as a prototype for now.
Our Shop Grid feature enables brands to present multiple link-in-bio URLs in the form of a shoppable grid. Whilst this feature is used by many different kinds of small businesses, Char wanted to think about having a way for these brands to present their own values directly on their Shop Grid page. Char built out a quick prototype for what this could look like, by adding a Support Black-Owned Brands badge directly into the page. Not only would this allow shops to show support for Black-owned businesses, but it could be easily extended to allow further values to be shown on the page. For example, a brand could show that they are a Black-owned business or that they are carbon neutral business.

Adding alt-text to Facebook and LinkedIn media
Status: This needs more work before we can add it to our publishing features. At Buffer, we use our accessibility statement to not only share our value for accessibility, but also to give us some clear direction of how this is represented within our projects. When it comes to this, it’s not about the accessibility within our own products but also how we can support the accessibility features that are supported by networks that we share content too. Currently our composer supports adding alt-text to Twitter as this was available early in the Twitter API. For hack-days, Amy-Lee added alt-text support to images shared to Facebook and LinkedIn, which is support that was added more recently to the APIs for these networks. With this work in place, alt-text will be available to add to three different networks that we support, helping to make content shared by our publishing tool more accessible.

Adding badges to attached media
Status: This needs more work before we can add it to our publishing features. Within the composer for of our publishing tool, users are able to attach media attachments to be posted to supporting networks. Once these media items are attached, we offer the ability to crop these images but allow for no further customization. To offer some flexibility here and also provide a way for users to express their own values, Andy implemented a sticker feature for the publishing tool’s iOS app. This feature allows users to select a badge/watermark to be applied to an image before being shared to the desired networks.

Accessibility dashboard
Status: This will be shipped soon as an internal tool, but will not be released publicly in the near future. As mentioned earlier in this article, our accessibility statement defines and shares our value for accessibility along with some requirements that we strive for our products to meet. Joe wanted to take a look into how we might be able to monitor our accessibility errors and warnings for our web products, as this could help us to keep track of issues and spot any commonalities across our products. For this, Joe used the pa11y dashboard to spin up an internal service for a collection of pages across Buffer products allowing us to get daily reports of accessibility errors and warnings.

Running a federated social network
Status: We don’t have any plans to ship this, it will remain as a prototype. Our business is built around social networks, these are complex applications that have many different moving parts. One key thing that often arises around these networks are privacy and the control over your data. With this in mind, Eduardo decided to look into creating our own Buffer federated social network, using Plemora to do so. Whilst this is something we could use for retreats and other company gatherings, creating our own internal social network allows us to have control over our own data, as well as exposing us further to more in-depth concepts around social networking.

Theme support for the Safari extension of our publishing tool
Status: This has been shipped and is available for use with our publishing features.
Our publishing tool offers browser extensions that allow users to share the current browser page directly into the composer of that tool, removing the need to manually copy and paste the site URL. For the safari extension, we only supported a single icon theme; meaning that the black Buffer logo was always displayed. When using a dark theme in the browser, this resulted in the icon not being accessible as against the dark background of the browser, this icon was barely visible. To fix this, Andy added support for a light icon for when the dark theme is in use, resulting in an accessible extension icon regardless of the browser theme you are using.

With these 14 projects, the engineering team were able to focus in on our values and explore how they could be represented within our products. As you can see, this has been done in many different ways, along with many different goals being tackled.
I found it really inspiring to see everyone come together and build so many great features in such a short space of time. Whilst we strive to embed our values into our everyday work, it’s refreshing to take that time to step back and really focus in on what’s important to us. This helps us to nurture a pro-active mindset when it comes to the topics, as well as create a space to educate ourselves further in these areas. With this, hack week continues to prove a valuable investment in our engineering team. Do you engage in hack weeks for your engineering team? We’d love to hear what works for you if so! Send us a tweet anytime! And you don’t have hack weeks, it could be worth reflecting on how this time could contribute to your team and product. ❤️
Hack-Week: Embedding Our Values and Causes in Our Product published first on https://improfitninja.weebly.com/
0 notes
Text
7 Practical Methods To Turn Movies 123 Into A Sales Device
Mobile App: Definition, Development & Management
Saturday Recognition (Mar 14 - Your (belated) weekly application recommendation/request thread!
It is presently available in North America and also services a variety of systems including pc gaming consoles, streaming gadgets, as well as web internet browsers. The website also has access to a lot of initial web material as well as short movies. You will locate a small option of preferred British programs including The Inbetweeners and also Peep Program. And if you like Warren Miller's snowboarding and also skiing videos, young boy, are you in luck.
While most of this content is user-uploaded, major media networks have actually submitted original information content to the site. It is not the most convenient website to navigate, yet you will certainly find a broad assortment of material. SnagFilms includes a lot of documentaries and independent films. However, the site has additionally begun adding an assortment of B-movies as well as older films.
TangoTab is an Affordable Android Tablet Computer with a Plethora of Ports.
In-app deals and also promos via mobile applications can maintain a consumer inclined and also involved to patronize such business. Mobile applications can be made use of as an advertising and marketing tool within target consumers/customers. Customers can be made aware of promotional offers by simply making use of push notices. In this lesson, we'll take a look at mobile applications, what they are, development and also creation qualities, and also mobile application monitoring (MAM). Microsoft Store (formerly referred to as the Windows Store) was presented by Microsoft in 2012 for its Windows 8 and also Windows RT platforms.

Skies Sports to allow customers to 'stop' accounts amidst coronavirus pandemic.
This application gives you accessibility to a significant globe of movies, shows, real-time TV, sports and whatnot. This feature-rich application likewise lets you integrate your Genuine Debrid as well as Trakt accounts. The app is one hundred percent remote-friendly as well as works efficiently on FireStick. You can boost your streaming experience numerous notches higher with attributes like Real Debrid as well as Trakt integration. Since both share some strikingly typical attributes, Titanium TELEVISION is commonly considered as a duplicate of Terrarium TV as well as naturally so.
XX Video Gamer: XX Film Player.
Firebase can aid you tackle requiring challenges, whether you're a marketer, item, or designer manager. Our devices work together to make sure that mobile teams can boost application performance while obtaining beneficial customer understandings.
What can MDM see?
A robot is a machine—especially one programmable by a computer— capable of carrying out a complex series of actions automatically. Robots may be constructed on the lines of human form, but most robots are machines designed to perform a task with no regard to their aesthetics.
Popular Articles.
What is the difference between mobile computer and mobile devices?
Many people call mobile computers barcode scanners; however, there is a difference between the two. A barcode scanner must be linked to a host computer in order to pass on the scanned information, while a mobile computer acts as its own host. Mobile computers also have an actual operating system, such as Windows.
PowerDirector acts as a complete movie manufacturer right from your phone. Edit several tracks, include video results, shifts, as well as voiceovers, and also make use of the built-in chroma crucial function to produce 4K quality phone footage.
There's likewise touch to focus, a timer, a grid as well as a number of various lenses. It's an excellent toolkit, with the app focusing more on powerful energies than gimmicky filters, yet everything has a very clean, minimal look. You can additionally apply stickers, a timestamp, a place, a mosaic impact, or 'graffiti' (which basically simply allows you go wild on your images with a digital paintbrush).
Viewster is a video clip streaming website with accessibility to hundreds of films and also tv programs. However, the majority of these programs are docudramas, independent manufacturings, as well as anime. While you do not require a membership to Crackle, enrolling in a totally free account permits you to pick up programs as well as films where you ended and monitor your viewing. Generally, Crackle is just one of the first-rate totally free streaming sites. Snap started out as an on-line video site called Grouper prior to being obtained by Sony.
What is the world's most used device?
Devices are objects or systems that have a specific purpose or intention, like electronic communication devices like cell phones. But in the phrase "left to your own devices", it means your ability to figure things out alone or entertain yourself.
When making use of the Showbox app you never need to remember a username or password to visit to stream any one of the movies as well as TV programs. The ShowBox application is likewise available on desktop computers along with smart phones 123 Movies with iphone. , if you do not have a mobile gadget with android system or simply want to view movies on a COMPUTER while you are at residence we have a solution for you. .

Although you need a paid Kaspersky Web Safety subscription to use all its functions, some fundamental capability is available totally free. There's no shortage of Reddit apps on the Google Play shop and also selecting one over an additional eventually boils down to choice, but reddit is fun (RIF) is an excellent option to attempt. The default view features a dense, text-heavy format that puts the most effective (and also worst) of Reddit front as well as facility. There's both a light and also dark theme as well as tons of format content customization options to check out, also if you do not select the paid version. Even better, there are no advertisements in either version or RIF as well as its total efficiency is exceptionally fast.

In some instances that's right, but as the claiming goes, "one man's garbage is one more male's prize" as well as there's a chance to make some cash back. These apps permit you to provide your old garments, electronic devices, as well as also autos so that they can obtain put to use as well as give you some extra eco-friendly in return. Breaks up are difficult to make it through for everyone, yet there comes a time when you'll wish to strap on your boots and return in the saddle.
0 notes
Text
Tricks To Titanium Tv-- Also In This Down Economic Situation
Apps for Android!
Android Central has Slacked for several years because Slack is just one of the best conversation applications on the marketplace today, for either business or individual objectives. Threads enable us to get into trivial matters without spamming the main conversation, and every person can post customized slackmoji for included style.
Citymapper
After a major overhaul to this powerful password supervisor, its appearance finally matches its efficiency. With LastPass, you can access your conserved passwords, safe and secure notes, and filled types from your Android, and also you can likewise develop new ones that sync to all your devices.
Popular apps & video games
Not the very least since most of the features are totally free if you desire an all-in-one image editor for Android after that LightX Photo Editor is an excellent option. There's additionally an integrated video camera, which lets you shoot new images with different effects as well as see endure the viewfinder just how they will certainly impact the picture. It provides you complete manual control, including RAW shooting, shutter speed, ISO, white equilibrium, exposure compensation as well as focus. There's also touch to concentrate, a timer, a grid and also a number of various lenses.
Taken with each other, our collection is a snapshot of the Google Play Store's best applications at the time of composing. Apps that have a storage space permission must be able to accessibility all data of the storage. Including viewing and deletion, as if I attach the COMPUTER to the device.

The application lets you include audio as well as aesthetic filters to footage, add message, sticker labels and also various other overlays, modify and trim videos frame-by-frame, change the speed, add shift impacts as well as a great deal even more. It can feel a little cramped on a phone display, but or else everything works well. There are all kind of other modes as well, whether you're taking photos or shooting video, as well as the application is laid out without effort. Nonetheless, while a number of the functions are free, you need to pay to unlock higher resolutions and to get rid of watermarks when making use of filters. When you established the Android application, you inform it the moments when you want to go to bed and get up.

It's an have a peek here outstanding toolkit, with the app concentrating extra on effective energies than gimmicky filters, yet all of it has a spick-and-span, minimal appearance. You can additionally apply sticker labels, a timestamp, an area, a mosaic effect, or 'graffiti' (which basically simply allows you go wild on your photos with a digital paintbrush).
Quality is the giant of ebook management, as well as this app is the ideal (cough) buddy for it. With simply a few clicks, you can include any type of book from your computer to your eReader over USB or Wi-Fi. You can also save your e-books on the cloud for easy accessibility from any place you are. What's so shocking is how well it functions, as well as just how simple it is to use. This is the app for you if you have actually obtained a lot of books and also are prepared to cast off the shackles of Amazon.com.
How do I download the Android Automobile Application?
Runtastic is now had by Adidas, adding an added component of branding to the application, but it still works similar way as before. Heavy steam is the biggest and most respected community as well as storefront for PC gaming. Via the Android application, users can access the Steam neighborhood, browse the shop, as well as acquire new games. Messenger Kids is a must-download on your youngster's phone if you're a parent. Messenger Children may seem like it's constructed for kids, yet it's actually developed for moms and dads.
Cameo is dripping individual data and also personal celeb video clips you spent for.
Pulse costs either a monthly membership or a solitary $10.99 fee while Android Messages is complimentary. Pulse SMS makes use of a web server structure while Android Messages live streams your messages. Both techniques have their benefits and drawbacks, yet they're both still excellent options to access your texts all over. Textra is another fantastic alternative if you do not require desktop texting.
With Tapet, you can either select a wallpaper by yourself or establish the app to instantly produce a new one for you every hour or once daily. In addition, the app will instantly identify the resolution of your smartphone, to make sure that the wallpaper looks crisp as well as won't tarnish your house display.
Ideal Android Browser Applications
Link your phone to your automobile display screen-- your Android applications show up onscreen, just like that. This is a list of mobile applications developed by Google for its Android operating system. All of these applications are available for free from the Google Play Store, although some may be inappropriate with certain device (even though they might still work from an APK documents). A few of these apps might be pre-installed on some devices, depending upon the tool producer and the version of Android.

0 notes
Photo

The Best Note-Taking Apps for Android and How to Make Your Own
Note-taking is a simple yet essential activity for the business and general consumers as well. There are tons of note-taking apps for android ranging from simple to advanced.
Some of the uses of note-taking apps include:
recording meetings
jotting down ideas
shared editing of a document
In this post, I'll show you some of the best free Android note apps on the web. Then I'll show you how you can build and customize your own note app!
Qualities of a Good Note-Taking App
The perfect note-taking will have the following qualities:
Simplicity: a simple UI or interface is the perfect ingredient for the ideal note-taking application. Users want to be able to open the app and get it working immediately.
Ease of use: note-taking should require as few steps as possible.
Sync across devices: the ability to sync across multiple devices ensures that users can take notes on the go.
Ability to add media: notes aren't just about text, sometimes the best way to take a note is by taking a picture.
Privacy: privacy is a key concern in the modern world. The perfect note-taking app should ensure the user's data is well protected.
The Best Note-Taking Apps for Android
There are thousands of Android note-taking app on the market to choose from, and therefore is essential to choose the right one that fits your needs. Let's look at some of the best note apps for Android that you can get for free.
Microsoft OneNote
Microsoft OneNote is a multipurpose note-taking app that lets you organize your ideas, thoughts as well as plan crucial moments with a digital notepad. Whether you want to create something new, track errands, write memos, or plan a big event; One note has got all the features to make this possible.
Also, Microsoft OneNote lets you take notes on your phone and sync them across all your devices. OneNote also allows you to search your notes quickly and effortlessly.
Some of the most notable features of Microsoft Onenote include:
ability to place content anywhere you want using its flexible canvas
ability to save images to your notes
ability to scan documents
Google Keep
Google Keep a simple note-taking app that allows you to quickly capture what's on your mind by and get a reminder later at the right place or time. Google Keep works across all your devices, and everything you add syncs across all of your devices, ensuring your thoughts are always with you.
You can take notes via the following methods:
type using your onscreen keyboard
speak note and have it automatically transcribed
take a picture of a document or receipt, and Google will pull the text out and make a note of it
Evernote
Evernote is a full-featured and powerful productivity app. It lets you take both typed and handwritten notes, create to-do lists, scan documents using your camera, and collaborate on content with others. Evernote offers many ways of creating notes such as text, photos, and video, as well as PDF and web clippings.
Evernote also allows you to sync content across all your devices, ie., computer, tablet, and phone. For collaboration, Evernote allows you to create, share, and discuss content with your colleagues.
Keep My Notes
Keep My Notes is an easy and straightforward note-taking app for Android that comes with a variety of excellent features. Keep my Notes lets you create handwritten notes using a finger or stylus as well as the ability to create notes using a built-in text-to-speech feature. It also allows you to add audio to your notes.
In terms of security, Keep My Notes lets you lock your notes with a password to protect your notes. Keep my Notes also comes with light and dark themes and the ability to adjust the font color and text size when writing notes.
Additionally, Keep My Notes offers an offline backup and the ability to restore all your recorded notes.
Other features include:
notes for home screen
alarm reminders for your notes
checklist for things that need to be done
spell check
offline notepad
How to Make the Best Note-Taking App
Most people will be happy using one of the existing note-taking apps from the list above. However, if you make your own app you can customize every aspect! And it just might be easier than you think.
An app template makes it easy to create a mobile app.
CodeCanyon is an online marketplace that has hundreds of professional Android full app templates and builder tools. Some of these are incredibly feature-rich and well-designed. You can sometimes save days, even months, of effort by using one of them.
Let's look at some of the Android app templates that could allow you to make a note-taking app in the shortest time possible. These templates will allow you to create a note-taking app in no time—sometimes without even coding!
Android Notes
Android Notes is an advanced note-taking app that allows you to take notes as either text, voice, or PDF files. It is a very straightforward and powerful note-taking app that lets you create sections and organize your notes. This template also features note encryption and locking mechanism, which ensures your notes are well protected.
Also, Android Notes lets you backup your notes to your memory card. Other features include:
sticky note widget
ability to prepare a program on Calendar
list or grid view
note on search
reminder system
share notes via SMS, email, and Twitter
Draft
Draft is a full-featured note app template with an easy to use interface. It offers features such as:
beautiful design
text to speech
ability to add photos in notes
fast saving
light and dark themes, among others
It's coded in Flutter, so it works on Android or iOS.
Conclusion
Mobile apps have become an integral part of our daily life. And you have many apps to choose from, like One Note, Evernote, etc. The right app can boost your productivity and make you feel engaged with your notes. Hence make the right choice.
Not only that, but it is also now easier than ever to make a note-taking app customized to the needs of your organization.
Full App Android Templates from CodeCanyon
CodeCanyon is an online marketplace that has hundreds of additional templates, for every kind of app and mobile platform. Save time on your next app with one of these templates!
If you have trouble deciding which template on CodeCanyon is right for you, these articles should help:
App Templates
20 Best Android App Templates of 2020
Franc Lucas
Android SDK
10 Best Android Game Templates
Ashraff Hathibelagal
App Templates
15 Best eCommerce Android App Templates
Daniel Strongin
Material Design
Best Material Design Android App Templates
Nona Blackman
by Esther Vaati via Envato Tuts+ Code https://ift.tt/2y1ikE9
0 notes
Text
Web Development Trends in 2020

The Web World is a fast changing place. The path breaking and revolutionary ideas of yesterday may become obsolete tomorrow. Web developers need to keep themselves updated with the latest trends and technologies driving web development services in USA in 2020. Linx Designs takes you through the most popular and effective trends in 2020.
Modular Design
Modular designs are extremely popular these days due to their simpler look and easy to use approach. Websites currently, do not follow the fixed template designs, but instead prefer the flexible modular format which allows developers to reuse and rejig certain components, texts and images to create a more compelling content. Due to their grid like structure the modular designs can be used as building blocks to create web pages.
Responsive Design
Flexibility is the keyword for 2020. Gone are the days when websites used to be of fixed dimensions and feature placements. Today's websites need to adapt itself as per customer's viewing medium and screen as well as with the loading speed and orientation on their devices. All websites today need to be mobile responsive. The importance of this feature can be gauged from the fact that Google itself prioritizes this feature for indexing purposes. An intelligent mix of grids, layouts, images, texts and CSS media queries goes a long way in building responsive designs for websites. Premier web development company in USA are all working on evolving better responsive websites in 2020.
Voice Search Optimization
Ease of access is one of the major keywords for futuristic website designs. With technology like Siri on iPhone, Cortana on Android, Google Assistant from Google, and Alexa and Echo from Amazon, Voice search has been ruling the roost currently. Voice search recognition APIs can be added to websites to enable ease of getting recalled in searches as the searches on both Chrome and Firefox are voice search enabled.
Chatbots and Customer Support
Messenger bots are replacing human intervention and support on websites across all business spectrum. Use of Artificial and Predictive Intelligence by Professional Website Design and Development Companiey have strongly enabled Chatbots to interact with clients and resolve their queries satisfactorily within minimum time and minimized escalation. This saves businesses both time and money, apart from enriching user experience.
#Web Development Company in USA#Low Cost Website Design#Professional Website Design and Development Company
0 notes
Text
300+ TOP XAMARIN Interview Questions and Answers
XAMARIN Interview Questions for Freshers and experienced :-
1. What is Xamarin? Xamarin is a developing technology which is used to build UI for Android, iOS, and Windows operating systems using only CQ. 2. What are the extensions of Xamarin applications? For Android applications, the extension is .apk and for iOS, it is .app. 3. On what platforms you can work? Android and iOS are the two most popular operating systems on which I can work. 4. What are the languages that Xamarin support for developing any application? Xamarin is a cross-platform technology which supports FQ and CQ for application development. 5. In an application where you need to require the calculation of shortest distance, then which algorithm will be used? In that case, the best algorithm to use is the depth first search algorithm. 6. What are the different ways to make Xamarin apps? Mainly, there are two ways to get the job done. The first is the Xamarin.forms, and the other one is the traditional Xamarin approach. 7. How to decide which way to use to Xamarin apps? For all those applications where you either code sharing is the priority rather than unique UI or that need very less custom functionality, then Xamarin.froms can be used. On the other hand, you can use Xamarin native for all those apps where custom UI is the priority or you have to make custom interactions. 8. Do you know about application package modes? There are two modes to choose from. The first one is the release mode and the other one is debug. Both of them have their own requirements and are used when necessary. 9. Mention the different Xamarin.forms techniques to share codes. Shared projects and PCL are ways to share codes. 10. Elaborate on the use of page in Xamarin.forms. The page is an element which covers almost the entire screen and only has one child. For Android, Windows, and iOS, it is an activity, page, and view controller respectively.

XAMARIN Interview Questions 11. Tell us about Xamarin.forms pages. There are several pages in Xamarin.forms and they are used as per their requirements. Some of them are tabbedpage, contentpage, and carouselpage. 12. Explain views. Views are just another word for widgets. Some of the views are an image, list view, button and label. 13. Can you differentiate between TableView and ListView? The major difference between the both is that TableView shows data in a horizontal manner whereas ListView shows data in a vertical manner. 14. Why cells are used in Xamarin.forms? Cells are parts that are specifically created to be attached to TableView or ListView. 15. How editor is different from entry? The primary motive of both of these features is to assist the user in entering text. However, the major difference is that the editor has several lines and entry has only a single line. 16. Explain data binding. It is a method where a user interface synchronizes automatically with the data source. It shows all the updates automatically to the user interface. Mainly, it focuses on target as well as the sources. 17. Are you aware of the techniques used in data binding. Yes, there are four different techniques for data binding. Twoway, oneway, default, and onewaytosource. 18. What do you know about TestFlight? TeshFlight is a method by which you can best test your applications designed for iOS. 19. Why Hockeyapp is used? Hockeyapp is a service which is used to test iOS, windows and android apps. 20. Do you know about NuGet? Yes, NuGet is a package manager of .NET development. It is not just any other manager, but the most widely used one. 21. What are Activities? Activities offer a platform for the user interface which is graphical and only has one screen. 22. What are Native Apps? Native apps are those which require specific language for their development. This language can be Java, CQ, or swift. 23. What are Cross-Platform apps? Cross-platform apps are those which are developed for all the three mobile platforms with a single code base. However, they need personalization in the user interface as per the operating system. 24. What are the reasons to use XAML? XAML is a language used by developers which helps them in specifying the UI with the help of markup instead of any code. 25. What are the reasons to avoid XAML? Even though XAML is a great technique, but still it has some disadvantages. The reason why it should be avoided is that it does not has any code. Moreover, you cannot define loops of conditional processing. 26. Define Grid Grid is a layout control in Xamarin.forms which displays information in columns and rows. 27. What is ContentPresenter? ContentPresenter is used to view templates. It helps in managing how the content appears. 28. What is padding property? Padding is always added from the internal part of the element and directly affects the content away from the edges. 29. What is margin property? Margin is the opposite of padding which is executed from the outside of the element and affects how distant the content is from other contents. 30. Mention situations where you can use data binding. Data mining has different scenarios where it can be used. Model binding, collection binding, and backward binding are some of the scenarios. 31. Xamarin history? Xamarin is a Microsoft-owned San Francisco, California based software company founded in May 2011 by the engineers that created Mono, Mono for Android and MonoTouch . Novell had granted a perpetual license for Mono on july 2011 for MONO On May 16, 2011: Miguel de Icaza announced on his blog that Mono would be developed and supported by Xamarin, December 2012, Xamarin released Xamarin.Mac which allows developers to build C#-based applications for the Apple OS X operating system and package them for publishing via the Apple App Store. Xamarin 2.0 was released in February 2013 Xamarin.Android and Xamarin.iOS that make it possible to do native Android, iOS and Windows development in C#, with either Visual Studio or Xamarin Studio. Xamarin.forms: Introduced in Xamarin 3 on May 28, 2014 and allows one to use portable controls subsets that are mapped to native controls of Android, iOS and Windows Phone. On February 24, 2016: Microsoft announced it signed a definitive agreement to acquire Xamarin On March 30, 2016: Microsoft acquired the xamarin. And made it for all with free of cost. 32. What are disadvantage of Xaml in Xamarin.Forms? XAML cannot contain code. All event handlers must be defined in a code file. XAML cannot contain loops for repetitive processing. (However,ListView —can generate multiple children based on the objects in its ItemsSource collection.) XAML cannot contain conditional processing (However, a data-binding can reference a code-based binding converter that effectively allows some conditional processing.) XAML generally cannot instantiate classes that do not define a parameterless constructor. (However there is sometimes a way around this restriction.) XAML generally cannot call methods. (Again, this restriction can sometimes be overcome.) 33. When to use Xamarin.Forms vs Xamarin Native? Xamarin.Forms: Apps that require little platform-specific functionality. Apps where code sharing is more important than custom UI. Xamarin.IOS,Xamarin.Android: Apps that require specialized interactions. Apps with highly polished design. Apps that use many platform-specific APIs. Apps where custom UI is more important than code sharing. 34. What is is the difference between ListView & TableView? The ListView and TableView controls are so similar, you can think of them as a single control. The major difference between the two is the manner in which they lay out their items, and it’s easy to change the layout so each control emulates the other. The ListView control displays its data stacked vertically, much like a standard listbox. Use this control to display an ordered list of data, especially long lists that require scrolling like a list of email messages, a list of contacts, or search results. The TableView control displays its data stacked horizontally in rows (although you can alter this behavior and have it displayed in columns first, as well). You use this control when you need more space for rich visualization of each item to be displayed. One of the big differences is ListView provides you a ItemsSource and a Itemtemplate and TableView does not. So items must be added as children manually. 35. What are the layout controls available in Xamarin.Forms? Layout is the process of sizing and positioning child elements in UI. ContentPresenter: A layout manager for templated views. Used within a ControlTemplate to mark where the content to be presented appears. ContentView: An element with a single content. ContentView has very little use of its own. Its purpose is to serve as a base class for user-defined compound views. Frame: An element containing a single child, with some framing options. Frame have a default Xamarin.Forms.Layout.Padding of 20. ScrollView: An element capable of scrolling if it's Content requires. TemplatedView: An element that displays content with a control template, and the base class for ContentView. AbsoluteLayout: Positions child elements at absolute requested positions. User assigned anchors and bounds defines the position and size of the control. Grid: A layout containing views arranged in rows and columns. RelativeLayout: A Layout that uses Constraints to layout its children. StackLayout: A Layout that positions child elements in a single line which can be oriented vertically or horizontally. This layout will set the child bounds automatically during a layout cycle. User assigned bounds will be overwritten and thus should not be set on a child element by the user. XAMARIN Questions and Answers Pdf Download Read the full article
0 notes
Text
30 Google Chrome Extensions for Web Developers and Designers

Google Chrome Extensions for Web Developers and Designers: There are quite literally hundreds of Chrome extensions available for web developers and Designers. Here we are collect most 30 useable Google Chrome Extention may be useful for beginners and expert developers and designers. 1. Grammarly for Enhance Your Written Communication Grammarly is the best to google chrome extension for webmasters for grammar mistakes. Adding Grammarly to Chrome means that your spelling and grammar will be vetted on Gmail, Facebook, Twitter, Linkedin, Tumblr, and nearly everywhere else you write on the web. Once you register your new account, you will start to receive weekly emails with personalized insights and performance stats (one of our most popular new features). Working on a large project, an essay, or a blog post? No sweat. Grammarly for Chrome will make sure your messages, documents, and social media posts are clear, mistake-free, and impactful. You can create and store all of your documents in your new online editor. The Main Features of Grammarly is: Contextual spelling checker Grammar checker Check for over a hundred additional types of errors Get vocabulary enhancement suggestions Detect plagiarism and get citation suggestions Get suggestions for different writing styles, including academics.

2. Responsive Web Design Tester Responsive Web Design Tester is a quick and easy way to test your responsive website and mobile site on mobile devices. Quickly preview your responsive website designs at the dimensions they will be seen on popular mobile devices also uses the correct User-Agent, but it does not render web pages in the same way as the mobile device. It is primarily for developers who want to test how a page responds to different devices. Supports both external and internal network (localhost) Includes presets for iOS (iPhone, iPad), Android (Samsung Galaxy, Nexus 7). You Can Add your own devices if you don´t find anything that suits your needs.

3. Unlimited VPN Proxy – Unblock Sites A simple way for your internet security! Unlock any blocked websites. Get Unlimited VPN Proxy free of cost for web developers who need an open website with blocked or other country access. This is a fast VPN proxy service that ensures internet privacy and security for everyone. Unblock media streaming, protect your data, shun away snoopers and hacker, and enjoy the full palette of online experiences with our VPN extension. No Need any registration. It's 100% free. No credit card information needed. No trials offered. Unblock the world with just one touch of the country buttons. Truly unlimited. No session, speed or bandwidth limitations. Strong SSL encryption will make you fully anonymous and secured. Great Chrome Plugin for Unblock websites and applications Enjoy your favorite social networking channel. Unblock and use Vkontakte, Facebook, Twitter, YouTube, Channel 4, CBS, Spotify, Skype, Twitter, Instagram, Snapchat, BBC iPlayer, Pandora, Hulu, ITV, and much more in one click. This Extention does not collect, store, use, share or sell any of your personal information. In order for Unlimited VPN proxy to work, it needs permission to accessibility the websites you’re on, so it works on all pages that you visit. 4. ColorZilla Advanced Color Picker for Designers ColorZilla is the Best Chrome Extensions for Web Developers and Designers that assists web developers and graphic designers with color related and other tasks with over 5 million downloads is finally available for Chrome! With ColorZilla you can get a color reading from any point in your browser, quickly adjust this color and paste it into another program. Main features of ColorZilla Eyedropper - get the color of any pixel on the page Color History of recently picked colors Displays element information like tag name, class, id, size, etc. Advanced Color Picker (similar to Photoshop's) Ultimate CSS Gradient Generator Webpage Color Analyzer - get a color palette for any site Palette Viewer with 7 pre-installed palettes Auto copy picked colors to clipboard Keyboard shortcuts Get colors of dynamic hover elements Single-click to start color picking (currently only on Windows) Pick colors from Flash objects Pick colors at any zoom level All features here: http://colorzilla.com/chrome/features.html

5. Google Translate Google Translate is Google's free service that instantly translates words, phrases, and web pages between English and over 100 other languages. View translations easily as you browse the web By the Google TranslateChrome Extention. Google Translate is a free multilingual machine translation service developed by Google, to translate text. Highlight or right-click on a section of text and click on the Translate icon next to it to translate it to your language. Or, to translate the entire page you're visiting, click the translate icon on the browser toolbar. Translate between 103 languages by typing Tap to Translate: Copy text in any app and your translation pops up Handwriting: Draw characters instead of using the keyboard in 93 languages Phrasebook: Star and save translations for future reference in any language Offline: Translate 59 languages when you have no Internet Instant camera translation: Use your camera to translate text instantly in 38 languages

6. PixelParallel by htmlBurger PixelParallel by htmlBurger is a perfect completely free, super handy and light HTML vs Design comparison tool for developers. Built from developers to developers, PixelParallel is a tool working in favor of the ultimate precision in front-end coding. How PixelParallel works: Simply upload your image and compare the semi-transparent overlay with the web page below. Customize the opacity, scale, and position of the image as you wish. You can also hide it or lock it. Perform color difference for a strong pixel-perfect precision. Use the vertical and horizontal grids to achieve a pixel-perfect web design. Main Features of PixelParallel : Customizable overlay opacity Saving overlays between sessions Bootstrap grid with customizable width, number of columns, gutter, and opacity Horizontal lines with customizable space between Draggable rulers (Photoshop-like) + Reset option Inversion (Color difference) Separate overlays for each web page Overlay scaling Draggable overlay Quick hide/show image Shortcuts + customizable keyboard hotkeys Works with local files Intuitive UI: clean and simple; draggable; minimizable All image sizes supported

7. Awesome Screenshot: Screen Video Recorder Awesome Screenshots is a free Chrome Extensions for Web Developers and Designers that lets you take snapshots of whatever you're currently browsing with over 2 million users! The app provides various editing features that make it easy to annotate your screenshots and hide sensitive information and also lets you upload screenshots in just one click. Previously premium features are now completely free. It’s the easiest way to communicate with your images! Capture Capture or clip selected area, or all visible portion, or the entire page Supports PNG format Supports horizontal scrolling when capturing Desktop screen capture Annotate & Edit Annotate any image with rectangles, circles, arrows, lines, and text Crop, scroll & show crop area dimensions Blur certain sections to hide sensitive information Copy the screenshot and paste it to Gmail, Facebook, Twitter, etc. Supports Windows and Linux Save & Share Save to local One-click to upload to awesomescreenshot.com and get a shareable link Support for Google Drive (Gdrive) Save very large images, bypass the 2M limit. No more crashes Interact with point-specific comments between friends and colleagues thru the new awesomescreenshot.com

8. Page Ruler - Pixel Dimensions and Positioning Page Ruler lets your draw out a ruler to any page and displays the width, height, and position of it. It allows you to draw out a ruler to web page and displays the width, height, and position of it while performing Web UI testing. You can manually update the size and position of the ruler from the toolbar to make precision changes. Main Features of Page Ruler: Draw a ruler to any page and view the width, height, and top, bottom, left and right position Drag the edges of the ruler to resize it Use the arrow keys to move and resize the ruler Show guides extending from the ruler edges Manually update the size and position of the ruler from the toolbar to make precision changes Enable “Element Mode” to outline elements on the page as you move your mouse over them Navigate through parents, children and sibling elements of any measured element

9. Postman - API Testing Chrome Extention Firebug is an extension ( add on ) for Chrome browser Which helps to view the source code and thereby identify the different elements. efficiently. Firebug - Inspect HTML and CSS Elements - Google Chrome Extensions for Web Developers and Designers

11. Keyword Everyware - SEO Extention Keyword Everyware is the best SEO Extention for Search volume, CPC & competition. Keyword search volume for 15+ websites like Google Analytics, Google Search Console, Moz, Majestic, YouTube, Amazon & more. The Keywords Everywhere extension is an SEO keyword research tool that shows you useful google keyword search volume and cost per click data on multiple websites. This tool saves you the hassle of copying data from various websites and using the Google AdWords keyword planner to see relevant search volume and CPC data. Monthly Search Volume - This is an average of the total searches that people have performed for this keyword per month over the last 12 months. Cost Per Click - The cost per click (CPC) is the amount that advertisers are paying for a single click for this keyword in Google Adwords. Adwords Competition -The competition is a gauge of the number of advertisers that are running ads on Google AdWords for this specific keyword. Below websites are currently supported. As we support more websites, we will add them to the list below. Google Search - data are shown under the search box and in the right-hand side (People also ask for & related keywords) Google Analytics - data are shown in the Organic and Search Engine Optimization -> Queries pages YouTube, Bing, Amazon, eBay - data shown under the search box AnswerThePublic.com - data are shown in the popup on each spoke of the wheel, data also shown in the alphabetic listings Soovle.com - data shown next to each keyword all over the page KeywordShitter.com - data shown under the main text area next to keywords Majestic, Moz Open Site Explorer - Anchor Text Report The tool also allows the user to get keyword metrics for any list of keywords and also lets the user download the list in Excel, CSV or PDF file formats.

12. CSS Shack - Create Layers Styles CSS-Shack is a web and desktop application, which allows you to create layers styles (just like you would in any other image editing software), and export them into a single CSS file. Create designs to export as a CSS file which you can use on your website with the help of CSS-Shack. This robust Chrome extension contains a wide array of tools like those from a normal photo editor and it also provides layer support.

13. Web Developer Tool Extention The Web Developer extension adds a toolbar button to the browser with various web developer tools. With this extension, you can control browser cache and manage cookies, inspect and highlight web-elements, etc. on any web page. It saves a lot of time while performing web UI testing.

14. Clear Cache - Clear Cache and Browsing Data Do you want to clear the browser data in the middle of your testing process? You don’t need to follow the long and mundane process to clear browser history. With this extension, you can Quickly clear your cache with this extension without any confirmation dialogs, pop-ups or other annoyances with the toolbar and customize passwords, app cache, file systems, browsing the history, local storage, downloads and form data. You can customize what and how much of your data you want to clear on the options page, including App Cache, Cache, Cookies, Downloads, File Systems, Form Data, History, Indexed DB, Local Storage, Plugin Data, Passwords, and WebSQL.

15. Usersnap Classic - Collect feedback & bugs The Usersnap Chrome extension lets you capture and annotate any web page directly in your browser. It’s super-easy to provide feedback on prototypes or report bugs with this Chrome extension And all created screenshots are directly stored in your project dashboard. With Usersnap you can Capture your screen, collect user feedback, and track bugs reports on any website, prototype, or application. Usersnap is your central place to organize user feedback and bugs. No matter if you love agile methods, scrum, Kanban or even waterfall - Usersnap is here to help. Bring your own style, Usersnap follows. Special features of Usersnap in-browser screenshots: you’ll get a screenshot of what your users see. No plugins required. See browser-specific issues immediately. Collaborate & Communicate: invite your colleagues into Usersnap and discuss screens and find solutions together. bug tracking in the browser: tracking bugs and website errors gets super easy & fast with the Usersnap Chrome extension. JavaScript error recording: Track and log client-side JavaScript errors and XHR logs with the Usersnap console recorder. Read the full article
#AwesomeScreenshot:ScreenVideoRecorder#bestchromeextensions#bestchromeextensionsforproductivity#BestChromeExtensionsforWebDevelopersandDesigners#chromedevelopertoolsextension#ChromeExtensionsforWebDesignersandDevelopers#ChromeExtensionsforWebDevelopersandDesigners#ChromeExtensionsforWebDevelopersandDesigners2019#chromewebdeveloperapp#ClearCache-ClearCacheandBrowsingData#ColorZillaAdvancedColorPickerforDesigners#CSSShack-CreateLayersStyles#designerchromeextensions#Firebug-InspectHTMLandCSSElements#googledevelopertools#GoogleTranslate#GrammarlyforEnhanceYourWrittenCommunication#KeywordEveryware-SEOExtention#PageRuler-PixelDimensionsandPositioning#PixelParallelbyhtmlBurger#Postman-APITestingChromeExtention#ResponsiveWebDesignTester#UnlimitedVPNProxy–UnblockSites#UsersnapClassic-Collectfeedback&bugs#webdeveloperdownload#webdeveloperextension#WebDeveloperToolExtention
0 notes
Text
MF - Multipurpose WordPress Theme
New Post has been published on https://babesgobananas.com/mf-multipurpose-wordpress-theme/
MF - Multipurpose WordPress Theme

Current Version 2.5.0 – 28 Apr 2019
Compatible with WordPress 5.1+ and WooCommerce 3.6+


The Future Of Web Design. See what you are using.

Make your works easier with copy & paste rows from page to page.


Description
Responsive, clean, modern, minimal & seo friendly MF can be used in: business, agency, corporate, personal , blog, dental clinic, dentist, restaurant, pizza, cafe , product, landing, hospital, doctor, furniture, hosting, creative, app, portfolio, event, food, fashion, finance, bitcoin, crypto currency coin , ico, landing page, law, lawyer, law firm, lawyer attorney, medical, architecture, onepage, photographer, photography, construction, wedding, pet, contractor, constructor, technology, transport, unique, video, sport etc.
Feature List
Modern Design
SEO optimized
One Click Demo Import
Clean & Valid Code
Wocommerce Ready
Responsive Theme
Retina Image Support
Child Theme Compatible
WPBakery Page Builder
Massive Addons Premium Plugin
WPBakery Page Builder Clipboard Premium Plugin
Slider Revolution Premium WordPress Slider
The Grid – Responsive WordPress Grid Plugin
Essential Grid – Premium Grid Plugin
12 Blog Layouts
36 Portfolio Layouts
Google Font Support 700+
Over 2500+ Font Icons
Build in Mega Menus
Advanced Header Versions
WPML Support
Translation Ready (.pot file included)
Unlimited Sidebars
Footer Widgets 1-4 Columns
Contact Form 7
MailChimp for WordPress
bbPress Forums
WordPress Multisite (WPMU) Tested and Approved
MF Premium WordPress Theme is Multi-Lingual Ready!
Translation Ready, Includes the .pot file
Our Theme is compatible with WPML plugin
Polylang Support
Language selector with WPML plugin
Certificate Of Official Wpml.org

Note: See here how to update plugins: http://www.mfdsgn.com/documentation/#plugins_33_update
Version 2.5.0 (28 Apr 2019)
- Woocommerce 3.6.2 compatible issues fixed - Plugins updated
Version 2.4.9 (07 Feb 2019)
- Custom Not Found page options added to admin panel - Sticky logo height option added to admin panel - Text logo option added to admin panel - General Post layout (Full, Left Sidebar, Right Sidebar) option added to admin panel - Use Page Title Image on Homepage option added to Page options - Page title background image overlay color & opacity option added to admin panel - Soundcloud added to Social icons - Category and Tags added to Product page - Page edit color select Hex code issue fixed. - Header 6 Submenu open issue fixed - Header 12 mobile view problem fixed - Color picker issue at Menu fixed - Onepage goto top problem on header fixed - Mobile view is improved
Version 2.4.7 (24 Oct 2018)
- Business 2 homepage renewed: https://www.mfdsgn.com/mf/home/business-2/ - Woocommerce 3.5.0 compatible issues fixed - No header option added to mobile view on pages at Header 14 (No Header) - Massive Addons updated to 2.4.2.1
Version 2.4.6 (08 Oct 2018)
- widget area view improved - submenu open issue fixed - submenu font + color option added to Theme Options - header 6 submenu open issue fixed - Post category description issue fixed - Fade on load page issue fixed - Breadcrumb color issue fixed - Search, Blog, Category, Page and Post headers improved - WPBakery Page Builder updated to 5.5.4 - The Grid updated to 2.6.70 - Layer Slider updated to 6.7.6 - Massive Addons updated to 2.4.2 - Visual Composer Clipboard updated to 4.5.0 - Essential Grid updated to 2.2.5 - Master Slider updated to 4.9.2
Version 2.4.5 (26 Agu 2018)
- App Landing homepage added : https://www.mfdsgn.com/mf/home/app-landing/ - Product Landing homepage added : https://www.mfdsgn.com/mf/home/product-landing/ - Redux Framework updated to 3.6.11 - Header image jump problem fixed
Version 2.4.4 (01 Agu 2018)
- WPBakery Page Builder updated to 5.5.2 - The Grid updated to 2.6.60
Version 2.4.3 (21 Jun 2018)
- Slider Revolution updated to 5.4.8 - WPBakery Page Builder updated to 5.5 - The Grid updated to 2.6.56
Version 2.4.2 (28 May 2018)
- Woocommerce 3.4 compatible issues fixed - Slider Revolution updated to 5.4.7.4 - Layer Slider updated to 6.7.6 - Redux Framework updated to 3.6.9 - The Grid updated to 2.6.50
Version 2.4.1 (30 Mar 2018)
- Cryptocurrency ICO homepage added : http://mfdsgn.com/icoonepage1/
Version 2.4.0 (17 Mar 2018)
- WPBakery Page Builder updated to 5.4.7 - Slider Revolution updated to 5.4.7.2 - Massive Addons updated to 2.3.3 - Layer Slider updated to 6.7.1 - Flickr social button added
Version 2.3.9 (27 Feb 2018)
- No Header option added - Slider Revolution updated to 5.4.7.1 - The Grid updated to 2.6.0
Version 2.3.8 (15 Feb 2018)
- Cryptocurrency Consulting homepage added: https://www.mfdsgn.com/mf/home/crypto-consulting/ -Woocommerce 3.3 compatible issues fixed -Woocommerce product display improved -Yelp social button added -Header 4 overlay issue fixed
Version 2.3.7 (29 Jan 2018)
- Minor menu issue fixed
Version 2.3.6 (24 Jan 2018)
- Cryptocurrency ICO homepage added: https://www.mfdsgn.com/mf/home/cryptocurrency-ico/
Version 2.3.5 (03 Jan 2018)
- Vimeo social icon added to admin panel
Version 2.3.4 (21 Dec 2017)
- WMPL Mobile Language switcher option added
Version 2.3.3 (18 Dec 2017)
- Hide Mobile Menu On every Click option added - Gap issue between content and sidebar is fixed on posts - Header 13 responsive issue is fixed - Wooocommerce product responsive issue on Chrome fixed
Version 2.3.2 (03 Dec 2017)
- Massive Addons updated to 2.3.2 - The Grid updated to 2.5.5
Version 2.3.1 (27 Nov 2017)
- Essential Grid updated to 2.1.6.2.2 - Master Slider updated to 3.2.2
Version 2.3.0 (24 Nov 2017)
- WordPress 4.9 compatibility fixed - PHP 7.1.x compatibility fixed - WPBakery Page Builder updated to 5.4.5 - Slider Revolution updated to 5.4.6.3.1 - Massive Addons updated to 2.3.1 - Redux Framework updated to 3.6.7.10 - Visual Composer Clipboard updated to 4.1.1 - Oneclick Demo Import improved
Version 2.2.6 (12 Nov 2017)
- Header 1 and Header 4 padding issue fixed - Mobile Menu close issue fixed on Onepage menus.
Version 2.2.5 (09 Nov 2017)
- Photography 1 homepage renewed: https://www.mfdsgn.com/mf/home/photography-1/ - Photography 2 homepage added: https://www.mfdsgn.com/mf/home/photography-2/ - Updated Plugins: WPBakery Clipboard
Version 2.2.4 (06 Nov 2017)
- Business 1 homepage renewed: https://www.mfdsgn.com/mf/home/business-1/
Version 2.2.3 (01 Nov 2017)
- Lawyer homepage added : https://www.mfdsgn.com/mf/home/lawyer/
Version 2.2.2 (28 Oct 2017)
- Construction homepage added : https://www.mfdsgn.com/mf/home/construction/ - Updated Plugins: Visual Composer, Slider Revolution, Massive Addons.
Version 2.2.1 (26 Oct 2017)
- 3 new Homepages added - Creative Agency : https://www.mfdsgn.com/mf/home/creative-agency/ - Medical : https://www.mfdsgn.com/mf/home/medical/ - Dental Clinic : https://www.mfdsgn.com/mf/home/dental-clinic/ - Updated Plugins: Essential Grid
Version 2.2.0 (16 Oct 2017)
- Single Post Featured image responsive issue - Post global featured image enable/disable option added - Category Decription added - Sticky Header menu + hover + bg color option added to panel - PHP 7 issues fixed - Pot file renewed - Woocommerce arrow problem fixed
Version 2.1.0 (06 Sep 2017)
- Woocommerce Mini Cart issue fixed
Version 2.0.9 (08 Agu 2017)
- Woocommerce 3.1 files upgraded
Version 2.0.7 (23 Jun 2017)
- Android, Apple and Xing social icons added to admin panel
Version 2.0.6 (10 Jun 2017)
- Header Topbar bg color option added to panel
Version 2.0.5 (04 Jun 2017)
- Mobile Header Color options added to panel - Mobile Header Phone option added to panel - Mobile Header Email option added to panel
Version 2.0.4 (31 May 2017)
- Pizza Restaurant Homepage added
Version 2.0.3 (26 May 2017)
- Header background issue fixed
Version 2.0.2 (22 May 2017)
- Portfolio Homepage added - New Elements pages added - New Sliders added
Version 2.0.1 (04 May 2017)
- Demo content changed
Version 2.0.0 (29 Apr 2017)
- New Homepages added - New Subpages added - Transparent Menu feature added - New Header versions added - New Footer area added - Footer enable/disable option added - Predefined Colors added - New Elements added
Version 1.5.9 (30 Mar 2017)
- Onepage demo improved - Demo data xml renewed
Version 1.5.8 (15 Mar 2017)
- Footer copyright link availibility added
Version 1.5.7 (05 Mar 2017)
- 4 New Homepages added - New Slider added
Version 1.5.6 (27 Feb 2017)
- New Homepage added - New Slider added - New 24 Portfolio layouts added - New Essential Grid Premium Plugin added - Slider Revolution 5.4 updated
Version 1.5.5 (17 Feb 2017)
- New Sliders added
Version 1.5.4 (25 Jan 2017)
- Onepage Demo Site added
Version 1.5.3 (19 Jan 2017)
- Full Shop Demo Site added
Version 1.5.2 (11 Jan 2017)
- bbPress Forums added - MailChimp for WordPress added - VC Clipboard added
Version 1.5.1 (29 Dec 2016)
- Go Portfolio added
Version 1.5.0 (24 Dec 2016)
- All pages redesigned - New Homepages added - New Sliders added - New premium plugins added - One Click demo import added - 39 new .po files added - Elements page added - Woocommerce added - Documentation renewed
Version 1.4.0 (20 Dec 2016)
- 404 page improved - Custom code area added
Version 1.3.0 (16 Dec 2016)
- Search pages improved - Demo data improved
Version 1.2.0 (11 Dec 2016)
- New Homepage added - New Sliders added
Version 1.1.0 (09 Dec 2016)
- The Grid Plugin added - Blog pages renewed - Portfolio pages added


Source
0 notes
Text
How Much Does it Cost to Make An App in 2019?

There is no one right answer to how much it costs to make or build an app. However, this article will help you try to get a ballpark estimate for what you would like to create. There are three main variables involved in pricing app development. Want to skip this and go directly to a handy app pricing calculator? Click on Start a Project here. First, the feature set - a lot depends on the features of the app. Rule of Thumb: features with complicated bookkeeping like real-time location tracking will be 3x-4x more expensive than less extensive features like user profiles. Second, the brand. If you get your app developed from the Rolls-Royce of software development companies, keep a fat check handy. Instead, it’s better to opt for a quality freelancer or dev shop that does solid, reliable work but isn’t overly pricey. Rule of Thumb: A high-end software agency will charge you about 2x-5x what a reliable, mid-range app development company might. Third, where your app developers are located matters a lot. Different places have different market salaries for good software engineers, and that will translate directly to the price you can obtain in that market. Rule of Thumb: An app that costs ~ $60,000 in America will be ~ $20,000 in Eastern Europe and ~ $12,000 if made by a software development company in Pakistan. Countries with similar demographics will have similar rates if all other factors are roughly equal.
What Do You Want to Build?

Just like the development of any other software, a complex mobile application requires more time and effort as compared to a simple one. Each added feature and entity consumes back-end services, time, energy, and resources. The more screens and entities involved, the messier it gets for developers. Let’s walk through the cost of development of an app if you were to develop your application from a mobile app dev company in Pakistan.
Cost By Key Features to Build an App

Take, for example, a simple Android App with basic features like User Logins and reading articles or ebooks start from around $2,000. A simple direct to consumer app with Email & Push Notifications, Admin Panel, and Payment Integration would start from around $6,000 and up. Similarly, an E-commerce website (for mobile) which requires logins, to user profile, to payment & CRM integration to Admin Panel, inventory and order management, and support would start from around $9,000. Here’s a feature-wise cost breakdown: User Login This is one of the most common features for applications that demand users’ registration before they can use it. Registrations are normally via email, phone number, or through a social media account. Expect a login module with email, phone and social account signup to take around 20 - 40 hours in the making. At a a per hour rate of $15, the cost comes out to around $600. Push Notifications An essential feature engagement feature, push notifications update users on various activities happening in your app and may help to increase engagement rates significantly. There are a variety of options: simple text notifications, text-with-image notification, and ones that have action buttons on them. Push notifications allow administrators to decide very granularly who, when and where to send a push notification to (for example in chat box). Based on the complexity of the feature, the timeline for push notifications combined with automated emails may range between 20 hours to 100 hours and may cost from between $500 to $1,000. Geolocation & Google Maps This is a crucial feature for taxi apps, restaurant apps, business and travel apps, etc. Real-time location updates, GPS tracking and maps integration are critical for any localized service. It may take as many as 50 hours or even more in development; the module might cost around $700-$1,000. Chats & Messaging While many mobile applications can do without them, chat boxes are essential for some apps like an e-commerce platform or a social app. The cost may vary depending on the type of service(s) required. Do you want a direct person-to-person or a group chat, a supporting emoji, files transfer, or just basic texting? Or one with a messaging history or auto-delete? Giving an accurate budget specification is only possible with available data. But expect no less than 80+ hours to complete this feature. Ads & In-App Purchase These features are a must for consumer apps as they may increase the conversion rates. In-app purchases are driven through mobile ads appearing on users’ screen in the form of a simple text, text, and image or full-screen pop-ups, or other in-app prompts. They have traditionally been custom developed, but services and tools are now available to assist developers. The pricing may range between $500 -$2000 based on the complexity of the in-app purchase integrations. Each ad appearing on the screen prompts users to explore other products or services and to make an in-app purchase. The development cost for this feature is relatively lower and should be around $250. Payments Integration For every in-app purchase, applications require payment integration options. You can pick from a score of possibilities. There is Android Pay, Google Wallet, Apple Pay, PayPal, credit cards, and many more. The development process for this feature mostly relies on various factors: Payment process, the security of transactions and users’ data, and the level of PCI compliance, etc. However many of these can be streamlined by using a payments gateway like Stripe or Wepay. The task may take developers as many as 50 hours or more, with costs starting from $600 and upwards Offline Mode Offline Mode has recently been gaining a lot of popularity in mobile apps, as it makes usability even more flexible; even if the connection is low, slow, flickering, or not working at all. Developers mostly use a SQL database, local caching, and cookies on the device for offline data storage. The task usually takes 40 hours to complete and costs around $450-$480 accordingly. Customization Customization is when an app lets users change its appearance as per their liking. This may include a change in language, or mode (day or night), or shifting from a grid view to list, or full-width screen cards. The time taken depends completely on the depth of customization required. The cost normally runs between $500 to $1,500. Search Adding custom search requests to content within your app may take user engagement to another level. Yes, Android and iOS phones have their own search bars, but adding a custom search option makes your app stand out among others. The development timeline is around 24 hours; thus, the cost ranges from $250 to $350. Multi-Language Support If you intend to make an app for various regions, the multi-language option comes handy as it lets users select the language of their choice. From the developers’ perspective, two key aspects are essential for this task: the scope of data and User Interface (UI adjustments). The adjustments may take several days, and cost around $350-750.
How much Does it Cost to Design an App?

Design, as Apple co-founder Steve Jobs described it, is “not just what it looks like and feels like. Design is how it works.” In software development, the word ‘design’ may translate to visual design, user interface (UI), and user experience (UX), wireframes, logos, icons, etc. However, each of these fits into an overall process. For more on that process, check this. Rule of Thumb: Designers normally charge by the hour, and cost will be proportional to visual complexity of the app and the level of market & user research required. For design agencies in Pakistan, $150 per app screen is a decent estimate. The App design has a lot to do with the cost of an app making. The price of app design may differ based on the profile of the designer, geography, complexity, and platform. Designer: A senior designer in the US may charge you as much as $150 per hour or more, whereas a less experienced designer may cost as low as $25/hour. Geography: Costs vary greatly by region. Given below is a region-wise breakdown of the range of hourly rates by decent designers.. Again, factors like brand also influence which end of the range you will find. USA & Canada – $25-250 per hourAustralia – $20-$150Western Europe & UK – $25-170Eastern Europe – $15-150Asia – $10-80 Complexity: UI design costs are directly proportional to the visual complexity of an app. While simple app designs (like Clock apps) may cost around $1,000, a more complex chat app design like WhatsApp may take about $3,000. Similarly, an intricate social media app design – the likes of Facebook or Twitter – may even range from $8,000 to $15,000. Platform: Designing an iOS app is relatively easier and may cost around $100 to $10,000. But, an Android app’s design cost may range from $1,500 to $12,500. You should expect to add a similar amount for a web app.
Where Do You Want to Get it Done?
The geographical factor cannot be downplayed while calculating the cost of app making. It is an open secret that freelance developers and software agencies from South Asian countries can deliver a solid project in less than half of what dev shops from Europe, Canada, and US charge. Here is how much developers worldwide cost to make an app:
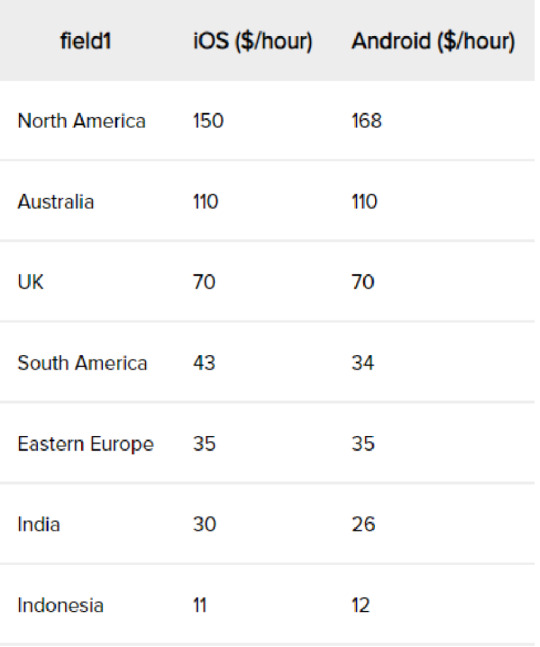
Who Builds It?

Now here is the trickiest part. You can have your app made through two main channels. Each offers tradeoffs in quality, cost, risk, and efficiency. You can either: Hire a freelance developer, orUse the services of a development agency like AppRocket. Rule of Thumb: Freelancers are cheaper but often unreliable and prone to miscommunication issues. Dev shops are more expensive but will be more reliable and leverage past experience to ensure that you end up with a solid product. Freelancer Engaging freelance developers might prove to be the cheapest way of going about it, but involves significantly more risk. Because: (i) You have to hire a separate programmers (server/backend, and mobile or web/frontend) and designers. (ii) You have manage your project and its delivery yourself. And if you are not technically aware yourself, you might find it a lot trickier. (iii) Working with a team of strangers might bring communication issues and may affect the quality as well. (iv) After all the money and personal monitoring put in; there remains a chance of not attaining the desired results. If you cannot communicate your idea clearly (which sometimes requires technical know-how), your team will build whatever they thoguht you told them to build. Engage a Software Development Agency: A little more expensive but the best way to get your mobile application built is to hire a reasonable developing agency. Development agencies are the more reliable option . Why? Because: (i) They are also entrepreneurs with ample experience and can take your project from idea to launch and beyond. (iii) They work in close coordination with you to create a product that genuinely and entirely reflects your concept and is market-ready. (ii) Their teams work under expert Team Lead to flesh out your application from concept to live within the timeline. In case one developer is not up to par, they have the buffer to reassign someone to the project. Cost to Make an App with Software Agency If you opt for a top-of-the-line development shop to build your app, it may charge anywhere from $50,000 to $500,000 – maybe even more. Whereas at mid-tier agencies like AppRocket, the cost for even higher-end complex applications would normally run under $50,000. To get an accurate estimate for your app, try our cost calculator. Visit this page and click “Start Project.”
How much Does it Cost for App Maintenance?

If you are taking a sigh of relief considering that the work is done, we would suggest you wait a bit more. Because your expenses don’t just end with the release of an app – you got to maintain it. How? Testing and releasing an app is just the end of a chapter – it is not the end of the story. Next thing you want is your app to perform better with every passing day. And certainly, you would also like users to keep using and downloading your app. If you cannot personally handle all this; you would again need services of a developer to maintain it. And it costs money! Quotations from some of the leading developers suggest that the average cost of maintaining an app is about 20% of the development cost. So, if your application was built in around $50,000 – you would be required to pay at least $10,000 every year to keep it up and running. Here’s is a list of additional features (depending on the demand and requirement of the project) that may further jack up the cost: Powerful servers – $20-$60/monthpush notifications – $10/monthPayment gateways – up to $150/month (plus a fee on each transaction)Emergency maintenance – depends on the nature of the emergencyThird party APIs chargesApp stores developer fee – $25 at Google Play, $99 at Apple App. Read the full article
0 notes
Text
Qt, QML and Felgo tutorial. NASA Astronomy Picture of the Day app for Desktop, iOS and Android
Javier did it again! Thank you very much for your NASA Astronomy Picture of the Day app tutorial. We at Felgo team enjoyed reading this easy-to-follow tutorial.
We hope Felgo users will find it useful and put it into practice. This is the original article that we fetched below:
This is an introductory tutorial to getting started with Qt/QML and Felgo to design multi-platform apps for desktop (Linux, Window & macOS) and mobile devices (iOS & Android). A complete app is developed in this tutorial: NASA Astronomy Picture of the Day app. This tutorial also describes how to create custom QML components and how to perform HTTP requests by accessing one of the NASA Open APIs.
Have a look at the following video to see the app in action! This app works on Linux, Window, macOS, Android and iOS, all from the same code. Isn’t it cool? But there is more, Felgo roadmap includes building apps for different platforms in the cloud, support for embedded and IoT devices and publishing apps to the web.
youtube
Astronomy Picture of the Day app
Background
If you are not familiar with the Qt framework or Felgo, I recommend first having a look at Qt 5 framework technology and tools: QML, Qt Quick, Qt Creator and Felgo.
Outline
Astronomy Picture of the Day (APoD) app
NASA APoD open API
Performing an HTTP Request
Creating Custom QML Components
How can I execute the app? How about live reloading in my mobile phone?
What can I do to learn and improve the app?
Astronomy Picture of the Day (APoD) app
Let’s see how we can design a QML app for accessing NASA Astronomy Picture of the Day open API and test it in our mobile phone or tablet using live code reloading. The cool thing is that you can use any combination of desktop operating system (Linux, Windows and macOS) and mobile device (Android or iOS).
The code of the APoD app is open source and available at our APoDapp repository hosted on GitHub.
APoD app screenshot
The first thing to do is to download and install Felgo. It integrates everything needed. Felgo includes the Qt framework and the Qt Creator IDE. Once installed, execute Felgo and you should see Qt Creator. Have a look at the Example section to see what can be done with this Software Development Kit (SDK).
Felgo – Qt Creator IDE
The next step is to create a new app, click on File -> New File or Project, and then select Felgo Apps, Single-Page Application. Give it a name “APoDapp” and select the destination folder. In the kit selection, choose only Felgo desktop, click next, again next and finish.
The QML code in Main.qml is a hierarchical tree of QML objects. The import statements define the modules and versions we want to use. We can set an alias if needed (such as Quick2) in case there are components with the same name in different modules.
The general structure of our app is shown below. The App component in the main node. The NavigationStack component adds a navigation bar that shows the page title and is used to navigate between pages. A Page is a container for components.
import QtQuick 2.11 import QtQuick.Controls 2.4 as Quick2 import QtMultimedia 5.8 import Felgo 3.0 App { id: app NavigationStack { Page { id: page title: qsTr("NASA - Astronomy Picture of the Day") ..... ..... } } }
Each QML object has a different set of properties, but some of them are common to all of them, for instance the id property. Each QML object can be referenced by the name given in its id property. The title property in the Page object defines the text shown in the navigation bar. The qsTr function is a helper function for translating your app to different languages.
Inside the assets folder in your app main folder you can place the assets (images, videos, documents, etc.) you want to distribute with your app.
The app appearance can be customized implementing a handler (onInitTheme) for the App initTheme signal. This code set a new tintColor (app-wide default main color), and the background and text colors of the navigation bar.
App { id: app onInitTheme: { Theme.colors.tintColor = "#1e73be" Theme.navigationBar.backgroundColor = Theme.colors.tintColor Theme.navigationBar.titleColor = "white" } property bool isVideo: false ..... ..... }
In the App object, a variable (property in QML) is declared to store if the media from the NASA open API is a video (isVideo), because the requested media can be an image or a video link as we will see later.
In page, we define a background image and a set of QML components inside a Column object which is nested with a Flickable object.
..... ..... Page { ..... ..... Image{ anchors.fill: parent source: "../assets/MTB_background.jpg" fillMode: Image.PreserveAspectCrop opacity: 0.5 } Flickable{ anchors.fill: parent contentWidth: column.width contentHeight: column.height flickableDirection: Flickable.VerticalFlick interactive: !dateControl.isDialogOpenend Column{ id: column width: page.width spacing: dp(10) topPadding: dp(10) bottomPadding: dp(30) ..... ..... } } } ..... .....
The first component inside page is the page background Image. Qt Quick provides a way to layout components using the concept of anchors. In this case, the background image is filling the whole area of its parent (page object). Besides the image source, the fillMode and opacity properties are also set.
The Flickable object places its nested objects on a surface that can be dragged and flicked, causing the view onto the nested objects to scroll. Inside the flickable, objects are organized following a Colum layout. The flickable object properties contentWidth and contentHeight are therefore set to the width and height of the column. The flickable direction is also set to be only in the vertical axis (VerticalFlick). Additionally, we disable the flicking when the calendar is opened (interactive = false), more about this later.
QML components can be organized considering different layouts (column, row, grid, etc). In the column object, we set the width, which corresponds to the page width, and also the top and bottom paddings (topPadding and bottomPadding) and the spacing between the QML objects inside the column layout. The dp method provides a density-independent unit for the value passed as an argument, that must be specified in pixels.
The QML objects inside the Column layout are given below.
Column{ ..... ..... Image // Logo AppText // Text: "Choose date" DateControl // Date control (custom QML object) AppText // Picture title AppText // Picture author ProgressBar // Loading image progress bar Image // Media - Image YouTubeWebPlayer // Media - Video Rectangle // Black rectangle DescriptionBlock // Description of media (custom QML object) }
The following QML components are the logo and the text “Choose date”, both are horizontally centered. We also set the image width with respect to its parent width. The image height is implicitly calculated by setting the preserve aspect fit mode.
Image{ source: "../assets/MTB_logo.png" fillMode: Image.PreserveAspectFit anchors.horizontalCenter: parent.horizontalCenter width: parent.width - dp(40) } AppText{ anchors.horizontalCenter: parent.horizontalCenter text: qsTr("Choose date") }
There isn’t a stock date picker or control in QML, but we can create our own component. This component is described later in this tutorial. Our date control trigger an signal when a date is selected accepted, and we can implement a handler of such signal (onAccepted) where we call a JavaScript function (request_nasa_image_QML). This function is also described later. Our date control also implement two additional handlers: onOpened and onCanceled.
DateControl{ id: dateControl onAccepted: request_nasa_image_QML(dateStr) onOpened: hideVideo(isVideo) onCancelled: showVideo(isVideo) }
The video component (nasaVideo) is tricky since we need to hide it to show the date dialog over it, so we call JavaScript functions to show (showVideo) or hide (hideVideo) it. When we hide the video component, we show a black rectangle (rectangle) with its same size. Also, we have to hide this rectangle when the video container is shown.
function hideVideo(isVideo) { if (isVideo) { nasaVideo.stop() rectangle.width = nasaVideo.width rectangle.height = nasaVideo.height nasaVideo.visible = false rectangle.visible = true } } function showVideo(isVideo) { if (isVideo) { rectangle.visible = false nasaVideo.visible = true } }
Next, we have two AppText components that show the title and author of the retrieved media. Some configuration is done in both components, such as: width minus some spacing, center horizontal alignment, bold font and word warp mode.
AppText{ id: message horizontalAlignment: AppText.AlignHCenter font.bold: true wrapMode: AppText.WordWrap width: parent.width - 2*dp(10) } AppText{ id: author horizontalAlignment: AppText.AlignHCenter wrapMode: AppText.WordWrap font.pixelSize: sp(12) font.bold: true width: parent.width - 2*dp(10) }
A progress bar shows the loading progress when the retrieved media is an image, hence it is only visible when an image is loading (nasaImage.status === Image.Loading). The loading progress is obtained from the image progress property (nasaImage.progress). This value is between [0,1], so we set accordingly the progress bar interval (from and to properties).
Quick2.ProgressBar{ anchors.horizontalCenter: parent.horizontalCenter visible: nasaImage.status === Image.Loading value: nasaImage.progress from: 0 to: 1 }
If the retrieved media type is an image, we show it in the nasaImage component. If we click or touch this image (MouseArea component), the image URL is opened in the default browser (onClicked handler) thanks to the functionality provided by the Felgo nativeUtils object.
Image { id: nasaImage anchors.horizontalCenter: parent.horizontalCenter visible: nasaImage.status === Image.Ready fillMode: Image.PreserveAspectFit width: parent.width - 2*dp(10) MouseArea{ anchors.fill: parent onClicked: nativeUtils.openUrl(nasaImage.source) } }
It may happen that the media retrieved from the API REST call is a link to a YouTube video instead of a link to an image. In this case, we use the Felgo YouTubeWebPlayer QML component (nasaVideo) to load the video.
We also have a Rectangle component (rectangle) that is shown when the YouTubeWebPlayer component is hidden.
YouTubeWebPlayer{ id: nasaVideo anchors.horizontalCenter: parent.horizontalCenter width: parent.width - 2*dp(10) visible: false } Rectangle{ id: rectangle color: "black" anchors.horizontalCenter: parent.horizontalCenter visible: false }
Finally, we include another custom QML object (DescriptionBlock) to customize the appearance of the media text description obtained from the API REST call. This custom QML object is described later in this tutorial.
DescriptionBlock{ id: descriptionBlock }
NASA APoD open API
One of the NASA Open APIs is Astronomy Picture of the Day (APoD) API. To get access to this API we have to perform a GET request to the following URL.
GET https://api.nasa.gov/planetary/apod
Three parameter can be provided as shown below. We don’t need a key for testing but it is required for expanded usage, we can easily apply for one here.
Parameter Type Default Description date YYYY-MM-DD Today The date of the APoD image or video hd bool False High resolution image api_key string DEMO_KEY Key for expanded usage
A successful request returns a JSON object with the following structure.
{ "title", // Media title "copyright", // Author/s "explanation", // Media description "media_type", // "image" or "video" "url" // Media URL (image or YouTube link) "hdurl", // High-definition media URL "service_version" // "v1" }
Performing an HTTP Request
We have different ways to perform a GET request to the NASA APoD API in our QML app. We can use pure JavaScript or a Felgo QML object. Let’s have a look at both.
XMLHttpRequest JavaScript object
The get_request function is a general function that performs an asynchronous GET request using the XMLHttpRequest JavaScript object. This function has three arguments: url, parameters and a callback function that is called when the request is finished.
function get_request(url,params,callback) { var http = new XMLHttpRequest() http.onreadystatechange = function(myhttp) { return function() { if (myhttp.readyState === XMLHttpRequest.DONE) callback(myhttp) } }(http) http.open("GET", url + "?" + params, true) http.send() }
The request_nasa_image_JS function uses the get_request function. It receives as an argument (dateStr) a date in string format (yyyy-mm-dd).
The first thing done in this function is to clear the GUI (clearInfo). Then, the request is performed. Inside the callback function, we check that the status is OK (Http_OK = 200). Then, the responseText is parsed to a JSON object (res_json). If everything went well, the requestSuccess function is called, otherwise requestError is executed.
function request_nasa_image_JS(dateStr) { const url_base = "https://api.nasa.gov/planetary/apod" const apiKey = "DEMO_KEY" const Http_OK = 200 var params = "date=" + dateStr + "&api_key=" + apiKey clearInfo() get_request(url_base,params, function(http) { if (http.status === Http_OK) { var res_json = JSON.parse(http.responseText) if (requestSuccess(res_json)) return } requestError() }) }
The clearInfo function simply clears all the previously shown information in the GUI.
function clearInfo() { message.text = "" nasaImage.source = "" nasaVideo.visible = false isVideo = false rectangle.visible = false author.text = "" descriptionBlock.text = "" }
The requestError function just sets an error message and the text color to red.
function requestError() { message.color = "red" message.text = qsTr("No data found") }
The requestSuccess function checks that the JSON object (res_json) is not empty. Then, it sets the title (res_json.title) and description (res_json.description).
After that, it checks if media is an image or a video, and set accordingly the image source or open the YouTube video. We use the youtube_parser function to obtain the YouTube video id from the URL, since the NASA APoD API provides a URL but the YouTubeWebPlayer object asks for the YouTube video id.
It may happen that there is not author information in our JSON (res_json.copyright), in this case the author QML component is hiden.
function requestSuccess(res_json) { if (res_json && res_json !== {}) { message.color = Theme.tintColor message.text = res_json.title descriptionBlock.text = res_json.explanation if (res_json.media_type === "image") nasaImage.source = res_json.url else if (res_json.media_type === "video") { nasaVideo.loadVideo(youtube_parser(res_json.url),true) nasaVideo.visible = true } if (res_json.copyright !== undefined) { author.visible = true author.text = "Copyright " + res_json.copyright } else author.visible = false return true } return false }
HttpRequest QML Component
Another way to perform an HTTP request is to use the Felgo HttpRequest QML object. The following JavaScript function makes use of it. Notice that we are also using here the clearInfo, requestError and requestSuccess JavaScript functions previously introduced.
function request_nasa_image_QML(dateStr) { const url_base = "https://api.nasa.gov/planetary/apod" const apiKey = "DEMO_KEY" const Http_OK = 200 const timeout_ms = 5000 var params = "date=" + dateStr + "&api_key=" + apiKey var url = url_base + "?" + params clearInfo() HttpRequest .get(url) .timeout(timeout_ms) .then(function(res) { if (res.status === Http_OK) if (requestSuccess(res.body)) return requestError() }) .catch(function(err) { requestError() }); }
Creating Custom QML Components
To create a new QML component, go to File -> New File or Project, then in File and Classes, select Felgo Apps and then choose Item (this is the base class of our custom component, it can be changed if needed). The name of our QML custom component will be the same as the given filename, also make sure that you create this file inside the qml folder.
DateControl QML Component
Our DateControl component has a row layout (Row) and a custom Felgo Dialog.
Calendar QML component
Item{ id: item width: parent.width height: row.height property date selectedDate: new Date() property alias isDialogOpenend: dateDialog.isOpen signal accepted(string dateStr) signal cancelled() signal opened() Row { id: row anchors.horizontalCenter: parent.horizontalCenter property date selectedDate: new Date() signal accepted(string dateStr) ..... ..... } Dialog{ ..... ..... } }
The components inside the row layout will be horizontally centered. A property (variable) is defined to store the chosen date (selectedDay), its default value is today (new Date()). Another property tracks when the dialog is opened (isDialogOpened).
We also define signals that will be emitted when a date is chosen by the user (accepted), the dialog is opened (opened) or the selection of a date cancelled (cancelled).
DateControl has three additional components: a read-only (enabled: false) text field (textDate), an icon button and a calendar (calendar). The calendar is inside a custom dialog (dateDialog).
Below, you can see the text field and its custom property values.
AppTextField{ id: textDate anchors.verticalCenter: parent.verticalCenter width: dp(120) height: dp(30) borderWidth: dp(2) borderColor: Theme.tintColor radius: dp(20) placeholderText: "yyyy-mm-dd" horizontalAlignment: TextInput.AlignHCenter enabled: false }
When the icon button is clicked (onClicked) the calendar dialog is shown (dateDialog.open()) and the opened signal is emitted. The Felgo IconType object provides a set of cool icons to use in our apps.
IconButton{ anchors.verticalCenter: parent.verticalCenter icon: IconType.calendar onClicked: { item.opened() dateDialog.open() } }
The calendar dialog is a custom dialog that includes only one QML component, a calendar. A dialog has two buttons by default, “Cancel” and “OK”.
In the calendar component, the default date is given by the selectedDate property in the row component. A locale can be set if needed.
When “OK” is pressed, the onAccepted signal is emitted in dateDialog. The same happens if the date is double clicked. On the other hand, when “Cancel” is pressed the onCanceled signal is emitted.
We intercept the onAccepted signal to format the selectedDate in textDate (Qt.formatDateTime), close the dateDialog and also emit the accepted signal in the row component.
For the onCanceled signal, we close the dateDialog and emit the cancelled signal to the dialog parent object (row).
Dialog{ id: dateDialog title: "Choose a date" autoSize: true outsideTouchable: false onAccepted:{ textDate.text = Qt.formatDateTime(calendar.selectedDate,"yyyy-MM-dd") dateDialog.close() parent.accepted(textDate.text) } onCanceled: { dateDialog.close() parent.cancelled() } Calendar{ id: calendar width: parent.width locale: Qt.locale("en_EN") selectedDate: parent.selectedDate onDoubleClicked: dateDialog.accepted() } }
DescriptionBlock QML Component
This QML object is used to define the style of the description block in the app. We use two Rectangle components. One of them defines a border around the description text and the other sets a semi transparent background. The column object has two nested AppText components: the text “Description” and the media description itself obtained from the APoD API call.
Custom description QML component
Rectangle{ id: root anchors.horizontalCenter: parent.horizontalCenter width: parent.width - 2*dp(10) height: columnDescription.height border.width: dp(2) border.color: Theme.tintColor radius: dp(20) visible: text color: "transparent" property string text Rectangle{ anchors.fill: parent opacity: 0.2 color: Theme.tintColor radius: parent.radius } Column{ id: columnDescription width: parent.width topPadding: dp(15) bottomPadding: dp(20) spacing: dp(10) AppText{ anchors.horizontalCenter: parent.horizontalCenter text: qsTr("Description") color: Theme.tintColor font.bold: true font.pixelSize: sp(18) } AppText{ id: description anchors.horizontalCenter: parent.horizontalCenter width: parent.width leftPadding: dp(15) rightPadding: dp(15) wrapMode: AppText.WordWrap font.pixelSize: sp(14) horizontalAlignment: AppText.AlignJustify text: root.text } } }
How can I execute the app? How about live reloading in my mobile phone?
Let’s see the functionality of each one of the buttons placed in the bottom-left corner of Qt Creator.
Qt creator buttons
Live Reloading – Start the live server.
Run – Run your app locally in your computer
Debug – Debug your app locally in your computer
Build – Build your app
The live reloading button opens a new window (Felgo live server) and starts the live server. Now, you can connect to it from your desktop client by hitting start, see the figure below, or in your mobile device. In both cases, the app will be automatically updated when you save new changes in your code.
Felgo Live Server – Start desktop client
For live code reloading in your mobile device, you have to keep the Felgo Live Server window opened and use the Felgo & QML Live Scripting App in your mobile device to connect to the live server. Download and follow the instructions given in the app (we have to press the Connect Desktop option in the app to connect to our desktop live server). Felgo & QML Live Scripting app download links for Android and iOS are below.


Felgo & QML Live Scripting App
Check Felgo Live Server documentation for detailed information.
Note: if your app includes custom C++ code (not considered in this tutorial), you have to turn out your own application in a Felgo Live Client Module and deploy it conventionally to your mobile device. After that, you will be able to connect to it and use live code reloading for your QML and JavaScript code.
For deploying your apps conventionally to mobile devices (Android and iOS), follow this guide.
What can I do to learn further and improve the app?
The APoD app is nice but there is room for improvement for sure. Some ideas are listed below.
Editable date component (introducing text).
Automatically load the astronomy picture (media) of the day when the app is loaded.
Change the month and year easily and directly in the date dialog.
Share a link to the media of the day (copy to clipboard or post in social networks).
We hope you enjoyed this tutorial and find it helpful for learning Qt, QML and Felgo! Feel free to share it on Facebook or Twitter.
Get Felgo Apps!
More Relevant App Development Resources
Qt AR: Why and How to Add Augmented Reality to Your Mobile App
Handle Safe Area Insets, Notch & Display Cutout for iPhone X, iPad X and Android P
Real-World Examples of Machine Learning and A
The Best App Development Tutorials & Free App Templates
All of these tutorials come with full source code of the mobile apps! You can copy the code to make your own apps for free!
How to create a mobile app for iOS & Android with a single code base
How to support multiple languages and internationalization in your mobile app
Common Widgets & Controls in a cross-platform App
How to support multiple screen sizes & screen densities – Responsive App Guide
Guide for App Layout
Guide for App Navigation
How to add native code to your mobile App
How to easily style your App with Themes
How to add Animations to your App
How to add a Chat to your Mobile App
How to make a Weather App accessing a REST weather service
Conference App Template
Widget Gallery App Template
Twitter App Template
Messenger App Template
Property Finder App Template
App Development Video Tutorials
Make Cross-Platform Apps with Qt: Felgo Apps
youtube
How to Add In-App Chat or Gamification Features to Your Mobile App
youtube
How to Make a Mobile App with Qt Quick Designer (QML Designer) & Felgo
youtube
The post Qt, QML and Felgo tutorial. NASA Astronomy Picture of the Day app for Desktop, iOS and Android appeared first on Felgo.
Qt, QML and Felgo tutorial. NASA Astronomy Picture of the Day app for Desktop, iOS and Android published first on https://medium.com/@TheTruthSpy
0 notes