#cyberpunk 2077 modding tutorials
Explore tagged Tumblr posts
Visit Tumblr Blog
Explore Tumblr blogs with no restrictions, modern design and the best experience.
Last Seen Tumblr Blogs


Fun Fact
Users from the US are the majority of Tumblr visitors.
Text
NPV Skin Textures - A Primer
Hello, I promise at some point I will put together a full tutorial with lots of screenshots and my own tutorial file (primarily for the folder structure but it won't be required) and such. For now, I just wanna talk about custom pathing skin textures and especially UV/VTK overlays.
Glossary
custom pathing: renaming a file or adding it to a different folder in your project to prevent any other game files (vanilla or modded) from overwriting your project and vice versa. I prefer custom folder structures because it helps me find files more easily.
.mi file: material instance. You can read more about these on the wiki. All you need to know is that it is a type of texture file.
.xbm file: from the wiki: .dds files in a format REDEngine can use. Essentially, just images. When you export them, they usually get exported as PNGs for you to edit. The majority of modded skin textures are going to be .xbm files and what you want to pay particular attention to when custom pathing.
localMaterialBuffer: this tells the game what texture files to look for and use when loading an entity.
DepotPath: the file path to an asset (e.g. the xbm or mi file)
relative path: this is the path to an asset contained in the project.
(Let me know if more should be added here!)
Pro tip: how to easily add a modded file to your project
The easiest way to quickly find and add the texture you need to your project is to search for the texture name in the asset browser. Then, you can right click on the file and hover over "Add selected from archive." You should then see a list of mods that contain that file. Pay attention to the file size and if there are other files with the same name in the list of results in the asset browser.
Click on the mod and the file from that specific mod will be added to your project!

Custom Pathing the Textures
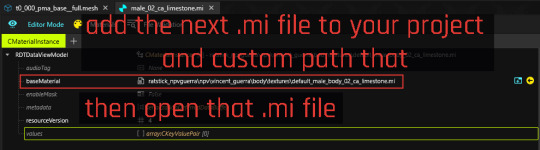
For this, we're going to be looking at t0_000_pma_base__full.mesh from the NPV of my dear boy Vincent Guerra. I also use the UV framework for him, so we're using the mesh included in the UV framework.
If you're using a tutorial file, make sure you overwrite the vanilla body mesh with the modded one for the framework you're using. Each framework's body will include additional file paths in their respective textures for the various overlays.
1. In the mesh file
In my screenshot, I've cleaned up the appearances I don't need for this NPV. This is generally good practice to keep things neat and tidy.
VG uses 02_ca_limestone. Find the material entry in the localMaterialBuffer that matches the skin tone your NPV is using. You can use NoraLee's Parts Picker if you're not sure what the name of the skin tone your V uses is.

You'll need to add the .mi file listed under baseMaterial and the d03_naked.xbm and n03_naked.xbm underneath "values" to your project. Make sure you rename the files or move the files to a different folder inside the project. That's the whole point of custom pathing after all. (。•̀ᴗ-)✧
Right click on the file in your project explorer (on the left with all the files and folders for your project) and select "copy relative path to game file". That's what you'll paste on the right when you select the texture.

Once that's done, save the file and open up the .mi file you just added to your project.
2. The first .mi file
This one is simple, there's only one file we need to add and custom path.
Save, and open up the new .mi file you just added to your project.
3. The second .mi file
This one has another .mi file and textures we'll need to add. It will include the same d03_naked.xbm and n03_naked.xbm. Since we already added those to our project in the first step, we can just recopy their respective relative paths and paste into the appropriate sections.
Add the roughness file to your project and path that. Remember, you can copy and paste the file name into the asset browser if you need to add it from a mod instead of the base game vanilla files.
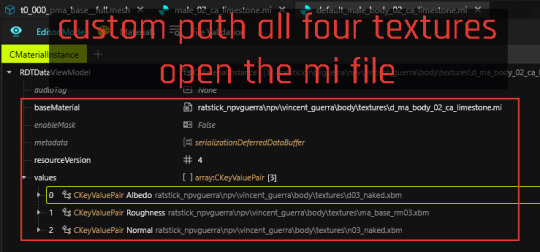
Save and open the next .mi file.
4. The third .mi file
This is where you'll usually find the spots to put your tattoo and other overlays.
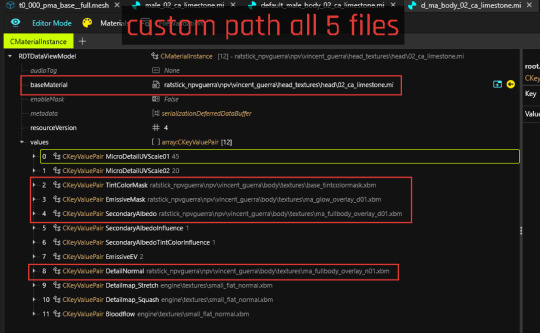
Save, and you're done!
The last .mi file
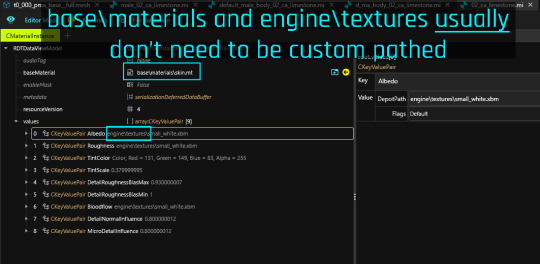
Generally, once you hit base\materials\file.exe or engine\textures, you don't need to custom path those. You may still want to add this .mi file to your project anyway, just in case the friend you're sending the NPV to has some kind of mod that overwrites it.
Personally, I take a very thorough approach and custom path as much as I can to ensure the NPV is a completely self-contained entity outside of base engine files.
Final Thoughts
This process applies for custom pathing any mesh in your NPV. The body, complexion, hair, clothes. You're going to find the localMaterialBuffer and follow the texture paths.
Some general tips:
Look into any .mi file to see if it has additional items that may need to be custom pathed.
Don't forget to check the "values" section in the cMaterialInstance. If something looks off with textures, you likely just forgot to check there and path them appropriately.
When in doubt, just redo the pathing. Right click > copy relative path > paste.
And remember, NPVs are essentially Mr. Potato Head dolls. The .app file is the body and all the components are the features and clothing you can slap on the doll. Wanna add two different types of face cyberware? Just add 'em!
My DMs are always open if you need help with your NPV. You can also find me in the main modding discord under ratstick.
#cyberpunk 2077#cyberpunk 2077 modding#cyberpunk 2077 modding tutorials#modding tutorials#npv tutorial
6 notes
·
View notes
Text
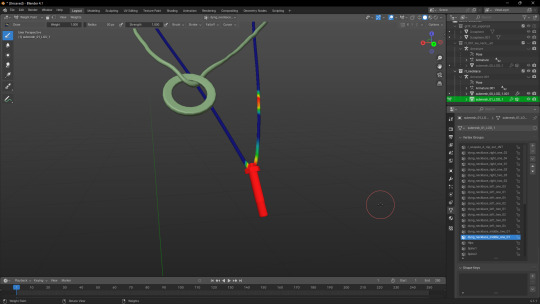
🟨 Transfering Physics from one Mesh to another
▶ A Step-by-Step visual tutorial on how to transfer dangle "DYNG" bones from one mesh to another; using Claire's pants as an example, in a WA to MA refit!
(pants is still cooking but will be available soon tm :3)
#cyberpunk 2077#cp77 tutorial#tutorial#got another request for Claire's pants so I got motivated#s'been on my to do list for forever too auhgzheugez#it got to me ngl it looks hot as fuck hHH(--(-(-#modding yap
42 notes
·
View notes
Text
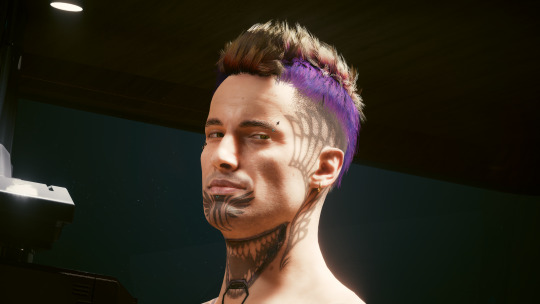
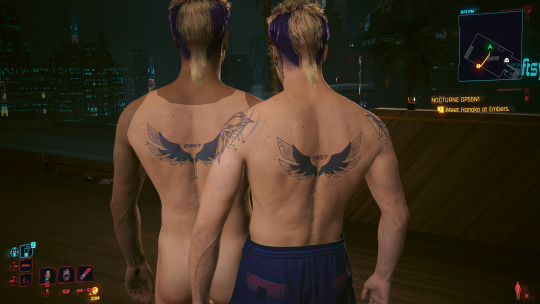
Another little NPVince Update ( ノ ゚ー゚)ノ
His base is done now aaaahhhh!! I'm so happy. I cleaned up his file today, renamed everything, started adding some variants for cyberware and stuff for appearances to come and yeeeh :3 It's been such an insane learning experience ngl, I feel like I'm slowly getting better at understanding how all the game files work together (sort of xD). There is still one issue I can't seem to be able to resolve, but hopefully it's not gonna be a big issue once he's finished.
Currently I'm just happy I made it this far along the process, and he looks so good with my customized skin textures and all aaahhh ;___;
Some shenanigans I encountered along the way below the cut xD
Wrong Face Texture, Who dis:
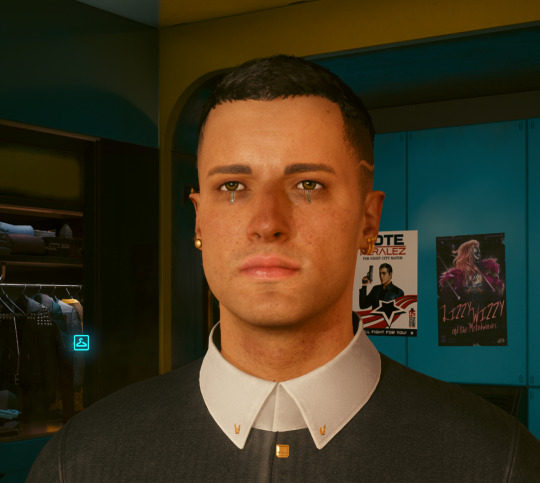
Impostor spotted!

Fashion!
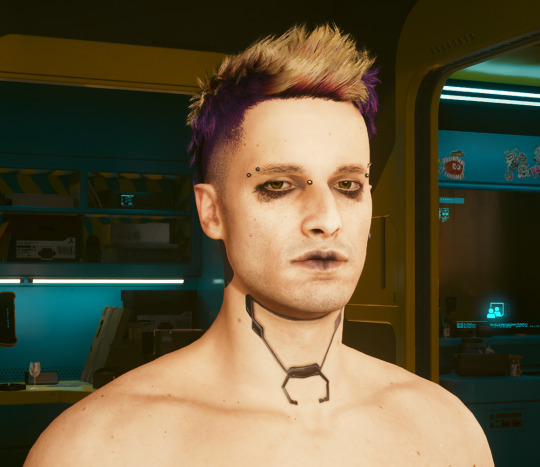
The cursed farmer's tan saga:

This is still somewhat unresolved, kept running into problems with custompathing a specific material (skintones were always correct, I redid this like. 12 times with various approaches and yeh no. No idea other than he's haunted).
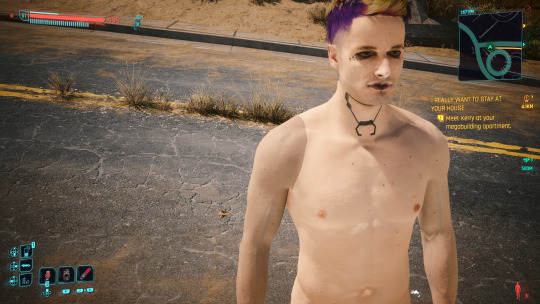
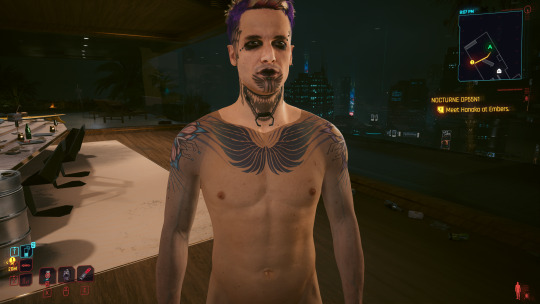
Vincent Purplehand:
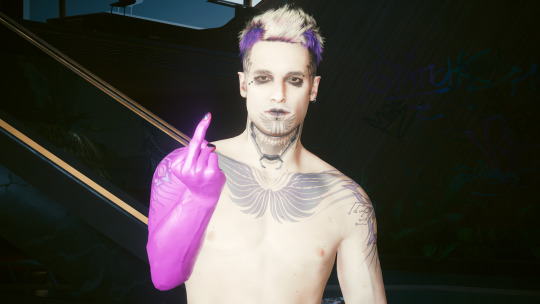
(aka be careful where you put your roughness maps aka Ezaki evening fashion aka putting on the extra large cleaning gloves to clear out the trash from Kerry's villa)
Excited to see what shenanigans I will run into with clothes XD But also looking forward to learning even more uwu
#cyberpunk 2077#cyberpunk v#elven tries modding cyberpunk#vincent ezaki#personal stuff#I built that guy!! from scratch!!#(with much much much help from lovely friendos and other modders whose tutorials even made this possible for beginners like me XD)#best and most relaxing part so far - painting over his skin textures and giving him even more of the lovely moles the vanilla tex has#and that he has his weapon grip on his hand properly now#and that I can customize the shit out of him however I want xD#neokitsch zebra striped personal slots and neck port ftw
24 notes
·
View notes
Note
joining the anons screaming at u for help hahahah ;] do u know any tutorial for adding physics to clothes/jewelry? i ran thru the whole modding wiki and found nothin
Hey anon! That's fine, I'm happy to help!
Both of these require the same thing: an existing item that sits and moves in the place you expect your custom mesh to be.
Adding physics to garments is limited because most of the NPC clothes use something called Cloth Proxy, which is not a system we have yet cracked to use.
For example, you can't have a jacket that dangles like River's because his jacket is a proxy mesh instead of a rig mesh.

You could, however, base a garment on Judy's overalls because the belt dangle has a rig and animgraph. This however limits you to having a garment/item on the legs, as it'd need to follow the general area of the original dangle - all you'd need is steal weights from it, as you would when handling a regular mesh re-weight without dangles.

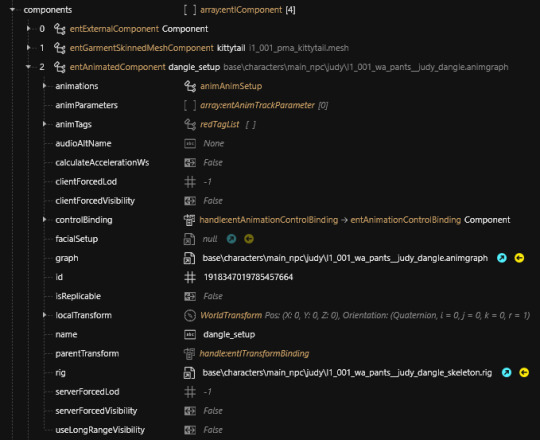
Jewelry on the other hand has dozens of different rigs and dangles. I'll give an example with Farren's necklace, which uses Alt's physics.


As you can see, the first step is finding something in game that sits and moves like how you want your mesh to. Some have stronger movement in physics, others don't, and more often than not you have to try multiple meshes to find the one that works for you.
The easiest way to know if a mesh has physics is just to check in its folder if there is a .rig and .animgraph component with it. Items with physics also generally have bones that start with dyng, which you can check in the boneNames entry on WolvenKit:

Then it'll be just like a regular weight stealing process. Pop both meshes in Blender (you don't need to export the dangle entries), make sure your desired mesh is now using the rig of the transfer mesh, and that it sits roughly in the same spot so weight stealing is accurate.
Alt's Necklace:

Farren's Necklace:

I'm not gonna show how to weight transfer, but it's the exact same process of regular clothing/items. You do, however, sometimes need to do some manual painting in the dyng bones just to ensure the mesh won't break when dangling.
Good dangle dyng:

Bad dangle dyng:
After you have your mesh re-weighted, materials fixed, etc etc, you'll need to decide if that's going to be directly into a NPV/NPC+ or an ArchiveXL item. There is no way to simply make a mesh replacer for one of V's clothes because they don't have the means to reach the physics .rig and .animgraph. (At least, I don't recall so.)
For NPV/NPC+, all you need to do is path your jewelry into a regular component, and then its .rig and .animgraph on an animated entry.

You can custom path these if you want, I normally don't because nowadays rarely a mod will go poking into a NPC's dangle skeleton.
For ArchiveXL, you'll be pathing the dangle into an animated component entry of your garment's .ent.
After that, it's a matter of testing!
If the mesh promptly collapses into the floor when you equip/load it, then it's not reaching the rig and/or animgraph, or wasn't weighted properly, or might be in the wrong rig.
Hope that helps!
#cyberpunk 2077#cyberpunk modding#correspondence#sorry I know this is a 'lazy' tutorial compared to what I usually do#but I'm doing a little bit of modding detox and focusing on other things so I don't have the juice for a full blown tutorial#I think what I put here is enough to at least help finding any gaps but let me know if anything's missing
18 notes
·
View notes
Text
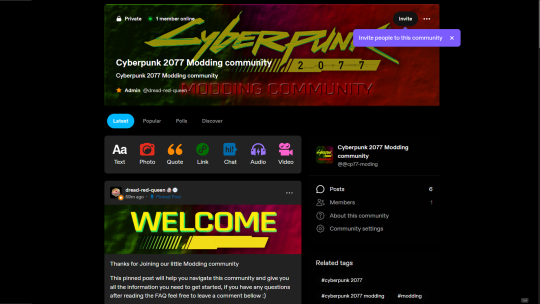
Hey everyone I created a Tumblr Community for Cyberpunk 2077 Modding. if your a Modder, like mods or have tips/tricks or how to guides to Modding cyberpunk 2077 this is the community for you.
If you are interested and would like to Join drop my a DM and I will send you a Community Invitation :)

#community#new community#cyberpunk 2077 modding#tips and tricks#moding tips#modding tricks#moding tutorials#share your mods#talk about mods#Tumblr community#cyberpunk 2077#cp77#moding games#how to mod cyberpunk 2077#friendly
9 notes
·
View notes
Text
TUTORIALS UPDATED
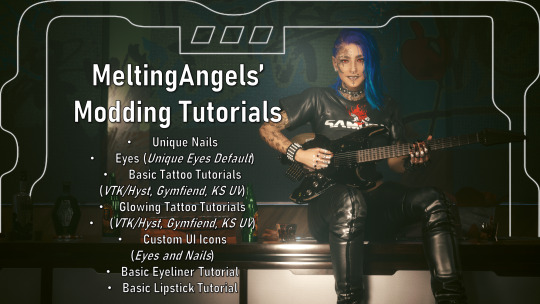
Hey chooms! I've updated my Tutorials page!
This new update now includes GLOWING tattoo tutorials for EVERY framework, as well as Basic Eyeliner + Lipstick tutorials.
These tutorials are built around Wolvenkit!
So I've now got Tutorials available for:
- Nails.
- Eyes.
(Unique Eyes Default)
- Standard Tattoo Tutorials.
(VTK/Hyst, KS UV, Gymfiend)
- Glowing Tattoo Tutorials.
(VTK/Hyst, KS UV, Gymfiend)
- Custom UI Icons.
(Eyes and Nails)
- Basic Eyeliner.
- Basic Lipstick.
Hope you guys find the tutorials helpful! They are all done on Powerpoint, are detailed, and include screenshots as an additional visual guide.
I will be doing Video versions/Audio Narrated versions of the Tutorials in the future as well!!!
If you happen to make anything with any of these tutorials, it'd be cool to have a little mention somewhere, but MOST of all; I'd absolutely love to see screenshots!
Happy Modding!!!
(Any Tutorials you'd like to request? Feel free to DM me)
Nexus Link: MeltingAngels Tutorials
#cyberpunk modding#cyberpunk 2077#cyberpunk mod#cyberpunk mods#meltingangels mods#modding#mods#nexus mods#mod#cyberpunk#tutorial#modders resource
21 notes
·
View notes
Text
@dread-red-queen - I'm not sure if you found what you were looking for re: Goro's disappearing bodyparts in the Appearance Creator Mod, but here's a really quick breakdown of what usually causes his missing limbs:
The h0_001_ma_a__takemura fields correspond to different parts of his mesh, and I think for the majority of his default appearances, the one that ends in 8086 is blank (pretend this one is blank, lmao).
You can technically put any kind of mesh in any field, but I try to keep things organized by using the shirt field for his shirt, pants for pants, body for body, etc. so I'm going to modify this field to give him arms:
(ETA - I actually realized after the fact that this field is for his teeth, lmao. So experiment with different fields to figure out which one you can override without causing any major mayhem.)
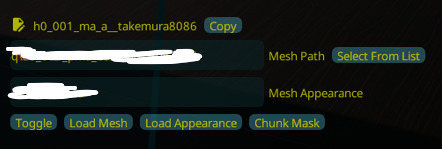
Because this field is usually blank, if you put him in a shirt that exposes his forearms, his arms will be invisible:

So what you need to do is populate the h0_001_ma_a__takemura8086 field with a mesh that will fill in the gap.
Goro actually has his own body mesh which fills in everything except the gap between his shoulders and cyberware:

You can use this body mesh for a lot of clothing options, but Goro's tiddies and thighs are a little more bountiful than some of the male_average clothes, which might result in clipping. If that's the case, you'll need to find individual body parts to fill in the missing spaces instead. For this shirt, I just found a mesh to fill in his arms:

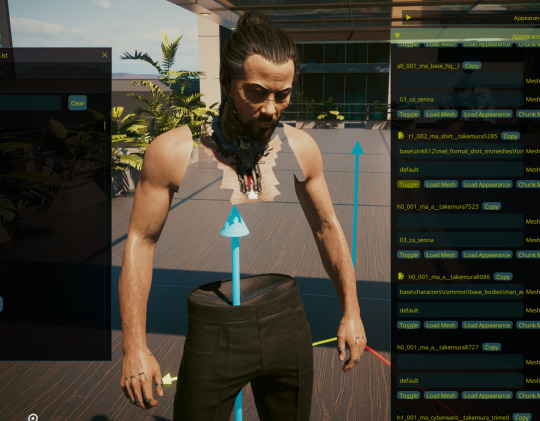
There are also meshes that will do the just the forearms, just his torso, different parts of his legs, etc. but you'll have to search a little to find them.
If you do use anything other than his default body mesh, you'll also probably need to change the Mesh Appearance field to 03_ca_senna so the skintone will match. The default skintone is usually paler than his.
And lastly, if you're not sure what field corresponds to what mesh, the Toggle button is a really useful tool--It turns the mesh's invisibility on and off so you can see what meshes are in use and what ones are available to modify.
I hope this helps! <33
11 notes
·
View notes
Text
ArchiveXL tutorial
youtube
Finally sat down and dubbed over the mandarin ArchiveXL tutorial I did for my friend. I hope this will be helpful, even tho I kinda blabbered quite a bit. xD
If you want the mandarin original video it's here
#my post#cyberpunk 2077#cyberpunk 2077 modding#cyberpunk modding#tutorial#really productive tonight lol#kinda stayed up tho but oh well#Youtube
23 notes
·
View notes
Text
I really wish I could wrap my head around refits. It seems simple enough, but when I try, it just doesn't work. I can make an NPC+ or an NPV with very few hiccups, but refitting a shirt for Dino's stupid shoulders? NOPE!

#cyberpunk 2077#modding woes#I feel like an idiot for not being able to make a t-shirt fit a man proper in the shoulders.#Like looking at tutorials it looks doable#but once I try it on my end I just...can't#and I'm ready to just not bother anymore
3 notes
·
View notes
Text
really happy with that screenshot, too
11 notes
·
View notes
Text
Just reblogging this for an awareness boost - snapping poses is a thing and makes it SO MUCH EASIER like you wouldn't believe
I'm way too lazy and not nearly horny enough to deal with synced poses though
#cyberpunk 2077#cyberpunk mods#vp tips#i am never consistent with tagging these and i hate it#tutorial#maybe that's the word I use for these kinds of posts
18 notes
·
View notes
Text
Regarding the warm welcome of my video tutorial I would like to see what next is needed. I made this form to see which tutorials are the most sought after or aspects are unclear. Please, if you can, share it so it reaches more people!
39 notes
·
View notes
Text

▶ Flat Chest AXL Update
Introducing the new Flat Chest Detector (Thanks once again to Berdagon for the amazing script!)

Supported Garments will automatically adapt to the Flat Chest when worn
No need to re-equip garments
Can affect multiple garments simultaneously (T1 & T2)
Work with both the vanilla inventory and Equipment EX
My Stinky Racerback Set has been updated to support it!
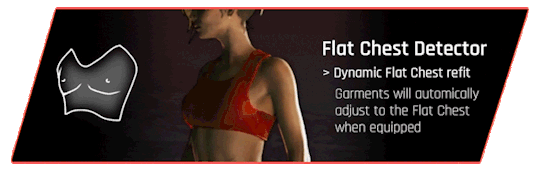
⚠ You NEED the latest Archive XL and Codeware versions!
#Cyberpunk 2077#Cyberpunk 2077 Mod#Mod#Mod Update#✨👄✨ IT JUST WORKS#The binder vision coming THROUGH#I'll work a tutorial soon - it works the same way as the bulge detector#both the flat chest and bulge detector now supports Dynamic Appearances btw#thanks to the new XL + Codeware update
52 notes
·
View notes
Text
I have a couple of really basic modding tutorials I wrote for cyberpunk 2077 but I don't know if that's something people would be inchrested in. They're not fancy in the slightest, but they're good for basic OC customization. Specifically tutorials for very basic (non-framework) tattoos, adding extra face cyberware via two different routes, and recoloring face cyberware
#they're fairly easy to follow judging by what the people who i wrote them for said gehrhdhds#anyways i'll probably add a link to my pinned post once i clean the tutos up and make sure they're neat and tidy#cp2077#cyberpunk 2077 modding#cyberpunk 2077 mods
6 notes
·
View notes
Note
hi! im sorry i know its very out of pocket, but i just laid my hands on marvelous designer and was absolutely lost, until i remembered somehow that you once mentioned you have it auto-refitting for cp77 or something similar? could i ask how to achieve it / navigate around it in md? im sorry for asking about cp77 while you moved away from modding it, i hope its ok <3
Hi! Marvelous Designer doesn't really autorefit, you still need to mostly direct the pieces into an appropriate position so the cloth simulation feature can hug the body.
For that you need MD Avatars that match Cyberpunk 2077's pose - @pinkyjulien made a resource with Fem, Masc and Nibbles frame for Marvelous Designer and it can be found here.
Other than that you just need a garment (I have never made them from scratch so I can't help you there. Many good tutorials on YouTube though) to loosely position the pieces into CP2077's pose so the stitched pieces are pulled together around the body when you tell the fabric to simulate.
I don't have any in-depth tutorials on how to navigate and move stuff around MD but, again, there's tons of them on YouTube - the important part for Cyberpunk specifically are the avatars I linked! :)
#correspondence#cyberpunk 2077#sorry I know the use of 'autorefit' is a bit loose#it's just that MD will not provide as perfect match one might expect#it's definitely handy though#also no worries! I don't mind answering mod questions at all#I might just not be in the mood to write a proper tutorial like I usually do for Cyberpunk <3
3 notes
·
View notes
Text

--------------THE NOCTURNE--------------
The Nocturne is new bar opening in Night City, the perfect place to get a cold drink, hangout and unwind after a busy day as a merc, after a long day organising jobs for clients as a fixer or just to relax after a stressful day at the Corp, The Nocturne's doors are open 24/7 after all its always 5 o'clock somewhere right? why not head over and grab a cold one with your chooms
----------------JOIN TODAY-----------------
I wanted to create somewhere where everyone can share there passion for Virtual Photography/virtual videography/Fan Fiction/Art and love for Cyberpunk 2077, show off there OCS, share lore and Mods or just hangout and have a laugh where they can share tips and tricks to help eachother be the best Virtual Photographer/Modder they can be and hopefully make alot of friends along the way.
#cyberpunk 2077#cyberpunk 2077 photomode#virtual photography#cyberpunk2077#cp77#discord#server#discord server#cyberpunk discord#modding#community#cyberpunk 2077 modding#cyberpunk 2077 virtual photography#safe place#photomode#safe space#oc's#share your lore#grab a drink#make friends#tutorials
7 notes
·
View notes