#npv tutorial
Explore tagged Tumblr posts
Visit Tumblr Blog
Explore Tumblr blogs with no restrictions, modern design and the best experience.
Last Seen Tumblr Blogs


Fun Fact
Tumblr was acquired by Yahoo for $1.1B in 2013.
Text
NPV Skin Textures - A Primer
Hello, I promise at some point I will put together a full tutorial with lots of screenshots and my own tutorial file (primarily for the folder structure but it won't be required) and such. For now, I just wanna talk about custom pathing skin textures and especially UV/VTK overlays.
Glossary
custom pathing: renaming a file or adding it to a different folder in your project to prevent any other game files (vanilla or modded) from overwriting your project and vice versa. I prefer custom folder structures because it helps me find files more easily.
.mi file: material instance. You can read more about these on the wiki. All you need to know is that it is a type of texture file.
.xbm file: from the wiki: .dds files in a format REDEngine can use. Essentially, just images. When you export them, they usually get exported as PNGs for you to edit. The majority of modded skin textures are going to be .xbm files and what you want to pay particular attention to when custom pathing.
localMaterialBuffer: this tells the game what texture files to look for and use when loading an entity.
DepotPath: the file path to an asset (e.g. the xbm or mi file)
relative path: this is the path to an asset contained in the project.
(Let me know if more should be added here!)
Pro tip: how to easily add a modded file to your project
The easiest way to quickly find and add the texture you need to your project is to search for the texture name in the asset browser. Then, you can right click on the file and hover over "Add selected from archive." You should then see a list of mods that contain that file. Pay attention to the file size and if there are other files with the same name in the list of results in the asset browser.
Click on the mod and the file from that specific mod will be added to your project!

Custom Pathing the Textures
For this, we're going to be looking at t0_000_pma_base__full.mesh from the NPV of my dear boy Vincent Guerra. I also use the UV framework for him, so we're using the mesh included in the UV framework.
If you're using a tutorial file, make sure you overwrite the vanilla body mesh with the modded one for the framework you're using. Each framework's body will include additional file paths in their respective textures for the various overlays.
1. In the mesh file
In my screenshot, I've cleaned up the appearances I don't need for this NPV. This is generally good practice to keep things neat and tidy.
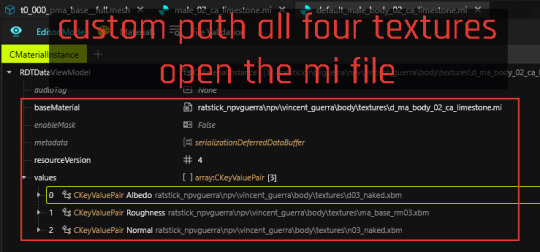
VG uses 02_ca_limestone. Find the material entry in the localMaterialBuffer that matches the skin tone your NPV is using. You can use NoraLee's Parts Picker if you're not sure what the name of the skin tone your V uses is.

You'll need to add the .mi file listed under baseMaterial and the d03_naked.xbm and n03_naked.xbm underneath "values" to your project. Make sure you rename the files or move the files to a different folder inside the project. That's the whole point of custom pathing after all. (。•̀ᴗ-)✧
Right click on the file in your project explorer (on the left with all the files and folders for your project) and select "copy relative path to game file". That's what you'll paste on the right when you select the texture.

Once that's done, save the file and open up the .mi file you just added to your project.
2. The first .mi file
This one is simple, there's only one file we need to add and custom path.
Save, and open up the new .mi file you just added to your project.
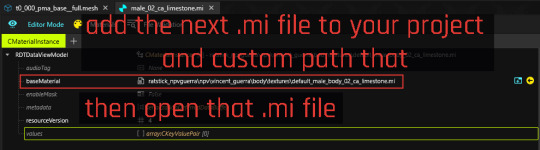
3. The second .mi file
This one has another .mi file and textures we'll need to add. It will include the same d03_naked.xbm and n03_naked.xbm. Since we already added those to our project in the first step, we can just recopy their respective relative paths and paste into the appropriate sections.
Add the roughness file to your project and path that. Remember, you can copy and paste the file name into the asset browser if you need to add it from a mod instead of the base game vanilla files.
Save and open the next .mi file.
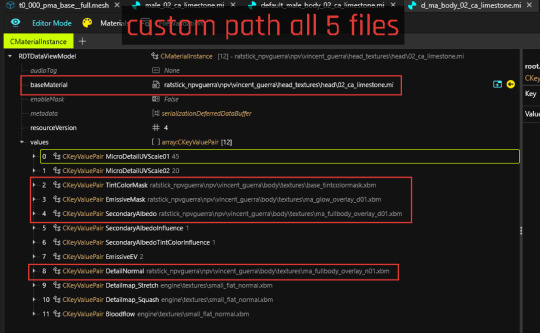
4. The third .mi file
This is where you'll usually find the spots to put your tattoo and other overlays.
Save, and you're done!
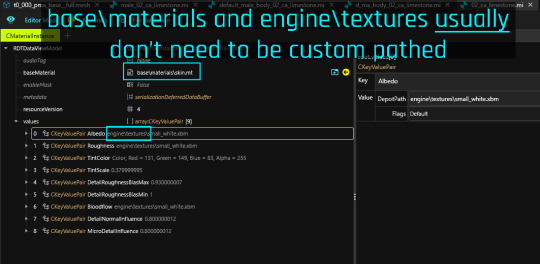
The last .mi file
Generally, once you hit base\materials\file.exe or engine\textures, you don't need to custom path those. You may still want to add this .mi file to your project anyway, just in case the friend you're sending the NPV to has some kind of mod that overwrites it.
Personally, I take a very thorough approach and custom path as much as I can to ensure the NPV is a completely self-contained entity outside of base engine files.
Final Thoughts
This process applies for custom pathing any mesh in your NPV. The body, complexion, hair, clothes. You're going to find the localMaterialBuffer and follow the texture paths.
Some general tips:
Look into any .mi file to see if it has additional items that may need to be custom pathed.
Don't forget to check the "values" section in the cMaterialInstance. If something looks off with textures, you likely just forgot to check there and path them appropriately.
When in doubt, just redo the pathing. Right click > copy relative path > paste.
And remember, NPVs are essentially Mr. Potato Head dolls. The .app file is the body and all the components are the features and clothing you can slap on the doll. Wanna add two different types of face cyberware? Just add 'em!
My DMs are always open if you need help with your NPV. You can also find me in the main modding discord under ratstick.
#cyberpunk 2077#cyberpunk 2077 modding#cyberpunk 2077 modding tutorials#modding tutorials#npv tutorial
8 notes
·
View notes
Text

All the devils that you don't know Can all come along for the ride I wanna be as close as I can get to you (xxx)
#I’m like 98% sure v is supposed to be holding a gun in this pose but I like it without#otp: fatally yours#cyberpunk 2077#cp2077#johnny silverhand#silverv#shippy saturday#cyberpunk 2077 photomode#cyberpunk2077edit#cyberpunk 2077 screenshots#male v#bisexual johnny silverhand#my vp#my ocs#I haven’t taken pics of them together in a while#(I’ve started shipping viggo with my new wraith boy a lot)#((trying to wrap my head around the npv tutorials to make it happen))#oc: kaito miura
101 notes
·
View notes
Text
a weird thing i did notice when fucking around with the nibbles replacer earlier tho
the masc refit of the juri poses still don't work for my V in photomode. But they do work for standard male with the replacer. They show up in the menu for V, but don't work. Just get the idle standing. Ditto for another pack, by a different creator.
#if anyone has an idea as to why this might be the case let me know#i'd like to use the poses at some point#and don't have an npv let alone one that is set up to work with nibbles replacer#(the written tutorial on the wiki seems specifically designed to make me want to lie in the grass#like it does not compute with how i need work flow and steps written out for a strictly written tutorial#had the same problem all the time when 'lecturers' at school would just give us a doc and tell us to work through the editing technique it#was describing and it's like 'you are teacher - mayhaps you do teach?'#they miss out steps or write shit weird#at least 'weird' as in my idiot ass non functioning brain doesn't follow them
1 note
·
View note
Text
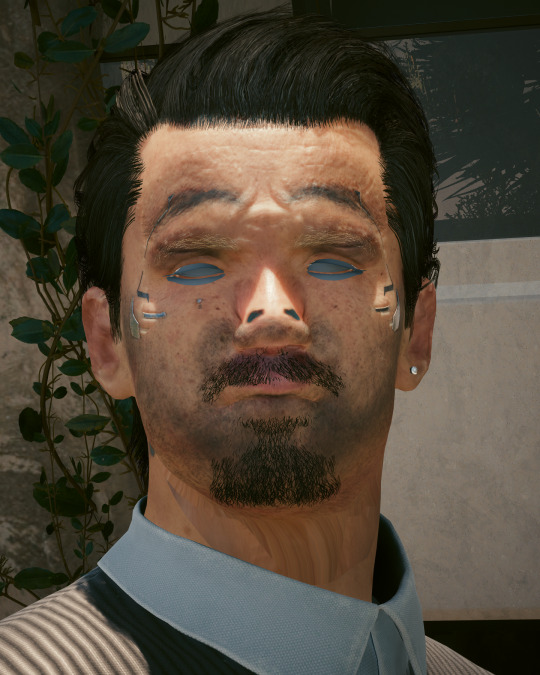
I tried to make an NPV mod of myself today so I could take shameless self insert screenshots with my V.
I swapped out the tutorial head mesh and tried to change the eye colour to brown to match my own eyes, but when I loaded the game to check, they had no eyes and no teeth. I was horrified 🤣
Jesus Christ. I hope I figure this out LOL.
I find it really hard to follow written instructions without having to reread them a dozen times (fucking thanks, adhd.) so are there like any video tutorials?
Rkwlclrlelflrlwldl
#im a beginner modder i guess#ahahah#help#cyberpunk modding#if any veteran modders know wtf i did wrong#your input would be appreciated
18 notes
·
View notes
Text
youtube
I've made a beginner friendly shapekeying tutorial for anyone who's been wanting to make an NPV but has no modding experience! Go check it out if it's something you're interested in!
26 notes
·
View notes
Text
In light of the last bit of Nexus User Entitlement and me still being miffed about it, let's try to make something positive out of it and shed some clarity why certain private mods cannot simply be made public (aside from, obviously, one not wanting them to be public in the first place):
Not always you can just yeet a .archive into the big world wide web. Some mods require frameworks, some mods require specific structures, some mods need to function in specific ways in order for them to be available universally. These same mods can work perfectly fine in the modder's game because it's held by duct tape and glue as the modder knows they won't put anything in their game that will break it, or they've made it using a framework that is not ideal for public release, but works just fine for their own needs, etc. 90% of my OCs are NPVs. Their mods are not made in a way I can load on PlayerV. I'd have to convert them into something else or put them in a framework. Some of my NPV clothes are badly chopped at the edge because it's going inside a specific pants or boots and I don't need to worry about that edge showing. It's just not fit for release because I didn't make it thinking about release. This is true for many, many modmakers.
A modmaker with an ounce of responsibility will want to publish a mod with a degree of proper documentation, showcase what it does / what it looks like, and offer said mod support and troubleshooting after it's released. This is a lot of work, even if you do it lazily.
There are dozens of body mods available for Cyberpunk currently. The ideal way of working for a mod that you intend to publicly release is to fit it for the vanilla/default bodies first, and adapt to the others later. Doing the inverse process is definitely doable but extremely counterproductive. So just because someone has a mod currently working on their OC, it does not mean it'll even fit another if their body types don't match. This is also true for hairs or jewelry or other accessories.
There are many ways of making certain things, and more often than not, these conflict with each other. Some body mods cannot be used alongside certain frameworks, which means a modmaker would have to either learn a new system and convert to it, or make their mod compatible to multiple options. This has to be a conscious choice from the start, or the modder has to actively decide to do all of this conversion after something is already done (which isn't necessarily hard, but still, extra work).
Feeling frustrated or upset that you cannot have a certain mod is fair. It's a human response and it's understandable. But popping a private mod into the world isn't as deal and done it might seem from a technical level - and even if it is easy, people who pour their time into a creative outlet are allowed to keep things for themselves!
I am thoroughly against refusing to help people to achieve the same/similar result of something you worked on. We are a community and helping each other is paramount to keep modding going and improving. Don't ever uphold knowledge from others, but do not feel pressured into sharing the results of your labor either.
My Cyberpunk Modding Tutorials Cyberpunk Modding Wiki Cyberpunk Modding Discord
54 notes
·
View notes
Text
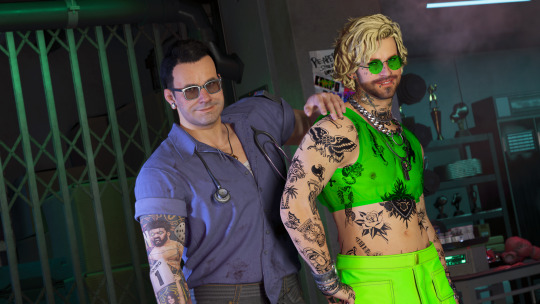
>:3c
Sudden flashbacks to Chapter 8 of my post-Sun-Ending fic >:D
I... may have been going a bit nuts with modding the last few days and was like "yknow what. Fuck it, I'll attempt that NPV tutorial now" and well :3
Chunkmasks are still confusing, took a couple attempts to get his piercings right xD but he spawns and looks like himself and yeh :33
I'm mostly excited about all the stuff I can learn from this now, and especially being able to create permanent appearances for him for his Arasaka days (and future looks) and all that kinda stuff that will come in handy for VP stories :3 for which I previously obviously always had to manually and temporarily alter his appearance. This will be fun \o/
#elven tries modding cyberpunk#not to mention being able to send him on adventures with other people's babies :3#but first: deciding on outfits aaaahhh
10 notes
·
View notes
Note
Hey I have a question about how you make stuff like this (the photo). I really want to try it but I have no idea where to start. 😅
Thanks in advance!
Hi! I would love to help you! 😊I am gonna go through this from the very beginning, so if you already know some of this stuff feel free to skim around! I thought I'd be thorough in case it helps anyone else too :)
Update!! : After you read this, Part 2 is here!
So first things first, you'll need to be on PC cuz we'll need some mods. Be sure to download all required dependencies and read the main page to make sure they install and work! To start with the basics, the mods I use for photomode capabilities are these ones here:
Photo Mode Unlocked (PMU) This mod adds extra features to photomode and removes a lot of the restrictions.
Appearance Menu Mod (AMM) This lets you do all sorts of things like place decorations, spawn NPCs, change character's outfits, teleport to other locations, and so much more! It's basically crucial for taking photos a wide variety of photos! I will say, a lot of people do their character spawning and posing directly through AMM. Using AMM is a great way to do it and allows for more variety and ease, but unfortunately I frequently get a bug that makes it frustrating so I just don't Lots of tutorials out there on it though, so look around if you'd rather use this method! Personally I use something else which I will describe below!
Nibbles to NPC
This mod allows you replace Nibbles in photomode with an NPC of your choice! This allows you to pose them together with V directly in photomode. You still need to download AMM for this to work!
Again, make sure you've downloaded all the dependencies for these! Under the cut I'll explain how I set up a basic shot. :)
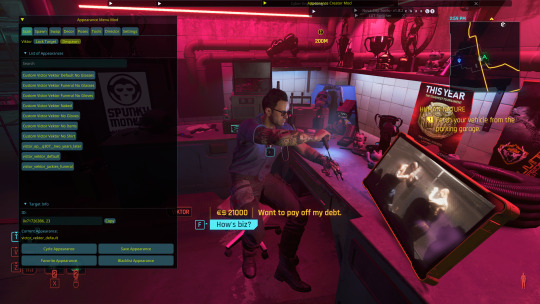
So to start with the basics, once you have everything installed let's pick a spot and set up our Nibbles replacer! So, using the hotkey I set up through Cyber Engine Tweaks (there should be instructions on how to do this on the CET page), I'll open up CET and start messing with the AMM tab. Let's teleport to Vik's clinic! You can go wherever you'd like though. You can save these location presets yourself with AMM or you can download large location packs from Nexus.

So the first thing I'm gonna do is look at Vik, open AMM, and send him to the shadow realm so that we won't risk any clones of him in the background of our shots. Don't worry! If you teleport out of the location and then return he'll come back! You can ignore this step if there are no background characters you care to remove from the scene.
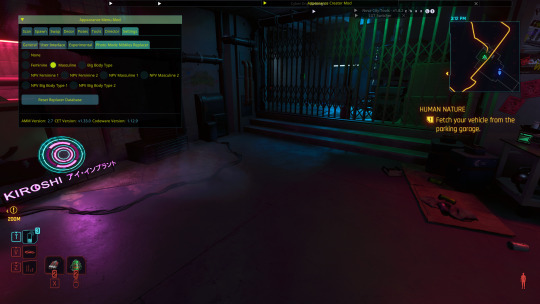
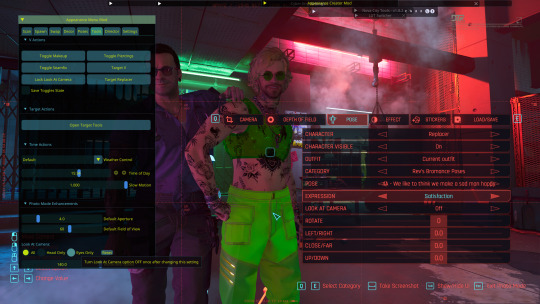
Now, in the AMM window I'm gonna go to the settings tab. If you installed Nibbles Replacer correctly you should have have a sub tab called Nibbles Replacer. Go ahead and click on that then select what category of NPC you want to spawn. Masc is most male NPCs, Fem is most female NPCs, and MBig are the large NPCs like River, Jackie, Ozob, etc. I don't use NPVs (custom characters) so I can't explain that unfortunately. I'll select Masc because that's the section Vik is in, you can choose whatever you'd like! Note: You cannot switch this inside photomode, you have to select the category outside of it.
Next, open up photomode and go to the pose tab and click the arrows on the character section until it says replacer. Turn this to on! You'll see Mr. Hands appear for Masc (or Songbird for Fem). Open AMM and go to the tools tab. Select "target replacer". Now go over to the scan tab and you should have a list of characters with this body type. You can change the character in photomode as much as you like, you just can't, say, switch from fem body type to masc without closing and reopening photomode. I'll scroll down and select Viktor. There's a few outfits to choose from, but I'll select his default outfit without the glove.
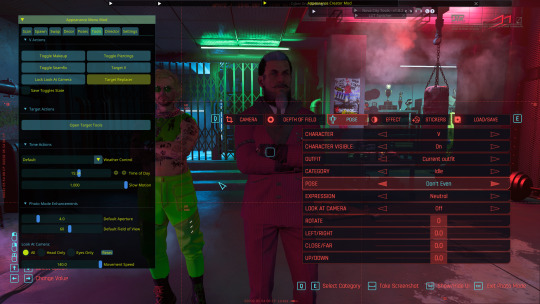
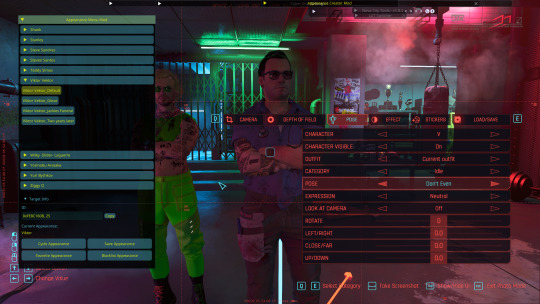
Next, I'll get the two characters aligned by making sure their location values are all set to the same thing (in this case zero). This is crucial for making sure two-person poses are synced correctly. For this I'll be using Rev's bromance pose pack. I'll choose the corresponding A&B poses for them. You can do this by selecting which character you're working with in the photo mode character tag. Now go ahead and choose whatever expressions you want for each of them too!
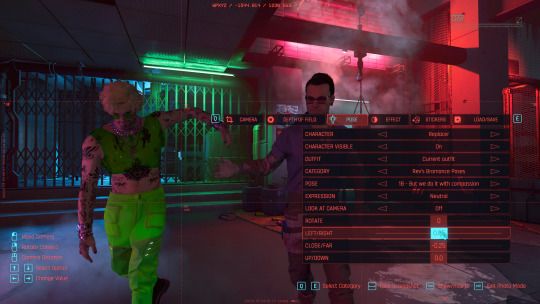
Now I'm going to go back into AMM in the tools tab and hit "target V" then go down to the look at section and select "eyes only". I'll do the same for the replacer. Now I'll close AMM and turn on look at for both characters! This is not mandatory but it really helps characters not have a lifeless stare.
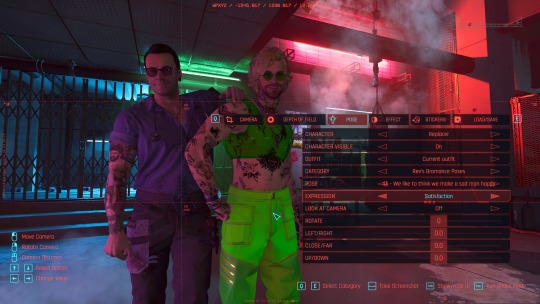
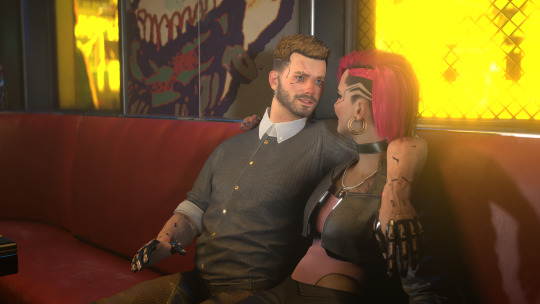
Now we have the basics of our scene all set up! It looks a little something like this!
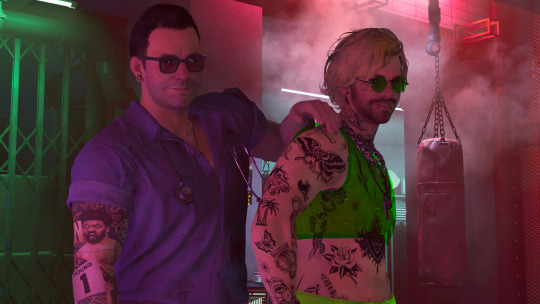
It's totally fair and valid to stop here if you'd like, but I personally use some additional mods to add in artificial lighting, get a better FOV, and so on! I'll explain that in another post (and tag you so you can see it!) since I've almost hit the image limit 😅 Here's how it could look with said additional mods and tweaks, as a little preview:
5 notes
·
View notes
Text
I'm gonna be launching a modding Patreon soon as soon as they switch it from per post to monthly
🥺👉👈
No private mods so I can stay within nexus's tos but you'll get wip updates and early access and at the highest tier I'm offering live one on one tutorials for like NPVs or what else I know how to do (there is of course a dedicated channel so it won't be the only means of support). And you can also request any hair color at any time and also at the highest tier you get 50% hair color comms and 35% off NPV comms if I launch those again
I'll already have an early access mod ready :3
15 notes
·
View notes
Text
🟨 Random CP77 Tutorials
👋 Heya!
I decided to save and stock some of my private CP77 modding tutorials, that I usually do in Discord servers threads, on my Google Drive
I'll maaaybe go through the more interesting ones and re-write them into proper tutorials, but for now I figured this could still be useful for some of y'all!
As said before, those were private discord tutos, so don't expect any seriousness and expect a lot of typos! Those are tutorials for friends, so you'll have to deal with my goofy ass ✋😌
Keep in mind that some (if not all) of these are OLD, so the methods and my understanding/skills evolve since then!
━━━━━━━━━━━━━━━━━━━━━
Adding stitches to a mesh - My workflow on how I go about adding stitches to ported garments. Can also be used to add rivets / buttons / scratches!
Garment replacers with physics - For people who prefer old garment replacers over the XL additions, this will allow you to have physics enable garment as well :>
Making Fishnet Garments - How to convert any shirt, pants, garments into a mesh/fishnet
Move bones between armatures - or how to Give physics to a mesh!
Restore physics to an edited hair - Can also be used to add physics to a fully modded hair :>
Stop meshes from disappearing - Useful for modded meshes that likes to turn invisiible at a certain distance
Swap custom entities with AMM - Edit the AMM's database to add your custom NPV and NPC+ into your swappable entities :3
Use guns as garment in your oufits - Slap any guns or weapons models as accessories in your outfits
Wearable Garment Port How I port custom models into the game as wearable garments! My workflow from A to Z, as always this is just my own workflow, don't take this as THE method to port stuff :>
━━━━━━━━━━━━━━━━━━━━━
Hope those can be useful! 🤙 Happy modding
▶ Link to the Google Drive Folder
40 notes
·
View notes
Text

OMG I made a "V"!! \(≧∇≦)/ a NPV for Cyberpunk 2077!! - personal use only ( •̀ ω •́ )✧
This tutorial HERE is awesome!!💛💚💛💚
7 notes
·
View notes
Text


It's Shippy Satur-Trey!
May still be Friday where you live though
This set featuring everyone's favourite Nomad without a clan, and the girl who could've been V (and definitely is not Rogue's granddaughter, no sir) in Trey's rarely seen formal outfit (which is actually the default outfit from manavortex's tutorial NPV, because Trey is the first NPV I ever made for Cyberpunk).
Vicky's full transformation into E3 V now possible thanks to manavortex's new E3 adaptation mods.
Judy x Val set also incoming.
#cyberpunk#cyberpunk 2077#cyberpunk 2077 photomode#cp2077#cp2077 photomode#virtual photography#my vp#cp2077 au: brother's shadow#oc: vicky santiago#fem v kinda#oc: trey marshall#oc x oc ship#vicky x trey: the quiet life#shippy saturday
8 notes
·
View notes
Text
WIP Wednesday - Modding Hell
Thanks @morganlefaye79 for tagging me! I have a WIP for once!
I'm slowly learning the whole NPV/NPC+ shtick and oh god! This is so difficult. I want to make Flavio into his own NPC to reunite him with Silver but.... Oh god!

This first few tries were.... let's say inconclusive? And the "final" product just wasn't him?

So I restarted from scratch and decided to go NPC+ since it's easier and... I think there's a problem in the template given with Manavortex's tutorial or at least, there's a problem with their template and my game...


These two NPCs are using the exact same face, from the exact same path... And yet one is Johnny, the second is some dude IDK who that is XD
#gonna switch to noralee's instead... gonna be harder but maybe it'll work better...#went through the 5 stages of grief 3 times in the past 48h i think XD#thanks again! think i needed to vent about the difficulty i have with simple stuff#gain some knowledge at least... and the power to refit clothes!!!!!
19 notes
·
View notes
Text
if i ever find a tutorial that isn't worded specifically to make my brain want to die, and figure out NPVs, yall are fucked.
I will make a Shanks. I will become insufferable. I sure hope yall will appreciate some cyberpunk shuggy cause I'd become a one trick pony of red and blue boys in situations.
#i was joking that october was my like cringetober clown core season#but i think i like descending into cringe
5 notes
·
View notes
Text
been trying to get this tutorial to work for ages now and having 2 odd problems. when i import my shapekeys the preview window from the texture painting tab and on -> shows the intended changes but when i switch back to the default layout tab everything turns blue and defaults to the state it was in before i did the shapekeys. then when i try to export the files it creates a copy of my project folder in my onedrive documents directory (???????) and saves it there. and Then when i try to see if wolvenkit will import those files it reads them in the little import window, refuses to preview them and then when i actually press 'import selected' it fails for every file and the log refuses to tell me why.
funnily enough i can still use blenders native save and export functions and when i try to open those files in substance painter it does the thing and i can even bake it but its still the incorrect default un-shapekey-ed .morphtargets.glb. fascinating problems to have at 430 am. all this for video games
0 notes
Note
joining the anons screaming at u for help hahahah ;] do u know any tutorial for adding physics to clothes/jewelry? i ran thru the whole modding wiki and found nothin
Hey anon! That's fine, I'm happy to help!
Both of these require the same thing: an existing item that sits and moves in the place you expect your custom mesh to be.
Adding physics to garments is limited because most of the NPC clothes use something called Cloth Proxy, which is not a system we have yet cracked to use.
For example, you can't have a jacket that dangles like River's because his jacket is a proxy mesh instead of a rig mesh.

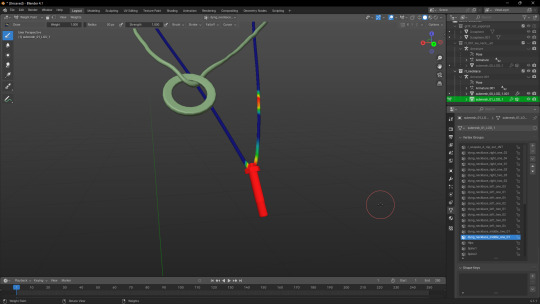
You could, however, base a garment on Judy's overalls because the belt dangle has a rig and animgraph. This however limits you to having a garment/item on the legs, as it'd need to follow the general area of the original dangle - all you'd need is steal weights from it, as you would when handling a regular mesh re-weight without dangles.

Jewelry on the other hand has dozens of different rigs and dangles. I'll give an example with Farren's necklace, which uses Alt's physics.


As you can see, the first step is finding something in game that sits and moves like how you want your mesh to. Some have stronger movement in physics, others don't, and more often than not you have to try multiple meshes to find the one that works for you.
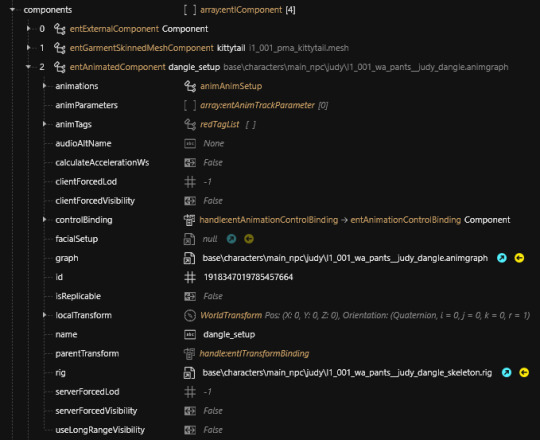
The easiest way to know if a mesh has physics is just to check in its folder if there is a .rig and .animgraph component with it. Items with physics also generally have bones that start with dyng, which you can check in the boneNames entry on WolvenKit:

Then it'll be just like a regular weight stealing process. Pop both meshes in Blender (you don't need to export the dangle entries), make sure your desired mesh is now using the rig of the transfer mesh, and that it sits roughly in the same spot so weight stealing is accurate.
Alt's Necklace:

Farren's Necklace:

I'm not gonna show how to weight transfer, but it's the exact same process of regular clothing/items. You do, however, sometimes need to do some manual painting in the dyng bones just to ensure the mesh won't break when dangling.
Good dangle dyng:

Bad dangle dyng:
After you have your mesh re-weighted, materials fixed, etc etc, you'll need to decide if that's going to be directly into a NPV/NPC+ or an ArchiveXL item. There is no way to simply make a mesh replacer for one of V's clothes because they don't have the means to reach the physics .rig and .animgraph. (At least, I don't recall so.)
For NPV/NPC+, all you need to do is path your jewelry into a regular component, and then its .rig and .animgraph on an animated entry.

You can custom path these if you want, I normally don't because nowadays rarely a mod will go poking into a NPC's dangle skeleton.
For ArchiveXL, you'll be pathing the dangle into an animated component entry of your garment's .ent.
After that, it's a matter of testing!
If the mesh promptly collapses into the floor when you equip/load it, then it's not reaching the rig and/or animgraph, or wasn't weighted properly, or might be in the wrong rig.
Hope that helps!
#cyberpunk 2077#cyberpunk modding#correspondence#sorry I know this is a 'lazy' tutorial compared to what I usually do#but I'm doing a little bit of modding detox and focusing on other things so I don't have the juice for a full blown tutorial#I think what I put here is enough to at least help finding any gaps but let me know if anything's missing
18 notes
·
View notes