#delete run history using cmd
Explore tagged Tumblr posts
Visit Tumblr Blog
Explore Tumblr blogs with no restrictions, modern design and the best experience.
Last Seen Tumblr Blogs


Fun Fact
After the announcement of the deal with Yahoo!, there were 170K signatures of unhappy Tumblr users petitioning to prevent the sale in 2013.
Text
How to Remove RUN history using Command Prompt in Windows 10
In this video tutorial you will learn how to Remove Run History using CMD in Windows 10.
The Start Menu at Windows 10 is totally redesigned as compare to Previous Operating Systems of Microsoft. In the New interface of Windows 10, the search history in RUN windows doesn't get removed by itself. When you open RUN windows, and you tap on arrow to open a drop down list, the list of commands you see their, that's called RUN history. To remove the RUN history you just need to run simple command at Command Prompt.
Follow the steps shown below to Remove Run history using Command Prompt in Windows 10:
1. Open Start Menu then type cmd, right click on it then click on Run as Administrator
2. Now type below command then press Enter:
reg delete HKEY_CURRENT_USER\SOFTWARE\Microsoft\Windows\CurrentVersion\Explorer\RunMRU /va
type above command as it is
3. After press Enter, it will ask you for confirmation, so press y then press Enter to execute command.
Now command is successfully executed, then open RUN box again to check history.
youtube
#remove run history#delete run history#how to delete run history in windows 10#clear run history windows 10#how to clear run history#delete run history using cmd
0 notes
Note
ur post abt computer errors made me think abt my work, where we have a win 7 computer (yes) that runs all the phones, and for a while it didnt have enough memory to boot properly or load the program for the phone people to backdoor in to help me with something (tbclear im NOT IT i can just open menus and google), and every time i deleted shit it would fill back up to 0mb free space. and frm my memory (this was a year ago now) its bc the error log would make files abt errors, which were TOO BIG for the compression type thats built into win7, so the uncompressed error log would a) take up space b) generate more and more also-uncompressed error logs About the existing uncompressed log until the disc was entirely full. i had to delete the entire error log history, every file with a certain extension, and restart like 5 essential background processes in cmd. it was. an experience.
a similar issue happened on a computer also running win7 that no one had ever installed an essential patch we needed to be able to use our stupid fucking firewall we have to use to be able to use our inventory program (which, even so, last time i updated the antivirus someone from the program company had to remotely babysit the installation to individually greenlight update packages past the firewall, which was flagging them as viruses -_-), so every few seconds windows defender would ping windows update about the antivirus being out of date, and win update would try and fail to update it without the patch. the computer had 6 digits of whatever category is down from critical in the error log every week.
Honestly you're doing pretty good if your work phones run on something as new as Windows 7. I shall not name names but there are organizations that to my direct, personal knowledge have to routinely buy replacement parts on eBay for machines like a Sun UltraSparc 3 because the damn server is the only thing that can still run the driver software that drives the motors in large expensive scientific equipment. And if you learn COBOL the sheer amount of legacy payroll and accounting software still in use in major corporations will have you set for life.
Back in 2010 I started playing the original Deus Ex and ran into a fun problem where I couldn’t save the game because my machine had a 4-disk 2.7 TB RAID and Deus Ex is a game from the distant mists of 2000, a time in which a >2 TB disk volume was not just unlikely but actively impossible in Windows. So when I tried to save its disk space check overflowed and thought I had negative 2 TB of space and no joke I had to make a 400 GB text file of the letter 'a' to bring my free space under 2 TB just so I could play the game.
#nega-achievement hall of fame#output generated#god the cascading error logs though XD#'I'M SO UPSET THAT I'VE RUN OUT OF SPACE TO BE UPSET IN'#mood really
12 notes
·
View notes
Text
Rapidminer studio tutorial

#RAPIDMINER STUDIO TUTORIAL HOW TO#
#RAPIDMINER STUDIO TUTORIAL 64 BIT#
#RAPIDMINER STUDIO TUTORIAL ANDROID#
#RAPIDMINER STUDIO TUTORIAL LICENSE#
#RAPIDMINER STUDIO TUTORIAL DOWNLOAD#
#RAPIDMINER STUDIO TUTORIAL LICENSE#
Step 7: The next screen will be of License Agreement, click on I Agree. Step 6: After this Setup screen will appear, click on Next. Step 5: It will prompt confirmation to make changes to your system. Step 4: Now check for the executable file in downloads in your system and run it.
#RAPIDMINER STUDIO TUTORIAL DOWNLOAD#
It is a big 273 MB file that will take some time depending on download speed.
#RAPIDMINER STUDIO TUTORIAL 64 BIT#
Step 3: New webpage will open, which will contain RapidMiner installation files for the different operating systems, let’s take a 64 bit Windows installer file, click on it, downloading the executable file will start shortly. Click on the Downloads button which is adjacent to My Account, no need to create an account. Step 2: Clicking on the DOWNLOAD button will redirect to another webpage. Step 1: Visit the official website of RapidMiner using URL on any web browser.
#RAPIDMINER STUDIO TUTORIAL HOW TO#
How to Remove the Password from a Zip File?įollow the below steps to install RapidMiner on Windows:.Authentication Bypass using SQL Injection on Login Page.How to Set Java Path in Windows and Linux?.How to Recover a Deleted File in Linux?.
#RAPIDMINER STUDIO TUTORIAL ANDROID#
How to Install and Set up Android Studio on Windows?.
How to Install and Use Metamask on Google Chrome?.
How to Change the Theme of Netbeans 12.0 to Dark Mode?.
How to install requests in Python - For windows, linux, mac.
How to Install and Run Apache Kafka on Windows?.
How to integrate Git Bash with Visual Studio Code?.
How to Connect Two Computers with an Ethernet Cable?.
How to filter object array based on attributes?.
How to setup Anaconda path to environment variable ?.
How to set up Command Prompt for Python in Windows10 ?.
How to set fixed width for in a table ?.
How to Check Incognito History and Delete it in Google Chrome?.
Different Ways to Connect One Computer to Another Computer.
How to Install OpenCV for Python on Windows?.
How to install Jupyter Notebook on Windows?.
How to Find the Wi-Fi Password Using CMD in Windows?.
ISRO CS Syllabus for Scientist/Engineer Exam.
ISRO CS Original Papers and Official Keys.
GATE CS Original Papers and Official Keys.
By aggregating listings from multiple websites, Rent By Owner offers an immense amount of choice of the best RBO properties in Fawn Creek. How many RentByOwner vacation rentals are available in Fawn Creek?Ĭurrently, the total number of properties listed by Rent By Owner in 2022 is over 230 in the Fawn Creek area, and still counting.
Private room in Independence with Parking.
Evolve 1-Acre Home by Lake with RV Hookup and Hot Tub.
If you are looking for a family-friendly vacation home in Fawn Creek, check out one of the following properties as all are highly-rated places to stay with excellent review for families or groups staying in Fawn Creek: Which vacation homes in Fawn Creek are best for families?
Hampton Inn & Suites Pittsburg Kansas Crossing.
Holiday Inn Express Hotel & Suites Bartlesville, an IHG Hotel.
Holiday Inn Express & Suites - Coffeyville, an IHG Hotel.
Top-rated RBO homes that have access to a swimming pool include: There are 28 vacation rentals with private pools near Fawn Creek. How many vacation rentals have private pools in Fawn Creek?
Lakefront Cedar Vale Lodge with Private Boat Dock!.
Pet-Friendly Grand Lake House with Dock and Kayaks!.
Pastoral Log Cabin with Trails about 1Mi to Grand Lake.
If you plan on staying in the Fawn Creek area, consider making a reservation for a few nights at one of these properties as these have been rated the Top Vacation Rentals in Fawn Creek: There are a lot of options in Fawn Creek. Just search for your destination and secure your reservation today.įrequently Asked Questions About Fawn Creek What are the top vacation rentals in Fawn Creek? RentByOwner makes it easy and safe to find and compare vacation rentals in Fawn Creek with prices often at a 30-40% discount versus the price of a hotel. Popular Airbnb-style properties in Fawn Creek. Huge master suite bedrooms and have large screen televisions? You can find vacation rentals by owner (RBOs), and other Looking for an RBO with the best swimming pools, hot tubs, allows pets, or even those with Homes? With RentByOwner Fawn Creek, you have the flexibility of comparing different options of variousĭeals with a single click. Looking for last-minute deals, or finding the best deals available for cottages, condos, private villas, and large vacation Get more value and more room when you stay at an RBO property in Fawn Creek. These rentals, including vacation rentals, Rent By Owner Homes (RBOs) and other short-term private accommodations, have top-notch amenities with the best value, providing you with comfort and luxury at the same time. There are more than 230 vacation rentals that are available in Fawn Creek.
0 notes
Text
Imessage on virtualbox mac os x

#Imessage on virtualbox mac os x mac os x
#Imessage on virtualbox mac os x install
#Imessage on virtualbox mac os x password
#Imessage on virtualbox mac os x mac
Now, you can select files and delete them as usual.ĭo you know any other way of cleaning up the Messages app chat history? If yes, do share it with us in the comments below. You’ll see the attachment files listed randomly. Now enter the ~/Library/Messages/Attachments/
#Imessage on virtualbox mac os x mac
How To Clean Up the Attachment Files on Mac Hence, you will need to move ahead with the further steps to delete the attachment files. Remember, all the conversation attachments such as video, audio, gif, photos, etc. (you can delete the individual file if you don’t want to remove the entire chat history.) NVRAM parameters modeled on an existing Macbook.
#Imessage on virtualbox mac os x password
However, when iMessage is started and AppleID and password are provided, the VM churns for a while and then the login message box refreshes with no app launch. Type the name of the person in the address book whom you want to send iMessage. The VM correctly authenticates the AppleID and iCloud during setup. After opening you will get New Message button, click on that. First of all open iMessage on your desktop and sign in providing your Apple ID.
#Imessage on virtualbox mac os x mac os x
The files would be named as chat.db, chat.db.shm, chat.db.wal, etc. So if you want to use the iMessage to send and receive iMessage on Mac OS X Yosemite, you can follow the below steps: 1. Up next, you will need to select all the files which you want to remove and then move them to Trash. Now, in the dialog box Enter ~/Library/Messages/ Open Finder and press CMD+Shift+G to bring up “Go To Folder” window. How to Delete iMessages Chat History on Mac Let me take you through the simple process of cleaning up your Mac in the easiest possible manner. Though Messages app chat history can be very useful in providing you the comprehensive record of your conversations, it’s needed to be edited from time to time so that it doesn’t clutter your Mac for space.
#Imessage on virtualbox mac os x install
Set Base memory (RAM) to minimum of 1GB, if you can afford it set it to 2 or more. Install Xcode on MacOS Mojave and test with Virtualbox on Windows 10 2020Can we install MacOS with Virtualbox on Windows 10 to develop iOS apps- Yessssssy. The Messages app of Mac doesn’t have any in-app option to delete chat history.Īs it keeps track of entire chat history of iMessages or SMS, caches, attachment and more, over the time the chat history piles up and becomes problematic for your Mac. Set OS Type to Mac OS X and set Version to Mac OS X Server or Mac OS X Server 64 on 64-bit systems (standard Mac OS X is not officially supported in VirtualBox). This feature is available in macOS Big Sur or later.Unlike Messages app in macOS, clearing messages history in iOS Messages app is fairly simple. Their name is then highlighted in the message, and they will receive a notification letting them know that they have been mentioned. To help bring your message to the attention of a recipient, include before their name, like Or click their name after you type it.This feature is available in macOS Big Sur or later. To include other items, such as Memoji stickers, GIFs, and message effects such as balloons or confetti, click the Apps button.I'd like to run OS X in a VirtualBox VM, and use iMessage there. To include an audio recording, click the Record Audio button and record your message. I just switched from Mac to PC, and I'm really missing iMessage on my laptop.To include an image or other file, drag or paste it into the message field.To include emoji, click the Emoji Picker button.Press Tab or click the message field at the bottom of the window, then type your message.Or click the Add button and choose from your contacts. Type the name, email address, or phone number of one or more recipients.Click the New Message button at the top of the Messages window.There you will find number of files named as chat which actually stores all the chat history. In the field provided, enter /Library/Messages/. You need a Go To Folder window now, so just hit Command + Shift + G. First thing that you need to do is quit iMessage application on your Mac machine. You might be asked to sign in with your Apple ID. Steps To Delete iMessage Chat History On Mac OS X.
0 notes
Text
Free mac os ftp client

#FREE MAC OS FTP CLIENT FOR MAC#
#FREE MAC OS FTP CLIENT CODE#
#FREE MAC OS FTP CLIENT MAC#
#FREE MAC OS FTP CLIENT WINDOWS#
In terms of SSH, iTerm2 will keep you informed of which directory you’re in, and will let you navigate back to previous commands by hitting Shift + Cmd + Up Arrow or Shift + Cmd + Down Arrow. It also lets you go back and recover text you deleted or changed with an Instant Replay feature.
#FREE MAC OS FTP CLIENT CODE#
It also lets you search through an iTerm2 Terminal window for a particular word or command, so you can get to that bit of code in seconds.Ĭopying and pasting in iTerm2 is a lot easier than it is in PuTTY for Mac, and it keeps a paste history for you so you can quickly find the second-to-last item you copied.
#FREE MAC OS FTP CLIENT WINDOWS#
ITerm2 supports split panes, so you can have multiple Terminal windows open and operating right beside each other or on top of each other.
#FREE MAC OS FTP CLIENT MAC#
In addition to letting you establish SSH connections, it lets you perform functions on your Mac that Terminal performs, but with a bunch of extra useful features. ITerm2 is a complete Terminal replacement. If you’re familiar with Terminal and have some complaints about it, or feel it has some limitations, iTerm2 is the SSH client for you.
#FREE MAC OS FTP CLIENT FOR MAC#
It might make sense to just use Terminal rather than downloading a totally separate application for the same basic functions.īut if you know PuTTY from Windows, or really want your login and session information saved, PuTTY for Mac is great, and we’d still recommend it. Ultimately, though, PuTTY for Mac works much like Terminal in terms of operation and what actions it can perform. This saves a lot of time when logging in and switching between remote computers. You can also use PuTTY for Mac to save your SSH session information-the IP address and port number you’re logging into. The GUI has options for saving your SSH login information, so you don’t have to keep passwords written down everywhere to remember them. PuTTY for Mac has a graphical user interface (GUI) that you can log in with instead of using the Terminal windows. So PuTTY for Mac isn’t necessary to make an SSH connection or run command line on a Mac, but it does come with features that make it useful as an SSH client on Macs. Unlike Unix-based Macs, Windows doesn’t have Terminal built into it. PuTTY for Mac, like Windows PuTTY, allows for SSH connections by creating Terminal windows that run command line inputs for logging into and using remote computers. PuTTY is a Windows application for connecting to SSH servers that has a Mac port. Plus, it’s free, and already on your Mac! For us, an SSH client would have to be very impressive to beat it. But if you do have some background in these areas, you should be fine. If you don’t know a ton about coding, or haven’t used Terminal much before, it might be a tough SSH client to use. We have a Mac Terminal commands cheat sheet if you need ideas or reminders of what you can input and run via command line in Terminal. There is no graphical system for this-Terminal is text based-so you type out your commands and hit Enter to access, run, and make changes on another system. With Terminal open, you can log into a remote computer via an SSH connection by inputting ssh where user is replaced with your username for the system, and IP-Address is replaced with the IP address of the remote server.įrom there you can input commands to access files and run programs on the other computer. This application is Terminal, which you can usually find by heading to your Applications folder and looking inside Utilities, though there are a few ways to open Terminal on a Mac. You Mac comes with an application that will let you access and run SSH built into it.
0 notes
Text
How to get a wifi password prompt mac

#How to get a wifi password prompt mac how to#
#How to get a wifi password prompt mac install#
Step1: Press start and type CMD, right-click on the Command Prompt option shown as a search result and click on Run as administrator. We can recover our forgotten Wi-Fi password by running a couple of quick ‘ netsh’ commands using Windows Command Prompt. Windows keeps a record of all our networks and their password so we don’t have to type the password again to connect to the same network. It happens sometimes that we forget our Wi-Fi password and it is painful to reset our Wi-Fi password as all our home devices and system are connected with the same network and we have to save the new password again to all our devices.īut we can save ourself from resetting Wi-Fi password if we ever connected our Windows 10 PC to that Wi-Fi network.
#How to get a wifi password prompt mac how to#
How to Check Incognito History and Delete it in Google Chrome?.Different Ways to Connect One Computer to Another Computer.Top Programming Languages for Android App Development.Android App Development Fundamentals for Beginners.How to create a COVID-19 Tracker Android App.How to create a COVID19 Data Representation GUI?.Scraping Covid-19 statistics using BeautifulSoup.Implementing Web Scraping in Python with BeautifulSoup.Downloading files from web using Python.Create GUI for Downloading Youtube Video using Python.Pytube | Python library to download youtube videos.Python | Download YouTube videos using youtube_dl module.YouTube Media/Audio Download using Python – pafy.Hyperlink Induced Topic Search (HITS) Algorithm using Networxx Module | Python.Expectation or expected value of an array.Expected Number of Trials until Success.
#How to get a wifi password prompt mac install#
How to install Jupyter Notebook on Windows?.How to setup Anaconda path to environment variable ?.Set up virtual environment for Python using Anaconda.How to Find the Wi-Fi Password Using CMD in Windows?.ISRO CS Syllabus for Scientist/Engineer Exam.ISRO CS Original Papers and Official Keys.GATE CS Original Papers and Official Keys.
0 notes
Text
Notepad++ download for macbook pro

#Notepad++ download for macbook pro how to#
#Notepad++ download for macbook pro android#
Step 5: Next screen is of selecting language, click OK. Step 4: It will prompt confirmation to make changes to your system. Step 3: Now check for the executable file in downloads in your system and run it. It is a small 4.19 MB file that will hardly take a minute. Downloading of the executable file will start shortly. Step 2: On the next webpage, different installer files are listed, click on the Download button. Step 1: Visit the official Notepad++ website on any web browser.
#Notepad++ download for macbook pro how to#
How to check Active Network Connections in Windows?įollow the below steps to install Notepad++ on Windows:.How to Remove the Password from a Zip File?.Authentication Bypass using SQL Injection on Login Page.How to Recover a Deleted File in Linux?.
#Notepad++ download for macbook pro android#
How to Install and Set up Android Studio on Windows?.How to Install and Use Metamask on Google Chrome?.How to Change the Theme of Netbeans 12.0 to Dark Mode?.How to install requests in Python - For windows, linux, mac.How to Install and Run Apache Kafka on Windows?.How to integrate Git Bash with Visual Studio Code?.How to filter object array based on attributes?.How to Connect Two Computers with an Ethernet Cable?.How to setup Anaconda path to environment variable ?.How to set up Command Prompt for Python in Windows10 ?.How to set fixed width for in a table ?.How to Check Incognito History and Delete it in Google Chrome?.Different Ways to Connect One Computer to Another Computer.How to Install OpenCV for Python on Windows?.How to install Jupyter Notebook on Windows?.How to Find the Wi-Fi Password Using CMD in Windows?.ISRO CS Syllabus for Scientist/Engineer Exam.ISRO CS Original Papers and Official Keys.GATE CS Original Papers and Official Keys.
0 notes
Text
How To Fix An Error Occurred “Playback ID” On YouTube ?
5 METHODS TO FIX AN ERROR OCCURRED “PLAYBACK ID” ON YOUTUBE

YouTube is one of the most popular platforms for video streaming so most of the people use the YouTube content for learning, Tutorials and Entertainment. It is easy to see this video using your browser but sometimes it gives some error like An error occurred. Please try again later. Playback ID while accessing video through YouTube.
Let’s discuss it in detail as this error is coming due to many factors and you can follow some steps to resolve this error.
Method 1: Clear the Cache and Data of Your Browser
One of the common reasons is because of corrupt cached data in your browser and you can clear the cache and data of your browser.
Google Chrome
· At the top right corner, You can see three vertical dots or arrow icon
· Now Click On More tools
· Click On Clear browsing data
· Now You can select a time range. “To delete everything, select All time”
· Enable Checkbox for Cookies and other site data and Cached images and files.
· Now Click On Clear data
Firefox
· At the top right corner, Open Firefox menu OR CTRL + H to Open History
· Select History and Clear Recent History…
· You will find “Time range to clear:” from DropDown menu to select Everything
· Now Check the box for Cache (It is ok to leave everything else unchecked it)
· Click On Clear Now and Restart or refresh Firefox
Safari
· Click On Safari in the menu bar
· Select Preferences then Privacy Tab
· Choose the Manage Website Data
· Click Remove All and Click on Remove Now to confirm
Edge
· Click on Hub Icon
· Now click on History in the left panel
· Clear History
· Check boxes for Cached Data and Files
· Check boxes for Cookies and Saved Website
· Now Click On Clear
Method 2: Restart your modem or router
Sometimes due to internet connectivity issues then it also creates some problems. You can open another browser and try to open any website and if you are unable to open the website then you can try to reboot or restart your website to fix the problem. You can turn off the device and turn on the device after some time.
Method 3: Flush the DNS Cache
DNS cache is one kind of database stored in your computer which contains information of all the websites which you have visited. This cache sometimes becomes corrupted so it results in not accessing the website. If it is the problem then you will have to flush the DNS cache.
· To flush DNS Press Windows key + R to Open up a Run dialog box
· You can type “cmd” and now press Ctrl + Shift + Enter to open Command Prompt if it opens prompted by the UAC (User Account Control) and click Yes to give administrative access
· Now you can enter ipconfig/flushdns to Flush your DNS cache
Method 4: You Can Try Using Google’s Public DNS
Your internet service provider set your DNS to one which they have automatically chosen and sometimes by changing Google’s Public DNS will fix your problem.
· To Open Run dialog box you can click Windows Key + R
· Now type “ncpa.cpl” to open Network Connections Windows
· You can select the connection that you want to configure in Google Public DNS
· In Ethernet/Wi-fi Properties, Go to Networking Tab and open settings box
· Now Select Internet Protocol Version 4 (TCP/IPv4) and Open properties
· Inside Properties of Internet Protocol Version 4 (TCP/IPv4), You will find General Tab
· You can set Preferred DNS server by 8.8.8.8 and Alternate DNS Server by 4.4.4.4 and Save it
· You can follow above two steps for Internet Protocol Version 6 (TCP/IPv6) and set Preferred DNS server by 2001:4860:4860::8888 and Alternate DNS Server by 2001:4860:4860::8844 and Save it
· Now Restart Your Computer
Method 5: ReInstall Your Browser
Sometimes there is a possibility that your browser contains some corrupt files which is causing issues. In order to fix this issue you need to download and install the latest or Fresh version of your browser.
· To Open Run dialog box you can click Windows Key + R
· Type “appwiz.cpl” and Enter
· You will find list to locate the browser that is creating issue
· You can Right Click On it and Uninstall it
· You can follow steps given on screen to remove browser from your computer
· Once it is completely uninstalled from your computer then Restart your computer
· Now you can download latest version of your third-party browser you can use IE or Edge from your computer
· Follow the steps to Install latest version of your browser
Check Other Blogs For YouTube, Here
Google Chrome, Playback ID Error, YouTube, YouTube Video
0 notes
Text
How To View Saved WiFi Password On Android & Windows

How To View Saved WiFi Password On Android & Windows
Today we know about how to view saved WiFi passwords on android & windows. Many times we feel the need to know our Computer connected to a WiFi password on Windows, which was entered to connect a public or private WiFi network. When we enter a password to connect the computer system or laptop with any wifi network, that password gets stored inside in a windows file. In case you forget the wifi password, you can easily find a WiFi password on the windows operating system using cmd. There are two simple steps to know the connected details of WiFi password or the network of a computer system details that is not connected to the system. For example: – If you do not remember the used Wifi password which was used to connect a laptop or computer with a Wi-Fi network. And now you want to connect your android mobile or smartphone to the same WiFi network. You have to check and verify the saved WiFi password in windows. Register a Domain name from GoDaddy | Buy Domain Name | Where to Buy Domain Name. Delete Instagram Account Permanently | Best Part-Time Jobs for College Students | Best Websites To Create Cartoon Character.
How to Know Connected WiFi password on Windows
This method will only work when your computer system or laptop is connected to a WiFi network. Follow the below simple and easy steps to know the connected WiFi password in Windows 7/8/10 operating system. Step1) Open Run Prompt (Press Shortcut key to open Run, then Press Windows+R key) Step2) Now paste the windows command on control /name Microsoft.NetworkAndSharingCenter RUN box and after that press the Enter key to open or start Network and Sharing Center.

How To View Saved WiFi Password On Android & Windows Step3) Then Click on Wi-Fi (AndroidAP) Note: AndroidAP is my WiFi network name Which I am Using, In your case click on that name which displays. Step4) Now click on the Wireless Properties option and after that select the Security option.

How To View Saved WiFi Password On Android & Windows Step5) Now click on the Show characters box to know everything about the saved WiFi password. Step6) As you can see in the above screenshot image in the case of my wifi password, in the Network Security Key box details of my network password are shown. This method is very simple and useful to know only connected WiFi network password. You can follow the cmd method to know all details of the WiFi password.
How to Know My Saved WiFi Password Using CMD
With the help of the cmd command method. we can easily find all connected Wi-Fi network history details as well as passwords that were used to connect with that network. Follow the below simple steps to know all saved WiFi password history details in the windows 7/8/10 operating system. Step1) Open Run Prompt and enter cmd command to open the command prompt. (Shortcut key to open Run, Press Windows+R key) Step2) Now type the cmd command in netsh wlan show profile Run prompt and after that press the Enter button.
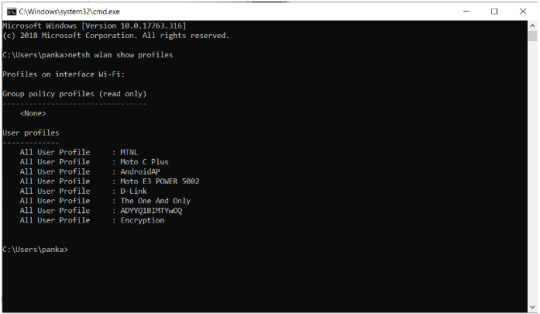
How To View Saved WiFi Password On Android & Windows Step3) The command displays all the Details of connected network profile history. Step4) Now follow the below simple and easy step to show the particular network saved password. Step5) Now type in CMD netsh wlan show profile "Your Network profile name" key = clear. (In my case network profile is MTNL)

How To View Saved WiFi Password On Android & Windows Step6) As you can see in the above screenshot Picture/image Key Content is the password of my Key Content 11343967 WiFi network. I hope your all query will be solved regarding "How To View Saved WiFi Password". Please comment below if you want to ask me something and share this article on Facebook, Instagram & Twitter, etc. Also, Read this: - Steps to Buy Domain Name | Where to Buy Domain Name. - How To Delete Instagram Account Permanently Or Temporarily Disable Tip. - Top 7 Best Part-Time Jobs for College Students – Tech Dhyan Read the full article
#forgotwifipasswordandroid#howtofindwifipasswordonphonewhenconnected#howtoseewifipasswordwindows10#HowToViewSavedWiFiPassword#howtoviewsavedwifipasswordonandroidwithoutroot#howtoviewsavedwifipasswordonandroidwithoutroot2021#howtoviewwifipasswordonandroid#onlinewifipasswordviewer#viewsavedwifipasswordswindows10
0 notes
Text
Ways to Uninstall Updates Manually on Windows 10
Windows 10 updates sometimes might cause problems like performance issues, system crashes, and more to your computer. It’s better to uninstall Windows 10 updates from time to time, and believe us; these steps will help you make your computer or devices fast and smooth. You will learn the basic steps to uninstall Windows 10 updates manually.

Steps to Uninstall Windows 10 Updates Manually
Below are the very basic steps that help you uninstall updates manually on Windows 10 and you can try these methods at home. Let’s start.
Use Settings
You can also use the Settings app to uninstall Windows 10 updates on your computer. See the steps below.
Click on the Start menu.
Open the Settings app.
Tap on the Update & Security.
On the new window, click View Update History.
Click on the update that you wish to delete.
Write down the KB number of the patch.
Select the Uninstall updates.
Open the Control Panel on your computer and search for the update using the KB number.
Click on a particular update that you want to uninstall
Tap on the OK button to uninstall the update.
Note: If you forgot or not sure about the KB number of any update. Open Control Panel and click on the installed on data filter to check the latest update.
Use DISM Tool
To uninstall Windows 10 updates manually on your computer, use the DISM tool.
Open Command Prompt Window and enter the below command.
dism /online /get-packages | clip
Click on the Notepad option and copy-paste the content from the clipboard.
On Notepad, use the Find feature to check if any faulty update is installed.
Note: You can’t find some updates using their KB ID. You are required to enter the last three or four digits of the build number.
Once you are done, copy the package identity of any Build.
Enter the command to remove updates dism /Online /Remove-Package /PackageName:[package_ID].
On the same command, after replacing the package id enter the following command.
Once you are done with the steps, tap on Y to restart your system.
Use Control Panel
Open the Control Panel on your device.
Click on Uninstall a Program option.
On the Program and Features window, tap on View Installed Updates.
You will see a list of installed updates on your screen. It includes updates for software as well as for Windows 10.
Click on the Microsoft Windows section and select the update that you wish to remove.
Press the Uninstall button.
Once you click on the uninstall button, Windows 10 will ask you to confirm. Click on the Yes option.
Use Command Prompt
You can also use Command Prompt to uninstall Windows 10 updates manually. To use Command Prompt, you need to know the KB number of the update.
On your computer, open the Windows search.
Type cmd.
Choose Command Prompt.
Tap on Run as an Administrator.
Enter the below command once you replaced the KB ID.
uninstall: wusa /uninstall /kb:[id]
Press Y to restart the system and finish the uninstallation.
To automatically restart your system once the update is removed. Use the below command.
wusa /uninstall /kb:[id] /quiet
Use Advanced Options
You can also uninstall updates manually on Windows 10 using Advanced Options. See the below steps.
Open the Settings app on your device.
Click on the Update & Security > Recovery option.
Tap on the Advanced Startup option.
You will see the Advanced Startup screen. Click on Troubleshoot.
There will be two options, Reset this PC and Advanced Options, click on the Advanced.
Tap on the Uninstall updates.
On the same screen, you will see two options: Uninstall latest feature update or Uninstall latest quality update.
Once you select an update to install, you need to login to your Windows 10 using your username and password.
Click on Uninstall quality update and Uninstall feature update and remove the update.
After clicking, restart your PC.
Now, the Windows update has been removed from the system.
Conclusion
You can uninstall Windows 10 updates manually now by applying some techniques, like Control Panel, Command Prompt, Settings, Advanced options, DISM toll, and more. These steps will help you make your computer run smooth and fast.
Source: Ways to Uninstall Updates Manually on Windows 10
0 notes
Text
Remove Text Boxes In Word For Mac

How To Remove Text Boxes In A Word Document
How To Remove A Text Box In Word For Mac
How To Remove Text Boxes In Word
Editing Text in PDF Documents. • The Embed check box allows you to quickly remove embedding from any embedded. On Windows, choose Fit Text to Selection from the context menu; on Mac OS, choose Tools > Touchup > Fit Text to Selection. Type in the new text. The new text will stretch or condense to fit the area of the originally. When you release the mouse button, your insertion point is inside the text box. Type the text that you want to appear on the graphic. NOTE: The text box may have a solid background and border. To change these settings, follow these steps: On the Format menu, click Text Box, and then click the Colors and Lines tab. Mar 01, 2018 Remove the black text box. If you want to get ride of the black border around your text, you can do so by following these steps: Click your text box. Click the Format tab. Click Shape Outline; Click the white box in the Shape Outline drop-down menu. Click a blank place on the Word document. 5 PowerTips for Deleting Text Mac Tip #388, 10 June 2009. In this comment box the Cmd-Delete doesn’t work and it also doesn’t work in Google Docs. However gaining the whole word delete is a huge bonus for me. Comments are closed. Recent Posts.
When you type text in Microsoft Word, you have options for making it look a particular way on the page (such as changing the page margins), but those options are somewhat limited. Text boxes expand your formatting repertoire, offering additional control and flexibility for how your text appears. You can place a text box anywhere within a document and format it with different colors and fonts. This feature is especially helpful for creating a blockquote or a sidebar. Here's everything you need to know about creating and customizing text boxes in Word.
This article applies to Word 2019, Word 2016, Word 2013, and Word for Office 365. How to turn a picture into text in word.
Insert a Text Box in Word
Start by opening the document you want to add a text box to. Then follow the steps below.
On the ribbon, select Insert.
In the Text group, select Text Box. Choose a text box template.
The new text box appears in the middle of your text, and the Shape Format tab is automatically selected.
Click and drag the box to the position you want. To resize the text box, click and drag the circles around the edge. To resize, click and drag the circular arrow at the top of the box.
Place your cursor inside the text box and type the information you want to appear there.
Customize a Text Box
Once you've created your text box, you can customize it in a number of ways.
To bring up options, place your cursor inside the box and right-click. Choose an option and follow the screen prompts from there to add a border, change the style, or adjust the way the box interacts with the other text on the page.
Alternatively, use the controls on the Shape Format tab.
To go directly to the Layout Options menu, select the box, then select the Layout Options icon (it looks like a horseshoe) to the right of the box.
You can change the text, make more adjustments, or move the box to another location at any time. To delete a text box, select its border, then press Delete on your keyboard.
Related Articles
1 Justify Text in Word for Columns in Checklist Style
2 Work With Check Boxes in Word
3 Remove All of the Metadata From Excel Spreadsheets
4 Remove a Footer Only on OpenOffice
Remove a check box from a Microsoft Word document in a few simple steps. Before undertaking this process, you should first understand how to add the check box. Users typically insert check boxes into a Word document when creating a checklist or when attempting to give an ordinary bulleted list a fancier look.
Inserting
To add a check box to your Word document, click on the arrow on the right side of the “Bullets” button located on the “Home” tab of the user interface window. Next, select “Define New Bullet,” then “Symbol” from the resulting window. Locate the check box you want to use from the list of symbols, click “OK,” and then “OK” again on the initial window. This process inserts the check box into your document and will create a new check box each time you press “Enter” to create a new line of text.
Removing Boxes
Remove a check box from your Word document by highlighting the line from which you want to remove the box or by placing the cursor somewhere on the line that contains the box. If you want to remove multiple check boxes, highlight all of the lines you want to change. Click on the arrow on the right side of the “Bullets” button. From the next window, select the “None” option in the “Bullet Library” section. With the check box removed, you can proceed to work on the document with the settings that were in place before you undertook the editing process.
Convert Scanned PDF to Word Using iSkysoft PDF Converter In order to lighten the heavy burden of the work, a PDF Converter should be used to convert the scanned PDF files to editable Word files. There is an effective one called iSkysoft PDF Converter Pro for Mac (or PDF Converter Pro for Windows ) which comes readily to mind. Choose 'Black & White' to scan in an object in Grayscale (256 or Thousands of grays). Choose 'Text' to scan in text documents. The 'Resolution:' pop-up menu lets you select the dpi (dots per inch) of your scanned imaged. Typically, 300 dpi is all that you need. Too high of a resolution can result in printing performance issues. Before the steps, make sure you Mac camera function properly. Steps to Scan a Document into Word on Mac. Open and run your mac. Go to the webpage of CisdemOCRWizard, download the free trial and install on your mac. It is safe to use this tool, don’t worry. How to scan for readable text on mac.
Electronic Checklist
Typically, Word documents that contain check boxes are intended for use in printed form, such as for a questionnaire or test, which is checked off with a pen or pencil. You can also create a checklist that is checked off electronically within a Word document. Because this involves creating table with two columns and however many rows your checklist requires, removing the check box is done by deleting the table’s left column. Removing the check boxes in this type of checklist does not remove the table.
Considerations
Although most check boxes are square or rectangular in shape, you can add check boxes of different shapes and sizes to your Microsoft Word document. Select the shape you want to use from the “Symbol” list to give your checklist a different look. Remove these check boxes using the same method used to delete traditionally-shaped check boxes. As you adjust the text size in your document, the check box sizes are adjusted accordingly.
About the Author
How To Remove Text Boxes In A Word Document
Lou Martin has been writing professionally since 1992. His work has appeared in the 'Los Angeles Times,' the 'Long Beach Press-Telegram' and the 'Deseret Morning News.' Martin holds a Bachelor of Science in history and communication.
Photo Credits
Hemera Technologies/AbleStock.com/Getty Images
Cite this Article
Choose Citation Style
Martin, Lou. 'Removing Check Boxes in Word.' Small Business - Chron.com, http://smallbusiness.chron.com/removing-check-boxes-word-38381.html. Accessed 07 September 2019.
Martin, Lou. (n.d.). Removing Check Boxes in Word. Small Business - Chron.com. Retrieved from http://smallbusiness.chron.com/removing-check-boxes-word-38381.html
How To Remove A Text Box In Word For Mac
Martin, Lou. 'Removing Check Boxes in Word' accessed September 07, 2019. http://smallbusiness.chron.com/removing-check-boxes-word-38381.html
How To Remove Text Boxes In Word
Note: Depending on which text editor you're pasting into, you might have to add the italics to the site name.
0 notes
Text
Chrome Cleaner For Mac

By Gina Barrow, Last updated: August 27, 2019
Chrome Cleaner For Mac
Registry Cleaner For Mac
Chrome Cleaner For Mac Repair
Mac Cleaners For Free
Chrome Cleaner For Mac Os
Best Chrome Cleaner For Cars
Chrome cleaner free download - Google Chrome, Google Chrome dev, Adblock Plus for Chrome, and many more programs. Uninstall apps from your Mac and clean all their left-over files safely. Get more done with the new Google Chrome. A more simple, secure, and faster web browser than ever, with Google’s smarts built-in.
Clearing cache on chrome browser on a Mac is pretty easy. All it takes is a few good steps to get rid of large cache files, history, and images. Get your device performance at its peak by removing cache files. Find out how to clear the cache on Google Chrome on Mac.
People Also Read5 Ways to Make Your Mac Run FasterThe Ultimate Guide on How to Clear Cache on Mac
Part 1. A Quick Look on Cache on Mac
Cache takes a lot of space in your Mac and like all web browsers. Google Chrome stores cache of a user’s browsing habits. Browsers do this for all most-visited web pages to let it quicker to load.
The Google has officially released the chrome cleanup tool software for Windows and Mac, which is free to download and use. Chrome cleanup tool is a very useful application for any device. This tool helps your Mac and windows device to be free from unwanted files and unwanted programs.
Click&Clean is an innovative and totally free solution for your PC, Mac or Chromebook, that will help you to: - Scan your PC for Malware - Delete your browsing history - Remove download history.
There are actually 3 kinds of caches in your Mac:
Chrome Cleaner For Mac
System
Browser
User
Usually, it takes a while for a web page to load, especially images, a cache was made so that users can easily retrieve and go back to these frequent sites they visit. Caches also consume a lot of space on a Mac.
If you notice your device is slowing down, it may be due to a lot of files stored in your system or a lot of cached files. Removing or deleting such files can greatly free up some space and give you more room for performance.

A lot of Mac users wish to clear out Chrome cache, including web data, downloads history, and browsing history, and cookies. Find out how you can clear cache from your chrome browser on your Mac in this article!
Part 2. Clear Cache on Chrome Automatically
Are you tired of manually repeating these processes every now and then? You can actually save a lot of time by removing these junk files automatically.
What you need is FoneDog PowerMyMac. This software provides optimization, cleanup, and toolkit for series of Mac issues.
In fact, you can clean a lot of junk files inside your system and get more space! Here’s how to clear the cache:
Download and launch the program on your Mac
You may opt to check the current status of your device by clicking on Status. This will check the overall health condition of your Mac.
Go to Cleaner menu and select the desired junk files to remove
Click Scan
Selectively choose the files you wish to erase
Click Clean
That’s it! You no longer need to undergo a series of menu and settings. What’s more, is that you get to use more features too!
Part 3. How to Clear Cache on Chrome via Settings
The very basic step on how toclear the cache on Chrome on Mac is by following the steps Google has given. If you do not have issues with cache, you can leave it in your Mac, however, it can sometimes cause a problem during website updates and cached files saved in your Mac do not match.
It may cost inconvenience to users so clearing cache is a way to ensure that any issues you may come across are actually something wrong with the website, rather than inconsistencies caused by using different browsers.
Along with this article, we will give you other steps on how to clear cache using the keyboard shortcut and via the terminal.
Launch Chrome browser on your Mac
Click More, at the top right corner
Then Select More tools and then click Clear browsing data
Set the frequency at the top, by choosing a time range. If you opt to delete everything, select ‘All time’, or depends on your choice
Tick the boxes next to ‘Cookies and other site data’ and then ‘Cached images and files’
After that, click on Clear data
Registry Cleaner For Mac
Wait until the clearing is complete. The steps are pretty similar to other browsers too; there are just minor changes as to where to find the settings or menu.
Part 4. Clear Cache on Chrome Using Keyboard Shortcut on Mac
Don’t like the idea of going over manual steps? There is also a quicker way to clear the cache on Chrome and that is to use a keyboard shortcut.
You no longer need to do several steps to go to the clear cache window, all you need is a keyboard shortcut to route you directly.
Chrome Cleaner For Mac Repair
In fact, you can do this to Google Chrome, Mozilla Firefox, and Internet Explorer browsers.

While in any of these browsers, press Shift + Cmd + Delete altogether on your keyboard to open the settings window.
Select the time-frequency in the pop-up window
Tick the box for “Cached Images and Files”
Click on “Clear Browsing Data”
The process is similar to the usual way but a lot quicker since you no longer need to go through a series of the menu.
Part 5. Clear Cache on Chrome via Main Menu on Mac
The third easy way on how to clear the cache on Chrome is via the Mac menu. It’s quicker than the second option and more user-friendly. You will definitely save more time with this process. Here’s how:
Open Google Chrome on your Mac
Go to the menu toolbar
Find and click on Chrome
Choose Clear Browsing Data
Wait for a popup screen to appear and follow the onscreen instructions on how to clear cache completely.
Part 6. How to Clear User Cache on Mac via Terminal
Apart from manual options to clear these files, you can also remove them through the local folders inside your Mac.
Some users find it easy to navigate and manage system files via the terminal. The terminal is the main command line wherein you can easily manage all folders and settings of your Mac.
If you are one of them, you can also clear or empty the cache files using commands. Take note, if you are not familiar with how terminal works, carefully follow the procedures below:
Simply follow these steps:
Mac Cleaners For Free
Launch the terminal by pressing Command + Shift + G
Enter ~ /Library/Caches/
Find Chrome among the apps listed
Select the desired folder and press Command + Delete to erase the cached files
Finally, we have discussed how to clear the cache on Chrome using four manual operations. We learned that Mac offers several processes to delete cache files.
Chrome Cleaner For Mac Os
If you opt for a one-stop solution, you can use FoneDog PowerMyMac toolkit, you can take advantage of its other features apart from just clearing caches and junk files. Find out which option works best for your needs!
Best Chrome Cleaner For Cars
Comment ()
0 notes
Text
Ways to Uninstall Updates Manually on Windows 10
Windows 10 updates sometimes might cause problems like performance issues, system crashes, and more to your computer. It’s better to uninstall Windows 10 updates from time to time, and believe us; these steps will help you make your computer or devices fast and smooth. You will learn the basic steps to uninstall Windows 10 updates manually.

Steps to Uninstall Windows 10 Updates Manually
Below are the very basic steps that help you uninstall updates manually on Windows 10 and you can try these methods at home. Let’s start.
Use Settings
You can also use the Settings app to uninstall Windows 10 updates on your computer. See the steps below.
Click on the Start menu.
Open the Settings app.
Tap on the Update & Security.
On the new window, click View Update History.
Click on the update that you wish to delete.
Write down the KB number of the patch.
Select the Uninstall updates.
Open the Control Panel on your computer and search for the update using the KB number.
Click on a particular update that you want to uninstall
Tap on the OK button to uninstall the update.
Note: If you forgot or not sure about the KB number of any update. Open Control Panel and click on the installed on data filter to check the latest update.
Use DISM Tool
To uninstall Windows 10 updates manually on your computer, use the DISM tool.
Open Command Prompt Window and enter the below command.
dism /online /get-packages | clip
Click on the Notepad option and copy-paste the content from the clipboard.
On Notepad, use the Find feature to check if any faulty update is installed.
Note: You can’t find some updates using their KB ID. You are required to enter the last three or four digits of the build number.
Once you are done, copy the package identity of any Build.
Enter the command to remove updates dism /Online /Remove-Package /PackageName:[package_ID].
On the same command, after replacing the package id enter the following command.
Once you are done with the steps, tap on Y to restart your system.
Use Control Panel
Open the Control Panel on your device.
Click on Uninstall a Program option.
On the Program and Features window, tap on View Installed Updates.
You will see a list of installed updates on your screen. It includes updates for software as well as for Windows 10.
Click on the Microsoft Windows section and select the update that you wish to remove.
Press the Uninstall button.
Once you click on the uninstall button, Windows 10 will ask you to confirm. Click on the Yes option.
Use Command Prompt
You can also use Command Prompt to uninstall Windows 10 updates manually. To use Command Prompt, you need to know the KB number of the update.
On your computer, open the Windows search.
Type cmd.
Choose Command Prompt.
Tap on Run as an Administrator.
Enter the below command once you replaced the KB ID.
uninstall: wusa /uninstall /kb:[id]
Press Y to restart the system and finish the uninstallation.
To automatically restart your system once the update is removed. Use the below command.
wusa /uninstall /kb:[id] /quiet
Use Advanced Options
You can also uninstall updates manually on Windows 10 using Advanced Options. See the below steps.
Open the Settings app on your device.
Click on the Update & Security > Recovery option.
Tap on the Advanced Startup option.
You will see the Advanced Startup screen. Click on Troubleshoot.
There will be two options, Reset this PC and Advanced Options, click on the Advanced.
Tap on the Uninstall updates.
On the same screen, you will see two options: Uninstall latest feature update or Uninstall latest quality update.
Once you select an update to install, you need to login to your Windows 10 using your username and password.
Click on Uninstall quality update and Uninstall feature update and remove the update.
After clicking, restart your PC.
Now, the Windows update has been removed from the system.
Conclusion
You can uninstall Windows 10 updates manually now by applying some techniques, like Control Panel, Command Prompt, Settings, Advanced options, DISM toll, and more. These steps will help you make your computer run smooth and fast.
Ella johnson has extensive expertise in Microsoft Office and has spent a good part of her life working in the technical industry. Ella has written several technical blogs, manuals, and reviews for several renowned websites.
Source: Ways to Uninstall Updates Manually on Windows 10
0 notes
Text
All About Google Chrome
What are the best resources for anonymous browsing? What are the best lightweight browsers for Android? What are the best resources to access the dark web? Google Chrome is Google's web browser. With it, you can open web applications and games without any hassle and, most importantly, quickly. This is the main alternative to Firefox and Internet Explorer.
Chrome is a fast, young browser that can browse any web page. It supports all major technologies and standards such as HTML5 and Flash. With Google Chrome, as well as loading web pages, you can run complex web applications for free, such as Angry Birds and Chrome Remote Desktop. In short, Chrome is basically designed to be a operating system in an operating system, the window through which you run all your applications. In fact, it's the essence of Chrome OS. When signing in to a Google Account,
Chrome is able to sync browsing data and tabs between multiple computers and devices. This is a very useful option if you are using Chrome for Android or iOS. Private browsing mode, a navigation mode that does not save any file on the hard disk is ideal for privacy: no cookies stored and no images to leave traces. A unique feature of Chrome is its support for multiple users, which allows shared use of Chrome on a single computer, which is essential if you have visitors who want to connect or if you do not only one computer.
Finally, Google Chrome can be customized and improved with extensions and themes. There are thousands to satisfy all tastes and needs. You can even create them yourself. Google Chrome is a very easy program to use. Its unique bar, Omnibox, lets you enter web addresses and search for Google. Based on what you've written, Google Chrome will show you results from your browsing history, favorite websites, or apps you've already installed.
The quick start page, which allows you to access the sites you visit most often, your favorite web applications or your recently closed tabs (on your PC or on other devices you have synchronized) is another key point. Finally, the Google Chrome options panel is a single page where you can instantly find the settings you want to change. It's much more fun to use than the typical window full of tabs you'll see in Firefox and Internet Explorer. Clearing the navigation data is easy.
Go to the Chrome Tools menu and Optionsopen the Advanced panel. There, click Clear Browsing Database and choose the period and type of data you want to delete. When it comes to the Incognito mode, it is activated in the Tools menu or by pressing Ctrl + Shift + N. You will see how the window subtly changes in appearance to indicate that you are browsing now without saving the data on your PC. From a system point of view, with its V8 engine, Google Chrome is at the head of the competition in terms of comparative speed. This performance improves with each version.
Compatible with all Web standards such as HTML5 and Flash, Chrome loads PDF files with its own viewer. You do not have to worry about installing plugins or changing options: Chrome does it all. More and more people are using Google Chrome as the primary browser. Its attractive design, superior speed and customization options make it a solid candidate to take the lead in the browser market.
The best alternatives? Only Opera and Firefox can hope to compete. This is the best search engine I have ever encountered. It always displays the right information and its easy to use ot ...More. I like it, but I did not simply uninstall it because it did not respond and by referring it to the support, in which ... More. it is easier for the beginning user to compare themselves to other navigation tools. More. it is easier for the beginning user to compare themselves to other navigation tools. More. its totally awesome! is the best internet browser! .. More.

The name and logo of Softonic are registered trademarks of SOFTONIC INTERNATIONAL SA Opera - the browser of the user of the virtual private network Note: Nunca publicaremos nada sin tu consentimiento Do you think about Google Chrome? We recommend it? Why? We use own and third-party cookies to improve our services and experience, including personalizing ads, providing social media functionality, and analyzing our traffic. your use of our site with our social media, advertising and analytics partners.If you continue to browse, you are considered to have accepted this use.
You can change your preferences of cookies and get more information here. Log in to the VPN extension of your browser with One click to secure your connection instantly Choose from 148 VPN server locations in 94 countries Prevent Internet traffic from going out of the VPN tunnel if your VPN connection falls down. Prevent unauthorized entities such as your Internet Service Provider or DNS from seeing what you are doing online. Prevent websites from discovering your true IP address and location. You can perform silent installation of google chrome using CMD package.
Set the Google Chrome locale to match the VPN location to which you are connected. Use the Internet securely on public Wi-Fi hotspots. Hide your IP address and the location of the websites you surf. Protect sensitive information from your ISP, third parties, hackers and malicious websites. Access content blocked by firewalls, filters or censorship. Connect to thousands of servers in 148 VPN server locations in 94 countries around the world. Import documents, web pages and other documents directly into your reference library from search engines and academic databases.
Mendeley Web Importer is available for all major web browsers. Click the Chrome extension button to the right of the address bar to save an article or other document. Add your notes to the prompt pop-up window. Click the Mendeley logo in the bookmarks bar to save an article or other document. Add your notes to the prompt pop-up window. If you
3 notes
·
View notes
Text
Solved: SPIN_LOCK_ALREADY_OWNED BSOD Error on Windows 10
The SPIN_LOCK_ALREADY_OWNED error message might make an appearance on your PC, and then the device might reboot constantly. It is the pretty worst error ever seen on the Windows 10 operating system, and it mostly happens due to the software issues. The causes include corrupted drivers, misconfigured settings, Windows system corrupted or missing files, and more. If you are also facing the same error message, then we have got your back, so don’t worry and read this complete guide to fix the ongoing issues.

Solution 1: Turn Off Automatic Restart
By following the below-given steps, you can easily troubleshoot the SPIN_LOCK_ALREADY_OWNED error message on your Windows 10 installed computer:
Head to your Desktop screen.
Locate the This PC icon and then right-click it.
Choose the Properties option.
On the new screen that appears, head to Advanced system settings using the left menu.
In the System Properties window, head to Advanced.
Scroll downwards and then tap on the Settings located under the Startup and Recovery option.
Head to System failure and turn of the feature saying Automatically restart.
Then make a press on the OK option to make changes.
Solution 2: Get into the Safe Mode
The safe mode is indeed helpful in solving the SPIN_LOCK_ALREADY_OWNED error code on the Windows enabled computers, especially the Windows 10 ones. Here ‘s how to enable Safe mode in Windows 10:
Press the Start + I keys on your keyboard to trigger the Settings window on your PC screen.
Then head to the option saying Update &Security.
In the Advanced Settings window, head to Recovery using the left menu.
Head to Advanced startup and then make a tap on Restart now.
Now make your way to Troubleshoot using the Startup Screen.
To continue. head to Advanced Options and go to Startup Settings.
Get to the Restart button.
During the restart process, make sure to turn on the Safe Mode via hitting the F4 key on your keyboard.
Solution 3: Launch the Windows Built-in Troubleshooter
The Windows 10 OS comes up with the inbuilt Troubleshooter tool, which is even capable of solving the BSOD errors on your device. So if you can still manage to get to the startup screen, then follow these steps to solve the SPIN_LOCK_ALREADY_OWNED error:
Head to the Start menu.
Then make a press on the gear-like button to open the Settings.
Now go to Update & Security.
Head to Troubleshoot using the left side menu.
Now get your eyes to the right side screen and find the Blue Screen option
Choose Run the troubleshooter in the Blue screen option.
Solution 4: Deleting the Problematic Windows Files
To solve the SPIN_LOCK_ALREADY_OWNED error, simply delete the bad Windows Updates using the instructions mentioned down here:
Hit the Start + I keys altogether on your keyboard to trigger the Settings window on your laptop or desktop.
Jump to the Update & Security link.
Head to the Windows Update link afterward.
Then go to View update history.
Make a press on the Uninstall updates icon.
Solution 5: Fix the Faulty Drivers via Device Manager
The Windows Device Manager is a perfect place to solve the issues related to outdated and corrupt computer drivers. It is being noticed that the SPIN_LOCK_ALREADY_OWNED error sometimes appears when there are some issues related to your computer. So make sure to install and update all necessary drivers on your computer:
Make a press on the Windows key on your keyboard.
Now, once the Start menu appears, put in the device manager using the keyboard.
Now, choose the most relevant result.
Look for the devices that have the yellow exclamation indication.
Now open that device and expand its drivers.
Make a Right-click on the driver of that yellow indication device.
Head to Update driver from the triggered options.
Follow the On-screen guide to wrap up the driver installation.
Reboot the device to see the changes.
Solution 6: Via Windows System File Checker
It is a perfect solution for solving the SPIN_LOCK_ALREADY_OWNED error since it will find and fix the problematic system files automatically once it is active. See these steps to use the Windows system file checker to fix the issue:
Hit Start+ R keys simulational on your keyboard to trigger Run.
Then put in cmd.
Press CTRL+ Shift + Enter keys to open Command Prompt as an administrator.
Then enter sfc /scannow.
Hi, the Enter key on your keyboard to apply this command and to start the scan.
The issues will be solved automatically.
To enjoy our services more visit on: McAfee.com/activate.
Source Url: https://installermcafee.com/solved-spin_lock_already_owned-bsod-error-on-windows-10/
0 notes
Text
Download Notepad++ MSI

Download Notepad++ MSI. Notepad++ logo 512x512 for System Center Configuration Manager (SCCM) deployments:

Notepad++ 7.8.3 MSI x64
No desktop shortcut;English localization;No AutoUpdater;No PluginsAdmin;Upgradable. Notepad++ v7.8.3 enhancements & bug-fixes: Add the “Expand All”, “Fold All” and “Select/Show current editing file” capacity into Folder as Workspace.Fix restoring line position issue while document is wrapped.Improve Json syntax highlighting.Make filling find field of Find dialog with selected word(s) optional.Make doSaveOrNot dialog simpler when there’s a single file to save.Fix auto-insert {} imbrication not working issue.Make cmd cli (for “Open Containing Folder in cmd”) customizable.Prevent from setting Updater’s Proxy as Notepad++ is not in Admin mode.Disable file association settings when Notepad++’s no admin right.Fix incremental search bar “highlight all” option not conserved bug.Enhance SQL syntax highlighting (add 2 more keyword lists).Fix too small buffer issue during add text macro playback.Fix “Close All Unchanged” not working issue for sub-view.Eliminate garbage displaying in Find-result fold margin. Don’t forget support Authors. Notepad++ v7.8.3
Notepad++ 7.8.2 MSI x64
No desktop shortcut;English localization;No AutoUpdater;No PluginsAdmin;Upgradable. Notepad++ v7.8.2 enhancements & bug-fixes: Add key shortcuts in Save or not dialog.Add find in files filter excluding ability.Add “Open UDL folder” command.Fix issue of showing save dialog twice while cloned file is dirty.Enhance “Open Explorer” command in Folder as workspace with expected path.Fix tab dragging issues.Enhance “Close all but This” and “Close all to the left/right” commands while files are dirty.Enhance “In Selection” option in Find dialog.Fix Notepad++ blocked in notification zone issue.Make end-of-line conversion operations macroable.Fix “View Current File In” commands disabled problem in some situations. Notepad++ v7.8.2
Notepad++ 7.8 MSI x64
No desktop shortcut;English localization;No AutoUpdater;No PluginsAdmin;Upgradable. Notepad++ v7.8 enhancements & bug-fixes: Upgrade Scintilla from 4.1.4 to 4.2.0Fix non Unicode encoding problem in non-Western language(Chinese or Turkish).Add “No to All” and “Yes to All” options in Save dialog.Add the command line argument “-openFoldersAsWorkspace” to open folders in “folder as workspace” panel. Example: notepad++ -openFoldersAsWorkspace c:\src\myProj01 c:\src\myProj02Enhance plugin system: allow any plugin to load private DLL files from the plugin folder.Fix File-Rename failing when new name is on a different drive.Make “Clear all marks”, “Inverse Bookmark”, “Remove Consecutive Duplicate Lines” & “Find All Current Document” to be macro recordable.Make “Command Argument Help” MessageBox modal.Fix Folder as Workspace crash and “queue overflow” issues.Make Combobox font monospace in Find dialog.Fix folding in user-defined languages for non-windows line endings.Fix crash of Folder as Workspace when too many directory changes happen.Fix ‘-nosession’ overwrites config.xml issue.Fix the crash due to NPPM_DESTROYSCINTILLAHANDLE message.Improve GUI in Find dialog for Find Previous & Find Next buttons.Fix Sort Line as Integer regression.Add more OS information to debug info.Fix tab dragging issues under WINE and ReactOS.Fix indent indicators continue to following code blocks for Python.Fix Python folding collapse issue.Fix crash when sorting “out of range” columns.Fix find 2 times for the same occurrence in both original and cloned documents issue.Fix command line issues where filenames have multiple white spaces in them.Fix Document Peeker constantly changing focus problem.Make backward direction checkbox be also on Find dialog’s Mark tab.Add 2 new columns for HTML Code in the Character Panel.Fix “clear all marks in find dialog also removes bookmarks” issue.Enhance supported language (on function list or auto-completion): LISP, BaanC,(PL/)SQL & COBOL. Notepad++ v7.8
Notepad++ 7.7.1 MSI x64
No desktop shortcut;English localization;No AutoUpdater;No PluginsAdmin;Upgradable Notepad++ v7.7.1 enhancements & bug-fixes: Fix drag and drop tab regression: dragging tab is switched to another tab issue.Fix an input regression: Cyrillic, Turkish and other languages input issue in ANSI mode.Fix an ASP regression: VB looses syntax highlighting in ASP document.Fix Reload dialog displaying issue during File Monitoring.Fix “unhide lines” markers disappears issue.Fix Plugin menu is not localized issue if no plugin installed.Add “Copy File Name” command in context menu of “Folder as Workspace”.Fix crash while sorting lines with numbers longer than 20 digits.Enable Scintilla Virtual Space Option change from macro.Add Tcl, CMake and AutoIt keywords; add Python and SQL new syntax highlighting cathegories. Notepad++ v7.7.1
Notepad++ 7.7 MSI x64
No desktop shortcut;English localization;No AutoUpdater;No PluginsAdmin;Upgradable. Notepad++ v7.7 new feature & bug-fixes: Continue Microsoft binary code signing thanks to the offer from DigiCert (again).Upgrade Scintilla from v3.56 to v4.14.Fix a regression of memory issue while reloading a file.Fix cursor flickering problem after double clicking on URL.Make Python files default to using spaces instead of tabs.Add "Count in selection" option in Find dialog.Add Ctrl + R shortcut for "Reload from disk" command.Fix '\' display problem in CSS while using themes (Remove Batang font for CSS tags).Fix crash while right clicking on DocSwitcher's column bar.Fix all plugins being removed problem while Plugin Admin romoves an old plugin (of old system). Notepad++ v7.7
Notepad++ 7.6.6 MSI x64
No desktop shortcut;English localization;No AutoUpdater;No PluginsAdmin;Upgradable. Notepad++ v7.6.6 bug-fix: Fix crash issue inserted by adding an enhancement for retaining read only setting state in session. Notepad++ v7.6.6
Notepad++ 7.6.5 MSI x64
No desktop shortcut;English localization;No AutoUpdater;No PluginsAdmin;Upgradable. Notepad++ v7.6.5 enhancements & bug-fixes: Security enhancement: GPG Signature is provided for Notepad++ release.Fix a long waiting issue about file auto change detection: enhance "File status Auto-Detection" to avoid switching editing tab off behaviour.Fix encoding (language) detection regressions since v7.6.Fix a regression: double-clicking on a "find all in current document" result for an unsaved doc prompts to save it.Added close all unchanged tabs command.Restore deleted "Launch in browser" customized shortcuts in EU-FOSSA bounty program by implementing them in more secure way: Add "View CurrentRetain read only setting state in session.Enhancement: after file reload user can still undo.Fix a bug in command "Remove Consecutive Duplicate Lines" and make it work with old Macintosh EOL.Fix UDL language marker bullet position, if UDL Name exceeds 14 characters, extend UDL names to max 64 characters.Enhance external call code to avoid eventual arbitrary commands execution. (EURO-FOSSA)Fix crash issue by command "On Selection->Open File" while the number of selected characters is exceed 2048. (EURO-FOSSA)Fix crash issue of User Define dialog while deleting a unallocated entry. (EURO-FOSSA)Fix crash issue on shortcut command while its length exceed 260. (EURO-FOSSA)Add an enhancement on "Open..." command to prevent from the eventual crash. (EURO-FOSSA)Fix stack Buffer Overflow in Command::extractArgs. (EURO-FOSSA) Notepad++ v7.6.5
Notepad++ 7.6.4 MSI x64
No desktop shortcut;English localization;No AutoUpdater;No PluginsAdmin;Upgradable. Notepad++ v7.6.4 new features and bug-fixes Add Markdown in zip packages and fix Markdown not working in installer package of v7.6.3.Switch from certificate verification to hashes verification due to "Notepad++" is rejected by certification authority.Enhance User Defined Language System for supporting more than one UDL file. Here is new behaviour.Add "Remove Consecutive Duplicate Lines" feature to remove duplicate consecutive lines from whole document.Add new shortcut "shift + scroll" for horizontal scrolling.Add Stack Overflow as search engine.Add the capacity to rename non-existing document's tab.Fixed file open hang issue in old style mode.Fix "Find in files" tab translation issue on initial dialog call.Fixed macro playback junk characters display issue on Find dialog.Ensure each recorded command is playable before playing to avoid exploit in hacking. (EURO-FOSSA)Enhance "Search on Internet" command to avoid command hijacked. (EURO-FOSSA)Fix buffer overrun in Print dialog. (EURO-FOSSA)Load nppPluginList.dll as resource instead of binary for the sake of security. (EURO-FOSSA)Check Updater's authenticity before its each launch to prevent from hijacking. (EURO-FOSSA)Fix stack buffer overflow in WordStyle dialog. (EURO-FOSSA)Fix stack buffer overflow issue on User Define Language dialog. (EURO-FOSSA)Prevent eventual DLL hijacking while loading plugins. (EURO-FOSSA) Notepad++ v7.6.4
Notepad++ 7.6.3 MSI x64
No desktop shortcut;English localization;No AutoUpdater;No PluginsAdmin;Upgradable. Notepad++ v7.6.3 new enhancement and bug-fixes Add Markdown language (Markdown++), in UDL, included only in installer.Move plugins home from %ProgramData% to %ProgramFiles% for the sake of security.List plugins in alphabetical order in Plugins Admin dialog.Fix loading unexpected dll as plugin issue. (EU-FOSSA)Fix stack overflow issue while affecting "ext" field on stylers.xml. (EU-FOSSA)Fix stack overflow in XML Parsing. (EU-FOSSA)Fix a remote code execution vulnerability via "Open containing folder" command. (EU-FOSSA)Fix EXE Hijacking of gup.exe launched by Notepad++. (EU-FOSSA)Fix crash issue due to heap overflow in clipboard history panel. (EU-FOSSA)Remove run external exe entries for avoiding to execute eventual hijacked binaries. (EU-FOSSA) Notepad++ v7.6.3
Notepad++ 7.6.2 MSI x64
No desktop shortcut;English localization;No AutoUpdater;No PluginsAdmin;Upgradable. Notepad++ v7.6.2 new enhancement and bug-fixes Fix Plugins Admin unzip (0 lengh) bug.Add generation of SHA-256 hash feature.Add Plugins Admin module into portable version (zipped package).Add new feature: double click splitter resets panes to equal size.Fix the plugin crash issue due to the inexistent plugin conf path. Notepad++ v7.6.2
Notepad++ 7.6.1 MSI x64
No desktop shortcut;English localization;No AutoUpdate;Upgradable. Notepad++ v7.6.1 new feature & bug-fixes Several bug-fixes & enhancement on Plugins Admin.Notepad++ will load plugins from %PROGRAMDATA% instead of %LOCALAPPDATA%.Fix installer's plugins copy issue under Linux (by using WINE).Fix Installer HI-DPI GUI glitch.Fix "Import plugins" not working issue.Fix printer header/footer font issue.Make installer more coherent for the option doLocalConf.xml.Make text display right in summary panel. Notepad++ v7.6.1
Notepad++ 7.6 MSI x64
No desktop shortcut;English localization;No AutoUpdate;Upgradable. Notepad++ v7.6 new feature & bug-fixes Add Built-in Plugins Admins. Users can install, update and remove plugins by some clicks via Plugins Admin.Change plugin loading method: Remove the legacy plugin loading way and apply only the new plugin loading method.Add new message NPPM_GETPLUGINHOMEPATH in Notepad++ API for plugin, so plugin can get its path easily.Fix a regression of performance issue while word wrap option is enable.Fix a performance issue for switching back to folded document.Fix crash issue due to Unix style path input in Open file dialog.Fix UTF-8 detection problem: 4 byte characters UTF-8 character can be detected now.Enhance/Fix encoding detection/problem.Fix auto-indent issue by typing Enter on empty line.Fix "Close all but this" behaviour if multiple views are present and some files are dirty.Fix tool tip in document switcher showing the old name issue (after being renamed).Add autoit and lua autoCompletion. Notepad++ v7.6
Notepad++ 7.5.9 MSI x64
No desktop shortcut;English localization;No AutoUpdate;Upgradable. Notepad++ v7.5.9 bug-fixes and enhancements Fix hanging problem while switching back a fully-folded document by using shortcut (Ctrl-TAB).Fix possible file corruption during backup or power loss or other abnormal N++ termination.Fix wrong backup file deleted issue.Fix backup not fully disabled issue.Add 2 command line flags "-notepadStyleCmdline" and "-z" for the replacement of notepad.exe.Add new plugin API NPPM_REMOVESHORTCUTBYCMDID to allows plugins to remove unneeded shortcuts.Fix Tail monitoring incoherent status after deleting a monitored file.Fix issue with wrong smart highlighting when it is disabled.Fix last active tab is ignored on Notepad++ restart issue.Fix Tab non-responding by mouse click after dragging bug.Fix switching back position restoring issue for wrapped document.Add several spiritual quotes and a subtle Easter egg in the source code. Notepad++ v7.5.9
Notepad++ 7.5.8 MSI x64
No desktop shortcut;English localization;No AutoUpdate;Upgradable. Notepad++ v7.5.8 bug-fixes Remove annoying "no update" notification.Fix Folder as Workspace not updating regression.Fixed crash issue by checking & unchecking "Disable extension column" option in preferences dialog.Fixed a crash when trying to launch a secondary instance with command line arguments.Fix "Explorer Here" from "Folder as Workspace" problem if folder name contains comma. Notepad++ v7.5.8
Notepad++ 7.5.7 MSI x64
No desktop shortcut;English localization;No Updater;Upgradable. Notepad++ v7.5.7 bug-fixes Fix hanging problem while shutdown and backup file is absent.Fix Sort Lines as Integers issue: use Natural Sort algorithm.Fix JavaScript not working regression in Function list.Fix Open File Dialog error for a long path.Fix document map display bug when the view is scrolled past the end of the file.Fix tool bar display bug in big icon mode issue.Make caret line always visible on click from Finder panel.Fix UDL export extension issue.Fix Run Macro multiple times dialog display glitch after deleting a Macro. Notepad++ v7.5.7
Notepad++ 7.5.6 MSI x64
No desktop shortcut;English localization;No Updater;Upgradable. Notepad++ v7.5.6 enhancements & bug-fixes Fix macro playing back crash issue on new added "find previous" and "find next" buttons.Function List enhancement: Highlight the current function based on cursor position.Fix crash on styler dialog of User Defined Language dialog.Fix file status detection issue under Windows XP.Ghost typing enhancement: Unicode, syntax highlighting and speed support.Add a message from outer space. Notepad++ v7.5.6
Notepad++ 7.5.5 MSI x64
No desktop shortcut;English localization;No Updater;Upgradable. Notepad++ v7.5.5 enhancements & bug-fixes Restore 2 buttons ">" in Find dialog (optional).Fix monitored (tail -f) file not always updated issue.Keep Doc Switcher's ordering in sync with Tab bar.Shortcut Mapper enhancements: Add filter capacity and make dialog resizable and maximizable.Fix for "Toggle Single Line Comment" malfunctioning with HTML/XML.Make Unix style path (slashes) work in open file dialog (optional).Fix tab sticks to mouse pointer problem after external update of a opened file.Fix encoding not sync (on status bar) after reloading.Fix menu items' state is not maintained due to save macro command.Fix line ending changes are not detected in reloaded changed files issue.Fix highlighting of tags in XML files issue.Fix Unicode file name comparison to match Windows behaviour (as opposed to doing a linguistic filename comparison). Notepad++ v7.5.5
Notepad++ 7.5.4 MSI x64
No desktop shortcut;English localization;No Updater;Upgradable. Notepad++ v7.5.4 bug-fixes The Access Violation crash issue has been fixed in this release: the crash is caused by DSpellCheck, but due to disordered notifications sent by Notepad++. Both DSpellCheck plugin and Notepad++ has been enhanced to prevent from this issue.Fix a crash bug due to disordered notifications sent to plugins.Fix encoding broken regression.Improve smart highlighting performance.Auto-completion enhancement: remove unwanted symbols {} for variable names.Add auto-completion for BaanC & CoffeeScript.Fix localization copy regression in Installer. Notepad++ v7.5.4
Notepad++ 7.5.3 MSI x64
No desktop shortcut;English localization;No Updater;Upgradable. Notepad++ v7.5.3 bug-fixes Fix shell extension registration failure in installer.Fix theme files installation failure in installer.Fix DSpellCheck incomplete installation in installer. Notepad++ 7.5.3
Notepad++ 7.5.2 MSI x64
No desktop shortcut;English localization;No Updater;Upgradable. The main new fix: Notepad++ Auto-updater (WinGup) has been upgated fom v4.1 to v4.2 in this release in order to fix Notepad++ auto-updating issue in certain network configuation. Other Notepad++ v7.5.2 new features and bug-fixes Fixed hanging issue while modifying JavaScript TAB settings.Add DSpellCheck plugin into distribution.Add version and other info into installer.Fix an issue while installing a x64 version, x86 version (if it exists) is not removed - and vice versa.Fix display glitch of certificate checking error message.Remove unused/empty entries from shortcut mapper.Add BaanC function list feature.Add batch auto-completion into installer. Notepad++ v7.5.2
Notepad++ 7.5.1 MSI x64
No desktop shortcut;English localization;No Updater;Upgradable. Notepad++ v7.5.1 new features and bug-fixes Fix some excluded language cannot be remembered bug.Fix a localization regression bug.Fix the bug that Notepad++ create "%APPDATA%\local\notepad++" folder in local conf mode.Add Visual Prolog language support.Add auto-completion support for batch file (*.bat).Enhance Function List for PHP and JavaScript.Enhance Shortcut Mapper by adding category column.Make double click work for language menu disabling/enabling in preferences dialog.Make double click work to improve file extension movement in Preferences dialog.Fix bug: language menu item is restored back on the wrong zone.Add a spiritual quote. Notepad++ v7.5.1
Notepad++ 7.4.2 MSI x64
No desktop shortcut;English localization;No Updater;Upgradable. Notepad++ v7.4.2 bug-fixes Add SWIFT language support.Fix replace in files regression.Enhance Find Replace dialog (resizable & remove search direction radio buttons).Fix a crash issue while doing a column insertion on a CJK unicode document.Fix repeated notification dialog for modification from outside of Notepad++.Fix a visual glitchy during tab drag and drop. Notepad++ v7.4.2
Notepad++ 7.4.1 MSI x64
No desktop shortcut;English localization;No Updater;Upgradable. Notepad++ v7.4.1 bug-fixes Fix Notepad++ hanging issue on start up due to its connection on Internet - disable the certification chain verification.Fix the opened zero length file not saving bug.Improve Document Peeker performance issue for large files. Notepad++ v7.4.1
Notepad++ 7.4 x64 MSI
No desktop shortcut;English localization;No Updater;Upgradable. Notepad++ v7.4 new features and bug-fixes Add document peek feature (while mouse hovering on tab).Add peek on document map feature.Fix issue with clicking links in html/js/asp/php.Fix folding vertical line loses colour after changing folding style via Preference dialog.Enhance folding feature (multi-line quotes) for python.Improve certificate verifying method.Fix issue of losing syntax highlighting while changing file extension (by "save as").Enhance the UI of "Windows" dialog (Menu "Window->Windows...") for sorting.Apply the new file custom encoding (Unicode or not) while opening an empty content file.Improve whitespace visibility while the visualization of whitespace is activated.Support RTL for header and footer printing.Add a warning message for launching folder as Workspace while both files and folders are dropped in Notepad++.Drag and dropping tabs is possible in multi-line tab mode.Fix issue of right clicking on multiline tabs.Add new moving tabs with mouse wheel feature (SHIFT + Mouse Wheel)Fix text on active tabs (multi-line mode) being clipped problem.Fix regression for saving session file (for session file extension, if set).Enhance saving workspace file by adding workspace file extension (if set).Fix change.log always opened issue. Notepad++ v7.4
Notepad++ 7.3.3 MSI x64
No desktop shortcut;English localization;No Updater;Upgradable. Notepad++ v7.3.3 bug-fixes and enhancements Fix CIA Hacking Notepad++ issue (https://wikileaks.org/ciav7p1/cms/page_26968090.html).Fix mouse wheel to task list scroll crash bug.Fix flickering issue while switching back after modifying or deleting a document from outside.Support Motorola S-Record, Intel and Tektronix extended hex file formats.Improve multi-line tab: maintaining the selected tab position.Fix add char into word char list bug.Add Shift+Enter in Find dialog for searching in the opposite direction.Fix a regression that delimiter settings is not retained correctly.Add clear command button in shortcut mapper.Enhancement: file extension supported in Load/Save Session dialog if a session file extension is set. Notepad++ v7.3.3
Notepad++ 7.3.2 MSI x64
No desktop shortcut;English localization;No Updater;Upgradable. Notepad++ v7.3.2 new features and bug-fixes Fix crash issue on column mode editor.Fix "Use new style save dialog" setting's regression.Enhance "Open file" command - open a file from editor zone without selecting its full path.Fix word char list settings not applying on next launch issue.Fix block uncomment for line comment bug.BaanC Language is supported.Add error notification on run dialog.Fix the caret position not maintained issue between document move.Fix caret goes to wrong position after word completion.Enhance Function List for supporting language.Add check mark in Language menu.Fix toolbar not showing issue while launching Notepad++ from system tray in some unknown configuration. Notepad++ v7.3.2
Notepad++ 7.3.1 MSI x64
No desktop shortcut;English localization;No Updater;Upgradable. Notepad++ 7.3.1
Notepad++ 7.3 MSI x64
No desktop shortcut;English localization;No Updater;Upgradable. Notepad++ v7.3 new feature and bug-fixes Add MD5 functionalities.Fix the problem of launch Notepad++ with Admin right after installation.Fix a problem of recent file history - add to recent file history only if file is removed from all the views.Get back Find dialog while you lost it (in a multi-screen + laptop configuration).Fix long hyperlinks truncated problem. Notepad++ v7.3 Read the full article
#MicrosoftWindowsServer#MSI#Notepad++#SystemCenter#SystemCenterConfigurationManager#TechnicalPreview#Windows#Windows10#WindowsServer2012R2#WindowsServer2016#WindowsServer2019
0 notes