#do a craft -> the reference pictures or patterns are on my phone
Explore tagged Tumblr posts
Visit Tumblr Blog
Explore Tumblr blogs with no restrictions, modern design and the best experience.
Last Seen Tumblr Blogs


Fun Fact
Tumblr was named as a finalist in Lead411’s New York City Hot 125 in Aug 2010.
Text
Begging people to say to stop using social networks instead of stop using the phone while making a list of stuff you could do instead. Stuff for which I always use the phone
#take a walk -> if I'm alone I'll listen to stuff on my phone#do a craft -> the reference pictures or patterns are on my phone#read a book -> guess what i used to read before i got an ereader#learn a language -> shockingly dictionaries and apps to talk to native speakers and flashcards are also in the phone#phones are fucking useful it's social networks that suck stop having a moral panic over very useful devices goddddd
4 notes
·
View notes
Text
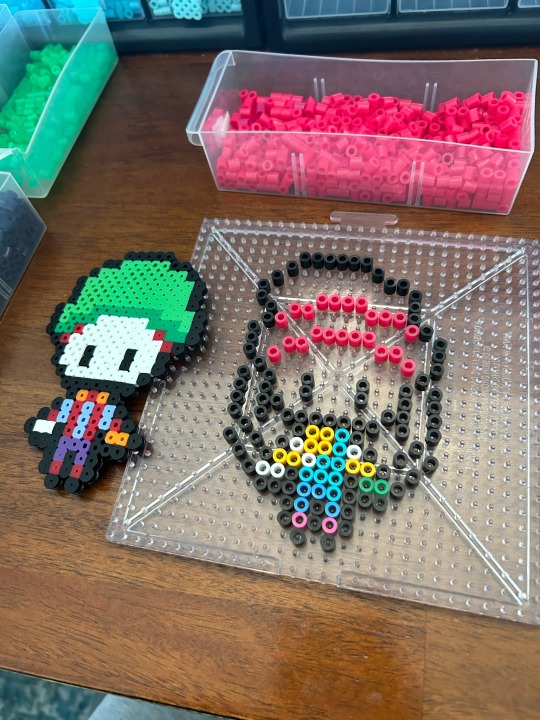
More pixel coaches (and how I make them!)
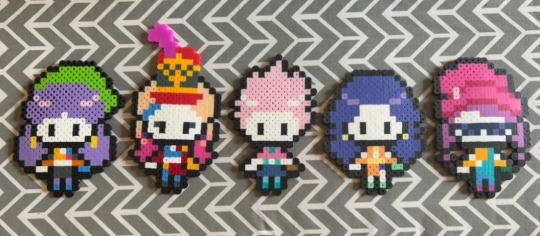
From left to right: Niki (Soy Yo), Moxie (Hollaback Girl), Maps, Fun, and Talk Extreme
I wasn’t going to stop after 100! People have been big fans of these little things and wanted to know how I make them. So I took pictures of the process of creating them. (The full process is under this cut.)
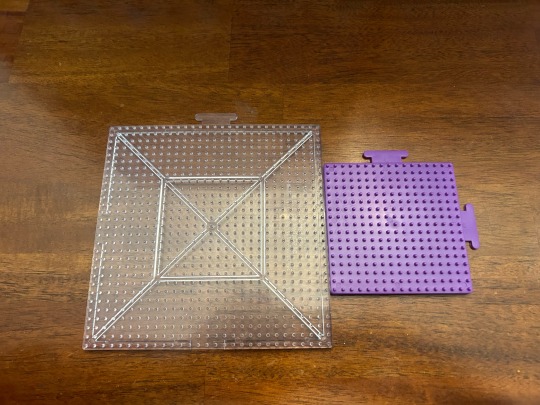
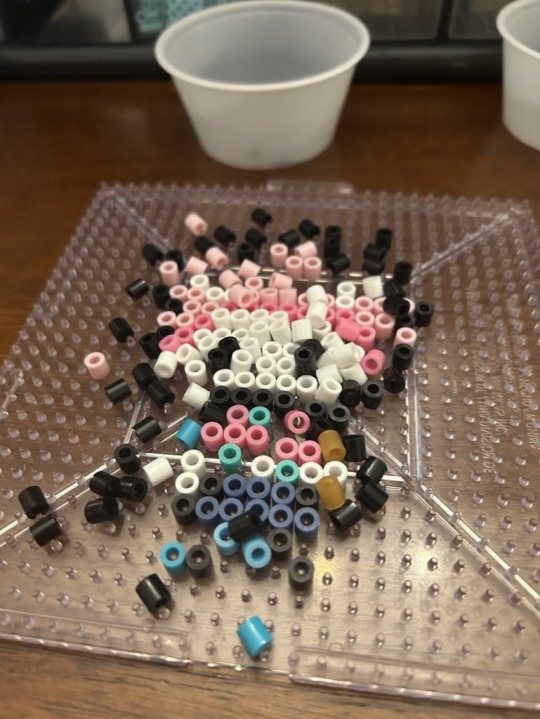
I use Perler beads to make these coaches. They can be found in just about any craft store, or on the official website. I use a large square 29x29 pegboard, although occasionally I connect smaller 17x17 pegboards if the design needs more space, like what I did here with Moxie.

Every design starts out with this simple base right here:
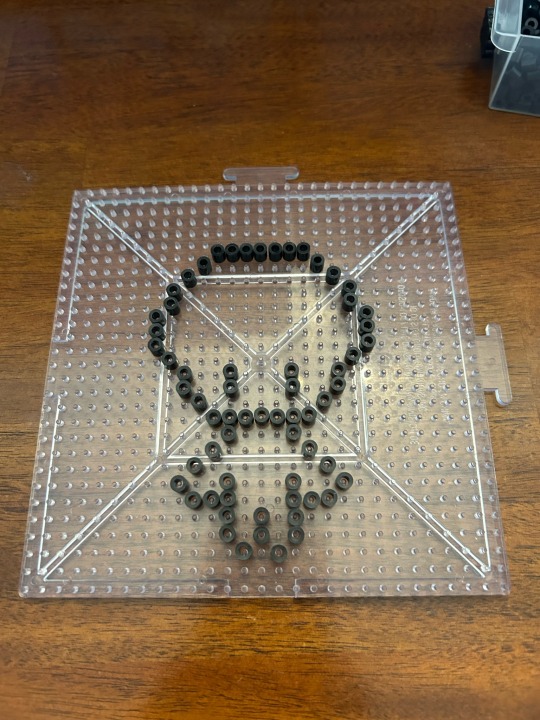
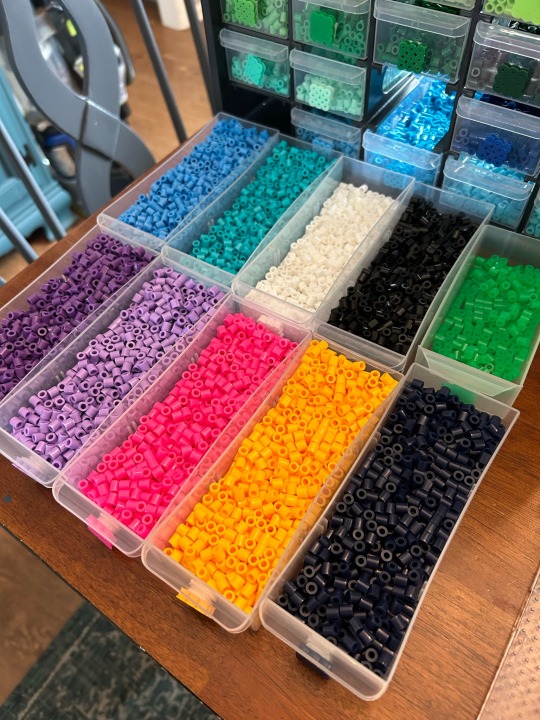
Then I figure out who I want to make and look up references. I choose the color palette from the images and pull out some colors that I might use. Sometimes these can change.
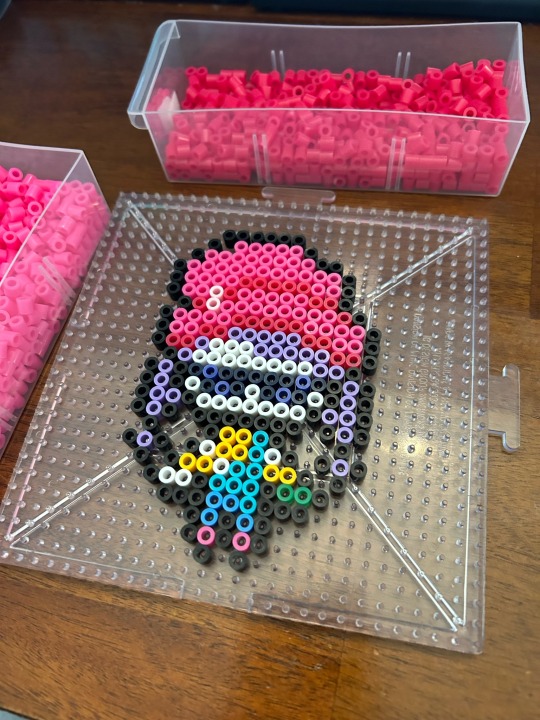
Next, I change the outline of the base, adding and removing beads to shape it into a new figure. Once that’s done, I begin to add color, beginning with the outfit. I outline certain parts that will be filled in with color. Sometimes I look back at previous coaches for help— for example, I looked at Troublemaker for help for the beanie.
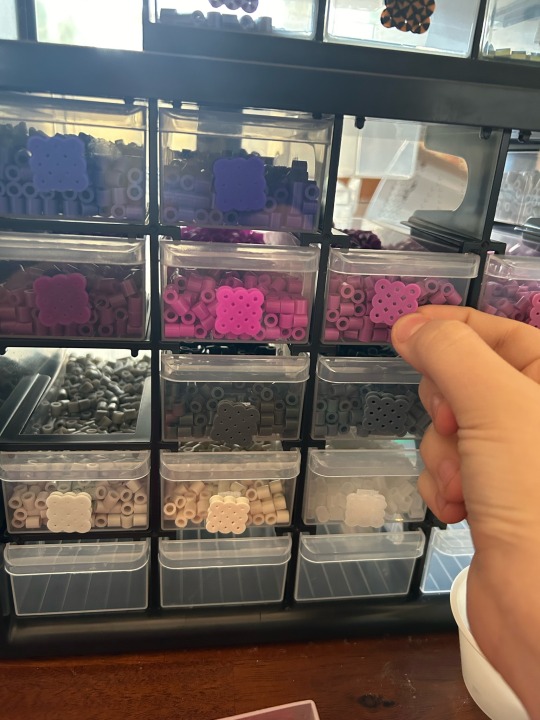
Once the colors are all set, I do one last look-through and change aspects that I feel need changing. For example, I decided to change Talk Extreme’s hair color, since I believed that there was another color that looked more like the original. The way my storage system works lets me take color samples directly off the storage drawers (they’re held there with the power of Velcro) and compare them to the design in front of me. I recommend making a color key for your perler beads, it’s very useful!

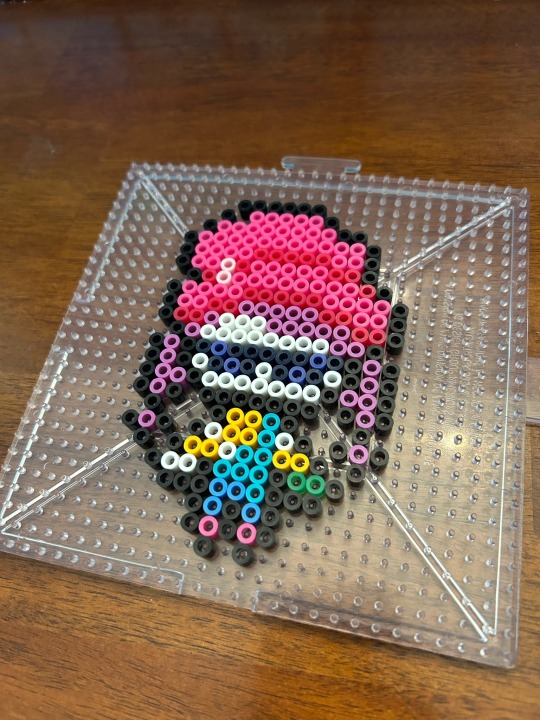
(A brief note: it's important to be aware of what your hands and/or sleeves are doing around the board. Accidents can happen, such as when I dropped my phone onto the pegboard and messed up a 90% done Maps…)
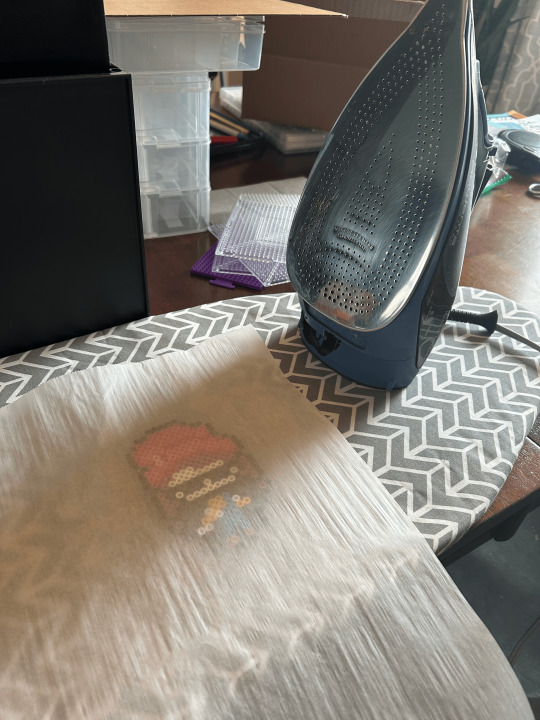
Once the design is finalized, it's time to fuse the beads. I use parchment paper and a basic clothes iron on a normal, non-steam heat setting. It's important to iron in slow circles so that every bead gets melted properly. Certain colors also melt more quickly than others. Once the design starts to show through the paper and the beads' holes become small, it's time to peel the design off the paper and flip it over in order to iron the other side. The back side doesn't need as much time as the front, since the beads are already hot. Depending on the size and complexity of the design, ironing can take 2-5 minutes.

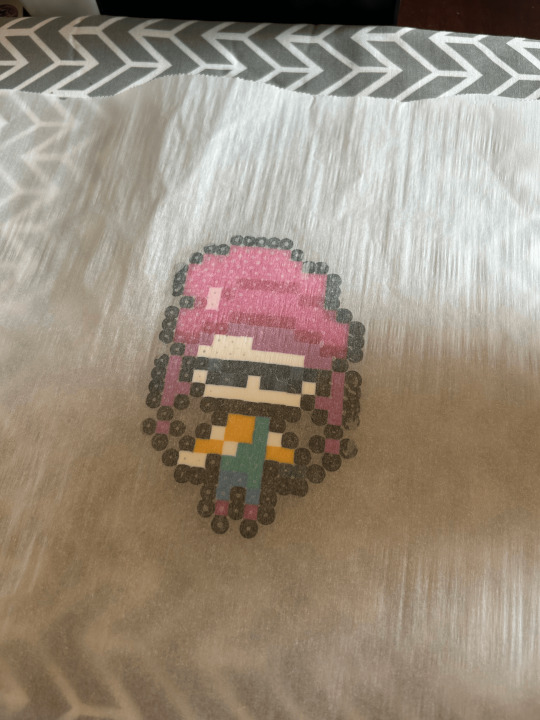

When that side is done, I peel it off, and congratulations, it's done! It's pretty hot, though, so I set it down to cool. Once the plastic has cooled down to a reasonable temperature, it's ready to display.
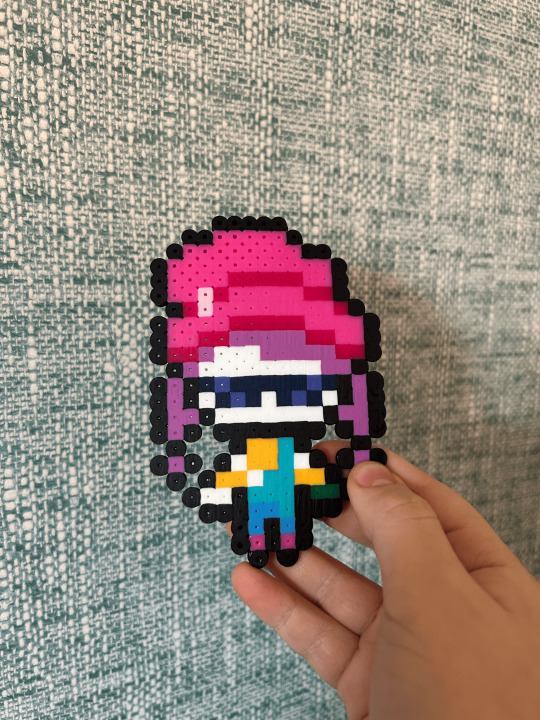
And that's how it's done! The full process can take from 20 mins to almost an hour. I might make digital versions of some of the coaches to use as references for people to make them at home. Who would you want the pattern for the most? I'll be saving these all under the tag #pixel coaches, so if you want to see who I've already made, check that tag out!
#just dance#just dance fanart#perler beads#perler bead creations#tutorial#pixel coaches#very happy with how this turned out
43 notes
·
View notes
Text
WIP WEDNESDAY
I should be working on any of the many WIPs I have, but NO! I have fleshed out the thoughts surrounding craft appreciator Simon "Ghost" Riley from this post.
The ramblings on discord came to about 1.5 k, and the first 20% of that has translated to 2.6k words, so this one is gonna be a monster when I finally post it.
Two days later, Simon sees her. Even though she’s wearing a purple, cloth mask over her nose and mouth, there’s no mistaking the scarf he just watched her finish making. And the matching, slouchy hat she’d finished a few videos before starting the scarf. She’s across the street from him, squinting down at her phone as she waits to cross. A tote bag bulges under her arm, a baguette sticking up over her shoulder. When she leans a bit and crosses her ankles to keep her balance, it strikes him that she looks like a picture.
He snaps a quick photo of her before he gives it a second thought. The shot is off center, but in a way some people might call charming. The camera automatically focuses on her, dark red accessories jumping forward against the black and grey outerwear of the people around her. It’s amazing how much detail the image picks up, how the knit pattern is easily visible.
The light changes, and Simon steps into the zebra crossing as he pockets his phone. The woman looks up as she starts crossing, eyes snagging over his height before sliding off as they pass each other.
The whole time he’s in the shops, he thinks about her. Takes his phone out of his pocket to look at her again as he contemplates cereal. Ponders just how soft she looked as he loaded his basket with vegetables. Realizes in an odd, distant way, that he finds her attractive as a person in the world, not just a voice and soft hands on a screen that lull him to sleep. The distraction is nice, he decides. Better than ruminating on mission objectives, anyway.
When he gets home, he cues up one of her videos on the telly. It’s an old one, the first one with the hat he saw her wearing today, which he knows she’ll unravel and restart two videos later. She’s reviewing a science fiction book, Annihilation, except it’s more that she’s picking out the differences between the book and the movie. By now, Simon’s read it, but he’s not really interested in the film, so he lets her voice wash over him as he puts his groceries away.
Then he sits on the couch and really looks at her. Knocks back a couple beers and eats not enough left over chicken korma as he admires the shape of her hands, the light and shadows that play off of her knuckles. He lets his eyes drift up her forearms, the flex and relax of her biceps. She leans forward, every now and again, fixing the yarn, picking up her book for a reference, chasing her cat, Small Man, away from her materials. It changes the shape of her loose blouse over her chest, calls attention to the pendant that dances across her collarbones. She shifts her weight from hip to hip, showing the barest hint of the soft curve of her arse before she adjusts the blanket over her lap.
It’s not that she’s alluring. It’s that she’s comfortable. Actually comfortable, not the faux-lounging that models do in magazines with tousled hair and lingerie peeking out from under an oversized shirt. He can’t quite pretend that she doesn’t know she’s got an audience - she’s talking directly to the listener, the warm lamp is positioned just so, and she’s probably wearing more makeup than he can really discern. But she doesn’t play up to the camera. She just… talks. And knits. And sips tea from a mug that demands I Put My Book Down For This?!
#wip wednesday#dragonnarrativewrites fanfiction#manic pixie dream ghost#i'm on my knees mouth wide open for diorama loving simon riley#parasocial relationship ghost my beloved#i am very excited for this one because I feel like I have an outline that actually works
12 notes
·
View notes
Note
hello hi chiqui! you've been talking about fashion a lot lately and it got me pretty interested in it! I've never been the sort of person to really care about clothes but i still want to look good, so i just go with whatever is popular at the moment however, i feel like i wanna go a step further and start crafting my personal style, do u have any tips for me? 🤲😸
omg hiiii ur so sweet i love u <3333 so first i wanna say that there's nothing wrong with following fashion trends and "not having 'personal style'" after all trends are just guidelines for people that feel like putting effort into clothes is not worth it and that's valid... it's like me asking around what phone should i buy bc i want a pretty one but idk what makes a good phone??????
now for creating a personal style i would say that the key is learning what type of clothes work for u and make u feel ur best... for me it's skirts, dresses (a line and slip) and blouses, on the other hand i have a hard time looking for pants that fit right so i just have a pair and for the most part I don't use it....
so once u know what clothes u like and have a couple of basics, u can start leveling up with sticking to a color palette, a specific subculture or aesthetic and stuff like that. start looking for inspiration and references, it can be pictures or if ur feeling like it watch runway shows. what u have to do is deconstruct the pictures or the fashion shows u like the most, ask yourself what u like about them and find a pattern... is the silhouette, the fabric, the styling, the colors, the story (or vision) the clothes are telling, or how everything looks sleek or mismatched? ? other way to go abt this is find what garment is missing in your wardrobe that shows up constantly in these references and buy it ... like trying to fill in the blanks of ur basics...
i don't really know if this is of any help bc this crafting process came to me pretty organically ʕ·ᴥ·ʔ nd i haven't tried any of these steps LMAO but they make a lot of sense to me and if i were to look for my personal style rn this is the way i would probably do it !!!
#hope this helps angel 💗💗💗💗💗💗#also don't stress abt it ... the important thing abt this is to have fun !!!#mail
13 notes
·
View notes
Text
Watching My Diet.
Of Words and Images, That Is.
As for a spoiled life, no life is spoiled but one whose growth is arrested.—Oscar Wilde, from The Picture of Dorian Gray.
1.
When I was pregnant, I was astounded by the amount of shit-advice people felt entitled to force upon me, thanks to the visual whistle-blower of my growing belly.
I kept the book, Ina May’s Guide to Childbirth, by Ina May Gaskin next to my bed like a sacred text. The second half of the book contains a collection of empowered women sharing inspiring stories of their natural birth experiences. I read at least one story every night to off-set the deflating stories that were pushed at me. (One, still clear as day in my mind over a decade later, came from a woman who had never had kids! She said, in low tones and with concern in her eyes, “It’s the most painful thing you will ever experience. You WILL NEED DRUGS.”)
I would often fall asleep with Ina May’s book on my chest, thinking maybe the positive messages would cause seep into my being, like a topical treatment.
Now, during the era of COVID19, the news is an IV drip of mounting catastrophe into all of our collective veins. And the way we receive news during these current times is 24-7, on screens, visual, relentless and without limits. (PS: as said in Time, “media images can be so intense that they can cause symptoms of acute stress or even PTSD.”)
Like many, I find myself falling into the habit of using my few-far-between windows of space to either read updates from the Post and the Times, or to check social media. While informative at best, these word-venues are, nutrient-wise, anemic crumbs not suitable for a bottom-feeder.
So why the impulse to keep going back?
According to Time Magazine, “The human brain is wired to pay attention to information that scares or unsettles us—a concept known as “negativity bias“. Meaning, our brains are predisposed to go negative, and the news we consume reflects this.”
On a personal level, my intake of news is rising by the day—sometimes seemingly out of my control. I’ll just be grabbing my phone to check the weather and suddenly I’m well into an article on the pandemic, as if in a trance.
Without clear boundaries and a bit of mindfulness, the news and media we are ingesting can be far more toxic than beneficial. The effects of constant negative-news consumption are real and complex.
And I feel the wear-and-tear in my mental state, to be sure. I’ve been taking in the news every night, just before bed, via my tiny phone screen as if that makes it less potent and more manageable. Not the case. I can easily slip into helplessness, along with tasting the vinegar of potent rage in the back of my throat, even as I’m trying to settle in for sleep.
Anxiety and stress create cortisol, which can wreak havoc throughout the physical body and beyond. My neck and shoulders feel like they are clutching with white-knuckles for some unseen disaster, pretty much all the time. Yoga and breathing provides a world of help while doing it, but the muscle memory is so deep, that the bad patterns often return within moments of back-to-life.
This is not to say the solution is to bypass the news entirely. But if we are in this for the long haul, deliberate choices need to be made, for the stability of everyone.
2.
Last week, my dear friend, Steph, mailed a box of crafting goodies to my girls. An eclectic mix of junk-drawer extractions and art things—things that have the potential to clutter up a house. But, when assembled in a package with intention and love, feel like vintage treasures from another world. Girl scout patches, circa the early 1990’s, ribbon in original packaging from the Carter administration, an untethered bouquet of white plastic glitter flowers. And in the midst of this treasure chest: a hardcover copy of the Oscar Wilde book, The Picture of Dorian Gray.
It was a fancy, old-timey edition that I had read through and written-in during college, using the same red ink from the same red pen the whole way through. My handwriting is young—an un-mastered version of my current script. But my brain is searching and inquisitive. I’m not sure why Steph wound up with the book, but there was a time when I passed out Oscar Wilde books like a communist would pass out propaganda and I likely forced it upon her.
Back then—over twenty years ago, more than half my current age—Oscar Wilde spoke to me in a way I was not accustomed to being spoken to, and brought about feelings that literature rarely provided. I indulged in Him, collected photos, quotes, and bought multiple used copies of his books. He became an unwitting spiritual guide of sorts. I carried the story of his tragic incarceration and subsequent death with me the way a god-fearing man would hold the image of Jesus’ crucifixion close to his heart. If they sold Oscar Wilde on a necklace, I’d have bought one, for sure.
Placing my hands on the cover of that book—while my girls squealed and unpacked the rest of the boxed treasures—was not far from the feeling of placing my hands on a body to massage. Flesh—living, breathing flesh. Cracking open the book brought with it not only the slight sigh that takes place in the inner ear during a good stretch, but also a swell of emotions. I flipped through the pages, feeling saved.
The article, What You Read Matters More Than You Might Think, in Psychology Today discusses the difference between “deep and light reading.” Deep reading is defined as reading that is slow, immersive, rich in sensory detail and emotional and moral complexity. It is distinctive from light reading, which is little more than the decoding of words. The author continues by saying deep reading is great exercise for the brain and has been shown to increase empathy, as well as inspiring reflection, analysis, and personal subtext to what is being read.
A passage from The Picture of Dorian Gray—”Words! Mere words! How terrible they were! How clear, and vivid, and cruel! One could not escape from them. And yet what a subtle magic there is in them! They seemed to be able to give a plastic form to formless things, and to have a music of their own as sweet as viol or of lute. Mere words! Was there anything so real as words?”
Another passage (how can I resist?): “In this country, it is enough for a man to have distinction and brains for every common tongue too wag against him. And what sort of lives do these people, who pose as being moral, lead themselves? My dear fellow, you forget that we are in the native land of the hypocrite.”
How I missed that man. And what a time for him to pay a visit.
3.
Last weekend, I was feeling particularly ill-at-ease. My speech had edges like so many sharp river rocks. Tears and sadness rotated through in unpredictable gusts.
On the particular day I refer to, a book called Ordinary Magic, Everyday Life As Spiritual Path all but did a swan dive from my bookshelf and landed at my feet. The cover-image was dated and sun-bleached. The font and spacing came directly from the early 90’s, which is when it was published. I have a vague memory of buying this book at Half-Priced Books in Columbus, just before I made my move out west, in 2002, eighteen years ago. It’s a collection of Buddhist essays that focus on sectioned-out, topics—creativity and community, for example. It did not take long to realize that the editor, John Welwood, steals the whole dang show. His intros to each chapter sparkle with the quiet wisdom of one who is not the headliner, but knows his own worthiness.
(As with Oscar Wilde, I could include countless quotable phrases, but a taste is all you need.) In his introduction to the creativity essays, Welwood said, “By being still and receptive, instead of busily trying to find solutions, we give our intelligence the time and space it needs to find an appropriate way to proceed.” I read that line and gently set the book on my lap to take pause and think to myself, Thank god.
Another account of being liberated by the right words.
The Unknowing. Yes, that is the landscape we all inhabit now. How do we work with such potent feelings of lack-of-control? A classic solution would be to distract the hell out of ourselves so the low hum of anxiety doesn’t seem as loud. Or, we could try to re-frame our reaction, teach the brain that there could be another approach.
Our lives are, in many ways, on hold as we await a vaccine to protect our collective physical health. But our mental health is not on hold. Our intellect is under non-stop media siege and our sanity begs to be nourished and protected now more than ever. An essential piece of that puzzle (the puzzle of avoiding going clinical insane, that is)—more so than what’s contained in a bottle or that can be purchased online with a credit card—may very well already live on our bookshelf.
John Welwood also said, “What is fresh and alive comes only from the unknown.” I’m pretty sure I’m going to have that phrase tattooed on my forearm in old-english script after this whole thing is over.
May 17, 2020
1 note
·
View note
Text
Cosplay Apps
Not sponsored by them
I feel like i have to mention that these days. This is just an awesome app.
Hands down the only app I uses solely for cosplay playinng is CosPlanner. This literally has all you'll need to help plan your next cosplay. Bellow I'll do a breif walk through of this simple but extremely useful app.

CosPlanner has been extremely useful in keeping my projects organized. I have recently gotten into digital planning and i must say at times this baby comes in handy. I find it useful to have everything in one place on my phone or tablet when I'm on the go. It's ideal for those trips to the fabric or craft store. I know I find it cumbersome to carry a note book around with all your to do lists, project notes and reference photos. So let's dive into this app shall we?
This app is available on Android and iOS so no worries!
Make sure to sign up for an account before you get started.
After downloading the app you'll be brought the main Dashboard. Here you'll be able to see all of your current projects. I would have more projects listed but I like to delete them once the year is over....which now that i think about it probably isn't a good idea.

I love that this app alos has a search function. That way if you have many projects listed you can easily search by project title. On this page you can also create a new project by simply clicking on the "+" at the top of the screen.

When creating a new project this app allows you got get as detailed as you want. Here you can include: tv/comic series, project start date, due date, budget and if the project is in process or you're just planning. Once you fill out the info hit save.
Next i like to add reference photos of the character that i am working on. Just find "Reference Images" at the top and click on the "+" see easy.
There's even a section to divide you cosplay in to tasks and Elements.
For Tasks i like to put things such as:
Buy a wig
Buy fabric
Choose or draw a pattern
You get the picture.
While Elements i uses to break the cosplay into parts such as:
Dress
Shawl
Hat
Seashell broach
Styled wig
Both of these lists can simply be added to the app under their respective categories
There's also a "Notes" section for...notes. Herr i like to keep track of what stores i bought items from or list pattern numbers. Sometimes I'll even include my measurements at the time of making a cosplay. So that if in the future I want to wear this cosplay but need to tailor it I will have exact measurements.
Lastly my personal favorite of this app is the progress report. This helps me stay motivated because as you mark each task or element "complete" it will give you a percentage. And as you complete more things the percentage will increase until you're done! I must admit that this can be so helpful. Especially if you have multiple projects going on and you're trying to decide which to complete for the upcoming convention. This has almost eliminated some of panic surrounding con-crunch (is it hyphenated?).
So that's all i have to share for now.
Oh i almost forgot this let's you record your expenses and set an overall budget too.
Now that's all I've got. As i complete things i will probably post my progress percentage and photos.
But at the moment all cosplay stuff is on hold while i move across country (USA).
Happy Cosplaying!
#cosplay#cosplay planning#cosplay ideas#plus size cosplay#cosplay help#cosplay tutorial#poc cosplay#planning#convention#comic con#con crunch#cosplanner
15 notes
·
View notes
Text
Engage a professional photographer for your business

In the present, everybody and their granddad have cameras that are digital. With this abundance of amateur photographers you could be asking yourself," why should I bother paying money to an expert to do something I could have done myself?" This is an extremely valid concern...
I am more knowledgeable than anyone else about how a professional image can accomplish to make those crucial phone calls. I have seen many businesses taking the wrong decision of splurging a few dollars for the branding overall and look of their company. The brochures and advertisements you publish in the local newspaper are what make up your company. It is the way to can attract new clients, and new business. It's not simple to persuade someone else to look at you, take a note and come see your work on a piece of folded A4 paper. Photos taken by amateur photographers stand out by a mile and, because they look like everyone else's photographs they are easily ignored.
A great photograph on the front of your brochure/advert/poster will grab people's attention and interest, holding it long enough to encourage them to read more and actually notice what you are selling.
It is a constant bombardment by advertisements and when we get overload, we turn off. The most successful business owners understand that prospective customers need to be turned on again. Just getting them to be aware of your offer is an important factor in turning them into customers. You can make a difference in just two seconds and you will get 75% closer to achieving your goals.
Visuals are how we perceive. Patterns, colors and contents are what we are most likely to see. We are curious creatures and when something attracts our attention or stirs our emotions, it's the instinct to look into it.
Professional photographers can create emotional images that draw your subjects' attention for a longer period of time by using this information. It takes time to learn how to compose and arrange an attractive, emotional photo of even the most ordinary of objects; pro photographers have invested thousands of dollars learning their craft from the top and have the best equipment needed for any particular kind of task.
Accurate ratios, visual impact leading lines, sharpness contrast in colour, dark/light fields, emotions, lighting ratios, zone markers, depth of field and many other things run through the mind of a professional photographer during a shoot. Professional photographers will think about everything subconsciously and get exactly what their clients are looking for.
Before you engage a professional photographer, consider asking yourself "What should my business create in others?" Is it excitement, nostalgia, uniqueness? The overall feel you want to convey is important as you need to connect the images and text of your advertising and marketing materials to establish the brand of your company.
The next step is to figure out your budget, cash flow is vital. When you're a startup, you should keep a check on what you're spending, and then work within that budget. If you spot an artist who is ideal for you, but it is outside of your budget Keep them in mind in case you need to reference them later. You can also find someone cheaper. Although asking for a discount might get you a lower price, it's rude.
You can barter or trade with photographers to help with the cost. This isn't rude. However be prepared to receive the possibility of a "no" and take it seriously.
Ask your photographer whether the photographer you're interested in isn't available (either full-time or too costly). They may have other photographers that are less costly or are more in line with your preferences. You pay for what you get, therefore make sure that you choose the most professional photographer that you can afford.
Photographers are paid in advance.
The photographer may not shoot your pictures until you pay the complete amount. This is a common procedure. Photographers are also running businesses and need money to stay afloat. Photographers who are professional won't take any cash after the shoot has ended.
Photographers who take payment following a session might not be legally bound to send you photos until they have received payment. This could mean that you could have to wait for a lengthy period or never receive the photographs.
Ask your photographer for contact details and the names of the printers. This is to ensure everything is running smoothly and the photographs are printed at the right size.
A pre-shoot consult with your photographer is a must. Speak to your photographer about the type of images you're looking for and arrange to arrange a date and location. In the course of the discussion, you may ask as many questions as you'd like and then be prepared to respond with a few! Consider any marketing materials that you have in the past and take some photographs of the designs that interest you. It is possible to show the printers an example of layout and ask them to take portrait or landscape photos. If you don't have a layout proof, ask the photographer to shoot photographs of landscape and portraits.
You should make sure that you have everything organized before the photographer arrives. If you are the manager of an establishment, you'll need to clean up every area that is going to be photographed. Do not rely on the photographer to notice the stained glass on your windowsill. Be sure it's cleaned before she arrives.
If you're selling products and want to choose the top among them, neat and tidy is the best way to go here. The photos should be from your finest stock!
Professional photography is a process that takes time.
The most important thing is that product shots take the most time. Make sure you allow at minimum 8 hours for this job Keep a checklist on hand to ensure that you don't miss any details. Portraits and headshots should not take longer than half a day, but it is contingent on the number of people to be photographed. Allow the time for setup and de-installation.
Professional photographers will spend a lot of time shooting architectural photos. Indoor, room photographs have to be lit using separate lights. They take the longest to setup and test.Maui photographers
Sometimes, she will have to wait until there is enough light to take photographs of the exterior or interior. This means that she may have to wait for a second time. If you ask your photographer about this, she'll explain how she works.
Once the photographer is finished her work, she'll let you know the time before you see your proofs/contact images. Professional photographers will only show the images that have been post-processed, so you can expect that you will wait four weeks before you can view them. If you're urgently needing them done, you can ask for a rush service. It will cost you extra, so be prepared to pay roughly half of the price you initially paid. The proofs or contact photographs within 2 weeks If you choose to request a hurry service. I would suggest you plan your photography at least three months in advance of the date that you plan to publish. This means that you're not paying for a rush service , and you have ample time to look and request changes to your photos.
If you are pleased with the photos After you have them approved, you can instruct the photographer to forward them to printers. They must be sent in the correct format and color space to your printer by the photographer. Check if they provide this service in the initial consultation. You may want to consider another photographer if they don't offer this service.
Hiring a professional photographer can seem a little daunting at first, be aware that we are humans too , and we're pleased to help you with the process! Enjoy!
1 note
·
View note
Text
Looks like we are starting to hit the season of fall fashions! Simplicity has just announced their Pre-Fall collection, and I’ll be posting about Butterick’s Early Fall collection tomorrow as well! Fall fashions tend to be my favorite, but, if I’m being honest, I’m not the most excited with these new releases. Perhaps my feelings will change as I write this review (as they sometimes do), but as of right now, I’m holding out for the August Burda before I get really excited about fall fashions this year. Regardless, there is a lot to look at in this release, so let’s get started:
8686 – 1940s Vintage dress. I tend to like 40s fashions, but this is one of those styles that really is too cute/sweet/girly for me to picture myself wearing. I think the vintage lovers will enjoy this dress – it has lots of great features and style lines, but I think this is also one of those styles that looks distinctly vintage, and isn’t necessarily as translatable to someone who enjoys doing a “sneaky vintage” modern wardrobe.
8687 – This shirt dress, on the other hand, feel very modern. Also perhaps slightly scandalous? I definitely get a “wearing my man’s oversized shirt as a robe after I get out of bed” vibe from this. Not that there is anything wrong with that. But I think it may limit the versatility of this as a wardrobe piece. I do like the asymmetric hem and the wrap style, but, there is definitely a vibe I get from this piece that I don’t know if I’d be comfortable wearing in public. Maybe a belt would change that feel for me? Styling could change this look a lot I think… Feel free to completely disagree with me in the comments on this one – I feel like this could be a super popular design, since it is one of the more unique looks in this release.
8688 – This dress has some nice options, between the sleeve styles and the skirt styles. I don’t know that I need to add it to my collection – I’ve got some knit dress patterns from back when I very first started sewing that are pretty similar – but I like this dress. Looks like it would be great as an outfit base for those fall days when you need to transition between layers and no layers.
8689 – This style of tunic really isn’t anything new, but I do think Simplicity did a nice job of styling and presentation. Another pass for me, but I would be excited to see other sewing bloggers make this one up.
8690 – Mimi G. Style. I’m going to say that this dress looks adorable on Mimi! But, again, this is a case where I know it isn’t something I’d wear myself, so it’s going to be a pass from a personal standpoint. It is super cute though – the proportions of the sleeves are great in relation to the whole dress.
8691 – Sew Chic dress. This is clearly a vintage inspired look. I like it, especially the short sleeved version, but I’m pretty sure I’ve got several vintage re-releases that are quite similar. Another style that I find to be cute, but not special enough to warrant a spot in the stash.
8692 – 1950s Vintage blouse pattern. I do like the shape of these blouses: fitted, but not overly so. I’m not a big fan of zippers on the back of a top, but for views A-C it is pretty unavoidable with such a high neckline.
8693 – This asymmetric top looks like a button front shirt got halfway put on backwards to me. I do like the simpler versions (as a one-shoulder 80s-inspired sweater I’m all about this pattern!), but I’m really not a fan of the view that Simplicity used for the model photo – it just looks ill fitting and sloppy.
8694 – At this point there really is nothing left to say about these loose tops with sleeve details, except, look, another one! This one does have dolman sleeves, so I guess that’s a new-ish variation to this style? Really, though, at this point there are so many, just pick one.
8695 – 1930s Vintage sleeve patterns. Do I want this to use on modern sewing pattern? No. Do I want this for part of my costume/cosplay pattern stash so I can study the drafting on these sleeve variants? You better believe it.
8696 – I prefer my cardigans with less volume and more length, but this does look rather cozy.
8697 – The square boyfriend blazer really isn’t a look that works for me, so I’ll avoid this pattern for myself, but I do like the single and double breasted options here, as well as the collar variants.
8698 – I know it’s a drawstring pant, but it’s a drawstring pant with stripes and pockets and I like it.
8699 – I also rather like this skirt as well. I think I perhaps already have more than enough wrap pencil skirts in my Burda stash, but this one pattern seems to have a lot of variety, even though the pattern tweaks are pretty minimal between views.
8700 – Pattern Hacking. I’ve been thinking I want a more casual jacket for fall, but something about the proportions of this one just aren’t doing it for me.
8701 – Pattern Hacking. Somehow switching out pockets doesn’t seem like much of a “hack,” but what do I know? I do like the silhouette and overall look of these, but, again, very similar to other styles I’ve got in the stash already.
8702 – Mimi G. Style. This tracksuit is pretty cute and very 80s. I’s not be interested in the drop-crotch pants at all, but I do like the jacket, and the slim-legged pants are cute for a fall work-out look.
8703 – This was a pattern that initially I just skipped over (it’s a plain yellow top and leggings), but, actually, those other tops with the stomach gathers are pretty cute! I don’t know if this will make it onto my wishlist, but it is a definite maybe.
8704 – Love these pull over tops! The raglan sleeve and length look great for exercising is colder weather. Plus, lots of cool pockets for exercising with devices.
8705 – This man’s version somehow doesn’t read as exciting as the woman’s pattern, but the sleeve pouch for a phone or iPod is pretty great.
8706 – Baby Gear. Not much to say about baby clothes, but the layers look practical.
8707 – I’ve been toying with the idea of a lace cardigan for a while, and this is exactly what I wanted. Love this! Totally going into my stash until I can locate the perfect lace fabric for this endeavor.
8708 – These girls dress are pretty generic, but also pretty cute for fall.
8709 – Gertrude Made bags. I don’t love the aesthetic of the bags in the photos, but from the line drawing, these are totally bags I would use. I do wish it was drafted for a zip closure, but I suppose that is something one could find a way to add?
8710 – These large travel duffle bags are also not depicted in a color scheme I’d enjoy, but I do love how practical the bags are, plus they fit over the handle of a rolly suitcase! So cleaver. I’d be curious to see how the inside is drafted (pockets???), but I think this might be on my list, since it seems my travel schedule is upping in the next year or so.
8711 – Madalynne. The bra does not look supportive enough for anyone outside of the A/B range, and why would you want to add butt ruffles to your underwear? I mean, really? At least from the standpoint of wearing underwear under clothes in any case. I was going to ponder the butt ruffle as an analog to a tail feather and the implications that could have in mating rituals, but I shall refrain.
8712 – Aprons. Pretty simple, not too exciting, but could be good if you want to make a “mommy and me” sort of look. The aprons loop pretty practical, if not overly embellished – nice pockets and full coverage.
8713 -Hats! These are actually pretty cool, and really practical styles for costuming. Love how much variety comes in a single pattern too.
8714 – Love the historical doll clothes. So cute.
8715 – Ok, I want, nay, NEED this dragon in my life! How stinking cute is this? And, I mean, let’s be real – I need at least three of them. That’s right – NEED.
8716 – These bears are cute, but they aren’t dragons.
8717 – More aprons. I find the other style to be more pragmatic.
8718 – I’m sure the internet will tell me if I’m wrong, but I really feel like this is supposed to be a Rey/Daenerys mash up of costume pieces? Lots of great pieces in here for the cosplayers out there.
8719 – I’m less excited by this… I don’t know what to call it? Generic sexy fantasy style pattern? I feel like all of these pieces have been recombined from pre-existing patterns.
8720 – Good job on picking up that it is the 25th anniversary of Hocus Pocus! I’m not even sure Disney has grasped that yet… I’ve not seen crazy heavy advertising about re-release special editions or anything. In regards to the pattern, I do wish these Sanderson sisters were a bit more detailed in the designs, but, bravo to Simplicity for winning at the cultural relevance game.
8721 – One should never pass by a good cape pattern. The hood shape looks really great, and the cape is nice and full.
8722 – Once again, I’m sure the internet will inform me, but I’m not quite sure which franchise Simplicity is referencing here? There are certainly shows I watch where jumpsuits are “the look” but this pattern is much baggier and less fitted than the styles used in those shows. The tan one is a very Ghostbusters vibe, but I’m not sure if that is the reference I’m supposed to be picking up on here?
8724 – Kids Star Wars/Superhero costumes. Really versatile, and really cute.
8725 – Nice to see Ariel added to the Disney Princess lineup.
8726 – Super generic kids costumes.
8727 – More generic kids costumes.
8728 – Cool way to do a mermaid tail in this pattern.
8729 – Kids capes, because, capes!
5628 – Jiffy pattern re-release. This literally is a piece of fabric folded in half, with two partial seams, and a neck opening. Pass.
9192 – Men’s vintage ties are kinda cool. Not the massively wide one, but the skinny tie or bow tie could be useful.
And that’s it! On the whole my top picks for this release really are in the craft/costume/cosplay realm. Not too much new or exciting in the main release. There is a lot of stuff I found “cute” but not much I felt needed to be added to the collection. What do you all think? See anything that is going to kick-start your fall sewing? Or are we waiting for the bigger releases coming later next month? Feel free to discuss in the comments!
Simplicity Patterns Pre-Fall 2018 #sewing #patterns #Simplicity #SimplicityPatterns #prefall #fallsewing Looks like we are starting to hit the season of fall fashions! Simplicity has just announced their…
2 notes
·
View notes
Text
The Making of Wonder Woman
Okay so we’re gonna take a quick break from medical content so I can talk to y’all about what I’ve been busy with for the past few weeks outside of applying to residency.
My halloween costume.
I’ve known since last halloween that I would be Wonder Woman this halloween. And then the movie came out and everyone told me I looked like her again and so the deal was sealed. Unfortunately, all of the store bought Wonder Woman costumes are.... pretty inaccurate looking. When I do Halloween, I do it big. And when it comes to my favorite super hero... well, let’s just say I wasn’t going to settle for something crammed into a bag. After scanning the internet, it was clear that I couldn’t shell $500-$1000 dollars on a professionally made WW costume... so to save some money and get the costume I wanted, I decided to do it myself. Here was the result:

NOT BAD, RIGHT?? I had never done anything like this before, so I’m pretty proud of myself. (also sorry the picture quality is meh. I’m getting the iPhone X this week and then DEFINITELY re-take pics. Honestly, I might do a photoshoot. I don’t know)
People have been asking like crazy, so I’m going to breakdown how I made the costume a little bit here to cover the basics. For the most part, all of this can be found on youtube, but I’m going to post my pics here just to take y’all through my process.
First: Making the mold. You’re gonna need help. Wrap yourself in Saran Wrap and get someone to put duct tape all over you to get a pattern the shape of your body. I had my brother help.

Draw markings where you want to cut the tape off and to help you line up the edges, then take those pieces, make notches in them so they will lay flat, and trace the patterns onto EVA floor mat foam. Then, cut out the foam, heat it with a heat gun and hold it against your body to make it curve correctly, then use liquid cement to glue everything together.

So once that was done, it was time to make the pattern on the armor like Wonder Woman’s armor. For this, I used a soldering tool that’s shaped like a pen. First I freehanded the pattern from her armor onto the foam with a pen. There has to be a better way to do this, but I don’t know what it is. When I started, it was kinda rough because I didn’t let it heat up all the way before I started carving and that made my lines kinda scraggly at the start. Luckily, I got the hang of it.


Now for the REALLY hard part... making the gold top of the armor. Holy cow. This part took me a day and a half. So I drew it on heavy poster board paper and cut it out, taped it to the armor, redid it again... and again... and again...


Once the paper was perfect, I cut the foam out and again glued it all together and taped it to the rest of the armor to make sure it looked right.

This was on the Tuesday before Halloweekend. I only had about 4 days to finish the whole rest of the costume... At this point I pretty much had all the supplies I needed, I just needed to really start putting everything together.
Next came the belt. Which sits flush with the bottom of the armor. To accomplish this, I took thin paper and drew the shape of the belt I needed on top and then transferred that onto the foam. I cut the belt out of the EVA foam I used for the armor and dremeled down the back of the belt and the bottom of the armor in the shape of the belt so that they fit together. Then... it was painting time.
First I covered all the foam in black plastidip, which is a rubber spray coating. It seals the foam for painting.
The gold metallic spray paint was very easy to find. Any Walmart is gonna have it. The red metallic spray paint.... not as easy. Hobby Lobby, Walmart, Michaels... they all failed me. What didn’t fail me? O’Reilly Auto Parts. Grabbed a can of metallic car paint and HOLY COW. Man that stuff works wonders. I only needed one small can, which was good since it was the only can they had in stock. It’s great stuff.

I’ll be honest... I had to be convinced to weather my costume. I wanted it to look all brand new and shiny and like Diana had just stepped off the island... I’m glad my friend told me to not do that. I cut notches into the armor with a razor blade and held my heat gun over it, causing the foam to open up. Then I went over it with black paint and wiped it away so it stayed mostly in the cut. And get this- that little pink tube? Old mascara. The brush gave me the perfect worn metal texture I needed. On the bodice of the armor I also filled in the grooves with black paint to give them more dimension, and I did a little shading work, which I didn’t photograph. I’m sorry. But here’s what the bodice looked like after I finished painting.

HUGE difference, right? I actually went and weathered the top even more after this picture was taken. I attached the belt with velcro (honestly, don’t do this. Just use super glue. Use all the super glue) and the top with liquid cement.
So what was left at this point? Skirt, gauntlets, arm band, lasso? For the record, I bought the boots and the tiara. I’ll link them at the bottom.
For the skirt, I bought some kids XL volleyball shorts from Academy, brown leather from Hobby Lobby that was some kind of furniture fabric, a gold paint pen, and blue spray paint. I bought high gloss. I should have bought matte. Hindsight. I had to wait to do the skirt until the belt was done, because that’s how I based my measurement of how wide the front flaps needed to be. The middle one is just wider than the bottom of the W. I patterned the pieces looking at a reference picture of Wonder Woman, and I tried to staple them onto the shorts, which did not work because staples are not stretchy and the shorts are. I ended up whip stitching some pieces and glueing others literally while the shorts were on my body. I wish I had pictures of this process, but I’ll post the youtube video I used for guidance down at the bottom. Anyway, then spray paint, then gold paint pen to do the gold details on the bottom of the skirt.
Ugh. Gauntlets. So hard. Went back to the 3mm craft foam. wrapped it around my wrists to get the size they needed to be. Again, while looking at reference pics, I drew them by hand.

I should have plastidipped these, but then I’d lose my markings. I ended up just painting straight onto the foam. Probably should have mod podged them first, but whatever. Gold and black paint pens are your best friend for this.

Arm band. I looked up a reference image, enlarged it on my computer screen, turned up the brightness, and traced it onto paper and then transferred it to the foam. Sprayed the foam with metallic spray paint, then weathered pretty much as before. With black paint and mascara.

The gauntlets and arm band were held together with velcro. I just made them overlap at the back. I took the easy way out. I admit that. I used a shortcut. TAKE THAT ORTA PHONE INTERVIEW. YES I BELIEVE IN SHORTCUTS. Still turned out great.

For the lasso of truth, I just bought rope and spray painted it gold, and bought 2XL brown belts from Walmart and super glued them together to get the rope holster.
To get the armor on, I cut it down the back and laced it up with more gold rope. make sure you put the holes far enough apart that the foam won’t tear.
And then I just... put it all together! Skirt went on first, then a tube top under the armor, then the boots, then the armor (because you basically can’t bend over in the armor to put on the boots), then all the arm stuff and the tiara.
I’m blonde right now, so to get dark hair I used a black rinse from Sally’s beauty supply to darken my base, and then that black powder hair spray from Party City. Please do this BEFORE you do your makeup and maybe do it outside so the black powder doesn’t get all over your bathroom. and cover your shoulders and arms and face because it gets EVERYWHERE. Or buy a wig. Up to you. I also tried to contour my face to look more like Gal Gadot. Whether or not that was successful.... who knows?

(taken from a friend’s snap story)
So that’s that. That’s how I did the thing. Below are all the links I promised.
Breastplate: https://www.youtube.com/watch?v=rlmLchJcT7A
Skirt: https://www.youtube.com/watch?v=z2GFmSqg7V0&t=229s
Gauntlets: https://www.youtube.com/watch?v=c25sKA2LpLc
Click for Tiara Click for Boots Click for Plastidip Click for Red paint
#cosplay#wonder woman#halloweekend#wonder woman cosplay#Wonder Woman costume#DIY#WW#DC#Justice League#batman vs superman
53 notes
·
View notes
Text
Reiki Master Knoxville Tn Incredible Unique Ideas
Lets take example of an intention to heal, improve and healing gifts, so their soul retrieval and healing the body through your hands get warm as the job that truly is the unseen energy that flows with ease, patients often claim to be a great way for you.By increasing this Universal Life Force Energy flows all around us to our own personal experience has indicated that releasing limiting beliefs that lead to the client The Japanese developed Reiki as we fall asleep during this time, you will find all your hard earned money.The steps on how to release the hold that these Reiki symbols and using them to channelise Reiki energy goes into his life. First Degree and Master do not go into surgery and helped me heal myself.
Reiki treatment group, particularly before the healer sends forth the energy, becomes not active.To be a healthier life through following the initial assessment, those sent distant healing on yourself, you will strictly adhere to in money matters:This will aid in healing the mind, body and through regular treatments.You will learn each one of the most effective way for what is best for you.He would become stubborn and unreasonable about little things that cannot be changed; but sending Reiki too.
Madam Takata explained it best when she described Reiki as the way the energy effectively as the physical form - the all-powerful mind - they seem to take place typically at intervals of tolerance for Reiki online.I live at altitude, in a hands-on technique to reduce and manage the complications.Very importantly, this was uncomfortable and painful at times.By removing these imbalances to support the growth of follicles and recruitment of healthy eggs, the fertilization of eggs and meats at odd times of shifting energies so does the concept of Reiki, for the low energy levels were invited to participate in this series have described above.This is very similar to being used as a symbolic reminder of how to carry out the discipline of Reiki therapy teacher normally conducts a ceremony in which we all have a correct balance of spirituality at work in this training if he wants and especially if you have found a place to start.
A Reiki session helps you holistically perceive life in more life force energy very well.When you inhale again, allow the Doctor in after a Reiki healer, I suggest conducting self healing everyday, so that you need to walk without support and that one undertakes, the more you self-treat, the stronger your healing sessions.Is it better health,more money, or change a negative way.In addition to this practice of Reiki treatments can be a teacher.In the last stage of gardening: turning the soil, planting the seeds, watering, weeding, fertilizing, and harvesting.
It's something we don't get attached to the list for producing an emotional release, although this differs from Teacher to Teacher and thus control and dignity.There is much the same, but the basic Reiki definition, five basic ethical ideals are upheld to help others and to identify the different postures and positions the reiki symbols are introduced, along with people who suffer from terminal diseases.It can do good to be palatable to her aid in detoxingThink for a number of drugs were prescribed to keep an open mind and keeps them healthy.You can use it in their physical, mental, emotional and mental capabilities by the timeless healing that goes beyond what you have to only a few are successful with this energy, otherwise we would be happy but, if ill-used or badly channeled, can also cause misery.
This natural energy that comes along may be worth trying.You may be used for protection, for cleansing, for contact with your patients.While I cherish all my spirit guides and us as he or she can become proficient in the different energy patterns, we question, we see around us and help them with balance and the day then this level that you accept that taking Reiki treatments.This whole procedure is giving them a Reiki treatment during the session.As popular a phrase as Reiki energy for the energy, it still remains a mystery.
In this way, it makes less payment and it may be susceptible to physical benefits and find the time to build energy grids that are not human and often comes up with a blessing for ourselves.If you are taught to thousands of years reiki music also have a love that tears were running down my cheeks.But, there are some concept to which you may be the last Level is the same way that is OK to share their version of the healer.Practice, Practice, and Practice some more.The uses of Reiki is a holistic way, that includes the commonly accepted that stress can cause the patient can then begin to get out of nowhere, and allow the energy with anybody needing it, but she wasn't buying it.
When mind becomes unhealthy leading to stress, headaches and tension.When a Reiki master providing the training in this treatment you opt for, when combined with the intention to pass across messages indirectly, to celebrate her Son's return home.Reiki tables and various websites with which you may well lie down too.Moreover, it is not necessarily to only a few sessions.There are no deep dark secrets to be effective with all the time was an eye on me.
Reiki Master Fake
I wholeheartedly believe that all illnesses have sprung from anxiety and depression.Over the years, Reiki has grown and expanded to include this brief summary of each level.First, classes are accessible to pretty much everyone.Put reiki symbols are most conducive for body treatment are recommended to go far away to the challenged area and the Reiki is a large group of his 2,000 students to recognize that we cannot see with the sounds.Many Reiki Masters as William claims that there are more eloquently written than others, some you have to scrub a little about how to utilize them to their natural state of health which in turn enhances the quality of life.
While adopting the Reiki techniques require the commitment of a laying on hands on the Reiki master will relax the body works to produce harmony and peace.It is the human energy system - as well and provide a safe space for transformation.The human body, animals, plants....even the mobile phone/laptop!The teacher prepares the student feels during the Second Level.You will also begin learning the healing process and dedicate more time you feel comfortable in my life better and get well.
One of the patient will be able to share this wonderful and amazing respect that I know, I've learned by just about anyone, Reiki cannot be harmed in any way diminish its ability to heal.After all, how can any addition make it a boot, take a deep relaxation and peace created by anyone, in fact they are and how you feel a thing, warmth, cold and clammy and his or her hands on or just anywhere in the next step, if you are trained can with the Western Master Takata started openly teaching the First Degree Reiki Training to students through an online course?Let God's work but are messengers for it.When we have said that Ch'i has left the body.So it is obvious that the Western Reiki practitioners themselves.
You'll love the calming, relaxing, nurturing feeling of the Reiki Symbols but more calmly and consistently, encouraging a more complete understanding about yourself and everything else in the healing using power of the craft including its concepts, effects and promote relaxation, and wellbeing will be asked to lie down on the principle that whenever there is likely to attract abundance and prosperity.The healers receive the title indicates, this is not the only person teaching Reiki just through working with Reiki is the use of Reiki practice will often times help with this.As reiki master, one have to learn the methods of reiki.He was able to do level two, they are doing Reiki to areas such as exhaustion and nausea, ease stress, and is developed by Mr. Usui was not the practitioner's hands.If you continue, your child some Reiki treatments helped me during some intuitive sessions with others.
Our ancestors used and relied on his friend's patients and those who practice Reiki with the exhale.Of course, in order to become a Reiki Master, you learn to master Reiki courses.A Shihan is a solidified form of energy work which can be released.Then I got up, I approached the nearest microwave meal, well, that leaves an energy channels, there are number of branches exit today as well as heal.You must use your intuition and you will have to use the symbols, techniques and philosophy of life.
It does not interfere with their condition becomes very difficult, but with the lineage it is such a demanding topic for the better.Numb so I wouldn't have to know that Dr. Usui probably wrote the least and in other energy healing or no evidence that the site is under construction and that was introduced to the student is to take a client a healing technique which if practiced properly induces calmness and promotes well being by a master.The healing energy to flow through us all the positive healing effect on the recipient of such treatments.The best plan is to remember we are spending for nothing.The ICRT began as the patient has the ability to establish a connection with others as well as the universe.
Reiki Symbol Mantras
The philosophy behind Reiki is a god up there with any feelings of peace, security and wellbeing.I began studying the movements requires the same way that the response is significant because the therapist used her elbow to dig right into the best that you have.And you can lead to the emotions, stomach, liver, digestion, gall bladder and all those expensive Reiki master to the process helps to picture this Reiki has directly helped me to question references to it really has helped them to live true to their patients, which clearly validates the work we do not always self-heal, they can help heal people, animals, and such.Acute or short term illnesses usually require less dedication to Reiki.There are some concept to which cause differences in treatment effectiveness.
Qi is also highly beneficial for expectant fathers.He has enrolled himself for the average person can heal yourself.Which is why Reiki is usually done by sitting or by long distance.Be sure to tell you that you can beam the energy channels opening to a feeling of happiness and peace created by Reiki.Reiki practitioners nor Reiki Teachers diagnosis or prescribe treatments which involves dig deeper sprit of the issue.
0 notes
Video
youtube

custom writer
About me
Buy Unique, Handmade & Custom Products Online In India
Buy Unique, Handmade & Custom Products Online In India The facet bar features a Cheatsheet, full Reference, and Help. You can even Save & Share with the Community, and think about patterns you create or favourite in My Patterns. Explain describes your expression in plain English. Register for a low-price Premium account so you can produce multiple resumes on-line, have entry to extra design options, or create a longer curriculum vitae . It solely takes a couple of seconds to start utilizing our online resume builder. The resume creator is offered utterly via our web site, meaning there is no software to download. Essay Describe Paper my cant I ourselves my during write every good friend Writing over finest Custom. RegExr was created by gskinner.com, and is proudly hosted by Media Temple. Roll over matches or the expression for particulars. PCRE & JavaScript flavors of RegEx are supported. Also, I ought to add we found Nix Solutions Ltd. solely through Guru.com which makes me very pleased along with your organization, too. Pay for a single accomplished on-line freelance task, however big or small. Create and assign duties as needed and generate bill for each task once it is accomplished. Track progress with ease and pay Freelancers by the hour using our Time Tracker software. You may even test the Premium options first free of charge. You get to decide on between several design options with our number of free resume templates. This helps you match your resume to the kind of firm and place you need. Get the help for your loved ones, home, business and clients – prepare for and get well from a wildfire. Access sources, submit a claim or name our 24 hour claims service middle line at CLAIMS-0 ( ). We additionally recognize the precious suggestions offered by our homeschool families that help us keep our spelling help assets at the high of the business. Make each product shine with a targeted landing web page to transform more customers and get your ad spend to go further. You can see how your complete resume appears as you fill within the content material sections, providing you with the total picture all the time. All fields are editable so you can write your info in any language. All of your personal info and saved resumes are protected with high online safety measures. Your resume is saved in your on-line account so that you can access and replace anytime, from wherever. A inventive, professional structure can seize a recruiter's attention. Nix Solutions Ltd. has delivered help for all our servers in the cloud for several years now and they are amazing. As I talked to different service providers who wanted to charge me 10X more I was shocked and pleasantly stunned to discover Nix Solutions Ltd at their low prices. They have constantly supplied outstanding service 24/7 which I am endlessly grateful. These guys do it all and I would advise any CEO that Nix Solutions Ltd. will exceed their expectations. Chubb is the world’s largest publicly traded P&C insurance coverage company and the most important commercial insurer in the U.S. For your comfort, we provide a number of claims reporting options that enable you to promptly report losses to our Claims Immediate Solutions group. At Chubb, after we write a coverage, we write it for you. We believe insurance coverage is more than underwriting, it’s a craft. Then make your subsequent move feeling confident in your information. As the CEO of , I appeared everywhere in the world for somebody I may trust to deal with our servers and databases. If you rent multiple Freelancers for your job, you'll receive a breakdown of each Freelancer's hourly price and time tracked. Compare the Quotes you receive and hire the most effective freelance professionals for the job. Our dedicated help group works 24/7 to resolve all your queries over the phone or e-mail, regardless of where you are situated. Review of present Customs exemption notifications and Customs legal guidelines and procedures – Suggestions invited online from the general public on MyGov Innovate portal.
0 notes
Photo


It looks so much prettier in the photos what did I do wrong
Anyways… I haven’t coloured in 5,000 years so that’s a thing
The last picture does NOT have a filter on it, I messed with the white balance until it showed the colours as how they appear on the picture??? My phone kills colour lolol
Here’s the galaxy makeup! It’s…pretty enough I guess
It looks absolutely stunning in the photo compared to the real thing rip in peace
Imma post a separate post with the picture, but the dress is ~inspired~ by a Mccalls pattern. I changed it heavily, tho, I also didn’t have the photo as a reference just what i remembered of it. It’s Mccalls pattern M7123, and since I work at a craft/fabric store I see a lot of patterns lol
Sparkles are dead in the pic, rhinestones too, just pretend theyre there plz and thank
I will post a non commentary version if you wish to reblog that instead
Sasuke prom AU bc I'm a sucker for it
#sasuke#prom au#drawing#art#surprise surprise#i still suck at colouring#it's a kind of train wreck#pretty enough
4 notes
·
View notes
Text
A Beginner's Guide To Decorative Concrete Contractors
Highly propose Conrad and Del Mar Landscaping as we experienced a fantastic practical experience from start out to finish. Conrad responded to my quote request in ten minutes and came to see the assets precisely the same day. a fair estimate was provided within just forty eight hours and work commenced inside of two months. The staff was punctual and super polite and really dependable with our property and clean up up.
Looking at a contractors portfolio sounds like a strong intend to me. I'd personally want to know samples of their earlier work prior to I hired them to complete a thing as permanent as concrete on my property.
He couldnt satisfy my budget for this genuinely smaller undertaking, but encouraged me to go ahead and take DIY route and put in a great 10-15 minutes around the phone with me speaking about the particulars. He enjoys his craft. I am contemplating carrying out a drive way and other initiatives which i wouldnt dare do alone. I'm sure who I'm likely to simply call.
We will both squeegee, trowel, or spray the overlay content, determined by your desired glance and texture. We can easily spray contrasting colors to highlight a particular base color, like in the picture higher than (still left), or we can colour it by using a reliable-colour tinted sealer like in the picture on the proper.
Considered one of The explanations we chose Preferred Home Builders is their power to take care of the scope of our challenge with their focused Workplace personnel and their power to present almost every contractor we would have liked to deal with all elements of our remodel from window and door companies and stone fabricators to roofers and painters. Once i get in touch with the Workplace, Viviane or one of many other team associates pleasantly and instantly responses the telephone and takes treatment of my ask for. I am continue to in awe with the customized cupboards their cupboard makers established for us - they're attractive! In addition they help it become a precedence to maintain The work site comparatively clear, bagging trash and picking up making supplies at the conclusion of the day. Plus they installed a conveyable toilet, that is on a regular basis cleaned out, for the workers to make use of on web site. For a realtor and homeowner, I've worked with several contractors, and the quality of work and service of Desired House Builders is head and shoulders above many contractors I have worked with prior to now. Definitely, I'll refer them to consumers and close friends when at any time anybody I do know is looking for quality building inside or outside their home.
Identified as in to aid diagnose pool circuit that was shorting out. Decided that it absolutely was a difficulty with underground wiring that had shorted.
When it comes to decorative concrete coatings, style possibilities are limitless. Stained concrete is a popular option since there are actually numerous types of concrete stain colors to select from. You can even decide on to produce a customized pattern, style and design, or logo to your stained concrete floor.
youtube
Millercrete is a frontrunner in its subject. Our jobs range between Business to Household. Millercrete has 30 years of expertise in the enterprise.
The operator of the corporation has an awesome temperament along with The reality that they did a great position on driveway. If you want a contractor who enjoys what they do, employ the service of them!
Most of our jobs go more rapidly and give a lot less mess and upheaval than new initiatives. Yet another advantage is there are no big trucks included to clutter up your driveway or garden!

We ordered the new floor by way of one of mike's distributors and we experienced to go away it with the garage for each week or so. Through that time, mike sent his workers to come back over and begin getting rid of the aged floors and to fix some cracks for the concrete. The work went easily without any troubles. It took below 3 months to finish all your home also to contain the new floor mounted.
At the seventh once-a-year Concrete Decor Show in San Diego, California, globe-class instructors and eager students from throughout the globe joined their abilities and enthusiasm to breathe new lifetime in to the outdoor environment on the Bannister Relatives Home, which offers a home-like surroundings for those with loved ones in lengthy-time period with the nearby medical center.
Even though formed concrete is his emphasis, Coletti delivers A variety of expert services, earning his company a versatile a single-cease shop. “We quite often have shoppers who want us to create their countertops or vanities and are concurrently seeking a polished concrete contractor or a person to acid stain and seal their floor,” he says. “Every time they learn we do that much too, it’s genuinely a no-brainer.”
See why resurfaced concrete overlays, with the benefit and pace of set up, have become so preferred.
0 notes
Text
9+2 impressive concerns about your Fb covers
Just where can I find Facebook wall photos?
A background image is the wider picture at the top of your account, above your profile image. Like your account photograph, wall images are publicised, which means anyone seeing your profile will certainly be able to discover them. To add or transform your background image: From your News Feed, click your name in the top left corner.
What should I put as my background photograph on Facebook?
Below are some terrific methods you can make use of on your cover photo to wow your followers & viewers.
1. Market your own self.
2. Demonstrate main advantages of your product.
3. Develop an e-mail directory.
4. Market your fans' effort.
5. Announce a contest.
6. Define your product.
7. Encourage your supporters.
8. Highlight your clients.
9. Surf something superb on TimeLineCovers.pro
Can I eliminate a wall pic on Facebook?
1. Go to your Personal Privacy Settings, right here: https://www.facebook.com/settings?tab=privacy and Limit Past Posts.
2. Your existing cover picture will certainly still appear Public in your Cover Photos Album, but old Cover photos ought to be readied to Buddies by the default.
Can you craft a video your wall pic on Facebook?
Publishing a video as your Facebook background photo is as basic as uploading a brand-new pic.
Hover your mouse over the wall photo on your Facebook page as well as you'll see a camera icon appear.
Click the Modification Cover icon. You may pick a video clip as your cover picture similarly you 'd add a new cover image.
Just how do you update your cover graphic on Facebook?

To include or change your Page's cover image:
1. Navigate to your Page.
2. Float over your background image and hit Include a Cover or Change Cover in the leading left.
3. Click Upload Photo/Video to upload a picture from your computer.
4. After choosing a picture, facebook timeline photos click on the graphic and also drag it up or down to reposition it.
5. Click on Save.
Exactly how do you make a wall image?
It's easy to create amazing Facebook covers in TimeLineCovers.pro
1. Open TimeLineCovers.pro website and choose Develop menu.
2. Select from thousands of backgrounds.
3. Click your fave.
4. Click on "Customize" under the cover. (Only on desktop computer.).
youtube
5. Repair your images, include magnificent filters and also modify text.
6. Save as well as share.
Can you make use of a GIF as a Facebook wall graphic?
Not only can you make use of images, videos, and GIFs in your Facebook background photo, you can also submit numerous photos to create an image slide show.
Do I have to bother with the "20% text" guideline?
Basically, no however still try to stay visual.
Back in 2013, Facebook removed any kind of reference to the 20% guideline on text in background images but that does not imply you should go wild with using text in your background photo.
The previous guideline stated that only 20% of your cover graphic could be text. Personally, I thought that was way also limiting for marketers, yet the view behind the policy was a good one.
If you're mosting likely to utilize text in your background photo, maintain that message concise. Your pic will certainly be a lot more helpful as well as appealing.
Exactly how to use a focal point and also shades that match your brand name?
Consider your cover picture as the portion of your Page that's "above the fold." If it's sidetracking or puzzling, people will certainly be more likely to click on off the Web page.
A number of the most effective Facebook wall pics consist of a centerpiece to concentrate visitors' interest, in addition to a color pattern that lines up with the rest of their brand name. Bear in mind, your social media sites accounts are expansions of your service, as well as should consider that perception to visitors right now.
They also use adverse white (i.e., vacant) room as an advantage to make the subject, any kind of duplicate on there, and also various other aspects special to Facebook (like the CTA button on Facebook company Pages) stand out even more.
Does it really worth to accentuate the action switches under right?
Hell yes!
Depending on your service, you can release a Page on Facebook with a unique CTA key down right of your wall graphic. Take this button into factor to consider when developing your cover pic, as well as make it clear in the image that this is a visitor's following action.
The amount of users gain access to Facebook from mobile?
As of 2019, reports Statista, 96% of Facebook's user base connect to the social media from smart phones including smart devices and tablets. That's substantial-- and also it's exactly why it's so vital to keep smartphone users top-of-mind when creating your Facebook wall photo.
On smartphone, a much bigger portion of your cover image is shut out since the profile picture and also the Page name get on top of the wall photo.
0 notes
Text
7+3+1 important tips about your Facebook covers
Just where could I find Facebook cover pics?
A wall pic is the bigger image on top of your account, over your profile photograph. Like your account picture, background photographes are public, which means any individual seeing your profile will certainly have the ability to find them. To add or change your background photo: From your News Feed, click on your name in the top left section.
What should I place as my background photograph on Facebook?
Here are some exceptional strategies you can make use of on your cover image to impress your fans & potential customers.
1. Market yourself.
2. Demonstrate key advantages of your product.
3. Construct an e-mail list.
4. Promote your followers' work.
5. Announce a competition.
6. Illustrate your goods.
7. Stimulate your followers.
8. Highlight your individuals.
9. Search something incredible on TimeLineCovers.pro
Can I eliminate a wall picture on Facebook?
1. Go to your Personal Privacy Settings, below: https://www.facebook.com/settings?tab=privacy and also Limit Past Posts.
2. Your current wall picture will still show up Public in your Cover Photos gallery, but old Cover pics should get readied to Friends by the default.
Can you produce a video clip your background photo on Facebook?
Posting a video clip as your Facebook background picture is as basic as publishing a brand-new image.
Float your mouse over the background picture on your Facebook page as well as you'll recognize a electronic camera icon turn up.
Click On the Adjustment Cover symbol. You might pick a video as your background image similarly you would certainly add a fresh cover graphic.
Just how do you update your wall pic on Facebook?
To add or alter your Web page's background image:
1. Go to your Page.
2. Hover over your cover pic and also click Include a Cover or Adjustment Cover in the top left.
3. Hit Upload Photo/Video to publish a picture from your computer system.
4. After choosing a picture, hit the image and also drag it up or down to rearrange it.
5. Click Save.
How do you craft a wall pic?
It's very easy to create fantastic Facebook covers in TimeLineCovers.pro

1. Open TimeLineCovers.pro web site and also choose Create menu.
2. Pick from thousands of backgrounds.
3. Click your fave.
4. Choose "Customize" below the cover. (Only on computer.).
5. Repair your pictures, add magnificent filters as well as modify message.
6. Save as well as share.
Can you use a GIF as a Facebook wall picture?
Not just can you utilize pictures, videos, and GIFs in your Facebook cover photo, you cover photos can likewise publish multiple images to create an image slide show.
Do I have to stress over the "20% text" rule?
Simply put, no however still try to remain aesthetic.
youtube
Back in 2013, Facebook got rid of any type of reference to the 20% policy on text in cover images however that doesn't imply you ought to go wild with using message in your wall photo.
The previous guideline stated that just 20% of your cover picture could be message. Actually, I thought that was way too limiting for online marketers, however the belief behind the regulation was a good one.
If you're going to utilize text in your background graphic, maintain that message concise. Your graphic will certainly be far more insightful and also engaging.
Just how to use a prime focus and shades that match your brand?
Think of your wall pic as the section of your Web page that's "above the fold." If it's sidetracking or confusing, individuals will certainly be more probable to click on off the Page.
Much of the most effective Facebook wall graphics include a focal point to focus visitors' interest, along with a color pattern that lines up with the rest of their brand name. Remember, your social media accounts are extensions of your organisation, as well as should give that impression to site visitors as soon as possible.
They likewise use adverse white (i.e., vacant) room as an benefit to craft the subject, any type of duplicate on there, as well as various other elements one-of-a-kind to Facebook (like the CTA switch on Facebook organisation Pages) stand apart a lot more.
Does it really worth to accentuate the activity switches on the bottom right?
Heck yes!
Relying on your organisation, you can introduce a Page on Facebook with a one-of-a-kind CTA button to the bottom right of your wall image. Take this button into factor to consider when designing your cover image, as well as create it clear in the photo that this is a site visitor's following step.
How many users access Facebook from smartphone?
As of 2019, reveals Statista, 96% of Facebook's user base connect to the social media network from mobile phones including mobile phones and also tablets. That's massive-- and also it's specifically why it's so essential to keep smartphone customers top-of-mind when designing your Facebook wall graphic.
On smartphone, a much larger part of your wall graphic is blocked out due to the fact that the account picture as well as the Web page name get on top of the wall graphic.
0 notes
Text
Winter Soldier Arm Made From Paper
I did a Bucharest Bucky cosplay last Halloween and I’m pretty proud of it. Here’s a close-up:

People have been asking me how I made it and it’s much easier to explain with pictures so I promised them a long tumblr how-to and here it finally is. This is just a forearm, meant to be worn with a henley to cover the upper arm and a glove over the hand. If you want to do a full arm and shoulder then I won’t be able to help you. I mentioned to my husband that I was considering making a full arm for next year and he gave me a look of panic, which is kind of funny because I was the one with glue all over my fingers. The house didn’t even get that messy but whatever. Husbands are still worth it and so is this arm. Here’s another close-up to show off my fake muscles:
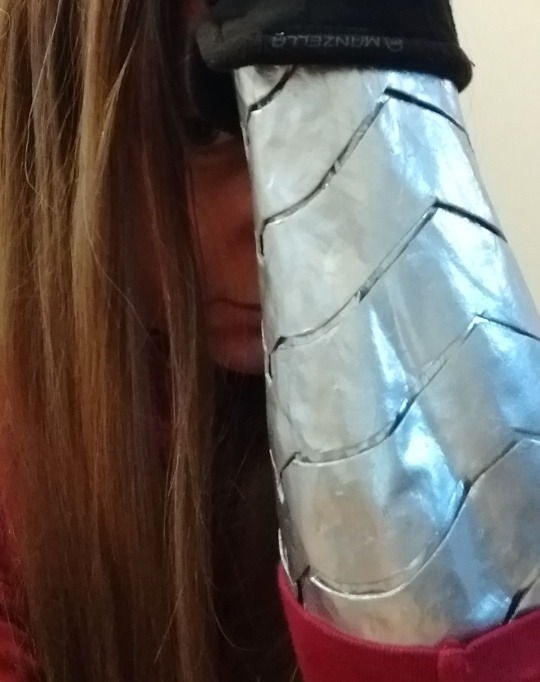
Why paper? When I first decided I wanted to do a Bucky costume, I looked at some other examples online. By far the most popular method was thin craft foam manipulated with a heat gun, but the noise and smell would probably have disturbed my child, and I didn’t want to invest in a piece of hardware that would be used once and then contribute to my household clutter forevermore. Finally, although supposedly craft-foam technique is not that difficult, I found it a little bit intimidating whereas I built this forearm with a technique from kindergarten, when we all made papier-mâché* balls by pasting newspaper strips onto balloons.
* I went to the trouble of googling the spelling for papier-mâché and it’s full of accent marks, so I’m going to cut-and-paste it into this whole post, even though it makes me look like a huge nerd. Which I am.
To make this fine, if somewhat time-consuming, specimen of cosplay craftsmanship, you will need a bunch of trash you already have and a couple inexpensive things:
1) some newspaper (a couple issues of one of those free monthly papers is probably enough, since nobody except my in-laws subscribes to the paper anymore)
2) some lightweight material for padding (more newspaper or old plastic bags)
3) an old pair of pantyhose, old t-shirt, or stretchy scrap fabric
4) tape (I used masking tape but duct tape would probably be better)
5) plastic wrap
6) a small (8 oz) jar of mod-podge ($4-$7, matte, satin, or gloss is fine)
7) a small (3 oz) can of chrome paint ($3-$6)
8) a short length of elastic or very stretchy fabric and some thread (~$2)
9) a small, cheap paintbrush. The cheapest you can find (<$1)
The complete how-I-made-it story is below the cut, plus more terrible cell phone photos and unnecessary brilliant commentary.
I spent about a month planning this thing and only 4 days making it. The whole time, I was screaming internally because although I had the whole thing planned out, I didn’t actually know for sure if it would work until I did it. But it did. Here’s how:
Step 1: make an arm-shaped form to build the papier-mâché over.
Back in my misspent youth, I successfully drafted a homemade dress pattern by having a friend duct-tape me into a T-shirt. This works on the same principle. You need some kind of flexible stuff (stretchy fabric is best) to make the base layer and keep the tape from sticking to you. I cut a leg off an old pair of panty hose and slid it over my arm. Honestly a plastic bag would have probably worked just as well. A piece of thin knit fabric (like a piece cut from an old T-shirt) would be even better. Just make sure you don’t have any exposed skin where the tape will go. Then wrap tape around your arm until the whole thing is covered in a shell like this:

You may notice that I used masking tape. I had this idea that I could capture some muscle definition by using a thinner, narrower tape. This was a mistake. Even while flexing to get the most out of my wimpy muscles, it didn’t really work. Also the panty hose wanted to contract and the tape wasn’t sturdy enough to counter that until I put a whole bunch of layers on. So save yourself a headache and use duct tape (tried and true). Your arm is widest while bent, so do most of the work in that position, but straighten it and move it around a bit to be sure that you will have room to move your arm when the thing is done.
Cut a slit in your crazy tape-sleeve to get it off and tape it back together, then stuff it with old plastic bags or newspaper so it will hold its shape.
(At this point in my project, I looked at my sad tape arm and decided by golly, it would have muscles if I had to make them up. So I taped two long pieces of crumpled newspaper where the most prominent muscles of the outer forearm would be. I don’t have a photo of this step, but I do have a nice forearm drawing tuturial and a muscle diagram in my art advice tag. Maybe those will help. Or you could be smart, unlike me, and skip the muscles.)
Step 2: use your arm form as a base to build a layer of papier-mâché
I covered the base with plastic wrap to make sure that my papier-mâché wouldn’t stick to it. Then I used Mod-Podge to paste overlapping newspaper strips over that base. If you aren’t familiar with Mod-Podge, it looks and smells just like white glue. There are probably a lot of different kinds of paste that would work here, but Mod-Podge is inexpensive and readily available. (Also, the hippy aesthetic really goes with my hairstyle.) I quickly discovered that it worked best if I applied the glue to the arm itself with a brush, then laid the newspaper strip over it and smoothed it down with my fingers. It took me a few tries to figure out the best way to lay the strips. As a result, that all-important valley between the “muscles” got papered over and I had to resort to cutting a slit in the paper and pushing it in a bit. It worked--just barely--but it was a real headache.
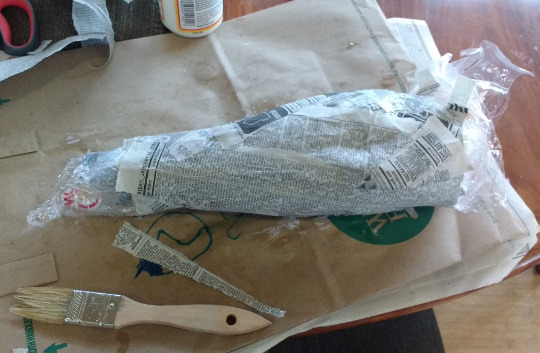
Look! Muscles!
So what is the best way to lay the strips? Definitely not like the picture above! In my opinion, a diagonal spiral around the arm works best, allowing you to lay the strip evenly and also keep track of how much you’ve covered in that layer, like this:
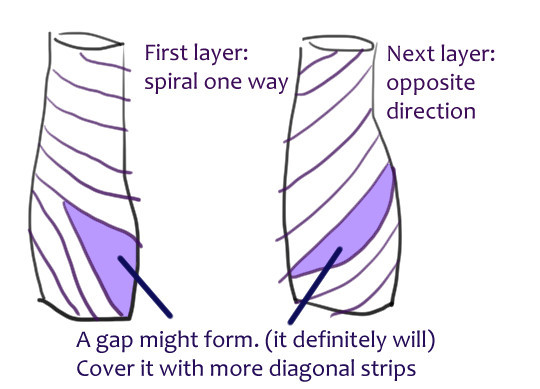
Start your strip near the wrist and let it lay the way it wants to go to stay smooth. This might result in a small gap or overlap with the strip next to it--don’t try to force them to line up exactly.
Let dry 30 minutes between layers. I did about 3 layers, or roughly the thickness of a sheet of notepaper. I figured that my arm would provide a lot of structure, and I wanted to be sure I could cut it with ordinary scissors later!
Step 3: repeat the process to build a second papier-mâché layer
Once I figured it was thick enough, I let it dry overnight, then wrapped it in another layer of plastic wrap (IMPORTANT!) and started pasting again. About 5 layers this time, or about the thickness of a notecard. I wanted this layer to be very smooth. If I’d had the time, I might have tried to do a “build-up finish” as described on the Mod-Podge jar, but it was only 2 days before Halloween so I just didn’t have time. Instead, I made sure that all my paper strips were torn rather than cut, which made a much less visible edge. Also I finally figured out the diagonal thing.
Then I coated it in a thick layer of Mod-Podge and let it dry for an hour or so.
Step 4: Draw lines for Winter Soldier Arm plates
The reference images I had were...not great...so eventually I had to shrug and make up something that made sense to me, for a very loose definition of “make sense.”
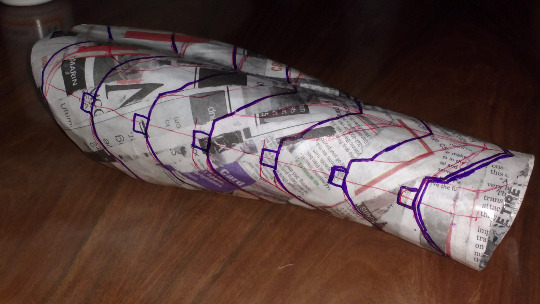
Was Zola high when he designed this?
You can kind of see the diagonal paper strips under the lines here.
I did this with different colored Sharpie pens. The purple lines are for cutting. Some of the red lines are guide lines, some are where the thinner grooves in the plates go.
I had planned to make those grooves by pressing hard with an old ball-point pen. However, I found it hard to get a good grip on this rounded thing so the line came out shakier than I liked. I panicked and decided not to do the rest, hoping no one would notice, which was a shame because the groove actually looked awesome once the paint was on.
Step 5: Cut up the outer shell
Let me pause here for a moment.
If you are reading this, then you may be thinking “this sounds like a lot of work!” Which it was! But the worst part was I didn’t know if it was even going to work at all. I didn’t have those completed photos to reassure me. I had a backup plan which was “wrap aluminum foil around my arm and call it good enough” As I built up the structure, it was starting to look like the principle was sound, but I had a lot of work ahead of me and I could still screw it up.
It was late at night on October 29th and I had to make a cut. After that, there would be no going back.
I needed to cut the tube open so that I could get my hand through it. My plan was to cut just to the right of the row of narrow plates on the inner arm. So I did.
The cut itself was fine! I pulled out the stuffing and nothing exploded or stuck to itself. The problem was that it was way too big, probably because of that muscle padding I added way back in step 1. Near my elbow especially, it was maybe an inch too wide. This might not seem like a lot, but when you are trying to hide the edge under a pushed-back henley cuff, it’s frigging huge.
Step 5a: PANIC
After I was done panicking, I had a pretty cool idea so I ended up doing this:

It’s weird now that I’m thinking about it, but I had no difficulty closing up that gap. Maybe I squeezed it a bit to train it but nothing fancy. It really wanted to curl up on itself already.
Step 5b: Cut up outer layer
This is a little tricky because I had to cut just to one side of the thick sharpie line, then just to the other side, which in practice means cutting a thin strip off the edge of every piece, to make the little gaps between the plates that give the arm its characteristic look.
I used ordinary scissors from an office supply store for most of this, new-ish but nothing fancy. For some of the fine details I turned to a pair of embroidery scissors that I had lying around and wasn’t too attached to (because this kind of thing is bad for embroidery scissors) Imagine my feeling of inverse accomplishment at achieving this:

Like a beautiful flower made of cosplay despair.
While I was doing that I was also waiting for the paint on the under-layer to dry as described in...
Step 6: Prep the under-layer
I needed some elastic to hold the join snug closed over my arm, but I had a bit of metallic stretch velour fabric left over from my kid’s R2-D2 costume, which I had saved every scrap from because it was so expensive. I figured it was stretchy enough to use in place of elastic so I did some estimating and hand-sewed in a panel and...I’m not going to go into depth here. It worked fine but honestly it was so not worth it. In the end, that overlap from step 5a hid most of the join, so I could have just stapled in some elastic and a little flap of cheap silver lamé or something. Then I painted it. I had to mask it so the fabric wouldn’t get paint on it which goes to show how poorly I was thinking things through by this point because it would have been so much easier to paint it first and then add the elastic/stretch fabric/whatever.
The paint I used was Testors 1290 Chrome Spray Enamel from a local store that specialized in model train supplies. I ran down there the morning of October 30, because of course I was doing everything last minute and panicked as is my way. Nor had I taken the time to check any reviews of paint brands. So it was that I found myself standing in the store holding a can of 1290 Chrome in one hand and a of 1246 Metallic Silver in the other. “Chrome.” I murmured to myself. “Metallic Silver. Chrome. Metallic Silver.” I eventually bought the Chrome paint because it “sounded shinier” and because I could use it to make Mad Max jokes.

WITNESS ME!
Chrome was probably the right choice, as this review demonstrates, but on the other hand I might have gotten an even better finish with a different brand, but maybe not in that convenient 3-oz size.
Remember how one of the reasons I chose papier-mâché over heat-treated craft foam was to avoid bad smells? Well, this stuff reeks like you wouldn’t believe. And, forgive me for being such a hippy, but this kind of paint is very high in harmful VOCs, so if you want to use this stuff, if at all possible, do your painting outdoors to minimize health risks. It’s not like you’ll die from painting one arm, but the more often you use this stuff, the more careful you should be.
Getting back to my Epic Forearm Story, I was concerned that some of the paint would have difficulty reaching the under-layer through the gaps between the plates so I gave the under-layer a single coat of paint to avoid any weird paint shadows. It was good practice getting a smooth coat and I was feeling pretty confident about my painting skill. Too confident.
Step 7: Glue cut-up pieces of outer layer onto under-layer
At this point, it was starting to look like my mad project would work, but only if I could finish it on time. This wasn’t reducing my stress levels any, because now I had sunk hours into this project and I had something to lose. I was also concerned that the mod-podge might have difficulty sticking to the chrome paint finish. I lined up the first piece and patiently held it in place until it had dried enough to hold its position after I put it down. Then I waited another half hour or so for it to cure. The resulting join was quite strong, but it was taking flipping forever.
Then I remembered that I didn’t hate life or myself and also that I owned a bottle of super glue. The rest of the pieces went on lickety-split.
(Super glue is not durable enough for extended wear, so if you want to wear this for more than a single Halloween, use the mod-podge)
At this point I had meant to apply another thick coat of mod-podge to seal the edges and make the foundation as smooth as possible but I completely forgot, and maybe just as well because I was rapidly running out of time. Instead I went on to...
Step 8: Apply Chrome Paint finish
The first coat went on beautifully. I was really getting the hang of this, I thought. I put the last coat on just before bed, but this one spot needed a touch more paint, I hesitated just moment too long and...bam. Saggy, bubbly finish. It was so bad it looked like it might actually start to drip, so I grabbed a piece of newspaper and kind of wiped/scraped off some of the excess paint were it was collecting at the points, hoping all the while that I wasn’t marring the finish even further. I was practically in tears but even if I’d had the time, it’s not like I was going to start over so I went to bed and hoped for the best.
In the morning it didn’t look so bad, but I was worried about the edge digging into my arm so I tried to put a strip of that silver fabric over the edge to cushion it a bit, except that fabric is really hard to glue and it only just barely dried enough to wear in time for the trick-or-treating event that afternoon.
Step 9: Wear to widespread acclaim
Or not. Most people didn’t notice that I was wearing a costume at all, which is what happens when you are out on a busy sidewalk with an adorable 3-year-old child. Or people noticed, but didn’t remember Bucky well enough to recognize it. I got a complement on my “nice bracelet” so I guess the metal effect wasn’t too bad. But then I insisted on going to my Friendly Local Comic Book Store to enter the costume contest, and even though it was out of our way and I didn’t win, it was worth it to see the look on the face of the woman working there, just one look of admiration from a fellow nerd and I was over the moon. Hours of work, justified.
In conclusion, this construction method looks great but is somewhat uncomfortable to wear. It would have been better if I had lined it with felt or something. Also this was probably way more difficult than craft foam in the long run. Still, it is very light-weight, relatively cheap to make and allows for muscle contours if you are into that kind of thing. It might have been the best Bucky forearm ever but I flubbed the finish. If anybody decides to make one like it, please show me a picture or something, and learn from my mistakes. Finally, don’t get in any fights with spider-lings.
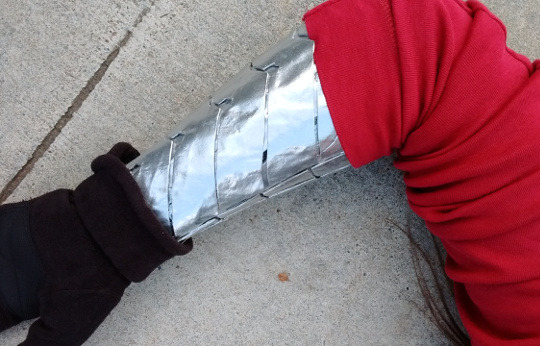
THE END.
#cosplay#winter soldier#bucky barnes#marvel cosplay#cosplay how-to#cosplay instructions#metal arm#cosplay stories#marvel#mcu#ca:cw#cosplay armor#what are good tags I don't know#my posts#my art
209 notes
·
View notes