#drawer android tutorial
Explore tagged Tumblr posts
Visit Tumblr Blog
Explore Tumblr blogs with no restrictions, modern design and the best experience.
Last Seen Tumblr Blogs


Fun Fact
Tumblr has been banned in Indonesia for providing people with access to pornographic content.
Text
Hands-on: Debugging and Profiling Large Android Apps with ASAN and ANR
Introduction Hands-on: Debugging and Profiling Large Android Apps with ASAN and ANR is a critical aspect of app development that ensures the stability and performance of Android applications. In this tutorial, you will learn how to use Address Sanitizer (ASAN) and Artificial Neural Network Drawer (ANR) to identify and fix crashes, memory leaks, and other memory-related issues in your Android…
0 notes
Text
Tiranga Apps Download Embrace Culture and Innovation with Easy Access
In today's digital landscape, mobile applications have become an integral part of our daily lives, offering everything from entertainment to productivity solutions. Among the emerging trends, Tiranga Apps have gained prominence by merging cultural themes with modern technology. If you're interested in exploring these innovative apps, understanding the process of downloading Tiranga Apps can help you access a unique blend of tradition and technology. This article delves into what Tiranga Apps are, their key features, and how to download them effectively.

What Are Tiranga Apps?
Tiranga Apps are mobile applications that integrate elements inspired by the Indian national flag, known as the Tiranga, into their design and functionality. The term "Tiranga," which translates to "tricolor," reflects the colors of the Indian flag��saffron, white, and green. These apps often incorporate cultural, historical, and artistic themes related to Indian heritage, offering users a rich and immersive experience that celebrates and connects with their cultural roots.
Key Features of Tiranga Apps
Cultural Integration: Tiranga Apps are designed to reflect Indian cultural values and heritage. This integration is evident in their visual design, which often features the colors and symbols associated with the Indian flag. The apps might also include content related to Indian festivals, history, and traditions.
Diverse Categories: Tiranga Apps span various categories, including educational, entertainment, productivity, and lifestyle. Whether you’re interested in learning about Indian history, exploring traditional music, or finding tools to enhance your daily life, there’s likely a Tiranga App tailored to your needs.
User-Friendly Design: Despite their cultural focus, Tiranga Apps prioritize ease of use. The interfaces are typically designed to be intuitive and accessible, ensuring that users from all backgrounds can navigate the apps with ease.
Interactive Features: Many Tiranga Apps include interactive elements such as quizzes, games, or virtual tours. These features not only entertain but also educate users about Indian culture and traditions in an engaging manner.
Community Engagement: Some Tiranga Apps offer social features that allow users to connect with others who share their interests. This might include forums, chat functions, or social media integration where users can discuss cultural topics and share experiences.
Regular Updates: To keep users engaged, Tiranga Apps often receive updates that include new content, features, and improvements. These updates ensure that the apps remain relevant and continue to offer fresh and engaging experiences.
How to Download Tiranga Apps
Choose Your Platform: Tiranga Apps are available on various platforms, including iOS and Android. Determine which platform you prefer and ensure that the app you want to download is compatible with your device.
Find a Trusted Source: To download a Tiranga App, visit a reputable app store or the app’s official website. For Android devices, this is typically the Google Play Store, while iOS users will use the Apple App Store. Avoid downloading apps from unverified sources to protect your device from potential security risks.
Search for the App: Use the search function in your chosen app store to find the Tiranga App you’re interested in. You can search by the app's name or related keywords.
Download the App: Once you locate the app, click on the download or install button. The app will be downloaded and automatically installed on your device. Make sure you have a stable internet connection to ensure a smooth download process.
Open and Set Up: After installation, open the Tiranga App from your device’s app drawer or home screen. Follow any initial setup instructions or tutorials to get acquainted with the app’s features and settings.
Customize Your Experience: Explore the app’s settings to customize your experience according to your preferences. This might include adjusting notification settings, language preferences, or personalizing content.
Benefits of Using Tiranga Apps
Cultural Connection: Tiranga Apps offer a unique way to connect with Indian culture and heritage, providing users with valuable insights and experiences related to their traditions.
Educational Value: Many Tiranga Apps have educational components that enhance users’ knowledge about Indian history, festivals, and arts. This educational value makes the apps both enjoyable and informative.
Entertainment and Engagement: The diverse range of Tiranga Apps ensures that there’s something for everyone, from interactive games and quizzes to educational resources and cultural content.
Community Building: Social features in Tiranga Apps foster a sense of community, allowing users to connect with others who share their interests and participate in cultural discussions.
User-Friendly Experience: The intuitive design and regular updates ensure that Tiranga Apps remain accessible and engaging, providing a satisfying user experience.
Conclusion
Tiranga Apps represent a vibrant intersection of culture and technology, offering users a unique way to explore and engage with Indian heritage. By following the steps outlined above, you can easily download and enjoy these innovative apps, benefiting from their rich cultural content and interactive features. Whether you’re interested in learning about Indian traditions, accessing educational resources, or simply enjoying culturally themed entertainment, Tiranga Apps provide a valuable and enriching digital experience.
0 notes
Text
We Tried Ragnarok Origin and So Far…
Published: August 20, 2021 Last Updated on October 9, 2021
(Reposted from bunnhop.com)
…we love it! Ragnarok Origin feels like the original Ragnarok Online, which I have been playing since–believe it or not–I was 9. There have been a few times when I’d quit to take care of real-life responsibilities only to come back after a few months. It’s because the nostalgia and the sense of community are too strong for me to paste it on a scrapbook page, shove it in a drawer that nobody uses, and leave it there forever that in a few years I’d forget it ever existed.
I always come back... Unless this new game is good enough to break this cycle.
youtube
While waiting for Ragnarok Origin to be released in NA, we decided to take a sneak peek by playing in one of the Japanese servers. As you can see in the video above, we took our time to check every nook and cranny of the Adventurers’ Academy, talk with all the NPCs, and dissect the Character/Stats window.
We found that some non-player characters (NPCs) are voiced, although these voice dialogues are not exclusive to one NPC. The ambient NPCs are as much fun to talk to as the main ones, with some offering insight into the world and its lore.
We translated all the dialogues, the UI, as well as other important details from Japanese to English so that you can all share the experience with us. We will continue to make translated playthroughs and how-tos until its official release in English to help you get a head start on the game! We hope you’ll like the video and that you’ll share your thoughts on the game in the Comment Section.
Ragnarok Origin vs. Ragnarok M vs. Ragnarok Online
Honestly, I’m not very fond of mobile games since I’m a PC gamer through and through, but I can see myself enjoying Ragnarok Origin much longer than my stint with Ragnarok M last year, which I had only played for two months before finally giving up. I tried it on mobile initially, which I found is almost impossible for me to do since I can’t hold up my arms to hold the phone and keep that position for hours.
Ragnarok M is not your typical mobile game that you can play casually for 20 minutes whenever you feel like it. Since it’s heavy on RPG, you’ll be invested in your character and would want to see it grow through quests and combat, and also interact with other players via the party and guild systems, as well as dungeon raids and boss monster fights.

Then, I tried it on Bluestacks which is one of the top Android emulators out there, but eventually got bored because the earlier quests that we did involved going back and forth between two NPCs from two different maps. To make things worse, the game was quite slow and clunky for us that it just didn’t feel right. We’re used to playing the original RO which runs much faster and smoother, so it felt more natural and intuitive even though it’s click-to-move.
Ragnarok Origin, in our experience, feels familiar compared to Ragnarok M. For starters, the former’s beginners’ area tells a story, compared to the latter where your character just appears in Prontera South Gate out of nowhere (as far as I can remember). Like in Ragnarok Online, you arrive at the tutorial area as a Novice adventurer in need of guidance.
The original tutorial area in RO called “Novice Training Grounds” was an island with a castle that functioned like a school. It was there where new adventurers were taught how to interface with the game, including basic combat, status attributes, party system, and ultimately the various Job classes. This was, however, replaced in the iRO server in 2012 with the Criatura Academy on the northern part of Izlude town.

In ROO, it’s pretty much the same as the old RO tutorial. Riding an airship, you arrive on an island with a castle called “Adventurers’ Academy.” With other Novices like you running around, you go with a female guide who introduces you to an old professor who talks about the world of Ragnarok and its lore, and to a warrior who teaches the basics of combat, skills, and Job classes. And then you change to your First Job. It’s easy to follow even for total beginners who have never played any Ragnarok game before.
I prefer this tutorial to that of Ragnarok M‘s Eden Group considering they were only later introduced in RO as a group that helps new adventurers by giving them beginner equipment, consumables, and EXP gained through quests posted by random villagers in need. Yes, the Eden Group is there to help but not to train Novices. But that’s just me. Which one do you like better?
Will Ragnarok Origin be as memorable as Ragnarok Online? Will it attract as many players as Ragnarok M? For now, we’ll continue playing in the Japanese server to bring you as much information as we can to prepare you for its English release. We hope you’ll join us in this new adventure!
0 notes
Text
Snaptube for pc
Title: SnapTube for PC:
A Comprehensive Guide
In an era dominated by online streaming platforms and social media, the need for versatile video downloading tools has become increasingly apparent. SnapTube emerges as a leading solution, offering users the ability to download videos from various sources with ease. While primarily known for its mobile version, SnapTube's compatibility with PC opens up a world of possibilities for users seeking flexibility and convenience in managing their media content. In this article, we delve into the realm of SnapTube for PC, exploring its features, benefits, and how to harness its full potential.
Understanding SnapTube: A Versatile Video Downloader
SnapTube is a feature-rich video downloader app that allows users to download videos from a wide range of platforms, including YouTube, Facebook, Instagram, and more. Its intuitive interface and robust functionality have made it a favorite among users seeking to download and manage their favorite videos offline.
Features of SnapTube for PC
1. Wide Compatibility:
SnapTube for PC is compatible with various Windows operating systems, making it accessible to a broad user base. Whether you're using Windows 7, 8, or 10, you can seamlessly integrate SnapTube into your PC environment.
2. High-Quality Downloads:
One of the standout features of SnapTube is its ability to download videos in high definition (HD) quality. Users can choose from various resolutions, ensuring optimal viewing quality based on their preferences and device specifications.
3. Batch Downloading:
SnapTube for PC allows users to download multiple videos simultaneously, saving time and effort. With just a few clicks, you can queue up your favorite videos for downloading and let SnapTube handle the rest.
4. Audio Extraction:
In addition to downloading videos, SnapTube also offers the ability to extract audio from videos. This feature is particularly useful for creating playlists or enjoying your favorite music offline.
5. Built-in Search Functionality:
SnapTube features a built-in search function that enables users to discover and download videos directly from within the app. Whether you're looking for the latest music videos, tutorials, or entertainment content, SnapTube makes it easy to find and download what you need.
How to Download and Install SnapTube for PC
Download an Android Emulator: Since SnapTube is primarily designed for Android devices, you'll need to download an Android emulator for your PC. Popular options include BlueStacks, NoxPlayer, and Andy.
Install the Emulator: Once you've downloaded the emulator, follow the on-screen instructions to install it on your PC.
Download SnapTube APK: Visit the official SnapTube website or trusted third-party sources to download the SnapTube APK file.
Install SnapTube: After downloading the SnapTube APK, open the emulator and navigate to the location where the APK file is saved. Double-click the file to initiate the installation process.
Launch SnapTube: Once installed, you can launch SnapTube from the emulator's app drawer and start downloading your favorite videos.
Conclusion
SnapTube for PC offers a convenient and efficient solution for downloading and managing videos from various online platforms. With its user-friendly interface, high-quality downloads, and versatile features, SnapTube empowers users to enjoy their favorite content offline, without limitations. By following the steps outlined in this guide, you can unlock the full potential of SnapTube on your PC and elevate your media consumption experience to new heights.
1 note
·
View note
Text
📱🕵️♂️ Can I Use My Old Phone as a Spy Camera? 🕵️♀️📷

Hey everyone! 👋 Have you ever wondered what to do with your old smartphone gathering dust in your drawer? 🤔 Well, here's a cool idea: Turn it into a DIY spy camera! 📹📡
It's not just a fun project but can also have some practical uses like home security or monitoring your pets. 🏡🐾 So, if you're curious about repurposing your old phone for some undercover action, here's a quick guide to get you started.
📚🔍📷Read the full tutorial on my blog to learn more about how to use your old phone as a spy camera: https://guideclever.com/can-i-use-my-old-phone-as-a-spy-camera/
1️⃣ Choose the Right App: There are plenty of spy camera apps available for both Android and iOS. Look for one that suits your needs and has good reviews. 📱📥
2️⃣ Positioning: Decide where you want to place your old phone. Make sure it has a clear view of the area you want to monitor. 📍👀
3️⃣ Connectivity: Ensure your old phone is connected to a Wi-Fi network so you can access the live feed remotely. 📶🌐
4️⃣ Power Supply: Keep your old phone plugged in or connected to a power source to avoid running out of battery during surveillance. 🔌🔋
5️⃣ Security: Don't forget to secure your camera feed with a password or PIN to prevent unauthorized access. 🔒🤐
6️⃣ Testing: Before you go full-on spy mode, test your setup to make sure everything is working as expected. 🧪✅
Remember, while this can be a fun and useful project, always respect privacy laws and the consent of those being monitored. 🚫👁️🗨️
Have you ever tried repurposing an old phone as a spy camera? Share your experiences and tips in the comments below! Let's get creative together! 🤩
0 notes
Text
Creating User-Friendly iOS and Android Designs: Navigating Away from Common Mistakes

Designing user-friendly mobile apps for iOS and Android platforms is crucial to ensure a positive user experience and app success. In this blog, we will explore the common mistakes that developers often make while designing for these platforms and provide practical tips to avoid them. By following these best practices, you can create intuitive and engaging mobile applications that users will love.
Emphasize Intuitive Navigation
Mistake: Complex navigation structures can confuse users and make it difficult for them to find what they're looking for, leading to frustration and app abandonment.
Solution: Implement a simple and intuitive navigation system that follows platform guidelines. Utilize standard UI components like tab bars, navigation drawers, and bottom navigation to provide familiar user experiences. Keep the most important functions within easy reach and ensure a consistent flow throughout the app.
Responsive Design for Different Screen Sizes
Mistake: Neglecting responsive design can result in a poor user experience on various screen sizes, causing layout issues and content overlap.
Solution: Adopt a responsive design approach to adapt your app's layout dynamically based on the device's screen size. Utilize layout constraints and flexible designs to ensure elements adjust proportionally on both smaller phones and larger tablets.
Optimize App Performance
Mistake: Overloading the app with unnecessary animations, heavy graphics, and background processes can slow down the app's performance, leading to user frustration and increased battery consumption.
Solution: Optimize your app by reducing resource-intensive elements, compressing images, and minimizing the use of animations where possible. Leverage lazy loading to load data and media only when needed, improving app responsiveness and conserving battery life.
Prioritize Accessibility
Mistake: Ignoring accessibility features can exclude users with disabilities, making your app less inclusive and reducing its potential user base.
Solution: Adhere to accessibility guidelines and make your app accessible to everyone. Provide alternative text for images, ensure proper color contrast, use semantic HTML elements, and enable voiceover/screen reader support. Testing your app with assistive technologies is crucial to ensure a seamless experience for all users.
Consistent and Clear Typography
Mistake: Using inconsistent or illegible fonts can make the app visually unappealing and difficult to read.
Solution: Choose a clean and legible font for your app and maintain consistency throughout. Avoid using too many different font styles and sizes, as it can create a cluttered look. Adjust font sizes based on the device's screen size and resolution to ensure readability. Also Read: Top Flutter App Development Companies in 2023
Streamlined Onboarding Experience
Mistake: A lengthy or confusing onboarding process can deter users from using the app further.
Solution: Keep the onboarding process simple and concise, focusing on the essential features and benefits of your app. Offer optional tutorials or tooltips to guide users through key functionalities. Consider implementing a skip option for users who are already familiar with the app.
Thorough Testing and Bug Fixing
Mistake: Launching an app without adequate testing can result in a poor user experience due to bugs and glitches.
Solution: Conduct rigorous testing on various devices, screen sizes, and OS versions to identify and fix any issues. Regularly update your app with bug fixes and improvements to maintain a seamless user experience.
Responsive Touch and Gestures
Mistake: Unresponsive touch interactions and conflicting gestures can lead to user frustration and difficulty navigating the app.
Solution: Implement smooth and responsive touch interactions that match the platform's guidelines. Ensure that gesture controls are intuitive and don't conflict with native OS gestures, such as swiping or pinching.
Conclusion
Designing user-friendly iOS and Android apps is a continuous process that requires attention to detail and adherence to best practices. By avoiding common mistakes and implementing intuitive navigation, responsive design, and accessibility features, you can create mobile apps that users will love. Prioritizing performance optimization, clear typography, streamlined onboarding, and thorough testing will further enhance the user experience and contribute to the success of your app in the competitive app market.
About Getwidget
To hire Android app developers is a critical step towards creating a successful mobile app. With an ever-growing pool of candidates and varying skill levels, finding the perfect fit can be challenging. However, GetWidget is here to simplify the hiring process and help you discover the ideal Android app developer for your project.
GetWidget is a leading online platform that connects employers with skilled Android app developers. It serves as a one-stop destination for businesses and startups looking to hire professionals with expertise in building Android applications. By leveraging GetWidget, employers can easily browse through a vast pool of developers, review their portfolios, and assess their skills to make informed hiring decisions.
#Flutter App Development#Flutter App Development Company#Flutter App Developer#Hire Flutter Developer
0 notes
Text
Unleash the Battle Royale: Download Free Fire Now
Introduction
Free Fire, the exhilarating battle royale game, has taken the gaming world by storm with its fast-paced action and intense gameplay. If you're eager to dive into the thrilling battles and showcase your skills, you'll need to download Free Fire on your device. In this guide, we'll provide you with a step-by-step tutorial on how to download Free Fire, ensuring that you can embark on your battle royale adventure in no time. Get ready to unleash the excitement of Free Fire by learning how to download the free fire now!
Step 1: Access the App Store or Play Store To begin, locate and open the App Store (for iOS users) or the Play Store (for Android users) on your device. These platforms are where you can find and download apps and games.
Step 2: Search for Free Fire Using the search bar at the top of the screen, type "Free Fire" and tap the search icon. This will initiate the search for the game in the store's database.
Step 3: Select the Official Free Fire App From the search results, look for the official Free Fire app developed by Garena International. Tap on the app to access its details page.
Step 4: Tap the "Install" or "Download" Button On the Free Fire app page, you'll find an "Install" or "Download" button. Tap on it to start the download process. You may need to provide your Apple ID password (for iOS users) or confirm the download (for Android users).
Step 5: Wait for the Download to Finish The game will now start downloading to your device. Depending on your internet connection speed, this may take a few minutes. Be patient and ensure you have a stable internet connection.
Step 6: Launch Free Fire Once the download is complete, locate the Free Fire app icon on your device's home screen or app drawer. Tap on it to launch the game.
Step 7: Sign In or Create an Account Upon launching Free Fire, you'll be prompted to sign in with your existing account (if you have one) or create a new account. Follow the on-screen instructions to complete the process.
Step 8: Start Playing Free Fire With the game installed and your account set up, you're ready to start playing Free Fire. Explore the game's features, join battles, and strive to be the last survivor standing!
Conclusion
By following these simple steps, you can easily download Free Fire and embark on an exciting battle royale experience. Whether you're playing on iOS or Android, the App Store or Play Store will provide you with the official Free Fire app. Get ready to unleash the thrill and adrenaline of this action-packed game by downloading Free Fire now. Prepare yourself for intense battles, strategize your moves, and aim for victory in the ultimate battle royale arena!
0 notes
Text
Code to Create Navigation Drawer in Android App
Create Navigation Drawer in Android App
Create Navigation Drawer in Android App Being an app developer, one should know how to create a navigation drawer, of course, you will have the code for navigation drawer from many sources code sites. Seizing instant code and implementing it as it is in your app is not a big deal, what if you want something other than the size code? you need to make changes to the enfolded code. Without proper…

View On WordPress
#android#android app drawer#android drawer#android drawer menu#android gps#app drawer android#apps drawer#drawer android#drawer android tutorial#drawer app#How to create navigation drawer in android#nav android#navigation drawer android tutorial#navigation menu android#sliding draw#sliding drawer#sliding drawer in android tutorial#what is navigation drawer
0 notes
Text
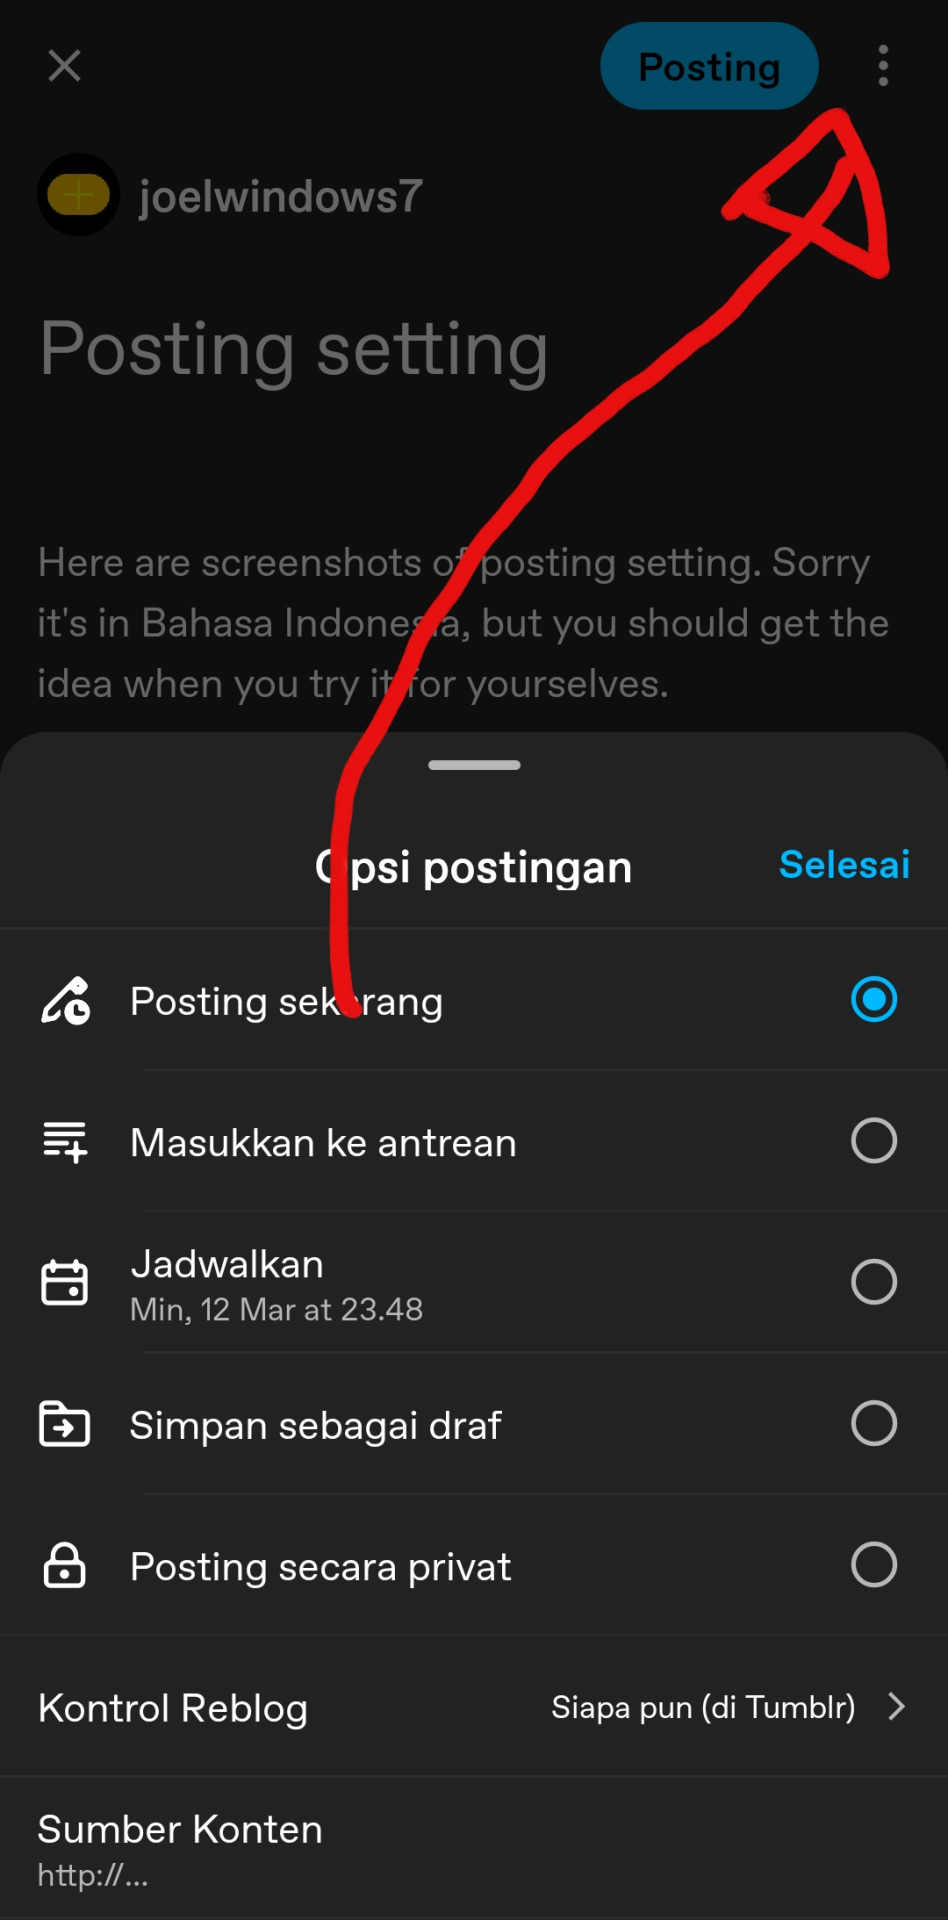
Posting setting
Here are screenshots of posting setting here in Android Tumblr APK. Sorry it's in Bahasa Indonesia, but you should get the idea when you try it for yourselves.
Access by pressing the 3 dots on right
You'll be presented with this drawer
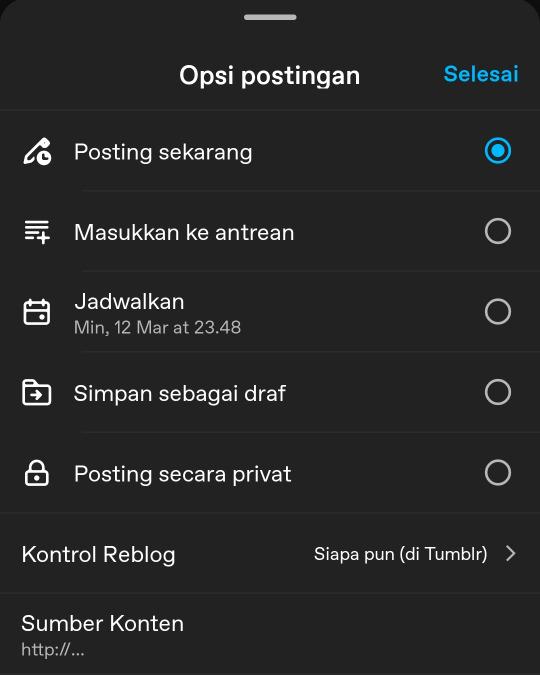
There are:
When to post
Reblog permission
Sauce
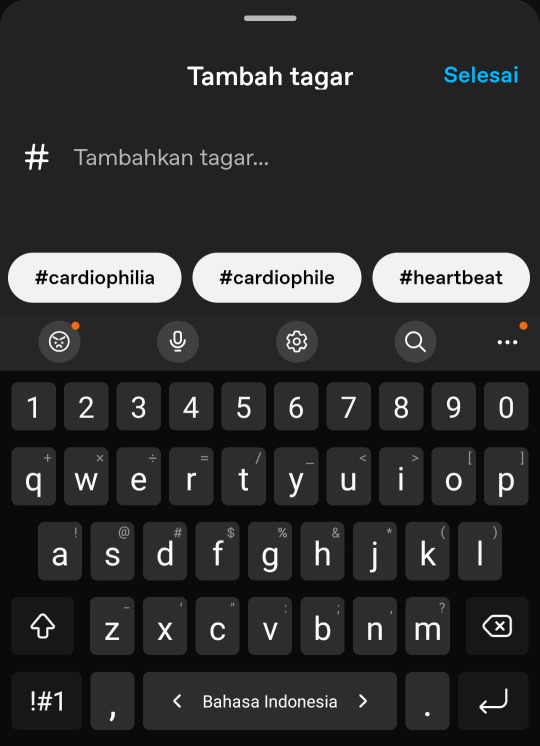
Also, the hashtag
And finally NEW!!! Community Label yey!

Nah this not gonna a tutorial or anything, all gamers can figure this out, even brain trouble could do this.
I'm gonna point out something still wrong here.
Reblog control + Community Restricted 2018
I found a guy that notorious for setting his video to Nobody allowed to reblog. Well, I'll just link it, easy! No. It's not that hopeful for many.
combined by the fact he was a victim back in.. uh 2018 Tumblr NSFW purge, yess. The... the entire blog channel NSFW Restricted still in place, and that you still need an account. See what's wrong here? It destroys all anonymous Archivers like Archive.org!!!
What the peck, man! I want to reblog so if you gone, we still have it. I already tried to link that your post since people are so disrespectful, but guess what, I PECKING TRIED, and the not logged in crawler cannot pecking access it!! OH MY GOD!!!! I really hope that guy didn't declare hehehehee, I win, f888 you, I hate y'all!. No, that's can't be. I hope he hear this and reconsider his reblog permission setting whenever video, okay? Ask tumblr to get rid of that legacy betrayal scar and use this weaker new Community Label!!
Which infact I did tried with Archiver and it still crawlable, btw! Idk, my blog already has website mode, try here
Yes it's true, Archive.org can crawl not suitable for wumpus posts I reblogged and my own!!! Yey!!!
Pls!! Let us peserve!! Idk man
Twitter Syndicate gone
Did you notice that the Post to Twitter gone? Yeah. I already heard the API will be paid due to spam scammers abusing it. W or L? Let us know about this Elon's decission
But eh.. what's the point anyway? Personally, I mostly reblogs heartbeat stuffs and most of them tend to be.. 😏😏😏😏😏, yeah. And it could mess things up, if I didn't careful. Can't let this happen, since my Twitter is the historical artifact where I got my username you're seeing now on every account I have. Idk.
End
By JOELwindows7
Perkedel Technologies
CC4.0-BY-SA
2 notes
·
View notes
Text
Creating a Custom Navigation Drawer with Android Navigation
Introduction Creating a Custom Navigation Drawer with Android Navigation is a crucial aspect of building a robust and user-friendly Android application. A navigation drawer provides a convenient way for users to access frequently used features, settings, and other essential information without having to navigate through the main content of the app. In this tutorial, we will guide you through the…
0 notes
Text
Vuescan App

Vuescan App Crack
Vuescan App
Vuescan Apps
Vuescan Appliances
VueScan Pro is a powerful scanning application that allows you to acquire high-quality images using a flatbed or film scanner. If you are not satisfied with the software delivered by the scanner vendor or if you want to improve it with new functions you should try this program.
Features:
Download VueScan and start scanning again in 60 seconds. Download VueScan for Windows Download VueScan Download VueScan for other operating systems or older versions. Truly the best scanning App for Mac! See review on Facebook. Louise Adams Quidort. VueScan allowed me to still use my ScanSnap S1500M. Saved me from buying a new document. VueScan Mobile allows you to seamlessly scan documents and photos straight to your Android device from HP, Canon, and Epson WiFi printer/scanners. The free version of VueScan mobile includes the core features of VueScan Mobile. We will be releasing a paid version soon with more advanced features. Purchase VueScan and get a free license for SoftMaker Office Standard 2021 This month we're partnering with SoftMaker to offer SoftMaker Office 2021 to all our customers for free. SoftMaker Office is the excellent drop-in replacement for Office on Windows, macOS, and Linux. The perfect complement to VueScan.
Scan Documents – Whether you need to scan a single page or a hundred page book, VueScan has the tools to help you. – Scan with Flatbed and Automatic Document Feeders (ADF) – Scan to PDF (Single and Multipage) – Optical Character Recognition (OCR) – Automatic Color Detection – Small document file sizes – Automatic document deskewing
Scan Photos – Do you have a box full of photos in your drawer? Use VueScan to get them on your computer, and off your to-do list.
Scan to JPG or TIFF – Whether you’re saving a few snapshots or archiving boxes of prints, VueScan has the tools you need to output your scans at either the highest possible quality or a large number of good quality scans.
Scan with Flatbed and Automatic Document Feeders (ADF) – VueScan supports over 3000+ different scanners from 35 manufacturers, even scanners that don’t have drivers from their manufacturers anymore.
Preset photo sizes for faster scans – VueScan improves one of the slowest parts about scanning by scanning only the part of the flatbed where your photo is. So you can spend less time scanning, and more time enjoying your photos.
Scan multiple photos on the flatbed – Scanning multiple photos with VueScan is very simple. Just put them in the corners of the flatbed, do a preview, and manually crop each of the photos without needing to do another scan.
Automatic file naming for faster scans – Don’t waste time manually naming every photo, use VueScan’s auto naming feature to include dates, numbers, or other prefixes and suffixes in your file names.

Remove fading and correct colors – Stay out of photoshop and save the best version possible of your photos with VueScan’s built in features to remove fading, and correct colors. – Scan Film and Slides
VueScan is the ultimate tool for all your film and slide scanning needs. – Works with almost all film/slide scanners – Scan to JPEG/TIFF/RAW – Infrared Dust Removal – Color correction – IT8 Calibration – Photoshop Integration
Proof:
What’s new in version 9.7.35:

• Added support for 16 new HP scanners – Deskjet 2300 – Deskjet 2700 – Deskjet 4100 – Deskjet Ink Advantage 2300 – Deskjet Ink Advantage 2700 – Deskjet Ink Advantage 4100 – Deskjet Plus 4100 – Deskjet Plus 6000 – Deskjet Plus 6400 – ENVY 6000 – ENVY Pro 6400 – Scanjet Flow 5000 s5 – Scanjet Flow n7000 snw1 – Scanjet Pro 2000 s2 – Scanjet Pro 3000 s4
Homepage: https://www.hamrick.com/
Installation/Activation Instruction is Included in the folder!
Torrent Contain:
Size: 20.8MB
x64
x86
FRIENDLY WEBSITES
Tutorials For Free, Guides, Articles & Community Forum.OneHack.Us
Download Free Courses Online
FreeCoursesOnline.Me
Vuescan App Crack
RELATED POSTS
Image CaptureOperating systemmacOSTypeImage importer
Image Capture is an application program from Apple that enables users to upload pictures from digital cameras or scanners which are either connected directly to the computer or the network. It provides no organizational tools like iPhoto but is useful for collating pictures from a variety of sources with no need for drivers.
Vuescan App

Image Capture is scriptable with AppleScript, and may be manipulated with Mac OS X v10.4 (Tiger)'s 'Automator' application. As of Mac OS X 10.4, Image Capture's AppleScript dictionary does not open in Script Editor. As of Mac OS X 10.6 only the Image Capture Web Server opens in Script Editor.
See also[edit]
Vuescan Apps
References[edit]
Vuescan Appliances
Retrieved from 'https://en.wikipedia.org/w/index.php?title=Image_Capture&oldid=888403124'
1 note
·
View note
Text
How to Download and Install Imo Messenger for Pc
Imo is a android app, which you can use in your android Phone, which is available on Google Play Store. This app allows you to send and receive free sms, video calls etc. If you installed Imo on Pc, then you must have working Internet connection on your Phone. so if you want to install IMO on your Pc, then you must use Bluestacks on your PC. There are some other chatting apps, which are Imo alternatives, but believe me Imo for Pc is the best.
If you are owner for a mac, then you must have a look at this Imo for Macbook. So imo download for pc windows 7 now, and install in your imo for pc. You can download and use IMO in your PC. This is the best way ever for download and use IMO in PC for free. Imo for pc is the one of the best way, to use imo with your PC. if you don’t have smartphone, and want to use imo in pc, then simply follow above tutorial.

imo for pc free download windows 7 imo video call free download for windows 7/ You can also download and install IMO on your Windows 7 PC. Now it’s possible to download and install IMO in your Pc, with the help of Android Emulator, which is known as Bluestacks. This is the best Emulator, which is available right now. You can easily download and Install IMO on your Desktop, and enjoy Free Audio / Video calling with your friends or Family. this Guide will perfectly work for you without any issues. Nowdays, Chrome Extension is also available for use imo for pc, which you can install in your Google Chrome Browser.
With the help of this internet messaging apps, you will be able to make audio and video calls in your pc easily without any issues at all for use free instant messenger. In Windows 7, there are many ways to installing IMO. you can install it in Chrome, of you can use below mentioned guide, you can also checkout Youwave Emulator. So checkout the best and easy guide for installing IMO on your Pc with easy way. Checkout imo download for pc windows 8 now from below guide.
Must See – Imo app Review
Alternate Way for Install IMO On Bluestacks If Play Store is not working in your Bluestacks, or you have any other issues while downloading IMO in your PC with play store, then you can follow below guide, for use imo in bluestacks without using play store. this method is based on apk, which you can manually install in bluestacks. Checkout step by step guide now from below.
At first, Install Offline Bluestacks Installer on your PC from This link Bluestacks Offline Installer Now, After Download and Install Bluestacks Offline Installer, it will Add a Icon in your Desktop. Just Click on it, and it will launch Bluestacks. For first time, it will take some time to load, depend on your Pc Performance. Now, Download IMO Apk (imo free download) on your PC Manually from here – IMO Apk imo for pc download
Note – Untick Download with Secured Download manager option from above link for download the File.
After Download IMO on your Pc, Double Click on Imo app, and it will start installing Imo via Bluestacks. If it’s not started installing IMO for pc, then check if Bluestacks is installed properly or not, or simply restart your Pc once. After few seconds, It will show you a notification, that Imo have successfully installed, congratulations, you have Successfully Installed IMO on your PC, with this simple Guide. So now, no worry about anything. Now you are enjoying video calling app in your pc for free. And you are done. Open IMO From Bluestacks, Login with your Account, or sign up if you don’t have account already. and you are done. So with this way, you can download and install this awesome imo app on your PC with the help of bluestacks. You can follow step by step guide and enjoy it. For more queries, simply drop a comment below.
Video Tutorial on How to Install Imo for pc on Bluestacks So Guys, This was the easy way for use imo instant messaging. If you have any issues, while following above tutorial, then checkout more simple steps for how to install instant messenger download with the help of bluestacks. Checkout video tutorial from below, for better understand this trick. Installing imo for pc maybe little difficult for newbie, so you can also watch full video from below about installation process of imo for pc.
Must see – Imo app for Blackberry Devices
Install imo free video calls and text with Youwave in PC / Computer If your PC don’t have 2GB Ram, then Bluestacks will not run on your Pc, because Bluestacks is only for PC with more than 2GB ram. So what can you do if your Pc don’t have 2GB ram? You can’t install Imo on your Pc? Absolutely Wrong, you can still install instant messinger, if your Pc have less than 2Gb ram. this is possible with the help of youwave. you can easily use Youwave in your Pc, and Install IMO on your Pc, without Bluestacks, and with the help of Youwave. Checkout Simple Steps for use / install Imo For Pc without bluestacks, in youwave easily. So If you are interested in this Guide, then let’s checkout it’s Steps from Below Now.
imo for pc youwave imo for pc youwave At first, Install Youwave in your PC from here – Download Youwave download imo for pc
After Download and Install Youwave in Your Pc, now you have to Open it, and after youwave Opens successfully in your Pc, now Download Imo apk in Your Pc from here. After that, In Top Left Corner of youwave, you will see a option of Path to apps, and now Select Folder in which you was Downloaded Imo apk. which is also known as imo for android. youwave imo for pc
And it will show you imo for pc app in left panel of youwave, Just Double click on it, and it will Start Installing IMO app in Youwave. So with this way, you can easily Install Imo on youwave, Open App drawer from Youwave, and you are done, launch Imo app from there, and login with your IMO account, or sign up for a new account if you don’t have IMO account.
1 note
·
View note
Text
Mastering React Learning: A Complete Information

React Native is a popular JavaScript framework that enables developers to build mobile apps for iOS and Android platforms using a single codebase. It offers a range of features and benefits, including fast development, hot reloading, and a large community of developers. In this blog, we will provide a comprehensive guide to mastering React Native and building high-quality mobile apps. For more updates like this, keep visiting us on The React Company.
What is React Native?
React Native is a JavaScript framework that allows developers to build mobile apps for iOS and Android platforms using a single codebase. However, It was developed by Facebook in 2015 and has gained popularity among developers due to its fast development, efficient performance, and easy maintenance. React Native uses a declarative approach to build user interfaces, which makes it easier to write code and maintain the app.
Getting Started with React Native
To get started with React Native, you will need to have some basic knowledge of JavaScript and React. Once you have a solid understanding of these concepts, you can start exploring the React Native documentation and tutorials available online. You can also download the React Native CLI and start building your first app using the command line.
Creating a Simple React Native App
To create a simple React Native app, you will need to follow these steps:
Building Complex React Native Apps
Once you have a solid understanding of the basics of React Native, you can start building more complex apps. This will require knowledge of additional concepts and tools, such as Redux, navigation, and API integration. Here are some tips for building complex React Native apps:
1. Use Redux for State Management
Redux is a popular library for state management in React Native apps. It allows you to store data in a centralized location and access it from any component in the app. Redux can help you manage complex app logic and make it easier to maintain and update your code.
2. Use React Navigation for Routing
React Navigation is a library that allows you to handle routing and navigation in your React Native app. It provides a range of features, including stack, tab, and drawer navigation, as well as customizable headers and footers. React Navigation can help you build a seamless user experience and make it easier to navigate between screens in your app.
3. Use APIs for Data Integration
Most mobile apps require data integration from external sources, such as APIs or databases. React Native provides a range of libraries and tools for integrating data into your app, including Axios, Fetch, and AsyncStorage. By using these tools, you can easily retrieve data from external sources and use it to build dynamic and engaging mobile apps. You might also like Power of the React Key Attribute: Efficient List-Building.
Best Practices for React Native Development

Here are some best practices to keep in mind when developing React Native apps:
1. Keep the App Simple
When building React Native apps, it's important to keep the app as simple as possible. This means avoiding unnecessary features or functionalities and focusing on the core functionality of the app. Keeping the app simple can help you avoid bugs and make it easier to maintain and update the app.
2. Use Native Components
React Native provides a range of built-in components, such as Text, View, and Image. These components are optimized for performance and are designed to work seamlessly on both iOS and Android platforms. When building your app, try to use these native components as much as possible, as they can help you achieve a more native look and feel. You can also read it here.
3. Optimize App Performance
Optimizing app performance is critical when building React Native apps. There are several ways to improve app performance, such as using PureComponents, implementing lazy loading, and optimizing images. By optimizing your app's performance, you can ensure that your app runs smoothly and provides a seamless user experience.
Conclusion
As a result, React Native is a powerful JavaScript framework for building mobile apps for iOS and Android platforms. By following the best practices and tips outlined in this blog, you can master React Native and build high-quality mobile apps that are fast, efficient, and easy to maintain. Whether you are a beginner or an experienced developer, React Native offers a range of features and benefits that can help you achieve your mobile app development goals. So start exploring React Native today and take your mobile app development skills to the next level.
0 notes
Text
How to get started with LinearLayout on Android Studio with App?
LinearLayout is among the most important layout managers used in Android Studio. It is employed to lay out the layout's content. It is used by default to arrange the content of Activity and Fragment layout. For beginners, it is sufficient to be able to use it but for advanced developers, it's recommended to use other layout managers like GridLayout and FrameLayout. LinearLayout is also sufficient to design the layout of your application. In this article, I'll describe the fundamental procedures and configurations that you have to be aware of to begin working with LinearLayout.
The 5 Best CCNA Certification Books for 2022
1. What is LinearLayout?
LinearLayout is a layout manager used to build the scrolling list of views. It is similar to a ListView or RecyclerView however, it's not a replacement for these. It's an adaptable layout manager that can be used to create footers and headers as well as navigation or other type of content.
CCNA Routing And Switching All In One Study Guide BOOK
2. Basic steps of using LinearLayout
LinearLayout LinearLayout class is among the most effective layout classes in Android. It can be used to create almost any layout you can think of. One of the most frequent uses of LinearLayout could be creating a scrolling layout that behaves like a list. This layout can be made by creating a LinearLayout using only one child, which is an a ListView. This is the basic design of the scrolling list. You can also create an a scrolling list with TabLayout. TabLayout class. This layout is more suitable to create a list of tabs. LinearLayout is a crucial component of the Android framework. It can be used to create various layouts, such as lists that scroll. This article will show you how to start using LinearLayout using Android Studio.
How To Configure OSPF Single Area On 4 Routers In Cisco Packet Tracer
3. Fundamental configurations and configurations to LinearLayout
This section demonstrates how to make use of the LinearLayout to build the layout with just one column and only one row. The layout is comprised of the following components: TextView, Button TextView and Button. Button. The basic configurations of LinearLayout How To Configure OSPF Multi Area On 4 Routers In Cisco Packet Tracer
4. Conclusion.
To begin using linearLayout using Android Studio, it's helpful to know the different layout classes. Each layout class comes with its own set or utilities and behavior. LinearLayout is one of the most widely used layout classes. LinearLayout is a layout that lays out its children horizontally and vertically. It has multiple children that it can support, which means you can use it to display an item list such as a navigation bar or even a navigation drawer. Another thing to consider about linearLayout is that it does not have any way to connect to its children, other than setsChild() as well as getChild(). This means that you will have to go through each child to access the desired one.
Basic Cisco Router Configuration | Cisco Packet Tracer Tutorial
0 notes
Text
Download adaway program to remove ads
AdAway can be a open-source free program for both Android that lets you block the adverts into your smartphone.The program is totally free and blocks all advertisements which maybe turning into a bit annoying. The program works to Android variant 2.1 & upward and demands a frozen apparatus to work correctly. It can also be likely to incorporate certain sites to this white- and also black lists all on your .Down load the AdAway program today and prevent those annoying advertising.
WARNING: the program calls for root access, do not take to this programs if you don't realize what you do. Installing this program could result in your mobile becoming inoperable.
With this tutorial, find out how it is possible to down load and install AdAway 4.0 APK in your own Android mobile or tabletcomputer. AdAway is actually a superb advertising remover application designed for Android apparatus. There are always a whole lot of annoying adverts nowadays whenever you're browsing via a website that do divert a good deal. To eliminate them, you are able to put in AdAway that can be your very best program to cope with any type of annoying increases. You're able to down load AdAway 4.0 APK with the guide beforehand and install it entirely on your own Android device.
There are a number of forms of advertisements such as banners and pop ups, the majority of these quite difficult to remove. With AdAway advertising blocker application it is simple to eliminate these adverts. AdAway is quit a potent tool and also you may own it running in your own smartphone with an guide beforehand.

In terms of features, AdAway enables one to put in your host files. With AdAway, then you may even add exceptions when in any event the demand arises. As its name says, it's possible to readily remove adverts, not simply from your cellular internet browser however out of few games and apps. Before you install and download this program, be certain your apparatus is rooted which means that you are able to take advantage of this program readily.
Measure 2 -- Find the APK you downloaded and then open it to put in it.
Measure 3 -- in case you're installing an APK directly to your initial time, then you could be advised to empower"Unknown Source" setting. Or even sure about any of it, we've written a tutorial. Watch link below on the place to obtain this particular setting.
Measure 4 -- Once allowing, the program should put in. You're able to start the program using exactly the exact same short cut you'd previously or through the program drawer.
11 notes
·
View notes
Text
Whatshack online


That's it! Now you have successfully installed WhatsHack Simulator on your computer using Bluestacks. Confirm that you want to install the app, and it will appear on your BlueStacks home screen after installing. You can also drag-and-drop the APK file onto the BlueStacks home screen. Double-click the file to launch BlueStacks and install the app. If you haven't installed any other programs that associate with the APK file type, BlueStacks will automatically open APK files. Step 2: Installing WhatsHack Simulator APK when it opens, you will be asked to sign in using a Google account like any Android smartphone or tablet.ĭuring the installation process, you may come across error messages like “Hardware acceleration is not available on your system” or “This host supports Intel VT-x, but it is disabled.” Enabling hardware acceleration features help virtualization apps run smoother and much faster - apps like Bluestacks are basically running an entire OS on top of your current system. Once the initial installation process is done, opening the program doesn’t take more than a few seconds. The installer file is quite large and the engine setup may take awhile. All you have to do is download the program from the BlueStacks website and run the file. Installing BlueStacks is a very simple process. There're many Android emulators but in this tutorial we use BlueStacks. You can run Android apps on your computer using an Android emulator app. How to install WhatsHack Simulator on your computer (Windows PC, Mac. Then, using a file manager, such as Astro or ES File Explorer, you can locate the file on your device and install it. The next step is to drag and drop the file onto your device. You must connect your Android device to the PC and enable USB mass-storage mode. If you downloaded the APK file on your computer, the process is slightly different. Next, go to your app drawer and click Downloads here you will find the file you just downloaded. To get started, download an APK file using either Google Chrome or the stock Android browser. You can either download the APK file on your mobile device or on your computer, although the latter is a little more difficult. WhatsHack Simulator apk downloaded from ChipApk is 100% safe and virus free, no extra costs. The next step will be downloading WhatsHack Simulator installer file, also known as an APK, which is the way Android apps are distributed and installed. Step 2: Downloading WhatsHack Simulator apk On devices running an earlier version of Android, go to Settings, open the Applications option, select Unknown sources, and click OK on the popup alert. This can be enabled by selecting the Verify apps option in the Security settings. Depending on your device, you can also choose to be warned before installing harmful apps. Selecting this option will allow you to install apps outside of the Google Play store. Here's how you can do it.įrom your smartphone or tablet running Android 4.0 or higher, go to Settings, scroll down to Security, and select Unknown sources. Here's how to do it: How to install WhatsHack Simulator on Android devicesĪndroid devices have the ability to "sideload" applications. You can also install and run this application on your computer by using an Android emulator app. WhatsHack Simulator works on any Android devices (requires Android 4.0 or later).
0 notes