#android drawer menu
Explore tagged Tumblr posts
Visit Tumblr Blog
Explore Tumblr blogs with no restrictions, modern design and the best experience.
Last Seen Tumblr Blogs


Fun Fact
130K people were victims of a chain letter scam that affected Tumblr in May 2011.
Text
Wednesday, July 5th, 2023
🌟 New
We now show audio information you add (like title, artist, album, and album cover) for uploaded audio on the blog network.
On web, links to the Mass Post Editor now open in a new tab.
On web, on the mobile layout of the site, tapping a blog’s info (avatar, name, or title) inside the Account menu in the navigation drawer will now go straight to that blog's management view.
Previously, it was possible that we could recommend different reblogs from a post you had dismissed. Now, based on your feedback, we will no longer recommend a post or any of its reblogs for a month after dismissal.
🛠 Fixed
On web, when using a touchscreen device, the toggle button for expanding a blog's stats in the Account menu is now much easier to tap, regardless of the site layout.
Folks on the latest version of the iOS and Android apps should no longer experience audio from ads autoplaying (even when no ad is visible). If you still do, please contact support!
🚧 Ongoing
We're aware that the Notes view on the iOS app can sometimes appear broken after re-launching the app. Fully closing the app might fix this. We should have a more permanent fix in the next update.
Staff are hard at work updating our docs. If you see anything confusing or out-of-date, please send some feedback!
🌱 Upcoming
We're rolling out the ability to have more than one type of badge visible next to your blog. This option will be available soon!
Experiencing an issue? File a Support Request and we'll get back to you as soon as we can!
Want to share your feedback about something? Check out our Work in Progress blog and start a discussion with the community.
284 notes
·
View notes
Text
How I Customize Windows and Android
Windows: Rainmeter
Rainmeter Skins
Rainmeter | Deviantart
r/Rainmeter
Rainmeter is where I get nifty desktop widgets (skins). There are a ton of skins online and you can spend hours just getting caught up in customizing. There are clocks, disk information, music visualizers, weather widgets*, and more.
I get most of my skins from the links I posted, but they are by no means the only resources for Rainmeter skins. r/Rainmeter and Deviantart have some awesome inspiration.
This is what my desktop looks like right now:

Dock: Dock 2 v1.5
Icons: icons8 - this is probably the best free resource for icons I know of
"Good Evening [name]": Simple Clean
Clock: Simplony
* Note about weather widgets: Older Rainmeter skins that use old weather APIs will likely not work. The Rainmeter forums has information with lists of weather skins that do work.
Windows: Useful Things for Workflow
Flow Launcher - this is basically a search bar, app launcher, and even easy-access terminal all in one. The default hotkey is Alt+Space. I use this almost primarily to do quick calculations. There are a ton of plugins and I've barely scratched the surface with how I use it.
ShareX - This is my screenshot tool and I love it. Admittedly, I find it difficult to configure, but once I had it set up, I didn't really have to adjust it. You can create custom hotkeys to screenshot your entire screen, or to select your screen, or even use OCR. This has saved me a ton of time copying over text in images and making it searchable.
Bonus - Get Rid of Windows Web Search in the Start Menu: If you're comfortable with editing your registry, and you want to get rid of the pesky web results in Windows search, this fix is what I used to get rid of it.
Android: Nova Launcher
This is my main Android launcher that I've been using for almost as long as I've owned a smartphone, and it's super customizable. The best part is that it's free with no ads, and you can purchase premium at a one-time cost.
The main things I use it for are app drawer tabs, renaming apps, hiding apps, and changing the icons.
I've had premium for so long that I've forgotten what the features were, but looking at the website, the one feature I use is app folders.
This is what my phone homescreen and app drawers look like:


Time/Weather: Breezy Weather
Calendar: Month: Calendar Widget (I got this on sale for like 30 cents once but there are a plethora of good calendar apps out there)
Icons: Whicons - White Icon Pack
Advanced Customization
Further things to enhance your customization experience to look into include:
Flashing a custom Android ROM (e.g. LineageOS)
Give up on Windows & install Linux instead (Ubuntu is a good one to start with)
Android app modification: ReVanced apps (includes Tumblr), Distraction Free Instagram
Miscellaneous notes under the cut:
None of these links are affiliate links. These are all tools I happen to use on a daily basis and I'm not being paid to promote them.
Install Rainmeter skins and programs I recommend at your own risk. Before altering Windows, such as editing the registry, make sure you have everything backed up.
The Windows web search fix works on my Windows 11 machine. I don't know if it works for Windows 10, but I do know I was able to disable it in Windows 10 at some point, so your mileage may vary.
Install non-Play Store apps at your own risk. (Although in my opinion, open source APKs are less sketchy than some apps on the Play Store...) Always check where you're downloading APKs form!
The wallpaper for my desktop and phone are custom wallpapers I made myself.
(At the request of @christ-chan-official)
8 notes
·
View notes
Text
just FYI: i tried to locate the app on my phone (samsung galaxy s20 FE) and i couldn't locate it through search terms or via the apps drawer or anything. i tried locating it in the play store via search terms, nothing showed up that matched there, either.
so i had to actually go digging in my "apps" option under settings:
settings > apps > android safetycore
what's very unnerving about this is that i have automatic updates disabled. i don't allow my phone to update unless i manually activate it, whether it's a system update or an app update. i almost assumed it wouldn't be on there because of this, until i had my roomie check the google play store link (she does auto-update her phone, but we couldn't find the app either by any means) and it said "uninstall" on the page, indicating it was on her phone as well.
after searching in the apps menu under "settings," i was able to find it and uninstall it.
oddly enough, the app itself seemed to be auto-disabled before i did anything with it, which may be why it wasn't showing up in search on my phone or the play store. i'm not sure if that's due to my own settings i have enabled that prevent certain functions from activating or what, but if you can't find it via the play store or via searching your apps drawer, try going to settings > apps instead. that will show you all your apps, including disabled ones.
i would highly recommend removing it even if it's already disabled. if it was supposedly "critical" to the phone's function or performance, it wouldn't allow you to uninstall it in the first place (which may be the case for pixel phones, but i'm not sure; i don't know anyone who has one).
also if anyone has a good recommendation for a security app that would alert to these "shadow installations," please let me know!
hey folks if you have an android phone: google shadow installed a "security app".
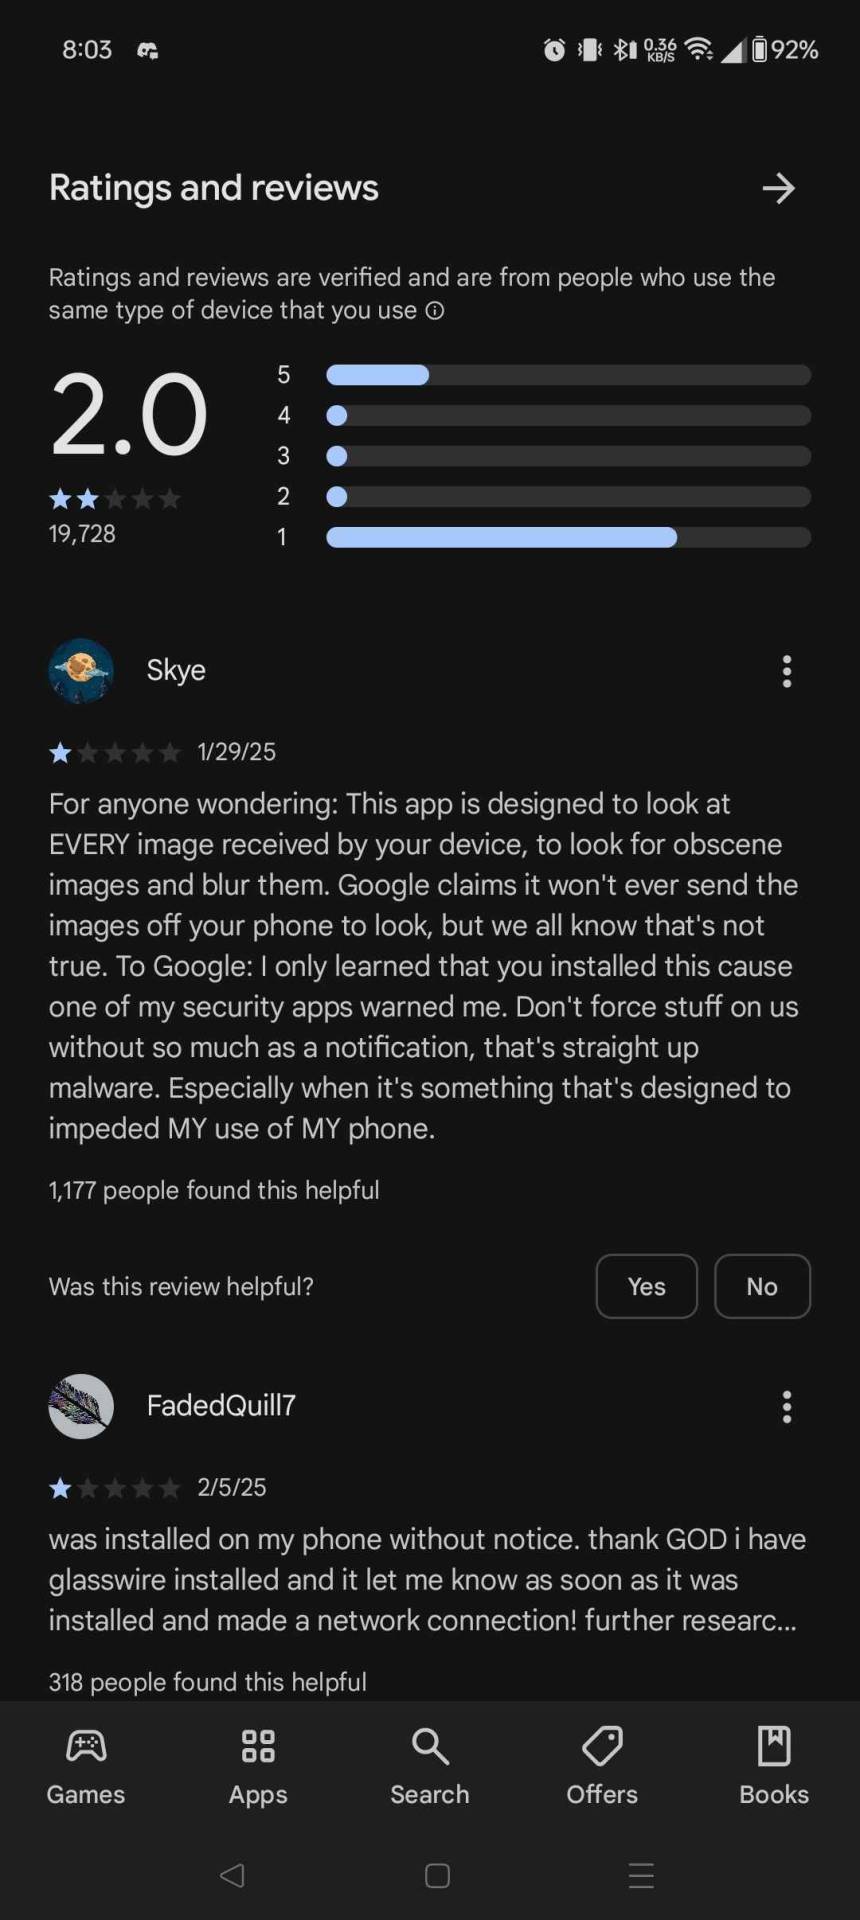
I had to go and delete it myself this morning.
93K notes
·
View notes
Text
Samsung Good Lock Best features: All Information You Need

Samsung Good Lock One UI 7
Reviewing Samsung Good Lock Best features: Best Customisation Tool, Explore New Home Up
Samsung's Good Lock is the finest device customisation option for Galaxy customers who want to show off their flair. One UI 7 adds more personalisation options to this crucial tool.
The redesigned Home Up module, which boosts design freedom and home screen modification, stands out among the numerous enhancements. Samsung Newsroom analyses the new Home Up's user interface customising options.
DIY Home Screen: Innovative App Arrangement and Design
Home Up's DIY Home Screen feature lets users customise their layout instead than using grids and app icons. Apps, widgets, and folders may be resized and moved like calendar pages.
Use sticker and layer features to cleverly disguise program icons under decorative decorations for a whimsical touch. Simply add a sticker to the home screen, place it over an app icon, and modify layer settings. This makes the sticker a fun shortcut that launches the hidden app when pressed.
Display or hide Favourites Apps Row
The bottom of most smartphones' home screens includes a permanent row of favourites. Good Lock makes changing this default layout easy. Users who want a simpler home screen may deactivate Show Favourites in the Home Up menu.
House Gesture Animation: Easy Management Navigation
Customers who want to personalise each interaction may utilise the Home Gesture Animation option under Good Lock > Home Up > Gesture Settings. The feature lets you change the transition animations when you return from an app to the home screen, making even simple activities more expressive and enjoyable.
Advanced Tuning adds four pre-set animation styles and fine-grained control over speed and vibration for a more advanced user experience.
Good Lock's Home Up module offers useful options for customising device home screens. In the next article, Samsung Newsroom will showcase the top three Good Lock features, which Galaxy customers globally enjoy.
Samsung GoodLock
Samsung Good Lock is a powerful and customisable customising feature for Galaxy handsets. Good Lock lets users modify their phones' look, feel, and functions like never before. This software lets you modify the lock screen and navigation gestures on your phone.
What's Samsung Good Lock?
Samsung Galaxy tablets and smartphones have Samsung Good Lock, a powerful customising feature. One UI, the company's Android skin, lets consumers modify their phones beyond the basic features.
Good Lock Best Samsung features
Good Lock modules improve or change specific device features. A look at some of its most popular modules follows:
LockStar
Personalise widgets, shortcuts, clock styles, and lock screen layout.
Arrange parts as desired.
QuickStar
Customise Quick Panel button layouts, colours, and transparency.
Add or delete fast settings toggles for efficiency.
The Task Changer
Customise the recent apps screen.
Available styles include stack cards, grid view, and list view.
Get Home
Customise your app drawer and home screen with sophisticated choices.
Change folder styles, background blur, and navigation motions.
NavStar
Create a distinctive navigation bar icon and button arrangement.
Hidden shortcut buttons are added features.
ClockFace
Personalise your lock screen and Always On Display with clock designs.
Multiple-Star
Improve multitasking using popup views and split-screen.
Keys Cafe
Customise your keyboard layouts and themes.
Include fun animations and important sound adjustments.
The NotiStar
Arrange and filter notifications well.
View alerts or set rules to archive them.
Samsung Good Lock Installation and Use: A Guide
Download Good Lock.
Access the Galaxy Store on your Samsung smartphone.
Install the app after finding “Good Lock.”
Select Modules
Launch the app and explore the modules.
The Galaxy Store lets you download modules.
Enable and customise
Open each module and customise parameters.
Enjoy a personalised Galaxy experience!
Samsung Good Lock benefits
Increased Customisation: Customise your gadget to your style.
Personal navigation, multitasking, and notification management boost productivity.
Better User Experience: Customise your phone to make it more appealing and functional.
Compatibility
Good Lock is not available everywhere due to location and One UI version. If it's not available in your location, visit the Galaxy Store occasionally as Samsung is expanding its availability. Good Lock can usually be obtained via Samsung's Galaxy Store.
One UI 7 expands Good Lock's Google Play Store accessibility.
Final comments
Samsung Good Lock boosts Galaxy phone performance. Its modularity lets you download and use the functionalities you need, making it flexible and easy to use.
Download Good Lock today to control your Galaxy experience and discover what's possible!
Good Lock modules' availability and functionality vary per Samsung device and One UI version.
#technology#technews#govindhtech#news#technologynews#Good Lock#Samsung Good Lock One UI 7#One UI 7#One UI#Samsung Good Lock#Samsung Good Lock Best features
1 note
·
View note
Text
Creating a Custom Navigation Drawer with Android Studio and Kotlin
Introduction Creating a Custom Navigation Drawer with Android Studio and Kotlin is a valuable skill for any Android developer. A navigation drawer is a crucial component of an Android app, providing users with quick access to main menu items, settings, and other essential features. In this tutorial, we will guide you through the process of creating a custom navigation drawer from scratch,…
0 notes
Text
How to Install and Set Up the AllPanel App for Maximum Efficiency

In today’s fast-paced digital world, efficient management tools are essential for enhancing productivity and streamlining operations. The AllPanel App is designed to help users manage their tasks and projects seamlessly. Whether you're a business owner, a team leader, or simply someone looking to organize your personal tasks, installing and setting up the AllPanel App correctly can significantly improve your workflow. In this guide, we’ll walk you through the installation process and provide tips for setting it up for maximum efficiency.
Step 1: Downloading the AllPanel App
The first step in utilizing AllPanel is downloading the app. Here’s how you can do that:
For Mobile Devices:
For Android:
Open the Google Play Store on your device.
In the search bar, type “AllPanel App” and hit enter.
Find the official AllPanel App in the search results and tap on it.
Click the “Install” button to download the app.
For iOS:
Open the App Store on your iPhone or iPad.
Use the search function to locate “AllPanel App.”
Select the app from the list and tap on “Get” to download it.
For Desktop Users:
Visit the official AllPanel website.
Look for the download section and select the version compatible with your operating system (Windows or macOS).
Click on the download link to begin downloading the installer.
Step 2: Installing the AllPanel App
Once the download is complete, the next step is installation. This process may vary slightly depending on your device.
On Mobile Devices:
For Android:
Once the app is downloaded, open it from your app drawer.
Follow the on-screen instructions to complete the installation.
For iOS:
After downloading, the AllPanel App icon will appear on your home screen.
Tap the icon to launch the app.
On Desktop:
For Windows:
Locate the downloaded installer file, usually in your “Downloads” folder.
Double-click the installer file and follow the on-screen prompts to install the app.
For macOS:
Open the downloaded .dmg file and drag the AllPanel App icon into your Applications folder.
Once copied, you can open the app from your Applications.
Step 3: Creating an Account or Logging In
After installation, you’ll need to set up your account:
Open the AllPanel App.
If you’re a new user, select “Sign Up” to create an account. You’ll need to provide basic information such as your email address, password, and any other required details.
If you already have an account, select “Log In” and enter your credentials.
Step 4: Customizing Your Profile
Once logged in, take a moment to customize your profile for a personalized experience:
Profile Picture: Upload a photo to make your account more recognizable.
Settings: Adjust your notification preferences and privacy settings to suit your needs.
Step 5: Navigating the Dashboard
The AllPanel App features a user-friendly dashboard that provides easy access to all its functionalities. Familiarize yourself with the layout:
Main Menu: Located on the left side, it provides access to your projects, tasks, and settings.
Dashboard Overview: Here, you can see an overview of your tasks, deadlines, and any notifications.
Step 6: Setting Up Your First Project
To maximize efficiency, it’s essential to set up your projects correctly. Here’s how:
Create a New Project:
Click on the “Projects” tab in the main menu.
Select “Create New Project” and fill in the necessary details, such as the project name, description, and deadlines.
Adding Tasks:
Within your project, you can add specific tasks.
Click on “Add Task” and provide relevant details, such as task name, assigned team members, due dates, and any necessary attachments.
Setting Priorities:
Assign priority levels to tasks to help you focus on what’s most important.
Step 7: Collaborating with Team Members
One of the key features of the AllPanel App is its collaboration capabilities:
Inviting Team Members:
Under your project settings, you can invite team members by entering their email addresses.
Assigning Tasks:
Assign tasks to specific members to ensure accountability and clear responsibilities.
Using Comments and Notes:
Each task has a comment section where team members can communicate, ask questions, and provide updates.
Step 8: Utilizing Integrations
To make the most of the AllPanel App, explore its integration options with other tools you may already use:
Calendar Syncing: Link your Google or Outlook calendar to keep track of deadlines.
File Sharing: Integrate with cloud storage services like Google Drive or Dropbox for easy access to documents.
Step 9: Monitoring Progress
Tracking the progress of your projects is crucial for efficiency:
Dashboards and Reports: Utilize the built-in analytics features to generate reports on project progress and team performance.
Task Completion Tracking: Check off completed tasks to visualize your progress.
Conclusion
Installing and setting up the AllPanel App is a straightforward process that can significantly enhance your productivity. By following these steps, you can ensure that you’re using the app to its full potential. From organizing projects to collaborating with your team, AllPanel is designed to help you work smarter, not harder. Start your journey toward maximum efficiency today!
1 note
·
View note
Text
Tiranga App Login: A Comprehensive Guide

In an era where digital innovation is rapidly transforming the way we interact with the world, the Tiranga App stands out as a prime example of how technology can enhance convenience and accessibility tiranga app developed by the Indian government, is designed to provide a range of services to its users, including access to government schemes, services, and information. To fully utilize the app's features, users need to understand the login process. This guide will walk you through the steps of logging into the Tiranga App, ensuring a seamless and secure experience.
1. Downloading the Tiranga App
Before you can log in, you need to download the Tiranga App. The app is available for both Android and iOS devices. You can find it on the Google Play Store for Android users and the Apple App Store for iOS users. Simply search for "Tiranga App" and download it to your device. Make sure to download the official app to avoid any security risks associated with counterfeit versions.
2. Opening the App
Once the app is installed, open it by tapping on the app icon on your home screen or app drawer. You will be greeted with the app's welcome screen, which provides an overview of its features and services. To proceed, tap on the "Login" button, usually located prominently on the screen.
3. Creating an Account (If You Don't Have One)
If you are a new user and don’t have an account yet, you will need to create one before logging in. Look for the "Sign Up" or "Register" option on the login screen. You will be prompted to enter basic information such as your name, phone number, email address, and create a secure password. Some versions of the app may require additional verification steps, such as entering an OTP (One-Time Password) sent to your registered phone number.
4. Logging In
For existing users, the login process is straightforward. Enter your registered phone number or email address and your password in the designated fields. Ensure that you enter this information correctly to avoid any login errors. After entering your credentials, tap on the "Login" button.
If you have forgotten your password, look for the "Forgot Password" link on the login screen. This will guide you through a process to reset your password, usually involving sending a reset link to your registered email address or phone number.
5. Two-Factor Authentication (Optional)
To enhance security, the Tiranga App may offer two-factor authentication (2FA). If enabled, you will need to enter a verification code sent to your registered phone number or email address after entering your login credentials. This additional layer of security helps protect your account from unauthorized access.
6. Navigating the App
After successfully logging in, you will be directed to the app's main dashboard. Here, you can access various services and features offered by the Tiranga App. Familiarize yourself with the app's layout, including menus and navigation options, to make the most of its offerings.
7. Troubleshooting Common Issues
If you encounter issues during the login process, such as forgetting your password or facing technical glitches, the app typically provides a support or help section. Consult this section for troubleshooting tips or contact customer support if needed. Common issues might include incorrect login credentials, problems with the internet connection, or app-related errors.
8. Logging Out
For security reasons, it is important to log out of the app when you are finished using it. Look for the "Logout" option, usually found in the app’s settings or profile section, and tap on it to end your session.
Conclusion
The Tiranga App is a valuable tool for accessing a range of government services and information. By following these steps, you can ensure a smooth login experience and make the most of the app’s features. Whether you are a new user setting up your account or an existing user logging in, understanding the process is key to using the app efficiently and securely.
0 notes
Text
Tiranga Game App: A Comprehensive Guide to Enjoying the Ultimate Gaming Experience
The Tiranga Game App is an engaging and culturally themed mobile application designed to offer a unique gaming experience. Inspired by the vibrant colors of the Indian flag and the rich cultural heritage of India, this app provides players with interactive games, challenges, and educational content. Whether you’re a casual gamer or a dedicated enthusiast, the Tiranga Game App promises a fun and immersive experience. This guide will explore the features of the Tiranga Game App how to get started, and tips for making the most of your gameplay.
What Is the Tiranga Game App
The Tiranga Game App is a mobile game designed to celebrate Indian culture through engaging and colorful gameplay. The app combines elements of gaming with educational content to offer players a multifaceted experience. Key features include:

Cultural Themes: Games and challenges inspired by the Indian flag and cultural symbols.
Interactive Gameplay: A range of interactive games and puzzles that test skills and strategy.
Educational Insights: Learn about Indian heritage and cultural elements through gameplay.
User-Friendly Interface: Easy navigation and intuitive controls for a seamless gaming experience.
Key Features of the Tiranga Game App
1. Culturally Themed Games
The Tiranga Game App offers a variety of games that incorporate themes from Indian culture:
Color Matching Games: Engage in challenges that involve matching colors inspired by the Indian flag.
Cultural Puzzles: Solve puzzles and complete challenges that highlight aspects of Indian heritage.
2. Educational Content
The app provides educational insights as you play:
Cultural Facts: Learn about the significance of different colors and symbols in Indian culture.
Historical Information: Discover historical contexts related to the themes and elements used in the games.
3. Interactive Features
Enjoy interactive and dynamic gameplay:
Multiple Levels: Progress through various levels with increasing difficulty.
Customizable Settings: Adjust game settings to suit your preferences and playing style.
4. User-Friendly Design
The app is designed for ease of use:
Simple Navigation: Intuitive menus and controls make it easy to find and play games.
Attractive Graphics: Vibrant visuals and animations enhance the gaming experience.
5. Community and Social Features
Connect with other players and share your achievements:
Leaderboards: Compete with friends and other players for high scores and rankings.
Social Sharing: Share your progress and achievements on social media platforms.
How to Get Started with the Tiranga Game App
1. Download the App
To get started, download the Tiranga Game App from your device’s app store:
For Android Devices: Open the Google Play Store, search for “Tiranga Game App,” and tap “Install.”
For iOS Devices: Open the Apple App Store, search for “Tiranga Game App,” and tap “Get.”
2. Install the App
Follow these steps to install the app:
Android Devices: Once downloaded, the app will automatically install. You may need to grant permissions for the app to access necessary features.
iOS Devices: After downloading, the app will install automatically. You may need to enter your Apple ID password or use Face ID/Touch ID to authorize the installation.
3. Create an Account
After installation:
Open the App: Tap on the Tiranga Game App icon on your home screen or app drawer.
Sign Up: Follow the prompts to create a new account using your email address or social media accounts.
Log In: If you already have an account, enter your login credentials to access the app.
4. Explore the App
Start exploring the app’s features:
Play Games: Begin with introductory levels and progress through various challenges.
Learn About Culture: Engage with educational content integrated into the gameplay.
Tips for an Optimal Gaming Experience
Regular Play: Regularly play the app to improve your skills and advance through levels.
Engage with the Community: Join forums or social media groups related to the Tiranga Game App to connect with other players and share tips.
Keep Updated: Ensure the app is updated to access new features and improvements.
Troubleshooting Common Issues
If you encounter problems with the Tiranga Game App:
Update the App: Make sure you have the latest version installed.
Check Device Compatibility: Ensure your device meets the app’s system requirements.
Reinstall the App: If issues persist, try uninstalling and reinstalling the app.
Contact Support: Reach out to the app’s support team if you need additional help.
Conclusion
The Tiranga Game App offers a vibrant and culturally rich gaming experience that celebrates Indian heritage through interactive gameplay. By following the steps in this guide, you can easily download, install, and enjoy the app’s features.
Explore the app’s games and educational content, connect with other players, and make the most of your gaming experience. Whether you’re playing for fun or looking to learn more about Indian culture, the Tiranga Game App provides a unique and enjoyable experience for players of all ages.
0 notes
Text
Tiranga Login Seamlessly Access Your Game Experience
The Tiranga Game, inspired by the Indian national flag and its vibrant colors, offers players a unique and engaging gaming experience. To fully immerse yourself in the game and access all its features, you need to complete a login process. This article provides a comprehensive overview of the Tiranga login process, highlighting its importance and offering tips for a smooth and secure login experience.

Understanding Tiranga Login
The Tiranga login process is designed to grant players access to their personal game profiles and data. By logging in, users can save their progress, participate in challenges, and access exclusive features. This process typically involves creating an account or signing in with existing credentials, ensuring that each player’s game experience is personalized and secure.
Steps to Log In to Tiranga
Here’s a step-by-step guide to help you navigate the Tiranga login process:
Download and Install the Game: Before logging in, ensure you have the Tiranga Game installed on your device. You can download it from the Google Play Store for Android devices or the Apple App Store for iOS devices. Follow the installation instructions to set up the game on your device.
Open the Game: Tap the Tiranga Game icon on your device’s home screen or app drawer to launch the game. This action will take you to the game’s main interface.
Locate the Login Option: On the main screen of the game, look for the login or sign-in option. This is usually found in the top right corner of the screen or within the game’s settings menu. Tap this option to proceed to the login screen.
Choose Your Login Method: Depending on the game’s design, you may have several login options:
Email/Password: Enter your registered email address and password.
Social Media Accounts: Some versions of the game allow you to log in using social media accounts such as Facebook or Google. This option can simplify the login process.
Guest Login: If you prefer not to create an account, you may have the option to play as a guest. Note that guest access might limit certain features and personalization options.
Enter Your Credentials: If logging in with an email and password, ensure that you enter your credentials accurately. For social media logins, you may need to authorize the game to access your social media account.
Verify and Access: After entering your credentials, verify the information if prompted and tap the “Login” or “Sign In” button. Upon successful login, you will be directed to the game’s main interface, where you can begin playing and exploring its features.
Benefits of Logging In
Progress Tracking: Logging in allows you to save your game progress, ensuring that you can pick up where you left off without losing any achievements or data.
Personalization: An account-based login enables you to customize your gaming experience, including settings, preferences, and game themes tailored to your liking.
Rewards and Achievements: Many games offer rewards and achievements linked to your account. Logging in ensures that you can earn and track these rewards, adding to the game’s enjoyment.
Access to Features: By logging in, you gain access to exclusive features, special events, and in-game challenges that enhance your overall experience.
Troubleshooting Login Issues
If you encounter issues while logging in, consider the following tips:
Verify Credentials: Ensure that you are entering the correct email address and password. Check for typos and make sure that Caps Lock is not enabled.
Password Reset: If you’ve forgotten your password, use the “Forgot Password” option to reset it. Follow the instructions sent to your registered email.
Update the Game: Ensure that you have the latest version of the game installed, as updates can resolve bugs and improve login functionality.
Check Internet Connection: A stable internet connection is required for a successful login. Verify that your device is connected to the internet.
Conclusion
The Tiranga login process is an essential step for accessing and enjoying the game’s features. By following the outlined steps and tips, you can ensure a smooth and secure login experience. Whether you’re a new player or a returning enthusiast, logging in allows you to track your progress, participate in exclusive challenges, and fully engage with the culturally themed elements of the Tiranga Game.
0 notes
Text
Tiranga APK: A Comprehensive Guide
In the ever-evolving world of mobile applications, some apps stand out due to their unique features and functionalities. One such application is the Tiranga APK, which has garnered attention for its utility and features. This blog post delves into what Tiranga APK is, its features, benefits, and how you can use it effectively. Whether you’re new to this app or seeking more information, this guide will provide a thorough understanding of Tiranga APK.
Introduction
In a landscape teeming with mobile applications, the Tiranga APK emerges as a notable entry. Designed to cater to specific needs, this application offers a range of features that appeal to its user base. From its primary function to additional benefits, Tiranga APK has established itself as a valuable tool for many. This post will explore its core aspects and help you make the most of it.

What is Tiranga APK?
Tiranga APK is an Android application known for its utility and specialized features. Unlike many apps that are created with general purposes in mind, Tiranga APK is designed to serve a specific function. It’s essential to understand the core functionality of this application to appreciate its value fully.
Core Features
User-Friendly Interface: One of the standout features of Tiranga APK is its intuitive user interface. The app is designed to be accessible to users of all tech-savviness levels, ensuring a smooth and straightforward experience.
Customizable Options: Tiranga APK allows users to customize their experience according to their preferences. This level of personalization helps in tailoring the app to meet individual needs.
Regular Updates: The app frequently receives updates, which improve functionality and introduce new features. Staying updated with the latest version ensures that you’re benefiting from the most recent enhancements.
Security: Security is a priority for Tiranga APK, and the app incorporates several measures to protect user data. This feature is crucial in maintaining user trust and ensuring a safe experience.
How to Install Tiranga APK
Installing Tiranga APK is a straightforward process, but it requires a few specific steps to ensure successful installation. Here’s a step-by-step guide to help you through the installation process.
Step 1: Download the APK File
Visit a Trusted Source: To download Tiranga APK, visit a reliable source. It’s essential to ensure that you’re downloading from a trustworthy site to avoid potential security risks.
Check Compatibility: Ensure that the APK file is compatible with your device. Most sites will specify the Android versions that support the app.
Step 2: Enable Installation from Unknown Sources
Access Device Settings: Go to your device’s settings menu and navigate to the security section.
Enable Unknown Sources: Find the option that allows installation from unknown sources and enable it. This step is crucial as APK files are not always available on the Google Play Store.
Step 3: Install the APK File
Locate the Downloaded File: Use a file manager app to locate the downloaded APK file on your device.
Begin Installation: Tap on the file to begin the installation process. Follow the on-screen prompts to complete the installation.
Step 4: Launch the App
Open Tiranga APK: Once installed, you can open the app from your app drawer or home screen.
Configure Settings: Follow any initial setup instructions to configure the app according to your preferences.
Benefits of Using Tiranga APK
Tiranga APK offers several benefits that make it a valuable addition to your mobile application arsenal. Understanding these benefits can help you maximize the app’s potential.
Efficiency and Functionality
Tiranga APK is designed to be highly efficient, offering functionalities that cater to specific needs. Whether it’s productivity or entertainment, the app delivers its features effectively.
Customization and Flexibility
The app’s customization options allow users to tailor their experience. This flexibility ensures that the app can be adjusted to suit various preferences and requirements.
Regular Updates and Support
With regular updates, Tiranga APK continually improves and adapts to user feedback. This ongoing support ensures that users benefit from the latest features and enhancements.
Enhanced Security
Security features within Tiranga APK protect user data and ensure a secure experience. This emphasis on security is crucial for maintaining user trust and confidence.
Common Issues and Troubleshooting
Despite its advantages, users may encounter some common issues with Tiranga APK. Being aware of these issues and knowing how to address them can enhance your experience with the app.
Installation Problems
Invalid APK File: Ensure that the APK file is downloaded from a reputable source. A corrupted or invalid file can lead to installation issues.
Permission Issues: Verify that the necessary permissions are granted for the app to function correctly.
App Crashes or Freezes
Update the App: Ensure that you are using the latest version of Tiranga APK. Updates often resolve bugs and improve stability.
Clear Cache: Clearing the app’s cache can help resolve performance issues.
Compatibility Issues
Check Device Compatibility: Ensure that your device meets the app’s requirements. Incompatible devices may experience functionality issues.
Update Android Version: If possible, update your Android version to the latest release to improve compatibility.
Conclusion
Tiranga APK is a versatile and valuable application that offers a range of features designed to enhance user experience. From its user-friendly interface to its robust security measures, the app provides various benefits that cater to its users’ needs. Whether you’re installing it for the first time or seeking to maximize its potential, understanding its features and how to troubleshoot common issues can help you make the most of Tiranga APK.
Have you used Tiranga APK before? What was your experience? Feel free to share your thoughts or ask questions in the comments below. Your feedback helps others make informed decisions and fosters a supportive community.
0 notes
Text
How to Change the Ringtone for Telegram on an Android Phone
Introduction
Customizing your ringtone for Telegram notifications on your Android phone can make your messaging experience more personal and convenient. Whether you want to set a unique ringtone to distinguish Telegram notifications from other apps or prefer a specific tone for important contacts, changing the ringtone is straightforward. This guide will walk you through the steps to change your Telegram ringtone on an Android device.
Steps to Change the Telegram Ringtone on Android
Open Telegram:
Launch the Telegram app from your app drawer or home screen.
Access Settings:
Tap on the three horizontal lines (menu icon) at the top-left corner of the screen.
Scroll down and select "Settings."
Navigate to Notifications and Sounds:
In the Settings menu, tap on "Notifications and Sounds."
Select the Notification Type:
You will see different categories such as "Private Chats," "Group Chats," and "Channels."
Select the category for which you want to change the ringtone. For instance, if you want to change the ringtone for personal messages, tap on "Private Chats."
Choose a New Ringtone:
Under the selected category, tap on "Sound."
A list of available ringtones will appear. You can listen to each by tapping on them.
If you prefer a custom ringtone, tap on "Add Ringtone" or "Select from file" to choose a ringtone from your device’s storage.
Confirm Your Selection:
Once you’ve chosen your preferred ringtone, tap "OK" or "Save" to confirm your selection.
Repeat for Other Categories:
If you want different ringtones for group chats or channels, repeat the above steps for each category.
Additional Tips
Custom Ringtones: If you want to use a custom sound that is not in your device’s default list, ensure the audio file is in a compatible format (like MP3) and stored in your phone’s internal storage.
Volume Levels: Make sure your phone’s volume is set appropriately for notifications, so you don’t miss important messages.
Silent Mode: If your phone is in silent mode, the ringtones will not play, so check your phone’s sound settings if you aren’t hearing notifications.
Conclusion
Changing the ringtone for Telegram notifications on your Android phone is a quick and easy process that enhances your user experience. By customizing your notification sounds, you can ensure that you never miss an important message and can easily distinguish Telegram alerts from other app notifications. Follow the steps above to personalize your Telegram experience today.
0 notes
Text
how do you delete an app on android
Deleting an app on an Android device is a straightforward process. Here are the steps you can follow to uninstall an app: Method 1: From the Home Screen or App Drawer Locate the App: Find the app you want to delete on your home screen or in the app drawer. Long Press: Press and hold the app icon until a menu appears or the app icon starts to move. Uninstall Option: Depending on your device, you…
0 notes
Text
Creating a Custom Navigation Drawer with Android Studio
Introduction Creating a Custom Navigation Drawer with Android Studio is a fundamental skill for any Android developer. A navigation drawer is a crucial component of an Android app that provides users with quick access to main menu items, settings, and other essential features. In this tutorial, we will guide you through the process of creating a custom navigation drawer from scratch using…
0 notes
Text
where is vpn located on my phone
🔒🌍✨ Get 3 Months FREE VPN - Secure & Private Internet Access Worldwide! Click Here ✨🌍🔒
where is vpn located on my phone
VPN settings location on Android
If you're looking to tweak your VPN settings on your Android device, you'll find that the process is fairly straightforward once you know where to look. Here's how to access your VPN settings on Android:
Open Settings: Begin by unlocking your Android device and navigating to the Settings app. This is typically represented by a gear icon and can usually be found either on your home screen or in the app drawer.
Network & Internet: In the Settings menu, scroll down until you find the "Network & Internet" option. Tap on it to proceed.
VPN Settings: Within the "Network & Internet" menu, you should see an option labeled "VPN" or "VPN settings." This is where you'll manage all aspects of your VPN connections.
Add VPN: If you haven't already set up a VPN on your device, you can do so by tapping on the "Add VPN" option. Here, you'll be prompted to enter the necessary details for your VPN provider, such as server address, username, and password.
Manage VPNs: Once you've added your VPN, you can manage your connections from this menu. You can connect to or disconnect from a VPN, edit existing VPN configurations, or remove VPNs altogether.
Additional Settings: Depending on your device and Android version, you may have additional options within the VPN settings menu, such as advanced configuration settings or the ability to select specific apps to use the VPN.
Connect and Enjoy: Once you've configured your VPN settings to your liking, simply select a VPN server, toggle the connection switch, and you'll be securely connected to the internet through your VPN provider.
By following these steps, you can easily access and customize your VPN settings on your Android device to ensure a secure and private online experience.
VPN configuration on iPhone
Setting up a Virtual Private Network (VPN) on your iPhone can enhance your online privacy and security by encrypting your internet connection and hiding your IP address. By configuring a VPN on your iPhone, you can protect your sensitive data from potential cyber threats and access geo-blocked content from anywhere in the world.
To configure a VPN on your iPhone, follow these simple steps:
Choose a reliable VPN service provider and subscribe to their service.
Go to the App Store on your iPhone and download the VPN app provided by your chosen service.
Install the app and open it on your device.
Log in to your VPN account using the credentials provided by the service.
Select a server location you want to connect to (you can choose a server from a different country to access region-locked content).
Toggle the VPN connection switch to establish a secure connection.
Once connected, you will see a VPN icon in the status bar at the top of your iPhone screen, indicating that the VPN is active.
Remember to adjust any additional settings within the VPN app according to your preferences for optimal security and performance. It's essential to choose a VPN service that prioritizes user privacy and has a no-logs policy to ensure your online activities remain private.
By configuring a VPN on your iPhone, you can browse the internet anonymously, prevent potential data breaches, and enjoy unrestricted access to online content securely. Prioritize your online security and privacy by setting up a VPN on your iPhone today.
Virtual Private Network setup on smartphone
A Virtual Private Network (VPN) is a key tool for ensuring your online security and privacy while using your smartphone. Setting up a VPN on your smartphone is straightforward and can greatly enhance your digital experience.
To set up a VPN on your smartphone, start by choosing a reputable VPN service provider from the App Store or Google Play Store. Download and install the VPN app on your device. Once installed, open the app and create an account if required. Next, follow the on-screen instructions to configure your VPN settings.
Choose a server location from the available options provided by the VPN service. Selecting a server closer to your physical location can help improve connection speeds. Additionally, some VPN services offer specialized servers for streaming or torrenting purposes.
After selecting a server, activate the VPN connection to encrypt your internet traffic and protect your online data from prying eyes. Your smartphone will now connect to the chosen server, masking your real IP address and location.
It is crucial to keep your VPN app updated to ensure optimal performance and security. Regularly check for updates and install them promptly.
By setting up a VPN on your smartphone, you can browse the internet securely, access geo-restricted content, and protect your personal information from potential security threats. Stay safe and anonymous online with a VPN installed on your smartphone.
Finding VPN on mobile device
When it comes to ensuring your online privacy and security on a mobile device, using a VPN (Virtual Private Network) is essential. A VPN encrypts your internet connection, providing you with anonymity and protection from potential cyber threats.
Finding a VPN on your mobile device is a simple process that can be done in a few easy steps. There are many VPN apps available for both iOS and Android devices, making it convenient to choose one that suits your needs. To find a VPN on your mobile device, follow these steps:
Go to your device's app store, whether it's the Apple App Store for iOS or Google Play Store for Android.
In the search bar, type in "VPN" to browse through the various VPN apps available.
Read the reviews and ratings of each VPN app to gauge their performance and reliability.
Choose a VPN app that meets your requirements in terms of privacy features, server locations, speed, and user interface.
Download and install the selected VPN app on your mobile device.
Open the app and follow the on-screen instructions to set up your VPN connection.
Connect to a VPN server of your choice and enjoy secure browsing on your mobile device.
Remember to enable the VPN whenever you connect to public Wi-Fi networks or want to access geo-restricted content. By finding and using a VPN on your mobile device, you can enhance your online security and privacy effortlessly.
Locating VPN on cell phone
Locating VPN on a cell phone is a straightforward process that offers enhanced security and privacy for users. VPN, short for Virtual Private Network, enables users to establish a secure connection to another network over the internet, encrypting data transmission and masking the user's IP address.
To locate and set up a VPN on a cell phone, follow these simple steps:
Choose a VPN Provider: Start by selecting a reputable VPN provider from the numerous options available in the market. Look for providers that offer strong encryption, a wide server network, and good customer support.
Download and Install the VPN App: Visit the Google Play Store (for Android) or the App Store (for iOS) on your cell phone. Search for the VPN provider's app and download it onto your device. Follow the installation prompts to set up the app.
Create an Account: Once the app is installed, open it and create an account with the VPN provider. You may need to provide an email address and choose a subscription plan if the VPN service is not free.
Connect to a Server: After logging in, you'll typically see a list of server locations to choose from. Select a server location based on your preferences, such as accessing geo-restricted content or optimizing for speed.
Enable the VPN Connection: Toggle the VPN connection switch to the "on" position within the app. Once activated, the VPN will encrypt your internet traffic and route it through the selected server, providing you with enhanced privacy and security.
Verify the Connection: Confirm that the VPN is working by checking your IP address or visiting a website that detects your location. You should see the IP address of the VPN server location you selected, indicating that your connection is secure.
By following these steps, you can easily locate and set up a VPN on your cell phone, ensuring your online activities remain private and secure, whether you're browsing the web, accessing public Wi-Fi networks, or streaming content.
0 notes
Text
A Comprehensive Guide to Downloading PUBG Mobile from the Play Store
In the realm of mobile gaming, few titles have captured the attention and devotion of players quite like PUBG Mobile. With its intense battles, strategic gameplay, and immersive experience, PUBG Mobile has become a global phenomenon, boasting millions of active players worldwide. If you're eager to join the fray and dive into the adrenaline-pumping action, you're in luck! In this guide, we'll walk you through the process of Pubg Mobile Download Play Store.
Step 1: Accessing the Play Store
The first step in downloading PUBG Mobile is to access the Google Play Store on your Android device. The Play Store is the official marketplace for Android apps and games, and it's where you'll find PUBG Mobile among countless other titles.
To open the Play Store, simply locate the Play Store icon on your device's home screen or app drawer and tap on it. Once the Play Store is open, you'll be greeted with a vast selection of apps and games.
Step 2: Searching for PUBG Mobile
With the Play Store open, it's time to search for PUBG Mobile. You can do this by tapping on the search bar at the top of the screen and typing "PUBG Mobile" into the search field. As you type, the Play Store will begin to suggest relevant results, making it easier to find what you're looking for.

Once you've entered the search term, tap on the magnifying glass icon or press the Enter key on your device's keyboard to initiate the search. In just a few moments, the Play Store will display a list of search results, with PUBG Mobile likely appearing at the top of the list.
Step 3: Selecting PUBG Mobile
After locating PUBG Mobile in the search results, tap on the game's icon to access its download page. Here, you'll find more information about the game, including its description, screenshots, and user reviews. Take a moment to review this information to ensure that PUBG Mobile is the right choice for you.
If you're satisfied and ready to proceed, simply tap on the "Install" button to begin downloading PUBG Mobile to your device. Depending on your internet connection speed, the download process may take a few moments to complete, so be patient.
Step 4: Installing PUBG Mobile
Once the download is complete, the Play Store will automatically PUBG Mobile Update Download Apk on your device. You'll see a progress bar indicating the installation process, and once it's finished, you'll receive a notification confirming that PUBG Mobile has been successfully installed.
Step 5: Launching PUBG Mobile
With PUBG Mobile installed on your device, you're ready to jump into the action! Simply locate the game's icon on your home screen or app drawer and tap on it to launch PUBG Mobile. The game will then load, and you'll be greeted with the main menu, where you can sign in, customize your settings, and start playing.
Step 6: Getting Started
If you're new to PUBG Mobile, take some time to familiarize yourself with the game's mechanics and controls before diving into your first match. You can explore the various game modes, customize your character, and even team up with friends for a squad-based adventure.
Whether you're a seasoned veteran or a newcomer to the world of PUBG Mobile, the Play Store provides a convenient and straightforward way to download and enjoy this thrilling gaming experience. So what are you waiting for? Join the millions of players worldwide and experience the excitement of PUBG Mobile today!
0 notes
Text
where is vpn in settings
🔒🌍✨ Get 3 Months FREE VPN - Secure & Private Internet Access Worldwide! Click Here ✨🌍🔒
where is vpn in settings
VPN settings location
Navigating through the settings of your VPN can sometimes feel like finding a needle in a haystack. Whether you're seeking to tweak security preferences or optimize performance, knowing where to locate these settings is crucial. Here's a guide to finding your VPN settings location across different devices and platforms.
On Windows, locating VPN settings is relatively straightforward. Start by accessing the Control Panel, then click on "Network and Internet" followed by "Network and Sharing Center." From there, select "Change adapter settings" on the left-hand side. Right-click on your VPN connection and choose "Properties" to access its settings.
If you're using a Mac, the process is slightly different. Head to "System Preferences" and click on "Network." In the left sidebar, select the VPN connection you wish to configure. Click on the "Advanced" button to reveal additional settings such as DNS and proxy configurations.
For mobile devices running on iOS or Android, the VPN settings location may vary depending on the device manufacturer and operating system version. Generally, you can find VPN settings under the "Network" or "Connections" section in the device settings menu. Look for options like "VPN," "Network & Internet," or "Wireless & Networks" to access and configure your VPN settings.
Some VPN providers also offer dedicated apps for easier configuration. These apps typically provide a user-friendly interface where you can customize settings such as protocol selection, server preferences, and kill switch functionality.
Regardless of the device or platform you're using, taking the time to familiarize yourself with your VPN settings location can help you make the most out of your VPN service, ensuring both security and optimal performance for your online activities.
Accessing VPN in settings
Accessing a VPN through your device's settings is a straightforward process that can provide numerous benefits, including enhanced privacy, security, and access to region-restricted content. Whether you're using a smartphone, tablet, or computer, the steps to access a VPN are generally similar.
Navigate to Settings: Begin by locating the Settings app on your device. This is typically represented by a gear icon and can be found on the home screen or in the app drawer.
Select Network or Connections: Within the Settings menu, look for options related to network or connections. This may vary depending on your device and operating system but commonly includes headings like "Network & Internet" or "Connections."
Choose VPN Settings: Once you've accessed the network or connections menu, locate the option for VPN settings. This is where you can manage and configure your VPN connections.
Add a VPN Configuration: Within the VPN settings menu, you'll typically find an option to add a new VPN configuration or connection. Tap or click on this option to proceed.
Enter VPN Details: You'll need to provide certain details to set up your VPN, including the VPN server address, your username, password, and any additional authentication details required by your VPN provider.
Save and Connect: After entering the necessary information, save your VPN configuration. You should now see your newly added VPN listed among the available connections. Tap or click on it to connect.
Enjoy Secure Browsing: Once connected, your device's internet traffic will be encrypted and routed through the VPN server, providing you with enhanced security and privacy. You can now browse the web, access region-restricted content, and enjoy a more secure online experience.
By accessing a VPN through your device's settings, you can take control of your online privacy and security with just a few simple steps.
Finding VPN option in settings
Finding the VPN option in settings is a crucial step in ensuring your online privacy and security. With the increasing prevalence of cyber threats and surveillance, using a VPN (Virtual Private Network) has become essential for safeguarding your sensitive data and maintaining anonymity while browsing the internet.
To locate the VPN option in settings, follow these simple steps:
Open Settings: Begin by accessing the settings menu on your device. This can usually be done by tapping the gear icon on your home screen or app drawer.
Navigate to Network Settings: Within the settings menu, look for the section labeled "Network" or "Connections." This is where you'll find options related to your device's internet and network connections.
Locate VPN Settings: Scroll through the network settings until you find the option for VPN. Depending on your device and operating system, it may be listed as "VPN," "VPN Settings," or something similar.
Enter VPN Settings: Tap on the VPN option to enter the VPN settings menu. Here, you'll be able to configure and manage your VPN connections.
Set Up VPN: If you haven't already set up a VPN on your device, you can do so from this menu by adding a new VPN connection. You'll typically need to enter the server address, authentication credentials, and other relevant details provided by your VPN service provider.
Connect to VPN: Once you've configured your VPN settings, you can easily connect to or disconnect from the VPN network directly from this menu.
By following these steps, you can quickly find the VPN option in settings and take advantage of the enhanced security and privacy features that a VPN provides. Remember to choose a reputable VPN service and regularly update your VPN settings for optimal protection against online threats.
Locating VPN in device settings
Locating a VPN in Device Settings
Virtual Private Networks (VPNs) are crucial tools for safeguarding your online privacy and security. Whether you're concerned about hackers, government surveillance, or simply want to access region-restricted content, a VPN is a go-to solution. However, many users struggle with locating the VPN settings on their devices. Here's how to find them across different platforms:
Windows PC:
On Windows 10, go to Settings > Network & Internet > VPN.
Alternatively, type "VPN" in the search bar and select "VPN settings."
Mac:
For macOS, navigate to System Preferences > Network > VPN.
iOS (iPhone/iPad):
Access VPN settings by going to Settings > General > VPN.
Android Devices:
On Android, it varies slightly depending on the device manufacturer. Typically, it's found under Settings > Network & Internet > VPN.
Linux:
VPN settings can often be found in Network Settings or Network Manager, depending on your Linux distribution.
Router Setup:
Some routers support VPN configuration directly. Refer to your router's manual or consult the manufacturer's website for instructions.
Once you've located the VPN settings, the next steps involve adding a VPN connection. This usually requires entering details provided by your VPN service provider, such as server address, username, and password.
Remember to choose a reputable VPN provider known for their privacy policies and security measures. After setting up your VPN, you can enjoy browsing the internet with enhanced privacy and security.
In conclusion, while finding VPN settings may seem daunting initially, most devices offer straightforward paths to access them. By utilizing VPN technology, you can take control of your online privacy and enjoy a safer browsing experience.
VPN configuration settings
VPN Configuration Settings: A Comprehensive Guide
Virtual Private Networks (VPNs) have become an essential tool for ensuring online privacy and security. However, to maximize their effectiveness, proper configuration settings are crucial. Here's a detailed guide on the essential VPN configuration settings:
Protocols Selection: VPN protocols dictate how data is transmitted between your device and the VPN server. Common protocols include OpenVPN, L2TP/IPsec, and IKEv2/IPsec. Choose the protocol based on your priorities, balancing between security, speed, and compatibility.
Encryption Strength: Encryption ensures that your data remains secure during transmission. Opt for AES encryption with 256-bit keys, considered industry-standard for robust security without compromising performance.
DNS Settings: DNS (Domain Name System) translates domain names into IP addresses. Configure your VPN to use its DNS servers to prevent DNS leaks, which could expose your browsing activities.
Kill Switch: A kill switch is a vital safety feature that automatically disconnects your device from the internet if the VPN connection drops unexpectedly. Enable this setting to prevent your data from being exposed to prying eyes during interruptions.
Split Tunneling: This feature allows you to choose which traffic goes through the VPN and which accesses the internet directly. It's useful for accessing local network devices while still encrypting sensitive data.
Multi-hop (or Double VPN): For enhanced privacy, consider using multi-hop functionality, which routes your connection through multiple VPN servers, adding layers of encryption and anonymity.
IP Address Rotation: Some VPNs offer the option to periodically change your IP address, further enhancing anonymity by making it harder to trace your online activities back to you.
Port Selection: VPNs often allow users to choose which ports to use for their connections. Experiment with different ports to bypass network restrictions and improve connection stability.
By configuring your VPN with these settings, you can ensure maximum privacy, security, and performance while navigating the digital realm. Remember to regularly update your VPN software and settings to stay ahead of potential threats and enjoy a seamless online experience.
0 notes