#navigation drawer android tutorial
Explore tagged Tumblr posts
Visit Tumblr Blog
Explore Tumblr blogs with no restrictions, modern design and the best experience.
Last Seen Tumblr Blogs


Fun Fact
28.6 is the average number of monthly visits per US mobile user.
Text
Creating a Custom Navigation Drawer with Android Navigation
Introduction Creating a Custom Navigation Drawer with Android Navigation is a crucial aspect of building a robust and user-friendly Android application. A navigation drawer provides a convenient way for users to access frequently used features, settings, and other essential information without having to navigate through the main content of the app. In this tutorial, we will guide you through the…
0 notes
Text
Tiranga Apps Download Embrace Culture and Innovation with Easy Access
In today's digital landscape, mobile applications have become an integral part of our daily lives, offering everything from entertainment to productivity solutions. Among the emerging trends, Tiranga Apps have gained prominence by merging cultural themes with modern technology. If you're interested in exploring these innovative apps, understanding the process of downloading Tiranga Apps can help you access a unique blend of tradition and technology. This article delves into what Tiranga Apps are, their key features, and how to download them effectively.

What Are Tiranga Apps?
Tiranga Apps are mobile applications that integrate elements inspired by the Indian national flag, known as the Tiranga, into their design and functionality. The term "Tiranga," which translates to "tricolor," reflects the colors of the Indian flag—saffron, white, and green. These apps often incorporate cultural, historical, and artistic themes related to Indian heritage, offering users a rich and immersive experience that celebrates and connects with their cultural roots.
Key Features of Tiranga Apps
Cultural Integration: Tiranga Apps are designed to reflect Indian cultural values and heritage. This integration is evident in their visual design, which often features the colors and symbols associated with the Indian flag. The apps might also include content related to Indian festivals, history, and traditions.
Diverse Categories: Tiranga Apps span various categories, including educational, entertainment, productivity, and lifestyle. Whether you’re interested in learning about Indian history, exploring traditional music, or finding tools to enhance your daily life, there’s likely a Tiranga App tailored to your needs.
User-Friendly Design: Despite their cultural focus, Tiranga Apps prioritize ease of use. The interfaces are typically designed to be intuitive and accessible, ensuring that users from all backgrounds can navigate the apps with ease.
Interactive Features: Many Tiranga Apps include interactive elements such as quizzes, games, or virtual tours. These features not only entertain but also educate users about Indian culture and traditions in an engaging manner.
Community Engagement: Some Tiranga Apps offer social features that allow users to connect with others who share their interests. This might include forums, chat functions, or social media integration where users can discuss cultural topics and share experiences.
Regular Updates: To keep users engaged, Tiranga Apps often receive updates that include new content, features, and improvements. These updates ensure that the apps remain relevant and continue to offer fresh and engaging experiences.
How to Download Tiranga Apps
Choose Your Platform: Tiranga Apps are available on various platforms, including iOS and Android. Determine which platform you prefer and ensure that the app you want to download is compatible with your device.
Find a Trusted Source: To download a Tiranga App, visit a reputable app store or the app’s official website. For Android devices, this is typically the Google Play Store, while iOS users will use the Apple App Store. Avoid downloading apps from unverified sources to protect your device from potential security risks.
Search for the App: Use the search function in your chosen app store to find the Tiranga App you’re interested in. You can search by the app's name or related keywords.
Download the App: Once you locate the app, click on the download or install button. The app will be downloaded and automatically installed on your device. Make sure you have a stable internet connection to ensure a smooth download process.
Open and Set Up: After installation, open the Tiranga App from your device’s app drawer or home screen. Follow any initial setup instructions or tutorials to get acquainted with the app’s features and settings.
Customize Your Experience: Explore the app’s settings to customize your experience according to your preferences. This might include adjusting notification settings, language preferences, or personalizing content.
Benefits of Using Tiranga Apps
Cultural Connection: Tiranga Apps offer a unique way to connect with Indian culture and heritage, providing users with valuable insights and experiences related to their traditions.
Educational Value: Many Tiranga Apps have educational components that enhance users’ knowledge about Indian history, festivals, and arts. This educational value makes the apps both enjoyable and informative.
Entertainment and Engagement: The diverse range of Tiranga Apps ensures that there’s something for everyone, from interactive games and quizzes to educational resources and cultural content.
Community Building: Social features in Tiranga Apps foster a sense of community, allowing users to connect with others who share their interests and participate in cultural discussions.
User-Friendly Experience: The intuitive design and regular updates ensure that Tiranga Apps remain accessible and engaging, providing a satisfying user experience.
Conclusion
Tiranga Apps represent a vibrant intersection of culture and technology, offering users a unique way to explore and engage with Indian heritage. By following the steps outlined above, you can easily download and enjoy these innovative apps, benefiting from their rich cultural content and interactive features. Whether you’re interested in learning about Indian traditions, accessing educational resources, or simply enjoying culturally themed entertainment, Tiranga Apps provide a valuable and enriching digital experience.
0 notes
Text
Snaptube for pc
Title: SnapTube for PC:
A Comprehensive Guide
In an era dominated by online streaming platforms and social media, the need for versatile video downloading tools has become increasingly apparent. SnapTube emerges as a leading solution, offering users the ability to download videos from various sources with ease. While primarily known for its mobile version, SnapTube's compatibility with PC opens up a world of possibilities for users seeking flexibility and convenience in managing their media content. In this article, we delve into the realm of SnapTube for PC, exploring its features, benefits, and how to harness its full potential.
Understanding SnapTube: A Versatile Video Downloader
SnapTube is a feature-rich video downloader app that allows users to download videos from a wide range of platforms, including YouTube, Facebook, Instagram, and more. Its intuitive interface and robust functionality have made it a favorite among users seeking to download and manage their favorite videos offline.
Features of SnapTube for PC
1. Wide Compatibility:
SnapTube for PC is compatible with various Windows operating systems, making it accessible to a broad user base. Whether you're using Windows 7, 8, or 10, you can seamlessly integrate SnapTube into your PC environment.
2. High-Quality Downloads:
One of the standout features of SnapTube is its ability to download videos in high definition (HD) quality. Users can choose from various resolutions, ensuring optimal viewing quality based on their preferences and device specifications.
3. Batch Downloading:
SnapTube for PC allows users to download multiple videos simultaneously, saving time and effort. With just a few clicks, you can queue up your favorite videos for downloading and let SnapTube handle the rest.
4. Audio Extraction:
In addition to downloading videos, SnapTube also offers the ability to extract audio from videos. This feature is particularly useful for creating playlists or enjoying your favorite music offline.
5. Built-in Search Functionality:
SnapTube features a built-in search function that enables users to discover and download videos directly from within the app. Whether you're looking for the latest music videos, tutorials, or entertainment content, SnapTube makes it easy to find and download what you need.
How to Download and Install SnapTube for PC
Download an Android Emulator: Since SnapTube is primarily designed for Android devices, you'll need to download an Android emulator for your PC. Popular options include BlueStacks, NoxPlayer, and Andy.
Install the Emulator: Once you've downloaded the emulator, follow the on-screen instructions to install it on your PC.
Download SnapTube APK: Visit the official SnapTube website or trusted third-party sources to download the SnapTube APK file.
Install SnapTube: After downloading the SnapTube APK, open the emulator and navigate to the location where the APK file is saved. Double-click the file to initiate the installation process.
Launch SnapTube: Once installed, you can launch SnapTube from the emulator's app drawer and start downloading your favorite videos.
Conclusion
SnapTube for PC offers a convenient and efficient solution for downloading and managing videos from various online platforms. With its user-friendly interface, high-quality downloads, and versatile features, SnapTube empowers users to enjoy their favorite content offline, without limitations. By following the steps outlined in this guide, you can unlock the full potential of SnapTube on your PC and elevate your media consumption experience to new heights.
1 note
·
View note
Text
Creating User-Friendly iOS and Android Designs: Navigating Away from Common Mistakes

Designing user-friendly mobile apps for iOS and Android platforms is crucial to ensure a positive user experience and app success. In this blog, we will explore the common mistakes that developers often make while designing for these platforms and provide practical tips to avoid them. By following these best practices, you can create intuitive and engaging mobile applications that users will love.
Emphasize Intuitive Navigation
Mistake: Complex navigation structures can confuse users and make it difficult for them to find what they're looking for, leading to frustration and app abandonment.
Solution: Implement a simple and intuitive navigation system that follows platform guidelines. Utilize standard UI components like tab bars, navigation drawers, and bottom navigation to provide familiar user experiences. Keep the most important functions within easy reach and ensure a consistent flow throughout the app.
Responsive Design for Different Screen Sizes
Mistake: Neglecting responsive design can result in a poor user experience on various screen sizes, causing layout issues and content overlap.
Solution: Adopt a responsive design approach to adapt your app's layout dynamically based on the device's screen size. Utilize layout constraints and flexible designs to ensure elements adjust proportionally on both smaller phones and larger tablets.
Optimize App Performance
Mistake: Overloading the app with unnecessary animations, heavy graphics, and background processes can slow down the app's performance, leading to user frustration and increased battery consumption.
Solution: Optimize your app by reducing resource-intensive elements, compressing images, and minimizing the use of animations where possible. Leverage lazy loading to load data and media only when needed, improving app responsiveness and conserving battery life.
Prioritize Accessibility
Mistake: Ignoring accessibility features can exclude users with disabilities, making your app less inclusive and reducing its potential user base.
Solution: Adhere to accessibility guidelines and make your app accessible to everyone. Provide alternative text for images, ensure proper color contrast, use semantic HTML elements, and enable voiceover/screen reader support. Testing your app with assistive technologies is crucial to ensure a seamless experience for all users.
Consistent and Clear Typography
Mistake: Using inconsistent or illegible fonts can make the app visually unappealing and difficult to read.
Solution: Choose a clean and legible font for your app and maintain consistency throughout. Avoid using too many different font styles and sizes, as it can create a cluttered look. Adjust font sizes based on the device's screen size and resolution to ensure readability. Also Read: Top Flutter App Development Companies in 2023
Streamlined Onboarding Experience
Mistake: A lengthy or confusing onboarding process can deter users from using the app further.
Solution: Keep the onboarding process simple and concise, focusing on the essential features and benefits of your app. Offer optional tutorials or tooltips to guide users through key functionalities. Consider implementing a skip option for users who are already familiar with the app.
Thorough Testing and Bug Fixing
Mistake: Launching an app without adequate testing can result in a poor user experience due to bugs and glitches.
Solution: Conduct rigorous testing on various devices, screen sizes, and OS versions to identify and fix any issues. Regularly update your app with bug fixes and improvements to maintain a seamless user experience.
Responsive Touch and Gestures
Mistake: Unresponsive touch interactions and conflicting gestures can lead to user frustration and difficulty navigating the app.
Solution: Implement smooth and responsive touch interactions that match the platform's guidelines. Ensure that gesture controls are intuitive and don't conflict with native OS gestures, such as swiping or pinching.
Conclusion
Designing user-friendly iOS and Android apps is a continuous process that requires attention to detail and adherence to best practices. By avoiding common mistakes and implementing intuitive navigation, responsive design, and accessibility features, you can create mobile apps that users will love. Prioritizing performance optimization, clear typography, streamlined onboarding, and thorough testing will further enhance the user experience and contribute to the success of your app in the competitive app market.
About Getwidget
To hire Android app developers is a critical step towards creating a successful mobile app. With an ever-growing pool of candidates and varying skill levels, finding the perfect fit can be challenging. However, GetWidget is here to simplify the hiring process and help you discover the ideal Android app developer for your project.
GetWidget is a leading online platform that connects employers with skilled Android app developers. It serves as a one-stop destination for businesses and startups looking to hire professionals with expertise in building Android applications. By leveraging GetWidget, employers can easily browse through a vast pool of developers, review their portfolios, and assess their skills to make informed hiring decisions.
#Flutter App Development#Flutter App Development Company#Flutter App Developer#Hire Flutter Developer
0 notes
Text
Code to Create Navigation Drawer in Android App
Create Navigation Drawer in Android App
Create Navigation Drawer in Android App Being an app developer, one should know how to create a navigation drawer, of course, you will have the code for navigation drawer from many sources code sites. Seizing instant code and implementing it as it is in your app is not a big deal, what if you want something other than the size code? you need to make changes to the enfolded code. Without proper…

View On WordPress
#android#android app drawer#android drawer#android drawer menu#android gps#app drawer android#apps drawer#drawer android#drawer android tutorial#drawer app#How to create navigation drawer in android#nav android#navigation drawer android tutorial#navigation menu android#sliding draw#sliding drawer#sliding drawer in android tutorial#what is navigation drawer
0 notes
Text
Mastering React Learning: A Complete Information

React Native is a popular JavaScript framework that enables developers to build mobile apps for iOS and Android platforms using a single codebase. It offers a range of features and benefits, including fast development, hot reloading, and a large community of developers. In this blog, we will provide a comprehensive guide to mastering React Native and building high-quality mobile apps. For more updates like this, keep visiting us on The React Company.
What is React Native?
React Native is a JavaScript framework that allows developers to build mobile apps for iOS and Android platforms using a single codebase. However, It was developed by Facebook in 2015 and has gained popularity among developers due to its fast development, efficient performance, and easy maintenance. React Native uses a declarative approach to build user interfaces, which makes it easier to write code and maintain the app.
Getting Started with React Native
To get started with React Native, you will need to have some basic knowledge of JavaScript and React. Once you have a solid understanding of these concepts, you can start exploring the React Native documentation and tutorials available online. You can also download the React Native CLI and start building your first app using the command line.
Creating a Simple React Native App
To create a simple React Native app, you will need to follow these steps:
Building Complex React Native Apps
Once you have a solid understanding of the basics of React Native, you can start building more complex apps. This will require knowledge of additional concepts and tools, such as Redux, navigation, and API integration. Here are some tips for building complex React Native apps:
1. Use Redux for State Management
Redux is a popular library for state management in React Native apps. It allows you to store data in a centralized location and access it from any component in the app. Redux can help you manage complex app logic and make it easier to maintain and update your code.
2. Use React Navigation for Routing
React Navigation is a library that allows you to handle routing and navigation in your React Native app. It provides a range of features, including stack, tab, and drawer navigation, as well as customizable headers and footers. React Navigation can help you build a seamless user experience and make it easier to navigate between screens in your app.
3. Use APIs for Data Integration
Most mobile apps require data integration from external sources, such as APIs or databases. React Native provides a range of libraries and tools for integrating data into your app, including Axios, Fetch, and AsyncStorage. By using these tools, you can easily retrieve data from external sources and use it to build dynamic and engaging mobile apps. You might also like Power of the React Key Attribute: Efficient List-Building.
Best Practices for React Native Development

Here are some best practices to keep in mind when developing React Native apps:
1. Keep the App Simple
When building React Native apps, it's important to keep the app as simple as possible. This means avoiding unnecessary features or functionalities and focusing on the core functionality of the app. Keeping the app simple can help you avoid bugs and make it easier to maintain and update the app.
2. Use Native Components
React Native provides a range of built-in components, such as Text, View, and Image. These components are optimized for performance and are designed to work seamlessly on both iOS and Android platforms. When building your app, try to use these native components as much as possible, as they can help you achieve a more native look and feel. You can also read it here.
3. Optimize App Performance
Optimizing app performance is critical when building React Native apps. There are several ways to improve app performance, such as using PureComponents, implementing lazy loading, and optimizing images. By optimizing your app's performance, you can ensure that your app runs smoothly and provides a seamless user experience.
Conclusion
As a result, React Native is a powerful JavaScript framework for building mobile apps for iOS and Android platforms. By following the best practices and tips outlined in this blog, you can master React Native and build high-quality mobile apps that are fast, efficient, and easy to maintain. Whether you are a beginner or an experienced developer, React Native offers a range of features and benefits that can help you achieve your mobile app development goals. So start exploring React Native today and take your mobile app development skills to the next level.
0 notes
Text
How to get started with LinearLayout on Android Studio with App?
LinearLayout is among the most important layout managers used in Android Studio. It is employed to lay out the layout's content. It is used by default to arrange the content of Activity and Fragment layout. For beginners, it is sufficient to be able to use it but for advanced developers, it's recommended to use other layout managers like GridLayout and FrameLayout. LinearLayout is also sufficient to design the layout of your application. In this article, I'll describe the fundamental procedures and configurations that you have to be aware of to begin working with LinearLayout.
The 5 Best CCNA Certification Books for 2022
1. What is LinearLayout?
LinearLayout is a layout manager used to build the scrolling list of views. It is similar to a ListView or RecyclerView however, it's not a replacement for these. It's an adaptable layout manager that can be used to create footers and headers as well as navigation or other type of content.
CCNA Routing And Switching All In One Study Guide BOOK
2. Basic steps of using LinearLayout
LinearLayout LinearLayout class is among the most effective layout classes in Android. It can be used to create almost any layout you can think of. One of the most frequent uses of LinearLayout could be creating a scrolling layout that behaves like a list. This layout can be made by creating a LinearLayout using only one child, which is an a ListView. This is the basic design of the scrolling list. You can also create an a scrolling list with TabLayout. TabLayout class. This layout is more suitable to create a list of tabs. LinearLayout is a crucial component of the Android framework. It can be used to create various layouts, such as lists that scroll. This article will show you how to start using LinearLayout using Android Studio.
How To Configure OSPF Single Area On 4 Routers In Cisco Packet Tracer
3. Fundamental configurations and configurations to LinearLayout
This section demonstrates how to make use of the LinearLayout to build the layout with just one column and only one row. The layout is comprised of the following components: TextView, Button TextView and Button. Button. The basic configurations of LinearLayout How To Configure OSPF Multi Area On 4 Routers In Cisco Packet Tracer
4. Conclusion.
To begin using linearLayout using Android Studio, it's helpful to know the different layout classes. Each layout class comes with its own set or utilities and behavior. LinearLayout is one of the most widely used layout classes. LinearLayout is a layout that lays out its children horizontally and vertically. It has multiple children that it can support, which means you can use it to display an item list such as a navigation bar or even a navigation drawer. Another thing to consider about linearLayout is that it does not have any way to connect to its children, other than setsChild() as well as getChild(). This means that you will have to go through each child to access the desired one.
Basic Cisco Router Configuration | Cisco Packet Tracer Tutorial
0 notes
Text
How to use twrp app without root

#How to use twrp app without root install#
#How to use twrp app without root drivers#
#How to use twrp app without root update#
#How to use twrp app without root android#
#How to use twrp app without root series#
#How to use twrp app without root android#
Albeit not present upon its Android theme for any variation, you may attempt to toggle the fonts without that much trouble. There are several reasons why you would want to alter the fonts: readability, marketing of the business, distinctive look, etc. From both the look or sound, through convenience and strength, anyone can adjust the interface landscape.
#How to use twrp app without root install#
Root and Install TWRP Recovery on Galaxy Tab 3 7.Among the most flexible smartphone ecosystems you’ll probably have is Android. Just to verify that your tab has proper root access, verify it with the Root Checker app from the Google Play Store: If it is present, your device has been rooted successfully. When your Galaxy Tab 3 7.0 boots up, open the app drawer and look for the SuperUser app there. Finally, its time to reboot your device by selecting Reboot> System option.Then slide the confirmation slider button to flash SuperSU on your Galaxy Tab 3.Tap the Install button, navigate to UPDATE-SuperSU.zip file and select it.Now boot your Tab 3 into Recovery Mode: press and hold the Volume Up + Home + Power buttons together till the screen turns up you see the Samsung logo, and then release the Power button but keep the Volume and Home buttons pressed until you see the TWRP menu.Now turn off your tab by pressing and holding the Power button.When the installation is finished, you will see PASS! message on Odin.Then click the Start button to start TWRP installation.click the AP button and add T210.TWRP.2.8.0.0.tar.md5 to the field.Now uncheck Auto Reboot option on Odin.You’ll see “Added!!” on the Odin message box.Use the original cable provided by Samsung to avoid errors. Now connect your tab to your computer via USB cable.When the warning screen with yellow exclamation sign appears, press the Volume Up key to enter the Download Mode. Turn off your tab and boot it into the Download mode by pressing the Volume Down + Home + Power buttons at the same time for 2-3 seconds.Copy UPDATE-SuperSU.zip file to your device.Install TWRP & Root Galaxy Tab 3 7.0 SM-T210 / T210R Backup your apps and data as a precaution.Enable USB debugging on your Galaxy Tab 3 (see instructions here).
#How to use twrp app without root drivers#
Install Samsung USB Drivers on your computer if you do not have it already.
Download the latest SuperSU zip and copy the file to your device: UPDATE-SuperSU.zip.
Download Odin 3.09 and unzip the downloaded file: Odin_v3.09.zip.
Download the TWRP image file (it’s same for SM-T210 and SM-T210R both): T210.TWRP.3.0.5.
However, if you a new to such things, do not miss any of the preparatory steps described below: Well, there is nothing new in here are most things are the same as you do while using Odin. Getting Preparedīefore we proceed to gain root on the Galaxy Tab 3 7.0 SM-T210 and SM-T210R, there are a few things to be taken care of. We have successfully tested the method for rooting and installing TWRP recovery on the Galaxy Tab 3 7.0 SM-T210 and SM-T210R both (thanks to Javez and Polaris Star for testing!) However, before you make your mind to follow or tutorial, you must know that rooting your device will void its warranty and put it at risk. And thus we can now not only root Galaxy Tab 3 7.0 SM-T210 and SM-T210R but also install TWRP recovery to enjoy custom ROMs and mods. The unavailability of a KitKat compatible custom recovery made it impossible to flash the latest SuperSU to gain root access on the device running Android 4.4.2.įortunately, we now have an unofficial build of TWRP Recovery that is compatible with the new KitKat bootloader. Since the old root method that worked on Android 4.2.2 Jelly Bean firmware stopped working on Android 4.4.2, the users of the Galaxy Tab 3 7.0 SM-T210 and SM-T210R were forced to wait for a working root method. Whether you have updated your Tab via OTA or manually through Odin, you must have lost root access on your device.Īs you know, if you have got used to enjoying the privilege of owning a rooted Android device once, it really feels bad to go a single day without root access.
#How to use twrp app without root update#
If you have not yet received the the new Android 4.4.2 update notification yet, you can update your device manually by following our step-by-step tutorial. The KitKat update for the Galaxy Tab 3 7.0 SM-T210 and SM-T210R brings a plethora of new features and enhancements for better performance. The device was released with Android 4.2.2 Jelly Bean out of the box and it has been just less than a month when Samsung started to roll out the long-awaited Android 4.4.2 KitKat update. This mid-sized tablet sports a 7″ display (600 x 1024 px), Dual-core 1.2 GHz CPU, 1GB RAM, 3.15MP primary and 1.3MP secondary camera, and a powerful 4000mAh battery.
#How to use twrp app without root series#
The Galaxy Tab 3 7.0 belongs to the third generation of Samsung’s tablet series in 7-inch category.
0 notes
Text
App that lets you download instagram videos

#APP THAT LETS YOU DOWNLOAD INSTAGRAM VIDEOS HOW TO#
#APP THAT LETS YOU DOWNLOAD INSTAGRAM VIDEOS APK#
#APP THAT LETS YOU DOWNLOAD INSTAGRAM VIDEOS INSTALL#
#APP THAT LETS YOU DOWNLOAD INSTAGRAM VIDEOS ANDROID#
How to Download Instagram Videos on Windows Phones
#APP THAT LETS YOU DOWNLOAD INSTAGRAM VIDEOS ANDROID#
Hope this short tutorial to download Instagram videos to your Android devices is helpful. But you may find it in the video section of the app, or navigate to the app folder by using a decent file explorer application. NOTE: Sometimes the videos you downloaded using this app, won’t show up in the gallery app on your android smartphone.
Now select the file you want to download, in our case, it is a video.
Now as you know, there will be a lot of media files that the app will fetch from Instagram, you need to set the filter like, mp4, avi, or other popular video formats.
Then after processing all the media available on the page, the app will show you.
Now tap on the Download option that you will find in the lower right corner of the screen in the app, and then wait for the phone and the app to process the data.
You can get the URL by clicking three dots undethe r video in your Instagram app.
Next enter the ULR of Video you need to download.
#APP THAT LETS YOU DOWNLOAD INSTAGRAM VIDEOS APK#
If you have any play store issues, download the Instagram video downloader apk directly from here
Now launch the app from the drawer after you have successfully installed it.
Here is the link to download the app from Google Play Store.
#APP THAT LETS YOU DOWNLOAD INSTAGRAM VIDEOS INSTALL#
Install it on your Android Smartphone.Now the first step is to download the GetThemAll Any File Downloader app to download Instagram videos.How to Download Instagram Videos on Android devicesįollow these steps to Download Instagram Videos on your Android Device: Now open previously installed the Regrammer application and paste the copied URL and click Download.To copy the URL, just open your desired video or image and top on three dots and click Copy Share URL. Now open the Instagram application and copy the URL of your video or Photo.This app is currently running on iOS 6 or higher Download and Install Regrammer application app to download Instagram videos on your device.How to Download Instagram Videos on iPhoneįollow these simple steps to download Instagram videos on any iOS devices. Here we classified this guide depending on different mobile operating systems which makes you easy to download Instagram videos online. Using these applications you can even download private Instagram videos (provided you follow those people). Thanks to developers who developed these applications to download video from Instagram to smartphones directly. Paste the copied URL in the text box provided.Follow first 3 steps from the above procedure and open dredown website.Then right-click anywhere on the screen and select Save Video Asĭownload Instagram Videos to Computer Easily Now your video will start playing in a new tab.You will see a link in a tag after src, click it.Right-click on the video and Select “ Inspect Element“.Log in to your Instagram Account using the best web browser like Google Chrome, Mozilla Firefox etc.
#APP THAT LETS YOU DOWNLOAD INSTAGRAM VIDEOS HOW TO#
Some may inject malware like Ransomware into your device.Ĭonsidering the potential threats from the various fake video downloaders for Instagram, we have sorted the best possible tips and best Instagram video savers to help you.Īlso Read: How to Install Instagram on PC Download Instagram Videos to Computer/PC But you can’t blindly rely on those applications for your purpose. There are many Instagram video downloaders available in the market to download videos from Instagram. And guess what? You can download the private videos your crush shared on Instagram with a small workaround trick. Still many users feel like downloading the videos and the images your friends have shared on Instagram. Do not repost/reuse videos or photos downloaded from Instagram without proper permissions
0 notes
Text
Creating a Custom Navigation Drawer with Android Studio and Kotlin
Introduction Creating a Custom Navigation Drawer with Android Studio and Kotlin is a valuable skill for any Android developer. A navigation drawer is a crucial component of an Android app, providing users with quick access to main menu items, settings, and other essential features. In this tutorial, we will guide you through the process of creating a custom navigation drawer from scratch,…
0 notes
Photo

Navigationsschublade mit Fragmenten (2020) | Teil 2/4 | Android Studio Navigation Drawer Tutorial
0 notes
Text
Pc App Market

AC Market for PC lets you install Android Apps on Windows. Download the latest version of AC Market for PC and get Cracked/Paid Android apps on PC for free.
AC Market is an app store just like Google Play Store but it is different in many ways. ACMarket provides direct downloads to cracked and modded apps. Lots of good apps are paid on Play Store but you can get all those apps for free from AC Market. You just need to download and install AC Market APK on your Android or iOS device and you are good to go. Yes, Android and iOS only, because there is no official version of ACMarket app for PC. But as said earlier AC Market APK is required for installing it on Android. So, we know we can use an Android emulator like Bluestacks, Nox, or ARC Welder and install APKs on PC. It is a workaround but it works and millions of people do this. In this article, we’ll discuss how to download and install AC Market for PC. We’ll show you various cool features of this application and how you can take the benefit of this Android application on Windows PC.
Download AC Market for PC
Apr 09, 2018. Oct 05, 2018. Jul 18, 2020.
You need to install Bluestack or Nox for installing APK file on PC. Download any one of these two, we recommend Nox.
or
Now download AC Market APK for PC.
Run the APK with Nox or Bluestacks and install it.
AC Market for PC: Download and Install
Now we’ll share the tutorial on how to download and install ACMarket for PC. As we told you earlier, this app is not officially available for PC but we can use an emulator to run it, so we’ll show you how to do that. As we are using an emulator workaround, therefore AC Market can be installed on all modern versions of Windows like 10, 8, 8.1, 7, Vista, and XP.
Firstly, you need to download an Android Emulator. There are a lot of emulators out there, which one to download mainly comes down to the speed and design. We recommend getting Bluestacks, NOX, or Droid4x. All three of these Android Emulators boots fast and does not lag while running. They run on the latest Android version which is another thing you should look at. You can directly search their name on Google and the first link will be the download link. Common help yourself lazy person.
The next step is, of course, installing the emulator. Now assuming that you have successfully installed it, and you are on the home screen of Android. You need to download the AC Market latest version APK. You can download that by clicking the button below. It is the same APK file you would download for your Android smartphone or device. It is the latest version 4.2 which is compatible with all modern Android versions.
Dumb, browse this webpage again from the browser in the Android emulator and then click the download. This way you get the AC Market APK file inside the emulator.
You can now directly install this APK file on your emulated Android. Just go to the file manager and then downloads the folder. Tap on the AC Market .apk file and follow on the screen instructions.
Congratulations. Now I hope you don’t want me to tell you how to launch it from the app drawer.
So I hope now you understand the process of installing AC Market on PC.
Features
This application does not have an official version for Windows PC but you can get ACM by using an emulator like Bluestacks, NOX, or ARC Welder which allows the installation of APK files. Basically, this is a workaround for running Android apps on PC. But it works and millions of people do this so why not you do it too. Using this method you can install this market app on Windows 10, Windows 8, Windows 7, and Windows XP or Vista. So, follow the steps given below to install the application on your PC.
Here the best features of the AC Market for PC.
It has a huge library of apps, not as big as Play Store’s as it has all the apps ever created but it has all the apps which are most used. This great library of applications includes cracked and modded apps with lots of paid apps for free.
AC Market for PC has an easy to use interface with proper search and navigation features. When you’ll first install this id versions.
These are the main features of the amazing Play Store alternative. There are other little features that add together and make this application experience wonderful.
Screenshots
Final Verdict
If you are bored with Play Store and generally don’t have money to buy those expensive yet useful apps then AC Market is the perfect alternative. AC Market does not come for PC but this method we showed you above works pretty well without any problems. That’s said we think it is a great app and you should give it a try. You must have read all the features of this Android application if you are reading this verdict so you must have an idea of how it works.
Are you getting bored of using the usual apps and games on your PC? You can get some of them on the Google Play store for free but most of the apps need to be purchased. If you are looking for the perfect way to get all the apps that you enjoy on Android devices using your PC, then we introduce to you ACMarket APK for PC. It is a brand new app installer with advanced features that makes it better than any other third-party app store. Now you can install any modded, hacked or paid apps and games on your PC with no payment at all.
Another great thing about ACMarket APK for Windows 10/8.1/8/7 & Mac PC is the awesome user interface which lets anyone download the app easily. All the premium features are accessible in this app for free. Now it is time to upgrade your Windows PC and Laptops. The best third-party apps for PC are just a few taps away using ACMarket APK. In this article, we have given the easiest way to download ACMarket APK for PC and enjoy all your favorite apps and games.
Contents
2 Install ACMarket APK for Windows 10/8.1/8/7 & Mac PC
ACMarket APK for PC | Features
Even though there are thousands of third-party apps and games for your Android devices, you cannot install all of them on Windows PC using the Google Play store. This is where ACMarket APK for PC comes to your rescue. This gives you access to one of the largest databases consisting of apps of all kinds. Let us explore more about the app installer by looking at the amazing features.
The wide range of apps and games it provides you for free is the main highlight of the app. This includes entertainment, social networking apps, instant messengers and modded, tweaked and hacked versions of several advanced apps.
Even with such a vast database, ACMarket APK for PC does not take up much space of your storage device.
There is also no need to sign up or register to use this app on a PC.
ACMarket APK is free of in-app advertisements.
Also, this is the safest app installer for your PC and does not interfere with the functioning of your device.
It also offers you many emulators for free.
The download speed has been increased. Also, there are no bugs while installing or running the app.
Interesting, isn’t it? Well, there are a lot more in ACMarket APK for PC that is going to amuse you. It is compatible with Windows 7,8 and 10. Now don’t limit your Windows PC. Go on and download this fantastic app installer now.
Pc App Market Download
My favorite game with ACMarket:
Download Last Shelter: Survival Mod APK on Android using ACMarket.
Install ACMarket APK for Windows 10/8.1/8/7 & Mac PC
ACMarket APK for PC has got tons of stuff and amazing features in store for you. Now you no longer need to limit your games to your Android devices. You can enjoy them in high-quality graphics on your PC/Laptop. ACMarket APK for PC also lets you run any number of apps and games at the same time. There is no restriction on the RAM which makes it easy for you to do anything you need using your favorite apps. You can follow the procedure given below to get ACMarket APK for PC safely.
1) The first thing you need to do is to download an emulator on your PC. We recommend you to use BlueStacks as it is the number one emulator for Windows using which you can install the apps safely. Go to the link given below to download the BlueStacks emulator (bluestacks.com) for PC.
2) Once the installation is complete, you need to run the emulator by opening it. You can now find the emulator icon on the screen.
3) Now it is time for you to download ACMarket APK for PC. To do this, you need to open the link given here and download the APK file on PC.
4) Once you are done with the download, open BlueStack emulator and search for ACMarket APK.
5) You need to double click on the APK file and the installation will begin shortly.

6) Once the installation is over, you can find ACMarket APK on your PC. Launch the app installer by clicking on it and enjoy.
Best App with ACMarket Store: “GBWhatsApp APK Download with AC Market APK“.

Final Words – AC Market APK Download on PC/Laptop [Windows/MAC]
Now you can access your favorite apps and games on PC for free and make the best out of your PC. That is all you have to do. Make sure that you have an active internet connection during the installation process. ACMarket APK on Windows 10/8.1/8/7 & Mac PC is all you need to get all the cool apps that you used to have for Android on your Windows PC as well.
Market Store Apps Free Download
Thank You.
Pc App Market
4.3/5(38 votes )
0 notes
Photo

Navigation Drawer with Fragments Part 1 - MENU AND ACTIVITY THEME - Android Studio Tutorial In this little video series we are goi... #hugochamber Source: https://hugochamber.org/navigation-drawer-with-fragments-part-1-menu-and-activity-theme-android-studio-tutorial/?feed_id=24607&_unique_id=5f4bd995815e9
0 notes
Link
more @ -> https://bit.ly/2SmKtdK
*****For more tutorials visit***** http://androidcoding.in/
***** Free java course link ***** http://www.androidcoding.in/tutorials-java/
***** Get updates on Facebook ***** https://www.facebook.com/androidcoding.in/
***** Get updates on Medium ***** https://medium.com/androidcoding-in
***** Subscribe us for more interesting tutorials ***** https://www.youtube.com/channel/UCWCLzrDi9TVkAsE-l4ZAHVQ?sub_confirmation=1
***** Follow us on instagram ***** https://www.instagram.com/accounts/login/?next=%2Fandroidcoding.in%2F&source=follow
0 notes
Photo

How to Learn Android App Development: Start with These Courses and Tutorials
With more than 2.5 billion Android devices existing worldwide, it’s clear that this platform is a must for any app developer. But how do you go about getting your app from idea to finished product? This guide will take you through some of the best tutorials, courses, and products from Envato. Whether you're getting started, or are already well on your way into your development journey, we've got something for you.
Let’s lay down some basics for Android development before delving into the resources.
Android Native or Cross-Platform?
Creating Android apps requires learning one of the languages supported by the Android software development kit. Most commonly, this means Kotlin, Java, or C++. If you happen to already know a web development language, such as JavaScript, you can take a look at frameworks that let you deploy to an Android device. We’ve covered some of these frameworks previously in our React Native learning and Ionic learning tutorials. These platforms also come with the benefit of being able to deploy to multiple platforms.
But those looking to code native apps for Android through the standard toolset, read on!
Getting Started With Android App Development
First off, you’ll have to head over to the official Android developer site, and install the latest version of Android Studio and the Android App Development Kit. This self-contained software covers almost every aspect of your development, incorporating an IDE, UI designers, debugging, documentation, and build tools.
Android
Understanding the Android App Development Kit
Esther Vaati
If you want easy step-by-step instructions for how to set up Android Studio, follow our complete guide on getting set up to create your first Android app!
Android SDK
How to Get Started Making Android Apps
Ashraff Hathibelagal
Once you set up Android Studio, you’ll either need an Android device to test on or a virtual device. They've got a guide on setting up virtual devices here. You’ll also need access to Google Play Console with a developer account if you want to launch to the Google Play store. This isn't necessary to get started with development though.
Learn to Code Android Apps From Scratch—For Free
Over the course of 18 free tutorials, the Android From Scratch series will take you right from your first Android app through to advanced topics like connecting to a REST API or Google Firebase.
Android
Android From Scratch: An Overview of Android Application Development
Ashraff Hathibelagal
Android
Android From Scratch: How to Run Your Application on a Physical Device
Ashraff Hathibelagal
Android
Android From Scratch: Understanding Views And View Groups
Paul Trebilcox-Ruiz
Android
Android From Scratch: Activities and Fragments
Paul Trebilcox-Ruiz
Courses to Learn Android Development
If you want to jump-start your app development knowledge, check out our complete series of video courses here on Envato Tuts+. You'll have to buy a subscription for these, but it comes included with a subscription to Envato Elements.
You can start with the Steps to Creating an Android App to get a glimpse into the development lifecycle for Android. You'll discover some questions to ask yourself before moving on, helping to lock in on what you want your project to be. It’s a quick course, laying out important fundamentals for new Android developers. Those coming from different development formats will appreciate the run down as well.
Mobile App
Steps to Creating an Android App
Paul Trebilcox-Ruiz
From there, the Kotlin from Scratch series will help you to get a solid understanding of the language you’ll be focusing on the most during your development. These courses cover everything you needed to get started working with Kotlin, from how variables work, to using loops, to implementing error handling.
Kotlin From Scratch: Variables, Basic Types, and Arrays
Kotlin is a modern programming language that compiles to Java bytecode. It is free and open source, and promises to make coding for Android even more fun.
Chike Mgbemena
11 Aug 2017
Kotlin
Kotlin From Scratch: Nullability, Loops, and Conditions
Kotlin is free and open source, and makes coding for Android even more fun. In this tutorial, we'll look at nullability, loops, and conditions in Kotlin.
Chike Mgbemena
16 Aug 2017
Kotlin
Kotlin From Scratch: Ranges and Collections
Kotlin is free and open source, and makes coding for Android more fun. In this tutorial we'll look at advanced data types such as ranges and collections.
Chike Mgbemena
25 Aug 2017
Kotlin
Next you’ll need to work on connecting Kotlin to Android, and the Get Started Coding Android Apps with Kotlin does just that. Covering things like Android views, layouts, inputs, and navigation, you’ll be well on your way to creating your first simple app by the time you’re through.
Kotlin
Get Started Coding Android Apps With Kotlin
Annapurna Agrawal
Working with App Templates
Once you’ve built a few of your own simple apps, it’s time to move onto more advanced concepts. There are plenty of mid-level tutorials out there, but one of the best moves to is to look at existing apps, and try to break down how they work.
Whether you want to look at popular open source apps, or some of the best Android app templates available over on CodeCanyon, there’s plenty of code to start with.
App Templates
20 Best Android App Templates of 2020
Franc Lucas
Take a look at the app you’ve chosen, and try to break it down into its components. How are they displaying the layout of a particular screen? How did they get the login function to work? What are they doing to make user profiles available?
Analyzing each of these sections, and anything else that interests you about the app will help you to understand how that type of function is built. Even more useful though is that you can see it in action by building the app and fiddling with the code.
Can you adjust the template to display things differently? Can you re-theme it to match how you’d like an app to look? Can you add a new piece of functionality to the template?
Working through these questions will give you hands on experience on making your way through these tasks. If you run into any issues, make sure to reach out to the community for help!
You can read more about how to use an Android app template here on Envato Tuts+.
Android
Build a 360-Degree Video Player App With an Android App Template
Esther Vaati
Android
Best Free Android Apps and How to Create Them Yourself
Ashraff Hathibelagal
Expanding Your App Development Skills
You’re starting to branch out with your Android development now, building basic apps and extending them using existing pieces. But where do you go next? Next up is expanding on your fundamentals, learning more about the capabilities of Kotlin, Android, and the interactions between them.
Learning more about Android Activities will help you to create more robust user interfaces. By looking into activities in more depth, you’ll get a handle advanced listening for activity events, how to navigate between activities, and how to share data between them.
Android
Android Fundamentals: Activities
Annapurna Agrawal
You might also want to flesh out your understanding for concepts such as intents and services as well. Intents can act as the glue holding the components of your app together, and the course Kotlin Android Fundamentals: Intents will help you to understand them inside and out. To expand your knowledge on services, the course Kotlin Android Fundamentals: Services will help you out. Covering foreground and background services, and their implementation, this course is a must-have for anyone looking to develop Android apps.
Android
Kotlin Android Fundamentals: Intents
Annapurna Agrawal
Android
Kotlin Android Fundamentals: Services
Annapurna Agrawal
Once you’ve explored the more in-depth portions of the fundamentals, it’s time to move on to some of the more advanced aspects of Android app development.
Advanced Android App Development
Once you get into the more advanced areas of any type of programming, things inevitably get more niche. If you have a specific area that you’d like to improve, the Android Development content category here on Tuts+ can be a great start. With 200+ tutorials and 20+ courses, most topics have enough coverage to help you decide where to go next.
For example, you can learn how to code a professional looking navigation bar:
Android SDK
How to Code a Navigation Drawer for an Android App
Chike Mgbemena
You can learn how to connect to a REST API with the Retrofit library:
Android SDK
Sending Data With Retrofit 2 HTTP Client for Android
Chike Mgbemena
And there are lots of examples of how to code a complete app. For example, you can learn how to build a complete chat app that connects to Firebase:
Android SDK
How to Create an Android Chat App Using Firebase
Ashraff Hathibelagal
Finally, if you’re more into optimization, 8 Ways to Reduce Your Android App APK Size covers some interesting aspects of what goes into your app’s final size.
Android SDK
8 Ways to Reduce Your Android App APK Size
Jessica Thornsby
Learn to Create Apps With Android App Templates from CodeCanyon
A great way to get started coding Android apps is with an app template from CodeCanyon. CodeCanyon is an online marketplace that has hundreds of templates for every kind of app. You can save days, even months, of effort by using one of them. And since the app templates come with full source code, you can learn how to create all sorts of different kinds of apps by reading the source.
If you have trouble deciding which template on CodeCanyon is right for you, these articles should help:
App Templates
20 Best Android App Templates of 2020
Franc Lucas
Android SDK
10 Best Android Game Templates
Ashraff Hathibelagal
App Templates
15 Best eCommerce Android App Templates
Daniel Strongin
Material Design
Best Material Design Android App Templates
Nona Blackman
by Kyle Sloka-Frey via Envato Tuts+ Code https://ift.tt/2KxOWYu
0 notes
Text
Android App Entwicklung: ESP Controller ansprechen #3 Navigationsmenü erstellen
In diesem dritten Teil der Reihe "Android App Entwicklung: ESP Controller ansprechen" möchte ich gerne erläutern wie wir unsere AndroidApp umbauen damit wir ein schönes Menü zur Auswahl von Seiten bekommen zbsp. um die Daten des Fotowiderstandes in einem Liniendiagramm anzeigen zu können. Ich empfehle die beiden zuvor veröffentlichten Tutorials zu lesen, damit du auf dem aktuellen stand bist. Wir haben bisher einen Text an den ESP Controller gesendet und eine Begrüßung empfangen und einen Request abgesendet damit wir den aktuellen Wert des Fotowiderstandes als Respond erhalten. Wollen wir nun die Android App umschreiben so das wir neue Seite erstellen können denn alles auf eine Seite zu pressen sieht nicht schön aus.

Anzeigen eines Wertes vom Fotowiderstand
Erstellen eines Layouts mit Navigationsleiste
Zunächst wollen wir ein neues Layout erzeugen. Denn wir benötigen die Möglichkeit die Daten für den Aufbau einer Verbindung zu einem ESP Controller einzugeben und eine Navigationsleiste zum aufrufen von neuen Seiten in der App. Erzeugen wir also zunächst unser Menüelement, dazu klicken wir auf das Projekt und wählen aus dem Kontextmenü aus dem Pfad "New" > "Activity" > "Navigation Drawer Activtiy", oder aber aus der "Gallery".

Navigation Drawer Activtiy Nachdem wir nun einen doppelklick auf diesen Eintrag vorgenommen haben müssen wir im neuen Dialog einige Einstellungen vornehmen. Zuerst ändern wir die Bezeichnung in "NavigationActivity" und setzen den Haken bei "Launcher Activity".

Daten "Navigation Drawer Actitivy" Nun wird AndroidStudio einige neue Dateien erstellen und das Projekt neu bauen, dieses kann je nach Rechenleistung etwas dauern. Ist der Vorgang abgeschlossen so können wir das Projekt auf dem mobilen Gerät deployen. Wir sehen nach dem erfolgreichen starten dann eine leere Seite mit dem Titel "NavigationActivity" und rechts und links jeweils ein Menüpunkt.

neue leere Seite für Navigation in der App Klickt man nun auf den linken Menüpunkt so wird eine Menüleiste eingeblendet.

neue Navigationsleiste für den Aufruf von Funktionen Ändern der Icons Jedoch haben wir nun 2 Icons für unsere App auf dem Homescreen erzeugt. Einmal mit dem Einstiegspunkt zu unserer "alten" Activity und einmal zu unserer neuen.

AppIcons ESPTutorialApp Um hier nur ein Icon als Einstiegspunkt in unsere App zu haben müssen wir die Datei "AndroidManifest.xml" anpassen. Wir sollten hier 2 Activitys deklariert haben, einmal unsere neue "NavigationActivity" und einmal die "alte" MainActivity. Um nur ein Icon zu haben müssen wir lediglich den gesamten Tag zu ".MainActivity" entfernen. ... ... Nun heißt die App auf unserem Homescreen jedoch "NavigationA..." das ist natürlich sehr unschön. Es sollte also zusätzlich das Attribut "android:label" in "@string/app_name" geändert werden. Nun haben wir nur ein Icon auf unserem Homescreen. Auf meinem Handy wird das Icon rund dargestellt, je nach verwendetem Gerät & Android Version kann dieses abweichen. Hier sollte beachtet werden, wenn die App verteilt wird das andere Geräte ggf. andere Icons benötigen. Menüpunkte verwalten Die Menüpunkte werden in der Datei "activity_navigation_drawer.xml" verwaltet. Hier werden wir nun etwas einkürzen denn wir benötigen z.Zt. nur die Menüpunkte: Fotowiderstand Impressum Datenschutzerklärung Auswahl eines neuen Icons Als Icon für den Menüeintrag können wir einmal aus dem Pool von "android:drawable/*" wählen.
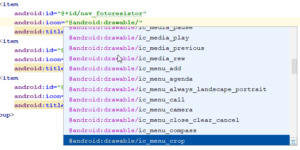
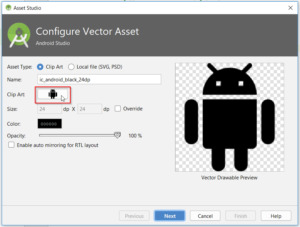
Neues Icon für einen Menüeintrag wählen Oder aber man wählt aus einem "Asset" Vector Asset erstellen Ein Vector Asset erstellt man indem man das Projekt wählt und mit der rechten Maustaste das Kontextmenü öffnet, dort wählt man aus dem Pfad "New" > "Vector Asset". In dem neuen Dialog tätigt man einen Doppelklick auf den "Androidrobot".
Vector Asset erstellen Es wird sich nun ein neues Fenster öffnen wo man links eine Kategorie wählen und recht ein Bild auswählen kann.
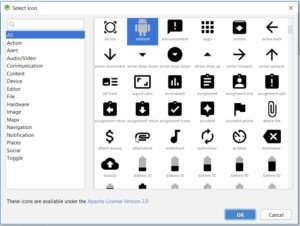
Auswahl eines Vector Assets Hat man eine Grafik seiner Wahl gefunden so tätigt man auf dieser einen einfachen Klick und betätigt die Schaltfläche "OK" nun kehren wir in den Dialog "Asset Studio" zurück, hier können wir nun den Dateinamen, sowie die Farbe anpassen.
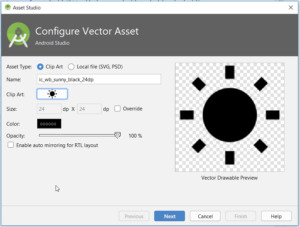
Vector Asset gewählt, Einstellungen setzen Wenn alle nötigen Einstellungen getroffen wurden so werden diese mit der Schaltfläche "Next" bestätigt. Im nächsten Dialog wird nun lediglich angezeigt in welchem Verzeichnis diese neue Datei abgelegt wird. Möchten wir diese nun in unserem Menü verwenden so wird in der XML Datei auf den Dateinamen wifolgt verwiesen: android:icon="@drawable/ic_wb_sunny_black_24dp" Dieses machen wir nun für alle weiteren Menüpunkte. Alte Referenzen entfernen Bevor wir uns jedoch das neue Menü live in der App anschauen können, müssen wir noch die alten Referenzen auf die gelöschten Menüpunkte entfernen bzw auf die neuen Umschreiben. Dazu öffnen wir die Klasse "NavigationActivity" und bearbeiten die Funktion "onNavigationItemSelected" wie folgt: @Override public boolean onNavigationItemSelected(MenuItem item) { // Handle navigation view item clicks here. int id = item.getItemId(); if (id == R.id.nav_fotoresistor) { } else if (id == R.id.nav_imprint) { } else if (id == R.id.nav_privacynotice) { } DrawerLayout drawer = (DrawerLayout) findViewById(R.id.drawer_layout); drawer.closeDrawer(GravityCompat.START); return true; } Zwischen den geschweiften Klammern schreiben wir später unseren Code um den Seitenwechsel zu vollziehen. Wenn wir also nun die App einmal bauen und starten so sollte unser Menü nun wiefolgt aussehen: Neues Navigationsmenü in der ESPTutorialApp Ich habe hier zusätzlich noch das Icon & die E-Mail Adresse angepasst. Wenn du dieses auch machen möchtest so kannst du die E-Mail Adresse in der Datei "strings.xml" im Ordner "app" > "res" > "values" ändern. Als Bild kannst du jedes Bild nutzen, jedoch darf der Dateiname keine große Buchstaben enthalten. Das Bild selber wird im Ordner "app" > "res" > "drawable" abgelegt. Dieses kannst du per Drag'n Drop einfach hineinziehen oder aber über den Explorer deines Betriebssystems. Wenn das Bild abgelegt wurde muss noch die Datei "nav_header_navigation.xml" angepasst werden, hier gibt es einmal die Möglichkeit die Änderungen über die XML Ansicht zu vollziehen oder aber auch über ein Menü.

Anpassen des Bildes im Navigationmenü Neben dem Bild ist noch genügend Platz für weitere Informationen, hier könnte man ggf. noch Versions & Build Nummern anzeigen lassen. Wie man dieses macht erläutere ich in einem weiteren Kapitel.
Download
Fazit & Ausblick
Wir haben nun unsere App erweitert so das wir ein Seiten Navigationsmenü haben. Als nächstes wollen wir nun die Aktion für den Menüpunkt "fotoresistor" ausprogrammieren. Read the full article
0 notes