#dust mask compatibility
Text
Adaptability of KN95 Particulate Respirator to the Face
Masks are an important line of defense against respiratory infectious diseases and can reduce the risk of new coronavirus infection. Masks can prevent patients from spraying droplets, reduce the amount and speed of droplets, and block coronavirus-containing droplets, thereby preventing wearers from inhaling and protecting susceptible people. Masks have become very important respiratory safety protective equipment.
The size of the human head and face is one of the important bases for the design of particulate protective masks. The suitability of cup-shaped masks for people with different face shapes is quite different. One of the reasons is that the shape of the cup-shaped mask is fixed, and changes in the size of the head and face of different people will affect the size of the face. The fit has a certain impact. Due to the huge difference in the suitability of KN95 particulate respirators, a suitability test before use is a necessary measure to ensure the protective effect.
The suitability test is the basic requirement to screen the type of mask suitable for the user and to ensure that the protective performance of the mask is maximized. According to the US CDC survey data, the pass rate of the quantitative fitness test of KN95 particulate protective masks is 20% to 100%. In different user groups, there are certain differences in the pass rate. One of the reasons for the difference is the size of the user's head and face. different. As a new standard to measure the matching degree of masks and users, the quantitative fit test can quantify the leakage of masks and has been recommended and adopted by more and more research institutions and enterprises. Studying the relationship between the results of the fit test and the size of the human head and face has application value and guiding significance for workers to choose suitable protective masks.
The size of the human head and face is an important parameter to guide the design of masks. How to select the most representative indicators and study the relationship between them and suitability is a hot topic of research at home and abroad. A study on the size of the head and face of Chinese workers showed that the length, width of the face, the width of the nose bridge, width between two mandibular angles, and nasal protrusion are the indicators that can best reflect the characteristics of the human head and face.
Analysis conclusion
1. There is a certain difference in the relationship between head and face size indicators and fitness between men and women. In this study, the indicators related to fitness in men are nose width, and in women, the indicators related to fitness are face width and tragus Submandibular arc length between points. People with larger face width and nose width are more suitable for wearing masks.
2. The nose clip and lower edge of the cup-shaped mask are the parts that are more prone to aerosol leakage. Adjusting these two parts can improve the protective effect of the mask.
3. Before each use of a new mask, a quantitative fit test is required, and training is required to master the correct wearing and adjustment methods.
4. The limitations of this study are: the masks used for the test are of the same brand and two types, and the proportion of males in the test population is slightly lower, which makes the representativeness of the research results unsatisfactory. When extrapolated to the entire population, The data support is not strong, and the results of the study should be further verified on the basis of increasing the types of samples and the number of subjects tested.
Jiangyin Xinni Textile Co., Ltd is a 20 years factory which is established in 2002. Our factory is in Jiangyin city, Jiangsu Province, with an overall area size of 6000 square meters. We have long-term partnerships with world-famous brands across 50 countries and our annual export value is over 5 million US dollars. Our factory is specialized in manufacturing FFP2 NR face masks, reusable FFP2 R D cloth masks, KN95 face masks, and reusable KN95 cloth masks production; protective clothing production.99% Filtering Efficiency Nano Custom Logo Printed Masks is one of our products, more details are as follow:
Product Name
Reusable Cloth Facemask 99% Filtering efficiency Reusable Nano Technology Black Washable Cloth Face Masks Customize Logo Print
Brand
Placide
Texture
Cotton + Nano Fabric
Size
L:15.5*10.5 CM,
M:14.5*9.5CM
Style
Folded with adjustable ear straps
If you are interested in our products, please get in touch with us as soon as possible.
Related news of KN95 mask
Difference between FFP2 masks and KN95 masks
Duration of the KN95 Disposable Masks in use
What is the effect of wearing a kn95 mask?
0 notes
Text
Halloween Event
[You may use any Song or music in the Event!]
* Reaper was taking some guardian bags[Bags that can carry anything to Titan sized and Planet or universal size] for him and his lover and A few for his brothers and little kids[The children will be going to the Guardian Halloween Special Festival] but remembers that some of the SCP creatures and creepy-pasta Creatures even Bendy and the Ink Creatures will be all over before Halloween starts and he can use his bad boy form for Protection for his lover and he tells his brothers to use it if necessary as reaper makes a Mask that is only compatible to the bad boy form and it looks very Horrifying that scares anyone but not his lover*
Reaper:Almost done just need some Alternate Universal Death Dust I can ask my father for that and then some Cosmic and Aether Scraps and some Divinity Energy and so it’s complete * The mask looks like a Dark purple with black lining Skull with reaper’s name on it as he kept trying make some tweaks and some Modifications and some Adjustments so everything is Absolutely perfect and reaper already made two for Blaze and Angel*
Reaper:My bad boy form is Accepted and is Compatible to this Mask just need to be finished until the day starts then those Creatures will know that you will never mess with this Guardian!
* Reaper gets The rest of Materials as he finishes on the mask as He goes into his bad boy form then he wears the mask as he looks at the mirror as the mirror Shatters Instantly and the room was Dark as there was a Echoing Laughter*

[Not really the Mask but Very close!]
* Reaper goes back to normal as he takes off the mask as it looks normal again* Reaper:Just what I Needed but… Fock…
* Reaper Makes the Right adjustments and modifications on the mask as he also finishes up his lovers Universal mask* Reaper: as Beautiful as the universe
* The SCP and Creepy-Pasta and Bendy and his Ink Creatures are now Roaming around the Neighborhood and The Guardian City [ Imagine New York City but Beyond any number Sized City] yet only one SCP creature is in the Guardian Halloween Festival SCP-999*

[SCP-999 is just a very Friendly and Happy orange Slime!]
Reaper:Wait Does the Mask Also Makes her into her? I gotta Give it to her to see…Hm?* DING DING! The Clocktower from outside at the middle of the Palace is that it’s The evening and It has Started!* F-Fock…. Time to send some of these masks to my brothers and just these two masks are for me and my Love
* Reaper Puts on his clothing [He wears a Black All Elemental Immunity Existing or non existing Buttoned shirt and Pants ]* Reaper: Let’s Have a Majestic Early Halloween!
Bad Boy Reaper: And to scare the Fock out of Focking Monsters!
@saphirafoxgirlspost1
* Reaper sends the Mask that actually resembles the Universal Goddess to his lover and a Note saying: Hello my Lovely Kitsune~ I made a Mask that looks as beautiful as the universe and it’s for you, I love to see you wearing it, I’m doing an early Halloween! Meet me outside the palace at the main Gate!
Your Bad Boy Reaper~~*
18 notes
·
View notes
Note
Re: Your answer to the THPS 1+2 ask, it's also fascinating how often corporations will sacrifice long-term prospects for short-term profits. Rolling VV into Blizzard may have been more profitable than THPS 3+4 right now, but probably less profitable in the long run than letting them do more work opening up more revenue streams from dormant IPs for Activision. But every quarter they've gotta make more than last quarter, so they end up shooting themselves in the foot.
(Previous ask.)
Oh, absolutely. They only take responsibility when it comes to receiving praise, most of which amounts to "good job cracking that whip, sir."
And they only want today's money, because if they wait until tomorrow, somebody might catch up to what they're doing and pose a reasonable threat to the line going up. So they will -- and have -- chewed up entire industries down to the bare dirt, leaving nothing but dust and tumbleweeds for everyone else.
It's all about them, it's all about their money, and as long as they have enough safeguards that let them constantly pump and dump, it doesn't matter who they step on along the way. Even failure, ultimately, will never touch them, because by the time their destructive practices legitimately catch up with them, the worst they suffer is a slap on the wrist (if even that) and an extremely comfortable retirement.
It's all a long con and nothing matters except how hard they can get someone else to crank the machine to fill their pockets up before they ultimately cash out. Loyalty, reputation, none of it matters, because they can just buy their way out of most trouble.
Microsoft's been doing it for years. They were in the dog house after the Xbox One "no used games, always online" launch problems, so they pivoted to this friendly, generous company, who proudly supports backwards compatibility and has this great thing called Game Pass where they give away $1 trials almost constantly.
Except now the tides are shifting back in their favor again, and wouldn't you know it... that generosity is starting to dry up.
For one of the richest companies in the world, they are absolutely willing to buy your goodwill. Public opinion is a commodity they can and have purchased. Sony did it, too. Hell, even Nintendo tried it -- compare the original Mario Kart 8 DLC on Wii U ($12 to almost double the size of the game) versus the current Mario Kart 8 DX DLC on the Switch ($25 for ports of phone content).
All it takes is being far enough in the lead and the masks start to come off.
Eat the rich.
6 notes
·
View notes
Text
Abandoned fan project: Where?
Dead due to the hush hush audio developments and my inability to write it without help, (I can lay out a framework, explain scene atmosphere and tone, and suggest dialogue but thats it). I hoped to get this one off the ground but it was not to be and is probably stupid so instead of letting it gather dust, I've decided to post everything I came up with as someone might find it useful.
Constructive feedback is welcome.
General
Title: Where?
Format: Audio.
Duration: 4 x 15 minute episodes or a NuWho style 60 minute edit and a Next Time trailer for a never to be released Hallwoeen Special sequel.
Description: A Faction audio disguised as an 8th Doctor spin off to both add verismilitude to the Companion assumption and enable the stealth introduction of Faction elements to the larger Whovian fandom. If anyone asks it's an, "ultimate 8th Doctor audio" project exploring how the novel elements might be integrated.
Synposis
Ostensibly it's a companion going on a breif tour of the .F.P. Spiral Politic and the more compitable novel and NuWho elements while searching for the 8th Doctor, who's gone missing with help from a companion of her own, (unknown to her a Faction Cousin) she dubs, "The Assistant". Naturally it's more complicated then that.
She discovers that things she remembers doing with the Doctor didn't seem to have happened or maybe have been reversed and that certain people she met don't remember her. On top of that the situations they find themselves in aren't as, "nice" or, "resolvable" as those she's used to and gradually bring her around to a more Faction compatible mindset and on the brink of a possible mental breakdown.
After loosing her ability to walk, (and becoming cooped up in a crudely modified Dalek skirt salvaged from a battlefield) she finally catches up with her Doctor only to find out he doesn't remember her nor any of their adventures together seeming more interested/concerned about her companion whom he reveals to be a Factional, perhaps dismssing her as, "another Faction trick". The mental breakdown she has been able to keep at bay/compensate for with the hope of being reunited with him occurs at full force shattering her prompting her to quickly go back into the .T.T. capsule and start crying/wailing. The Assistant watches her go in then walks up to the Doctor ranting about how much she wanted to reunite with him and had had to go through to get back to him all for nothing followed by punching the Doctor in the stomach doubling him over then an upper cutting knocking him out.
The Assistant then goes into the .T.T. capsule, quietly sets the controls with his shadow and it demterialises. The Companion flashbacks to the instances where he showed more knowledge then he was supposed to have. The two have a frank emotional heart to heart in which she works through her feelings and confronts The Assistant about who and what he is. He gives a basic summary of what the Faction is emphasising the aspects that make it seem like a group of misfits/don't fit elsewherers but not lying. She decides to join the Faction and to do it, "properly", (ie: Killing her parents erasing herself from time and causing the whole mess but she doesn't realise it and it's not spelt out for the audience).
Episodes
Ep.1:
Ep.2: Weeping angels encounter and encounter.
Ep.3: Crippling incident then the combined brooding and salvaged Dalek skirt modification.
Ep.4: Finding the Doctor and the aftermath.
Characters
Titles only until the final episode. Organically, not forced or highlighted. (A play on the .F.P.'s need to use codenames).
No romance between the two humans, they are merely comfortable enough to snark at each other.
1.The Companion: A previously unknown 8th Doctor companion who has 4th Doctor's scarf from her alternate timeline. No Faction knowledge but ends up joining it which causes her erasure from time.
2.The Assistant: Goth male. Factional wearing a symbol ring instead of robes and a mask. Knows more about the Spiral Politic then he lets on, (makes some small slips not really noticed until the end) but is genuinely swept up by events.
3..T.T. capsule: One of the many the Master had hidden away, took the form of the 8th Doctor's Tardis using the Companion's memories of what would be expected/the most wanted).
Quotes
*Tardis turbulence and small console sparks*
Assistant: "Where are the seatbelts on this thing?".
*Console spark*
Companion (Laughing joyously): "There aren't any!".
*
*Companion kicks the Assistant on the ground*
Companion: "Are you dead?".
Assistant (sarcastically): "Only on the inside".
*Companion chuckles*
*
Assistant: Ideally we'd want something faster and more manoveurable then a wheelchair, perhaps with anti gravity if possible so you can clear obstacles. Do you know anything like that?".
The Companion (Sadly): Yeah.
*Dalek Civil War battle sound effects*
#faction paradox#fan audio#abandoned#8th doctor#eighth doctor#doctor who#spiral politic#bbc doctor who#dr who#whoniverse
2 notes
·
View notes
Text
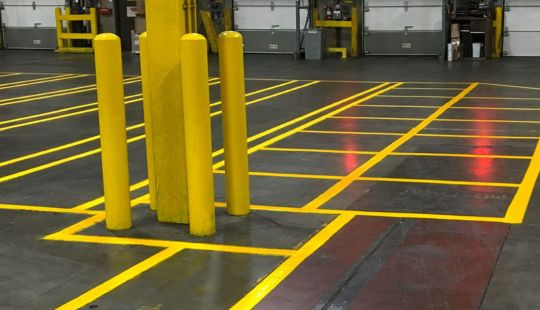
A Guide to Painting Warehouse Floors: Tips and Steps
Are you looking to spruce up your warehouse space? Painting the floor can be a cost-effective way to enhance its appearance while also improving safety and durability. Whether you're aiming to delineate pathways, create designated zones, or simply refresh the look, here's a comprehensive guide on how to paint warehouse floors:
1. Preparation is Key: Before diving into the painting process, adequate preparation is crucial. This involves thorough cleaning to remove any dust, dirt, grease, or oil from the floor surface. Use a degreaser or a power washer for effective cleaning. Allow the floor to dry completely before proceeding.
2. Repair Any Damage: Inspect the floor for cracks, potholes, or other damages. Repair these areas using appropriate patching materials. It's essential to have a smooth and even surface before applying paint.
3. Choose the Right Paint: Selecting the right type of paint is essential for achieving the desired results. Epoxy floor paints are popular choices for warehouse floors due to their durability and resistance to chemicals, abrasion, and heavy traffic. Consider the specific requirements of your warehouse environment when choosing the paint.
4. Plan the Layout: Before starting to paint, plan the layout of the floor. Determine if you need to mark specific areas such as walkways, storage zones, or safety zones. Use masking tape to outline these areas before painting to ensure clean lines and precise boundaries.
5. Apply Primer: Applying a primer is essential for promoting adhesion and ensuring the longevity of the paint. Choose a primer that is compatible with the paint you've selected. Apply the primer evenly across the entire floor surface and allow it to dry completely according to the manufacturer's instructions.
6. Start Painting: Once the primer has dried, it's time to start painting. Use a high-quality paint roller or a paint sprayer for efficient and even application. Start from one corner of the warehouse and work your way toward the exit, ensuring that you cover the entire floor surface evenly.
7. Allow Sufficient Drying Time: After applying the paint, allow it to dry thoroughly before allowing any foot traffic or heavy machinery on the floor. Follow the manufacturer's instructions regarding drying times and curing periods to ensure optimal results.
8. Apply Additional Coats (If Necessary): Depending on the desired color intensity and durability, you may need to apply multiple coats of paint. Allow each coat to dry completely before applying the next one. This will help achieve a more robust and long-lasting finish.
9. Maintain Regularly: Once the painting process is complete, it's essential to implement a regular maintenance routine to preserve the integrity and appearance of the painted floor. This may include routine cleaning, inspections for any signs of wear or damage, and touch-ups as needed.
10. Safety First: Throughout the entire painting process, prioritize safety. Ensure adequate ventilation when applying paint and follow all safety precautions specified by the paint manufacturer. Additionally, consider implementing safety measures such as warning signs or barriers to prevent accidents during the drying and curing process.
By following these steps and tips, you can effectively paint your warehouse floor, transforming it into a clean, organized, and visually appealing space that enhances productivity and safety. Remember, proper preparation, the right materials, and attention to detail are key to achieving professional results.
0 notes
Text
Precautions of Leiya Power Tools
Using Leiya Power Tools safely and effectively requires following proper procedures and precautions. Here's a comprehensive guide on the usage methods and safety considerations:
Before using any Leiya Power Tool, carefully read and understand the user manual provided by the manufacturer. Familiarize yourself with the tool's features, functions, and safety instructions.
Always wear appropriate personal protective equipment (PPE) when using power tools. This may include safety goggles or glasses, ear protection, gloves, and dust masks to protect against flying debris, loud noise, and airborne particles.
Before each use, inspect the power tool for any damage, defects, or signs of wear. Check the power cord, switches, handles, and accessories for integrity and proper functioning. Do not use the tool if it appears damaged or faulty.
Ensure the power source (e.g., electrical outlet, battery) is compatible with the tool's requirements and is in good condition. If using a corded power tool, inspect the power cord for any fraying or damage and use a grounded outlet with proper voltage.

0 notes
Text
Unveiling the Marvels of Masking Film: A Versatile Solution for Every Project
In the realm of renovations, DIY projects, and professional painting endeavors, the unsung hero often goes unnoticed—the masking film. This seemingly simple tool holds immense power in its ability to streamline processes, protect surfaces, and ensure precision. Let's delve deeper into the world of masking film and uncover the myriad benefits that make it an indispensable asset for any project.
Precision Protection
When it comes to painting or refurbishing delicate surfaces, precision is paramount. Masking film serves as a reliable shield against unwanted paint splatters, drips, or stains. Its static cling feature ensures a snug fit, seamlessly adhering to surfaces without leaving behind any residue. From window frames to furniture edges, masking film provides a precise boundary, safeguarding adjacent areas from accidental damage.
Time Efficiency
In the fast-paced world of construction and renovation, time is of the essence. The masking film significantly expedites the preparation phase by simplifying the masking process. The masking film swiftly covers large areas with minimal effort. Its adhesive backing facilitates quick application, allowing projects to progress smoothly without unnecessary delays.
Versatility Redefined
One of the most remarkable attributes of masking film is its versatility. Available in various sizes and thicknesses, it can adapt to diverse project requirements. Whether it's a small-scale DIY endeavor or a commercial painting project, masking film offers a solution tailored to the task at hand. Furthermore, its compatibility with different surfaces, including wood, metal, and glass, underscores its universal applicability.
Enhanced Safety
Safety should never be compromised, especially in work environments prone to hazards like paint fumes or debris. Masking film acts as a barrier, not only protecting surfaces but also minimizing health risks for workers and inhabitants. By containing dust particles and volatile chemicals, it fosters a safer and healthier workspace conducive to productivity and well-being.
Eco-Friendly Alternative
In an era increasingly focused on sustainability, choosing environmentally friendly options is paramount. The masking film aligns with this ethos by offering a greener alternative to traditional masking materials. Many masking films are made from recyclable materials, reducing waste and minimizing environmental impact. By opting for eco-conscious solutions, individuals and businesses can contribute to the preservation of our planet.

Masking film may appear unassuming at first glance, but its benefits are truly transformative. From precision protection to time efficiency and versatility, this humble tool enhances every stage of a project, ensuring impeccable results while prioritizing safety and sustainability. As the cornerstone of masking solutions, masking film continues to revolutionize industries and empower individuals to unleash their creativity without constraints. Embrace the power of masking film, and witness your projects soar to new heights of excellence.
0 notes
Text
Home Essentials: Versatile Drilling Machines for DIYers
1. Introduction to Drilling Machines for Home Use
Drilling machines for home are versatile tools designed to make various DIY tasks easier. They come in different sizes and types, ranging from handheld drills to powerful benchtop models. These machines are essential for tasks such as drilling holes, driving screws, and even sanding and polishing surfaces with appropriate attachments. Investing in a good drilling machine can greatly enhance your capability to tackle home improvement projects efficiently.
Drilling machines for home usually operate on electricity and are equipped with adjustable speed settings to accommodate different materials and drilling needs. Some models feature cordless designs for added convenience and mobility. With the right attachments, these machines can also be used for tasks beyond drilling, such as mixing paint or mortar. Whether you're a seasoned DIY enthusiast or a beginner looking to tackle simple household repairs, having a reliable drilling machine at home is a must.
2. Types of Drilling Machines for Home Projects
When it comes to drilling machines for home use, there are several types to choose from, each suited to specific tasks and preferences. Corded drills, which require an electrical outlet for power, are typically more powerful and suitable for heavy-duty drilling tasks. Cordless drills, on the other hand, offer greater mobility and convenience but may have slightly less power.
Another popular option is the hammer drill, which is designed for drilling into hard materials like concrete and masonry. These drills feature a hammering function that helps break through tough surfaces with ease. Impact drivers, although primarily used for driving screws, can also function as drilling machines when equipped with the right drill bits.
For precision drilling and intricate work, a drill press is an excellent choice. These machines are stationary and offer precise control over drilling depth and angle, making them ideal for woodworking and metalworking projects. Assess your specific needs and preferences to determine the most suitable type of drilling machine for your home workshop.
3. Key Features to Consider When Choosing Drilling Machines
Selecting the right drilling machine for your home projects requires careful consideration of several key features. Firstly, consider the power and torque of the machine, as this will determine its capability to handle different materials and drilling tasks. Variable speed settings are essential for versatility, allowing you to adjust the drilling speed according to the material being worked on.
The chuck size is another important factor to consider, as it determines the maximum size of drill bits that can be used with the machine. Additionally, look for features such as ergonomic design and rubberized grips for comfortable handling, especially during extended use. Built-in LED lights can improve visibility in dimly lit areas, while integrated laser guides aid in achieving precise drilling accuracy.
Consider the availability of accessories and compatible attachments, as these can enhance the versatility of the drilling machine and expand its functionality beyond simple drilling tasks. Lastly, don't forget to assess the overall build quality and durability of the machine to ensure long-term reliability and performance in your home workshop.
4. Safety Precautions When Using Drilling Machines at Home
While drilling machines are incredibly useful tools, it's essential to prioritize safety when using them for home projects. Always wear appropriate personal protective equipment, including safety goggles to protect your eyes from flying debris and dust masks to prevent inhalation of harmful particles. Avoid wearing loose clothing or jewelry that could get caught in the machine's moving parts.
Before starting any drilling task, ensure that the work area is well-lit and free from clutter or obstacles. Secure the workpiece firmly in place using clamps or a vice to prevent it from moving during drilling. Always use sharp drill bits appropriate for the material being drilled to minimize the risk of slippage or kickback.
Be mindful of the drill's power cord or battery life, and never operate a drilling machine with damaged cords or batteries. If using a corded drill, be cautious of the cord's placement to avoid tripping hazards. Lastly, familiarize yourself with the machine's operating manual and follow all manufacturer recommendations and guidelines for safe usage.
5. Maintenance Tips to Keep Your Drilling Machines in Top Condition
Proper maintenance is essential to ensure the longevity and optimal performance of your drilling machines for home use. Regularly inspect the machine for signs of wear or damage, such as frayed cords, loose parts, or overheating. Clean the drill chuck and spindle regularly to remove debris and prevent the accumulation of dust and dirt, which can affect the machine's accuracy and performance.
Check and lubricate moving parts as needed to reduce friction and ensure smooth operation. Replace worn drill bits and accessories promptly to maintain drilling precision and efficiency. Store the drilling machine in a clean, dry area away from moisture and extreme temperatures when not in use to prevent corrosion and damage.
If you notice any unusual noises, vibrations, or performance issues while using the drilling machine, stop immediately and investigate the problem. Continuing to use a faulty machine can lead to further damage or injury. When in doubt, consult the manufacturer's manual or seek professional assistance for repairs and maintenance.
6. Creative DIY Projects Using Drilling Machines at Home
Drilling machines for home use open up a world of creative DIY possibilities beyond simple repairs and maintenance tasks. With the right techniques and accessories, you can embark on various projects to enhance your home decor, organize your space, or even create personalized gifts for friends and family.
One popular project idea is creating custom shelving units or storage solutions using drilled holes in wood, metal, or plastic materials. You can also experiment with different drill bits and techniques to add decorative patterns or textures to furniture, picture frames, or wooden crafts. For outdoor enthusiasts, drilling machines can be used to build birdhouses, planters, or even custom garden trellises.
If you're feeling adventurous, consider tackling more advanced projects such as building a DIY standing desk, installing a pegboard wall organizer, or constructing a backyard fire pit. The possibilities are endless, limited only by your imagination and creativity. With some practice and patience, you can transform ordinary materials into unique, handcrafted masterpieces using drilling machines in your home workshop.
7. Budget-Friendly Options for Drilling Machines at Home
Investing in quality tools doesn't always mean breaking the bank. There are plenty of budget-friendly options available when it comes to drilling machines for home use. Consider opting for corded drills or entry-level cordless models, which tend to be more affordable than their high-end counterparts.
Many reputable brands offer starter kits or combo sets that include a drill, batteries, charger, and a selection of drill bits and accessories at a discounted price. Shopping during sales events or taking advantage of online promotions can also help you score great deals on drilling machines and accessories.
Another cost-saving strategy is to prioritize essential features and functionalities that align with your specific needs, rather than opting for fancy extras that may drive up the price. Additionally, don't overlook the option of purchasing gently used or refurbished drilling machines, which can often be found at a fraction of the cost of new ones.
By being savvy with your purchasing decisions and exploring budget-friendly options, you can acquire a reliable drilling machine for your home workshop without breaking your budget. Remember to prioritize quality and durability to ensure that your investment pays off in the long run.
0 notes
Text
The Ultimate Guide to Dustless Floor Sanding: Clean, Efficient, and Effective
Dustless floor sanding has revolutionised the way we approach floor renovation projects. Its benefits are numerous, including minimal airborne dust, improved indoor air quality, and a more efficient sanding process.
In this ultimate guide, we will delve into the world of dustless floor sanding in Melbourne, providing you with a comprehensive understanding of the technique, equipment and materials needed, preparation steps, execution techniques, post-sanding cleanup, and maintenance tips.
By the end of this guide, you'll be equipped with the knowledge to tackle your own dustless floor sanding project with confidence.
Dustless Floor Sanding
Dustless floor sanding, also known as dust-free sanding, is a modern approach to floor renovation that aims to minimise the release of airborne dust particles during the sanding process.
Unlike traditional floor sanding methods, which can create clouds of dust that infiltrate every nook and cranny of a space, dustless floor sanding utilises advanced equipment and containment systems to capture dust at its source, resulting in a cleaner and healthier working environment.
The primary difference between dustless floor sanding and traditional methods lies in the containment and extraction of dust. Instead of allowing dust to disperse freely into the air and settle on surrounding surfaces, dustless sanding systems feature powerful vacuums and filters that capture the dust as it is generated, preventing it from becoming a nuisance or health hazard.
The benefits of choosing dustless floor sanding in Melbourne for your project are numerous. Not only does it create a healthier and safer work environment by reducing airborne dust, but it also minimises the need for extensive post-sanding cleanup. Additionally, the controlled extraction of dust helps maintain the integrity of the surrounding space, preventing dust from settling on furniture, walls, and other surfaces.
Equipment and Materials Needed
Before embarking on a dustless floor sanding project, it's essential to gather the necessary equipment and materials. Additionally, you'll need to consider the type of flooring you'll be sanding and select the appropriate materials, such as sanding discs designed for hardwood or engineered wood floors.
When selecting equipment for dustless floor sanding, it's crucial to choose tools and supplies that are compatible with dustless sanding systems. This ensures optimal performance and dust containment throughout the sanding process. Investing in high-quality equipment and materials will contribute to the success and efficiency of your project, ultimately yielding a superior finish.

Preparing for Dustless Floor Sanding
Proper preparation is essential for a successful dustless floor sanding project. Begin by clearing the work area of furniture, rugs, and any other items that could obstruct the sanding process. It's also important to ensure adequate ventilation in the space and seal off doorways or openings to adjacent rooms to prevent dust from spreading.
In terms of containment, consider using plastic sheeting to create a barrier between the work area and the rest of the space. This containment system helps confine airborne dust and facilitates its extraction through the dustless sanding equipment. Additionally, taking safety measures, such as wearing a dust mask and protective gear, is crucial to safeguarding your health during the sanding process.
Executing Dustless Floor Sanding
Executing dustless floor sanding requires careful attention to detail and adherence to best practices. Begin by familiarising yourself with the operation of the dustless floor sander and the proper technique for maneuvering it across the floor surface.
As you progress through the sanding process, pay close attention to the dust containment system and ensure that it is effectively capturing the dust generated by the sender. Periodically check and empty the dust collection unit to prevent any loss of suction and maintain optimal dust extraction.
Common issues that may arise during the sanding process include uneven sanding, swirl marks, or clogging of the sanding pads. Troubleshooting these issues may involve adjusting the sanding technique, replacing the sanding pads, or addressing any mechanical issues with the equipment.
By remaining attentive to the sanding process and making necessary adjustments, you can achieve a smooth and uniform finish without compromising dust containment.
Post-Sanding Cleanup and Maintenance
Once the dustless floor sanding in Melbourne is complete, it's time to focus on post-sanding cleanup and floor maintenance. Begin by thoroughly cleaning the work area, including vacuuming any remaining dust and removing the containment barriers. It's crucial to pay attention to details, such as baseboards, corners, and transitions, to ensure that no dust particles are left behind.
Following the cleanup, consider applying a protective finish or sealant to the newly sanded floors to enhance their durability and longevity. This step not only adds a layer of protection to the wood but also contributes to the overall aesthetic appeal of the floors. Select a finish that is compatible with your flooring type and follow the manufacturer's application instructions for the best results.
In terms of ongoing maintenance, establish a regular cleaning routine to preserve the beauty of your newly sanded floors. Use a soft-bristled broom or a vacuum with a hardwood floor attachment to remove debris and prevent scratches. Additionally, consider using furniture pads to protect the floors from scratches and dents caused by moving furniture.
Conclusion
By embracing dustless floor sanding, you can enjoy the benefits of a cleaner, more efficient sanding process while achieving a beautifully refreshed floor surface.
With the knowledge and tips provided in this guide, you are well-equipped to embark on your own dustless floor sanding project with confidence. Here's to clean, efficient, and effective floor renovation!
Source By - https://tinyurl.com/2x75zbrz
#FloorPolishingMelbourne#FloorSandingMelbourne#MelbourneFloorSanding#FloorSandingandPolishingMelbourne#TimberFloorPolishingMelbourne
0 notes
Text
Geisha MacBook Skin - Quality MacBook Pro Skin - Transform Your Laptop with Style - MacBook Air Skin - M1, M2, 13", 14", 16, All

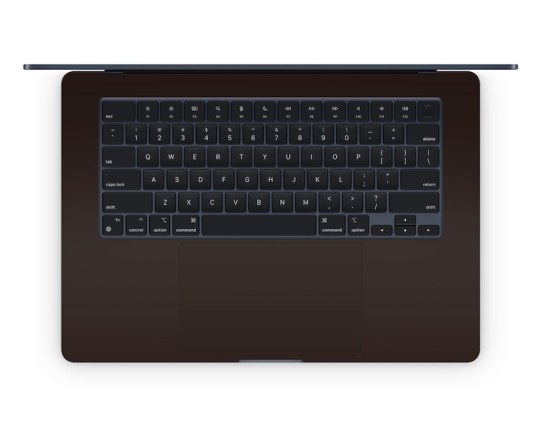
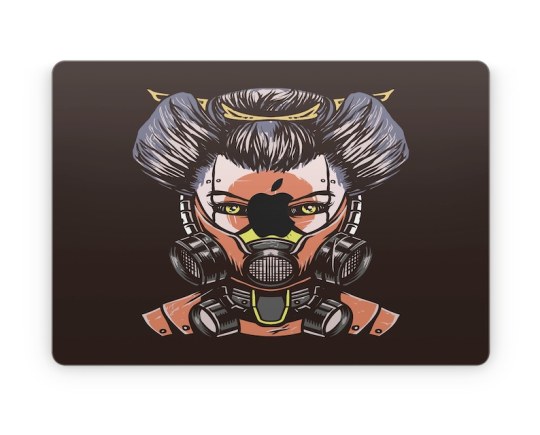
This Gas Mask MacBook Skin designed to transform the look of MacBook Air & Pro models, including M1 and M2 chip versions, for sizes 13", 14", 15", and 16", involves emphasizing its design aesthetics, functionality, and compatibility.
Transform your MacBook Pro into a masterpiece with our extraordinary Macbook Skin! Designed specifically for MacBook Pro, our Macbook Skin is not only a stylish accessory but also a protective layer for your laptop.
Crafted with high-quality materials, our Gas Mask MacBook Skin is easy to apply and remove, leaving no residue or damage behind. Whether you're a nature lover, a comic book enthusiast, or a fan of geometric patterns, we have the perfect design for you. Upgrade your MacBook Pro and make a statement with our Retro Macbook Skin!
Our MacBook skins are designed to protect your laptop from scratches, dust, and everyday wear and tear.
⭐⭐⭐ ///// Item Description \\\\\ ⭐⭐⭐
-We are using high-quality vinyl
-High opaque, white gloss monomeric PVC film with bubble-free liner
-Air-release technology, no more air bubbles!
-Clear permanent acrylic-based adhesive that is initially easily repositionable
-No edge peeling, lifting, or curling
💬💬💬Please see HOW-TO-APPLY in FAQ or You can always reach out to us :))
🍏🍏🍏///// Which version is best for you? \\\\\\ 🍏🍏🍏
- Since new devices are constantly being introduced, it can be very easy to choose the wrong option during checkout.
-In order to locate your Model Number on your iPad, you will need to look at the lower backside of the device
-The word will begin with the letter "A.".For instance 'A1502 ' is the MacBook Pro 13-inch Model.
-Or you can always navigate in your Macbook > Open Settings, tap General, then tap About. Look for the model number in the top section. If the number you see has a slash "/", that's the part number
✉️ Are you still unsure of which version you possess? Send us a message. ✉️
📦📦📦 ///// Shipping and handling \\\\\ 📦📦📦
-Thank you for inquiring about our products. We pride ourselves on providing fast and efficient service and will do our best to fulfill your order within 2-3 business days. Thank you for your time.
💳💳💳 ///// Return Policy \\\\\ 💳💳💳
-If there are any problems with your order, please let us know as soon as possible. We will work to rectify the situation as soon as possible.
-We accept returns and exchanges within 7 days of receiving your order for any reason.
🎮🎮🎮 ///// Custom Design - Inquiry \\\\\ 🎮🎮🎮
-Please send us a message if you would like to personalize your device.
-Image must be min 720p - higher quality brings better result
-Custom design takes more than usual shipping time. (5 business days)
-After we receive the photo, we will send you an example and we will ask for your final decision.
-If you still have questions you can reach out any time.
#Gas Mask Skin#Retro Macbook Skin#Macbook Pro Skin#Macbook Air Skin#Macbook Skin Decal#Macbook M1 Skin#Macbook A1398 Skin#Macbook Keyboard Skin#Macbook A2485 Skin#Macbook Pro 16 Skin#Macbook Pro 13 Skin#Macbook Pro 15 Skin#Macbook Air Decal
0 notes
Text
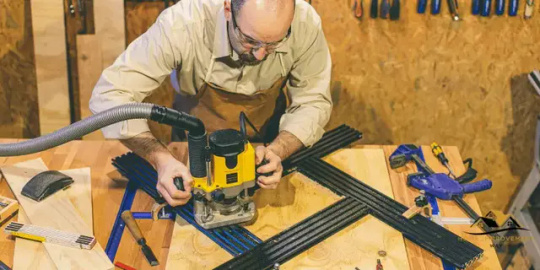
Can You Use a Router on Plywood: Ultimate Guide

Yes, you can use a router on plywood for various woodworking projects. The stability and durability of plywood make it suitable for router operations, allowing you to create smooth and precise cuts without compromising the integrity of the material.
Plywood's layered construction offers consistent strength and minimizes potential tear-out, making it an excellent substrate for routing tasks. Whether you're shaping edges, creating intricate patterns, or crafting joinery, plywood can effectively withstand the forces exerted by a router. Additionally, its cost-effectiveness and availability in different thicknesses and grades make plywood a popular choice for woodworking enthusiasts and professionals alike.
Understanding the compatibility of a router with plywood can enhance your project possibilities and streamline your woodworking processes.
Understanding Plywood As A Router Substrate
What Is Plywood?
Plywood is a versatile building material composed of thin layers of wood veneer, known as plies, that are glued together. This construction gives plywood unique qualities such as strength, stability, and durability. It is commonly used in construction, furniture making, and various woodworking projects.
Types Of Plywood Suitable For Routing
When considering plywood as a substrate for routing, it's essential to choose the right type to ensure the best results. Not all plywood is suitable for routing, as the quality and composition of the material can vary significantly.
- Hardwood plywood: This type of plywood, made from hardwood veneers, is known for its strength and resistance to warping. It is an excellent choice for routing due to its durability.
- Softwood plywood: Comprising softwood veneers, this type of plywood is lighter and more affordable. While it can be used for routing, it may not provide the same level of durability as hardwood plywood.
Safety Precautions For Using A Router On Plywood
Using a router on plywood requires careful attention to safety precautions in order to maintain a secure working environment and avoid potential hazards. Whether you are a beginner or an experienced woodworker, it is essential to prioritize safety before initiating any project. The following safety precautions and best practices should be adhered to when using a router on plywood.
Safety Gear And Equipment
Appropriate safety gear and equipment are crucial when operating a router on plywood. Always ensure you have the following items readily available:
- Protective eyewear to shield your eyes from debris and potential flying particles.
- Ear protection to minimize the impact of the router's noise on your hearing.
- Dust mask to prevent inhaling wood dust and other harmful particles.
- Sturdy work gloves to protect your hands from sharp edges and splinters.
Router Usage Best Practices
When using a router on plywood, it is important to follow these best practices to ensure safe and efficient operation:
- Secure the plywood firmly in place using clamps or a workbench to prevent it from shifting during routing.
- Start the router at a low speed and gradually increase it to the appropriate level for the specific cutting or shaping task.
- Use the appropriate router bit for the desired cutting depth and ensure it is securely fastened to the router's collet.
- Maintain a steady and controlled movement of the router, avoiding sudden movements or jerky actions that could compromise safety.
- Keep the router's power cord and extension cords away from the cutting path to prevent accidental entanglement.
https://www.youtube.com/watch?v=fytfHBcBWSA
Choosing The Right Router For Plywood Projects
When working on projects involving plywood, choosing the right router is crucial for achieving precise and clean cuts. The router plays a significant role in the outcome of your woodworking projects, so it's essential to consider various factors when selecting a router that is suitable for plywood. In this post, we'll explore the considerations for choosing the appropriate router and the features to look for in a plywood-compatible router.
Considerations For Selecting The Appropriate Router
When selecting a router for plywood projects, there are several important considerations to keep in mind. Here are some key factors to consider:
- Power: Ensure that the router has sufficient power to handle plywood, especially if you're working with thick or dense plywood materials.
- Base Size: Consider the size of the router's base, as a larger base provides more stability and support when working with plywood.
- Variable Speed: Opt for a router with variable speed settings, as this allows you to customize the speed based on the type of cut and the specific plywood material you're working with.
- Dust Collection: Look for routers with effective dust collection features to keep your workspace clean and minimize airborne particles when working with plywood.
Features To Look For In A Plywood-compatible Router
Choosing a plywood-compatible router requires considering specific features that are well-suited for working with plywood materials. Here are some essential features to look for:
- Efficient Chip Ejection: Look for a router that efficiently ejects chips and debris, preventing them from getting trapped in the cutting path and affecting the quality of your cuts.
- Depth Adjustment: Ensure that the router offers precise depth adjustment capabilities, as this is crucial for achieving accurate cuts on plywood materials of varying thicknesses.
- Plunge Base Option: Consider a router that offers a plunge base option, providing versatility for plunge cuts and precise routing operations on plywood surfaces.
- Smooth Start Feature: Opt for a router with a smooth start feature to reduce jerking and ensure a smoother cutting experience, particularly when working with delicate plywood materials.
Techniques For Effective Routing On Plywood
Yes, you can use a router on plywood to create clean and precise cuts for various woodworking projects. By employing the correct router bits and techniques, such as using a sharp bit and making shallow cuts, you can achieve excellent results without splintering the wood.
With proper care and attention to detail, routing plywood can produce professional-looking edges and designs.
Proper Setup And Calibration
When using a router on plywood, the proper setup and calibration are crucial for achieving accurate and clean cuts. Ensure that the router is securely fastened to the router table or handheld router base. Additionally, adjust the router bit height and speed according to the thickness and type of plywood being used. Properly calibrating the router will help prevent tear-out and ensure smooth, precise cuts.
Routing Basics For Plywood
Routing plywood requires specific techniques to achieve optimal results. Use sharp, high-quality router bits designed for woodworking to minimize tear-out and splintering. Secure the plywood firmly to the work surface to prevent any movement during routing, which could result in uneven cuts. When routing plywood, it's important to move the router against the wood grain to minimize tear-out and achieve a clean edge.
Finishing And Maintenance Tips For Plywood Routed Projects
When working with plywood and routing projects, finishing and maintenance play a vital role in ensuring the longevity and visual appeal of your creations. To achieve professional-looking results, it's important to understand the best practices for sanding and preserving the routed areas on plywood. In this section, we will delve into essential finishing and maintenance tips to enhance the appearance and durability of plywood routed projects.
Sanding And Smoothing Plywood Edges
Proper sanding and smoothing of plywood edges are crucial steps to achieve a polished and professional finish on routed projects. Below are some key points to consider when sanding and smoothing plywood edges:
- Use a fine-grit sandpaper to smooth the edges of the routed plywood, ensuring uniformity and avoiding rough spots.
- Gradually progress from coarser to finer grit sandpapers, such as 120 to 220 grit, to achieve a smooth and even surface without splinters or imperfections.
- Employ a sanding block or a power sander to maintain consistency and avoid uneven sanding across the plywood surface.
Preserving The Routed Areas On Plywood
Preserving the routed areas on plywood is essential for protecting the decorative edges and maintaining the integrity of the project. Here are some effective approaches to preserve the routed areas on plywood:
- Apply a wood sealant or protective finish to the routed areas to guard against moisture, UV exposure, and wear and tear.
- Regularly inspect and clean the routed areas to prevent dust and debris buildup, which can detract from the aesthetics and cause premature wear.
- Consider using a clear, protective coating such as polyurethane to enhance the natural beauty of the plywood while providing a durable shield against scratches and damage.
Frequently Asked Questions On Can You Use A Router On Plywood
Can A Router Be Used On Plywood?
Yes, plywood is suitable for routing, but it's crucial to choose the right router bit and set the correct depth. Using a router on plywood can produce clean cuts and detailed edges, making it a versatile material for various woodworking projects.
What Router Bit Should I Use For Plywood?
To achieve smooth and clean cuts on plywood, it's recommended to use a straight router bit with a carbide tip. This type of bit is designed to reduce tear-out and produce precise edges, making it ideal for routing plywood without splintering or chipping the surface.
How Do I Secure Plywood For Routing?
Securing plywood for routing is essential to ensure safety and precision. Clamping the plywood to a workbench or using router mats can help stabilize the material during the routing process. Additionally, using a router with a stable base and maintaining a steady hand can improve overall control and accuracy.
Conclusion
Using a router on plywood is possible and can yield exceptional results. By following proper techniques and safety precautions, you can achieve precise cuts and intricate designs with ease. Remember to choose the right router and proper bit for the task at hand.
With the necessary knowledge and skills, your woodworking projects will surely flourish.
Read the full article
0 notes
Text
Guardians of Electronics: Unveiling the Power of PCB Conformal Coating Spray
In the ever-evolving landscape of electronics, the need to protect printed circuit boards (PCBs) from environmental stressors is paramount. Whether it's moisture, dust, chemicals, or extreme temperatures, these factors can jeopardize the performance and longevity of electronic components. One effective solution to fortify PCBs against these challenges is the application of PCB Conformal Coating Spray.

Understanding Conformal Coating
Conformal coatings are thin protective layers applied to PCBs to shield them from a range of environmental threats. These coatings come in various formulations, including acrylics, urethanes, silicones, and epoxies, each offering unique properties to suit diverse applications.
Why Conformal Coating?
1. Moisture Resistance:
Conformal coatings act as a barrier against moisture, preventing it from seeping into the PCB and causing corrosion. This is especially crucial in applications where exposure to humidity is common.
2. Dust and Contaminant Protection:
The spray forms a protective shield, safeguarding the delicate electronic components from dust, dirt, and other contaminants. This is particularly beneficial in environments with high levels of airborne particles.
3. Chemical Defence:
PCBs in industrial settings often encounter a variety of chemicals. Conformal coatings provide a chemical-resistant layer that shields the components, preventing degradation and malfunction.
4. Temperature Extremes:
Electronic devices can experience temperature fluctuations. Conformal coatings offer thermal protection, ensuring that the PCB operates reliably even in extreme temperature conditions.
Application Process
1. Preparation:
Before applying the PCB conformal coating spray, ensure that the PCB is clean and free of contaminants. Mask off areas that should not be coated, such as connectors or sensitive components.
2. Material Selection:
Choose the right conformal coating material based on the specific requirements of your application. Consider factors such as flexibility, ease of rework, and compatibility with other materials.
3. Ventilation and Safety:
Work in a well-ventilated area, or use appropriate ventilation equipment, as the fumes from the spray can be harmful. Wear protective gear, including gloves and safety goggles.
4. Application Technique:
Hold the spray can at a consistent distance from the PCB and apply a thin, even coat. Ensure uniform coverage across the entire board.
5. Drying and Inspection:
Allow the conformal coating to dry thoroughly according to the manufacturer's recommendations. After drying, inspect the PCB for defects and ensure complete coverage.
Additional Considerations
Temperature and Humidity:
Consider the environmental conditions during application, as they can impact the coating's curing time and performance.
Curing Processes:
Some coatings may require additional curing steps, such as exposure to UV light or heat. Follow the manufacturer's guidelines for the specific coating used.
Re-Work and Repair:
Familiarize yourself with the removal and re-application procedures for the chosen conformal coating, especially if rework or repair becomes necessary.
Conclusion
In the realm of electronics, reliability is non-negotiable. PCB conformal coating spray emerges as a frontline defence, fortifying electronic components against the challenges posed by the environment. By understanding the application process and considering key factors, engineers and hobbyists alike can enhance the durability and performance of their electronic creations, ensuring they stand the test of time.
reference url: https://blogsubmissionsite.com/blog/details/guardians-of-electronics-unveiling-the-power-of-pcb-conformal-coating-spray
#pcb conformal coating spray#parts washing machines#contact cleaner spray#electronic contact cleaner spray#industrial component cleaning machines#industrial parts washing machines
0 notes
Text
Displaced Dust - Projection Mapping Loops Pack Vol.30

Download Displaced Dust - Projection Mapping Loops Pack
Remember the times, when we all were children and were making sand castles on the beach? Remember a satisfying feeling, when the castle was ready and even more exciting feeling, when you could destroy it, imagining yourself as a giant monster! :) Watching a solid-looking structure decays easily is always somehow satisfying. With visuals you can force any building or object to decay like a sand figure. 32 extraordinary high-quality 4K visuals with 3D effect of falling and decaying monochromatic sand texture. Smooth 3D textured animations for your projection mapping projects. This pack is the best choice to create a stunning 3D Depth projection mapping effects. All clips come with alpha background, 4K resolution & 30 fps frame rate.
After purchase we will send You a confirmation E-mail with access to instant download.
3D Depth Effect Visuals for of ripped 3d curtain animation
For Architectural and interior 3D Video Mapping Projection. Produced for different architectural styles: Ancient / Islamic / Asian / Gothic / Modern / Baroque / Futuristic / Neo etc. Also, can be used as Overlay/Multiply blending masks for Live Mixing and VJing. Compatible with all Video Mapping Software: Resolume, Arkaos, HeavyM, Grand VJ, Modul8, MadMapper, VDMX.
Look our video tutorial to see how 3D Mapping Loops works.
Interesting in Projection Video Mapping? What is Video Mapping
Read the full article
0 notes
Text
How to Use Automotive Masking Tape to Protect Your Car from Overspray When Painting
Automotive masking tape is a specialized tape used to protect your car from overspray when painting. It is essential to use automotive masking tape to ensure clean and precise paint lines and prevent unwanted paint from reaching areas you don't want painted. In this guide, we will explore the importance of automotive masking tape, its benefits, how to choose the right tape, and the correct application and removal techniques.
What is automotive masking tape?
Automotive masking tape is a type of tape specifically designed for use in automotive painting projects. It is made with a combination of materials that provide good adhesion and can withstand the conditions encountered during painting, such as exposure to paint chemicals and high temperatures.
Why is it important to use automotive masking tape when painting your car?
Using automotive masking tape is crucial for several reasons:
Protection from overspray: Overspray occurs when paint particles drift beyond the intended target area. Automotive masking tape acts as a barrier, preventing overspray from reaching areas you want to keep paint-free.
Clean and precise lines: Automotive masking tape helps create sharp, well-defined lines between painted and non-painted areas, resulting in a professional-looking finish.
Damage prevention: By covering parts of your car that shouldn't be painted, such as trim, windows, or rubber seals, automotive masking tape helps protect them from potential damage caused by paint or paint removers.
Benefits of using automotive masking tape
The use of automotive masking tape offers several benefits:
Time and cost savings: By effectively protecting specific areas of your car, you can avoid the need for touch-ups or repairs caused by overspray, saving both time and money.
Professional finish: Automotive masking tape ensures clean lines and precise edges, giving your paint job a polished and professional appearance.
Versatility: Automotive masking tape can be applied to various surfaces, including metal, plastic, glass, and rubber, making it suitable for different parts of your car.
How to choose the right automotive masking tape for car paint?
When selecting automotive masking tape, consider the following factors:
Types of automotive masking tape
There are different types of automotive masking tape available, each with its specific characteristics:
Paper tape: This type of tape is economical and easy to tear, making it suitable for general painting applications.
Plastic tape: Plastic automotive masking tape offers better adhesion and resistance to paint solvents, making it ideal for more demanding painting projects.
Foam tape: Foam automotive masking tape is flexible and conforms well to curved surfaces and tight spaces, ensuring complete coverage.
Factors to consider when choosing automotive masking tape
Surface compatibility: Ensure that the tape you choose is compatible with the surface you will be applying it to. Some tapes work better on certain materials than others.
Adhesive strength: Consider the level of adhesion required for your project. Stronger adhesion is necessary for rough or uneven surfaces.
Temperature resistance: If you will be subjecting the taped areas to high temperatures during the painting process, select a tape that can withstand these conditions without melting or leaving residue.
How to apply automotive masking tape
Follow these steps to apply automotive masking tape correctly:
Clean the area to be masked: Ensure that the surface is clean and free of dirt, dust, or debris that could affect adhesion.
Choose the right width of tape: Select a width that provides adequate coverage while allowing for smooth application and easy removal.
Apply the tape smoothly and evenly: Start by positioning one end of the tape on the edge of the area you want to mask. Press down firmly as you unroll the tape, smoothing it out as you go to prevent air bubbles or wrinkles.
Overlap the edges of the tape slightly: Overlapping the edges by a small amount helps ensure complete coverage and prevents paint from seeping underneath.
Use a burnisher to seal the edges of the tape: Run a burnisher or a smooth, hard object along the edges of the tape to create a tight seal and prevent overspray from seeping through.
How to remove automotive masking tape
To remove automotive masking tape without damaging the paint:
Remove the tape carefully: Slowly peel back the tape at a 45-degree angle, pulling it away from the painted surface. Avoid pulling too quickly or forcefully to prevent any paint from peeling off with the tape.
Use a heat gun or hair dryer to soften the adhesive if necessary: If the adhesive residue remains after removing the tape, apply gentle heat from a heat gun or hair dryer to soften it. Then, use a clean cloth or plastic scraper to remove the residue.
Conclusion
Using automotive masking tape is essential when painting your car to protect it from overspray and achieve clean, professional results. By selecting the right type of tape, applying it correctly, and removing it carefully, you can ensure optimal protection for your car's surfaces during the painting process. Remember to follow these tips and take your time for a successful paint job that will make your car look its best.
For more info: https://www.tubetape.works/what-it-is
0 notes
Text
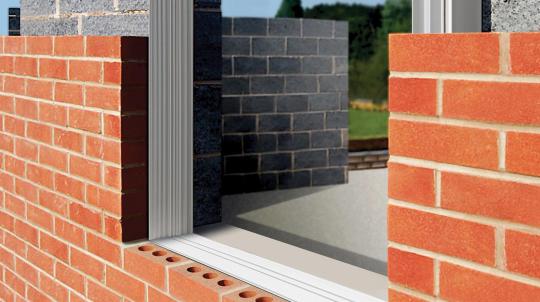
DIY Cavity Wall Insulation: Tips and Tricks for a Successful Project
Cavity wall insulation is a valuable home improvement that can enhance energy efficiency and comfort. While many homeowners opt for professional installation, some may consider a do-it-yourself (DIY) approach. If you're considering DIY cavity wall insulation, it's essential to do it correctly to reap the benefits. In this article, we'll provide you with tips and tricks for a successful DIY cavity wall insulation project.
1. Assess Your Skills and Comfort Level:
Know Your Limits: Before diving into a DIY insulation project, honestly assess cavity wall insulation installers skills and comfort level with home improvement tasks.
Considerations:
Are you experienced with DIY projects and comfortable working with tools?
Do you have the physical ability to access and work within your wall cavities?
Are you willing to take the time to research and learn the necessary techniques?
2. Understand Your Home's Compatibility:
Suitable Homes: Not all homes are suitable for cavity wall insulation, so it's crucial to determine if your home meets the criteria.
Considerations:
Check if your home has an existing cavity between the exterior and interior walls.
Ensure your walls are in good condition and free from moisture or structural issues.
Verify the type of wall construction (e.g., brick, masonry, wood) and whether it can accommodate insulation.
3. Safety First:
Prioritize Safety: Safety is paramount when working on any home improvement project, including insulation.
Safety Measures:
Wear appropriate personal protective equipment, such as gloves, safety glasses, and a dust mask.
Work on a stable platform or ladder when accessing high areas.
Be cautious when handling insulation materials to avoid skin irritation or inhalation of dust.
4. Gather the Necessary Tools and Materials:
Right Equipment: Make sure you have all the tools and materials required for the job.
Essential Tools and Materials:
Insulation material suitable for your wall type (e.g., mineral wool, foam board, or cellulose).
Safety equipment (gloves, safety glasses, dust mask).
Insulation removal tools (if replacing existing insulation).
Insulation delivery system (blowing machine or injection system).
Drill with the appropriate drill bits.
Access holes and materials to seal them.
5. Plan Your Work:
Strategic Approach: Plan your insulation project to ensure it's efficient and effective.
Project Planning:
Determine the number and location of access holes needed in your walls.
Plan the sequence of work to ensure even coverage throughout the wall cavities.
Coordinate the project with suitable weather conditions to prevent moisture issues.
6. Insulation Delivery:
Injection or Blowing: Choose the appropriate insulation delivery method based on your home's construction and the insulation material you've selected.
Injection Method:
Suitable for existing wall cavities with a narrow gap.
Requires specialized injection equipment.
Blowing Method:
Suitable for open wall cavities during construction or major renovations.
Involves using a blowing machine to distribute loose-fill insulation.
7. Work Methodically:
Even Distribution: Whether you're injecting or blowing insulation, work methodically to ensure even coverage.
Techniques:
Maintain consistent pressure and pace when injecting insulation.
Distribute insulation evenly across the cavity during blowing.
8. Seal Access Holes:
Prevent Air Leaks: After injecting or blowing insulation, seal the access holes properly to prevent air leaks.
Sealing Options:
Use suitable sealing materials such as mortar, expanding foam, or specialized plugs.
Ensure the seals are airtight and weather-resistant.
9. Post-Insulation Inspection:
Thorough Check: Once the insulation is in place and access holes sealed, perform a post-insulation inspection.
Inspection Points:
Ensure there are no gaps or voids in the insulation.
Check for any insulation material protruding from access holes and trim as needed.
Confirm that all access holes are securely sealed.
10. Monitor and Maintain:
Regular Check-Ups: After DIY insulation, periodically monitor your home for signs of moisture or insulation issues.
Maintenance Steps:
Watch for any dampness or mold growth on walls.
Check for any unusual changes in indoor humidity levels.
Address any problems promptly to maintain insulation effectiveness.
Conclusion:
DIY cavity wall insulation can be a rewarding project that improves your home's energy efficiency and comfort. However, it's essential to assess your skills, prioritize safety, and plan your project meticulously. By following these tips and tricks and conducting the work methodically, you can achieve a successful DIY cavity wall insulation project and enjoy the benefits of a more energy-efficient and comfortable home.
0 notes
Last Seen Blogs

myrasjayh
SELEN

myhotbabesworldreblogs
My Hot Babes World Reblogs

itsmekingbitch
#KingBitch

zorianclarke
Know Your Rights

valourine
valourine