#dxtc
Explore tagged Tumblr posts
Visit Tumblr Blog
Explore Tumblr blogs with no restrictions, modern design and the best experience.
Last Seen Tumblr Blogs


Fun Fact
When “GIF” was named word of the year in 2012, Oxford Dictionaries U.S.A. credited Tumblr for pushing the word.
Text

eyes...
#deus ex#adam jensen#deus ex mankind divided#deus ex human revolution#deus ex the consequences#lexi margo#dxhr#dxmd#dxtc
39 notes
·
View notes
Text
Dxtc lids only fcgv paper dxfccccgvvv packageings only paid loked paid dxfc tax must return to Candace Marie Hughes only paid loked paid and taxed paid loked paid and receipt. Paid. Loked. Paid. Dxfc kill.

0 notes
Photo

Hi! I was asked to make a quick little tutorial for making eyeshadows, but since I can’t half-ass anything, here’s a whole-ass tutorial. Please note that I am in NO WAY an expert and that I’m still learning. My method is probably not the best but it works. There’s probably an easier way to do it! Sims4Studio has a lot of tutorials you can check out to find a method that works for you if this doesn’t.
You need Photoshop + an extension to read DDS files and S4Studio. It would probably work with something other than Photoshop, but it’s what I use and that’s what I’m gonna write about.
Under the cut because it got suuuuper long!!!
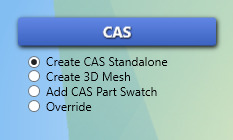
Step 1: Open Sims 4 Studio.
Step 2: Choose “Create CAS Standalone”, then click on the big blue CAS button.
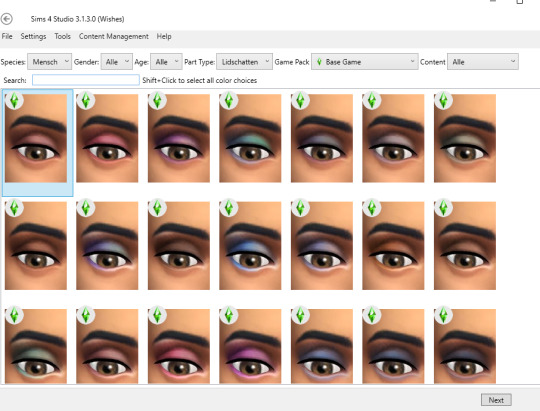
Step 3: S4S will show you the catalogue. I like to sort it so Part Type is set to the stuff that I want to make (in this case “Lidschatten” or “Eyeshadow”) then set Game Pack to “Base Game”, which ensures that the item we’ll make is base game compatible. Then just choose any eyeshadow. I usually just take the first one.
Step 4: A new window will open and ask you to name your new package! I usually go NEWCRESTINGwhateveritisNAME. Extra characters like -_.(){] slow your game down, and I feel like putting whatever it is (in this case an eyeshadow) makes sorting it easier. If you wanna name your shadow just eyeshadow1 that’s fine but it will kinda suck for ppl who download it.

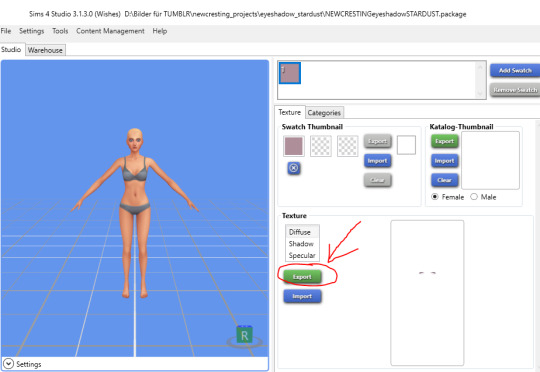
Step 5: After you named your eyeshadow, you get to the main S4S screen. We don’t need to do much here for now, just export the texture. To do that, we click export. (I drew a lil arrow) S4S then tells you to save the texture. I usually make a folder per project and save it there under the name “tex” but it really doesn’t matter.
Step 6: Open Photoshop. Make sure you got your DDS plugin installed.
Step 7: Open your texture (in my case called “tex”) The DDS plugin asks you how to load it, click “load using default sizes.”
Step 8: Now you should have your texture in front of you. I like to zoom in to 300-500% depending on what I’m making.
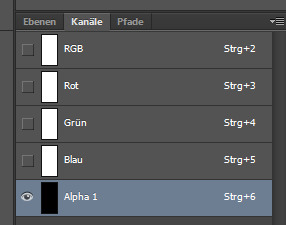
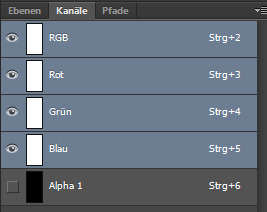
Step 9: Now, on the left there should be a panel called “Channels” or something (my PS is in German so I’m just guessing here). There’s five channels: RBG, Red, Green, Blue, and Alpha. By default, all are selected except Alpha. We’re gonna reverse that so that it looks like this:
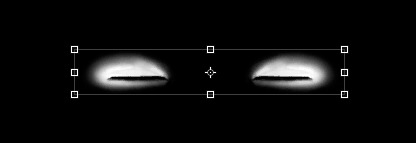
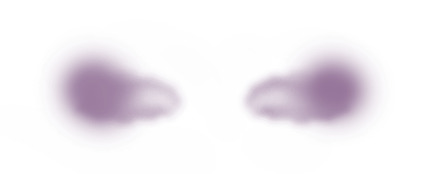
Step 10: By now your image should look mostly black with two little white thingies on it. The alpha channel basically tells the eyeshadow where to show up. Where there is pure white, it’s gonna show. Grey tones are a way to “lower” the opacity. Where there is pure black, there’s not gonna be any eyeshadow.
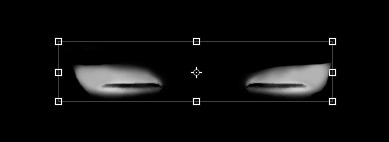
Now, get creative! Use the brush tool set to white to add and black to subtract from the alpha so that the form suits what you want. Make it softer, make it bolder. This is where you decide the shape! Experiment, get creative, use the brush and eraser tools until you find something you like.
Here’s before (a.k.a. EA’s alpha):
And here’s mine after some very quick editing because I wanted to get this done:
Step 11: Change the channels back so that the alpha is disabled and all the other ones are enabled, so that it looks like this:
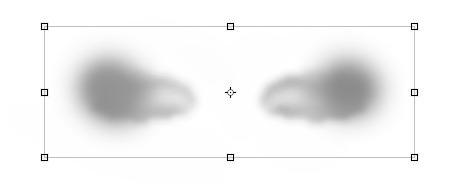
Step 12: Now, we get to the fun part: The actual texture. I dislike EA’s textures as I find them too stark and harsh. I like them softer and subtler. But that’s just me, feel free to go wild! Paint your own texture or just color fill with a single block of color, it doesn’t matter! If you paint your texture, just make sure it lines up with your alpha layer. Also, make sure that you make the texture black and white for now so that we can easily recolor it later.
This is EA’s texture:

And this is mine! It’s ugly, but that doesn’t matter, ‘cause only the stuff that our alpha specifies is gonna show up, so it doesn’t matter that it’s just blurry circles.
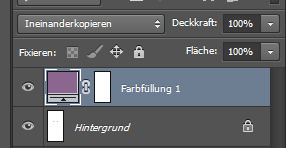
Step 13: Now to get some colors into that! Go to the menu at the top, select Layer --> New Fill Layer --> Solid Color (or something. something with solid). Photoshop should then ask you to specify a color. Choose one, then go to the layer tab on the right and change the blend mode or whatever it’s called from “normal” to “overlay” or “soft light” or just experiment with the modes! It doesn’t matter! Get what looks best to you. I chose Overlay.
This is what my eyeshadow looks like now that it has color:
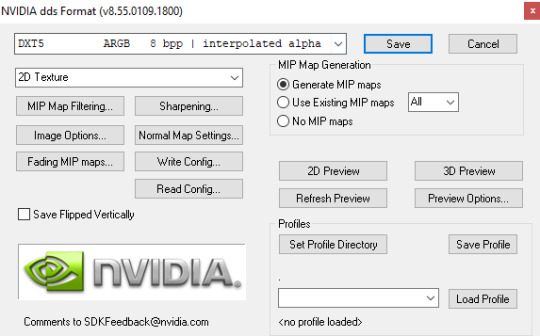
Click on File --> Save as ... A window will pop up with a save dialogue. Make sure to save your file as a .DDS file!!! This is super important. Then name it (I usually just number the swatches, so this one would be “1″) and save it where you can find it.
The DDS plugin will then ask you how to save it. From the drop-down menu, choose “DXTC 5 ARGB 8bpp | interpolated alpha”, then click save.
Step 14: Now you can choose to make more colors by clicking on the little colorful rectangle (purple in my case) on your fill layer in the layer tab. That will make PS ask you what color you want once more but eliminate the need to make a new layer.
Step 15: You’re basically done now! Open S4S if you closed it and click “import” on the side, just under where you exported the texture at the beginning. Your eyeshadow should show up on the model and you can preview if you like it!
For example, I realized my eyeshadow looks way too light, so I changed the blending mode from Overlay to Linear Burn and put the opacity at 75%. Experiment!
This is what my final shadow looks like in S4S:
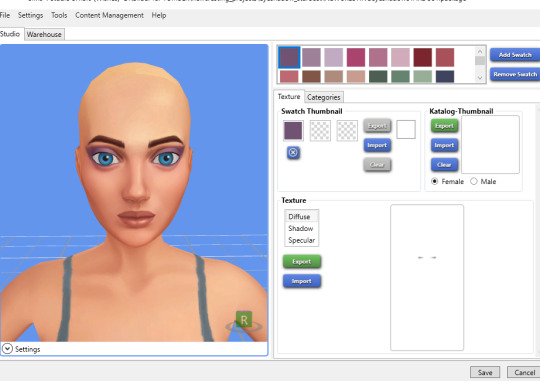
As you can see, I have a whole bunch of swatches now. Click “add swatch” in the top right corner to add a new swatch. Under Swatch Thumbnail you can drop-pick the color that the swatch is supposed to have in your catalog, or you can import a color palette through tools. S4S has tutorials for that on their site.
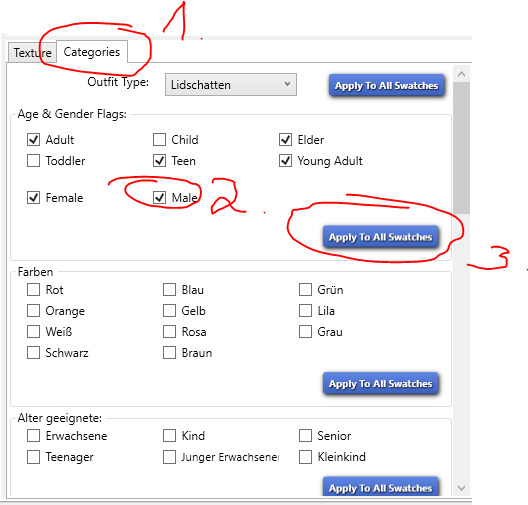
Step 16: This is OPTIONAL! But I like to do it. The eyeshadow we used as a base is by default enabled only for females and allowed for random. I don’t like that, so I enable it for males by checking the box (circled) and then remove the checkmark from the box at the very bottom (you have to scroll a bit) so it’s no longer allowed for random. Don’t forget to click Apply to All Swatches!
Now click Save! And you’re done!!! Don’t forget to copy over your package to your cc folder, then go in game and find them, take a couple of screenshots for a thumbnail and preview and then it’s done!
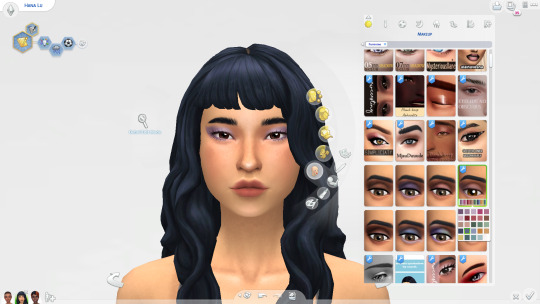
This is my shadow in game:
Now go forth and make your own eyeshadows!
242 notes
·
View notes
Photo
https://youtu.be/8KPbJ0-DxTc


6K notes
·
View notes
Note
Hey, Ragamuffin! Have you ever had any music playing in the background while you were chasing down a "playmate"?
Ragaeli: Oooh, yes, it’s always a fun addition to any good Nightmare with a chase~ Depends on what I’m in the mood for, really. Could be anything from a horror classic:https://www.youtube.com/watch?v=ZnnS2N4KAkITo video game music:https://www.youtube.com/watch?v=n8_LJN-dxtcOr even something more light-hearted like some Looney Tunes, hehehe.https://www.youtube.com/watch?v=4S4NDnNTptY
10 notes
·
View notes
Text
DDS NVIDIA Plug-ins for Adobe Photoshop (32/64bits)
NVIDIA Plug-ins for Adobe Photoshop have two main components:
NormalMapFilter — filter for Photoshop that can convert any image to normal map. It works on Height2Normal algorithm, so source image must have darker parts representing the "deep" and lighter parts as elevations ( as the Bump Map does ). In other words — not any raw image can be converted to quality normal map, and if you need one — it's may be better to process source image by hands. Filter has many options for Normal Map generation procedure and ability to preview the result in 3D View window.

DDS Plug-In — allows to open and save .dds files, compressed with DXTC algorithm ( files with .dds extension ), choose required compression profile and more. DDS format ( Direct Draw Surface ) is widely used in game production and often game model textures compressed with it.

On NVIDIA Developer Zone you can download Nvidia Plug-ins for Adobe Photoshop and other tools, or use direct links below for downloading plug-in version 8.5:
NVIDIA Plug-in for Adobe Photoshop (32-bit) (8.51.0301.0345) NVIDIA Plug-in for Adobe Photoshop (64-bit) (8.51.0301.0345)
P.S. Be careful with any manipulations with your textures and always save your work before apply any filter. In general it's good practice to save often and in different files.
10 notes
·
View notes
Link
0 notes
Link
So, you know how we passed down those lyrics for Bohemian Rhapsody, only with Covid-19 lyrics? For people who don’t know, some people made this into a video. I think some of the lyrics are tweeked, but still cool! Enjoy!!!
0 notes
Text
literally never knocks 😔
#deus ex#deus ex mankind divided#adam jensen#deus ex human revolution#deus ex the consequences#lexi margo#adam x lexi#dxhr#dxmd#dxtc
37 notes
·
View notes
Text
Dxtc flags : bandannnnnnnnnnas killers paid dxfc gv : 1233456677(fort Lauderdale) soldiers paid must return to Candace Marie Hughes only. ON. Paid. Loked. Lk.
0 notes
Text


some old messy sketches...
#deus ex#adam jensen#lexi margo#deus ex human revolution#deus ex mankind divided#deus ex the consequences#megan reed#david sarif#vaclav koller#eliza cassan#veda#bob page#francis pritchard#dxhr#dxmd#dxtc
25 notes
·
View notes
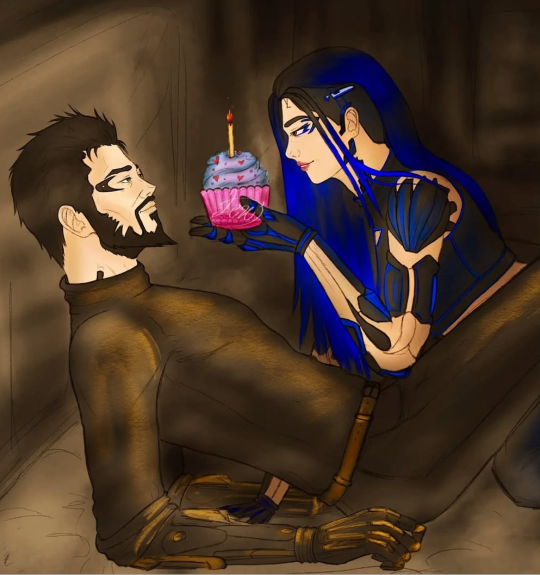
Text

Happy birthday to my sexy man 🥳🎂
I was up till 5 am to finish this 🥴
again with this hair style cause I know it suits him perfectly 😔🫦

@deusex
#deus ex#adam jensen#hbd#deus ex mankind divided#deus ex human revolution#deus ex the consequences#cyberpunk#dxhr#dxmd#dxtc#my artwork#digital art
29 notes
·
View notes
Text
my last year's fan art with my lil oc Lex🥹🌌✨
#deus ex#adam jensen#lexi margo#oc x canon#adam x lexi#deus ex mankind divided#deus ex the consequences#deus ex human revolution#dxhr#dxmd#dxtc#love#hbd#birthday
18 notes
·
View notes
Text

Real cowards are always looking for excuses to save themselves from drowning in the swamp. The one who stops making excuses and accepts the truth is a hero and already accepting the punishment.
- Adam please I can explain everything, I wasn't the one who shot...
+ you expect me to ignore what I saw with my own eyes?


Aww, such a miserable woman she is

#deus ex#adam jensen#deus ex mankind divided#deus ex human revolution#deus ex the consequences#lexi margo#oc x canon#adam x lexi#dxhr#dxmd#dxtc
18 notes
·
View notes
Note
Hi can you draw adam jenson with legendary Pokemon please
Hi ✨✌🏻
I wasn't sure which one you wanted to see but I felt good with picachu, hope you like it ☺️💙
Both MD and TC (my dx version)


#deus ex#pokemon#picachu#adam jensen#deus ex mankind divided#deus ex the consequences#deus ex human revolution#fanart#dxhr#dxmd#dxtc
19 notes
·
View notes