#electrocard
Explore tagged Tumblr posts
Visit Tumblr Blog
Explore Tumblr blogs with no restrictions, modern design and the best experience.
Last Seen Tumblr Blogs


Fun Fact
BuzzFeed published a report claiming that Tumblr was utilized as a distribution channel for Russian agents to influence American voting habits during the 2016 presidential election in Feb 2018.
Text


Agatha || Olivia || Carla || Eve || Jennifer
a/n: I'm in love with this robot and I'd do anything for her
💛💛💛💛💛💛💛💛💛💛
You sighed as your brother started to sing that stupid song again! You knew you should be happy for him, but it was so annoying to hear him singing it all day, especially when you...when you couldn’t.
In a world where people can hear a special song that connects them to their soulmates, you haven’t been able to find yours. You asked your brother how it was, what were you supposed to feel or hear. He said it was like hearing a voice in your head that made your heart race.
You didn’t know what that meant but you appreciated the help...for small it was.
You started to feel a little desperate when your brother heard his song and started to sing it at all times. It was a cute song and you knew his soulmate was singing it too, even if he was the only one who could hear it. But still, it hurted that you haven’t heard yours.
After a while, you started to think you didn’t have any soulmate after all. It was rare, but there were stories about people whose souls were already full and didn’t need their other half. It didn’t feel like that to you, you felt like there was something missing, but since you couldn’t hear your song, you were worried you might be one of those few people.
________________
You groaned when your friend Janice started to put her strange medical things on your chest. She had told you what their name were, but you really couldn’t care less. It was enough that you were still accepting to be her fake patiente when she had medical practice for her school.
“Y/N…” Janice said and you didn’t like her tone.
Usually, you were just there for her practice and she would praise you about how healthy you were. But this was the first time she asked to do an electrocard-... electrocardi...whatehever the fuck they did to check your heart. You were sure it was fine...but her tone and facial expression were making you nervous.
“What? Is my heart too small? Does it have ice?” you joked
“It’s your heartbeat” she whispered.
“What about it?”
“Remember that class I took about code morse?” she asked suddenly. You frowned, totally confused, but nodded. “Y/N...I- I think your heart is...There’s a name in code morse on your heartbeat” she said quickly.
You blinked and didn’t say anything for a moment. You were sure you passed out at some point.
________________
Ursula Gernsback.
You read the paper on your hand for the fifth time, wanting to be absolutely sure this was the right address. It was hard to find who the fuck this woman was, and you doubted she’d be able to give you answers. But you needed to know why her name was in your heart...literally.
“Well...at least this seems to be a cool place” you thought, as you entered the store.
_________________
You didn’t know what you were expecting. Maybe some fireworks, or a heavenly light from the sky, or perhaps that damned song. But instead, you got red cheeks and a tangled tongue as you looked at the most beautiful eyes you have ever seen.
“Can I help you?” the woman in front of you asked. Her eyes kept roaming your body, as if she tried to find something specific.
“I- uh...are you” you stuttered. You cursed yourself as she raised an eyebrow before you cleared your throat “I apologize if this is weird, ma’ am, but...Are you Ursula Gernsback, by any chance?” you asked.
The woman blinked and frowned. You were afraid of her reaction and only then you thought about the fact that you didn’t have a plan. What were you going to do? Say “Hey! I don’t have any idea of who the hell you are and you don’t know who the fuck am I, but I have your name on my heart in code morse, do you think you know why?” God, you would be lucky if she didn’t call the police.
“I am” she said after a moment “And you are?”
“Oh, uhm...I’m Y/N Y/L/N” you smiled.
The woman’s face changed suddenly and before you knew it, she was taking your hand and dragging you to the back of the store. What the hell did you get yourself into?”
_______________
“Wait, wait, wait” you said for the millionth time “Let’s go back to the part where you are a robot”
“Let’s go back to the part where you’re not” she answered and you sighed.
In the five hours you had been in the store cellar, there have been a lot of questions and few answers. For both of you. Ursula was so confused (and almost angry, which was scary) for the fact that you weren’t a robot as she thought (which had been the reason she showed you her true self without second thought, to your horror), and even more so for the fact that it didn’t make any sense.
She believed you when you told her you found her because her name was in you, because she herself had been listening to it. You had been calling her name all this time, and she listened, but never knew how to find you, no matter how many times she looked up in her system.
And now, you were here, afraid, alone, confused and so...so human. It didn’t make any sense!!! Why would a human be able to use code morse with her heart and why would you be calling her if you didn’t know her?
“Ursula?” you asked softly
“Shhhh, let me think, human” she said. But you had an idea...or perhaps a hope.
“Do you robots...do you have a soul?” you asked.
“What?” she blinked
“Do you have a soul?” you asked again “I- I don’t know if I’m crossing a line here, but...I’m sure you have heard about soulmates?”
“The songs you humans like to sing all the time?” she frowned.
“No...well-” you sighed “the songs are the way to find your soulmate, the soulmate itself is...I don’t know. I’ve heard it is a person who compliments you, a person you’re supposed to spend your life with...your other half”
“And what does it have to do with us?” she asked
“I-...I’ve never been able to hear my song” you admitted “And I’ve been trying to all my life”
“And you’re telling me this, because?”
You sighed. She had told you that human behaviour was still strange to her and she didn’t understand some things, which was cute for you, but you really needed her to be on the same page as you in this.
“Because I think we might be soulmates” you blushed as you said it.
The woman frowned again and she did look adorable and cute, but you wanted to smack your head against the wall at that moment.
“Think about it! I’m a human who could never hear the song. You’re a robot who could never find the origin of the call...But your name’s in my heart and mine’s in your code...what if it is because we’re soulmates, but since you’re a robot...rules are different for us?”
She looked at you for a moment before she looked down. You could see her thinking about it, so you stayed quiet until she looked up again. You didn’t want to admit it, but these hours felt...special to you. As if you had found something important, something you never knew you needed. If she wasn’t your soulmate, she was totally your crush.
“I don’t know” she said suddenly
“what?”
“You asked me if I had a soul” she said, stepping closer to you. Her beautiful eyes stared at yours, as if she was looking for something again “I don’t know if I have one”
You felt your heart breaking, but didn’t say anything. She took your chin carefully and lifted your head to make you look at her again. Her touch was soft and warm and her scent felt like home...all of her, felt like home. The woman caressed your cheek with her thumb and it made you tremble.
“I don’t know if I have a soul or not” she said “but if I do...I’d like it to belong to you, little human”
#x reader#reader insert#imagine#ursula gernsback preference#ursula tomorrowland imagine#ursula gernsback imagine#ursula tomorrowland#ursula gernsback x reader#ursula gernsback#giveursulaagirlfriendchallenge#gay for kathryn hahn
96 notes
·
View notes
Text
grr my electrocard meter isn't working i put the card in and nothing happens >:c
4 notes
·
View notes
Photo

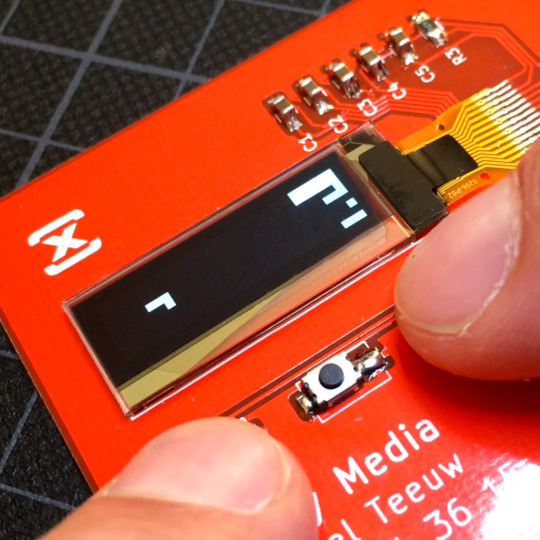
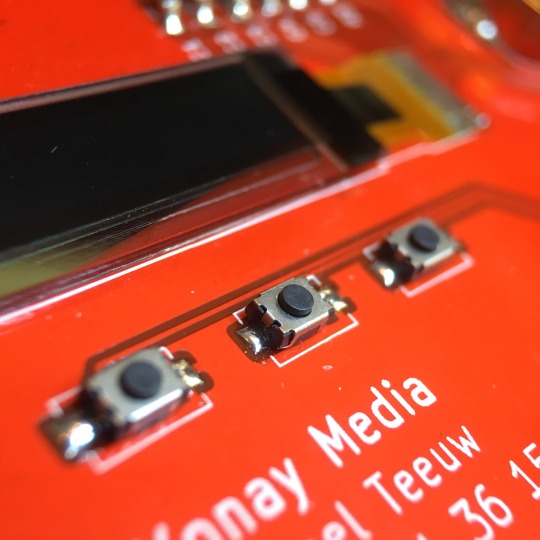
My Electrocards are pretty popular. To make sure I always have a few in stock I tend to assemble a few of them every week. A great way to improve my soldering skills. And try out some different techniques. What's your preferred way of soldering SMD? #electrocard #soldering #electronics #pcb #smd #attiny85 #atmel #arduino #oled #business #card #branding
4 notes
·
View notes
Text
Electrocard Part 3: Writing The Software
Now that the hardware part of my Electrocard is done, it's time to start working on the software side of my electronic business card.
This is a 3 part story. Check out the previous parts here:
Part 1: Designing the PCB. Part 2: Soldering the board.
First of all, it's good to make a list of the desired functionalities. Of course, the OLED screen combined with the 3 push buttons give me a lot of nice opportunities, so most of all, the display will be used to display the important company information for as far as it isn't already printed on the PCB's.
Secondary, it would be nice to display some debug information regarding the battery, the memory and the software version.
And last but not least, it's mandatory to add a nice easter egg to a business card like this. But more about that later.
The controls
Since I have three buttons, and have both primary and secondary functionalities, I want to add a short press and long press feature to the buttons. This is easily done with the help of the clickButton library. It gives me a simple way to add 6 desired modes:
Button A, Short press: Power on / Display the startup screen.
Button B, Short press: Display my company's address.
Button C, Short press: Display my company's & blog's url.
Button A, Long press: Standby mode (also initiated after 30 seconds of inactivity).
Button B, Long press: Debug mode.
Button C, Long press: Start the easter egg.
With the help of the earlier mentioned button library and a simple state machine the user can switch between the various modes, without the need of an complicated user interface.
Controlling the display
Controlling the display isn't particular difficult, especially since there are a lot of example codes and libraries available to control the SSD1306 OLED controlled I've used. I've tried a few of them, and most of them run fine on the ATTiny85 processor. But during the process I found out there are actually two separate challenges.
Control the display by sending an image to the OLED controller.
Drawing realtime graphics onto the screen.
The first challenge isn't extremely difficult. Most of the available libraries allow you to send a 128x32 pixel monochrome image (a BPM converted to a HEX values stored in the micro controller's flash memory) to the OLED controller. It took a while to figure out how to convert the BPM to the correct values, since it depends a bit on how the library reads and writes the data. But after some googling I found a working combination of the TinyOLED library and the LCD Assistant image converter.
This is the same method as used for writing text to the OLED. In stead of one complete stream of image data, every letter has a small portion of data (6 bytes) which is read from the micro controller's flash memory.
The second part is a bit more complicated, and that is mostly due to the limited available memory (RAM) of the ATTiny85 micro controller.
The OLED expects a sequential stream of bytes to control 8 vertical pixels per byte. The 128x32 pixel oled is built up by four rows (called pages) of 8 vertical pixels (1 byte). Each 128 bytes width. In total that adds up to 512 bytes.

If you want to draw lines and shapes on any position on the screen, you'll need to create a buffer for those 4096 pixels (512 bytes) in the micro controller's memory, to which you can draw. After drawing to the buffer, you send the full buffer to the OLED and your lines and shapes are displayed on the screen. That's how most OLED libraries work (for example, the popular Adafruit SSD1306 library).
The problem is, that you'll need to allocate 512 bytes of memory in you micro controller as the buffer. Since the ATTiny85 I used only has 512 bytes of RAM in total, there isn't enough memory to allocate this buffer.
In other words: I can't allocate a buffer. I need to render the drawing while I'm writing all the graphics data to the OLED controller. This turned out to be a BIG challenge. And while I only needed this for incorporating the easter egg, it's something I wanted to solve.
The Easter Egg: Horizontal Micro Tetris!
So, as told, I wanted to add a nice easter egg. I already programmed Pong once. But with the 3 push switches and the width 128x32 pixel screen, i reckon Tetris was better suited. Or to be more precise: horizontal Tetris. The added benefit of tetris is that it doesn't need a high frame rate. And honestly, seeing such a cute little Tetris game on a business card, brings a smile to most people's faces.
Due to the size of the screen, I opted to go for Tetris blocks of 4x4 pixel squares. This way, 8 blocks will fit vertically, and there is room for 32 horizontal blocks. In total there will be room for 256 blocks.

The blocks that are already on screen will be stored in an array called the arenaMatrix. And since each vertical row has 8 blocks, this array will consist of 32 bytes.
unsigned char arenaMatrix [32] = {};
The currently falling piece will be stored in a 4x4 block matrix, called the userMatrix. And since since we only need 16 bits of data, we can easily store this in an integer.
unsigned int playerMatrix = 0;
In other words, for storing all the blocks, we only need 34 bytes of data. Leaving us 478 bytes for additional variables (like the score and the user's piece position) but of course also a lot of other objects and pieces of code that's loaded in to memory.
Since the two matrixes matrices contain every piece of information I want to display on screen during a game of tetris, the render function can "simply" lookup and calculate the bytes of data for the OLED controller on the fly. This solves the lack of the graphics buffer. Or, if you look at it from a different perspecitve: this is an alternative graphics buffer with a 1/16th resolution (since the blocks are made of of 4x4 pixels).
In any way: it allowed me to render tetris without the use of any helper methods like drawLine() or drawSquare(). It all comes down to flipping bits one by one. Which isn't the most convenient, but did teach me A LOT about bit manipulation.
Now, of course, drawing a few matrices to the screen isn't enough to make a playable tetris. It needs some timers to drop the pieces. It needs collision detection to check if the blocks hit an other block. It needs a way to check if a fill line is filled with blocks, and it needs a way to remove the fully filled lines.
The Code
I'd love to run you thru the code, but that would probably account for a full year of blog posts. So to make things easier, I put all my code on GitHub so you can take a look at everything that's in there. Feel free to take a look at the Electrocard Repository.

If you're not familiar with the PlatformIO folder structure, you might want to start at the entrance point of the firmware in the main.cpp file. If you're mainly curious for the Tetris code, check out the Tetris.cpp file.
Fun fact: the full code used almost every byte of flash available in the the ATTiny85 (8KB). Of course, I could work on making the code more efficient, but everything I wanted to be in there is in the code.
Game Over
And with this information, I think this project is a wrap. It was an extremely satisfying and fun project to work on. Both the electronics and the code.
Although I'm extremely satisfied with the end product, there are some things to reconsider if I start a similar product:
Consider a different micro controller. Finding a solution for the limited amount of memory of the ATTiny85 was fun, but having a little bit more memory would probably allow me to add a few nice effects.
If I did have an other micro controller, I'd probably have more GPIO pins, which allowed me to add more buttons, and a nice colorful LED. Every project is better with a LED.
In the future, I'll definitely check EVERY footprint before I order my PCB's.
Work on the software on the breadboard prototype before you finish up the PCB. This would have showed me the limiting factor of the ATTiny85. I would have given me a heads up before I pulled out all my hairs during the search for a solution.
If you have any question or suggestions about this project, feel free to leave them in the comments down below.

#electrocard#attiny#attiny85#atmel#businesscard#electronics#development#arduino#tetris#game#oled#ssd1306#firmware#platformio
6 notes
·
View notes
Text
ElectroCard Part 1: The Design

Ever since I have my own company I wanted to have a PCB business card. Of course I wouldn't be the first, but it would definitely give a nice touch to my company's identity. And since I wanted to give KiCad a good try anyway, why not go for it?
Of course it's fun to just make a fake pcb layout, but it would be even better if an assembled version of my business card really had some nice features. Since I managed to get a bare SSD1306 OLED working, there wasn't any excuse to not accommodate the business card with an OLED display.
Due to the cost and time of the assembled version, not all my clients or prospects would get the fully assembled edition. The bare PCB will be my default business card. The assembled version will be a present for paying customers. A great incentive to become a paying customer. ;)

Based on the schematics I worked out to control the OLED, the schematics for this ELECTROCARD are pretty straight forward. The OLED requires 8 passive components, and will be controlled by an ATTiny85 which also needs one capacitor. To interact with the business card I'll add 3 SMD push buttons. The board will be powered by a CR2032 coin cell. Since I'll be using the low power sleep mode when the card is not in use, the card won't need a real on/off switch.

With the schematics worked out, I started designing the PCB. Since the card is 85mm x 55mm I have more than enough room for all the components. Of course, I did put some effort in the visual aspect of the PCB layout. This step took a lot of time, since there's alway something to improve. Luckily KiCad's Push and Shove functionality makes it a breeze to make any modifications.

With the help of KiCad's 3D render function I could get a good idea of the final result. So after a few days of tweaking, playing and checking the footprints based on a paper printed version, It was time to order the first version of the PCB. Of course I used red PCB's since this is my company color.

Since I wanted the bare PCB's to be cheap I checked some Chinese PCB production facilities and ended up going for Elecrow. When ordering 50 boards, they would cost me €1,- per board (€6,- per board including components from AliExpress). A perfect price for a premium business card. Normaly you would only order a small batch for testing first, but since I can use unassembled (and faulty) PCB's as my business cards I decided to order 50. Elecrow really did a great job here. Fast delivery. High Quality and perfect communication. If you're looking for cheap PCB's, I can really recommend these guys.

Of course no project can ever go without any set back. While I was waiting for my PCB's to arrive, I received the ATTiny 85's. And lo and behold, they didn't fit the SOIC footprint I used. Stupid me used an ATTiny84 to check the width of the footprint ...

It turned out there are two different package standards. The EIAJ SOIC body is approximately 5.3mm wide, while the JEDEC SOIC body is approximately 3.8mm wide. Make sure to check your parts before ordering your PCBs ... Luckily it isn't a big deal, since I could simply bend the pins of the ATTiny85 and make them fit. None the less: the next batch will have a fixed footprint.

The end result of the PCB really looks more beautiful than I could have hoped. The red soldering mask really pops, and the 0.8mm PCB's are the perfect size to be used as a real business card. On the back I used coper traces to imprint my company's name. Remember that name, it might be the company you need for you future innovation projects. ;)
Next time I'll be showing the hand soldering of one of the cards ... Keep an eye on my blog to make sure you don't miss it. :)
EDIT: Check out Part 2 here.
Psssttt ... wondering what happened to my activity board project? I'm still working on it, but had some issues with sourcing the materials I need. No worries, I'll write an update soon!
#electrocard#pcb#business#card#kicad#oled#electronics#identity#design#maker#project#atmel#arduino#attiny#attiny85#cr2032
5 notes
·
View notes
Text
A Tiny Success: Flashing the USBasp

Two weeks ago I posted about my experiment with the ATTiny10. A 12Mhz 8-bit micro controller small enough to be confused with an obese ant. Unfortunately I didn't succeed in programming this tiny guy, so this week I continue my small scale flashing quest.
My first guess was that the tiny wires I used to connect the ATTiny10 to my USBasp flasher weren't working, or I damaged the ATTiny10 in my amateur micro soldering attempts.

To test if these were the causes, I soldered an ATTiny10 and a WS2812 2020 to SOP16 breakout board. This allows me to do some testing on a breadboard. It also made the soldering much simpler, lowering the risk of overheating the components.
Unfortunately, this didn't solve the issue. I still wasn't able to upload firmware to the ATTiny. Time to shift the focus to the next suspect: the USBasp flasher.

To program the ATTiny10 I tried using the USBasp flasher I bought from AliExpress. I used this Flasher to program my Electrocards, so I know it works. The only difference between the electrocard's ATTiny85 and the ATTiny10 is that the latter uses TPI protocol in stead of the ISP protocol to be programmed.
After a small Google session, I found the USBasp project website. Besides some interesting technical details, this website also offers the Firmware downloads. And that's where I noticed that TPI support was only available in the newest firmware. Maybe my cheap chinese USBasp included some old firmware? Time for an update!

To allow the USBasp to be updated, JP2 needs to be closed. In this case, the JP2 is on the back of the PCB. Soldering a short wire between these connection points is enough to enable self programming mode.

Next, I used an Arduino Uno as the programmer. To do so, I uploaded the ArduinoISP sketch to the Uno. This sketch is available in the Examples sketches section of the Arduino IDE. Next I connected the USBasp to the Arduino using the following pin configuration:
ARDUINO --- USBasp 5V ------- 2 (VCC) GND ------- 10 (GND) 13 ------- 7 (SCK) 12 ------- 9 (MISO) 11 ------- 1 (MOSI) 10 ------- 5 (RESET)
(Note that the blue led of the USBasp will not turn on after connecting it. I'll get back to this later ...)
To check if the connection is working, I used the following command in my macOS terminal:
avrdude -c avrisp -P /dev/cu.usbmodem14201 -b 19200 -v -p m8
avrdude is a utility to download/upload/manipulate the ROM and EEPROM contents of AVR microcontrollers.
The -c flag specifies which programmer whe are using. In this case the Arduino usni which is configured as an avrisp programmer.
Using -P I specify to which port the Arduino Uno is connected. In my case this is the /dev/cu.usbmodem14201 port, but in your case it might have a different name/path.
Next, I specify the communication speed using the -b flag. In this case 19200 baud.
To get some feedback, I enable the verbose mode using -v.
And last but not least, I specify the type of AVR I want to program. Since my USBasp has a ATMEGA8A, I specify part m8 using the -p. If you omit the -p flag you'll get a list of all supported AVRs.
After running this command, avrdude will try to communicate with the USBasp's microcontroller using the Arduino avrisp.

Great! This works! Time to do the real work: flashing the USBasp with the new firmware. First I downloaded the latest firmware at: http://www.fischl.de/usbasp. In this case the latest firmware was usbasp.2011-05-28.tar.gz. After downloading and extracting the file (by simply double clicking it in the macOS finder) I navigated to the usbasp.2011-05-28/bin/firmware folder which includes the firmware I need: usbasp.atmega8.2011-05-28.hex.
Uploading the firmware to the USBasp is almost the same command as before:
avrdude -c avrisp -P /dev/cu.usbmodem14201 -b 19200 -v -p m8 -U flash:w:usbasp.atmega8.2011-05-28.hex
In this case I've added the -U flag to do a memory operation:
I want to do an operation on the flash part of the micro controller.
I want to write, so I specify the write flash with the w flag.
And most important: I define the filename of the flash hex file (which is in the current folder)
Let's press enter, and hope for the best ...

Yes! It seems it has worked! :) Since the blue led has turned on after flashing, it really feels like something good has happened. LEDs always make thing better, right?!

Now, most important ... don't be like me: don't forget to open/disconnect that self programming jumper JP2 on the back of the USBasp! When it's connected/closed, the ESPasp won't be able to function.
So, after reconnecting the ATTIny10 to the USBasp, it's time for the most exciting part. Will the Arduino IDE, be able to flash the ATTiny10 using the ATTiny10Core?
How about we just select the USBasp programmer and smash that Upload button?

YEAH! It worked! :)

If you want to read more about this flashing process, make sure to read Roger Clark's great post on this subject...
For me it's time to start working the firmware to get that WS2812 2020 LED working. Don't miss it, so make sure to keep an eye on my blog or follow me on Twitter or Instagram.
7 notes
·
View notes