
I build stuff. Virtual and physical. For both business and pleasure. Join me in my development, design and electronics journey.
Don't wanna be here? Send us removal request.
Statistics
We looked inside some of the posts by michaelteeuw and here's what we found interesting.
Average Info
Notes Per Post
57
Likes Per Post
50
Reblog Per Post
2
Reply Per Post
5
Time Between Posts
2 months
Number of Posts By Type
Text
15
Video
2
Last Seen Tumblr Blogs


Fun Fact
Tumblr has 16.74 million mobile monthly users in the US.
Text
This blog has been moved!

This blog has been moved from Tumblr to a custom system. If you want to stay up to date on my maker projects, please visit:
https://michaelteeuw.nl
1 note
·
View note
Text
Quiet for now & plans for the future

If you are a regular reader of my blog, you know I've been posting new updates approximately every two weeks for the past few years. So the fact that my last post was over 6 weeks ago deserves a bit of an explanation.
12 years ago I bought a two bedroom appartement in a small vilage in the Netherlands. Back then this appartement had more than enough room for me and all of my hobbies. Now, 12 years later, this appartement is occupied not only by me but also my beautiful wife and two awesome sons. Great to see how much your life can change for the better in 12 years time.

Although the appartement is big enough for 2 adults and 2 kids, it isn't ideal. There is no garden for the kids to play and my hobbies are now limited to a small desk in the livingroom which is strictly supervised for tidiness by my wife and is often raided by my two boys. As you might understand, I'm really longing for my own space.
Because of this, we decided to sell the appartement and buy a new house. And even though it took us over one and a half year to sell it and find a new suitable house, we are now on the verge of the next step in our lives as grown ups: we bought a real house! With a garden ... and more importantly (for me at least), my own 15 m² office / makerspace!

Of course this is great news. But also a bit scary. Since the house is built back in 1935 and wasn't really modernised in the past 84 year, it requires a "bit" of work. But even though it's scary, it will definitely make up for some awesome projects I can blog about.
For now, this change means I have a lot of work doing all the paperwork, packing up our stuff and planning the big renovations (next to my regular day job). This does mean I currently don't have a lot of time for hobby projects to blog about. I will do my best to keep the MagicMirror² project maintained and post some Instagram pictures every now and then. But over here on my blog it might be a bit more quiet than usual.

Don't worry, it won't be a permanent goodbye. And I might even post some irregular updates. So make sure to check my blog every now and then. Or follow me on Twitter and Instagram to be alerted whenever I'm (temporary) back on track.
For now: Have a great summer and hope to see you soon!
TLDR; Life gets in the way. BRB.
Header image: courtesy of Allison Heine / Unsplash.
4 notes
·
View notes
Text
Solving a Hot and Sticky situation.
In the past few weeks, life got a little bit in the way of my maker-hobby. To make sure I got my monthly doses of tinkering, I decided to take on a quick and fun one hour project this weekend: solving a hot and sticky situation.
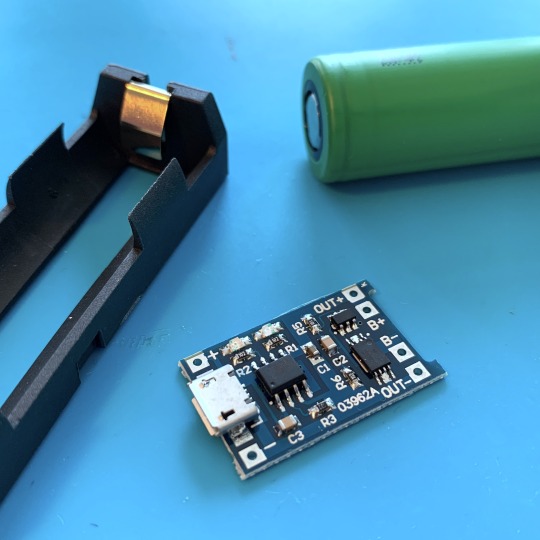
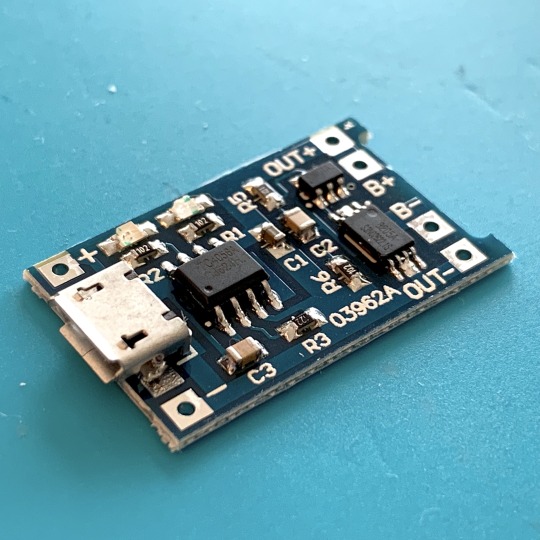
A few weeks ago I quickly fabricated a simple 18650 charger by soldering a TP4056 charging module to a Keystone battery holder. I used my hot glue gun to keep everything together.
Not my brightest moment: the TP4056 charger module gets VERY hot, resulting in melting glue. Ending up with a desk full of glue after the 18650 battery was charged. I facepalmed so hard, I forgot to take a picture of the hot and sticky situation.
3D-Printing to the rescue!
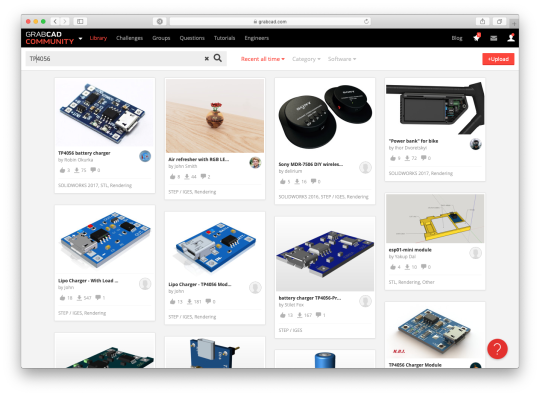
Owning the 3D printer, the only obvious solution is to print a mount for the 18650 Keystone holder and the TP4056 module. If you search Thingiverse, you'll find a lot of these mounts, but of course there is no fun in downloading a ready made model.
Let's design my own version!
To make things easy, I've downloaded a model of the Keystone holder as well as the TP4056 module from GrabCad.
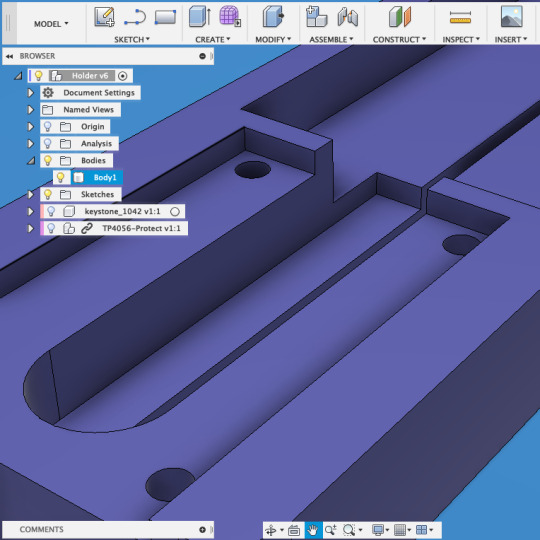
After importing the step files into Fusion 360, I place the models as desired, allowing me to design a holder around them.
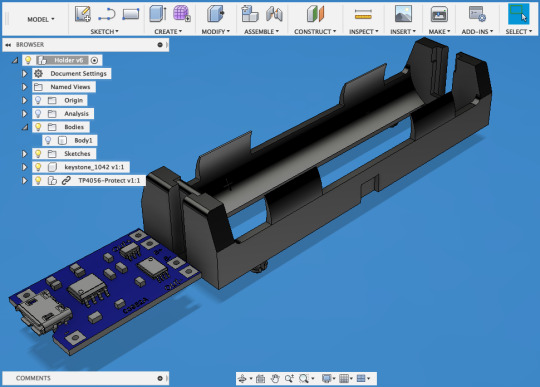
With a few sketches and extrusions, the holder begins to take shape.

After adding some mounting holes and and slot for the wires. The design is ready to be printed.
Aside from some minor slicing issues at one of the corners of the design, my Lulzbot Mini did a fine job of printing the design I just made.
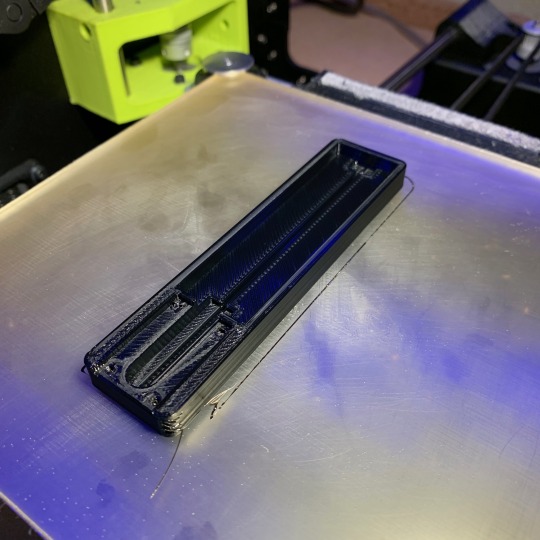
Time to put everything together!
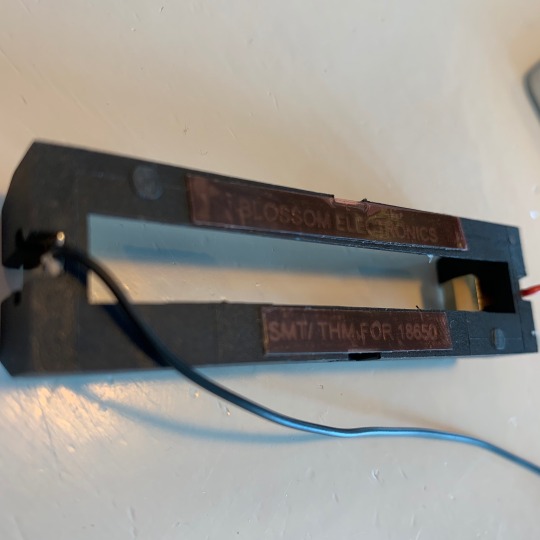
The Keystone holders I use don't have the little trough hole mounting pins, so I used a few pieces of double sided tape to keep the holder in place. I also soldered two wires to the connectors. And soldered those wires to the battery connection points of the TP4056 module.
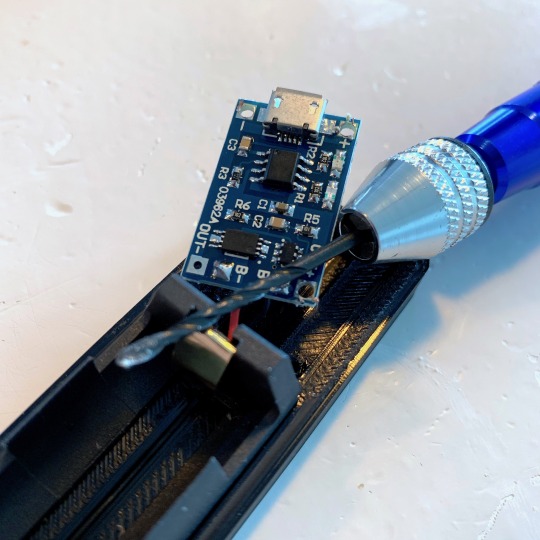
Because I wanted to use 4 screws to mount the TP4056 module, I needed to use a little drill to make the holes a bit wider. After drilling I cleaned up the burs. And more importantly: after screwing the module into place I checked for shorts using my multimeter because I used metal screws. Everything good to go!
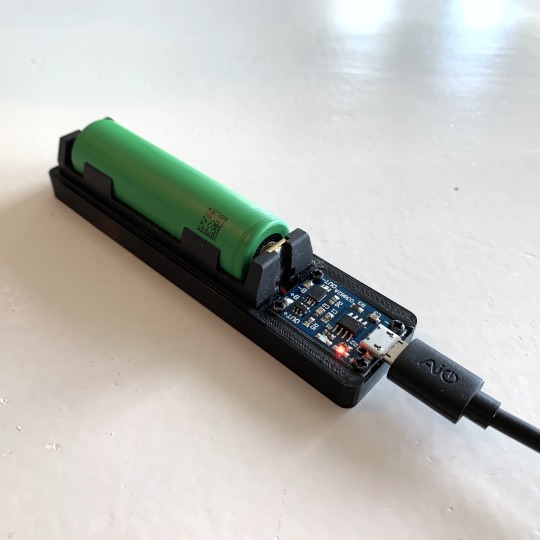
Time to start using this handy little fella!
If you want to print this mount yourself, check out the STL file on Thingiverse. Happy Printing!
4 notes
·
View notes
Text
MusiCubes - Part 6: Touch Me Four Times

It's been a few months since I've finished my MusiCubes Controller. And although most of the controller works perfect, there is one issue that is still bugging me: the false positives of the touch sensors. Time to fix this!
Originally I tried to solve this issue by taking some counter measures in the software:
Touches when no music was playing were ignored.
Touches shorter than 50ms were ignored.
And although this solved most of the false positives, it still wasn't perfect. Mainly the volume down button was triggered every once in a while, resulting in a mute state after a few hours of playing. Also the fact that I couldn't turn the volume all the way down before starting the music was a minor inconvenience as well. A modified touch system should solve this.

I originally added one plate of brass on each side of the the MusiCubes tray to handle the touches on the designated surface. The plates of brass were 40x30 mm, allowing me to touch the designates surface anywhere I wanted.
The Solution
The idea is to split up the touch surfaces in 4 sections each. Since I am using the MPR121 Proximity Capacitive Touch Sensor Controller which has 12 touch sensing inputs, connecting these four sections doesn't require any extra electronics.
Whenever the MPR121 reports a touch, I'll count the number of active touch surfaces. By setting a threshold of a minimum of 2 surfaces, false positives on one of the touch surfaces will be ignored.
Let's start cutting up the original brass plates!
I had used some hot glue to mount the brass plates to the MDF. A small screwdriver and a bit of force aloud me to pry of the glue and remove the plates. Removing the glue from the plates and cleaning them up was very a satisfying job.

Cutting the pieces of brass up into four sections was an easy job for my Dremel multitool, so soon enough I ended up with 8 small brass plates.

With an overdose of hot glue, I glued the four pieces back in place, making sure the four pieces didn't touch. The hot glue is a perfect isolator for this!

Next I connected four pieces on both sides to their respective MPR121 sensors. Note to self: next time solder the wires to the plates before glueing them in place, because the soldering heat melts the glue.
And with this modification done, it's time to modify the code.
To quickly count the number of active fields, I added a method to my TouchManager:
uint8_t TouchManager::activeFields(uint8_t sensorIndex) { uint16_t state = _sensors[sensorIndex].touched(); uint8_t count = 0; while (state) { count += state & 0x1; state >>= 1; } return count; }
If the number of active fields is above the threshold, I handle the touch like I did in the previous version. For the full modification of the code, check out this commit on GitHub.
The Big Discovery
To test if this works, I added some logging to report the false positives. Which brought me to my big discovery: the false positives of the sensors were completely gone! It turns out the false positives where caused by the fact that the original brass plates were to large. With four small plates, the MPR121 was much more reliable. As a matter of fact, I haven't had a single false positive in two weeks time! The issue was completely gone! Even though the touch surface is still as large. Awesome!
Because of this, I didn't need a threshold of 2 touched surfaces. In stead I can just respond to any touch detection. And because there aren't any false positives anymore, I can enable the tough controls even when there isn't any music playing.
Victory!
Turn Down The Heat
And with the touch changes, the hardware of the MusiCubes is almost perfect. Almost. Unfortunately there still was one minor issue. The system is powered with a Micro USB power supply, directly into the NodeMCU USB connection. This means that the Neopixels are powered over the same connection.
Unfortunately the USB power goes trough a diode on the NodeMCU board, to prevent any power going into the USB port. But this means the 1 amps that are necessary for the NeoPixels flow through that diode as well. It works, but the diode gets hot. Too hot.

To fix this, I added an external USB connector that directly feeds the 5V into the Neopixel power lines, as well as the the NodeMCU. The tiny diode no longer has to deal with the power hungry LEDs.

And with this change, all of the issues are solved!

The MusiCubes controller really turned out to be a perfect companion to my Sonos sound system. Starting and stopping the music is so simple that even my 3 year old son casually controls the music from time to time. It took a while to convince him to play something else then Disney's Moana music though ...

#musicubes#fix#touch#sensor#mpr121#microusb#power#diode#brass#metal#soldering#electronics#nodemcu#esp8266#sonos
3 notes
·
View notes
Text
Connecting an ESP8266 to AWS IoT

During my day job I make a lot of use of Amazon Web Services. And because of this, I recently attended the AWS Summit in Amsterdam. Of course, a day like that can't end without some tinkering ...

Although most of the talks I attended weren't particularly inspiring, one of the talks sparked my interest. They demonstrated AWS IoT: "IoT services for industrial, consumer, and commercial solutions". Of course I'm familiar with the technology. And I had played around with it before. But during the talk it started to annoy me that I had never managed to to connect an ESP8266 to their MQTT servers.
This needed to change. Now, the issue is that AWS IoT only works with secure connections using SSL. And even thought the ESP8266 is pretty powerful compared to an Arduino, it isn't really powerful enough to handle the TLS 1.2 encryption used by Amazon. In previous attempts, this was the reason I stopped trying. But this time I wouldn't give up.
If you Google this issue, you find *A LOT* of example on how to connect an ESP8266 to AWS IoT. But none of the examples seem to work for me. Luckily, after a few nights of banging my head against the wall, I found a workaround which worked for me.
It turns out, the WiFiClientSecure class (which is necessary to setup secure connections) is able to disable the validation of the key chain using the setInsecure() method. Of course this is a huge security risk, but since I will only use my ESP8266's to send some temperature and humidity data of my toilet visits, I don't think this is a major threat to the entire nation.
And with that in place I had a working example sketch.

Although I disable the ssl chain validation, I still need to send the SSL certificate and key to Amazon to authenticate our ESP8266. So I need to make these available to the ESP8266.
When creating the "Thing" using the AWS console, it will ask you to create a certificate as well and allows you to download the private key and certificate files.
A lot of the examples I found online made a huge deal of using the files, forcing me to convert the files I downloaded from Amazon before I could use them. The code I created simply reads the unmodified files from the ESP's file system (SPIFFS). Much easier!
Uploading these files to the ESP8266 isn't very difficult when you use Platform.io as your development environment. Simply put the certificate and the private key in the data folder of your project, and run the following terminal command: platformio run --target uploadfs. Platform.io will instantly create a SPIFFS image and upload it to your ESP8266.

After defining the correct filenames of your certificate and private key, the aws endpoint (which you can find in the AWS console) and the WiFi credentials in the sketch, all you need to do is to upload the sketch to the ESP8266. If all goes well, your ESP8266 will connect to Amazon, and starts publishing data to outTopic.

The AWS console allows you to test your MQTT data. Simply subscribe to the outTopic topic, and see your messages come in.
If you are having issues publishing messages to AWS IoT make sure your created Thing has a policy that allows you to publish. Since we are already ignoring all security rules anyway, let's just make things even worse by using the most permissive policy:
{ "Version": "2012-10-17", "Statement": [ { "Effect": "Allow", "Action": "iot:*", "Resource": "*" } ] }
Is it worth the hassle?
Well, that depends what you need. The upside is that the MQTT broker is fully managed by AWS and is unlikely to ever go down. Which saves you the hassle of managing a server or Raspberry Pi which runs Mosquitto. And as long as you aren't planning to connect your whole village, it is free as well.
Unfortunately AWS IoT has a few downsides:
There is no support for retained messages.
There is no support for QoS 2 messages.
If those two issues aren't a big deal for you and you can live with the risks of an insecure SSL connection, AWS IoT definitely is the way to go. If you do want to feel secure, just skip the hassle and use an ESP32.
Yeah yeah, whatever. Give me the code!
Interested in my code, and want to give it a try yourself? Download the Platform.io project on Github.
Have a great and connected weekend!
2 notes
·
View notes
Text
The Fire Proof Birthday Candle

This week we celebrated the first birthday of my youngest son, Luca. So it is time for him to blow out his first candle. Of course you can't trust a one-year-old to not set the house on fire when handling a candle, so of course we need to solve this with some electronics.
Obviously the only solution to this problem is building a sound responsive fake candle which Luca can blow out. We only need to throw together a MEMS microphone, an amplifier, a microcontroller and some fire-colored LEDs. Easy. Right?

The schematics are mostly based on Sprakfun's MEMS Microphone Breakout. I swapped out the ADMP401 microphone for the INMP504, since the ADMP401 is no longer available. The charasterictrics of the INMP504 are the same so I didn't need to adjust the schematics for this change.
The audio signal which is amplified by the OPA344 opamp goes into the ADC of the AtTiny85 microcontroller, allowing me to measure the volume of the sound. Blowing into the microphone generates a loud noise which will trigger the power-off function of the microcontroller and the LEDs.

With the help of KiCad 5.1 (Which, by the way, is an awesome update) I designed a PCB the size of a standard 40mm tea light. The small hole next to the LED's is the sound port for the MEMS microphone which is placed on the other side of the PCB.

The back side houses most of the parts together with a CR2032 battery holder.

After the tiny INMP504 MEMS microphone arrived I was somewhat intimidated by its small size. A great part to test my SMD soldering skills. Next to the INMP504 is the SOT23 OPA344 opamp which isn't a whole lot bigger. This is going to be fun!

After I finalized the design and check all (BUT ONE!) of the footprints, I ordered the PCB's at PCBWay. The quality is pretty good, although the silk screen is a bit offset. Not a big deal, but not perfect either.

After I painstakingly applied some solder paste by hand and placed all the tiny parts, the board was ready to dance on my hot plate.

The result (after a bit of touchup using my hot air soldering iron) looked pretty decent.

See that little botch wire at the button? Yeah, that button was the only footprint I didn't check ... sigh
Using some test code I checked if the LED's worked. By default running PWM on the ATTiny85 is only available on two PWM ports at the same time when you use the Arduino framework. But with the help of some sample code found on Technoblogy.com I quickly got all three LEDs up and running.
And now for the fun part! By reading the analog port and defining a volume-threshold on which the the LEDs should turn off, I'm able to "blow out the candle". I wasn't sure if this would work. Especially since I wasn't able to check the soldered connections of the tiny MEMS microphone. But lo and behold ... IT WORKED!

Initially I only turned off the LED's. But since the button on the top is bound to the reset port of the ATTiny85, I could put the microcontroller to sleep as well. Better yet, as you might have seen on the PCB, I've added some jumper pads. this allows me to change the power input of the microphone and opamp from VCC to the spare pin of the microcontroller. This allows me to cut off the power to the microphone and amplifier whenever the candle goes in power off mode.

The result! 0,5uA after I blow out the candle. This way Luca can easily reuse this candle and battery until his 30th birthday. Right?!

Of course, my 1 year old son will not be fooled by three little SMD LEDs, so I need to work on the packaging a bit. Some hot glue and a few blisters on my fingers is all I need to make a few convincing flames.

The best part of using hot glue for this, is that I only need a little bit of heat to fix it to the PCB.

With the help of my 3D-printer I made a few holders to finish it off. I think I made come damn convincing candles!

So, with all this hard work done, it was time to celebrate Luca's first birthday ... Time to show my awesome parenting skills to my wife, and make this a fire-safe party!

"Are you out of your mind? Real man play with real fire!" was her response. She didn't say those exact words. But her rolling eyes and loud sigh made it absolutely clear.
So there you have it. A big birthday cake with one 5 cent candle. A candle with real fire.
Oh well ... What matters is that Luca had a great birthday party!

Congratulations little fellow! Hopefully one day we will burn our fingers together. Not with the help of a candle. But with the help of your own soldering iron.
#luca#birthday#candle#attiny85#mems#microphone#inmp504#admp401#opamp#opa344#kicad#pcbway#electronics#soldering
4 notes
·
View notes
Text
The Ridiculous Kitchen Timer™

I'm a huge coffee addict. As for many of us, coffee is the core ingredient for my projects. And since I like quality coffee we own a manually operated espresso machine. If the grind is perfect, and you use the ideal brewing time, the coffee will be able to fuel any project. But how to measure the perfect brewing time? The Ridiculous Kitchen Timer™ to the rescue!
The perfect brewing time for an espresso shot is 24 ~ 27 seconds. For our machine and taste, it turns out 26 seconds is the sweet spot. Now of course we could use a stopwatch or an Ikea kitchen timer to measure that time. But where's the fun in that? Let's build our own solution!

With the help of KiCad I designed a PCB which accommodates 10 SK6805-2427 LEDs. These are the 2.4mm x 2.7mm version of the well know WS2812 (Neopixel) LEDs. To control these LEDs I use an ATTiny85 microcontroller.

After trowing in some capacitors and a simple button to start the timer, the PCB files were ready to be sent off to China.

4 days later 5 of these black beauties arrived in my mail. The delivery costs were approximately 6 times as high as the PCBs, but hey, perfect coffee is important!

After squirting on some solder paste and placing the 15 surface mount components it was ready so be soldered.

I don't own a reflow oven, but I do own a reflow hot plate, which should allow me to accomplish the same result: 15 components that stick to the board. And to be honest, trying out soldering on this hot plate was the real reason to make this PCB, so let's give it a try!

In my first test I heated the plate up to 180 degrees celsius and then place the PCB on the surface continuing to heat it up until 250 degrees celsius. It turned out the components didn't like the sudden 180 degrees from the bottom, so it took some fiddling with my tweezers to fix all the tombstoned components. In a second test I placed my PCB on the place from the start, but that vaporized most of the flux before it was halfway warming up. I need to find the sweet spot somewhere in between. For now, the boards I had soldered seem to look ok, so let's continue with the project ...

To power this Ridiculous Kitchen Timer™, I use an over-expensive 3.5 Amp 18650 LiPo Battery. So I soldered the PCB to a 18650 battery holder. Due to some fascinating miracle, both the battery holder as well as the PCB are the exact same size! They go together perfectly!

After flashing the PCB with some test firmware it seemed the board worked perfect so I assembled a second unit to make sure we can keep continue brewing coffee while I work on the next gen firmware.

Speaking of the firmware: after making a few slight adjustments to the demo code, the Ridiculous Kitchen Timer™ is ready to be used: the 10 leds slowly light up in blue to count down the 26 seconds and then turn red to inform me to stop brewing and start drinking my coffee.
youtube
So, to conclude: this really is the most Ridiculous Kitchen Timer™. And as a matter of fact, it's pretty flawed as well:
It contains a dangerous LiPo battery with no under voltage protection.
Although it's based on a rechargeable battery, it doesn't come with a charging feature.
The 26 seconds is non adjustable (without reflashing the firmware).
Is has no audible signals, like any other decent kitchen timer.
The LEDs are so bright your retina is damaged before you've finished your second coffee of the day.
With all the components (and shipping costs) combined, it probably is the most expensive kitchen timer ever produced.
It doesn't come with an app.
Never the less, it was a fun little project and from now on, our coffee tastes even better. And that's the only thing that matters.

Enjoy your coffee!
#kitchentimer#ridiculous#ridiculouskitchentimer#pcb#kicad#soldering#reflow#smd#ws2812#sk6805#electronics#attiny85
6 notes
·
View notes
Text
A Place To Sleep

It's been 10 months since my second son was born. And Since then, he has been sleeping in a crib in our master bed room. And as much as I love him, It was time for him to move out. Out of our bed room at least ... Time to built him a place to sleep.
We live in a 2 bedroom apartment. So moving our youngest son out of our bed room meant he had to move in to his brother's room. Unfortunately that room isn't big enough for two beds next to each other, so the only option was to use a bunk bed.
It turns out the big yellow and blue furniture store doesn't sell bunk beds for kids. A regular bunk bed would be unnecessary large and would not fit in the tiny room. So the only option was for me to show my wife why she married me. (I can not think of an other reason besides the fact that I like to build stuff.)

I fired up Fusion 360 and started drawing the bed I had in mind. The sizes were based on a 70x160 cm kids mattress and the fact that the baby bed my 3yo was still using should fit under it. Essentially they both would get an upgrade.

After rendering a nice image on what I had in mind I convinced my wife that it was a good idea to spent a some money on lumber and let me make a mess in the house for the following two weekends. Somehow she felt for that.

The upside of designing your ideas in CAD before you start building is that you can make a good estimation of the amount of lumber you need. And boy, was that more than I expected ...

I started with the two sides. To give me an estimation of the size I clamped them to the baby bed. Eventually the bed will be 40 centimeter longer, but for now It started to look like something.

Next I added all the main 4x4cm beams that will carry the weight. Now it really started to show what size it would be.

And then it was a matter of adding some scrap pieces of wood here and there. ;) Keep in mind I don't own a circular saw, so imagine the amount of blisters I had after sawing all these pieces.

The mattress base was the last part before the quality assurance team could start testing the bed.

The stairs were tested on strength and safety ...

And the baby bed was checked on cosiness. And after they both approved, I could start the fun part. Sarcastically speaking. After I spent a full day on sanding during an ice cold winters day (hence no photo’s), I moved the bed back inside the house to give it it's first layer of paint.

And as you can see by my big smile on the photo below, I really enjoy the second layer of paint as well.

So when that was done, there was only one appropriate way to finish off this project ...

An official opening ceremony to celebrate all the fun these little guys will have together in this room.
6 notes
·
View notes
Text
MusiCubes - Part 5: The Finishing Touch (END RESULT)

Starting a project isn't difficult. Finishing is. Or as they say: the last 20% is always the hardest part. But no worries, today we'll finish this project by working on the final details.
Read the full series of this project:
Part 1: Concept & Prototyping
Part 2: Assembling The Tray
Part 3: Touch Me!
Part 4: The Software
Part 5: The Finishing Touch
First off, lets give the MusiCubes tray a spray of paint! This MDF isn't too ugly, but a nice layer of white paint will blend it in to the rest of my furniture. Because it is MDF I sealed off the sides with some wood glue to prevent excessive absorption of the paint.

Next, I gave it a layer of primer ...

And before I put on the final layer of white spray paint, I gave it some light sanding. Of course I could pretend that after this whole paint process everything was perfect as I had it in mind, but unfortunately it took me a few days of sanding, painting and retrying to get the end result. Again: the last part of the project is never easy.

Now before I show you the end result, let's work on the cubes!

Using some design tools I designed the printouts that go into the 9 photo cubes. To make the MusiCubes more easy to use, I designed 9 cubes with each a different type of music:
Radio Staions
Male Artists
Female Artists
EDM
Playlists
Alternative Music
Moods
Special Occasions
Kids Music
All cubes have their own icon and color coding using a colored triangle in the bottom right of a cubes face. Filling up these 9 cubes was the most tedious part of the project.

To make the cubes easy to update without the need for a new RFID tag, I printed 9 black cubes that go inside the photo cubes, wrapped in the printouts. The added benefit to these cubes is that they add some weight to the cube, giving them a more high quality feel.
And there it is ... the end result!

The end result after the paint job and the 9 printouts is beyond my wildest expectation! I really Love the vibrant colors of the cubes against the clean white surface of the MusiCubes tray.

The pink LED glow whenever the music is playing makes it even cooler. But best of all ...

... are the magic touch surfaces that work surprisingly well!
And to give you a full impression on how well the end product works, check out the following video. Note that the laptop is only there to show you how quick the Sonos responds. (Watch the volume slider when I change the volume!)
youtube
Overall I think it really is a sexy looking project with a huge added benefit to my Sonos audio system. As a matter of fact, my 3 year old son can now start his own songs without my help. Although I'm not sure that's something I should be happy with. The wheels of the bus go round and round, round and round, round and round!
What I've learned ...
I really learned a lot from this project. I'm almost tempted to go for a new and improved version two. But for now let me state my learnings here. They might come handy if you decide to build one yourself.
Gluing multiple layers of MDF together is not a rush job. Take your time. Glue layer for layer and let those layers dry between two heavy flat surfaces.
Painting the tray isn't fun. At all. If you want to make it more easy to finish the project, do this at the start while you are still motivated. The paint can dray while you work on the electronics or software.
Experiment with multiple types and sizes of conductive surfaces for the capacitive touch sensors before you permanently glue them to your tray.
If you have the time, the knowledge and the funds: design a complete PCB in stead of using wires and perfboard. It would make the assembly much easier and would probably improve the reliability.
And last but not least: Think twice before you design a version with 9 cubes. Coming up with your 54 favorite artists, playlists or albums is much harder then you think. It also makes the MusiCubes tray pretty large.
And with that last one in mind: a version with just one cube would probably be just as effective: 5 of your favorite artists, playlists or albums and one stop-side. You can always swap it out for different cubes if you really need more artists, playlists or albums.
Who knows I might build one on the future. But for now, I'm going to focus on a complete different type of project. Keep an eye on my blog!
For now: Enjoy the music!

#musicubes#endresult#result#paint#spray#design#music#sonos#controller#rfid#capacitive#touch#ws2812b#neopixels#esp8266#diy#maker#project#opensource
2 notes
·
View notes
Text
MusiCubes - Part 4: The Software

Two weeks ago I finished up the electronics of the MusiCubes controller. So now it's time to discuss the software side of things. Buckle up, and get ready for the long ride!
Read the full series of this project:
Part 1: Concept & Prototyping
Part 2: Assembling The Tray
Part 3: Touch Me!
Part 4: The Software
Part 5: The Finishing Touch
Before we start, a little heads up: this post won't contain a whole lot of interesting photos of the project. As a matter of fact, the following photo is just here to satisfy the people who are here for the pictures. It has no significance whatsoever. It's not even a nice picture. But it does show the ESP8266 which will run most of the code discussed in this post.

The Architecture & Infrastructure
Ok, let's dive in. Heads first. The architecture & infrastructure of the system. Using the words architecture and infrastructure might be a bit extreme for something as simple as what we are building. But let's pretend we are building something huge. Using big words from time to time makes you feel important, right?
The first iteration.
Initially I used MQTT to let the MusiCubes' ESP8266 communicate with the world. I'm a big fan of MQTT because it's simple and fast. The MusiCubes controller publishes the unique identifier (of one of the sides) of the active cube to a MQTT topic. And using a simple node.js script running on a Raspberry Pi I subscribe to this topic and handle the messages. From now on, let's call this node.js script the MusiCubes Server.
The MusiCubes Server also contains a list of Cube UIDs. This list connects the UIDs to (Spotify) playlists:
const playlist = { '04:1e:3d:ba': 'favorite/538', '04:12:3d:ba': 'favorite/Koffee', '04:1a:3d:ba': 'favorite/Lekkere Nummertjes', '04:0e:3d:ba': 'spotify/now/spotify:user:defected.records:playlist:08M2kTqmlPNHygrNfrZJuQ', '04:16:3d:ba': 'favorite/Discover Weekly', '04:31:3c:ba': 'playlist/kinderliedjes', '04:25:3c:ba': 'favorite/BLUE MARLIN IBIZA RADIO', '04:22:3d:ba': 'favorite/Ibiza Global Radio', '04:29:3c:ba': 'spotify/now/spotify:user:21ifzjxggdajdpc4w6iqxslkq:playlist:4hfe8itOfwwijAHHOlI6pp', ... }
To control the Sonos One, I use the Node Sonos HTTP Api by Jishi. This application runs a small webserver which allows you to easily control your Sonos device.
To clarify the setup, lets make a little diagram which shows the full setup:

Now, this setup works fine, and allowed me to do a lot of debugging using additional MQTT topics to which I published debug data. But to be honest, for me it felt like a bit of overkill. Especially since my MQTT broker runs in the cloud. This means all the messages from the controller make a round trip via a server far far away, while the only thing I need, is a simple request to the MusiCubes Server.
Time to simplify the approach!
The second (and current) iteration.
Let's remove the need for an MQTT broker. I've removed all MQTT dependencies, and converted all the communication to simple HTTP request. In stead of subscribing to a few MQTT topics, the MusiCubes Server now runs a simple HTTP webserver.
This gives us the following setup:

After changing the setup to the above architecture, I noticed the MusiCubes was a lot more stable and faster. This is mainly based on the fact that the initial approach was based on a MQTT Broker which was a bit wonky. But it showed that a chain is as weak as its weakest link.
The third iteration.
Of course there is even more room to simplify things. The node.js scripts running on my Raspberry Pi are communication over HTTP, which is a bit unnecessary since I can just implement the Node HTTP Api into my MusiCubes Server. This would result in the following setup:

But since the current setup (the second iteration) works fine. I think I'll skip this step. Mainly because there is an even better approach. Which brings us to the next approach ...
The fourth iteration.
Sonos uses a pretty cumbersome SOAP API to control the Sonos devices. In the previous iterations, the Node Sonos HTTP API script did all this heavy lifting for us, but ideally we just want to connect to Sonos directly from the MusiCubes controller.
The good news is that Sonos announced a new API last year. The Sonos Control API. This API uses simple JSON HTTP request which is much easier to implement into the ESP8266 firmware. If this is implemented, we end up with the following beautiful simple setup:

Unfortunately there are a few drawbacks holding me back from doing this right now:
We need to configure all the Cube UIDs in the ESP8266 firmware which makes it a bit cumbersome to add new cubes UIDs.
The Sonos Control API uses the oAuth authentication flow. Since Sonos doesn't allow us to generate long lived authorization tokens, we need to implement the authorization flow in our firmware.
To use the oAuth authorization flow, the application needs to run on a https server. This is a bit tricky to do on the ESP8266. (Without the need of an external service.)
It's way more difficult to initiate playback based on Spotify URIs.
Of course, overcoming the above issues is a fun future project. But for now, let's work with the second iteration, and see how this works ...
The Firmware

Most of the coding went into the firmware of the MusiCubes controller. It has to control the following elements:
Setup a WiFi connection with my network.
Read the RFID tags to see which cube is currently active.
Check the Touch sensors to handle touch controls.
Control the WS2812 RGB LEDs for visual feedback.
Communicate interaction with the MusiCubes Server over http.
Allow for Over The Air updates to make the development of the controller easier.
To do so, and keep thing simple, I chopped up the firmware in multiple classes:
WifiManager
For this, I used the awesome WifiManager by Tzapu. This allows you to establish a WiFi connection using a web captive portal. This means you don't need to to hard code any WiFi credentials, which makes it a bit safer and easier to reconfigure if nessecery.
RFIDReader.h
This class reads the MFRC522 RFID reader every 100 milliseconds. Whenever the RFID tag changes or whenever it's removed this class will fire a callback configured in the main routine.
TouchManager.h
The TouchManager reads the state of the two capacitive touch sensors we integrated in the last blog post. The TouchManager also does some duration checking to prevent false positives and distinguish between short and long touches.
Whenever a touch is detected this class will fire a callback configured in the main routine.
LedController.h
The LedController allows us to control the lighting of the MusiCubes controller using the underlying FastLED library. The LED effect are currently pretty simple, but we can always extend this class for more fancy effects.
HTTPManager.h
To simplify the communication with the MusiCubes server, I've packed the API into a HTTPManager class. This allows us to fire simple commands like: httpManager.changeVolume(Up);
ArduinoOTA
Using the default ArduinoOTA class, I've enabled Over the Air updates. By simply specifying the IP of the MusiCubes controller in the platform.ini file, Platform.io allows me to update the firmware of the controller over the air as if it was connected using USB.
Of course I need to implement some authentication in the OtA update feature. But for now I'd like to live on the edge. Lets say the S in IoT stands for Security.
main.cpp
The main.cpp script ties everything together by setting the callbacks and calling the handle() method on all of the above classes during the loop() function.
The Server
The MusiCubes server is simple enough to keep everything (except the MusiCubes playlist) in one file. It doesn't do much more than waiting for some some HTTP request and calling the Node HTTP Sonos API.
There is one piece of fancy code though, and that is to allow the server to cancel request to the Node HTTP Sonos API. If a request takes a bit longer to handle, and the user changes the cube before the request is finished, we want to cancel the request before we fire a new request.
The underlying HTTP library I use (Axios) does this by using a CancelToken. It feels a bit cumbersome, but works perfect.
And with that being said, I think I've covered most of the code. If you like to dive into the code, check out the full repository on GitHub: https://github.com/MichMich/MusiCubes
If you have any suggestions for improvements, make sure to leave a comment down below.
Next blog post I'll work on the final touches to wrap up the project.

0 notes
Text
MusiCubes - Part 3: Touch Me!

Now that the MusiCubes tray is assembled and the RFID-sensor and LEDs are working as expected, It's time to add the last feature of the original concept: invisible capacitive touch sensors to control the volume of the music.
Read the full series of this project:
Part 1: Concept & Prototyping
Part 2: Assembling The Tray
Part 3: Touch Me!
Part 4: The Software
Part 5: The Finishing Touch
In my last blog post about the MusiCubes project I already showed that I experimented with a capacitive touch sensor behind 3mm MDF. And since that gave promising results, It's time to incorporate the sensors into the MusiCubes tray.

The sensor that I'll be using is the MPR121. A multichannel proximity capacitive touch sensor. It's a 3-in-1 module with the following features: Capacitance Sensing, Touch Sensing, and Proximity Sensing. Since it uses I2C it's pretty easy to connect to the ESP8266. And the breakout board on which I ordered them makes connecting them a breeze.

Because I want to make the two fairly large empty planes next to the play-bay touch sensitive, I need some sort of metal touch planes below the 3mm MDF to function as electrodes. I my case I just stole some pieces of brass my dad was using to built his NS 5500 model train. Not sure if he needs those pieces, but if that is the case, the model train will now need to be a cabriolet.

I glued the pieces of brass in place using an overdose of hot glue, and soldered a piece of wire to it.

The two plates where then connected to the MPR121 breakout board which is connected to the ESP8266 using a JST connector which allows me to easily disconnect or rewire it.

The first tests with the integrated touch sensor were very promising. But soon I noticed a lot of false positives on one of the two sensors. And since these sensors are controlling the volume of my Sonos system, false positives are very annoying. In this case the music was muted within a few minutes of idling.
It turns out that the long green wires to the brass plates pick up too much interference. Especially the wire that goes under the connection to the RFID reader. This interference generates most of the false positives.

The MPR121 gives you a lot of room to tweak the sensitivity of the sensors, but of course it's best to prevent as much interference as possible. And since the sensors are pretty cheap, connected via I2C and offer the option to change the I2C address, I opted for an extra MPR121 IC close to the brass plate. This eliminated a lot of false positives.

Unfortunately this didn't solve all the issues. So I've been playing with all the possible registers the are described in the documentation of the MP121. And while I did notice some improvement, I didn't manage to completely prevent all false positives. Because of this I added some code that checks the length of the registered touch. Anything shorter than 50ms is ignored. And since 99% of the false positives are around 17ms, this solves most of the issues. In addition to this, I added a few other countermeasures to prevent unwanted volume changes.
But let's save the software discussion for next blog. For now, let's enjoy this cool demo of me controlling the volume of my Sonos system using the two invisible capacitive touch sensors.
youtube
In the next blog we'll dive in the code and the software architecture of the project.
0 notes
Video
instagram
It’s almost new year, so time to wish you a happy 2019! If you don’t have any fireworks, and want to go out with a boom, hook up a capacitor to your power supply with reversed polarity.
2 notes
·
View notes
Video
instagram
I had A LOT of issues with over-adhesion of the XT CoPolyester. It became so problematic that it damaged the PEI surface of my Lulzbot Mini. I already had a new PEI surface ready, but as an experiment I printed directly on the glass surface...
2 notes
·
View notes
Text
MusiCubes - Part 2: Assembling The Tray

After last week's proof of concept it is time to assemble the MusiCubes tray. Just slap on some wood glue and you're ready to go! What could go wrong, right?
Read the full series of this project:
Part 1: Concept & Prototyping
Part 2: Assembling The Tray
Part 3: Touch Me!
Part 4: The Software
Part 5: The Finishing Touch
I ended last week's blog post with showing off the laser cut layers that make up the MusiCubes tray. These were ordered online and to keep things withing budget, I didn't order any spares.

And although I promised myself that I would carefully glue together these layer, my enthusiasm and curiosity got the best of me ... Just a few minutes after I opened the package of Snijlab.nl I started squirting wood glue like there was no tomorrow.

Of course these layers should be glued together two at a time, and pressed together on a flat surface while drying to prevent warping.

Of course, I got impatient and decided to glue all the layers at once.

More than enough clamps to keep everything the way I wanted ... right? Wrong! After drying, the tray was completely warped and the layers were terribly misaligned. I was so frustrated that I forgot to take a picture of the result.
Luckily my dad has more experience with woodworking (as well as with making embarrassing mistakes), so with some of his tips and suggestions, I could try to fix it.

First I sprayed the tray with hot water giving it a good soak. Next, I put it between two completely flat side tables and added a heavy barstool as additional weight. I left it like this over night, so the MDF layers could dry.
The next morning I had two successes:
The tray recovered almost perfectly. It's still a tiny bit warped, but my guess is that nobody will notice it as long as you don't tell anybody.
And more important: my wife didn't ask any questions on why I built an unstable tower of doom in our living room just before we went to bed. I'm finally convinced I married the right person.
The left over misaligned layers could be easily fixed by my disc sander.

Not only did the disc sander smooth out any misalignment, it also removed the burn marks caused by the laser cutter, making the spray paint in the future a bit easier.

Next I mounted the RFID reader and the ESP8266 microcontroller with the help of my hot glue gun.
Now we reached an important step in the process: I handed the MusicCubes over to Quality Assurance for a thorough inspection.

After confirming the RFID reader worked, I added four strips of WS2812 LEDs also known as Neopixels. To make sure I could see the light from below the tray, I also added some standoffs on the bottom of the tray.

And after soldering the four strips together with a few wires, and hooking it up to the ESP8266, it was time to give it a test.

This certainly looks promising! I do need to add a big capacitor to prevent power issues when the LEDs turn on. But other than that, they look beautiful!

Just before I wanted to write this update, I received the MPR121 breakout boards which will help me with the proximity capacitive touch sensors to control the volume of the music.

I didn't have time yet to incorporate it into the MusiCubes tray, but a quick test on a bread board does look promising. With a piece of aluminum foil as the sensor, the MPR121 is able to sense the touches trough the 3mm thick MDF.
Let's work on that part of the project in the upcoming blog post.
3 notes
·
View notes
Text
MusiCubes - Part 1: Concept & Prototyping

Most of my projects start behind my desk, Tinkering. But every now and then, new ideas come to mind while I'm not geeking. Just as with my MagicMirror, those projects and ideas are usually the best. Today I start a new project which, just as with my MagicMirror, popped in my mind far away from my soldering iron and computer: A digital music controller in an analog form factor.
Read the full series of this project:
Part 1: Concept & Prototyping
Part 2: Assembling The Tray
Part 3: Touch Me!
Part 4: The Software
Part 5: The Finishing Touch
The last few weeks, I haven't been spending a lot of time behind my desk or laptop, due to some back problems. I spent a lot of time wandering through my house doing every day tasks that didn't need any desk work. Because of this, I didn't have my Sonos Music controls at hand, and while Alexa occasionally offered me a good way to switch music without reaching for my computer or phone, the options to quickly start a different playlist was limited.
It turned out I somehow missed the old fasioned way to put on a record or CD. This gave me the idea to build a digital music controller in an analog form factor: The MusiCubes!

The first thing that came to mind was the RC522 RFID reader that I ordered over a year ago. After plugging it on to a breadboard to confirm I could use an ESP8266 to read out the RFID Unique Identifiers, I knew I was on the right track.

My initial idea was to add RFID tags to the original CD jewel cases. But after playing around in Fusion 360, I came up with a different concept which was a little more abstract. If I use cubes in stead of the jewel cases, it would allow me to have 6 RFID tags per cube. With a set of 9 cubes, this would allow me to play 54 playlists, streams, or artists. It also gives a more futuristic look and feel to the design, which is still an analog interface.

Fusion's render function really shows what I want: 9 acrylic cubes on a high-gloss white tray. The tray will 'float' in the air. LED illumination from below is used to confirm user interaction. One separate recess will contain the RFID reader and function as the play-bay. The empty planes next to the play-bay will get capacitive touch sensors to control the volume of my Sonos system.

Of course, the cubes won't be fully transparent. To show which cube plays what, I'll be using 50x50mm photo cubes. This allows me to print inlays showing album covers, icons, artist photos or station logo's. Finding these photo cubes took me a while, so if you are looking for them, check out this link.

I initially wanted to use the RFID tags extracted from the key chain tags. But since extracting these is a pretty tedious process with a high risk of damaging the RFID tags, I checked AliExpress to see if there was a better solution.

And luckily it turned out there is! For around 10 cents a piece you can buy RFID stickers. This makes the process way easier, and not unimportant: way cheaper.
There was one issue that I needed to check: since the 6 tags are contained within the 50x50mm cube, I was worried the RFID reader would pick up more than one tag a time. To make sure it would only pick up the bottom one, I built a small demo. And since I was coding anyway, I decided to hook it up to my Sonos to give me an impression of the result.
youtube
Awesome! This works perfectly. Time to start working on the real deal. Unfortunately I don't own a laser cutter (yet). But luckily the good folks of Snijlab.nl run a perfect service to quickly order the parts I need.

So only a few days later I received this exciting package ... the first parts of the MusiCubes controller!

These are the 5 layers that together will form the MusiCubes base tray. Next step: gluing them together and adding the electronics.
Make sure to keep an eye on my blog to follow the next steps of this projects, or follow me on Twitter and Instagram to be notified of the updates.
See you in two weeks! Read the part 2.
3 notes
·
View notes
Text
What are you looking at?

2 weeks ago I strained my back while doing the heavy duty task of putting my 7 month old son to bed. As a lot of us desk nerds, my core muscles are non existent, so this was a matter of time for it to happen. Unfortunately it means I currently can't spent any time behind my desk. Luckily there are other ways of fulfilling my maker needs.
As much as I love YouTube for some good old dashcam compilations, I think YouTube is especially great to give the die-hard makers an audience to show off their work and contraptions. Since I'm currently unable to work on my own project, I figured it might be fun to share my favourite YouTube channels with you.
So without further ado, here is the list of channels that keep me sane while I munch away my morphine pills.
This Old Tony
youtube
Not only does This Old Tony know almost everything about metal working, his video skills are great too. I can't decide if I love his channel because of his ridiculous high quality metal work, or his hilarious way of story telling. Either way, This Old Tony always leaves me in awe. A 25 minute video feels like a 3 minute short form clip, fuelling the desire for the next episode.
The video above is the video by which I discovered his channel. It's a 2 year old video and since then, his video's got even better.
Check out This Old Tony's channel here.
Wintergatan
youtube
You probably know the video above. If not, you are one of the few since this video has been watched over 87 million times on YouTube. Not only is Martin a GREAT musician. He is also a great engeneer working on the Marble Machine X which he wants to take on a world tour.
The combination of beautiful engeneering and delightful self composed music makes his videos really stand out.
Check out Wintergatan's channel here.
Tom Stanton
youtube
Tom is a graduated Aerospace engineer with a huge interest in all aspects of engineering. His video's are filled with smart engineering, but also with understandable and interesting explanations of the theory behind the experiments.
If you are into RC planes this channel is for you. But his E-bike videos are just as (if not more) awesome.
Check out Tom Stanton's channel here.
Project Air
youtube
Project Air is a relative small channel by James Whomsley I found trough a collaboration video with Tom Stanton. Project Air is about everything that can fly. But truth to be told: the cinematic quality of the Project Air video's is so ridiculously high, James could probably make a video about his turds worthwhile.
The beautiful english accent of James are the icing on the cake. This channel has the potential to become one of the most successful RC channels on YouTube.
Check out Project Air's channel here.
Strange Parts
youtube
With over 16 million views on his first video Scotty Allen really put his channel on the map. If you are into electronics, this channel will show you the magical wonders of the place it all starts: Shenzhen, China.
Scotty likes to take a technical challenges and take us on his journey while going through the markets of Shenzen.
Check out Strange Parts's channel here.
From here on, I’m unable to embed the video’s. Nice work Tumblr, allowing me to only embed 5 videos ... *sigh* ... Just click the video thumbnail to open the video.
Frank Howarth

If you are into wood working, Frank's channel is what you are looking for. His fun way of filming (including stop motion) and his soothing voice will keep you glued to the screen.
I never expected I would be so fascinated by bowl turning ...
Check out Frank Howarth's channel here.
Ivan Miranda

I think Ivan is the world's biggest consumer of red 3D-printing filament. Luckily he uses it for hilarious fun projects that a lot of time completely fail but are extremely fun to watch.
Ivan is a pro in not taking himself too serious, which makes his video's even better. Every video I'm looking forward to the music and parts montage. But for the love of god, Ivan ... for once, try not to forget putting on the timing belts when you assemble your next 3D printed tank!
Check out Ivan Miranda's channel here.
Jeremy Smith

Jeremy is a born engineer who builts a lot of his own tools. His self designed and built belt grinder is a piece of art.
I've learned a lot about engineering by just watching a few of his video's. Of which the most important one is: "If you can't make it perfect, at least make it adjustable!". You'll hear this sentence being used by a lot of other makers. Well, Jeremy is the source of this wisdom.
Check out Jeremy Smith's channel here.
Matthias Wandel

If you are a maker, if you like engineering and if you're interested in woodworking, Matthias must be one of your idols. A lot of YouTube channels are inspired by Matthias's channel.
Matthias invents his own tool and toys and shows that almost anything can be built using some lumber and a band saw.
Unfortunately Matthias is currently unable to work on any big project due to health issues, but his endless catalog of video's will keep you busy for a while.
Check out Matthias Wandel's channel here.
Colin Furze

Colin Furze ... not sure how to introduce this legend. His contraptions are so ridiculous and awesome that I completely forget how genius his engineering work is. His contraptions are straight from a 8 years old boy's mad dream and are the perfect ingredient for the next Marvel block buster.
The perfect combination of engineering and entertainment.
Check out Colin Furze's channel here.
So, what are you favourite maker channels? Any channels that absolutely should be added to the list above? Let me know in the comments down below.
I hope my back will be okay soon, because I got a lot of nice ideas for future projects. Till then, enjoy YouTube! :)
6 notes
·
View notes
Text
Fixing Annoyances
When I bought my 3D printer a little over 3 years ago, I convinced my wife that it wasn't just yet another useless gadget. I told her it was a tool which would help me solve problems I didn't know I had. This week, I solved one of those problems using Fusion 360 and a few meters of white filament.
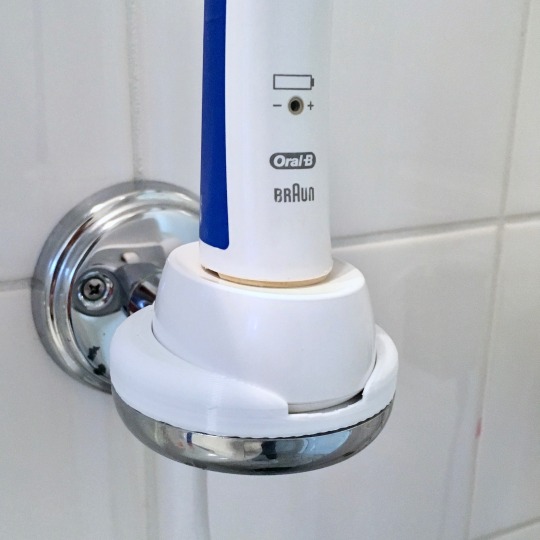
In our bathroom we have a soap dish mounted to the wall. Since soap bars are pretty "previous generation", we never use it for soap. In stead, it's the spot where we charge our electric tooth brush. But since the soap dish doesn't have a flat surface, the toothbrush has the tendency to drop on the floor every 42 minutes. Time to fix that!
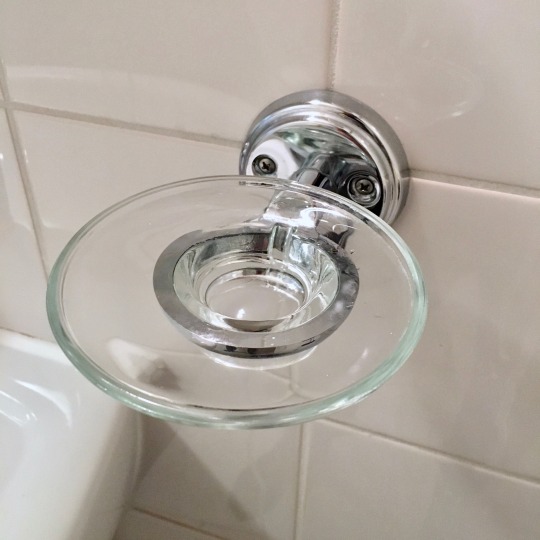
The soap dish exists of two pieces: the glass dish, and a chrome look wall mount. Let's take out the glass dish ...
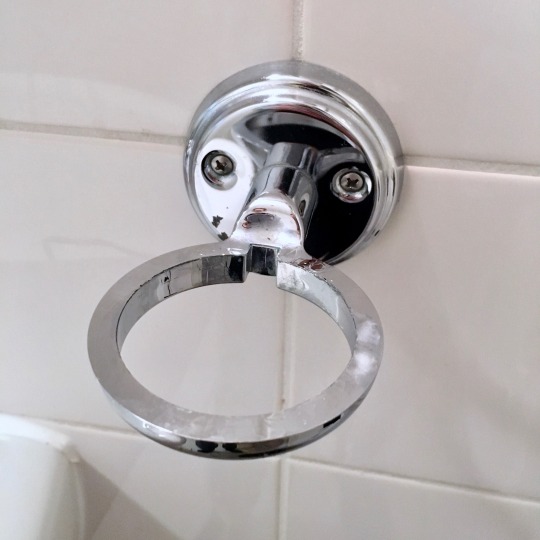
Now we end up with just the chrome holder, which can be put to good use in the 3d printing project. After some necessary cleaning ... :-/
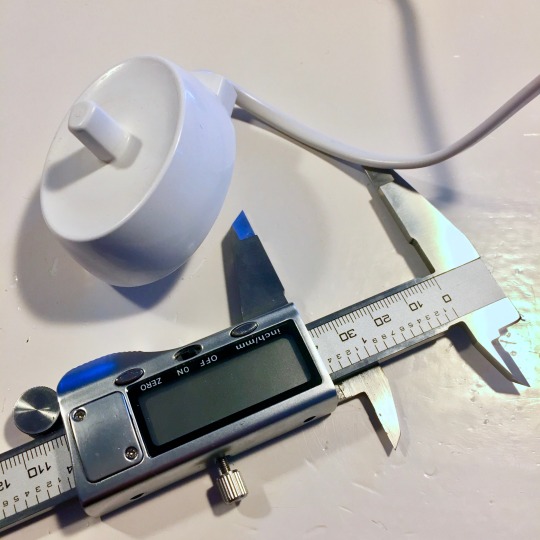
With my calipers I took a few measurements of both the chrome wall mount, as well as the tooth brush charger.
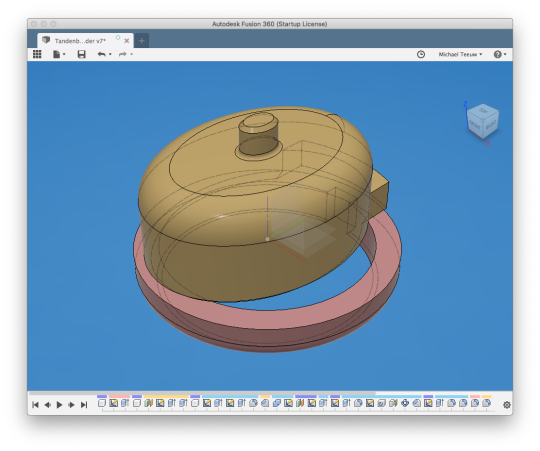
With those measurements I was able to make a 3D drawing in Fusion 360. And match them together the way they should end up.
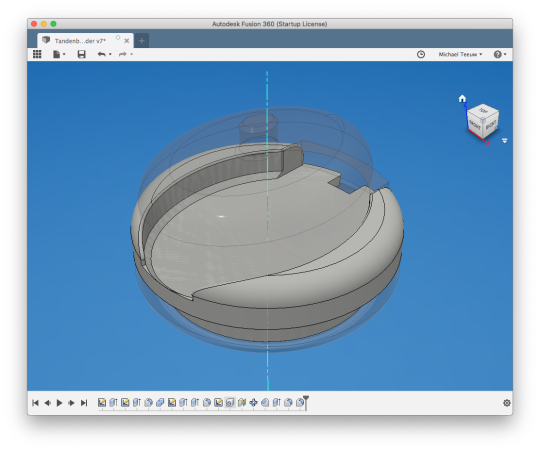
This allows me to design the intermediate piece which will keep the two parts together. The notch in the back allows me to wire the power cable trough the hole of the wall mount, and keep everything tightly in place.
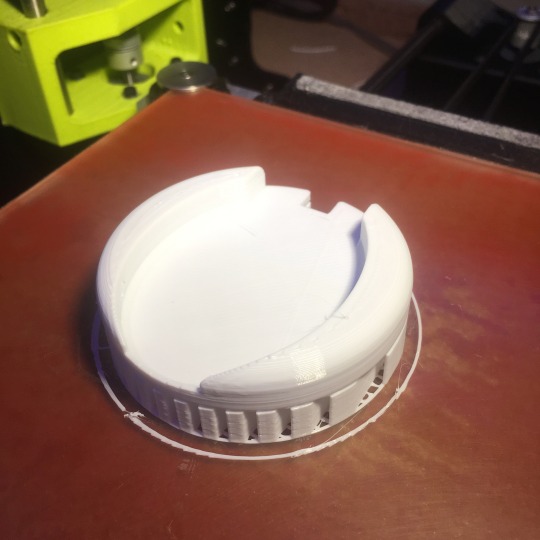
After one and a half our of printing, I once again surprised myself with the absolutely fascinating wonders of 3D printing. Seeing your own design come to life is extremely satisfying.
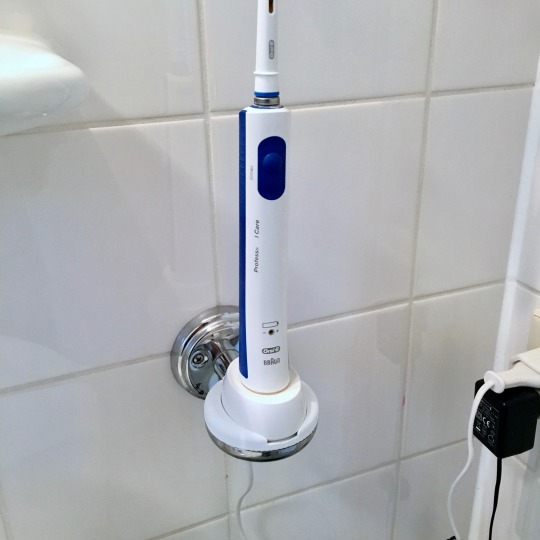
The 3D printed mount fits tightly in the chrome wall mount, and the toothbrush charger snaps into place. The charging toothbrush has no place to go and the bathroom looks a lot cleaner. If this doesn't impress the lady, I don't know what does ...
By the way, it turns out the bathroom is the perfect place for functional 3D prints:
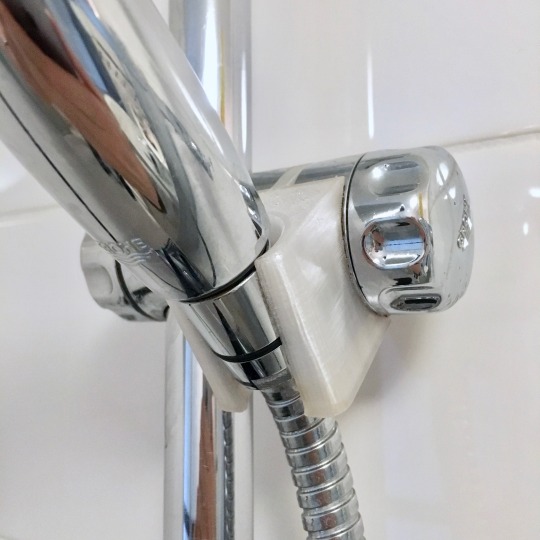
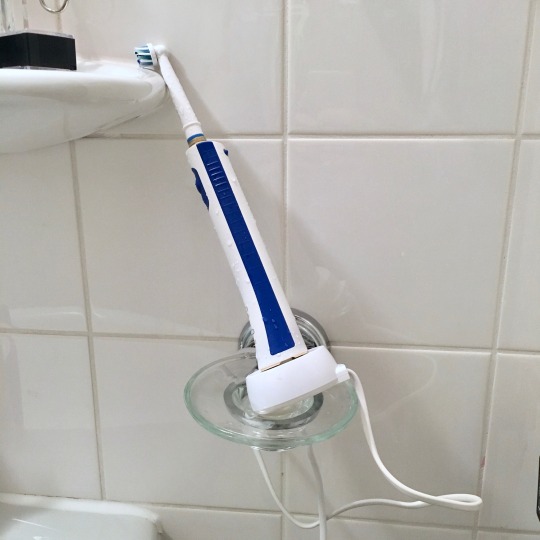
The 'temporary' shower head mount i designed and printed over 2 years ago is still holding up perfectly ...
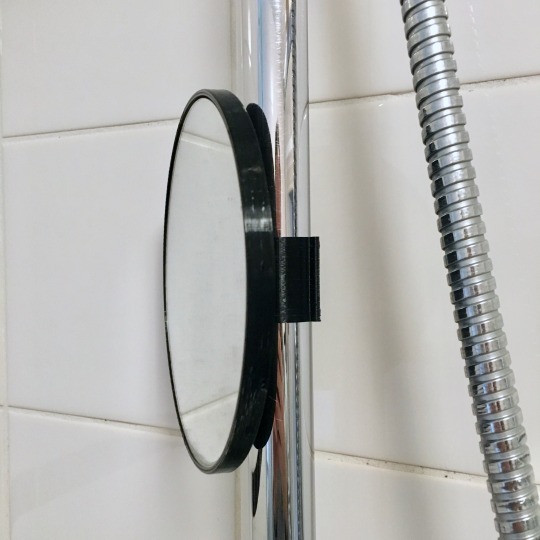
And the shaving mirror frame which snaps onto the shower rail is by far the most convenient saving mirror I ever owned. I designed this one after I dropped my old one for the 10th time, which broke the frame and left me with the mirror I used in this 3D printed frame.
Now, what shall we 3D-print-fix next?
9 notes
·
View notes