#exposuretriangle
Explore tagged Tumblr posts
Visit Tumblr Blog
Explore Tumblr blogs with no restrictions, modern design and the best experience.
Last Seen Tumblr Blogs


Fun Fact
Tumblr has been providing a Korean-language service since 2013.
Text
What is ISO in Photography? | A Comprehensive Guide

ISO in photography is a measure of how sensitive your camera is to light. It is one of the three pillars of the exposure triangle, along with aperture and shutter speed. When you adjust your ISO setting, you are essentially telling your camera how much to amplify the incoming light. A higher ISO setting will make your camera more sensitive to light, allowing you to take photos in darker conditions. However, it will also introduce more noise into your images.
Noise is a grainy or speckled appearance that can occur in photos taken at high ISO settings. It is caused by the amplification of the incoming light signal. The higher the ISO setting, the more noise will be introduced into the image. When to use a high ISO A high ISO setting can be useful for taking photos in low-light conditions, such as indoors or at night. It can also be used to freeze motion, as it allows you to use a faster shutter speed.

However, it is important to be aware of the trade-off between ISO and image quality. The higher the ISO setting, the more noise will be introduced into the image. Therefore, it is important to find the lowest ISO setting that you can use for a given situation. How to minimize noise There are a few things you can do to minimize noise in your photos: - Use the lowest ISO setting possible. - Use a tripod to keep your camera steady. - Shoot in RAW format so that you can reduce noise in post-processing. - Use noise reduction software. Tips for using ISO Here are a few tips for using ISO in your photography: - Start with the lowest ISO setting possible and increase it as needed. - Be aware of the trade-off between ISO and image quality. - Use a tripod to keep your camera steady when shooting in low-light conditions. - Shoot in RAW format so that you can reduce noise in post-processing. - Use noise reduction software to reduce noise in your images. Examples of ISO in photography Here are a few examples of how ISO can be used in photography:

- Low ISO: Low ISO settings are typically used for shooting in bright conditions, such as outdoors on a sunny day. This will help to reduce noise in your images. - Medium ISO: Medium ISO settings are a good all-around option for shooting in a variety of conditions. They can be used for shooting both indoors and outdoors, and they will provide a good balance between image quality and noise reduction. - High ISO: High ISO settings are typically used for shooting in low-light conditions, such as indoors or at night. They will allow you to take photos in dark conditions, but they will also introduce more noise into your images. Conclusion ISO is a powerful tool that can help you to take photos in low light conditions and freeze motion. However, it is important to be aware of the trade-off between ISO and image quality. The higher the ISO setting, the more noise will be introduced into the image. Therefore, it is important to use the lowest ISO setting possible and to minimize noise in post-processing. Read the full article
#aperture#camerasettings#exposuretriangle#highISO#howtochooseISOsetting#howtouseISO#ISOforbeginners#ISOforeventphotography#ISOforhighspeedphotography#ISOforlandscapephotography#ISOforlowlightphotography#ISOforportraitphotography#ISOforsportsphotography#ISOforstreetphotography#ISOforwildlifephotography#ISOinphotography#ISOsetting#lowISO#lowlight#noise#photographybasics#photographytips#photographytutorial#shutterspeed
0 notes
Text
The exposure triangle in photography refers to the three fundamental settings that control the exposure of an image: aperture, shutter speed, and ISO. Aperture (measured in f-stops) controls the size of the lens opening, affecting the amount of light entering the camera and the depth of field. Shutter speed determines the length of time the camera's sensor is exposed to light, influencing motion blur and sharpness. ISO measures the sensor's sensitivity to light, with higher values increasing sensitivity but also adding noise. Balancing these three elements is essential to achieving the desired exposure and creative effect in a photograph.
Visit our website: www.ftihedu.com Enroll Now at FTIH Film School: +918121152777
Photography #ExposureTriangle #Aperture #ShutterSpeed #ISO #PhotographyBasics #CameraSettings #PhotoTips#LearnPhotography #PhotographyTutorial #PhotographySkills #PhotoExposure#CreativePhotography #DepthOfField
MotionBlur #Photography101 #PhotoTechnique #CameraExposure #PhotoEducation
0 notes
Text
Exposure Triangle
The exposure triangle consists of Aperture, Shutter Speed and ISO. They work together to give the ideal exposure for a photographers work

The shutter speed is measured in seconds and determines for how long the shutter will remain open to allow light to reach the image sensor
The Aperture is measured in f-stop numbers and determines how much light is allowed into the camera to reach the image sensor, the smaller the f-stop number the more light is allowed in, the larger the f-stop number the smaller the hole and therefore less light is allowed in. This also sets depth of field, the smaller the number and more light the shallower the depth of field, the larger the number and less light the more sharp the whole image becomes.
The ISO determines the light sensitivity of the sensor, the higher the number the mores sensitive the sensor is to light making the image brighter but also the image will have more grain / noise. With a smaller ISO number the opposite is true, less light, less noise / grain
4 notes
·
View notes
Text
My black on black and white on white
Today I have learned about exposure composition and 18% grey. Our cameras naturally produce images which seem grey with white and black objects and therfore we increase our exposure composition from 0 to +2 for white objects to produce the accurate exposure and from 0 to -2 to create the correct exposure for black objects.
In addition 18% grey comes as a exposure triangle where ISO, SHUTTER SPEED AND APERATURE play a role in achieving the correct exposure for our image.


3 notes
·
View notes
Text
Values: 1/8, ISO 1600, F20 = Values: 1/200, ISO 1600, F10
FIRST BLOG
The Exposure Triangle is the visual representation of the relationship between three main components of the Exposure: ISO, Shutter Speed, and Aperture. Every type of camera has this factors. In photography they use the exposure triangle as a method of associating the three main components of a camera. At first the picture format was all white because the White Balance was high and we didn’t know how to put it down, the teacher helped us. Then it was too dark so it was a bit hard to put the camera in the right format.
We kept having issues such as the picture was to blurry because of the shutter speed and it was tricky to put it in a good speed. Then it was having many grains because at first we didn’t know how to put the format or take a good angle. The exposure triangle is very meaningful in the photograph world. The person has to adjust every component of the triangle to get the a perfect picture or it just won’t work. Is best if you learn about every single element before you take a picture.
The picture that I selected is the best because it has an good angle, perfect exposure if you ask me, no blur, no grain. In all ways the picture is good and I like it also. The activity was interesting.
1 note
·
View note
Photo


Aperture
The final part of the exposure triangle is Aperture. The aperture controls the amount of light coming into the camera and what it is focusing on. If you have a wide aperture (f1.8 - 5.6), the object you are capturing will be sharp and the surrounding area will be out of focus. If you have a narrow aperture (f8 - f22) then the full frame will be in focus.
Image one - f1.8, 1/125sec, ISO 100
As you can see in the first image, I have used a wide aperture, focusing on the leaves in the foreground. This creates a nice effect with the background out of focus, which keeps your attention on the textures and detail in the green leaves.
Image two - f11, 1/80sec, ISO 800
The second image has been captured using a narrow aperture, which has the full photograph in focus. Although you can still see the detail and textures in the leaves in the foreground, you are distracted by the background.
The aperture you use can have a huge impact on your image, but it all depends in what your photographing.
1 note
·
View note
Text


EXPOSURE TRIANGLE!
SHUTTER SPEED:
These two images showing above are examples of a fast and slow shutter speed, this is where the shutter either capture the motion blur when it slow shutter speed but when it fast shutter speed is where it capture the object and freeze the moment.
IMAGE ONE:
For image one my shutter speed was set at a fast shutter speed so that I was able to freeze the moment, so that I was able to capture the object while it was in the movement. The shutter speed my camera was set at for this image was 1/1600s of a section.
IMAGE TWO:
For image two my shutter speed was set at the slowest so that I was able to capture the motion blur within the image. This meant my shutter speed had to be really slow. The shutter speed my camera was set at for this image was 1/200s of a second.
1 note
·
View note
Photo


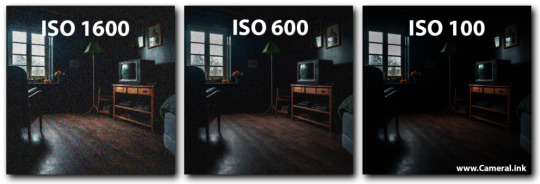
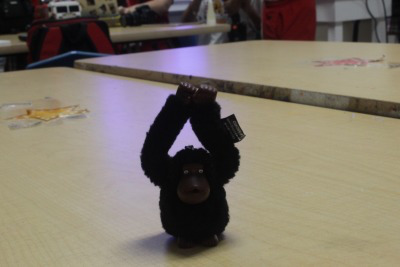
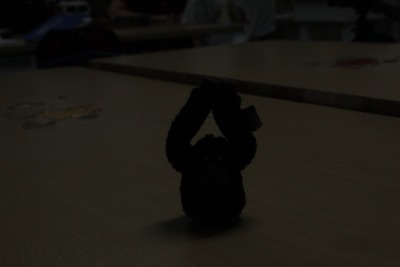
Exposure Triangle! ISO Setting- for these images, I wanted to show what ISO could do for images, all these images I kept the shutter speed at 1/60s of a second, and the aperture f5.6. The only thing I was changing was the ISO. This was to show the best outcome, and show that even if an image is under or over exposed where you can’t change the shutter speed or aperture that the ISO is an option so that you can still get the image. Image 1 was captured with ISO 100, the main idea behind this was to show that sometimes with ISO 100 its not going to get enough light on the sensor when taking an image. Image 2 is the other end of the skill where the sensor is is more sensitive to the light which brightens the image up. ISO 3200 was used to capture this image. This is what the ISO is used for so that even in darkly light areas the amount of light can still be captured with the sensor is more sensitive. Although a down side to this is the image gets more noise the higher the ISO you use. With new cameras coming out now a days it can get higher ISO without the image having a lot of noise. Image 3 was captured at ISO 400, this was to show an image light enough that it shows everything, not being over or under exposed. Showing light noise in the image.
1 note
·
View note
Note
«pretty mech... look here»
Skywarp yelps and backs up. Looking towards the voice. “W-wh-what?”
11 notes
·
View notes
Text
Cont. from [x] @exposuretriangle
The Combaticon chuckles at the comments before replying back with a tease in his tone. “Aw. I didn’t mean to hurt your feelings. You three are so important to the Decepticon cause, don’t know what we would do without you.”
10 notes
·
View notes
Text
Perceptor felt a chill go down his backstruts.
He hadn’t forgotten about how Reflector had stalked him for months. How he had felt watched and his privacy breached.
So when he felt that attention again, he knew who it was.
“Reflector.”
@exposuretriangle
14 notes
·
View notes
Text
Exposure Triangle
There are three elements to the exposure triangle: Aperture, Shutter Speed and ISO. Each element of the triangle has a different way of manipulating light, and thereby the quality of the exposure that results.

Aperture - This is the size of the lens opening. It controls the amount of light that gets in. The larger the opening, the more light. The smaller the opening, the less light. It also controls Depth of Field which determines what’s sharp or blurry in an image

Shutter Speed - This controls how long the shutter is open for. That means it controls the duration of light that's allowed to hit your camera's sensor. The longer the shutter speed, the more overexposed the image might be. The shorter the shutter speed, the more likely the image is to be underexposed. It also controls motion, meaning you’d want to use a faster shutter speed such as 1/200th of a second to capture a very still image or 1/3rd of a second to capture something with more movement.


ISO - This element is seen more as an SOS when you can’t quite capture what you want by using the other elements. The ISO controls the sensitivity of the camera. The lower the ISO, the less sensitive the sensor is to light. The higher the ISO, the more sensitive it is. Meaning simply the higher the ISO, the more noise/grain you’ll receive in an image

1 note
·
View note
Text
My black on black and white on white assignment setup for this afternoon
Ngl was quite fun thinking outside the box for this one

3 notes
·
View notes
Photo


ISO
The next part of the exposure triangle is ISO. This controls the sensitiviy of light when hitting the sensor in the camera. I decided to go to quite a dark place to capture the images for this to show the effect it can have.
Image one - ISO 100, f3.2, 1/125sec
As you can see, the first image is quite dark and you lose a lot of detail within the shadows. I usually always have my ISO set at 100, and I will adjust it until I find the perfect exposure.
Image two - ISO 800, f3.2, 1/125sec
The second image is a lot brighter, and you can see a lot more detail under the dark archway. Although, you can see that to the right of the image is extremely bright and over exposed.
You have to be wary when it comes to ISO as anything over 800 can create noise within the image.
1 note
·
View note
Text


EXPOSURE TRIANGLE!
APERTURE SETTING:
For these two images above they are based on aperture only so that mean the iso and shutter speed get kept the same so you are only focusing on the one part of the exposure triangle and these images here is only on aperture. The shutter speed for this was set at 1/160s of second and the iso was set at either 400 or 800 as these images was took at the start of the evening.
IMAGE ONE:
For image one my aperture number was set at one of the lowest numbers so that I was able to show the shallow depth of field. Shallow depth of field is that only one thing was in focus and the rest won’t be so the aperture for this was set at 2.8
IMAGE TWO:
For image two my aperture number was set at one of the highest number so that i was able show an extensive depth of field. The extensive depth of field is when everything is in focus within the image nothing is blur out so the aperture for this image was set at f16.
0 notes