#fix moodle
Explore tagged Tumblr posts
Visit Tumblr Blog
Explore Tumblr blogs with no restrictions, modern design and the best experience.
Last Seen Tumblr Blogs


Fun Fact
Tumblr has 16.74 million mobile monthly users in the US.
Text
i deserve a treat its 2017 anyways
#ouhdhfhhh gripping my head#thinking of those like. whats it self-inserts w bill?#do you see him im not going to fix him im not going to make him worse im#going to put him in a situation#moodle rambles#theraprism isnt working dying didnt work denial didnt work and 'toxic yaoi' didnt work#rolling up my sleeves#'huey do you think THIS will work' no
9 notes
·
View notes
Text
.
#found where more feedback was on my last essay assignment i dont like Moodle lol online classes are kind of annoying sometimes alas#and i think she gave me good feedback on my extra credit too#literature reviews are so annoying to me still and i still have to do essay 2 which is the same thing due friday and i still struggled to#fix the things i got wrong in essay one in the extra credit assignment but i think she gave me more concrete examples now#so i just gotta figure out how to do it in my own paper now that i understand what im supposed to do bc knowledge and application of the#knowledge are very much two different things#just grad school things#anyways my essay is not what im working on today#alas alas alas#it's so warm and i just made a tea i might have to make it iced hahaha
0 notes
Note
💜with galex? 😙
💜 surprise kiss / impulsive kiss - GALEX
Stardew Valley AU for the win? Yes. YES. Galex Stardew Valley AU.
"I finished repairing the fences for the cows, by the way. The wood on the left side was nearly rotted through, and I swear if you had let Oodles of Moodles or Cowabunga escape--"
George scoffs and rolls his eyes, effectively cutting Alex off with a curt, "One plank was rotted through, Alex. One plank."
"And that's one plank too many, if you ask me. I saw the way Oodles of Moodles was eyeballing her escape." Alex says with a grin, one that betrays the nature of his words. "It's high time I teach you how to fix your own fences, I reckon."
"I reckon," George agrees, "Especially if it will put an end to your dramatics. Shakespeare would have loved you."
"I'll take that as a compliment, thank you very much. Now hand me that hammer." Alex points to the discarded tool at George's feet, before sliding a dirty arm across his forehead to wipe away the sweat that had built up there.
George bends down and grabs the hammer, though his gaze is completely deadlocked on Alex. It's a rather warm day and the thin white t-shirt that hugs Alex's chest is nearly soaked through with sweat. George would normally find reason to curl his nose up at this - but he can make out every curve and dip of Alex's chest through the now translucent material, and quite frankly he thinks he has had enough.
Enough of Alex coming to his rescue every time he calls. Enough of those bright, Earth-shattering smiles he flashes George's way every time he makes a ridiculous joke. Enough of his strong hands and his warm eyes, and that utterly infuriating sound he makes before he laughs. He's had enough of the teasing, enough of the ambiguous flirting, and the way Alex really sees him for who he is beyond the front of the rich, spoiled city boy that everyone else is so eager to accept at face value.
George is not an impulsive person. His words and actions are so carefully crafted in his mind, down to the finest detail. He thinks and he plans - that is his specialty. Funny, how one glance over at a man so beautiful it makes his knees weak could destroy everything he's ever known about himself and worked so hard to achieve.
He rushes forward, mind and heart tangled deeply in turmoil, and presses a kiss to Alex's lips. It's a soft thing, no more than a mere meeting of warm skin against warm skin, but it alights something in George that makes his heart beat faster and his hands tremble. The hammer slips from his grasp and hits the ground with a dull 'thunk', and neither of them pay it any mind.
"Well, well, city boy," Alex breathes, and George considers it a triumph that Alex's usual confidence is missing from his tone, "I didn't realize you felt this strongly about fence repair."
"Oh, come off it." George shoots back in response, but he's smiling so goddamn bright he can physically feel the shine radiating off of himself. "Tell me you wanted it, too. That's all I want to hear."
Something strange flashes across Alex's face at George's words. It's akin to surprise, perhaps, like George has said something so completely unexpected. Another triumph, he thinks, as he pulls down more and more of Alex's walls.
"It wasn't already obvious, George? Of course I wanted it. In fact, get back over here. I'm not through with you just yet."
#abovecalamity#galex#george russell#alex albon#ask games#kiss meme#AYOOO lets go#stardew valley au for the win???#save#save tag
21 notes
·
View notes
Text
The docent, who didn't show up, has answered my email. Told me she did put the information that we start next week on moodle (that's the online platform we use for uni).
I replied that the course is literally empty.
She said "well I can see and read it. And so should you." Which came across very much like her assuming I don't know how the platform works.
At which point I would have liked to replied something along the lines of "buddy, pal, friendo, if I could see that, then I and 12 other students would not have gotten up so fucking early, driven to uni, and waited for 40 fucking minutes a fucking week early. The course is fucking empty, my dude!" Instead I pull the ace out of my sleeve and suggested she check if she had still set the topic to "hidden from participants", using the exact wording of the settings menu only visible to someone who has admin rights to a course on that platform and therefore in fact actually is perfectly qualified to recognize that a course with no info in it is in fact empty and does not contain visible information. (Not that you need to know literally anything about the backend to see that, but it does clearly communicate that I do in fact know how the platform works actually). I ended that email with a "If you would like I can send you screenshots of how the course is currently visible to students on Monday, until then I wish you a relaxed weekend!"
Literally 10 minutes after that I get the first response that is longer than a single sentence. She checked and oh no she is so sorry she was editing a course from a year ago and has fixed it now and she hopes I can forgive her?! With literally a ?! and the previous sentences ending with !
But as per my last email it is now the weekend and I will respond on Monday. lol
#bo studies social work#Gotta admit that I had fun being a bit annoying. Not so much I fuck up my chances of getting a passing grade#but just enough to make the authority figure actually go check where they messed up and correct it#Very curious now how she's like in person and if I can manage to stick with the course or not#It was definitely a memorable start
2 notes
·
View notes
Text
I know im of the "falling through the cracks" curse but now I keep falling through the email and admin cracks of my fucking staff responsibilities as a tutor even after ive sent updates to people to fix my email so I'm on the right mailing lists and moodles and all and its driving me crazy and I'm gonna start crying
21 notes
·
View notes
Text
god i hate school sm
trying to do an assignment thats due today. its those college forum posts and i gotta write a response to someone. however my moodle is acting up and says that the due date has passed when it hasnt so i cant reply to people and i rlly need the points bcus im actually failing the class rn so all points help.
im so mad oghhhh
but at least the professor is responding and trying to fix the problem!!
3 notes
·
View notes
Text
small personal vent.
Was sick last week, down for the count for 4 days. I got antibiotics and stuff for my cough and am on the mend. Head is still getting back to normal, I also didn't feel like mixing my ADHD meds with my antibiotics, but can start that again tomorrow.
Now I got what I wanted and can go to a teacher conference thing on Friday, that means minor shuffling of stuff which ordinarily would be fine but that means I now have to make stuff earlier, when I am behind on stuff for my other class.
I caved and even had chat gpt help me write my drafts and I seem to be lacking even the mental energy to fix the draft, reword it and type it up into moodle.
I'm so out of mental energy but I'm the damn teacher and can't skip out on prepping for class, when I have no backup materials, no nothing. I am also now again way behind on grading...... Almost wish I was a morning person so I could just go sleep and finish prep in the morning.
#I'm a new grad teacher#who is the only one teaching this subject at the school#and I'm using different materials than my predecessor#can't use any old material#I'm so tired
3 notes
·
View notes
Text
Marmalade

Also known as
Smoo, Smoodle, SmooSmoo, Moodle, Mimu, Meemaloo, Smacky Smoo, Lil Smoo (her rapper name), Weewoo (my dad's name for her), Bun, Little Bun, Bumper Sticker, Lil'bit, Biddy, Pocahontas (I don't remember why), Bean, Yell Master 8000, Karen, Cranky, Wee Whiny Tiger, Shromp, Boney...
She's somewhere north of 16 and has thyroid issues. It means she's a cranky skeleton who sleeps a lot. (Don't worry. She's medicated twice a day and given tons of wet food. This makes vacationing challenging for her humans.) She now weighs SIX whole pounds! That's pretty hefty for her runty ass.
If she is denied a lap to sleep on, her preferred forms are Bun Shape and Shrimp Shape.
She's extremely affectionate to her two pet humans, and hates all other living creatures. We tried getting her a friend once and she did violence unto all of us until we removed Other Cat. (Toot was the least feral stray in our yard who loved pets and treats from humans. We caught him and got him fixed intending to adopt him , but wound up sending him to live with a friend instead.)


This utter muppet.


My phone is 98% cat trash photos.
Use your own judgement on the line between a nickname and a cutesy version of their name
18K notes
·
View notes
Text
Cloud Web Server Hosting in 2025 The Ultimate Cloud Web Server Guide by SEOHostKing

What Is Cloud Web Server Hosting in 2025? Cloud web server hosting in 2025 is the most advanced, scalable, and reliable way to host websites and web applications. It utilizes a network of virtualized servers operating in the cloud to provide lightning-fast performance, elastic resource allocation, and nearly 100% uptime. Unlike traditional hosting, it doesn’t rely on a single physical machine, which means your website stays online even if one server fails. Why Cloud Web Hosting Is the #1 Choice in 2025 High Availability Architecture Your website is hosted across multiple cloud servers. If one goes down, another instantly takes over. This fault-tolerant infrastructure ensures your web presence is always available. Automatic Resource Scaling In 2025, websites can experience unpredictable traffic surges. Cloud web hosting automatically scales your resources—CPU, RAM, and bandwidth—so you’re always ready for growth without downtime. Blazing-Fast Load Times With SSD/NVMe drives, global CDN integration, and advanced caching layers, cloud web hosting provides sub-second page load times—critical for SEO and user experience. Top Benefits of Cloud Web Hosting with SEOHostKing Unlimited Scalability Add or remove resources instantly without migration or reconfiguration. Perfect for startups, agencies, and enterprises alike. 99.99% Uptime Guarantee Cloud-based redundancy and self-healing systems eliminate single points of failure, ensuring your website is always online. Real-Time Server Monitoring Proactive monitoring tools detect issues before they happen. SEOHostKing’s AI-based alerts provide early warnings and automated fixes. Daily Offsite Backups With daily backups and fast restoration, you can restore your entire site or individual files anytime with one click. 24/7 Technical Support Cloud experts are available around the clock to help you with server setup, optimization, and issue resolution. Full Root Access Whether you need to install custom software, run scripts, or configure your own environment, full root access puts you in control. Use Cases of Cloud Web Server Hosting in 2025 High-Traffic Blogs and News Portals Websites publishing regular content need scalable hosting to handle massive visitor spikes without compromising performance.

eCommerce Stores From WooCommerce to Magento, cloud hosting ensures fast product loading, secure checkouts, and minimal downtime—key to higher conversions. Corporate Business Sites Businesses benefit from reliable uptime, branding security, and responsive support with cloud infrastructure powering their websites. Digital Agencies Manage client websites with ease. Create isolated environments, scale per client, and automate updates. Educational Platforms and LMS Deploy Moodle, LearnDash, or custom learning systems on cloud servers with global reach and low latency for students. How to Launch a Cloud Web Server with SEOHostKing Step 1: Select a Hosting Plan Choose a plan based on traffic expectations, required resources, and scalability needs. Options range from entry-level to enterprise-ready. Step 2: Choose a Control Panel Decide between cPanel, Plesk, or a custom dashboard for managing your files, domains, databases, and emails. Step 3: Deploy Your Cloud Server Launch your server from SEOHostKing’s dashboard with pre-configured templates or your own OS of choice. Step 4: Point Your Domain Configure your domain’s DNS to connect it to your cloud server and go live instantly. Step 5: Optimize for Performance Install caching plugins, enable CDN integration, configure compression, and set up SSL for maximum speed and security. Cloud Hosting vs Traditional Hosting Cloud Hosting vs Shared Hosting Cloud hosting provides isolated environments with guaranteed resources, while shared hosting puts your site at risk of neighboring sites’ issues. Cloud Hosting vs VPS Hosting While VPS is a step up from shared hosting, cloud web hosting offers even more flexibility, redundancy, and scalability. Cloud Hosting vs Dedicated Servers Cloud hosting removes hardware limitations, offering better uptime, scalability, and cost-efficiency over physical servers. Why Cloud Hosting Is SEO-Friendly in 2025 Faster Page Speeds Google rewards fast websites. Cloud web hosting with SSD storage and CDN boosts performance dramatically. Higher Uptime = Better Rankings Sites that are constantly down lose traffic and rankings. Cloud hosting’s high-availability design keeps your site online. Global Data Centers for Geo-Targeting Choose server locations closest to your audience to reduce latency and improve regional rankings. Built-in SSL and HTTP/3 Support Secure websites with fast modern protocols increase trust and SEO signals. Best Features of SEOHostKing’s Cloud Web Hosting One-Click App Installer Deploy WordPress, Laravel, Joomla, Drupal, and hundreds of other platforms instantly. DDoS Protection and WAF Built-in security layers protect your site against hackers, bots, and malware. Staging Environments Test changes in a staging area before pushing live, avoiding disruptions to your live site. Email Hosting Integration Easily add professional email accounts with anti-spam protection and SMTP/IMAP/POP3 support. Developer-Friendly Tools SSH, GIT, Composer, Python, Node.js, and custom stacks available with full root access for advanced users. How to Optimize Cloud Web Hosting for Speed Use a Content Delivery Network (CDN) Serve static content from global edge nodes to minimize server load and increase delivery speed. Enable GZIP Compression and Browser Caching Speed up page rendering by compressing files and storing assets in users’ browsers. Optimize Images and Lazy Load Reduce page size and load times with image compression and lazy loading for media-rich sites. Leverage PHP 8.x and HTTP/3 Modern web tech ensures faster processing, better compatibility, and more stable performance. Best Control Panels for Cloud Web Hosting cPanel User-friendly, powerful, and loaded with tools like Softaculous, email management, and security modules. Plesk Ideal for Windows or multi-platform users with advanced development tools and Docker support. CyberPanel A lightweight, open-source panel based on LiteSpeed, offering powerful caching and WordPress support. SEOHostKing’s Cloud Hosting Plans in 2025 Startup Cloud Plan Perfect for small businesses or blogs with up to 10,000 monthly visits. Comes with 1 CPU core, 1 GB RAM, and 20 GB SSD. Professional Cloud Plan For medium-sized businesses, marketing agencies, and growing sites. Includes 2 CPU cores, 4 GB RAM, and 60 GB SSD. Enterprise Cloud Plan Built for high-traffic eCommerce, SaaS, and media-heavy platforms. Offers 4+ CPU cores, 8+ GB RAM, and 120+ GB SSD. Fully Managed Cloud Hosting Option Worry-Free Maintenance Let SEOHostKing handle OS updates, patching, malware removal, and server configuration while you focus on business. Guaranteed Optimization Your website is optimized by cloud engineers to ensure max speed, security, and performance. 24/7 Monitoring and Repair Downtime and errors are detected and fixed automatically before they affect your site. Top Security Measures for Cloud Web Hosting Firewall and Intrusion Detection Automated firewalls and monitoring systems detect and block unauthorized access. Two-Factor Authentication Protect your control panel and server with 2FA to prevent unauthorized logins. Malware and Vulnerability Scanning Daily scans detect threats, outdated software, and suspicious activity. SSL Certificates and HSTS All plans come with SSL and can be configured with HSTS for better encryption and browser trust. Cloud Hosting Trends in 2025 AI-Powered Server Optimization Intelligent algorithms automatically adjust server performance based on user behavior and traffic patterns. Green Hosting and Sustainability Data centers now run on renewable energy, and SEOHostKing ensures carbon-neutral hosting solutions. Edge Computing Expansion Data is processed closer to users at edge nodes for even faster response times and minimal delay. Zero-Downtime Deployments Sites can be updated or migrated live without affecting user access or search rankings. Cloud web server hosting in 2025 has redefined how websites are launched, managed, and scaled. With powerful servers, instant resource flexibility, airtight security, and developer-ready tools, it’s the perfect solution for modern businesses. SEOHostKing delivers industry-leading cloud web hosting that’s built for SEO, optimized for performance, and ready for your digital future. Read the full article
0 notes
Text
Education Website Development Melbourne: Creating Engaging Online Learning Platforms
In today’s digital world, having a strong online presence is essential for educational institutions, training centers, and e-learning businesses. Whether you're a school, university, or private tutor, investing in education website development Melbourne can transform how you engage with students, parents, and educators. A well-designed website enhances learning experiences, streamlines administrative tasks, and boosts credibility. Let’s explore what makes an exceptional education website and how professional development services in Melbourne can help.
Why Educational Institutions Need a Strong Website
A great website is more than just an online brochure—it’s an interactive platform that connects educators with learners. Here’s why a professionally developed education website is crucial:
Improved Accessibility – Students can access learning materials anytime, anywhere.
Enhanced Communication – Streamlines communication between educators, students, and parents.
Credibility and Trust – A well-structured website reinforces your institution’s reputation.
Efficient Administration – Online enrollment, fee payment, and scheduling simplify operations.
Interactive Learning Tools – Features like quizzes, video lessons, and discussion forums improve engagement.
With the increasing demand for online learning, investing in education website development Melbourne ensures your institution stays competitive and accessible.
Key Features of a Successful Education Website
When planning your education website, consider the following essential features:
1. User-Friendly Design
An intuitive and visually appealing interface helps students and educators navigate the website effortlessly. A clutter-free layout, easy navigation, and responsive design enhance user experience.
2. Mobile Responsiveness
Since many users access websites via smartphones and tablets, mobile-friendly design is a must. Education website development Melbourne professionals ensure that your site functions seamlessly on all devices.
3. Learning Management System (LMS) Integration
An LMS allows students to access courses, submit assignments, and track progress. Popular platforms like Moodle and Blackboard can be integrated for an efficient e-learning experience.
4. Online Enrollment and Payment System
A seamless registration and payment system simplifies admissions and course sign-ups. Secure payment gateways ensure hassle-free transactions.
5. Interactive Learning Tools
Features such as video tutorials, discussion forums, quizzes, and live classes enhance student engagement and make learning more interactive.
6. Search Engine Optimization (SEO)
A well-optimized website ranks higher in search engines, attracting more students. Melbourne-based developers implement SEO best practices to increase your site’s visibility.
7. Security and Data Protection
Educational websites handle sensitive student and faculty data. Implementing security measures such as SSL certificates and data encryption ensures a safe browsing experience.
8. Fast Loading Speed
Slow websites can frustrate users and affect engagement. Expert education website development Melbourne ensures optimized performance and fast load times.
Choosing the Right Website Development Team in Melbourne
Partnering with experienced developers ensures your education website meets modern standards and caters to user needs. Here’s what to look for when selecting a education website development Melbourne service:
Experience in the Education Sector – Choose a team with a portfolio of successful education websites.
Customization Options – Ensure they offer tailored solutions to match your institution’s specific requirements.
Ongoing Support and Maintenance – A reliable development team provides continuous updates, bug fixes, and improvements.
SEO and Digital Marketing Services – A well-optimized website attracts more visitors and potential students.
0 notes
Text


I practiced drawing some shapes with the pen tool using a Bezier game on our Moodle page. these are just a couple of the shapes that i took screenshots of. ( i didn't notice the wonky tire until looking back at the screenshot otherwise i would have fixed it) I ended up finishing the game with 37 nodes leftover that i didnt need to use
1 note
·
View note
Text
delish. phone battery suddenly spicy pillow'd and i have zero (0) dollars to fix it/replace my phone rn bc my school fucked up billing dates because of the hurricane and some stupid grant nobody even ended up getting and my stupid temporary winter-break job hasn't paid me yet because i forgot to bring two forms of id with me when my campus threw us out for the month of winter break and huh wow my university sucks total ass. need to acquire a functional phone so that i can successfully two-factor auth into my uni's moodle page to access my classwork oh my god just shoot me
0 notes
Text
How to Develop a Web App – A Detailed Guide by KSoft Technologies
November 24, 2024
How to Develop a Web App – A Detailed Guide by KSoft Technologies: Discover the essentials of web application development, from planning and design to deployment and maintenance, with expert tips from KSoft Technologies.
Developing a web application is an exciting journey, merging creativity, technical skills, and strategic planning. At KSoft Technologies, we specialize in turning ideas into reality, guiding businesses through this process to create applications that align with their goals and captivate their target audience. In this blog, we’ll walk you through the step-by-step process of web application development, infused with industry best practices and actionable insights.
What Is a Web Application?
A web application is an interactive software platform accessible through web browsers. Unlike static websites, web apps deliver dynamic functionalities like user authentication, data management, and real-time interactions. They empower businesses to enhance engagement, optimize processes, and deliver seamless digital experiences.
Examples of web applications include:
E-commerce Platforms: Amazon, Shopify
Social Media Platforms: Facebook, LinkedIn
CRM Tools: Salesforce
Learning Management Systems (LMS): Moodle, Coursera
Whether you're crafting a simple Minimum Viable Product (MVP) or a robust enterprise application, a systematic approach is key to success.
The Web Application Development Process 🚀
Creating a web application involves several well-defined stages. Here's how we approach it at KSoft Technologies:
1. Requirement Gathering and Analysis 🧐
Every project starts with a deep dive into your objectives. We collaborate with stakeholders to answer key questions:
Who is your target audience?
What business challenges will the app solve?
What features are essential?
Through brainstorming, interviews, and research, we craft a detailed roadmap for success.
2. Planning and Strategy 📝
With requirements in hand, we create a solid plan, including:
Wireframes: Blueprints of the app’s layout.
Sitemaps: A structured overview of pages and features.
Technology Stack Selection: Choosing frameworks like:
MEAN: MongoDB, Express.js, Angular, Node.js
MERN: MongoDB, Express.js, React, Node.js
LAMP: Linux, Apache, MySQL, PHP
3. Design and User Experience (UX) 🎨
Design plays a pivotal role in app usability. Our approach ensures:
Prototypes: Using tools like Figma to visualize the user journey.
User-Centered Design: Incorporating feedback for intuitive and accessible interfaces.
4. Development 💻
Development is divided into:
Front-End: Transforming designs into responsive, user-friendly interfaces with tools like React, Angular, or Vue.js.
Back-End: Managing data and logic with robust frameworks like Node.js, Django, or Laravel.
At KSoft, we ensure seamless integration between front-end and back-end components for optimal performance.
5. Testing and Quality Assurance ✅
We leave no stone unturned to ensure your app is flawless:
Functional Testing: Validating features.
Performance Testing: Stress-testing under various loads.
Cross-Browser Testing: Ensuring compatibility across major browsers.
Security Testing: Protecting against vulnerabilities.
6. Deployment 🌐
A successful launch involves:
Configuring servers using platforms like AWS or Azure.
Setting up secure databases like MySQL or MongoDB.
Monitoring performance with tools like Datadog.
7. Maintenance and Support 🔧
Post-launch, we keep your app running smoothly with:
Bug fixes and updates.
Security patches.
Scalability optimizations to meet growing demands.
Key Technical Considerations
Choosing the Right Technology Stack: Your stack impacts performance and scalability. Popular options include React.js, Node.js, and PostgreSQL.
Emphasizing Security: Prevent threats like SQL injection and XSS through encryption and audits.
Scalability: Techniques like load balancing ensure your app grows with your business.
Common Challenges and How to Overcome Them
Balancing Features and Performance: Focus on user needs to avoid overloading your app.
Cross-Platform Compatibility: Extensive testing ensures consistent experiences.
Managing Costs: Start small with an MVP and scale strategically.
Why Choose KSoft Technologies for Web Application Development?
Technical Expertise: Mastery of tools like Angular, Django, and PHP.
Comprehensive Services: From wireframes to maintenance.
User-Centric Design: Intuitive, accessible, and engaging applications.
Proven Success: A track record of innovation and excellence.
Looking Ahead: Trends in Web App Development
Stay ahead with emerging trends:
Progressive Web Apps (PWAs): Bridging the gap between web and mobile.
AI Integration: Smarter functionalities with chatbots and recommendations.
Serverless Architecture: Simplified infrastructure with AWS Lambda.
Conclusion 🌟
Developing a web application is a rewarding endeavor. With a structured process and expert guidance from KSoft Technologies, your vision can transform into a high-impact application that drives growth. Ready to start your journey? Let’s build something extraordinary together!
0 notes
Text
How to Hire a Skilled Moodle Developer for Your Online Learning Platform
In today’s digital era, online learning is booming, and learning management systems (LMS) like Moodle are at the forefront of this transformation. As an open-source platform, Moodle offers a wide range of features, making it the go-to LMS for educational institutions, businesses, and organizations worldwide. However, while Moodle is versatile, customizing it to suit your unique needs requires technical expertise. This is where hiring a skilled Moodle developer becomes crucial. In this article, we will explore why you should hire a Moodle developer, what to look for in a candidate, and how to find the right one for your project.
What is Moodle?

Why You Need to Hire a Moodle Developer
While Moodle is a powerful tool out-of-the-box, its true potential is unlocked through customization. Whether you're looking to integrate third-party tools, develop custom plugins, or optimize the platform’s performance, hiring a Moodle developer ensures that you get the most out of the system.
Here’s why hiring a skilled Moodle developer is essential:
Custom Development: A Moodle developer can create custom themes, plugins, and features to align with your business or educational goals.
Seamless Integration: Developers can integrate Moodle with other platforms like CRMs, video conferencing tools, or eCommerce systems.
Performance Optimization: Developers ensure that your Moodle site runs smoothly, even as your user base grows, by fine-tuning the platform.
Ongoing Support and Maintenance: A developer can provide post-launch support to handle updates, bug fixes, and security patches.
Key Skills to Look for When Hiring a Moodle Developer
When hiring a Moodle developer, you should look for someone with a well-rounded skill set. Below are key skills that make a developer suitable for the job:
Moodle Expertise: An in-depth understanding of Moodle's core architecture, modules, and plugin system is essential. This will allow the developer to extend and customize Moodle effectively.
PHP & MySQL Knowledge: Since Moodle is built on PHP and MySQL, a strong grasp of these technologies is a must for developing custom functionality and managing the database.
Front-End & Back-End Development: Look for a developer who is proficient in both front-end (HTML, CSS, JavaScript) and back-end (PHP, MySQL) development to ensure a seamless user experience.
Customization & Integration: The developer should have experience in integrating Moodle with third-party tools and creating custom themes and plugins that enhance the platform’s capabilities.
Problem-Solving: Moodle development may require troubleshooting complex issues, so look for someone who can diagnose problems and provide effective solutions.
Communication & Project Management: Effective communication is vital to ensure the project stays on track and deadlines are met. Choose a developer who is responsive and has strong project management skills.
How to Find the Right Moodle Developer
Finding the right Moodle developer for your project can be daunting, but there are several avenues you can explore to locate a qualified candidate:
Freelancers vs. Agencies: Decide whether you want to hire a freelancer or a development agency. Freelancers are often cost-effective for smaller projects, but an agency may be better suited for larger, more complex development tasks that require a team of experts.
Freelancer Platforms: Platforms like Upwork, Freelancer, and Fiverr allow you to browse profiles and hire developers based on their experience, reviews, and rates.
Moodle Development Companies: Consider working with a specialized Moodle development company. These agencies have experience with Moodle projects and can offer end-to-end services, including custom development, hosting, and ongoing support.
Job Portals & Social Networks: You can also find skilled Moodle developers on job portals like LinkedIn, Indeed, or niche tech sites where developers post their portfolios.
Referrals and Reviews: Ask for recommendations from colleagues or check online reviews to ensure the developer has a good reputation and a history of delivering quality work.
Questions to Ask Before Hiring a Moodle Developer
Before you hire a Moodle developer, make sure to ask the right questions to assess their capabilities:
What is your experience with Moodle projects?
Can you provide examples of Moodle customizations or development work you've done?
What is your approach to solving issues that arise during development?
What is your timeline for completing this project?
How do you ensure the security of the Moodle platform?
Do you provide post-launch support and maintenance?
These questions will help you assess whether the developer has the technical expertise and experience needed for your project.
Budgeting for Your Moodle Developer
The cost of hiring a Moodle developer can vary based on the scope of your project and the developer’s expertise. Freelancers tend to charge lower rates, but if your project is large or complex, hiring an agency might be more cost-effective in the long run.
On average, developers charge between $25 to $100 per hour depending on their experience and location. For larger projects, the total cost can range from a few thousand to tens of thousands of dollars. Keep in mind that customization, integrations, and ongoing support can impact your budget.
Benefits of Hiring a Moodle Developer for Your Organization
Hiring a skilled Moodle developer provides several key benefits:
Customization: Tailor Moodle to suit your exact needs, whether you need custom features, a unique theme, or integrations with other platforms.
Security: A developer can implement the necessary security protocols to protect your platform from cyber threats.
Time-Saving: A developer can handle all the technical aspects of setting up and customizing Moodle, allowing you to focus on the content and learning experience.
Scalability: As your user base grows, a developer ensures that Moodle remains efficient and scalable.
Ongoing Support: Post-launch maintenance and troubleshooting keep your platform running smoothly and securely.
How to Manage a Moodle Development Project
Managing a Moodle development project requires clear communication and effective project management. Here are a few tips to keep things on track:
Set Clear Expectations: Define the scope, timeline, and deliverables upfront.
Use Project Management Tools: Tools like Trello or Asana can help you track progress and ensure that tasks are completed on time.
Test and QA: Regular testing and quality assurance will ensure the final product meets your requirements.
Common Mistakes to Avoid When Hiring a Moodle Developer
Lack of Clear Project Scope: Avoid vague project descriptions and unclear expectations.
Choosing Based on Price Alone: Don’t compromise on quality to save costs. Choose a developer based on their skills and experience.
Skipping Post-Launch Support: Ensure that the developer offers ongoing support after the project is completed.
Poor Communication: A developer who doesn't communicate effectively can lead to delays and misunderstandings.
Conclusion
Hiring the right Moodle developer can make all the difference in the success of your e-learning platform. With the right expertise, customization, and ongoing support, your Moodle platform will be tailored to meet your organization’s unique needs and grow with you over time. If you’re ready to get started, begin your search for a skilled Moodle developer today and take your online learning platform to the next level.
Ready to take your Moodle platform to the next level? Contact us today to discuss your project and hire a skilled Moodle developer who can help bring your vision to life!
0 notes
Text
Entrepreneurial Journey : Navigating Entrepreneurial Ideas!!
University students from all academic levels and disciplines participated in a number of in-depth customer interviews that we conducted early in the development process. The purpose of these interviews was to learn about the needs and trouble spots that students had with their time at university.
Based on the insights gathered from the interviews, our team formulated several hypotheses regarding the features and functionalities that would most benefit students. These hypotheses included assumptions about the demand for features such as study group formation, career services, and campus event calendars.

We discovered that the assumptions about the need for study group creation and career services were validated through iterative testing and feedback loops. Students indicated a great need for resources to enhance career development and to enable networking and collaboration. But based on input from early prototypes, a few theories about particular features—like peer support and counseling—needed to be further refined.
In the previous week, our team made a crucial decision regarding the integration with Learning Management Systems (LMS) for accessing course materials and other academic resources. The team had two options: to develop custom integrations for each LMS platform used by universities or to prioritize integration with the most widely adopted LMS platforms such as Moodle and Canvas.
Following a thorough evaluation of available development resources, market research, and early user feedback, the team decided to give integration with Moodle and Canvas top priority. Universities utilized these systems extensively, guaranteeing optimum accessibility for students and lowering development and maintenance complexity.
As a team we learned that developing a product that appeals to the target market requires prioritizing features according to user feedback and market demand, optimizing user experience, and raising adoption rates can be achieved by integrating with current platforms and systems, and using users to test prototypes and hypotheses regularly can help detect and fix possible problems early in the development process.
0 notes
Text
Blog 6:Slides production and detail refinement

After the research and ideas were in place and communicated to the group, we decided to start creating the slides, and for better "synchronization" we chose the platform Google Slides.
The group members worked together to complete the PowerPoint presentation, I think it is very important is the "logic chain", each person needs to summarise their own part of the research into several modules, and following the artefacts idea generation - the group members of the idea summary and refinement --Artefact production - Artefact publicity and promotion;
Therefore, I have listed a few suggestions for the presentation on Google Slides based on the different specializations of the group members and the work they have done, and regarding the template for group presentations given by Dr. Matt on Moodle:
These include:
·the order of presentations
·fixed language at the beginning and end
· The key points to be mentioned in the presentation
· A list of group study patterns
· What each person might include in his or her presentation

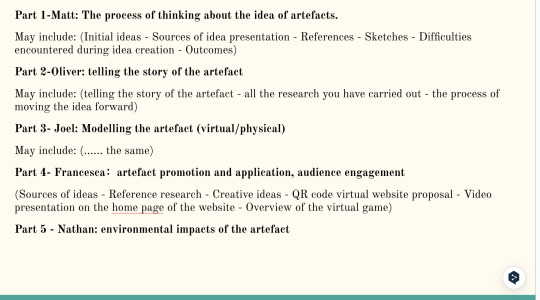
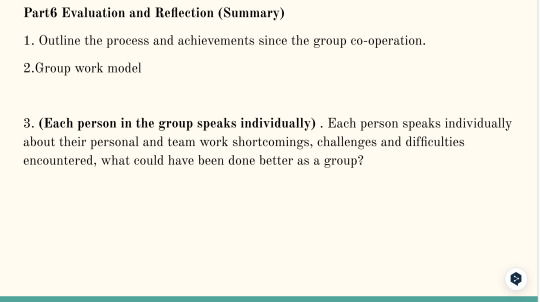
Figure 9&10&11 Screenshot of Google Slides - made by myself
And for me personally, I made the following content refinements while making it:
·extracted key data and examples from all the research I have done
·collect images and short videos
·minimize text
· The unity of the background color palette and the theme of the Slide production
·Going into detail: promotional and application video sections
Below is a video I independently produced and dubbed for New Forest's publicity and promotions:
The hedgehog is introduced as the first point of view, its friends are introduced in turn, and an interesting storytelling video is created by combining the different habits of the four animals in the New Forest, and ending with - welcome to The New Forest, which attracts and guides the audience to the next step of the virtual game interface.
0 notes