#floral yardage
Text

83 notes
·
View notes
Text
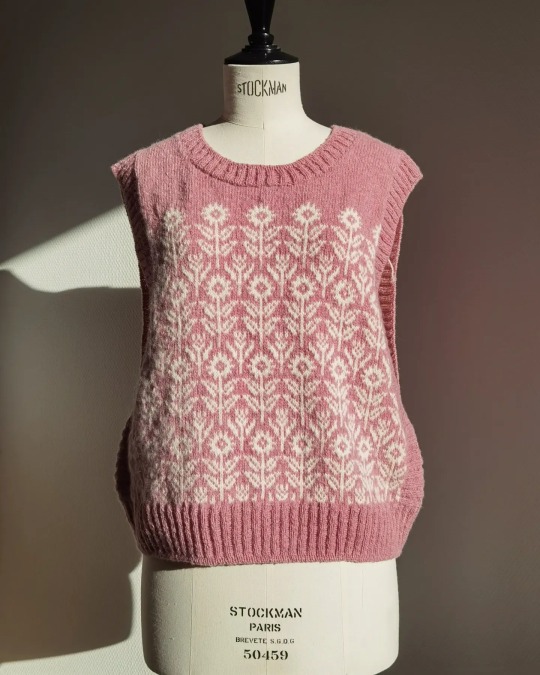
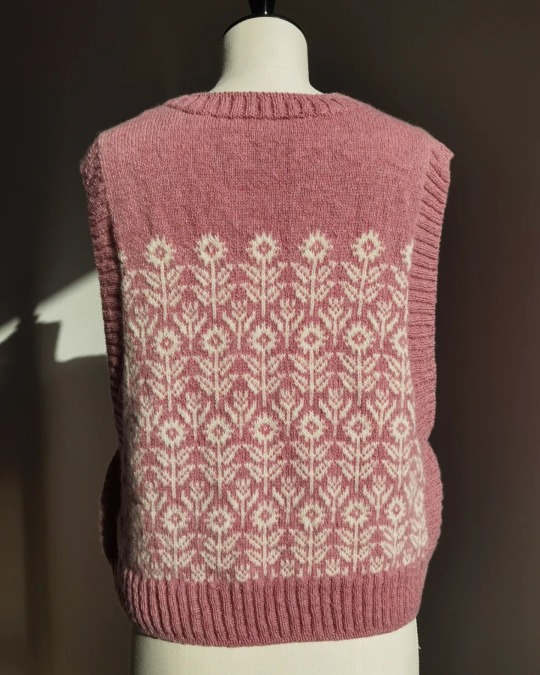
Floral vest | November, 2023

This vest is a Frankenstein of two patterns—the construction is from the Ophelia Slipover by Toshiyuki Shimada 嶋田俊之and the floral pattern from the Flower Yoke Pullover by Erika Tokai 東海えりか (@erika_tokai on Instagram). Both patterns are listed on Ravelry but only available in printed books.
Now, it is not my genius idea to piece these two together. I think it was first done by a fellow Chinese knitter and designer, who is XS KNITTING on RED and XS_KNITTING on Wechat. I have both pattern books but she did provide very detailed instructions on how to combine the two patterns for this vest. I mostly followed her notes – see modifications below.
Overview of the construction
Make a provisional cast on with a waste yarn.
Knit colourwork in the round from bottom up, ending at approx. underarm level. Decrease on the sides as instructed. You will later steek the fabric at the sides so the pattern includes the additional allowance for steeking.
Knit the front and back yoke sections flat, following the instructions for neck and shoulder shaping. (There is no armhole shaping in the yoke part.)
Sew together the front and back yoke parts, pick up stitches to make the neckband.
Reinforce the steek and cut. Pick up stitches from the steeked edges to make the side bands. Sew the bottom bit of the side bands together.
Pick up stitches to make the hem.
Needles
(all 80cm circulars)
Colourwork: 3.00mm
Yoke: 2.75mm
Neckband: 2.75mm, bind off with 2.5mm
Side bands: 2.5mm, bind off with 2.25mm
Hem: 2.75mm, bind off with 2.5mm
Yarn
Biches & Bûches Le Petit Lambswool 248m/50g, in white and light pink. This is a 2-ply woolen spun, slightly rustic but soft yarn. It softens even more after washing and blooms too, making an incredibly light but hearty fabric. I always thought it was produced in Europe since this is a French brand, but the Lambswool range is actually spun and dyed in Scotland. Hence it is a little less local than I thought (and their website doesn’t say where the wool material comes from), but I’m also happy to support Scottish mills that produce less chemically treated yarns in small batches.
Another nice thing is that each of my skeins/balls actually weighed 55g, so there was a little surplus than what I paid for.
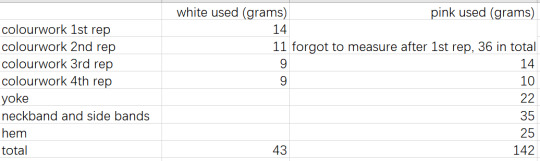
Yardage
I took detailed measurements just in case you (or future me) are worried about having enough yarn, or thinking about doing differently coloured bands, etc.
As can be seen, the bands and hem take up quite a bit of yardage.
Modifications
Colourwork
I think I followed the instructions entirely for the colourwork.
Yoke
I knitted one more row at the bottom of the front and back yokes respectively, because I somehow started from the wrong side and the pattern started from the right side. The shoulder seams are done with Kitchener stitch instead of a three-needle bind-off. Therefore I think I had about 104 rows in the yoke instead of 100 in the pattern, which means I picked up 84 stitches instead of 80 for the side band at the yoke section.
First block and felting
After I finished the yoke, the colourwork looked rather uneven. Since the yarn I used was thinner than the Shetland yarn in the pattern and I knitted the colourwork loosely to match the instructed gauge, the fabric was also quite loose and not as supple as I wanted. The good thing is that the finished garment (using the required gauge) had quite a lot of positive ease for my body measurements. So I decided to shrink the garment slightly by hand-felting it.
To felt a wool garment, you need one or more of the following: high temperature, moisture, agitation, soap. Here’s what I did to felt it as gently as possible. The half-finished main body had no live stitches at this point so I just soaked it in icy cold water as how you would normally block a knitted garment, but without soap. Then I just use my hands to agitate the fabric until I felt that it had first evened out and then tightened up. Trust me, without hot water or soap you need quite a lot of agitation to felt a garment—not just swishing it around.
I’ve also seen people putting their work into a pillow case into the washing machine on a hot drying cycle and stopping every few minutes to check if it’s felted enough. I have no confidence in operating my washing machine but you can try.
The result was satisfactory enough for me to go ahead.
Neckband
Neckband was finished with a tubular bind off with two rows, i.e. one pair, of reinforcement (the ‘tubular’ bit’). To do this, you would first use a slightly smaller needle to switch the ribbing from 2*2 to 1*1 as you knit across (see Suzanne Bryant’s video). I used a needle one size smaller but I think I could’ve gone down two sizes, as the finished neckband feels a little too loose.
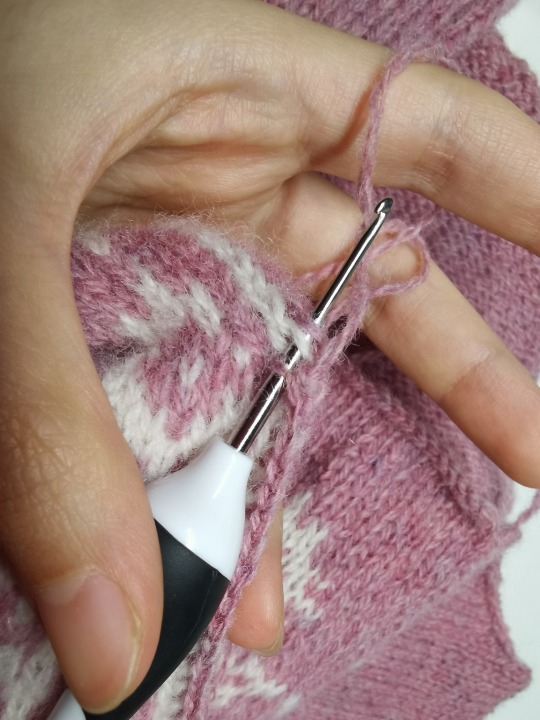
Side bands
I reinforced the fabric using the crochet method and then steeked it. Some people recommend the hook to be one size smaller than the knitting needles, but I used a 1.5mm and it worked well for me. It;s absolutely possible to steek with an even number of stitches (many tutorials say you can only do an odd number of stitches).

Using a 2.5mm circular I picked up stitch for stitch for the colourwork and 84 for 104 for the yoke. One stitch is added at either ends. There was no stitch decrease after picking up. I finished with Italian bind off which is another kind of invisible bind off like tubular bind off, just without the ‘tubular’ bit.
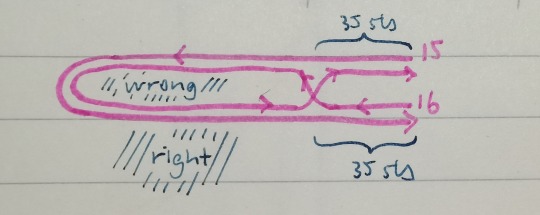
To do this: On the 15th row (wrong side), I knitted the first 35 sts (which were not bound off) using the 2.5mm needle in 2*2 ribbing. Then I switched to 2.25mm and switched the ribbing to 1*1 as I knitted across, and finished by knitting the last 35 sts using the 2.5mm needle again in 2*2 ribbing. On the 16th row (right side), I knitted the first 35sts in the 2.5mm needle and 2*2 ribbing as usual. Then I adjusted how I held the project so that I could pull the working yarn to the opposite side (front/back side) of the garment and start the sewn bind off from the wrong side.
It is absolutely not necessary to do all this. Some people make a very simple knitted bind off. This is purely because I want an invisible bid off and the ribbing pattern made it easier to do it this way. Also see illustration.
Then I Kitchener-stitched the 2*2 ribbing to make the side seam.
Hem
I took out the provisional cast on and transfer sts to a 2.75mm needle. My side bands were slightly wider than instructed so I picked up more side stitches for the hem too. 336 sts I think. I did 2*2 ribbing and finished with a tubular bind-off with four rows, i.e. two pairs, of reinforcement.
And that's it! I'm really pleased about this little vest and might make more in different colour schemes in future.
168 notes
·
View notes
Note
Hi! I'm making Christine's wishing dress cosplay and I was wondering if you might know what kind of fabric I could use if silk is not an opinion. Could strong 100% cotton work, thinking that the bodice needs some boning
As the dress require some yardage, I would probably first and foremost keep the fabric firm, but light. But maybe not quilting-cotton light, as it doesn't always drape well. Think taffeta, silk dupioni, cotton satin, or light brocades. These last couple of years there's been several on Spoonflower etc. who's made versions of the stripy/floral fabric for sale. The option there is usually cotton, and they look gorgeous.
The benefit of using natural fibres like silke, cotton, linen, wool etc. is that they breathe. But if this is out of your budget (as it was for me!) think of lining the bodice, and keep the lining in natural fibres like cotton or linen. It is SO much more comfortable to wear, especially if you will wear the costume for hours out and about rather than "just" a photoshoot.

I think my main thing when being impressed with a replica is if the blue fabric somehow illude stripes and flower ranks, as the original fabric. The general pattern is depicted above.
It doesn't have to be an exact replica of the original fabric, but keeping in mind that the fabric has two main patterns going on, and to play with this in the construction is a cool feature. Maria Bjørnson plays around with the direction of the stripes in her design.
But there's also been stage-worn dresses in the US where they used various floral patterns without stripes, so this is also an option.
One was a type worn by Kathy Voytko in the 1990s, and also re-used by Rachel Zatcoff on Broadwa, as well as Krista Buccellato and Kaitlyn Davis in the Restaged US Tour (where @phantomphashion photographed it). The stripes you see are the velvet trims, the fabric itself is greyish pale blue in two nuances, with black (or navy) floral pattern:

There's also the super-floral one in shades of blue, green and red that was worn by Teri Bibb in the 1990s:

And also the blue-on-blue floral fabric first worn by Patti Cohenour in the original Broadway production, and later by Sara Jean Ford in the US Tour. This was photographed next to a dress made of the original stripy/floral fabric, which is very useful as a reference:

So no, you don't have to buy silk, and you don't have to do stripes and flowers. But think of the drape and weight of the fabric - it should drape well, but also not be to heavy - and think of natural fibres if you will wear it for hours.
Happy hunting and happy sewing!
#wishing dress#wishing gown#wishing fabric#phantom of the opera#maria bjørnson#christine daae cosplay
19 notes
·
View notes
Text
Once I finish the shirt, I’d like my next major sewing project to be an 18th century banyan/wrapping gown (technically different things but banyan is sometimes used for both), ideally utilizing this spectacular printed/tie dyed quilting cotton.

The print itself is fairly reasonable in content for a period piece, being an Indian-influenced sort of floral, whereas the tie dyed ground is extremely anachronistic.

The main potential problem with this particular fabric, aside from handling the directionality and broader segments of the print, is the width of available fabric. It measures approximately 44 inches from selvage to selvage. Even without accounting for how much will need to be hidden in the seam allowance, that width is on the very lowest end of what most patterns seem to call for. I do have a significant amount of yardage, however, but I haven’t unfolded the fabric fully in order to measure that dimension.
The other issue is that I want to work closely off a pattern, being an rank amateur sewist, but as a rank amateur sewist, I don’t know how much instructional detail any given pattern will provide. I probably should simply pick a pattern that looks reasonable, buy it, and select a different pattern if the first doesn’t work for me. Unfortunately, I dislike spending money, and hate even more spending money on things that turn out to be useless or unhelpful.
#also one of the patterns I’m looking at is actively inconsistent in the yardage it calls for#it’s written for one size only so do I need 2yds by 60’’#or 4 yds by 45’’?#bc one of those is feasible for a fairly small person and the other is not#hoping that doing a deliberately anachronistic piece will make me less insane abt period accuracy#that hope may be in vain#my blather#ego sum art
8 notes
·
View notes
Text
Ugh. Reversible apron FUBAR
How could I have made so many stupid mistakes on one project??
After carefully calculations to determine how to get all the needed pieces out of one slightly-less-than-a-yard length of floral fabric, I managed to cut the largest piece in the wrong direction, so that there wasn't enough width to cut the rest of the pieces without splicing
Then I realized I excluded a good-sized pattern piece when I did the calculations and had to improvise around that
Then I sewed one of the pockets on with the opening at the bottom
Then when I went to attach the front to the back, I discovered I'd cut the bib portion at the wrong angle on the dragonfly fabric. Rather than doing the smart thing - removing the ruffle, neck straps, ties, and pocket; recutting the fabric from the leftover yardage, I decided to trim the floral fabric - the one that I only have tiny scraps of, and which is no longer available at the shop - to match.
Apron DOES NOT FUCKING FIT. The top portion is too narrow, and bunches up because the neck ties are too close together. The ties are too low, and hit my hip bone rather than my waist.
I really, *really* love the floral fabric and don't want to waste it. Current plan is to rip out the seams, remove the neck straps and ties, stitch a complementary solid along the bib on both pieces, trim them to the proper size, then put it all back together again. This will not be fun, but it's the only way I can think of to end up with a usable garment.
And just so you can laugh, here's a pic of the upside down pocket:

#sewing#apron#what a mess#sewing woes#honestly it's not even a difficult project#i don't know why so many things went wrong#i'm smarter than this i swear
2 notes
·
View notes
Text
Buy Upholstery Fabric & Sofa Fabric Online in India
Are you currently seated? If the answer is a YES, there are great chances that it is on some upholstered furniture. Most of our hours while working as well as sleeping are spent on these comfortable furnishings, which range from dining chairs to sofas.

More goes into upholstery than just picking the proper cloth. From working artistically to produce and design luxury sofa fabric and furniture of the highest calibre, to cutting expenses and enhancing our services is our main objective here at AARTEX. The process of making furniture by physically packing seats and other items into frames with padding, cushions, foam, or webbing and then covering it along with upholstery fabric is known as upholstery. This kind of work is quite specialised and requires an expert.
Although it's simple to get upholstery fabric, choosing the best fabric for particular furniture can sometimes be a matter of guesswork. Upholstery fabric can indeed be made of a single fibre or a combination of many. Everything relies on the style and design you choose for your upholstery. Many upholstery stores sell their own fabric while others need you to bring your own fabrics. One can easily buy yardage fabric at a neighbourhood fabric shop or even online at Etsy. Depending on the sort of piece and its location, upholstered furniture is used to varied degrees. No matter where upholstery is utilised in any home, it's critical that the fabric withstands normal wear and tear. For instance, sofas, recliners, and ottomans in guestrooms or more formal settings that only see modest use will be good with less robust upholstery fabric.
Some pinpoints to keep in mind while purchasing the Upholstery Fabric!
While purchasing upholstery fabric one should always remember to buy natural fibres, and ensure that neither chemicals nor fire retardants were used during its production. Also it's important to inquire about the fabric that wherever it has been made fairly tight chemical regulations have been followed. Also the person can easily approach to their upholsterer to let you know whether a particular fabric is appropriate for a particular use, such as whether a fabric one adores might not work for a chair.
AARTEX FURNISHINGS
Aartex’s ulterior motive is to beautify each and every home. Aartex are among the top producers of furniture in India, and they have their own weaving, knitting, embroidery, sofa fabric and digital printing facilities to produce unique and contemporary designs for all of our esteemed customers. Aartex understands and meets all of their prestigious clients' home furnishings-related requirements because of their more than 30 years of business experience, down to the smallest details which may only be visible to the keen eyes. We have something for everyone. From the extravagant people to the old school romantics to the pure classics, a range of fabrics that have a resistance to wrinkling, fading and piling.
youtube
Aartex furnishings is the most sought-after brand for upholstery because of its vast online collection of upholstery fabric that comes in a variety of features, styles, and colours. Aartex has everything you need to satisfy your search for the best sofa fabric covers online, including timeless solids, luxurious textures, cutting-edge digital designs, energising florals, traditional damask, modern geometrics, and many more designer upholstery fabric. Aartex offers countless variations of plains in any tints and colours you can think of.
WHY AARTEX FURNISHINGS?
We at Aartex have in store for you some of the latest and the most beautiful collections of designer upholstery fabric. AURUS, BEATLES, CABANA, BIBER, CARNATIC, TESLA, SATYA, TAKEDA, TOREX, META, JUNGLE CRUISE, etc. are some of our most famous and unique luxury sofa fabric collection designs. From an aesthetic perspective, the right upholstery add an extra charm, elegance and approachability to a particular space and that is something what we here at Aartex love doing for you. We bring together pieces that are chemical free, with proper joinery, can withstand a little wear and tear and most importantly are antiques at your HOME.
Aartex are differentiating themselves from the competition so that no one will mistake them for uncompetitive nerds in the furniture industry by using artistic talent to develop and create furniture of the highest calibre to cutting expenses and enhancing our offerings and an option to make your furniture more attractive and unique by adding your own touches to ensure that every time you touch or feel it, you'll fall in love.To simplify things , if you want it, we can provide it. Time and time again, these collections have already been establishing industry best practices. You must see them to appreciate them. Therefore, don't merely envision designer upholstery fabrics but bring it to life only with Aartex furnishings.
#Best sofa fabric#upholstery fabric#sofa fabric#Luxury sofa fabric#Designer upholstery fabric#Home Décor fabric#Outdoor fabric#Quilting fabric#fabric#home decor#home design#Youtube
2 notes
·
View notes
Text
3D Floral Fabric Online in Nigeria
Out of all designer fabrics, the 3D floral fabric is a beautiful choice for dresses. This fabric adds a unique touch of elegance and sophistication. With a convenient and easy online shopping platform, it’s easy to find a wide range of options available.
However, buying fabric online requires you to consider different factors carefully. Please check out the following tips to find the perfect 3D floral fabric for your dress material:

Understand the Fabric Very Well.
Know the base fabric - Determine whether the 3D floral elements are applied to the base fabric like lace, chiffon, or satin.
Check the floral material – Check the material used for the 3D flowers i.e. polyester, cotton, or other to assess its quality and durability.
Consider fabric care – Follow the fabric's care instructions to avoid damaging the delicate 3D elements.
Inspect Product Images Carefully.
High-resolution images – Check out the clear and detailed product images to identify the fabric's quality, color, and pattern.
Multiple angles – You can see the images from different angles to get a better view of the fabric's texture and 3D effect.
Zoom in – Consider using the zoom function to see the fabric's details closely.

Check Fabric Measurements and Quantity.
Consider fabric width – The width of the fabric should be perfect for your dress design.
Calculate the required yardage -Determine the amount of fabric needed accurately for your dress material.
Consider extra fabric – You can always buy slightly more fabric than needed for potential mistakes or design changes.
Go Through the Customer Reviews and Ratings.
Reliable feedback - Check customer reviews thoroughly and gain valuable insights into the fabric's quality, color accuracy, and overall satisfaction.
Look for patterns – Find the common issues or praises mentioned by multiple customers.
Consider the online supplier reputation – You should consider the seller's overall rating and customer feedback.

Stay Updated on the Latest Fashion Trends.
You need to keep an eye on current fashion trends and choose the 3D floral fabrics that are in vogue. Follow:
Fashion Blogs and Magazines – You can gain inspiration and stay informed about the latest fabric styles.
Social Media Influencers – You should consider how influencers and fashion designers use 3D floral fabrics in their creations.
Compare Prices
Comparing prices throughout different online fabric stores in Nigeria can help you find the right selection. You can consider the following factors:
Price per Yard – You should ensure that you know the cost per yard to compare prices accurately.
Shipping Costs – You can factor in shipping costs, especially if the fabric supplier is located internationally. If possible, you can choose a local wholesale fabric supplier online to find the right selection.
Conclusion -
You should follow these tips and increase your chances of finding the perfect 3D floral fabric for your dress online for the amazing shopping experience.
If you’d like to know about the popular supplier to buy wholesale fabric in Nigeria, JayBecks Store is hard to neat. Please check out our available designer fabric selection and find the right choice for your dress material.
0 notes
Link
Check out this listing I just added to my Poshmark closet: Sanctuary | Swim | Organic Botanics 2 piece High waisted Bikini | L.
0 notes
Text
My Day on the Romance Garden Blog Hop
Welcome to my day on the Romance Garden blog hop!
The twelve day celebration of this gorgeous Island Batik collection started Friday, March 1st. Every day on the hop you’ll be able to visit another designer to see Romance Garden featured in a quilt project. Such inspiration!
Romance Garden is a Signature collection by Sherry @ Powered by Quilting. Sherry is a super talented quilter, and a fellow member of the Partners in Design.
Romance Garden is arriving in stores now. Click here to find a quilt store near you that carries Island Batiks.
Introducing Broken Road Mini
When Sherry reached out for supporters for her lovely collection, I immediately knew I wanted to make it in my upcoming Broken Road Mini pattern.
When I saw Romance Garden, I was immediately struck by it’s loveliness. I love the mix of greens with the red and blue violets. And the butterfly, dragonfly, and floral motifs are perfect for a garden theme. Talk about gorgeous!
I think the fabrics in this collection look lovely from any angle!
I’m Hosting a Broken Road Quilt Along!
My Broken Road Mini pattern is not ready for release just yet, but it will be in May when my Signature collection becomes available in stores. The Broken Road Mini pattern will include two sizes—Crib and Wall. I’ve updated my Broken Road pattern as well so it includes multiple sizes too—Lap, Twin, and Queen. Both patterns will be released in May.
My Romance Garden quilt is shown in the Crib size. The quilt on the left, shown in the Red, White, and Blooms collection, is Twin size. Both patterns include yardage and cutting directions for using a rotary cutter or AccuQuilt to make the quilt.
To celebrate the release of my first Signature collection and the new versions of Broken Road and Broken Road Mini, I’ll be hosting a quilt along. You can make any of the five sizes for the quilt along. Participants will receive a discount code for the patterns and a chance to win fabrics from my collection.
Interesting in Quilting Along?
Sign up below and in April I’ll send you details on the Broken Road Quilt Along and the discount codes for the patterns as soon as they become available.
Yep! I can't wait to make Broken Road!
Yes! Put me on the list!
As you're waiting to start the quilt along, you'll receive my newsletter with free monthly patterns, quilty tips and insights, and fun tutorials. Plus you get a free pattern just for subscribing! Unsubscribe at anytime.
Built with ConvertKit
.formkit-form[data-uid="3fda7add4e"] *.formkit-form[data-uid="3fda7add4e"] legend.formkit-form[data-uid="3fda7add4e"] fieldset{border:0;padding:0.01em 0 0 0;margin:0;min-width:0;}.formkit-form[data-uid="3fda7add4e"] body:not(:-moz-handler-blocked) fieldset.formkit-form[data-uid="3fda7add4e"] h1,.formkit-form[data-uid="3fda7add4e"] h2,.formkit-form[data-uid="3fda7add4e"] h3,.formkit-form[data-uid="3fda7add4e"] h4,.formkit-form[data-uid="3fda7add4e"] h5,.formkit-form[data-uid="3fda7add4e"] h6.formkit-form[data-uid="3fda7add4e"] h2{font-size:1.5em;margin:1em 0;}.formkit-form[data-uid="3fda7add4e"] h3{font-size:1.17em;margin:1em 0;}.formkit-form[data-uid="3fda7add4e"] p.formkit-form[data-uid="3fda7add4e"] ol:not([template-default]),.formkit-form[data-uid="3fda7add4e"] ul:not([template-default]),.formkit-form[data-uid="3fda7add4e"] blockquote:not([template-default]).formkit-form[data-uid="3fda7add4e"] p:not([template-default]),.formkit-form[data-uid="3fda7add4e"] hr:not([template-default]),.formkit-form[data-uid="3fda7add4e"] blockquote:not([template-default]),.formkit-form[data-uid="3fda7add4e"] ol:not([template-default]),.formkit-form[data-uid="3fda7add4e"] ul:not([template-default]).formkit-form[data-uid="3fda7add4e"] .ordered-list,.formkit-form[data-uid="3fda7add4e"] .unordered-list{list-style-position:outside !important;padding-left:1em;}.formkit-form[data-uid="3fda7add4e"] .list-item.formkit-form[data-uid="3fda7add4e"][data-format="slide in"].formkit-form[data-uid="3fda7add4e"][data-format="sticky bar"].formkit-sticky-bar .formkit-form[data-uid="3fda7add4e"][data-format="sticky bar"].formkit-form[data-uid="3fda7add4e"] .formkit-input,.formkit-form[data-uid="3fda7add4e"] .formkit-select,.formkit-form[data-uid="3fda7add4e"] .formkit-checkboxes.formkit-form[data-uid="3fda7add4e"] .formkit-button,.formkit-form[data-uid="3fda7add4e"] .formkit-submit.formkit-form[data-uid="3fda7add4e"] .formkit-button:hover,.formkit-form[data-uid="3fda7add4e"] .formkit-submit:hover,.formkit-form[data-uid="3fda7add4e"] .formkit-button:focus,.formkit-form[data-uid="3fda7add4e"] .formkit-submit:focus.formkit-form[data-uid="3fda7add4e"] .formkit-button:hover > span,.formkit-form[data-uid="3fda7add4e"] .formkit-submit:hover > span,.formkit-form[data-uid="3fda7add4e"] .formkit-button:focus > span,.formkit-form[data-uid="3fda7add4e"] .formkit-submit:focus > span.formkit-form[data-uid="3fda7add4e"] .formkit-button > span,.formkit-form[data-uid="3fda7add4e"] .formkit-submit > span{display:block;-webkit-transition:all 300ms ease-in-out;transition:all 300ms ease-in-out;padding:12px 24px;}.formkit-form[data-uid="3fda7add4e"] .formkit-input{background:#ffffff;font-size:15px;padding:12px;border:1px solid #e3e3e3;-webkit-flex:1 0 auto;-ms-flex:1 0 auto;flex:1 0 auto;line-height:1.4;margin:0;-webkit-transition:border-color ease-out 300ms;transition:border-color ease-out 300ms;}.formkit-form[data-uid="3fda7add4e"] .formkit-input:focus{outline:none;border-color:#1677be;-webkit-transition:border-color ease 300ms;transition:border-color ease 300ms;}.formkit-form[data-uid="3fda7add4e"] .formkit-input::-webkit-input-placeholder.formkit-form[data-uid="3fda7add4e"] .formkit-input::-moz-placeholder.formkit-form[data-uid="3fda7add4e"] .formkit-input:-ms-input-placeholder.formkit-form[data-uid="3fda7add4e"] .formkit-input::placeholder.formkit-form[data-uid="3fda7add4e"] [data-group="dropdown"].formkit-form[data-uid="3fda7add4e"] [data-group="dropdown"]::before{content:"";top:calc(50% - 2.5px);right:10px;position:absolute;pointer-events:none;border-color:#4f4f4f transparent transparent transparent;border-style:solid;border-width:6px 6px 0 6px;height:0;width:0;z-index:999;}.formkit-form[data-uid="3fda7add4e"] [data-group="dropdown"] select{height:auto;width:100%;cursor:pointer;color:#333333;line-height:1.4;margin-bottom:0;padding:0 6px;-webkit-appearance:none;-moz-appearance:none;appearance:none;font-size:15px;padding:12px;padding-right:25px;border:1px solid #e3e3e3;background:#ffffff;}.formkit-form[data-uid="3fda7add4e"] [data-group="dropdown"] select:focus.formkit-form[data-uid="3fda7add4e"] [data-group="checkboxes"].formkit-form[data-uid="3fda7add4e"] [data-group="checkboxes"] [data-group="checkbox"].formkit-form[data-uid="3fda7add4e"] [data-group="checkboxes"] [data-group="checkbox"] *.formkit-form[data-uid="3fda7add4e"] [data-group="checkboxes"] [data-group="checkbox"]:last-of-type.formkit-form[data-uid="3fda7add4e"] [data-group="checkboxes"] [data-group="checkbox"] input[type="checkbox"].formkit-form[data-uid="3fda7add4e"] [data-group="checkboxes"] [data-group="checkbox"] input[type="checkbox"] + label::after.formkit-form[data-uid="3fda7add4e"] [data-group="checkboxes"] [data-group="checkbox"] input[type="checkbox"]:checked + label::after.formkit-form[data-uid="3fda7add4e"] [data-group="checkboxes"] [data-group="checkbox"] input[type="checkbox"]:checked + label::before.formkit-form[data-uid="3fda7add4e"] [data-group="checkboxes"] [data-group="checkbox"] label.formkit-form[data-uid="3fda7add4e"] [data-group="checkboxes"] [data-group="checkbox"] label::before,.formkit-form[data-uid="3fda7add4e"] [data-group="checkboxes"] [data-group="checkbox"] label::after.formkit-form[data-uid="3fda7add4e"] [data-group="checkboxes"] [data-group="checkbox"] label::before{height:16px;width:16px;border:1px solid #e3e3e3;background:#ffffff;left:0px;top:3px;}.formkit-form[data-uid="3fda7add4e"] [data-group="checkboxes"] [data-group="checkbox"] label::after{height:4px;width:8px;border-left:2px solid #4d4d4d;border-bottom:2px solid #4d4d4d;-webkit-transform:rotate(-45deg);-ms-transform:rotate(-45deg);transform:rotate(-45deg);left:4px;top:8px;}.formkit-form[data-uid="3fda7add4e"] .formkit-alert{background:#f9fafb;border:1px solid #e3e3e3;border-radius:5px;-webkit-flex:1 0 auto;-ms-flex:1 0 auto;flex:1 0 auto;list-style:none;margin:25px auto;padding:12px;text-align:center;width:100%;}.formkit-form[data-uid="3fda7add4e"] .formkit-alert:empty.formkit-form[data-uid="3fda7add4e"] .formkit-alert-success.formkit-form[data-uid="3fda7add4e"] .formkit-alert-error.formkit-form[data-uid="3fda7add4e"] .formkit-spinner{display:-webkit-box;display:-webkit-flex;display:-ms-flexbox;display:flex;height:0px;width:0px;margin:0 auto;position:absolute;top:0;left:0;right:0;width:0px;overflow:hidden;text-align:center;-webkit-transition:all 300ms ease-in-out;transition:all 300ms ease-in-out;}.formkit-form[data-uid="3fda7add4e"] .formkit-spinner > div{margin:auto;width:12px;height:12px;background-color:#fff;opacity:0.3;border-radius:100%;display:inline-block;-webkit-animation:formkit-bouncedelay-formkit-form-data-uid-3fda7add4e- 1.4s infinite ease-in-out both;animation:formkit-bouncedelay-formkit-form-data-uid-3fda7add4e- 1.4s infinite ease-in-out both;}.formkit-form[data-uid="3fda7add4e"] .formkit-spinner > div:nth-child(1).formkit-form[data-uid="3fda7add4e"] .formkit-spinner > div:nth-child(2).formkit-form[data-uid="3fda7add4e"] .formkit-submit[data-active] .formkit-spinner.formkit-form[data-uid="3fda7add4e"] .formkit-submit[data-active] .formkit-spinner ~ span.formkit-form[data-uid="3fda7add4e"] .formkit-powered-by[data-active="false"].formkit-form[data-uid="3fda7add4e"] .formkit-powered-by-convertkit-container{display:-webkit-box;display:-webkit-flex;display:-ms-flexbox;display:flex;width:100%;z-index:5;margin:10px 0;position:relative;}.formkit-form[data-uid="3fda7add4e"] .formkit-powered-by-convertkit-container[data-active="false"].formkit-form[data-uid="3fda7add4e"] .formkit-powered-by-convertkit{-webkit-align-items:center;-webkit-box-align:center;-ms-flex-align:center;align-items:center;background-color:#ffffff;border:1px solid #dde2e7;border-radius:4px;color:#373f45;cursor:pointer;display:block;height:36px;margin:0 auto;opacity:0.95;padding:0;-webkit-text-decoration:none;text-decoration:none;text-indent:100%;-webkit-transition:ease-in-out all 200ms;transition:ease-in-out all 200ms;white-space:nowrap;overflow:hidden;-webkit-user-select:none;-moz-user-select:none;-ms-user-select:none;user-select:none;width:190px;background-repeat:no-repeat;background-position:center;background-image:url("data:image/svg+xml;charset=utf8,%3Csvg width='162' height='20' viewBox='0 0 162 20' fill='none' xmlns='http://www.w3.org/2000/svg'%3E%3Cpath d='M83.0561 15.2457C86.675 15.2457 89.4722 12.5154 89.4722 9.14749C89.4722 5.99211 86.8443 4.06563 85.1038 4.06563C82.6801 4.06563 80.7373 5.76407 80.4605 8.28551C80.4092 8.75244 80.0387 9.14403 79.5686 9.14069C78.7871 9.13509 77.6507 9.12841 76.9314 9.13092C76.6217 9.13199 76.3658 8.88106 76.381 8.57196C76.4895 6.38513 77.2218 4.3404 78.618 2.76974C80.1695 1.02445 82.4289 0 85.1038 0C89.5979 0 93.8406 4.07791 93.8406 9.14749C93.8406 14.7608 89.1832 19.3113 83.1517 19.3113C78.8502 19.3113 74.5179 16.5041 73.0053 12.5795C72.9999 12.565 72.9986 12.5492 73.0015 12.534C73.0218 12.4179 73.0617 12.3118 73.1011 12.2074C73.1583 12.0555 73.2143 11.907 73.2062 11.7359L73.18 11.1892C73.174 11.0569 73.2075 10.9258 73.2764 10.8127C73.3452 10.6995 73.4463 10.6094 73.5666 10.554L73.7852 10.4523C73.9077 10.3957 74.0148 10.3105 74.0976 10.204C74.1803 10.0974 74.2363 9.97252 74.2608 9.83983C74.3341 9.43894 74.6865 9.14749 75.0979 9.14749C75.7404 9.14749 76.299 9.57412 76.5088 10.1806C77.5188 13.1 79.1245 15.2457 83.0561 15.2457Z' fill='%23373F45'/%3E%3Cpath d='M155.758 6.91365C155.028 6.91365 154.804 6.47916 154.804 5.98857C154.804 5.46997 154.986 5.06348 155.758 5.06348C156.53 5.06348 156.712 5.46997 156.712 5.98857C156.712 6.47905 156.516 6.91365 155.758 6.91365ZM142.441 12.9304V9.32833L141.415 9.32323V8.90392C141.415 8.44719 141.786 8.07758 142.244 8.07986L142.441 8.08095V6.55306L144.082 6.09057V8.08073H145.569V8.50416C145.569 8.61242 145.548 8.71961 145.506 8.81961C145.465 8.91961 145.404 9.01047 145.328 9.08699C145.251 9.16351 145.16 9.2242 145.06 9.26559C144.96 9.30698 144.853 9.32826 144.745 9.32822H144.082V12.7201C144.082 13.2423 144.378 13.4256 144.76 13.4887C145.209 13.5629 145.583 13.888 145.583 14.343V14.9626C144.029 14.9626 142.441 14.8942 142.441 12.9304Z' fill='%23373F45'/%3E%3Cpath d='M110.058 7.92554C108.417 7.88344 106.396 8.92062 106.396 11.5137C106.396 14.0646 108.417 15.0738 110.058 15.0318C111.742 15.0738 113.748 14.0646 113.748 11.5137C113.748 8.92062 111.742 7.88344 110.058 7.92554ZM110.07 13.7586C108.878 13.7586 108.032 12.8905 108.032 11.461C108.032 10.1013 108.878 9.20569 110.071 9.20569C111.263 9.20569 112.101 10.0995 112.101 11.459C112.101 12.8887 111.263 13.7586 110.07 13.7586Z' fill='%23373F45'/%3E%3Cpath d='M118.06 7.94098C119.491 7.94098 120.978 8.33337 120.978 11.1366V14.893H120.063C119.608 14.893 119.238 14.524 119.238 14.0689V10.9965C119.238 9.66506 118.747 9.16047 117.891 9.16047C117.414 9.16047 116.797 9.52486 116.502 9.81915V14.069C116.502 14.1773 116.481 14.2845 116.44 14.3845C116.398 14.4845 116.337 14.5753 116.261 14.6519C116.184 14.7284 116.093 14.7891 115.993 14.8305C115.893 14.8719 115.786 14.8931 115.678 14.8931H114.847V8.10918H115.773C115.932 8.10914 116.087 8.16315 116.212 8.26242C116.337 8.36168 116.424 8.50033 116.46 8.65577C116.881 8.19328 117.428 7.94098 118.06 7.94098ZM122.854 8.09713C123.024 8.09708 123.19 8.1496 123.329 8.2475C123.468 8.34541 123.574 8.48391 123.631 8.64405L125.133 12.8486L126.635 8.64415C126.692 8.48402 126.798 8.34551 126.937 8.2476C127.076 8.1497 127.242 8.09718 127.412 8.09724H128.598L126.152 14.3567C126.091 14.5112 125.986 14.6439 125.849 14.7374C125.711 14.831 125.549 14.881 125.383 14.8809H124.333L121.668 8.09713H122.854Z' fill='%23373F45'/%3E%3Cpath d='M135.085 14.5514C134.566 14.7616 133.513 15.0416 132.418 15.0416C130.496 15.0416 129.024 13.9345 129.024 11.4396C129.024 9.19701 130.451 7.99792 132.191 7.99792C134.338 7.99792 135.254 9.4378 135.158 11.3979C135.139 11.8029 134.786 12.0983 134.38 12.0983H130.679C130.763 13.1916 131.562 13.7662 132.615 13.7662C133.028 13.7662 133.462 13.7452 133.983 13.6481C134.535 13.545 135.085 13.9375 135.085 14.4985V14.5514ZM133.673 10.949C133.785 9.87621 133.061 9.28752 132.191 9.28752C131.321 9.28752 130.734 9.93979 130.679 10.9489L133.673 10.949Z' fill='%23373F45'/%3E%3Cpath d='M137.345 8.11122C137.497 8.11118 137.645 8.16229 137.765 8.25635C137.884 8.35041 137.969 8.48197 138.005 8.62993C138.566 8.20932 139.268 7.94303 139.759 7.94303C139.801 7.94303 140.068 7.94303 140.489 7.99913V8.7265C140.489 9.11748 140.15 9.4147 139.759 9.4147C139.31 9.4147 138.651 9.5829 138.131 9.8773V14.8951H136.462V8.11112L137.345 8.11122ZM156.6 14.0508V8.09104H155.769C155.314 8.09104 154.944 8.45999 154.944 8.9151V14.8748H155.775C156.23 14.8748 156.6 14.5058 156.6 14.0508ZM158.857 12.9447V9.34254H157.749V8.91912C157.749 8.46401 158.118 8.09506 158.574 8.09506H158.857V6.56739L160.499 6.10479V8.09506H161.986V8.51848C161.986 8.97359 161.617 9.34254 161.161 9.34254H160.499V12.7345C160.499 13.2566 160.795 13.44 161.177 13.503C161.626 13.5774 162 13.9024 162 14.3574V14.977C160.446 14.977 158.857 14.9086 158.857 12.9447ZM98.1929 10.1124C98.2033 6.94046 100.598 5.16809 102.895 5.16809C104.171 5.16809 105.342 5.44285 106.304 6.12953L105.914 6.6631C105.654 7.02011 105.16 7.16194 104.749 6.99949C104.169 6.7702 103.622 6.7218 103.215 6.7218C101.335 6.7218 99.9169 7.92849 99.9068 10.1123C99.9169 12.2959 101.335 13.5201 103.215 13.5201C103.622 13.5201 104.169 13.4717 104.749 13.2424C105.16 13.0799 105.654 13.2046 105.914 13.5615L106.304 14.0952C105.342 14.7819 104.171 15.0566 102.895 15.0566C100.598 15.0566 98.2033 13.2842 98.1929 10.1124ZM147.619 5.21768C148.074 5.21768 148.444 5.58663 148.444 6.04174V9.81968L151.82 5.58131C151.897 5.47733 151.997 5.39282 152.112 5.3346C152.227 5.27638 152.355 5.24607 152.484 5.24611H153.984L150.166 10.0615L153.984 14.8749H152.484C152.355 14.8749 152.227 14.8446 152.112 14.7864C151.997 14.7281 151.897 14.6436 151.82 14.5397L148.444 10.3025V14.0508C148.444 14.5059 148.074 14.8749 147.619 14.8749H146.746V5.21768H147.619Z' fill='%23373F45'/%3E%3Cpath d='M0.773438 6.5752H2.68066C3.56543 6.5752 4.2041 6.7041 4.59668 6.96191C4.99219 7.21973 5.18994 7.62695 5.18994 8.18359C5.18994 8.55859 5.09326 8.87061 4.8999 9.11963C4.70654 9.36865 4.42822 9.52539 4.06494 9.58984V9.63379C4.51611 9.71875 4.84717 9.88721 5.05811 10.1392C5.27197 10.3882 5.37891 10.7266 5.37891 11.1543C5.37891 11.7314 5.17676 12.1841 4.77246 12.5122C4.37109 12.8374 3.81152 13 3.09375 13H0.773438V6.5752ZM1.82373 9.22949H2.83447C3.27393 9.22949 3.59473 9.16064 3.79688 9.02295C3.99902 8.88232 4.1001 8.64502 4.1001 8.31104C4.1001 8.00928 3.99023 7.79102 3.77051 7.65625C3.55371 7.52148 3.20801 7.4541 2.7334 7.4541H1.82373V9.22949ZM1.82373 10.082V12.1167H2.93994C3.37939 12.1167 3.71045 12.0332 3.93311 11.8662C4.15869 11.6963 4.27148 11.4297 4.27148 11.0664C4.27148 10.7324 4.15723 10.4849 3.92871 10.3237C3.7002 10.1626 3.35303 10.082 2.88721 10.082H1.82373Z' fill='%23373F45'/%3E%3Cpath d='M13.011 6.5752V10.7324C13.011 11.207 12.9084 11.623 12.7034 11.9805C12.5012 12.335 12.2068 12.6089 11.8201 12.8022C11.4363 12.9927 10.9763 13.0879 10.4402 13.0879C9.6433 13.0879 9.02368 12.877 8.5813 12.4551C8.13892 12.0332 7.91772 11.4531 7.91772 10.7148V6.5752H8.9724V10.6401C8.9724 11.1704 9.09546 11.5615 9.34155 11.8135C9.58765 12.0654 9.96557 12.1914 10.4753 12.1914C11.4656 12.1914 11.9607 11.6714 11.9607 10.6313V6.5752H13.011Z' fill='%23373F45'/%3E%3Cpath d='M15.9146 13V6.5752H16.9649V13H15.9146Z' fill='%23373F45'/%3E%3Cpath d='M19.9255 13V6.5752H20.9758V12.0991H23.696V13H19.9255Z' fill='%23373F45'/%3E%3Cpath d='M28.2828 13H27.2325V7.47607H25.3428V6.5752H30.1724V7.47607H28.2828V13Z' fill='%23373F45'/%3E%3Cpath d='M41.9472 13H40.8046L39.7148 9.16796C39.6679 9.00097 39.6093 8.76074 39.539 8.44727C39.4687 8.13086 39.4262 7.91113 39.4116 7.78809C39.3823 7.97559 39.3339 8.21875 39.2665 8.51758C39.2021 8.81641 39.1479 9.03905 39.1039 9.18554L38.0405 13H36.8979L36.0673 9.7832L35.2236 6.5752H36.2958L37.2143 10.3193C37.3578 10.9199 37.4604 11.4502 37.5219 11.9102C37.5541 11.6611 37.6025 11.3828 37.6669 11.0752C37.7314 10.7676 37.79 10.5186 37.8427 10.3281L38.8886 6.5752H39.9301L41.0024 10.3457C41.1049 10.6943 41.2133 11.2158 41.3276 11.9102C41.3715 11.4912 41.477 10.958 41.644 10.3105L42.558 6.5752H43.6215L41.9472 13Z' fill='%23373F45'/%3E%3Cpath d='M45.7957 13V6.5752H46.846V13H45.7957Z' fill='%23373F45'/%3E%3Cpath d='M52.0258 13H50.9755V7.47607H49.0859V6.5752H53.9155V7.47607H52.0258V13Z' fill='%23373F45'/%3E%3Cpath d='M61.2312 13H60.1765V10.104H57.2146V13H56.1643V6.5752H57.2146V9.20312H60.1765V6.5752H61.2312V13Z' fill='%23373F45'/%3E%3C/svg%3E");}.formkit-form[data-uid="3fda7add4e"] .formkit-powered-by-convertkit:hover,.formkit-form[data-uid="3fda7add4e"] .formkit-powered-by-convertkit:focus{background-color:#ffffff;-webkit-transform:scale(1.025) perspective(1px);-ms-transform:scale(1.025) perspective(1px);transform:scale(1.025) perspective(1px);opacity:1;}.formkit-form[data-uid="3fda7add4e"] .formkit-powered-by-convertkit[data-variant="dark"],.formkit-form[data-uid="3fda7add4e"] .formkit-powered-by-convertkit[data-variant="light"].formkit-form[data-uid="3fda7add4e"] .formkit-powered-by-convertkit[data-variant="light"]{color:#ffffff;background-image:url("data:image/svg+xml;charset=utf8,%3Csvg width='162' height='20' viewBox='0 0 162 20' fill='none' xmlns='http://www.w3.org/2000/svg'%3E%3Cpath d='M83.0561 15.2457C86.675 15.2457 89.4722 12.5154 89.4722 9.14749C89.4722 5.99211 86.8443 4.06563 85.1038 4.06563C82.6801 4.06563 80.7373 5.76407 80.4605 8.28551C80.4092 8.75244 80.0387 9.14403 79.5686 9.14069C78.7871 9.13509 77.6507 9.12841 76.9314 9.13092C76.6217 9.13199 76.3658 8.88106 76.381 8.57196C76.4895 6.38513 77.2218 4.3404 78.618 2.76974C80.1695 1.02445 82.4289 0 85.1038 0C89.5979 0 93.8406 4.07791 93.8406 9.14749C93.8406 14.7608 89.1832 19.3113 83.1517 19.3113C78.8502 19.3113 74.5179 16.5041 73.0053 12.5795C72.9999 12.565 72.9986 12.5492 73.0015 12.534C73.0218 12.4179 73.0617 12.3118 73.1011 12.2074C73.1583 12.0555 73.2143 11.907 73.2062 11.7359L73.18 11.1892C73.174 11.0569 73.2075 10.9258 73.2764 10.8127C73.3452 10.6995 73.4463 10.6094 73.5666 10.554L73.7852 10.4523C73.9077 10.3957 74.0148 10.3105 74.0976 10.204C74.1803 10.0974 74.2363 9.97252 74.2608 9.83983C74.3341 9.43894 74.6865 9.14749 75.0979 9.14749C75.7404 9.14749 76.299 9.57412 76.5088 10.1806C77.5188 13.1 79.1245 15.2457 83.0561 15.2457Z' fill='white'/%3E%3Cpath d='M155.758 6.91365C155.028 6.91365 154.804 6.47916 154.804 5.98857C154.804 5.46997 154.986 5.06348 155.758 5.06348C156.53 5.06348 156.712 5.46997 156.712 5.98857C156.712 6.47905 156.516 6.91365 155.758 6.91365ZM142.441 12.9304V9.32833L141.415 9.32323V8.90392C141.415 8.44719 141.786 8.07758 142.244 8.07986L142.441 8.08095V6.55306L144.082 6.09057V8.08073H145.569V8.50416C145.569 8.61242 145.548 8.71961 145.506 8.81961C145.465 8.91961 145.404 9.01047 145.328 9.08699C145.251 9.16351 145.16 9.2242 145.06 9.26559C144.96 9.30698 144.853 9.32826 144.745 9.32822H144.082V12.7201C144.082 13.2423 144.378 13.4256 144.76 13.4887C145.209 13.5629 145.583 13.888 145.583 14.343V14.9626C144.029 14.9626 142.441 14.8942 142.441 12.9304Z' fill='white'/%3E%3Cpath d='M110.058 7.92554C108.417 7.88344 106.396 8.92062 106.396 11.5137C106.396 14.0646 108.417 15.0738 110.058 15.0318C111.742 15.0738 113.748 14.0646 113.748 11.5137C113.748 8.92062 111.742 7.88344 110.058 7.92554ZM110.07 13.7586C108.878 13.7586 108.032 12.8905 108.032 11.461C108.032 10.1013 108.878 9.20569 110.071 9.20569C111.263 9.20569 112.101 10.0995 112.101 11.459C112.101 12.8887 111.263 13.7586 110.07 13.7586Z' fill='white'/%3E%3Cpath d='M118.06 7.94098C119.491 7.94098 120.978 8.33337 120.978 11.1366V14.893H120.063C119.608 14.893 119.238 14.524 119.238 14.0689V10.9965C119.238 9.66506 118.747 9.16047 117.891 9.16047C117.414 9.16047 116.797 9.52486 116.502 9.81915V14.069C116.502 14.1773 116.481 14.2845 116.44 14.3845C116.398 14.4845 116.337 14.5753 116.261 14.6519C116.184 14.7284 116.093 14.7891 115.993 14.8305C115.893 14.8719 115.786 14.8931 115.678 14.8931H114.847V8.10918H115.773C115.932 8.10914 116.087 8.16315 116.212 8.26242C116.337 8.36168 116.424 8.50033 116.46 8.65577C116.881 8.19328 117.428 7.94098 118.06 7.94098ZM122.854 8.09713C123.024 8.09708 123.19 8.1496 123.329 8.2475C123.468 8.34541 123.574 8.48391 123.631 8.64405L125.133 12.8486L126.635 8.64415C126.692 8.48402 126.798 8.34551 126.937 8.2476C127.076 8.1497 127.242 8.09718 127.412 8.09724H128.598L126.152 14.3567C126.091 14.5112 125.986 14.6439 125.849 14.7374C125.711 14.831 125.549 14.881 125.383 14.8809H124.333L121.668 8.09713H122.854Z' fill='white'/%3E%3Cpath d='M135.085 14.5514C134.566 14.7616 133.513 15.0416 132.418 15.0416C130.496 15.0416 129.024 13.9345 129.024 11.4396C129.024 9.19701 130.451 7.99792 132.191 7.99792C134.338 7.99792 135.254 9.4378 135.158 11.3979C135.139 11.8029 134.786 12.0983 134.38 12.0983H130.679C130.763 13.1916 131.562 13.7662 132.615 13.7662C133.028 13.7662 133.462 13.7452 133.983 13.6481C134.535 13.545 135.085 13.9375 135.085 14.4985V14.5514ZM133.673 10.949C133.785 9.87621 133.061 9.28752 132.191 9.28752C131.321 9.28752 130.734 9.93979 130.679 10.9489L133.673 10.949Z' fill='white'/%3E%3Cpath d='M137.345 8.11122C137.497 8.11118 137.645 8.16229 137.765 8.25635C137.884 8.35041 137.969 8.48197 138.005 8.62993C138.566 8.20932 139.268 7.94303 139.759 7.94303C139.801 7.94303 140.068 7.94303 140.489 7.99913V8.7265C140.489 9.11748 140.15 9.4147 139.759 9.4147C139.31 9.4147 138.651 9.5829 138.131 9.8773V14.8951H136.462V8.11112L137.345 8.11122ZM156.6 14.0508V8.09104H155.769C155.314 8.09104 154.944 8.45999 154.944 8.9151V14.8748H155.775C156.23 14.8748 156.6 14.5058 156.6 14.0508ZM158.857 12.9447V9.34254H157.749V8.91912C157.749 8.46401 158.118 8.09506 158.574 8.09506H158.857V6.56739L160.499 6.10479V8.09506H161.986V8.51848C161.986 8.97359 161.617 9.34254 161.161 9.34254H160.499V12.7345C160.499 13.2566 160.795 13.44 161.177 13.503C161.626 13.5774 162 13.9024 162 14.3574V14.977C160.446 14.977 158.857 14.9086 158.857 12.9447ZM98.1929 10.1124C98.2033 6.94046 100.598 5.16809 102.895 5.16809C104.171 5.16809 105.342 5.44285 106.304 6.12953L105.914 6.6631C105.654 7.02011 105.16 7.16194 104.749 6.99949C104.169 6.7702 103.622 6.7218 103.215 6.7218C101.335 6.7218 99.9169 7.92849 99.9068 10.1123C99.9169 12.2959 101.335 13.5201 103.215 13.5201C103.622 13.5201 104.169 13.4717 104.749 13.2424C105.16 13.0799 105.654 13.2046 105.914 13.5615L106.304 14.0952C105.342 14.7819 104.171 15.0566 102.895 15.0566C100.598 15.0566 98.2033 13.2842 98.1929 10.1124ZM147.619 5.21768C148.074 5.21768 148.444 5.58663 148.444 6.04174V9.81968L151.82 5.58131C151.897 5.47733 151.997 5.39282 152.112 5.3346C152.227 5.27638 152.355 5.24607 152.484 5.24611H153.984L150.166 10.0615L153.984 14.8749H152.484C152.355 14.8749 152.227 14.8446 152.112 14.7864C151.997 14.7281 151.897 14.6436 151.82 14.5397L148.444 10.3025V14.0508C148.444 14.5059 148.074 14.8749 147.619 14.8749H146.746V5.21768H147.619Z' fill='white'/%3E%3Cpath d='M0.773438 6.5752H2.68066C3.56543 6.5752 4.2041 6.7041 4.59668 6.96191C4.99219 7.21973 5.18994 7.62695 5.18994 8.18359C5.18994 8.55859 5.09326 8.87061 4.8999 9.11963C4.70654 9.36865 4.42822 9.52539 4.06494 9.58984V9.63379C4.51611 9.71875 4.84717 9.88721 5.05811 10.1392C5.27197 10.3882 5.37891 10.7266 5.37891 11.1543C5.37891 11.7314 5.17676 12.1841 4.77246 12.5122C4.37109 12.8374 3.81152 13 3.09375 13H0.773438V6.5752ZM1.82373 9.22949H2.83447C3.27393 9.22949 3.59473 9.16064 3.79688 9.02295C3.99902 8.88232 4.1001 8.64502 4.1001 8.31104C4.1001 8.00928 3.99023 7.79102 3.77051 7.65625C3.55371 7.52148 3.20801 7.4541 2.7334 7.4541H1.82373V9.22949ZM1.82373 10.082V12.1167H2.93994C3.37939 12.1167 3.71045 12.0332 3.93311 11.8662C4.15869 11.6963 4.27148 11.4297 4.27148 11.0664C4.27148 10.7324 4.15723 10.4849 3.92871 10.3237C3.7002 10.1626 3.35303 10.082 2.88721 10.082H1.82373Z' fill='white'/%3E%3Cpath d='M13.011 6.5752V10.7324C13.011 11.207 12.9084 11.623 12.7034 11.9805C12.5012 12.335 12.2068 12.6089 11.8201 12.8022C11.4363 12.9927 10.9763 13.0879 10.4402 13.0879C9.6433 13.0879 9.02368 12.877 8.5813 12.4551C8.13892 12.0332 7.91772 11.4531 7.91772 10.7148V6.5752H8.9724V10.6401C8.9724 11.1704 9.09546 11.5615 9.34155 11.8135C9.58765 12.0654 9.96557 12.1914 10.4753 12.1914C11.4656 12.1914 11.9607 11.6714 11.9607 10.6313V6.5752H13.011Z' fill='white'/%3E%3Cpath d='M15.9146 13V6.5752H16.9649V13H15.9146Z' fill='white'/%3E%3Cpath d='M19.9255 13V6.5752H20.9758V12.0991H23.696V13H19.9255Z' fill='white'/%3E%3Cpath d='M28.2828 13H27.2325V7.47607H25.3428V6.5752H30.1724V7.47607H28.2828V13Z' fill='white'/%3E%3Cpath d='M41.9472 13H40.8046L39.7148 9.16796C39.6679 9.00097 39.6093 8.76074 39.539 8.44727C39.4687 8.13086 39.4262 7.91113 39.4116 7.78809C39.3823 7.97559 39.3339 8.21875 39.2665 8.51758C39.2021 8.81641 39.1479 9.03905 39.1039 9.18554L38.0405 13H36.8979L36.0673 9.7832L35.2236 6.5752H36.2958L37.2143 10.3193C37.3578 10.9199 37.4604 11.4502 37.5219 11.9102C37.5541 11.6611 37.6025 11.3828 37.6669 11.0752C37.7314 10.7676 37.79 10.5186 37.8427 10.3281L38.8886 6.5752H39.9301L41.0024 10.3457C41.1049 10.6943 41.2133 11.2158 41.3276 11.9102C41.3715 11.4912 41.477 10.958 41.644 10.3105L42.558 6.5752H43.6215L41.9472 13Z' fill='white'/%3E%3Cpath d='M45.7957 13V6.5752H46.846V13H45.7957Z' fill='white'/%3E%3Cpath d='M52.0258 13H50.9755V7.47607H49.0859V6.5752H53.9155V7.47607H52.0258V13Z' fill='white'/%3E%3Cpath d='M61.2312 13H60.1765V10.104H57.2146V13H56.1643V6.5752H57.2146V9.20312H60.1765V6.5752H61.2312V13Z' fill='white'/%3E%3C/svg%3E");}@-webkit-keyframes formkit-bouncedelay-formkit-form-data-uid-3fda7add4e-@keyframes formkit-bouncedelay-formkit-form-data-uid-3fda7add4e-.formkit-form[data-uid="3fda7add4e"] blockquote{padding:10px 20px;margin:0 0 20px;border-left:5px solid #e1e1e1;}.formkit-form[data-uid="3fda7add4e"] .seva-custom-content.formkit-form[data-uid="3fda7add4e"] .formkit-modal.guard .formkit-form[data-uid="3fda7add4e"]{box-shadow:0 0px 2px rgba(0,0,0,0.15);max-width:700px;overflow:hidden;}@media only screen and (min-width:800px).formkit-form[data-uid="3fda7add4e"] [data-style="full"].formkit-form[data-uid="3fda7add4e"] .formkit-background{background-position:center center;background-size:cover;min-height:200px;}.formkit-form[data-uid="3fda7add4e"] .formkit-column.formkit-form[data-uid="3fda7add4e"] .formkit-header.formkit-form[data-uid="3fda7add4e"] .formkit-field{margin:0 0 10px 0;}.formkit-form[data-uid="3fda7add4e"] .formkit-input.formkit-form[data-uid="3fda7add4e"] .formkit-fields .formkit-submit.formkit-form[data-uid="3fda7add4e"] .formkit-disclaimer{margin:0 0 15px 0;}.formkit-form[data-uid="3fda7add4e"] .formkit-disclaimer > p.formkit-form[data-uid="3fda7add4e"] .formkit-powered-by-convertkit-container.formkit-form[data-uid="3fda7add4e"][min-width~="600"] [data-style="full"],.formkit-form[data-uid="3fda7add4e"][min-width~="700"] [data-style="full"],.formkit-form[data-uid="3fda7add4e"][min-width~="800"] [data-style="full"].formkit-form[data-uid="3fda7add4e"][min-width~="600"] .formkit-column,.formkit-form[data-uid="3fda7add4e"][min-width~="700"] .formkit-column,.formkit-form[data-uid="3fda7add4e"][min-width~="800"] .formkit-column
Romance Garden Blog Hop Deets
Be sure to jump over to Sherry’s blog today to see the patterns she used to showcase the beauty of this collection and to enter her giveaway. Then go down this list to visit a new designer every day of the hop!
Friday, March 1st
Sherry @ Powered by Quilting
Friday, March 1st
Leanne @ Devoted Quilter
Saturday, March 2nd
Kate @ Katie Mae Quilts
sunday, March 3rd
Jen @ Dizzy Quilter
monday, March 4th
Elizabeth @ Epida Studio
tuesday, March 5th
Sally @ Sally’s Sewing Circle
Wednesday, March 6th
Brianna @ Sew Cute and Quirky
Thursday, March 7th
Jennifer @ Inquiring Quilter <— YOU ARE HERE
Friday, March 8th
Anja @ AnjaQuilts
Saturday, March 9h
Tammy @ Tamarinis
Sunday, March 10th
Kathryn @ Dragonfly’s Quilting Design Studio
Monday, March 11th
Sarah @ Sew Joy Creations
Tuesday, March 12th
Sherry @ Powered By Quilting
Thanks for stopping by!
Tell me…what would you make with the Romance Garden collection?
you might also like
0 notes
Link
Check out this listing I just added to my Poshmark closet: VNTG YARDAGE ~ GORGEOUS FLORAL & LEAF COLONIAL 138 " (UNDER 4 YDS) X 56" W.
0 notes
Text
Episode 34: "A Quick One" (3/30/16)
https://youtu.be/OC6Ftu1FEQQ
Here's a short episode for you this week. I'm hoping that next episode will be a little longer and that I'll have more to chat about. :)
Welcome!
I'm Samashwilliams94 on Ravelry, @sam__williams94 on Twitter, and Samantha Williams on Goodreads, Pinterest and Google +.You can find the Ravelry group under the groups tab as The Yarn Reader Blog and Podcast.Show notes are on the blog.
Week in Review:Nothing exciting, just working. But we did get a box of Japanese candy!
Books:
I finished The Help by Kathryn Stockett.I'm currently reading Harry Potter and the Sorcerer's Stone by J.K. Rowling.Next on the book shelf is Harry Potter and the Chamber of Secrets by J.K. Rowling.
Crafty Stuff:I finished a couple of more pages in my floral coloring book,My works in progress are :Light-weight Patchwork BlanketCabled Knit CardiganLonging for Spring
TV Time:We watched Harry Potter and the Chamber of Secrets.
Gamer's Corner:Still playing The Sims 2.
Added to the Pile:
Loops & Threads Value Pack YarnButtonsBoye Yardage CounterMore progress keepers.
Don't forget about the pattern giveaway in the Ravelry group, I'll be drawing for it on the next episode if we have any entries.
Happy Knitting!
Sam<3
0 notes

Link
Check out this listing I just added to my Poshmark closet: Lot of 6 Pink Floral & Calico Prints - Great for Quilting - 6+ Yards Total.
0 notes
Link
Check out this listing I just added to my Poshmark closet: Vintage Corduroy Fabric.
0 notes
Link
Check out this listing I just added to my Poshmark closet: VINTAGE Quilting Fabrics Yardage 4 Piece Bundle 6½ Yards.
0 notes
Link
Check out this listing I just found on Poshmark: Willoughby Upholstery Fabric in Onyx.
0 notes
Last Seen Blogs


