#forward shield projector module
Explore tagged Tumblr posts
Visit Tumblr Blog
Explore Tumblr blogs with no restrictions, modern design and the best experience.
Last Seen Tumblr Blogs


Fun Fact
In 2020, 27% of US Tumblr users had an annual household income of over $100,000.
Text
Hyperdrive Booster Ring
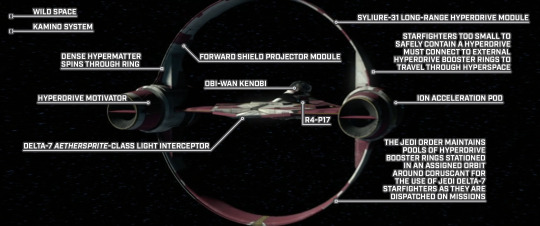


STAR WARS EPISODE II: Attack of the Clones 00:40:56 - 00:41:00
Because of the limit on keywords, here is a list of everything mentioned in these images for search purposes:
• Coruscant • Delta-7 Aethersprite-class light interceptor • forward shield projector module • Galactic Roundel • heat surge radiator • hyperdrive • hyperdrive booster ring • hyperdrive motivator • hypermatter • hyperspace • ion acceleration pod • ion drive thruster nozzle • Jedi Order • Kamino system • Narg • Obi-Wan Kenobi • Outer Rim Territories • port stasis field generator • R4-P17 • Rayter sector • starboard reactor • Syliure-31 long-range hyperdrive module • TransGalMeg Industries • Wild Space
#Star Wars#Episode II#Attack of the Clones#Wild Space#Kamino system#hypermatter#forward shield projector module#Obi-Wan Kenobi#Obi-Wan Kenobi’s Delta-7 Aethersprite#hyperdrive motivator#Delta-7 Aethersprite-class light interceptor#Syliure-31 long-range hyperdrive module#hyperspace ring#hyperframe#hyperdrive booster ring#hyperdrive#hyperspace#ion acceleration pod#R4-P17#Jedi Order#Coruscant#starboard reactor#port stasis field generator#TransGalMeg Industries#Narg#Rayter sector#Outer Rim Territories#Galactic roundel#heat surge radiator#ion drive thruster nozzle
1 note
·
View note
Text


𝑻𝒉𝒆 𝑪𝒍𝒆𝒎𝒆𝒏𝒕𝒊𝒏𝒆 𝒑𝒕. 𝟐: 𝒅𝒆𝒔𝒊𝒈𝒏 𝒂𝒏𝒅 𝒔𝒚𝒔𝒕𝒆𝒎𝒔
𝒔𝒄𝒊-𝒇𝒊 𝒅𝒓
𝒔𝒉𝒊𝒑 𝒄𝒍𝒂𝒔𝒔 𝒂𝒏𝒅 𝒄𝒐𝒏𝒇𝒊𝒈𝒖𝒓𝒂𝒕𝒊𝒐𝒏
Class: Modified mid-class freighter (original designation untraceable)
Dimensions: Compact and fast—built more for speed and evasion than cargo bulk
Original Use: Unknown. Judging by the design mix, she may have once been a light cargo hauler, but at this point, almost nothing about her is stock.
𝒉𝒖𝒍𝒍 𝒂𝒏𝒅 𝒂𝒓𝒎𝒐𝒓
Plating: Mismatched but reinforced. Some hull panels are standard titanium composite, others are salvaged from military vessels. I once found a piece stamped with a defense contractor logo. Soren played dumb.
Damage Markers: Scars from asteroid grazes, plasma burns, and at least one railgun strike that tore through the starboard side before being patched with a piece of what appears to be an old satellite dish.
Stealth Coating: A stolen stealth coating on one side (only one side), giving her a bizarre half-gloss appearance when flying in certain light.
𝒑𝒓𝒐𝒑𝒖𝒍𝒔𝒊𝒐𝒏 𝒂𝒏𝒅 𝒎𝒂𝒏𝒆𝒖𝒗𝒆𝒓𝒂𝒃𝒊𝒍𝒊𝒕𝒚
Here’s where things get... illegal.
Engine Type: Tri-core fusion drive (overclocked illegally)
Thrusters: Multi-angle vectoring thrusters scavenged from a racing skiff
Hyperspace Drive: Installed after-market. Very not standard. Definitely not licensed. Burns through fuel like sin, but gets the job done.
Maneuverability: Shockingly agile for her size. She’s not built to win dogfights—she’s built to not get hit.
Speed: Capable of outpacing most patrol cruisers and nearly anything in her class. Soren once escaped a blockade by flipping her vertical, killing main thrust, and gliding between two gunships with only manual microthrusters. Clemmy didn’t love that. But she did it.
Max Velocity: Classified (by Soren) as “if she shakes apart, you pushed her too far.”
Signature Trick: Emergency micro-bursts for fast stops or rapid angular shifts—great for dodging, terrible for unsecured passengers.
𝒐𝒇𝒇𝒆𝒏𝒔𝒊𝒗𝒆 𝒔𝒚𝒔𝒕𝒆𝒎𝒔
While not technically a warship, Clemmy has teeth—and Soren is not shy about using them.
Primary Weapons:
Retractable twin plasma cannons mounted under the nose (illegally modified for rapid cycling)
Hidden turret along the dorsal fin with full 360° tracking (camouflaged beneath sensor shielding)
Secondary Systems:
Ion net disruptor (used for disabling ships mid-chase)
Forward grappling harpoon (officially for salvage… unofficially for “creative boarding solutions���)
Mod Notes: All weapons have been internally rewired for faster charge times and energy efficiency. Soren insists it’s “completely safe.” The ship disagrees. The floor near the control relay is still scorched.
𝒅𝒆𝒇𝒆𝒏𝒔𝒊𝒗𝒆 𝒔𝒚𝒔𝒕𝒆𝒎𝒔
Shielding: Layered energy-dispersal field adapted from outdated military specs. It’s finicky, but when tuned right, it can absorb an entire volley without so much as a flicker.
Hull Reinforcement: Polyceramic inner shell under the patchwork hull. Not factory standard. Probably military surplus. Possibly stolen.
Cloaking:
Partial stealth mode: One side only. Meant for short bursts, ambushes, or dodging sensor sweeps. Jax once described it as “trying to hide behind your own arm.”
Signature Dampeners: Basic-grade dampeners, good enough to fool low-level scans or confuse weapons locks for a few seconds.
Countermeasures:
Chaff and flare deployment for missile evasion
ECM scrambler array that definitely violates at least five galactic communication laws
Reinforcement Field: Short-range gravitic pulse projector, used to knock boarding parties off balance or repel magnetic tethers.
𝒏𝒂𝒗𝒊𝒈𝒂𝒕𝒊𝒐𝒏 𝒂𝒏𝒅 𝒑𝒊𝒍𝒐𝒕𝒊𝒏𝒈
Primary Navigation System: Jury-rigged hybrid between an outdated freighter nav-core and a racing AI module. The interface is messy, but the calculations are blindingly fast—when they don’t crash mid-jump.
Manual Controls: Everything important is mapped to tactile controls. Soren doesn’t trust full automation. If the nav AI glitches mid-dive, he wants to feel the override.
Autopilot: Exists. Technically. Mostly used as a glorified parking brake or when Soren needs to sleep for 20 minutes in a safe orbit.
Charting Software: Half-legal, half-pirated. Capable of plotting hyperspace routes through narrow, high-risk corridors that most ships avoid.
Backup Systems: A wall-mounted hardcopy star chart in the cockpit. Just in case. Zia thinks this is hilarious. Soren calls it “responsible.”
𝒅𝒐𝒄𝒌𝒊𝒏𝒈 𝒄𝒂𝒑𝒂𝒄𝒊𝒕𝒚 𝒂𝒏𝒅 𝒂𝒄𝒄𝒆𝒔𝒔
Docking Clamps: Can attach to standard civilian ports, refueling stations, and most illicit trade hubs. May need to be “persuaded” into alignment.
Shuttle Bay: None. She’s too compact for internal hangars. Instead, she has one reinforced top-hatch cradle rigged for small detachable pods—used rarely, and only when absolutely necessary.
Airlocks:
Main Port: Standard-sized, sealed, and usually a bit stubborn when opening.
Secondary Hatch: Hidden behind a supply wall in the engine bay. Used for stealth entries and exits.
𝒓𝒆𝒑𝒂𝒊𝒓 𝒂𝒏𝒅 𝒎𝒂𝒊𝒏𝒕𝒆𝒏𝒂𝒏𝒄𝒆 𝒏𝒆𝒆𝒅𝒔
Routine Repairs: Constant. Something is always groaning, leaking, sparking, or “just about to give out but not yet.”
Spare Parts: Stored in crates scattered across the ship—engine parts in the pantry, coolant lines under the bench seat, wiring spools in my hydroponics pod (which I do not appreciate).
Self-Diagnostics: Unreliable. The system either reports “everything is fine” (it’s not), or starts shrieking about seven simultaneous reactor leaks (there are none). Soren usually ignores it and just listens to the hum of the engine to diagnose problems.
Repairs in Flight: Doable. Often necessary. Soren has made mid-warp hull welds while dangling from a tether. Zia once had to climb into the bulkhead to manually restart a fried fuse bank after a flare surge.
Critical Weakness: The fuel converter. If anything’s going to go first, it’s that. It’s been patched, rewired, and coaxed with offerings—but one day, it’s going to die loudly.
𝒔𝒚𝒔𝒕𝒆𝒎 𝒊𝒏𝒕𝒆𝒈𝒓𝒂𝒕𝒊𝒐𝒏
Power Grid: Custom-wired. Inconsistent. If too many systems are running at once (say, stealth mode, shields, and weapons), things start flickering. Choosing what gets power is sometimes a strategic decision—or a desperate one.
AI Integration: No full AI. Just a scattered handful of voice-assist systems, diagnostic subroutines, and a navigation core that occasionally asks Soren if he’s “sure about that” when he plots something stupid.
Voice Recognition: Primarily responds to Soren’s voice, but Zia has jury-rigged access to certain commands—especially life support, lighting, and doors.
𝒅𝒐𝒄𝒌𝒊𝒏𝒈/𝒃𝒐𝒂𝒓𝒅𝒊𝒏𝒈 𝒇𝒆𝒂𝒕𝒖𝒓𝒆𝒔
Hard-dock only. No fancy mag-coupling or remote landers.
Zero-G Transfer Capability: Yes, with magnetic grip points and a manually sealed transition tunnel.
Boarding Defense: Reinforcement field, sealed bulkheads, and at least three blasters stashed near the doors “just in case.”
𝒔𝒚𝒔𝒕𝒆𝒎 𝒏𝒐𝒕𝒆𝒔
Most systems are custom-built, hotwired, or frankensteined together. Only Soren knows how everything works—and even he sometimes has to hit things to make them run.
Diagnostics require manual calibration. The ship’s internal sensors are either hyper-sensitive or utterly dead.
Flight path records? Wiped. Regularly. On principle.
𝒊𝒏 𝒔𝒉𝒐𝒓𝒕:
Clementine might look like a rustbucket. But she’s got the firepower of a private gunship, the speed of a racer, and the evasive instincts of a hunted animal. She doesn’t win fights with brute force—she wins them by being faster, smarter, and just illegal enough to stay one step ahead of the galaxy’s worst.
𝒆𝒙𝒕𝒓𝒂
Ok, I'm gonna be honest here, my friend who's really into sci-fi had to help me write most of this, because as I've said before, I know like nothing about it. So all the fancy technical stuff in here was all him.
@aprilshiftz @lalalian
#reality shifting#shiftblr#desired reality#shifters#scripting#original dr rambles#reality shifter#dr scrapbook#original dr scrapbook
6 notes
·
View notes
Text
Are low beams and high beams headlights the same thing?
Answer: Low beam vs. high beam – key differences explained Low beam and high beam are not the same; they have different purposes and operate under different technical specifications. Here is a detailed comparison based on design, functionality and safety regulations:
Brightness and illumination range** Low beam: emits medium brightness (≈40m visibility) with a focus on short-range, asymmetrical illumination, with a wide light distribution and downward slant to avoid dazzling other drivers. High beam: provides high-intensity light (≈100m visibility) with symmetrical, long-range coverage for maximum forward visibility in dark conditions.
Beam pattern and direction** Low beam: asymmetrical beam preferentially illuminates the road on the driver's side while minimizing glare for oncoming vehicles. Suitable for night driving environments on urban roads, meeting or with a vehicle ahead. The light is directed downward and slightly to the right (in right-hand traffic countries) to highlight the edge of the road and pedestrians. High beam: Symmetrical beam evenly illuminates both sides of the road ahead, usually used on open stretches with no oncoming traffic or vehicles ahead to enhance the driver's field of vision, ideal for unlit highways or rural areas. Light shines straight ahead without glare-reducing shielding, which can be dangerous when other vehicles are nearby.
Use cases and safety regulations** Low beam: Must be used in urban areas, in rain/fog, or when following/approaching other vehicles. Must comply with glare control standards (e.g. ECE regulations). High beam: Only used on dark, empty roads with no oncoming traffic. Must be dimmed when within 150-200 meters of other vehicles to prevent dazzling the driver. Not allowed in fog, as its strong light reflects off water droplets, reducing visibility.
Technical design** Low beam: Uses a diffuser lens or reflector to limit the upward spread of light. Modern versions often include adaptive features (e.g. turn signals). High beam: Use a focusing reflector or projector lens to maximize light output. Some advanced systems (e.g., matrix LEDs) automatically adjust the beam to avoid glare. Different filaments in the same bulb: Some models (such as those using H4 model bulbs) achieve high and low beam switching through dual filaments in the same bulb, with different filaments for low and high beams. Independent modules or light sources: High-end models (such as Mercedes-Benz geometric multi-beam LED headlights) may use independent LED modules to dynamically adjust the beam by controlling different numbers of point light sources (such as 84 LEDs), with low beams being more dispersed and high beams being more concentrated.
Circuits and controls Circuit separation: Low beams and high beams are usually controlled by different circuits. If the low beam fails and the high beam is normal, it may be a fuse, relay, or dimmer switch failure in the low beam circuit, not a bulb problem. Automatic adjustment technology: Some vehicles are equipped with adaptive beam systems (such as AFS), which can automatically adjust the beam angle and range according to vehicle speed, steering angle, etc. to optimize the lighting effect. Summary While both beams enhance nighttime driving, low beam prioritizes the safety of other road users, while high beam maximizes visibility in isolated conditions. Misuse of high beam (e.g., in traffic) can create dangerous glare and violate road safety laws. Always comply with local regulations and switch beams appropriately for road conditions.

#led lights#car lights#led car light#youtube#led auto light#led headlights#led light#young artist#led headlight bulbs#ledlighting#highlights#headlight bulb#headlamp#headlight#carparts#cars#car light#truck#lighting#lights
0 notes
Text
Walkthrough - Phendrana: Into the Core
Welcome to a darker place in Phendrana. You will now begin to head into the Research Core. Enter into Specimen Storage, disable the defense turret (easily done if you charge your Wave Beam) and prepare your scan visor. A Shadow Pirate will come hopping out after you. Then press forward into the Research Entrance where you will be spotted. Then out come the Space Pirates . But, before you scan them and blast them to pieces, turn around and look at the door you just entered through. Scan it and you'll see that it is a Locked Door , which can only be opened by defeating all the enemies in the room. It enters into your Log Book, so it's worth examining.
After you've defeated everyone in that room, go back to the bottom floor and you'll see an unopened door. This is the Map Station for Phendrana Drifts. Once it is downloaded, head back up the walkways and exit through the top of the room.
This is the Research Entrance. You'll find the next room, Research Lab Hydra, is also full of Space Pirates. Destroy them all and then get your scan visor ready to scan the area. On the bottom floor you will find three Pirate Data log book entries: Security Breaches , Phazon Analysis , Mining Status . At this point you should have completed 50% of your Log Book, thus unlocking Image Gallery 1, accessible through the main menu. Upstairs there is another set of computer terminals, which also contains the Pirate Data Parasite Larva and Glacial Wastes . Move out through the Wave Beam door on the ceiling. You should end up in the Observatory. Clear out the Space Pirates and head to the bottom. More Pirate Data is available for downloading: Phazon Program and Contact . Now, scan the center module to activate one of the Morph Ball slots in the room. Bomb it and you will begin to send power to the hub. You will need to bomb the second Morph Ball slot located on the opposite side, however. This will take some large leaps, but you can do it. Once activated, you will trigger power to the Morph Ball spinners below. Roll down there and Boost Ball spin in all four of them. This will cause the power to flow to the astronomical holographic projector. Be sure to scan the new Research Data floating around: the planets Zebes and Tallon IV . Your goal is to make it to the top by platforming around the edge. There are some very distant jumps to complete, but it is doable. At the top you will find the Super Missile upgrade, resting in the center of the Observatory.
Move through the West Tower Entrance and access the Control Tower transport. As soon as you enter the Control Tower, a battle is waiting for you. Clear out the Space Pirates on the ground and then prepare to meet the Flying Pirate , an agile, missile-shooting unit that will require a little more persistence. Try firing back with your own missiles; they're just as quick and deadly, but be wary of the Flying Pirate when it falls. Like a bottle rocket, it will zoom towards you out of control and explode. You should burn through about four of them before the doors unlock. If you need any health, just shoot the nearby boxes. Then head into the East Tower and activate the transport to the Research Lab Aether. Inside the lab you will see several things to scan. First check out the two Pirate Data entries Meta Ridley and Metroid Studies . You will also be treated to your first Metroid encounter. Blast it with missiles and your Wave Beam. If it attaches itself to you, just roll into a ball and set a bomb to jolt it loose.
A Space Pirate will jump through a window to attack you. Proceed into that room (defeat the pirates, of course) and check the computer terminals at the top and bottom of the room. You'll find the Pirate Data Phazon Infusion , Metroid Forces , and Metroid Morphology . There are several more stasis containment units in the lab. There is one more Metroid hiding in one of them. Shoot the glass with a missile to free it and dispose of it. Take a closer look at the rest of the stasis units. An Energy Tank is hidden in one that is adjacent to the wall. Blast it open with a missile and power up! But wait -- there's more. Take the elevator back up to the walkways hanging above. If you look closely at the piping in the room, you'll see there is a Missile Expansion hidden at the end of one. You'll have to jump up there and roll in Morph Ball form to get it. It's tricky too.
From the lower floor, drop down into the Research Core Access. Don't be surprised to see your first Ice Beetle . As you enter into the Research Core, you will be met with some opposition from Space and Flying Pirates. Destroy them and then scan the nearby terminal to disconnect the containment unit below. You will get a quick glimpse via cut-scene of a visor upgrade. Continue downward -- watch and listen for defense turrets -- and access the next terminal, disconnecting yet another power source to the unit below. Finally, when you reach the bottom there is one last terminal to scan, which frees the force field around your new Thermal Visor . Grab it and prepare for a power outage. Accustom tapping down on the D-pad to use it. You're going to need it immediately, as Shadow Pirates will be running around the area causing havoc. Likewise, the Metroids will grow restless. Blast them away with your Super Missiles if you don't want to prolong the battles. Return up to the top where you entered. The door no longer has power. This is where your Thermal Visor comes in handy. On the right side of the door is a power conduit (only visible with the Thermal Visor), which can send power from your Wave Beam to the door. Simply shoot it to continue forward.
On the other side of the door you will find a Sentry Drone waiting for you. They cause major static to your visor, so try blasting them quickly with missiles. Move back through the Research Lab Aether and be wary of more Shadow Pirates. Right now you should just focus on getting back to the save station located in the Observatory. If you make it there all right, you're next check point should be the save station located off of the Ruined Courtyard. You'll need all your energy for the forthcoming boss fight. In the Ruined Courtyard flip on your Thermal Visor and examine the door straight across from the save point. You'll see a glowing power conduit on the archway above it. It is shielded by cordite, however, so you'll need to use your Super Missiles (Charge Beam+Y) to uncover it. Then send power to the door by shooting it with your Wave Beam. Continue forward and enter into the Quarantine Cave, and prepare for battle.
Boss: Thardus
As always, be sure to scan for vital Log Book data immediately. You'll find that Thardus, a rock structure infused with Phazon, cannot be targeted as usual. The data suggests you should try another visor, and that's just what you need to do. Use your Thermal Visor to locate the hot spots on Thardus. You'll be able to lock on to him while using this visor. You can easily crack the highlighted stone portion of his body with the use of charge blasts and missiles. Try not to get too antsy and use Super Missiles just yet. Save those for a bit. When the Phazon-infused rock cracks open, it will expose the highly radioactive material beneath it. The material is far too bright for your Thermal Visor, so just switch it off and you'll be able to lock on as usual. Repeat the same process of hitting the weak spot with charge blasts and missiles, all the while sidestepping out of his line of fire.
Thardus will often summon rocks from beneath the ground and toss them your way. Take the moment to lock on to them and blast them to pieces. Note: if you're in Thermal Visor mode and try this, the Phazon material inside will blind you. If you get frozen by Thardus, just quickly tap the B-button to get out of it. Another attack that you must get a handle on is his boulder form. You will him animate, leaning back and then curling up in ball form. This is your cue to turn into a Morph Ball and boost out of the way. It's important that you memorize this animation. As soon as he begins to roll into a ball, do the same and boost out of the way. Thardus will also summon snow storms to blur your view. Try not to let it disorient you too much, and use your Thermal Visor when possible to cut through the haze. When it gets to the point that his Phazon is exposed during a snow storm and you cannot see him, try to get as close as possible and use those Super Missiles. You should eventually be able to work him down to the final center point of his body. Work through it and he will die.
You are rewarded with the Spider Ball , which is just about the coolest upgrade in the game. It allows you to attach yourself to magnetic Spider Ball Tracks (scan!), which are all around the world. To accustom you to the process, you actually have to escape Thardus's lair by using the Spider Ball. You should find another exit, leading you through the South Quarantine Tunnel and to the Magmoor Caverns South transport. Proceed downward into the warmer territory. There is a Blast Shield and save station right behind the elevator when you arrive in Magmoor. After freshening up, head into the Magmoor Workstation and fight the Flying Pirates from behind the entrance door if you want to save some health. Then jump down to the bottom where you'll see three glowing passages: green, purple, and blue. Scan around and you'll see there is a pillar-shaped machine that is not receiving power. Flip on your Thermal Visor. This reveals a power conduit next to each colored passageway. Flash power through them with your Wave Beam and the machine will begin to function. This cools the lava beneath the blue passage. Roll underneath the grating and access the area behind the, blue passage. You will see a panel ready for the scanning. Do so and you will cool the lava in the green passageway. Repeat this process and you will end up behind the purple passageway where an Energy Tank awaits you.
Face the purple passage and exit the door directly to the right. This leads into the South Core Tunnel. The giant mollusk Puddle Spore will be standing in your way. Shoot its mouth when it opens and jump on it like a platform when it flips over. Use the same technique to get across the Geothermal Core, and nevermind the tall pillars that spike through the room. In the North Core Tunnel use a missile to shoot down the stalactite that is hanging above, and use it as a platform. Move forward into Twin Fires and repeat the same procedure by missile-blasting the stalactite at the front of the room. Hug the right wall, take down another stalactite and move to the other side of the cave. Yet another stalactite must be used as a platform. Open the next door and you should be in Twin Fires Tunnel, which connects you to the Tallon Overworld West transport. You may have seen this room before if you went snooping around. Use your Spider Ball and roll into the small hole. Hold on to the magnetic track and cross the lava pit. Then take the transport up to Tallon Overworld. Then head over to the Chozo Ruins West transport.
Right now you should be heading for the Main Plaza in Chozo Ruins. Remember that half-pipe structure in there? Time to put it to use. Roll into Morph Ball so you're under the bridge and slip underneath it to grab a Missile Expansion pack.. Now roll your way into the Ruined Fountain. With the water free of toxins and your new magnetic Spider Ball, you'll find a nice little puzzle awaits you. Bomb your way up on top of the fountain spout. It will spit you onto the Spider Ball track above with leads to another Missile Expansion . After finishing up that, head into the Aboretum right next door with the goal of arriving in the Watery Hall. There is a small Morph Ball tunnel at the end where you original got the Charge Beam. Bomb it and roll through it to the Dynamo. Once in the Dynamo, scan the room and locate a weakened metal structure. You'll find a Missile Expansion pack behind it. Then look above and access the Spider Ball track , which leads to yet another Missile Expansion . Now would be a good time to save off of the Gathering Hall. Platform to the top of the hall and look above the doorway to the East Atrium. Yet another Missile Expansion is hidden above it. You'll need to use the red lights as stepping stones before you can double jump up there. Bomb the wall and grab the missiles.
Next head through the East Atrium towards the Furnace As soon as you enter you will see a Spider Ball track. It leads you to a whole new area. You'll need to use Boost Ball to get across some disappearing blocks: quickly boost across the disappearing blocks and lay a morph ball bomb to jump up to the blocks on the right. You'll have to be very quick or you'll fall down a level and you'll have to backtrack a tad and try again.
Once in the heart of the Furnace get your scanner out. The little critters carving their way around the elevated Spider Ball tracks are called Plated Parasites . You can't do anything with that track for now, but keep it in mind. Spin around and head to the other side of the room where you'll find a Morph Ball tunnel and Chozo Lore . Scan it and roll through the tunnel to access the Crossway. There's a lot to do in this room. You'll notice the half-pipe in front of you. Use it to propel yourself high enough to access the other side. Once there scan the three Chozo Lore engravings. After reading through them, you should scan a cordite shield just on the adjacent wall. Blast through it with a Super Missile shot and scan the reticle behind it. This will activate one of a set of Spider Ball tracks. Use the half-pipe to launch yourself up to it, then bomb the nearby Morph Ball slot. Repeat this process and you will be able to take a special Morph Ball elevator up to a Missile Expansion .
After receiving it, head through the archway and into the Elder Hall Access. You should eventually arrive in the Hall of the Elders where you'll immediately find a Morph Ball tunnel that leads to a Missile Station . This should be your first encounter with one; scan it. Then jump down into the center of the Hall of Elders. The room will darken and you will meet your first Chozo Ghost . Use a few Super Missiles to dispose of him and then walk behind the giant Chozo statue in the room and check out the latest Chozo Lore . With that out of the way, jump into the hands of the Chozo statue and change to Morph Ball form. It will toss you like a bowling ball, ramping you up the opposite wall of the room where you can use your Spider Ball to access a Morph Ball slot. Bomb the slot and you will reveal three more special slots.
Jump back over by the Missile Station and look up where you can find another ledge to platform on. This will lead you to the three slots. One of them will work with your Wave Beam. Shoot it and you will reveal another Morph Ball slot behind it. Bomb it and a new path will be opened in front of the Chozo Elder. Once again, roll into his hands and you should be able to follow a new path that leads you behind an energy shield. Scan the nearby reticle to take it offline and then enter the unopened door in the same vicinity. This leads to the Reflecting Pool, which is surrounded by Stone Toads. Roll into a ball and drop into the center of the pool. Bomb the drain to release the water. Now you can see the pool acts as a half-pipe. Use it -- avoiding the Toads -- and boost up to the second floor. There are two Blast Shields. You're looking for the Antechamber. Walk in and you'll find your new best friend, the Ice Beam . After, head do the door across from the Antechamber, which leads to a Save Station. From Save Station 3 you can roll into Morph Ball form and access Tallon Overworld East transport, but don't use it just yet. You should also walk in to the unopened Ice Beam door on the top floor of the Reflecting Pool. This is another transport to Tallon Overworld South.
With that out of the way, head back to the Hall of Elders. This time use your Ice Beam to activate the second Morph Ball slot located behind the Chozo Elder. He will then toss you down a new path, which leads to an Energy Tank . Who couldn't use one of those, huh?
5 notes
·
View notes
Text
1:50 Sienar Fleet Systems “TIE/E” Escort Fighter, “801”, based on board of the Imperial-class Star Destroyer ‘Vehement’ during the Battle of Endor (Whif/kitbashing)
+++ DISCLAIMER +++ Nothing you see here is real, even though the conversion or the presented background story might be based historical facts. BEWARE!
Some background: The TIE/LN starfighter, or TIE/line starfighter, simply known as the TIE Fighter or T/F, was the standard Imperial starfighter seen in massive numbers throughout most of the Galactic Civil War and onward. The TIE Fighter was manufactured by Sienar Fleet Systems and led to several upgraded TIE models such as TIE/sa bomber, TIE/IN interceptor, TIE/D Defender, TIE/D automated starfighter, and many more.
The original TIEs were designed to attack in large numbers, overwhelming the enemy craft. The Imperials used so many that they came to be considered symbols of the Empire and its might. They were also very cheap to produce, reflecting the Imperial philosophy of quantity over quality.
However, a disadvantage of the fighter was its lack of deflector shields. In combat, pilots had to rely on the TIE/LN’s maneuverability to avoid damage. The cockpit did incorporate crash webbing, a repulsorlift antigravity field, and a high-g shock seat to help protect the pilot, however these did next to nothing to help protect against enemy blaster fire.
Due to the lack of life-support systems, each TIE pilot had a fully sealed flight suit superior to their Rebel counterparts. The absence of a hyperdrive also rendered the light fighter totally dependent on carrier ships when deployed in enemy systems. TIE/LNs also lacked landing gear, another mass-reducing measure. While the ships were structurally capable of "sitting" on their wings, they were not designed to land or disembark their pilots without special support. On Imperial ships, TIEs were launched from racks in the hangar bays.
The high success rate of more advanced Rebel starfighters against standard Imperial TIE Fighters resulted in a mounting cost of replacing destroyed fighters and their pilots. That, combined with the realization that the inclusion of a hyperdrive would allow the fleet to be more flexible, caused the Imperial Navy to rethink its doctrine of using swarms of cheap craft instead of fewer high-quality ones, leading to the introduction of the TIE Advanced x1 and its successor, the TIE Avenger. The following TIE/D Defender as well as the heavy TIE Escort Fighter (or TIE/E) were touted as the next "logical advance" of the TIE Series—representing a shift in starfighter design from previous, expendable TIE models towards fast, well armed and protected designs, capable of hyperspace travel and long-term crew teams which gained experience and capabilities over time.
The TIE/E Escort, was a high-performance TIE Series starfighter developed for the Imperial Navy by Sienar Fleet Systems and it was introduced into service shortly before the Battle of Endor. It was a much heavier counterpart to the agile and TIE/D fighter, and more of an attack ship or even a light bomber than a true dogfighter. Its role were independent long range operations, and in order to reduce the work load and boost morale a crew of two was introduced (a pilot and a dedicated weapon systems officer/WSO). The primary duty profile included attack and escort task, but also reconnoiter missions. The TIE/E shared the general layout with the contemporary TIE/D fighter, but the cockpit section as well as the central power unit were much bigger, and the ship was considerably heavier.
The crew enjoyed – compared with previous TIE fighter designs – a spacious and now fully pressurized cockpit, so that no pressurized suits had to be worn anymore. The crew members sat in tandem under a large, clear canopy. The pilot in front had a very good field of view, while the WSO sat behind him, in a higher, staggered position with only a limited field of view. Both work stations had separate entries, though, and places could not be switched in flight: the pilot mounted the cockpit through a hatch on port side, while the WSO entered the rear compartment through a roof hatch.
In a departure from the design of previous TIE models, instead of two parallel wings to either side of the pilot module, the TIE Escort had three quadanium steel solar array wings mounted symmetrically around an aft section, which contained an I-s4d solar ionization reactor to store and convert solar energy collected from the wing panels. The inclusion of a third wing provided additional solar power to increase the ship’s range and the ship’s energy management system was designed to allow weapons and shields to be charged with minimum loss of power to the propulsion system.
Although it was based on the standard twin ion engine design, the TIE/E’s propulsion system was upgraded to the entirely new, powerful P-sz9.8 triple ion engine. This allowed the TIE/E a maximum acceleration of 4,220 G or 21 MGLT/s and a top speed of 144 MGLT, or 1,680 km/h in an atmosphere — almost 40 percent faster than a former standard TIE Fighter. With tractor beam recharge power (see below) redirected to the engines, the top speed could be increased to 180 MGLT in a dash. In addition to the main thrusters located in the aft section, the TIE Escort’s triple wing design allowed for three arrays of maneuvering jets and it featured an advanced F-s5x flight avionics system to process the pilot’s instructions. Production models received a class 2, ND9 hyperdrive motivator, modified from the version developed for the TIE Avenger. The TIE/E also carried a Sienar N-s6 Navcon navigation computer with a ten-jump memory.
Special equipment included a small tractor beam projector, originally developed for the TIE Avenger, which could be easily fitted to the voluminous TIE Escort. Models produced by Ysanne Isard’s production facility regularly carried such tractor beams and the technology found other uses, such as towing other damaged starfighters until they could achieve the required velocity to enter hyperspace. The tractor beam had limited range and could only be used for a short time before stopping to recharge, but it added new tactics, too. For instance, the beam allowed the TIE/E crews to temporarily inhibit the mobility of enemy fighters, making it easier to target them with the ship’s other weapon systems, or prevent enemies from clear shots.
The TIE Escort’s weapons systems were primarily designed to engage bigger ships and armored or shielded targets, like armed freighters frequently used by the Alliance. Thanks to its complex weapon and sensor suite, it could also engage multiple enemy fighters at once. The sensors also allowed an effective attack of ground targets, so that atmospheric bombing was a potential mission for the TIE/E, too. . The TIE Escort Fighter carried a formidable array of weaponry in two modular weapon bays that were mounted alongside the lower cabin. In standard configuration, the TIE/E had two L-s9.3 laser cannons and two NK-3 ion cannons. The laser and ion cannons could be set to fire separately or, if concentrated power was required, to fire-linked in either pairs or as a quartet. The ship also featured two M-g-2 general-purpose warhead launchers, each of which could be equipped with a standard load of three proton torpedoes or four concussion missiles. Depending on the mission profile, the ship could be fitted with alternative warheads such as proton rockets, proton bombs, or magnetic pulse warheads. Additionally, external stores could be carried under the fuselage, which included a conformal sensor pallet for reconnaissance missions or a cargo bay with a capacity for 500 kg (1.100 lb).
The ship’s defenses were provided by a pair of forward and rear projecting Novaldex deflector shield generators—another advantage over former standard TIE models. The shields were designed to recharge more rapidly than in previous Imperial fighters and were nearly as powerful as those found on capital ships, so that the TIE/E could engage other ships head-on with a very high survivability. The fighters were not equipped with particle shields, though, relying on the reinforced titanium hull to absorb impacts from matter. Its hull and wings were among the strongest of any TIE series Starfighter yet.
The advanced starfighter attracted the attention of several other factions, and the Empire struggled to prevent the spread of the technology. The ship’s high cost, together with political factors, kept it from achieving widespread use in the Empire, though, and units were assigned only to the most elite crews.
The TIE/E played a central role in the Empire’s campaign against rogue Grand Admiral Demetrius Zaarin, and mixed Defender and Escort units participated in several other battles, including the Battle of Endor. The TIE Escort continued to see limited use by the Imperial Remnant up to at least 44 ABY, and was involved in numerous conflicts, including the Yuuzhan Vong War..
The kit and its assembly: Another group build contribution, this time to the Science Fiction GB at whatifmodelers.com during summer 2017. Originally, this one started as an attempt to build a vintage MPC TIE Interceptor kit which I had bought and half-heartedly started to build probably 20 years ago. But I did not have the right mojo (probably, The Force was not strong enough…?), so the kit ended up in a dark corner and some parts were donated to other projects.
The sun collectors were still intact, though, and in the meantime I had the idea of reviving the kit’s remains, and convert it into (what I thought was) a fictional TIE Fighter variant with three solar panels. For this plan I got myself another TIE Interceptor kit, and stashed it away, too. Mojo was still missing, though.
Well, then came the SF GB and I took it as an occasion to finally tackle the build. But when I prepared for the build I found out that my intended design (over the years) more or less actually existed in the Star Wars universe: the TIE/D Defender! I could have built it with the parts and hand and some improvisation, but the design similarity bugged me. Well, instead of a poor copy of something that was more or less clearly defined, I rather decided to create something more individual, yet plausible, from the parts at hand.
The model was to stay a TIE design, though, in order to use as much donor material from the MPC kits as possible. Doing some legwork, I settled for a heavy fighter – bigger than the TIE Interceptor and the TIE/D fighter, a two-seater. Working out the basic concept and layout took some time and evolved gradually. The creative spark for the TIE/E eventually came through a Revell “Obi Wan’s Jedi Starfighter” snap fit kit in my pile – actually a prize from a former GB participation at phoxim.de (Thanks a lot, Wolfgang!), and rather a toy than a true model kit.
The Jedi Fighter was in so far handy as it carries some TIE Fighter design traits, like the pilot capsule and the characteristic spider web windscreen. Anyway, it’s 1:32, much bigger than the TIE Interceptor’s roundabout 1:50 scale – but knowing that I’d never build the Jedi Starfighter OOB I used it as a donor bank, and from this starting point things started to evolve gradually.
Work started with the cockpit section, taken from the Jedi Starfighter kit. The two TIE Interceptor cockpit tubs were then mounted inside, staggered, and the gaps to the walls filled with putty. A pretty messy task, and once the shapes had been carved out some triangular tiles were added to the surfaces – a detail I found depicted in SW screenshots and some TIE Fighter models.
Another issue became the crew – even though I had two MPC TIE Interceptors and, theorectically, two pilot figures, only one of them could be found and the second crewman had to be improvised. I normally do not build 1:48 scale things, but I was lucky (and happy) to find an SF driver figure, left over from a small Dougram hoovercraft kit (from Takara, as a Revell “Robotech” reboxing). This driver is a tad bigger than the 1:50 TIE pilot, but I went with it because I did not want to invest money and time in alternatives. In order to justify the size difference I decided to paint the Dougram driver as a Chiss, based on the expanded SW universe (with blue skin and hair, and glowing red eyes). Not certain if this makes sense during the Battle of Endor timeframe, but it adds some color to the project – and the cockpit would not be visible in much detail since it would be finished fully closed.
Reason behind the closed canopy is basically the poor fit of the clear part. OOB, this is intended as an action toy – but also the canopy’s considerable size in 1:50 would prevent its original opening mechanism. Additional braces on the rel. large window panels were created with self-adhesive tape and later painted over.
The rear fuselage section and the solar panel pylons were scratched. The reactor behind the cockpit section is actually a plastic adapter for water hoses, found in a local DIY market. It was slightly modified, attached to the cockpit “egg” and both parts blended with putty. The tail opening was closed with a hatch from the OOB TIE Interceptor – an incidental but perfect match in size and style.
The three pylons are also lucky finds: actually, these are SF wargaming/tabletop props and would normally be low walls or barriers, made from resin. For my build, they were more or less halved and trimmed. Tilted by 90°, they are attached to the hull with iron wire stabilizers, and later blended to the hull with putty, too.
Once the cockpit was done, things moved more swiftly. The surface of the hull was decorated with many small bits and pieces, including thin styrene sheet and profiles, steel and iron wire in various strengths, and there are even 1:72 tank tracks hidden somewhere, as well as protective caps from syringes (main guns and under the rear fuselage). It’s amazing how much stuff you can add to such a model – but IMHO it’s vital in order to create some structure and to emulate the (early) Star Wars look.
Painting and markings: The less spectacular part of the project, even though still a lot of work because of the sheer size of the model’s surface. Since the whole thing is fictional, I tried to stay true to the Imperial designs from Episode IV-VI and gave the TIE/E a simple, all-light grey livery. All basic painting was done with rattle cans. Work started with a basic coat of grey primer. On top of that, an initial coat of RAL 7036 Platingrau was added, esp. to the lower surfaces and recesses, for a rough shading effect. Then, the actual overall tone, RAL 7047, called “Telegrau 4”, one of Deutsche Telekom’s corporate tones, was added – mostly sprayed from abone and the sides onto the model. Fuselage and panels were painted separately, overall assembly was one of the final steps.
The solar panels were to stand out from the grey rest of the model, and I painted them with Revell Acrylic “Iron Metallic” (91) first, and later applied a rather rich wash with black ink , making sure the color settled well into the many small cells. The effect is pretty good, and the contrast was slightly enhanced through a dry-brushing treatment.
Only a few legible stencils were added all around the hull (most from the scrap box or from mecha sheets), the Galactic Empire Seal were inkjet-printed at home, as well as some tactical markings on the flanks, puzzled together from single digits in "Aurebash", one of the Imperial SW languages/fonts. For some variety and color highlights, dozens of small, round and colorful markings were die-punched from silver, yellow, orange, red and blue decal sheet and were placed all over the hull – together with the large panels they blur into the the overall appearance, though. The hatches received thin red linings, also made from generic decals strips.
The cockpit interior was a bit challenging, though. Good TIE Fighter cockpit interior pictures are hard to find, but they suggest a dark grey tone. More confusingly, the MPC instructions call for a “Dark Green” cockpit? Well, I did not like the all-grey option, since the spaceship is already monochrome grey on the outside.
As a compromise I eventually used Tamiya XF-65 "Field Grey". The interior recieved a black ink in and dry-brushing treatment, and some instruments ansd screens were created with black decal material and glossy black paint; some neon paint was used for sci-fi-esque conmtraol lamps everywhere – I did not pay too much intention on the interior, since the cockpit would stay closed, and the thick clear material blurs everything inside. Following this rationale, the crew was also painted in arather minimal fashion – both wear a dark grey uniform, only the Chiss pilot stands aout with his light blue skin and the flourescent red eyes.
After an overall black ink wash the model received a dry brusing treatment with FS 36492 and FS 36495, for a weathered and battle-worn look. After all, the "Vehement" would not survive the Ballte of Endor, but who knows what became of TIE/E "801"’s mixed crew…? Finally, the kit was sealed with matt acrylic varnish, and some final cosmetic corrections made.
The display is a DIY creation, too, made from a 6×6" piece of wood, it’s edges covered with edgebonder, a steel wire as holder, and finally the display was paited with semi-matt black acrylic paint from the rattle can.
A complex build, and the TIE/E more or less evolved along the way, with only the overall layout in mind. Work took a month, but I think it was worth the effort. This fantasy creation looks pretty plausible and blends well into the vast canonical TIE Fighter family – and I am happy that I finally could finish this mummy project, including the surplus Jedi Starfighter kit which now also find a very good use!
An epic one, and far outside my standard comfort zone. But a wothwhile build!
Posted by dizzyfugu on 2017-08-19 18:32:22
Tagged: , mpc , tie , defender , escort , fighter , interceptor , star , wars , sw , endor , battle , two , seater , chiss , pilot , tandem , heavy , sienar , imperial , empire , sith , ral , grey , fictional , kitbashing , modellbau , whif , what-if , non-canonical , tri , three , dizzyfugu , science , fiction , group , build , whatifmodelers
The post 1:50 Sienar Fleet Systems “TIE/E” Escort Fighter, “801”, based on board of the Imperial-class Star Destroyer ‘Vehement’ during the Battle of Endor (Whif/kitbashing) appeared first on Good Info.
0 notes
Text
Brands Magazine
http://monthlybrands.com.pk/motorola-re-enters-pakistan-with-the-launch-of-moto-z-in-pakistan/
Motorola re-enters Pakistan with the launch of Moto Z in Pakistan
Motorola has made its comeback in the Pakistani market with the launch of Moto Z, being one of the initial moduler phones available in the market.
The launch is undertaken by Lenovo, which bought the Motorola Mobility in 2014 and later merged Lenovo smartphones into Motorola. This essentially means that Moto Z is launched by Lenovo but since due to its strong brand recognition — particularly due to iconic Motorola Razr or those early days Motorola phones — we are marking the event as Motorola’s re-entry in Pakistani market.
Coming forward with the official launch of Moto Z, the smartphone brand and almost three of its models will be available in Pakistan with official warranties.
Getting back to the base, the phone is world’s thinnest smartphone at just 5.2mm. Made from military aircraft-grade aluminum and stainless steel, the Moto Z is equipped with a powerful Qualcomm® SnapdragonTM 820 processor, 4GB of RAM and 32 GB or 64 GB of storage inside.
Furthermore, it boosts a Quad HD AMOLED display for crisp images and video play.
The Motorolla model has a 13MP camera with optical image stabilization and laser autofocus, which help users take beautiful, true-to-life pictures in any light and condition. The front-facing 5MP camera includes a wide-angle lens. Moto Z also includes an extra flash on the front camera to ensure users look their best, even in low light.
It comes with a water-repellant coating, which shields the smartphone from rain, splashes or spills that might come in its way.
With the fingerprint reader, a touch is all it takes to instantly wake up the phone. Moto Z supports up to 30 hours of battery.When in need, the TurboPower™ Mod provides up to 8 hours of power in just 15 minutes.
Arif Shafique, head of Lenovo in Pakistan, said that Moto mods are the revolution that consumers of this age were looking for. He said that mods are designed to enrich the user experience about things they love to do
SCustomers can expect even more control and flexibility with the ability to shoot in RAW format, in addition to the physical shutter and zoom controls, guaranteeing a great handling experience.
The Moto Z smartphone along with the Moto Mods are also available across select retailers in Pakistan with following prices:
Moto Z: PKR 74,999
Moto Z Play: PKR 49,999
Moto Insta-Share Projector Mod: PKR 39,500
Incipio offGRID Power Pack Mod: PKR 8,650
JBL SoundBoost Mod: PKR 12,500
Hasselblad True Zoom Mod: PKR 29,500
Moto Z will be available in two colors: Black & Lunar Grey/White & Fine Gold.
youtube
0 notes