#fursuit tutorials
Explore tagged Tumblr posts
Visit Tumblr Blog
Explore Tumblr blogs with no restrictions, modern design and the best experience.
Last Seen Tumblr Blogs


Fun Fact
28.6 is the average number of monthly visits per US mobile user.
Text
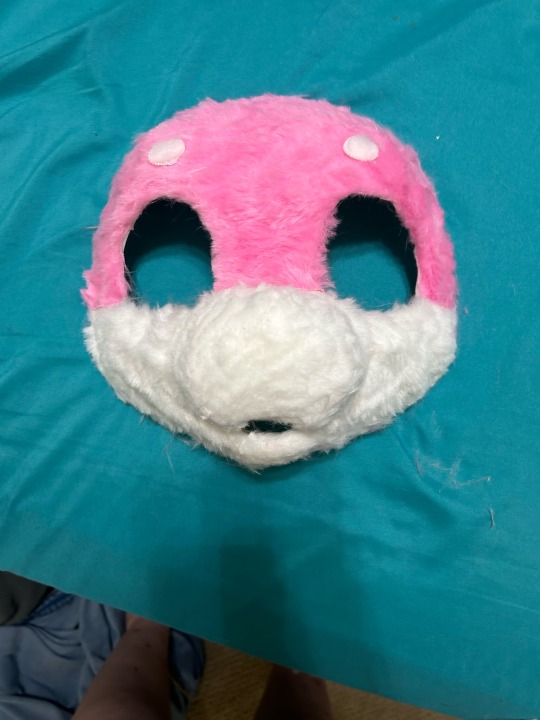
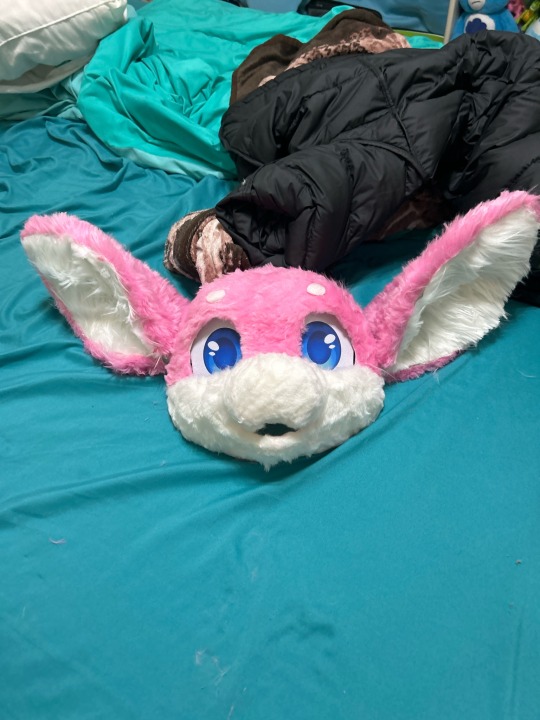
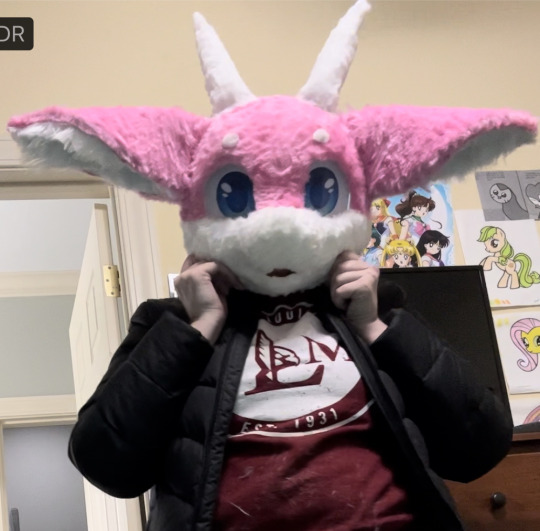
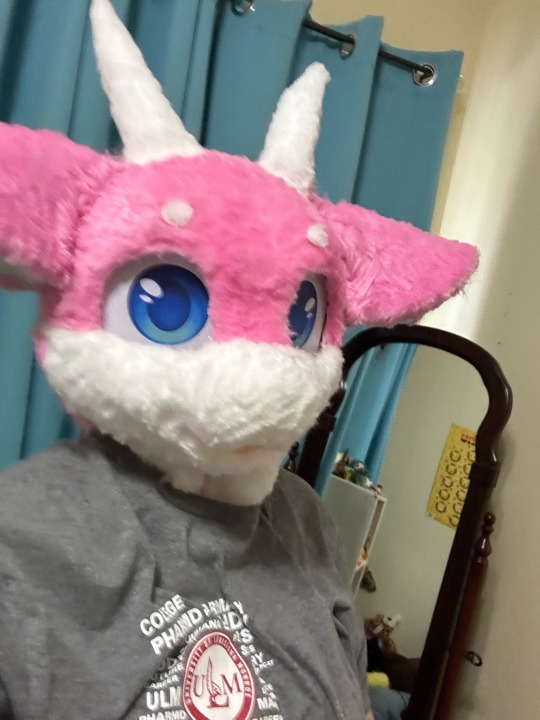
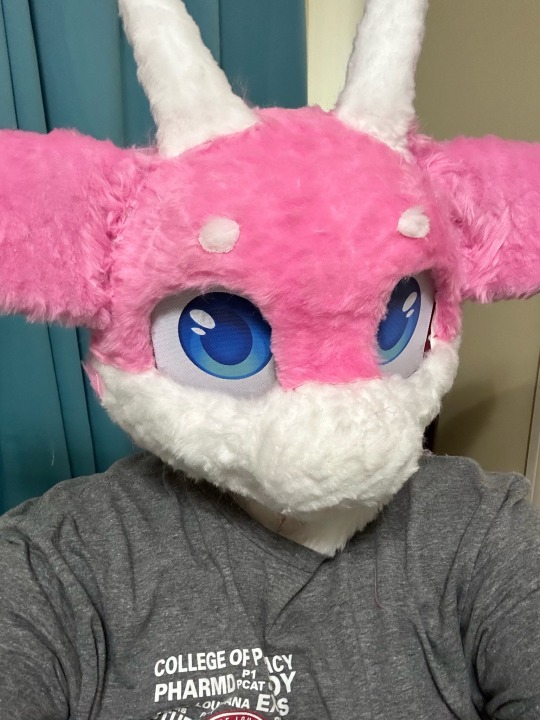
What I've learned from making 2 fursuits!
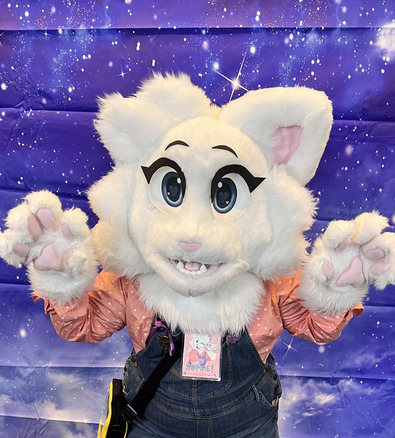
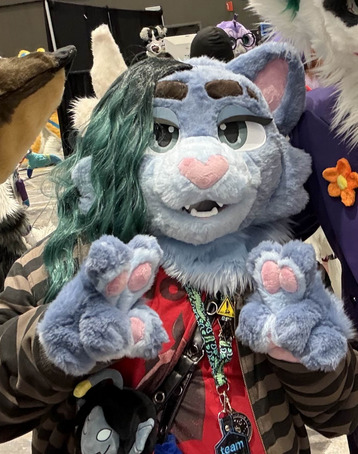
I've learned a TON from the process of both of these suits, making my 2nd suit I improved on a lot of stuff I had learned from the first! Here's stuff I would've liked to know before I started either of these
For reference, the white cat suit's name is Sophie and she was made first. The blue one is Raine, and she was made second! I'll be referring to them throughout this.
I've learned nearly everything I know about sewing and these types of craft projects from making these 2 suits, I haven't had any prior experience. This is all very much advice From a beginner TO beginners, experienced makers may say some of this is wrong, this is just my lived experience written down. I figured I'd write all this now while it's fresh in my mind! When you get experienced at doing stuff, you tend to forget what problems you faced as a beginner.
Fur Bulk
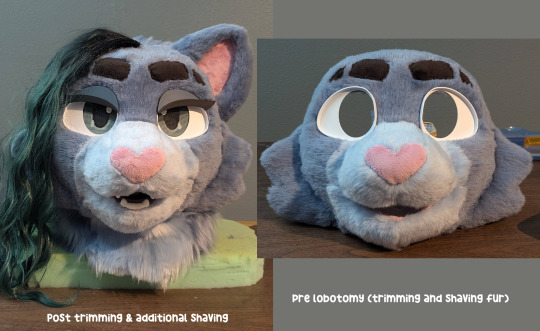
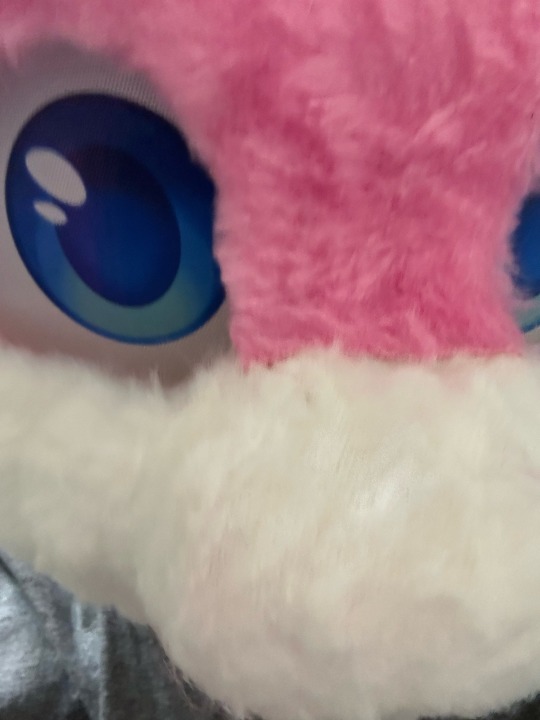
Fur bulk is REAL and a MASSIVE PROBLEM when making your sculpt. Regardless of what method you use to make your base, 3D printed or foam. Depending on how short you can shave your fur, fur bulk will add about 1cm - 0.5cm of thickness to your base
Look how much her mouth closed up from the base sculpt! I ended up still loving the end result, but it was a bit unexpected. (Despite learning about fur bulk from my first suit, and ALSO testing fur bulk in Blender with a fur particle system when I was making the sculpt for this head.)
Raine's ear is an unfortunate victim of fur bulk still, but I didn't have time to remake it how I wanted it. I even tried to make it slimmer on purpose since Sophie's ear ended up so stupidly thick 😭

Seam Allowance & Stitches
(Talking PURELY about hand sewing, I've never used a sewing machine, I cannot give any advice for that)
You should be using a blanket or whip stitch for most of your fursuit, in terms of speed and seams, they are the most effective! Whip stitch for most of your face, it's going to be glued down.. so truly you just need the fabric together and not SECURE since it'll be glued. Use the blanket stitch for things like paws or stuff that's more likely to pop a seam (ears? tails? etc)
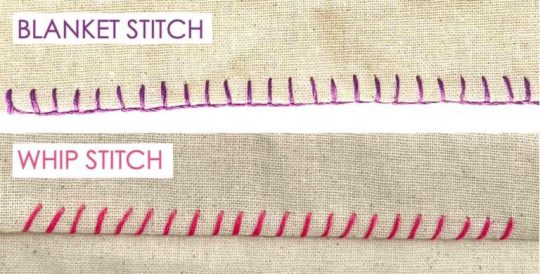
More experienced suit makers might say use blanket for everything, that may be more correct 🤷♀️ Whip/Blanket are nearly the same stitch, blanket is just more secure than a whip stitch, takes a little longer, and uses slightly more thread. I haven't timed other stitches, but the blanket takes me about 5 minutes per inch to do.
On Sophie, I had made up my own bizarre version of a backstitch that was stupidly strong.. but also took a million years to do. It also made my paws near IMPOSSIBLE to turn inside out. Sewing raines face together with a whip stitch was way quicker!
For your face pattern, use next to no seam allowance for the cleanest look. The areas that I added seam allowance on Raine, I really regretted the bulged out look they had. If you aren't confident in your pattern making ability, some seam allowance does give you some wiggle room in terms of how easily your pattern fits onto your base
Designing your suit for airflow
This wasn't actually a problem for me, I did this from the start. But I've worn suits that weren't designed for proper ventilation, and it really just makes suiting a very unpleasant experience. You want to have a mouth hole that is right in front of your own mouth, so you can easily get fresh air in your suit. I'm not saying you HAVE to do this, as not all designs can accommodate this, but it's absolutely something to think about for your comfort!
Another thing I've learned, is the roomier your suit is around the mouth hole, the more overall airflow you get! I tried on my friends head which I sculpted, and they printed in TPU, significantly roomier than Raine, and much more breathable! Raine is still comfortable for me to wear even masked underneath, since I made her ventilation so good!


My future suits I make, I'm going to be looking into TPU due to the sheer weight and breathability difference from my PLA suit!
Non-Fur Supplies
I highly recommend getting hand sewing needles and EVA foam at Daiso if you have one! Daiso has lots of little sewing kits, and I got both of my main needles there. The little circle disks of needles you can find at other stores didn't have needles that were the right size and shape for my hands to comfortably use. Daiso also sells EVA foam in the smaller amounts that you'd need for a suit, unlike hardware stores which usually sell giant square packs of 5
For handsewing, I noticed going for the slightly thicker thread lead to stronger seams overall.
For what you should have in a sewing kit for fursuit, here's what I have (ranked by importance)
Multiple handsewing needles you're comfortable with, just in case you lose one
Pins
Wonder clips (the little plastic rainbow clips) ABSOLUTELY necessary for suit making honestly, they work better than pins in most situations
Seam ripper
Soft measuring tape
Some generic white and/or black thread, as well as your fursuits thread
Safety pins
Overall helpful fursuit supplies
Velcro patches
Masking tape
Duck/Duct Tape
Have garbage shitty scissors, and separate scissors JUST for fabric. Your fabric scissors will remain sharp for much longer if you don't use them on other stuff. (3rd pair of scissors that's not used on tape/sticky stuff, but thread and paper also is helpful. The garbage scissors can get gunky when cutting tape, and your medium scissors remain sharp enough to easily cut other stuff)
Xacto knife + LOTS of new blades. The blades go dull FAST when cutting fur and foam. If you're having to use a lot of pressure to cut through your fur's backing, that means you need a new blade
Box cutter + LOTS of new blades for box cutter. I have a Kobalt box cutter, it's nearly as sharp as my xactos. I use it for cutting out big sections of fur and foam.
I get my eye mesh from Curlworks! I love the visibility on it ^_^
Fur Brands
In terms of my fur company quality rankings, it would be this (I've tried fur from a million different companies on my sample hunt for Raine)
1. Howl Fabrics 2. BigZFabrics 3. MofuMofu.shop
Howl overall is the most dense, relatively soft, and best to shave out of all 3. (Canfur is of very similar quality to Howl, except it has a mild crayon or carpet smell. The smell wears off completely after around 6-7 months, at least on the small sample I got)
BigZ is kind of like a middle ground, but shaves HIGHLY powdery compared to the other 2. As well as shaves a little worse/choppy compared to better quality fur.
MofuMofu is the least dense out of the 3, but I would consider the softest. Best if they have a niche color you need. The fur tends to clump together when it is shaved like sheep wool, and is less powdery than BigZ.
Random furs from etsy are usually LQ/MQ and patchy on their density, not great for shaving super short
Fur Shaving / Length
If you're going for a high quality look on your suit, you want SHORT fur for the face, full-stop. Every suit I've seen that's truly made me go WOW has always had VERY short face fur. Shorter fur shows the look of your sculpt better, instead of hiding it all behind any lumpy fur bulk or unbrushed sections. (Brushing fur doesn't last very long after a suit's been put on haha)
If you can buy your fur in shorter lengths like teddy/beaver, ABSOLUTELY do so. It'll make your shaves much shorter and cleaner. The longer your fur is, is the harder it is to get it to a "HQ" shave length. I personally couldn't get Raine as short as I wanted her to be 😩 But her colors are niche, so I couldn't locate them in shorter fur lengths
Once your suit is complete, don't be afraid to go in there with scissors and your clippers to clean up the fur+markings as well! Raine's mouth opened up a LOT more when i trimmed it down to shape with my scissors
Pattern Making
Avoid putting any seams down the middle of your face, it is noticeable! This is roughly how my pattern for Raine worked, I think the eyebrows helped disguise that horizontal middle seam really well! (the fur from the "eyebrow" piece covers the seam to the forehead piece as it is brushed over it!) I also made the nose bridge it's own piece, to utilize the visible seam to create a crease for it.

I also recommend avoid making any + shaped intersections on your seams if you can avoid it, it's really hard to sew cleanly😭 Sometimes they're unavoidable, but I try my best to avoid doing them.
Wearability
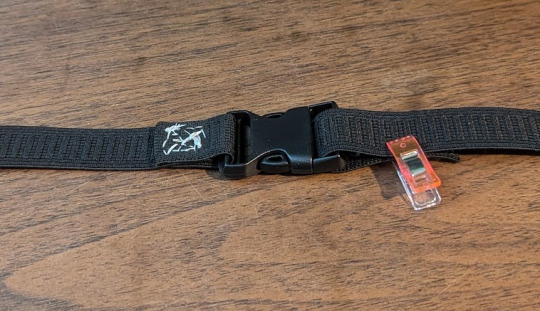
I'm not sure how much this applies to foam suits, but I really recommend using some elastic, a parachute clip, and some velcro to make an adjustable strap to keep your suit on your head! I tried to use foam on Sophie to get a snug fit, it did not work and made her struggle to stay on. The elastic strap on Raine is way better and more secure.

Misc / Random
When making your ears, you don't necessarily need to sew the minky/inner ear onto the fur parts! You can get a much flatter look on your minky if you just glue it on seperate, and have the fur not connected to it
(Specifically for beginner suit makers making personal projects) Not everything has to be perfect! No one will notice your little imperfections, and you don't have to make a nice product for a client. You can leave some things unsewn, you can have tiny bits of foam show from weird angles. You can hot glue some things instead of sewing them to save time. You can have small accidental bald spots. You can have little unsewn holes in corners if it's too hard to sew around those parts. Take it easy on yourself!
You may spring for fleece to save some money on buying minky, I honestly recommend not doing this. Minky feels significantly nicer, and minky from Howl is really not that much more than some fleece, for small pieces like inner mouths, noses, ears, etc, all you need is a "Fat Quarter" sized piece. It's more than enough! And only $6.50 (if you want fleece specifically, ignore this haha. I just regret going for fleece instead of minky on Sophie!)
Carving a foam base, to me, is the hardest part of suit making. So much so, that I never plan to do it again :P It's some people's thing, definitely not mine. If you've been frustrated with how your foam results turn out, consider 3D printing! Or buying a base from someone.
When looking for fursuit advice and tutorials, beyond the obvious places to look (matrices, youtube, google), I genuinely recommend Tiktok! A lot gets posted there for small niche problems you may have
Use this method for tying a knot on your thread when hand sewing, it's extremely fast https://youtu.be/LWWhRtxl6eE?si=AEt2HDiwp09AigOS
When making a 3D printed base, do not go too thin. I'd do test prints to see what thickness feels right to you, raine was about 0.5-0.7 cm but I wish she was a bit thicker because I worry a lot about her shattering 😨
Removeable eyes are very useful, if i get hair in my face I'm able to pop out Raine's eyes to move it out of my way x)
169 notes
·
View notes
Text
Anybody have any good beak tutorials? I want a muzzle like some of the therians do, just beak-y

Like this kind of (image found on Pinterest)
I could probably make it out of EVA foam, just wondering if there’s any established tutorials out there.
#hawk therian#therian tips#theiran#bird therian#birdkin#aviankin#avian#alterhuman#crafts#fursuit#diy#cosplay#tutorial
91 notes
·
View notes
Text
How to build your first fursuit head for ~$100 USD (2023)

What’s good furries? I’m sure a lot of you have a fursona and want to make your first fursuit. I recommend starting with a partial just in case you mess up or fall out of the hobby. It’s also less expensive!
This tutorial will only cover the head. I haven’t made any of the other stuff and I’m probably going to buy it online premade because I’m lazy.
1.) Have a reference sheet for your fursona.
If you are an artist, draw (the best you can) a reference sheet of your fursona from the front, side, and back. I made a little turnaround animation for mine, but this is not necessary.
Not an artist? Don’t want to draw? Commission someone to do it for you. I recommend Etsy, but you can find furry artists with open commissions all over the internet.
No money for commissions? You might be out of luck. Ask a friend or draw it the best you can. Alternatively, you can edit someone else’s fursona reference sheet to make it look like your fursona. Yeah, it’s stealing. Just don’t post it and act like it’s yours 👍
You can also go into the Roblox game, Catalogue Avatar Creator, and assemble something that looks kind of like your fursona. Take a screenshot of it from the front, side, and back, then go into a photo editor (I recommend IbisPaint or MediBang Paint, they are both free) and add in your special details.
I recommend not making your first fursuit super complicated or some kind of rare species. But you do you. It will just be really hard.
Also determine what style of fursuit you want. Toony? Kemono? Realistic? (I don’t recommend realistic for your first fursuit but you do you). This will be important later.
2.) Find Shit to Build It With
Once again, I recommend Etsy. You’ll need:
+ all the fur colors you need (try 2-3)
+ eye mesh
+ 3D printed mask
+ hot glue gun and hot glue sticks (dollar store)
+ needle and thread (dollar store or Walmart)
+ balaclava
+ styrofoam head
+ fabric scissors
+ extra foam pieces for ears or horns
Assemble all of that. It should be around $80-120 USD.
Your 3D printed mask is the most important thing. Another reason to get a relatively common species. Mine was a dragon. Remember the fursuit style you picked earlier? Search on etsy “3d printed [style] [species] furry mask” and you should be able to find one. You can also get pre-made foam heads. I don’t recommend trying to make your own head base, because A) it’s hard and B) those materials cost more money.
This shit will take a while to come in so don’t get too excited about it. My mask took like a month because it came from Germany.
3.) Mark the Color Spots on your Head Base
Basically just take a sharpie and outline the different color regions on your headbase. You can also use a pencil if you’re a pussy /j
4.) Uhhhh Eyeball That Fabric Pattern and Hot Glue the Pieces to Your Headbase
Some people use duct tape to make a pattern. That did not work for me! So I eyeballed it. Made some mistakes. That’s okay.
5.) Trim Down the Fur Length
Most people use clippers for this but I didn’t want to buy any and I didn’t know how to use them so I did it VERY CAREFULLY with scissors.
6.) Fill in the Cracks Between Your Hot Glue Seams With Loose Fur
Look at all this damn fur on the floor! If only there was something to do with it!
Put hot glue between the super visible seams where you hotglued different pieces of fabric next to each other, then pack in some of that loose fur. Cut it down if it’s too long. The seams will be less visible.
7.) Hot Glue the Eye Mesh Behind the Eye Holes
VERY CAREFULLY hot glue this so your character isn’t cross-eyed. You can try follow-me eyes but I didn’t do that with mine.
8.) Add Your Extra Details
You know like whiskers or plastic teeth or a tongue or anything else you want to put on there.
Now you’re done with the mask part.
9.) CAREFULLY Hot Glue Your Balaclava to the Inside of the Mask
The eye hole should be where your eye mesh is so that you can see out. Also make sure some of the balaclava is glued to the top of the mask.
10.) Weigh Down Your Styrofoam Head With a Heavy Rock
Or put it on a stand. Or hot glue it to the table. Whatever works.
11.) Put the Balaclava that you Glued to the Mask on the Styrofoam Head
Pretty simple. The reason we weighed down the styrofoam head is because the front of your mask will be heavy and make it fall over while you’re trying to work.
12.) ????? Put Fur On the Balaclava
You’ll also need to like add some fur connecting the sides of the mask to the balaclava. Hard to explain. You’ll probably figure it out?
13.) Trim that Fur and Put the Trimmings in the Seams Like Before
14.) Take it off of the Styrofoam Head
You may need to cut a slit in the back of the neck of your fursuit head. Not only will it help get the styrofoam head out, now your head can get in and out too!
15.) Put it on
Edit it if something is wrong. It might feel crooked but it’s probably not.
16.) Enjoy!
Hopefully this was helpful! This is how made mine.
#furry community#furry anthro#furry#furry fandom#fursuit head#fursuit#first fursuit#fursuit making#tutorial#fursuit tutorial#partial fursuit#fursuit partial#maximilliansblogstuff
144 notes
·
View notes
Text
Making of my Crochet Kigurumi Fursuit Head!
I have found little info online that helps fully explain how to make a Kigurumi Fursuit Head, so I am posting not only how I made my own, but linking tutorials that helped me!
I went about making my head in a nontraditional fashion. Most kig heads are made from layers of plastic, foam, fur, and a helmet to help secure everything on you. I didnt do that, since I have little resources and money. Plus, I have tons of sensory issues and am disabled, so I needed something lighter and more flexible. I wanted to push myself to see if I could make a kig head with my knowledge of crochet.
Disclaimer: This is my first ever tutorial and kigu head and I didnt take as many photos as I liked, so feel free to ask any questions uwu

I used this piece I drew as a base for everything, but as I made my kig head, I ended up changing things and adding more stuff. But this is the blueprint.
Let us start with the face!

The face is the easiest part. There are actually TONS of tutorials on how to fur a kig head, which is really the only part of the head you can find in abundance. Many people use Minky fabric for the base of the head, but I opted for Anti-Pill Fleece since it is easier for me to find and it is cheaper.
I got a bit excited and started doing the makeup and such right after adding the fur to the face, which in hindsight I dont recommend. I had to fix up the makeup, so maybe wait until the hair is done before you do the face! I will talk more about the face later, but for now the rest of the head.

I crocheted a hat with long sides out of plain acrylic yarn. I was inspired by this tutorial , since I was considering doing a full mask before I decided to opt out of that. I just added more rows until the hat fit me. I have crocheted plenty of hats over the years, so this wasnt very hard for me.
If you find a tutorial online to make a simple hat using a magic circle, make the hat fit you, then just add some rows in the back until I looks like a helmet or weird bob wig lol. It doesnt have to be perfect by any means. I do think using a color similar to the hair color you want is best though. Most of my character is white, so I opted for white.

I put the hat on, then hot glued the mask on where the foreheads meet. Since I used a Half Double Crochet for my hat, there are little to no holes in the hat, meaning the hot glue didnt seep through and burn me, but still be careful!!
Then I pulled the hat and mask off, gluing the sides of the hat/helmet on to the mask. I was HEAVILY inspired by this creator and their video of how they made their kigu head. They used an old balaclava, while I used a crocheted hat.
There is the base!!


Next I crocheted some ears for my character, I used this Bra Cup Tutorial for the shape in order to make cute, large triangle ears for my lamb character. I knew the ears would get in the way, so I made them first so I knew how much hair I would need to later add.
I made a matching red triangle and white triangle, stacked them, then crocheted around it to secure them together. I used this video as inspo for it, but used my own shape instead. I did quite a few rounds and honestly didnt count. I kept going until the size looked good. Then I sewed them to my hat/helmet base.
~~~~~
Now for the hair/wig portion!


I knew you could use acrylic yarn for doll hair, but I never considered using yarn for a whole wig. Turns out its a thing! So I made some yarn wefts and began to brush them out. There are tons of tutorials on Youtube about yarn wig for dolls or people. This one helped me the most.
The main thing you want to keep in mind is the length will be much shorter once you finish brushing out the yarn, as is the nature of yarn. I made all my yarn really long and ended up cutting most of it in the end for my character, but I am glad I went longer overall.
I just used a cat brush and comb to comb out the wefts. Then I sewed on the wefts to the crocheted hat. I used pink thread for the first weft, but moved to white since it blended in better.
You can see I made lines of where my wefts would go on the hat. I just followed along and made tons of wefts until the head was full. Then I styled the hair how I wanted!
~~~~
The Face and last minute details!!

As you can see, I added a lot to the face. I used mostly acrylic paint markers, with little touches of eyeshadow to add a faint blush and such.
For the eyes, I followed tons of Follow-Me eye tutorials online and copied. I used the paint markers to paint them on some thick mixed media paper, but you could easily have them printed on cardstock or mesh online. I just used what I had!
The lashes are made from simple black arts and crafts foam. Very cheap stuff. Some people use 3D printed lashes or fur, but I like the cartoony look more. The fangs are also foam.
As for the studs and horns, I had them already and just glued them on. I painted the horns to match my eyes and added glitter glue to make them sparkle!! :D
I also glued the bangs down so they would always look pretty!!
Finally, I added tons of cute earrings and accessories to make my character even cuter. I have lots of jewelry and some I dont wear or dont like how they look on me, so I used them for this instead!
I also crocheted some little hoove gloves as well... but I made it up on the fly and dont fully remember how I made them lol. I have been crocheting a long time and sometimes I just make things up!!
~~~~
Final results!!

This is the final result! I think Yu came out super cute, even if she looks different from my ref sheet. I think she looks even cuter in this version!!!
In total, this entire head and hooves cost me about $80 and 5 full days of time.
I had a lot of the supplies already and the knowledge of crocheting. Also the time it took me was a bit long since I did have to trial and error some things.
If you know minimally how to crochet a hat and a little bit about sewing, you could make this work!! The longest part was the hair by far, so expect a long of brushing if you do the yarn wig route!!
I hope to do more in the future and maybe I will do an updated tutorial one day :D!! Cheers!!
10 notes
·
View notes
Text
The tutorial to put your fursona on your tamagotchi is finally out!✨
Do you want more customization tutorials? 🐭
Watch it here:
youtube
#furry#fursona#cute#lion#shark#art#hybrid#knockout#fursuit#fursuit maker#tamagotchi#custom#hacking#tamasma#custom content#english patch#fandom#modding#pixel art#aseprite#cartoon#tutorial#diy#kawaii#Youtube
10 notes
·
View notes
Text
HOLY FLIP
I AM A DUMMY
I was just about to go print out my fursuit eyes, resigned to the fact that the nice ones I ordered wouldn't show up in time, and as I was digging though my mess of supplies for my blank buckram I found...
...AN UNOPENED PACKAGE
IT WAS THE EYES
THEY WERE HERE THE WHOLE TIME
the package must've gotten buried in my other mail and I somehow didn't notice it!! good gracious I feel like an idiot lol. Welp, the important thing is that they're here before I left and I found them before I went through the hassle of printing anything myself lol
The quality looks fantastic; I'm super hyped to actually install them in my head tonight!! It's the very last step to finishing my whole suit!! sadly I will not be able to get any pictures of the full finished suit before the con because the body, tail, and feetpaws are already vacuum-sealed in my suitcase lol, but I'll definitely get a pic of the finished head tonight and hopefully plenty of full body pics at the con! :D
#for the maybe three of you who have any actual interest in this fursuit making saga and were wondering: yes I got the neck fixed!#i found a good tutorial and it's looking wayyyyyy better now#SO HYPED FOR THIS CON AAAA
34 notes
·
View notes
Text
youtube
Need to measure your head for a commission? Here is a handy video tutorial on how to measure your head.

25 notes
·
View notes
Text
I finished them!!


The hat is removable btw!
#my art#gallonwghost shenanigans#clown furry#bat fursona#paper fursuit#Fursuit#Furry#I followed eliotsstuff tutorial on youtube If anybody wants to try it
44 notes
·
View notes
Text
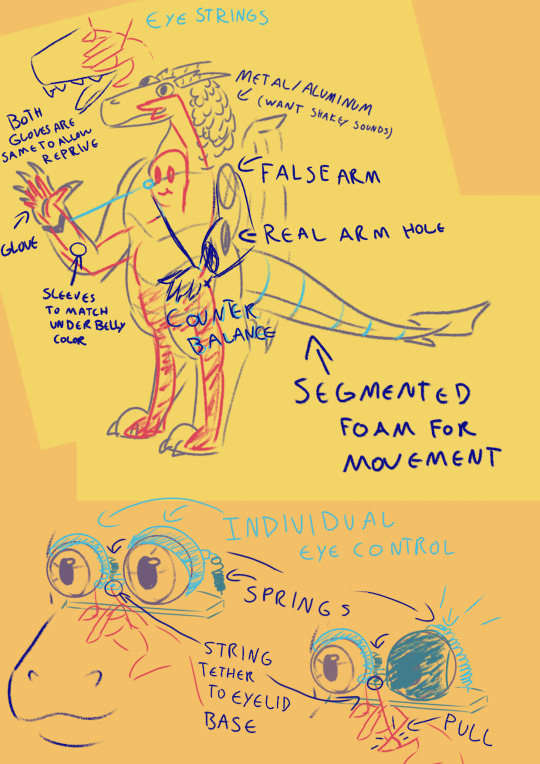
Wurmple Build Log
Guess who's back to drop another overly detailed post about a cosplay project. Another Pokémon one, unsurprisingly! My dumb ass made a Nargacuga fursuit head back in 2020 so I could learn how to work with upholstery foam. It looked... alright... but I know in my heart it was a horrible, horrible mess. Fast forward to 2023, I go to a 3-day convention, wear a bunch of different heavy wigs the whole time, get a rash on my forehead and think, fuck it, I am cringe and I am free, I'm gonna finally live the dream and make a Pokémon suit. It'll be great, and I won't have to wear a wig; I'll just have to worry about heat strokes instead. Fun! Of course, in true shitpost fashion, my perfect fursuit candidate has 10 legs and is shaped like a sausage.
Click on over to read the wondrous tale of building a Wurmple Partial Suit in like two weeks.
1. The Worm
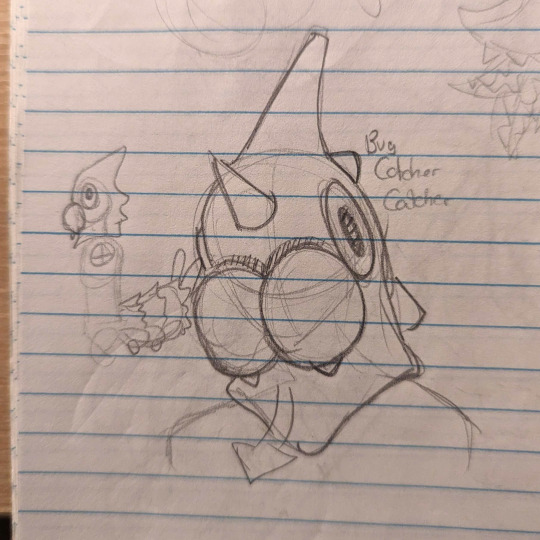
Wurmple started as a dumb little sketch in the corner of my notebook. I have a lot of cosplays and plushes under my belt but the last fursuit (head) kinda looked like it would belong in a bootleg Freddy Fazbear establishment, so I brainstormed over a bunch of Pokémon I like that would work as a partial and are simple enough in design to avoid accidentally creating Uncle Uncanny 2.0. The goal was something that would be relatively comfortable and easy to bring to events 'cause I'm just not mentally prepared to drag a suitcase in public transport and wear a full body sweat carpet yet. I ended up doodling a few ideas like Haunter or Koffing, but then I pictured a Bug Catcher trainer with a bug head and I thought it was funny as hell, so the choice was made. I picked up my copy of Alpha Sapphire to get a good look at the model and immediately ran into a problem; the eyes on Wurmple are literally on the side of the head. They sit so flush you literally cannot see them if you look at them from the front. Not a great start. I figured I could probably hide a small hole for vision right above the mandibles where the red and cream colors separate. I wasn't super confident it would work, but dammit, I was already commited to being a stupid Bug Bug Catcher. Similarly, I looked at the side profile and figured I could open a hole behind the mandibles at mouth height to breathe out of. With an disproportionate amount of confidence for the bullshit I'm about to summon into the world, I began the project by patterning out the tail.
2. Bug Ass
I'll be honest, I started on the tail so I wouldn't have a reason to back out of it if the head ended up being a hot mess. I've patterned out and sewn a few plush before, so making a big ol' headless grub sounded like a reasonable goal. I usually make plush patterns by building out the shape with newspaper and tape, but Wurmple's tail got pretty big when scaled to fit a human, so I searched for alternatives. I ended up building the base shape to draw a pattern out of by taping two pillows together. I tied down small sections to shape the belly and slapped a layer of masking tape over half of it to trace my pattern. Once everything looked good, I cut the pattern pieces out and laid them flat. The pillows were returned to the couch safely once they recovered from the barbaric treatment.
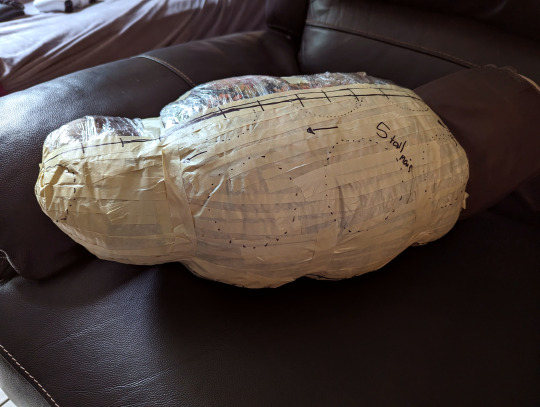
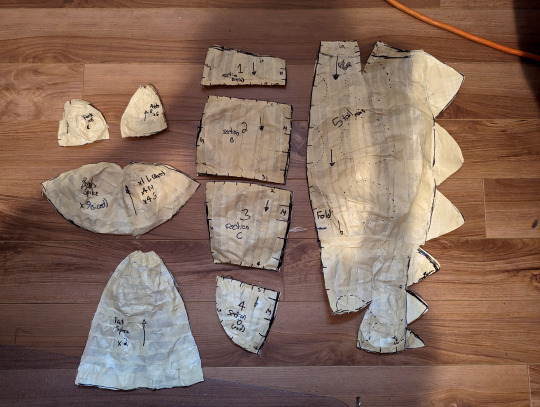
I dug through my materials storage (a sad lonely plastic bin) for some Trash Fabric ™ leftovers from other Trash Projects ™ and tested the pattern out to see how it looked. I made the pattern for the spikes and legs at that point based on the test build and adjusted some seams on the tape pattern to refine some shapes, but overall the first pattern was a great success!

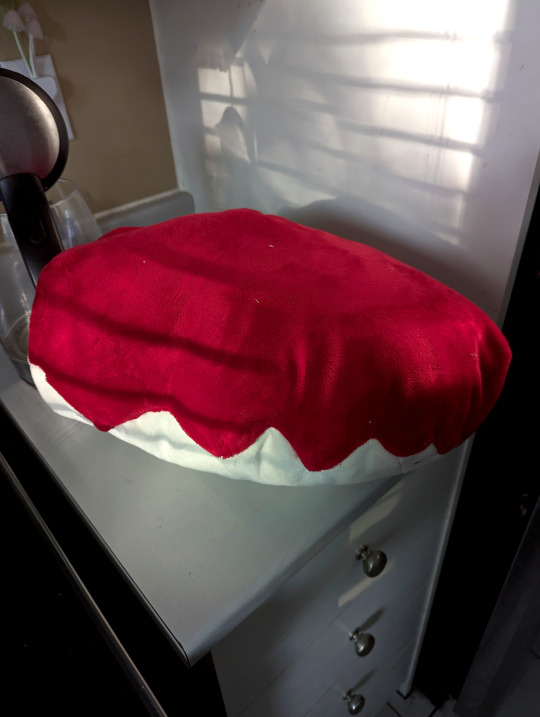
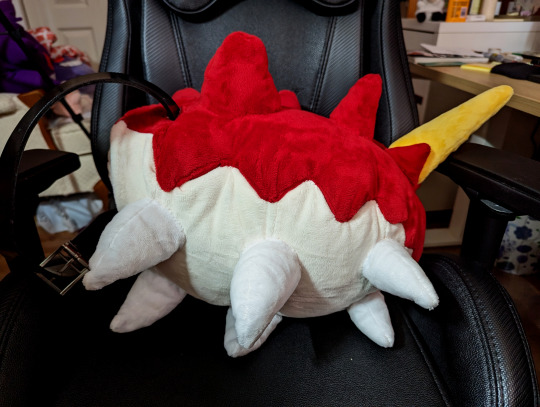
With the mockup done, I pulled out the minky fabric and got to sewing the tail together. I picked minky for the project 'cause it felt right for the cartoony 3d models to have that smooth short-pile look in real life (kinda like the official mascots, really). I was aware the margin for error when your fur pile is 3mm long is basically non-existent, but hey, at least I could work without a respirator on unlike fur! Sewing the body of the tail was pretty straightforward; I assembled the belly panels together, stitched the darts on the red parts to form the curve, and attached the backside of the zigzag spikes to it. I assembled the top and bottom halves together, tacked each zigzag down in place by hand, and filled the whole thing with polyester stuffing to see my beautiful bug sausage take shape.
Once I was sure it everything looked good. I stitched six little white legs and attached them onto the belly by hand using the belly seams as a guide.

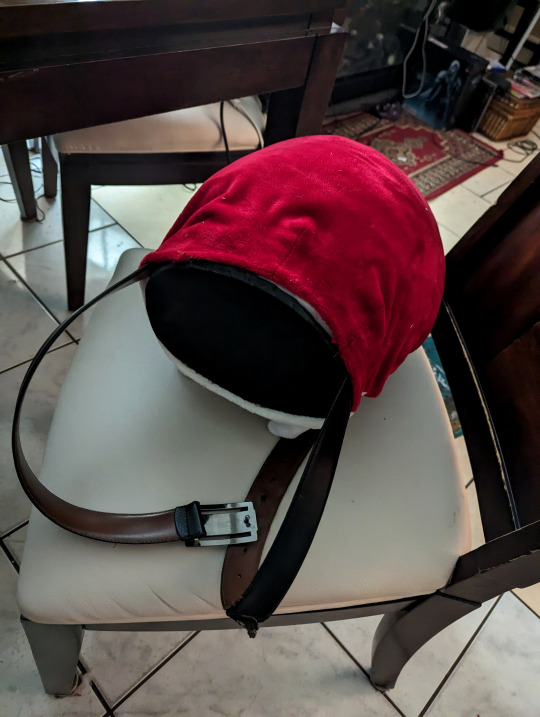
Before moving on to the top spikes, I took a break from handsewing to build the tail base. It's a little nub made out of sandwiched upholstery foam with a belt running through a channel carved into the foam. It's topped off with a layer of high density EVA Foam glued at the base to keep the anchor point sturdy. Huge thanks to Neffertity for her tail tutorials as this was the main inspiration behind the method I used for the tail attachment. The foam nub goes about a quarter of the way through the tail, with the rest of it being filled up with the polyester stuffing that was added earlier.
Once the tail attachment point was secured, I started sewing all the spikes for the top half of the tail, stuffed them, and then stitched each of them to the tail by hand. Once they were all stitched on securely, I sewed the back closed with one last minky piece and Wurmple's tail was complete!
(Looking back, I could probably have machine stitched the legs and spikes on... But I was watching some really good Resident Evil Randomizer streams while handsewing these, so I didn't wanna get off the couch to work on the pattern again)

I'm so glad I started with the tail. It was basically a big plush, and I was so proud of the results when I was done that I was energized to start working on the head. Oh right, the stupid worm head with no vision.
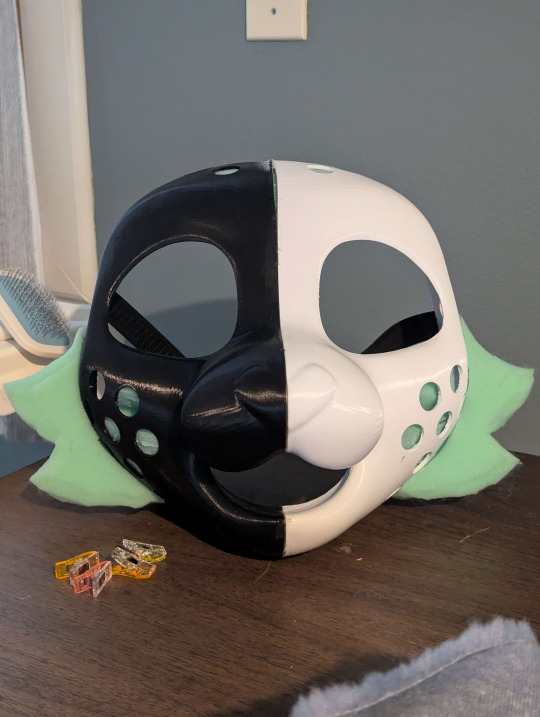
3. The Head
Building up the shape of Wurmple's head was simple enough. I began by building a bucket head base out of upholstery foam by following Skyehigh's Studios old tutorial (new one linked here) and slapped some paper on it to figure out the size of the main elements; the mandibles and the eyes. I immediately regret following the tutorial steps for the eye holes, since I Forgot We Weren't Gonna Be Doing That, and mark where my cyclops eyehole is generally going to be instead.

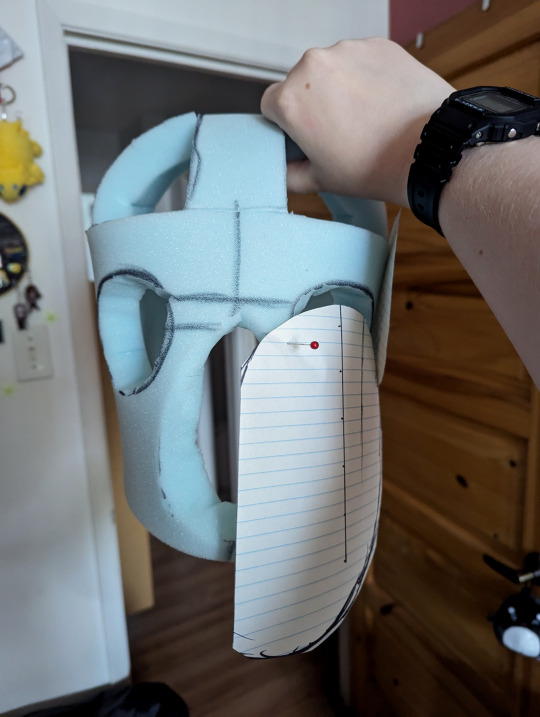
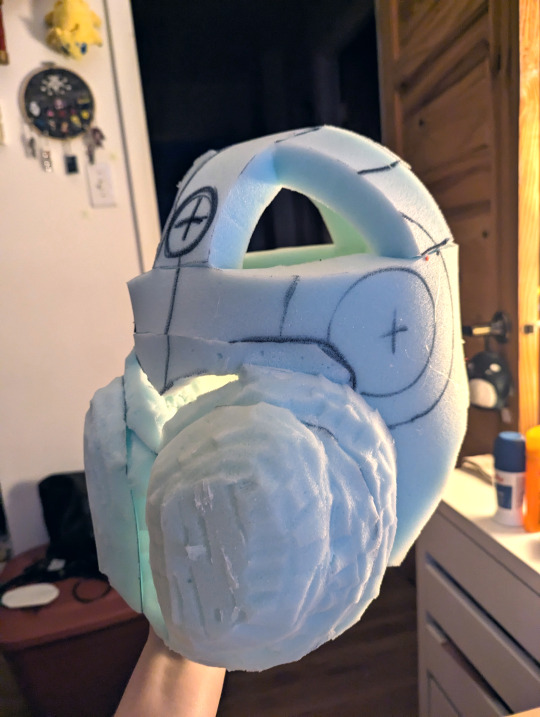
Once I was satisfied with my patterns, I cut some more upholstery foam slabs, carved them with scissors until I got down to the general shape of the mandibles and horns, and glued them onto the base. I immediately got another stress injury carving everything down and realized I did not learn from my wig ventilating mistakes. I took a break to add a turkey carver to my online shopping bookmarks, which I immediately forgot about until I sat down to write this post. Since I was using minky for this project, I needed to make sure my base was as smooth as possible. The fabric is so thin it would pick up every wrinkle ever and look sad if I didn't. I dug into the bin for some Trash Felt ™ and glued it over the mandibles to smooth things out and added some mesh to the holes of the bucket head base to keep the curved shape of the head going without sacrificing those sweet ventilation holes. I also added my vision hole and marveled at my horrifying Mando helmet abomination. At that point in time I'm having some big doubts about the vision hole, but I trudge on because I'm not just gonna wear a bug ass to these conventions.

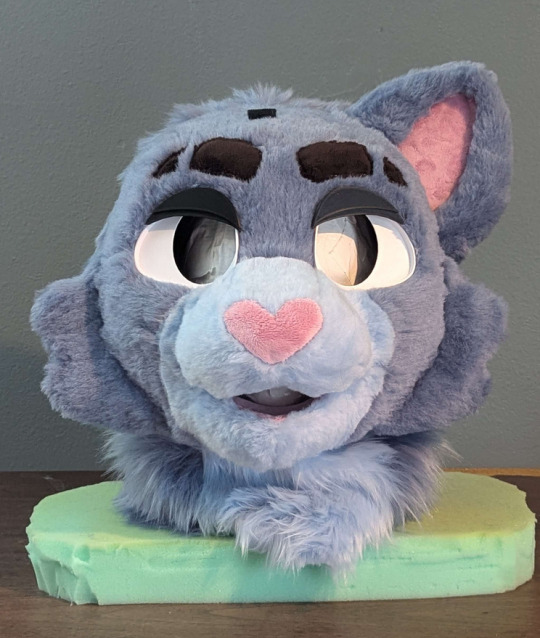
With the base complete, I covered the whole thing in tape and drew over it like I did with the tail to create a pattern, made sure to forget to take pictures of said pattern so that this step is lost to time, and started sewing the head fabric so I could slap some skin on this bad boy, starting with the horns. At the same time, I stitched the darts on the mandibles, pinned that to the head for later, and assembled the red halves of the head together on the back seam to test the fit.

With the test fit successful, I pulled the red part off in order to machine stitch it to the front half of the head along the zigzag edge and slipped the whole thing over the head again. With everything in place, I painstakingly handstitched everything up, including the side of the mandibles and the horns.
Somewhere in the magical stretch of time between midnight and 5 in the morning, I somehow summoned the inner lining of the head out of french terry knit, a tape pattern and a dream. I also painted a little piece of buckram for the eye mesh to match the red fabric and glued that to the inside of the head. I included a little velcro pocket on the back of the neck in the lining to insert a powerbank for the fans (which I then proceeded to procrastinate on installing for a whole 4 months afterwards). Since I'm an idiot and took no pictures signed an NDA with the Midnight Craft Wizard, here's a picture of the fan installation in the mandibles with velcro so they can be removed to wash it. (Fan kit by Henry's Helmet Fans)

Once the head was completed, I finally went to sleep. And then I woke up at noon and remembered I forgot the eyes WHOOPS I cut four circles out of high density EVA Foam (Two of them smaller for the pupils), heat shaped a slight curve to them, and covered them with minky. I glued the pupils to the irises and then I glued those suckers to the head and NOW THE HEAD WAS ACTUALLY DONE WOOHOO

Turns out hiding the vision hole right over the mandibles was... Actually a decent idea, in the end. It blends pretty well into the face at a short distance. The mouth opening also isn't visible in most angles so I can actually breathe pretty well, and I can even wear a portable necklace fan and have it blow hair into the head without making poor Wurmple eat the fan.

I took it for a test run and realized the eye vision in the suit was actually pretty damn bad overall because the minky covered half of the original hole up, especially on the sides. I took a heat gun and some scissors to the head so I could peel it back around the vision hole, cut some material out to open it up more, and glued everything back down with a new piece of mesh. Now I have like 40 more degrees in my cone of vision, which puts me on par with some of the guys in Metal Gear Solid.

With those adjustments done, the head was finally complete!
4. Get Worm'd on

Turns out I like it a whole lot, whoops. It's definitively not perfect (what costume ever is?), but it looks leagues better than I expected it would, so it works out. Looking back, I don't think I'd really do anything else differently on the build. I still got to make the Bug Catcher outfit to go along with it, but with winter in full swing there's no rush to do so. Definitively looking forward to making a net, though!

If you're still reading, thank you for getting through my ramblings! I hope it was an interesting read, and maybe even provided some insights or inspirations for your own future projects.
❤️
#Wurmple#Cosplay#Pokemon#Pokemon Cosplay#Fursuit#Partial Fursuit#Fursuit Friday#Pokemon Fursuit#Fursuit Maker#Cosplay tutorial#Cosplay Build Log#Original Content#Oh yeah I'm totally making another dumb pokémon suit project after this it was real fun#I'm thinking maybe giving that Koffing or Haunter idea a try later. Or maybe something else equally stupid like Grimer. Something
32 notes
·
View notes
Note
sorry if youve been asked a billion times but how did you make ur fursuits hair? i need something just like it for my emo bastard T__T and ive never done this before
i have never been asked actually and im happy to explain! what i did was cut hair like shapes out of paper and held them up to my suit head and adjusted them until i got satisfactory shapes. the shapes i used were sort of like this, i hope this helps good luck with your suit!

63 notes
·
View notes
Note
alright. your @ is springlock-suits.
can you hook me up with a real springbonnie suit?
absolutely no nefarious purposes behind said ask
thumbs up!
Oh yeas, I am the expert in springbonnie suits 👍, I've even put alot of thoughts into the springlocks themselves (hurt) (ouchie)
#been meaning to turn withered springbonnie (first and currently only cosplay ive made with foam n such)#into withered springbonnie (movie edition) but ive sadly lacked the motivation 😔#my cosplay#ask#im reading this ask as jokey. but if your serious i unfortunately do not know where to obtain a cosplay!#i made mine myself. taking alot of tips from andiematronics glitchtrap video. and others by that channel#fursuit tutorials hwlp too! with a bit of just winging it#also foam and lots and lots of hot glue
24 notes
·
View notes
Text
Anyways here’s a picture of some rough blueprints I’ve thought about and a meme of how I felt for the past week while on my ways of going about learning to make it

#shiny speaks#shiny scribbles#literally 99% of this is big bord the puppet’s mechanics but with a dragon#gonna have to combine fursuit tutorial with a muppet tutorial
24 notes
·
View notes
Text

It’s kind of been a childhood dream for me to make a fursuit, and now years later I’m finally starting my very first one!! I only have the bucket head base so far, and even that is messy (the tape and pins are there because the glue just wouldn’t set and the base kept popping apart), but if that works out I can finally start sculpting. If anyone has any advice for me, I’d love to hear it!!
#actual sugar post#the base is from skyehigh studios tutorial btw#furry#sfw furry#furry fandom#fursuit#first fursuit#fursuit maker
4 notes
·
View notes
Note
hi! i hope this doesnt come off as a bother or anything . but do you have any mask making tips or tutorials you could reccomend ?? (like for materials, jaw movement, and how to see out of there) im planning to do a raven named Goose :D
ive been finding some resources here and there, but i thought it wouldnt hurt to ask !!!
Absolutely not! I'd love to answer all your questions. :D I have not looked at that many tutorials, I mostly looked at pinterest pictures of raven costumes to see what I can come up with. One that really inspired me to get things going is actually another Tumblr user I found on there who has posted some helpful tips that I followed along with! They too have a raven costume and they got their resin base from the same manufacturer (Crystumes, they have a website where you can shop for their blanks) Since this post is awfully long, I'll do a read more from here on:
The tutorials I followed the most is this one by Rah-Bop:
Rah-Bop has some tips about adding feathers, making foam-feathers, adding claws to your gloves, making gloves or feet. In terms of material: I used the hinged resin base by Crystumes which by itself cost me +/- 200USD, they sent me a pair of customizeable glass eyes and a tongue.
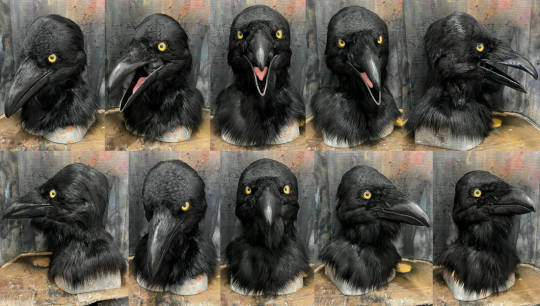
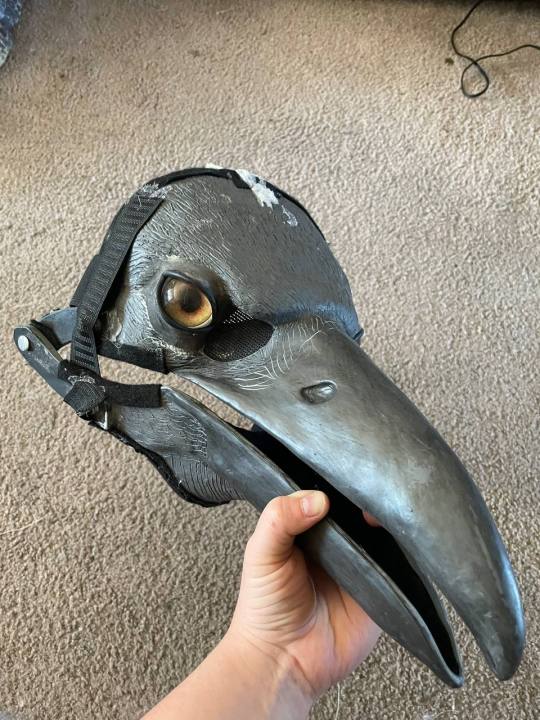
Crystumes has some additional tutorials specifically regarding their masks on their website! Crystumes also lists some of the materials on their website that I used and where to get them (Like the apoxie clay to do the eyelids, the glass eyes etc.) I did mess the eyes up though the first time I did it so I had to order them from delviesplastics.com (As suggested by Crystumes) Since I ordered the base with hinges I'm not sure how to do them myself but I will have to figure it out for the second fursuit I'm cooking! In terms of other material I bought some long rooster feathers and hair jewelry off of Etsy. I bought a pair of long faux leather gloves from Ricardo (which is a swiss second hand online shop) but you can buy the gloves anywhere else or even sew them yourself by tracing your arm and hand on a piece of paper, then trace the pattern twice on any somewhat stretchy material like faux leather or spandex and sew those two together for one glove each. I bought black fur in another Swiss textile / sewing shop named Alja (not sure if it's actually Swiss) since it's cheaper (around 60$ for 4 yards) than to ship fur from America to Switzerland (Which amounts to 100-200 for the same amount). But if you can afford it: Take a look at Howl's Fabrics or Big Z Fabric. Both websites offer samples! I personally don't buy from them as the shipping costs for me are devastating. I suggest looking at general "furring" tutorials or "how to fur a fursuit head" tutorials on youtube. Most of them will tell you to make a duct tape pattern on your base, draw on the patterns then cut those patterns out on fur, sew the fur together then glue to the base. Crystumes once made a twitter post about it as well I think but I'm not sure I'll find it. When cutting fur in general just make sure you keep the scissors as close to the backing as possible to avoid cutting any fur fibers in the process, it will be visible otherwise. I made a fur top / shirt by tracing one of my long sleeve t-shirts onto the fur I bought and went with that. For the back of the head I used an 80s Mullet/Rockstar wig I bought from another Swiss online store. Other fursuit makers mostly sew fur even to the back of the head but my personal Raven fursuit is literally just a mask with a wig to cover the back. Which in turn makes the whole mask less hot. To keep the mask ON my face and to keep it from slipping down I used the adjusteable part of a biking helmet or climbing helmet. and attached it to the mask by using a lot of hot glue, I eventually had to use some stronger glue as it kept falling off. Since the mask was fairly big when I bought it and rather uncomfortable I used thick felt sheets and glued them inside the head as padding material! Foam works as well, whatever floats your boat. I went with felt since I could easily cut some feather patterns into them as a nice easter egg. Not sure anymore what exactly I used to cover the holes by the beak that I see out of, but it was some kind of very fine dark and flexible grid that I bought from the swiss equivalent of home depot. In terms of being able to see: The crystume base has holes between the beak and the eyes that you can look out of or you can even look through the mouth, both works pretty well and the mask allows for a lot of visibility from within- Out of all my fellow furry friends I'm the only one that doesn't necessarily need a spotter since I can see pretty well. In terms of clothing I pretty much sewed nothing by myself and only assembled a bunch of my own outfits that would fit the raven costume. Sometimes I did buy some costume specific stuff from online clothing stores or went into the thrift shop to buy some costume specific clothing pieces. In general, for your first raven costume just go with the flow and try to keep it budget friendly, as your first will unlikely be perfect. And that's about it! Not sure if I missed something but I tried to cover everything as much in detail as I could. Hope it helps!
#tutorial#costume design#cosplay#cosplay tutorial#raven#costume#furry#fursuit#fursuiters#furry fandom#fursuiter
13 notes
·
View notes
Text
instagram
2 notes
·
View notes
Text

im trying to make one of those kig/kemono style fursuit heads :3 hopefully ill be able to finish it quickly and have it 3d printed to see how it looks
#this is like. my 2nd blender project ever. so thats why it looks kinda ass lol#i really love how these types of fursuit heads look so im following a tutorial to make one#im going to 3d print it because I need to see if I have to make any changes to the mold (hopefully not)#also the eyes and eyebrows are just for reference because theyll be holes in the actual mask#if i am going to make a fursuit (even just the head) im gonna have to buy fur fabric aughhh. I dont like spending moneyy
4 notes
·
View notes