#gcms notes sample
Explore tagged Tumblr posts
Visit Tumblr Blog
Explore Tumblr blogs with no restrictions, modern design and the best experience.
Last Seen Tumblr Blogs


Fun Fact
After the announcement of the deal with Yahoo!, there were 170K signatures of unhappy Tumblr users petitioning to prevent the sale in 2013.
Text
24-hr Phone Support – Best Gcms Notes fees 400 only
Navigating through immigration, visa, or citizenship applications can be a daunting process, especially when it comes to dealing with the intricacies of the application process. To ease your journey, applygcmsnotes.ca offers reliable and affordable services, specifically with gcms notes Canada and caips notes Canada.
Understanding GCMS and CAIPS Notes in Canada
When it comes to Canadian immigration proceedings, Global Case Management System (GCMS) notes and Computer Assisted Immigration Processing System (CAIPS) notes play a vital role. These tools contain extensive records of an applicant’s immigration dossier, encapsulating crucial data about visa applications and decisions made by visa officers. They essentially serve as a window into the ongoing status and advancement of an applicant’s application. GCMS and CAIPS notes are much more than just administrative paperwork; they offer a deep dive into your immigration journey, shedding light on the process’s intricacies and giving you the power to stay informed.
The Significance of Applygcmsnotes.ca in the Application Process
Applygcmsnotes.ca proves to be a valuable ally in navigating the often-complicated process of obtaining gcms notes and caips notes. They employ a team of highly skilled professionals who meticulously handle each aspect of your application to ensure accuracy and precision. The company eliminates the complexities involved in securing these essential documents, serving as a vital bridge between the applicant and the necessary paperwork. Additionally, the services extend to assist with ATIP notes, providing a more robust package for clients. This dedication to providing comprehensive services places applygcmsnotes.ca at the forefront of immigration service providers.
The Affordable $400 Fee for Quality Services
Applygcmsnotes.ca stands out not only for its expert services but also for its pocket-friendly price. With a straightforward fee of just $400, applicants can leverage their full suite of services, avoiding any hidden costs or unwarranted extras. This unmatched price point enables individuals on their immigration journey to secure their gcms notes sample or caips notes sample without breaking the bank. The nominal charge ensures a smooth, budget-friendly path to obtaining the crucial documents needed for your application. This affordability does not compromise the quality of service, ensuring you receive top-notch assistance at a fraction of the usual cost.
The Convenience of 24-Hour Phone Support
For those on the immigration journey, uncertainties and questions can arise at any time. That’s why applygcmsnotes.ca offers a round-the-clock phone support system. Whether you need help understanding the intricacies of your gcms notes, have a query about your caips notes, or just want to know the current status of your application, a professional team is ready to assist you 24/7. This constant availability takes the stress off applicants, allowing them to get prompt, accurate answers to their questions whenever they need them. Offering such an invaluable service demonstrates applygcmsnotes.ca’s dedication to their clients’ peace of mind and satisfaction. The 24-hour phone support serves as a reliable and convenient way for applicants to stay informed about their immigration process. With applygcmsnotes.ca, you are never alone on your immigration journey.
The Transparency of the Application Process at Applygcmsnotes.ca
In the realm of immigration services, transparency can often be hard to come by. Applygcmsnotes.ca distinguishes itself by offering applicants clear and unfettered access to their application information at all times. This commitment to openness fosters a climate of trust and accountability between the service provider and the applicant. Candidates have the freedom to track their gcms notes, caips notes, or atip notes, thus being constantly updated about their application’s progress. The company’s transparency policy ensures that applicants are not left in the dark about their status and are well-informed about every step of the process. This approach enhances the applicant’s experience and positions applygcmsnotes.ca as a paragon of integrity in the immigration services sector.
CLIENT FEEDBACK AND REVIEWS FOR APPLYGCMSNOTES.CA
A wealth of positive testimonials and client reviews speak volumes about the quality of service provided by applygcmsnotes.ca. These reviews underline the exceptional affordability, swift service delivery, and superior customer service that the company is known for. Customers consistently express satisfaction with the professionalism of the team, especially their skill in handling gcms notes sample and caips notes requests. In their feedback, clients frequently highlight the company’s transparency and the peace of mind that the 24-hour support offers. The endorsements from satisfied clients stand as a clear indication that applygcmsnotes.ca is a trusted partner for anyone navigating the complexities of Canadian immigration documentation. Their reputation for delivering a seamless and efficient service truly sets them apart in the sector.
0 notes
Text
Reality of Canadian Sponsorship Letters in 2023

Canadian Sponsorship Letters
Canadian Sponsorship Letters play a pivotal role in various immigration and sponsorship processes within Canada. These documents serve as compelling narratives that showcase the genuine intent and commitment of sponsors to support applicants, be it for family reunification, study permits, or work visas. Crafting a well-structured sponsorship letter is essential to communicate the depth of the relationship between the sponsor and the applicant, as well as to address any potential concerns that immigration authorities might have. This guide provides valuable insights into the art of writing effective Canadian Sponsorship Letters, offering tips, dos and don’ts, along with sample templates tailored to specific situations. Whether you’re uniting loved ones or facilitating educational and career opportunities, mastering the art of sponsorship letter composition can significantly enhance your application’s prospects.
Understanding Canadian Sponsorship Letters
Canadian Sponsorship Letters are powerful tools that substantiate the sincerity of the sponsor’s commitment to the applicant’s journey in Canada. From family sponsorships to study and work permits, these letters provide a tangible testament of the sponsor’s genuine intent to support the applicant. The letters form a bridge between personal relationships and official immigration processes, demonstrating the willingness to provide financial and emotional assistance. By illustrating the significance of Canadian Sponsorship Letters in various immigration contexts, this section sheds light on their vital role in building a strong case for approval.
IMygrate your trusted Canadian Immigration Consultants

If you want to know more about the sponsorship letter. Or if you want to know about visa or any other information, then you can consult Imygrate, then there is a registered consultant for Canada.
Key Components of an Effective Canadian Sponsorship Letter
An effective Canadian Sponsorship Letter is a carefully woven tapestry of genuine emotions and practical commitments. It not only highlights the relationship between the sponsor and the applicant but also outlines the sponsor’s capacity to meet financial responsibilities. By artfully presenting compelling details, such as shared experiences and future plans, the letter conveys a holistic understanding of the applicant’s aspirations. Addressing potential concerns or doubts preemptively can further fortify the letter’s impact. This section delves into the key elements that contribute to the persuasiveness of a sponsorship letter, guiding sponsors towards creating a convincing and comprehensive document.
Book your consultation with IMygrate
Crafting a Compelling Sponsorship Letter: Dos and Don’ts
DosDon’tsTailoring the letter to the specific immigration or sponsorship programOverstating or misrepresenting factsUsing a respectful and professional toneUsing generic or template-like languageProviding authentic and accurate informationNeglecting to address potential concerns or doubtsHighlighting unique qualities and contributions of the sponsor and applicantIncluding irrelevant or excessive detailsShowcasing genuine emotional connection and shared experiences–
Sample Canadian Sponsorship Letter Templates
Sample Canadian Sponsorship Letter Templates offer practical guidance by showcasing real-world examples tailored to specific situations. Whether you’re sponsoring a spouse, family member, student, or worker, these templates provide a structured framework for composing personalized and impactful letters. By incorporating these samples as a reference, sponsors can gain insights into the tone, language, and structure that resonate most effectively in different contexts.
Also Read: IRCC GCMS Notes
Tips for Submitting an Effective Sponsorship Letter
Submitting an effective Canadian Sponsorship Letter involves meticulous attention to detail. From formatting and organization to proofreading and seeking feedback, this section offers practical tips to ensure the letter is polished and persuasive. Encouraging sponsors to infuse anecdotes and stories that underscore the applicant’s qualities can further enrich the letter, making it a compelling testament to their commitment.
Conclusion:
Canadian Sponsorship Letters are not mere formalities; they are eloquent expressions of dedication and support. Mastering the art of crafting these letters can significantly enhance the success of immigration and sponsorship applications. By combining genuine emotions with a clear demonstration of capabilities, sponsors can create documents that not only meet the requirements but also touch the hearts of immigration authorities, paving the way for a smoother and more positive outcome.
FAQs
What are Canadian Sponsorship Letters?
Canadian Sponsorship Letters are formal documents submitted as part of various immigration and sponsorship applications in Canada. These letters demonstrate the sponsor’s intent, commitment, and ability to financially and emotionally support the applicant throughout their journey.
Why are Canadian Sponsorship Letters important?
Sponsorship Letters play a crucial role in showcasing the authenticity of the relationship between the sponsor and the applicant. They provide immigration authorities with insight into the sponsor’s genuine intent, thus strengthening the applicant’s case for approval.
What should be included in a Canadian Sponsorship Letter?
A well-crafted Sponsorship Letter should include the sponsor and applicant’s relationship details, an explanation of the sponsorship intent, personal anecdotes, financial support details, and a proactive addressing of potential concerns or doubts.
How can I tailor a Sponsorship Letter to a specific immigration program?
To tailor a Sponsorship Letter effectively, research and understand the specific requirements and expectations of the immigration program. Customize the content to align with the program’s criteria and emphasize relevant details.
Are there any common mistakes to avoid in Canadian Sponsorship Letters?
Yes, common mistakes include using generic language, overstating facts, neglecting potential concerns, and providing excessive or irrelevant details. It’s important to maintain authenticity and adhere to the specific requirements of the immigration program.
Can I use a template for a Canadian Sponsorship Letter?
While templates can serve as a starting point, it’s crucial to personalize the content according to your unique situation. Avoid using template-like language, and instead, focus on presenting genuine emotions and specific details.
How do Canadian Sponsorship Letters enhance my application’s chances?
A well-crafted Sponsorship Letter demonstrates to immigration authorities that the relationship between the sponsor and the applicant is genuine and well-founded. It can address potential doubts and highlight the sponsor’s capacity to provide support, ultimately bolstering the application’s credibility.
Are there sample Canadian Sponsorship Letter templates available?
Yes, sample templates for various scenarios, such as spousal sponsorship, family member sponsorship, student visa sponsorship, and work visa sponsorship, can serve as references for creating your own personalized Sponsorship Letter.
Can storytelling be effective in a Canadian Sponsorship Letter?
Yes, storytelling can be a powerful tool in conveying emotions and shared experiences between the sponsor and the applicant. Meaningful anecdotes can strengthen the emotional connection and authenticity of the letter.
What role does proof reading and editing play in creating a compelling Sponsorship Letter?
Proofreading and editing are essential to ensure clarity, correct grammar, and accurate information. A well-edited letter reflects professionalism and enhances the overall impact of your Sponsorship Letter.
0 notes
Text

Apply GCMS NOTES is privately owned by Migrator Immigration Services Inc Canada, and we assist those whose applications to visit, study,work in Canada were rejected by officers of IRCC or Delayed PR decision. We assist you in getting those officer notes for your next application so that you can reapply your Canada study visa , Work permit, and Canada visitor application with proper documentation.
gcms notes canada gcms notes processing time gcms notes for visitor visa gcms notes sample gcms notes ircc gcms notes tracking caips notes canada
0 notes
Text
Gaussian Mixture Modeling Extensions for Improved False Discovery Rate Estimation in GC-MS Metabolomics
The ability to reliably identify small molecules (e.g. metabolites) is key towards driving scientific advancement in metabolomics. Gas chromatography mass spectrometry (GCMS) is an analytic method that may be applied to facilitate this process. The typical GCMS identification workflow involves quantifying the similarity of an observed sample spectrum and other features (e.g. retention index) to that of several references, noting the compound of the best-matching reference spectrum as the identified metabolite. While a deluge of similarity metrics exists, none quantify the error rate of generated identifications, thereby presenting an unknown risk of false identification or discovery. To quantify this unknown risk, we propose a model based framework for estimating the false discovery rate (FDR) among a set of identifications. Extending a traditional mixture modeling framework, our method incorporates both similarity score and experimental information in estimating the FDR. We apply these models to identification lists derived from across 548 samples of varying complexity and sample type (e.g. fungal species, standard mixtures, etc.), comparing their performance to that of the traditional Gaussian mixture model (GMM). Through simulation, we additionally assess the impact of reference library size on the accuracy of FDR estimates. In comparing the best performing model extensions to the GMM, our results indicate relative decreases in median absolute estimation error (MAE) ranging from 12% to 70%, based on comparisons of the median MAEs across all hit lists. Results indicate that these relative performance improvements generally hold despite library size, however FDR estimation error typically worsens as the set of reference compounds diminishes. http://dlvr.it/Sj4kHp
0 notes
Text
YELLOWSTONE NATIONAL PARK (JOLLYROGER)
condition that it is strong presumptive evidence
June 1972 the group had found that a similar reaction could occur with methane as the carbon source; as Horowitz described it to Miller: Ellis Golub a postdoc who is working with Hubbard
The reaction is different in some ways
identification of HCHO is not certain yet and I
I am not suggesting that Mars is inhabited by kangaroo
Klein's superior as overall director
I had the nickname 'Rabbi' among some of my associates.^' Klein's levelheaded calm would turn out to be most important of all in the days
Lovelock shared Horowitz's feeling that sterilizing Martian
I am happy to hear that GCMS is in good shape
complexities of getting all four experiments to function problemfree in a single instrument NASA's Viking Project manager James Martin issued a directive on 1 July 1971 declaring: It is project
It is not optimism
Paul B. Hamilton of DuPont had put it thus: what appears to be the pitter patter of heavenly feet is probably instead the print
His and Horowitz's concerns notwithstanding work on the latest versions
Horowitz's way of thinking this produced conditions
it must be noted that at least one of the other participants does not agree with certain parts of Kvenvolden's account and thinks
chemistry on Mars had been frozen by changes in the planet's climate and atmosphere
it is irradiated with longwavelength
virtually certain that the earth is the only lifebearing planet
It is truly fortunate that the Moon
anyone about these results. After a long and heated argument in which Kvenvolden went over Ponnamperuma's head to Chuck
The fact is that nothing
Lovelock argued this is so far from the equilibrium
Then we began to get these great results.'^ It is an age
President Lyndon Johnson after looking at the Mariner 4 photos concluded that life as we know it with its humanity is more unique than many have
CO as might be expected since one is an oxidation
it totally uncharacteristic of Ponnamperuma to act in such a petty manner. It is fortunate that in the end
we have learned about Mars â in contrast to Venus â excludes it as a possible abode of life.''^ Although he concluded it is certainly true that no terrestrial species
result would have. When one multiplied the probability of success by the importance of the problem he concluded the value so obtained is high
He reasoned and the later discovery of dry water channels from a time of flooding in Mars's distant past confirm
life detection instrument.'^ His description of the discussions between scientists and engineers is highly evocative of the heady sense
GCMS team: The Viking biology package is experiencing severe difficulties
he concluded on a more skeptical note even Southern California is not as dry as Mars
outcome that gives impetus to the search for extraterrestrial life he said; rather it is the immense importance
it was Levin's machine turned upside down.'*^ Horowitz discussed the concept briefly in the February 1966 Science paper: one could use radioactively labeled carbon dioxide to test for photosynthesis in a sample of Martian regolith because if there is life
finds that methane is converted to organics formaldehyde
mixture was what one would expect for extraterrestrial synthesis by purely chemical means that is Miller
December 1969 from over fifty submissions the four experiments chosen were Horowitz's PR Levin's
His first NASA grant for $30100 was awarded before year's end and was channeled
Klein Lederberg and Rich the Biology Team members who did not have a stake in any one of the experiments met to discuss priorities; shortly afterward by 13 March 1972 NASA headquarters had decided that Vishniac's lightscattering
Herbert has also been credited with inspiring the nascent environmental movement; he constructed an entire ecology from Immense sandworms to microscopic organisms crucial to the desert ecosystem's stability and to the plot.'^^ Summarizing his own thinking in a paper in Science Horowitz wrote that the Mariner 4 data were very depressing news for biologists but if I have learned anything during 6 years of association with the space program it is that people
experiment he had no qualms about making uncomfortable those who insisted on such nonMarslike wet experiments as he told Lederberg: There is to be an important meeting
it is now
finding: earthly contaminants would be entirely the Lform of amino acids since that is the only form Earth
0 notes
Text

[ID: a whiteboard with writing in blue marker stating:
Afternoon
Prep 100 microliter samples for GCMS
All 16 specimens + 2 methanol blanks
A note of ‘Run 8?’ Is next to the previous two lines.
Weigh fresh specimens
Finish photos that weren’t complete in Field ID
Do Spore prints of specimens that need one
Begin ID’ing specimens using Taxonomy keys
If time: Finish T. elegans chromatograms. /End ID]
Sometimes I have nice handwriting! If you have questions feel free to DM me or send an ask!
You might ask: How’s research going Ezra?
The answer is: it’s complicated.
#updates from Ezra#data processing my enemy#ezra comp biology bs#biology bs (derogatory)#ezra rambles#mushroom research
8 notes
·
View notes
Photo

Order Caips and Gcms notes online for your Canada Visa. See a sample at sample.gcmsnotes.com (at Brampton, Ontario) https://www.instagram.com/p/B_1GvtJp_O3/?igshid=1qp15z252pyqj
0 notes
Text
Understanding GCMS Notes Processing Time: What You Need to Know

Introduction
Gas Chromatography-Mass Spectrometry (GCMS) is a powerful analytical technique used in various fields, including chemistry, environmental science, forensics, and pharmaceuticals. It allows scientists to identify and quantify compounds within a sample, making it an invaluable tool for research and analysis. However, one crucial aspect that often gets overlooked is the processing time for GCMS notes.
GCMS notes processing time refers to the duration it takes for scientists to review, analyze, and document the data generated by a GCMS instrument. This aspect is vital as it can significantly impact the overall efficiency of a laboratory, affect research timelines, and influence decision-making processes. In this blog, we will delve into the various factors that influence GCMS notes processing time and explore strategies to optimize it.
Understanding GCMS Notes
Before we dive into the processing time, let's briefly review what GCMS notes are and why they are essential in analytical chemistry.
GCMS notes are the records and documentation produced during the analysis of a sample using a Gas Chromatography-Mass Spectrometry instrument. These notes contain a wealth of information, including:
Sample Information: Details about the sample being analyzed, such as sample ID, source, and preparation method.
Instrument Parameters: Settings and conditions used in the GCMS analysis, including column type, temperature, and injection mode.
Chromatogram Data: Graphical representations of the separation of compounds in the sample over time, typically showing peaks corresponding to different analytes.
Mass Spectra: Information about the mass-to-charge ratios of ions detected by the mass spectrometer, allowing for compound identification.
Analysis Notes: Any additional observations or comments made by the analyst during the analysis.
GCMS notes are essential for several reasons:
Data Integrity: They provide a detailed record of the analysis, ensuring the integrity of the data for future reference and validation.
Quality Control: Analysts can use these notes to track instrument performance and troubleshoot any issues that may arise during analysis.
Regulatory Compliance: In regulated industries like pharmaceuticals and environmental monitoring, maintaining comprehensive records is essential to meet compliance requirements.
Factors Affecting GCMS Notes Processing Time
The processing time for GCMS notes can vary widely depending on several factors. Understanding these factors is crucial for laboratories seeking to optimize their workflow and improve efficiency. Here are some of the key factors that influence GCMS notes processing time:
Sample Complexity: The complexity of the sample being analyzed plays a significant role in processing time. Complex samples with numerous compounds or matrix interferences may require more time for data interpretation and analysis.
Instrument Performance: The condition and performance of the GCMS instrument itself can impact processing time. A well-maintained and calibrated instrument is more likely to produce reliable data, reducing the need for extensive troubleshooting.
Analyst Experience: The expertise of the analyst conducting the GCMS analysis is another critical factor. Experienced analysts may be able to process notes more efficiently and make quicker decisions regarding data quality.
Data Volume: The volume of data generated during a GCMS analysis can be substantial, especially when running multiple samples. Managing and reviewing this data can be time-consuming.
Data Analysis Software: The choice of data analysis software can also affect processing time. User-friendly software with robust data processing capabilities can streamline the analysis process.
Regulatory Requirements: Laboratories operating in regulated industries must adhere to specific documentation and reporting requirements. Compliance with these regulations can add additional time to the processing of GCMS notes.
Optimizing GCMS Notes Processing Time
Now that we understand the factors that influence GCMS notes processing time, let's explore strategies to optimize this crucial aspect of analytical chemistry:
Sample Preparation:
Invest time in optimizing sample preparation methods to minimize matrix interferences and simplify data interpretation. Proper sample preparation can significantly reduce the time required for data analysis.
Instrument Maintenance:
Regularly maintain and calibrate your GCMS instrument to ensure optimal performance. Preventative maintenance can help avoid instrument issues that may prolong processing time.
Training and Skill Development:
Provide training and continuous learning opportunities for analysts. A well-trained analyst can make quicker and more accurate decisions, reducing the time spent on data review and troubleshooting.
Standard Operating Procedures (SOPs):
Develop and follow standardized operating procedures for GCMS analysis. SOPs can streamline the analysis process and ensure consistency in data processing.
Data Management Software:
Invest in data management and analysis software that is user-friendly and capable of handling large volumes of data efficiently. Consider software that offers automation and data processing workflows.
Parallel Processing:
If you have multiple samples to analyze, consider parallel processing to maximize efficiency. This involves setting up multiple instruments to run samples simultaneously, reducing turnaround time.
Documenting Best Practices:
Encourage analysts to document their best practices and insights. These documented procedures can serve as references for future analyses, saving time on troubleshooting.
Regular Audits and Reviews:
Conduct regular audits and reviews of GCMS notes processing workflows to identify bottlenecks and areas for improvement. Make necessary adjustments to streamline the process.
Compliance Management:
Implement a robust compliance management system to ensure that all regulatory requirements are met efficiently. Automation can help simplify compliance tasks.
Collaboration and Communication:
Foster collaboration and open communication among team members. Effective communication can help resolve issues quickly and prevent delays in data processing.
Conclusion
GCMS notes processing time is a critical aspect of analytical chemistry that can significantly impact laboratory efficiency and research timelines. By understanding the factors that influence processing time and implementing optimization strategies, laboratories can streamline their workflows and improve overall productivity. Investing in sample preparation, instrument maintenance, training, software, and compliance management can lead to more efficient GCMS analysis and better-quality results, ultimately benefiting scientific research and applications in various fields.
0 notes
Text
Guide to Immigration, Refugees, and Citizenship in Canada
Guide to Immigration, Refugees, and Citizenship in Canada
Immigrating to a new country can be both exciting and daunting. a land known for its welcoming nature and diverse opportunities, the journey towards obtaining immigration, refugee,status can feel like navigating a complex maze. However, with the right information and guidance, you can successfully navigate this pathway. Caips Notes for Canada This comprehensive guide aims to provide you with insights and essential information to understand the processes involved in immigration, refugees.
Understanding GCMS Notes
GCMS (Global Case Management System) notes play a vital role in the immigration process in Canada. These notes contain detailed information about your immigration application, including the progress, decisions, and any updates. Many applicants find GCMS notes invaluable for tracking their application and gaining insights into the decision-making process. What are GCMS Notes? GCMS notes are internal documents maintained by Immigration, Refugees (IRCC). They provide a comprehensive overview of your immigration application, including correspondence, officer’s notes, and any relevant documents associated with your case. How to Obtain GCMS Notes To request your GCMS notes, you can submit an Access to Information and Privacy (ATIP) request to the IRCC. This process allows you to access your complete file, including the GCMS notes. However, please note that the processing time for obtaining GCMS notes can vary, and it is important to be patient during this period.
gcms notes for visitor visa The processing time for GCMS notes can vary depending on various factors such as the complexity of your case, the workload of the IRCC, and the number of requests they receive. On average, it can take several weeks to several months to receive your GCMS notes. It is essential to plan accordingly and be prepared for the wait.
GCMS Notes for Visitor Visa Applications
Visitor visas are a common pathway for individuals who wish to visit Canada for tourism, business, or visiting family and friends. Here’s what you need to know about obtaining GCMS notes for visitor visa applications: Relevance of GCMS Notes for Visitor Visa Applications GCMS notes provide insights into the decision-making process of your visitor visa application. By reviewing the notes, you can understand the reasons behind a decision, any additional requirements, or potential areas of improvement for future applications. Requesting GCMS Notes for Visitor Visa Applications To obtain GCMS notes for your visitor visa application, you can follow the same process mentioned earlier—submit an Access to Information and Privacy (ATIP) request to the IRCC. Be sure to specify that you are requesting the GCMS notes related to your visitor visa application.
GCMS Notes for Visitor Visa
Sample GCMS Notes and Tracking Progress
Many applicants find it helpful to review sample GCMS notes to understand the format and content they can expect. Additionally, tracking the progress of your application is crucial for staying informed and managing expectations. Here’s what you need to know
Conclusion
Obtaining GCMS and CAIPS notes can provide valuable insights into your immigration application in Canada. Understanding the processing time, requesting the notes,
0 notes
Text
All About Terpene Testing & Analysis!

While considering cannabis production, cannabinoids like THC and CBD are not the only compounds to be focused on but there are many other present compounds that must be shaded light. And one such compound is a terpene, that is prominently be tested while considering the cannabis production.
Terpenes are a significant element of essential oils stemmed from plants, they portray an assorted class of organic syntheses produced largely by plants. Being an element in cannabis, it asks for great attention during the industrial hemp production or when cannabis is being used for medical purposes. And for the right reasons, terpenes can determine the smell, flavor, and even the remedial effects of the strain.
Moreover, terpenes own strong and distinguished odors. Although it's being thought that these compounds developed to help plants to flush out predators and bacterias, terpenes are now profoundly solicited in the food, perfume, and cannabis industries. Hence, the terpene testing has come into play.
About Terpene Testing
From cheezy to piney, over 100 different types of terpenes have been found in the cannabis plant. These pungent smelled terpenes give cannabis strain distinct flavors. And to understand and detect each unique impression of terpenes present in the cannabis plant, the testing has been done.
Terpene testing and analysis are noteworthy and important to conduct for contrasting strains of cannabis. Since terpenes have a great impact on the medical and psychological effects of the cannabis plant, testing has been done to ensure the manufacturers and growers about cannabis and its contained elements.
Curious to know, how the terpene testing matters for cannabis growers, manufacturers and chiefly for consumers? Let's brief it-
Identifying terpenes which is essential in helping consumers for medicinal use to classify the best and right strain as per their symptoms.
Terpene analysis enables organizations and manufacturers to tailor treatment plans for their clients and maximize a terpene strain’s pharmacological outcomes.
By knowing terpenes, farmers can selectively change the terpene proportions of their cannabis strains, to optimize wanted benefits.
Grants to the regularity of phytochemical production for consumer safety and medicinal potency.
Methods To Test Terpenes
To recognize the nature and quantify the number of individual terpenes present in a cannabis sample, the gas chromatography-mass spectrometry or GCMS method is being used commonly. It is an analytical method used by industries such as food, perfume, and cannabis to detect the aromatic and volatile compounds as terpenes.
The testing is done by separating the small molecules in a vaporized cannabis sample with the help of a gas chromatograph. After that, the mass spectrometer detects and quantifies those separated molecules. This method is an ideal method to detect a broad variety of terpenes in the most accurate method with a notable level of sensitivity.
Note: When terpenes volatilization is compared with the THC, they are notably highly volatile. While THC has a boiling point of about 315°F, there the most volatile terpenes in the cannabis plant will begin to concentrate at around 70°F.
Common Terpenes Found in Marijuana and Hemp
Myrcene - Being found in cannabis in major, myrcene terpenes are also found in thyme, hops, laurel leaves, verbena, and lemongrass. Its odor can be defined as musky and earthy.
Linalool - This terpene has two stereoisomers known as S-linalool and R-linalool. Being present in cannabis, it is also present in plant species like mint, cinnamon, birch, laurel, and several citrus fruits.
Limonene - Pleasant smell like oranges, limonene is usually used in the creation of household products and cosmetics. This terpene is present in a species of citrus fruits and most prominently in cannabis strains.
Humulene - It is one of the notable terpenes in the cannabis plant. With a cherished fragrance, it comes with the earthy, woody, and herbal notes that give the hoppy beer.
A-Pinene - It is a woody and earthy aromatic terpene with marks of pine and cedarwood. It is also known as Alpha-Pinene.
Beta-Caryophyllene (BCP) - It is a pungent sesquiterpene known to produce a sharp, spicy odor as clove, black pepper, rosemary.
Bottom Line!
In the cannabis industry, where people over the last decades thought only of the legalization of cannabis products in terms of marijuana presence, there the terpene testing is too equally important. Being an important phase in the world of cannabis, terpenes testing is highly required by all the CBD product manufacturers, growers, and consumers.
Considering the standard and ideal testing methods like GCMS, terpene testing can be easily done and so the consumers will get a quality CBD product delivered. Kaycha Labs holds the terpene testing methods and tools by understanding the federal rules and laws for the cannabis industry. With our quality assurance and testing reports results, the consumers using cannabis for medicinal purposes can be sure of their medicines as unquestionably as they do on else pharmaceuticals.
0 notes
Text
caips notes ircc caips notes sample get gcms notes order gcms notes canada gcms notes order atip request online how to apply caips notes atip gcms notes tracking gcms notes apply online how to get gcms notes faster gcms notes how to read
0 notes
Text
Configuring Push Notifications For Xamarin Forms
Push Notifications are one-way forms of communication offered to mobile users that some operation (like an update, deletion, or addition) has happened.
To send a push notification to an Apple device, use the Apple Push Services. For an Android device, use Google’s Firebase Cloud Messaging Services. Fortunately, if you’re sending a push notification to an app on both platforms, Microsoft offers an easier way through Microsoft Azure Notification Hub.
Go to the Azure portal.
Click “Create a resource”, “Web + Mobile” and select “Notification Hub.”
In the new window, enter the notification hub name and create a new namespace.
Select a location. We recommend a location closest to the user or closest to you (the developer).
Choose an existing resource group or create a new resource group.
Select your Microsoft subscription (for billing purposes).
Choose a pricing tier based on your usage needs and click “Select” to close the pricing tab.
Click “Create” to create the new notification hub. It may take few minutes to create and configure.
Choose the “Google (GCM)” from the side menu. This section is used to configure and send Android-based push notifications using Birebase cloud messaging.
Create the Firebase Push Notifcation
Open a new browser window and navigate to https://console.firebase.google.com/.
Login or create a new account. After you have logged in, click “+ Add Project”.

Enter the Project Name and Country/region. You can change the Project ID if required.
Click “CREATE PROJECT.” It may take a few minutes to create the project.
After the message “Your new project is ready”, click “CONTINUE” to navigate to the project page.

In the new page, select “Add Firebase to your Android app” to create an Android-based Firebase app.

In the next screen, enter the “Android package name” and enter an optional app nickname. Select “REGISTER APP.”

In the next screen, click “Download google-services.json” and download the file.

Open the downloaded file and copy the project number (a 12-digit code like 272477558565) into the project’s AppSettings.cs file for FirebaseSenderID.
Create push services for iOS:
Select “Apple (APNS)” from the Azure portal side menu.

Upload a certificate to send push notifications on iOS. Log in to https://developer.apple.com.
Navigate to “Certificates, Identifiers and Profiles.”

Select the Apple ID associated with the application.
Ensure that the ID is configured to use Push Notifications. It should have the status as Configurable. Click “Edit” to configure push services.

In the next screen, choose to create either a development or production SSL certificate and click “Create Certificate.”

The next screen requires you to create a “certSigningRequest”. Create the file and upload it.
On the Mac, open the “Keychain Access” application: press WinKey + Spacebar to open Spotlight. Type “keychain access” and press enter.
Select Keychain Access -> Certificate Assistant -> Request a Certificate From a Certificate Authority.

Enter the user email address, command name, and Certificate Authority (CA) Email address.
Select “Saved to disk” and click “Continue”.

In the popup dialog, save the certSigningRequest.
Choose a location. If you’re choosing a default location, make sure to note the location for future purposes.
Now navigate back to the apple developer website and upload the previously created certSigningRequest and select “Continue.”

In the next screen, click “Download” button to download the .cer file. After downloading the file, select “Done” and close the browser.
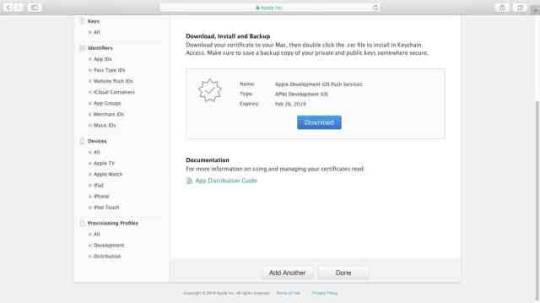
Double click to open the .cer file. It will by default open the Keychain Access application.
Enter the administrator password to install the .cer file.

Right-click on the certificate and choose “Export [Certificate Name].”

Enter a name for the “.p12” file. Select the location of the file and click “Save.” Make sure the file format is “Personal Information Exchange (.p12)” before saving the file.

Enter a password for the p12 file. Re-enter the password.

Enter the administrator password for Keychain Access application to export the key and select “Allow.”

Now navigate back to the Azure portal.
Select Folder Icon.

Find the p12 file and click “Open.” Enter the same password used to create the file. Save.

Open the Backend Mobile app service from the Azure portal and navigate to “Push” from the sidebar menu.
Connect to the notification hub we created earlier.

Choose the previously created notification hub.

On the next screen, add the tag “UserGroup1” for push notifications to be delivered to the mobile devices. Save.

Xamarin.Forms application functionality
The sample Xamarin.Forms application displays a list of push notification messages. This is achieved with the AddMessage method, which adds the specified push notification message to the UI. This method also prevents duplicate messages from being added to the UI, and runs on the main thread so it can be called from any thread. The following code shows the AddMessage method:
public void AddMessage(string message) { Device.BeginInvokeOnMainThread(() => { if (messageDisplay.Children.OfType<Label>().Where(c => c.Text == message).Any()) { // Do nothing, an identical message already exists } else { Label label = new Label() { Text = message, HorizontalOptions = LayoutOptions.CenterAndExpand, VerticalOptions = LayoutOptions.Start }; messageDisplay.Children.Add(label); } }); }
The sample application contains an AppConstants.cs file, which defines properties used by the platform projects. This file needs to be customized with values from your Azure Notification Hub. The following code shows the AppConstants.cs file:C#Copy
public static class AppConstants { public static string NotificationChannelName { get; set; } = "XamarinNotifyChannel"; public static string NotificationHubName { get; set; } = "< Insert your Azure Notification Hub name >"; public static string ListenConnectionString { get; set; } = "< Insert your DefaultListenSharedAccessSignature >"; public static string DebugTag { get; set; } = "XamarinNotify"; public static string[] SubscriptionTags { get; set; } = { "default" }; public static string FCMTemplateBody { get; set; } = "{\"data\":{\"message\":\"$(messageParam)\"}}"; public static string APNTemplateBody { get; set; } = "{\"aps\":{\"alert\":\"$(messageParam)\"}}"; }
Customize the following values in AppConstants to connect the sample application to your Azure Notification Hub:
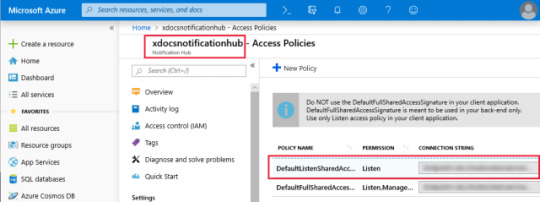
NotificationHubName: Use the name of the Azure Notification Hub you created in your Azure portal.
ListenConnectionString: This value is found in the Azure Notification Hub under Access Policies.
The following screenshot shows where these values are located in the Azure portal:
Configure the Android application for notifications
Complete the following steps to configure the Android application to receive and process notifications:
Configure the Android Package name to match the package name in the Firebase console.
Install the following NuGet packages to interact with Google Play, Firebase and Azure Notification Hubs:
Xamarin.GooglePlayServices.Base.
Xamarin.Firebase.Messaging.
Xamarin.Azure.NotificationHubs.Android.
Copy the google-services.json file that you downloaded during FCM setup to the project and set the Build Action to GoogleServicesJson.
Configure AndroidManifest.xml to communicate with Firebase.
Override FirebaseMessagingService to handle messages.
Add incoming notifications to Xamarin.Forms UI.
Note
The GoogleServicesJson build action is part of the Xamarin.GooglePlayServices.Base NuGet package. Visual Studio 2019 sets the available Build Actions during startup. If you do not see GoogleServicesJson as a Build Action, restart Visual Studio 2019 after installing the NuGet packages.
Configure Android manifest
The receiver elements within the application element allow the app to communicate with Firebase. The uses-permission elements allow the app to handle messages and register with Azure Notification Hub. The complete AndroidManifest.xml should look similar to the example below:XMLCopy
<manifest xmlns:android="http://schemas.android.com/apk/res/android" android:versionCode="1" android:versionName="1.0" package="YOUR_PACKAGE_NAME" android:installLocation="auto"> <uses-sdk android:minSdkVersion="21" /> <uses-permission android:name="android.permission.INTERNET" /> <uses-permission android:name="com.google.android.c2dm.permission.RECEIVE" /> <uses-permission android:name="android.permission.WAKE_LOCK" /> <uses-permission android:name="android.permission.GET_ACCOUNTS"/> <application android:label="Notification Hub Sample"> <receiver android:name="com.google.firebase.iid.FirebaseInstanceIdInternalReceiver" android:exported="false" /> <receiver android:name="com.google.firebase.iid.FirebaseInstanceIdReceiver" android:exported="true" android:permission="com.google.android.c2dm.permission.SEND"> <intent-filter> <action android:name="com.google.android.c2dm.intent.RECEIVE" /> <action android:name="com.google.android.c2dm.intent.REGISTRATION" /> <category android:name="${applicationId}" /> </intent-filter> </receiver> </application> </manifest>
Override FirebaseMessagingService to handle messages
To register with Firebase and handle messages, subclass the FirebaseMessagingService class. The sample application defines a FirebaseService class that subclasses the FirebaseMessagingService. This class is tagged with an IntentFilter attribute, which includes the com.google.firebase.MESSAGING_EVENT filter. This filter allows Android to pass incoming messages to this class for handling:C#Copy
[Service] [IntentFilter(new[] { "com.google.firebase.MESSAGING_EVENT" })] public class FirebaseService : FirebaseMessagingService { // ... }
When the application is started, the Firebase SDK will automatically request a unique token identifier from the Firebase server. Upon successful request, the OnNewToken method will be called on the FirebaseService class. The sample project overrides this method and registers the token with Azure Notification Hubs:C#Copy
public override void OnNewToken(string token) { // NOTE: save token instance locally, or log if desired SendRegistrationToServer(token); } void SendRegistrationToServer(string token) { try { NotificationHub hub = new NotificationHub(AppConstants.NotificationHubName, AppConstants.ListenConnectionString, this); // register device with Azure Notification Hub using the token from FCM Registration registration = hub.Register(token, AppConstants.SubscriptionTags); // subscribe to the SubscriptionTags list with a simple template. string pnsHandle = registration.PNSHandle; TemplateRegistration templateReg = hub.RegisterTemplate(pnsHandle, "defaultTemplate", AppConstants.FCMTemplateBody, AppConstants.SubscriptionTags); } catch (Exception e) { Log.Error(AppConstants.DebugTag, $"Error registering device: {e.Message}"); } }
The SendRegistrationToServer method registers the device with the Azure Notification Hub and subscribes to tags with a template. The sample application defines a single tag called default and a template with a single parameter called messageParam in the AppConstants.cs file. For more information about registration, tags, and templates, see Register templates and tags with the Azure Notification Hub.
When a message is received, the OnMessageReceived method will be called on the FirebaseService class:C#Copy
public override void OnMessageReceived(RemoteMessage message) { base.OnMessageReceived(message); string messageBody = string.Empty; if (message.GetNotification() != null) { messageBody = message.GetNotification().Body; } // NOTE: test messages sent via the Azure portal will be received here else { messageBody = message.Data.Values.First(); } // convert the incoming message to a local notification SendLocalNotification(messageBody); // send the incoming message directly to the MainPage SendMessageToMainPage(messageBody); } void SendLocalNotification(string body) { var intent = new Intent(this, typeof(MainActivity)); intent.AddFlags(ActivityFlags.ClearTop); intent.PutExtra("message", body); //Unique request code to avoid PendingIntent collision. var requestCode = new Random().Next(); var pendingIntent = PendingIntent.GetActivity(this, requestCode, intent, PendingIntentFlags.OneShot); var notificationBuilder = new NotificationCompat.Builder(this) .SetContentTitle("XamarinNotify Message") .SetSmallIcon(Resource.Drawable.ic_launcher) .SetContentText(body) .SetAutoCancel(true) .SetShowWhen(false) .SetContentIntent(pendingIntent); if (Build.VERSION.SdkInt >= BuildVersionCodes.O) { notificationBuilder.SetChannelId(AppConstants.NotificationChannelName); } var notificationManager = NotificationManager.FromContext(this); notificationManager.Notify(0, notificationBuilder.Build()); } void SendMessageToMainPage(string body) { (App.Current.MainPage as MainPage)?.AddMessage(body); }
Incoming messages are converted to a local notification with the SendLocalNotification method. This method creates a new Intent and places the message content into the Intent as a string Extra. When the user taps the local notification, whether the app is in the foreground or the background, the MainActivity is launched and has access to the message contents through the Intent object.
The local notification and Intent example requires the user to take the action of tapping on the notification. This is desirable when the user should take action before the application state changes. However, you may want to access the message data without requiring a user action in some cases. The previous example also sends the message directly to the current MainPage instance with the SendMessageToMainPage method. In production, if you implement both methods for a single message type, the MainPage object will get duplicate messages if the user taps the notification.
Note
The Android application will only receive push notifications if it is running in either the background or foreground. To receive push notifications when the main Activity is not running, you must implement a service, which is beyond the scope of this sample. For more information, see Creating Android Services
Add incoming notifications to the Xamarin.Forms UI
The MainActivity class needs to obtain permission to handle notifications and manage incoming message data. The following code shows the complete MainActivity implementation:C#Copy
[Activity(Label = "NotificationHubSample", Icon = "@mipmap/icon", Theme = "@style/MainTheme", MainLauncher = true, ConfigurationChanges = ConfigChanges.ScreenSize | ConfigChanges.Orientation, LaunchMode = LaunchMode.SingleTop)] public class MainActivity : global::Xamarin.Forms.Platform.Android.FormsAppCompatActivity { protected override void OnCreate(Bundle savedInstanceState) { TabLayoutResource = Resource.Layout.Tabbar; ToolbarResource = Resource.Layout.Toolbar; base.OnCreate(savedInstanceState); global::Xamarin.Forms.Forms.Init(this, savedInstanceState); LoadApplication(new App()); if (!IsPlayServiceAvailable()) { throw new Exception("This device does not have Google Play Services and cannot receive push notifications."); } CreateNotificationChannel(); } protected override void OnNewIntent(Intent intent) { if (intent.Extras != null) { var message = intent.GetStringExtra("message"); (App.Current.MainPage as MainPage)?.AddMessage(message); } base.OnNewIntent(intent); } bool IsPlayServiceAvailable() { int resultCode = GoogleApiAvailability.Instance.IsGooglePlayServicesAvailable(this); if (resultCode != ConnectionResult.Success) { if (GoogleApiAvailability.Instance.IsUserResolvableError(resultCode)) Log.Debug(AppConstants.DebugTag, GoogleApiAvailability.Instance.GetErrorString(resultCode)); else { Log.Debug(AppConstants.DebugTag, "This device is not supported"); } return false; } return true; } void CreateNotificationChannel() { // Notification channels are new as of "Oreo". // There is no need to create a notification channel on older versions of Android. if (Build.VERSION.SdkInt >= BuildVersionCodes.O) { var channelName = AppConstants.NotificationChannelName; var channelDescription = String.Empty; var channel = new NotificationChannel(channelName, channelName, NotificationImportance.Default) { Description = channelDescription }; var notificationManager = (NotificationManager)GetSystemService(NotificationService); notificationManager.CreateNotificationChannel(channel); } } }
The Activity attribute sets the application LaunchMode to SingleTop. This launch mode tells the Android OS to only allow a single instance of this activity. With this launch mode, incoming Intent data is routed to the OnNewIntent method, which extracts message data and sends it to the MainPage instance through the AddMessage method. If your application uses a different launch mode, it must handle Intent data differently.
The OnCreate method uses a helper method called IsPlayServiceAvailable to ensure the device supports Google Play Service. Emulators or devices that do not support Google Play Service cannot receive push notifications from Firebase.
Configure iOS for notifications
The process for configuring the iOS application to receive notifications is:
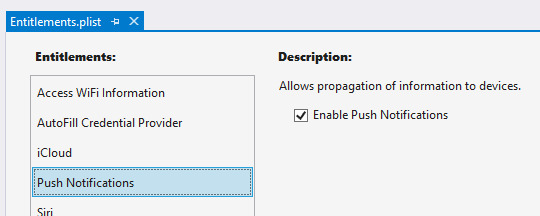
Configure the Bundle Identifier in the Info.plist file to match the value used in the provisioning profile.
Add the Enable Push Notifications option to the Entitlements.plist file.
Add the Xamarin.Azure.NotificationHubs.iOS NuGet package to your project.
Register for notifications with APNS.
Register the application with Azure Notification Hub and subscribe to tags.
Add APNS notifications to Xamarin.Forms UI.
The following screenshot shows the Enable Push Notifications option selected in the Entitlements.plist file within Visual Studio:
Register for notifications with APNS
The FinishedLaunching method in the AppDelegate.cs file must be overridden to register for remote notifications. Registration differs depending on the iOS version being used on the device. The iOS project in the sample application overrides the FinishedLaunching method to call RegisterForRemoteNotifications as shown in the following example:C#Copy
public override bool FinishedLaunching(UIApplication app, NSDictionary options) { global::Xamarin.Forms.Forms.Init(); LoadApplication(new App()); base.FinishedLaunching(app, options); RegisterForRemoteNotifications(); return true; } void RegisterForRemoteNotifications() { // register for remote notifications based on system version if (UIDevice.CurrentDevice.CheckSystemVersion(10, 0)) { UNUserNotificationCenter.Current.RequestAuthorization(UNAuthorizationOptions.Alert | UNAuthorizationOptions.Sound | UNAuthorizationOptions.Sound, (granted, error) => { if (granted) InvokeOnMainThread(UIApplication.SharedApplication.RegisterForRemoteNotifications); }); } else if (UIDevice.CurrentDevice.CheckSystemVersion(8, 0)) { var pushSettings = UIUserNotificationSettings.GetSettingsForTypes( UIUserNotificationType.Alert | UIUserNotificationType.Badge | UIUserNotificationType.Sound, new NSSet()); UIApplication.SharedApplication.RegisterUserNotificationSettings(pushSettings); UIApplication.SharedApplication.RegisterForRemoteNotifications(); } else { UIRemoteNotificationType notificationTypes = UIRemoteNotificationType.Alert | UIRemoteNotificationType.Badge | UIRemoteNotificationType.Sound; UIApplication.SharedApplication.RegisterForRemoteNotificationTypes(notificationTypes); } }
Register with Azure Notification Hub and subscribe to tags
When the device has successfully registered for remote notifications during the FinishedLaunching method, iOS will call the RegisteredForRemoteNotifications method. This method should be overridden to perform the following actions:
Instantiate the SBNotificationHub.
Unregister any existing registrations.
Register the device with your notification hub.
Subscribe to specific tags with a template.
For more information about registration of the device, templates, and tags, see Register templates and tags with the Azure Notification Hub. The following code demonstrates registration of the device and templates:C#Copy
public override void RegisteredForRemoteNotifications(UIApplication application, NSData deviceToken) { Hub = new SBNotificationHub(AppConstants.ListenConnectionString, AppConstants.NotificationHubName); // update registration with Azure Notification Hub Hub.UnregisterAll(deviceToken, (error) => { if (error != null) { Debug.WriteLine($"Unable to call unregister {error}"); return; } var tags = new NSSet(AppConstants.SubscriptionTags.ToArray()); Hub.RegisterNative(deviceToken, tags, (errorCallback) => { if (errorCallback != null) { Debug.WriteLine($"RegisterNativeAsync error: {errorCallback}"); } }); var templateExpiration = DateTime.Now.AddDays(120).ToString(System.Globalization.CultureInfo.CreateSpecificCulture("en-US")); Hub.RegisterTemplate(deviceToken, "defaultTemplate", AppConstants.APNTemplateBody, templateExpiration, tags, (errorCallback) => { if (errorCallback != null) { if (errorCallback != null) { Debug.WriteLine($"RegisterTemplateAsync error: {errorCallback}"); } } }); }); }
Note
Registering for remote notifications can fail in situations such as no network connection. You can choose to override the FailedToRegisterForRemoveNotifications method to handle registration failure.
Add APNS notifications to Xamarin.Forms UI
When a device receives a remote notification, iOS calls the ReceivedRemoteNotification method. Incoming message JSON is converted into an NSDictionary object, and the ProcessNotification method extracts values from the dictionary and sends them to the Xamarin.Forms MainPage instance. The ReceivedRemoteNotifications method is overridden to call ProcessNotification as shown in the following code:C#Copy
public override void ReceivedRemoteNotification(UIApplication application, NSDictionary userInfo) { ProcessNotification(userInfo, false); } void ProcessNotification(NSDictionary options, bool fromFinishedLaunching) { // make sure we have a payload if (options != null && options.ContainsKey(new NSString("aps"))) { // get the APS dictionary and extract message payload. Message JSON will be converted // into a NSDictionary so more complex payloads may require more processing NSDictionary aps = options.ObjectForKey(new NSString("aps")) as NSDictionary; string payload = string.Empty; NSString payloadKey = new NSString("alert"); if (aps.ContainsKey(payloadKey)) { payload = aps[payloadKey].ToString(); } if (!string.IsNullOrWhiteSpace(payload)) { (App.Current.MainPage as MainPage)?.AddMessage(payload); } } else { Debug.WriteLine($"Received request to process notification but there was no payload."); } }
Test notifications in the Azure portal
Azure Notification Hubs enable you to check that your application can receive test messages. The Test Send section in the notification hub allows you to choose the target platform and send a message. Setting the Send to Tag expression to default will send messages to applications that have registered a template for the default tag. Clicking the Send button generates a report that includes the number of devices reached with the message. The following screenshot shows an Android notification test in the Azure portal:

Testing tips
When testing that an application can receive push notifications, you must use a physical device. Android and iOS virtual devices may not be configured correctly to receive push notifications.
The sample Android application registers its token and templates once when the Firebase token is issued. During testing you may need to request a new token and re-register with the Azure Notification Hub. The best way to force this is to clean your project, delete the bin and obj folders and uninstall the application from the device before rebuilding and deploying.
Many parts of the push notification flow are executed asynchronously. This may result in breakpoints not being hit or being hit in an unexpected order. Use device or debug logging to trace execution without interrupting application flow. Filter the Android device log using the DebugTag specified in Constants.
When debugging is stopped in Visual Studio, the app is force closed. Any message receivers or other services launched as part of the debugging process will be closed and will not respond to message events.
Create a notification dispatcher
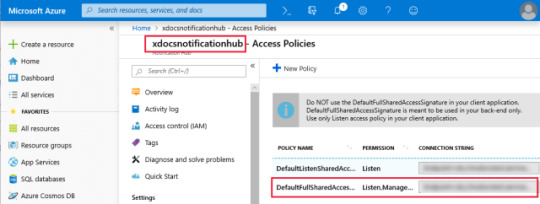
Azure Notification Hubs enable your backend application to dispatch notifications to devices across platforms. The sample demonstrates notification dispatch with the NotificationDispatcher console application. The application includes the DispatcherConstants.cs file, which defines the following properties:C#Copy
public static class DispatcherConstants { public static string[] SubscriptionTags { get; set; } = { "default" }; public static string NotificationHubName { get; set; } = "< Insert your Azure Notification Hub name >"; public static string FullAccessConnectionString { get; set; } = "< Insert your DefaultFullSharedAccessSignature >"; }
You must configure the DispatcherConstants.cs to match your Azure Notification Hub configuration. The value of the SubscriptionTags property should match the values used in the client apps. The NotificationHubName property is the name of your Azure Notification Hub instance. The FullAccessConnectionString property is the access key found in your notification hub Access Policies. The following screenshot shows the location of the NotificationHubName and FullAccessConnectionString properties in the Azure portal:
The console application loops through each SubscriptionTags value and sends notifications to subscribers using an instance of the NotificationHubClient class. The following code shows the console application Program class:C#Copy
class Program { static int messageCount = 0; static void Main(string[] args) { Console.WriteLine($"Press the spacebar to send a message to each tag in {string.Join(", ", DispatcherConstants.SubscriptionTags)}"); WriteSeparator(); while (Console.ReadKey().Key == ConsoleKey.Spacebar) { SendTemplateNotificationsAsync().GetAwaiter().GetResult(); } } private static async Task SendTemplateNotificationsAsync() { NotificationHubClient hub = NotificationHubClient.CreateClientFromConnectionString(DispatcherConstants.FullAccessConnectionString, DispatcherConstants.NotificationHubName); Dictionary<string, string> templateParameters = new Dictionary<string, string>(); messageCount++; // Send a template notification to each tag. This will go to any devices that // have subscribed to this tag with a template that includes "messageParam" // as a parameter foreach (var tag in DispatcherConstants.SubscriptionTags) { templateParameters["messageParam"] = $"Notification #{messageCount} to {tag} category subscribers!"; try { await hub.SendTemplateNotificationAsync(templateParameters, tag); Console.WriteLine($"Sent message to {tag} subscribers."); } catch (Exception ex) { Console.WriteLine($"Failed to send template notification: {ex.Message}"); } } Console.WriteLine($"Sent messages to {DispatcherConstants.SubscriptionTags.Length} tags."); WriteSeparator(); } private static void WriteSeparator() { Console.WriteLine("=========================================================================="); } }
When the sample console application is run, the spacebar can be pressed to send messages. Devices running the client applications should receive numbered notifications, provided they are properly configured.
The post Configuring Push Notifications For Xamarin Forms appeared first on PureSourceCode.
from WordPress https://www.puresourcecode.com/dotnet/xamarin/configuring-push-notifications-for-xamarin-forms/
0 notes
Text
VPN Usage Is Skyrocketing. Get Covered For 76 Percent Off With SurfShark
If you thought the advent of virus lockdowns and work from home orders was probably sending VPN use through the roof, even you might be surprised at just how right you are. According to a report by researchers at Top10VPN, demand for VPN service skyrocketed by 44 percent during the second half of March and still remains at 22 percent higher than before the COVID-19 outbreak.
And that escalation is happening on top of previous exponential VPN growth, with estimates that over 30 percent of all web users logged in via a VPN even before the recent surge.
Protecting your personal and business data on all your home and mobile devices has never been more critical. And as one of the heritage VPN service providers on the block, a 2-year subscription to Surfshark VPN ($69, 76 percent off) goes a long way toward safeguarding everything you do online.
Surfshark’s network is robust, to say the least. Their service is available through more than 1,200 servers across the globe in over 60 nations, each providing fast, anonymous web service with iron-clad protection. Cloaked in military-grade AES-256-GCM encryption and IKEv2 and OpenVPN protocols, no one from cyber crooks to government watchdogs will ever be able to track your movements.
youtube
Meanwhile, that cloak of protection also allows access to streaming and other online content anywhere in the world, even around frustrating global geo-restrictions. Your Surfshark shield allows you to access Netflix, Hulu, Disney Plus, or any of your other streaming favorites, even when you’re outside U.S. borders. Or, you can sample what’s available around the world, but blocked out of U.S. markets. Just log into a server in that region — and your IP will make you appear just like a local.
Of course, Surfshark didn’t just win the approval of Apple App Store and Google Play customers with meat and potatoes. They also provide a whole host of special features like the ad-blocking, malware-defeating abilities of CleanWeb; a kill switch that instantly cuts your connection and shields your data if your link to the web drops suddenly; and a bunch more.
Surfshark is also a no logging provider, meaning they never track or keep any record of your movements online, ensuring complete and total anonymity at all times.
A 2-year subscription to Surfshark VPN is a $290 value, but it’s available now for only $69, a whopping 76 percent off, with this latest deal.
Note: Terms and conditions apply. See the relevant retail sites for more information. For more great deals, go to our partners at TechBargains.com.
Now read:
ET Alienware Gaming PC Sale: Extra 10 Percent Off Already Discounted Aurora Desktops, M15 Laptops, and More
Save $400 When You Grab This Refurbished Microsoft Surface Book 2
ET Weekend Deals: Apple Watch Series 5 Just $299, New iPhone SE Now Available
from ExtremeTechExtremeTech https://www.extremetech.com/deals/309830-vpn-usage-is-skyrocketing-get-covered-for-76-percent-off-with-surfshark from Blogger http://componentplanet.blogspot.com/2020/04/vpn-usage-is-skyrocketing-get-covered.html
0 notes
Text
Data Encryption on Android with Jetpack Security
Posted by Jon Markoff, Staff Developer Advocate, Android Security
Have you ever tried to encrypt data in your app? As a developer, you want to keep data safe, and in the hands of the party intended to use. But if you’re like most Android developers, you don’t have a dedicated security team to help encrypt your app’s data properly. By searching the web to learn how to encrypt data, you might get answers that are several years out of date and provide incorrect examples.
The Jetpack Security (JetSec) crypto library provides abstractions for encrypting Files and SharedPreferences objects. The library promotes the use of the AndroidKeyStore while using safe and well-known cryptographic primitives. Using EncryptedFile and EncryptedSharedPreferences allows you to locally protect files that may contain sensitive data, API keys, OAuth tokens, and other types of secrets.
Why would you want to encrypt data in your app? Doesn’t Android, since 5.0, encrypt the contents of the user’s data partition by default? It certainly does, but there are some use cases where you may want an extra level of protection. If your app uses shared storage, you should encrypt the data. In the app home directory, your app should encrypt data if your app handles sensitive information including but not limited to personally identifiable information (PII), health records, financial details, or enterprise data. When possible, we recommend that you tie this information to biometrics for an extra level of protection.
Jetpack Security is based on Tink, an open-source, cross-platform security project from Google. Tink might be appropriate if you need general encryption, hybrid encryption, or something similar. Jetpack Security data structures are fully compatible with Tink.
Key Generation
Before we jump into encrypting your data, it’s important to understand how your encryption keys will be kept safe. Jetpack Security uses a master key, which encrypts all subkeys that are used for each cryptographic operation. JetSec provides a recommended default master key in the MasterKeys class. This class uses a basic AES256-GCM key which is generated and stored in the AndroidKeyStore. The AndroidKeyStore is a container which stores cryptographic keys in the TEE or StrongBox, making them hard to extract. Subkeys are stored in a configurable SharedPreferences object.
Primarily, we use the AES256_GCM_SPEC specification in Jetpack Security, which is recommended for general use cases. AES256-GCM is symmetric and generally fast on modern devices.
val keyAlias = MasterKeys.getOrCreate(MasterKeys.AES256_GCM_SPEC)
For apps that require more configuration, or handle very sensitive data, it’s recommended to build your KeyGenParameterSpec, choosing options that make sense for your use. Time-bound keys with BiometricPrompt can provide an extra level of protection against rooted or compromised devices.
Important options:
userAuthenticationRequired() and userAuthenticationValiditySeconds() can be used to create a time-bound key. Time-bound keys require authorization using BiometricPrompt for both encryption and decryption of symmetric keys.
unlockedDeviceRequired() sets a flag that helps ensure key access cannot happen if the device is not unlocked. This flag is available on Android Pie and higher.
Use setIsStrongBoxBacked(), to run crypto operations on a stronger separate chip. This has a slight performance impact, but is more secure. It’s available on some devices that run Android Pie or higher.
Note: If your app needs to encrypt data in the background, you should not use time-bound keys or require that the device is unlocked, as you will not be able to accomplish this without a user present.
// Custom Advanced Master Key val advancedSpec = KeyGenParameterSpec.Builder( "master_key", KeyProperties.PURPOSE_ENCRYPT or KeyProperties.PURPOSE_DECRYPT ).apply { setBlockModes(KeyProperties.BLOCK_MODE_GCM) setEncryptionPaddings(KeyProperties.ENCRYPTION_PADDING_NONE) setKeySize(256) setUserAuthenticationRequired(true) setUserAuthenticationValidityDurationSeconds(15) // must be larger than 0 if (Build.VERSION.SDK_INT >= Build.VERSION_CODES.P) { setUnlockedDeviceRequired(true) setIsStrongBoxBacked(true) } }.build() val advancedKeyAlias = MasterKeys.getOrCreate(advancedSpec)
Unlocking time-bound keys
You must use BiometricPrompt to authorize the device if your key was created with the following options:
userAuthenticationRequired is true
userAuthenticationValiditySeconds > 0
After the user authenticates, the keys are unlocked for the amount of time set in the validity seconds field. The AndroidKeystore does not have an API to query key settings, so your app must keep track of these settings. You should build your BiometricPrompt instance in the onCreate() method of the activity where you present the dialog to the user.
BiometricPrompt code to unlock time-bound keys
// Activity.onCreate val promptInfo = PromptInfo.Builder() .setTitle("Unlock?") .setDescription("Would you like to unlock this key?") .setDeviceCredentialAllowed(true) .build() val biometricPrompt = BiometricPrompt( this, // Activity ContextCompat.getMainExecutor(this), authenticationCallback ) private val authenticationCallback = object : AuthenticationCallback() { override fun onAuthenticationSucceeded( result: AuthenticationResult ) { super.onAuthenticationSucceeded(result) // Unlocked -- do work here. } override fun onAuthenticationError( errorCode: Int, errString: CharSequence ) { super.onAuthenticationError(errorCode, errString) // Handle error. } } To use: biometricPrompt.authenticate(promptInfo)
Encrypt Files
Jetpack Security includes an EncryptedFile class, which removes the challenges of encrypting file data. Similar to File, EncryptedFile provides a FileInputStream object for reading and a FileOutputStream object for writing. Files are encrypted using Streaming AEAD, which follows the OAE2 definition. The data is divided into chunks and encrypted using AES256-GCM in such a way that it’s not possible to reorder.
val secretFile = File(filesDir, "super_secret") val encryptedFile = EncryptedFile.Builder( secretFile, applicationContext, advancedKeyAlias, FileEncryptionScheme.AES256_GCM_HKDF_4KB) .setKeysetAlias("file_key") // optional .setKeysetPrefName("secret_shared_prefs") // optional .build() encryptedFile.openFileOutput().use { outputStream -> // Write data to your encrypted file } encryptedFile.openFileInput().use { inputStream -> // Read data from your encrypted file }
Encrypt SharedPreferences
If your application needs to save Key-value pairs - such as API keys - JetSec provides the EncryptedSharedPreferences class, which uses the same SharedPreferences interface that you’re used to.
Both keys and values are encrypted. Keys are encrypted using AES256-SIV-CMAC, which provides a deterministic cipher text; values are encrypted with AES256-GCM and are bound to the encrypted key. This scheme allows the key data to be encrypted safely, while still allowing lookups.
EncryptedSharedPreferences.create( "my_secret_prefs", advancedKeyAlias, applicationContext, PrefKeyEncryptionScheme.AES256_SIV, PrefValueEncryptionScheme.AES256_GCM ).edit { // Update secret values }
More Resources
FileLocker is a sample app on the Android Security GitHub samples page. It’s a great example of how to use File encryption using Jetpack Security.
Happy Encrypting!
Data Encryption on Android with Jetpack Security published first on https://phonetracking.tumblr.com/ Data Encryption on Android with Jetpack Security published first on https://leolarsonblog.tumblr.com/
0 notes
Text
Data Encryption on Android with Jetpack Security
Posted by Jon Markoff, Staff Developer Advocate, Android Security
Have you ever tried to encrypt data in your app? As a developer, you want to keep data safe, and in the hands of the party intended to use. But if you’re like most Android developers, you don’t have a dedicated security team to help encrypt your app’s data properly. By searching the web to learn how to encrypt data, you might get answers that are several years out of date and provide incorrect examples.
The Jetpack Security (JetSec) crypto library provides abstractions for encrypting Files and SharedPreferences objects. The library promotes the use of the AndroidKeyStore while using safe and well-known cryptographic primitives. Using EncryptedFile and EncryptedSharedPreferences allows you to locally protect files that may contain sensitive data, API keys, OAuth tokens, and other types of secrets.
Why would you want to encrypt data in your app? Doesn’t Android, since 5.0, encrypt the contents of the user's data partition by default? It certainly does, but there are some use cases where you may want an extra level of protection. If your app uses shared storage, you should encrypt the data. In the app home directory, your app should encrypt data if your app handles sensitive information including but not limited to personally identifiable information (PII), health records, financial details, or enterprise data. When possible, we recommend that you tie this information to biometrics for an extra level of protection.
Jetpack Security is based on Tink, an open-source, cross-platform security project from Google. Tink might be appropriate if you need general encryption, hybrid encryption, or something similar. Jetpack Security data structures are fully compatible with Tink.
Key Generation
Before we jump into encrypting your data, it’s important to understand how your encryption keys will be kept safe. Jetpack Security uses a master key, which encrypts all subkeys that are used for each cryptographic operation. JetSec provides a recommended default master key in the MasterKeys class. This class uses a basic AES256-GCM key which is generated and stored in the AndroidKeyStore. The AndroidKeyStore is a container which stores cryptographic keys in the TEE or StrongBox, making them hard to extract. Subkeys are stored in a configurable SharedPreferences object.
Primarily, we use the AES256_GCM_SPEC specification in Jetpack Security, which is recommended for general use cases. AES256-GCM is symmetric and generally fast on modern devices.
val keyAlias = MasterKeys.getOrCreate(MasterKeys.AES256_GCM_SPEC)
For apps that require more configuration, or handle very sensitive data, it’s recommended to build your KeyGenParameterSpec, choosing options that make sense for your use. Time-bound keys with BiometricPrompt can provide an extra level of protection against rooted or compromised devices.
Important options:
userAuthenticationRequired() and userAuthenticationValiditySeconds() can be used to create a time-bound key. Time-bound keys require authorization using BiometricPrompt for both encryption and decryption of symmetric keys.
unlockedDeviceRequired() sets a flag that helps ensure key access cannot happen if the device is not unlocked. This flag is available on Android Pie and higher.
Use setIsStrongBoxBacked(), to run crypto operations on a stronger separate chip. This has a slight performance impact, but is more secure. It’s available on some devices that run Android Pie or higher.
Note: If your app needs to encrypt data in the background, you should not use time-bound keys or require that the device is unlocked, as you will not be able to accomplish this without a user present.
// Custom Advanced Master Key val advancedSpec = KeyGenParameterSpec.Builder( "master_key", KeyProperties.PURPOSE_ENCRYPT or KeyProperties.PURPOSE_DECRYPT ).apply { setBlockModes(KeyProperties.BLOCK_MODE_GCM) setEncryptionPaddings(KeyProperties.ENCRYPTION_PADDING_NONE) setKeySize(256) setUserAuthenticationRequired(true) setUserAuthenticationValidityDurationSeconds(15) // must be larger than 0 if (Build.VERSION.SDK_INT >= Build.VERSION_CODES.P) { setUnlockedDeviceRequired(true) setIsStrongBoxBacked(true) } }.build() val advancedKeyAlias = MasterKeys.getOrCreate(advancedSpec)
Unlocking time-bound keys
You must use BiometricPrompt to authorize the device if your key was created with the following options:
userAuthenticationRequired is true
userAuthenticationValiditySeconds > 0
After the user authenticates, the keys are unlocked for the amount of time set in the validity seconds field. The AndroidKeystore does not have an API to query key settings, so your app must keep track of these settings. You should build your BiometricPrompt instance in the onCreate() method of the activity where you present the dialog to the user.
BiometricPrompt code to unlock time-bound keys
// Activity.onCreate val promptInfo = PromptInfo.Builder() .setTitle("Unlock?") .setDescription("Would you like to unlock this key?") .setDeviceCredentialAllowed(true) .build() val biometricPrompt = BiometricPrompt( this, // Activity ContextCompat.getMainExecutor(this), authenticationCallback ) private val authenticationCallback = object : AuthenticationCallback() { override fun onAuthenticationSucceeded( result: AuthenticationResult ) { super.onAuthenticationSucceeded(result) // Unlocked -- do work here. } override fun onAuthenticationError( errorCode: Int, errString: CharSequence ) { super.onAuthenticationError(errorCode, errString) // Handle error. } } To use: biometricPrompt.authenticate(promptInfo)
Encrypt Files
Jetpack Security includes an EncryptedFile class, which removes the challenges of encrypting file data. Similar to File, EncryptedFile provides a FileInputStream object for reading and a FileOutputStream object for writing. Files are encrypted using Streaming AEAD, which follows the OAE2 definition. The data is divided into chunks and encrypted using AES256-GCM in such a way that it's not possible to reorder.
val secretFile = File(filesDir, "super_secret") val encryptedFile = EncryptedFile.Builder( secretFile, applicationContext, advancedKeyAlias, FileEncryptionScheme.AES256_GCM_HKDF_4KB) .setKeysetAlias("file_key") // optional .setKeysetPrefName("secret_shared_prefs") // optional .build() encryptedFile.openFileOutput().use { outputStream -> // Write data to your encrypted file } encryptedFile.openFileInput().use { inputStream -> // Read data from your encrypted file }
Encrypt SharedPreferences
If your application needs to save Key-value pairs - such as API keys - JetSec provides the EncryptedSharedPreferences class, which uses the same SharedPreferences interface that you’re used to.
Both keys and values are encrypted. Keys are encrypted using AES256-SIV-CMAC, which provides a deterministic cipher text; values are encrypted with AES256-GCM and are bound to the encrypted key. This scheme allows the key data to be encrypted safely, while still allowing lookups.
EncryptedSharedPreferences.create( "my_secret_prefs", advancedKeyAlias, applicationContext, PrefKeyEncryptionScheme.AES256_SIV, PrefValueEncryptionScheme.AES256_GCM ).edit { // Update secret values }
More Resources
FileLocker is a sample app on the Android Security GitHub samples page. It’s a great example of how to use File encryption using Jetpack Security.
Happy Encrypting!
Data Encryption on Android with Jetpack Security published first on https://phonetracking.tumblr.com/
0 notes