#get access token from authorization code azure
Explore tagged Tumblr posts
Visit Tumblr Blog
Explore Tumblr blogs with no restrictions, modern design and the best experience.
Last Seen Tumblr Blogs


Fun Fact
After the announcement of the deal with Yahoo!, there were 170K signatures of unhappy Tumblr users petitioning to prevent the sale in 2013.
Text
How to Set Up Postman to Call Dynamics 365 Services

Overview
A wide range of setup postman to call d365 services to allow developers and administrators to work programmatically with their data and business logic. For calling these D365 services, Postman is an excellent tool for testing and developing APIs. Your development process can be streamlined by properly configuring Postman to call D365 services, whether you're integrating third-party apps or running regular tests. You may ensure seamless and effective API interactions by following this guide, which will help you through the process of configuring Postman to interface with D365 services.
How to Set Up Postman Step-by-Step to Call D365 Services
Set up and start Postman:
Install Postman by downloading it from the official website.
For your D365 API interactions, open Postman, create a new workspace, or use an existing one.
Obtain Specifics of Authentication:
It is necessary to use OAuth 2.0 authentication in order to access D365 services. If you haven't previously, start by registering an application in Azure Active Directory (Azure AD).
Go to "Azure Active Directory" > "App registrations" on the Azure portal to register a new application.
Make a note of the Application (Client) ID and the Directory (Tenant) ID. From the "Certificates & Secrets" area, establish a client secret. For authentication, these credentials are essential.
Set up Postman's authentication:
Make a new request in Postman and choose the "Authorization" tab.
After selecting "OAuth 2.0" as the type, press "Get New Access Token."
Complete the necessary fields:
Name of Token: Assign a moniker to your token.
Type of Grant: Choose "Client Credentials."
URL for Access Token: For your tenant ID, use this URL: https://login.microsoftonline.com/oauth2/v2.0/token Client ID: From Azure AD, enter the Application (Client) ID.
Client Secret: Type in the secret you made for the client.
Format: https://.crm.dynamics.com/.default is the recommended one.
To apply the token to your request, select "Request Token" and then "Use Token."
Construct API Requests:
GET Requests: Use the GET technique to retrieve data from D365 services. To query client records, for instance:
.crm.dynamics.com/api/data/v9.0/accounts is the URL.
POST Requests: POST is used to create new records. Provide the information in the request body in JSON format. Creating a new account, for instance:
.crm.dynamics.com/api/data/v9.0/accounts is the URL.
JSON body: json
Copy the following code: {"telephone1": "123-456-7890", "name": "New Account"}
PATCH Requests: Use PATCH together with the record's ID to update already-existing records:
.crm.dynamics.com/api/data/v9.0/accounts() is the URL.
JSON body: json
Code {"telephone1": "987-654-3210"} should be copied.
DELETE Requests: Utilize DELETE together with the record's ID: .crm.dynamics.com/api/data/v9.0/accounts()
Add the parameters and headers:
In the "Headers" tab, make sure to include:
Bearer is authorized.
Application/json is the content type for POST and PATCH requests.
For filtering, sorting, or pagination in GET requests, use query parameters as necessary. As an illustration, consider this URL: https://.crm.dynamics.com/api/data/v9.0/accounts?$filter=name eq 'Contoso'
Submit Requests and Evaluate Answers:
In order to send your API queries, click "Send."
Check if the response in Postman is what you expected by looking at it. The answer will comprise status codes, headers, and body content, often in JSON format.
Deal with Errors and Issues:
For further information, look at the error message and status code if you run into problems. Authentication failures, misconfigured endpoints, or badly formatted request data are typical problems.
For information on specific error codes and troubleshooting techniques, consult the D365 API documentation.
Summary
Getting Postman to make a call A useful method for testing and maintaining your D365 integrations and API interactions is to use Dynamics 365 services. Through the configuration of Postman with required authentication credentials and D365 API endpoints, you may effectively search, create, update, and remove records. This configuration allows for smooth integration with other systems and apps in addition to supporting thorough API testing. Developing, testing, and maintaining efficient integrations will become easier with the help of Postman for D365 services, which will improve data management and operational effectiveness in your Dynamics 365 environment.
0 notes
Text
Docusign refresh token - increase access token life span
Docusign refresh token – increase access token life span
In this blog, we will see how we can increase access token life span by DocuSign refresh token in laravel, as you see by default access token life span is 8 hours and after that again you need the access token in order to call DocuSign API. But by using the DocuSign refresh token we can again create the access token by which we call the API’s. To call the refresh token API , remember you…

View On WordPress
#docusign jwt authentication example#docusign unauthorized client#get access token from authorization code azure#get access token from authorization code c#get access token from authorization code google#get access token from authorization code java#get access token from authorization code python#how to get access token from authorization code
0 notes
Text
Schedule an appointment in Office 365 using an Amazon Lex bot
You can use chatbots for automating tasks such as scheduling appointments to improve productivity in enterprise and small business environments. In this blog post, we show how you can build the backend integration for an appointment bot with the calendar software in Microsoft Office 365 Exchange Online. For scheduling appointments, the bot interacts with the end user to find convenient time slots and reserves a slot.
We use the scenario of a retail banking customer booking an appointment using a chatbot powered by Amazon Lex. The bank offers personal banking services and investment banking services and uses Office 365 Exchange Online for email and calendars.
Bank customers interact with the bot using a web browser. Behind the scenes, Amazon Lex uses an AWS Lambda function to connect with the banking agent’s Office 365 calendar. This function looks up the bank agent’s calendar and provides available times to Amazon Lex, so these can be displayed to the end user. After the booking is complete, an invitation is saved on the agent’s Office 365 and the bank customer’s calendar as shown in the following graphic:
The following flowchart describes the scenario:
To achieve this automation we use an AWS Lambda function to call Office 365 APIs to fulfill the Amazon Lex intent. The Office 365 secrets are stored securely in AWS Secrets Manager. The bot is integrated with a web application that is hosted on Amazon S3. Amazon Cognito is used to authorize calls to Amazon Lex services from the web application.
To make it easy to build the solution, we have split it into three stages:
Stage 1: Create an Office 365 application. In this stage, you create an application in Office 365. The application is necessary to call the Microsoft Graph Calendar APIs for discovering and booking free calendar slots. You need to work with your Azure Active Directory (AAD) admin to complete this stage.
Stage 2: Create the Amazon Lex bot for booking appointments. In this stage, you create an Amazon Lex bot with necessary intents, utterances, and slots. You also create an AWS Lambda function that calls Office 365 APIs for fulfilling the intent.
Stage 3: Deploy the bot to a website. After completion of stage 1 and stage 2, you have a fully functional bot that discovers and books Office 365 calendars slots.
Let’s start building the solution.
Stage 1: Create an Office 365 application
Follow these steps to create the Office 365 application. If you don’t have an existing office 365 account for testing, you can use the free trial of Office 365 business premium.
Notes:
To complete this stage, you will need to work with your Azure Active Directory administrator.
The Office 365 application can be created using Microsoft Azure portal or the Application Registration portal. The following steps uses the Application Registration portal for creating the Office 365 application.
Log in to https://apps.dev.microsoft.com/ with your Office365 credentials and click Add an App.
On the Create App Screen, enter the name and choose Create.
On the Registration screen, Copy the Application Id and choose Generate New Password in the Application Secrets.
In the New password generated pop-up window, save the newly generated password in a secure location. Note that this password will be displayed only once.
Click Add Platform and select Web.
In the Web section, enter the URL of the web app where the Amazon Lex chatbot will be hosted. For testing purposes, you can also use a URL on your computer, such as http://localhost/myapp/. Keep a note of this URL.
In the Microsoft Graph Permissions section, choose Add in Application Permissions sub-section.
In the Select Permission pop-up window, select Calendars.ReadWrite permission.
Choose Save to create the application.
Request your Azure Active Directory (AAD) Administrator to give you the tenant ID for your organization. The AAD tenant ID is available on the Azure portal.
Request your AAD Administrator for the user id of the agents whose calendar you wish to book. This information is available on the Azure portal.
Admin Consent: Your AAD administrator needs to provide consent to the application to access 365 APIs. This is done by constructing the following URL and granting access explicitly.URL: https://login.microsoftonline.com/{Tenant_Id}/adminconsent?client_id={Application_Id}&state=12345&redirect_uri={Redirect_URL}For the previous parameters substitute suitable values.
{AAD Tenant_Id}: AAD Tenant ID from step 9
{Application_Id}: Application ID from step 2
{Redirect_URL}: Redirect URL from step 5
Your AAD administrator will be prompted for administrator credentials on clicking the URL. On successful authentication the administrator gives explicit access by clicking Accept.
Notes:
This step can be done only by the AAD administrator.
The administrator might receive a page not found error after approving the application if the redirect URL specified in step 5 is http://localhost/myapp/ . This is because the approval page redirects to the redirect URL configured. You can ignore this error and proceed
To proceed to the next step, a few important parameters need to be saved. Open a text pad and create the following key value pairs. These are the keys that you need to use.
Key
Values/ Details
Azure Active Directory Id The AAD Administrator has this information as described in step 9. Application Id The ID of the Office 365 application that you created. Specified in step 2. Redirect Uri The redirect URI specified in step 5. Application Password The Office 365 application password stored in step 3. Investment Agent UserId The user ID of the investment agent from step 10. Personal Agent UserId The User ID of the personal banking agent from step 10.
Stage 2: Create the Amazon Lex bot for booking appointments
In this stage, you create the Amazon Lex bot and the AWS Lambda function and store the application passwords in AWS Secrets Manager. After completing this stage you will have a fully functional bot that is ready for deployment. The code for the lambda function is available here.
This stage is automated using AWS CloudFormation and accomplishes the following tasks:
Creates an Amazon Lex bot with required intents, utterances, and slots.
Stores Office 365 secrets in AWS Secrets Manager.
Deploys the AWS Lambda function.
Creates AWS Identity and Access Management (IAM) roles necessary for the AWS Lambda function.
Associates the Lambda function with the Amazon Lex bot.
Builds the Amazon Lex bot.
Choose the launch stack button to deploy the solution.
On the AWS CloudFormation console, use the data from Step 11 of Stage 1 as parameters to deploy the solution.
The key aspects of the solution are the Amazon Lex bot and the AWS Lambda function used for fulfilment. Let’s dive deep into these components.
Amazon Lex bot
The Amazon Lex bot consist of intents, utterances, and slots. The following image describes them.
AWS Lambda function
The AWS Lambda function gets inputs from Amazon Lex and calls Office 365 APIs to book appointments. The following are the key AWS Lambda functions and methods.
Function: 1 – Get Office 365 bearer token
To call Office 365 APIs, you first need to get the bearer token from Microsoft. The method described in this section gets the bearer token by passing the Office 365 application secrets stored in AWS Secrets Manager.
var reqBody = "client_id=" + ClientId + "&scope=https%3A%2F%2Fgraph.microsoft.com%2F.default&redirect_uri=" + RedirectUri + "&grant_type=client_credentials&client_secret=" + ClientSecret; var url = "https://login.microsoftonline.com/" + ADDirectoryId + "/oauth2/v2.0/token"; Request.post({ "headers": { "content-type": "application/x-www-form-urlencoded" }, "url": url, "body": reqBody, }, (error, response, body) => { if (error) { return console.log(error); } accessToken = JSON.parse(body).access_token; if (bookAppointment) { BookAppointment(accessToken , //other params); } else { GetDateValues(accessToken , //other params); } });
Function: 2 – Book calendar slots
This function books a slots in the agent’s calendar. The Graph API called is user/events. As noted earlier, the access token is necessary for all API calls and is passed as a header.
var postUrl = "https://graph.microsoft.com/v1.0/users/" + userId + "/events"; var endTime = parseInt(time) + 1; var pBody = JSON.stringify({ "subject": "Customer meeting", "start": { "dateTime": date + "T" + time + ":00", "timeZone": timeZone }, "end": { "dateTime": date + "T" + endTime + ":00:00", "timeZone": timeZone } }); Request.post({ "headers": { "Content-type": "application/json", "Authorization": "Bearer " + accesstoken }, "url": postUrl, "body": pBody }, (error, response, postResBody) => { if (error) { return console.log(error); } //Return successful message to customer and complete the intent..
You have completed Stage 2, and you have built the bot. It’s now time to test the bot and deploy it on a website. Use the following steps to the test the bot in the Amazon Lex console.
Testing the bot
In the Amazon Lex console, choose the MakeAppointment bot, choose Test bot, and then enter Book an appointment.
Select Personal/ Investment and Choose a Day from the response cards.
Specify a time from the list of slots available.
Confirm the appointment.
Go to the outlook calendar of the investment/ personal banking agent to verify that a slot has been booked on the calendar.
Congratulations! You have successfully deployed and tested a bot that is able to book appointments in Office 365.
Stage 3: Make the bot available on the web
Now your bot is ready to be deployed. You can choose to deploy it on a mobile application or on messaging platforms like Facebook, Slack, and Twilio by using these instructions. You can also use this blog that shows you how you can integrate your Amazon Lex bot with a web application. It gives you an AWS CloudFormation template to deploy the web application.
Note: To deploy this in production, use AWS Cognito user pools or use federation to add authentication and authorization to access the website.
Clean up
You can delete the entire CloudFormation stack. Open the AWS CloudFormation console, select the stack, and choose the Delete Stack option on the Actions menu. It will delete all the AWS Lambda functions and secrets stored in AWS Secrets Manager. To delete the bot, go to the Amazon Lex console, select the Make Appointments bot, and then choose Delete on the Actions menu.
Conclusion
This blog post shows you how to build a bot that schedules appointments with Office 365 and deploys it to your website within minutes. This is one of the many ways bots can help you improve productivity and deliver a better customer experience.
About the Author
Rahul Kulkarni is a solutions architect at Amazon Web Services. He works with partners and customers to help them build on AWS
Source link
Source/Repost=> http://technewsdestination.com/schedule-an-appointment-in-office-365-using-an-amazon-lex-bot/ ** Alex Hammer | Founder and CEO at Ecommerce ROI ** http://technewsdestination.com
0 notes
Text
Unauthorized attempting to send Email with valid access token
Hi, I'm attempting to programatically send email using PowerShell and the Office 365 outlook REST API (can't use SMTP as it's blocked). I've managed to set up my Web App in Azure AD with what I'm pretty sure are the requisite permissions and have authorized those via the admincon...
"Unauthorized attempting to send Email with valid access token" by Azure Admin originally published November 14th 2018 in Office 365 topics
Hi,
I'm attempting to programatically send email using PowerShell and the Office 365 outlook REST API (can't use SMTP as it's blocked).
I've managed to set up my Web App in Azure AD with what I'm pretty sure are the requisite permissions and have authorized those via the adminconsent URI. I've set up the shared secret and can successfully retrieve an access token using the client credentials flow, but when I attempt to use that token to send mail I get a 401 unauthorized error.
Here's my code with all the juicy bits replaced
$emailaddress = "<email address to send to>"
$secret = "<secret from Azure AD App registration>" $urlencodedsecret = [System.Web.HttpUtility]::UrlEncode($secret) $tenantid = "<our tenant id>" $appid="<my app id>"
$requesturi = "https://login.microsoftonline.com/$tenantid/oauth2/token" $body = "grant_type=client_credentials&client_id=$appid&client_secret=$urlencodedsecret" $response = Invoke-RestMethod -Method POST -Uri $requesturi -body $body -ContentType "application/x-www-form-urlencoded" $token = $response.access_token;
So that all works OK and I get a nice shiny new access token - however when I try to use it ...
$bearerAuthHeader = "Bearer {0}" -f $token; $headers = @{ Authorization = $bearerAuthHeader; "x-AnchorMailbox" = "<my email address>" }; $uri = "https://outlook.office365.com/api/v2.0/me/sendmail"; $body = '{ "Message": { "Subject": "<Subject>", "Body": { "ContentType": "Text", "Content": "<Content>" }, "ToRecipients": [ { "EmailAddress": { "Address": "' + $emailaddress + '" } } ], "Attachments": [ { "@odata.type": "#Microsoft.OutlookServices.FileAttachment", "Name": "<attachment name>, "ContentBytes": "<Base 64 encoded attachment>" } ] }, "SaveToSentItems": "false" }' $sendMsgResult = Invoke-RestMethod -Method Post -Uri $uri -Body $body -Headers $headers -ContentType "application/json";
And that results in the following error
Invoke-RestMethod : The remote server returned an error: (401) Unauthorized. At line:43 char:18 + ... MsgResult = Invoke-RestMethod -Method Post -Uri $uri -Body $body -Hea ... + ~~~~~~~~~~~~~~~~~~~~~~~~~~~~~~~~~~~~~~~~~~~~~~~~~~~~~~~~~ + CategoryInfo : InvalidOperation: (System.Net.HttpWebRequest:HttpWebRequest) [Invoke-RestMethod], WebException + FullyQualifiedErrorId : WebCmdletWebResponseException,Microsoft.PowerShell.Commands.InvokeRestMethodCommand
I've successfully used the exact same email sending code code with an access token obtained manually using the auth code grant flow - so I have no idea why I'm now getting the 401. It's as if the token I'm getting from the client credentials flow doesn't have the permissions I know I've set for it in AAD.
Any pointers for troubleshooting this further gratefully received.
Thanks,
Mark.
Read Full Post
0 notes
Text
Microsoft Azure OData Feed Web API Authentication Setup With Azure AD
Microsoft Azure has been one of the leading and most developed cloud platforms that have been formerly known as Windows Azure and Microsoft has been the Azure development company. Microsoft Azure cloud services have been designed and optimized in an amazing manner which allows the global users to achieve a lot of user accessibility features and therefore is popular and growing more popular among the people who need the cloud platforms. Let us know a bit more about Microsoft Azure.
WHAT IS MICROSOFT AZURE? WHAT IS IT FUNCTIONS?
Microsoft Azure is a cloud-based computing platform which enables users to access cloud servers which provide amazing solutions relating to data analytics, high-quality storage, computing etc. The packages and user accesses can be easily customized by the people as per their needs and requirements. Since it’s inception Microsoft Azure has been very popular, thanks to the amazing updates and changes which the development team makes and patches them upon.
Microsoft Azure has a lot of functions and different features, more than you can possibly imagine. Microsoft Azure can help to develop a centralized system like a cloud-based machine which will host the data and different apps which a user must have created. Azure can also create different types of SQL databases. Another important function of Microsoft Azure is its ability to bring changes to the already existing format of network set up by any user with the help of Azure Active Directory Domain services. So here are the important functions which you must keep in mind while opting for Microsoft Azure.
Now we are going to talk about the most important topic about which you are probably going to read the article. It is Azure OData Feed Web API Authentication Setup.

Azure OData Feed Web API Authentication Setup
If you are a regular Microsoft Azure user then this is one problem which you must come across very commonly i.e. building a Web API in Azure which has been authenticated for using the important credentials for Azure. But what it is exactly? Actually, it is irrespective of the fact that the whole objective of the Azure OData Feed Web API Authentication Setup was to achieve a no-code solution for the API apps. However, there are several problems that can be faced because the whole concept has not been documented in details.
Azure API App Setup
The Azure API App setup is an important component of the whole process. Here are the important details that you must consider.
The Azure App Setup has been developed as a customized API app which has an app template.
It has been developed to give back some data that was present under the credentials of the memory of the OData format.
The sample code returns back the in-memory data as OData format when the user is accessing the API controller.
The Azure API app set up has been deployed within the sector of the Microsoft Azure app service and development which demands the need for Azure AD authentication which can be enabled from the Azure app. Just go to the App and click on “Authentication and Authorization setting”.
Now, you will have to keep in mind that setting up the Azure OData Feed Web API Authentication in a manner similar to this will register the application within the Azure AD automatically.
Solution to The Problem
Even though there is not much help available in a situation like this, there have been many people who are fed up with this situation for a long time now. The solutions would not seem to work for a majority of the people who faced them. However, it was found that the web access token which was produced for the users would not match with one of the Web apps and therefore would show the “401 Unauthorized” message.
You can, therefore, solve the problem by simply adjusting the authentication which is present within the Azure AD Web API. There is also an advanced mode which is for those who are familiar with the different types and sectors of Web API problems. Adjusting the settings will finally help you out of the situation without any hassles. But, the Advanced settings should only be accessed by those who are sure enough to understand that it requires a good amount of knowledge and the right information about the different types of Web API.
After the process have been completed you can see that the simple setup process has led the API to get authenticated using the prisons Azure AD credentials and enjoy Microsoft Azure services. The Azure API works fine without any problem. The users will get the in-memory data just the way they would have expected. The problem will be resolved and the error message will be easily neglected.
Final Verdict

No software or Clouding platform is perfect, neither is Microsoft Azure. It has its own set of problems and thanks to the extensive research and different solutions that people think of helps the users to be brought out of a tricky problem. Similarly, if you read and keep in mind the facts and details we talked about then you will also help yourself to set up the Azure OData Feed Web API Authentication without any hassles.
We hope that this article has helped you understand the different aspects of Microsoft Azure and how you can come to enjoy Microsoft Azure cloud services.
Originally published by Concetto Labs > Microsoft Azure OData Feed Web API Authentication Setup With Azure AD
0 notes
Text
Terraform Multi-Provider Deployment Including a Custom Provider
Introduction
In the post Continuous Delivery on AWS with Terraform and Travis CI we have seen how Terraform can be used to manage your infrastructure as code and automate your deployments. When working on a project involving different infrastructure providers Terraform can also be very helpful.
Besides managing popular cloud providers like Amazon Web Services, Google Cloud, or Microsoft Azure, Terraform supports a great set of additional official and community providers. If the desired provider happens to be missing you can write your own custom provider and utilize Terraform’s flexible plugin mechanism to include it into your workflow.
The fact that Terraform is not tied to a specific infrastructure or cloud provider makes it a powerful tool in multi-provider deployments. You are able to manage all resources using the same set of configuration files, sharing variables or defining dependencies between resources across providers.
In this post we want to take a look at an example on how to provision resources from two providers. We will combine an AWS API Gateway deployment with a webhook subscription for the Enterprise Architecture Management (EAM) tool called LeanIX. I chose LeanIX in this example because we have recently been working with a customer who uses it for their EAM and it has a very developer friendly API.
We are going to write our own custom provider for LeanIX because no community provider exists, yet. The goal is for both the API and the webhook subscription to be integrated such that webhook is calling the AWS API. All resource configuration will be managed from within Terraform. The source code of the complete example as well as the custom provider is hosted on GitHub.
The remainder of the post is structured as follows. First we will quickly outline the solution architecture. The next section is going to discuss the implementation details, including the Terraform resource definitions, provider configuration, as well as the implementation of the custom LeanIX provider. We are concluding the post by summarizing and discussing the main findings.
Architecture
The solution architecture involves two main components: LeanIX and the API Gateway. In LeanIX you can create a new Webhook subscription in order to react to events happening within the system. This can be used, e.g., to build a Slack application that notifies you whenever a new user signed up.
In our example we will send the events towards a dummy API. API Gateway can integrate with arbitrary services to process incoming requests, e.g. AWS Lambda, but also just act as a reverse HTTP proxy. For the sake of simplicity we will only have a mock integration which does not actually process the requests. Let’s dive into the implementation details.
Implementation
To implement the target architecture we will define our resources in Terraform configuration files as usual. The AWS Provider is responsible for managing the API Gateway, while a custom LeanIX provider will manage the webhook subscription. The implementation of the custom provider will be explained in more detail in the second part of this section. First let’s look at the resource definitions.
Resource Definitions
API Gateway
An API Gateway deployment consists of a set of resources. Each resource can work with a set of methods. For each method we need to define what should happen if the API is called on this resource. This can be achieved by defining four building blocks: A method request, an integration request, an integration response, and a method response.
In our particular case we will have one resource called events which accepts requests made with the POST method. The definitions of method request/response and integration request/response are fairly simple, as we are using a mock endpoint. We configured the API to return status code 200 (OK) on every request. The following figure illustrates the final result after creating the API.
The method request defines the HTTP request format accepted by the API gateway. If your resource requires authentication and authorization, you need to define an authorizer inside the method request settings. The integration request defines how the API Gateway sends a request towards the integration endpoint. If your integrating with a Lambda function, it will contain the original request wrapped inside a JSON event containing additional meta data. But you are also free to define your own request mapping depending on the API of the integration endpoint.
The integration response defines how to transform the back-end response before passing it on to the client. The status code must match to an existing method response. The method response then defines the form of the final HTTP response sent back to the client.
The listing below shows the Terraform file required to setup the API Gateway deployment. After creating all required resources we also have to create a deployment resource. Each deployment happens in a stage, allowing us to deploy the API multiple times, e.g. one for testing and one for production.
It is important to note that AWS requires you to setup the request and response definitions in order, following the arrows from the figure above. Unless you are defining this dependency implicitly by using variables it is necessary to explicitly make the resources depend on each other.
Having the API that will accept incoming webhook events setup, we now need to create the webhook subscription.
Webhook Subscription
In LeanIX, webhooks allow you to subscribe to events happening inside the application in near-real time. You can subscribe to many different event types, such as creation, modification or deletion of objects and user logins, for example.
To create a new webhook subscription we need to provide the following information:
Identifier. The identifier is the name of the webhook that is shown on the UI.
Target URL. The URL which the webhook is pushing events to.
Target method. The HTTP method to use when sending a request to the target URL.
Activity Status. Whether the webhook is active or not.
Workspace ID. This associates the webhook with a specific LeanIX workspace, so it is visible and manageable through the workspace administration UI.
Tag sets. Tag sets can be used to subscribe to specific event types. Every event that matches all of the tags in at least one of the tag sets will get forwarded.
The following figure shows a successfully created webhook subscription in LeanIX.
There are more configuration options available but we are going to leave them out at this point. Please consult the official LeanIX API documentation for more information. The listing below illustrates the Terraform resource definition for the webhook subscription.
In this subscription we are only interested in getting notified when someone creates or deletes a fact sheet object. The service responsible for fact sheets is called pathfinder. We are generating the identifier from the LeanIX API key as it has to be unique across the system. The target URL is filled in by Terraform based on the API Gateway deployment.
In order to apply the changes and make Terraform create the webhook subscription we need to initialize and configure the AWS and LeanIX providers. In the next section will look into the provider configuration as well as the basics on how the custom provider is implemented.
Providers
Provider Configuration
The AWS provider needs to have a valid access and secret key. There are multiple ways to provide AWS credentials and you are free to choose the one you prefer. In this case we are using a credentials file to keep the provider configuration clean. Thus we are only providing the region to use.
The LeanIX provider needs to have the URL of your LeanIX instance, as well as a valid API token. You can generate new API tokens directly from within LeanIX.
Next we can initialize Terraform and apply the changes. For convenience reasons we even made Terraform generate a curl statement to immediately try the API.
Great! We have a working webhook subscription sending events towards our API hosted in AWS. The only open question is how did we write the LeanIX Terraform provider?
LeanIX Custom Provider
Terraform knows two types of plugins: Providers and provisioners. Providers enable you to manage resources provided by a specific service through an API. Provisioners are used to execute scripts on a local or remote machine as part of the resource lifecycle, e.g. bootstrapping a newly created virtual machine resource.
In our example we need to create a new custom provider to manage the LeanIX webhook subscription resource. Luckily, Terraform offers a comprehensive guide on creating custom providers. Here’s what we need to do:
Create new Go project. Terraform is written in Go. Terraform plugins are also written in Go. Each plugin is an executable that communicates with the Terraform core through remote procedure calls (RPC). Plugins are loaded dynamically and only have to be initialized once using terraform init.
Create main method boilerplate. In order for the plugin to be usable it needs to have a main method that initializes the provider. It will be called by Terraform as soon as the provider is being used.
Create provider definition. The provider definition contains the provider schema, the available resources, as well as a function to bootstrap the provider given a user configuration. The provider schema defines which configuration options are available and required to use the provider.
Create resource definitions. A resource definition contains functions to create, read, update, and delete resources. This usually corresponds to API calls on the provider service, e.g. AWS or LeanIX. It also contains a schema definition which states the configuration options available and required for the Terraform resource.
It is recommended to decouple actual client logic from the resource definition, which is why I implemented a separate LeanixClient type which contains all the logic including authentication and usage of the LeanIX API. Going into details regarding the actual resource implementation is beyond the scope of this post. But feel free to browse the source code and drop any question you might have in the comments.
Conclusion
In this post we have seen how Terraform can be used to deploy infrastructure involving more than one provider. By defining dependencies between resources and imputing variables across providers we are able to seamlessly integrate all infrastructure components.
Terraform resources can only be defined using configuration files, which is limiting the flexibility to some extend. Nevertheless the simple, yet powerful plugin system allows to extend Terraform functionality as required. Terraform plugins have to be written in Go, but there is plenty of documentation and examples available to refer to.
Please do not forget to destroy your resources in case you were following along. Did you write you own custom provider before? Do you know any alternatives to Terraform when it comes to infrastructure as code involving multiple service providers? Let me know your thoughts in the comments.
Der Beitrag Terraform Multi-Provider Deployment Including a Custom Provider erschien zuerst auf codecentric AG Blog.
Terraform Multi-Provider Deployment Including a Custom Provider published first on https://medium.com/@TheTruthSpy
0 notes
Text
Setting Up Postman to Call Dynamics 365 Data Entities

Overview
A strong API structure offered by Dynamics 365 (D365) enables programmatic interaction between developers and administrators and its data entities. You can set up and run queries to these data entities with ease using Postman, a robust tool for API development and testing. This makes operations like querying, updating, and managing your D365 data easier. In order to ensure that you can efficiently utilize the API for your integration and development needs, this article will lead you through the setup postman to call d365 data entities.
How to Set Up Postman Step-by-Step for D365 Data Entities
Set up Postman:
Install Postman by downloading it from the official website.
Create a new workspace in Postman after opening it to arrange your API testing.
Acquire API Passwords:
Enter your D365 credentials and go to If you haven't already, go to the Azure Active Directory portal to register an application.
Go to "Azure Active Directory" > "App registrations" in the Azure portal to register a new application. Make a client secret and write down the Application (Client) ID and Directory (Tenant) ID.
Your Postman requests will be authenticated using these credentials.
Activation Setup in Postman:
Click the "New" button in Postman and choose "Request" to start a new request.
Navigate to the “Authorization” tab in the request setup.
Select "OAuth 2.0" as the format. After selecting "Get New Access Token," fill out the following information:
Token Name: Any name you want.
Grant Category: Client References.
https://login.microsoftonline.com//oauth2/v2.0/token is the URL for the access token.
Application (Client) ID: This is the Client ID from Azure. Client Secret: The secret you made for the client.
Scope: /.default/.crm.dynamics.com
For your request, click "Request Token" and then "Use Token."
Set Up an API Request:
Configure the D365 data entities API endpoint. For example, the URL would be https://.crm.dynamics.com/api/data/v9.0/accounts to retrieve data from the accounts object.
Based on your action, choose the proper HTTP method (GET, POST, PUT, or DELETE):
GET: To obtain information. For instance, GET /accounts
POST: To generate fresh data. POST /accounts with a JSON payload in the body is an example.
PUT/PATCH: To bring current records up to date. PATCH /accounts() with the modified data in the body, for instance.
DELETE: To delete information. DELETE /accounts(), for instance
Include Query Parameters and Headers:
Add the subsequent headers to the "Headers" tab:
Permission: as bearer
Application/json is the content type for POST and PUT/PATCH queries
Use the query parameters in the request URL to filter or sort the results. To filter accounts by name, for instance, go to this link: https://.crm.dynamics.com/api/data/v9.0/accounts?$filter=name eq 'Contoso'. Requests can be executed and reviewed.
In order to submit your API request, click "Send."
Postman will show the answer, together with any returned data and status codes. Make sure the response satisfies your expectations by reviewing it.
Deal with Errors and Issues:
Summary
A useful and effective technique to work with your D365 data programmatically is to set up Postman to call Dynamics 365 data entities. By setting up Postman You may easily execute a variety of API queries, from adding and removing records to retrieving and updating data, if you have the necessary login information and API endpoints. This configuration offers a simple and manageable interface for working with D365 data, which assists integration efforts in addition to facilitating thorough API testing. Gaining proficiency with this configuration will improve your capacity to create and manage integrations, automate workflows, and take full advantage of Dynamics 365's API features.
0 notes
Text
Multi-Factor Authentication Or 2FA Today!

In today’s world, simply going to any tech blog or turning on the news there are constantly reports of breached websites, hacked accounts, stolen identities and compromised passwords. The reality, regardless of the expectation, is that there is no one or two magic wands that can guarantee 100% security in a computer environment. A computer environment can be fully patched at both the desktop, server and infrastructure level and still be completely at risk of a compromise. The best that we can do is reduce the footprint of our environments that we show to the public world and make sure that security basics are followed, and even more importantly, taught to the employees. Over the course of my career, regardless of the sector or whether I was on the administration side or the security side, the most common risk factor identified and often the cause of an incident was an uneducated or non-caring employee. We can implement firewalls, intrusion detection, intrusion prevention, Security Event Information Management system (SEIM) or any flavor of technology to prevent security lapses, but there is nothing we can do if an employee decides to click on a malware infested website and/or email or decides that their system password is going to be catlover123. The reality is, in my opinion based on research and psychology, that if we want to start changing the security culture in corporations around the world and reduce/limit the number of breaches we are currently witnessing, we have to begin with employee education. In the realm of employee education on issues of network security, chapter 1 of that book should absolutely be dedicated to secure passwords and how to create them. It should cover what complexity is expected and all the do’s and don’ts of a good secure password. The sad fact is that this will not convince many employees to follow suit. They will do their best to keep their catlover123 password, like it is the lifeblood that flows through their body. Enter multi-factor authentication stage left. So, what is multi-factor authentication? Multi-factor authentication (MFA) is a method of confirming a user's claimed identity in which a user is granted access only after successfully presenting 2 or more pieces of evidence (or factors) to an authentication mechanism: knowledge (something they and only they know), possession (something they and only they have), and inherence (something they and only they are). Simple enough right? No, it is not quite as simple and can be very expensive and very complex to implement but, it has also been around for a long time, just not widely adopted. If you have been in the corporate world for some time you have probably worked in an environment where someone logging into a website or their computer had to pull out what we called a “RSA Device” so that they could get a key that they used in combination with their password. Again, this was a secure solution, although not perfect, but it was quite pricey and very complex to implement. But as technology advances, so do our options! There is a solution that will give us an additional layer of security that is personal to the employee and is considered multi-factor authentication. The beauty of the solution is in the fact that it is widely adopted across many open source vendors and therefore can be implemented with little to no cost, with the exception of the engineers who need to implement it. Let me introduce you to two–factor authentication, often referred to as, and for the rest of this document, 2FA and two-step verification. 2FA is defined as a type (subset) of multi-factor authentication. It is a method of confirming a user's claimed identity by utilizing a combination of two different factors: 1) something they know, 2) something they have, or 3) something they are. A good example of two-factor authentication is the withdrawing of money from an ATM; only the correct combination of a bank card (something that the user possesses) and a PIN (personal identification number, something that the user knows) allows the transaction to be carried out. Two-Step Verification is an important piece of this puzzle and it is defined as a method of confirming a user's claimed identity by utilizing something they know (password) and a second factor other than something they have or something they are. An example of a second step is the user repeating back something that was sent to them through an out-of-band mechanism. Or the second step might be a 6-digit number generated by an app that is common to the user and the authentication system. Many of us may already have experienced one of these two security mechanisms or a combination of them in interactions with our online bank, investment account or even something as simple as Google mail. Microsoft Azure and Office 365 even supports 2FA and two-step verification, if you enable it and provide users with instructions on how to deploy the out of band mechanism, which in this case would be your mobile phone. Wow, but what is this all mean? Paul Simon taught us that there are 50 Ways to Leave Your Lover, but hackers have taught us there are thousands of ways to steal your password. The advantage of 2FA is that even with a compromised password the hacker would have to have the ability to gain access to the verification device. Now the key to the success of this formula is that the password in question cannot and should not be connected to the verification mechanism. For example, it would defeat the purpose of protecting the log into your email account if you’re verification step was an email with a pin code to the same email account that you’re trying to protect. This should be a simple concept, but many employees do not understand this, if your password is compromised and your verification method is the email of the account that uses that password then the hacker has access to both. Enter mobile authentication to potentially save the day. There are two variants utilizing a mobile phone. Google and Microsoft both have an authorization application that can be installed on your mobile phone and when you login, depending on how your systems are set up, it will either ask you to open up the app and input the code on the screen or it will ask you to open the app and login, and yes bio-metrics can be used, to authenticate and verify your login attempt on your computer. Another common method utilizing mobile technology is to send a text via SMS to your phone with a code to input into the login screen. Simple, easy but generally effective. In this scenario if your password is compromised the hacker would have your password but would be unable to utilize it to login as they would not have your verification method. The following website provides lists of sites that offer two-factor authentication and resources to contact other companies to request that they adopt it: https://twofactorauth.org Now, for full disclosure, as I said earlier nothing is 100% and neither is two factor authentications and two-step verification. By relying on your mobile phone as the out of band personal source of verification, if your mobile phone was cloned then the hacker could in fact get the same texts and, in some instances, generate the same codes in the smart phone applications. But the reality is, we have reduced our footprint on passwords by significant amount and reduced the risk associated with employees who come up with many ways to get past the complexity requirements and still have passwords that are very easily cracked. I lay awake at night, wondering why in today’s technological environment, why every login to every system across the world does not implement two factor authentication and two-step verification. These are not the days of having to purchase a six-figure application to generate a token as the secondary login mechanism, but often can be a simple piece of software installed in conjunction with your active directory environment or LDAP server. And to compound my confusion, many of the cloud environments that we are moving into as a default now, come with two factor authentications and/or already built into them. Implementation of this technology would significantly decrease risk factor for an organization while also helping them comply with PCI – DSS and HIPAA regulations at the same time. While we still need to educate users in the philosophical nature of complex password creation, and yes that will be another topic coming soon, the best way to protect against the uneducated user or the user who just doesn’t care is multifactor authentication. Repeat after me: 2FA Today! Let Longevity Technology manage the technology, so you can focus on your business!!! About the Author: Stephen Turner is a 24-year veteran of the Information Technology world that began as a crypto technician in the United States Marine Corps. He has worked all facets of the Information Technology world including administration, security, consulting, project management, Director and as a Chief Information Officer for nationwide organization where he was responsible for architecting the security infrastructure during the migration of the organization’s entire data center to the “cloud”. He also served as the Director of Cyber Security – Cybersecurity and Research for the Florida Center for Cyber Security, a Florida organization established by legislation to position Florida as a national leader in cybersecurity through education and workforce development; innovative, interdisciplinary research; and community engagement He is currently a partner and President of the MSSP Services for Longevity Technology, a Tampa, FL based company that is uniquely designed to provide managed technology services, but also true managed security services for the small to mid-size business community. Stephen has trained as a Certified Ethical Hacker, Certified Information Systems Security Professional and as a Red Hat Certified Architect with a focus on Linux security and is a Microsoft Certified Systems Engineer. Read the full article
0 notes
Text
Connect to Azure SQL Database by obtaining a token from Azure Active Directory (AAD)
Scenario:
Use an Access Token from an Azure Service Principal to connect to an Azure SQL Database.
We used this in the following scenario:
With a VSTS Extension Task we wanted to create/add an Azure SQL Database to an existing Azure SQL Server. During the create SQL Database Action we want to assign DBOwner permissions for an AAD Group to the SQL database.
Steps:
Create Service Principal
Create AAD Group
Add SPN as member to AAD Group
Create SQL Server in Azure
Add AAD Group as Active Directive admin for SQL server
Connect with Azure SQL Server using the SPN Token from Resource URI Azure Database
Remark:
Only the last step is being used in our VSTS Extension Task Action to create the SQL Database.
Step 1. Create Service Principal
When you register an Azure AD application in the Azure portal, two objects are created in your Azure AD tenant: an application object, and a service principal object.
Application object
An Azure AD application is defined by its one and only application object, which resides in the Azure AD tenant where the application was registered, known as the application's "home" tenant. The Azure AD Graph Application entity defines the schema for an application object's properties.
Service principal object
In order to access resources that are secured by an Azure AD tenant, the entity that requires access must be represented by a security principal. This is true for both users (user principal) and applications (service principal).
Application and service principal relationship
Consider the application object as the global representation of your application for use across all tenants, and the service principal as the local representation for use in a specific tenant. The application object serves as the template from which common and default properties are derived for use in creating corresponding service principal objects. An application object therefore has a 1:1 relationship with the software application, and a 1:many relationships with its corresponding service principal object(s).
PowerShell Code to create a Application and Service Principal object:
Prerequisites:
Azure Subscription
Azure Resource Group
#region create SPN $SecureStringPassword = ConvertTo-SecureString -String "[Enter SPN Password]" -AsPlainText -Force New-AzureRmADApplication -DisplayName "[Enter name for Application]" -HomePage "https://www.contoso.com/sqldb-spn" -IdentifierUris "https://www.contoso.com/sqldb-spn" -Password $SecureStringPassword -OutVariable app New-AzureRmADServicePrincipal -ApplicationId $app.ApplicationId #endregion
Step 2. Create AAD User Group
Next we need to create an AAD User Group which is being used as the Active Directory Admin for the Azure SQL Server. Later in the process the SPN is being added to this AAD Group.
With the following PowerShell code you can create the AAD Group:
#region Create AAD User Group New-AzureRmADGroup -DisplayName "[Enter name for AD Group]" -MailNickname '[Enter Mail NickName]' #endregion
Step 3. Add Service Principal to created AAD Group
Because the SPN is being used to connect to the Azure SQL Database this account needs to be added to the AAD Group which has Active Directory Admin permissions on the Azure SQL Server.
Remark:
Use the PowerShell Module AzureAD for adding the SPN to the AAD Group.
#region add SPN to AAD Group # Using AzureAD Module (Install-Module AzureAD). Azure Active Directory PowerShell for Graph Import-Module AzureAD # Use a credential which has permissions to connect to Azure Active Directory using Microsoft Graph $Credential = Get-Credential -UserName "[email protected]" -Message 'Enter Credentials' Connect-AzureAD -Credential $Credential Get-AzureADServicePrincipal -SearchString "[Enter AppObject Name]" -OutVariable SPN Get-AzureADGroup -SearchString "[Enter AAD Group Name]" -OutVariable AADGroup Add-AzureADGroupMember -ObjectId $($AADGroup.ObjectId) -RefObjectId $($SPN.ObjectId) #Check if SPN is member of the AADGroup Get-AzureADGroupMember -ObjectId $($AADGroup.ObjectId) #endregion
Result:
Step 4. Create SQL Server in Azure
Just use an ARM Template or use the Azure Portal to create an Azure SQL Server.
Result:
Step 5. Add AAD Group as Active Directory admin for SQL Server.
Open the Azure Portal, browse to the SQL Server and configure the Active Directory admin. Use the AAD Group you created earlier.
Step 6. Connect with Azure SQL Server using the SPN Token from Resource URI Azure Database
For retrieving the Access Token I got some inspiration from the Get-AADToken function from Tao Yang.
I made some small changes.
New Get-AADToken function:
Function Get-AADToken { [CmdletBinding()] [OutputType([string])] PARAM ( [String]$TenantID, [string]$ServicePrincipalId, [securestring]$ServicePrincipalPwd ) Try { # Set Resource URI to Azure Database $resourceAppIdURI = 'https://database.windows.net/' # Set Authority to Azure AD Tenant $authority = 'https://login.windows.net/' + $TenantId $ClientCred = [Microsoft.IdentityModel.Clients.ActiveDirectory.ClientCredential]::new($ServicePrincipalId, $ServicePrincipalPwd) $authContext = [Microsoft.IdentityModel.Clients.ActiveDirectory.AuthenticationContext]::new($authority) $authResult = $authContext.AcquireTokenAsync($resourceAppIdURI, $ClientCred) #$Token = $authResult.Result.CreateAuthorizationHeader() $Token = $authResult.Result.AccessToken } Catch { Throw $_ $ErrorMessage = 'Failed to aquire Azure AD token.' Write-Error -Message 'Failed to aquire Azure AD token' } $Token }
You can verify you Token at the JSON Web Tokens Website.
Remark:
Make sure that you have allowed Firewall access from where you want to connect to the Azure SQL Server.
Script to connect to the Azure SQL Server with SPN Token:
#region Connect to db using SPN Account $TenantId = "[Enter tenant id]" $ServicePrincipalId = $(Get-AzureRmADServicePrincipal -DisplayName [Enter Application Name]).ApplicationId $SecureStringPassword = ConvertTo-SecureString -String "[Enter plain password used for SPN]" -AsPlainText -Force $SQLServerName = "[Enter SQL Server name]" Get-AADToken -TenantID $TenantId -ServicePrincipalId $ServicePrincipalId -ServicePrincipalPwd $SecureStringPassword -OutVariable SPNToken Write-Verbose "Create SQL connectionstring" $conn = New-Object System.Data.SqlClient.SQLConnection $DatabaseName = 'Master' $conn.ConnectionString = "Data Source=$SQLServerName.database.windows.net;Initial Catalog=$DatabaseName;Connect Timeout=30" $conn.AccessToken = $($SPNToken) $conn Write-Verbose "Connect to database and execute SQL script" $conn.Open() $query = 'select @@version' $command = New-Object -TypeName System.Data.SqlClient.SqlCommand($query, $conn) $Result = $command.ExecuteScalar() $Result $conn.Close() #endregions
In above example we are not setting the DBOwner permissions but retrieving the Azure SQL Server version.
For more options please look at the SQL Command Methods.
References:
Application and service principal objects in Azure Active Directory (Azure AD)
SQL Command Methods
JSON Web Tokens
Blog post - PowerShell Function to Get Azure AD Token
from Stefan Stranger's Weblog – Manage your IT Infrastructure https://ift.tt/2M806mw via IFTTT
0 notes
Text
Predicting Personality Traits from Content Using IBM Watson
Would you like to know what your customers want before they do?
Of course. Every business wants to be able to anticipate the needs of their customers.
And that starts by understanding customers in a deep and meaningful way.
Unfortunately, that is getting harder and harder in our digital world…
Consumers are increasingly less trusting and loyal
Consumers have more power — thanks to social media, online shopping comparisons, and a ever-growing list of choices
With all the noise out there, it has become increasingly difficult to get an accurate view of your customers
Consumer mindsets are shifting from product ownership to experience due to economic uncertainty and information overload
All of this certainly highlights the need to create a more compelling customer experience to stay relevant.
”Customer experience is the new competitive battlefield.” ~ Gartner
But to stay close to this new digital consumer, you really need to get a view into their mind.
Fortunately, artificial intelligence is stepping up to the challenge. Giving you the ability to turn all those digital transformations into digital advantage.
We can use an A.I. platform to instantly analyze and predict the values, needs and behaviors of your customers. A platform which can provide a wide range of uses — from precision marketing to product recommendations to ultra-personalized emails.
So let’s build one!
Customer Research…A.I.-Style
This application (originally developed by IBM’s Watson Developer Cloud) uses a content analysis service to analyze social media content and provide you with insights about the personality traits of the content’s author.
Want to see some source code? Here’s our fork of the application on GitHub.
Step 1: Requirements
Step 2: Create the Application Container
Step 3: Create the Personality Insights Instance
Step 4: Create the Twitter App
Step 5: Fire it Up!
Troubleshooting
Let’s get to it…
The end result
By following the steps in this guide, you’ll create an application similar to the following.
Here’s a live preview.
The application currently supports two content sources:
Custom content — Copy/paste any type of text content
Twitter stream — Classification of tweets in a particular account
It even gives you a nice visual with the results…
And of course, this is just the beginning — the application can be extended in any number of different ways. The only limit is your imagination.
How it works.
The application analyzes content and intelligently analyzes the core topics and tone of the content, then predicts personality traits of the author based on that analysis.
And it uses one cloud-based service from IBM Watson:
Personality Insights — Classifies the content and makes a prediction for the corresponding personality traits
Step 1: Requirements
Before we create the Watson service, let’s get the system requirements covered.
Download the source repository.
To start, go ahead and download the source files.
Note: You’ll need a git client installed on your computer for this step.
Simply move to the directory you want to use for this demo and run the following commands in a terminal:
terminal
# Download source repository git clone https://github.com/10xNation/ibm-watson-personality-insights.git cd ibm-watson-personality-insights
At this point, you can keep the terminal window open and set it aside for now…we’ll need it in a later step.
Name the application.
Right away, let’s nail down a name for your new app:
manifest.yml
... # Application name - name: xxxxxxxxxxxxxxx ...
Replace xxxxxxxxxxxxxxx in the manifest.yml file with a globally unique name for your instance of the application.
The name you choose will be used to create the application’s URL — eg. http://personality-insights-587854.mybluemix.net/.
Create a Bluemix account.
Go to the Bluemix Dashboard page (Bluemix is IBM’s cloud platform).
If you don’t already have one, create a Bluemix account by clicking on the “Sign up” button and completing the registration process.
Install Cloud-foundry.
A few of the steps in this guide require a command line session, so you’ll need to install the Cloud-foundry CLI tool.
Open a terminal session with Bluemix.
Once the Cloud-foundry CLI tool is installed, you’ll be able to log into Bluemix through the terminal:
Note: Feel free to use the same terminal window as above.
terminal
# Log into Bluemix cf api https://api.ng.bluemix.net cf login -u YOUR_BLUEMIX_ID -p YOUR_BLUEMIX_PASSOWRD
Replace YOUR_BLUEMIX_ID and YOUR_BLUEMIX_PASSOWRD with the respective username and password you created above.
Step 2: Create the Application Container
Go to the Bluemix Dashboard page.
Once you’re signed in and see your Dashboard, click on the “Create app” button.
In this demo, we’ll be using a Node application, so click on “SDK for Node.js.”
Then fill out the information required, using the application name you chose in step #1 — and hit the “Create” button.
Set the application memory.
Let’s give your application a little more memory to work with.
Click on your new application.
Then click on the “plus” sign for “MB MEMORY PER INSTANCE” — set it to 512 — then hit “Save.”
That’s it for the application container, so let’s move onto the service instance.
Step 3: Create the Personality Insights Instance
To set up the Personality Insights service, go back to your Bluemix Dashboard page.
Then click on your application.
And that should take you to the Overview section of your application dashboard. Since this is a brand new application, you should see a “Create new” button in the Connections widget — click that button.
You should now see a long list of services. Click “Watson” in the Categories filter and then click on “Personality Insights” to create a new instance of that service.
Go ahead and choose a Service Name that makes sense for you — eg. Personality Insights-Demo. For this demo, the “Lite” Pricing Plan will do just fine. And by default, you should see your application’s name listed in the “Connected to” field.
Click the “Create” button when ready. And If needed, update the Service Name you chose in the manifest.yml file:
manifest.yml
... services: # Service name - Personality Insights-Demo ...
Just replace Personality Insights-Demo with your chosen Service Name.
Feel free to “Restage” your application when prompted.
Enter service credentials.
After your Personality Insights instance is created, click on the respective “View Credentials” button.
And that will pop up a modal with your details.
Copy/paste your Personality Insights service username and password into the .env file:
.env
... # Service credentials PERSONALITY_INSIGHTS_USERNAME=xxxxxxxx-xxxx-xxxx-xxxx-xxxxxxxxxxxx PERSONALITY_INSIGHTS_PASSWORD=xxxxxxxxxxxx ...
Replace xxxxxxxx-xxxx-xxxx-xxxx-xxxxxxxxxxxx with your username and xxxxxxxxxxxx with your password.
Your Personality Insights service is now ready, so let’s move onto Twitter.
Step 4: Create the Twitter App
Go to the Twitter Apps home page.
Log in with the Twitter user account you plan to use with your new app.
After logging in you should see a “Create New App” button…click it.
Enter a globally unique name for your Twitter application, a brief description, and the URL to your website.
Click on the “Keys and Access Tokens” tab.
Copy/paste your credentials into the .env file:
.env
... # Twitter credentials TWITTER_CONSUMER_KEY=xxxxxxxxxxxxxxxxxxxxxxxxx TWITTER_CONSUMER_SECRET=xxxxxxxxxxxxxxxxxxxxxxxxxxxxxxxxxxxxxxxxxxxxxxxxxx ...
Replace xxxxxxxxxxxxxxxxxxxxxxxxx with your consumer key and xxxxxxxxxxxxxxxxxxxxxxxxxxxxxxxxxxxxxxxxxxxxxxxxxx with your consumer secret.
Step 5: Fire it Up!
That’s it for the hard stuff. So let’s put this app to work.
Launch the application.
To bring the application to life, simply run the following command — making sure the terminal is in the repository directory and logged into Bluemix:
terminal
cf push
This command will upload the files, configure your new application and start it.
Note: You can use the cf push command to update the same application after it’s originally published.
Take a look.
After the server has started, you’ll be able to open the application in your browser at the respective URL.
The application should look something like this…
Play around with it and get a feel for the functionality.
Troubleshooting
If you’re having any problems with the application, be sure to check out the logs…
Just click on the “Logs” link within your application dashboard.
Take it to the Next Level
But this is just a start. The real power comes when you apply this type of analysis across all your customers’ content and brand interactions — giving you an insightful view into their thinking and habits.
How will you build on this web service? Run it separately — or better yet — integrate it with your existing marketing and hiring tools (CRM, social media automation, etc.).
And currently, you can make 1,000 API calls per month for free — so go ahead and just start playing with it!
You can dig deeper into the entire suite of Watson APIs in the IBM Watson Developer Community.
Enjoy!
This post is part of our How to Apply A.I. in Your Business blog series. Be sure to check out our past issues:
Building Voice-Enabled Products With Amazon Alexa
Cognitive Customer Engagement Using IBM Watson
Harnessing Visual Data Using Google Cloud
Building a Recommendation Engine Using Microsoft Azure
Predicting Marketing Campaign Response Using Amazon Machine Learning
Unleashing A.I.-Powered Conversation With IBM Watson
Get into the Mind of Your Customer Using Google’s Sentiment Analysis Tools
Discover Your Customers’ Deepest Feelings Using Microsoft Facial Recognition
Give Your Products the Power of Speech Using Amazon Polly
Computers Are Opening Their Eyes — and They’re Already Better at Seeing Than We Are
How to Predict When You’re Going to Lose a Subscriber
The Future of Business is a Digital Spokesperson — Let’s Build a Preview Using Microsoft’s Bot Framework
And be on the lookout for future issues, they come out every other Monday.
0 notes
Text
Configuring Push Notifications For Xamarin Forms
Push Notifications are one-way forms of communication offered to mobile users that some operation (like an update, deletion, or addition) has happened.
To send a push notification to an Apple device, use the Apple Push Services. For an Android device, use Google’s Firebase Cloud Messaging Services. Fortunately, if you’re sending a push notification to an app on both platforms, Microsoft offers an easier way through Microsoft Azure Notification Hub.
Go to the Azure portal.
Click “Create a resource”, “Web + Mobile” and select “Notification Hub.”
In the new window, enter the notification hub name and create a new namespace.
Select a location. We recommend a location closest to the user or closest to you (the developer).
Choose an existing resource group or create a new resource group.
Select your Microsoft subscription (for billing purposes).
Choose a pricing tier based on your usage needs and click “Select” to close the pricing tab.
Click “Create” to create the new notification hub. It may take few minutes to create and configure.
Choose the “Google (GCM)” from the side menu. This section is used to configure and send Android-based push notifications using Birebase cloud messaging.
Create the Firebase Push Notifcation
Open a new browser window and navigate to https://console.firebase.google.com/.
Login or create a new account. After you have logged in, click “+ Add Project”.

Enter the Project Name and Country/region. You can change the Project ID if required.
Click “CREATE PROJECT.” It may take a few minutes to create the project.
After the message “Your new project is ready”, click “CONTINUE” to navigate to the project page.

In the new page, select “Add Firebase to your Android app” to create an Android-based Firebase app.

In the next screen, enter the “Android package name” and enter an optional app nickname. Select “REGISTER APP.”

In the next screen, click “Download google-services.json” and download the file.

Open the downloaded file and copy the project number (a 12-digit code like 272477558565) into the project’s AppSettings.cs file for FirebaseSenderID.
Create push services for iOS:
Select “Apple (APNS)” from the Azure portal side menu.

Upload a certificate to send push notifications on iOS. Log in to https://developer.apple.com.
Navigate to “Certificates, Identifiers and Profiles.”

Select the Apple ID associated with the application.
Ensure that the ID is configured to use Push Notifications. It should have the status as Configurable. Click “Edit” to configure push services.

In the next screen, choose to create either a development or production SSL certificate and click “Create Certificate.”

The next screen requires you to create a “certSigningRequest”. Create the file and upload it.
On the Mac, open the “Keychain Access” application: press WinKey + Spacebar to open Spotlight. Type “keychain access” and press enter.
Select Keychain Access -> Certificate Assistant -> Request a Certificate From a Certificate Authority.

Enter the user email address, command name, and Certificate Authority (CA) Email address.
Select “Saved to disk” and click “Continue”.

In the popup dialog, save the certSigningRequest.
Choose a location. If you’re choosing a default location, make sure to note the location for future purposes.
Now navigate back to the apple developer website and upload the previously created certSigningRequest and select “Continue.”

In the next screen, click “Download” button to download the .cer file. After downloading the file, select “Done” and close the browser.
Double click to open the .cer file. It will by default open the Keychain Access application.
Enter the administrator password to install the .cer file.

Right-click on the certificate and choose “Export [Certificate Name].”

Enter a name for the “.p12” file. Select the location of the file and click “Save.” Make sure the file format is “Personal Information Exchange (.p12)” before saving the file.

Enter a password for the p12 file. Re-enter the password.

Enter the administrator password for Keychain Access application to export the key and select “Allow.”

Now navigate back to the Azure portal.
Select Folder Icon.

Find the p12 file and click “Open.” Enter the same password used to create the file. Save.

Open the Backend Mobile app service from the Azure portal and navigate to “Push” from the sidebar menu.
Connect to the notification hub we created earlier.

Choose the previously created notification hub.

On the next screen, add the tag “UserGroup1” for push notifications to be delivered to the mobile devices. Save.

Xamarin.Forms application functionality
The sample Xamarin.Forms application displays a list of push notification messages. This is achieved with the AddMessage method, which adds the specified push notification message to the UI. This method also prevents duplicate messages from being added to the UI, and runs on the main thread so it can be called from any thread. The following code shows the AddMessage method:
public void AddMessage(string message) { Device.BeginInvokeOnMainThread(() => { if (messageDisplay.Children.OfType<Label>().Where(c => c.Text == message).Any()) { // Do nothing, an identical message already exists } else { Label label = new Label() { Text = message, HorizontalOptions = LayoutOptions.CenterAndExpand, VerticalOptions = LayoutOptions.Start }; messageDisplay.Children.Add(label); } }); }
The sample application contains an AppConstants.cs file, which defines properties used by the platform projects. This file needs to be customized with values from your Azure Notification Hub. The following code shows the AppConstants.cs file:C#Copy
public static class AppConstants { public static string NotificationChannelName { get; set; } = "XamarinNotifyChannel"; public static string NotificationHubName { get; set; } = "< Insert your Azure Notification Hub name >"; public static string ListenConnectionString { get; set; } = "< Insert your DefaultListenSharedAccessSignature >"; public static string DebugTag { get; set; } = "XamarinNotify"; public static string[] SubscriptionTags { get; set; } = { "default" }; public static string FCMTemplateBody { get; set; } = "{\"data\":{\"message\":\"$(messageParam)\"}}"; public static string APNTemplateBody { get; set; } = "{\"aps\":{\"alert\":\"$(messageParam)\"}}"; }
Customize the following values in AppConstants to connect the sample application to your Azure Notification Hub:
NotificationHubName: Use the name of the Azure Notification Hub you created in your Azure portal.
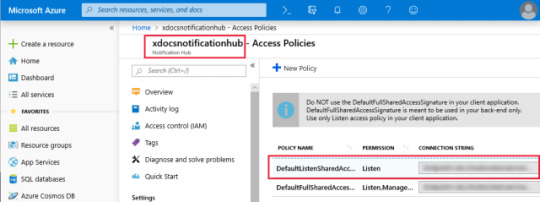
ListenConnectionString: This value is found in the Azure Notification Hub under Access Policies.
The following screenshot shows where these values are located in the Azure portal:
Configure the Android application for notifications
Complete the following steps to configure the Android application to receive and process notifications:
Configure the Android Package name to match the package name in the Firebase console.
Install the following NuGet packages to interact with Google Play, Firebase and Azure Notification Hubs:
Xamarin.GooglePlayServices.Base.
Xamarin.Firebase.Messaging.
Xamarin.Azure.NotificationHubs.Android.
Copy the google-services.json file that you downloaded during FCM setup to the project and set the Build Action to GoogleServicesJson.
Configure AndroidManifest.xml to communicate with Firebase.
Override FirebaseMessagingService to handle messages.
Add incoming notifications to Xamarin.Forms UI.
Note
The GoogleServicesJson build action is part of the Xamarin.GooglePlayServices.Base NuGet package. Visual Studio 2019 sets the available Build Actions during startup. If you do not see GoogleServicesJson as a Build Action, restart Visual Studio 2019 after installing the NuGet packages.
Configure Android manifest
The receiver elements within the application element allow the app to communicate with Firebase. The uses-permission elements allow the app to handle messages and register with Azure Notification Hub. The complete AndroidManifest.xml should look similar to the example below:XMLCopy
<manifest xmlns:android="http://schemas.android.com/apk/res/android" android:versionCode="1" android:versionName="1.0" package="YOUR_PACKAGE_NAME" android:installLocation="auto"> <uses-sdk android:minSdkVersion="21" /> <uses-permission android:name="android.permission.INTERNET" /> <uses-permission android:name="com.google.android.c2dm.permission.RECEIVE" /> <uses-permission android:name="android.permission.WAKE_LOCK" /> <uses-permission android:name="android.permission.GET_ACCOUNTS"/> <application android:label="Notification Hub Sample"> <receiver android:name="com.google.firebase.iid.FirebaseInstanceIdInternalReceiver" android:exported="false" /> <receiver android:name="com.google.firebase.iid.FirebaseInstanceIdReceiver" android:exported="true" android:permission="com.google.android.c2dm.permission.SEND"> <intent-filter> <action android:name="com.google.android.c2dm.intent.RECEIVE" /> <action android:name="com.google.android.c2dm.intent.REGISTRATION" /> <category android:name="${applicationId}" /> </intent-filter> </receiver> </application> </manifest>
Override FirebaseMessagingService to handle messages
To register with Firebase and handle messages, subclass the FirebaseMessagingService class. The sample application defines a FirebaseService class that subclasses the FirebaseMessagingService. This class is tagged with an IntentFilter attribute, which includes the com.google.firebase.MESSAGING_EVENT filter. This filter allows Android to pass incoming messages to this class for handling:C#Copy
[Service] [IntentFilter(new[] { "com.google.firebase.MESSAGING_EVENT" })] public class FirebaseService : FirebaseMessagingService { // ... }
When the application is started, the Firebase SDK will automatically request a unique token identifier from the Firebase server. Upon successful request, the OnNewToken method will be called on the FirebaseService class. The sample project overrides this method and registers the token with Azure Notification Hubs:C#Copy
public override void OnNewToken(string token) { // NOTE: save token instance locally, or log if desired SendRegistrationToServer(token); } void SendRegistrationToServer(string token) { try { NotificationHub hub = new NotificationHub(AppConstants.NotificationHubName, AppConstants.ListenConnectionString, this); // register device with Azure Notification Hub using the token from FCM Registration registration = hub.Register(token, AppConstants.SubscriptionTags); // subscribe to the SubscriptionTags list with a simple template. string pnsHandle = registration.PNSHandle; TemplateRegistration templateReg = hub.RegisterTemplate(pnsHandle, "defaultTemplate", AppConstants.FCMTemplateBody, AppConstants.SubscriptionTags); } catch (Exception e) { Log.Error(AppConstants.DebugTag, $"Error registering device: {e.Message}"); } }
The SendRegistrationToServer method registers the device with the Azure Notification Hub and subscribes to tags with a template. The sample application defines a single tag called default and a template with a single parameter called messageParam in the AppConstants.cs file. For more information about registration, tags, and templates, see Register templates and tags with the Azure Notification Hub.
When a message is received, the OnMessageReceived method will be called on the FirebaseService class:C#Copy
public override void OnMessageReceived(RemoteMessage message) { base.OnMessageReceived(message); string messageBody = string.Empty; if (message.GetNotification() != null) { messageBody = message.GetNotification().Body; } // NOTE: test messages sent via the Azure portal will be received here else { messageBody = message.Data.Values.First(); } // convert the incoming message to a local notification SendLocalNotification(messageBody); // send the incoming message directly to the MainPage SendMessageToMainPage(messageBody); } void SendLocalNotification(string body) { var intent = new Intent(this, typeof(MainActivity)); intent.AddFlags(ActivityFlags.ClearTop); intent.PutExtra("message", body); //Unique request code to avoid PendingIntent collision. var requestCode = new Random().Next(); var pendingIntent = PendingIntent.GetActivity(this, requestCode, intent, PendingIntentFlags.OneShot); var notificationBuilder = new NotificationCompat.Builder(this) .SetContentTitle("XamarinNotify Message") .SetSmallIcon(Resource.Drawable.ic_launcher) .SetContentText(body) .SetAutoCancel(true) .SetShowWhen(false) .SetContentIntent(pendingIntent); if (Build.VERSION.SdkInt >= BuildVersionCodes.O) { notificationBuilder.SetChannelId(AppConstants.NotificationChannelName); } var notificationManager = NotificationManager.FromContext(this); notificationManager.Notify(0, notificationBuilder.Build()); } void SendMessageToMainPage(string body) { (App.Current.MainPage as MainPage)?.AddMessage(body); }
Incoming messages are converted to a local notification with the SendLocalNotification method. This method creates a new Intent and places the message content into the Intent as a string Extra. When the user taps the local notification, whether the app is in the foreground or the background, the MainActivity is launched and has access to the message contents through the Intent object.
The local notification and Intent example requires the user to take the action of tapping on the notification. This is desirable when the user should take action before the application state changes. However, you may want to access the message data without requiring a user action in some cases. The previous example also sends the message directly to the current MainPage instance with the SendMessageToMainPage method. In production, if you implement both methods for a single message type, the MainPage object will get duplicate messages if the user taps the notification.
Note
The Android application will only receive push notifications if it is running in either the background or foreground. To receive push notifications when the main Activity is not running, you must implement a service, which is beyond the scope of this sample. For more information, see Creating Android Services
Add incoming notifications to the Xamarin.Forms UI
The MainActivity class needs to obtain permission to handle notifications and manage incoming message data. The following code shows the complete MainActivity implementation:C#Copy
[Activity(Label = "NotificationHubSample", Icon = "@mipmap/icon", Theme = "@style/MainTheme", MainLauncher = true, ConfigurationChanges = ConfigChanges.ScreenSize | ConfigChanges.Orientation, LaunchMode = LaunchMode.SingleTop)] public class MainActivity : global::Xamarin.Forms.Platform.Android.FormsAppCompatActivity { protected override void OnCreate(Bundle savedInstanceState) { TabLayoutResource = Resource.Layout.Tabbar; ToolbarResource = Resource.Layout.Toolbar; base.OnCreate(savedInstanceState); global::Xamarin.Forms.Forms.Init(this, savedInstanceState); LoadApplication(new App()); if (!IsPlayServiceAvailable()) { throw new Exception("This device does not have Google Play Services and cannot receive push notifications."); } CreateNotificationChannel(); } protected override void OnNewIntent(Intent intent) { if (intent.Extras != null) { var message = intent.GetStringExtra("message"); (App.Current.MainPage as MainPage)?.AddMessage(message); } base.OnNewIntent(intent); } bool IsPlayServiceAvailable() { int resultCode = GoogleApiAvailability.Instance.IsGooglePlayServicesAvailable(this); if (resultCode != ConnectionResult.Success) { if (GoogleApiAvailability.Instance.IsUserResolvableError(resultCode)) Log.Debug(AppConstants.DebugTag, GoogleApiAvailability.Instance.GetErrorString(resultCode)); else { Log.Debug(AppConstants.DebugTag, "This device is not supported"); } return false; } return true; } void CreateNotificationChannel() { // Notification channels are new as of "Oreo". // There is no need to create a notification channel on older versions of Android. if (Build.VERSION.SdkInt >= BuildVersionCodes.O) { var channelName = AppConstants.NotificationChannelName; var channelDescription = String.Empty; var channel = new NotificationChannel(channelName, channelName, NotificationImportance.Default) { Description = channelDescription }; var notificationManager = (NotificationManager)GetSystemService(NotificationService); notificationManager.CreateNotificationChannel(channel); } } }
The Activity attribute sets the application LaunchMode to SingleTop. This launch mode tells the Android OS to only allow a single instance of this activity. With this launch mode, incoming Intent data is routed to the OnNewIntent method, which extracts message data and sends it to the MainPage instance through the AddMessage method. If your application uses a different launch mode, it must handle Intent data differently.
The OnCreate method uses a helper method called IsPlayServiceAvailable to ensure the device supports Google Play Service. Emulators or devices that do not support Google Play Service cannot receive push notifications from Firebase.
Configure iOS for notifications
The process for configuring the iOS application to receive notifications is:
Configure the Bundle Identifier in the Info.plist file to match the value used in the provisioning profile.
Add the Enable Push Notifications option to the Entitlements.plist file.
Add the Xamarin.Azure.NotificationHubs.iOS NuGet package to your project.
Register for notifications with APNS.
Register the application with Azure Notification Hub and subscribe to tags.
Add APNS notifications to Xamarin.Forms UI.
The following screenshot shows the Enable Push Notifications option selected in the Entitlements.plist file within Visual Studio:
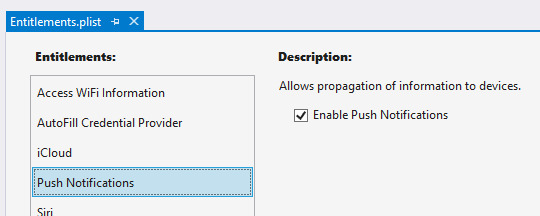
Register for notifications with APNS
The FinishedLaunching method in the AppDelegate.cs file must be overridden to register for remote notifications. Registration differs depending on the iOS version being used on the device. The iOS project in the sample application overrides the FinishedLaunching method to call RegisterForRemoteNotifications as shown in the following example:C#Copy
public override bool FinishedLaunching(UIApplication app, NSDictionary options) { global::Xamarin.Forms.Forms.Init(); LoadApplication(new App()); base.FinishedLaunching(app, options); RegisterForRemoteNotifications(); return true; } void RegisterForRemoteNotifications() { // register for remote notifications based on system version if (UIDevice.CurrentDevice.CheckSystemVersion(10, 0)) { UNUserNotificationCenter.Current.RequestAuthorization(UNAuthorizationOptions.Alert | UNAuthorizationOptions.Sound | UNAuthorizationOptions.Sound, (granted, error) => { if (granted) InvokeOnMainThread(UIApplication.SharedApplication.RegisterForRemoteNotifications); }); } else if (UIDevice.CurrentDevice.CheckSystemVersion(8, 0)) { var pushSettings = UIUserNotificationSettings.GetSettingsForTypes( UIUserNotificationType.Alert | UIUserNotificationType.Badge | UIUserNotificationType.Sound, new NSSet()); UIApplication.SharedApplication.RegisterUserNotificationSettings(pushSettings); UIApplication.SharedApplication.RegisterForRemoteNotifications(); } else { UIRemoteNotificationType notificationTypes = UIRemoteNotificationType.Alert | UIRemoteNotificationType.Badge | UIRemoteNotificationType.Sound; UIApplication.SharedApplication.RegisterForRemoteNotificationTypes(notificationTypes); } }
Register with Azure Notification Hub and subscribe to tags
When the device has successfully registered for remote notifications during the FinishedLaunching method, iOS will call the RegisteredForRemoteNotifications method. This method should be overridden to perform the following actions:
Instantiate the SBNotificationHub.
Unregister any existing registrations.
Register the device with your notification hub.
Subscribe to specific tags with a template.
For more information about registration of the device, templates, and tags, see Register templates and tags with the Azure Notification Hub. The following code demonstrates registration of the device and templates:C#Copy
public override void RegisteredForRemoteNotifications(UIApplication application, NSData deviceToken) { Hub = new SBNotificationHub(AppConstants.ListenConnectionString, AppConstants.NotificationHubName); // update registration with Azure Notification Hub Hub.UnregisterAll(deviceToken, (error) => { if (error != null) { Debug.WriteLine($"Unable to call unregister {error}"); return; } var tags = new NSSet(AppConstants.SubscriptionTags.ToArray()); Hub.RegisterNative(deviceToken, tags, (errorCallback) => { if (errorCallback != null) { Debug.WriteLine($"RegisterNativeAsync error: {errorCallback}"); } }); var templateExpiration = DateTime.Now.AddDays(120).ToString(System.Globalization.CultureInfo.CreateSpecificCulture("en-US")); Hub.RegisterTemplate(deviceToken, "defaultTemplate", AppConstants.APNTemplateBody, templateExpiration, tags, (errorCallback) => { if (errorCallback != null) { if (errorCallback != null) { Debug.WriteLine($"RegisterTemplateAsync error: {errorCallback}"); } } }); }); }
Note
Registering for remote notifications can fail in situations such as no network connection. You can choose to override the FailedToRegisterForRemoveNotifications method to handle registration failure.
Add APNS notifications to Xamarin.Forms UI
When a device receives a remote notification, iOS calls the ReceivedRemoteNotification method. Incoming message JSON is converted into an NSDictionary object, and the ProcessNotification method extracts values from the dictionary and sends them to the Xamarin.Forms MainPage instance. The ReceivedRemoteNotifications method is overridden to call ProcessNotification as shown in the following code:C#Copy
public override void ReceivedRemoteNotification(UIApplication application, NSDictionary userInfo) { ProcessNotification(userInfo, false); } void ProcessNotification(NSDictionary options, bool fromFinishedLaunching) { // make sure we have a payload if (options != null && options.ContainsKey(new NSString("aps"))) { // get the APS dictionary and extract message payload. Message JSON will be converted // into a NSDictionary so more complex payloads may require more processing NSDictionary aps = options.ObjectForKey(new NSString("aps")) as NSDictionary; string payload = string.Empty; NSString payloadKey = new NSString("alert"); if (aps.ContainsKey(payloadKey)) { payload = aps[payloadKey].ToString(); } if (!string.IsNullOrWhiteSpace(payload)) { (App.Current.MainPage as MainPage)?.AddMessage(payload); } } else { Debug.WriteLine($"Received request to process notification but there was no payload."); } }
Test notifications in the Azure portal
Azure Notification Hubs enable you to check that your application can receive test messages. The Test Send section in the notification hub allows you to choose the target platform and send a message. Setting the Send to Tag expression to default will send messages to applications that have registered a template for the default tag. Clicking the Send button generates a report that includes the number of devices reached with the message. The following screenshot shows an Android notification test in the Azure portal:

Testing tips
When testing that an application can receive push notifications, you must use a physical device. Android and iOS virtual devices may not be configured correctly to receive push notifications.
The sample Android application registers its token and templates once when the Firebase token is issued. During testing you may need to request a new token and re-register with the Azure Notification Hub. The best way to force this is to clean your project, delete the bin and obj folders and uninstall the application from the device before rebuilding and deploying.
Many parts of the push notification flow are executed asynchronously. This may result in breakpoints not being hit or being hit in an unexpected order. Use device or debug logging to trace execution without interrupting application flow. Filter the Android device log using the DebugTag specified in Constants.
When debugging is stopped in Visual Studio, the app is force closed. Any message receivers or other services launched as part of the debugging process will be closed and will not respond to message events.
Create a notification dispatcher
Azure Notification Hubs enable your backend application to dispatch notifications to devices across platforms. The sample demonstrates notification dispatch with the NotificationDispatcher console application. The application includes the DispatcherConstants.cs file, which defines the following properties:C#Copy
public static class DispatcherConstants { public static string[] SubscriptionTags { get; set; } = { "default" }; public static string NotificationHubName { get; set; } = "< Insert your Azure Notification Hub name >"; public static string FullAccessConnectionString { get; set; } = "< Insert your DefaultFullSharedAccessSignature >"; }
You must configure the DispatcherConstants.cs to match your Azure Notification Hub configuration. The value of the SubscriptionTags property should match the values used in the client apps. The NotificationHubName property is the name of your Azure Notification Hub instance. The FullAccessConnectionString property is the access key found in your notification hub Access Policies. The following screenshot shows the location of the NotificationHubName and FullAccessConnectionString properties in the Azure portal:
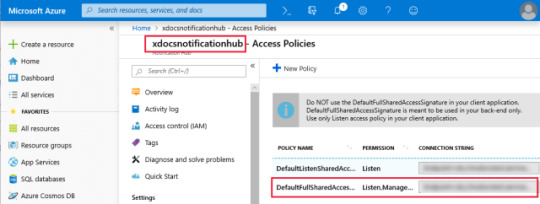
The console application loops through each SubscriptionTags value and sends notifications to subscribers using an instance of the NotificationHubClient class. The following code shows the console application Program class:C#Copy
class Program { static int messageCount = 0; static void Main(string[] args) { Console.WriteLine($"Press the spacebar to send a message to each tag in {string.Join(", ", DispatcherConstants.SubscriptionTags)}"); WriteSeparator(); while (Console.ReadKey().Key == ConsoleKey.Spacebar) { SendTemplateNotificationsAsync().GetAwaiter().GetResult(); } } private static async Task SendTemplateNotificationsAsync() { NotificationHubClient hub = NotificationHubClient.CreateClientFromConnectionString(DispatcherConstants.FullAccessConnectionString, DispatcherConstants.NotificationHubName); Dictionary<string, string> templateParameters = new Dictionary<string, string>(); messageCount++; // Send a template notification to each tag. This will go to any devices that // have subscribed to this tag with a template that includes "messageParam" // as a parameter foreach (var tag in DispatcherConstants.SubscriptionTags) { templateParameters["messageParam"] = $"Notification #{messageCount} to {tag} category subscribers!"; try { await hub.SendTemplateNotificationAsync(templateParameters, tag); Console.WriteLine($"Sent message to {tag} subscribers."); } catch (Exception ex) { Console.WriteLine($"Failed to send template notification: {ex.Message}"); } } Console.WriteLine($"Sent messages to {DispatcherConstants.SubscriptionTags.Length} tags."); WriteSeparator(); } private static void WriteSeparator() { Console.WriteLine("=========================================================================="); } }
When the sample console application is run, the spacebar can be pressed to send messages. Devices running the client applications should receive numbered notifications, provided they are properly configured.
The post Configuring Push Notifications For Xamarin Forms appeared first on PureSourceCode.
from WordPress https://www.puresourcecode.com/dotnet/xamarin/configuring-push-notifications-for-xamarin-forms/
0 notes
Text
Episode 112 with Andrew Connell on technical training—Office 365 Developer Podcast
In episode 112 of the Office 365 Developer Podcast, Richard diZerega and Andrew Coates talk with Andrew Connell about technical training.
http://ift.tt/2hVjqmK
Download the podcast.
Weekly updates
Get Azure AD app-only access token using certificate on .NET Core by Waldek Mastykarz
Use cascading dropdowns in SharePoint Framework web part properties by Waldek Mastykarz
SharePoint and Client-side Development – the common build toolchain by Chakkaradeep (Chaks) Chandran
Retrieving external/guests users via the Microsoft Graph by lio Struyf
Show notes
http://vtns.io/o365devpodcast
Got questions or comments about the show? Join the O365 Dev Podcast on the Office 365 Technical Network. The podcast RSS is available on iTunes or search for it at “Office 365 Developer Podcast” or add directly with the RSS http://ift.tt/1oUifnc.
About Andrew Connell
Andrew Connell is a full stack web developer with a focus on Microsoft Azure and Office 365—specifically the Office 365 APIs, SharePoint, Microsoft .NET Framework /.NET Core, Angular, Node.js and Docker. He’s received Microsoft’s MVP award every year since 2005. Andrew has helped thousands of developers through the various courses he’s authored and taught both in-person and online courses. Recently he launched his own on-demand video platform, Voitanos to deliver his on-demand video training. You can also follow Andrew on his blog (http://ift.tt/PbxuKA) and on Twitter @andrewconnell. Also, check out some of the numerous projects he’s involved in on GitHub or listen to his popular weekly podcast, The Microsoft Cloud Show, which focuses on Microsoft cloud services such as Azure and Office 365 as well as the competitive cloud landscape.
About the hosts
Richard is a software engineer in Microsoft’s Developer Experience (DX) group, where he helps developers and software vendors maximize their use of Microsoft cloud services in Office 365 and Azure. Richard has spent a good portion of the last decade architecting Office-centric solutions, many that span Microsoft’s diverse technology portfolio. He is a passionate technology evangelist and a frequent speaker at worldwide conferences, trainings and events. Richard is highly active in the Office 365 community, popular blogger at aka.ms/richdizz and can be found on Twitter at @richdizz. Richard is born, raised and based in Dallas, TX, but works on a worldwide team based in Redmond. Richard is an avid builder of things (BoT), musician and lightning-fast runner.
A Civil Engineer by training and a software developer by profession, Andrew Coates has been a Developer Evangelist at Microsoft since early 2004, teaching, learning and sharing coding techniques. During that time, he’s focused on .NET development on the desktop, in the cloud, on the web, on mobile devices and most recently for Office. Andrew has a number of apps in various stores and generally has far too much fun doing his job to honestly be able to call it work. Andrew lives in Sydney, Australia with his wife and two almost-grown-up children.
Useful links
Office 365 Developer Center
Office 365 main blog
dev.office.com blog
Twitter
Facebook
FlipBoard
Slack channel
StackOverflow
http://ift.tt/1j37Z6y
http://ift.tt/1kyGR4O
http://ift.tt/1kyGRl5
Yammer Office 365 Technical Network
O365 Dev Podcast
O365 Dev Apps Model
O365 Dev Tools
O365 Dev APIs
O365 Dev Migration to App Model
O365 Dev Links
UserVoice
The post Episode 112 with Andrew Connell on technical training—Office 365 Developer Podcast appeared first on Office Blogs.
from Office Blogs http://ift.tt/2hVBGMz via IFTTT
0 notes
Text
Triggering Azure Automation Runbooks using the Azure ARM REST API
There are many ways to start an Azure Automation Runbook. You can start the Runbook from the Azure Portal, using PowerShell cmdlets or a Webhook. And maybe even more.
If you want to call a Runbook from another tool, like OMS or any other tooling supporting web requests you can create a Webhook for the Runbook which to be called from the external tool.
A Webhook allows you to start a particular runbook in Azure Automation through a single HTTP request. This allows external services such as Visual Studio Team Services, GitHub, Microsoft Operations Management Suite Log Analytics, or custom applications to start runbooks without implementing a full solution using the Azure Automation API.
A disadvantage of using a Webhook for an Azure Automation Runbook is the lack of authentication for calling the Webhook. The only security available for calling the Azure Automation Runbook Webhook is the secret token that is generated during the creation of the Webhook.
After creation the URL can't be viewed anymore but anyone knowing the Webhook URL is able to call the Runbook via the Webhook. Provided they also know the needed parameter inputs.
So how could you call an Azure Automation Runbook via a web request using a username and password?
Azure REST API
Azure Resource Manager provides a way for you to deploy and manage the services that make up your applications. For an introduction to deploying and managing resources with Resource Manager, see Azure Resource Manager Overview. Most, but not all, services support Resource Manager, and some services support Resource Manager only partially. Microsoft will enable Resource Manager for every service that is important for future solutions, but until the support is consistent, you need to know the current status for each service. For information about the available services and how to work with them, see Resource Manager providers, regions, API versions and schemas. [*from Azure Resource Manager REST API Reference]
How to call an Azure Automation Runbook with Azure ARM REST API?
So how does the authentication work when you want to to do a web request call against the Azure ARM REST API? You need to supply a bearer Access Token in the request Header of the web request. But how do you get that AccessToken? You can retrieve the AccessToken by creating an Active Directory application and service principal and use a ClientID and ClientSecret to retrieve the AccessToken. We will use PowerShell to create the Service Principal to access resources in Azure.
Create a service principal to access resources
Create the AD application with a password
Create the service principal
Assign the Contributor role to the service principal
#region variables $ADApplicationName = 'demowebrequest' $HomePage = 'http://ift.tt/2etcKN4' $ADApplicationPassword = 'P@ssw0rd!' #endregion #region Login to Azure Add-AzureRmAccount #Select Azure Subscription $subscription = (Get-AzureRmSubscription | Out-GridView ` -Title 'Select an Azure Subscription ...' ` -PassThru) Set-AzureRmContext -SubscriptionId $subscription.Id -TenantId $subscription.TenantID Select-AzureRmSubscription -SubscriptionName $subscription.Name #endregion #region create SPN with Password New-AzureRmADApplication -DisplayName "demowebrequest" -HomePage $ADApplicationName -IdentifierUris $HomePage -Password $ADApplicationPassword -OutVariable app New-AzureRmADServicePrincipal -ApplicationId $app.ApplicationId New-AzureRmRoleAssignment -RoleDefinitionName Contributor -ServicePrincipalName $app.ApplicationId.Guid Get-AzureRmADApplication -DisplayNameStartWith 'demowebrequest' -OutVariable app Get-AzureRmADServicePrincipal -ServicePrincipalName $app.ApplicationId.Guid -OutVariable SPN #endregion
Remark:
If you want the Service Principal only to manage Automation Runbooks you should give this service account the "Automation Operator" Role and limit access to the Scope where the Automation Account is created.
You now need to follow the steps described in the blog post Using the Azure ARM REST API – Get Access Token.
If you followed the steps described there you should have a ClientId and ClientSecret which are going to be used to Authenticate against the Azure ARM REST API.
You can verify correct authentication using the following commands from bash. An access token is returned.
curl --request POST "http://ift.tt/2vO0z7L" --data-urlencode "resource=http://ift.tt/ORHUID" --data-urlencode "client_id=[clientid]" --data-urlencode "grant_type=client_credentials" --data-urlencode "client_secret=[clientsecret]"
Or if you prefer PowerShell you can use the following commands:
#Azure Authtentication Token #requires -Version 3 #SPN ClientId and Secret $ClientID = "clientid" #ApplicationID $ClientSecret = "ClientSecret" #key from Application $tennantid = "TenantID" $TokenEndpoint = {http://ift.tt/1fZDn6l} -f $tenantid $ARMResource = "http://ift.tt/ORHUID"; $Body = @{ 'resource'= $ARMResource 'client_id' = $ClientID 'grant_type' = 'client_credentials' 'client_secret' = $ClientSecret } $params = @{ ContentType = 'application/x-www-form-urlencoded' Headers = @{'accept'='application/json'} Body = $Body Method = 'Post' URI = $TokenEndpoint } $token = Invoke-RestMethod @params $token | select access_token, @{L='Expires';E={[timezone]::CurrentTimeZone.ToLocalTime(([datetime]'1/1/1970').AddSeconds($_.expires_on))}} | fl *
The next step is to call an Azure Automation Runbook using a web request against the Azure REST API with the earlier retrieved access token.
Azure Automation Runbook Web Request
Let's first start with retrieving Azure Automation Runbook information.
Method Request URI GET 'http://ift.tt/2uoY0FF}'
Example web request call using curl from bash:
#!/bin/bash # bash script to retrieve Azure Runbook information using plain Azure ARM REST API web requests #Azure Subscription variables ClientID="[applicatie clientid" #ApplicationID ClientSecret="application client secret" #key from Application TenantID="[azure tenantid]" SubscriptionID="[azure subscriptionid]" ResourceGroupName="[resourcegroup name for azure automation account]" AutomationAccountName="[azure automation account name]" APIVersion="2015-10-31" accesstoken=$(curl -s --header "accept: application/json" --request POST "http://ift.tt/2vNREmB" --data-urlencode "resource=http://ift.tt/ORHUID" --data-urlencode "client_id=$ClientID" --data-urlencode "grant_type=client_credentials" --data-urlencode "client_secret=$ClientSecret" | jq -r '.access_token') #Use AccessToken in Azure ARM REST API call for Runbook Info runbookURI="http://ift.tt/2uoWhjE" curl -s --header "authorization: Bearer $accesstoken" --request GET $runbookURI | jq .
Result running script in WSL (Bash for Windows)
Trigger Azure Automation Runbook with web request:
Simple Hello World Runbook PowerShell Script (HelloWorld.ps1):
[CmdletBinding()] param( $firstname, $lastname ) Write-Output "Hello $firstname $lastname"
This Runbook has two parameters, FirstName and LastName.
If we now want to trigger this Runbook using a web request we need the following information.
Method Request URI POST 'http://ift.tt/2vNIXsn}' BODY
Example web request using curl:
#!/bin/bash # bash script to retrieve Azure Runbook information using plain Azure ARM REST API web requests #Azure Subscription variables ClientID="[applicatie clientid" #ApplicationID ClientSecret="application client secret" #key from Application TenantID="[azure tenantid]" SubscriptionID="[azure subscriptionid]" ResourceGroupName="[resourcegroup name for azure automation account]" AutomationAccountName="[azure automation account name]" APIVersion="2015-10-31" GUID=$(uuidgen) accesstoken=$(curl -s --header "accept: application/json" --request POST "http://ift.tt/2vNREmB" --data-urlencode "resource=http://ift.tt/ORHUID" --data-urlencode "client_id=$ClientID" --data-urlencode "grant_type=client_credentials" --data-urlencode "client_secret=$ClientSecret" | jq -r '.access_token') #Use AccessToken in Azure ARM REST API call for Runbook Info runbookURI="http://ift.tt/2vNJ9rV" curl -s --header "authorization: Bearer $accesstoken" --header "Content-Type: application/json" -d '{"tags":{},"properties":{"runbook":{"name":'"'$RunbookName'"'},"parameters":{"LastName":"Stranger","FirstName":"Stefan"}}}' --request PUT $runbookURI | jq .
Result output:
You can also check the Runbook output in the Azure Portal.
If you prefer to use PowerShell to call the Azure Automation Runbook via the Azure REST API you can use the following code:
#requires -Version 3 # --------------------------------------------------- # Script: CallRunbookFromRESTAPI.ps1 # Version: # Author: Stefan Stranger # Date: 09/08/2017 15:16:25 # Description: Call Azure Automation Runbook using Azure ARM REST API calls. # Comments: http://ift.tt/2uoXZS7 # Changes: # Disclaimer: # This example is provided "AS IS" with no warranty expressed or implied. Run at your own risk. # **Always test in your lab first** Do this at your own risk!! # The author will not be held responsible for any damage you incur when making these changes! # --------------------------------------------------- #region variables $ClientID = '[ClientID]' #ApplicationID $ClientSecret = '[ClientSecret]' #key from Application $tenantid = '[Azure Tenant Id]' $SubscriptionId = '[Azure Subscription Id]' $resourcegroupname = '[Resource Group Automation Account]' $AutomationAccountName = '[Automation Account Name]' $RunbookName = '[Runbook Name]' $APIVersion = '2015-10-31' #endregion #region Get Access Token $TokenEndpoint = {http://ift.tt/1fZDn6l} -f $tenantid $ARMResource = "http://ift.tt/ORHUID"; $Body = @{ 'resource'= $ARMResource 'client_id' = $ClientID 'grant_type' = 'client_credentials' 'client_secret' = $ClientSecret } $params = @{ ContentType = 'application/x-www-form-urlencoded' Headers = @{'accept'='application/json'} Body = $Body Method = 'Post' URI = $TokenEndpoint } $token = Invoke-RestMethod @params #endregion #region get Runbooks $Uri = 'http://ift.tt/2vNSMGU}' -f $SubscriptionId, $resourcegroupname, $AutomationAccountName, $APIVersion $params = @{ ContentType = 'application/x-www-form-urlencoded' Headers = @{ 'authorization' = "Bearer $($token.Access_Token)" } Method = 'Get' URI = $Uri } Invoke-RestMethod @params -OutVariable Runbooks #endregion #region Start Runbook $Uri = 'http://ift.tt/2upnanF}' -f $SubscriptionId, $resourcegroupname, $AutomationAccountName, $((New-Guid).guid), $APIVersion $body = @{ 'properties' = @{ 'runbook' = @{ 'name' = $RunbookName } 'parameters' = @{ 'FirstName' = 'Stefan' 'LastName' = 'Stranger' } } 'tags' = @{} } | ConvertTo-Json $body $params = @{ ContentType = 'application/json' Headers = @{ 'authorization' = "Bearer $($token.Access_Token)" } Method = 'Put' URI = $Uri Body = $body } Invoke-RestMethod @params -OutVariable Runbook $Runbook.properties #endregion #region get Runbook Status $Uri ='http://ift.tt/2vO5sNW' -f $SubscriptionId, $resourcegroupname, $AutomationAccountName, $($Runbook.properties.jobId) $params = @{ ContentType = 'application/application-json' Headers = @{ 'authorization' = "Bearer $($token.Access_Token)" } Method = 'Get' URI = $Uri } Invoke-RestMethod @params -OutVariable Status $Status.properties #endregion
Have fun with calling your Runbooks using web requests against the Azure ARM REST API!
References:
Azure Automation Runbook Webhook lesson learned
What is a Webhooks Push-Styled API and How Does It Work?
Using the Azure ARM REST API – Get Access Token
Using the Azure ARM REST API – Get Subscription Information
Using the Azure ARM REST API – End to end Example Part 1
Using the Azure ARM REST API – End to end Example Part 2
Use Role-Based Access Control to manage access to your Azure subscription resources
from Stefan Stranger's Weblog – Manage your IT Infrastructure http://ift.tt/2updWaF via IFTTT
0 notes