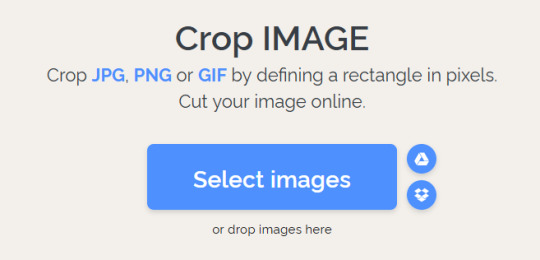
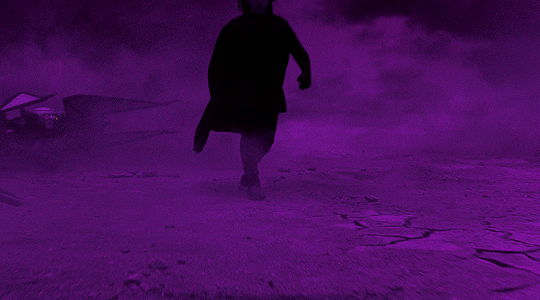
#gifv to gif converter
Text


CPUK 88x31 buttons I made for the shrine on my neocities
free to use with or without credit
(NOTE: if ur saving from tumblr itll be converted to webp. if you dont want this just open the image in a new tab and replace the .gifv in the url to .gif and it should save normally)
#my art#cpuk#cpu kerfuffle#changed slightly from the original buttons i made to fix contrast and consistency#mostly based off the official logos except for team chonk (it was hard to make it recognizable in pixel art#+ i wanted rainbow colors so i switched chonk to be orange. i *think* the other colors are the same)
198 notes
·
View notes
Text
gif/gifv vs mp4
to those saying that tumblr’s decision to begin converting gif/gifv to mp4 will not significantly impact quality, here’s a side by side comparison to prove you wrong.
here’s what a normal gif (made using photoshop, sharpened and colored, dimensions are 540x615px) looks like on the tumblr dashboard:

and zoomed in:

this is what it looks like after being converted to mp4 (static image because i can’t upload the video):
and zoomed in:

if you’re a content creator, the difference is very very significant, even more so when zooming in. people who claim otherwise should maybe consider listening to gif makers who actually... create gifs??? and have a process??? that takes time and energy as it is??? and all of that will be completely undone if staff decides to implement this change sitewide. it will worsen the quality of gifs even more. it will drive content creators away from the site for good.
rather than argue to the contrary, please continue to do what you can to support creators and bring this to staff’s attention.
#signal boost#sameera.txt#gifs#gif making#ccnet#idk what to tag this with but dfjfdkfkl look how UGLY they are making gifs look by doing this#it should also be noted that the gif's file size is ~8 mb#and after being converted to mp4 the size is ~600 kb#hence why it looks so fucking ugly
1K notes
·
View notes
Photo
Today I created an account just to show a proof of concept - animated version of That One Tango Panel that @infinityroom wanted to make as a gif. I just took original artwork (I can’t draw, sadly) and animated it, that’s all I’ve done.
What you can see in the post itself is just a mockup of how actual animation would look like while being placed on white and black bg, since I just found out that tumblr can’t upload webps and it converts all gifs to gifvs anyway, so tumblr basically said “no transparency for you”.
That means that that great blog can’t have cool animations with hidden with transparency elements because of tumblr limitations. If I’m wrong about this - please please please tell me how to force tumblr to keep transparency.
If you want to check out how the animation is supposed to work and look like - download it from here and view it with any normal webp viewer (chrome can open webp just fine). Unlike gifs from this post - webp supports alpha channel and you can place that webp on a background of any color you like and imagine how cool the idea of creating working gif with normal transparency that was close to original artwork was in my head before I realized that tumblr can’t upload webp.
At the end I had fun making this simple animation, even if drawing all this glitches was a tedious task and animation itself turned out to be less polished than I wanted it to be. I was a bit lazy to make appearing animation for all the mites as well, but all I wanted was to show potential of using webps for animated panels... yeah.
And to wrap it up I’ll throw you personal recommendation - I was listening to Cicatrices while working on this animation and now I’m properly stuck in the Infinity Room, actually worried for everybody that got stuck inside
500 notes
·
View notes
Note
hi how do you put gifs in stamps? i cannot figure it out for some reason

I'll be happy to give you a hand! I've put most of this under the cut because I have two different methods of editing gif stamps, and I don't want to clog someone's dash LOL
I want to preface that I edit using a PC, so I'm not confident in giving advice/tips to anyone who is mobile-bound.
For the first method, and generally the easier one, I entirely use EZgif. It really is a lifesaver of a website... ^^
I start by cropping the gif I want to make a stamp of. Here’s the gif I’ll be using!
(Note: You can’t make stamps using gifv/webp files on EZgif, they will bug out. You can convert gifv files to gif by going to its URL and removing the “v,” and you can convert webp files to gif using this section of the website!)
[Photo ID: Gif of Shadow the Hedgehog.]
Sometimes you don't need to do this, but usually, I crop the gif to remove unnecessary background space and to put more focus on the character.
[Photo ID: Cropped gif to put more focus on Shadow and remove background space.]
Now, I resize the cropped gif. Set the width to “91″ and the height to “47.”
(Note: Sometimes after you size down the image, the gif gets corrupted. You can fix this by changing the resize method. I find Gifsicle works the best, though that isn't guaranteed.)

[Photo ID: Prior gif resized to 91 x 47.]
We’re almost done! All we have to do now is put the stamp border on through using the overlay section.

[Photo ID: Transparent downloadable stamp border.]
Here’s the stamp border I’ll be using!
Note: If you want to use a different border, you'll likely have to find its area on your own to properly resize the gif again.
Once you are on the overlay page with your resized gif, you want to click this button once.

[Photo ID: Screenshot of Canvas Size button. Picture reads “Extend canvas size (use if overlay exceeds gif size).”]
After you do that, you want to insert the stamp border with this button.
[Photo ID: Screenshot of Choose File button. Picture reads “Select overlay image or watermark (PNG/GIF/JPG): Choose File: No file chosen. Upload Image!”]
Now that the border is inserted, change left to “41″ and top to “19,″ then click "Generate image!"
Note: You'll also have to find the left and top on your own if you're using a different stamp border. This is important because if you don't have the correct numbers, your gif will have a random sliver of transparency in it.
[Photo ID: Gif stamp with a noticeable amount of unnecessary transparent space.]
You should have something like this, but we aren’t done yet though. Do you notice all the transparent space we don’t need that’s around the stamp? We need to crop that out using this easy button!

[Photo ID: Screenshot of Autocrop button. Picture reads “Autocrop: trim transparent pixels around the image.”]
After you click "Autocrop," click "Generate image," and then you’re done!
[Photo ID: Completed gif stamp.]
You're free to add whatever aesthetic changes you like using the "Effects" section, though I usually tend to lay off that since I see it as a hassle.
Now, for the second, and more tedious method, that I have been using recently!
Starting off, we are going to find and crop our gif using EZgif again, so just copy the first two steps from the last method.
[Photo ID: Gif of Shadow the Hedgehog.]
[Photo ID: Cropped gif to put more focus on Shadow and remove background space.]
Now that's done, we need to resize the gif to fit the same stamp border I used before! But instead of using the prior numbers, we're going to use new ones.
Resize your gif by using the width “101″ and the height “57.”
Note: If you're using a different border, you can easily find these numbers because they'll be the same as your border's, as long as it doesn't have any background space. If your border does, please crop it out.
[Photo ID: Prior gif resized to 101 x 57.]
Now, here's where things get different. We're going to use the website "Photopea," which is basically just online Photoshop.
Click "File" on the top left corner of the website and then click "Open," then insert the resized gif.
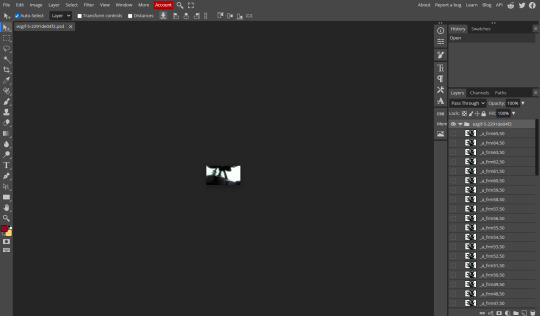
[Photo ID: Photopea editing software with stamp opened.]
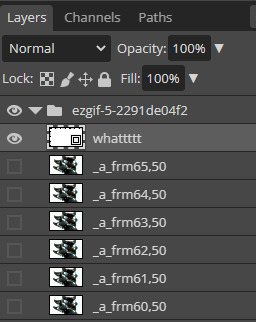
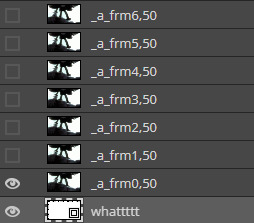
You should now have something like this! It's important to keep in mind that all of those layers are the frames of your gif.
Now, insert the stamp below, which is just the same border from earlier except with the stamp part colored in, onto the gif by clicking "File," and then clicking "Open & Place."

[Photo ID: Filled in downloadable stamp border, edges are still transparent.]
It will automatically paste onto a new layer at the top of the folder layer list. You need to move it down so that it's on the bottom of the folder, not the layer list. You can do this by simply dragging and dropping.
[Photo ID: Two images. One shows the filled-in stamp on top of the folder layer list. The other shows the filled-in stamp on the bottom of the folder.]
Here's the tedious part. You now need to set ALL of the gif's frames to "Clipping group," not including the filled-in stamp. This can conveniently be done by clicking each frame while holding down "Ctrl" and "Alt" on your keyboard. This process can either last a few seconds or up to a full minute depending on how many frames the gif has. Sorry...
[Photo ID: Example of the gif's frames all set to "clipping group." You can tell this has been done successfully because the frames have a small arrow pointing downward on the left side of the layer preview image.]
Don't forget to double-check in case you missed any frames! You should now have something like this at the center of your screen.
[Photo ID: Screenshot of the gif at the center of the screen, now looking stamp-shaped.]
We're not done yet! We still need to add a light stamp border and a dark stamp outline. We can do this by pasting the images below.


[Photo ID: Two photos. One is a transparent downloadable outline of a stamp. The other is a transparent downloader border of a stamp.]
Paste the light one first, and then the dark one last on top of the folder's layer list.
[Photo ID: Previous screenshot after the templates have been pasted.]
Click on "File," and then click "Save," and now you're done!
[Photo ID: Completed gif stamp made in Photopea.]
This part is optional, but if you want, you can mess around with the layers and add some aesthetical changes! Here's an example of the previous stamp after I edited it like I normally do!
[Photo ID: Completed gif stamp made in Photopea with effects.]
That's all for now! If you have any questions or need more help, don't be afraid to ask! :D
-Mod Shadow
87 notes
·
View notes
Note
For the gifs one thing I learned is that if you go to the end of the link and remove the v (so it's .gif instead of .gifv) it won't try to save as a webp file anymore. Don't know how to it for still images though. But it is useful though for nice you want to save. Like yours!
Oh that does work on tumblr, I had no idea! Thanks! I used to convert the webp back into gifs or png using this site, but this is easier. Again, you don't need to do this for my gifs cause there's a link for a dropbox folder with all of them, on my pinned post!
Anonymous asked: You are doing god's work with the dd animations
Ah thank you, making those gifs took a ton of work, so I’m glad it was appreciated! There were some other gifs I wanted to make (like some attack animations) but I think to make them look their best I’d have to let go of the transparency, some effects do not look good with the no dithering transparency setting I’m using. I also wanted to make some gif sets with the enemies and monsters animations (which are already on the wiki btw), but for that I’d need to resize them to fit nicely here. But I’m not doing anything anytime soon. Here, have the little animation that plays before combat, I couldn't fit it anywhere:
Anonymous asked: I hope something positive happens to you today
Hah thanks anon, nothing positive happened on the day you’ve sent this (way waaay long ago) all I did was play video games. Then again, nothing negative happened either! Thanks for the nice message <3
#darnest answers#I was answering this with an extended version of my gif making struggles but then I accidentally hit ctrl z twice and lost everything#it had comparison gifs of the earlier attempts and all that#dd gifs
10 notes
·
View notes
Note
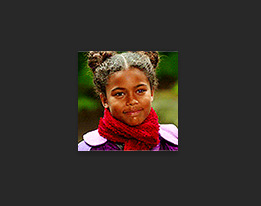
Yeah! Like, cropping an gif image and turning it into a proper icon for a muse reaction. Sorry, english is my second language at times
Okay! So you're looking to turn a gif into a gif icon. I can walk through two options for that -- one using a website (ILoveImg) and one using Photoshop. I'll be taking one of my own gifs from this:
To this with ILoveImg:

And to this with Photoshop:

Before you crop any gif, always check the gif maker's rules. Some require you to ask permission first, some require you to credit them, and some don't let you crop their gifs at all. If their rules don't say, ask them if they're okay with having their gifs cropped for personal use. And whatever their policy is, make sure to follow it.
For either option, you'll need to save the original gif to your computer. Tumblr usually converts gifs into another format, gifv, which doesn't save correctly. To make sure you can download a gif correctly, right click it and click Copy image link.
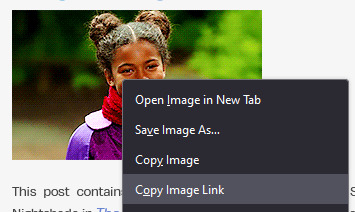
Paste that image link into a new tab, load it, and look at the URL in the top bar.

If the URL ends with .gif -- you can download it as is. Right click the image and save it to your computer.
If the URL ends with .gifv -- you need to do another step. Go to the URL and remove the v at the end, so it just ends with .gif, then hit enter to reload with the new URL. You can now right click the image and save it.
Option 1 - ILoveImg
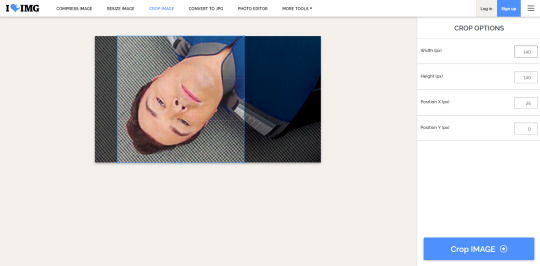
To crop a gif without using Photoshop, you can use ILoveImg -- the link is here. There are similar sites out there, but this one accepts gifs and I found it the most straightforward to use. It looks like this:
Click Select images and upload your gif. It'll now look like this:

Type the dimensions you want the final icon on the left -- the standard icon size here on Tumblr is 100x100.
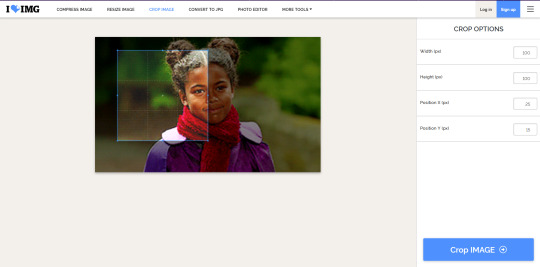
You'll see the blue cropping box on your gif has changed size. Click the center of that box and drag it so it frames the image how you like.
Then click Crop image in the bottom right. It will take you to a new screen to download your cropped icon.
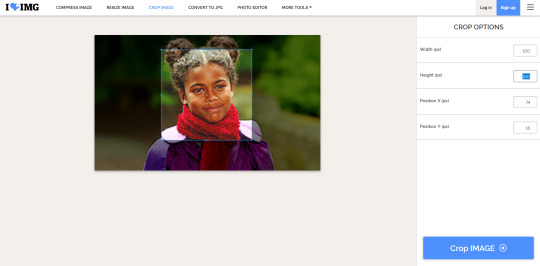
For most gifs, that should be fine. However, you may run into a gif whose subject is either too large or too small, and the framing of the icon looks strange. I'll use this one of mine as an example.
When I upload this to the site, and enter in the width and height as 100, the square is too small to show his entire face.

As a result, the final icon looks very awkward.
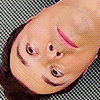
To get around this, go back to the crop options screen. Instead of typing 100x100, type a larger number. It just needs to be square, so the same number for the width and the height. Keep trying larger numbers until the resulting square is big enough to frame the entire face -- for this one, 140x140 worked.
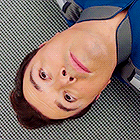
You'll then wind up with a nicer looking icon that's bigger than before.
Now you can go to the same site's resize image section. Upload the icon you just made there.

On the right, change the width and height to 100.
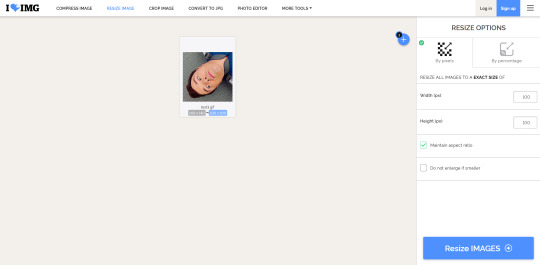
Then click Resize images to download your new icon. This one will be the correct size and have the better framing.

You could also make a bunch of square gif icons at once, in all different sizes, then upload them to resize all at once. It should be able to turn all of them into 100x100 in one go, which would save you time.
Option 2 - Photoshop
For this option, you'll need Photoshop. I currently have 24.1, but any version should work.
Open your gif in Photoshop.
Select the crop tool on the left toolbar (or hit C on your keyboard). Here's what it looks like:
Along the top bar, you'll see a drop down menu.

Open it and change it to W x H x Resolution.
In the two boxes to the right of it, enter 100 and 100.

You'll now see the cropping box on your gif.

Click and drag the corners of this box to resize it. Click the middle of the box and drag to reposition it. Get it size and positioned just how you want it.
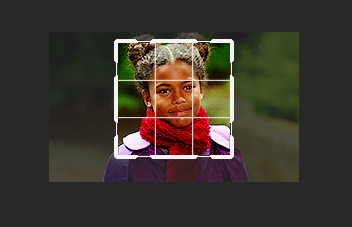
When you have it how you want it, click the check mark in the top bar (or hit Enter).

You should now see your gif has been cropped into an icon.
Now you just need to export this new gif. Go to File > Export > Save for web (Legacy). You can also use the keyboard shortcut CTRL + ALT + SHIFT + S.
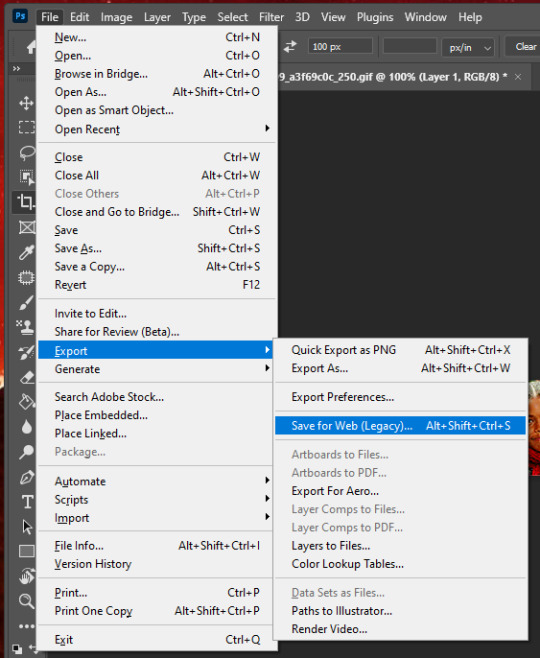
This will pop up a new window. You don't need to understand what most of this means. These are the settings I use:
The main things that you need to check are that Colors in the top right says 256, and that Looping Options in the bottom right says Forever. If your final icon has poor quality, try changing some of the other dropdowns in the top right and see how that improves things. You'll find the best settings that work for you. You can preview your gif by clicking the play button in the bottom right corner.
When it's how you want it, click save and save it to your computer.
For this method, you can always frame the image correctly the first time, and Photoshop will automatically size it to 100x100. You don't need to make a larger one first and resize it later.
5 notes
·
View notes
Photo

#love live!#A song for You! You? You!!#Rin Hoshizora#mygif#anime gif#text post gifs apparently get converted to that gifv crap too now so might as well make them photo posts again
352 notes
·
View notes
Photo
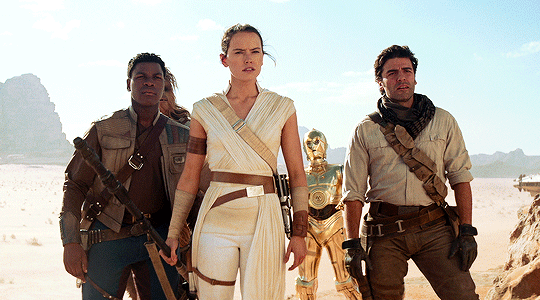

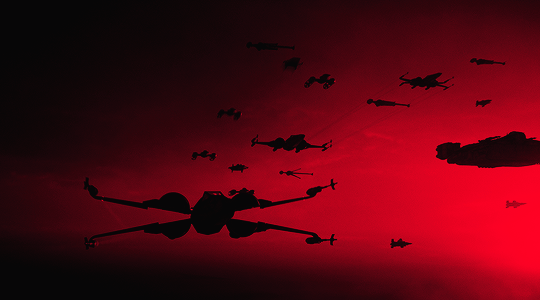
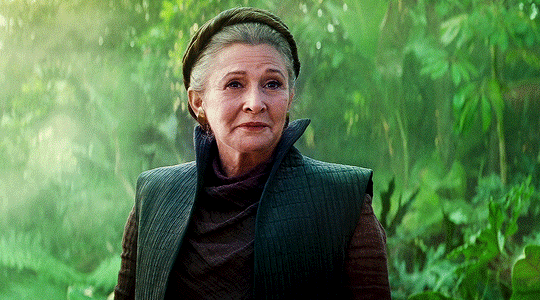
Star Wars: The Rise of Skywalker (2019)
#swedit#sw edit#swmovies#theforcesource#strwrsdaily#resistancesource#userelysia#star wars#the rise of skywalker#edit#mine#1k#long post#flashing gif warning#star wars hype giving me some giffing motivation!#I'll be reusing some of these gifs for another set#also one of the times i saved this the gifs weren't converted to gifv and it made me so happy *sobs*
2K notes
·
View notes
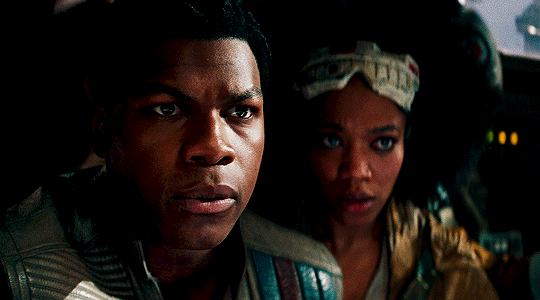
Photo
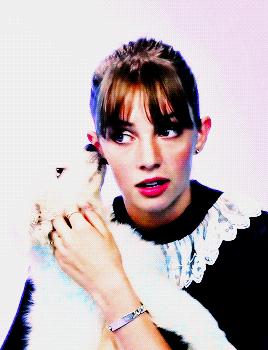

#mhawkeedit#mayahawkeedit#strangerthingscastedit#userava#maya hawke#mine#people#these look so much better before being converted to gifv :(#mygifs#celeb*
417 notes
·
View notes
Photo
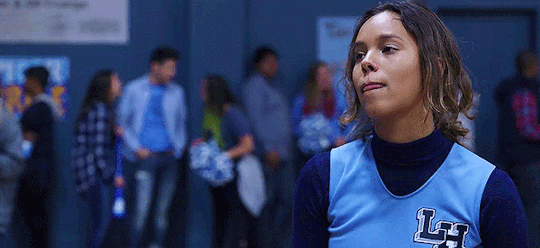
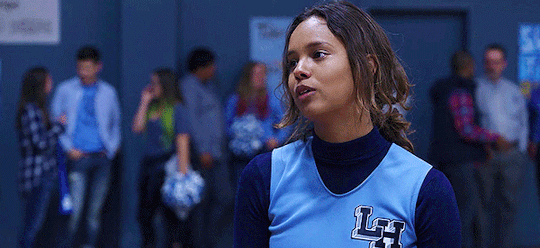
the new 8mb image limit is dangerous ft. alisha boe being stunning
#alisha boe#alishaboeedit#aboeedit#13rwedit#jessicadavisedit#if only they didnt then convert it to gifv and make the quality like less than 1mb#ch; andrea
99 notes
·
View notes
Photo
Finding high quality film/tv rips, saving the large files, and screencapping them are half the battle for gifmakers when setting out to make a gifset. Here’s a little guide on this process, including my advice on
Where to download stuff
Where to store your movies/shows
Screencapping programs
Making gifs as HQ as possible, including tips for picking out what to download when you have multiple options (not all 1080p rips of the same movie or tv episode are the same quality and I explain why)
Why screencaps of 4k movies can look weird and washed out and how to fix that
and more
✨ You can find my gifmaking 101 tutorial here and the rest of my tutorials here.
Where can I download movies and shows?
First off, I prefer direct downloading rather than torrenting stuff because it’s faster and with torrenting, there’s more of a risk. Other people downloading the same torrent can see your IP address. This means movie studios can find out you’re downloading their content and can send you a warning letter. The download speed also varies depending on how many other people are seeding it. I would only do it if it’s your only option and you have a VPN or something.
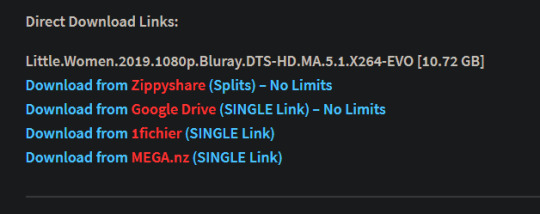
This is THE best guide for pirating I’ve ever seen. I use it for finding sites for books, music, you name it. The part of the guide you’d want to look at is where it says Direct Downloads Link (DDL) sites. My favorite place is Snahp. These ddl sites will have links to their movie/tv rips that are typically hosted on one of these two sites: google drive or mega.nz. You can download stuff from both of those sites for free, but with mega, they have a 5GB file download limit unless you have a premium account. I personally pay the $5 a month membership for mega because it’s worth it imo. You can buy a subscription through the mega app found on the iphone app store (so you’re billed through apple and it’s less scary than giving a random site your credit card info lmao) and as for androids I think mega has an app on there too.
So basically, if you go to http://snahp.it, they’ll have rips for different movies and shows.
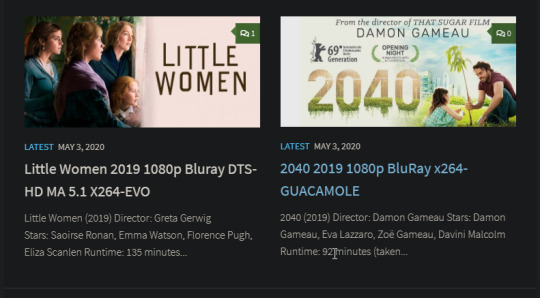
You click on the movie title and it’ll take you to a page where they have links for the video which they have uploaded on a variety of sites (including mega).
How do I make my gifs as HQ as possible?
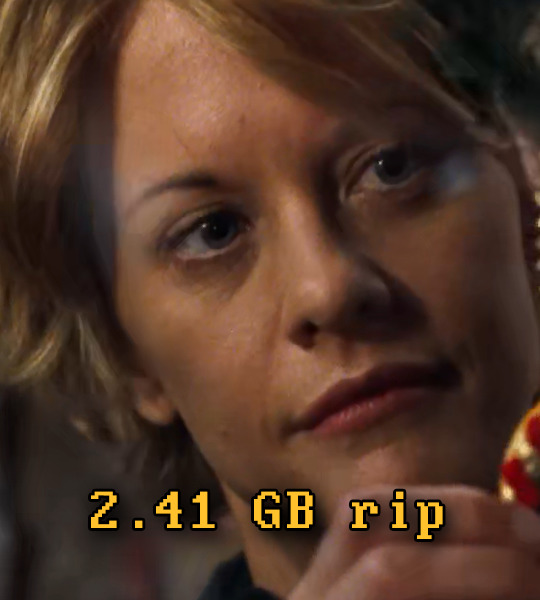
It’s best to gif things that are 1080p. And usually the higher the file size, the better. A really important thing to note is that not all 1080p bluray rips are the same. The piracy groups that rip these files take uncompressed .mkv rips from discs that are anywhere from 10gb to like 50gb, and then run that through video converters to compress the file down so that they’re 2-8gb. Sometimes when that happens, the video quality goes down a LOT. The same goes for TV episodes. One rip could be 800mb, the other could be 3gb and both could claim to be “1080p” but the quality would be NOTICEABLY different. Your best bet is to always pick the rip with the highest file size.
I’ll show you an example with this scene from You’ve Got Mail.

I downloaded 2 different 1080p rip versions of the film. Both claim to be 1080p, but one is 2.41 GB and the other is 9.75 GB. After taking screencaps, it’s obvious that there’s a BIG difference in quality.
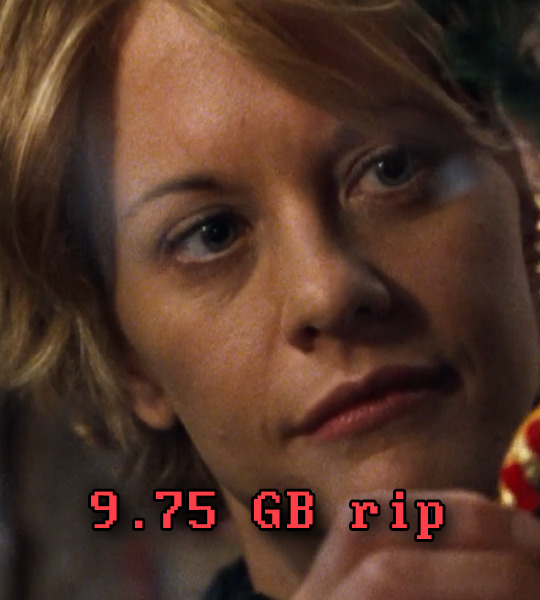
(these pictures are best viewed on desktop tumblr)
When it comes to Blu-ray rips, download remux versions of films and shows if possible. Remux means .mkv files that are uncompressed and straight from a Blu-Ray disc. Giffing remux rips cuts down on the possibility of seeing pixel-y effects a LOT in my experience. It’ll take a bit longer to download than typical 1080p rips but it’s worth it imo.
For TV episodes, if you can’t find a Blu-Ray rip, uploads with the word AMZN in it are usually the highest quality and your best bet (unless you see another upload that’s higher in file size - again: always try to pick the highest file size). 'AMZN’ means they’re from a person that ripped the episode from Amazon Prime Video.
Also, even better than 1080p is 4k (2160p). I only really recommend this though if you know you’re going to gif something up close and crop it a lot - like if it’s a big 540x540px close-up gif of a person. You’ll REALLY see the difference if it’s a 1080p vs 4k rip in that situation. I usually don’t bother with giffing 4k files unless it’s the case above because my laptop lags when taking 4k screencaps and it takes longer to load them into photoshop (4k screencaps are usually about 60mb each!)
⭐️ Another thing that’s important is making sure that when you actually make your gifs, you set them to the correct speed (.05 for movies and most shows, and .04 sometimes for reality tv and live broadcasts). Here’s my gif speed guide. Having the right gif speed is really important for making a gifset HQ. You don’t want it to look too slow or too fast.
What’s your favorite video player to take screenshots with?
MPV player, hands down. And I’ve tried a TON of programs over the years. I’ve tried KMPlayer and found that it added duplicate frames (and even missing frames) which is horrible, and I’ve tried GomPlayer which is.....I’m just gonna say it, I’m not the biggest fan of it. It’s a little overly complicated in my opinion and it has ads. If you like these programs, more power to you! Use whatever you’re comfortable using. I just like MPV the most because it doesn’t have ads, it’s simple, you can take sequential screencaps with a keyboard shortcut, and it can play 4k movies.
Screencaps I take of 4k 2160p movies look so dull and washed out, like the colors aren’t right. Why is that?
That’s because your computer can’t handle HDR 4k video files. It probably can handle SDR 4k video files, but unfortunately, 99% of 4k rips out there are HDR.

[picture source]
Now, HDR displays just fine on computers that have 4k-HDR capabilities, but most older computers don’t have this ability. Having said that, MPV - the video player I mentioned above can take a 4K-HDR video and fix the colors/lighting in real time so it displays correctly AND take screenshots of it with the fixed colors. If you have an older version of MPV, make sure you download the newest update for this. In my general gifmaking tutorial, there’s a portion on how to install this program on macs. I also just made a video tutorial on how to install it on pcs here!
High quality TV and Movie rips can take up a LOT of space on my computer. Where do you store your files?
I store them on external hard drives. External hard drives are like flash drives but they have a MUCH higher storage capacity. You just plug them into your computer via a usb cord when you need access to the files and it’s that easy. I have two of these Seagate 4TB hard drives in different colors so I can easily pick out whichever one I need. I have silver for my movies (because it makes me think of “silver screen” lmao and it’s easier for me to remember) and then I just have a blue for shows. Now, external hard drives of this size can be $$$$ but it’s worth it imo. Look out for when they’re on sale.
What’s the size limit for gifs now?
It’s 10mb! It used to be 3mb and then last year Tumblr upped it to 5mb. Some gifs initially had distortion because of Tumblr’s switch from the .gif to .gifv format, but they’ve fixed the problem AND increased the upload limit to 10mb. Just make sure not to add any lossy to a gif.
Lossy is basically a grain you can add to a gif to lower the file size down. Gifmakers (including myself) used to use this as a trick to get the file size down under 3mb. However, since the .gifv update on Tumblr, any gifs with Lossy added will look distorted like it’s a gif made on a phone app or something.
_________________________________
That’s it for this guide! Again, feel free to check out my other tutorials on photoshop, how to center subtitles, download hq movie trailers, and more ✌️
UPDATE 6/23/20 ⚠️
I’ve gotten an ask about this problem 3 times since I’ve uploaded this tutorial, so I thought I’d add this in. If you are experiencing duplicate and/or missing frames in mpv, it is a glitch with the latest version of mpv. download an older version like 0.29.0. this happened to me on my mac and downloading an older version fixed the problem.
2K notes
·
View notes
Note
hi lovelys! it seems whenever i upload a picture or gif as my tupper bot it breaks it. do you know a trick to fixing this so i can use gif icons when i rp on discord?
hey! do you mean using a gif as your tupper's icon? unfortunately that isn't possible, since gif icons are a nitro perk tupperbox isn't able to support the capability, so you can only use a still image for your tupper’s icon. if you mean just uploading an image regularly along with your text post, i haven't really heard of that happening before, i'm sorry! the one thing i can think of is if you're trying to post it as a url to try downloading the image and reuploading it yourself instead, because i know discord can be finicky about automatically converting links to images sometimes.
ETA: just remembered -- also make sure your image is a .gif rather than a .gifv!! discord doesn’t like .gifv and will show them as still images rather than animations. if you’re getting a gif off tumblr you can easily fix this by just removing the v from the gif’s url on your browser before downloading the image or copying the link.

4 notes
·
View notes
Note
you can save gifs on this broken site by opening them in a new tab so it's a gifv file, remove the v at the end of the url, and then download. idk if you're on desktop tho and it's really dumb.
THANK YOU SO MUCH I HAD NO IDEA! i always used ezgif to convert them but its really annoying doing that everytime so i just gave up. i had no idea you could do that. thank you anon you’ve saved my life
1 note
·
View note
Text
webp? hell yea!
oh god, imagine thinking that gifv or webp formats are bad and blaming it all on Googel.
it’s not the format that’s bad, tumblr just needs to tweak it’s conversion algorithm, perhaps. and let us upload our own webp files. hardly anything can compare to webp’s file size.
as someone who makes animated files for nearly every page of my comic i had to constantly choose between making a gif with smaller dimensions or destroying the quality for the sake of smaller file size. and then i found out that webp exists and WHOO BOY. i can make animations with the same dimensions and at HALF THE FILE SIZE of what the gif would be???
it’s incredibly flexible when you can control the creation of your own files. there’s even a whole ass photoshop plugin which greatly simplifies the process of saving a file as webp. in fact, even though i’m someone who is tech savvy, i prefer to use it instead of the command line for simplicity (there’s a free libwebp library, and you can also convert files with ffmpeg in your console).
and then i hear some people scream that it’s only supported by chrome, which is a lie??
wait, did you mean old as fuck IE doesn’t support it? well it’s about time to GET A BETTER FUCKING BROWSER. as for Safari holding back on webp support - i can imagine why, but none of the reasons are “because webp sucks”. so while there is no webp in your precious Apple device.... GET A BETTER FUCKING BROWSER.
I wish I could attach my own webp files for comparison, but let me show you this instead:

These are the files I made for one of the pages of my comic. Take a look at the dimensions. GIF file at half the dimensions is twice the size. Webp is only slightly compressed and looks almost exactly like the original art, while GIF has lost background gradient smoothness and gained some artifacts. I can show you a bit of the background where this difference is the most evident:
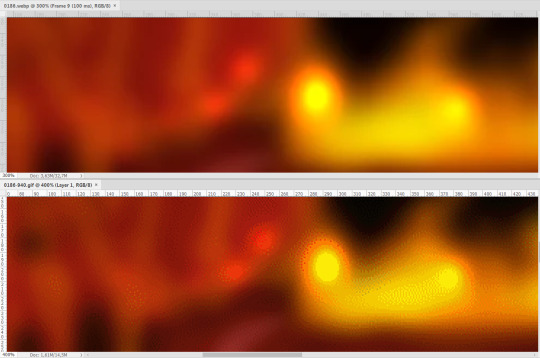
Webp is on top, GIF at the bottom. Webp can have somewhat visible “blocks” but it largely depends on the compression level. Gif has too much noise and gradient smoothness is completely ruined.
SO
one of the things that matters to me and matters to Tumblr is server space. what also matters to me is that my animations look just as good as my original art, and considering how many effects I like to use and how many colors there are, it’s nearly damn impossible to preserve with GIFs even at the best quality settings.
OK BUT WHAT ABOUT PIXEL ART
good question. i think webp can still achieve this. i’ve done a quick test with this image:
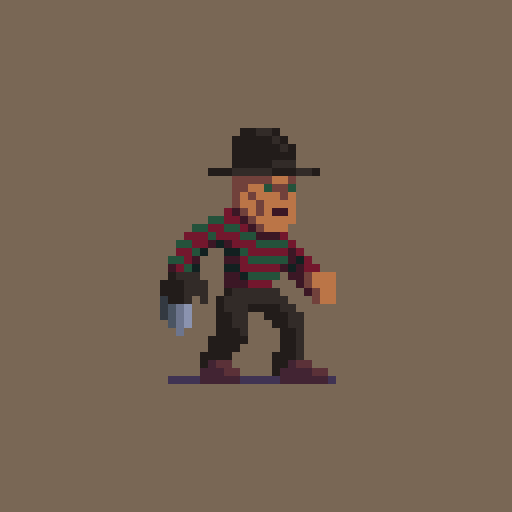
(credit: https://www.artstation.com/artwork/9YPWa )
opened it in Photoshop and this is what the output shows:
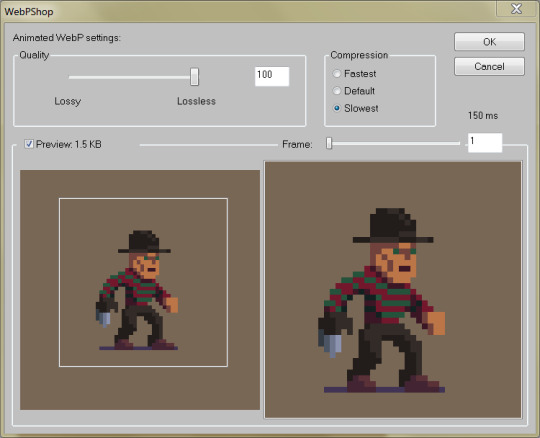
left is source file, right is webp preview. they really look EXACTLY the same. and you know what the best part is?

¯\_(ツ)_/¯
once again, the webp version is drastically smaller. okay, yeah, it says 1,5 KB in the preview and windows says 2KB, but that’s because the file is actually 1,58 so I guess it rounded up, here are the correct numbers (pardon the Russian language ui):

sooooo, stop demonising the entire file format? ask tumblr to let us upload webp files instead? if y’all are smart enough to bitch about it and find out how to turn it off in browser settings, you will learn how to make these files by yourselves too. it took me, like, one evening.
YEAH BUT TUMBLR FILES BIG, COMPRESSION HARD
i hear ya. and i already said: they need to tweak their conversion algorithm. what i noticed is that the gifv file your browser shows is always slightly bigger than the webp file it saves. i’m not sure what causes that, i’ll try to find out.
and again, as i said, we need to be able to upload our own webps. trust me, when you learn how to make them, it’s hard to look back.
30 notes
·
View notes
Photo
Question: should I spend 750 gold giving her Nightfury?
(this is a 5.1MB gif that Tumblr appears [edit not?] to convert to .gifv; I’m unsure what effects that has at the moment)
1 note
·
View note
Text
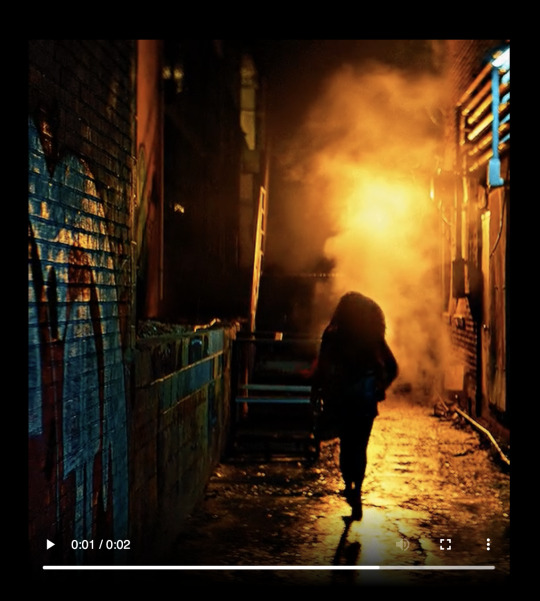
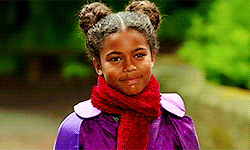
Source; I converted it to gif from gifv because I couldn’t get the Tumblr gif search to find the damn thing.
Anyway, me today.
0 notes
Last Seen Blogs
jinsuui-blog
jinsuui

shh2l
WAS SO AM WEGESRAND LIEGT
karenfordonte
Caring For Donte

allsportsnewsbr-blog
All Sports News

secrettalebluebird
Untitled