#gitcommit
Explore tagged Tumblr posts
Visit Tumblr Blog
Explore Tumblr blogs with no restrictions, modern design and the best experience.
Last Seen Tumblr Blogs


Fun Fact
In 2020, Tumblr had 29.4 million users in the US.
Text

I haven’t drawn for sooo long. Feels nice :)
#gitcommit draws#philippa eilhart#your honor i love her#drawing#witcher 3#traditional art#укртумбочка
0 notes
Text
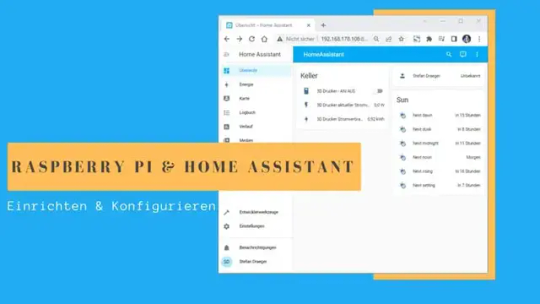
Home Assistant auf Raspberry Pi installieren
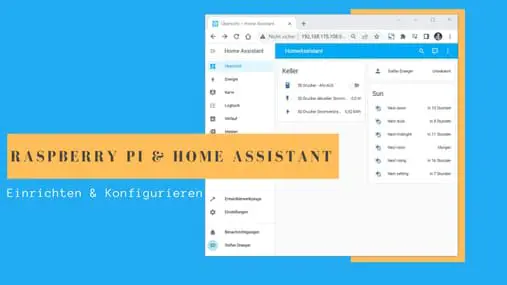
In diesem Beitrag erfährst du, wie man das System Home Assistant auf einen Raspberry Pi installiert.
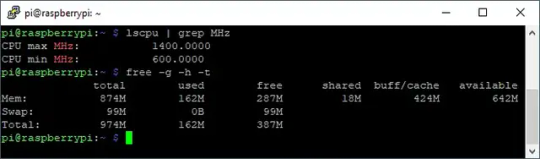
Ich verwende einen Raspberry Pi 3B+ welcher mit 1.4 GHz und 1 GB RAM mit doch recht ausreichend Kapazitäten daher kommt.
Benötigte Ressourcen
In meinem Fall möchte ich zunächst nur Home Assistant auf den Pi installieren, d.h. ich benötigte lediglich: - einen Raspberry Pi 3B+ oder besser Pi 4, - eine SD-Karte mit 32 GB Speicherplatz, - ein Micor-USB Netzteil mit min. 2.5 A Leistung, - ggf. ein Netzwerkkabel Das Netzwerkkabel benötigt du nur, wenn du kein lokales WLAN hast und du diesen über einen Hub / Switch anschließen musst.
Raspberry OS
Für diesen Beitrag verwende ich mein bestehendes System mit einem Raspberry OS, welches ich zunächst mit dem Befehl "sudo apt-get upgrade -y" aktualisiere. Wie du ein Raspberry OS installierst, habe ich dir bereits im Beitrag Raspberry PI : Installation ausführlich erläutert. Damit ich die Installation durchführen konnte, musste ich auf die aktuelle Version des Raspbian OS upgraden. Hier habe ich per Imager ein neues OS auf die SD-Karte geschrieben.
Installieren von Home Assistant
Die Installation von Home Assistant auf einen Raspberry Pi ist auf der englischen Seite https://www.home-assistant.io/installation/raspberrypi sehr ausführlich beschrieben. Hier möchte ich nun gerne an diese Anleitung anknüpfen und dir das Ganze einmal auf Deutsch erläutern. Installieren von Docker Das System Home Assistant läuft in einem Docker Container. Jedoch ist Docker nicht unbedingt vorinstalliert und daher müssen wir dieses zunächst tun. Zur Installation und konfiguration können wir entweder die Befehle auf dem Terminal eingeben oder wir nutzen ein Shell Skript von Docker, welches das ganze für uns erledigt. curl -fsSL https://get.Docker.com -o get-Docker.sh sudo sh get-Docker.sh In meinem Fall habe ich heute (06.05.2023) nachfolgendes Paket installiert bzw. installieren lassen. Client: Docker Engine - Community Version: 23.0.5 API version: 1.42 Go version: go1.19.8 Git commit: bc4487a Built: Wed Apr 26 16:17:05 2023 OS/Arch: linux/arm Context: default Server: Docker Engine - Community Engine: Version: 23.0.5 API version: 1.42 (minimum version 1.12) Go version: go1.19.8 Git commit: 94d3ad6 Built: Wed Apr 26 16:17:05 2023 OS/Arch: linux/arm Experimental: false containerd: Version: 1.6.21 GitCommit: 3dce8eb055cbb6872793272b4f20ed16117344f8 runc: Version: 1.1.7 GitCommit: v1.1.7-0-g860f061 docker-init: Version: 0.19.0 GitCommit: de40ad0 Benutzerberechtigungen setzen Da man unter Linux nicht direkt mit dem Benutzer root arbeiten soll und ich dieses auch mache, muss ich den Benutzer pi noch in die Gruppe der Docker Benutzer hinzufügen. sudo usermod -aG docker $USER newgrp docker Testen der Docker Installation Bevor wir jetzt mit der Installation von Home Assistant starten, testen wir zunächst, ob die Docker Installation erfolgreich war. Dazu laden wir den Container "Hello-World" vom Docker Repository https://hub.docker.com/_/hello-world. Du findest auf der Seite oben rechts auch den Befehl um dir den Container herunterzuladen.
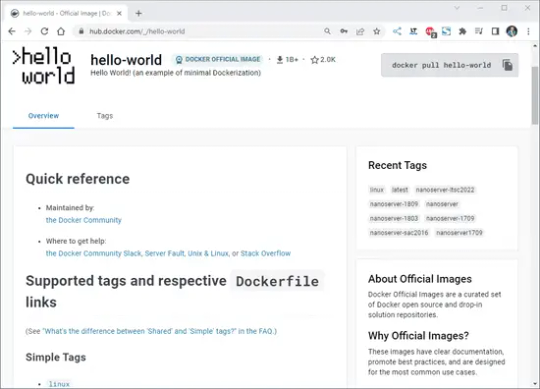
Hello-World Container im Docker Repository Wenn der Container mit "docker pull hello-world" heruntergeladen wurde, können wir danach mit "docker run hello-world" diesen ausführen. Wenn das ganze erfolgreich war, dann sollten wir die nachfolgende Ausgabe sehen. pi@raspberrypi:~ $ docker pull hello-world Using default tag: latest latest: Pulling from library/hello-world c4018b8bf438: Pull complete Digest: sha256:9eabfcf6034695c4f6208296be9090b0a3487e20fb6a5cb056525242621cf73d Status: Downloaded newer image for hello-world:latest docker.io/library/hello-world:latest pi@raspberrypi:~ $ docker run hello-world Hello from Docker! This message shows that your installation appears to be working correctly. To generate this message, Docker took the following steps: 1. The Docker client contacted the Docker daemon. 2. The Docker daemon pulled the "hello-world" image from the Docker Hub. (arm32v7) 3. The Docker daemon created a new container from that image which runs the executable that produces the output you are currently reading. 4. The Docker daemon streamed that output to the Docker client, which sent it to your terminal. To try something more ambitious, you can run an Ubuntu container with: $ docker run -it ubuntu bash Share images, automate workflows, and more with a free Docker ID: https://hub.docker.com/ For more examples and ideas, visit: https://docs.docker.com/get-started/ pi@raspberrypi:~ $
Container Home Assistant aus dem Docker Repository laden
Nachdem Docker installiert und erfolgreich getestet wurde, können mit der Installation von Home Assistant fortfahren.
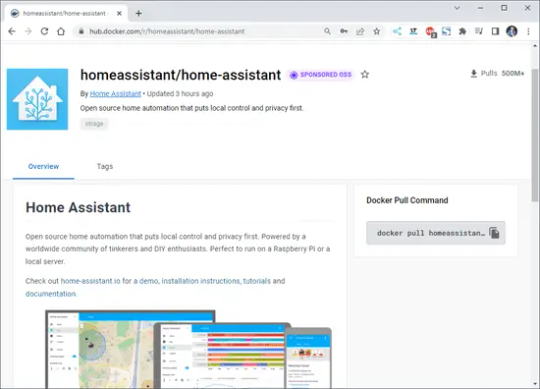
Home-Assistant Container im Docker Repository Zuerst laden wir uns den Container vom Docker Repository mit "docker pull homeassistant/home-assistant" herunter.
Starten von Home Assistant
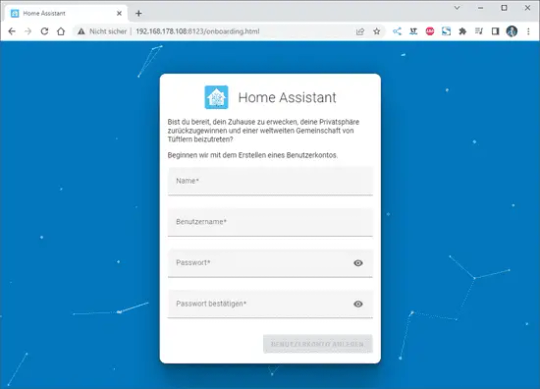
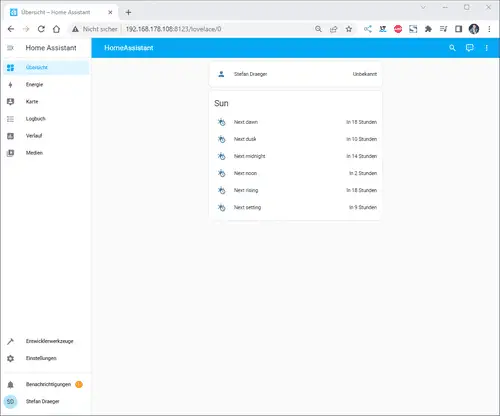
Wenn der Container geladen wurde, dann können wir mit dem nachfolgenden Befehl, den Container starten. docker run -d --name homeassistant --privileged --restart=unless-stopped -e TZ=MY_TIME_ZONE -v /PATH_TO_YOUR_CONFIG:/config --network=host ghcr.io/home-assistant/home-assistant:stable Auf der Konsole solltest du nun folgende Ausgabe sehen: Wenn wir nun im Browser die IP-Adresse des Raspberry Pi gefolgt vom Port 8123 eingeben, dann sollten wir das Fenster für die Einrichtung eines Benutzers für Home Assistant sehen.
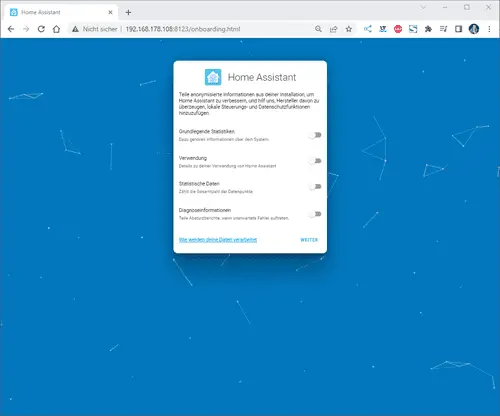
Wenn der Benutzer angelegt wurde, dann müssen noch ein paar Einstellungen getroffen werden. Im dritten Dialog, wo man gebeten wird Statistiken zu versenden, hake ich nichts an!

Ein Gerät hinzufügen
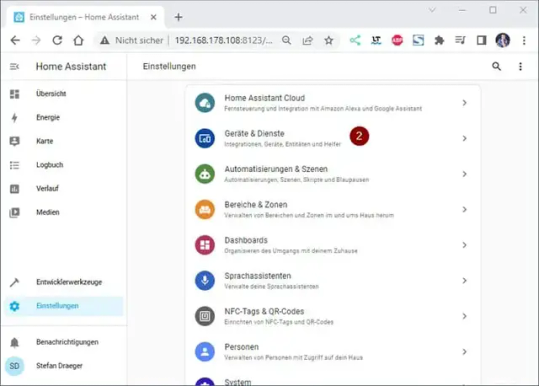
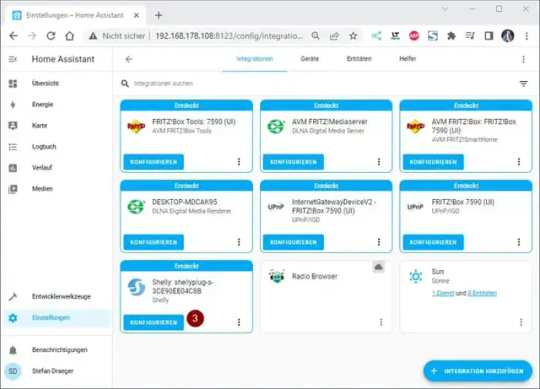
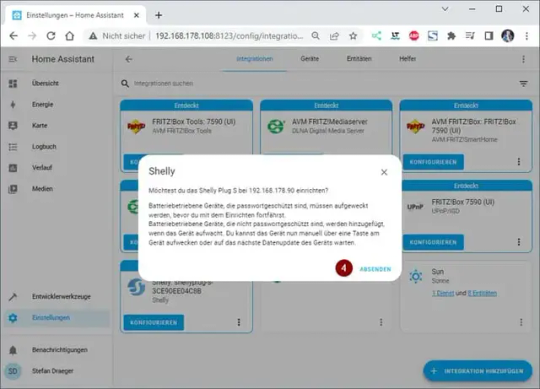
Als Erstes möchte ich dem Dashboard ein neues Gerät hinzufügen. Derzeit habe ich einige Shellys im Haus (und auch draußen) verbaut. Zum Beispiel läuft mein 3D Drucker über einen Shelly Plus Plug S welcher den Stromverbrauch misst. Diesen Shelly Plug S möchte ich als erstes Einrichten und klicke auf die Einstellungen (1) unten links. Danach wähle ich den Menüpunkt Geräte & Dienste (2). Es werden jetzt Geräte aufgelistet, welche im Netzwerk gefunden wurden, aus dieser Liste wähle ich die Schaltfläche Konfigurieren (3) aus. Den nächsten Dialog bestätigen wir einfach mit Absenden (4). Zum Schluss muss dieses Gerät noch einem Raum zugeordnet werden, per Default sind bereits drei Räume konfiguriert. Du kannst aber auch recht einfach einen neuen Raum hinzufügen, was ich in meinem Fall getan habe und bestätige die Auswahl Keller (5) mit dem Link Fertig (6). Wenn das abgeschlossen ist, dann findest du den Shelly im Dashboard mit seinen Eigenschaften.


Was besonders gut funktioniert ist, die Synchronisation zwischen dem Dashboard und dem Gerät. Im nachfolgenden Video habe ich das Dashboard von Home Assistant und der Shelly Cloud geöffnet und aktiviere / deaktiviere den Shelly bzw. den angeschlossenen Verbraucher. Read the full article
0 notes
Text
Ooh a picrew game, thx for the tag!

@alren-ki @ghoullovinbutch @lion-s-pride-andu-inn @lady-of-rohan @stag-with-swag @maccreadyswife @medievalmidinette @gitcommit @obsidian-thunder
Picrew Time!
Use this picrew to make your gorgeous self and tag whoever you'd like 🍙
Kudos to this Picrew for having the exact Rammstein shirt I own lol

Tagging: @sangheilihoes @tobaccosmain @milliemakesmagic @mytaxidermia @decahedrones @101-android-luvr-001 @fox-stuck
159 notes
·
View notes
Photo

Blog post extract from https://initialcommit.io/blog/Learn-Git-Staging-Index. Follow @initialcommit for more programming content. Check out our website https://initialcommit.io for programming articles, books, live sessions, and how to create your own code-oriented website. #initialcommit #git #github #stage #stagingarea #index #stagingindex #cache #gitadd #gitcommit #add #commit #python #pythonprogramming #java #javaprogramming #javascript #cprogramming #php #programming #coding #learnprogramming #learncoding #softwaredevelopment https://www.instagram.com/p/CCVusjXA7NA/?igshid=12obi5b5a6obd
#initialcommit#git#github#stage#stagingarea#index#stagingindex#cache#gitadd#gitcommit#add#commit#python#pythonprogramming#java#javaprogramming#javascript#cprogramming#php#programming#coding#learnprogramming#learncoding#softwaredevelopment
0 notes
Photo

Can't " git commit " ?? Guess you need to check if you are committed with you work... From : @vagaphile #git #commitment #gitcommit #jokes #joke #humerous #programmerjokes #coder #programmer #softwareengineer
0 notes
Text
Today we will see how to Install JFrog Artifactory on Ubuntu 20.04|18.04|16.04. JFrog Artifactory is the world’s most advanced repository manager designed to integrate with the majority of continuous integration and delivery tools. With JFrog Artifactory, delivering an end to end automated solution with artifacts tracking from development to production becomes a reality. Artifactory is mostly used by build tools such as Maven, Apache Ant, and Gradle to store respective artifacts in its local repository to be consumption by other applications and tools. In our recent guide, we covered the installation of JFrog Artifactory on CentOS 7. Install JFrog Artifactory on Ubuntu The easiest way of installing and running Artifactory on Ubuntu 20.04|18.04|16.04 is by using Docker. The process is straightforward without dependency/permission hurdles. You just install Docker, download Artifactory image and spin a container. Step 1: Install Docker Engine Install Docker using our guide: How to install Docker CE on Ubuntu / Debian / Fedora / Arch / CentOS. For a quick start, here is the process. Install packages to allow apt to use a repository over HTTPS: sudo apt update sudo apt -y install apt-transport-https ca-certificates curl software-properties-common Add Docker’s official GPG key: curl -fsSL https://download.docker.com/linux/ubuntu/gpg | sudo apt-key add - Add stable repository: sudo add-apt-repository "deb [arch=amd64] https://download.docker.com/linux/ubuntu $(lsb_release -cs) stable" Install Docker CE: sudo apt update && sudo apt -y install docker-ce If you would like to use Docker as a non-root user, you should now consider adding your user to the “docker” group with something like: sudo usermod -aG docker $USER Run the command below to see a version of docker installed. $ docker version Client: Docker Engine - Community Version: 20.10.9 API version: 1.41 Go version: go1.16.8 Git commit: c2ea9bc Built: Mon Oct 4 16:08:29 2021 OS/Arch: linux/amd64 Context: default Experimental: true Server: Docker Engine - Community Engine: Version: 20.10.9 API version: 1.41 (minimum version 1.12) Go version: go1.16.8 Git commit: 79ea9d3 Built: Mon Oct 4 16:06:37 2021 OS/Arch: linux/amd64 Experimental: false containerd: Version: 1.4.11 GitCommit: 5b46e404f6b9f661a205e28d59c982d3634148f8 runc: Version: 1.0.2 GitCommit: v1.0.2-0-g52b36a2 docker-init: Version: 0.19.0 GitCommit: de40ad0 Step 2: Download JFrog Artifactory Docker image There are different editions of JFrog Artifactory available, check the Comparison Matrix. If you’re not sure, install the OSS (Open Source Software) version. For more features, you can consider the Pro. Pull the latest Docker image of JFrog Artifactory. docker pull docker.bintray.io/jfrog/artifactory-oss:latest For CE edition: docker pull docker.bintray.io/jfrog/artifactory-cpp-ce Confirm Docker images: $ docker images REPOSITORY TAG IMAGE ID CREATED SIZE docker.bintray.io/jfrog/artifactory-cpp-ce latest 24d943a892ac 43 hours ago 582MB docker.bintray.io/jfrog/artifactory-oss latest 58d49856785f 43 hours ago 582MB Step 3: Create Data Directory Create data directory on host system to ensure data used on container is persistent. sudo mkdir -p /jfrog/artifactory sudo chown -R 1030 /jfrog/ Step 4: Start JFrog Artifactory container To start an Artifactory container, use the command: docker run --name artifactory -d \ -p 8081:8081 \ -p 8082:8082 \ -v /jfrog/artifactory:/var/opt/jfrog/artifactory \ docker.bintray.io/jfrog/artifactory-oss:latest Check container status: $ docker ps CONTAINER ID IMAGE
COMMAND CREATED STATUS PORTS NAMES 1ca55e851bd3 docker.bintray.io/jfrog/artifactory-oss:latest "/entrypoint-artifac…" 4 seconds ago Up 2 seconds 0.0.0.0:8081-8082->8081-8082/tcp, :::8081-8082->8081-8082/tcp artifactory ubuntu@lorna-ubuntu20:~$ docker ps You can pass Java system properties to the JVM running Artifactory using EXTRA_JAVA_OPTIONS. Check more on Docker setup link. See example below. docker run --name artifactory -d \ -p 8081:8081 \ -p 8082:8082 \ -v /jfrog/artifactory:/var/opt/jfrog/artifactory \ -e EXTRA_JAVA_OPTIONS='-Xms512m -Xmx2g -Xss256k -XX:+UseG1GC' \ docker.bintray.io/jfrog/artifactory-pro:latest Step 5: Running JFrog Artifactory container with Systemd Systemd is the default init system for Ubuntu20.04|18.04|16.04. We can use it to manage JFrog Artifactory container. Create Artifactory service unit file. sudo vim /etc/systemd/system/artifactory.service Add: [Unit] Description=Setup Systemd script for Artifactory Container After=network.target [Service] Restart=always ExecStartPre=-/usr/bin/docker kill artifactory ExecStartPre=-/usr/bin/docker rm artifactory ExecStart=/usr/bin/docker run --name artifactory -p 8081:8081 -p 8082:8082 \ -v /jfrog/artifactory:/var/opt/jfrog/artifactory \ docker.bintray.io/jfrog/artifactory-oss:latest ExecStop=-/usr/bin/docker kill artifactory ExecStop=-/usr/bin/docker rm artifactory [Install] WantedBy=multi-user.target Reload systemd. sudo systemctl daemon-reload Then start Artifactory container with systemd. sudo systemctl start artifactory Enable it to start at system boot. sudo systemctl enable artifactory Status can be checked with: sudo systemctl status artifactory Sample output: Also check service binding with: $ ss -tunelp | grep 8081 tcp LISTEN 0 128 *:8081 *:* users:(("docker-proxy",pid=2820,fd=4)) ino:117162 sk:b v6only:0 Step 6: Access Artifactory Web Interface Artifactory can be accessed using the following URL: http://SERVERIP_OR_DOMAIN:8081/artifactory You should see Artifactory welcome page. Follow setup instructions that follows. Once you complete JFrog Artifactory on Ubuntu 18.04, you should get to Administration dashboard. Step 7: Configure Nginx reverse proxy (Optional) If you want to use Nginx as Proxy with SSL, check out the guide below: Configure JFrog Artifactory behind Nginx reverse proxy and Let’s Encrypt SSL Conclusion JFrog Artifactory is a Universal Repository Manager supporting all major packaging formats, build tools and CI servers. Visit the Artifactory Documentation for more features and usage guides.
0 notes
Text
SPaMCAST 625 - Finding Great Developers, GitCommit Bounties, A Conversation With Drew Angell
SPaMCAST 625 – Finding Great Developers, GitCommit Bounties, A Conversation With Drew Angell

Pay SPaMCAST 625
The Software Process and Measurement Cast 625 features our interview with Drew Angell. Drew and I talk about web development, software development excellence, and how to find great developers. Being good is more than just excellence in coding — listening and problem-solving are also needed which has led Drew to experiment with using GitCommit bounties to get great developers to…
View On WordPress
0 notes
Text
Dockerでデバッグ対象のコンテナにツールを入れずにtcpdump/straceなどを使うワンライナー
from https://qiita.com/minamijoyo/items/9dd59109e9fe1a35f888?utm_campaign=popular_items&utm_medium=feed&utm_source=popular_items
はじめに
Dockerであんなコンテナやこんなコンテナを動かしてると、なんかうまく動かなくて、デバッグのためにtcpdumpとかstraceなどのツールが使いたくなることが稀によくあります。 そんな時、デバッグ対象のコンテナ内にツールを一時的にインストールしちゃうというのが、まぁ簡単で分かりやすいんですが、デバッグ対象のコンテナを汚すのはできれば避けたいところです。
Dockerのコンテナの分離というのは、結局のところLinuxのリソースの名前空間の分離であるので、逆に同じ名前空間を共有すれば、デバッグ用に立てた隣のコンテナから、デバッグ対象のコンテナのネットワークやプロセスの状態を観察することも可能です。
また、docker buildはDockerfileを標準入力から受け取ることもできるので、ワンライナーにしてデバッグ用のコンテナをシュッと呼び出せるようにしてみました。
TL;DR
結論だけ知りたい人はこちらをどうぞ。 <target> のところはデバッグ対象のコンテナ名またはコンテナIDで読み替えて下さい。
tcpdump
echo 'FROM alpine\nRUN apk add --no-cache tcpdump' \ | docker build -t debug -f - . \ && docker run -it --rm --net container:<target> debug tcpdump -nn -X port 80
strace
$ echo 'FROM alpine\nRUN apk add --no-cache strace' \ | docker build -t debug -f - . \ && docker run -it --rm --pid container:<target> --cap-add sys_ptrace debug strace -fp 1
ワンライナーでデバッグ用のツールをインストールして、デバッグ用のコンテナを立てる方法は、使いたいツールを変えればいろいろ応用が効くので、シェルのヒストリやスニペットに保存してシュッと呼び出すとよさそうです。
解説
環境
稼働確認した手元のDockerのバージョンは 19.03.0-rc2です。
$ docker version Client: Docker Engine - Community Version: 19.03.0-rc2 API version: 1.40 Go version: go1.12.5 Git commit: f97efcc Built: Wed Jun 5 01:37:53 2019 OS/Arch: darwin/amd64 Experimental: false
Server: Docker Engine - Community Engine: Version: 19.03.0-rc2 API version: 1.40 (minimum version 1.12) Go version: go1.12.5 Git commit: f97efcc Built: Wed Jun 5 01:42:10 2019 OS/Arch: linux/amd64 Experimental: true containerd: Version: v1.2.6 GitCommit: 894b81a4b802e4eb2a91d1ce216b8817763c29fb runc: Version: 1.0.0-rc8 GitCommit: 425e105d5a03fabd737a126ad93d62a9eeede87f docker-init: Version: 0.18.0 GitCommit: fec3683
事前準備
ここではデバッグ対象として、適当なnginxのコンテナをtarget��いう名前で起動しておきます。
$ docker run -it --rm -p 8080:80 --name target nginx:alpine
tcpdumpを使ってみる
tcpdumpだけ入ったDockerfileを作って、debugというタグを付けてビルドします。
$ cat Dockerfile FROM alpine RUN apk add --no-cache tcpdump
$ docker build -t debug . Sending build context to Docker daemon 2.048kB Step 1/2 : FROM alpine ---> 3f53bb00af94 Step 2/2 : RUN apk add --no-cache tcpdump ---> Using cache ---> a000cadec8f5 Successfully built a000cadec8f5 Successfully tagged debug:latest
docker run --network container:<name|id> で対象のコンテナのネットワークにアタッチできます。
https://docs.docker.com/engine/reference/run/#network-settings
デバッグ用のコンテナをtargetのコンテナのネットワークにアタッチしつつ、tcpdumpを実行します。
$ docker run -it --rm --network container:target debug tcpdump -nn -X port 80 tcpdump: verbose output suppressed, use -v or -vv for full protocol decode listening on eth0, link-type EN10MB (Ethernet), capture size 262144 bytes
試しに手元からcurlしてみると
$ curl http://localhost:8080/
tcpdumpでパケットキャプチャできてることが分かります。
15:01:16.352790 IP 172.17.0.1.58354 > 172.17.0.2.80: Flags [S], seq 178914825, win 29200, options [mss 1460,sackOK,TS val 13258980 ecr 0,nop,wscale 7], length 0 0x0000: 4500 003c 56ed 4000 4006 8ba9 ac11 0001 E..<V.@.@....... 0x0010: ac11 0002 e3f2 0050 0aaa 0609 0000 0000 .......P........ 0x0020: a002 7210 5854 0000 0204 05b4 0402 080a ..r.XT.......... 0x0030: 00ca 50e4 0000 0000 0103 0307 ..P......... 15:01:16.352899 IP 172.17.0.2.80 > 172.17.0.1.58354: Flags [S.], seq 1290103227, ack 178914826, win 28960, options [mss 1460,sackOK,TS val 13258980 ecr 13258980,nop,wscale 7], length 0 0x0000: 4500 003c 0000 4000 4006 e296 ac11 0002 E..<..@.@....... 0x0010: ac11 0001 0050 e3f2 4ce5 69bb 0aaa 060a .....P..L.i..... 0x0020: a012 7120 5854 0000 0204 05b4 0402 080a ..q.XT.......... 0x0030: 00ca 50e4 00ca 50e4 0103 0307 ..P...P.....
staceを使ってみる
同様にstraceをインストールしたDockerfileを用意してビルドします。
$ cat Dockerfile FROM alpine RUN apk add --no-cache strace
$ docker build -t debug . Sending build context to Docker daemon 2.048kB Step 1/2 : FROM alpine ---> 3f53bb00af94 Step 2/2 : RUN apk add --no-cache strace ---> Using cache ---> b357653376b3 Successfully built b357653376b3 Successfully tagged debug:latest
straceの場合は、 docker run --pid container:<name|id> で対象のコンテナのPID名前空間にアタッチします。
https://docs.docker.com/engine/reference/run/#pid-settings---pid
とりあえずpsを打ってみると、プロセスが見えてるのが分かります。
$ docker run -it --rm --pid container:target debug ps PID USER TIME COMMAND 1 root 0:00 nginx: master process nginx -g daemon off; 6 101 0:00 nginx: worker process 7 101 0:00 nginx: worker process 8 101 0:00 nginx: worker process 9 101 0:00 nginx: worker process 16 root 0:00 ps
ただstraceを起動してみると、権限エラーが出ます。
$ docker run -it --rm --pid container:target debug strace -fp 1 strace: attach: ptrace(PTRACE_SEIZE, 1): Operation not permitted
Dockerはデフォルトではいくつかの特権操作は許可されておらず、 straceには docker run --cap-add sys_ptrace が明示的に許可が必要です。
https://docs.docker.com/engine/reference/run/#runtime-privilege-and-linux-capabilities
$ docker run -it --rm --pid container:target --cap-add sys_ptrace debug strace -fp 1 strace: Process 1 attached rt_sigsuspend([], 8
こんどはうまくstraceが起動できました。ためしに nginx -s reload でプロセスにシグナルを送ってみましょう。
$ docker exec -it target nginx -s reload 2019/07/13 15:26:45 [notice] 87#87: signal process started
straceでシステムコールトレースができてることが分かります。
strace: Process 1 attached rt_sigsuspend([], 8) = ? ERESTARTNOHAND (To be restarted if no handler) --- SIGHUP {si_signo=SIGHUP, si_code=SI_USER, si_pid=87, si_uid=0} --- clock_gettime(CLOCK_REALTIME, {tv_sec=1563031605, tv_nsec=559042300}) = 0 rt_sigreturn({mask=[HUP INT QUIT USR1 USR2 ALRM TERM CHLD WINCH IO]}) = -1 EINTR (Interrupted system call) clock_gettime(CLOCK_REALTIME, {tv_sec=1563031605, tv_nsec=559133400}) = 0 clock_gettime(CLOCK_REALTIME, {tv_sec=1563031605, tv_nsec=559208800}) = 0 clock_gettime(CLOCK_REALTIME, {tv_sec=1563031605, tv_nsec=559260400}) = 0 uname({sysname="Linux", nodename="976678564bed", ...}) = 0 open("/etc/nginx/nginx.conf", O_RDONLY) = 3
(参考) デバッグ用のイメージnicolaka/netshoot
毎回デバッグ用のツールをインストールするのがめんどくさければ、デバッグによく使うコマンドを全部入りしたnicolaka/netshootというDockerイメージがあります。
https://hub.docker.com/r/nicolaka/netshoot
何が入ってるかはDockerfileこれです。
https://github.com/nicolaka/netshoot/blob/master/Dockerfile
apache2-utils
bash
bind-tools
bird
bridge-utils
busybox-extras
calicoctl
conntrack-tools
ctop
curl
dhcping
drill
ethtool
file
fping
iftop
iperf
iproute2
iptables
iptraf-ng
iputils
ipvsadm
libc6-compat
liboping
mtr
net-snmp-tools
netcat-openbsd
netgen
nftables
ngrep
nmap
nmap-nping
openssl
py-crypto
py2-virtualenv
python2
scapy
socat
strace
tcpdump
tcptraceroute
util-linux
vim
ちなみにREADMEに貼ってある、どのレイヤを調査するのにどのツールが必要かの画像の元ネタはこれのようです。まじすげーなこのサイト。
引用元: http://www.brendangregg.com/linuxperf.html

ワンライナーを組み立てる
まぁ仕事で使ってる環境に公式イメージじゃない野良のイメージを使うのも若干抵抗があるので、自分がよく使うものだけ適当に入れたイメージを作って使うのがよいとは思います。
ただ個人的にはイメージのメンテすらあまりしたくないので、オンデマンドでビルドして使う技も思いつきました。 docker buildはDockerfileを標準入力から受け取ることもできるので、 tcpdumpの例をワンライナーで書くとこんなかんじです。
$ echo 'FROM alpine\nRUN apk add --no-cache tcpdump' \ | docker build -t debug -f - . \ && docker run -it --rm --net container:target debug tcpdump -nn -X port 80
Sending build context to Docker daemon 2.607kB Step 1/2 : FROM alpine ---> 3f53bb00af94 Step 2/2 : RUN apk add --no-cache tcpdump ---> Using cache ---> a000cadec8f5 Successfully built a000cadec8f5 Successfully tagged debug:latest tcpdump: verbose output suppressed, use -v or -vv for full protocol decode listening on eth0, link-type EN10MB (Ethernet), capture size 262144 bytes
straceだとこんなかんじでしょうか。
$ echo 'FROM alpine\nRUN apk add --no-cache strace' \ | docker build -t debug -f - . \ && docker run -it --rm --pid container:target --cap-add sys_ptrace debug strace -fp 1
Sending build context to Docker daemon 2.607kB Step 1/2 : FROM alpine ---> 3f53bb00af94 Step 2/2 : RUN apk add --no-cache strace ---> Using cache ---> b357653376b3 Successfully built b357653376b3 Successfully tagged debug:latest strace: Process 1 attached rt_sigsuspend([], 8
おわりに
ワンライナーでデバッグ用のツールをインストールして、デバッグ用のコンテナを立てる方法は、使いたいツールを変えればいろいろ応用が効くので、シェルのヒストリやスニペットに保存してシュッと呼び出すとよさそうです。
これであんなコンテナやこんなコンテナをデバッグし放題ですねー。
https://cdn.qiita.com/assets/qiita-fb-2887e7b4aad86fd8c25cea84846f2236.png
0 notes
Text
How we use Cake to build .NET Core apps and version assemblies
Let Them Eat Cake!
Apologies for the bad pun. I couldn’t help it. Today, we’re going to talk about CakeBuild, and why Stackify decided to start using it. But first, a little background.
We like to begin with the end in mind at Stackify. As our platform started to unfold into its’ first compiled bits nearly five years ago, it quickly became apparent that we needed some decent structure around how we built and deployed the many layers of our complex stack.
Like most shops, we were in search of an ALM system that could encompass our sprint / work item management, and build services. We wanted something SaaS based as well, and ultimately we landed with the Atlassian JIRA suite. Their CI server, Bamboo, has orchestrated our builds and deploys ever since then.
Doing a build on your build server and workstation should be exactly the same.
Something that has always bothered me about CI tools and servers like this is that they rarely work in the same way as building on your machine. When you hit F5 in Visual Studio, there are a lot of different build options set that we simply don’t think about, that you need to mirror in your MSBUILD task in Bamboo. Then, you have to think about the next steps: where the artifacts go, transforms applied, what you’re doing with the output, etc.
Point is, there have been far too many times where building locally doesn’t have the same result as building on the CI server. And getting the CI server to build and behave the way we want it to is always less than ideal.
This all came to a head a few months ago when we started converting Prefix, our ASP.NET profiler, to .Net Core. I needed our build server to:
Pull the Git repo
Version the assembly
Check in the modified assembly version change
Build it – now with the .Net CLI, and not MSBUILD
Nupack it
Ship to our Myget server
Pull request this release branch back to ‘master’ in our repo
Traditionally, I’d do this with a series of Powershell Script Tasks in Bamboo, but there’s one big pain point: we use AWS Elastic EC2 instances for build agents, and to test even the slightest change you need to create a new image, and spin it up in Bamboo and have it build. It’s extremely time consuming and frustrating.
Enter Cake!
I needed a task runner that would allow anyone on our dev team to execute all of these steps locally in just the same way our build server would, both to validate the process works correctly; and in the event our build server was down or had other issues.
I came across CakeBuild and read the docs. It just made sense. With Cake, you get:
A C# based DSL (no more Powershell or command line scripting!!)
A huge library of built-in scripts for nearly any task you would need.
A system that supports third party scripts
It’s all nuget based. It pulls in everything it needs.
Good support for .Net Core
On paper, it was perfect. So let’s take a look at what it does.
I’m going to skip over the “getting started” steps, and focus on how I’ve accomplished some of the specifics, with a big focus on assembly versioning.
Task: Version Assemblies
But first, a word on our versioning methodology. With .Net Core, you can keep the assembly version in project.json, which makes a lot of sense because it’s easy to manipulate. It’s just a json string.
When we are prepping a new release, we first cut a “release candidate” branch in Git, and it will be named with the target version, i.e:
root/rc/1.2
We will do our testing and once done, cut the actual release branch, i.e.
root/release/1.2
If we have to release a fix for the version, we work on that same branch. That next builds will be 1.2.2, 1.2.3, 1.2.4, etc etc.
For all other builds, the version number will follow the default format in .Net core, i.e:
1.2.0-*, where “*” gets replaced with the branch name + build number, so you’d end up with a 1.2.0-develop-1, or 1.2.2-rc-3, etc. This allows us to push a nuget package and dll that that is testable but never ever will be confused with a release version. If you use any pre-release .Net core packages, this will seem familiar.
So, here is what my Cake task looks like to version. I’ll break it down.
var target = Argument("target", "Default"); var configuration = Argument("configuration", "Release"); var buildVersion = ""; var buildSuffix = ""; var branch = ""; bool bambooRelease = false; Task("Version").Does(() => { branch = (EnvironmentVariable("bamboo_planRepository_branchName") ?? "unknown"); var buildNumber = (EnvironmentVariable("bamboo_buildNumber") ?? "0"); var json = ParseJsonFromFile("project.json") var version = json["version"].ToString();
See that? I check the environment variables (via a built in script) which will give me the branch name if I’m running in Bamboo, otherwise I don’t care, and “Unknown” is substituted (I could still get it with a Git task, but I was lazy and it wasn’t necessary). I then also parse the project.json again with a built in script.
Next, I use another built in script to check to see if we are, in fact, running in Bamboo.
if(Bamboo.IsRunningOnBamboo){ Information("Running on Bamboo"); Information(version); Information(branch); Information(buildNumber); if(branch.Contains("release/")) { bambooRelease = true; Information("Plan is release"); var relVer = branch.Split('/')[1]; var newVer = relVer+ "." + buildNumber + "-*";
Here I am looking for the branch name to support my versioning. If it is release, I know the next part is my Major.Minor. I append on the build number, and serialize the JSON back out to the project.json file.
//only write back if it is a release build json["version"]=newVer; SerializeJsonToFile("project.json",json); } Else{
For non-release, it will generate something like “1.2.0-rc-1” and in my specific case, I don’t need to write it back out to the file.
Information("Plan is not release"); var cleanBranchName = branch.Replace("/","-"); buildSuffix = cleanBranchName+"-"+buildNumber; var newVer = version.Replace("*",cleanBranchName + "-" + buildNumber);; buildVersion = newVer; } } else{ Information("Local Build"); var cleanBranchName = "local"; buildSuffix = cleanBranchName+"-"+buildNumber; var newVer = version.Replace("*",cleanBranchName + "-" + buildNumber);; buildVersion = newVer; } Information(buildVersion); Information(buildSuffix); });
And that’s it. Assembly versioning done easy and flexibly with CakeBuild.
Task: Nuget Package
The next step to build and pack is just as easy. Check it out.
Task("Pack").Does(() => { if(buildSuffix!=""){ DotNetCorePack("project.json", new DotNetCorePackSettings{ Configuration = configuration, VersionSuffix = buildSuffix }); } else{ DotNetCorePack("project.json", new DotNetCorePackSettings{ Configuration = configuration }); } var outputdir = "bin\\"+configuration; CopyFileToDirectory("NugetPack.ps1",outputdir); var wd = DirectoryPath.FromString(outputdir); if(Bamboo.IsRunningOnBamboo) { StartProcess("powershell.exe", new ProcessSettings { Arguments = "-file NugetPack.ps1", WorkingDirectory = wd}); StartProcess("powershell.exe", new ProcessSettings {Arguments = "-file MygetPush.ps1", WorkingDirectory = wd}); } });
The DotNetCorePack script actually builds the project and the nuget package in one step. It runs a build using the .Net CLI, which means that if I’m targeting multiple frameworks, they will all be in the package, so I can reference in projects that target NETStandard, Netcoreapp, and full .Net framework. All in one simple step.
The NugetPack.ps1 file is a script that I actually created and have checked into the project. It simply checks for the existence of a nuget package (and symbols package) and then generates MygetPush.ps1 which is a script that will actually push the package to my private Myget server. It only does this for bamboo builds, which means that if I run this Cake script locally, I’m not going to end up with a bunch of superfluous packages on my build server. You could put all of this logic directly in the Cake script if you wanted to; I already had those scripts from my previous process, so I just left it as it was.
Task: Commit and Push
The last step is to commit and push the change to my project.json file.
Task("CheckinVersion").Does(() => { if(bambooRelease){ var repPath = DirectoryPath.FromString("."); var filePaths = new FilePath[]{".\\project.json"}; GitAdd(repPath, filePaths); GitCommit(repPath,"Bamboo Build Task","[email protected]","Bamboo has detected a release build - versioning assembly"); GitPush(repPath); var repositoryDirectoryPath = DirectoryPath.FromString("."); var gitBranch = GitBranchCurrent(repositoryDirectoryPath); var remote = (gitBranch.Remotes[0].PushUrl).Split('/'); var repName = remote[remote.Count()-1]; string json = "{\\\"destination\\\": { \\\"branch\\\":{ \\\"name\\\":\\\"master\\\"}},\\\"source\\\":{\\\"branch\\\": {\\\"name\\\":\\\""+branch+"\\\"}},\\\"title\\\":\\\"Merge Bamboo Build\\\"}"; StartProcess("C:\\curl\\bin\\curl.exe", new ProcessSettings { Arguments = "-v -u [our user name] \"[git repo url]"+repName+"/pullrequests\" -H \"Content-Type: application/json\" -d \" "+ json + "\""}); } } );
Note that I have redacted some details, but again, I use the built-in scripts that Cake provides to commit and check in any file changes on my current branch (which happens to be my modified project.json with the new version number). I then use CURL to post a Pull Request to the api of my Bitbucket repo. The only part of this that was painful was the escape characters needed for the json that gets posted.
Putting the icing on top of the cake.
Sorry. Another bad cake pun. I couldn’t help it.
One thing that you’ve probably noticed in this is that I’m still using Bamboo. And that’s because Cake is simply a DSL for executing tasks. I still need an orchestration engine (like Bamboo) to kick off and execute the cake builds. But, Bamboo is now rather agnostic about the build. I’ve gone from having 10 or so complicated, hard to test Bamboo tasks to two simple tasks:
Pull repo.
Execute build.ps1
I’ve now also achieved a lot of portability. I could very easily migrate to a different CI server with a small level of effort. You’re not limited to .Net Core project either. I love this so much that I went back and implemented this same pattern for my .Net 4.5 class libraries. There are just a couple of differences, for example there are scripts to specifically work with your AssemblyInfo.cs file, i.e:
bambooRelease = true; Information("Plan is release"); var relVer = branch.Split('/')[1]; var newVer = relVer + "." + buildNumber; var newProductVersion = newVer + "-*"; CreateAssemblyInfo(assemblyPath, new AssemblyInfoSettings{ Product = assemblyProduct, Title = assemblyTitle, Company = assemblyCompany, Guid = guid, Version = newVer, FileVersion = newVer, InformationalVersion = newProductVersion, Copyright = "Stackify, LLC " + DateTime.Now.Year });
My methodology is the same for versioning, I just use a different mechanism to do it for these older projects. What I love about this, is that I previously had to do this through a custom MSBUILD task, which required a lot of finesse (and pain and alcohol) to get to work correctly on the build server and not break building locally. It was far too fragile.
If you think this can help make your life easier, check out CakeBuild. Don’t stop with just the build, either. Cake has scripts and add-ins for deployment (IIS, Azure, Docker, etc), for SQL tasks, to work with TFS work items, NUnit, etc. And if it doesn’t support something you need to do, you can simply create it yourself and publish as an add-on.
That really just leaves us with one last, horrible pun. With CakeBuild, you can have your cake and eat it too.
Have you tried cake? Comment below and tell us what you think!
The post How we use Cake to build .NET Core apps and version assemblies appeared first on Stackify.
from Stackify http://ift.tt/2jklb0F from Blogger http://ift.tt/2kmd0ys
0 notes
Text

Here, have some redanian bastards :)
8 notes
·
View notes
Photo

Refresher on the basic Gut commands: init, clone, add, commit, status, and log. Follow @initialcommit for more programming content. Check out our website https://initialcommit.io for programming articles, books, live sessions, and how to create your own code-oriented website. #initialcommit #git #gitinit #gitclone #gitadd #gitcommit #gitstatus #gitlog #init #clone #add #commit #status #log #python #pythonprogramming #java #javaprogramming #javascript #cprogramming #php #programming #coding #learnprogramming #learncoding #softwaredevelopment https://www.instagram.com/p/CBq02j_gr6Q/?igshid=2zdz60ncchlg
#initialcommit#git#gitinit#gitclone#gitadd#gitcommit#gitstatus#gitlog#init#clone#add#commit#status#log#python#pythonprogramming#java#javaprogramming#javascript#cprogramming#php#programming#coding#learnprogramming#learncoding#softwaredevelopment
0 notes
Text
So I drew myth loki and then gave it to meitu ai. Love them so much. Which one do you like more?


4 notes
·
View notes
Text

Just wanted to draw young silco. My favourite feral rat ^^
12 notes
·
View notes
Text

Here, have some Disco Elysium boys. I love them :)
12 notes
·
View notes
Text

They are tired. Just let them have some rest
11 notes
·
View notes