#github desktop windows
Explore tagged Tumblr posts
Visit Tumblr Blog
Explore Tumblr blogs with no restrictions, modern design and the best experience.
Last Seen Tumblr Blogs


Fun Fact
Tumblr has been banned in Indonesia for providing people with access to pornographic content.
Text
A Brief Guide on Uploading ChoiceScript Demos to Itch.io
Since Dashingdon is shutting down, and there will be a lot of folks wanting to host their ChoiceScript demos elsewhere, I thought it'd be a good idea to provide a brief guide on how to do so for itch.io.
This is for Windows in the folder actions, but it shouldn't be too difficult for folks to translate for Mac. This also assumes you haven't changed any of the files within your game folder other than those found under 'scenes'.
Within your game folder, locate the 'web' subfolder, right click it and select 'Send to' then 'Compressed (zipped) folder. Name your newly compressed file something sensible, and I recommend moving it to a new folder outside of your game files, just to keep everything neat and tidy.

2. Assuming you already have an itch.io account, navigate to your dashboard, and click the 'Create New Project' button.

3. Name your project as you like, and under 'Kind of project', select the 'HTML' option.

4. Set the 'Pricing' to 'No Payments', you cannot use ChoiceScript for profit unless it is with the Choice of Games or Hosted Games publishing labels. No one wants to get in trouble unnecessarily here.
5. In the Uploads section, upload your newly zipped file we made in step one. After it's finished uploading, you'll be given one drop down and two tick boxes. You need to tick the 'This file will be played in the browser' option.

6. I've found so far that 'Viewport dimensions' work quite well for desktop at 1080 x 640. Either use these numbers or experiment and find what works best for you.
7. You must tick the 'Enable scrollbars' option for your game to display properly, otherwise options, text and buttons can be clipped off the bottom of the viewport.

8. Continue filling out the rest of the form, or skip it for now and scroll all the way to the bottom to the 'Visibility & access' section. Here make sure you have 'Draft' selected. This prevents others from finding your game until you're ready, and I always recommend play testing things before you make your work public.
9. Finally, hit the 'Save' button, then go and have a look at your creation by hitting the 'View page' link. And there you go! When you're ready for public release, just change the option in section 8 to 'Public'.
---
A few things to bear in mind about hosting on itch.io:
There isn't currently any way for your readers to save their game. I'm sure someone could write in a plugin similar to Dashingdon's at some point, but as for right now, this isn't available. See addition/edit below.
Make sure you properly tag your game with the 'choicescript' and 'interactive-fiction' tags. There are an awful lot of games on itch.io and it's easy to get lost in the crowd. Make sure folks can find you by having the right tags.
I hope this brief guide was useful to folks.
Best of luck to you with your writing!
---
Addition/Edit:
Thanks to @hpowellsmith for bringing this to my attention. You can add save functionality to your game by using this addon:
The ChoiceScript Save Plugin
Just tried it out on my own game and it works perfectly.
Rather than run through the addon author's own tutorial here, I'll just forward you to the Readme on their Github page.
One small note I would add is when it asks you to make the two small additions to your index file, make sure you right click the file and open it with your coding program, don't double-click it as this will just open it in an internet browser, and it won't give you the access to what you need to change.
712 notes
·
View notes
Text


So, I make all of my devices look like old windows operating systems, usually Win7 cuz I'm a big fan of Aero Glass. I've got my Win11 laptop looking like XP, My Linux Dual Boot on pink Win7, My Linux Tablet on Blue Win7, and now my Win 11 desktop on pink Win7.
Here's how I do it.
For windows 10/11 there are a few ways. WindowBlinds 11 (WB11) is a good resource for this, but it's a paid program. Which kinda sucks. If you can't afford it you can find my sympathies in a button on my neocities. In an unrelated note, there's a github user named Discriminating who does some pretty cool windows styling programs. WB11 is how I style my two windows devices. The aero glass styling is done through WindowBlinds and also Start11, another Stardock program. The style I used for that is Aero 11 (set to blush :3) For the XP system (and older if you want it) I use RetroBar to style the taskbar and OpenShell to style the start menu. The WB11 style I use is eXperience11, but there are others as well. Of course, for MSN/Windows Live Messenger I use Escargot but if you're more into AIM or Yahoo! Messenger then you can check out their companion project Nina. You'll of course have to fiddle around with settings but eventually you'll get it looking good. If you want to go crazy with customization there is also Customizer God, however I've had no success getting it to work on Windows 11.
Linux is the easiest to configure to make look retro. Specifically you want to use some kind of KDE Plasma version of Linux. I use Kubuntu. Basically all you have to do for these is dig around in the app store for themes relating to "aero" "aero glass" and "windows 7" and apply them until you're happy. I don't really have any specific suggestions for that but it's very easy to do if you install Kubuntu or any KDE Plasma Linux. Basically you can find anything and everything you need in it.
There's one other thing I've not yet been able to set up but it's on my radar for my campus computer: ReactOS. I'll make another post when I'm able to try it out but if you're curious go nuts, install it in a virtual box or on a usb or directly over your main drive. God is your oyster.
One last thing, Space Cadet Pinball still runs perfectly on Windows 11
Edit: Suggested by @tetrachromacy4 (thx~!!!) GadgetPack offers a windows 7 sidebar. It is listed as 7/8/10 compatible so it will likely work on windows 11 but I have not yet tested it.
#oldweb#old web#old internet#internet nostalgia#old tech#old graphics#windows xp#windows 7#y2k nostalgia#y2kcore#y2k aesthetic
208 notes
·
View notes
Text
on the topic of writing software
I want to ramble at you about some writing software options. 98% of the time I'm perfectly content with LibreOffice Writer (and previously I used Word, back when Microsoft products were less shitty). But every now and then when I have a new project (like now - more on that later) I start looking for something shiny and new to try. And I fell down into another research rabbit hole lol
I usually don't talk a lot about this bc my needs are very simple, and not sure how useful my opinion is to others, but I enjoy the topic. It's an intersection of creative writing and tech nerdiness and I like both of those things. Also what writing software you prefer really depends on the type of writer that you are, and everyone has a slightly different writing process and I find that fascinating.
Now, as I said, I'm coming at it from a slightly tech-nerd angle. I don't care if the installation is clunky, I'm happy to see the words open-source, and the need to create an account will already mildly piss me off (:
Don't worry, I'm not as intense as the guy writing his novel in Vim. Though fucking respect. And I can't say I'm not tempted to try it even with the steep learning curve lmao (Seriously, if you don't know Vim is notorious among software developers.)
Anyway, things I've tried so far:
Manuskript: this was listed as an open-source Scrivener alternative (though I haven't tried Scrivener. so.). I gave it a go when I was writing heart worth the trouble and it was pretty nice. It helped me when I had to move scenes and chapters around. But overall I think it was made with plotters in mind bc it wants you to enter a lot of information upfront. I'm not a planner/architect type of writer so this type of software is a bit overwhelming for me. Still, the fact that it's open source and works on Linux gets kudos from me.
Wavemaker: I recently played around with this, and I actually surprisingly like the features it has. You can put multiple books in a project, which is very nice if you like to work on different things, like fanfic, novels, etc. The mindmap is a feature I liked, though it's a bit clunky bc it collapses the text fields when you exit, and once I added an image field by accident that I could never remove lol I do like a bit of a snowflake method, so that feature is cool, and the cards are pretty straightforward too. Usually, my problem with these apps is that I don't even want to touch half of the features so they are pointless to me, but the features of Wavemaker were kind of nice. It's a web app that you can download and use offline but it's still working from your browser if that makes sense. That was what I didn't really appreciate. Also, it doesn't give you a lot of options to back it up. You either save the wavemaker file, export it into a document (which is fine, but it adds an extra step to the backup process) or you sync with Google Drive *shudders*
Things I want to try out:
Calmly Writer: now this is just purely a text editor that focuses on being very zen, streamlined, distraction-free, etc. It's pretty and it has typewriter sounds. (Yeah, I'm not immune to a pretty UI and harmless fun features alright? I can contain multitudes :P) It has an online version, but you can also download it, and works on Windows, Mac, and Linux. On paper, the desktop app requires a license, but the way they put it is that you can evaluate it for free and the evaluation doesn't have an enforced time limit... So. As good as free. (Though if I really like it, I would totally consider buying a license for 20usd that I can use on 3 computers, that seems fair. I appreciate a license over a subscription model for sure.) Honestly, I think this is the one I'm going to try next bc it just integrates perfectly into my writing process. That being: a multitude of messy, hand-written notes and notebooks + a document editor + backups on hard drive and GitHub (yes, really) ^^"
Shaxpir: This is on the opposite end of the spectrum basically, but out of the "fancy" ones, I kind of like the look of this the most. I like the statistics part in particular. But honestly, I probably won't try it bc it doesn't have a Linux version which would be a pain in the ass for me, and is cloud-based. I kind of don't really trust them, which is my biggest issue with these companies. (Although the creator's heart seems to be in the right place when it comes to AI. Basically, some of their features are based on machine learning and language models. For example, it will recognize passive voice, if it's an adverb with "-ly" or the emotion of a word. Which I think is all cool and fine and shouldn't be lumped in with generative AI. But he also had a website that did this analysis for already published works, and when people pointed out that it was sketchy, he took that down and I can respect that. I'm not sure how much it influenced the actual features of the app, maybe I'll just take a peek out of curiosity. The whole thing does make me have trust issues though lmao) If anyone has experience with it though, I'm interested to hear about it.
Obsidian: not a dedicated writing software, but rather an elaborate note-taking app. I heard good things about it from smart people lol If I really wanted to access my writing on my phone, I would probably use this bc it works on every platform and has end-to-end encrypted sync with version control. I heard you can also integrate it with GitHub which is always music to my ears lol But the setup probably takes a bit of time and I'm not particularly motivated to do that right now.
So yeah, those are the options that appeal to me right now. If anyone used these and has opinions, I'm all ears :D
133 notes
·
View notes
Text
The main reason to use Firefox and Linux and other free and open source software is that otherwise the big tech monopolies will fuck you as the customer over in search of profits. They will seek to control how you use their products and sell your data. When a company dominates the market, things can only get worse for ordinary people.
Like take Google Chrome for example, which together with its chromium reskins dominate the web browser market. Google makes a lot of money from ads, and consequently the company hates adblockers. They already are planning to move to manifest V3, which will nerf adblockers significantly. The manifest V3 compatible chrome version of Ublock Orgin is a "Lite" version for a reason. Ublock's Github page has an entire page explaining why the addon works best in Firefox.
And Google as we speak are trying to block adblockers from working on Youtube, If you want to continue blocking Youtube ads, and since Youtube ads make the site unuseable you ought to want that, it makes the most sense to not use a browser controlled by Google.
And there is no reason to think things won't get worse. There is for example nothing stopping Google from kicking adblockers off their add-on stores completely. They do regard it as basically piracy if the youtube pop-ups tell us anything, so updating the Chrome extensions terms of service to ban adblocking is a natural step. And so many people seem to think Chrome is the only browser that exists, so they are not going to switch to alternatives, or if they do, they will switch to another chrominum-based browser.
And again, they are fucking chromium itself for adblockers with Manifest V3, so only Firefox remains as a viable alternative. It's the only alternative to letting Google control the internet.
And Microsoft is the same thing. I posted before about their plans to move Windows increasingly into the cloud. This already exists for corporate customers, as Windows 365. And a version for ordinary users is probably not far off. It might not be the only version of Windows for awhile, the lack of solid internet access for a good part of the Earth's population will prevent it. But you'll probably see cheap very low-spec chromebookesque laptops running Windows for sale soon, that gets around Windows 11's obscene system requirements by their Windows being a cloud-based version.
And more and more of Windows will require Internet access or validation for DRM reasons if nothing else. Subscription fees instead of a one-time license are also likely. It will just be Windows moving in the direction Microsoft Office has already gone.
There is nothing preventing this, because again on the desktop/laptop market Windows is effectively a monopoly, or a duopoly with Apple. So there is no competition preventing Microsoft from exercising control over Windows users in the vein of Apple.
For example, Microsoft making Windows a walled garden by only permitting programs to be installed from the Microsoft Store probably isn't far off. This already exists for Win10 and 11, it's called S-mode. There seem to be more and more laptops being sold with Windows S-mode as the default.
Now it's not the only option, and you can turn it off with some tinkering, but there is really nothing stopping Microsoft from making it the only way of using Windows. And customers will probably accept it, because again the main competition is Apple where the walled garden has been the default for decades.
Customers have already accepted all sorts of bad things from Microsoft, because again Windows is a near-monopoly, and Apple and Google are even worse. That’s why there has been no major negative reaction to how Windows has increasingly spies on its users.
Another thing is how the system requirements for Windows seem to grow almost exponentially with each edition, making still perfectly useable computers unable to run the new edition. And Windows 11 is the worst yet. Like it's hard to get the numbers of how many computers running Win10 can't upgrade to Win11, but it's probably the majority of them, at least 55% or maybe even 75%. This has the effect of Windows users abandoning still perfectly useable hardware and buying new computers, creating more e-waste.
For Windows users, the alternative Windows gives them is to buy a new computer or get another operating system, and inertia pushes them towards buying another computer to keep using Windows. This is good for Windows and the hardware manufacturers selling computers with Windows 11 pre-installed, they get to profit off people buying Windows 11 keys and new computers, while the end-users have to pay, as does the environment. It’s planned obsolescence.
And it doesn’t have to be like that. Linux distros prove that you can have a modern operating system that has far lower hardware requirements. Even the most resource taxing Linux distros, like for example Ubuntu running the Gnome desktop, have far more modest system requirements than modern Windows. And you can always install lightweight Linux Distros that often have very low system requirements. One I have used is Antix. The ballooning Windows system requirements comes across as pure bloat on Microsoft’s part.
Now neither Linux or Firefox are perfect. Free and open source software don’t have a lot of the polish that comes with the proprietary products of major corporations. And being in competition with technology monopolies does have its drawbacks. The lacking website compatibility with Firefox and game compatibility with Linux are two obvious examples.
Yet Firefox and Linux have the capacity to grow, to become better. Being open source helps. Even if Firefox falls, developers can create a fork of it. If a Linux distro is not to your taste, there is usually another one. Whereas Windows and Chrome will only get worse as they will continue to abuse their monopolistic powers over the tech market.
846 notes
·
View notes
Text
very brief torrent security primer
some brief comments on piracy safety for @goblin-thembo who has been asking a lot of questions in the notes of that post...
OK, so when you download a torrent, you are downloading some files. The BitTorrent protocol makes it almost impossible to substitute a different file than the one you request, but you have no way to be absolutely certain that the original file is 'safe' - that depends on the properties of the file, and what you do with it. Some types of file are safer than others.
Here's some jargon you may find useful.
torrent: a file that describes how to download some files through the BitTorrent protocol. we won't go into the technicalities, but when you load a torrent into your torrent client, you will connect to other people who have parts of the files, download the pieces, and reassemble the files you want.
seeding: providing a copy of the files in a torrent to other people.
ISP: Internet Service Provider, the company that connects you to the internet.
IP address: your computer's identity on a network, notably the public internet. When you connect to a website, they know your IP address. Your IP address is assigned by your ISP.
From an IP address, you can determine someone's broad geographical location (which country they're connected in) and which ISP they are using. You can contact the ISP, who will be able to associate it with a specific user.
swarm: the collection of users downloading or seeding a particular torrent.
VPN: Virtual Private Network, a relay service which hides your IP address from the public internet. People who connect to you will see the VPN's IP instead of your real IP. Your ISP will be able to know that you connected to a VPN, but not what you send through it. So they wouldn't be able to tell if you are using BitTorrent. VPNs usually cost a fairly small amount of money as a subscription service.
Threat model
In security we talk about a 'threat model', which is what you think you need to protect yourself from. There are two major threats when downloading files using BitTorrent.
copyright claims: your computer's IP is broadcast when you use BitTorrent. Copyright holders will often put 'sniffers' on the network which will monitor the IPs in the swarm of popular torrents. They will then send a takedown letter to your internet service provider (ISP), who will usually send you an email to stop sharing copyrighted media on their network, and then cut off your internet on multiple offences. This can easily be circumvented using a VPN. I strongly recommend using a VPN if you download any copyrighted content through BitTorrent.
attacks through the file you download: someone might upload a virus as a torrent, presenting it as a file you might be looking for (e.g. cracked software). So let's go over different types of file you might download and how they could be used to attack you.
Executable files, such as pirated software, are not safe. If you download a program and run it, you are potentially giving the author full control over your computer. So you should make damn sure the uploader is trustworthy. If you're downloading open source software from the maintainer's github release page, you're probably good. If you're downloading cracked art programs or games... good luck lol.
On a public torrent tracker, to which anyone can upload, there is no guarantee that any file is what anyone says. You have to make your own determination of which uploaders are trustworthy. I can't give you great advice on this, since I generally do not download cracked executables. For games, FitGirl Repacks is generally a pretty good source.
If you are on Windows, the default Windows Defender software should be used to scan any file you download. (Paid antivirus software is of somewhat dubious utility, often pushing ads and using CPU resources in its own right.) Fewer attackers will target desktop Linux or OSX, which doesn't mean you're guaranteed safe, but Windows is the biggest target as the most widely used operating system.
Videos, music and images are generally safe. I say 'generally' because it's possible, in theory, to create a video that exploits a vulnerability in your video player (e.g. mpv or VLC) and uses it to execute code. So far as I know this is largely theoretical, and known vulns have been patched, but make sure to keep your player up to date to mitigate against known vulnerabilities.
Any compressed archives (zip, rar, 7zip) can be used to create something called a 'zip bomb', which is a file which goes into an infinite loop when you try to decompress it, swallowing up more and more memory and hard drive space. I've never seen this actually be done, but it's possible. More subtle attacks would attempt to attack the program you use to decompress the file. Keep your software up to date to mitigate against known vulnerabilities.
Besides taking care about what you download, on Windows you should either not run your main account as an admin account, or make sure to set User Account Control to require a credentials check for admin operations, and also keep your operating system and software up to date. Make sure file extensions are visible so you don't get fooled by a file disguised as a different file type. And y'know, if the torrent tracker has comments, check to see if a lot of people are saying it's a virus.
What could happen if your computer gets infected? Well, they might use your computer to mine crypto at the cost of your CPU performance, they might encrypt and ransom your files, and they might steal your credentials for online services (including banking and the like). There are various measures you can take against this, such as making sure to encrypt sensitive data such as passwords, but the best defense is to not infect your computer in the first place.
The most likely time for people to upload viruses is when something is in high demand and there isn't a single authoritative high-quality source out yet.
Ultimately you get to decide what you consider an acceptable level of risk. There is no such thing as perfect safety. I would recommend using your own initiative to learn about computer security and not badger random tumblr users to explain it to you, but hopefully the above guidelines should help you avoid doing anything too dangerous.
189 notes
·
View notes
Text
A Guide To Ripping Sonic x Shadow Generations Models
This guide is meant as a walkthrough to how to rip models from the PC version of SxSG. While this process and programs will work with the Nintendo Switch version, I cannot promise the decompilation and file directories will be the same, especially as there is a massive quality difference in the assets between the two versions.
I recommend already having fundamental computer literacy and pre-existing familiarity or experience with 3d models and programs such as Blender. I'll be using Blender here.
Now, lets begin!
What You Will Need
A PC version of Sonic x Shadow Generations, whether through Steam or Epic Games, installed on your computer. Please make sure you know where the file directory for your game is. for Steam, you can easily access this via the Properties menu for the game in your Steam library, Installed Files, and then Browse.
For Steam, your directory should look something like: Program Files (x86)\Steam\steamapps\common\SONIC_X_SHADOW_GENERATIONS
PLEASE make sure youre keeping track of which files are modified, if at all. While you can create new files and folders in your game directory without issue, you may break your game if you modify or delete existing files. If you encounter a problem, you may need to Verify the Integrity of Game Files (through Steam), or uninstall and reinstall your game entirely. You may want to Backup your game files just in case.
A 3d program for importing and previewing 3d models, such as Blender. Blender will be the program used in this tutorial.
Tools You Will Need
HedgeArcPack from HedgeLib - A program used for the decompilation of Hedgehog Engine .pac and .ar00 archive files. Currently works on all Hedgehog Engine games (Unleashed - SxSG). HedgeLib is a larger library of programs for ripping Hedgehog Engine assets. Modelfbx from LibGens - LibGens is a library of tools for modding and editing Hedgehog Engine asset files, originally a Level Editor for Sonic Generations. Modelfbx converts .model files to .fbx files for use in 3d programs. There are a bunch of other fun modding tools in here as well. NeedleTextureStreamingPackage from SkythTools - An extractor for the texture data of the dds files used in some Frontiers and Shadow Generations models. Not all models will need this. Part of SkythTools, a library of tools for modding and extracting assets from Hedgehog Engine games. I recommend reading through the page and seeing what all the other tools do and if theyre something you'd also want to use!
Both LibGens and SkythTools do not have a Releases page on their Github pages, so just download the master archive as a zip file as normal. All programs here work with drag-and-drop, meaning you drag and drop the files directly onto the .exe file. Do not open the .exe files. (nothing will happen if you do, it simply will not work.)
After downloading all three libraries in your preferred location, open your game directory.
Unpacking The Model Archive Files
Now that you have your game directory open, you'll need to locate the model archive you wish to rip. All of the assets for Shadow Generations is located in image > x64 > raw in your game's base directory. Lets rip Maria's model.
Maria and other characters are located in the character folder. You'll need to find maria.pac.


Open a separate file explorer window to where you have HedgeArcPack.exe. For simplicity's sake, Ive put it on the desktop. Drag and drop the maria.pac file directly onto the exe file.

By default, it will unpack the archive in the original folder with the name of the archive you unpacked.
In this new maria folder, you'll find a lot of files. Dont be intimidated - these are simply the raw files for all of the model's dependencies and assets, including animations, dds files (texture files), and more.
A quick glossary: - .model - the base model file in native format. This is what youre looking for. - .dds - the texture files for the model. You will need these for importing and previewing the model in a program, as well as exporting it. - .material - the material data for the model for Hedgehog Engine 2. You wont need these so as long as you have the texture files on their own. - skl.pxd - the skeleton data for the model for Hedgehog Engine 2. - .anm.pxd - this is the file format for compressed Hedgehog Engine 2 animations the model uses. They can be opened using a plugin like FrontiersAnimDecompress, however this isnt a tutorial for how to use those. Feel free to ask for a tutorial on how to extract game animations or look it up on your own time, though!
Before we can convert and import the model to Blender, though, we'll need to extract the texture data.
Extracting the Textures
Note: not all models, such as bosses like Mephiles or Black Doom, will require this step. However, Maria's does.
Open a file explorer window to where you downloaded SkythTools. Make sure you have already unzipped the file. In SkythTools-master, go to Sonic Frontiers, and find NeedleTextureStreamingPackage.exe.

In the needle_texture_streaming_path.txt file, copy the file path for your Texture_Streaming folder in your game directory, then save the file. This is the path the program will use to extract the texture data for the .dds files.


Once that's done, you will need to drag and drop each .dds file onto the .exe one-at-a-time. Maria has multiple .dds files for different parts of her model, such as her eyes and hair, so make sure you do this for every one of them.

If youve worked with 3d models and textures before, you may recognizes some of the suffixes used for the texture files. Hedgehog Engine games use pbr texture maps. abd is the albedo map, nrm is the normal map, prm is the map for Metalness, Roughness and Specular, ems is the emission map, etc.
Now we can finally convert the model for use in 3d programs!
Converting and Importing the Model
We're in the homestretch! Finally we'll be able to preview and use our model. But first, we have to convert it to an .fbx.
Just like before, open a file explorer window to where you have LibGens downloaded (make sure you have already unzipped it). Go to the bin folder. This time, youre looking for a program called modelfbx.exe.
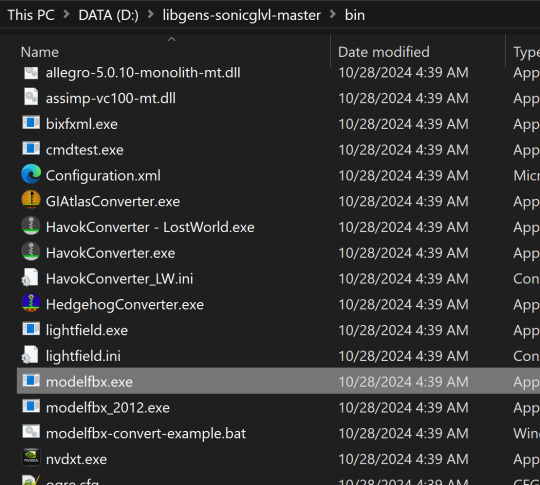
Find your .model file in your unpacked archive. Drag and drop it onto the exe.

It will create an .fbx file conversion of the .model file.
Now, we can finally open Blender!
I am using Blender 4.1.1 here, though the version doesnt matter as long as it is 2.8 or higher, as Blender has an fbx importer by default.
Like you would any other fbx file, go to File > Import > fbx (dont mind my Choco Mint blender theme here)

You'll need to navigate all to where you converted that fbx file. (Alternatively, you can copy that fbx file to somewhere else for ease of access, I just like keeping everything in one place).
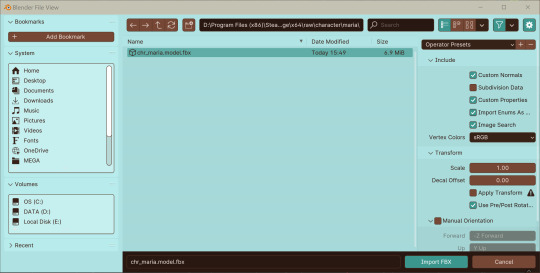
Import the fbx. You may notice that by nature of an fbx file, the albedo texture for the base model is already mapped to the model when you switch to Viewport Shading. However, sometimes, part of the model will be magenta, meaning we have a texture pathing error.
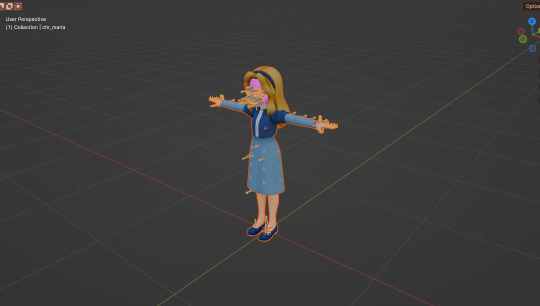
Hiding the bones, she looks a lil scary here--
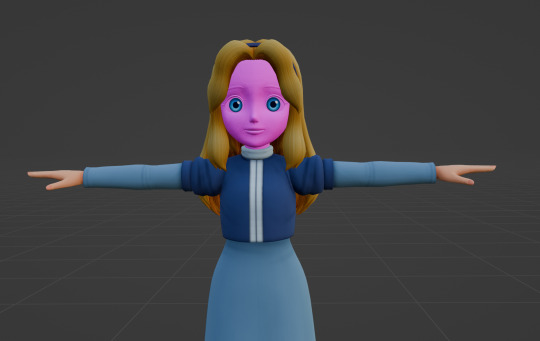
Opening the material data for the mesh, you can see where our problems lie. The texture map for her face has a file path that does not exist.


Its pretty easy to fix this - just open the albedo file for her face texture and map it to the material. You can simply drag and drop the dds file into the node editor in blender - blender can read the dds files just fine since weve extracted the texture data from them earlier.
Pathing errors can either happen as a result of the fbx file being wonky or if you havent properly extracted all the texture data for the dds files, so keep that in mind!

If you simply wish to view the models in their base colors, you can stop here. However, you can also set up the normal and prm maps for use in 3d renders or exporting the model!
The prm maps for Frontiers and Shadow Generations work a little differently than in other games. Instead of Red = Metalness, Green = Roughness, Blue = Ambient Occlusion, and Alpha = Specular, Frontiers and Shadow Generations uses Red = Specular, Green = Smoothness (inverted Roughness), and Blue = Metalness.
Setting this up in Blender is quite easy - simply drag and drop the respective prm, fal and nrm and other dds files into blender for their respective maps in the material editor.
If you already know 3d, you already know how to set up a normal map in Blender. Simply take the normal map, set the Color Space to Non-Color, then path it into the Normal Map node.

For the unique prm maps, you will need to create a Separate Color node, then plug Red into Specular > IOR Level (make sure Distribution is set to GGX, not Multi-Faceted GGX), Green through an Invert Color node > Roughness, and Blue > Metallic.
Overall, your node editor should be set up something like this for each material.

(I know it looks intimidating, but I promise its super quick and easy to set up - dont give up!)

And now we have our ripped model! You are now free to pose, deconstruct, play with, do whatever you please with it. Please note that if you want to export your model, you may want to convert the texture files to png using a program like Noesis. I hope this helps, and have fun!
#once again for other maps like the emissive map for Maria's eyes and etc you'd set them up like any other pbr texture#sonic x shadow generations#sxs gens#sxs generations#sxsg#sxsg dark beginnings#shadow generations#sonadow generations#shadow the hedgehog#maria robotnik#ripping guide
20 notes
·
View notes
Text
hey friends if you're like me and you don't wanna pay for music but you also like the customization and social features of spotify, here's what i use to bypass the limitations!!
spotx on github is a modified version of the desktop client that blocks all ads, and has several optional features like hiding podcasts from the homepage if you just use it for music, and blocking automatic updates to avoid incompatibility. it's currently only available on windows, but all you need is to have the official spotify app already installed!
and here's a modded apk of the mobile app for android! i've been using this for months and i believe it's safe, the only slight annoyance is that you HAVE to manually reinstall the latest version when it updates, but it'll notify you. just make sure you DON'T already have the spotify app installed - it doesn't override any features, it's an entirely seperate app.
i don't know what the alternative would be for ios so if anyone has one, feel free to let me know and i'll add it to the list!
237 notes
·
View notes
Text
got python setup working on my windows desktop :) now I can work on my silly code project through github / vscode on both the work mac and my windows desktop. Both on Python 3.13.
So windows ignores "shebang" (😳) notation bc it just like. opens .py files in whatever you have it set to open, but Unix doesn't seem to. So at the beginning of my code I have
#!/opt/homebrew/bin/python3.13
I'm thinking, though, that if other unix users try to run it, then they'd need to specifically open it through having a brew installation of python 3.13...
I want to see if I can set it to like
#!/usr/bin/env python3.13
Because I think that would be more normal to unix users... they still need 3.13 but not necessarily brew. I'll have to mess around with that tomorrow tho bc I'm in bed.
3 notes
·
View notes
Text
yt-dlp: An Installation and Use Guide
This guide specifically walks through how to download and use yt-dlp on Windows, but if you have a Mac, you should still be able to follow along. Just make sure to download the Mac version of software whenever the option comes up. I'm also going to be assuming that you have a 64-bit Windows system. The standard today tends to be 64-bit for PCs, but if you're not sure and you want to double check then go to Settings -> System -> About -> Device Specifications -> System Type.
This guide also focuses on the command line version of yt-dlp (accessed on Windows by typing cd in the search bar). If you prefer to access the program through a GUI, you'll need to download additional software. Here's a link to help you get started. (LINK)
If you have any specific questions that you can't find an answer to within the linked resources, feel free to reach out and I'll do my best. Also, as someone who can be incredibly computer illiterate at times, I'm writing this guide in a way that explains a bunch of things I used to be confused about, so sorry if it goes over something in too much detail.
Resources:
These are just some handy links in case you run into a problem.
The yt-dlp GitHub page (has literally everything you might need)
The r/youtubedl wiki, includes a list of common errors and FAQs
Installing:
Click on this link. It will take you directly to the section on the yt-dlp GitHub page where you can download the program.
Feel free to download whichever version works best for you, but I recommend scrolling down to RELEASE FILES and downloading the version that works for your system from the Recommended section. I've included a picture below.
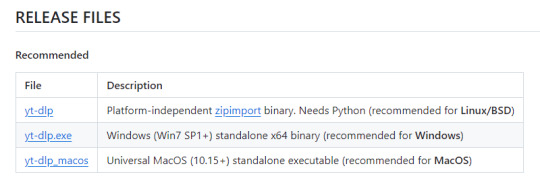
Once you've clicked on your version (yt-dlp.exe for Windows users), yt-dlp will download automatically. It should show up in your Downloads folder.
FFmpeg:
To merge video and audio files (which helps you get the best quality from youtube possible), you also need to download FFmpeg.
Scroll down even more to the DEPENDENCIES section.
Click on that first link. It will take you to the FFmpeg webpage. Clicking on Download in the sidebar will take you to a page full of different versions of FFmpeg. DO NOT CLICK on the big green button in the middle of the page. What we need is a version that is already compiled.
Find the section that looks like this (titled Get packages & executable files):

If you're Mac, pick accordingly. If you're Windows or even Linux, I actually recommend you download from this webpage. It contains the same versions as the Windows builds by BtbN but is instead managed by the developers of yt-dlp.
Find the one titled "ffmpeg-master-latest-win64-gpl.zip" (I've included a highlighted picture below for reference).

That will download and go into your Downloads folder too.
Setting up a Folder:
The easiest way to use yt-dlp is by placing it and FFmpeg into a folder. You can store the folder wherever you want, but you will need to remember (and type out) the path to the folder every time you want to use yt-dlp, so I recommend not making it too deep.
What I did was make a folder titled "yt-dlp" within my Desktop folder.

Move the yt-dlp application from your downloads folder to your new yt-dlp folder.
IMPORTANT: Assuming you also placed the yt-dlp folder into your Desktop folder (and assuming you are a Windows user), then the full path to your new yt-dlp folder should be C:\Users\YOUR_USERNAME\Desktop\yt-dlp. Fill YOUR_USERNAME in with whatever your profile is called on your PC.
For the FFmpeg zip you downloaded, extract the zip file into your new yt-dlp folder by clicking the zip, clicking Extract all from the tool bar, and then entering the path to your yt-dlp folder. Everything within the zip is already stored into a folder, so you don't need to create a new folder just for FFmpeg.
Now you're ready to go!
Using:
This section is going to be almost exclusively Windows-focused because I've never used a Mac before and I don't know how the Mac command line varies from the Windows one. I'm also not going to go into any details. If you want more info or to explore the options, I recommend checking out the links in the Resources section.
Type cd and then press enter into the Windows search bar to bring up the command line. If you've never used the command line before, this is what it looks like:
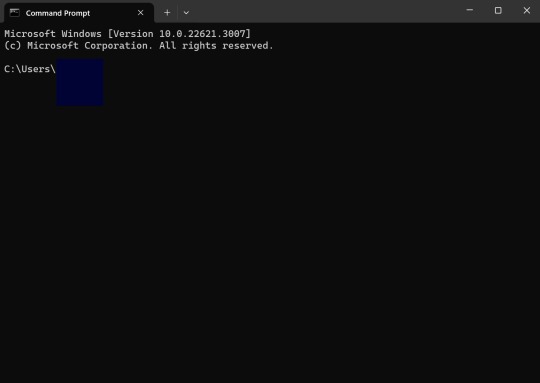
I covered up my username with that blue square.
Type the following into the command line:
cd Desktop cd yt-dlp
This will take you to the same place where your yt-dlp application is stored. You must cd into the appropriate folders every time you want to use yt-dlp.
YouTube, Twitch, and Most Websites:
Find a link to whatever YouTube or Twitch video that you want.
Into the command line, type yt-dlp followed by the link you want to use. This is what it should look like (the red is what you type):
C:\Users\YOUR_USERNAME\Desktop\yt-dlp> yt-dlp https://www.youtube.com/watch?v=hECaXfk2Wo4
Press enter and viola! Your video should download! It will automatically go into your yt-dlp folder.
Twitter:
Twitter forces you to log into an account to view a video, so you have to give yt-dlp your account information if you want to download anything. I understand being wary of doing this.
The easiest way of going about this is by typing:
yt-dlp https://www.youtube.com/watch?v=hECaXfk2Wo4 -u YOUR_TWITTER_USERNAME -p YOUR_TWITTER_PASSWORD
And then your video should download as normal.
Alternatively, you can use your browser cookies as explained here.
Updating:
Here is the section on the GitHub that explains updating. Basically, type yt-dlp as if you want to download a video, but instead of also adding the link, add -U at the end.
Uploading:
If you want to upload a video or clip to tumblr and it's not working, my number one advice is to rename the video file to something simple and add .mp4 at the end. If that doesn't work, try converting it (either with yt-dlp itself or an online website). Sometimes you just have to fiddle with things before they work the way you want. Good luck!
#yt-dlp#youtube-dl#speaking#i generalized this but i use yt-dlp almost 99% for various clips which is why I'm putting this post here for you guys
14 notes
·
View notes
Text
I need to start actually posting my own swap gifts in a timely manner. So!
This is what I created for @starrysnowdrop in the latest FFXIV Swap! It's a desktop pet of her OC Hali, written in python using gifs for animated sprites. A note if you decide to look at it, Windows Defender tends to dislike exes from python. The source code is on that github though, so you're welcome to confirm for yourself that the code is safe bc I promise you it is.
Here's an early clip I took of it breaking containment and getting onto my second monitor bc it was funny:
(She now stays on the one screen in the final build lol)
7 notes
·
View notes
Text
📁 Resamplers on MacOS.

For this tutorial, we will be running resamplers on OpenUTAU for MacOS. There are several steps to this process before we can start manipulating the files. These steps include, installing Homebrew, and installing Wine. Do not worry, for this tutorial I will also be showing you how to Homebrew your Mac, and how to install the latest version for Wine. Before we get into this process, I need to clarify that it is only possible on MacOS 13.7.1 (Ventura) or later, as Homebrew has discontinued its service for any older versions of MacOS. So without further ado, let’s begin.
Section 1, "Installing Homebrew."
To install Homebrew you will need to head over to the Homebrew website.
https://brew.sh/
From here, you will want to copy the installation command, and open Terminal. If you are not familiar with Terminal, it is in your Applications > Utilities > Terminal.
In the Terminal control panel, you will want to paste the installation command into the console. It will begin running the installation.
The installation will pause and ask for your computer’s passkey. Input the passkey and the installation will continue.
If you are on Intel, after it installs the, “X code command line tools,” it may run into a fatal error when updating the Homebrew install. Do not worry, head over to, System Preferences > Security and Privacy, and scroll down until you see, "allow install--sh.” Select OK to continue.
Now it will run the rest of the install and you have successfully Homebrewed your Mac.
Section 2, "Installing Wine."
In order to install Wine, head to the WineHQ website.
https://github.com/Gcenx/macOS_Wine_builds/releases
Download Wine Staging from the Github releases page.
Drag the Wine Staging .zip to your desktop and extract.
After extracting the zip, run the Wine Staging application.
The Wine installer will run into an error since it is an external application downloaded from the internet. Head to System Preferences > Security and Privacy, and allow Wine access to run. After this, Wine will be installed to your computer.
After performing these two steps, we will then prepare the environment for the resamplers. Inside of Terminal we will want to begin a new session and run the installation for Wine Crossover.
brew tap gcenx/wine brew install --cask --no-quarantine wine-crossover
After running these two commands your environment is set!
Section 3, "How to run resamplers on MacOS."
Now that you have installed both Wine and Homebrew onto your computer, we will now begin the process for installing the resamplers into MacOS. Before we get started, I will like to clarify that for this step we will be converting the executables (.exe) into .sh files. That will be the result we want in order to run resamplers. Here is how.
1. From the OpenUTAU github release page, download the "Mac_Additional.zip." This will be the package we use to convert the resamplers into .sh files.
Mac_Additional.zip
2. Before we get started, let’s find the version of wine that you have installed.
For Intel MacOS . . .
Perform CMND+SHIFT+G, to locate the directory. Now input the following path, /usr/local/bin/. What you will be looking for is either Wine32 or Wine64. Depending on what you have will be important information for a future step. Remember this!
For Silicon MacOS . . .
Open Terminal and run the following command.
which wine
After running this prompt you will receive the location of your Wine installation. *( eg. /opt/homebrew/bin/wine ) Please copy this location as it is very important for the following steps.
3. Download the resampler of your choice, for this tutorial, I will be installing TIPS. Extract the resampler, and run OpenUTAU.
4. Drag the resampler.exe into the OpenUTAU window. It will then ask you if you want to install as a resampler or wavtool, select the resampler option since that is what we are working with today.
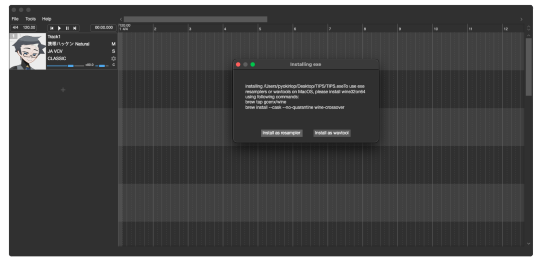
5. Extract the Mac_Additional.zip, by extracting it, it will generate a, “moresampler.sh,” file. Rename the file after the resampler you will be working with, *(eg. TIPS.sh ).
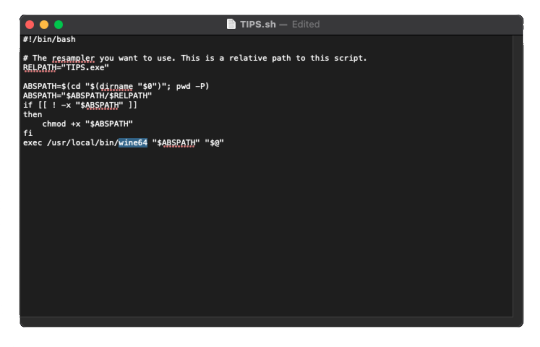
6. Open this file with textedit by double-clicking, or right-clicking. Select, “Open with textedit.” Now we will edit the .sh file with resampler's information.

7. Locate the, “moresampler-0.8.4/moresampler.exe” in the relative path and delete it. Replace with only the resampler name, eg. “TIPS.exe.”
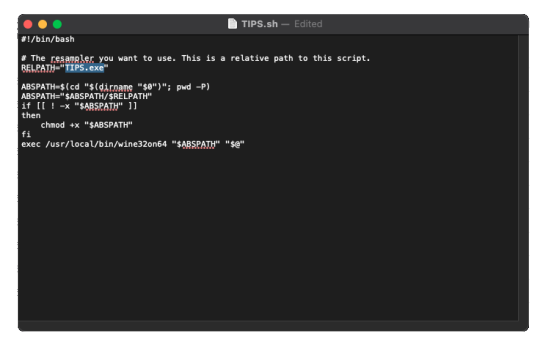
For MacOS Intel . . .
In the field for, “exec /usr/local/bin/wine32on64“ replace the Wine extension with your version of Wine. This will look like, “exec /usr/local/bin/wine64,” since my computer is running Wine64.
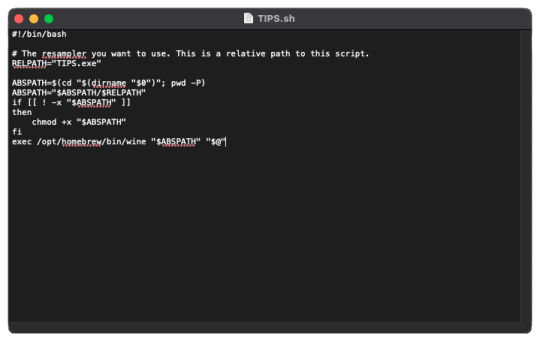
For MacOS Silicon . . .
In the field for, “exec /usr/local/bin/wine32on64“ replace this field with the location of your wine installation. This will may like, “/opt/homebrew/bin/wine." It should look like this!
9. In OpenUTAU, to quickly access the resampler folder, select the, “help,” tag, and, "Open Logs Location." We will not be working with the logs, from here you will open the resampler folder.
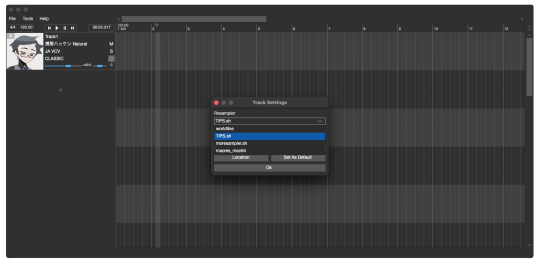
10. OpenUTAU will have already generated a .sh file for TIPS.exe in this scenario. With the edited TIPS.sh on your desktop, drag and drop it in the resampler folder, and replace.
11. Return to OpenUTAU, and select, “CLASSIC,” in the resampler field, and to the right there will be a cog icon. From here you will be able to select your downloaded resamplers.
If this is your first time running the instance, Wine will be running the executable in the background for the first render. This will take awhile.
There you have it! You can repeat this process and download as many resamplers as you like.
3 notes
·
View notes
Text
Audacity for Debian-based Linux
So, some time around 2020/2021, Audacity for Linux from the repositories of Debian-based distros (including Ubuntu, Mint, etc.) no longer had access to high quality stretch (change tempo, change pitch, shifting slider). This appears to be due to a combination of Debian no longer updating Audacity at all past 2.4.2 (as Audacity's new owners from 3.0.0 on have had...issues, to put it lightly), but also the fact that 2.4.2 specifically was requiring a version of the SBSMS library past what Debian had. It's still the case that the apt version of Audacity on Linux Mint still lacks the high quality stretch functions.
The workaround for this is to compile from source. HOWEVER. Be apprised that if you specifically go for version 2.4.2, there is still a bug around SBSMS, which causes Audacity to crash when attempting high quality stretching. Apparently, if you go for versions afterwards (3.0+, new Audacity owners), or the version before (2.3.3), you will not run into this issue.
I am stubborn, so I have verified that I can now open Audacity 2.4.2 and do a high quality pitch change without crashing. Here are the solution options. Know that both are still compiling from source.
Option 1: Do it manually command by command on the terminal
You will, however, notice that the important download link for the patch is broken. You must get it from here.
Note that you should preface all of the commands listed in that post with "sudo", or they will likely throw an error. (Or do whatever you need to for terminal to continuously recognize root access.) In addition, note that the "pre-installation test" section is not optional. Audacity will not run if the "Portable Settings" folder is not created, and furthermore, the "Portable Settings" folder and all containing files need to have write permissions enabled to the relevant non-root group/owner.
Whether you installed manually or used the script, you will need to go to "/usr/local/share/audacity/audacity-minsrc-2.4.2/build/bin/Release" to launch Audacity. In the file explorer window, you can click the button to the left of the magnifying glass to switch to text input where you can copy and paste the above path. Or, from /home, go up one level, and then navigate through manually.
Change the launcher's icon and add it to the start menu/desktop, per your specific distro and desktop environment.
Option 2: Modify and run a bash script
I found a helpful Youtube video stepping through the process, before they link to a bash script automating the whole thing. However, the script does not include the 2.4.2 patch. There are also a few modifications that need to be done to the script.
Modifications to make (right click the .sh file, open with, pick some text editor):
Line 35: change the dl_directory to match your own system. (Specifically, you probably need to replace "piuser" with your own account name.)
This change also needs be done on lines 115, 116, and 120 (or replace the hard coded parts with "${DL_DIRECTORY}").
Line 77 (optional): add "patch" as a dependent package to check. Like Python, it's mostly likely already installed, so you could leave this commented out.
Lines 139-142: Not a modification, but a note that I didn't end up using this (left it commented out), so I did have to download the 2.4.2 source code from fosshub manually and put it in the location specified by dl_directory. I also put the patch there. If you do want to try to automate the download, you'll not only have to add another line to also download the patch file, but both the source code for 2.4.2 and the patch have hyphens in their urls, so you need to either add backslashes to escape them, or enclose the entire url in quotation marks. But I also can't guarantee that either of those things will work, since I ended up doing the downloads manually.
Line 150: Per the manual installation above, the patch needs to be applied before the build. Add this code block at line 150 (after the script checks to see if the "Build" folder exists):
#SBSMS patch required for 2.4.2 if [ -f "${DL_DIRECTORY}/changepitch.patch" ]; then sudo cp "${DL_DIRECTORY}/changepitch.patch" "${DIRECTORY}/${VERSION}" fi sudo patch -p 1 < changepitch.patch
That's it for changing the script. Save it, close out of the text editor. (If you decided not to try letting the script do the downloads, then make sure you download the source code and the patch and put them in the dl_directory location at this point.)
Enable the script to be executable. (Right click the .sh file, Properties. On the Permissions tab, check that "Allow executing file as a program" is checked.)
Double click the .sh file. I suggest doing the "Run In Terminal" option so you can see the progress. (And if it's really short, probably something went wrong. The build section takes 20 minutes.)
This script does not include installing the offline manual for Audacity. That is covered in the guide posted in Option 1. Sorry, you'll have to do some terminal typing after all.
Whether you installed manually or used the script, you will need to go to "/usr/local/share/audacity/audacity-minsrc-2.4.2/build/bin/Release" to launch Audacity. In the file explorer window, you can click the button to the left of the magnifying glass to switch to text input where you can copy and paste the above path. Or, from /home, go up one level, and then navigate through manually.
Change the launcher's icon and add it to the start menu/desktop, per your specific distro and desktop environment.
#linux#linux mint#ubuntu#debian#audacity#category: other#vibrating at the mashups now once again at my fingertips
9 notes
·
View notes
Text
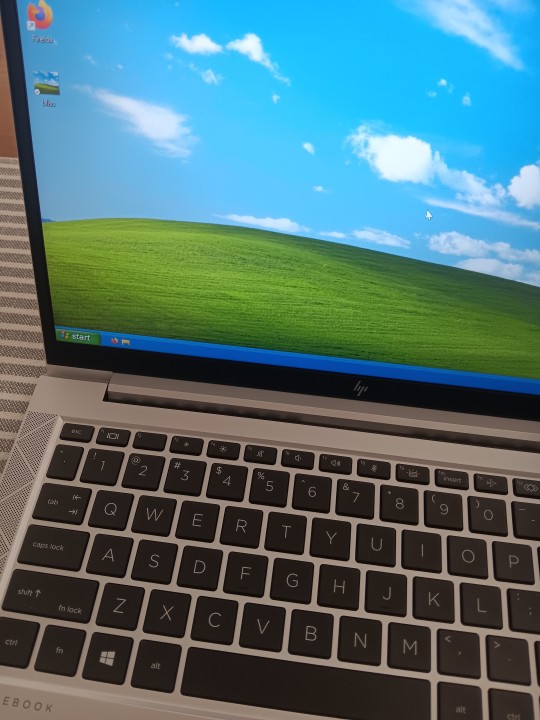
New pc!
the windows 11 setup made me feel a bit upset and anxious so I followed an online guide to make it look like XP with free software.
it's not a one-for-one copy but it's close enough to make me feel comfortable using it.
I still want to change my desktop icons and figure out how to get the file explorer menus to look like manila folders again because it trips me out that they don't!
I used OpenShell and RetroBar from github, not Windows Blinds. If anyone knows a trustworthy site to download the extracted Shell32 icons for XP, please let me know! I might just homebrew my own pixel art icons
2 notes
·
View notes
Text
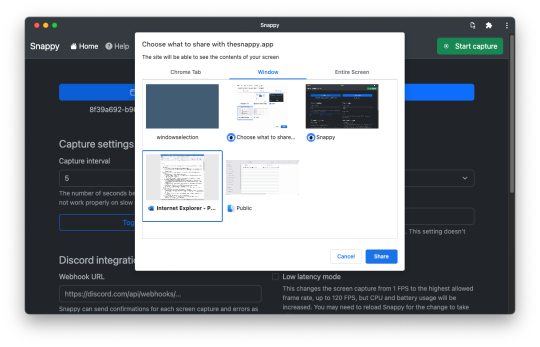
Introducing Snappy
I've been using tools like AutoScreenCap for years to automatically capture screenshots on an interval, but I wanted something that was more cross-platform and had more features. I decided to build my own alternative: Snappy!

Snappy is a Progressive Web App (PWA) that can run in any modern web browser, or it can be "installed" to look and feel more like a desktop application. It can be used to automatically capture a screenshot at a specified interval, down to one screenshot every single second. Snappy can save screenshots in PNG, JPEG, or WebP format, and can even send status updates (but not the images) to a Discord channel using webhooks, which can be useful for remote monitoring.
Snappy uses the getDisplayMedia browser API to capture your screen, just like Zoom and other web apps. In Chromium browsers (Google Chrome, Microsoft Edge, Vivaldi, etc.), the API allows Snappy to capture any screen, application window, or browser tab. It even works for tabs running in the background, which are normally off-limits to native screenshot tools. Firefox and Safari only support capturing screens and windows, and there's at least one Safari-specific bug that I haven't been able to fix yet.
Snappy takes advantage of the File System Access API to save screenshots to any location on your computer. That includes folders inside cloud storage folders, so you can quickly share screenshots with other people if needed. However, only Chromium browsers have fully implemented that API. In other browsers, like Safari and Firefox, screenshots are saved to your Downloads folder.
I was looking at a few different frameworks for building a screenshot application, such as Dart or Python, but a web app ended up being the best option. Since all the screen capture functionality is provided by the browser, and the new File System Access API is pretty simple, the initial working demo of Snappy was under 100 lines of JavaScript.
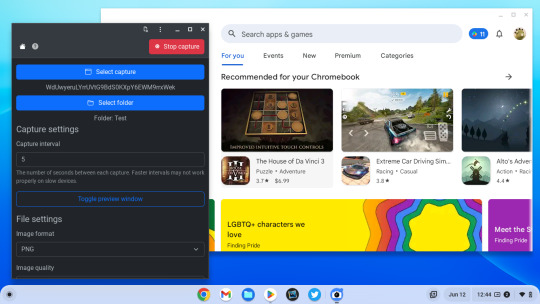
I know most people don't have a need for automatic screenshots, but I need it for my work on a somewhat regular basis (mostly capturing images from livestreams), and I think Snappy is already one of the best tools for the job. It might be especially useful on Chromebooks/ChromeOS, because most similar screenshot utilities aren't available on that platform.
I have some ideas for additional features, like keyboard shortcuts and camera capture support, but I consider Snappy "feature complete" already. I needed something that could take screenshots automatically and worked on more than just Windows, and Snappy does both.
You can try Snappy at thesnappy.app and the source code is on GitHub.
#web app#progressive web app#progressive web apps#snappy#chrome#firefox#web development#chromebook#chromebooks
2 notes
·
View notes
Text
This is your daily reminder of free alternatives to Spotify premium. SpotX is a free alternative to Spotify premium for windows and there is a modded Spotify apk for android, these both provide all premium features except for downloads. There are also a myriad of ways to download songs/videos off of YouTube without needing YouTube premium (for those songs not available on Spotify).
35K notes
·
View notes
Text
New PyTorch 2.7 On Intel GPUs Performance For AI Workflows

Intel GPU support and other features are improved in PyTorch 2.7. PyTorch 2.7 improves functionality and performance across platforms, including Intel GPU architectures. This version, with 3262 contributions from 457 contributors since PyTorch 2.6, aims to make AI research and development on more hardware easier and streamline AI workflows.
Improve Intel GPU Performance
PyTorch 2.7 prioritises Intel GPU acceleration, building on previous improvements. A single GPU programming model is used to provide a consistent user experience across Windows, Linux, and Windows Subsystem for Linux.
PyTorch 2.7 supports Intel GPUs in eager (torch.compile) and graph (Windows and Linux) modes. Users may have Intel GPU options. The enhanced support includes:
Intel A- and B-Series graphics
Intel Core Ultra Processors with Arc Graphics
Intel Core Ultra Mobile Processors (Series 2) with Arc Graphics
Max Series Intel Data Centre GPU
Series 2 Intel Core Ultra Desktop Processors with Intel Arc Graphics
Torch-xpu PIP wheels and simplified setup simplify installation. High ATen operation coverage with SYCL and oneDNN adds eager mode support for greater performance and functionality.
PyTorch 2.7 for Intel GPUs greatly improves scaled dot-product attention (SDPA) inference performance with bfloat16 and float16 data types. This was designed to accelerate attention-based models. On Intel Arc B580 Graphics, Intel Core Ultra 7 258V, and Intel Arc Graphics 140V, the new SDPA optimisation for Stable Diffusion float16 inference improves PyTorch 2.6 by up to 3x in eager mode.
Torch development is also crucial. breakthrough.Windows 11 Intel GPU compilation. The first accelerators that enable Torch are Intel GPUs, a milestone.work on Windows. This invention allows Windows to use graph mode compilation, previously only available on Linux, for performance. Torch improves inference and training similarly.PyTorch Dynamo Benchmarking Suite results on an Intel Arc B580 Graphics show compiling over eager mode on Windows.
Additional Intel GPU upgrades include
PyTorch 2 Export Post Training Quantisation (PT2E) performance optimisation for entire graph mode quantisation pipelines and computational efficiency.
Linux's AOTInductor and torch.export simplify deployment.
More Aten operators improve eager mode performance and operator execution continuity.
Developers can use Linux and Windows profilers to analyse model performance.
Further work on Intel GPU compatibility is expected to improve PyTorch-native performance, especially for torch-based GEMM computation.build and enhance LLM model performance using FlexAttention and less precise data types.
Improved accelerator support for torchao, torchtune, and torchtitan and distributed XCCL backend support for Intel Data Centre GPU Max Series will also be prioritised. GitHub and PyTorch Dev Discussion allow developers to track progress.
The Intel Core Ultra 7 258V and Intel Core Ultra 5 245KF with Intel Arc graphics provide detailed CPU, GPU RAM, OS, and driver specs.
Key Features of PyTorch 2.7
PyTorch 2.7 introduces several notable features, including Intel GPU acceleration:
NVIDIA Blackwell GPU support
PyTorch 2.7 now supports NVIDIA's Blackwell architecture and has pre-built wheels for CUDA 12.8 on Linux x86 and arm64. Updates to cuDNN, NCCL, and CUTLASS were needed for compatibility.
The distribution includes Triton 3.3, which supports torch.compile and Blackwell architecture. Users may install CUDA 12.8 with a pip script.
Torch supports Function Modes.compile
This feature is beta. Users can override torch actions to create custom functionality, such as rewriting operations for a backend. FlexAttention rewrites indexing.
Mega Cache
End-to-end portable Torch caching is available in Mega Cache beta. A model may be compiled and executed, then compiler artefacts can be loaded on a different computer to pre-populate torch.Cache compilation speeds later compilations.
PyTorch Native Context Parallel
The PyTorch Context Parallel API, initially a Prototype feature, allows users to create a Python context for parallel execution of calls to torch.nn.functional.scaled_dot_product_attention(). It currently supports cuDNN, Efficient, and Flash attention backends. TorchTitan's Context Parallel LLM training uses this.
FlexAttention improvements
FlexAttention, introduced in PyTorch 2.5.0 to let researchers adjust attention kernels without writing kernel code, is improved in PyTorch 2.7. These include:
Processing LLM tokens on x86 CPUs begins.
This release adds attention options for LLM inference initial token processing to PyTorch 2.6's x86 CPU support. It makes using FlexAttention on x86 CPUs.assemble more smooth by replacing scaled_dot_product_attention operations with a single API and enjoying high torch performance.
Optimisation of x86 CPU LLM throughput mode
By adding a C++ micro-GEMM template capabilities, PyTorch 2.6's huge batch size limitations have been solved and LLM inference throughput on x86 CPUs has improved. Users get better speed and seamlessness using FlexAttention APIs and torch.LLM-throughput x86 compilation.
Focus on inference. This version provides an inference-optimized PagedAttention and GQA decoding backend. New features include trainable biases, performance tuning guides, and layered jagged tensors.
Check each map.
Foreach Map is a torch-using prototype.Compile, like torch, lets users apply user-defined or pointwise functions like torch.add to tensors.foreach lists.
One of its benefits is that it can lift user-defined Python functions and handle lists of tensors or scalars. Torch.compile generates a horizontally fused kernel for optimal results.
Support Inductor Prologue Fusion
Another prototype feature, prologue fusion, optimises matrix multiplication (matmul) by incorporating pre-matmul operations into the kernel. Lowering global memory bandwidth improves performance.
In Conclusion
The release description highlights how upstream Intel GPU efforts have improved since PyTorch 2.4 and how PyTorch 2.7 capabilities have boosted AI workloads on a variety of Intel GPUs. In particular, torch.compile on Windows and SDPA optimisation for Stable Diffusion inference on Intel Arc and Core Ultra systems increase performance.
#PyTorch27#PyTorch26#PyTorch24#IntelArcBSeries#IntelCoreUltra#IntelArcB580Graphics#PyTorch#IntelCoreUltra7258V#LLMinferenc#News#Technews#Technology#Technologynews#Technologytrends#govindhtech
0 notes