#how to AutoHotkey
Explore tagged Tumblr posts
Visit Tumblr Blog
Explore Tumblr blogs with no restrictions, modern design and the best experience.
Last Seen Tumblr Blogs


Fun Fact
Premium Tumblr themes are available from anywhere between $9 to $49.
Text
AutoHotkey Newsletter August 14th, 2023
Howdy, Like most people that use AutoHotkey, my first uses of it were very simple things like HotStrings and Hotkeys. I spent several years using AutoHotkey to just utilizing those until I decided to change job roles and moved into Information Technology. The new job I was hired for I was tasked to find a way to automate an incredibly mundane task (the job would turn over after ~1 year because…

View On WordPress
#ahk news#ahk newsletter#AutoHotkey News#AutoHotkey Newsletter#how to AutoHotkey#Learn AutoHotkey#Learning AutoHotkey
0 notes
Text
Me playing rpgs again after five years: man you sure have to press that one button over and over again huh
#how did this never bother my arms before#I’m using autohotkey for the simpler games when I’m using controller#but ffxiv? not even any space for a second confirm button
1 note
·
View note
Text
Playing around with data packs again has me wondering how many other clumsy programming languages you could use to make a video game. Could you write a full-featured text adventure with just Vim macros? Could you build a precision platformer with MS Paint and AutoHotKey? There's a lot of state being exposed to these systems, even if they struggle to manipulate it precisely!
#my thoughts#programming#like with paint as the view and controller and ahk as the model#how features could you get away with i wonder
18 notes
·
View notes
Note
how do you manage to upload so much? all your posts are cropped and always tagged and everything too?
Short answer: I got what I like to call "laborious laziness syndrome"
Long answer: Over the years, I basically automated every tedious part of uploading posts to this blog.
For example, the (free) program XnConvert will automatically crop a thousand manga pages in like two minutes. It can do a lot more than that, but I mostly use it for cropping.
Tagging and captioning is done by a script I wrote in AutoHotkey. With the click of a button, it does this:

I am not gonna lie, I am pretty proud of this one…
The only parts that aren't automated are actually reading the manga and picking which pages and panels I want to upload, aka the fun parts.
Anyway, when I started out, I basically had a text file with all the captions and tags, which I copied and pasted by hand. But the most time-consuming part back then was, by far, manually cropping all the pages and panels in Lightroom.
But I am pretty lazy, so I decided to try and automate all this stuff. It took a lot of time and effort (that's the laborious part of "laborious laziness") but problem-solving has always been a hobby of mine.
Some people knit to relax, I run this blog.
#the and stuff part of manga and stuff#tales from the toolbox#manga and stuff answers stuff#for a long time I actually uploaded 10 posts a day but that was a little much so I reduced it to 5#reblogging older posts of mine also helps
96 notes
·
View notes
Text
I'm in the fucking Weedy trenches rn trying to learn how AutoHotkey works / writing a few scripts for some Weedy tech I'm trying to do. Is this what it's like for Specialistknights players every day?
19 notes
·
View notes
Text
update: i still cant figure out how to run autohotkey and my script keeps fucking up? but im using fakedata to make sockpuppets accounts so hope that helps 🫡
#gcesties who have been botting please keep it up#it’s not that serious except that it IS#dw i will keep making those sockpuppets ive made about forty of them maybe? lmao#additional: gc finally in the lead again I LOVE YOU BOTTER (?) ON OUR SIDE WEEHEEEEE
3 notes
·
View notes
Text
So, how's the JukeBox development coming along? Well, it sure is coming, I promise.

In case you don't know what a JukeBox is, it's a little hotkey device I'm building! I originally made this to assist with my endeavors in streaming, but it turns out having extra keys is very useful for a lot of things! Whether it be hotkeys for quickly running macros via AutoHotKey, managing your Discord audio settings, playing funny sounds with VoiceMod, switching tools in your favorite art program like Paint Tool SAI, or managing OBS like I do. It's a very powerful device, and all it does is act like a keyboard with the F13-F24 keys. I bet you didn't even know there was more than the F1-F12 keys, am I right?
About a year ago, I said I would begin selling these soon. That was a bit of a lie, fortunately I am very good at those. That last bit was also a lie, in case you couldn't tell. I got the opportunity to work on the JukeBox as part of an independent study for college credit, so I took a lot of time to plan and rethink the product. That part wasn't a lie The result is the new V5 board!
Ok so this isn't the actual V5 board yet.
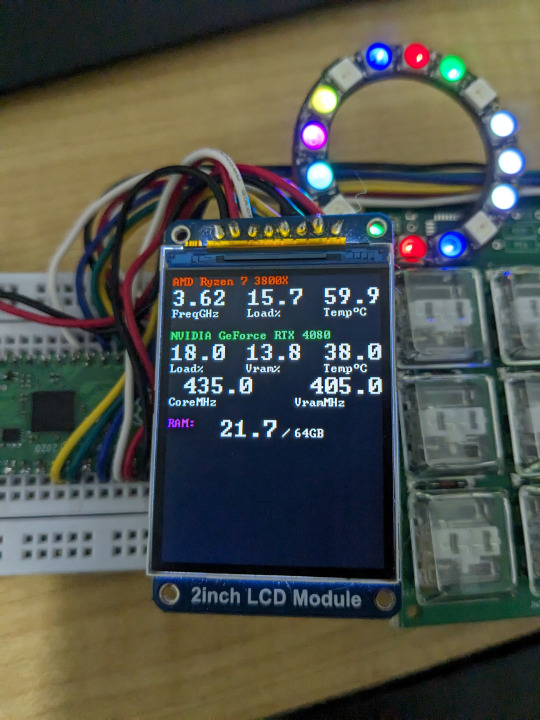
I decided to completely change up what makes up a JukeBox. I decided to use an RP2040 chip, which is used to power a Raspberry Pi Pico. I used a Pico board, along with the old JukeBox V4 boards, an RGB LED ring, and an OLED screen to build my ideal V5 prototype. The result is the same JukeBox known and loved but with some added features, like reactive lighting and a screen to display fun graphics and info!

This is the finalized board, it's design has been shipped off to manufacturing, and will hopefully arrive right at the start of the new year. I'm paying a lot of money for just 10 of these things! I can't wait.
The plan is to sell 3 versions of the board, a basic variant (keyboard only), an RGB variant, and an RGB plus screen variant. Prices are still being determined, but they will be higher than previously anticipated due to rising material costs. The goal is to keep the basic variant at $25 to maintain affordability. You will also be able to choose what kinds of keys you want, be it Cherry MX Blues or Kailh Choc Whites.


I'm working on the final casing. It'll be a 3D printed shell with some nice M2.5 nuts and bolts. It'll also be in a mostly-opaque white so the RGB looks good shining through. The legs are also completely optional, both the case and the legs will have nice rubber feet to keep the board steady. The keycaps will be "relegendable", meaning you'll be able to stick a piece of paper in them with whatever you want on them. You get everything seen here, plus a USB-C cable, and my deepest gratitude. Maybe some day you'll get to have a JukeBox in atomic purple instead of a basic white!
The best part about it all is that you don't need to install any drivers! The keyboard component is always guaranteed to work on any computer that supports USB, and most usually do (hopefully). The screen and RGB won't work without a companion app, sadly, but I'm working hard to make it painless to setup and use, near plug-and-play. I've been writing it in Rust while working on the board, and it will support Windows and Linux without much issue.
Lastly, the entire project is going to be open source! The code will be under an open license, and all the physical parts will be usable under a Creative Commons license (CC BY-NC-SA). I won't allow people to just up and sell the boards without modification, but if someone wants to make and sell their own variant I'd be more than happy to allow it if they ask. Devices like these should be cheap and accessible for everyone.
Hopefully I'll start selling these on my Ko-fi before Q2 of 2024. See you then!
13 notes
·
View notes
Text
anyone who knows how to use autohotkey is not going to heaven
9 notes
·
View notes
Text
i definitely did not just learn how to make a togglable loop in autohotkey just to automate booping
2 notes
·
View notes
Text
I'm working on a project that has a few little programs in it and i thought a little tarot drawing program would be cute. but i couldnt find any pixel art decks under the creative commons to fit the theme.
so naturally, the project spiralled into a whole night of making some. I didnt have time to make my own deck. so first i messed around with making some from creative commons icons but i couldnt get the look consistent and even if i could, making a whole deck would take too long.
The solution i landed on was procedurally modifying the RWS deck to fit the aesthetic. after a loot of tinkering with photoshop actions and a library i modified, i managed to get something i really liked.
I think with a bit more tinkering and some cleaning up, they could make for a really cool deck and i plan to freely release the images when they're done.
this is the result so far
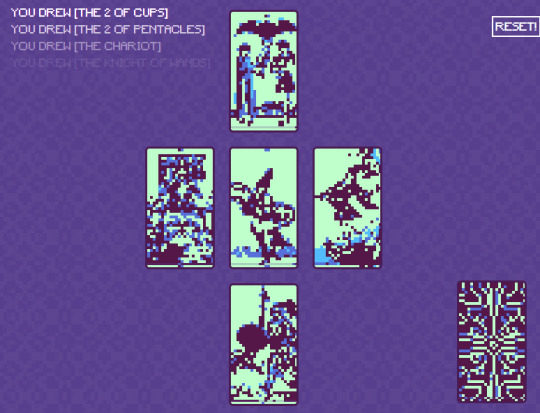
turns out, running a series of actions on 78 different images is really hard. the js library i used for a part of the process only supported doing one image at a time so i had to figure out how it worked and modify it. all up, it was a series of photoshop actions, a javascript library, a bash script, and an autohotkey script. I think i can refine the process and make something really cool, especially with some manual work on them afterwards.
id really like to make a physical copy of these for myself maybe at playing card size. here are a few of my favorites


3 notes
·
View notes
Text
Hi! Random hobbyist author here! (Though I don't really write on tumblr.) I love the em dash—I use it liberally. In fact, I use it in casual conversation; you know, on those occasions in casual conversation when some typographical offsetting—particularly parenthetical asides—would be called for. How do I do it?
I used to hold down alt and then 0151 on my numpad because my old laptop had a numpad on it. I didn't really memorize alt codes generally, but for something I used all the time? Easy peasy. Plenty of people on Windows are like that; I know (most?) Linux distros have some similar procedures for writing out Unicode characters by control code, and I know Mac has something.
But then I got my newer laptop and for some fiendish reason, despite sporting an extra-wide build and being the direct successor of my old laptop model with glorious in-chassis numpad, it had a TKL garbage. There's literally room in the thing for the numberpad. There is empty space, right there. Evil design.
Did I give up on my darling daughter Em? Well, no—you knew that already, I used some earlier—for a while, I made use of copy-paste. I got pretty tired of that, though. I copy a lot of things, and while I have a lil' application for memory in my clipboard it's kind of annoying to have to dig into it relatively regularly. Eventually I got an external keyboard which gloriously has the numberpad and also sports magnificently clicky mechanical keys. But before that, I found an even better solution.
I installed AutoHotKey and then made a file with this in it:
!-:: { Send "—" }
So now I just press alt and - and kabam I get —. It's so easy. I can use them all I want, I basically have an em dash key on my keyboard now. I'm sure other diehard fans of the em dash have our various ways. For that matter, the acolytes of the en dash likely have at least 1–5 ways between them for that darling. (I generally cheat and use the hyphen for that, though, I must confess.)
Humans can be very particular about what we want to do and how we want to do it. We'll find our ways over whatever random technical hurdles might be there, and often that's not even that hard—for better or worse we did make these silly computer machines for doing stuff, after all. And as pointed out, if we didn't, there wouldn't be the training data for AI to learn that sometimes people use whatever thing.
And the same principle, as stated, goes for quirks beyond the technical, too.
"this is DEFINITELY written by AI, I can tell because it uses the writing quirks that AI uses (because it was trained on real people who write with those quirks)"
c'mon dudes we have got to do better than this
27K notes
·
View notes
Text
Anyone know how to use AutoHotkey with tumblr?
I wanna make a hotstring that'll paste in OP's blog name, but I am an amateur and have no idea how to do more than check that the focused page is actually tumblr and make the hotstring itself with an empty %OPGet% variable. What I probably need is: determine what post is hilighted (this must be a thing since tumblr can navigate with keys already) grab the post contents. find the post's OP link. strip the name out of the url with regex return the name to the variable.
Any help?
0 notes
Text
Setting Up A Windows 11 Computer as a Permanent Installation
This guide covers setting up a brand new Windows 11 computer to serve as an arcade machine, but it is relevant for any project that where a single program should run in a gallery environment.
I'm a member of the arcade non-profit, Arcade Commons. As you might guess, we frequently make arcade machines that need to work as easily and reliably as possible. They are often on loan to venues, so the more automatic the machine is, the more likely it is to actually be running. This is equally true for setting up interactive projects in galleries.
The goal is for the computer to turn on as soon as it gets power, launch the game on startup, and not be interrupted by myriad updates and other popups that plague the modern Windows operating system. I also added an AutoHotkey script to handle restarting the game if it crashes.
This is an update to my previous post on how to do this for Windows 10.
That post was itself based on this excellent guide by Eva Schindlin on setting up Windows 7 for permanent installation.
I'm writing this post because I just got a new computer to serve as a dedicated device for Salmon Roll: The Upstream Team, a game I developed with Jane Friedhoff and Diego Garcia. I took notes as I setup the machine, following along with my old post and adding some new things along the way.
I am working with a GMKtec NucBox G5 running Windows 11 Pro.
Required software
Before we get started, get installers for Notepad++ and AutoHotkey on a thumb drive.
I say to put these on a thumbdrive, because I do not want to connect my new computer to the internet if I can avoid it.
AutoHotkey is used for automation. If you don't plan on using it, you can skip this. Note: the AutoHotkey scripts I provide in this post are for v1.1, NOT v2.0. Make sure you grab the right installer.
Notepad++ is an excellent free text editor for Windows. Maybe you can get by doing things with TextEdit, but taking the 30 seconds to give yourself a good text editor will pay dividends.
Finally, I add the game I want to run.
Initial setup
The first time you plug the computer in, you'll get the usual Windows setup flow. If you are not connected to the internet, you should be able to skip linking the device to a Microsoft account.
If you do need to be online, it is possible to circumvent the seemingly required Microsoft account login. Here are a few posts on the subject.
Set the username as something simple with no spaces. I went with "salmon".
Leave the password field blank. This prevents needing the password to login.
On the privacy screen I unchecked every option. No tailored experiences etc.
After that I hit confirm, and the computer thinks for a bit.
Prepping the computer
This is the bulk of the process! We're going to change a lot of settings to keep things running smoothly and without interruption.
1. Run those installers
Install Notepad++ and AutoHotkey.
2. Test the game
Now is a great time to make sure your game actually runs well on this computer.
3. Prevent sleeping
We do not want the computer to go to sleep ever.
Control Panel
Hardware and Sound
Power Options
Change when the computer sleeps
Set it all to “never”
4. Disable Windows Fast Startup
If you set a wake time in BIOS (more on that in a bit) but it doesn't work, that may be because Windows Fast Startup is turned on. This makes the computer startup faster, but does it by hibernating instead of actually shutting down.
While in Power Options:
Select Change What Power Buttons Do
Click “Change settings that are currently unavailable”
Uncheck “Turn on fast startup”
Save changes
On this computer, "Turn on fast startup" was unchecked by default, but that is not always the case.
5. Turn off screen saver
Go to settings and turn the screen saver off.
Right click on the desktop and select "personalize"
Then search for "screensaver" in the search bar of the personalize window
This computer already had screensaver set to "none" but it's worth checking.
6. Change the desktop background
The desktop will be visible during startup and might be seen if the game crashes. It really breaks the illusion of an arcade or art installation to see the default Windows desktop.
While in personalize, you can:
Search for "desktop"
Select "Choose your desktop background"
If you have a logo for your project you can set that image. Otherwise, from the dropdown, select "solid color" and pick one. I go with black.
For the DreamBoxXx we set the desktop to be an image that looked like a loading screen, which worked amazingly well!
7. Set the computer time
Make sure the system clock has the correct time. This is important to automate startup/shutdown.
Right click the time in the bottom right corner of the taskbar
Select “Adjust date/time”
8. Disabling updates
Updates have a good chance at messing up the setup, so it is worth avoiding them. As much as possible, you want this install to be frozen in amber.
I'm trying to avoid this by simply never connecting to the internet, but that will often not be viable.
Poking around online and the consensus seems to be that there is really no way to stop them short of staying offline.
Some possible solutions that I have not tested:
Reddit post
Microsoft Forum
9. Disabling startup processes
Press the Windows key and search for “startup”
Select "Startup Apps"
Disable all of them
If your project requires QuickTime or some other Apple product, set Apple Software Update to never check for updates.
10. Hide the taskbar & widgets
Right click the taskbar and select “Taskbar settings”
Turn Widgets off
Scroll down and expand "Taskbar behaviors"
Check "Automatically hide the taskbar"
11. Add shortcuts/aliases to the startup folder
We'll want to have items that run on startup. This means dropping them in the startup folder (which is different from the panel where you disabled the startup processes).
You can open this folder by pressing Win-R for the run prompt and entering shell:startup
If you don't mind doing this every time, it's fine to just memorize that command, but I like to make a shortcut to the startup folder.
With the startup folder open:
Go up one level by selecting the enclosing folder, Programs
Right click the Startup folder
Select "Show more options"
Select Send to->Desktop (create shortcut)

A shortcut is an alias, a link to another file or folder on the computer. It is not a copy.
You can move this shortcut anywhere. It does not need to stay on the desktop.
Double clicking it will open the startup folder, same as entering "shell:startup" on the run prompt.
I'll dive into some AutoHotkey stuff further down, but if you just want your game to launch on startup, you can make a shortcut for the game and drop that shortcut into the startup folder.
Go to the exe for your game
Right click and select "Show more options"
Select Send to -> Desktop (create shortcut)
Find the shortcut/alias on the desktop
Drag it into the startup folder
This should be enough to launch your game on startup.
12. Bypass the login screen
If you kept the password blank and did not connect to the internet, the computer should skip the login screen. No muss no fuss.
But if you are getting a login screen, here's what I did on Windows 10. It may still work.
By default, you need to enter your password on startup, but this can be turned off. Here are the steps in this guide to bypass this.
Search for “netplwiz” in the start bar
Uncheck the box labeled “Users must enter a user name and password to use this computer.”
Hit OK
If you do not see this checkbox in the netplwiz screen, you may need to disable "Require Windows Hello sign-in for Microsoft Accounts." You can follow these steps from Tenforums user Faslane to do it pretty easily:
Just open the sign in options at settings/accounts/sign in options and turn the "Require Windows Hello sign-in for Microsoft Accounts" to off, then re-open Netplwiz. Voila! it's back ;-)
Modern Windows 10 PCs are set up with a PIN and not a password. Presumably this is true in Windows 11 as well. You will need to disable the PIN first, otherwise the option to bypass the password won’t show up in netplwiz.
Furthermore, if you don’t have a password OR pin, then the message “Require Windows Hello Sign-In” will be checked ON but greyed out so you can’t change it! So you need to then ADD a pin, uncheck the box, then you will see the checkbox in netplwiz.
Although I have not tested these steps for Windows 11, in favor of never connecting to the internet, they seem to match up with this Windows 11 answer from Tobias Schneider on the Microsoft forums.
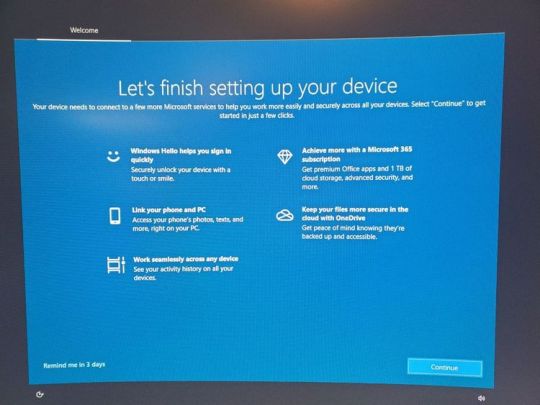
13. Preventing the “Let’s Finish Setting Up Your Device” blue screen
Fellow Arcade Commons member Mark Kleeb recommended I add this as it has come up in a bunch of our machines. This screen can be really annoying because it often waits a few days or months before popping up and ruining your installation.
This post on the Microsoft forums has a solution for Windows 10.
The exact options are a little different on Windows 11:
Open Settings
Select System
Select Notifications
Scroll down to Additional Settings and select it
Uncheck everything
While I was in the Notifications page, I went ahead and unchecked everything because why not.
14. Hide desktop icons
This is optional, but I like to put the various files I need on the desktop. I also don't want it to look cluttered if people see the desktop during startup:
Right click anywhere on the desktop
Select View
Uncheck "Show desktop icons"
You can still view the desktop files by opening a file explorer window.
15. Setting the computer to shut down automatically
For some installations, this will not matter, but we often have the arcade machines living at venues. We can't count on the staff there turning them on and off, so it's good to automate this so the computer is not running 24/7.
Shutting the computer down can be done via the Windows task scheduler. Turning it back on is done via BIOS (we'll get to that in a second).
You can ignore this if you're in an environment when you will be around to turn the computer on and off.
Eva Schindling’s guide has this process with pictures and it is relatively unchanged in Windows 11, but here are the steps:
Control Panel
System and Security
Windows Tools (in Windows 7 and Windows 10 this was "Administrative Tools")
Task Scheduler
Action Menu
Create Basic Task
Add title and description
Task Trigger: select Daily
Set your shut-down time and recurrence
Action: select Start a program
Program/script: C:\Windows\System32\shutdown.exe
Add arguments: /s
Click Finish
Make sure you remembered to set the computer time!
BIOS settings
BIOS is short for Basic Input/Output System and it is the firmware that lives on your computer at a lower level than your operating system.
There's a good chance you've never needed to look at it, but this is where we can do things like ensuring that the computer turns on as soon as it receives power, or having it turn itself on at a given time (as long as it is plugged in).
Every computer has a different BIOS and there are different ways to open up BIOS, but it generally involves holding a function key during startup. Restart the computer, and start holding the key as soon as it shuts down. You generally need to be holding it the moment it starts to enter BIOS.
The specific instructions here are for a GMKtec NucBox because that's what I'm setting up, but the general principle can be applied to any computer.
You may need a wired keyboard to do this. Wireless keyboards may not be connected yet during the startup process. Often it's fine (it was on this computer), but if you're not getting a response, try a wired keyboard.
For this computer I had to hold the delete key during restart. Other computers I've worked on have used F12 or F2. Search for "enter BIOS [brand of computer]" for this info. Some computers will print the key you need to press for BIOS during the startup process, but many don't.
BIOS may be a keyboard-only DOS-looking screen, or it may have a simple GUI (although one that you can probably navigate with just keyboard). Likewise, the exact settings will be a little different, but I'll tell you what to look for.
Make sure to save and exit when you're done. The computer should startup normally after that.
BIOS to turn the computer on at a set time
You are looking for a setting along the lines of “Resume by Alarm” or “Wake Settings.”
For example, on the computer we used for the DreamBoxXx, it was under advanced->S5 RTC Wake Settings.
On my GMKtec NucBox it was under Power->S5 RTC Wake Settings.
Then I set it to "Enabled" and selected "Fixed Time".
Note: Make sure you disabled Windows Fast Startup earlier or this may not work.
BIOS to turn the computer on when plugged in
It's very handy to not need to press the power button to start the computer. By setting the device to turn on as soon as it receives power, your whole installation can be turned on by flipping on a power strip.
In the BIOS settings, there will also often be an option to have the computer turn on when it is connected to power. The setting is often primarily for what to do after a power outage, but we can use it for our purposes. The name of the setting changes from machine to machine, but it is typically something along the lines of “AC Back On” or “Action When Lost Power” or "Wake on Power".
For my GMKtec NucBox, it was under Chipset:
Chipset -> PCH-IO -> Wake on Power -> S0 State
You really have to dig to find this option sometimes. Searching the web for "[Computer band] Wake on Power" can help.
AutoHotkey
This part is optional, but using an AutoHotkey script to automate things, like relaunching the game if it crashes, can be useful.
In the case of Salmon Roll, simply putting an alias to the game in the startup folder is not enough because when it launches, there's the little Unity popup where you have to click "Play".

So instead I made an AutoHotkey script that launches the game, waits a few seconds and then presses ENTER.
It also checks every 10 seconds to see if there is no window matching the window title of the game (which is what will happen if the game crashes or somebody closes it), and it will relaunch the game if that happens.
You can see my script here. Feel free to modify it for your own purposes: https://gist.github.com/andymasteroffish/41a02deb5d2924dadb4e3c005e564b8f
If you do not need it to press ENTER after launching the program, just remove these lines:
Sleep 5000 ; Wait 5 seconds Send {Enter} ; Press Enter
Full disclosure: I am script-kiddie-level with AutoHotkey and this is mostly clobbered together from old scripts and random things from the internet.
I HIGHLY recommend putting the hotkey to kill the script in writing on the computer. It can be super confusing to try to work on a machine where an AutoHotkey script is running in the background opening apps or taking control of the mouse etc. I always use Win-Z to kill my scripts, but it's up to you. Do not write an AutoHotkey script that has no way to exit.
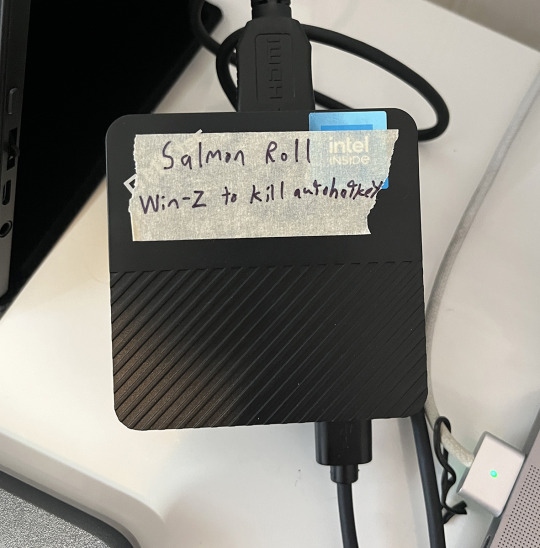
It is easy to forget to do this and you will regret it.
Once you have your AutoHotkey script, you can put it directly in the startup folder. If you are using AutoHotkey, make sure that you do not also have an alias to the game in the startup folder or it may launch twice.
That's it!
Hopefully that gets your arcade game or art installation running from now until the end of time.
Remember: do not connect to the internet if you don't have to!
And if you are more technically inclined, consider Linux for tasks like this.
If you use this guide, hit me up on Mastodon or Tumblr and show me what you made!
Follow Arcade Commons on Twitter, Instagram or Bluesky to see our games in action!
0 notes
Text
The Ultimate Guide to Windows 10 Keyboard Shortcuts
Windows 10 is packed with useful features, but nothing boosts productivity like mastering keyboard shortcuts. These shortcuts save time and make navigating your system a breeze. In this guide, we’ll explore the most essential Windows 10 keyboard shortcuts and some lesser-known ones that can significantly enhance your workflow.
Table of Contents
Introduction
Basic Keyboard Shortcuts
Copy, Cut, Paste
Undo, Redo
Select All
Windows Key Shortcuts
Basic Windows Key Functions
Advanced Windows Key Shortcuts
File Explorer Shortcuts
Navigation
File Management
Virtual Desktops Shortcuts
Creating and Managing Virtual Desktops
Switching Between Virtual Desktops
Command Prompt Shortcuts
Basic Commands
Advanced Commands
Accessibility Shortcuts
Magnifier
Narrator
High Contrast
Browser Shortcuts
Microsoft Edge
General Browser Shortcuts
Customizing Keyboard Shortcuts
Conclusion
1. Introduction
Keyboard shortcuts are a crucial part of using Windows 10 efficiently. By reducing reliance on the mouse, you can perform tasks more quickly and keep your workflow uninterrupted. This guide covers essential shortcuts and dives into more specialized ones, providing a comprehensive resource for users at all levels.
2. Basic Keyboard Shortcuts
Copy, Cut, Paste
Ctrl + C: Copy selected item
Ctrl + X: Cut selected item
Ctrl + V: Paste copied/cut item
Undo, Redo
Ctrl + Z: Undo an action
Ctrl + Y: Redo an action
Select All
Ctrl + A: Select all items in a document or window
3. Windows Key Shortcuts
Basic Windows Key Functions
Windows + D: Show or hide the desktop
Windows + E: Open File Explorer
Windows + L: Lock your PC
Advanced Windows Key Shortcuts
Windows + Tab: Open Task View
Windows + I: Open Settings
Windows + S: Open Search
Windows + X: Open Quick Link menu
4. File Explorer Shortcuts
Navigation
Alt + D: Select the address bar
Ctrl + F or F3: Search in File Explorer
Ctrl + N: Open a new window
File Management
Ctrl + Shift + N: Create a new folder
Alt + Enter: Open properties for the selected item
F2: Rename selected item
5. Virtual Desktops Shortcuts
Creating and Managing Virtual Desktops
Windows + Ctrl + D: Create a new virtual desktop
Windows + Ctrl + F4: Close the current virtual desktop
Switching Between Virtual Desktops
Windows + Ctrl + Left/Right Arrow: Switch between virtual desktops
6. Command Prompt Shortcuts
Basic Commands
Ctrl + C: Copy selected text
Ctrl + V: Paste text
Advanced Commands
Ctrl + Shift + Plus (+): Zoom in
Ctrl + Shift + Minus (-): Zoom out
7. Accessibility Shortcuts
Magnifier
Windows + Plus (+): Open Magnifier and zoom in
Windows + Minus (-): Zoom out
Narrator
Windows + Ctrl + Enter: Turn Narrator on or off
High Contrast
Left Alt + Left Shift + Print Screen: Turn high contrast on or off
8. Browser Shortcuts
Microsoft Edge
Ctrl + T: Open a new tab
Ctrl + W: Close the current tab
Ctrl + Shift + T: Reopen the last closed tab
General Browser Shortcuts
Ctrl + L: Highlight the URL
Ctrl + Tab: Switch to the next tab
Ctrl + Shift + Delete: Open the clear browsing data options
9. Customizing Keyboard Shortcuts
Windows 10 allows customization of certain keyboard shortcuts to better suit your workflow. To customize, you can use third-party tools like AutoHotkey, which provide extensive options for creating and managing your own shortcuts.
10. Conclusion
Mastering Windows 10 keyboard shortcuts can dramatically increase your productivity and streamline your tasks. Whether you are a beginner or a seasoned user, incorporating these shortcuts into your daily routine will save you time and effort. Keep this guide handy as a reference and start practicing these shortcuts today.
External Authoritative Sources
Microsoft Support: Keyboard shortcuts in Windows
How-To Geek: The Ultimate Guide to Windows 10 Keyboard Shortcuts
Lifewire: Essential Windows 10 Keyboard Shortcuts
By incorporating these detailed steps and tips, you can take full advantage of Windows 10 keyboard shortcuts, making your computing experience faster and more efficient.
#1.#Windows10#2.#KeyboardShortcuts#3.#WindowsShortcuts#4.#ProductivityTips#5.#WindowsTips#6.#TechTips#7.#ComputerShortcuts#8.#WindowsGuide#9.#VirtualDesktops#10.#FileExplorer#11.#AccessibilityShortcuts#12.#CommandPrompt#13.#MicrosoftEdge#14.#BrowserShortcuts#15.#TechHacks
0 notes
Text
Look– Listen—
I didn't buy a second keyboard, learn how to do basic coding in lua and scripting in autohotkey, and set up my second keyboard to have the en and em dashes on the most accessable key on the secondary keyboard for y'all to come out and attack me like this.

63K notes
·
View notes
Text
Really really kicking myself for never learning how to use AutoHotkey before now, this shit is easy and fantastic
1 note
·
View note