#how to build a wordpress website with bluehost
Text
How to Build a Website With Wordpress
Building a website with WordPress is a popular and user-friendly choice. WordPress is a content management system (CMS) that allows you to create and manage websites easily, even if you don't have extensive technical knowledge. Here's a step-by-step guide to help you build a website with WordPress:
Step 1: Choose a Domain Name and Hosting
Select a Domain Name: Choose a unique and memorable domain name that reflects your website's purpose. Make sure it's easy to spell and related to your content or brand.
Choose a Hosting Provider: Sign up with a reputable hosting provider that offers WordPress hosting. Popular options include Bluehost, SiteGround, and HostGator. They often provide easy WordPress installations and good customer support.

#how to build a website with wordpress#how to build a website with wordpress and elementor#how to build a website with wordpress from scratch#how to build a website with wordpress.org#step by step how to build a website with wordpress#how to build a website with wordpress pdf#how to build a wordpress website with bluehost#how to build a dating website with wordpress
0 notes
Text
The Best 5 Website Hosting For Blogging
Are you prepared to launch your blog? You must first find a blog hosting service. You are exactly right place to find the answers you are seeking .
As a beginner or advance blogger we have something in our box to make you happy. As a blogger I know how how confusing can be finding your right web hosting service.
That said, there are stacks of website builders for blogs to help you get your big ideas online – the tough part is sifting through the trash to find a tool that can cater to your blogging needs.
That’s why in this guide, we’re focusing only on the best 5 website hosting for blogging. In our research we not only tested these platforms ourselves and analyzed their features, prices, and more – we got other, everyday people to test them out too. So read on, to find out which blogging platform is right for you!
We’ll suggest the best blog hosting providers in this article.
So let's learn them here ...
#website builder#best web hosting#best website builder#best hosting for wordpress#make money blogging#start a blog#how to blog#how to start a blog#blog business#make money as an affiliate#side hustle for beginners#side hustle ideas#wordpress#bluehost#build a website#blogging
1 note
·
View note
Text
How to Begin Your Web Design Journey: A Step-by-Step Guide in Simple Terms

Understanding the Basics:
Learn about HTML, which is like a web page’s skeleton.
Understand CSS, which is like makeup for web pages.
Know how to make websites look good on different screens.
2. Choose your tools:
Start with simple text editors like Notepad (for Windows) or TextEdit (for Mac).
Later, try fancier editors like Visual Studio Code.
For making pictures, try Adobe Photoshop or Illustrator.
3. Learn HTML and CSS:
Use websites like W3Schools or Codecademy.
If you want to learn more about web design with certification and placement, ACTE Institute offers comprehensive machine learning training courses that can give you the knowledge and skills necessary to excel in this field. Consider the infinite possibilities for data analysis, automation, and decision-making that machine learning may create.
YouTube: There are many video tutorials covering HTML and CSS for beginners.
They teach you how to make web pages and make them look nice.
You can also learn from courses on Coursera or edX.
4. Practice your skills.
Besides learning, make simple web pages to get better.
Try harder projects as you get more confident.
Make your own website to practice lots.
5. Responsive Web Design:
Make sure your websites work well on phones and computers.
Learn about media queries (they help your design fit different screens).
6. Master CSS Layouts:
Get really good at arranging web stuff using CSS (like making boxes and arranging them nicely).
7. Web Design Frameworks:
Think about using ready-made kits like Bootstrap.
They have pre-made pieces to help you design faster.
8. UI/UX Design:
Learn to make websites easy to use and nice to look at.
Think about how people will use your site.
9. Web Hosting and Domain:
To show your website to people, you need a place to put it (hosting) and a name for it (domain).
Lots of companies can help with this, like Bluehost or HostGator.
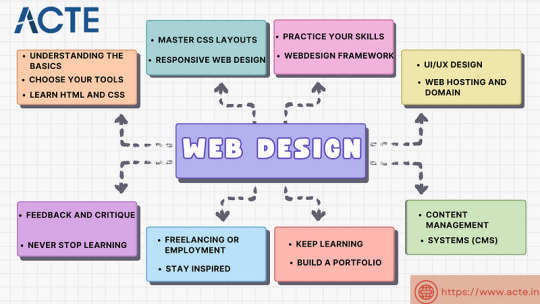
10. Content Management Systems (CMS):
Consider using tools like WordPress to manage your website easily.
11. Keep Learning:
Web design keeps changing, so keep learning new stuff.
Read blogs, watch webinars, and take more advanced classes.
12. Build a portfolio.
Make a collection of your best work to show others.
People who might hire you want to see what you can do.
13. Freelancing or employment:
Decide if you want to work alone or with a company.
Both ways have good things and not-so-good things, so pick what you like.
14. Networking:
Join groups of web designers to meet others like you.
Learning from others can help you become better.
15. Feedback and criticism:
Don’t be shy to ask for advice on your work.
When people give you tips, it helps you improve.
16. Launch your projects:
When you’re good enough, work on real websites.
Offer to make websites for friends or local businesses.
17. Stay Inspired:
Be creative and get ideas from different places.
Nature, art, and other designers can help you think of cool stuff.
18. Never Stop Learning:
Web design always changes, so keep learning new things.
Stay curious and open to learning more tricks and tools.
The secret to success in web design is to start with the fundamentals and gradually advance your abilities. Keep in mind that on this trip, patience and practice are the keys to success. As your skills advance, you’ll have the imagination needed to realise your ideas for websites. So put your hands in your pockets, launch your preferred coding editor, and start your web design experience!
3 notes
·
View notes
Text

Bluehost hosting services free domain and ssl secure website
Welcome to our ultimate guide to hosting with Bluehost! In this blog post, we’ll take a deep dive into what Bluehost’s web hosting solutions offer, how you can get started, and the best practices for using Bluehost. Let’s get started.
Introduction to Bluehost web hosting
Bluehost is a leader in the web hosting industry, providing reliable hosting solutions for individuals and businesses alike. It offers a wide range of hosting plans and features, making it one of the most popular choices for website owners. Bluehost also provides a variety of customer support options, so you can easily get help if you ever run into any issues.
Benefits of hosting with Bluehost
One of the biggest benefits of hosting with Bluehost is its affordability. Bluehost offers budget-friendly hosting plans that are perfect for new website owners or those who are just starting out. Plus, its plans come with plenty of features and resources, so you can easily get your website off the ground.
Another benefit of hosting with Bluehost is its reliability. Bluehost offers reliable hosting solutions and its servers are always up and running, so you don’t have to worry about downtime or slow speeds. Additionally, Bluehost offers several backup solutions so you can easily restore your website if anything ever goes wrong.
Finally, Bluehost provides a variety of customer support options, so you can easily get help if you ever run into any issues. Its customer service team is available 24/7, so you can easily get help whenever you need it.
Setting up a website with Bluehost
Once you’ve created an account and chosen a hosting plan, you can easily set up your website with Bluehost. Bluehost provides a variety of tools and resources to help you get started, such as WordPress and other website building tools. Additionally, it offers several design templates so you can easily create a professional-looking website.Bluehost also makes it easy to customize your website. You can use its drag-and-drop editor to easily add content, images, and videos to your website. Plus, it offers a variety of plugins and extensions to help you add extra features to your website.
Optimizing your Bluehost website
Once you’ve set up your website, you’ll want to make sure it’s optimized for search engines. Bluehost makes this easy with its SEO tools. You can easily add meta tags, keywords, and other SEO elements to your website to make sure it’s optimized for search engine rankings. Additionally, Bluehost offers a variety of speed optimization tools to make sure your website loads quickly.
2 notes
·
View notes
Text
How to build an Affiliate Marketing website with Bluehost?
Bluehost is the #1 recommended web hosting by wordpress.org. It is one of the most well-known, popular, and affordable web hosting options. Bluehost is great for Beginners due to due to its user-friendly features and one-click WordPress installation.

For those people who don’t know what is Affiliate Marketing, in short, The product which we promote that we don’t own is known as Affiliate Marketing.
Before starting the tutorial, use the link below to sign up for free!

1. Choose the Plan
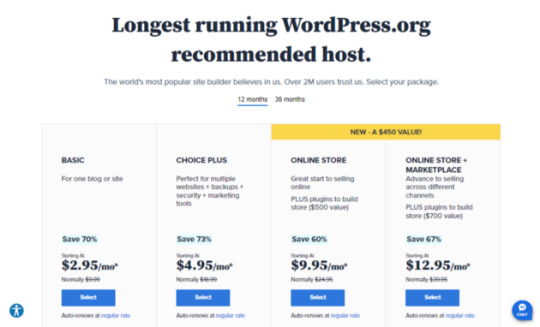
Click on the “Get Started” button. Now select a hosting plan that fits your need. If you are a beginner then I will recommend you go with the Basic plan, But If you are serious then you can go with Choice Plus. There are more two plans which are mainly for building Online Store, you can go with any one of them.
2. Pick your domain name

Once you select the plan, the next step was you have to pick your domain name. The name of your website. Here are two methods let's talk about the first method, Here you can create a free new domain. Bluehost gives you a domain for the first year for absolutely free. If you have an existing domain name then you can enter your domain name in “Use a domain you own”.
3. Account and Billing Information
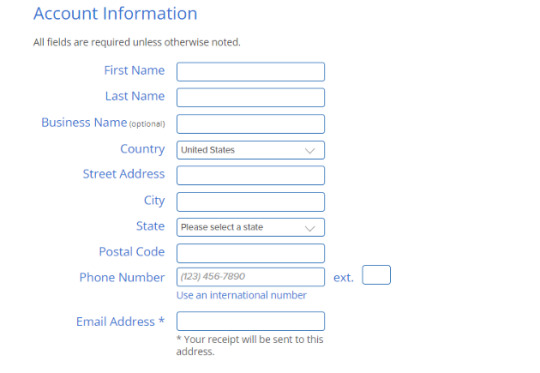
The next step is to fill out your account and billing information.
Review the package information below and decide whether add-ons are desired. Your receipt will be sent to your email address which you type there. Here you can choose 12 months or 36 months. Please note that this will charge you upfront for the entire term.

Insert payment information and accept the Terms.
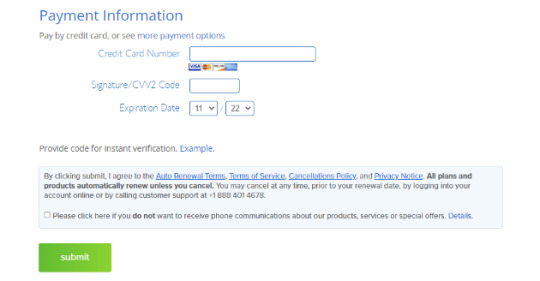
Congrats, your hosting account has been created! Bluehost will send you a welcome email.
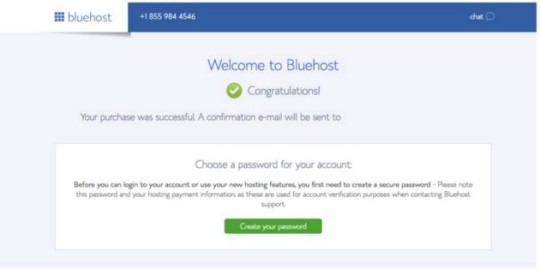
Now click on “Create your password”. If you need help you can also click on the “Suggest Password” option. You’ll end up needing it later on.

Go ahead and log in and start getting familiar.
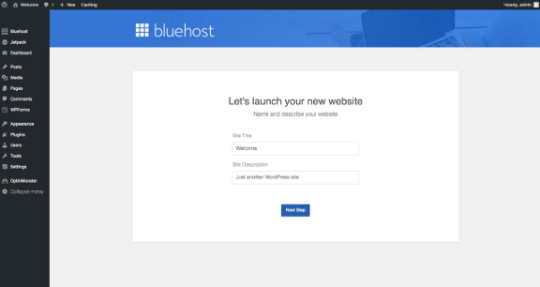
3. Install your WordPress website

After your hosting account has been created WordPress will automatically install. Pick the theme your need, all are free themes with WordPress.org. You can customize or update it at any time.
let’s jump into WordPress and get you even closer to constructing that first blog post.
Decide whether this site will be for business or personal use.
Here’s a revamped dashboard of the control panel.
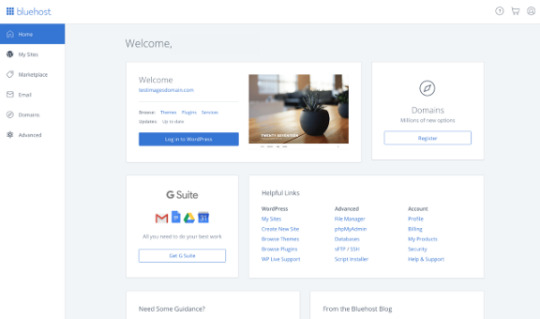
Now you can make your site look how you want!
Start Publishing!
Best of luck to you as you grow your business!
Join Bluehost now for free!
For more Visit our Website:
myspacehost.medium.com
#website traffic#website#web hosting#hosting#audience#affiliate marketing#bluehost#affilaite#business#wordpress#wordpress.org#wordpress website
3 notes
·
View notes
Text
Bluehost Review: Is It the Right Web Host for You?
Bluehost, one of the most popular web hosting companies, offers users a host of options to help build and grow their website or blog with relative ease. But how does Bluehost stack up against other web hosts? In this Bluehost review, we’ll look at some pros and cons to help you make an informed decision about whether Bluehost will help you achieve your goals online.

What is Bluehost?
Bluehost is a web hosting company that has been around since 1996. They offer a variety of hosting plans to suit different needs, and their prices are very competitive. In this Bluehost review, we'll take a look at some of the features they offer and see if they're the right web host for you. If you're just starting out on your own with your first website, then one of the best things about Bluehost is that it's easy to get started. They have easy-to-follow instructions on how to set up WordPress (or any other blogging software) so that you can get started quickly and easily without having to worry about technical issues. If you want more complicated or advanced features, there are also a range of high-end options available with extra monthly charges associated with them.
One thing people often ask when looking into new web hosts is what happens if they need help or support - how do I contact them?
The Advantage of Bluehost
Bluehost is a great option for those looking for an affordable and reliable web host. In this Bluehost review, we'll take a look at some of the features that make this company a great choice. First, Bluehost offers a variety of plans to fit any budget. Second, they provide 24/7 customer support. Third, they offer a free domain name and a free SSL certificate with each plan. Fourth, they have a 99.9% uptime guarantee. Fifth, they offer a 30-day money-back guarantee. Sixth, they have a one-click WordPress installation. And seventh, they have daily backups.
Services Offered by Bluehost
Bluehost is a web hosting company that offers a variety of services to its customers. These services include shared hosting, WordPress hosting, VPS hosting, dedicated servers, and more. Bluehost also offers a variety of features to its customers, such as a free domain name, unlimited storage and bandwidth, and more.
Pricing and Packages Offered by BlueHost
Bluehost offers a variety of different hosting plans to fit the needs of any website. Their most popular plan, Shared Hosting, starts at $2.95 per month. For this price, you get unlimited storage space and bandwidth, a free domain name, and email accounts. Bluehost also offers WordPress Hosting, VPS Hosting, Dedicated Hosting, and WooCommerce Hosting plans.
How to Get Started with a New Site on BlueHost
Bluehost is one of the most popular web hosting providers on the market. If you're thinking about starting a new website, Bluehost is a great option to consider. In this post, we'll walk you through how to get started with a new site on Bluehost. We'll cover everything from choosing your domain name to setting up your hosting account and installing WordPress. By the end of this post, you'll be ready to launch your new site!
What Are Some Key Features of This WordPress Hosting Platform
Bluehost is a popular web hosting platform that offers a variety of features for users. Some key features include unlimited storage, bandwidth, and email accounts, as well as a free domain name and site builder. Additionally, Bluehost offers 24/7 customer support and a money-back guarantee. These are just some of the many benefits of using this web hosting service. If you’re looking for quality WordPress hosting without spending a fortune, consider giving Bluehost a try!
Most Popular Customer Support Tools Available
Bluehost offers 24/7 customer support via phone, live chat, and email.
They have a vast knowledge base and video tutorials to help you with any questions you may have.
They also offer a 30-day money-back guarantee so you can try them out risk-free.
One of the most popular customer support tools they offer is their live chat feature.
This allows you to instantly connect with a customer service representative who can help answer any questions you may have.
Another popular tool is their email support, which allows you to send a message directly to their team and receive a response within 24 hours. 7. All in all, if you're looking for a web hosting company that has reliable customer support available at all times, then Bluehost is an excellent choice. 8. The company's pricing plans are fairly priced and can be customized according to your needs. 9. Their features include free SSL certificates, unlimited disk space, and bandwidth, one-click WordPress installation on new accounts, email addresses included on every plan type (which come with spam protection), 10GB cloud storage space per account (as well as mobile app access), and many more! 10. If you're not sure whether or not Bluehost will be right for your needs, sign up for their 30-day trial period where they offer unlimited usage with no credit card required!
Is it Easy to Install WordPress on this Web Hosting Platform?
Yes, it is very easy to install WordPress on Bluehost. You can do it yourself in just a few minutes by following these simple steps:
Log into your Bluehost account and click on the My Sites tab.
Select Create Site from the drop-down menu.
Enter a name for your website and choose a domain (if you don't have one already).
Select Install WordPress from the list of options.
Follow the instructions on the screen to complete the installation process.
That's it! Once WordPress is installed, you can start creating content for your website.
Can We Go Over Some Important Security Measures for Your Website While Using This Service Provider?
If you're looking for a web hosting provider, you've probably come across Bluehost. In this Bluehost review, we'll go over some of the features this provider offers and help you decide if it's the right fit for your website. First off, you should know that they offer their services at very affordable prices. They also offer shared and dedicated hosting plans so you can pick whichever is best for your site needs.
The downside to using Bluehost is that they only offer one type of control panel - cPanel. On the other hand, cPanel is a very user-friendly control panel with an intuitive interface which means no more training or hiring someone to set up your site!
Which Payment Methods are Accepted by the Company?
Bluehost is a web hosting company that offers a variety of services to its customers. One of the main features that sets Bluehost apart from other web hosting companies is its payment options. Bluehost accepts payments via credit card, PayPal, and wire transfer. Credit cards accepted by Bluehost include Visa, Mastercard, American Express, and Discover. Bluehost also offers a money-back guarantee if you're not satisfied with their service. If you cancel your web hosting plan within thirty days of signing up for it, they will refund 100% of your subscription fee. If you cancel within ninety days, they will refund 50%.
Conclusion
Overall, Bluehost is a great web host if you're looking for reliability and affordability. The company offers a wide range of features, making it a good choice for businesses of all sizes. Bluehost is also easy to use, even if you're new to web hosting. However, there are some downsides to using Bluehost, such as the lack of customer support and the slow speed of some pages. If you can live with these minor drawbacks, then Bluehost is a great option for your website. The pricing plans offered by Bluehost are more affordable than other web hosts, which is a big plus. And with the industry-leading uptime, we were happy to find that our site was always up and running. So if you're looking for an affordable and reliable web host that has high uptime rates, then Bluehost could be the right one for you! The summary would go here.
2 notes
·
View notes
Text
How to design a wordpress website with bluehost!
Why should you design your website with WordPress?
Don't worry if you've been delaying the choice to create a website for your small business because you think it will be difficult or time-consuming. The WordPress content management system makes it remarkably simple to put up a personal website or an online store (CMS). In fact, the majority of people can complete the process in approximately 30 minutes without any specialized knowledge or modern technology. The ideal drag-and-drop website builder is WordPress In this article I will show you how to design a Wordpress website with Bluehost!
Here is a quick rundown of the procedures to start your WordPress website.
Decide on a domain name.
Select a hosting company and plan.
Activate WordPress and select a theme.
Pick your WordPress plugins and become familiar with the dashboard.
alter the webpage.
You've made the decision to build a website, and you want to use WordPress as the platform. What's next?
How to Design a Wordpress website with Bluehost!
Here are the quick five steps for setting up a WordPress website.
Step 1: Launching Your Website and Picking a Domain Name
One of the most crucial steps, before you can start developing your website, is selecting your domain name because this is how your audience will find you and associate your brand with you.
People enter your domain name into their browser to access your website. Although it may be tempting to go with something silly or showy, pick a name that accurately captures your brand and facilitates user discovery.
For instance, "bobsmithwelding.com" is preferable to "bobdoesmetalwork.com" since it increases the likelihood that people searching for Bob will discover him.
After selecting your domain, you must purchase your name and choose a hosting provider that is appropriate for your website's requirements. It is recommended to select a hosting company that provides hosting exclusively for WordPress sites as you are creating a website with WordPress. In this manner, you can buy both a domain name and hosting from the same company. Luckily, WordPress recommends Bluehost and they provide both.
Step 2: Select a package and create a hosting account.
From our basic WordPress hosting plans to our fully managed WordPress hosting plans, Bluehost offers a variety of hosting services. After choosing your domain name, you must set up an account for your hosting package.
After filling out each field with your personal information, scroll down to the package listings.
Select a solution based on your needs for services and budget. Prices differ amongst hosting companies, but the majority provide extras like additional security features, tools to improve search rankings, and site backup.
To enter your billing information, scroll down and check the applicable boxes. Read the terms of service, cancellation policy, and privacy notices carefully before clicking the box to indicate your agreement.
After creating a password as directed on the screen, move on to step three, selecting your WordPress theme.
Step 3: Choose a WordPress Theme
If you've decided to use Bluehost as your web server, WordPress will be set up for you immediately. You only need to click "Log in" and select a theme. Don't worry if you're unsure about the theme you desire.
Continue reading
#wordpress#wordpress blog#marketing digital#webdesign#web hosting#hosting#ecommerce#webdevelopment#get more info#additional info#web developers#bluehost#wordpresswebsite#webdesigner#shopify#woocommerce#website
4 notes
·
View notes
Text
StableHost Review: Is Their Clustered Hosting Really Worth a Try?
New Post has been published on https://thedigitalinsider.com/stablehost-review-is-their-clustered-hosting-really-worth-a-try/
StableHost Review: Is Their Clustered Hosting Really Worth a Try?
As a digital marketer who has helped dozens of business owners set up their websites, my goal is always to find a reliable web host that offers dependable, performance-driven features. When I first came across StableHost, I hesitated since they’re less popular than GoDaddy, BlueHost, and other A-list providers. But after trying out their hosting services, I can boldly say StableHost is worth a try.
In this StableHost review, I shared everything – well, almost – you need to know about this web host, including its performance, customer support, pricing plans, and features.
Before we do, let’s cover some basics.
StableHost Review
StableHost isn’t the youngest kid on the block. The company was founded in 2009 and has since grown into one of the best hosting providers in the industry.
One thing you’ll love about StableHost is their customer-centricity. Despite its large customer base (housing over 50,000 domains), this host is led and managed by just 15 employees. According to them, having a tight-knit team helps them reduce operational costs and channel revenue into providing premium hosting solutions for their users. Awesome, right?
If you’re looking for all-inclusive web hosting, StableHost is an excellent choice. They offer domain registration services and even have a proprietary site builder (BaseKit) that allows you to build your websites in one click.
BaseKit has over 100 customizable templates to choose from, including a drag-and-drop editor that allows you to alter the design to your preferences. The best part about this site builder is that it is included in all StableHost’s plans at no extra cost.
StableHost provides a variety of hosting solutions, including shared, reseller, VPS, dedicated, and WordPress hosting. They are rated excellent on Trustpilot for garnering 4.9-star reviews from over 2000 users:
Pros and Cons
They offer VPS, WordPress, dedicated and reseller hosting
24/7/365 customer support
Their user interface has a steep learning curve, perfect for beginners or users with no-code skills
They offer 45-day money-back guarantee
They use cluttered hosting for faster performance
They built a proprietary website builder – BaseKit
Unmetered bandwidth
No proprietary control panel
StableHost Rating – my personal take
Currently, over 2 billion web pages are competing for the ‘best web hosting provider’ keyword. This includes web hosting providers and other third-party sites such as review platforms.
How do you sift through this list to find the right hosting provider for your website? To simplify this, I created a personal rating system that grades each provider based on six vital metrics: Performance, features, customer support, pricing plans, and user intuitiveness. This helps me to fairly evaluate each host’s capabilities and overall performance.
For effectiveness, I used a 5-point grading scale and provided reasons for each score given.
Quality My rating Why I gave this score Features and specs 4.4 Unlimited storage, unmetered bandwidth, DDoS protection, SSL certificates, and free site builder … StableHost provides several functionalities for a seamless hosting experience. However, I gave them this score because I believe they can provide more enterprise features. Pricing 4.5 StableHost is one of the most affordable web hosts in the market! Starting at $0.9, users can access basic tools to kickstart their digital journey. I gave them this score because their pricing packages are not so detailed. Performance stats 4.4 StableHost boasts a good performance with 100% uptime and 1.8s loading time. I gave them this score because I believe the overall performance can be improved. Ease of use 4.5 You’ll love StableHost’s user interface. It’s sleek, modern, and easy to use. They also use the traditional control panel – cPanel – to lessen the learning curve for their users. Awesome! But I gave them this score because other providers have more advanced UI. Customer support guarantee 4.5 StableHost offers four levels of customer support – phone, live chat, knowledge base, and emails, which is fantastic. Their response time is also satisfactory. I gave them this score because they have a quick response time compared to other popular providers.
StableHost Prices & Plans
Like every other provider, StableHost offers shared, VPS, reseller, dedicated, and WordPress hosting solutions.
Each plan comes with unlimited bandwidth, a free site builder, and a 45-day money-back guarantee, which is enough time to decide if they’re worth a try. Let’s explore what each plan entails.
StableHost’s Shared Hosting Plans
Mini
Space offered – 5GB SSD
Bandwidth – 500GB bandwidth
Number of websites – 1 website allowed
Price – $0.9/month
Starter
Space offered – Unlimited
Bandwidth – Unmetered bandwidth
Number of websites – 1 website allowed
Price – $4.30/month
Pro
Space offered – Unlimited
Bandwidth – Unmetered bandwidth
Number of websites – Unlimited number of websites allowed
Price – $4.25/month
Platinum
Space offered – Unlimited
Bandwidth – Unmetered bandwidth
Number of websites – Unlimited number of websites allowed
Price – $27.99/month
I recommend the StableHost pro plan, especially if you plan on building/managing a site with high traffic. At $4.25/month, you get unlimited disk space, bandwidth, email accounts, and databases. You can also access a free website builder, SSL let’s encrypt certificate, 99.9 SLA, and more.
Who is this for?
StableHost shared hosting plans are perfect for anyone with minimal hosting needs. Whether you’re just starting your website or looking to host several sites simultaneously, you’ll find a package tailored to your needs. However, if you have high-traffic sites, check out the next hosting plan.
StableHost’s dedicated hosting Prices & Plans
Professional
Space offered – 40 GB SSD Storage
Bandwidth – 2TB Bandwidth
Features – Intel Pentium G3450 3.4GHz 2C, RAID 0 or 1, Hard drives 2 * 300 GB SAS
Price – $145/month billed annually
Premium
Space offered – 40 GB SSD Storage
Bandwidth – 3TB Bandwidth
Features – 2 CPU cores, SSH and root access, Intel Xeon E3 – 1240L v3 2.0GHz 4C, RAID 0 or 1, Hard drives 2 * 300 GB SAS
Price – $165/month billed annually
Ultimate
Space offered – 100 GB SSD Storage
Bandwidth – 4TB Bandwidth
Features – 4 CPU cores, SSH and root access, Intel Xeon E5-2603 v3 1.6GHz 6C, hard drives 2 * 300 GB SAS, RAID 0 or 1
Price – $245/month billed annually
I recommend StableHost’s Ultimate dedicated hosting plan, considering it offers more robust features.
The Intel Xeon processor offers high performance and multi-core capabilities, ensuring the servers can handle demanding workloads. This is perfect if you run high-traffic websites or heavy applications.
The SAS drives are equally designed for enterprise-level reliability so the server remains operational and accessible during peak periods.
Who’s this for?
The StableHost’s dedicated hosting plan is a perfect choice if you need more performance-based features beyond what’s offered on shared hosting. The Intel Xeon processors, CPU cores, and RAID O or 1 keep your sites at blazing performance, provide faster data access, and minimize the risk of data loss due to disk failure.
StableHost’s VPS hosting Prices & Plans
VZ 1GB
Space offered – 40 GB SSD Storage
Bandwidth – 2TB Bandwidth
Features – 1 CPU core, SSH and root access
Price – $61.95/month billed annually
VZ 2GB
Space offered – 40 GB SSD Storage
Bandwidth – 2TB Bandwidth
Features – 2 CPU cores, SSH and root access
Price – $61.95/month billed annually
VZ 4GB
Space offered – 100 GB SSD Storage
Bandwidth – 4TB Bandwidth
Features – 4 CPU cores, SSH and root access
Price – $61.95/month billed annually
Who is this for?
Try out StableHost’s VPS plans to launch or run your website applications on enterprise-level hardware. Whether you manage a video streaming platform, gaming apps, or large eCommerce sites, the servers are built to handle high traffic volume and complex workloads easily. This ensures that the servers experience minimal downtime and optimal performance. If you also need to install your operating system, StableHost offers free access to KVM virtual machines.
StableHost’s Reseller hosting Prices & Plans
Basic
Space offered – 20 GB SSD Storage
Bandwidth – Unmetered bandwidth
Features – Allows to host up to 10 clients, LiteSpeed PHP Caching, unlimited FTP accounts, SSL Let’s Encrypt Certificates, etc.
Price – $9.12/month billed annually
Pro
Space offered – 40 GB SSD Storage
Bandwidth – Unmetered bandwidth
Features – Allows to host up to 50 clients, unlimited email accounts, advanced analytics, unlimited MySQL databases, etc.
Price – $18.29/month billed annually
Plus
Space offered – 60 GB SSD Storage
Bandwidth – Unmetered Bandwidth
Features – Allows to host up to 100 clients, unlimited email accounts, Softaculous, cPanel, etc.
Price – $27.45/month billed annually
Who is this for?
StableHost’s reseller hosting plans are a good choice for web developers, digital marketers, web hosting entrepreneurs, and IT professionals who manage multiple websites simultaneously.
They offer a white labeling option that allows you to customize the hosting solutions to your brand. On each plan, you also enjoy unmetered bandwidth, daily automatic backups, cPanel, access to LiteSpeed PHP caching, and more.
StableHost’s WordPress hosting Prices & Plans
Starter
Bandwidth – Unmetered bandwidth
Features – LiteSpeed PHP Caching, enterprise grade SSD drives, dual CPUs, unlimited MySQL databases, SSL Let’s Encrypt certificates
Price – $4.30/month billed annually
Pro
Bandwidth – Unmetered bandwidth
Features – One-click Softaculous installer, LiteSpeed PHP caching, unlimited email accounts, Site.Pro web builder, etc.
Price – $4.25/month billed annually
Platinum
Bandwidth – Unmetered Bandwidth
Features – Enterprise grade SSD drives, RISoft daily backups, advanced analytics, LiteSpeed PHP caching, etc.
Price – $27.99/month billed annually
Who’s this for?
StableHost’s WordPress plans are for WordPress owners even though they do not provide detailed features for each plan. They did cite that all plans have automatic daily backups, cPanel, SSH access (at an extra fee), unlimited email accounts, free site builder, etc.
StableHost’s Features
These are some of the functionalities you’ll enjoy if you decide to stick to this web host:
Free site builder
Enterprise-grade SSD storage
OpenLiteSpeed caching
cPanel
Free email tools
Softaculous one-click installer
24/7/365 customer support
To be candid, I didn’t find many top-of-the-line features with StableHost compared to other hosting providers such as BlueHost or Hostinger.
However, their clustered hosting features give them a distinct advantage. Let me explain.
StableHost uses a clustered technology that regularly monitors the health of the SSD drives. Since these drives are in sync, every file stored in the drive is replicated across multiple drives to minimize redundancy.
In addition, the technology also monitors your drives for issues such as high traffic volume or hardware malfunction. But if this happens, you don’t need to worry about a performance outage as the system automatically switches you to another drive/node. This way, your website remains accessible and functional to users at all times.
StableHost’s Performance Tests
The true test of any web host is its reliability in terms of performance, speed and uptime. These metrics give you real-time insights into the effectiveness of the host’s functionalities in keeping your site accessible, even during peak periods.
The three top metrics are:
Speed: Denoted as the time to the first byte (TTFB), it measures the responsiveness of a web server. It also tracks the time the user receives the response from the server.
A good TTFB should be 300ms or less. Although Google didn’t state explicitly that it affects rankings, I believe it does (indirectly) because of its influence on the Google Core Web Vitals.
Uptime: measures the reliability of the web server, that is, the amount of time it is operational and available to users. A good uptime should be around 99.9% – 100%.
Lastly…
The website’s loading time: this measures the time it takes for a web page to display fully on the user’s browser. It’s one of Google’s core ranking factors because it has a direct influence on user experience. The average website loading time should be 3s or less.
StableHost promises a 99.9% uptime guarantee, fast load time, and satisfactory server reliability. But how true is this?
I tested their performance using a website hosted on their servers, and here are the results.
First, I used GTMetrix to test the server response time and overall performance.
The TTFB was 300 ms, which is quite quick. While this is a good score, I believe it should be better since other hosts have lesser TTFB.
I validated their uptime in the last 30 days using Uptime Robot:
The uptime showed 100% in the last 30 days, proving that their web servers are reliable. Excellent!
Keep in mind that the location of your web host data center can impact the performance of your website. I’ll share more insights on this later.
StableHost’s Customer Support
StableHost boasts reliable customer support. According to them, they only hire talents passionate about web hosting. Let’s prove that.
Phone
Want a quick response? You can reach any of StableHost’s technicians by phone. This line is available for all regions but incurs charges for those outside the US:
Emails:
Whether you have sales-related, payment, or technical issues, StableHost allows you to get professional and specialized support through their email support system.
For sales inquiries, content them via [email protected]. For technical assistance, use [email protected]. This ensures you receive expert help tailored to your needs.
Live Chat
StableHost’s live chat support is readily available on the bottom-left of their website for quick fixes. I decided to try it out since they claim to respond within 10 minutes.
I sent a message, and a bot responded giving me a countdown till an agent attended to me. And three minutes later, a human responded. Cool!
KnowledgeBase
Do you prefer quick, accessible support? StableHost has a vast library of resources that features several articles on diverse topics:
The articles were authored by the StableHost team, so you can be confident of getting an expert’s view on any related issue.
Mailing Address
Who uses a mailing address in this modern age? StableHost includes their company address for post mails.
StableHost’s Security Features
I love how StableHost prioritizes the safety of their domains hosted on their platform. Although their security features aren’t the best in the industry, you still have access to the basic tools that protect your sites for the bad guys.
Whichever plan you opt for, you get SSL Let’s encrypt certificates, spam filtering, and DDoS protection.
You’ll also get Imunify 360, a multilayer security system, which is the major layer of protection on shared servers. This system helps detect and stop website attacks before infiltrating the web server.
If you want a more stringent security system, purchase any of StableHost’s security audit plans.
The system was built in-house and is used to scan servers for any attacks, even to the smallest point. This includes port scanning and intrusion testing, cross-site scripting vulnerability testing, SQL injection scanning, etc.
The best part is that they don’t stop at the audits. The StableHost security audit system also assists in remedying the issues affecting your server security.
StableHost’s website builder
You might be used to WordPress, Wix, Joomla, and other popular website builders. But StableHost did something unique – creating their own site builder – BaseKit!
BaseKit has over 100 customizable templates (responsive, too), a drag-and-drop editor for beginners, advanced analytics features, and more. It comes at no extra cost; you can access it after purchasing any of StableHost’s plans.
However, if you prefer WordPress, Drupal, Joomla, or other popular CMSs (content management systems), you can download it from Softaculous via cPanel.
User-Friendliness – Ease of use
One thing I admire about StableHost is that affordability isn’t an excuse to build a subpar interface.
The StableHost UI is user-friendly, and requires almost no technical knowledge. In fact, if you encounter any issues, they have a ton of how-to articles on their resource page to guide you.
Registering an account with StableHost
To register an account with StableHost, you have to purchase one of their hosting plans.
Step 1:
Navigate to the menu bar to find the hosting plan that best fits your needs:
Step 2:
Once you’ve found the package that fits your needs, click ‘Order Now.’ You’ll be redirected to a new page where you enter your domain.
If you have an existing domain or want to transfer your domain, just click any of the options listed and follow the prompts.
Tip: If you don’t have a domain name, StableHost also offers domain registration services so you can find and register the perfect name for your business:
Step 3:
You’ll see the product review page, where you will be required to choose your payment option. I love that StableHost offers a flexible means of payment – credit card, PayPal, AMEX, Stripe, MasterCard and Visa.
Step 4:
Once you choose your payment method, click ‘Continue to CheckOut.’ This is the second stage.
In the third stage, you’ll be asked to create an account with StableHost. Fill all the required information and click ‘Create Account:’
Step 5:
Next, you’ll receive a congratulatory message that your order has been received for review:
StableHost’s intuitive Control Panel
StableHost uses the default cPanel as its control panel. Here, you’ll find everything you need to manage your hosting environment efficiently. Although the user interface isn’t modern, you can easily find the tools and features conveniently.
Overall, I found it easy to use and navigate. However, I believe it can be upgraded to meet the modern consumer standards.
Installing WordPress on StableHost
Installing WordPress on StableHost is a breeze!
To do this, log into cPanel from your account.
Next, search for the ‘Softaculous Apps Installer’ and click ‘WordPress.’
You’ll be directed to a new page to install WordPress in one click. Then, hit the ‘Install >> Quick Install’ button.
Then, choose the domain name you want for your WordPress account and ‘wp’ for the directory field:
Also, add your preferred user name, password, and email address to receive the installation details.
Lastly, click the ‘Install” button and you’re all set!
You’ll get a congratulatory email alongside your installation details:
Server footprint and CDN
Before choosing any hosting provider, you need to consider the server footprint and content delivery network (CDN).
The server footprint is the geographical spread of a web host’s servers. The wider the server footprint, the faster the loading time, and vice versa.
Also, proximity matters. The closer a web server is to you (or your audience), the faster the speed and vice versa.
Using a CDN helps to reduce the distance between the server and the users, therefore making web pages load faster and improving the overall user experience of your website.
StableHost has data centers in different regions across the world – the US, Netherlands, Sweden, Singapore, Spain and Germany. They also use an advanced content caching technology and a globally distributed CDN to improve the performance of sites hosted on their platform.
Conclusion: Do We Recommend StableHost?
Yes!
I was impressed by StableHost’s hosting solutions, especially their commitment to improving customer experience. One thing that stood out to me is how they struck a balance between reliability and affordability. Also, their support team is good, but I think it needs to be improved.
Overall, I recommend StableHost to anyone looking for a holistic hosting platform. It offers a platform with enterprise grade functionalities to start your digital journey, grow and scale accordingly.
Visit StableHost →
FAQs
Is StableHost legit?
Yes, StableHost is a credible web host. They are well known for their affordable and reliable web hosting services. Their hosting services feature many attractive functionalities, including unlimited bandwidth, a 99.9% uptime guarantee, a web application firewall, DDoS protection for security, and more.
What is the money back guarantee on StableHost?
StableHost offers a 45-day money-back guarantee, which is enough time to evaluate the host’s services to see if they fit your website well.
Which web hosting performs best: Hostinger or StableHost?
Personally, there’s no perfect answer to this. Hostinger and StableHost are reliable and credible providers in the hosting industry, with unique features and specs. Let’s consider some use cases:
Affordability: StableHost trumps Hostinger by a few dollars if you’re considering costs. The Hostinger shared hosting plan starts at $2.99/month. StableHost offers the same deal at $0.90/month!
Speed: In this case, I’ll go with Hostinger. This is because they offer cloud hosting solutions, free CDN, servers in over 6 locations worldwide, LiteSpeed web server technology, and a 99.99% uptime reliability.
Security: I’ll also choose Hostinger over StableHost. Why? They offer advanced DDoS protection, web application firewall, cloudflare protected name servers, secure access manager, and more.
Customer support: I believe StableHost shines, thanks to its 24/7/365 customer support availability.
#000#Accounts#agent#amp#Analytics#applications#apps#Articles#audit#backups#billion#bot#browser#Building#Business#Byte#cdn#certificates#channel#Cloud#Cloud hosting#cloudflare#code#content#content management systems#control panel#cpu#credit card#cross-site scripting#customer experience
0 notes
Text
How do you build a restaurant website?
How To create a WordPress Restaurant website on Fiverr, follow these steps:
Building a restaurant website is a multi-step process, but it's achievable even if you're not a tech expert! Here's a breakdown of the key steps:
1. Choosing the Right Tools
Website Builder: These platforms make it easy to create stunning sites.
Popular Choices: Wix, Squarespace, WordPress (especially good if you want flexibility and customisation)
Key Factors: Ease of use, available templates, features (like online ordering, and reservations), and cost.
Domain Name: Your restaurant's web address (e.g., [invalid URL removed]). Get it from domain registrars like GoDaddy or Namecheap.
Web Hosting: Stores your website files, making it accessible online. Often bundled with website builders, or you can choose providers like Siteground or Bluehost.
>>>>Please click hare Fiverr <<<<
2. Design and Structure
Visual Appeal:
Choose a template that aligns with your restaurant's style (elegant, rustic, modern).
Use high-quality images of your food and restaurant ambiance.
Stick to a pleasing color palette.
Navigation:
Create a clear menu with sections like "About Us," "Menu," "Reservations," "Contact," etc.
Make it easy for users to find what they need.
Mobile-Friendly Matters: Ensure your website looks great on phones and tablets.
>>>>Please click hare Fiverr<<<<
3. Essential Content
Homepage Hero: A strong opening image and headline showcasing your restaurant's vibe and cuisine.
Menu: Clear with descriptions and prices. Organize into categories (appetizers, main courses, etc.).
About Us: Tell your restaurant's story, highlight your chef, and what makes you unique.
Location and Hours: Easy-to-find information. Embed a map if possible.
Contact: A simple form or list your phone number and email address.
Testimonials: Social proof is powerful! Display positive customer reviews.
4. Key Features (Optional but Recommended)
Online Ordering: Highly convenient for customers, can boost sales. Many website builders have integrated solutions or plugins for this.
Reservations: Use a system like OpenTable or Resy to streamline bookings.
Gallery: Showcase more enticing photos of your space and cuisine.
Events Section: If you host events, keep this updated.
5. Going Live and Beyond
Test Everything: Before launch, test the website's functionality on different devices and browsers.
Promote! Let people know about your new website! Use social media, email marketing, and even local listings.
SEO: Search Engine Optimization helps your website rank better in Google searches. Learn the basics or consider an SEO specialist.
Maintain: Update your menu, add specials, and keep your content fresh.
>>>>Please click hare Fiverr<<<<
Tips:
Inspiration: Look at websites of restaurants you admire. Note what you like and don't like.
Don't Rush: Take your time, especially with writing and selecting images. Quality matters!
Need Help? If this feels overwhelming, there are web developers specializing in restaurant websites.
Let me know if you want a deeper dive into any part of the process!
Thank you so much
Md Najmul Hasan
WordPress Developer
0 notes
Text
How To Create A Website In Wordpress | Web Development Tutorial

Are you considering creating a website? Especially if you’re not tech-savvy, starting a website could seem a daunting idea. Just be calm; you are not alone.
A good website is essential whether you’re establishing a small business from scratch or you already have one and want to increase your internet exposure. While there are many platforms to create a website, WordPress is one of the most popular website hosts due to its flexibility and customization options.
To help those who are not familiar with coding, Our web design institute trainer have made the most step-by-step tutorial on building a WordPress website.It can benefit users of all ages and ability levels.
This is a comprehensive rundown of every step we’ll cover in this guide, from beginning to end.
Understanding a Domain & Web Hosting
Buying a Web Hosting with Free Domain
Installing WordPress
Installing a Free WordPress Theme
Installing Few Necessary Plugins
Configuring or Customizing Settings of website
Creating & Designing Pages
Set up your Website
Setting up the website requires two steps to be done thoughtfully. First is to get a good hosting plan and then an apt domain name for the website.If you’re still unclear about what a domain name is, web hosting is, and how these things relate to websites, see our article How do a website, a domain, and hosting relate to one another?
Getting Web Hosting
Getting web hosting is the first step in creating a WordPress website.WordPress requires web hosting for your site to be accessible online.While there are several platforms offering basic to premium hosting services, some of the most popular ones include GoDaddy, Hostinger, and Bluehost.
Getting a Domain Name
Now buy a domain name from one of the top domain name registrars, such as GoDaddy or Google Domains, and manually link it to your web hosting provider.
The following factors should be considered while selecting a domain name:
The shorter, the better.
Eliminate dashes and numerals.
Though there are other excellent choices as well, try to stay with.com.
Steer clear of copyrighted content and names that are trademarked.
Verify if the domain is still accessible.
Avoid using terms that are hard to spell or pronounce.
Install WordPress
Once you are done with hosting and domain purchase, it’s now the time to install WordPress. Just link your web hosting account to WordPress.
Installing WordPress in Hosting has a process that directly depends on the hosting you are using. Check help page of your hosting and then install it. Once it is installed, login into the wp-panel. Just type “ /wp-admin” just after your domain name in the search bar , it will ask you for the username and password. It will then prompt you to the dashboard of the wordpress where you will be able to customize the website.
Install WordPress Theme
A theme is essentially a website template in the WordPress world. Your website’s appearance, features, and initial capabilities are all controlled by the templates. Every WordPress website has a default theme installed. If you go to your website, it will appear like this:
But don’t fret. You can install dozens of premium and free WordPress themes on your website.
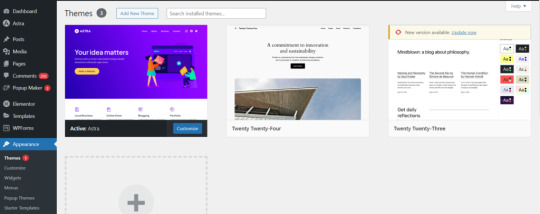
From the admin panel, you can modify the WordPress theme for the site. Go to the “Appearance » Themes” tab and select “Add New.”
The official WordPress.org themes directory offers over 11,000 free WordPress themes for search on the following screen.We’ll be utilizing Astra for the purpose of this guide. It is a widely-used free WordPress theme that can be used for many different types of websites and has versatile design choices.
You can look for the free theme you wish to install by entering its name in the search area.The theme will appear in search results on WordPress. To install the theme, move your cursor over to it and click the Install option. After installing your theme, select the Customize option from the Appearance menu to begin customizing it. This will take you to the theme customizer, where you can modify the theme settings while seeing a real-time preview of your website.
Install Plugins
Plugins for WordPress work similarly to applications on your website. They let you customize and add new features to your WordPress website like contact forms, picture galleries, AI Chat etc. Following the installation of your theme, you must install and activate all essential plugins to let you increase the functionality of WordPress. However, you should strive to restrict the amount of plugins you use, since too many might slow down your site or cause other plugins to malfunction.
To install plugins, navigate to the Plugins page from your WordPress dashboard. For WordPress, there are presently around 59,000 free plugins available. Additionally, third-party websites and developers sell premium plugins.
All corporate websites should have the following plugins installed:
Elementor
Turn your page editor into a more user-friendly drag-and-drop editor by using a page builder plugin, for example Elementor.
Akismet
Defend your website against comment spam.
Google Analytics
Monitor the traffic and activity on your website. This is a must if you’re a blogger since without it, most businesses won’t collaborate with you.
Jetpack
Offers upkeep, security, and performance improvements for your website.
HubSpot
Enhance your WordPress website with complimentary live chat to offer customer service, email marketing for newsletters, and CRM. Combines well with OptinMonster.
Yoast SEO
Aids in search engine optimization of your postings.
LiteSpeed Cache
An all-in-one, comprehensive plugin for site acceleration that comes with a variety of optimization tools and a dedicated server-level cache.
Disable Gutenberg
It will deactivate the basic WordPress webpage builder that has lots of limitations and will make it easy to use plugins and theme functions that extend the Classic Editor.
Tweaking the Settings
You must set up the settings, such as naming your homepage and blog posts page and modifying your site’s name, tagline, and icon, before you start customizing your web pages or laying out the content of your website.
Here’s how to set up the most popular settings:
Logo: Go to “Appearance” > “customize” > “site identity > “change logo” > upload your logo.
Site title: Go to “appearance” > “customize” > “site identity > input site title (a.k.a. your business name).
Site tagline: Go to “Appearance” > “customize” > “site identity > input site tagline (or simply delete the default WordPress tagline).
Site icon: Go to “Appearance” > “customize” > “site identity > under “site icon” click “change image” > upload the image you want to display as your site icon (a.k.a. favicon).
Homepage: Go to “Appearance” > “customize” > “homepage settings” and select the webpage you want to set as your homepage.
Blog: Go to “Appearance” > “customize” > “homepage settings” and under “posts page” select the page you want to set as your blog.
Permalink settings: Go to “settings” > “permalinks” then choose your preferred structure (typically “post name”) and save changes.
Create Pages
It’s time to start creating your web pages that form the foundation of a website. A company website, for example, usually consists of many pages, including the homepage, prices, services, about, and contact. Posts and pages are the two default content kinds that come with WordPress. Blogging features include posts, which are arranged chronologically backwards (newest entries are seen first). Pages, on the other hand, including your privacy policy, custom landing page, about page, and contact page, are supposed to be static, “one-off” types of material.
To display your most current postings, you can make a distinct page for your news or blog area. As an alternative, you can set up a website with no blog area at all. Here’s how to use WordPress to build and/or modify pages:
Navigate to “pages” using the vertical menu on the left side of the WordPress dashboard.
Click “add new” to start a new page.
Go to “all pages,” find the page in the list of pages, and click “edit” to make changes to an already-existing page.
Choose the option to edit with the page builder (i.e.”edit with Elementor”) at the top as we have installed a page builder plugin.
Compose the copy for your website and add personal touches to each page.
Press publish once you’re finished.
For any additional pages you wish to build, follow these instructions again.
Set Up Navigation Menu
After setting up your pages, design and build your menu. This is how people browse your website; the number of menus you have, such as those at the top and footer of the page, will depend on your theme.
This is how to set up the menu on your website:
Navigate to “menus” under “appearance” from your dashboard.
Choose the page from the list on the left to add it.
To rearrange your menu or to arrange pages as sub-pages beneath other pages, click and hold the pages.
Select “Save Changes.”
Following menu setup, locate the “menu settings” section by scrolling down the same page. In the “display location” column, select “primary” by checking the box. This will configure the menu to appear in your header as the primary menu for your website.
Add Content & Media
Now you need to add blog posts or other needed content to the pages.Many organizations prefer to include blog postings to boost their chances of being seen in search engines like Google. Here’s how to use WordPress to write a blog post:
On your dashboard, choose “posts” from the left side, then click “add new.”
Enter the title of your post.
Decide which category to place it in.
Compose the material for your blog.
When you’re finished, click “Publish.”
The primary difference is that, unlike a page, you can compose a blog post and then set it up to publish at a future date.
You can even add media and other images to enhance your content. You can, for example, include a gallery of your products or work images to make the homepage more appealing.
Market Your Site
It’s important to consider how you’ll market your website. Companies who have engaged in various internet marketing tactics to increase their online exposure and attract more visitors to their website are those that are easily found online.
The following are some of the best strategies for website marketing:
To help your website rank right away, submit the URL to Google Search Console.
When creating any kind of marketing material, such as business cards or email signatures, don’t forget to include your URL.
Make social media profiles for your website (such as a Facebook business page, an Instagram account, or a Pinterest business account) and link to them from your postings.
Establish a Google My Business profile to appear in local search results.
Submit your website to Yellow Pages, Tripadvisor, Yelp, and other pertinent internet directories.
We’ve now already covered how to create a WordPress website, install necessary plugins, add new web pages, and add new themes. If you’d want to go even farther, you can develop strong specialty websites that are able to perform much more. For example, you can add an e-commerce store,start your own podcast, create a web directory etc..
WordPress can be helpful for non-technical people to build simple websites but when it comes to customizable feature rich websites, you need expertise. ESS institute is one of the top Web development institute in Delhi and have recently launched a new online web design course to help you make websiyes. You can enrol in both online and offline batches now for detailed knowledge.
#Website development in wordpress#Web Development Tutorial#Create A Website In Wordpress#web development course#web development institute in delhi
0 notes
Text
How Much Does it Cost to Start a Travel Website?

In this digital era, establishing an online presence is crucial for businesses, particularly in the dynamic travel industry. If you're a business owner with dreams of creating a travel website, understanding the associated costs is a crucial first step. Fear not! We're here to guide you through the intricacies of starting a travel website without breaking your budget.
The Average Cost To Start a Travel Website
Creating a simple travel website typically ranges from $3,000 to $10,000, while more complex websites can go upwards of $50,000. However, the exact cost depends on various factors such as the inclusion of advanced features, integration of third-party tools, the choice of Content Management System (CMS), the timeline for development, and other considerations. Below we break down the factors that affect directly on the cost of starting travel website:
1. Domain Name and Hosting:
The first step is securing a unique domain name and a reliable hosting service. Domain prices can vary, depending on factors such as domain extension and availability. Hosting costs, likewise, depend on the provider and the specific plan you choose. Popular hosting platforms include Bluehost, SiteGround, and HostGator.
2. Website Design and Development:
Crafting an appealing and functional website is essential for success. There are two primary options here: you can use user-friendly website builders like WordPress, Wix, or Squarespace, or you can opt for professional agency. As they recognize the unique needs of the travel industry and offer specialized travel web design services. They are dedicated to creating visually stunning and highly functional websites tailored to the specific requirements of travel businesses.
3. Content Creation:
Engaging content is the lifeblood of any travel website. High-quality images, well-crafted copy, and captivating videos enhance the user experience. Consider budgeting for professional photography, copywriting services, and multimedia content creation. Investing in content creation can significantly elevate the overall appeal of your travel website.
4. SEO and Marketing:
Building your website is only half the battle; the other half is ensuring it's visible to your target audience. Search Engine Optimization (SEO) is crucial for improving your site's ranking on search engines. Allocate a portion of your budget to SEO practices and consider investing in marketing strategies such as social media advertising and email campaigns to drive traffic to your website.
5. Maintenance and Updates:
Regular maintenance and updates are vital to keep your website secure and up-to-date. Factor in the cost of ongoing support, security measures, and software updates. This ensures that your travel website continues to provide a seamless experience for users while staying protected against potential threats.
Conclusion
Starting a travel website involves various costs, but it's an investment that can yield substantial returns. By carefully planning and allocating your budget, you can create a stunning and functional website that attracts and retains your target audience. Remember, the key is to strike a balance between cost-effectiveness and quality, ensuring that your travel website becomes a valuable asset for your business.
0 notes
Text
Clash of the Titans: Bluehost vs Hostinger - Which Web Hosting Champion Reigns Supreme?

Web Hosting Concept, Line Style Vector Illustration
Meta Description: Struggling to choose between Bluehost and Hostinger for your website? This epic guide dissects their pricing, performance, features, and support to help you crown the champion that best suits your web hosting needs.
Focus Keywords: web hosting, Bluehost, Hostinger, website hosting, shared hosting, VPS hosting, cloud hosting, affordability, performance, features, customer support, scalability
Introduction:
"Building a website is like forging a sword and shield in the digital world," says web development expert Sarah Jones. "But the foundation of your online kingdom rests upon your web hosting provider. Choosing the right one is akin to selecting your champion in the never-ending battle against downtime, slow speeds, and security breaches."
But fear not, valiant adventurer! This epic guide dissects the strengths and weaknesses of two formidable contenders - Bluehost and Hostinger - to help you crown the champion that best suits your web hosting needs. Buckle up and prepare for a thrilling exploration of the web hosting landscape!

Data Processing Center and Cloud Storage. Isometric digital storage. Server room of cloud computing technologies and technologies of network computing. Data storage and cyber security. Blue 3D vector
Round 1: Pricing & Value - A Budgetary Brawl
Both Bluehost and Hostinger wield the allure of budget-friendly plans, but their appeal hinges on your strategic priorities. Bluehost emerges with a slightly cheaper Basic plan ($2.95/month), offering a free domain and SSL certificate like a well-equipped warrior. However, Hostinger counters with their Single Shared plan ($1.99/month), boasting even lower introductory rates, tempting budget-conscious adventurers. But Bluehost throws in unlimited storage and bandwidth with their Basic plan, a treasure trove compared to Hostinger's limited resources. In this skirmish, it's a nail-biter - Bluehost provides more immediate features, while Hostinger focuses on affordability, leaving the victor dependent on your priorities.
"Ultimately, the most affordable option isn't always the best value," cautions web design consultant Michael Chen. "Consider the long-term features and resources you'll need as your website grows."
Round 2: Performance & Speed - A Race for Website Supremacy
Website speed, like a knight's swift reflexes, is crucial for user experience and search engine ranking. Both contenders perform admirably, but Bluehost boasts slightly faster loading times in independent tests. This advantage could stem from their use of SSD storage, offering swifter data transfer speeds compared to Hostinger's standard HDD storage. However, both offer free Cloudflare integration, a potent tool that can further accelerate your website's performance. In terms of uptime (website availability), both providers maintain a near-perfect 99.9% guarantee, ensuring your website remains online and accessible, ever ready to serve your visitors.
"A few seconds slower loading time might seem insignificant, but it can significantly impact your bounce rate and conversions," warns SEO specialist Emily Garcia. "Prioritize providers with a proven track record of speed and reliability."

Isometric futuristic Hosting server. Abstract datacenter or blockchain background. 3D
Round 3: Features & Scalability - Gearing Up for Growth
As your website expands, your hosting needs evolve. Here's how each contender equips you for the journey:
- Bluehost: Offers a wider arsenal of plans, including specialized WordPress hosting, VPS hosting, and dedicated hosting. This allows you to effortlessly upgrade as your website's traffic and resource demands increase, ensuring your digital kingdom can accommodate its growing population.
- Hostinger: While their basic shared hosting plans are more restrained, they offer affordable VPS and cloud hosting options for scalability. However, their upgrade path might not be as seamless as Bluehost's, potentially hindering your swift expansion.
"Choose a provider that can grow with you," advises web developer Daniel Lee. "Don't get locked into a plan that will limit your website's potential."
Round 4: Customer Support - Who Has Your Back When the Dragon Attacks?
Facing technical gremlins? Reliable and responsive customer support is your trusty shield. Both Bluehost and Hostinger offer 24/7 support via live chat, phone, and email, ensuring you have access to help whenever needed. However, user reviews suggest that Bluehost's support might be slightly more knowledgeable and responsive, potentially offering a sturdier shield in the face of technical difficulties. Ultimately, the best way to judge is to test their support yourself and see which provider offers the assistance that resonates with you.
"Don't underestimate the importance of good customer support," emphasizes website owner Jessica Williams. "They can be your lifesavers when things go wrong."
The Verdict: Choose Your Champion Wisely!
So, who emerges victorious in the Bluehost vs Hostinger battle? There's no single champion, as the winner depends on your specific needs and priorities. If affordability is your top concern, Hostinger beckons with its lower introductory rates.
Conclusion, if you prioritize features, scalability, slightly faster performance, and potentially more robust customer support, Bluehost might be a better fit. Remember, the best web hosting provider is the one that aligns with your individual needs and budget. Consider the factors discussed in this guide, explore both platforms further, and choose the champion that empowers your website to thrive in the ever-evolving digital realm!
Bonus Quest: Take advantage of both providers' free trial periods to test their services and customer support firsthand before making a commitment. Remember, the perfect web hosting partner awaits—go forth and conquer the digital world!
Note: This blog post aims to provide an objective comparison based on publicly available information and user reviews. It is recommended to conduct your own research and consider your specific needs before making a decision.
Additional Tips:
- Include high-quality images or infographics to break up the text and make the post more visually appealing.
- Use internal linking to other relevant blog posts on your website.
- Promote your blog post on social media and other channels.
Read the full article
1 note
·
View note
Text
Reflection: Week 3
This week was fascinating to me. I've been working on websites for years, given I'm a Software Engineering Major, but something we hadn't really discussed in any of my classes was hosting, and of course, since I'm studying how to build websites from the ground up, we never discussed site builders either- though I played with WordPress a little on my own in high school, so I was rather familiar with that. It was interesting, seeing other ways to build a website, and really eye-opening to learn about hosting and all the ways different hosting sites can change the experience.
Honestly, I'm glad for the new perspective, though, as part of my future business plans did include having my own website, and while I can build one from scratch fairly easily, I had no idea how to host it properly until this week. That's valuable knowledge and experience I don't know if I would have gotten in any of my software engineering classes at this point.
Ultimately, I've decided to work with WordPress as my site builder, as my experience with HTML and CSS should be a valuable asset with WordPress, and rather than risk conflicts, I'm going to use the WordPress-recommended Bluehost as my hosting service. DreamHost was also an option that was recommended by WordPress, but it was nearly twice as expensive for far less service, so from there the decision was easy.
0 notes
Text
How To Create a Website in WordPress | Web Development Tutorial
Are you considering creating a website? Especially if you’re not tech-savvy, starting a website could seem a daunting idea. Just be calm; you are not alone.
A good website is essential whether you’re establishing a small business from scratch or you already have one and want to increase your internet exposure. While there are many platforms to create a website, WordPress is one of the most popular website hosts due to its flexibility and customization options.
To help those who are not familiar with coding, Our web design institute trainer have made the most step-by-step tutorial on building a WordPress website.It can benefit users of all ages and ability levels.
This is a comprehensive rundown of every step we’ll cover in this guide, from beginning to end.
Understanding a Domain & Web Hosting
Buying a Web Hosting with Free Domain
Installing WordPress
Installing a Free WordPress Theme
Installing Few Necessary Plugins
Configuring or Customizing Settings of website
Creating & Designing Pages
Set up your Website
Setting up the website requires two steps to be done thoughtfully. First is to get a good hosting plan and then an apt domain name for the website.If you’re still unclear about what a domain name is, web hosting is, and how these things relate to websites, see our article How do a website, a domain, and hosting relate to one another?
Getting Web Hosting
Getting web hosting is the first step in creating a WordPress website.WordPress requires web hosting for your site to be accessible online.While there are several platforms offering basic to premium hosting services, some of the most popular ones include GoDaddy, Hostinger, and Bluehost.
Getting a Domain Name
Now buy a domain name from one of the top domain name registrars, such as GoDaddy or Google Domains, and manually link it to your web hosting provider.
The following factors should be considered while selecting a domain name:
The shorter, the better.
Eliminate dashes and numerals.
Though there are other excellent choices as well, try to stay with.com.
Steer clear of copyrighted content and names that are trademarked.
Verify if the domain is still accessible.
Avoid using terms that are hard to spell or pronounce.
Install WordPress
Once you are done with hosting and domain purchase, it’s now the time to install WordPress. Just link your web hosting account to WordPress.
Installing WordPress in Hosting has a process that directly depends on the hosting you are using. Check help page of your hosting and then install it. Once it is installed, login into the wp-panel. Just type “ /wp-admin” just after your domain name in the search bar , it will ask you for the username and password. It will then prompt you to the dashboard of the wordpress where you will be able to customize the website.
Install WordPress Theme
A theme is essentially a website template in the WordPress world. Your website’s appearance, features, and initial capabilities are all controlled by the templates. Every WordPress website has a default theme installed. If you go to your website, it will appear like this:
But don’t fret. You can install dozens of premium and free WordPress themes on your website.
From the admin panel, you can modify the WordPress theme for the site. Go to the “Appearance » Themes” tab and select “Add New.”
The official WordPress.org themes directory offers over 11,000 free WordPress themes for search on the following screen.We’ll be utilizing Astra for the purpose of this guide. It is a widely-used free WordPress theme that can be used for many different types of websites and has versatile design choices.
You can look for the free theme you wish to install by entering its name in the search area.The theme will appear in search results on WordPress. To install the theme, move your cursor over to it and click the Install option. After installing your theme, select the Customize option from the Appearance menu to begin customizing it. This will take you to the theme customizer, where you can modify the theme settings while seeing a real-time preview of your website.
Install Plugins
Plugins for WordPress work similarly to applications on your website. They let you customize and add new features to your WordPress website like contact forms, picture galleries, AI Chat etc. Following the installation of your theme, you must install and activate all essential plugins to let you increase the functionality of WordPress. However, you should strive to restrict the amount of plugins you use, since too many might slow down your site or cause other plugins to malfunction.
To install plugins, navigate to the Plugins page from your WordPress dashboard. For WordPress, there are presently around 59,000 free plugins available. Additionally, third-party websites and developers sell premium plugins.
All corporate websites should have the following plugins installed:
Elementor
Turn your page editor into a more user-friendly drag-and-drop editor by using a page builder plugin, for example Elementor.
Akismet
Defend your website against comment spam.
Google Analytics
Monitor the traffic and activity on your website. This is a must if you’re a blogger since without it, most businesses won’t collaborate with you.
Jetpack
Offers upkeep, security, and performance improvements for your website.
HubSpot
Enhance your WordPress website with complimentary live chat to offer customer service, email marketing for newsletters, and CRM. Combines well with OptinMonster.
Yoast SEO
Aids in search engine optimization of your postings.
LiteSpeed Cache
An all-in-one, comprehensive plugin for site acceleration that comes with a variety of optimization tools and a dedicated server-level cache.
Disable Gutenberg
It will deactivate the basic WordPress webpage builder that has lots of limitations and will make it easy to use plugins and theme functions that extend the Classic Editor.
Tweaking the Settings
You must set up the settings, such as naming your homepage and blog posts page and modifying your site’s name, tagline, and icon, before you start customizing your web pages or laying out the content of your website.
Here’s how to set up the most popular settings:
Logo: Go to “Appearance” > “customize” > “site identity > “change logo” > upload your logo.
Site title: Go to “appearance” > “customize” > “site identity > input site title (a.k.a. your business name).
Site tagline: Go to “Appearance” > “customize” > “site identity > input site tagline (or simply delete the default WordPress tagline).
Site icon: Go to “Appearance” > “customize” > “site identity > under “site icon” click “change image” > upload the image you want to display as your site icon (a.k.a. favicon).
Homepage: Go to “Appearance” > “customize” > “homepage settings” and select the webpage you want to set as your homepage.
Blog: Go to “Appearance” > “customize” > “homepage settings” and under “posts page” select the page you want to set as your blog.
Permalink settings: Go to “settings” > “permalinks” then choose your preferred structure (typically “post name”) and save changes.
Create Pages
It’s time to start creating your web pages that form the foundation of a website. A company website, for example, usually consists of many pages, including the homepage, prices, services, about, and contact. Posts and pages are the two default content kinds that come with WordPress. Blogging features include posts, which are arranged chronologically backwards (newest entries are seen first). Pages, on the other hand, including your privacy policy, custom landing page, about page, and contact page, are supposed to be static, “one-off” types of material.
To display your most current postings, you can make a distinct page for your news or blog area. As an alternative, you can set up a website with no blog area at all. Here’s how to use WordPress to build and/or modify pages:
Navigate to “pages” using the vertical menu on the left side of the WordPress dashboard.
Click “add new” to start a new page.
Go to “all pages,” find the page in the list of pages, and click “edit” to make changes to an already-existing page.
Choose the option to edit with the page builder (i.e.”edit with Elementor”) at the top as we have installed a page builder plugin.
Compose the copy for your website and add personal touches to each page.
Press publish once you’re finished.
For any additional pages you wish to build, follow these instructions again.
Set Up Navigation Menu
After setting up your pages, design and build your menu. This is how people browse your website; the number of menus you have, such as those at the top and footer of the page, will depend on your theme.
This is how to set up the menu on your website:
Navigate to “menus” under “appearance” from your dashboard.
Choose the page from the list on the left to add it.
To rearrange your menu or to arrange pages as sub-pages beneath other pages, click and hold the pages.
Select “Save Changes.”
Following menu setup, locate the “menu settings” section by scrolling down the same page. In the “display location” column, select “primary” by checking the box. This will configure the menu to appear in your header as the primary menu for your website.
Add Content & Media
Now you need to add blog posts or other needed content to the pages.Many organizations prefer to include blog postings to boost their chances of being seen in search engines like Google. Here’s how to use WordPress to write a blog post:
On your dashboard, choose “posts” from the left side, then click “add new.”
Enter the title of your post.
Decide which category to place it in.
Compose the material for your blog.
When you’re finished, click “Publish.”
The primary difference is that, unlike a page, you can compose a blog post and then set it up to publish at a future date.
You can even add media and other images to enhance your content. You can, for example, include a gallery of your products or work images to make the homepage more appealing.
Market Your Site
It’s important to consider how you’ll market your website. Companies who have engaged in various internet marketing tactics to increase their online exposure and attract more visitors to their website are those that are easily found online.
The following are some of the best strategies for website marketing:
To help your website rank right away, submit the URL to Google Search Console.
When creating any kind of marketing material, such as business cards or email signatures, don’t forget to include your URL.
Make social media profiles for your website (such as a Facebook business page, an Instagram account, or a Pinterest business account) and link to them from your postings.
Establish a Google My Business profile to appear in local search results.
Submit your website to Yellow Pages, Tripadvisor, Yelp, and other pertinent internet directories.
We’ve now already covered how to create a WordPress website, install necessary plugins, add new web pages, and add new themes. If you’d want to go even further, you can develop strong specialty websites that are able to perform much more. For example, you can add an e-commerce store,start your own podcast, create a web directory etc..WordPress can be helpful for non-technical people to build simple websites but when it comes to customizable feature rich websites, you need expertise. ESS institute is one of the top Web development institute in Delhi and have recently launched a new online web design course to help you make websites. You can enroll in both online and offline batches now for detailed knowledge.
#Computer Institute in Delhi#Best Computer Institute in Delhi#Graphic design course in delhi#Graphic design institute#graphic design institute in delhi#Web development institute in delhi
1 note
·
View note
Text
Webinar: Building a WONDERful Website on WordPress
Register today! | View in Browser
Log In
INTRODUCING
Creating is
WONDERful
Quickly create a website today!
Hello Rj
Join our upcoming webinar for expert guidance, from domain selection to SEO optimization. Meet WonderSuiteby Bluehost and see how it will revolutionize website creation! Don’t miss out – register today and take your online presence to the next level!
Host:
Devin Sears,
Sr.…

View On WordPress
0 notes
Last Seen Blogs

blackcatanna
Welcome to my Trash Garden


quiet-and-soft
abby's aesthetic

valentinbelleyh505
BitterGiggle's number 1# Fan

natureforus-blog1
NatureForUs