#how to check wordpress username and password from cpanel
Explore tagged Tumblr posts
Visit Tumblr Blog
Explore Tumblr blogs with no restrictions, modern design and the best experience.
Last Seen Tumblr Blogs


Fun Fact
There are dozens of funny blogs to kill time on Tumblr.
Text
Find the step-by-step guide to easily find your WordPress admin username and password from cPanel. Let’s get started & retrieve it!
#how to find wordpress username and password in cpanel#how to get wordpress username and password from cpanel#how to check wordpress username and password from cpanel#how to change wordpress username and password from cpanel
0 notes
Text
13 Routine Maintenance Tasks that You Should Do on WordPress and WooCommerce

Maintaining a WooCommerce store is a lot of work. There are a lot of routine maintenance tasks for WordPress and WooCommerce that need to be done on a regular basis. In this post, we list down the most important tasks that you should do on your WooCommerce store.
1. Create Regular Website Backups

2. Update WordPress, WooCommerce, Themes and Plugins
Updating all elements of your WooCommerce store should be done on a regular basis. Do this weekly if you have the time. If not, monthly updates are good enough. Updates include updating WordPress Core, themes, WooCommerce and all other installed plugins. Remember to backup up your site before proceeding with updates since updates could cause your website to break. If you have a development site, it would be best to test the updates first on this staging environment. Then, do some user testing to make sure that there are no errors.
After that, you can proceed to update your live site. When that’s done, you will need to do another round of testing. Some important elements to test include checkout, add to cart, contact form emails, opt-in forms and other customizations that were done on the site.
3. Update WooCommerce Template Files
After updating WooCommerce, you will sometimes get an error notifying you of outdated WooCommerce template files. This just means that your theme has not updated to include the latest WooCommerce template files. In some cases, this could cause some formatting issues on your store. If there are no errors on your store, you can simply wait for your theme to release an update that includes the most recent template files. Or you can also fix this manually by following the steps in this documentation from WooCommerce.
4. Change User Passwords
It is important to use strong passwords. However, it is just as important to change passwords on a regular basis. There are times when security breaches can go undetected for a long time. Changing your password regularly blocks out these security breaches that you might not realize are there. You should change your password for WordPress admin, FTP, database and cPanel. And a pro-tip, never use “admin” as your username. This is the first username that hackers try out when brute forcing into websites.
5. Optimize Your Product Images
We’ve always emphasized the importance of optimizing images for your WooCommerce store to keep your site running fast.
If you have uploaded any product image that is more than 100KB in size, it might be a good idea to replace that image with an optimized product image. To learn more, you can check out our blog post on how to optimize images.
6. Approve and Respond to Product Reviews

7. Approve and Respond to Blog Comments
If you have a blog that is made to drive customer engagement, then your blog will most likely attract comments. Same with product reviews; don’t delete the negative comments. Rather, address them positively. Remove any spam comments as this will negatively impact the user experience of your blog. If you are using Akismet: Anti Spam plugin, this will block out most spam comments. However, some spam comments can still get through and you will need to manage them manually.
8. Test Your Contact Forms and Email Opt-in Forms
Every now and then, you will need to make sure that your contact forms and email opt-in forms are working. Just fill in your forms and send. If you receive it in your email, then you’re all good. But if you don’t, there’s something wrong and you need to do something about it. Have your developer look into it.
9. Optimize Your Database
Over time, your database accumulates a lot of gunk and you need to clean it to make sure your website runs fast. Before you go about this task, make sure you create a backup. You can choose to clean your database manually if you are comfortable and familiar with working on your database. Otherwise, you can use a plugin to do the optimizations for you. Notable plugins include WP-DBManager and WP-Optimize. You can check out our guide on how to clean your database.
10. Test Your WooCommerce Store’s Speed
If you have not yet made optimizations to your WooCommerce store’s speed, you should consider doing it now. Site speed has become increasingly important for WooCommerce store owners. Google now considers site speed as a ranking factor for SEO. Also, if you have a slow site, this will negatively impact the customer’s experience on your site. It is easy for your customers to buy instead from your competitors. You can test your site speed on Google’s Page Speed test and Google will provide you with recommendations on how you can improve your site’s speed. Other notable tools that you can use to test your site are Pingdom Website Speed Test and GTmetrix.
11. Scan Your Site for Malware
One way to keep on top of your website’s security is to regularly test your site for any malware. If you are connected to Google Search Console, it will let you know if malware is detected on your site. If your site has been found to have any form of malware, Google Chrome will actually alert your visitors that your site is dangerous. This can have devastating effects on your traffic and conversion rate.
No one will want to enter their payment information on a site that has malware. In extreme cases, Google may block your site from appearing in the Google search results page. You want to prevent this from happening. It would be best to invest on your site’s security by installing a security plugin such as Sucuri Security and WordFence. Even if you have those plugins installed, it is still a good idea to a manual scan. You can scan your website at Sucuri’s Website Malware and Security Scanner, or at SiteGuarding. If any manual scans detect anything malicious, you can contact your developer to fix the issue. You should get it fixed before Google applies any penalties. Wooassist also offers a security hardening service to improve the security of your site so you can prevent this from happening.
12. Fix Broken Links

13. Test Your Checkout Process
Last but definitely not the least; you should regularly test your checkout process. If you suddenly experience loss of sales, it’s a good idea to test your checkout. There might be an error that prevents your customers from checking out. Testing also gives you a feel of what your customers go through so you can optimize your checkout. Once you’ve determined that your checkout has problems, you can check out our post on how to fix the most common checkout problems in WooCommerce.
Final Notes
By doing these tasks on a regular basis, you can keep yourself on top of any issues that may occur on your WooCommerce store. If you find yourself overwhelmed by the all these, you can hire someone else to do it. You can also contact us and our team will be glad to assist with any of these tasks.
Are there any other routine maintenance tasks for WordPress and WooCommerce you think should be done on a regular basis? Do you have any suggestions? Let us know in the comments.
0 notes
Text
[ad_1] It was guys wanna back with another exciting video and in this video guys I'm going to show you how you can create a free Amazon affiliate website with WordPress so that you can make some cash with those free website so that's basically what we're gonna do here we will connect Amazon affiliate account With our WordPress website in order to import products directly from Amazon into our WordPress website so like I said we will create free website with free domain and free hosting if you want to buy a paid hosting or paid to mean you can do that as well and the rest of The work will be the same so if you want to give a try you can do that as well so anyways enough talking and let's get started let me show you guys how you can create a free Amazon affiliate website if you need to channel make sure to Subscribe or you can turn on notification by clicking this notification bell icon and you won't miss my new uploads and also you can leave in like if you've been enjoying these videos so guys let's get started and let's create a free Amazon affiliate website go to Google and perform a Google search for bite host so open up this website in a new tab meanwhile perform another Google search for free nom and open up this website in a new tab this website gonna provide us free hosting and here we can get a free domain so let's get it and here you need To sign in so I'm gonna quickly sign in so guys I recommend you to login why I email sometime Shousha login doesn't work so now go to services register a new domain here you can type your domain now click on check availability so there's these are the free domain and These are the paid one so in our case we needed freedom in then click on get it now and then click on checkout now click on it choose DNS now click on use your own DNS now change the time period twelve month free so does leave this phase as it is now we Need name server of this website let's go back here let's sign up for hosting click on sign up for plan here you can type your domain this is gonna be subdomain don't worry you can type anything you want we will replace this domain with our domain to complete this Registration process now give you a real email now we need to check the email so guys as you can see they send us the verification email now verify our account by clicking on this link so guys as you can see account has been created successfully now we can access our CPanel by going to this link this is your username of your cPanel you can copy and you can paste here and enter your password here and login quickly so guys this is the cPanel now let's scroll down and then click on add-on domains under the domain section so where as These are the name server we need to copy them now let's go back to this freedom website and paste here paste down here as well and let's change this number 1 to 2 and then click on continue let's move on to the rest of the work so here you can type your billing Information if you like otherwise check this box and click on complete order let's go to client area go to the services my domain so guys this is the domain that we just get it for free let's copy this now go back to the cPanel and paste your domain right here And make sure guys you don't have any space in the beginning or in the end of the domain and then click on add domains so guys they show us error this is just because we just added the name server and name server some time takes time to Reflect and that's why they show us this error message if the same thing happens to you then don't be panic try this process 5 minute or 10 min later you will be good to go let's go back to the home and let's try again and let's see this domain right Here click on add domain okay guys as you can see now we successfully added the custom domain let's go back go back to the home now we need to install WordPress let's scroll down click on software class Apps installer so these are the script that we can install on
This hosting so we need wordpress then click on install so guys here it says choose the main choose your custom domain do not choose subdomain delete this here you can give a name to your site you can call whatever you like here you can change the description of your Site here you can type username now type your password now here you need to enter your real email address now scroll down then click on install so as WordPress installed successfully now we can access our WordPress dashboard by going to this link so guys our first step is done now Let's move on to the next one which is we needed Amazon affiliate account let's go back to the google type Amazon so guys I'm from India so address is a Amazon taught in if you live in another country address might be different so let's open up Amazon let's Close these tab so guys you need to scroll down now how you need to click on become an affiliate so guys here you need to sign up you can join the Amazon affiliate program by clicking on this link I already have account on this so I'm gonna login So because as you can see I just log in with my Amazon account once you log in now let's leave the space as it is let's go back to the dashboard let's go to the appearance theme then click on add new now search here Astra now install this Theme now click on activate now go to plugins add new now such here Astra not install this Astro starter sites Install Now then click on activate now go to the appearance then click on astrocytes now you want to go to beaver builder so guys here you can choose any theme you like But theme should be included fook must plug-in scroll down so I'm going to choose this theme so guys as you can see this is the demo of this theme so we need to install these plugins as well click on install plug-ins so it'll take some time so I'm going to speed this Video up a few moments later now click on import this site and click on OK now it will import all the demo data of this website now it will import the media from this demo website so it will take some time so I'm going to speed this Video up so as you can see now we done here now click on View site so guys this is the website that we just build now click on customize because if you scroll down you can see we don't have Buy Now button here let's add that butter let's Go to the layout cuckoo Mars shop and then check this eyeball I can and now you can see the add to the Cart button and click on publish now close the customization let's go back to the dashboard let's go to the plugins click on add new Then click on upload plug-in so here we need to upload a plug-in so let's go back to the Google and here search for Busan Busan lite version open up this website and then download this plugin I already have this plug-in so I'm not gonna download this again let's go back To the cPanel now look for FTP account open this up so guys now we need the FTP client so I'm gonna use FileZilla to upload that plug-in so let's open FileZilla if you don't have FileZilla you can download FileZilla go to the google type FileZilla open up this first Website and download files Allah client you can download for Mac or you can download it for Windows according to your Windows version if you have 64-bit you can download 64-bit if you have 32-bit you can download 32-bit so once you download and install this into your Computer then open this up so I'm going to open my FileZilla so guys this is the FileZilla so as now we need to login into our webserver in order to login we need a hostname username and password and pout now let's go back to the cPanel This is the information of our FTP let's copy this one by one so I'm going to add all these information into my FTP client which is FileZilla then click on Quick Connect so as you can see now we inside our server now let's go to your domain now click on Etsy Docs inside the htdocs we need to open WP content then open plugins so here we need to drag and drop our plugin that we just
download so guys this is the plug-in that we download and this is the zip file we need to extract it right Click extract here so guys now we have this folder if you open this up these are the plug-in files now let's step back and we need to drag and drop this entire folder right here this uploading takes some time so I'm going to speed this video up and I will come back once It done one hour later so guys we almost done all right now plugin is upload successfully now let's go back to the dashboard now go to the plugins and then click on install plug-ins scroll down and you can see who's on light plugin now click activate now ologist config This plugin click on get started this is a set of result not asking what kind of site is so I'm going to select online store click Next this is a fresh install click Next here I'm going to choose the second option the next click Next click Next next So guys here we need to enter the access key ID of Amazon affiliate account and secret key so let's go ahead and open Amazon affiliate account now here go to the tools then click on products advertising API so as you can create your access key by clicking on this add Credential button so this is your access key now copy the access key by ctrl a select all copy let's go back to this plugin paste right here let's go back to Amazon again copy your secret key control a copy let's go back to this plug-in and paste here and next you need Your affiliate ID let's go back to your Amazon affiliate account so this is your Amazon affiliate ID go to your accounts your email and then click on manage your tracking ID now copy this let's go back here so I am from India I'm going to paste just in this section and then I'm Going to change the country India right here and I'm going to change this to India and then you can click on check Amazon AWS keys if this doesn't work for you guys then make sure you have account on Amazon AWS let me open up a new tab When you go to the Google type AWS Amazon and then open up this website aws.amazon.com here you need to create account when you create account it will ask you for credit card or debit card and it will charge you only 2 rupees to Indian rupees and that's almost a free Once you have account on this website then you won't face any sort of error now click on check Amazon AWS key ok as you can see it says WooCommerce Amazon a fill it was able to connect to Amazon with Pacific AWS key Pierre and associate ID and now click on finish Now close this now dismiss this notice so guys as you can see now we inside the Busan plugins dashboard first of all this is a free version with the free versions you get limited features if you have paid version you get tons of other features with it so there's now let's Just import products from Amazon in order to do that let's click on insane import mood here you can type a keyword like you can type chart and I'm gonna choose shirt for men select the category peril and I'm gonna scroll down I'm gonna click on launch search and this Will do some process here and this is the result that we have here so again guys this is a free version of this plug-in if you have a paid version then you can import many product in one click anyways once we have these products you can select Pacific one or you can select All of them scroll down and then click on import products and it will take just few seconds as you can see because these are only ten products now close box go to the store let us go to the t-shirt and polos open this up and these are the T-shirts so let's try this out so I'm going to click on a select option now select the color which is black available select the size and then click on Add to Cart and let's see what's going to happen and then click on View card alright don't worry about the Currency you can change it under the WooCommerce settings now click on proceed to checkout so guys as you can see we just redirect an Amazon with this plugin so how cool it is right so this way you can add tons of products on your website let's go
Back to the dashboard or I guess now let me show you the paid version of this plug-in so there's this is the paid version of this plugin if you buy this you will get six month of sport and variety of features you can see right here and you can see the sale many People are using this plug-in to increase their revenue if you are serious about this you can buy this otherwise you can use the free version of this plugin alright guys I think we done everything here we created our amazon affiliate website or I guess that's the end of This video guys I hope you enjoy if you did enjoy this long video then you can hit the like button and don't forget to subscribe to my channel so that being said goodbye and see you next time [ad_2] #free #Amazon #affiliate #website For More Interesting Article Visit : https://mycyberbase.com/
0 notes
Text
How to install wordpress – Complete wordpress tutorial

2 Things You Need Before Installing WordPress Before you installing WordPress, first you will need a domain name and second a good web hosting company. Most web hosting company provides shared space on a web server for less than $8-$10/monthly. Also many hosting company will install and maintain wordpress for you. Today, we highly recommend that you use BlueHost. Because they will give you a free domain as you like. And their hosting plan price start only $3.95/monthly. You will be happy and feel secure to hear that BlueHost is also an official recommended hosting company of wordress.

How to Install WordPress using Softaculous Softaculous is a most popular auto-installer script. Just a few clicks, you can easily install wordpress. The most popular BlueHost company use Softaculous in their control panel. Now just login to control panel account and look for WordPress icon (see below the image). You will get them under Softaculous apps installer section.

After clicking on wordpress icon you will see an overview of wordpress as like below the image. Now you need to click on the Install tab to continue the install process.

As protocol, you need to choose http:// or http://www. And if your site has SSL and HTTPS, then as protocol you have to select https:// or https://www. After that, you need to choose the domain name where you want to install WordPress. Most users want to install WordPress in their domain’s root directory, like example.com. In that case, you need to make sure that the ‘In Directory’ field is blank. (You will see ‘wp’ in directory filed as default)

Then down a little, you will see the site settings section. Under this section, first you need to fill a title and description of your site. If you don’t want yet, don’t worry you can easily change them from your wordpress admin area after installation. Next, you need to choose an admin username, strong password, and email address. Softaculous will automatically fill in the username and password fields for you. It will use a non-dictionary word for username and a strong password.

You can change them if you want so that they are easy to remember for you. However, we strongly suggest you to always use a strong password. Always you will use correct email address in the admin email field. Because wordpress will send notifications and password reset link if you ever forgot your password. Rest of the options are optional. So you can now click on the install button to run the installer.

Softaculous will run the installer using the settings you provided. You will see a progress bar with installation status. It will take a couple of minutes, do not close the window until the progress bar reaches 100% otherwise this may affect your wordpress installation. You will see a success message after the installation is finished. It will also show you a link to your website and another link to your wordpress admin area.

How to Install WordPress using FTP Just the five steps to install wordpress. Download the latest version of WordPress.Upload those files to your web server, using FTP or cpanel file manager.Create a MySQL database and user for WordPress.Configure WordPress to connect to the database that you created for you wp site.Complete the installation and setup your website! First thing you need to do is download the latest version of WordPress. Unzip the file, and use FTP to upload WordPress files into your web host directory of your choice.

If you want to install WordPress on your root domain name (like example.com), then you need to upload WordPress files to your website’s root directory. Usually this directory is called /public_html/. On the other hand, If you want to install WordPress in a subfolder (like example.com/myblog), then upload it in a folder /public_html/myblog/. Once you are done uploading WordPress, go to your hosting control panel to create a database. We are using cPanel web hosting, so you will find icon as like below screenshot.

You will see a field to create a new database. Enter your database name, and click “Create Database”.

Now that you have created your database, MySQL still needs a username MySQL Databases page in your cPanel account, down a little MySQL Users section. Simply provide a username and password for your new user and click on the ‘Create user’ button.

This new user still does not have access to the database you created earlier. For that you will need to add the user to the database and give them permissions to perform all actions. On the same MySQL Databases page in your cPanel account, down a little ‘Add User to a Database’ section. Select the database user you created from the dropdown menu next to user, then select database, and click on the add button.

You will be now asked for the privileges you want to allow this user. Select all privileges and click on the Make changes button.

Your MySQL database and user are now ready, and it is time to run the install. Now go to to the URL where you uploaded WordPress. If it is in the main domain, then enter your domain name in the browser window, like example.com or www. example.com. You will see the language selection page. You can choose a language and click on the continue button to procced.

You will now see some installation instructions. Wordpress will need database name, password, and mysql host information. Click on the ‘Let’s go’ button to continue.

Now wordpress will show you a database connection form. You need to enter the database name, user name, password and database host.

Then click on submit button.

Next you will see ‘Run the install’ page. So you have to click on ‘Run the Install’ button to continue. Now wordpress will create tables in your database and then send you to the next step of the installation. Then you need to fill some information for wordpress to setup your site. This includes site title, username, password, and admin email address. If you do not want your website to be visible to search engines, then you can check the box next to search engine visibility

Click on the Install wordpress button to continue. Wordpress will setup your website and finish the installation. You will see a success message showing your username. You can now click on the Log in button to sign in to your wordpress site.

Read the full article
1 note
·
View note
Text
How to install wordpress?
How to install WordPress? today an internet site is vital for everybody whether or not you're a man of affairs or a student. It becomes the foremost necessary a part of our life. web site|the web site} will be for love or money it will be your business website, it will be your earning web site, it will be your on-line store. Earlier it absolutely was tough to form an internet site, we've got to be told several languages for the event of the web site. as an example C language, C++ language, java language, hypertext markup language language, etc. however currently once the launch of WordPress, it's currently simple to style an internet site.
For the event of the web site, we'd like a pair of things domain and hosting. There square measure several domains and hosting suppliers accessible on-line you'll obtain from there. as an example Bluehost, GoDaddy, hostinger, etc. If to procure them from one web site then you don’t ought to do something however if to procure a site and hosting from a pair of different websites then you wish to attach them initial. For connecting them click here.
how to install wordpress So, once shopping for and connecting a site and hosting you wish to put in WordPress therefore, here are
The steps to put in WordPress Open your browser kind|and sort|and kind} your name and so type (/Cpanel) as an example airconditioner1.com/cpanel Then enter your username and arcanum. Check your registered email id wherever you've got submitted whereas making your hosting provider’s account. Check hosting provider’s email. Then resolve username and arcanum on it email and replica it and paste it to your Cpanel Then you'll be login to the Cpanel. Then scroll down and within the code section visit WordPress manager by softaculous. Then click on install Then scroll down and within the admin account section setup up your admin name, admin arcanum, and admin email (It are going to be used after you forgot your password). Then scroll down once more and click on to put in. Then it'll take 1-2 minutes for the installation. And finally your WordPress has put in. Then open a replacement tab kind|and sort|and kind} your name and afterward type wp-admin, as an example, airconditioner1.com/wp-admin, and so click enter. Then sort your username and arcanum now you're to sort the arcanum that you've got created at the time of installation of WordPress. Then click enter. Now you've got with success entered the WordPress backend. So, these were the steps that you simply will follow to put in WordPress. So, If you discover this data then share it along with your friend and facilitate them to put in WordPress.
visit our website for more information : aircondtioner1.com
0 notes
Text
Website Maintenance: Mistakes Every Website Owner Should Avoid
Stay Away From These Common Website Maintenance Mistakes
Website maintenance is an essential step in the upkeep of any website. Without proper maintenance, websites can become susceptible to many issues that will cost you time and money to repair. That’s why many website owners choose to have a regular website maintenance service to help keep them on top of the latest website problems with their web design tools.
It's essential for SEO purposes and general functionality to ensure your website runs correctly on all web browsers, platforms, and devices. Several things should be checked regularly to ensure your website is always running smoothly.
Below are some of the most common mistakes website owners make when it comes to their website maintenance.
Running Unnecessary Plugins
Plugins are beautiful tools that extend the functionality of a website by giving you easy access to advanced features. But too many plugins can lead to performance issues, conflicts, and loading times. It's crucial to not only know what each plugin does but also what its purpose is.
No matter how helpful a plugin may seem, if it's running on every page, you're going to experience some severe performance issues. Ensure that the plugins installed on your site are necessary and remove any that aren't being used or whose functionality can be replaced by another plugin.
Running Outdated Themes
Outdated themes are another critical issue that needs to be addressed for website maintenance. Just like any program, themes continue to evolve and become more efficient as time goes on. When you're using an outdated theme, your site will run slower than it should, which can cause all kinds of issues for your visitors, including high bounce rates.
Using The Wrong Web Hosting Provider
Your host provider is an essential piece to website maintenance because it's where your site gets its bandwidth and connectivity to the internet. With so many web hosting providers out there, it can be hard to determine which one is right for you, but it's essential to consider that each offers different features.
As you're looking for the best hosting provider, look at things like server speed, uptime, control panel support, available space and bandwidth, cPanel or other control panel availability, etc., so you can make sure you've found the right one. Also, note how easy it is to set up your website so you can get it running as soon as possible.
Not Having A Backup Strategy
It would be best if you had a backup strategy if something were to happen with your site. Imagine how hard it would be to recover from a hacked site or losing your entire database of users. You should always have backup copies of your database and website files stored on an external device if anything were to happen.
You should also test your backup files to ensure they work properly.
Not Understanding Basic SEO Practices
SEO is important to website maintenance because it makes sure your site gets the right kind of attention from search engines and users alike. It would be best to take basic steps every week to make sure that your site keeps its place among the top ranks in search engines.
For example, you should be using "keywords" on your site for SEO purposes, ensuring users can find your website when using specific keywords. You should also ensure that all the links throughout your site work properly and emphasize essential pages, not internal links like navigation menus.
Not Using A CMS
A Content Management System (CMS) can be a huge advantage in website maintenance because it allows you to update and edit content, images, etc., on your site efficiently, so you don't have to do everything manually.
It's important to note that WordPress is one of the most widely used CMS's out there, and it's easy to install on your website.
Ignoring Important Security Protocols
It would help if you were taking the necessary precautions when it comes to your website's security. One of the simplest things you can do is install a plugin that prevents brute force attacks on your site so malicious users can't get in and damage it.
As far as other protocols go, you should have an SSL certificate for your site that encrypts all user information and passwords when they're being submitted. It's also important that you verify your website in Google Webmaster Tools to make sure there aren't any issues or errors that could be causing problems for your site.
When securing your site, always use different usernames and passwords for each account you have access to because if one gets hacked, everything else is safe.
Conclusion
Website maintenance can be a daunting task, but it doesn't have to be if you follow these simple guidelines. Make sure you're using the right theme for your site's needs, you back up everything regularly in case anything were to happen, and focus on SEO and security protocols, so your users and search engines keep coming back for more!
Website Maintenance: Mistakes Every Website Owner Should Avoid was first published on
Sharp Tack Media 9009 SE Adams St #1911 Clackamas, OR 97015 (503) 451-6675 https://goo.gl/maps/hkv1FcwAw4U2
0 notes
Link
Accessing the Marketplace Installer and Installing an Application
Logging into the newly installed Application
Troubleshooting Errors
500 Error on Installation
Database Creation Issues
Accessing the Marketplace Installer and Installing an Application
Bluerock
1. Log in to your Bluehost control panel.
2. Click the Marketplace tab from the side navigation menu to the left.

3. Choose Add Website from the drop-down menu.

4. You will be prompted to create a new WordPress site; enter a Site Name and Tagline.

If you click the Advanced button, this will give you an option to add your Email Address, WordPress Admin Username, and Password.
5. Then click the Next button.
6. Choose the domain you would like WordPress installed to in the Domain drop-down.

7. If you would like your WordPress installation to exist in a subdirectory (i.e., example.com/blog), enter your preferred folder in the Directory field.
8.Toggle suggested plugins on/off, then click the Next button. Once the installation is done, you can jump through to Logging into the newly installed Application walkthrough.
Legacy
1. Log in to your Bluehost control panel.
2. Click the addons tab from the navigation menu that stretches across the top of your screen.

3. Click the Marketplace from the sub-menu.

4. Click One-Click Installs from the navigation menu at the top of your screen.

5. Select the application you would like to install. 6. Select Get Started. 7. From the drop-down menu, choose the Domain Name you would like to use for this application. Anything entered in the field following the domain name will be a part of the URL. 8. If desired, enter a Directory. 9. Click on Next. 10. Enter Admin Information
Site Name: This will be the name displayed on your site. This is not the URL but simply the name used on your site.
Admin Email Address: This will be where your login information will be sent.
Admin Username: The desired login name for your application
Admin Password: The desired password for this application
Logging into the newly installed Application
The Marketplace installer will take a couple of minutes to install your application. Once done:
Bluerock
1. Once the installation is done from Marketplace, you have an option to Click Go back to My Sites or Click Login to WordPress to sign in right away to your new WordPress site.

2. If you select Go back to my sites, please check Log in to WordPress through My Sites to learn more.
Legacy
1. Select My Installs from the Website section. 2. Find the domain install and click Login.
Troubleshooting Errors
500 Error on Installation
This usually is a result of something incorrect with the .htaccess file or the PHP Configuration being used.
Rename the .htaccess file. The system will create a blank one for you.
Change the PHP version that is set in the PHP Config on the cPanel. For more information on how-to do that, go to PHP Version Selection.
Database Creation Issues
If you experience issues with the database not being created for a WordPress installation, please see WordPress Installation Without Automatic Database Creation.
GET STARTED
Total Design Freedom
WordPress-based Builder Available
Free Domain Name for 1st Year
Expert 24/7 support
0 notes
Text
How to Start a Website in 5 Minutes with WordPress

What is WordPress?
For many, when they think of WordPress, they think “blog.” And while WordPress is one of the world’s largest blogging platforms, WordPress is also a complete content management system and is a great way to build many different types of websites. This article will show you how easy it can be to get your blog, or website, up and running quickly.
Setting up a Website or Blog
Whether you are wanting to learn how to create a blog or setting up a website for the first time, the first steps are always the same but before you can begin, you have to decide how you want to set it up. Most people choose to use either a website builder or content management system (CMS) like WordPress as those are the easiest if you have never started a website before. However, for the more advanced option, you could build a site from scratch, but that requires coding skills.

For the sake of simplicity, we breakdown how to set up a website or blog into easy to follow steps using WordPress. The rest is up to you!
Buy a Domain Name
Choose a Web Hosting Provider & Setting up your hosting account
Install WordPress
Step 1: Buy a Domain Name
If you don’t already have a domain name for your new website or blog then the hardest part is picking a domain name that best suits your business or blog. Once you have decided on a domain name and it’s available for purchase, the next step to buy it!
Step 2: Choosing a Web Host
There are many hosting companies out there, but for a WordPress site, Bluehost should definitely be at the top of anyone’s list. Bluehost is recommended by WordPress for website hosting and has been for more than 10 years.
To set up your hosting account with Bluehost, follow the steps below. It will speed up the process to think of a domain name you want to use and to have your credit card for payment ready to go before you get started.
Set Up Your Hosting Account
To get started, go to Bluehost’s home page and click “Get Started.”
Next, you need to choose a domain name for your site. If you already own a domain name, you can enter it here, and you will just have to go through a few extra steps to make sure you get your DNS pointed to Bluehost. If you don’t already have a domain name, you can purchase one from right in the sign up process, and the best part is, it comes free with your new managed WordPress hosting account purchase.

2
Once you’ve entered a domain name, you’ll fill in your personal information.

3
Then, you’ll choose which hosting package you want. Normal, shared hosting is priced at 12, 24 and 36-month terms. To help save you money, the longer term you purchase, the lower the monthly rate will be. For example, by choosing a 36-month hosting term, you can get a great introductory rate of $3.95/month. And, because you’ve chosen to host with Bluehost, if you ever need more than a shared hosting account, Bluehost provides seamless upgrades to VPS or dedicated server hosting accounts from inside your control panel.
There are few other offers provided at sign up, which you can include at your discretion. One we recommend is Domain Privacy, a paid service that allows personal information to be kept private on WHOIS databases.
After you’ve filled in your information and chosen your hosting package, click the “Next” button to complete your purchase. You’ll then be asked to create a password for your account. You can use the Password Generator to create a strong and secure password or create one yourself. It is required to have both capital and lowercase letters, a number, and a special character (?!#, etc.) in order to have a strong enough password to protect your account.
Now that you are all signed up and are able to log into your account, you can get started installing WordPress!
Step 3: Installing WordPress
This may seem like the most complicated step, but Bluehost has worked hard to make this one of the easiest things for you to do by using the new MOJO Marketplace for installing WordPress and other applications. In your cPanel, scroll to the section titled “MOJO Marketplace” and choose the “One-Click Installs” button. This will take you to a page inside MOJO Marketplace called Scripts and Platforms. The blog section is at the very top, so all you have to do here is click on the WordPress icon.

This will open the installation window. Click on the green “Start” button that will start the WordPress installation process, which has a few easy steps.
Step 1: Choose where you want to install WordPress. This can be any domain on your account, or a subdomain or a folder for one of your domains. Next, click on “Check Domain,” which will make sure the domain is assigned and pointing to your account. You may get a warning that you are overwriting files, but as long as you don’t have another website built yet, you can check the box and continue. This is mostly to make sure that you really want to install it in that location. If you do have other sites built, you will want to make sure you’re not overwriting something important.

Check Your Domain
Step 2: Show Advanced Options. This section allows you to set up your own username and password for your WordPress install. IT is recommended to use a different username than “admin” and a very strong password. Make sure that the “Automatically create a new database for this installation” box is checked unless you have a database already set up that you want to use.
Step 3: After you’ve read the terms and conditions, check the box indicating that you’ve done so, then click “Install Now.”

Install WordPress
Now you’ll see the progress page, which will show you how far along the installation is. Once WordPress is fully installed, it will provide you with your site URL, the admin login URL, your username, and password. You will get a copy of this information, except your password, in your email as well. Make sure to keep it in a safe place.

WordPress Install Progress Bar
Now you can log into your WordPress site by going to the admin login URL. Enter your username and password, then click “Log In.” This will take you to your WordPress dashboard.
What’s Next?
Congratulations! You have successfully set up a website in less than 5 minutes. From here, you can design your site using templates and plugins. You can control everything to do with your WordPress site, such as creating pages, writing blog posts, and changing the appearance.
Don’t forget to consider the following plugins & tips to get more out of WordPress to set your website up for success!
Install plugins – top 3 plugins
SEO (search engine optimization) – Yoast SEO
Contact Forms – WP Forms
Google Analytics
Optimize your website for search engines
Link to social media accounts to allowing for sharing content
Remember, if you sign up through this tutorial, you’ll receive a special offer of shared hosting at $3.95/month for 36 months, as well as a free domain name for a year!
0 notes
Text
Find the step-by-step guide to easily find your WordPress admin username and password from cPanel. Let’s get started & retrieve it!
#how to find wordpress username and password in cpanel#how to check wordpress username and password from cpanel#how to find wordpress admin username and password from cpanel#how to get wordpress username and password from cpanel#how to find database username and password in phpmyadmin cpanel
0 notes
Text
Find out how to Construct a WordPress Website in 24 Hours
New Post has been published on https://tiptopreview.com/how-to-build-a-wordpress-site-in-24-hours/
Find out how to Construct a WordPress Website in 24 Hours

WordPress is a incredible platform for constructing web sites on the fly with little to no growth time required to stand up and operating.
As well as, WordPress has incredible customizability starting from having the ability to absolutely customise your theme, to discovering plug-ins which have the performance to do absolutely anything you need.
The checklist of what you are able to do to customise WordPress is limitless and is mostly restricted solely to your creativeness.
You’ll be able to set up a publication plug-in to handle your publication subscriptions. You’ll be able to set up analytics plug-ins that seamlessly combine with WordPress and Google Analytics.
Different WordPress plugins will let you customise your search engine optimization similar to your title tags, meta descriptions, and meta key phrases.
Nonetheless, some plug-ins can even allow you to add noodp and noydir tags, and dive deep sufficient into their performance to permit for full management over noindex/nofollow on particular person pages.
1. Select a Good Area Identify

This could go with out saying, however choosing a good domain name is half the battle towards creating a superb web site.
Commercial
Proceed Studying Under
A great area title ought to typically be:
Quick.
Catchy.
Describe your enterprise.
Key phrase-related.
Related to your model.
Quick domains are typically outlined as domains which are three phrases or much less. Ideally two phrases or much less.
These phrases ought to talk and embody three areas: your model, your business, your key phrases.
Now, in the event you’re simply creating an organization website, your domain name ought to be a branded area title for posterity causes.
You wouldn’t simply be capable to promote your website in the event you created the area title to be “JohnsWebsitesRUS.com.” So, that consideration ought to come into play as nicely.
Now, it’s essential to say this: the precise match area title replace does are inclined to work towards domains with exact-match phrases.
Watch out about utilizing precise match key phrase phrases because the area title. Chances are you’ll get away with it for just a few months, however the selection will finally come again to hang-out you.
Commercial
Proceed Studying Under
2. Select a Good Host

Selecting a superb internet host for WordPress presents a number of challenges. An online host ought to be a optimistic addition to your web site’s arsenal.
Issues like extra web sites, bandwidth, or issues like no WHM management panel could be (and ought to be) dealbreakers. Discover a host that can fit your wants and allow you to improve your month-to-month bandwidth as essential.
As you drive extra site visitors to your website, you need to be sure that your host has a way so that you can improve that bandwidth.
Virtually nothing is worse than acquiring hundreds of tourists a month solely to search out that your web site is immediately down attributable to a scarcity of bandwidth.
Guarantee that your host provides you with the safety you want, as nicely. This may provide help to relaxation simple, realizing that you’ll not be hacked at a second’s discover.
Be taught extra about WordPress safety: 10 Tips For Keeping Your WordPress Site Secure.
For this tutorial, we’re assuming that you’ve got chosen a Linux internet host with CPANEL + WHM mixture as your internet hosting stack.
There are different implementations and kinds of hosts however for the needs of this text, that is what we’re utilizing.
Three. Stock Your Current Web site

Right here, you’ll be able to work out whether or not or not you need to begin over. In case your present web site is so horrible you need to begin over, I completely get it. I’d not need to add that website to my portfolio both!
Commercial
Proceed Studying Under
Check out your present web site and work out what you need to preserve and what you need to throw away.
Relying on what you uncover on this step, it is going to be essential to carry out a full web site migration, which is able to take longer than 24 hours and is past the scope of this text.
four. Obtain WordPress
Go to WordPress.org and obtain the set up information for WordPress. After downloading, you’ll be able to unzip the information.
Then, go browsing to your internet host. Add the information. You’ll be able to add the information wherever you need on the web site.
If you wish to add them to the foundation folder and have your whole website based mostly on WordPress, that may be accomplished.
If you happen to’d relatively only a part of your website hosted off a subdomain be the WordPress model, then that’s potential as nicely.
5. Create a MySQL Database

Earlier than continuing with the WordPress set up, it is going to be essential to create a MySQL database in Cpanel. With out a MySQL database, your WordPress set up will all be for naught.
Commercial
Proceed Studying Under
Follow the documentation here (or comply with your hosts’ assist information if they’ve them) so as to create a brand new database with the MySQL Database Wizard.
Make sure to take down your username and password for the SQL database. We might be utilizing them within the subsequent steps.
Want-to-know: When creating your username and password the MySQL database wizard often creates a username with the database title + consumer like so: user_databasename.
So, username_db1 can be the total username you utilize when modifying wp_config.php. Don’t fear – we’re attending to that in just a bit bit.
6. Set up WordPress in 15 Minutes
There are some modifications it is advisable make to the WordPress set up information earlier than you progress ahead with putting in WordPress.
To begin with, it’s essential to make modifications to wp_config.php so as to be certain that your set up will work. With out these modifications, your set up may have issues.
Please be aware as nicely that the gadgets within the wp-config.php file are all in a selected order. This order does matter and in the event you make modifications and also you don’t know what you’re doing, you’ll be able to introduce issues into your set up.
Commercial
Proceed Studying Under
Utilizing your FTP answer, let’s navigate to wp-config-sample.php. We have now to re-name this file to wp-config.php for the file to work.
Subsequent, we’re going to make modifications to some gadgets within the file: the database title, the database username, database password, and database host.
Do not forget that need-to-know merchandise we mentioned within the final step? That applies right here.
So your database title would be the full title of the database you created.
The Database Username might be “username_db1”. Enter your password.
Now, the Database Host is about by your internet hosting supplier. It will likely be essential to contact their assist and procure this data for that wp-config.php merchandise.
For additional particulars, here is the official documentation for modifying wp-config-sample.php.
Now that we have now renamed wp-config-sample.php, and we have now entered in our database’s data, it’s time to go to the primary set up URL and proceed with the set up.
In just a few seconds, you must have a welcome display that reveals, “Congratulations! WordPress is now installed.”
Commercial
Proceed Studying Under
This complete course of ought to take round 5-10 minutes whole.
Some upkeep suggestions: It would be best to change your admin listing in your website, so as to forestall hackers from hacking into your again finish. As well as, utilizing robust passwords like “7$192^98asv097!@#E41” is advisable only for the safety alone.
Please, don’t use the phrase “password” or different identifiable easy-to-guess data as your WordPress password. It’s higher to be thorough and just a little cautious on the outset than be sorry later.
7. Discover a Good Theme

Now that WordPress is put in, you will need to discover a good theme for our undertaking.
Commercial
Proceed Studying Under
Discovering a superb theme implies that:
It would meet our wants.
It’s typically light-weight and hundreds quick.
It has legitimate HTML together with legitimate CSS.
It consists of compatibility with not solely probably the most popular plug-ins, but additionally most plug-ins that you simply plan on utilizing.
It consists of high-quality assist together with thorough documentation.
Whenever you do discover a theme you want, you must take a look at issues like its customizability, your necessities, whether or not or not you’ll outgrow the theme, in addition to integration along with your model’s colours.
Now, nearly each theme provides you with the chance to vary colours after set up, so I wouldn’t fear an excessive amount of about this half at first.
Whereas discovering a theme keep in mind to be looking out for the theme’s customizability and compatibility with plug-ins.
eight. Set up the Theme
Whenever you do discover your theme, it’s typically a easy matter of downloading the information, extracting the information, and importing them to your server.
You’ll be able to then go into WordPress themes and alter the theme over to the brand new one so you’ll be able to check it out.
Commercial
Proceed Studying Under
9. Customise Your Theme
Taking a look at customizations of your theme, it’s important that you would be able to customise the whole lot. There are completely different ranges of customization out there that may make or break your web site efforts.
When you have a theme that doesn’t allow you to customise your content material with your individual coding, or you need to code in such a means that mimics the coding getting used on the theme, then the theme is just not coded nicely.
You can run into points with this later with cross-platform and cross-display compatibility.
A theme shouldn’t restrict what you are able to do along with your website. As a substitute, it ought to assist improve your web site efforts and make issues simpler.
If, for no matter motive, you discover that your theme doesn’t will let you accomplish what you need, it could be time to search out one other theme. Revisit step 7 and ensure your theme suits the targets of your undertaking earlier than you progress ahead.
If you happen to discover that out there themes don’t do what you need your web site to do, it could be essential to maneuver on to customized theme growth, which might take greater than 24 hours.
Commercial
Proceed Studying Under
Here are some good tutorials on how you can create customized WordPress themes.
10. Discover & Set up Good Plug-Ins
Discovering good plug-ins is critical to just remember to not solely have the performance that you simply want, however that enhanced performance runs easily.
From search engine optimization plug-ins to publication and analytics plug-ins, be certain your theme is suitable.
A few of my favourite plugins to make use of embody:
Redirection (for implementing 301 redirects the straightforward means).
Yoast’s search engine optimization Plugin (for implementing all the search engine optimization fundamentals simply).
Tribulant Newsletters (simple creation and administration of newsletters together with publication subscriptions).
Google XML Sitemaps (for straightforward implementation of XML Sitemaps on WordPress websites).
W3 Complete Cache (for minification, pace optimization).
Disqus Remark System (a widely-used remark system throughout the net).
Social media sharing plug-ins (if they aren’t already a part of your theme).
Social media analytics plug-ins (for social analytics).
11. Configuring the search engine optimization Fundamentals
Permalink construction
In an effort to implement effective SEO, the very first thing that ought to be modified is the construction of your permalinks. Yow will discover these settings underneath Settings > Permalinks.
I want utilizing the next permalink construction: domainname.com/class/postname/ the place class consists of the weblog submit’s class (keyword-optimized for the topical focus of your weblog), after which a keyword-rich postname.
If you happen to want to embody the class like advisable above, choose Customized Construction and use the next: /%class%/%postname%/.
Commercial
Proceed Studying Under
When you have had your website for some time, it’s possible that you’ve got hyperlinks in place. Don’t panic!
WordPress will robotically implement the redirects for you so that you don’t need to set them up manually.

Altering From WWW To Non-WWW
You’ll discover this selection underneath Settings > Basic.
It will likely be essential to take a little bit of time and take into consideration what you need your website to point out up as: WWW or non-WWW.
Commercial
Proceed Studying Under
In case you are migrating an present website over to WordPress, I like to recommend that you simply use the prevailing website URL. Altering from WWW from non-WWW in that occasion will solely trigger extra hurt than good, and you may introduce severe search engine optimization efficiency points because of this.

Make Positive You Enable Search Engines to Index Your Website
It is a biggie and might result in search engine optimization efficiency points in the event you don’t configure this. Yow will discover this setting in Settings > Studying > Search Engine Visibility.
Commercial
Proceed Studying Under
Usually, this field is checked. In an effort to enable full crawling of your site, at all times be sure that this field is unchecked.

Website Velocity
Velocity is king and might make or break your web site efficiency, particularly the place conversions are involved.
Look into how one can pace up your theme. It’s preferable to get rid of as many calls to the server as potential.
When you have 15 CSS information in your theme, contemplate condensing them all the way down to 1-Three CSS information. The identical factor holds true with JS information.
Commercial
Proceed Studying Under
When you have 15 JS information as a part of your theme, both search for one other well-optimized theme or manually condense them down into 1-Three information most.
As well as, putting in the WP Complete Cache plug-in might help make your website quicker with its choices of web page caching, database caching, providing minify choices, and integration with a spread of CDNs (content material supply networks), additional rising your alternative for pace.
Be Positive to Noindex, Comply with Archive Pages and Disable Archives You Don’t Want
Archive pages are the king of duplicate content material in WordPress. They will make or break a website, particularly when the positioning reaches tons of of pages.
You don’t need to tackle that headache sooner or later.
Setting this search engine optimization fundamental now will assist make your optimization efforts simpler. Yow will discover this setting in Yoast’s SEO plug-in underneath: Yoast > Titles & Metas > Different. Choose the setting that claims “Noindex subpages of archives.”
As well as, I like to recommend including the NOODP and NOYDIR meta robots tags sitewide. These tags will forestall Google and different search engines from robotically utilizing the DMOZ and Yahoo Listing descriptions.
Commercial
Proceed Studying Under
For individuals who proceed the combination of meta key phrases, I counsel checking “use meta keywords tag” right here as nicely.

Constructing a WordPress website is straightforward. It will possibly take lower than 24 hours to construct a reliable website that appears like a model you need to do enterprise with.
It would take for much longer, nonetheless, to construct a fantastic online presence that drives site visitors on a constant foundation.
Commercial
Proceed Studying Under
So mess around with it. Improve your creativity. See what you’ll be able to provide you with.
It’s by experimentation and testing that we really discover the suitable path by means of the SERPs.
Further Sources:

Picture Credit: Paulo Bobita
if( !ss_u )
!function(f,b,e,v,n,t,s) if(f.fbq)return;n=f.fbq=function()n.callMethod? n.callMethod.apply(n,arguments):n.queue.push(arguments); if(!f._fbq)f._fbq=n;n.push=n;n.loaded=!0;n.version='2.0'; n.queue=[];t=b.createElement(e);t.async=!0; t.src=v;s=b.getElementsByTagName(e)[0]; s.parentNode.insertBefore(t,s)(window,document,'script', 'https://connect.facebook.net/en_US/fbevents.js');
if( typeof sopp !== "undefined" && sopp === 'yes' ) fbq('dataProcessingOptions', ['LDU'], 1, 1000); else fbq('dataProcessingOptions', []);
fbq('init', '1321385257908563');
fbq('track', 'PageView');
fbq('trackSingle', '1321385257908563', 'ViewContent', content_name: 'how-to-build-wordpress-site', content_category: 'seo wp ' );
// end of scroll user Source link
0 notes
Text
How To Decide On The Most Effective Web Site Builder In 2021
BigCommerce is the best eCommerce web site builder in the market. If you’re looking to create a web-based store that scales, then BigCommerce is the platform for you. It comes with all of the important features built-in, so you'll be able to keep your overhead low and margins excessive. Zyro is a robust and inexpensive website builder on the market. They supply a simple to use drag & drop web site builder tool with free hosting and 87% off premium plans which makes them the cheapest website builder in our list. You get a simple web site builder that allows you to choose from 200+ professional website design templates.
📷
These websites are designed to look like different official sites (e.g., your financial institution) with the hope that they will phish delicate data corresponding to your username and password. A malicious web site is any web site that was set up with the intention of infecting one other laptop or amassing personal data. For example, a malware web site is a web site created with the intention of infecting any customer with malware, adware, or a malicious program. These kinds of sites might have a download that's contaminated and, if downloaded, infects your pc. A crowdfunding website is ready as much as assist help a enterprise, person, or another cause by making a one time or monthly cost. An example of a crowdfunding web site is Kickstarter.
Hakkasan is an award-successful restaurant which makes use of the best ingredients and expert traditional strategies to create timeless yet innovative signature dishes. We have operated in Asia Pacific since 1872, and right now are current across 17 markets in the area. Clients depend on our global strength, native expertise and leadership throughout our traces of enterprise. This web site uses cookies to ensure you get the best experience.
In this step-by-step information, I need to present you exactly what you should create an internet site from scratch. By the end, you’ll have a web site to point out for it and with none of the complications. With the best instruments and systems, creating a fantastic web site is as simple as ever.
Instruments
Many web hosting providers have “WordPress set up” positioned somewhere within the hosting cPanel. If you're coping with a web host that doesn’t present “one-click on installs“, attempt establishing WordPress manually. Setting up your WordPress website is simple, and your web host mostly does it for you, so you don’t actually need to get your palms too dirty. four) Once you’ve accomplished your registration process it'll take a few minutes to get prompt access, so you can begin constructing your website instantly. Keep in mind that Bluehost doesn’t offer nation-particular domain endings, similar to.de, .fr, or .ru. If you want them, you should buy these from Domain.com or GoDaddy.com individually.
Accelerate business restoration and ensure a greater future with options that enable hybrid and multi-cloud, generate intelligent insights, and hold your employees related. Cloud Talent Solution AI with job search and talent acquisition capabilities. Document AI Machine studying and AI to unlock insights from your documents. Build and Use AI Products to construct and use synthetic intelligence.
As the world’s world chief in constructing solutions, LafargeHolcim is reinventing how the world builds. Our 70,000 employees are committed to enhancing quality of life throughout 70 markets by way of four business segments. We imagine in building a world that works for people and the planet. A world that keeps people protected, linked and thriving. Together with our staff we wish to form a world that's greener, smarter and that works for all. With our customers and partners we're advancing society and uplifting communities.
Websites are constrained by architectural limits (e.g., the computing energy dedicated to the website). , Microsoft, and Google make use of many servers and load balancing equipment corresponding to Cisco Content Services Switches to distribute visitor masses over multiple computer systems at a number of locations. As of early 2011, Facebook utilized 9 data centers with approximately sixty three,000 servers.
Learn how a neighborhood Hong Kong financial institution grew to become one of the world’s largest financial companies organisations. We are dedicated to serving to our individuals to develop their expertise in an inclusive surroundings – and to supporting the communities where we function. We’re bringing together the folks, ideas and capital that nurture progress and growth รับทําเว็บไซต์, helping to create a better world. GE Healthcare makes use of AWS and Amazon SageMaker to ingest information, retailer information compliantly, orchestrate curation work throughout teams, and construct machine-studying algorithms. Zillow helped convey the real property industry online, then reinvented the house-search process utilizing AWS Cloud.
How Can I Get A Free Area?
There are checks suited for each degree, and on the finish you will get recommendations on how to improve your English. Practice material and learning sources to help you improve your English. Linguaskill is a quick and convenient online check to assist greater schooling institutions and employers verify the English levels of people and groups of candidates. It combines the most recent AI know-how with the reliability and quality you count on from Cambridge. Over the last 12 months, the International Organization for Migration has responded to the COVID-19-associated needs of hundreds of thousands of people worldwide.
Select the Wix site you wish to connect your domain to then click on Next. Keep it straightforward on your self and hold attempting till you discover a free one. Once you do, you possibly can register it right off of Domain.com (get 25% off with coupon code QUICKSPROUT) or through Wix. Choose the one you like probably the most and use that in your web site area. Plus it makes it tougher for folks to say what your URL is to others.
If you wish to edit your background color simply sort "background colour" and the choice will appear right away.
Use one platform to sell merchandise to anybody, anyplace—in particular person with Point of Sale and on-line by way of your website, social media, and on-line marketplaces.
Leverage automation to optimize and modernize load balancing throughout clouds.
NATO continually reviews and transforms its insurance policies, capabilities and constructions to make sure that it could proceed to deal with present and future challenges to the freedom and safety of its members.
This creates concise in-text citations and complete reference record entries.
The difference between taking your own footage and hiring a photographer could be a few hundred dollars. The same may be said for professional copywriting for net content material and so on. Starting a web site for your corporation is a low-value investment that can help you establish credibility and attain a wider customer base than you ever may through conventional advertising methods. If you retain your website updated with contemporary, present content and are quick to deal with technical issues, you will never have to worry about "not current" to your current and future shoppers. As you build your business web site, these importanton-web site SEO tactics can help you improve your ability to move up the ranks.
Coming on high of a surge in world debt since 2010, this creates new risks.Read More. Ahead of the Spring Meetings, World Bank Group President David Malpass discussed what is needed to construct a green, inclusive, and resilient recovery from the pandemic. We face big challenges to help the world’s poorest people and be sure that everybody sees advantages from financial progress. Data and analysis assist us understand these challenges and set priorities, share information of what works, and measure progress.
We are a global leader in design and make know-how. With experience throughout structure, engineering, construction, design, manufacturing, and entertainment, we help customers clear up right now’s urgent challenges. Correlate your user’s visible expertise to the technical measurements of your site. Test your person’s actual expertise with international locations, modern units, and the most recent browser variations. This is finished by re-routing all requests for the domains to blackhole.webpagetest.org which will silently drop all requests. Hugo's Go-primarily based templating offers simply the correct quantity of logic to construct something from the simple to complicated.
Get perks and instruments for managing clients whenever you join our free community, Mailchimp & Co. Run an A/B or multivariate take a look at to optimize your content material, format, or send time. Get lovely, on-brand designs made for you with the power of AI. Keep track of what you understand about your individuals with customizable tags. Target your messages based mostly on people's purchase behavior, app exercise, and extra.
That’s why we are reinventing how the world builds on our way to becoming a web zero firm. No extra app switching—join tons of of instruments like Office 365 and Google Workspace, or construct your personal integrations with our open APIs. Manage one built-in and safe platform with global PBX providers in over forty nations, from just about anywhere.
Add a web-based store, galleries, mailing lists, forums, analytics, and far more. forty% of the online uses WordPress, from pastime blogs to the largest news sites on-line. WordPress is open source software program you need to use to create a wonderful website, blog, or app. The concepts of a web web page and a web site are especially easy to confuse for a web site that accommodates just one internet page. Such a website is sometimes known as a single-page website. A website is a set of linked internet pages that share a novel domain name.
Follow the news: https://munkongseo.com/ สอนทำ SEO
0 notes
Text
10 Reasons Your WordPress Site Will Get Hacked (and How to Stop It)

A hacked WordPress site is as damaging as having your home burgled. It can completely shatter your peace of mind and adversely impact your online business.
Why do hackers target WordPress sites? The answer is relatively simple: WordPress is the single biggest platform for website creation these days, so there’s a larger base to attack; this attracts the attention of online criminals.
So, how can a hack impact your website?
Depending on the type of attack, your website could suffer any of the following:
It could be defaced completely;
It could load or operate very slowly on any device;
It could completely crash and malfunction;
It could display the dreadful “White Screen of Death”;
Its incoming visitors could be redirected to other suspicious websites;
It could lose all your valuable customer data.
This list is not exhaustive but you get the idea.
Now that we know how a successful hack can impact your website and online business, let us look at the top 10 reasons behind WP hacks and prevent them.
1. An Insecure Web Host
Like any website, WordPress is hosted on a web host or server. Unfortunately, most site owners do not pay much attention to the web host they select and choose the cheapest they can find. For example, it is more affordable to host a website on a shared hosting plan — one that shares its server resources with many other websites like yours.
This can make your site vulnerable to hackers as a successful hack into any website on the shared server. A single hacked site can consume the overall server bandwidth and impact all the other sites’ performance.
The only way to fix this problem is to opt for a reliable host and a virtual or dedicated server.
Pro tip: If you’re already using a shared hosting plan, check with your hosts if they offer VPS hosting and make the switch.
2. Use of Weak Passwords
Weak passwords are the main reason behind successful brute force attacks that target your account. Even to this day, users continue to use weak and common passwords like “password” or “123456”; if you’re one of them, your website could land in trouble!
Guessing weak passwords allows hackers to enter the admin accounts where they can inflict the maximum damage.
How do you fix this problem? Simple, ensure all your account users (including admin users) configure strong passwords for their login credentials. With at least 8 characters, passwords must be a mix of upper- and lower-case alphabets, numbers, and symbols.
For added safety, install a password management tool that can automatically generate and store strong passwords.
Pro tip: You can use a plugin to reset passwords for all your users.
3. An Outdated WP Version
Outdated software is among the most common reasons why websites get hacked. Despite being free to download, most site users defer updating their site to the latest version, for fears of updates causing their site to crash.
Hackers take advantage of any vulnerability or bug in an older version and cause issues like SQL Injections, WP-VCD Malware, SEO Spam & other major issues like website redirecting to another site.
How do you solve this problem? When you see a notification about an update on your dashboard, update your site as soon as possible.
Pro tip: If you are worried about updates crashing your live website, you can first test the updates on a staging site.
4. Outdated WP Plugins and Themes
Similar to the previous point, hackers also take advantage of outdated, unused, or abandoned plugins and themes installed on websites. With over 55,000 plugins and themes that are available, it is easy to install a plugin or theme, even from unsafe or untrusted websites.
Plus, many users do not update their installed plugins/themes to the latest version or do not find the updated version. This makes it easier for hackers to do their job & infect sites.
How do you avoid this problem? As with the core WP version, update each of your installed plugins/themes on your site regularly. Take stock of all the unused ones and remove them or replace them with better alternatives.
You can update your plugins/themes from your hosting account.
Pro tip: We suggest setting aside time every week to run updates. Test them on a staging site and then update your site.
5. Common Admin Usernames
In addition to weak passwords, users also create common usernames that are easy to guess.
This includes common usernames for admin users like – “admin”, “admin1”, or “admin123”. Common admin usernames make it easier for hackers to get into admin accounts and control backend files in your WP installation.
How do you avoid this problem? If you are using any such usernames that are easy to guess, change them immediately to a unique username. The easiest way of doing it is through your hosting account’s user management tool, by deleting the previous admin user and creating a new admin user with a unique username.
As the first step, change the default username of your admin user and limit users who have administrator privileges.
Pro tip: WordPress has 6 different user roles with limited permissions. Only grant admin access to users who really need it.
6. Use of Nulled Plugins/Themes
Coming back to the importance of plugins/themes, users have access to many websites that sell nulled or pirated copies of popular and paid plugins and themes. While these are free to use, they are often riddled with malware. They can compromise your website’s overall security and make it easier for hackers to exploit.
Being a pirated copy, nulled plugins/themes do not have any available updates from its development team, hence will not have any security fixes.
How do you fix this problem? Simple, for a start, only download original plugins and themes from trusted websites and marketplaces.
Pro tip: If you don’t wish to pay for paid or premium plugins and themes, opt for a free version of the same tools that will have limited features but are still safer to use than the nulled version.
7. Unprotected Access to wp-admin Folder
To take control of your site, hackers often try to break into and control your wp-admin folder in your installation. As the website owner, you must take measures to protect your wp-admin directory.
How can you protect your wp-admin folder? First, restrict the number of users having access to this critical folder. Additionally, apply for password protection as an added layer of security for access to the wp-admin folder. You can do this using the “Password Protection Directories” feature of the cPanel in your web host account.
Pro tip: Besides these fixes, you can also implement Two Factor Authentication (or 2FA) protection for all your admin accounts.
8. Non-SSL Website
You can easily migrate your HTTP website to HTTPS by installing an SSL certificate on your site. SSL (or Secure Socket Layer) is a secure mode of encrypting any data transmission between your web server and the client browser.
Without this encryption, hackers can intercept the data and steal it. Plus, a non-secure website can have many negative implications for your business – lower SEO ranking, loss of customer trust, or a drop in incoming traffic.
How do you fix this problem? You can quickly obtain an SSL certificate from your hosting company or SSL providers. It encrypts all data that is sent from and received by your website.
Pro tip: You can get a free SSL certificate from places like Let’s Encrypt, but these provide limit protection that will only be sufficient for a starter site or small site.
9. No Firewall Protection
Lack of firewall protection is another common reason why hackers can bypass website security measures and infiltrate the backend resources. Firewalls are the last line of defence against hackers and work like the security alarm installed on your house. Firewalls monitor web requests coming from various IP addresses, including the suspicious (or bad) ones.
They can identify and block requests that are known to be malicious in the past, thus preventing easy access for hackers to your website domain. Web application firewalls can thwart various attacks, including brute force attacks, XSS, and SQL injections.
Pro tip: A firewall provides much-needed security and is your first line of defence. But it’s important to also have a malware scanner installed.
10. Lack of WordPress Hardening Measures
Typically, hackers target the most vulnerable areas or weaknesses within a WP installation, to illegally access or damage the website. The WordPress team has identified these vulnerable areas and has devised a list of 12 hardening measures recommended for every website.
A few of these include:
Disabling the File Editor;
Preventing PHP execution in untrusted folders;
Changing the security keys;
Disallowing plugin installations;
Automatic logout of inactive users;
How do you implement these hardening measures? While some steps are easy to understand, others require the technical expertise of how WordPress works.
Pro tip: You can implement hardening measures on your own. However, some measures require technical expertise so in these cases, it’s much easier and safer to use a plugin.
Featured image via Pexels.
Source from Webdesigner Depot https://ift.tt/3noM7L1 from Blogger https://ift.tt/2IrliXM
0 notes
Text
How to Install WordPress from cPanel | WordPress Development Services

WordPress is one among the foremost popular Content Management Systems (CMS) that’s employed by many bloggers. cConsistent with Wikipedia, quite 30% of the highest ten million websites run on WordPress.
WordPress has great features and wide support for developers since it had been first released in May 2003. You’ll use WordPress attractive themes to run any quite website including personal blogs, portals, and online shops.
WordPress maintains a central repository for its latest software releases at www.wordpress.org. You’ll download and found out the software manually or use an automatic script installer like softaculous.
In this guide, we’ll show you ways to use softaculous to line up WordPress on your site via Cpanel. The whole procedure is fast, user-friendly and intuitive.
Special Note: If you’ve got not chosen a WordPress hosting plan, we recommend that you simply consult our greatest WordPress Hosting page, where you’ll find the simplest hosting providers during this category, including expert and user reviews.
Prerequisites
A domain name e.g. www.example.com
Web hosting account that supports Cpanel, PHP and MySQL
Cpanel username and password.
Step 1: Log to your Cpanel Account
You can login into your cPanel account by typing www.example.com/cpanel on your browser assuming ‘example.com’ is that the primary name related to your hosting account. Then, enter your username and password that you simply received from your web hosting provider once you found out an account with them as shown below.

Step 2: Locate Softaculous apps installer
On subsequent screen, you’ll see the Cpanel dashboard, locate the text box that reads, “Find functions quickly by typing here:” Just enter the name ‘Softaculous’. The script installer are going to be displayed below along side all apps that it supports. Click ‘WordPress’ and proceed as shown below:

Step 3: Choose a protocol and a website name
On subsequent screen, you’ll see a quick description of the Word Press version that you simply are close to install on your website, click on the button labeled ‘Install’. you’ll be taken to the ‘Software Setup’ page as shown below:

Choose your required protocol. The recommended one is ‘http://www.’ or ‘https://www.’ Use https as long as you’ve got an SSL certificate for your domain.
Then choose your domain below. you’ll leave the ‘In Directory’ textbox blank unless you would like to put in WordPress under a subfolder.
Step 4: Fill WordPress site settings detail
Next, you’ll see your website settings as shown below:

Enter the name of your website and a quick description. Then, choose an admin username, password, and email. You’ll need these details to log in to your Word Press admin panel, so choose a robust password. Select your preferred language and scroll right down to proceed.
Step 4: Choose plugins and a topic
The next screen displays an option where you’ll install some plugins (this is optional), then choose your required theme. Remember to provide your email address another on the text box that reads, “>Email installation details to”. Finally, click on the ‘Install’ button.

The Softaculous apps installer will check the submitted data and make WordPress Installation on your website

You will then be taken to the congratulations screen as shown below and email together with your WordPress installation details are going to be sent to the address that you simply entered above:
Congratulations, the software was installed successfully
WordPress has been successfully installed at: https://www.example.com
Administrative URL : http://www.example.com/wp-admin/
We hope the installation process was easy.
NOTE: Softaculous is simply an automatic software installer and doesn’t provide any support for the individual software packages. Please visit the software vendor’s website for support!
Regards,
Softaculous Auto Installer
Step 5: Test the Installation
Log in to your Word Press site by typing the executive URL e.g. http://www.example.com/wp-admin/
Your installation is now complete and you’ll be taken on to your Word Press dashboard as shown below:

Conclusion
That’s all when it involves installing Word Press on your site from cPanel. As you’ve got seen the general procedure is sort of straightforward and automatic. You don’t need to download the ASCII text file or create the database manually. Softaculous has done everything for us. You’ll see your Word Press site at a look , customize it a touch bit more and begin writing blogs. I hope this guide will assist you to successfully create a shocking WordPress site.
We at Netleaf Software, are among the most trustworthy custom wordpress service providers in India and provide very professional and satisfactory services whenever you need for wordpress website development
Since, we are the leading wordpress development company in Delhi NCR; we have worked with almost every business out there in the market and have delivered satisfactory results to our clients. Our wordpress development services include enough flexibility, amazing layout, originality, uniqueness with original ideas which you may have not seen prior. We work as per the budget and the time schedule which we have decided as per the project. We make sure that our service align with your budget and also satisfies your business objectives. We are here to make your business take a leap of growth from where it is right now, to a great extent.
0 notes
Photo

How to Install WordPress
What You'll Be Creating
So you want a WordPress site?
That’s great. WordPress is the world’s most popular content management system (or CMS), and for good reason.
With WordPress, you can get yourself a flexible, scalable, and user-friendly website. The software itself is free, and all you have to pay for is the hosting you’ll put it on.
But before you can start, there is one thing you’ll have to do, and that’s set up WordPress. This puts a lot of people off: they think it’s tricky, or long-winded, or requires writing code.
None of these are true. You have two options for installing WordPress, both of which are designed to be quick and easy. I’ll show you how to do both of them in this guide.
Premium WordPress Themes and Plugins
Once you've got your site set up, you'll want to explore the thousands of WordPress themes on ThemeForest and WordPress plugins on CodeCanyon. Purchase these high-quality WordPress themes and plugins and improve your website experience for you and your visitors.
Options for Installing WordPress
There are two ways of installing WordPress: manually, or with the click of a button.
For most non-techies, the click of a button option is the preferred one. But just in case you prefer the more thorough way, I’m going to help you to do it manually too.
Each method has its own advantages and disadvantages.
Automatic Installation
Pros:
It’s easy.
It works.
Cons:
Your hosting provider might add some extra code or plugins, which could cause you problems in the long run or might just annoy you. For most people, this isn’t an issue.
A poor hosting provider might not install the latest version of WordPress. A good one will. (Hint: you should only go with a good one.)
If your hosting provider doesn’t provide cPanel (or something like it) as part of your package, you might not have access to an auto-installer (which is why this is an important criterion when choosing hosting).
Manual Installation
Pros:
You get a clean installation with no extra code or plugins.
Cons:
It takes longer.
It’s not as easy.
Sometimes it doesn’t work properly (although that’s normally due to user error).
For 90% of website owners, the automatic installation is absolutely fine. It’s only if you’re planning to customize the code on your site that you may have issues.
If you fancy trying your hand at manual installation, read through the instructions below and give it a go. But if you prefer an easy life, go with the automatic option.
Installing WordPress with Siteground
If your hosting account is with Siteground, you’ll be pleased to know that installing WordPress is quick and easy, and doesn’t require any technical skills.
Log into your Siteground account and click on Websites to go to the Websites screen.
Click the New Website button at the top of the screen.
You’ll then be prompted for which domain you want to use with your site. You can use one of the following:
a new domain, which you register with Siteground
an existing domain which you already have registered and pointing at your Siteground account
a temporary domain, meaning you can test the new site and then set up the domain once it’s ready
Select the option you want to use and click the Select button beneath it. If you select existing domain, you’ll need to type the domain name into the field that appears. If you’re setting up a new domain, you’ll be given the option to register it with Siteground. If you select a temporary domain, that will appear on the screen.
Click the Continue button to go to the Add New Website screen.
Find the Start New Website box and click the Select button. You’ll be given a choice of apps to use for your new site. Click on Select in the WordPress box.
You’ll then be prompted to type in your login details.
Type in your email address and the password you want to use and click the Continue button.
You’ll then be given the option to add SG Site Scanner to your site. If you want to sign up for that, click Add. If not, click Finish.
The system will then start work creating your site.
And that’s it! The next screen you will see will have details of your new WordPress site.
From here you can view your site or log in to manage it. Check out our complete guide to making a site with WordPress to learn how to add content to your site and get it working for you.
WordPress
How to Make a WordPress Website
Rachel McCollin
Installing WordPress in CPanel
If you’re with a different hosting provider, they’ll probably provide you with an auto-installer that you access via cPanel or via their dashboard.
First, you’ll need to access your control panel with your hosting provider. This is normally called cPanel, although some providers give it a name of their own.
If you’re not sure how to get to this, check the email you received when you set up your hosting account. It should contain a link to cPanel. And if that fails, ask your hosting provider to tell you or google ‘access cPanel [my hosting provider]’.
You should find a section called Autoinstallers. In that section you’re looking for an icon with the word WordPress beneath it. If you can’t find that, you’ll need to use Softaculous instead.
Let me start by demonstrating the process with the dedicated WordPress installer.
Installing WordPress With the WordPress Auto-Installer
Click on the WordPress logo. This will take you to a set of screens for installing WordPress.
If the Install tab isn’t already open, click on it.
Now complete the fields as below.
Version: Leave this as the default.
Protocol: If you have SSL already set up for your site (some providers give you this when you register the domain), select https://. If not or if in doubt, select https://. Note that SSL makes your site more secure and is worth using if possible.
Choose Domain: If you have more than one domain registered, choose the one you want to use.
In Directory: Leave this blank.
Site Name: Enter the name of your site. You can change this later.
Site Description: Your tagline. Again, you can change this later.
Enable Multisite: Leave this unchecked. Some auto-installers don’t have this: don’t worry if you can’t see it.
Admin Username: Type in the username you want to use. Don’t use admin as this isn’t very secure. You can’t change this later, so make sure it’s what you intend to use forever.
Admin Password: Type in the password you want to use. Use something different from your username, with a few upper-case letters and numbers for extra security. You want to make it as hard as possible for people to get into your site. You can change your password later via the WordPress admin screens, to make it more secure.
Admin Email: Type in the email address you want to use for any emails relating to your site. This isn’t publicly displayed.
Select Language: Choose your language.
Select Plugins: Leave all of these unchecked. This will only be an option with some hosting providers: don’t worry if it isn’t there.
WordPress Starter: Uncheck this. Again, this is specific to some hosting providers and you might not have it.
If there are any other options, just leave them unchecked. And ignore any advanced settings: you don’t need to worry about them.
Once you’ve filled out the fields, click the Install button.
The auto-installer will take some time to set up your new WordPress site, and then you’ll be taken to a screen with details of your new site. There will be a link to the site itself and a link to your dashboard. In the screenshot below, I’ve installed WordPress in a subdirectory.
Congratulations, you now have a WordPress site!
Installing WordPress With Softaculous
If your cPanel doesn’t have a dedicated WordPress installer, you can use Softaculous instead. Follow these steps:
Click on the Softaculous icon in cPanel.
From the menu on the left, select WordPress.
Click the WordPress icon at the top of the screen.
Follow the steps in the previous section.
In fact, the WordPress auto-installer is nothing more than a shortcut to the Softaculous installer. So the process is the same.
Once you’ve done that, you can follow the link to your shiny new site and start getting it ready.
Installing WordPress Manually
Alternatively, you can use the "famous five-minute install" to install WordPress manually.
To install WordPress manually, you’ll need:
A web browser.
An FTP client. This will let you upload files to the server where your website is hosted. Personally, I use Coda, a code editing application with an FTP client included, but if you just need FTP, you can choose from our list of the top five FTP clients out there.
Access to your server to create databases—your hosting provider will likely provide you with a tool called phpMyAdmin to do this. If in doubt, ask them!
Note that you won’t need an FTP client if you’re running WordPress locally—that is if you're running it on your computer instead of on the internet.
To install WordPress, you’ll need to follow three steps:
Create a database on your server.
Download WordPress and copy it to your server.
Run the WordPress installation.
Create a Database
The database will hold all of your site’s content, and without it, WordPress and your WordPress site won’t work. You can create yours in one of two ways, depending on your hosting provider’s setup:
via your hosting admin screens
using phpMyAdmin
With my hosting provider, I use their admin screens to create a database, so let’s look at that first.
Using Your Hosting Admin to Create a Database
In your hosting admin screens, find an option called databases, SQL databases, or similar. The exact name will vary depending on your provider.
For example, here’s the screen I use:
If you’re using a similar admin screen, follow these steps:
Give your database a name and type it in the field.
Click on Create Database.
You’ll then be asked to enter a password for the new user associated with this database. Choose a password, type it in, and click OK.
Make a note of the database name, username, and password. You’ll need these later.
And, that’s it—your database is ready!
Using phpMyAdmin to Create a Database
If your hosting provider gives you phpMyAdmin as part of your package, or you’re using MAMP to install WordPress locally, you can use this to create your database.
In your hosting admin screens or the MAMP welcome screen, click the link to phpMyAdmin, which might look something like this:
The phpMyAdmin welcome screen will open. Click on the Databases tab at the top left to open the databases screen:
In the Create Database field, type the name of your database.
Click the Create button.
And with that, your database will be created. Make a note of the database name for later. The username and password will default to root.
Step 1 is done—and that’s the trickiest part. It’s plain sailing from here on in!
Download and Upload WordPress
Now you need to download the latest version of WordPress.
Go to the WordPress download page.
Click the Download WordPress button to download a zip file containing all of the WordPress files to your computer.
Unzip the file on your computer in exactly the same way you would normally unzip any other file. You’ll now have a folder called wordpress with all of the WordPress files in it. Make a note of where that folder is.
Next, you need to upload WordPress to your server.
Open your FTP client. Sign in to the FTP on your server using the FTP login details your hosting provider gave you when you created your account. If you’re not sure about these, ask them. You’ll need the server address, your username, and the password.
In your FTP client, find the wordpress folder on your local machine and the public_html folder on your server. You should be able to see the two of them side by side. As an example, here’s mine in Coda:
Note that my folder on the remote server is empty because I’m installing WordPress in a subdirectory. Yours will have other files in there—ignore those.
Now drag the contents of the wordpress folder (not the folder itself) to your public_html folder. Your FTP client will copy the files to your server.
Wait for the files to finish copying. Now you’re ready for the third and final stage: running the WordPress installation.
Run the WordPress Installation
Your database and files are in place, and you’re ready to install WordPress!
Open your browser and go to your website. You’ll see the first WordPress installation screen.
You should have all this information noted down from when you were creating your database. Click Let’s Go!
On the next screen, input your database name, username, and password. If you’re working locally, the username and password will default to root. Otherwise, they’ll be what you specified when you created your database.
Leave the Database Host and Table Prefix fields as they are (note: if in any doubt, ask your host for what to enter as the Database Host, as this can vary between hosting providers—assuming they haven’t already let you know in a previous email when you initially signed up for their services) and click Submit.
Next, you’ll see my favorite screen—the one that tells you WordPress is ready to install. Well done!
Note: If you’re in the US, it will say ‘All right sparky!’ I’m in the UK, so it uses the more sedate ‘sunshine’. I prefer ‘sparky’ to be honest.
Click Run the install to access the site details screen.
Finally, enter your site details: the site title, your username and password, and email address. If you want Google to find your site, leave the Privacy box checked. Click Install WordPress.
WordPress will be installed, and you’ll see a success screen. Hurray!
Now you can log in to your site by clicking the Log In button and entering the credentials you provided when you were installing WordPress.
This will take you to the WordPress dashboard.
Congratulations, you’ve successfully installed WordPress and can now start managing your site!
Installing WordPress isn’t as tricky as you may think. By following the advice above, you can get yourself a brand new site with the world’s favorite CMS. Enjoy!
The Best WordPress Themes and Plugins on Envato Market
Explore thousands of the best WordPress themes ever created on ThemeForest and leading WordPress plugins on CodeCanyon. Purchase these high-quality WordPress themes and plugins and improve your website experience for you and your visitors.
Here are a few of the best-selling and up-and-coming WordPress themes and plugins available for 2020.
Inspiration
15+ Best WordPress Portfolio Themes for Creatives
Brenda Barron
WordPress
17 Best WordPress Slider & Carousel Plugins of 2020
Daniel Strongin
WordPress
20 Best WordPress Calendar Plugins and Widgets
Daniel Strongin
WordPress Themes
23+ Best Responsive WordPress Themes (For Sites in 2020)
Brenda Barron
WordPress
24 Best WPBakery Page Builder (Visual Composer) Addons & Plugins of 2020
Daniel Strongin
WordPress Themes
20+ Best Coaching & Consulting WordPress Themes (2020)
Brenda Barron
by Rachel McCollin via Envato Tuts+ Code https://ift.tt/3ewc73h
0 notes
Text
Blogging tips and tutorials


This report includes the resources we use and recommend based on our experience in the online world. If you have doubts in applying these please reach out. We are glad to help and grateful to connect.
Jose Louro BLUEHOST BlueHost is one of the best web hosting sites out there !
Take a look at BlueHost’s many benefits:
A guaranteed 99.9 uptime– Quick recovery from site crashes, meaning you get unmatched access speed and almost constant uptime. Presence of cPanel, for ease in navigation– Customers get to navigate and manage a number of features without going through complicated processes. Multiple hosting options such as shared and VPS hosting– Greater versatility means customers get to choose how to host based on business needs. Absolutely unlimited Domain hosting, with unlimited file transfer and space– Customers will never want in terms of capacity with more than enough space to go around. Unlimited emails– Receive all the emails you can and send as many. Indefinitely. Competent pricing for beginners– A great deal for those new to the industry, especially for new startups looking to get more value for less expenditure. A lot of powerful add-ons for extra value– This is a boost for an already powerful hosting service enabling for better features and efficiency. Unbeatable moneyback guarantee– BlueHost doesn’t force you to pay if you don’t like it. You get what you paid for or you get back what you paid. The first thing to do to start off on this is to create an account on Bluehost. Follow the detailed steps below for this purpose.
1. First, go to the Bluehost website and click on the “get started now” button in green.

2. Once you have clicked on “get started now”, you will be redirected to a page with four plans to choose from. These are Basic, Plus, Prime and Go PRO.
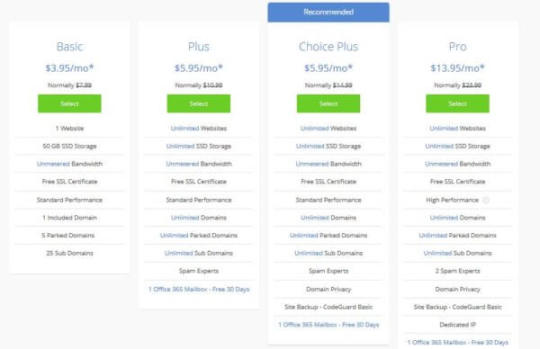
*The recommendation is that you start off with the basic plan for its cheapness and simplicity. 3. The next step after you have selected your preferred plan is to craft a domain name. You will be asked to do so. If you have an existing domain, you may enter it in the right box, and if you want to create one, enter the new domain name in the left box.
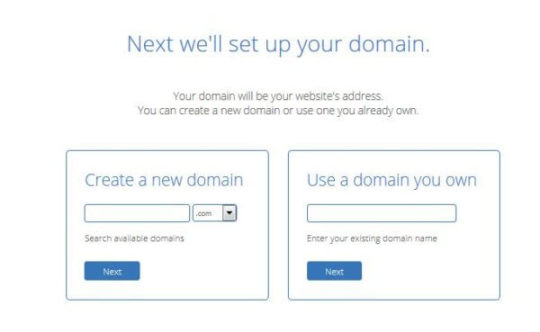
4. After the domain name is entered, you will be taken to a page where you will have to enter your personal information. This is integral to your credibility so ensure that you put in the right details.

You will also be prompted to enter your payment details. Carefully do so. PayPal is also an option.
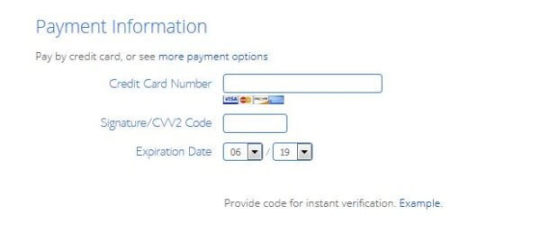
5. You also have add-ons that you can choose from to make your experience smooth and secure.

Small notes about the Add-Ons: Domain privacy - You get to hide your personal information and contacts, such as your name. Site Backup pro - In case of a website crash or some glitch, you get to restore your information by clicking one button. This means that all information is automatically backed up. Search Engine Jumpstart - From quick indexing to head-to-head comparative analysis reports, you are covered under this. You are also guided through the steps to improve your SEO rankings yourself and learn the tricks of Search Engine Mastery. SiteLock Security - This assures a security boost for your domain, involving scans for malware to DDoS protection. 6. Just read the disclaimer carefully and then click on the green button “Submit”, once you are done.
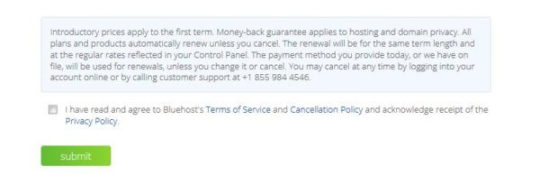
7. Now that you are done with the sign-up process, log in to your Bluehost account and you will see a control panel, where you need to click on the WordPress button.
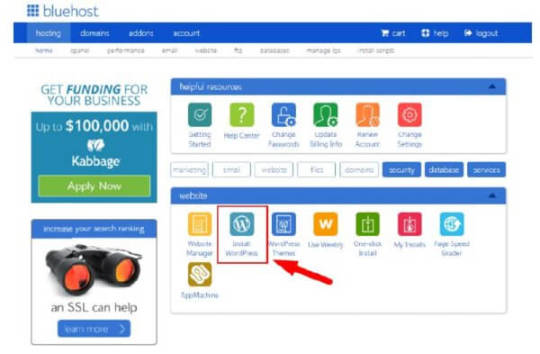
You may be redirected to the Mojo marketplace where you need to click on “Install New Scripts”.

On the next page, please enter your domain name that you have decided upon. This is where your WordPress will be installed on.
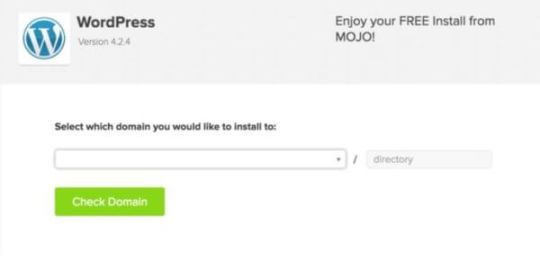
Notice that there is a small box stating “directory” on the right after a forward slash. You may leave it blank, in which case, WordPress will be installed on the root domain. If you write something there, for example “xyz”, the directory will appear as domain.com/xyz, and WordPress will be installed here. After this, click on the button “check domain”. Click “continue” on any following window until the installation starts. 8. WordPress installation will be followed by a page asking for your login credentials for WordPress.
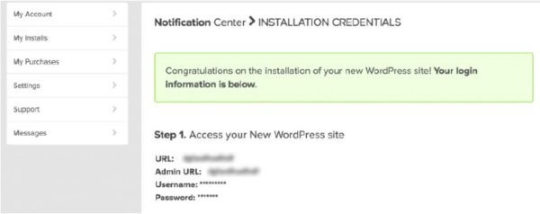
This will be followed by a confirmation email at your registered email address. So, if you have a wish to have a website of your own, get on this immediately! Get a Bluehost account now! That’s all really! Also, check out more here!
After having your Domain and Hosting you need to install a Theme that is User-friendly and lets you customize in an easy way if you’re not very tech-savvy.
Elegant Themes Elegant Themes is considered as one of the biggest revolutionary aspect of WordPress development. Being the most empowered WordPress community on the web, it helps users to create amazing website designs using premium WordPress themes and plugins. With these, you can take your website to a new level of professionalism.
These are the benefits of utilizing Elegant Themes:
Incredibly customizable – You get to customize your website theme and colour down to the smallest details. No need to dive deep into the coding process – You don’t have to be a coding savant to be able to use Elegant Themes to its fullest. Takes very less time to just drag and drop to develop a website – Optimization to the greatest level to bring about an ease in website designs and aesthetics. Offers design consistency – Every design is streamlined to ensure that bugs are minimized, making for a beautiful experience for those who visit your site. Compatible with several e-commerce plugins – You get to add a number of eCommerce plugins to your theme, meaning that you get to expand your business scope. Promotes your websites with premium WordPress plugins – This means that you don’t need to jump around the site for different functions but get most options at your fingertips thanks to these.
Follow the detailed steps mentioned in the next page to make the most of the premium themes and plugins provided by Elegant Themes.
1. First, go to the Elegant Themes website and click on the “Pricing” button.

2. Once you have clicked on it, you will be redirected to a page that includes the sign-up process. They have two membership plans which include Yearly Access ($89/year) and Lifetime Access ($249 one time) as you can see on the screenshot below:
Select your choice and click on the “Sign up Today” button. It will take you to another page, where you need to submit your personal details such as username, password, email ID.
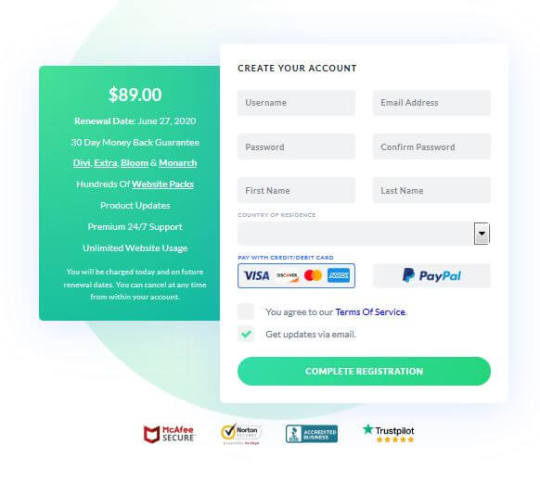
3. Once you’ve filled out all the mandatory slots, click on “Complete Registration”. Now, you’ll be asked to provide your payment account details for the completion of online payment. 4. After completing the sign-up process, you can visit the members area anytime by just logging in from the main page. There, you will find several themes and plugins which you can download and try out like ‘Divi’.

To get these themes and plugins, you need to click on the download button. 5. Next, save the downloaded file according to your preferences and keep it for utilizing through your WordPress website. 6. Now, head onto your WordPress website, go to “Appearance” - there you will find a drop-down menu containing “Themes” option. From there, upload the previously downloaded theme from Elegant Themes.
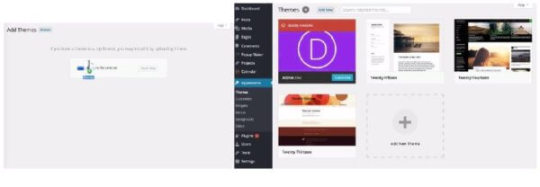
Now the installation process can be initiated. Once it is complete, you will get to see that the theme is active. The same procedure should be followed in case of installing plugin packages to your website. Download the plugin from the membership area. Next, go to WordPress dashboard, click on the Plugins option. This will let you add the downloaded plugin. Thereon, all you need to do is just activate the plugin by clicking on the relevant option.

Go through the readme file for that particular plugin, and get a thorough idea on its implementations. Elegant Themes’ packages are quite useful for web designers, business owners who think to use their WordPress framework for developing a website at its best. So, if you wish to use the themes and plugins from Elegant Themes and build attractive websites for your clients, sign up with an account right now!

Thrive Themes Today, when building a professional website or blog has become a crucial part of digital marketing, Thrive Themes is one of the strongest WordPress theme that one must install to attract audience and enhance the site’s conversion rate. Many people would regard this one to be just a theme, but in actuality, it offers different types of plugins that provide the audience much better experience. Different Thrive Themes Plugins are designed for distinct purposes and can be purchased separately. But a Thrive Themes package is always better to purchase as it offers everything from themes to plugins along with all the training and support that goes along with the package and that’s for a much-discounted price.
Following are the advantages of Thrive Themes:
The designs are simple in terms of layout and the fonts are clear, thus easily readable. Using specific action forms or calls to action, one can easily set focus areas in the website. The themes come with pre-built landing pages that can make website look stunning in minutes. Its lead generating plugin can be used to design and place email option forms to expand business email list. Using Thrives plugin like Thrive Clever Widgets, reaching out the audience with targeted content, makes much easier. Thrive Themes enhances conversions, promotional options and sales. With in-built social media sharing, reaching the target audience has become easier. In-built image optimizer builds images that compliments the website’s theme. Displays related posts at the end of the blog posts without slowing down the website. Very quick maintenance and excellent support.
To enjoy these features, one must start with creating a membership account with Thrive Themes.
1. First go the Thrive Themes website and their click on the “Get All Our Products” button.

2. Once you have clicked on that button, you will land into a page that talks about the membership plans. Now scroll down and click on “Secure Your Membership Here!” button.
3. Now, you will be redirected to membership pricing page, where first of all you have to select either “Paid Quarterly” or “Paid Annually” options. After selecting the same, you have to choose your Membership plan according to your requirement and business type. If you are an individual or an entrepreneur, pick “Thrive Membership” option and if you are running an agency or is a web designer, click on “Agency Membership” plan. Click on the “Add To Cart” button to buy the service.

4. Now, a checkout page will appear, where you must put all the required information. After filling up the details, proceed with your desired payment option to download and enjoy the facilities of the plugins. 5. Once you have purchased the membership plan, you can now go to member’s login page by clicking on “Member Login” button on the top of the webpage. Here, you have to enter your Username and Password to log into the Thrive Dashboard.
6. Now, when you are into the Thrive member’s dashboard, you can scroll down to get access to different Thrive products. Pick the one that suits your need and click on the ‘Download’ button. Here to guide you, I am picking up the Thrive Leads plugin. As soon as you click on the button, you will be asked to save the .zip file. As you save it, the download process will start spontaneously.

7. Next, to begin the installation process, go to your WordPress Admin Dashboard and long into it. 8. In the left side menu bar, look for “Plugins” option. When you take your cursor on top of the button, you will find “Add New” option. Click on the same.

9. On clicking on “Add New” option, a page will appear with a “Upload Plugin” button on the top of it. Click on it.
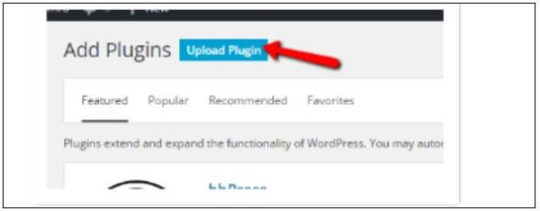
Now, you can upload the plugin by clicking on the “Choose File” option. choose the .zip file that you earlier saved and then click on the “Install Now” button to successfully upload the file.
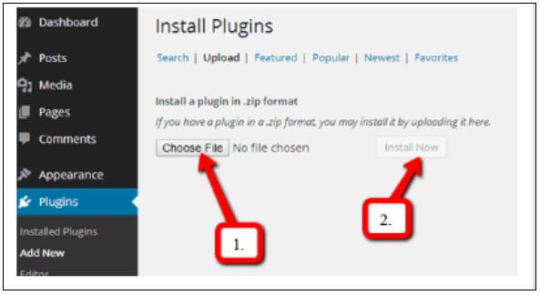
10.After a successful installation, a page will appear before you with an option “Activate Plugin”. click on it.

11.Now, it’s the time to activate the license of this plugin. In the menu bar of WordPress, go to the Thrive Dashboard and choose the License Manager.
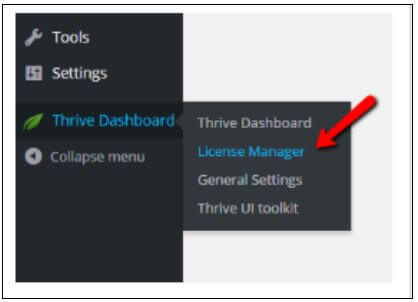
12.Go back to your Thrive Themes account to find the license key. Provide both the email address and the key on License Manager page and click on the “Activate License” button to enjoy the features of the chosen plugin.
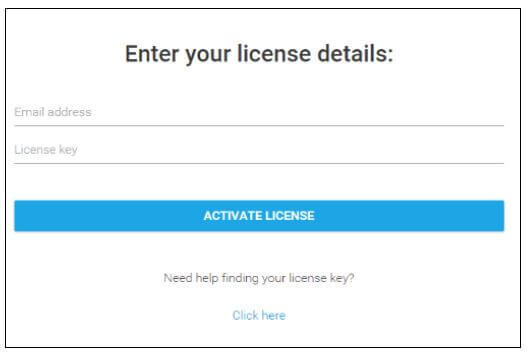
Thrive Themes is the ideal theme to enhance the look and functionality of a website. The newbie bloggers or entrepreneurs can use this theme to gain leads and engage the audience to their website. Different plugins with pretty powerful features not only maximize conversion rate and customize the website but also allow you to target ultra-segmented audiences and experience dramatic business growth. So, apply for its membership today to build your business website smoothly. Next You need a reliable Email marketing Service.

CONVERTKIT ConvertKit is one of the finest tools to assist bloggers get their craft off the ground! It is a one stop destination for any aspiring or established writer to work on and reap actual benefits. The best benefits you get of using ConvertKit are: Ease of tracking clicks and tagging users – Exceptionally well thought of tagging functions and click tracking abilities that tag according to the person’s interest. Efficient system for making email sequences – Compose and create from a single page rather than having to go to different pages for different functions. Automations & segmentation that are well designed – Automatic functions that ensure the tagging of new subscribers to your email list and much more! Integrates with a number of different platforms – Multi-platform support like with WordPress that allows you to use ConverKit in a number of different ways.
Let’s find out how to sign up and use it!
1. Signing Up - Go to ConvertKit and sign up. Enter your billing information & create your account.

Once you are done with entering your details, choose a plan. Make sure to be careful in choosing the most appropriate plan for you, don’t worry, you can always change it later, start with the lowest one.

2. Account approval – The next thing to get done is to have your ConvertKit account verified and approved! The purpose is obviously to test your credibility as a blogger. Normal business requirements allow you to submit your piece via an URL on their chat feature. The other way to gain acceptance is through the submission of a ticket feature and then provide the URL to your blog. Although you may browse around ConvertKit in the interim period, it is only post-approval that you can send something on it. 3. Time to Import Any Existing Subscriber – Do you have an email list? No? Then let’s go to the next step. But if yes, here’s what you do! Adding tags is the primary thing to do in the “Add Subscribers” process before anything else. This will categorize your subscribers accurately and for this, click on “Subscribers” on the menu and then hit “Create a Tag”.
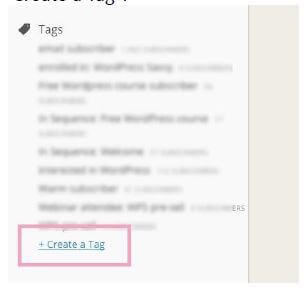
This is a really simple and effective process. For one, you may use a mundane and self-explanatory title to a tag like “imported subscribers”.
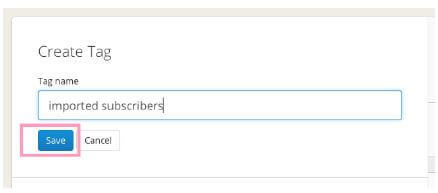
Make your checks and name your tags and when you are sure that you are done, hit “Save”. The next step is to import subscribers from the current email provider you have, saving that as a CSV file. Then, hit “Subscribers” on the main menu and then “Import Subscribers”.

Next, upload the saved CSV file and put your subscribers under the designated tags, in this case, “Imported Subscribers”. Align the columns on the CSV sheet to the relevant ConvertKit fields and then, finally, hit “Import Subscribers”. Repeat this for other lists, if available. 4. Form creation – This is the first look of your dashboard.
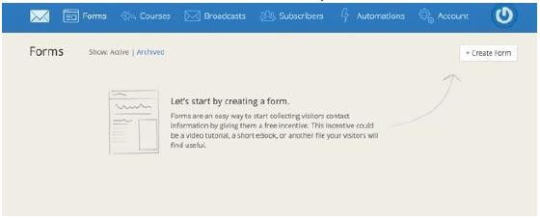
Once you click on “Create Form”, you can choose a form or a landing page. Let us go with form for now. You may choose one of three styles that serve different purposes.
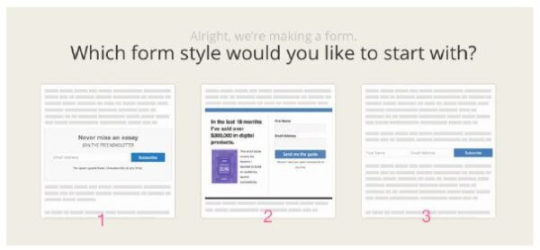
You can also go ahead and customize your form by clicking on the icon at the top right edge as per the picture below. Colour as you wish, and you may even personalize as per your brand.
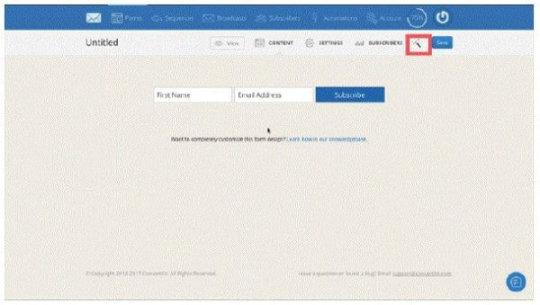
Access settings and change your form name, which is only visible to you, available on Dashboard once you sign-in. Modify the success message to what you want your subscribers to see when they fill up the form and hit “Subscribe”. You may, if you wish, redirect subscribers to a different page that displays a thank you message for subscribing or something else. After this, click on the “Save Form” button. 5. Incentive Emails – This is the very email that subscribers will receive that will be a confirmation of their subscription. You can turn it off if you so wish by clicking on the checkbox adjacent to the “send incentive/double opt-in emails” to your subscriber checkbox. Configure email and the subject title along with the email and button text! Go ahead and select the form style!
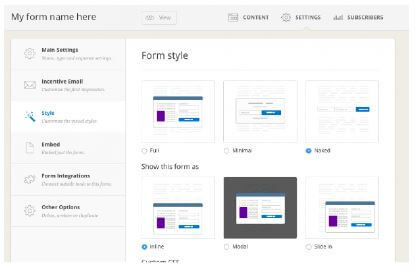
6. Form Addition – Now, on to embedding the subscription form on your website. There are three methods present, namely, WordPress, Javascript or Raw HTML.
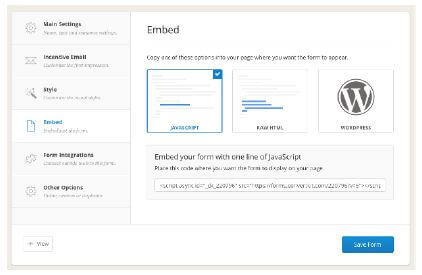
So, don’t wait and lay the groundwork for your future with ConvertKit’s excellent facilities!
GetResponse is a complete online marketing solution. It provides turnkey newsletter publishing and hosting features, as well as unlimited follow-up autoresponders, landing pages, webinars, marketing automation, and CRM to deliver information to your contacts and convert them to paying customers. Through responsible and fully automated list hygiene, anti-spam practices, and established relationships with major Internet service providers and email service providers, GetResponse prides itself on the highest possible email deliverability to ensure that your messages get through to your prospective customers. The platform delivers over 5 billion emails each year in 172 countries. GetResponse is fully scalable and capable of handling both small and very large lists (1+ million subscribers).
GetResponse in highlights:
Over 100,000 active accounts 30-day free trial Deliverability of up to 68% higher than our competitors Unlimited emails Powerful, automatic message personalization Smart tracking features
What benefits does it bring?
Catches lost sales and jolts your leads into profitable action Boosts your lead generation and business-building results Chops away tedious and repetitious email marketing tasks When you sign up for an account with GetResponse, you will be supported every step of the way by their excellent customer support and materials (context help, user guides, FAQs, and video tutorials). You will benefit from industry-leading email deliverability which GetResponse consistently maintains through their solid relationships with ISPs, proactive delivery initiatives, and strong anti-spam commitment. Try GetResponse today and find out how you can instantly get tangible, measurable results without wasting your time or investing a lot of money. The GetResponse List Building Program is a comprehensive email marketing course that covers everything you need to know to grow your list by up to 10,000 subscribers in as little as 90 days. Now marketers can maximize their email marketing efforts by taking advantage of this free program and enhancing their lists with new, engaged subscribers. The list building program, used with GetResponse email marketing tools, is the complete marketing solution. Marketers are provided with the know-how and necessary tools to launch a comprehensive and effective email marketing campaign. The course is unique to GetResponse and created exclusively for GetResponse customers; both free trial and pro accounts that have less than 10,000 subscribers. Customers may choose from two program schedules: the 90-day fast track and the 180-day standard program. Each session consists of a video tutorial, presentation, and an article. Those who complete the program and acquire at least 1,000 new subscribers will receive a GetResponse University Certificate of Performance. More details about the course may be found here: Getresponse Course So, then we have Social Media, if you are active and I think you are and should be consider using SMARTERQUEUE

SmarterQueue is a great post scheduling platform and a better alternative to the likes of Hootsuite and others. Why? Simply because it is all round more flexible with a focused view on customer friendly usability. These are what makes SmarterQueue truly effective: User-friendly interface- SmarterQueue has a great user-friendly interface which is very easy to use. The navigation is straightforward, and you can even filter your queue by category and social media platform. Competent pricing- In terms of pricing, no one can beat SmarterQueue. $20 a month will connect you up to four social media platforms that include Facebook, Twitter, LinkedIn, and Instagram. RSS Feeds to help in content curation- If you are currently using Feedly to curate your content, you will love how easy it is to integrate Feedly with SmarterQueue. SmarterQueue will import all your feeds so that you can curate content from one place without having to log in to Feedly. Posting simplicity- SmarterQueue makes posting content effortless and easy. Simply set a posting schedule for each of your accounts and then create categories for each type of content that you want to share. From there, just add posts to your categories and SmarterQueue will do the rest. Social media analytics- Social Media Analytics in SmarterQueue can help you decide when is the right time to post on Facebook or tweet, so that it gets the maximum visibility. Let’s learn the steps to properly get on with the SmarterQueue platform! Step 1: Visit SmarterQueue and go ahead to the sign-up page!

Choose how you want to sign-up and then log-in in the future. You will be prompted to start a trial or leave that for later. Once you are past that, it is time to set up the account for your work. This is how it looks:
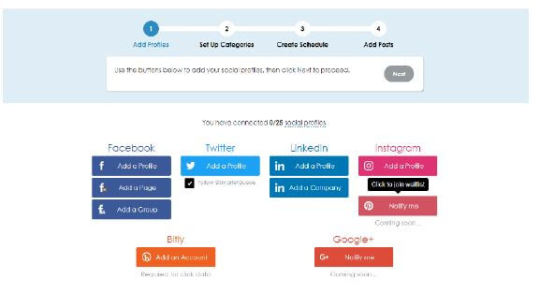
Add the profiles accordingly to expand your network on the platform. These are where you will be able to post via SmarterQueue, once you are up and running. Step 2: This is where you categorize by creating post categories. What are these? They are the different varieties of content that you will be putting up on social media. Name these as you like and make them relevant for ease of scheduling in the future.
Step 3: It is now time to create a schedule based on the categories that you have defined. The schedule is also for which accounts you want to post and in what order.
Step 4: Next up, add content to the posts! Your first option should be evergreen posts. What are these? Well, these are posts with a continuous recycle patter, that is, they are always renewing themselves. On SmarterQueue, the moment you add a new post, it immediately goes for the next available time and after being shared, it is sent to the bottom of the queue automatically. Basically, you fill up your queue once, and the platform automatically takes care of the scheduling from then onwards. Step 5: Like what you have seen so far? If you have had a great experience for the trial period, don’t forget to go for the paid subscriptions for continued services and greater benefits.
Every plan has the same basic features, except that the real difference is with the number of categories, volume of social media accounts, queued and daily posts. This is obviously one of the finer options out there and it’s time you get your membership of SmarterQueue! An alternative for Social Media is Social Pilot

Social Pilot SocialPilot is one of the most popular social media marketing and scheduling platform which was specifically developed for social media professionals and agencies. Here are some unique features that sets it apart from others; custom Facebook branding, bulk scheduling, team collaboration, social media calendar and client management.
The Benefits of SocialPilot are as follows:
Customized Facebook Branding- Using SocialPilot for sharing on Facebook, you can put your own customized branding so that it does not look automated. Bulk Scheduling- Using this feature you can create bulk posts as much as 500 or more at once, by simply uploading the CSV files. This awesome attribute allows users to manage multiple social media platforms with great ease and flexibility. Collaboration within teams- Using this platform, users can easily invite their team member to work in collaboration, share files, communicate, and come up with some useful business ideas. You can include as many participants as you want. Social Media Calendar- Users can visualize their social media sharing strategies and make them more creative and fruitful using SocialPilot. Effective extension on the browser- SocialPilot offers browser extension for Chrome, Firefox and Safari which not only lets the user share an interesting article from the internet, but also enables them schedule images from Canva. Social Media Analytics- The platform provides powerful, yet easy to understand social media analytics that lets a user improvise social media marketing with efficiency. Step 1: Visit the SocialPilot website and click on the “Get Started” button in orange.

Steps 2: Once you click on the Get Started button you will be redirected to the “Plans” page, which offers 4 distinct plans, namely Individual, Professional, Small team and Agency.
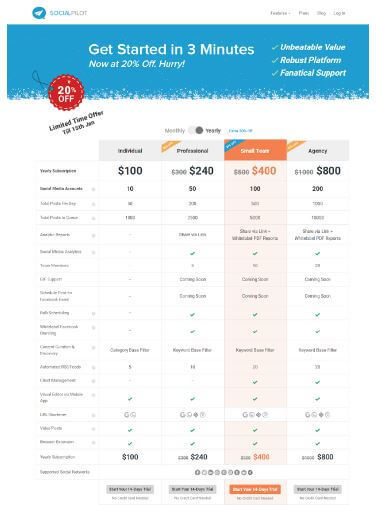
*we recommend you start with the “Individual plan” to see how it pans out. Step 3: In the next step, after you have chosen your preferred plan, click on start your 14-day trial and you will be redirected to the following page. You won’t require your credit card for this process.

Step 4: Fill up the credential details and click on “Signup”. You will be further redirected to a page where you will need to connect with any of your available social media account. You can also save time by skipping this step and connecting with any of the 3 specific social media platforms mentioned here, namely Facebook, Twitter and LinkedIn and complete the registration procedure.

Step 5: When you have completed registration, you will receive an email asking to confirm the email address you used for signing up. As soon as you confirm that email address you will be redirected to a dashboard. Step 6: As you reach the “dashboard” page or log into your SocialPilot account, the first thing you need to do is to connect your social profiles. To do this, click on “Connect Account” on the left panel under Social Accounts.

After you’ve completed connecting a profile, you will now be able to set a schedule for your posts. Please note that the default time zone is set for the United States, so adjust it accordingly to your needs. You can click on the “Edit” button to select your desired time zone on the next page.

To revisit setting a schedule, click on Manage Accounts on the left pane. Then, click on “Edit” for that account. Now you’re equipped to add a schedule for your social profile.

You can specify the time to add to the posting schedule under “Select Time” option. You can also choose the specific days of the week on which the schedule should be running. Once completed, click on the button displaying “Add Time”. Then, click on “Create Post” on the left pane to start adding posts into your schedule. Now you can start composing your post and adding links.
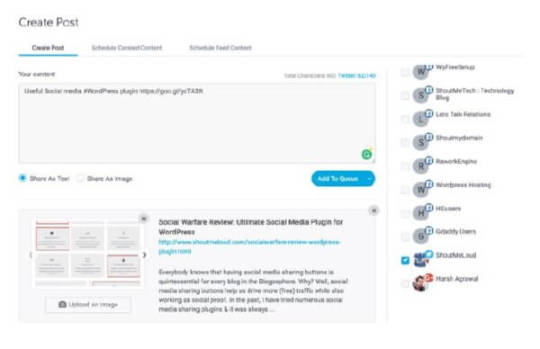
Once you have created the post, you will find three options in the drop-down menu: Add to Queue, Share Now and Share Next. Add to Queue will add that post to the schedule queue, while Share Now will share the content right then and there.
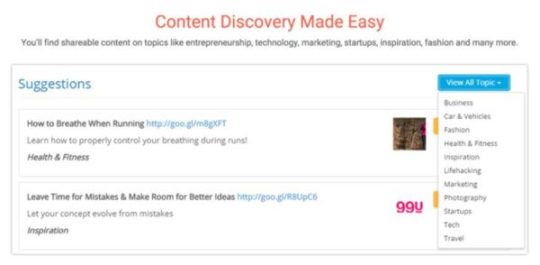
If you are out of content ideas, you can always use “SocialPilot content discovery” to get your hands on more interesting stories to share on your network. Social Media is the future, it is the place where most interactions take place, and where your content will most likely get noticed. However, you don’t need to be on every platform, just the ones providing the best exposure, and SocialPilot is one of the best tools to do so. But then we have something Special: Sniply

Sniply From link sharing to custom call to action to audience engagement monitoring, Sniply has come a long way in becoming integral to the online marketing process.
The benefits of Sniply are as follows:
Simple Setup and Installation- Sniply is one of those innovations with super-easy interface that involves a simple setup and installation. Great Call-to-Action- You can create a call-to-action for every link you share. The call-to-actions are not only time-sensitive that instill a sense of urgency but are also, interesting, and intriguing that are ultimately valuable to your customers. Compact Links Creation- The link shortener from Sniply is so compact that it lets you put a customized call-to-action on every page you share. When people click on a Sniply-generated URL, the page displays the ‘snip’ with a floating mini-banner which contains your CTA message along with a button that clicks through to the URL of your choice. Social Media Analytics- The platform’s dashboard shows you clicks, conversions, and conversion rates. You can also see your top-performing snips, top websites, and favorites as well. Customizable Free Edition- The free edition of Sniply is greatly customizable, leave alone the paid one. It allows you to change color, style and position of your snips, making them stand out without being irritating.
The real question for beginners to the scene is how to use it to its full potential. That’s what we are about to find out!
Step 1: Go to Sniply. There is an option to sign up for free as you can see below.

The next page will ask you to sign up via Twitter or Facebook or the age-old way of putting your details in. Step 2: Choose any of the plans that suit you. Everyone of them is free for 14 days. The recommendation is that you choose the basic for now as it’s the simplest.

Step 3: Find a content to share on social media platforms and ensure that it is an article/journal/blog that is connected to your occupation or business. Then, copy the URL of this piece to Sniply as shown below.

After you have entered the URL, hit the ‘snip’ button which will customize the URL as per your wish. Click ‘create’ next and then copy the custom URL to be shared on the social media platform of your choice.
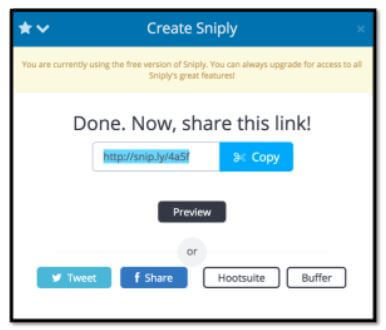
* Remember that when you are using Twitter to share, don’t forget to add the handle or name of the writer of the original post. It gives credit where it’s due and ensures that more people see your post. Step 4: Now it is time to set up a call to action through Sniply. On the dashboard, click on ‘Manage’ and then ‘call to action’.

Hit “+ New Call-to-Action” and then select a brand that exists or create one.
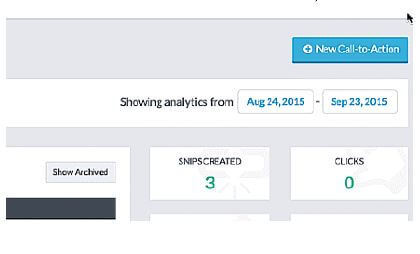
Now choose a type for your call-to-action.

Put in the preferred link for the call-to-action and then customize as you wish to be a worthy match for your company/brand.
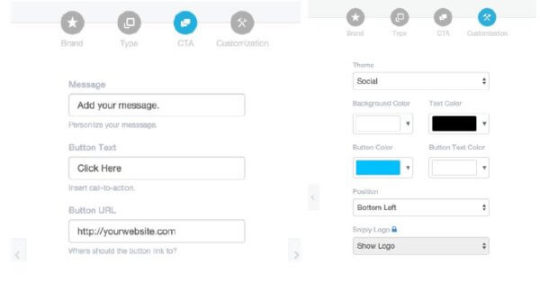
So start with Sniply today and behold the changes to your social media functions! If you plan or already have Products like E-books or other Digital (or Physical) Products you can set up a successful online shop with Shopify and leverage Sales. So lets see how it works:Shopify

Shopify Shopify’s exceptional capabilities in easily setting up your online shop has cemented its position as one of the most reliable ecommerce platforms out there!
The benefits that you get are:
Round the clock customer support- Shopify is big on customer support. It’s customer support is available 24 hours a day, 7 days a week. The response time is fairly instant, which means your business is never on its own. Mobile optimized- All of Shopify’s themes are mobile responsive. The platform also includes a free built-in mobile commerce shopping cart, which means your store looks great on all devices. Availability of SEO tools- Shopify has powerful Search Engine Optimization (SEO) features that will help your website rank higher in search results, so customers can find you easily. Stripe-powered payment gateway- Shopify has integrated with dozens of payment gateways, but also offers its own which is powered by Stripe. If you choose to use the Stripe-powered payment gateway, you will not incur any transaction fees instead, you will benefit from lower credit card fees. User-friendly interface- Shopify has a user-friendly customer front-end and admin backend which provides enhanced navigation options and various tools to help you manage inventory, insert product details, create web pages, track customer details, set up customer accounts, receive payments in various currencies, and much more. App store for addons- Shopify has an app store which provides some free and some paid plugins that seamlessly integrate with the platform and helps you to expand the functionality of your online store. Indeed, with it, your dreams of running an online business has become within your reach and if you learn every option that the platform provides, there is nothing that can prevent you from having your own online shop.
Let’s Start!
1. Sign up to Shopify and then navigate to the Shopify website. Click on the Get Started button.

You need to enter your information, such as the store name, desired password and an email address and finally stating what kind of an online or physical shop you are looking to create.

This is where you put in the information. Ensure that these are all valid and accurate.
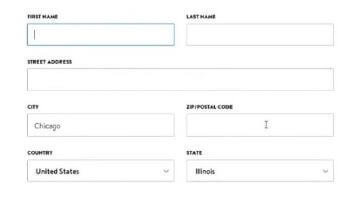
2. Customize the appearance of your store and it’s rather easy. Check out the image below. You need to click on the “Add Product” button and then enter all the details pertaining to the product such as price, vendor and description. When you are done, save it.

3. Return to your dashboard and hit the button saying, “Customize the Look of Your Site.” This is an extremely versatile place for changing colours and logos alike!

4. This step involves the selection of a domain and getting your site LIVE.

At the Dashboard, click on “Add a Domain.” Choose one to your liking and proceed to the next step in the process.
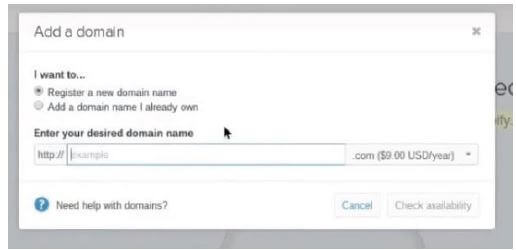
5. On the Dashboard, check out the “Payments” button at the left. You may now choose from numerous options such as Stripe, PayPal, etc. and if in doubt, you may also choose Shopify’s personal payment processor that is quite user-friendly. Once you choose one that suits your purpose/requirements, you will be able to receive payments from customers and store them. Once you are satisfied, hit the “Launch Website” button!

So you can use Shopify and have your own successful online venture today! Disclaimer: This is an important note that there are some links above which are affiliate links and if you click on them and decide to purchase something, I shall earn a commission at no additional cost to you. Let me say on record that I have used and experienced the services of this company, and my recommendation is strong as I have found them to be very helpful and useful. My opinion is not based on the commission I make, but because of how reliable I found this to be. You are not compelled to make any decision unless you see fit and feel that they will help you achieve your goal. Check out our shop with all these resources:

Read the full article
#blogging#bloggingsuccess#buildhomebusiness#business#BusinessSkills#Creativity#Determination#digitalmarketing#digitalnomad#DisciplineinLife#EffectiveTools#entrepreneur#Entrepreneurs#Entrepreneurship#internetbusiness#lifegoals#LifeStyleAttitude#locationindependent#luovita#makemoneyonline#mompreneurs#onlinebusiness#OnlineEntrepreneurs#onlinemarketing#OnlinePlatforms#OnlineTools#personalandprofessionalworld#ProcessFlow#travelfreedom#workfromhome
0 notes
Text
The Most Effective Method to Introduce WordPress with Bluehost
Here are the steps to how to install WordPress on Bluehost using Marketplace. Installing WordPress with Marketplace

1. Login to your Bluehost cPanel account. 2. Find the Website section and select Install WordPress. 3. Click the Install button. 4. Choose the domain name to install it to. In the field next to the domain, you can enter a subfolder such as ‘blog’ or leave it blank if you want the site’s main page to be the blog. 5. If necessary, you can edit the email address, username and password for the new WordPress installation. Click “advanced options” and you can change those settings. 6. Read through the license and service agreements and check the boxes. 7. Select the Install Now button. If you have already installed a fresh WordPress and looking for a solution to transfer your local/dev setup to BlueHost.
Migrating WordPress to BlueHost
1. To start, log into your current host and use a provided program (such as phpMyAdmin) to export your site’s database. 2. Use your preferred FTP program (such as Filezilla or Cyberduck) to download and save your wp-content folder (a.k.a. the files that make up your WordPress site.) Of course, You won’t need to download files if your existing site is on local 3. Login to your Bluehost control panel. 4. Install WordPress using the Marketplace, one-click install tool. 5. Create an FTP account in your Bluehost control panel so you can upload your files to your new WordPress site folder. When creating your FTP account, keep in mind that you might want to change its designated directory to something easily identifiable. 6. Launch your preferred FTP program and open a new connection. Log in with your new FTP account info. 7. Overwrite the existing wp-content folder with the one you downloaded from your previous host. 8. Open phpMyAdmin in the Database section of your Bluehost cPanel. 9. Select the database to which you want to import your data. You may need to look up this information. (To do so, go to the File Manager in your control panel and open your public_html folder. Then scroll down to find the wp-config file, right-click the icon, select “Code Edit”, and then “Edit.” In the code edit window, scroll down to identify the database you should use. 10. Back in your phpMyAdmin window, once you’ve selected the correct database, you will see a list of tables. Drop these tables before you import your new data by selecting the “Check All” option at the bottom of the list and then selecting “Drop.” 11. Now it’s time to import! Go to the “Import” tab in phpMyAdmin. Choose “Browse your computer” and find the SQL database file that you exported from your previous site. (It should be named something similar to “bluepm1_wor2.sql”.) Make sure the SQL format is selected and click “Go.” 12. Here is an important step after you import your database. After your database is imported, check to learn the new table names. If your table names begin with ‘wp_’ then you don’t need to make any changes. However, sometimes your tables will import with a name like ‘wrp-‘ Go to your file manager and open the wp-config file in your public_html folder. 13. Right click on wp-config, select “Code Edit”, and then select “Edit.” 14. Scroll down until you find the line “Stable Prefix” line. Edit it to read ‘wp_’. 15. Now that you have your database and site files, it’s time to put everything on your temporary URL. This is how you move your site without any downtime.* First, in your phpMyAdmin site, select wp-options from the menu on the left of the screen. Then, select “Edit” on the “site url” line. (This will typically be line .) Paste in the temporary URL provided to you when you created your Bluehost account and click “Go.” (Tip: if you’re not sure what it is, it can be found in your Bluehost welcome e-mail.) *Note: all of these previous steps can help anyone move their WordPress site. The following steps are for those are want to move their WordPress site without any downtime. 16. Repeat Step 11 for your “Home” line in wp-options. (This is typically line 36.) 17. Now it’s time to see if your work has paid off. Enter the temporary URL into your internet browser and check to see if your site is there. If so, you’re nearly done! 18. Log into your WordPress admin site to save your Permalinks. Go to “Permalinks” under the “Settings” tab of the dashboard and click “Save Changes.” 19. Before you can move from the temporary URL to your permanent one, you must change the nameservers associated with your domain to point to Bluehost. This can be done in the domain manager of your domain registrar, whether it be with Bluehost or another registrar. Use the following: NS1.BLUEHOST.COM and NS2.BLUEHOST.COM. (This indicates that your site is hosted at Bluehost.com. The DNS change can take anywhere from a few hours to several days to propagate. Once it is finished you will be able to use your domain on your new site.) 20. Once the DNS change in complete, log into your WordPress admin site and go to “General” under the “Settings” tab. Then, enter your domain into the “WordPress Address” and “Site Address” fields, and click “Save Changes.” 21. The last step is to enter your domain URL into your internet browser to check to see if your site is live. If so, then congratulations! You have successfully moved your WordPress site to Bluehost. These steps will remain more or less the same for most hosting providers. As you may have already expected, migrating WordPress first time can feel to be a little overwhelming, but once you do it, you would realise it is not much difficult either.
0 notes