#how to find wordpress admin username and password from cpanel
Explore tagged Tumblr posts
Visit Tumblr Blog
Explore Tumblr blogs with no restrictions, modern design and the best experience.
Last Seen Tumblr Blogs


Fun Fact
Total funding amounts to $125.3M.
Text
Find the step-by-step guide to easily find your WordPress admin username and password from cPanel. Let’s get started & retrieve it!
#how to find wordpress username and password in cpanel#how to check wordpress username and password from cpanel#how to find wordpress admin username and password from cpanel#how to get wordpress username and password from cpanel#how to find database username and password in phpmyadmin cpanel
0 notes
Text
How to Add Admin User to the WordPress Database with phpMyadmin
Adding an Admin User to the WordPress Database With phpMyAdmin becomes necessary when a hacker has locked your website, you have lost access to the WordPress admin panel, or you have forgotten credentials. Here we use the HostBet Shared Hosting cPanel account screenshot.
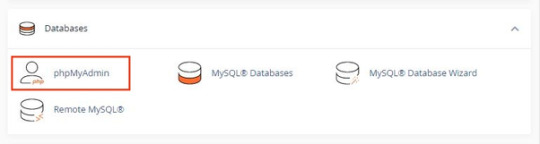
Step 1: Open the cPanel account Dashboard
Step 2: Navigate to phpMyAdmin in the Databases section.
Step 3: Click on phpMyAdmin.
Step 4: Once you’re on the phpMyAdmin dashboard, you need to select your WordPress database.
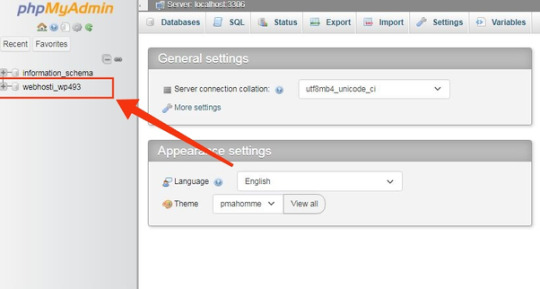
This will open the WordPress database. You will be making changes to the wp_users and wp_usermeta tables.

First, add a user to the wp_users table.
Step 5: First, you need to navigate the wp_users table and click on it. This will open the users currently listed in the table.

Please note that there is one user ID in our demo website table 1. You need to add a new user using a new unique ID, so we’ll use the 2 numbers.

Step 6: To create a new user, you need to click on the “Insert” tab.

Step 7: Add the following information to the fields on the Insert form:

ID: pick a unique number (in our example, we’ll use 2)
user_login: the username that will be used for login
user_pass: add a strong password, and make sure to select MD5 in the function from the drop-down menu (see the screenshot below)
user_nicename: the user’s full name or nickname ( you can write according to yourself)
user_email: the user’s email address
user_url: your website address
user_registered: select the date and time the user was registered using the calendar
user_activation_key: leave blank
user_status: set this to 0
display_name: the user’s full name or display name
Step 8: Once you have finished, click on the ‘Go’ button to add the new user.
Next adding a user to the wp_usermeta table.
Step 1: To add a new user, you need to navigate to wp_usermeta, click on it, and then click on the “insert” tab (same as the previous steps).
Step 2: Next, you need to add the following information to the Insert form:

unmeta_id: leave this blank
user_id: the user ID you used in the previous step
meta_key: this should be wp_capabilities
meta_value: insert this: a:1:{s:13:”administrator”;s:1:”1″;}
Step 3: After that, you need to find fields for the second row.

unmeta_id: leave this blank
user_id: the user ID you used in the previous steps
meta_key: you need to enter wp_user_level
meta_value: 10
Step 4: Once you finished typing the information into the fields, click the ‘Go’ button. that’s it. You Have successfully added new users.
0 notes
Text
How to Change Your WordPress Password [ A Guide ]
How to Change Your WordPress Password [ A Guide ]
It is very much common for WordPress users to ask how to change their password. If for any reason you are one of these WordPress users, you are very much welcome. In this article, you’ll get a complete and comprehensive guide on How to Change Your WordPress Password. However, before going further, it is important to highlight some important points just so you can understand this guide. First, you…

View On WordPress
#how to change local wordpress password#how to change wordpress admin password#how to change wordpress password in cpanel#how to find wordpress username and password#how to get wordpress username and password from database#wordpress reset admin password#wordpress reset password function
0 notes
Text
How to install wordpress – Complete wordpress tutorial

2 Things You Need Before Installing WordPress Before you installing WordPress, first you will need a domain name and second a good web hosting company. Most web hosting company provides shared space on a web server for less than $8-$10/monthly. Also many hosting company will install and maintain wordpress for you. Today, we highly recommend that you use BlueHost. Because they will give you a free domain as you like. And their hosting plan price start only $3.95/monthly. You will be happy and feel secure to hear that BlueHost is also an official recommended hosting company of wordress.

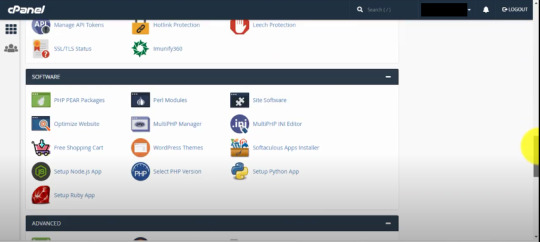
How to Install WordPress using Softaculous Softaculous is a most popular auto-installer script. Just a few clicks, you can easily install wordpress. The most popular BlueHost company use Softaculous in their control panel. Now just login to control panel account and look for WordPress icon (see below the image). You will get them under Softaculous apps installer section.

After clicking on wordpress icon you will see an overview of wordpress as like below the image. Now you need to click on the Install tab to continue the install process.

As protocol, you need to choose http:// or http://www. And if your site has SSL and HTTPS, then as protocol you have to select https:// or https://www. After that, you need to choose the domain name where you want to install WordPress. Most users want to install WordPress in their domain’s root directory, like example.com. In that case, you need to make sure that the ‘In Directory’ field is blank. (You will see ‘wp’ in directory filed as default)

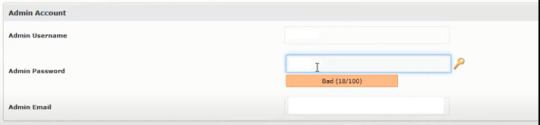
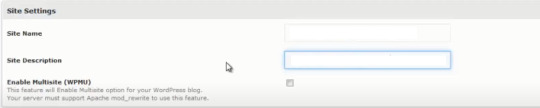
Then down a little, you will see the site settings section. Under this section, first you need to fill a title and description of your site. If you don’t want yet, don’t worry you can easily change them from your wordpress admin area after installation. Next, you need to choose an admin username, strong password, and email address. Softaculous will automatically fill in the username and password fields for you. It will use a non-dictionary word for username and a strong password.

You can change them if you want so that they are easy to remember for you. However, we strongly suggest you to always use a strong password. Always you will use correct email address in the admin email field. Because wordpress will send notifications and password reset link if you ever forgot your password. Rest of the options are optional. So you can now click on the install button to run the installer.

Softaculous will run the installer using the settings you provided. You will see a progress bar with installation status. It will take a couple of minutes, do not close the window until the progress bar reaches 100% otherwise this may affect your wordpress installation. You will see a success message after the installation is finished. It will also show you a link to your website and another link to your wordpress admin area.

How to Install WordPress using FTP Just the five steps to install wordpress. Download the latest version of WordPress.Upload those files to your web server, using FTP or cpanel file manager.Create a MySQL database and user for WordPress.Configure WordPress to connect to the database that you created for you wp site.Complete the installation and setup your website! First thing you need to do is download the latest version of WordPress. Unzip the file, and use FTP to upload WordPress files into your web host directory of your choice.

If you want to install WordPress on your root domain name (like example.com), then you need to upload WordPress files to your website’s root directory. Usually this directory is called /public_html/. On the other hand, If you want to install WordPress in a subfolder (like example.com/myblog), then upload it in a folder /public_html/myblog/. Once you are done uploading WordPress, go to your hosting control panel to create a database. We are using cPanel web hosting, so you will find icon as like below screenshot.

You will see a field to create a new database. Enter your database name, and click “Create Database”.

Now that you have created your database, MySQL still needs a username MySQL Databases page in your cPanel account, down a little MySQL Users section. Simply provide a username and password for your new user and click on the ‘Create user’ button.

This new user still does not have access to the database you created earlier. For that you will need to add the user to the database and give them permissions to perform all actions. On the same MySQL Databases page in your cPanel account, down a little ‘Add User to a Database’ section. Select the database user you created from the dropdown menu next to user, then select database, and click on the add button.

You will be now asked for the privileges you want to allow this user. Select all privileges and click on the Make changes button.

Your MySQL database and user are now ready, and it is time to run the install. Now go to to the URL where you uploaded WordPress. If it is in the main domain, then enter your domain name in the browser window, like example.com or www. example.com. You will see the language selection page. You can choose a language and click on the continue button to procced.

You will now see some installation instructions. Wordpress will need database name, password, and mysql host information. Click on the ‘Let’s go’ button to continue.

Now wordpress will show you a database connection form. You need to enter the database name, user name, password and database host.

Then click on submit button.

Next you will see ‘Run the install’ page. So you have to click on ‘Run the Install’ button to continue. Now wordpress will create tables in your database and then send you to the next step of the installation. Then you need to fill some information for wordpress to setup your site. This includes site title, username, password, and admin email address. If you do not want your website to be visible to search engines, then you can check the box next to search engine visibility

Click on the Install wordpress button to continue. Wordpress will setup your website and finish the installation. You will see a success message showing your username. You can now click on the Log in button to sign in to your wordpress site.

Read the full article
1 note
·
View note
Link
Accessing the Marketplace Installer and Installing an Application
Logging into the newly installed Application
Troubleshooting Errors
500 Error on Installation
Database Creation Issues
Accessing the Marketplace Installer and Installing an Application
Bluerock
1. Log in to your Bluehost control panel.
2. Click the Marketplace tab from the side navigation menu to the left.

3. Choose Add Website from the drop-down menu.

4. You will be prompted to create a new WordPress site; enter a Site Name and Tagline.

If you click the Advanced button, this will give you an option to add your Email Address, WordPress Admin Username, and Password.
5. Then click the Next button.
6. Choose the domain you would like WordPress installed to in the Domain drop-down.

7. If you would like your WordPress installation to exist in a subdirectory (i.e., example.com/blog), enter your preferred folder in the Directory field.
8.Toggle suggested plugins on/off, then click the Next button. Once the installation is done, you can jump through to Logging into the newly installed Application walkthrough.
Legacy
1. Log in to your Bluehost control panel.
2. Click the addons tab from the navigation menu that stretches across the top of your screen.

3. Click the Marketplace from the sub-menu.

4. Click One-Click Installs from the navigation menu at the top of your screen.

5. Select the application you would like to install. 6. Select Get Started. 7. From the drop-down menu, choose the Domain Name you would like to use for this application. Anything entered in the field following the domain name will be a part of the URL. 8. If desired, enter a Directory. 9. Click on Next. 10. Enter Admin Information
Site Name: This will be the name displayed on your site. This is not the URL but simply the name used on your site.
Admin Email Address: This will be where your login information will be sent.
Admin Username: The desired login name for your application
Admin Password: The desired password for this application
Logging into the newly installed Application
The Marketplace installer will take a couple of minutes to install your application. Once done:
Bluerock
1. Once the installation is done from Marketplace, you have an option to Click Go back to My Sites or Click Login to WordPress to sign in right away to your new WordPress site.

2. If you select Go back to my sites, please check Log in to WordPress through My Sites to learn more.
Legacy
1. Select My Installs from the Website section. 2. Find the domain install and click Login.
Troubleshooting Errors
500 Error on Installation
This usually is a result of something incorrect with the .htaccess file or the PHP Configuration being used.
Rename the .htaccess file. The system will create a blank one for you.
Change the PHP version that is set in the PHP Config on the cPanel. For more information on how-to do that, go to PHP Version Selection.
Database Creation Issues
If you experience issues with the database not being created for a WordPress installation, please see WordPress Installation Without Automatic Database Creation.
GET STARTED
Total Design Freedom
WordPress-based Builder Available
Free Domain Name for 1st Year
Expert 24/7 support
0 notes
Text
How to Create a Blog on WordPress in 10 Minutes? Free Full Guide
In today's time, everyone wants to earn money sitting at home from the Internet. Thousands of people are earning very well from the internet by working at home today. There are many ways to earn money from the internet, the most popular of which is blogging.

How to Create a Blog on WordPress? In today's time, a lot of people are earning very well at home, so to do blogging, we have to create a website or say blog, now to create a professional blog, without coding (Coding) For this, you have to use WordPress, so in today's article, I will tell you How to Create a Blog on WordPress step by step? (How to make Professional WordPress Blog step by step guide) How to Create a Blog on WordPress?. WordPress is a very popular name for creating websites and blogs, without coding, if you do not know the code at all, then you can take support of WordPress, this is software that helps you create a better website. Or you can make money from the internet by becoming a professional blog, so to create a WordPress site, you need to have knowledge of some things like what is a domain name, web hosting ) What happens, etc. So let's know what is needed to build a website and How to Create a Blog on WordPress?? (How to Create a Blog on WordPress or a website).
How to Create a Blog on WordPress? Complete information on creating a website on WordPress
1. Purchase a domain name for your website blog To create a professional WordPress blog or website, first of all, you have to have a name which we also call a domain name. The domain name is the name of the website or blog. For example, our website name is CatchHow.com. So Similarly, for your blog, a single name will be required, so you can buy this name from godaddy.com, this website is quite popular in Indian to buy a domain name, so you can go here according to your name and according to your name If you want to keep the website, you can keep it, then you will have to buy it, buy your domain name for a year or two and after that, you can increase the debt by giving money again.

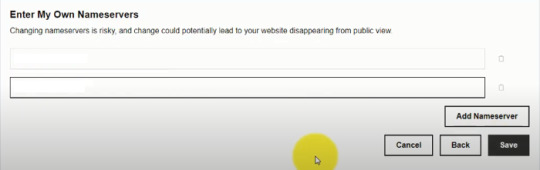
Domain Search 2. Web Hosting to Buy for Blog or Website The next important thing that comes after purchasing the domain name is Web Hosting. Web Hosting is a place on the Internet where we will store our files documents that will be needed to create a website or blog, then we will store it in Web Hosting. To buy hosting, you will find many websites on the internet, some of which are popular websites, Bluehost, Hostgator, Godaddy, from here you can buy web hosting. Web hosting is a bit expensive and different. so buy whatever hosting you need according to your needs. Read this:- Which 1 is best between SiteGround vs Bluehost? Some Website for Web Hosting - Bluehost - Hostinger - A2 Hosting - DreamHost - SiteGround - GoDaddy Hosting - GreenGeeks - InMotion Hosting - IONOS (1&1) Hosting - HostPapa 3. Connect the domain name to the DNS server After buying the domain name and web hosting, now you have to connect these two so that whatever you want to create your website or blog goes online, here you have to connect your domain name to the DNS server, so for this, you will have to You have to go to domain management and change the DNS of the domain and enter the DNS of your web hosting.
Nameserver 4. Now open the Control Panel and install WordPress Now after connecting DNS, now you have to install WordPress to create your website or WordPress blog, so for this, when you buy web hosting, then you are given a control panel on their behalf from where you can use your website. If you can control this, then you can get the link of this control panel through email or you can open the control panel by going to the account of the web hosting where you have purchased it, then you can see it in the following screenshot here. How the control panel appears.
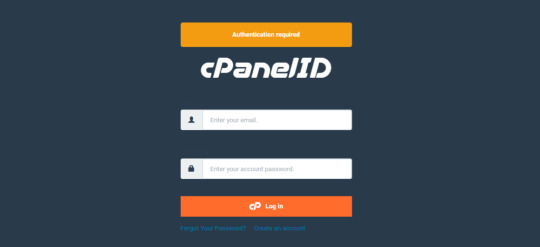
Cpanel login So here you have to enter your username and password, whichever has been given to you, be careful not to share the username and password of this control panel with anyone, then now you have to install WordPress to create a WordPress blog. To do this, you have to click on the softaculous option in the control panel and install WordPress. How to install WordPress?
softaculous apps installer - click on softaculous apps installer - Now click on WordPress - Click install - Now enter the domain name in the URL - After this, enter the login user name on the Admin user name so that when you log in on the WordPress blog, this is the user name you will need. - Enter admin password, within this option you have to enter the password which you will have to enter when logging into the WordPress blog - Now click on save installation details and save the details. - WordPress user name and password

WordPress Step-up
WordPress Step-up 5. Now open WordPress blog Now you have all already become a Ready Now you admin URL (Admin URL) from where the opening your WordPress blog ( WordPress Blog did) on the log must then URL where you will pay you to save installation details on click On top of that you will get the Admin URL, then click on the URL.
WordPress Step-up So the login page of the WordPress website will open, then here you have to enter admin user and password, whatever you entered in the details above, only then you will be able to log in to the WordPress blog.

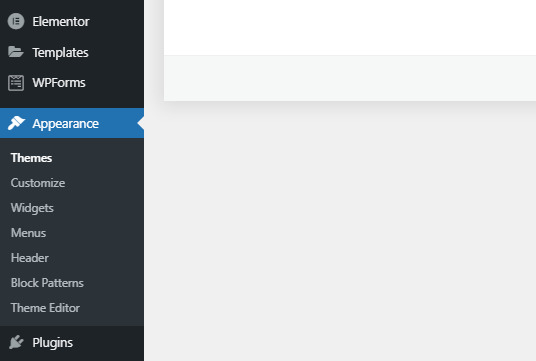
WordPress Login So here you do not have to share this username and password with anyone, other than that you have to remember the admin URL so that whenever you have to open a WordPress blog or a website, you will need this admin URL Will to be required 6. Now install the theme for your blog or website Now you have to design your WordPress blog, then for this, you will get many free themes or if you want, you can also buy some better WordPress themes, then after logging in here you have to click on the appearance And then you have to click on the themes and according to your theme, install any theme that you like and activate it, after that your website or blog will be created. Read this for theme choosing:- Top 10 Best Free WordPress Themes (Hand-Picked for 2021)
WordPress Theme So after all these things, now you can write and publish your post by clicking on the post option, but before that, if you have to design your WordPress blog, then use widgets here can you that good, that according to the plugin installed can and can design your blog is such a professional WordPress blog ( WordPress Blog can make) or website. Read this:- How to Create Backlinks Free | Dofollow or Nofollow (step by step) Continue this course:- WordPress Course Read the full article
#CreateaBlogonWordPress#HowtoCreateaBlog#HowtoCreateaBlogonWordPress#HowtoCreateaBlogonWordPressin10Minutes#howtomakeablogonwordpress#howtomakeawordpresswebsite
0 notes
Text
Find out how to Construct a WordPress Website in 24 Hours
New Post has been published on https://tiptopreview.com/how-to-build-a-wordpress-site-in-24-hours/
Find out how to Construct a WordPress Website in 24 Hours

WordPress is a incredible platform for constructing web sites on the fly with little to no growth time required to stand up and operating.
As well as, WordPress has incredible customizability starting from having the ability to absolutely customise your theme, to discovering plug-ins which have the performance to do absolutely anything you need.
The checklist of what you are able to do to customise WordPress is limitless and is mostly restricted solely to your creativeness.
You’ll be able to set up a publication plug-in to handle your publication subscriptions. You’ll be able to set up analytics plug-ins that seamlessly combine with WordPress and Google Analytics.
Different WordPress plugins will let you customise your search engine optimization similar to your title tags, meta descriptions, and meta key phrases.
Nonetheless, some plug-ins can even allow you to add noodp and noydir tags, and dive deep sufficient into their performance to permit for full management over noindex/nofollow on particular person pages.
1. Select a Good Area Identify

This could go with out saying, however choosing a good domain name is half the battle towards creating a superb web site.
Commercial
Proceed Studying Under
A great area title ought to typically be:
Quick.
Catchy.
Describe your enterprise.
Key phrase-related.
Related to your model.
Quick domains are typically outlined as domains which are three phrases or much less. Ideally two phrases or much less.
These phrases ought to talk and embody three areas: your model, your business, your key phrases.
Now, in the event you’re simply creating an organization website, your domain name ought to be a branded area title for posterity causes.
You wouldn’t simply be capable to promote your website in the event you created the area title to be “JohnsWebsitesRUS.com.” So, that consideration ought to come into play as nicely.
Now, it’s essential to say this: the precise match area title replace does are inclined to work towards domains with exact-match phrases.
Watch out about utilizing precise match key phrase phrases because the area title. Chances are you’ll get away with it for just a few months, however the selection will finally come again to hang-out you.
Commercial
Proceed Studying Under
2. Select a Good Host

Selecting a superb internet host for WordPress presents a number of challenges. An online host ought to be a optimistic addition to your web site’s arsenal.
Issues like extra web sites, bandwidth, or issues like no WHM management panel could be (and ought to be) dealbreakers. Discover a host that can fit your wants and allow you to improve your month-to-month bandwidth as essential.
As you drive extra site visitors to your website, you need to be sure that your host has a way so that you can improve that bandwidth.
Virtually nothing is worse than acquiring hundreds of tourists a month solely to search out that your web site is immediately down attributable to a scarcity of bandwidth.
Guarantee that your host provides you with the safety you want, as nicely. This may provide help to relaxation simple, realizing that you’ll not be hacked at a second’s discover.
Be taught extra about WordPress safety: 10 Tips For Keeping Your WordPress Site Secure.
For this tutorial, we’re assuming that you’ve got chosen a Linux internet host with CPANEL + WHM mixture as your internet hosting stack.
There are different implementations and kinds of hosts however for the needs of this text, that is what we’re utilizing.
Three. Stock Your Current Web site

Right here, you’ll be able to work out whether or not or not you need to begin over. In case your present web site is so horrible you need to begin over, I completely get it. I’d not need to add that website to my portfolio both!
Commercial
Proceed Studying Under
Check out your present web site and work out what you need to preserve and what you need to throw away.
Relying on what you uncover on this step, it is going to be essential to carry out a full web site migration, which is able to take longer than 24 hours and is past the scope of this text.
four. Obtain WordPress
Go to WordPress.org and obtain the set up information for WordPress. After downloading, you’ll be able to unzip the information.
Then, go browsing to your internet host. Add the information. You’ll be able to add the information wherever you need on the web site.
If you wish to add them to the foundation folder and have your whole website based mostly on WordPress, that may be accomplished.
If you happen to’d relatively only a part of your website hosted off a subdomain be the WordPress model, then that’s potential as nicely.
5. Create a MySQL Database

Earlier than continuing with the WordPress set up, it is going to be essential to create a MySQL database in Cpanel. With out a MySQL database, your WordPress set up will all be for naught.
Commercial
Proceed Studying Under
Follow the documentation here (or comply with your hosts’ assist information if they’ve them) so as to create a brand new database with the MySQL Database Wizard.
Make sure to take down your username and password for the SQL database. We might be utilizing them within the subsequent steps.
Want-to-know: When creating your username and password the MySQL database wizard often creates a username with the database title + consumer like so: user_databasename.
So, username_db1 can be the total username you utilize when modifying wp_config.php. Don’t fear – we’re attending to that in just a bit bit.
6. Set up WordPress in 15 Minutes
There are some modifications it is advisable make to the WordPress set up information earlier than you progress ahead with putting in WordPress.
To begin with, it’s essential to make modifications to wp_config.php so as to be certain that your set up will work. With out these modifications, your set up may have issues.
Please be aware as nicely that the gadgets within the wp-config.php file are all in a selected order. This order does matter and in the event you make modifications and also you don’t know what you’re doing, you’ll be able to introduce issues into your set up.
Commercial
Proceed Studying Under
Utilizing your FTP answer, let’s navigate to wp-config-sample.php. We have now to re-name this file to wp-config.php for the file to work.
Subsequent, we’re going to make modifications to some gadgets within the file: the database title, the database username, database password, and database host.
Do not forget that need-to-know merchandise we mentioned within the final step? That applies right here.
So your database title would be the full title of the database you created.
The Database Username might be “username_db1”. Enter your password.
Now, the Database Host is about by your internet hosting supplier. It will likely be essential to contact their assist and procure this data for that wp-config.php merchandise.
For additional particulars, here is the official documentation for modifying wp-config-sample.php.
Now that we have now renamed wp-config-sample.php, and we have now entered in our database’s data, it’s time to go to the primary set up URL and proceed with the set up.
In just a few seconds, you must have a welcome display that reveals, “Congratulations! WordPress is now installed.”
Commercial
Proceed Studying Under
This complete course of ought to take round 5-10 minutes whole.
Some upkeep suggestions: It would be best to change your admin listing in your website, so as to forestall hackers from hacking into your again finish. As well as, utilizing robust passwords like “7$192^98asv097!@#E41” is advisable only for the safety alone.
Please, don’t use the phrase “password” or different identifiable easy-to-guess data as your WordPress password. It’s higher to be thorough and just a little cautious on the outset than be sorry later.
7. Discover a Good Theme

Now that WordPress is put in, you will need to discover a good theme for our undertaking.
Commercial
Proceed Studying Under
Discovering a superb theme implies that:
It would meet our wants.
It’s typically light-weight and hundreds quick.
It has legitimate HTML together with legitimate CSS.
It consists of compatibility with not solely probably the most popular plug-ins, but additionally most plug-ins that you simply plan on utilizing.
It consists of high-quality assist together with thorough documentation.
Whenever you do discover a theme you want, you must take a look at issues like its customizability, your necessities, whether or not or not you’ll outgrow the theme, in addition to integration along with your model’s colours.
Now, nearly each theme provides you with the chance to vary colours after set up, so I wouldn’t fear an excessive amount of about this half at first.
Whereas discovering a theme keep in mind to be looking out for the theme’s customizability and compatibility with plug-ins.
eight. Set up the Theme
Whenever you do discover your theme, it’s typically a easy matter of downloading the information, extracting the information, and importing them to your server.
You’ll be able to then go into WordPress themes and alter the theme over to the brand new one so you’ll be able to check it out.
Commercial
Proceed Studying Under
9. Customise Your Theme
Taking a look at customizations of your theme, it’s important that you would be able to customise the whole lot. There are completely different ranges of customization out there that may make or break your web site efforts.
When you have a theme that doesn’t allow you to customise your content material with your individual coding, or you need to code in such a means that mimics the coding getting used on the theme, then the theme is just not coded nicely.
You can run into points with this later with cross-platform and cross-display compatibility.
A theme shouldn’t restrict what you are able to do along with your website. As a substitute, it ought to assist improve your web site efforts and make issues simpler.
If, for no matter motive, you discover that your theme doesn’t will let you accomplish what you need, it could be time to search out one other theme. Revisit step 7 and ensure your theme suits the targets of your undertaking earlier than you progress ahead.
If you happen to discover that out there themes don’t do what you need your web site to do, it could be essential to maneuver on to customized theme growth, which might take greater than 24 hours.
Commercial
Proceed Studying Under
Here are some good tutorials on how you can create customized WordPress themes.
10. Discover & Set up Good Plug-Ins
Discovering good plug-ins is critical to just remember to not solely have the performance that you simply want, however that enhanced performance runs easily.
From search engine optimization plug-ins to publication and analytics plug-ins, be certain your theme is suitable.
A few of my favourite plugins to make use of embody:
Redirection (for implementing 301 redirects the straightforward means).
Yoast’s search engine optimization Plugin (for implementing all the search engine optimization fundamentals simply).
Tribulant Newsletters (simple creation and administration of newsletters together with publication subscriptions).
Google XML Sitemaps (for straightforward implementation of XML Sitemaps on WordPress websites).
W3 Complete Cache (for minification, pace optimization).
Disqus Remark System (a widely-used remark system throughout the net).
Social media sharing plug-ins (if they aren’t already a part of your theme).
Social media analytics plug-ins (for social analytics).
11. Configuring the search engine optimization Fundamentals
Permalink construction
In an effort to implement effective SEO, the very first thing that ought to be modified is the construction of your permalinks. Yow will discover these settings underneath Settings > Permalinks.
I want utilizing the next permalink construction: domainname.com/class/postname/ the place class consists of the weblog submit’s class (keyword-optimized for the topical focus of your weblog), after which a keyword-rich postname.
If you happen to want to embody the class like advisable above, choose Customized Construction and use the next: /%class%/%postname%/.
Commercial
Proceed Studying Under
When you have had your website for some time, it’s possible that you’ve got hyperlinks in place. Don’t panic!
WordPress will robotically implement the redirects for you so that you don’t need to set them up manually.

Altering From WWW To Non-WWW
You’ll discover this selection underneath Settings > Basic.
It will likely be essential to take a little bit of time and take into consideration what you need your website to point out up as: WWW or non-WWW.
Commercial
Proceed Studying Under
In case you are migrating an present website over to WordPress, I like to recommend that you simply use the prevailing website URL. Altering from WWW from non-WWW in that occasion will solely trigger extra hurt than good, and you may introduce severe search engine optimization efficiency points because of this.

Make Positive You Enable Search Engines to Index Your Website
It is a biggie and might result in search engine optimization efficiency points in the event you don’t configure this. Yow will discover this setting in Settings > Studying > Search Engine Visibility.
Commercial
Proceed Studying Under
Usually, this field is checked. In an effort to enable full crawling of your site, at all times be sure that this field is unchecked.

Website Velocity
Velocity is king and might make or break your web site efficiency, particularly the place conversions are involved.
Look into how one can pace up your theme. It’s preferable to get rid of as many calls to the server as potential.
When you have 15 CSS information in your theme, contemplate condensing them all the way down to 1-Three CSS information. The identical factor holds true with JS information.
Commercial
Proceed Studying Under
When you have 15 JS information as a part of your theme, both search for one other well-optimized theme or manually condense them down into 1-Three information most.
As well as, putting in the WP Complete Cache plug-in might help make your website quicker with its choices of web page caching, database caching, providing minify choices, and integration with a spread of CDNs (content material supply networks), additional rising your alternative for pace.
Be Positive to Noindex, Comply with Archive Pages and Disable Archives You Don’t Want
Archive pages are the king of duplicate content material in WordPress. They will make or break a website, particularly when the positioning reaches tons of of pages.
You don’t need to tackle that headache sooner or later.
Setting this search engine optimization fundamental now will assist make your optimization efforts simpler. Yow will discover this setting in Yoast’s SEO plug-in underneath: Yoast > Titles & Metas > Different. Choose the setting that claims “Noindex subpages of archives.”
As well as, I like to recommend including the NOODP and NOYDIR meta robots tags sitewide. These tags will forestall Google and different search engines from robotically utilizing the DMOZ and Yahoo Listing descriptions.
Commercial
Proceed Studying Under
For individuals who proceed the combination of meta key phrases, I counsel checking “use meta keywords tag” right here as nicely.

Constructing a WordPress website is straightforward. It will possibly take lower than 24 hours to construct a reliable website that appears like a model you need to do enterprise with.
It would take for much longer, nonetheless, to construct a fantastic online presence that drives site visitors on a constant foundation.
Commercial
Proceed Studying Under
So mess around with it. Improve your creativity. See what you’ll be able to provide you with.
It’s by experimentation and testing that we really discover the suitable path by means of the SERPs.
Further Sources:

Picture Credit: Paulo Bobita
if( !ss_u )
!function(f,b,e,v,n,t,s) if(f.fbq)return;n=f.fbq=function()n.callMethod? n.callMethod.apply(n,arguments):n.queue.push(arguments); if(!f._fbq)f._fbq=n;n.push=n;n.loaded=!0;n.version='2.0'; n.queue=[];t=b.createElement(e);t.async=!0; t.src=v;s=b.getElementsByTagName(e)[0]; s.parentNode.insertBefore(t,s)(window,document,'script', 'https://connect.facebook.net/en_US/fbevents.js');
if( typeof sopp !== "undefined" && sopp === 'yes' ) fbq('dataProcessingOptions', ['LDU'], 1, 1000); else fbq('dataProcessingOptions', []);
fbq('init', '1321385257908563');
fbq('track', 'PageView');
fbq('trackSingle', '1321385257908563', 'ViewContent', content_name: 'how-to-build-wordpress-site', content_category: 'seo wp ' );
// end of scroll user Source link
0 notes
Text
Find the step-by-step guide to easily find your WordPress admin username and password from cPanel. Let’s get started & retrieve it!
#how to find wordpress username and password in cpanel#how to get wordpress username and password from cpanel#how to check wordpress username and password from cpanel#how to change wordpress username and password from cpanel
0 notes
Photo

Bluehost Review: Is It the Best Host for Your Site?
Best Overall Hosting Provider on the Market
BEST FOR
Best Overall Hosting Provider
OVERALL RATING
5 out of 5 stars
Bluehost is a hosting provider with strong customer service, uptime, and value for money. If you're looking to host a WordPress site, then this is the provider for you. Some of Bluehost's features are stronger than others, though – read on to learn more.
Is Bluehost Web Hosting for You?
Spend a few minutes researching the best web hosting providers, and Bluehost will be on your radar almost immediately – it’s widely used and hugely popular. But what sets Bluehost apart from the pack? Does it have exactly what you’re looking for, or would another provider be a better fit?
We’ll cover the most important deciding factors in-depth, but to start, here’s Bluehost at a glance:
Best Overall Hosting Provider
4.8 out of 5
TOP CHOICE
Types of Hosting
4 out of 5 stars
Hosting Features
4 out of 5 stars
Disk Space
5 out of 5 stars
Uptime
4 out of 5 stars
Help and Support
5 out of 5 stars
Value for Money
5 out of 5 stars
We’ve conducted our own user testing of the top hosting providers, and compared our findings for each provider in order to rank each as accurately as possible. Bluehost’s particular strengths were customer support, server uptime, and value for money.
Who Is Bluehost Best For?
Bluehost’s customer support, strong uptime, and affordable beginner plans make it a dependable hosting provider. If you’re looking for old-fashioned reliability, Bluehost is a great choice. That’s why we’ve rated it the best overall hosting provider on the market. Bluehost is also the best choice you can make if you’re hosting a WordPress site – it’s earned the title of best for WordPress hosting in our research, and WordPress.org itself has been recommending Bluehost since 2005. We also think it’s pretty great for photography website hosting, if that’s your kind of thing.
In the video below, Bluehost customer ‘Melty Way’ (a grilled cheese sandwich restaurant in Utah) discusses how Bluehost has helped to grow their small business:
Utah-based Bluehost came onto the scene in 2003. Since then, it’s become one of the leading providers of web hosting services, and is currently owned by The Endurance International Group, which also owns competitor HostGator. Bluehost currently powers more than two million websites worldwide, primarily out of its data center in Utah.
Pros and Cons
Bluehost Pros
Dependable server uptime: Bluehost offers a super-competitive uptime guarantee of 99.98%
Seamless WordPress integration: it couldn’t be easier to set up a WordPress site through Bluehost
Budget-level pricing: prices are still competitive even after the first year, and a variety of tiered pricing plans means there’s an affordable option for every site
Bluehost Cons
Additional costs: tons of optional add-ons will sneak into your cart at checkout, and it’s up to you to uncheck those items before you buy
Storage: Bluehost offers a small amount of storage on its Basic plan compared to competitors
Cyber Week deal alert! We’ve spotted Bluehost is currently offering some great Cyber Week discounts, meaning shared hosting prices now start from just $2.65. But hurry – these offers expire soon!
Go to the top
Reliability and Performance
We said Bluehost was dependable, and we meant it: Bluehost has a great uptime guarantee of 99.98%. No web host can provide 100% uptime, so 99.98% is a strong showing – it translates to roughly one hour and 45 minutes of downtime per year. That’s second only to Hostgator, which offers 99.99% uptime.
Types of Hosting and Features
Bluehost offers six different types of hosting: Shared, Shared WordPress, WooCommerce, VPS, Managed WordPress, and Dedicated. We’ve broken down the details of each type in our Bluehost Pricing Review, but generally, you can think of the differences like this:
Shared: the cheapest and easiest general service
Shared WordPress: the cheapest and easiest way to host a WordPress site
WooCommerce: the best way to host an online store with WordPress
VPS: not as expensive as dedicated hosting, and still good for business sites that need to go beyond the basics
Managed WordPress: even more features for your hosted WordPress site
Dedicated: the most expensive, but also the most powerful hosting service
WordPress and Bluehost
WordPress recommends Bluehost as its number one web hosting provider – and that’s no small feat, coming from a company that’s dealt with innumerable web hosts in its time. If you’re already set on having a WordPress site, then Bluehost is the best web host to go with. And if you’re already set on Bluehost, then you should definitely consider setting up your site with WordPress.org – you can install it through your Bluehost dashboard with just one click.
How to Install WordPress on Bluehost
This step-by-step tutorial shows just how easy it is to setup a WordPress website with Bluehost:
Other Bluehost Features
Seamless WordPress integration is Bluehost’s most impressive feature, but definitely not its only feature. We’ve compiled the rest of Bluehost’s best offerings below:
Domain registration Bluehost offers a free domain to certain users when they sign up for a one-year plan. However, that perk does not include the domain registration fee (between $10 to $15), which you’ll still have to pay for.
Website builder There’s a drag-and-drop site builder for those who have an idea of what they want to create, but don’t have sharp enough HTML and CSS skills.
Data transfer Bluehost offers unlimited data transfer on many of its plans. However, Bluehost also provides CPU Protection – more on this below.
cPanel Bluehost uses the “cPanel” Control Panel, which is a popular site management system. The company also offers free backups so you don’t lose any key site files.
Storage Depending on the plan you use, Bluehost offers anything from 50GB up to unlimited storage space for your site files. If all you plan to do is run a WordPress blog with words and images, then the 50GB plan will be fine, as it will take a while to use up that much storage.
The fact that you can get so much in one place is a big draw for customers. When we reached out to our email database for first-hand experiences of Bluehost, Steffi, a consultant, said:
“I used Bluehost, because I could do all in one place: domain registration, email-admin, hosting, unlimited sub-spaces. The documentation was very good and what I needed at the time.”
Pricing
Bluehost ranks highly in our research for value for money, with a score of 4.6/5. The best part? All Bluehost plans come with a 30-day money back guarantee. Shared hosting is Bluehost’s cheapest plan, at $2.95/month for the first year and $7.99/month after that. Dedicated hosting is the most expensive plan, starting at $79.99/month.
Bluehost Starting Prices:
Shared hosting: $2.95 per month, renews at $7.99 per month
Shared WordPress hosting: $2.95 per month, renews at $7.99 per month
WooCommerce hosting: $15.95 per month, renews at $24.95 per month
VPS hosting: $18.99 per month, renews at $29.99 per month
Managed WordPress hosting: $19.95 per month, renews at $29.99 per month
Dedicated hosting: $79.99 per month, renews at $119.99 per month
Which Plan Is the Best Value for Money?
If you’re new to web hosting or your site isn’t massive, then we recommend starting with Bluehost’s Shared or Shared WordPress plans. They’re the cheapest, and still offer a decent variety of features. When your site outgrows these shared plans, you can always upgrade to the pricier but better-equipped options.
Bluehost Additional Costs
Unfortunately, most hosting providers will fill your virtual basket with add-on items during checkout. These odds and ends will hike up the price of your plan, but you can always uncheck them before making your purchase.
Learn more about these extra items, and whether or not you’ll need them, in our full Bluehost Pricing Review.
Canceling Your Bluehost Plan
Bluehost’s 30-day money back guarantee means that you get some time to test out the platform and see if it’s for you. But it’s important to make this decision within the first 30 days, because afterwards, Bluehost doesn’t offer any refunds or cancellations.
When we reached out to our email database for reviews of Bluehost, the price of add-ons came up as an area for improvement. One reader said:
“[Bluehost is] pricey. The more add-ons you buy, the more expensive it is.”
When asked about the one improvement they’d make to Bluehost, the same reader suggested:
“Create different level bundles for add-ons and features.”
Security
The best indication of a secure website is an SSL (Secure Sockets Layer) certificate. SSL certificates let users know that any information they share on your site will be safe, and these certificates are indicated by the padlock icon and the “https” at the beginning of a web address.
Every Bluehost plan comes with a free SSL certificate, so you never have to worry about visitors getting a warning that your site is insecure. For more advanced security, you can also purchase a premium SSL certificate at $49.99/year. This would be a worthy investment for ecommerce sites, or any site where users will be logging in with a username and password and/or providing sensitive information (like credit card details).
Other free Bluehost security features include Spam Assassin protection, hotlink protection, and Secure Shell access. Basically, Bluehost includes more than enough security measures to get a standard site off the ground – but if you’re looking to scale your site or sell online, you may want to invest in a few extras.
Bluehost offers a lot of additional security measures to choose from, but they can quickly add up and increase your bill, so it’s important to choose wisely. For example, SiteLock Find (advanced security for ecommerce) only costs $1.99/month, but if you want to buy it, it must be billed annually at $23.88/year. That’s still not a lot to ensure the protection of your online shoppers, but it can be hard not to feel blindsided at checkout.
Migration
We know a large proportion of you read our hosting reviews because you’re unhappy with your current hosting provider, and looking to switch. With this in mind, we’ve examined how easy it is to make the switch to Bluehost.
The good news is, it’s pretty simple. There’s a DIY approach we’ll cover in brief below, or you can pay Bluehost to move your site for you. There’s even a bonus free migration on offer for qualifying websites:
1. Moving your own site to Bluehost
Doing the migration process yourself is pretty simple with Bluehost, because it uses the standard cPanel dashboard, so you can follow a general guide to migrating your site (like ours!) without encountering any surprises.
It’s a step-by-step process which can take some time, and people without much technical confidence may feel nervous giving it a go.
2. Paying for site migration
For $149.99, Bluehost will take complete control of moving your site to its servers (You can actually move up to five websites and 20 email accounts for this price).
Bluehost guarantees no downtime in this process, and 24/7 support during and after it’s complete. For many people, just having someone else own this process will be worth every penny.
It’s worth noting that this service is not available for reseller, VPS, or dedicated server accounts.
Not many hosting providers offer such an end to end migration service, so that’s a huge tick in the box for us!
3. Free site migration for (most) WordPress sites
Some WordPress sites are actually eligible to be migrated to Bluehost free of charge! Just fill in the form on Bluehost’s website once you’ve signed up for a hosting plan, and as long as there aren’t any complicated extras, a Bluehost expert will migrate your site free of charge!
Help and Support
Bluehost ranks number one in our research for customer support, earning a perfect 5/5. It has a variety of support options, including live chat, email support tickets, and 24/7 phone support. One user rated Bluehost’s customer support as “top notch,” citing his own experiences with the live chat option:
“I’ve had a few issues caused mainly by my own errors, and they’ve always helped me rectify them. They’re easy to contact via live chat, and I genuinely don’t think I’ve had to wait more than ten minutes to chat to someone.”
…But we wanted firsthand knowledge of Bluehost’s customer support, so we tried it out ourselves. Specifically, we tested the ease-of-use and effectiveness of two important features: Bluehost’s knowledge base, and Bluehost’s live chat. Overall, these features exceeded our expectations by 9%. Although we were impressed in both areas, we were more impressed by Bluehost’s expansive, searchable knowledge center than its live chat capabilities. We would have liked Bluehost’s live chat team to make it clearer how we could reach the same team member again in the future, in case we had more questions.
However, there’s still a lot to like about Bluehost’s live chat feature. When we tested it ourselves, agents’ responsiveness to our questions singled Bluehost out from other top competitors:
“All my questions were answered quickly and accurately, and the conversation felt friendly and natural throughout.”
But it wasn’t just response time that impressed our testers, it was also response quality:
“The agent always responded with relevant and helpful information, often including links and longer replies than I was expecting. They definitely seemed knowledgeable, and in a good position to help me.”
And if live chat isn’t your preferred method of communication, Bluehost offers three different technical support numbers that you can call instead, depending on your needs:
General enquiries
VPS and dedicated hosting
WordPress assistance
A nice thing about Bluehost’s website is that it offers instant answers right on the primary help page for some of the more common issues. Say, for example, you can’t figure out how to transfer your WordPress site from another host – you can click on that issue on the help page, then be shown multiple ways to solve your issue, including a help article, live chat, and the specific phone number you should call.
If you’re feeling especially tech-savvy, it’s worth trying to find the answer yourself on Bluehost’s support forums. It’s often quicker to do the research independently, and it will ultimately provide a better understanding of how a site works.
In general, Bluehost surpassed our customer service expectations the most compared to the three other hosting providers we tested. For example, where Bluehost exceeded our expectations by 9%, HostGator only exceeded them by 3%. Other providers like A2 Hosting and InMotion didn’t even meet our customer service expectations, which started at a baseline of 80%.
Customer Satisfaction
Bluehost customers are most impressed with the platform’s help and support services. One user named Robin wrote:
“I’ve used Bluehost for over five years on my WordPress website. I’ve had a couple of times when my site has gone down due to installed plugin problems, and I couldn’t figure out what to do. Each time they helped me fix the issue quickly. Highly recommended.”
Michael, another Bluehost user, had this to say:
“I’m not a website expert, so I think it’s better to ask someone before I click around and break something. Whenever I’ve had a question, I’ve used the live chat – with an average waiting time of three seconds for someone to join me. I’ve always received a quick, clear answer from a friendly rep in under five minutes.”
Aside from customer support, uptime and WordPress integration are also standout strengths for Bluehost. It performs well in value for money, too – as long as you remember to keep your eyes peeled for add-on costs during checkout. Michael even went on to write:
“Just read everything carefully to know what you’re signing up for. Also, pay attention to the plans and extras – know what your website requires, and simply avoid the rest.”
And we’d have to agree!
Limitations
Many Bluehost customers have expressed frustration with the lack of pre-installed features. It’s true that Bluehost has a lot to offer, but it’s also true that you have to actively pick and choose which of those offerings you want on your site – and often at an additional cost.
Additional Products
We now know about the additional costs that must be purchased outside of your Bluehost plan. But there are a lot of additions that do come included in every Bluehost plan. In fact, the most basic, bare-bones plan you can purchase with Bluehost (the Basic Shared plan, $2.75/month introductory price) still comes with:
50 GB SSD storage
Unmetered bandwidth
Free SSL certificate (remember those?!)
1 domain included
5 parked domains
25 sub domains
And if you venture one tier upwards to the Plus Shared plan (at an introductory price of $4.95/month), the number of websites, SSD storage, domains, parked domains, and sub domains all become unlimited. Plus Shared also gives you 30 free days with one Office 365 mailbox, and anti-spam email filtering through Spam Experts.
Final Thoughts
In our overall hosting rankings, Bluehost comes in first, ahead of hosting heavyweights such as HostGator and GoDaddy. In individual categories, Bluehost ranks first for customer service, second for uptime, and second for value for money. It’s also the best hosting provider to manage a WordPress site with.
If seamless features are your top priority, then you may be better off with InMotion rather than Bluehost – as we’ve seen, Bluehost’s extras and additional costs can be confusing.
Our conclusion? It all depends on your site goals – but if you’re looking for affordability and reliability, Bluehost is a solid provider.
0 notes
Text
10 Reasons Your WordPress Site Will Get Hacked (and How to Stop It)

A hacked WordPress site is as damaging as having your home burgled. It can completely shatter your peace of mind and adversely impact your online business.
Why do hackers target WordPress sites? The answer is relatively simple: WordPress is the single biggest platform for website creation these days, so there’s a larger base to attack; this attracts the attention of online criminals.
So, how can a hack impact your website?
Depending on the type of attack, your website could suffer any of the following:
It could be defaced completely;
It could load or operate very slowly on any device;
It could completely crash and malfunction;
It could display the dreadful “White Screen of Death”;
Its incoming visitors could be redirected to other suspicious websites;
It could lose all your valuable customer data.
This list is not exhaustive but you get the idea.
Now that we know how a successful hack can impact your website and online business, let us look at the top 10 reasons behind WP hacks and prevent them.
1. An Insecure Web Host
Like any website, WordPress is hosted on a web host or server. Unfortunately, most site owners do not pay much attention to the web host they select and choose the cheapest they can find. For example, it is more affordable to host a website on a shared hosting plan — one that shares its server resources with many other websites like yours.
This can make your site vulnerable to hackers as a successful hack into any website on the shared server. A single hacked site can consume the overall server bandwidth and impact all the other sites’ performance.
The only way to fix this problem is to opt for a reliable host and a virtual or dedicated server.
Pro tip: If you’re already using a shared hosting plan, check with your hosts if they offer VPS hosting and make the switch.
2. Use of Weak Passwords
Weak passwords are the main reason behind successful brute force attacks that target your account. Even to this day, users continue to use weak and common passwords like “password” or “123456”; if you’re one of them, your website could land in trouble!
Guessing weak passwords allows hackers to enter the admin accounts where they can inflict the maximum damage.
How do you fix this problem? Simple, ensure all your account users (including admin users) configure strong passwords for their login credentials. With at least 8 characters, passwords must be a mix of upper- and lower-case alphabets, numbers, and symbols.
For added safety, install a password management tool that can automatically generate and store strong passwords.
Pro tip: You can use a plugin to reset passwords for all your users.
3. An Outdated WP Version
Outdated software is among the most common reasons why websites get hacked. Despite being free to download, most site users defer updating their site to the latest version, for fears of updates causing their site to crash.
Hackers take advantage of any vulnerability or bug in an older version and cause issues like SQL Injections, WP-VCD Malware, SEO Spam & other major issues like website redirecting to another site.
How do you solve this problem? When you see a notification about an update on your dashboard, update your site as soon as possible.
Pro tip: If you are worried about updates crashing your live website, you can first test the updates on a staging site.
4. Outdated WP Plugins and Themes
Similar to the previous point, hackers also take advantage of outdated, unused, or abandoned plugins and themes installed on websites. With over 55,000 plugins and themes that are available, it is easy to install a plugin or theme, even from unsafe or untrusted websites.
Plus, many users do not update their installed plugins/themes to the latest version or do not find the updated version. This makes it easier for hackers to do their job & infect sites.
How do you avoid this problem? As with the core WP version, update each of your installed plugins/themes on your site regularly. Take stock of all the unused ones and remove them or replace them with better alternatives.
You can update your plugins/themes from your hosting account.
Pro tip: We suggest setting aside time every week to run updates. Test them on a staging site and then update your site.
5. Common Admin Usernames
In addition to weak passwords, users also create common usernames that are easy to guess.
This includes common usernames for admin users like – “admin”, “admin1”, or “admin123”. Common admin usernames make it easier for hackers to get into admin accounts and control backend files in your WP installation.
How do you avoid this problem? If you are using any such usernames that are easy to guess, change them immediately to a unique username. The easiest way of doing it is through your hosting account’s user management tool, by deleting the previous admin user and creating a new admin user with a unique username.
As the first step, change the default username of your admin user and limit users who have administrator privileges.
Pro tip: WordPress has 6 different user roles with limited permissions. Only grant admin access to users who really need it.
6. Use of Nulled Plugins/Themes
Coming back to the importance of plugins/themes, users have access to many websites that sell nulled or pirated copies of popular and paid plugins and themes. While these are free to use, they are often riddled with malware. They can compromise your website’s overall security and make it easier for hackers to exploit.
Being a pirated copy, nulled plugins/themes do not have any available updates from its development team, hence will not have any security fixes.
How do you fix this problem? Simple, for a start, only download original plugins and themes from trusted websites and marketplaces.
Pro tip: If you don’t wish to pay for paid or premium plugins and themes, opt for a free version of the same tools that will have limited features but are still safer to use than the nulled version.
7. Unprotected Access to wp-admin Folder
To take control of your site, hackers often try to break into and control your wp-admin folder in your installation. As the website owner, you must take measures to protect your wp-admin directory.
How can you protect your wp-admin folder? First, restrict the number of users having access to this critical folder. Additionally, apply for password protection as an added layer of security for access to the wp-admin folder. You can do this using the “Password Protection Directories” feature of the cPanel in your web host account.
Pro tip: Besides these fixes, you can also implement Two Factor Authentication (or 2FA) protection for all your admin accounts.
8. Non-SSL Website
You can easily migrate your HTTP website to HTTPS by installing an SSL certificate on your site. SSL (or Secure Socket Layer) is a secure mode of encrypting any data transmission between your web server and the client browser.
Without this encryption, hackers can intercept the data and steal it. Plus, a non-secure website can have many negative implications for your business – lower SEO ranking, loss of customer trust, or a drop in incoming traffic.
How do you fix this problem? You can quickly obtain an SSL certificate from your hosting company or SSL providers. It encrypts all data that is sent from and received by your website.
Pro tip: You can get a free SSL certificate from places like Let’s Encrypt, but these provide limit protection that will only be sufficient for a starter site or small site.
9. No Firewall Protection
Lack of firewall protection is another common reason why hackers can bypass website security measures and infiltrate the backend resources. Firewalls are the last line of defence against hackers and work like the security alarm installed on your house. Firewalls monitor web requests coming from various IP addresses, including the suspicious (or bad) ones.
They can identify and block requests that are known to be malicious in the past, thus preventing easy access for hackers to your website domain. Web application firewalls can thwart various attacks, including brute force attacks, XSS, and SQL injections.
Pro tip: A firewall provides much-needed security and is your first line of defence. But it’s important to also have a malware scanner installed.
10. Lack of WordPress Hardening Measures
Typically, hackers target the most vulnerable areas or weaknesses within a WP installation, to illegally access or damage the website. The WordPress team has identified these vulnerable areas and has devised a list of 12 hardening measures recommended for every website.
A few of these include:
Disabling the File Editor;
Preventing PHP execution in untrusted folders;
Changing the security keys;
Disallowing plugin installations;
Automatic logout of inactive users;
How do you implement these hardening measures? While some steps are easy to understand, others require the technical expertise of how WordPress works.
Pro tip: You can implement hardening measures on your own. However, some measures require technical expertise so in these cases, it’s much easier and safer to use a plugin.
Featured image via Pexels.
Source from Webdesigner Depot https://ift.tt/3noM7L1 from Blogger https://ift.tt/2IrliXM
0 notes
Text
How to Install WordPress from cPanel | WordPress Development Services

WordPress is one among the foremost popular Content Management Systems (CMS) that’s employed by many bloggers. cConsistent with Wikipedia, quite 30% of the highest ten million websites run on WordPress.
WordPress has great features and wide support for developers since it had been first released in May 2003. You’ll use WordPress attractive themes to run any quite website including personal blogs, portals, and online shops.
WordPress maintains a central repository for its latest software releases at www.wordpress.org. You’ll download and found out the software manually or use an automatic script installer like softaculous.
In this guide, we’ll show you ways to use softaculous to line up WordPress on your site via Cpanel. The whole procedure is fast, user-friendly and intuitive.
Special Note: If you’ve got not chosen a WordPress hosting plan, we recommend that you simply consult our greatest WordPress Hosting page, where you’ll find the simplest hosting providers during this category, including expert and user reviews.
Prerequisites
A domain name e.g. www.example.com
Web hosting account that supports Cpanel, PHP and MySQL
Cpanel username and password.
Step 1: Log to your Cpanel Account
You can login into your cPanel account by typing www.example.com/cpanel on your browser assuming ‘example.com’ is that the primary name related to your hosting account. Then, enter your username and password that you simply received from your web hosting provider once you found out an account with them as shown below.

Step 2: Locate Softaculous apps installer
On subsequent screen, you’ll see the Cpanel dashboard, locate the text box that reads, “Find functions quickly by typing here:” Just enter the name ‘Softaculous’. The script installer are going to be displayed below along side all apps that it supports. Click ‘WordPress’ and proceed as shown below:

Step 3: Choose a protocol and a website name
On subsequent screen, you’ll see a quick description of the Word Press version that you simply are close to install on your website, click on the button labeled ‘Install’. you’ll be taken to the ‘Software Setup’ page as shown below:

Choose your required protocol. The recommended one is ‘http://www.’ or ‘https://www.’ Use https as long as you’ve got an SSL certificate for your domain.
Then choose your domain below. you’ll leave the ‘In Directory’ textbox blank unless you would like to put in WordPress under a subfolder.
Step 4: Fill WordPress site settings detail
Next, you’ll see your website settings as shown below:

Enter the name of your website and a quick description. Then, choose an admin username, password, and email. You’ll need these details to log in to your Word Press admin panel, so choose a robust password. Select your preferred language and scroll right down to proceed.
Step 4: Choose plugins and a topic
The next screen displays an option where you’ll install some plugins (this is optional), then choose your required theme. Remember to provide your email address another on the text box that reads, “>Email installation details to”. Finally, click on the ‘Install’ button.

The Softaculous apps installer will check the submitted data and make WordPress Installation on your website

You will then be taken to the congratulations screen as shown below and email together with your WordPress installation details are going to be sent to the address that you simply entered above:
Congratulations, the software was installed successfully
WordPress has been successfully installed at: https://www.example.com
Administrative URL : http://www.example.com/wp-admin/
We hope the installation process was easy.
NOTE: Softaculous is simply an automatic software installer and doesn’t provide any support for the individual software packages. Please visit the software vendor’s website for support!
Regards,
Softaculous Auto Installer
Step 5: Test the Installation
Log in to your Word Press site by typing the executive URL e.g. http://www.example.com/wp-admin/
Your installation is now complete and you’ll be taken on to your Word Press dashboard as shown below:

Conclusion
That’s all when it involves installing Word Press on your site from cPanel. As you’ve got seen the general procedure is sort of straightforward and automatic. You don’t need to download the ASCII text file or create the database manually. Softaculous has done everything for us. You’ll see your Word Press site at a look , customize it a touch bit more and begin writing blogs. I hope this guide will assist you to successfully create a shocking WordPress site.
We at Netleaf Software, are among the most trustworthy custom wordpress service providers in India and provide very professional and satisfactory services whenever you need for wordpress website development
Since, we are the leading wordpress development company in Delhi NCR; we have worked with almost every business out there in the market and have delivered satisfactory results to our clients. Our wordpress development services include enough flexibility, amazing layout, originality, uniqueness with original ideas which you may have not seen prior. We work as per the budget and the time schedule which we have decided as per the project. We make sure that our service align with your budget and also satisfies your business objectives. We are here to make your business take a leap of growth from where it is right now, to a great extent.
0 notes
Photo

How to Install WordPress
What You'll Be Creating
So you want a WordPress site?
That’s great. WordPress is the world’s most popular content management system (or CMS), and for good reason.
With WordPress, you can get yourself a flexible, scalable, and user-friendly website. The software itself is free, and all you have to pay for is the hosting you’ll put it on.
But before you can start, there is one thing you’ll have to do, and that’s set up WordPress. This puts a lot of people off: they think it’s tricky, or long-winded, or requires writing code.
None of these are true. You have two options for installing WordPress, both of which are designed to be quick and easy. I’ll show you how to do both of them in this guide.
Premium WordPress Themes and Plugins
Once you've got your site set up, you'll want to explore the thousands of WordPress themes on ThemeForest and WordPress plugins on CodeCanyon. Purchase these high-quality WordPress themes and plugins and improve your website experience for you and your visitors.
Options for Installing WordPress
There are two ways of installing WordPress: manually, or with the click of a button.
For most non-techies, the click of a button option is the preferred one. But just in case you prefer the more thorough way, I’m going to help you to do it manually too.
Each method has its own advantages and disadvantages.
Automatic Installation
Pros:
It’s easy.
It works.
Cons:
Your hosting provider might add some extra code or plugins, which could cause you problems in the long run or might just annoy you. For most people, this isn’t an issue.
A poor hosting provider might not install the latest version of WordPress. A good one will. (Hint: you should only go with a good one.)
If your hosting provider doesn’t provide cPanel (or something like it) as part of your package, you might not have access to an auto-installer (which is why this is an important criterion when choosing hosting).
Manual Installation
Pros:
You get a clean installation with no extra code or plugins.
Cons:
It takes longer.
It’s not as easy.
Sometimes it doesn’t work properly (although that’s normally due to user error).
For 90% of website owners, the automatic installation is absolutely fine. It’s only if you’re planning to customize the code on your site that you may have issues.
If you fancy trying your hand at manual installation, read through the instructions below and give it a go. But if you prefer an easy life, go with the automatic option.
Installing WordPress with Siteground
If your hosting account is with Siteground, you’ll be pleased to know that installing WordPress is quick and easy, and doesn’t require any technical skills.
Log into your Siteground account and click on Websites to go to the Websites screen.
Click the New Website button at the top of the screen.
You’ll then be prompted for which domain you want to use with your site. You can use one of the following:
a new domain, which you register with Siteground
an existing domain which you already have registered and pointing at your Siteground account
a temporary domain, meaning you can test the new site and then set up the domain once it’s ready
Select the option you want to use and click the Select button beneath it. If you select existing domain, you’ll need to type the domain name into the field that appears. If you’re setting up a new domain, you’ll be given the option to register it with Siteground. If you select a temporary domain, that will appear on the screen.
Click the Continue button to go to the Add New Website screen.
Find the Start New Website box and click the Select button. You’ll be given a choice of apps to use for your new site. Click on Select in the WordPress box.
You’ll then be prompted to type in your login details.
Type in your email address and the password you want to use and click the Continue button.
You’ll then be given the option to add SG Site Scanner to your site. If you want to sign up for that, click Add. If not, click Finish.
The system will then start work creating your site.
And that’s it! The next screen you will see will have details of your new WordPress site.
From here you can view your site or log in to manage it. Check out our complete guide to making a site with WordPress to learn how to add content to your site and get it working for you.
WordPress
How to Make a WordPress Website
Rachel McCollin
Installing WordPress in CPanel
If you’re with a different hosting provider, they’ll probably provide you with an auto-installer that you access via cPanel or via their dashboard.
First, you’ll need to access your control panel with your hosting provider. This is normally called cPanel, although some providers give it a name of their own.
If you’re not sure how to get to this, check the email you received when you set up your hosting account. It should contain a link to cPanel. And if that fails, ask your hosting provider to tell you or google ‘access cPanel [my hosting provider]’.
You should find a section called Autoinstallers. In that section you’re looking for an icon with the word WordPress beneath it. If you can’t find that, you’ll need to use Softaculous instead.
Let me start by demonstrating the process with the dedicated WordPress installer.
Installing WordPress With the WordPress Auto-Installer
Click on the WordPress logo. This will take you to a set of screens for installing WordPress.
If the Install tab isn’t already open, click on it.
Now complete the fields as below.
Version: Leave this as the default.
Protocol: If you have SSL already set up for your site (some providers give you this when you register the domain), select https://. If not or if in doubt, select https://. Note that SSL makes your site more secure and is worth using if possible.
Choose Domain: If you have more than one domain registered, choose the one you want to use.
In Directory: Leave this blank.
Site Name: Enter the name of your site. You can change this later.
Site Description: Your tagline. Again, you can change this later.
Enable Multisite: Leave this unchecked. Some auto-installers don’t have this: don’t worry if you can’t see it.
Admin Username: Type in the username you want to use. Don’t use admin as this isn’t very secure. You can’t change this later, so make sure it’s what you intend to use forever.
Admin Password: Type in the password you want to use. Use something different from your username, with a few upper-case letters and numbers for extra security. You want to make it as hard as possible for people to get into your site. You can change your password later via the WordPress admin screens, to make it more secure.
Admin Email: Type in the email address you want to use for any emails relating to your site. This isn’t publicly displayed.
Select Language: Choose your language.
Select Plugins: Leave all of these unchecked. This will only be an option with some hosting providers: don’t worry if it isn’t there.
WordPress Starter: Uncheck this. Again, this is specific to some hosting providers and you might not have it.
If there are any other options, just leave them unchecked. And ignore any advanced settings: you don’t need to worry about them.
Once you’ve filled out the fields, click the Install button.
The auto-installer will take some time to set up your new WordPress site, and then you’ll be taken to a screen with details of your new site. There will be a link to the site itself and a link to your dashboard. In the screenshot below, I’ve installed WordPress in a subdirectory.
Congratulations, you now have a WordPress site!
Installing WordPress With Softaculous
If your cPanel doesn’t have a dedicated WordPress installer, you can use Softaculous instead. Follow these steps:
Click on the Softaculous icon in cPanel.
From the menu on the left, select WordPress.
Click the WordPress icon at the top of the screen.
Follow the steps in the previous section.
In fact, the WordPress auto-installer is nothing more than a shortcut to the Softaculous installer. So the process is the same.
Once you’ve done that, you can follow the link to your shiny new site and start getting it ready.
Installing WordPress Manually
Alternatively, you can use the "famous five-minute install" to install WordPress manually.
To install WordPress manually, you’ll need:
A web browser.
An FTP client. This will let you upload files to the server where your website is hosted. Personally, I use Coda, a code editing application with an FTP client included, but if you just need FTP, you can choose from our list of the top five FTP clients out there.
Access to your server to create databases—your hosting provider will likely provide you with a tool called phpMyAdmin to do this. If in doubt, ask them!
Note that you won’t need an FTP client if you’re running WordPress locally—that is if you're running it on your computer instead of on the internet.
To install WordPress, you’ll need to follow three steps:
Create a database on your server.
Download WordPress and copy it to your server.
Run the WordPress installation.
Create a Database
The database will hold all of your site’s content, and without it, WordPress and your WordPress site won’t work. You can create yours in one of two ways, depending on your hosting provider’s setup:
via your hosting admin screens
using phpMyAdmin
With my hosting provider, I use their admin screens to create a database, so let’s look at that first.
Using Your Hosting Admin to Create a Database
In your hosting admin screens, find an option called databases, SQL databases, or similar. The exact name will vary depending on your provider.
For example, here’s the screen I use:
If you’re using a similar admin screen, follow these steps:
Give your database a name and type it in the field.
Click on Create Database.
You’ll then be asked to enter a password for the new user associated with this database. Choose a password, type it in, and click OK.
Make a note of the database name, username, and password. You’ll need these later.
And, that’s it—your database is ready!
Using phpMyAdmin to Create a Database
If your hosting provider gives you phpMyAdmin as part of your package, or you’re using MAMP to install WordPress locally, you can use this to create your database.
In your hosting admin screens or the MAMP welcome screen, click the link to phpMyAdmin, which might look something like this:
The phpMyAdmin welcome screen will open. Click on the Databases tab at the top left to open the databases screen:
In the Create Database field, type the name of your database.
Click the Create button.
And with that, your database will be created. Make a note of the database name for later. The username and password will default to root.
Step 1 is done—and that’s the trickiest part. It’s plain sailing from here on in!
Download and Upload WordPress
Now you need to download the latest version of WordPress.
Go to the WordPress download page.
Click the Download WordPress button to download a zip file containing all of the WordPress files to your computer.
Unzip the file on your computer in exactly the same way you would normally unzip any other file. You’ll now have a folder called wordpress with all of the WordPress files in it. Make a note of where that folder is.
Next, you need to upload WordPress to your server.
Open your FTP client. Sign in to the FTP on your server using the FTP login details your hosting provider gave you when you created your account. If you’re not sure about these, ask them. You’ll need the server address, your username, and the password.
In your FTP client, find the wordpress folder on your local machine and the public_html folder on your server. You should be able to see the two of them side by side. As an example, here’s mine in Coda:
Note that my folder on the remote server is empty because I’m installing WordPress in a subdirectory. Yours will have other files in there—ignore those.
Now drag the contents of the wordpress folder (not the folder itself) to your public_html folder. Your FTP client will copy the files to your server.
Wait for the files to finish copying. Now you’re ready for the third and final stage: running the WordPress installation.
Run the WordPress Installation
Your database and files are in place, and you’re ready to install WordPress!
Open your browser and go to your website. You’ll see the first WordPress installation screen.
You should have all this information noted down from when you were creating your database. Click Let’s Go!
On the next screen, input your database name, username, and password. If you’re working locally, the username and password will default to root. Otherwise, they’ll be what you specified when you created your database.
Leave the Database Host and Table Prefix fields as they are (note: if in any doubt, ask your host for what to enter as the Database Host, as this can vary between hosting providers—assuming they haven’t already let you know in a previous email when you initially signed up for their services) and click Submit.
Next, you’ll see my favorite screen—the one that tells you WordPress is ready to install. Well done!
Note: If you’re in the US, it will say ‘All right sparky!’ I’m in the UK, so it uses the more sedate ‘sunshine’. I prefer ‘sparky’ to be honest.
Click Run the install to access the site details screen.
Finally, enter your site details: the site title, your username and password, and email address. If you want Google to find your site, leave the Privacy box checked. Click Install WordPress.
WordPress will be installed, and you’ll see a success screen. Hurray!
Now you can log in to your site by clicking the Log In button and entering the credentials you provided when you were installing WordPress.
This will take you to the WordPress dashboard.
Congratulations, you’ve successfully installed WordPress and can now start managing your site!
Installing WordPress isn’t as tricky as you may think. By following the advice above, you can get yourself a brand new site with the world’s favorite CMS. Enjoy!
The Best WordPress Themes and Plugins on Envato Market
Explore thousands of the best WordPress themes ever created on ThemeForest and leading WordPress plugins on CodeCanyon. Purchase these high-quality WordPress themes and plugins and improve your website experience for you and your visitors.
Here are a few of the best-selling and up-and-coming WordPress themes and plugins available for 2020.
Inspiration
15+ Best WordPress Portfolio Themes for Creatives
Brenda Barron
WordPress
17 Best WordPress Slider & Carousel Plugins of 2020
Daniel Strongin
WordPress
20 Best WordPress Calendar Plugins and Widgets
Daniel Strongin
WordPress Themes
23+ Best Responsive WordPress Themes (For Sites in 2020)
Brenda Barron
WordPress
24 Best WPBakery Page Builder (Visual Composer) Addons & Plugins of 2020
Daniel Strongin
WordPress Themes
20+ Best Coaching & Consulting WordPress Themes (2020)
Brenda Barron
by Rachel McCollin via Envato Tuts+ Code https://ift.tt/3ewc73h
0 notes
Text
How To Create A WordPress Website

Want to know how to create a WordPress website? There are some very important steps you must take, before actually building your website than you would think. Before you put your website plans into action, you need to decide on what your site is going to be about. Do you know what your domain name is going to be? Do you know what niche you are in? Have you thought about how to host your website and with someone that will get your site ranked? Do you know how to design your website to get your message out? NOTE: There may be terms and acronyms that are foreign to you or just not clear. Visit my page, Internet Marketing Acronym Glossary for clarification.
So What's This All About?
OK, what is this all about? That is what you have to ask yourself before you start. Before you can think about getting into the technical side of constructing a website, there are more steps to take. What is the site going to be about? This question is going to determine your niche. A niche is the category of your interest, such as sports, romance, business, fitness and so on. I am sure you have some idea, since you are researching how to get started, but this is the very most crucial step of getting started. The biggest mistake you will make, is just pulling a name out of your hat for your site and domain. You have to be clear and precise on what your goal is. Your interest may be about "Golf", you just love the game, and can't wait to get a blog and write all about it. Well here's the thing, if you want to be found on the internet, just the word "Golf", is just too broad. People would have to look through millions to find you. Defining Your Niche Defining your niche means, you need to take whatever your interest is, and be more specific about the topic. So you like golf, but is there any part of the subject you might be more of interest in? To refine your interest, let's pick a golf club bag. You hear all the time from other golfers, how most bags don't have a drink pocket. This can be a sub-niche to your niche, and from here is researching the need. Can you see what we are doing here? Take a category and then narrow it down to a more specific part of that category. This process, starts making your interest more unique. Which in turn, will make you easier to find out of the millions of search results. You might be thinking that talking about golf bags isn't what you really want your site to be about. But look at it like fishing, you have to find some way to reel in visitors. If you are talking about something specific like golf bags, then you will be getting traffic from people with that specific interest. The nice thing about WordPress, your post have categories, your visitors will see them. This means you can create tons of post and categories about what you want to talk about. You just need to get that audience in front of the stage first. Research The Need For Your Website and Domain Name In the golf bag scenario, you should look into the interest or demand for it. This could be a dead subject that won't help you get visitors to your site. Even though you hear offline talk, you need to look online about how many are searching for this. This research is going to help you come up with your Website and Domain name. Let's say you find that people are more interested in a golf bag with a drink cooler pocket. Now you have found the perfect fishing lure. Now you need to create a name for your website. Choose a domain name that reflects what this niche is going to be about. After playing around with a few ideas, you come up with a name for your site, "Cool Golfers". But before you stick to that name in stone, you will want to do some keyword research. Keywords Knowing how to create a WordPress website can be very intricate on the start up. Keyword research can be aggravating and time consuming. So now that you have a website name you would like to use, you need to see how much competition you are going to have. This means, in a keyword search, if it shows that the competition for "Cool Golfers" is high, it will be more difficult to find you. In your keyword search, you will be looking for how often the phrase or word is searched for. You will be looking for a search volume, at around 250 times a month and for the competition to be low to medium. In our scenario, it turns out that "Cool Golfers" has too high of a competition. You will now need to rethink your website name. After some play on words, you come up with "Cool Golf Bags". Your search shows low competition and a little over 250 searches a month. Now you are really unique and can begin to name your site and domain. Keyword Tools

After reading the above, you might not be clear on some of the lingo. Keyword tools go out and look for for keywords or long tail keywords, (three and four keyword phrases), that you are searching for. The tool pulls information from search engines on how often the keyword is searched for and how popular it is. It will then display the competition level, how many searches a month the keyword gets and how valuable it is. I highly recommend Jaaxy, most of the serious marketers use it. However you can use Google's Keyword Planner tool. It is free but you do have to create a Google Ads account before using it. I strongly suggest signing up with Wealthy Affiliate. They offer in both FREE and Premium, courses that will cover all of this, and you do get minimum access to the Jaaxy tool. The Wealthy Affiliate course will show you how to use keywords in your website to get ranked. It covers SEO in depth and if you want to get ranked, you will need the training. Domain Name To create a WordPress website, it has to have a URL to be found on the internet. Your site has to have an address, just like your home. If not, how could you tell anyone where to locate you? Usually, you make your website name and the domain name the same or very similar. So if you have the name "Cool Golf Bags", it's time to see if anyone else has that for a domain name. "Namecheap" is a great place to get a domain name from, and where you can see if your domain name is available. You could name your domain, "coolgolfbags.com". If someone already has that ".com", look for a ".net" or something that will be easy for others to remember. So if your website name, "Cool Golf Bags" matches your domain, then you will be easier to find and . To rank, means to getting to page one on a search engine. Hosting This is a really crucial part of being found on the internet. Google Will Not Rank you if your website is slow. This means the hosting company you go with needs to provide fast speeds. I used to use Hostgator, and that was the biggest joke of all. They are really nice people and their support is OK, but their hosting speed is horrible. Some of the things you should be looking for in a hosting company: Speed, great support, unlimited domains, unlimited emails and free SSL's. If they offer a CDN is even better. I know that was a lot of geek talk, and don't worry too much about the definitions just yet. Just ensure that you get these services when signing up. I host with A2 Hosting and I am tickled pink. My sites pop right open, I always get help when I need it and SSL's and a CDN are included in all my sites. Most Hosting companies usually sell domain names, and many offer one or two for free when you sign up. Wealthy Affiliate offers 2 free websites to free members that sign up. So that is free hosting, all you would need to do is buy a domain name. You would then, have your own URL and you can get started.

How To Create A WordPress Website
Now that you have your domain name and registered it with your hosting provider, you are about ready to start building a website. Log into your hosting account cPanel and look for a WordPress Installer. Depending on your hosting, you may have different ways to install WordPress. See images below: There are many different types of interfaces to manage your websites, but cPanel is the most popular one used. There are also different types of WordPress installs inside of the cPanels, below are two examples.

This is Softaculous, it is a little more advanced than the one above.

On either one of these or similar, go ahead and click on the Installer Icon.You should get a screen similar to this one:

You may get a screen a little more complex like this:

No matter what type of screen, it will ask you some basic questions: Installation URL > http:// or https:// > Select Your Domain Name from Drop-down > Directory You should always use https:// ——— This is where you should get free SSL's from your hosting More than likely this is your first and only domain, select the domain name you purchased Do not create a directory, leave blank NOTE: If asked at any point, do not select a service to do the install for you. It would be a waste of money. They charge A LOT and as simple as this is to install a WordPress website, it doesn't make sense. Site Name: This is the name of your website, the one that you created to help create the domain name. Site Description: This is what is going to show up under your website title. Example, website name is "Cool Golf Bags", so you could write in the site description something like, "Keeping Golfers Cool All 18 Holes". Admin Username: Create a name that you will log into your WordPress account with. Do not name it "Admin" unless you are just wanting a hacker to easily guess it and crack into your site. Be creative, it can be numbers and letters, upper or lowercase and or combinations. Admin Password: Again make it unique, at least 10 characters long. This can be numbers and letters, upper or lowercase and or combinations, and can you can use symbols. Admin Email: This should be an email that you don't use for everyday mail. I also recommend using a paid email account if you have one. If not, do not worry about it, just use one that is never used or create a new one. The Install Information After you have all the information filled out, go ahead and click on the install button. This will take a minute or two.. When a finish screen like this pops open, be sure to copy all the information about your login. Some of these installers do not ask you to create a password, it generates one for you. You will also notice that the WordPress website URL link is included in this information, you will need all of this. Copy and paste it into at least a notepad text file. Something you can save and retrieve anytime you need it.

Setting Up Your WordPress Website To Use
After you have clicked on the "Login" button from above, you will be taken to the WordPress Dashboard. Before you can start writing your awesome post, there are things that have to be done first. You will notice the left hand pane, this is your admin panel and where you are going to find your navigation to start building your site.

Things To Do While Your Site Is Under Construction Even though your site isn't ready to be found on the internet, search engines still look for new changes. You don't want everyone to see live changes while you're building your site, so here is what you do. In your left hand pane, (Admin Panel), go to Settings, then Reading. On this page, you are going to select the options that says: "Discourage search engines from indexing this site". This is step one, the next thing is to let people know your site is under construction.

Go into your hosting cPanel and go to "File Manager". In the left hand pane, look for, "public_html", click on the text, not the folder. This will display the right hand pane and all that is under this folder. I am going to give you for FREE, an Under Construction HTML Page. No opt-in or any catch, just a thank you for visiting my site. Click to get your download. A popup will open, just click the hyperlink and it will download. Read More on how to get your Under Construction page customized to your site name or whatever you want on it. In your file manage, look at the top of the page for, "Upload". Click on this and upload the "Under Construction" HTML file.

Now drag the "Under Construction" HTML file from your saved location onto the upload page.

How To Setup Your Under Construction Page Now that you have the "Under Construction" HTML file in the root of your domain, you will need to make this a URL. This may sound like it is going to be difficult but this is really easy. The HTML file you uploaded is named, (under-construction-1.htm). All that has to be done is type your website URL in front of it like this. https://YOUR DOMAIN NAME.COM/under-construction-1.htm To test this, copy the full URL and paste it into the address bar of a web browser to see if you get the "Coming Soon" page. Redirect Your Website To Coming Soon Page Go into your cPanel and go to the category "Domains". Find the icon "Redirect" and click on it. In this screen you will select for Type, 302. In the next field for HTTPS:, select your domain. For the Redirect Field, type this path: https://YOUR DOMAIN.COM/under-construction-1.htm. To test it, type in https://YOUR DOMAIN.COM/. You should now see the Coming Soon Page.


Once your site is ready to go live, you can go back to this page in your cPanel and delete the redirect. With the redirect, you can do whatever you want with your site and not worry about others seeing your construction in progress. Themes Now that you have the redirect situation handled, it is time to create a WordPress site. The first thing you will need to do, is to choose a theme that is going to fit what you want to say or promote. There are many kinds of themes. One or Two Columns, some made for just blogging and many made for eCommerce. There are many FREE Themes, some are already installed and ready for you to pick. I highly recommend doing a search on Free WordPress Themes, and look at demos. There are Paid Themes and as you get more experience with Website development, you are going to want to start buying themes. With Free Themes, you are stuck leaving "Powered By WordPress" in your footer with no real way to eliminate it permanently. Plus free themes have limits and no support. But for now, let's just use the free themes to get you started.

Here you will see that you can do a live preview of themes to get an idea of what it looks like. You may have to wait till you structure your site by adding content and images first. Once you have a little going on in your site, you can then try different themes. It will not hurt your site to try other themes.

Plugins You Will Need You will need 2 plugins before doing anything. Most themes these days are setup to use the Gutenberg editor. This is based on a block method, it allows you to create sections on your pages and post. It may be great for certain types of layouts, outside of plain blogging. However, for people that want to write actual post, it sucks. The first plugin will be the "Classic Editor", the second one will be, "WP-Edit". Classic Editor will give you the option to use both the regular editor or to switch over to the Gutenberg editor. WP-Edit will load more word editing tools into your pages and post to allow you do be more creative. From the Admin Panel, go to Plugins, and at the top of the page, click on "Add New". You will see a search bar, type in the plugins I mentioned. They will show up in a grid of plugins, click on the install button. After installation, the button will turn into Activate. Click on activate and then search for the next plugin and do the same thing.

To access the WP-Edit settings, you can find it under Plugins. Click the link to get to the settings panel.


After you add the desired tools, your pages and post editor go from this:

To this:

Pages You Need To Set Up
There are some basic pages you need when you create a WordPress site. Home, Blog, About, and Privacy Policy. Most WordPress themes now, come with a Privacy Policy page already created. You will need to tweak it for your business. From your Admin Panel, look for and click on Pages. If you already see Privacy Policy, you do not have to create this one. Click on "Add New" and title your page, "Home". repeat this for the other pages. You do not have to write anything in these pages yet, right now you are just structuring your site.

Important Settings Now that you have the important pages created, you need to jump over to Settings, and then Reading. On this setting page, Select "Home" from the drop down Homepage, and then select "Blog" from the drop down Post page. What you have just done, is set the page you created called Home, to be the what your website opens too, when someone lands on it. You will have to write and design this page for your website look. Setting the Blog page you created to be the "Post page", means this page will always display all of your post. You will not be writing on the Blog Page, WordPress knows what to do with it. You will want to select 5 for both "Blog pages show at most" and "Syndication feed show the most recent. What this means, the blog post page will show 5 post on each page. You will be able to go to the next page by pagination buttons at the bottom of the blog page. Syndication is for RSS feeds, usually done in a widget. I wouldn't worry too much about this one at this time. However I would go ahead and set it to 5. The reason for setting these to 5, it helps site speed. The more a site has to load per page, the slower it can make the site.

These settings are how most WordPress sites are setup, however, you can have your home page showing your latest post. These instructions are for basic setup and just an example. You will be changing things around to fit what you what your site to be about as you go.
Creating A Menu
From your Admin Panel, go to Appearance, then to Menus. In the blank field, "Menu Name", type Primary and then click on the Create Menu button.

You will now need to select the pages you want to be in your menu. If you are not clear what menu I am referring too, this would be the navigation menu at the top of your site. Select Home, Blog and About, you hardly ever see the Privacy Policy page listed in the top menu. The Privacy Policy page is usually something you have in your footer. Even though the below image shows the Privacy Policy page being a choice, ignore that. Once you select your desired pages, under menu setting, select that you want these to be the Primary Menu. This is to let WordPress know that you want these pages at the top of your website.

Creating Your Home Page
You want this to be a your best page, as I mentioned, this is the website's front page, what your visitors see first. So you want this page not only to look good, you want it to be easy for your visitors to navigate. It needs to state what your site is about and convince people to take interest in staying for a while. WordPress was originally designed to be just a place to blog, it wasn't made for graphics. However through time, WordPress with all the things available for it, allows it to surpass all the other web builders. I would highly recommend installing a page builder called Brizy. Page builders like Brizy allow you to make all these fantastic looking websites you see all over the internet. I encourage you to go look at Brizy and see what it can do for you. In this post, am not going to get into page builders. I want to mainly cover how to create a WordPress website and get it up and running.
Creating Your Post
From your Admin Panel, go to Post and then to Add New. You will notice it is pretty much the same as Pages as far as writing and editing. To make a post rank better, it is best to write a snippet at the very top, what your post is about. There is a "Read More" tool in your tool bar. You will want to make sure your cursor is below the snippet and click on the tool. This is what creates the "Continue Reading" link you often find in Blog Post Excerpts.

To add an image to your post title and snippet, you will find Featured Image towards the right hand bottom of the page.

Home And Blog Page
Let's take a look at what has been built so far. This isn't an ideal home page but I added some text and an image to the page named, Home. You will see your website name, (Testing Site) and the sub title, (Check out my new site). This was filled out when you were installing WordPress from your cPanel. Now to see what the blog page looks like, we'll click on Blog from the main menu at the top right.

You will see in this image, the snippet I was talking about and how the Read More or in this theme, it is called Continue Reading falls after.

Conclusion
This whole process may seem a bit overwhelming, especially to someone that is new to all of this. But it takes little time to start understanding it. I strongly suggest signing up with Wealthy Affiliate, even if it is just for the Free course. It steps you through this whole process in greater detail, with videos. The course will then test you to see how much you retained. That helps you understand where you need to study more. With Wealthy Affiliate, you already get at least 2 hosted WordPress websites. This would be perfect for trial and error learning, before going out on your own. I also recommend installing a page builder plugin to create a more dynamic home page. Brizy is a little cheaper than other builders, and I have gotten great results with it. You can also get Brizy in the Free version, but as you get more involved, you are going to want a paid version for more features and support. Keep checking back or sign up to my newsletter to be notified. Soon, I will be covering how to optimize a WordPress site for speed and SEO. I will also be doing a post and video on comparing different Page Builders and the one I think is the best.
Customizing Your Site Under Construction HTML Page
As promised, there is no catch to my gift, (Under Construction HTML file). I did want you to take a look at it, to see the quality. It can be customized with your Website name or other information on it, like a going live date or different background. You can Contact Me through this site. I can do customized pages, Logos, Favicons, Banners and more, for very reasonable rates. Pages like the Under Construction HTML, can be customized starting at $5, many of my Logos and Favicons run between $5 and $55. Banners vary depending on how in-depth you need them. Simple non-animated ones start at $5. No hustle, just offering services that newbies can afford and help get them going. If you have any questions about this post or anything else, again, please contact me. I usually reply within 24 hours. Site Index Read the full article
#howgetawebsitename#howtobuildawebsiteinwordpress#howtobuildawebsitewithwordpress#HowToBuildAWordPressWebsite#HowToCreateAWordPressWebsite#HowToGetStartedWithAWordPressWebsite#howtopickadomainname#whohasthebestwebhosting#whohasthecheapestdomainnames#WordPress
0 notes
Link

Easy Recovery of WordPress Username and Password
In order to recover the password and username, you must access your database management tool. Most of the hosting companies suggest to use phpMyAdmin for WordPress. With this information, let us follow the steps given below.
Access your cPanel and scroll down to the database section. There, click on the Database management tool, phpMyAdmin. Please note that before you make any changes in the database management tool, we suggest you to take a backup of all the MySQL databases. In case you replace something, you will always have a backup. So, download the database to your computer.
Once you are in the database management tool, phpMyAdmin, for instance, you can view a list of all the database you have connecting to your WordPress account. Firstly, expand the table with a click.
You will find all the usernames of each database under the table head, wp_users. This is a default table name. Click on the table name and you will find all the usernames listed on the right hand side. In addition, you will find login, user emails, user passwords, and user nicknames.
You will find the password under the table name user_pass. When you look at it, you will be baffled by the long numerical and alphabetical password. But, don’t be confused. The alphanumeric password is to protect you. However, it is difficult to do WordPress password decrypt work. So, you can either note it down or simply change the password to something of your choice.
Since you do not have access to your email address, you can choose to edit the email address from the table in phpMyAdmin.
To change WordPress password, go to the user_pass row, and hit the MD5 in the drop-down menu. Now, add the new password of your choice in the Value Box. Hit Go and your password for WordPress admin is successfully updated.
Now, using your noted database username and the new password, you can log into your WordPress admin page and manage your website.
#Wordpress website design sydney#Wordpress web design sydney#Wordpress web development sydney#Wordpress web development#Wordpress website development#Wordpress website design
0 notes
Text
Find the step-by-step guide to easily find your WordPress admin username and password from cPanel. Let’s get started & retrieve it!
#406 not acceptable error solution#http 406 not acceptable how to fix#what does 406 not acceptable mean#406 not acceptable meaning
0 notes
Text
The Most Effective Method to Introduce WordPress with Bluehost
Here are the steps to how to install WordPress on Bluehost using Marketplace. Installing WordPress with Marketplace

1. Login to your Bluehost cPanel account. 2. Find the Website section and select Install WordPress. 3. Click the Install button. 4. Choose the domain name to install it to. In the field next to the domain, you can enter a subfolder such as ‘blog’ or leave it blank if you want the site’s main page to be the blog. 5. If necessary, you can edit the email address, username and password for the new WordPress installation. Click “advanced options” and you can change those settings. 6. Read through the license and service agreements and check the boxes. 7. Select the Install Now button. If you have already installed a fresh WordPress and looking for a solution to transfer your local/dev setup to BlueHost.
Migrating WordPress to BlueHost
1. To start, log into your current host and use a provided program (such as phpMyAdmin) to export your site’s database. 2. Use your preferred FTP program (such as Filezilla or Cyberduck) to download and save your wp-content folder (a.k.a. the files that make up your WordPress site.) Of course, You won’t need to download files if your existing site is on local 3. Login to your Bluehost control panel. 4. Install WordPress using the Marketplace, one-click install tool. 5. Create an FTP account in your Bluehost control panel so you can upload your files to your new WordPress site folder. When creating your FTP account, keep in mind that you might want to change its designated directory to something easily identifiable. 6. Launch your preferred FTP program and open a new connection. Log in with your new FTP account info. 7. Overwrite the existing wp-content folder with the one you downloaded from your previous host. 8. Open phpMyAdmin in the Database section of your Bluehost cPanel. 9. Select the database to which you want to import your data. You may need to look up this information. (To do so, go to the File Manager in your control panel and open your public_html folder. Then scroll down to find the wp-config file, right-click the icon, select “Code Edit”, and then “Edit.” In the code edit window, scroll down to identify the database you should use. 10. Back in your phpMyAdmin window, once you’ve selected the correct database, you will see a list of tables. Drop these tables before you import your new data by selecting the “Check All” option at the bottom of the list and then selecting “Drop.” 11. Now it’s time to import! Go to the “Import” tab in phpMyAdmin. Choose “Browse your computer” and find the SQL database file that you exported from your previous site. (It should be named something similar to “bluepm1_wor2.sql”.) Make sure the SQL format is selected and click “Go.” 12. Here is an important step after you import your database. After your database is imported, check to learn the new table names. If your table names begin with ‘wp_’ then you don’t need to make any changes. However, sometimes your tables will import with a name like ‘wrp-‘ Go to your file manager and open the wp-config file in your public_html folder. 13. Right click on wp-config, select “Code Edit”, and then select “Edit.” 14. Scroll down until you find the line “Stable Prefix” line. Edit it to read ‘wp_’. 15. Now that you have your database and site files, it’s time to put everything on your temporary URL. This is how you move your site without any downtime.* First, in your phpMyAdmin site, select wp-options from the menu on the left of the screen. Then, select “Edit” on the “site url” line. (This will typically be line .) Paste in the temporary URL provided to you when you created your Bluehost account and click “Go.” (Tip: if you’re not sure what it is, it can be found in your Bluehost welcome e-mail.) *Note: all of these previous steps can help anyone move their WordPress site. The following steps are for those are want to move their WordPress site without any downtime. 16. Repeat Step 11 for your “Home” line in wp-options. (This is typically line 36.) 17. Now it’s time to see if your work has paid off. Enter the temporary URL into your internet browser and check to see if your site is there. If so, you’re nearly done! 18. Log into your WordPress admin site to save your Permalinks. Go to “Permalinks” under the “Settings” tab of the dashboard and click “Save Changes.” 19. Before you can move from the temporary URL to your permanent one, you must change the nameservers associated with your domain to point to Bluehost. This can be done in the domain manager of your domain registrar, whether it be with Bluehost or another registrar. Use the following: NS1.BLUEHOST.COM and NS2.BLUEHOST.COM. (This indicates that your site is hosted at Bluehost.com. The DNS change can take anywhere from a few hours to several days to propagate. Once it is finished you will be able to use your domain on your new site.) 20. Once the DNS change in complete, log into your WordPress admin site and go to “General” under the “Settings” tab. Then, enter your domain into the “WordPress Address” and “Site Address” fields, and click “Save Changes.” 21. The last step is to enter your domain URL into your internet browser to check to see if your site is live. If so, then congratulations! You have successfully moved your WordPress site to Bluehost. These steps will remain more or less the same for most hosting providers. As you may have already expected, migrating WordPress first time can feel to be a little overwhelming, but once you do it, you would realise it is not much difficult either.
0 notes